


 Loading...
Quickstart Guide
English ( 3 – 11 )
Guía de inicio rápido
Español ( 12 – 20 )
Guide d’utilisation rapide
Français ( 21 – 29 )
Guida rapida
Italiano ( 30 – 38 )
Schnellstart-Anleitung
Deutsch ( 39 – 47 )
Appendix
English ( 49 – 50 )

2
Quickstart Guide (English)
Introduction
Thank you for purchasing the Force. At Akai Professional, we know how serious music is to you. That’s why we design our equipment with only one thing in mind—to make your performance the best it can be.
Box Contents
Force |
Software Download Card |
Power Adapter |
Quickstart Guide |
USB Cable |
Safety & Warranty Manual |
(3) 1/8”-to-MIDI Adapters
Important: Visit akaipro.com and find the webpage for Force to download the complete user guide.
Support
For the latest information about this product (documentation, technical specifications, system requirements, compatibility information, etc.) and product registration, visit akaipro.com.
For additional product support, visit akaipro.com/support.
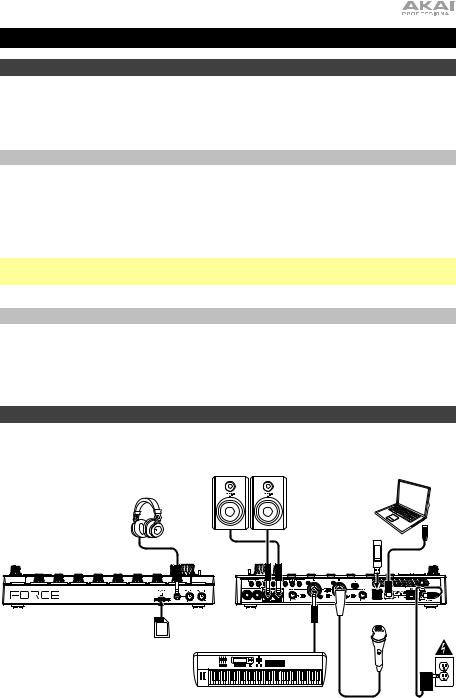
Setup
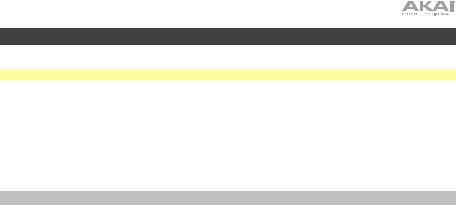
Items not listed under Introduction > Box Contents are sold separately.
Powered Monitors |
Computer (optional) |
Headphones
|
USB |
|
|
Flash |
|
|
Drive |
|
SD |
Keyboard |
|
|
|
|
Card |
|
|
|
Microphone |
Power |
3
Getting Started
This section describes how to do basic tasks using your Force.
Important: Visit akaipro.com and find the webpage for Force to download the complete User Guide.
When you first power on your Force, you can select a demo project to help get you started, select Empty Project at the bottom of the screen to load a blank template, or select User Template to load a saved custom template.
For this tutorial, tap the Deep House - Colors Demo project to load it.
After loading the demo, Force will automatically open Matrix Mode. This display mode gives you an overview of your project and mirrors the 8x8 layout of the clip launch pads. Use the cursor buttons to move the current view of the matrix by one row or column at a time.
Launching Clips
Each column in Matrix Mode represents a track. Tracks can be used to hold audio samples, drum kits, instrument plugins and more. In the Deep House – Colors project, you will see tracks labeled Kick Loop, Top Loop, Fill and more on the display.
To create a new track, tap the + icon at the top of the display, or press and hold an empty Track Selector button. You may need to scroll the Matrix to the right using the cursors to show an empty track.
Each track is made up of clips, which are short sequences of audio or MIDI. Only one clip in a track can play at a time. Let's try playing with a few clips to see how they work.
1.Press the Launch button to make sure the clip launch pads are in Launch Mode. In this pad mode, each pad represents a single clip in a track. The lighted pads represent the clips shown on the display, and the dim pads are empty clips.
2.Tap the first clip in Track 8 – Drum Kit to begin playing it. The clip launch pad will slowly blink green to indicate it is active, and the clip on the display will show the position of the playhead in the clip.
3.While in Launch mode, press the clip launch pad below the pad that is currently playing. The second clip will start playing after the next bar.
4.Clips will continue to play until another clip in the same track is launched, until playback is stopped or until the clip is stopped while playback continues.
To stop a clip, first press the Clip Stop button to assign the Track Assign buttons to stop mode. Then, press the Track Assign button for the track with the clip playing. You can also press the Stop All Clips button to stop clips in all tracks.
5.To create a new clip, enter Matrix view on the display and double-tap an empty clip slot in a track. New clips are always created at the default length, which can be set by holding Shift and pressing the second Track Assign button.
Alternatively, you can create an empty clip using the clip launch pads. First, press the Launch button to enter Launch mode. Press and hold the Select button, then double-tap an empty pad.
In addition to launching clips in a track, you can launch multiple clips across tracks in the same row. Each row of clips is called a scene, and these can be used to arrange different parts of a song.
1.Press the top-most Scene Launch button to launch the first row of clips, and then continue launching other scenes in order.
2.While one scene is playing, try launching clips from other rows to experiment with different variations.
3.To create a new scene, press and hold the Edit button, then press a Scene Launch button.
You can also assign tracks to Force's crossfader. This allows you to seamlessly transition between clips from multiple tracks.
1.To assign a track to a crossfader side, press and hold the Assign A/B buttons and press a Track
Assign.
2.To clear crossfader assignments, hold Shift and press the Assign A or Assign B button.
4
Note Mode
In addition to using the clip launch pads for launching clips, you can use them to play and record notes chromatically as you would use a MIDI keyboard, or to play and record a drum kit. This is enabled by pressing the Note button to enter Note Mode.
1.In the Deep House – Colors project, select Track 6 – Classic Bass. When using a melodic track such as a Keygroup or Plugin, the root note or chord will be lit in one color, and the notes or chords in between will be lit pale blue.
2.Select Track 2 – Top Loop. When using a drum track, bottom left quadrant of 16 clip launch pads will be lit and can be used to play the drum kit.
3.Hold Shift and press Note to configure the Note mode settings for each track.
Step Sequencer
When recording drums, you can also use Force's built-in Step Sequencer to quickly enter note events by using the clip launch pads as "step buttons," simulating the experience of a traditional step-sequencer-style drum machine.
1.In the Deep House – Colors project, select Track 8 – Drum Kit and select an empty clip slot.
2.Press the Step Sequencer button to cycle between step sequencer modes for the clip launch pads. Select Drum mode.
3.In Drum Step Sequencer pad mode, the top four rows of clip launch pads represent the steps in the sequence. The bottom four rows are split into two groups of 4 columns.
Use the bottom left quadrant to play the drum kit. The last pad played will be selected for sequencing. Tap any pad in the top four rows to insert the selected drum sound at that step in the sequence. The sequence will start playing automatically when a step is inserted.
The bottom right quadrant is used to set the velocity of the notes. In this quadrant, select the bottom left pad to set the velocity as played. The remaining pads, from left to right going up, represent minimum to maximum fixed velocity.
4.Alternatively, press Menu and then tap Step Sequencer to use the display to sequence note events.
Editing Clips & Tracks
Now that you are familiar with the basics of launching clips, let's try editing clips and tracks for even more customization of your project.
1.Press Clip to enter Clip Edit Mode, or press Menu and then tap Clip Edit.
2.In Clip View, you can view and edit the parameters of the clip itself, such as length, launch mode, and quantization.
To select a clip, press and hold Select and press a clip launch pad.
3.Depending on the type of clip selected, you can also edit an audio clip using Region View or edit MIDI note events using Event View.
In addition to Clip Edit Mode, you can edit the parameters of a track using Track Edit Mode. This mode is not available for audio tracks.
1.Hold Shift and then press Clip to enter Track Edit Mode, or press Menu and then tap Track Edit.
2.Use Note Mode to select the pad or keygroup you would like to edit, and use the tabs of pages to edit the different parameters available.
Mixing Tracks
Force's mixer allows you to adjust parameters such as level, stereo panning and routing the same way you would with a traditional mixer or digital audio workstation.
1.Press Mixer to open the Mixer, or press Menu and then tap Mixer.
2.The Mixer contains four tabs of pages that let you control different settings for the tracks and master. Tap and drag your finger to scroll through available tracks, or use the cursor buttons.
5
Features
Important: Visit akaipro.com and find the webpage for Force to download the complete User Guide.
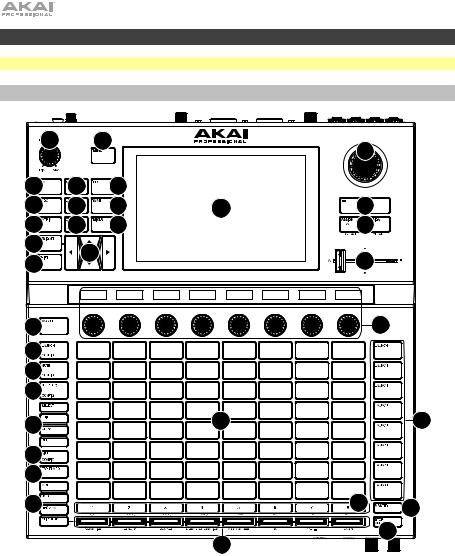
Top Panel
3 |
|
2 |
|
16 |
|
|
|
|
|
|
|
4 |
5 |
6 |
|
|
|
7 |
8 |
9 |
1 |
17 |
|
10 |
11 |
12 |
|
18 |
|
13 |
14 |
|
|
|
|
15 |
|
|
19 |
|
|
|
|
|
|
||
21 |
|
|
|
|
20 |
24 |
|
|
|
|
|
25 |
|
|
|
|
|
26 |
|
|
|
|
|
27 |
|
|
22 |
|
23 |
|
|
|
|
|
|
28 |
|
|
|
|
|
29 |
|
|
|
|
|
32 |
|
|
|
30 |
31 |
|
|
|
33 |
|
34 |
|
|
|
|
|
1.Display: This full-color multi-touch display shows information relevant to Force’s current operation. Touch the display (and use the hardware controls) to control the Force interface. See Display to learn how to use some basic functions.
2.Menu: Press this button to open the menu. You can tap an option on the menu screen to enter that mode, view, etc.
3.Master Volume: Turn this knob to adjust the volume level of the Master L/R outputs.
4.Play: Press this button to start playback.
5.Stop: Press this button to stop playback. Double-press this button to immediately stop all sound.
6.Record: Press this button to start or stop recording.
6

7.Undo: Press this button to undo your last action.
Press Shift and this button to redo the last action you undid.
8.Load: Press this button to open the Browser, where you can load projects, clips, and more.
9.Save: Press this button to save your project, sample or track, or to start a new project from scratch.
10.Matrix: Press this button to open Matrix View, an overview of your project with an 8x8 view of your clips.
11.Clip: Press this button to open Clip Edit View, which gives you finer detail of a single clip.
Tip: While in any of the menu or pad modes, you can press and hold the button for another mode to momentarily switch to that mode. You will return to the previous mode when you release the button.
Press Shift and this button to open Track Edit
View, where you can edit parameters of your drum kit, plugin, MIDI or CV tracks.
12.Mixer: Press this button to open Mixer View, where you can control each track's volume, pan, and send controls.
When using a drum track, press Shift and this button to open Pad Mixer View, where you can control each pad's volume, pan and send controls.
13.Navigate: Press this button to open the Navigate view, which gives you an overview of the entire project. Tap a section to jump the Matrix view directly to that section.
Press Shift and this button to open the XYFX.
14.Cursors: Press these buttons to move the Matrix View and the pads by one row or column at a time.
Press Shift and press these buttons to move by eight rows or columns at a time.
15.Shift: Press and hold this button to access some buttons’ secondary functions.
16.Data Dial: Turn this dial to scroll through the available menu options or adjust the parameter values of the selected field in the display. Pressing the dial also functions as an Enter button. Press Shift and turn this dial to adjust parameters in finer detail.
17.–/+: Press these buttons to increase or decrease the value of the selected field in the display.
18.Assign A/Assign B: Press one of these buttons and an Assign Mode button to assign the corresponding track to the crossfader A or B grouping.
Press Shift and press one of these buttons to clear all crossfader A or B assignments.
19.Crossfader: Use this crossfader to mix between clips assigned to the A or B grouping.
20.Assignable Knobs: Use these knobs controls track panning, track send levels, or other userassignable parameters. Use the Knobs button to change the active knob bank or mode (described below). The display strip above each knob indicates the parameter it is controlling and its current value or setting.
21.Knobs Button: Press this button to cycle between up to two banks of knobs for the currently active mode. The display strip above the knobs will indicate the currently active parameters. Press and hold this button to quickly select one of several preset knob control modes.
Press Shift and this button to open Knobs Mode, where you can edit knob assignments.
22.Clip Launch Pads: Use the velocity-sensitive pads in this 8x8 to launch clips, play notes, and more, depending on the active mode.
23.Scene Launch Buttons: You can press one of these buttons to launch the corresponding scene, represented by the row of clips to its left.
Press the Edit button and one of these buttons to quickly insert a new row, capture the currently playing clip(s) as a new scene or clear a row.
24.Launch/Config: Press this button to set the clip launch pads to Launch mode. In Launch mode, each pad represents a single clip slot. The eight columns represent eight tracks while the eight rows represent eight scenes. You can launch the entire scene by pressing the Scene Launch buttons to the right of the row of clips.
Press Shift and press this button to configure the Launch mode settings.
7

25.Note/Config: Press this button to set the clip launch pads to Note mode. In Note mode, you can use the pads to play a configurable scale of MIDI notes.
When in Note mode and using a Keygroup, Plugin, MIDI or CV track, press and hold this button to select different play modes, such as scales, chords, progressions and more. When in Note mode and using a Drum track, press and hold this button to select a time division for note repeat.
Press Shift and press this button to configure the Note mode settings, such as scale and root note. You can also press and hold this button to quickly select a mode.
26.Step Seq/Config: Press this button repeatedly to cycle through three different pad views for using the Step Sequencer.
Press and hold this button to quickly select a Step Sequencer mode.
Press Shift and press this button to configure the Step Sequencer's settings.
27.Edit Buttons: Press and hold one of these buttons to edit a clip or track according to the following:
•Select: Press and hold this button to view the currently select clip. While holding, tap another clip launch pad to select another clip.
•Edit: Press and hold this button then tap a clip launch pad or Track Selector button to edit a clip or track, respectively.
Hold this button and press any Scene Launch button to open the Edit Row window, where you can quickly add or clear rows in the Matrix.
•Copy: Press and hold this button to copy a clip or track. While holding, tap the clip launch pad or Track Selector button of the clip or track you would like to copy, then tap a new pad or button to copy it.
•Delete: Press and hold this button then tap a clip launch pad or Track Selector button to delete it.
28.Arp/Config: Press this button to enable or disable the internal Arpeggiator, whose rate is based on the current Tempo and Time Division settings.
Press Shift and this button to configure the Arpeggiator's settings.
29.Tap Tempo: Tap this button at the desired rate to enter a new tempo.
Press Shift and this button to open the Tempo window, where you can enter a new tempo.
30.Master: Press this button to view the Master and Return channels.
31.Track Selectors: Press one of these buttons to select a track, represented by the column of clips just above it.
Press and hold Shift and then press one of these buttons to select a Global Quantization setting: None, 8 Bars, 4 Bars, 2 Bars, 1 Bar, 1/4, 1/8, or 1/16.
32.Assign Mode Buttons: Press one of these buttons to set the function of the Track Assign buttons when pressed:
•Mute: Press this button to mute the track.
•Solo: Press this button to solo the track.
Press Shift and this button to configure the solo button and crossfader behaviors.
•Rec Arm: Press this button to record-arm the track.
•Clip Stop: Press this button to stop the clip that is playing in the track.
33.Track Assign: Press one of these buttons to apply an assignment to a track, represented by the column of clips just above it. Use the Assign Mode buttons to set the assign function.
Press and hold Shift and then press one of these buttons to access secondary functions, printed below the buttons.
34.Stop All Clips: Press this button to stop all clips when they reach the end.
8
Display
Here is some general information about how to use the Force display:
Tap a button or option to select it. Use the data dial or –/+ buttons to change its setting or value.
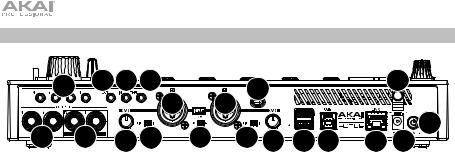
Double-tap a control to access advanced editing options. In some cases, this will show a numeric keypad that you can use to enter a value (an alternative to the data dial or –/+ buttons). Tap the upper-left part of the display to return to the previous view.
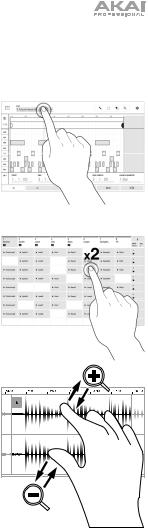
In Matrix View, double-tap an empty clip slot in your track to create a new clip.
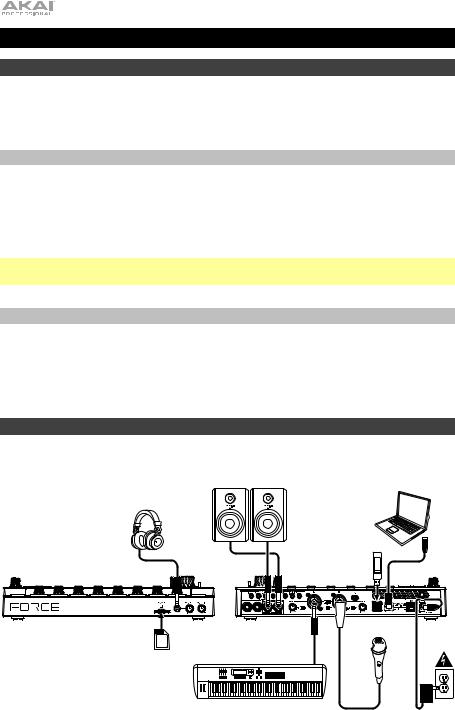
Spread two fingers to zoom in (into a section of a waveform, for example). Pinch two fingers to zoom out.
9
Rear Panel
15 |
12 13 14 |
|
16 |
|
|
|
|
2 |
||
|
|
|
7 |
|
7 |
|
|
|
|
|
11 |
11 |
8 |
9 |
10 |
9 |
8 |
|
|
4 |
3 |
6 |
5 |
1 |
||||||||
1.Power Input: Connect the included power adapter (19 V, 3.42 A, center-positive) to this jack then into an electrical outlet.
2.Power Adapter Restraint: Secure the power adapter cable to this restraint to prevent it from accidentally unplugging.
3.Power Switch: Press this button to turn Force’s power on or off.
4.Link: Connect a standard Ethernet cable to this port to use Ableton Link and other compatible devices with Force. Download the full User Guide for more information.
5.USB-B Port: Use the included USB cable to connect this high-retention-force USB port to an available USB port on your computer.
6.USB-A Ports: Connect USB flash drives to these USB ports to access their files directly using Force.
7.Input 1/2 (XLR or 1/4” / 6.35 mm): Use standard XLR or 1/4” (6.35 mm) TRS cables to connect these inputs to audio sources (microphone, mixer, synthesizer, etc.). When using a 1/4" cable, the Mic preamp is removed from the circuit, and the Line/Inst switch can be used to set the impedance.
Turn the Gain knobs to set the input level of each one.
8.Gain: Use these knobs to adjust the gain of the incoming signal from Input 1/2 on the rear panel. Be careful when setting this knob at higher levels, which can cause the signal to distort.
9.Line/Inst: Use these switches to set Input 1/2 to accept either a Line-level or Instrument-level sound source when using a 1/4" connection.
10.Phantom Power (+48V): This switch activates and deactivates phantom power for Inputs 1/2 when using an XLR connection. When activated, +48V of phantom power will be supplied to both inputs. Note that most dynamic microphones do not require phantom power, while most condenser microphones do. Refer to your microphone’s documentation to check if it needs phantom power.
11.Outputs (1/4” / 6.35 mm): Use standard 1/4” (6.35 mm) TRS cables to connect these outputs to your monitors, mixer, etc.). The Master L/R outputs are the same as Outputs 1,2.
12.MIDI Out: Connect compatible 1/8" MIDI devices to this output, or use the included 1/8"-to- MIDI adapter to connect a standard 5-pin MIDI cable from this output to the MIDI input of an external MIDI device (synthesizer, drum machine, etc.).
13.MIDI In: Connect compatible 1/8" MIDI devices to this input, or use the included 1/8"-to-MIDI adapter to connect a standard 5-pin MIDI cable from this input to the MIDI output of an external MIDI device (synthesizer, drum machine, etc.).
14.MIDI Thru: Connect compatible 1/8" MIDI devices to this thru-port, or use the included 1/8"- to-MIDI adapter to connect a standard 5-pin MIDI cable from this input to the MIDI output of an external MIDI device (synthesizer, drum machine, etc.). Incoming MIDI from the MIDI In port will be passed along to this output.
15.CV/Gate Out: Use standard 1/8” (3.5 mm) TS cables to connect these outputs to optional modular devices. Force will send control voltage (CV) and/or Gate data over this connection.
16.Kensington® Lock Slot: You can use this slot to secure your Force to a table or other surface.
10
Front Panel
1 |
2 |
3 |
4 |
1.SD Card Slot: Insert a standard SD/SDHC card into this slot to access its files directly using Force.
2.Phones (1/4” / 6.35 mm): Connect standard 1/4” (6.35 mm) stereo headphones to this output.
3.Phones Volume: Turn this knob to adjust the volume of the phones output.
4.Cue Mix: Turn this knob to adjust the balance between the Master and 3/4 signals in your headphones. Master is the signal sent from the Master outputs. 3/4 is the signal sent from the
Outputs 3/4.
11
Guía de inicio rápido (Español)
Introducción
Gracias por comprar Force. En Akai Professional, sabemos que usted se toma la música en serio. Por eso es que diseñamos nuestros equipos con una sola cosa en mente—hacer que pueda tocar su mejor interpretación.
Contenido de la caja
Force |
Tarjeta de descarga de software |
Adaptador de alimentación |
Guía de inicio rápido |
Cable USB |
Manual sobre la seguridad y garantía |
(2) Adaptadores MIDI de 3,5mm (1/8 pulg.)
Importante: Visite en akaipro.com la página correspondiente a Force para descargar la guía de usuario completa.
Soporte
Para obtener la información más reciente acerca de este producto (documentación, especificaciones técnicas, requisitos de sistema, información de compatibilidad, etc.) y registrarlo, visite akaipro.com.
Para obtener soporte adicional del producto, visite akaipro.com/support.
Instalación
Los elementos que no se enumeran en Introducción > Contenido de la caja se venden por separado.
Powered Monitors |
Computer (optional) |
Headphones
|
USB |
|
|
Flash |
|
|
Drive |
|
SD |
Keyboard |
|
Card |
|
|
|
Microphone |
Power |
12
Para comenzar
Esta sección describe cómo realizar tareas básicas con su Force.
Importante: Visite akaipro.com y acceda a la página web de Force para descargar la Guía del usuario completa.
Cuando encienda por primera vez su Force, podrá seleccionar un proyecto demo que lo ayudará a comenzar, seleccione Empty Project en la parte inferior de la pantalla para cargar una plantilla en blanco o seleccione User Template para cargar una plantilla personalizada guardada.
Para este tutorial, toque el proyecto demo Deep House - Colors para cargarlo.
Luego de cargarla demo, Force abrirá automáticamente el modo de matriz. Este modo de visualización le dará una vista general de su proyecto imitando la distribución de 8 x 8 de los pads de ejecución de clips. Utilice los botones del cursor para mover la vista actual de la matriz de a una fila o columna a la vez.
Ejecución de clips
Cada columna en el modo de matriz representa una pista. Las pistas se pueden utilizar para almacenar muestras de audio, baterías, plugins de instrumentos y más. En el proyecto Deep House – Colors verá las pistas etiquetadas como Kick Loop, Top Loop, Fill y más en la pantalla.
Para crear una nueva pista, toque el icono + en la parte superior de la pantalla o mantenga pulsado un botón selector de pista vacío. Es posible que tenga que desplazar la matriz hacia la derecha utilizando los cursores para mostrar una pista vacía.
Cada pista está compuesta de clips, los cuales son secuencias cortas de audio o MIDI. Sólo se puede reproducir un clip en una pista a la vez. Probemos experimentando con algunos clips para ver cómo funcionan.
1.Pulse el botón Launch para asegurarse de que los pads de ejecución de clips encuentren en modo de ejecución. En este modo de pad, cada pad representa un clip único en una pista. Los pads iluminados representan los clips que se muestran en la pantalla y los pads apagados representan clips vacíos.
2.Toque el primer clip en Track 8 – Drum Kit para comenzar a reproducirlo. El pad de ejecución de clip parpadeará lentamente de color verde para indicar que se encuentra activo y el clip en la pantalla mostrará la posición del cabezal de reproducción en el clip.
3.Estando en modo de ejecución, pulse el pad de ejecución de clip debajo del pad que se está reproduciendo actualmente. El segundo clip comenzará a reproducirse después de la siguiente barra.
4.Los clips continuarán reproduciéndose hasta que se ejecute otro clip en la misma pista, hasta que se tenga la reproducción o hasta que el clip se detenga mientras continúa la reproducción.
Para detener un clip, pulse primero el botón Clip Stop para asignar los botones de asignación de pista al modo de detención. Luego, pulse el botón de asignación de pista para la pista con el clip que se está reproduciendo. También puede pulsar el botón Stop All Clips para detener todos los clips en todas las pistas.
5.Para crear un clip nuevo, ingrese a la vista de matriz en la pantalla y toque dos veces una ranura de clip vacío en la pista. Los clips vacíos siempre se crean con la longitud predeterminada, la cual puede ajustarse manteniendo pulsado Shift y pulsando el segundo botón de asignación de pista.
Como alternativa, puede crear un clip vacío utilizando los pads de ejecución de clip. Primero, pulse el botón Launch para entrar al modo de ejecución. Mantenga pulsado el botón Select, y luego toque dos veces un pad vacío.
Además de ejecutar clips en una pista, puede ejecutar múltiples clips a través de pistas en la misma fila. Cada fila de clips se denomina escena y se puede utilizar para componer diferentes partes de una canción.
1.Pulse el botón de ejecución de escena de más arriba para ejecutar la primera fila de clips y luego continúe ejecutando otras escenas en orden.
2.Mientras se esté reproduciendo una escena, intente ejecutar clips de otras filas para experimentar con diferentes variaciones.
3.Para crear una escena nueva, mantenga pulsado el botón Edit, y luego pulse un botón de ejecución de escena.
También puede asignar pistas al crossfader de Force. Esto le permite realizar una transición ininterrumpida entre clips provenientes de múltiples pistas.
1.Para asignar una pista a un lado del crossfader, mantenga pulsado los botones Assign A/B impulse un botón de asignación de pista.
2.Para eliminar las asignaciones del crossfader, mantenga pulsado Shift y pulse el botón Assign A o Assign B.
13

Modo de nota
Además de utilizar los pads de ejecución de clips para ejecutar clips, puede utilizarlos para reproducir y grabar notas de forma cromática como si fuera un teclado MIDI o para grabar y reproducir una batería. Esto se logra pulsando el botón Note para ingresar al modo de nota.
1.En el proyecto Deep House – Colors, seleccione Track 6 – Classic Bass. Al usar una pista melódica, como por ejemplo, un grupo de teclas o plugin, la nota o acorde raíz se encenderá de un color y las notas o acordes entre medio se iluminarán de color celeste.
2.Seleccione Track 2 – Top Loop. Al utilizar una pista de batería, el cuadrante inferior izquierdo de 16 pads de ejecución de clips se encenderá y se podrá usar para reproducir la batería.
3.Mantenga pulsado Shift y pulse Note para configurar los ajustes del modo de nota para cada pista.
Secuenciador de pasos
Al grabar baterías, es posible utilizar el secuenciador de pasos integrado de Force para introducir eventos de nota rápidamente utilizando los pads de ejecución de clips como "botones de pasos", simulando la experiencia de una caja de ritmos tradicional con estilo de secuenciador de pasos.
1.En el proyecto Deep House – Colors, seleccione Track 8 – Drum Kit y seleccione una ranura de clip vacía.
2.Pulse el botón Step Seq para alternar entre los modos del secuenciador de pasos para los pads de ejecución de clips. Seleccione el modo Drum.
3.En el modo de pad de secuenciador de pasos de batería, las cuatro filas superiores de pads de ejecución de clips representan los pasos de la secuencia. Las cuatro filas inferiores se dividen en dos grupos de 4 columnas.
Utilice el cuadrante inferior izquierdo para reproducir la batería. El último pad reproducido se seleccionará para la secuenciación. Toque cualquier pad de las cuatro filas superiores para insertar el sonido de batería seleccionado en ese paso de la secuencia. La secuencia comenzará a reproducirse automáticamente cuando se inserte un paso.
El cuadrante inferior derecho se utiliza para ajustar la velocidad de las notas. En este cuadrante, seleccione el pad inferior izquierdo para ajustar la velocidad a medida que se reproduce. Los pads restantes, de izquierda a derecha hacia arriba, representan la velocidad fija de mínimo a máximo.
4.Como alternativa, pulse Menu y luego toque Step Sequencer para utilizar la pantalla a fin de secuenciar eventos de nota.
Edición de clips y pistas
Ahora que está familiarizado con los principios básicos del lanzamiento de clips, intentemos editar clips y pistas para lograr una mayor personalización de su proyecto.
1.Pulse Clip para ingresar al modo de edición de clips o pulse Menu y luego toque Clip Edit.
2.En la vista de clips se pueden visualizar y editar los parámetros del clip en sí, tales como su longitud, modo de ejecución y cuantización.
Para seleccionar un clip, mantenga pulsado Select y puse un pad de ejecución de clip.
3.En función del tipo de clip seleccionado, también es posible editar un clip de audio utilizando la vista de región o editar eventos de nota MIDI utilizando la vista de evento.
Además del modo de edición de clips se pueden editar los parámetros de una pista utilizando el modo de edición de pista. Este modo no está disponible para pistas de audio.
1.Mantenga pulsado Shift y luego pulse Clip para entrar al modo de edición de pista o pulse Menu y luego toque Track Edit.
2.Utilice el modo de nota para seleccionar el pad o grupo de teclas que desea editar y utilice las pestañas de las páginas para editar los diferentes parámetros disponibles.
Mezclado de pistas
El mezclador del Force le permite ajustar parámetros tales como el nivel, el balance estéreo y el enrutamiento de la misma manera que utilizan los mezcladores tradicionales o estaciones de trabajo de audio digitales.
1.Pulse Mixer para abrir el mezclador o pulse Menu y luego toque Mixer.
2.El mezclador contiene cuatro pestañas de páginas que le permiten controlar los diferentes ajustes para las pistas y el maestro. Toque y arrastre su dedo para desplazarse por las pistas disponibles o utilice los botones del cursor.
14

Características
Importante: Visite en akaipro.com la página correspondiente a Force para descargar la guía de usuario completa.
Panel superior
3 |
|
2 |
|
16 |
|
|
|
|
|
|
|
4 |
5 |
6 |
|
|
|
7 |
8 |
9 |
1 |
17 |
|
10 |
11 |
12 |
|
18 |
|
13 |
14 |
|
|
|
|
15 |
|
|
19 |
|
|
|
|
|
|
||
21 |
|
|
|
|
20 |
24 |
|
|
|
|
|
25 |
|
|
|
|
|
26 |
|
|
|
|
|
27 |
|
|
22 |
|
23 |
|
|
|
|
|
|
28 |
|
|
|
|
|
29 |
|
|
|
|
|
32 |
|
|
|
30 |
31 |
|
|
|
33 |
|
34 |
|
|
|
|
|
1.Pantalla: Esta pantalla multitáctil a todo color muestra información relevante para la operación actual de la Force. Toque la pantalla (y utilice los controles de hardware) para controlar la interfaz de la Force. Consulte Pantalla para aprender a usar las funciones básicas.
2.Menu: Pulse este botón para abrir el menú. Puede tocar una opción en la pantalla del menú para entrar a ese modo, pista, etc.
3.Volumen maestro: Gire esta perilla para ajustar el nivel de volumen de las salidas L/R maestras.
4.Play: Pulse este botón para iniciar la reproducción.
5.Stop: Pulse este botón para detener la reproducción. Toque este botón dos veces para detener todos los sonidos inmediatamente.
6.Record: Pulse este botón para iniciar o detener la grabación.
15

7.Undo: Pulse este botón para deshacer su última acción.
Mantenga pulsado Shift y pulse este botón para volver a hacer la última acción que deshizo.
8.Load: Pulse este botón para abrir el navegador, en donde podrá cargar proyectos, clips y más.
9.Save: Pulse este botón para guardar su proyecto, muestra o pista, o para empezar un nuevo proyecto desde cero.
10.Matrix: Pulse este botón para abrir la vista de matriz, Consejo: Al estar dentro de cualquier
una visión general de su proyecto con una vista de 8x8 de sus clips.
11.Clip: Pulse este botón para abrir la vista de clip, la cual le brinda un mayor detalle de un clip individual.
Pulse Shift y este botón para abrir la vista de edición de pistas, en la cual podrá editar los parámetros de su batería, plugin, pista MIDI o CV.
menú o modo de pad, puede mantener pulsado el botón correspondiente a otro modo para conmutar momentáneamente a dicho modo. Regresará al modo anterior una vez que suelte el botón.
12.Mixer: Pulse este botón para abrir la vista del mezclador, desde donde podrá controlar el volumen, balance y controles de envío de cada pista.
Al utilizar una pista de batería, pulse Shift y este botón para abrir la vista del mezclador de pads, en donde podrá controlar el volumen, balance y controles de envío de cada pad.
13.Navigate: Pulse este botón para abrir la vista de navegación, la cual le brinda una visión general de todo el proyecto. Toque una sección para trasladar la vista de matriz directamente a esa sección.
Pulse Shift y este botón para abrir el XYFX.
14.Cursores: Pulse estos botones para desplazar la vista de matriz y los pads de una fila o columna a la vez.
Pulse Shift y pulse esos botones para desplazarse de a ocho filas o columnas a la vez.
15.Shift: Mantenga pulsado este botón para acceder a las funciones secundarias de ciertos botones.
16.Cuadrante de datos: Utilice este cuadrante para desplazarse por las opciones de menú disponibles o ajustar los valores de los parámetros del campo seleccionado en la pantalla. Si se pulsa el cuadrante, también funciona como botón Enter.
Pulse Shift y gire este cuadrante para ajustar los parámetros con mayor detalle.
17.–/+: Pulse estos botones para aumentar o disminuir el valor del campo seleccionado en la pantalla.
18.Assign A/Assign B: Pulse uno de estos botones y un botón de asignación de modo para asignar la pista correspondiente al crossfader A o agrupamiento B.
Pulse Shift y pulse uno de estos botones para cancelar todas las asignaciones de crossfader A o B.
19.Crossfader: Utilice este crossfader para mezclar los clips asignados al agrupamiento A o B.
20.Perillas asignables: Utilice estas perillas para controlar el balance y los niveles de envío de la pista u otros parámetros asignables por el usuario. Utilice el botón Knobs para modificar el banco o modo de perilla activa (descrito a continuación). La banda de visualización encima de cada perilla indica el parámetro que está controlando y su valor o ajuste actual.
21.Botón Knobs: Pulse este botón para alternar entre hasta dos bancos de perillas para el modo actualmente activo. La cinta de visualización que se encuentra encima de las perillas indicará los parámetros actualmente activos.
Mantenga pulsado este botón para seleccionar rápidamente uno de los múltiples modos de control de perilla de preset.
Pulse Shift y este botón para abrir el modo de perillas, en donde podrá editar las asignaciones de las perillas.
22.Pads de ejecución de clips: Utilice los pads sensibles a la velocidad en este teclado de 8X8 para ejecutar clips, reproducir notas y más, dependiendo del modo activo.
23.Botones de ejecución de escena: Puede pulsar uno de estos botones para ejecutar la escena correspondiente, representada por la fila de clips de su izquierda.
Pulse el botón Edit y uno de estos botones para rápidamente insertar una nueva fila, capturar los clips que se están reproduciendo actualmente como una escena nueva o eliminar una fila.
24.Launch/Config: Pulse este botón para ajustar los pads de ejecución de clips al modo de ejecución. En el modo de ejecución, cada padre representa una ranura de un único clip. Las ocho columnas representan ocho pistas mientras que las cinco filas representan cinco escenas. Puede ejecutar la escena entera pulsando los botones de ejecución de escena de la derecha de la fila de clips.
Pulse Shift y este botón para configurar los ajustes del modo de ejecución.
16
Loading...