


Force
User Guide
English
Manual Version 1.0

Table of Contents
Introduction ............................................................. 6
Support .............................................................. 6
About This User Guide ..................................... 6
Important Notes ............................................... 6
Setup ........................................................................ 7
Features ................................................................... 8
Top Panel .......................................................... 8
Display ....................................................... 11
Rear Panel ....................................................... 12
Front Panel ...................................................... 13
2
Tutorial ................................................................... 14
Starting Up ...................................................... 14
Launching Clips .............................................. 14
Editing Clips & Tracks .................................... 17
Clip Edit Mode ........................................... 18
Region View ................................................... 20
Event View ...................................................... 22
List View ......................................................... 23
Track Edit Mode ........................................ 24
Renaming & Saving ........................................ 27
Using the Browser ..................................... 29
Mixing Tracks ................................................. 30
Cueing Tracks ............................................ 32
Recording Clips .............................................. 33
Recording with Note Mode ........................ 33
Recording with the Step Sequencer ......... 35

Operation ............................................................... 37
General Features ............................................ 37
Control Types ............................................ 37
Knobs ............................................................. 37
Parameter Values ............................................ 38
Drop-Down Menus / Lists ............................... 38
Selectors ......................................................... 39
Buttons ........................................................... 39
Checkboxes .................................................... 39
Tabs ............................................................... 39
Sliders ............................................................. 40
Envelopes ....................................................... 40
Event View Tools ............................................. 41
Audio Region Edit Tools .................................. 42
Pad Modes ................................................ 43
Launch Mode .................................................. 43
Note Mode ...................................................... 44
Drum Note Mode ........................................ 44
Melodic Note Mode .................................... 45
Launch & Note Mode ...................................... 47
Step Sequencer .............................................. 48
Drum .......................................................... 48
Melodic ....................................................... 49
Lanes ......................................................... 49
Tracks ........................................................ 50
About Tracks .................................................. 50
Audio Tracks ................................................... 51
Drum Tracks ................................................... 52
Keygroup Tracks ............................................. 54
Plugin Tracks .................................................. 56
MIDI Tracks ..................................................... 58
CV Tracks ....................................................... 59
Menu .......................................................... 60
Save ............................................................... 61
Preferences .................................................... 62
Info............................................................. 62
Wi-Fi .......................................................... 62
Bluetooth ................................................... 63
Sequencer ................................................. 63
Sync .......................................................... 64
Hardware ................................................... 64
Project Defaults .......................................... 65
Project Load/Save ...................................... 65
Record/Export ............................................ 65
General ...................................................... 65
Sync ............................................................... 66
Mode .............................................................. 66
System Resources.......................................... 67
Timing Correct (TC).................................... 68
Metronome (Click/Metro) ........................... 70
Automation ................................................ 71
Arpeggiator ................................................ 72
Effects ........................................................ 74
Overview ........................................................ 74
Insert Effects................................................... 76
Pads .......................................................... 76
Keygroups .................................................. 77
Tracks ........................................................ 78
Masters ...................................................... 79
Send/Return Effects ....................................... 80
Pads .......................................................... 81
Keygroups .................................................. 82
Audio and Plugin Tracks ............................. 83
Plugins ....................................................... 84
Bassline .......................................................... 84
Electric ........................................................... 87
Hype .............................................................. 91
TubeSynth ...................................................... 96
Standalone vs. Computer Mode .............. 103
3

Modes ............................................................ 104
Matrix Mode ............................................. 105
Step Sequencer ....................................... 107
XYFX Mode .............................................. 111
Navigate Mode ........................................ 114
Browser .................................................... 115
Clip Edit Mode ......................................... 118
Clip View ....................................................... 118
Event View .................................................... 120
Editing Events ........................................... 123
Region View .................................................. 128
List View ....................................................... 131
Track Edit Mode ...................................... 135
Drum Tracks ................................................. 135
Master ...................................................... 138
Samples ................................................... 139
Pan Velocity .............................................. 146
Filter/Envelope .......................................... 147
LFO Modulation ........................................ 148
Effects ...................................................... 150
Keygroup Tracks ........................................... 152
Master ...................................................... 153
Samples ................................................... 156
Pan Velocity .............................................. 162
Filter/Envelope .......................................... 163
LFO Modulation ........................................ 164
Effects ...................................................... 166
Plugin Tracks ................................................ 168
MIDI Tracks ................................................... 169
CV Tracks ..................................................... 170
Anatomy of an Envelope ............................... 171
Sample Edit Mode ................................... 172
Settings ........................................................ 174
Trim Mode .................................................... 175
Assigning Samples ................................... 178
Processing Slices & Samples .................... 180
Chop Mode .................................................. 184
Converting or Assigning Slices .................. 187
Processing Slices ..................................... 190
Sampler .................................................... 193
Auto Sampler ............................................... 197
Looper ...................................................... 199
Knobs ....................................................... 203
Screen .......................................................... 204
Project .......................................................... 205
Track ............................................................ 208
Volume ......................................................... 210
Pan .............................................................. 210
Sends ........................................................... 210
Mixer ........................................................ 211
Volume ......................................................... 212
Pan & Volume ............................................... 212
Sends ........................................................... 213
Inserts & I/O ................................................. 214
Pad Mixer ................................................. 215
Volume ......................................................... 216
Pan & Volume ............................................... 216
Sends ........................................................... 217
Inserts & I/O ................................................. 218
Pad Color Mode ....................................... 219
4

Appendix .............................................................. 221
Effects & Parameters ................................... 221
Reverbs .................................................... 221
Delays ...................................................... 225
Flangers ................................................... 229
Chorus ..................................................... 230
Autopans .................................................. 231
Tremolos .................................................. 231
Phasers .................................................... 232
HP (High-Pass) Filters .............................. 233
LP (Low-Pass) Filters ............................... 234
Filters (Other) ........................................... 235
Parametric EQs ........................................ 236
Distortions ................................................ 238
Compressors ........................................... 240
Bit Reducers ............................................ 241
Other ........................................................ 242
Glossary ........................................................ 249
SATA Drive Installation ................................ 254
MIDI Machine Control (MMC) ..................... 255
Technical Specifications ............................. 256
Trademarks & Licenses ............................... 257
5
Introduction
Thank you for purchasing the Force. At Akai Professional, we know how serious music is to you. That’s why we design
our equipment with only one thing in mind—to make your performance the best it can be.
Support
For the latest information about this product (documentation, technical specifications, system requirements,
compatibility information, etc.) and product registration, visit akaipro.com.
For additional product support, visit akaipro.com/support.
About This User Guide
This manual should help you get familiar with using the Force. For consistency, the terminology throughout is based on
the Force parameter names. We also used specific formatting to indicate particular topics of significance:
Important/Note/Tip: Important or helpful information on a given topic.
Names of buttons, controls, parameters, settings, and other options are written in bold characters throughout the manual.
Examples: Press the Play button.
Turn Knob 4.
Tap the Mute icon.
The Velocity ranges from 0 to 127.
Set the Sample Play selector to One Shot.
Tap BPM, and then use the numeric keypad to enter a 120 as the tempo.
Some parts of this manual refer to other relevant chapters or sections, which are cited in bold, italic blue characters.
Click the text to skip immediately to that section.
Examples: Read the Important Notes section before proceeding.
For more information about launching clips, see Tutorial > Launching Clips.
To learn more about using send effects, see General Features > Effects > Send/Return Effects.
Important Notes
Read the included safety & warranty manual before using Force.
Before getting started and connecting devices to Force or turning the hardware on/off, make sure all devices are
switched off.
6
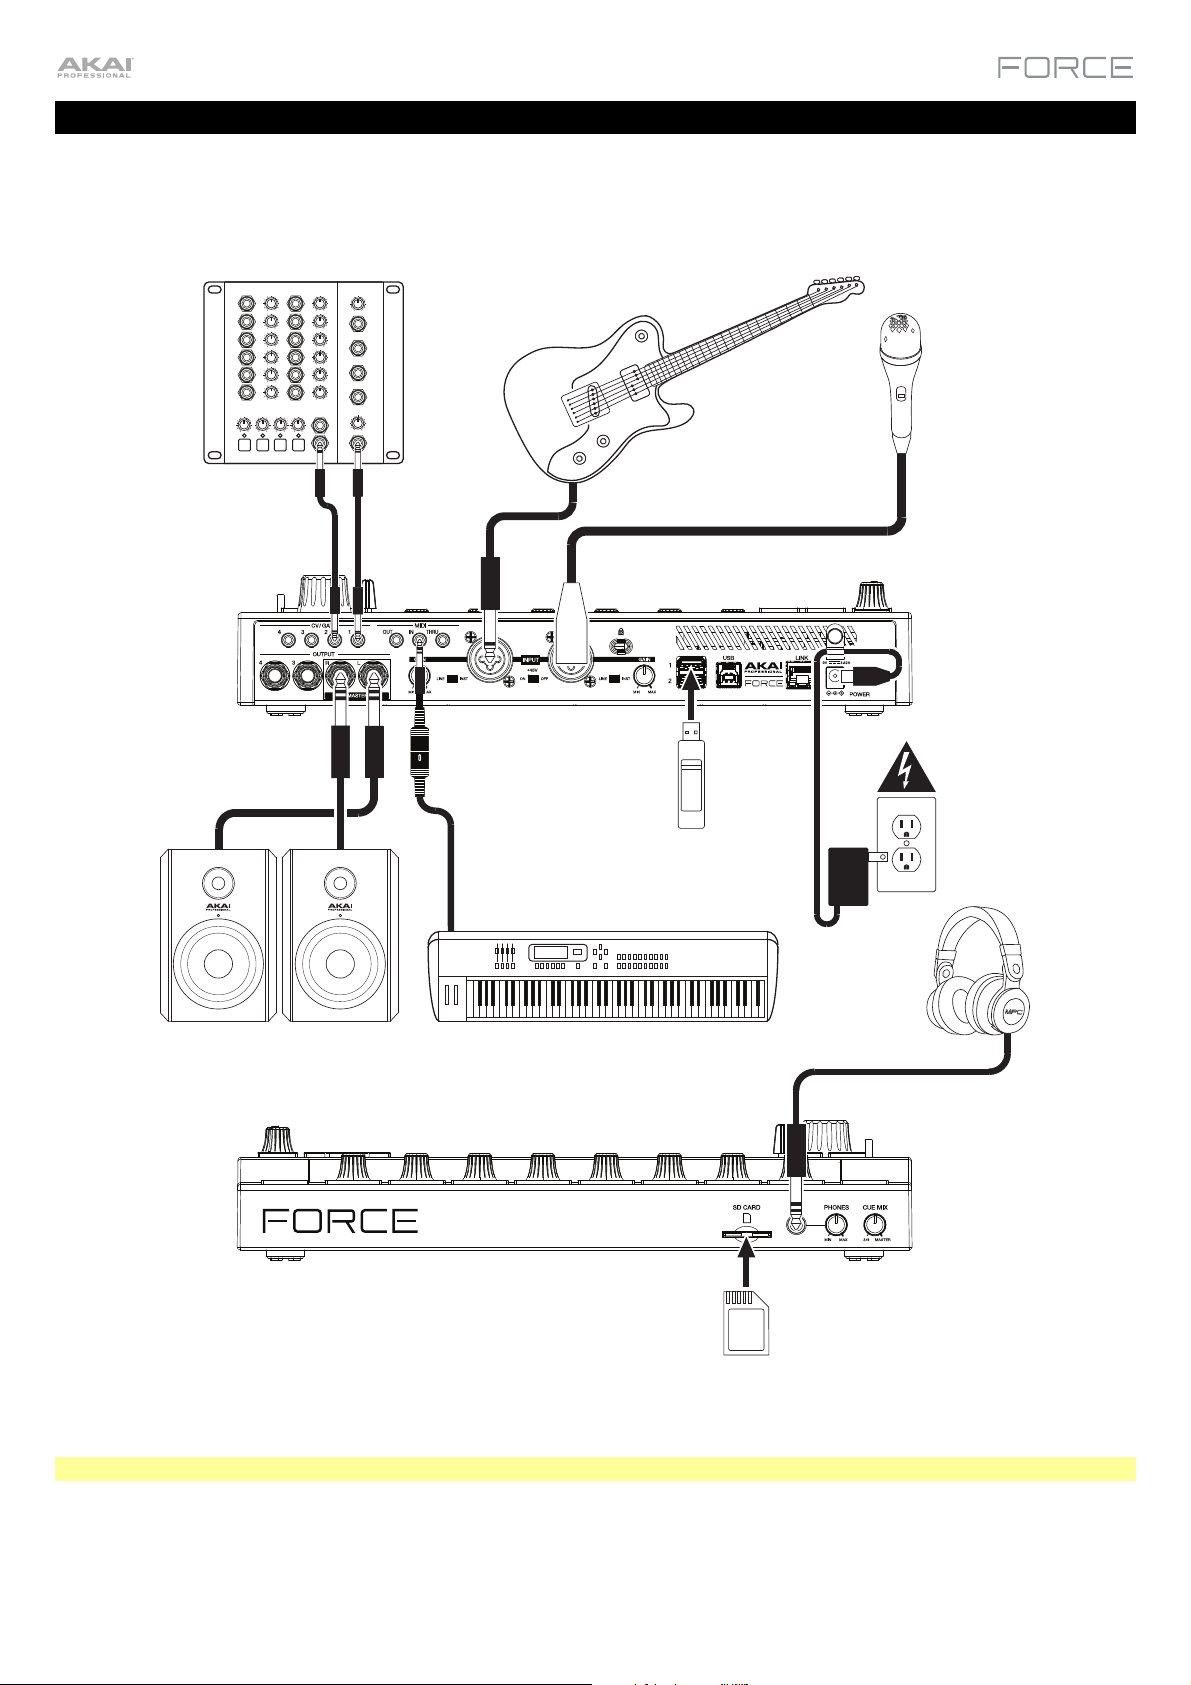
Setup
Here is just an example of how to use Force in your setup. Items not listed under Introduction > Box Contents of your
included Quickstart Guide are sold separately.
Remember to remove the protective film from the Force touchscreen!
Synthesizer
Powered Monitors
Guitar
USB
Flash
Drive
MIDI Keyboard
SD
Card
Headphones
Microphone
Power
Note: We highly recommend checking akaipro.com for any available updates to the Force firmware and/or drivers.
7
Features
This chapter explains the features and functions of your Force.
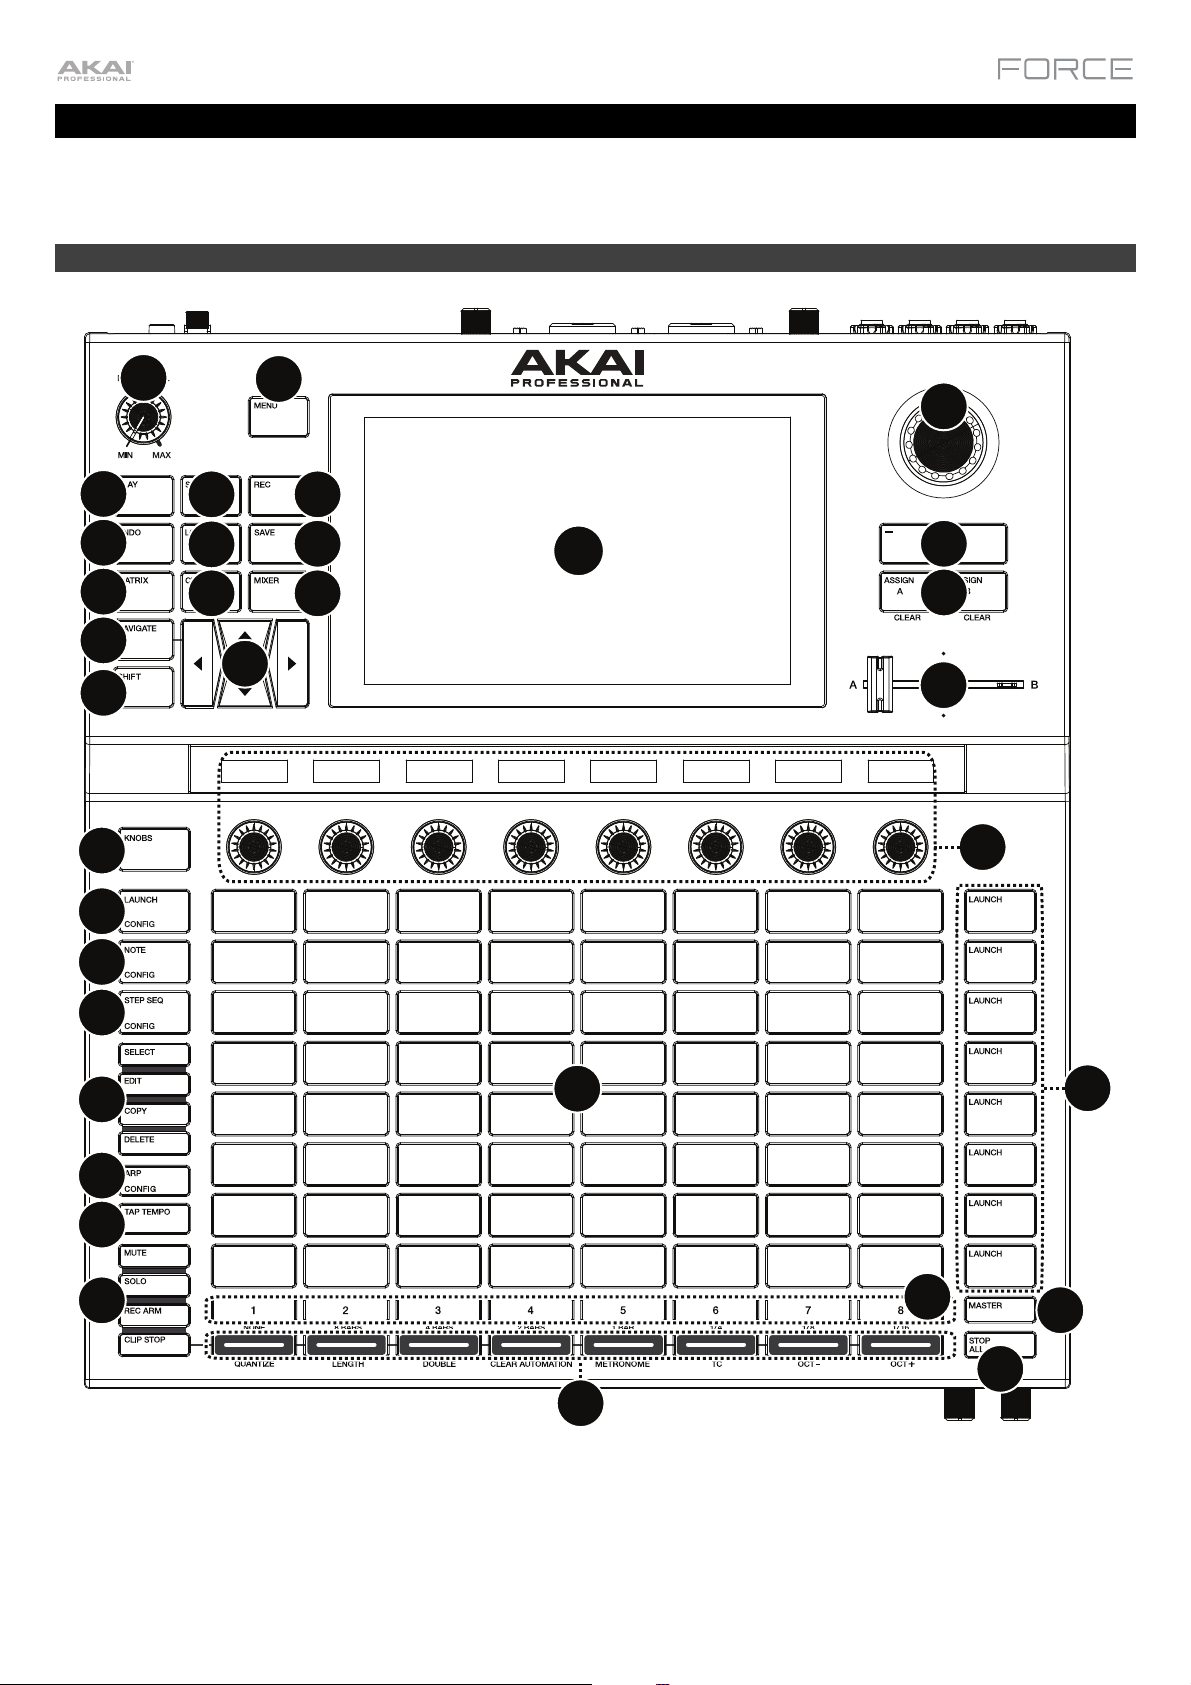
Top Panel
4
7
10
13
15
21
24
3
5
8
11
14
2
6
9
12
1
16
17
18
19
20
25
26
27
28
29
32
22
33
30
23
31
34
8

1. Display: This full-color multi-touch display shows information relevant to Force’s current operation. Touch the
display (and use the hardware controls) to control the Force interface. See Display to learn how to use some basic
functions.
2. Menu: Press this button to open the menu. You can tap an option on the menu screen to enter that mode, view, etc.
3. Master Volume: Turn this knob to adjust the volume level of the Master L/R outputs.
4. Play: Press this button to start transport playback.
5. Stop: Press this button to stop transport playback. Double-press this button to immediately stop all sound.
6. Record: Press this button to start or stop transport recording.
Press Shift and this button to view the Record Configuration window.
7. Undo: Press this button to undo your last action.
Press Shift and this button to redo the last action you undid.
8. Load: Press this button to open the Browser, where you can load projects, clips, and more.
9. Save: Press this button to save your project, sample or track, or to start a new project from scratch.
10. Matrix: Press this button to open Matrix View, an overview of your project with an 8x8 view of your clips.
11. Clip: Press this button to open Clip View, which gives you finer detail of a single clip.
Press Shift and this button to open Track Edit View, where you can edit
parameters of your drum kit, plugin, MIDI or CV tracks.
12. Mixer: Press this button to open Mixer View, where you can control each track's
volume, pan and send controls, as well as add plugin insert effects.
When using a drum track, press Shift and this button to open Pad Mixer View,
where you can control each pad's volume, pan and send controls, as well as add
Tip: While in any of the pad
modes, you can press and
hold the button for another
mode to momentarily switch
to that mode. You will return
to the previous mode when
you release the button.
plugin insert effects.
13. Navigate: Press this button to open the Navigate view, which gives you an overview of the entire project. Tap a
section to jump the Matrix view directly to that section, or use the cursors to move the Matrix View.
Press Shift and this button to open the XYFX View.
14. Cursors: Press these buttons to move the Matrix View and the pads by one row or column at a time.
Press Shift and press these buttons to move by eight rows or columns at a time.
15. Shift: Pre
ss and hold this button to access secondary functions on some buttons and display modes.
16. Data Dial: Turn this dial to scroll through the available menu options or adjust the parameter values of the selected
field in the display. Pressing the dial also functions as an Enter button.
Press Shift and turn this dial to adjust parameters in finer detail.
17. –/+: Press these buttons to increase or decrease the value of the selected field in the display.
18. Assign A/Assign B: Press one of these buttons and a Track Assign button to assign the corresponding track to
the crossfader A or B grouping.
Press Shift and press one of these buttons to clear all crossfader A or B assignments.
19. Crossfader: Use this crossfader to mix between clips assigned to the A or B grouping.
20. Assignable Knobs: Use these knobs controls track panning, track send levels, or other user-assignable
parameters. Use the Knobs button to change the active knob bank or mode (described below). The display strip
above each knob indicates the parameter it is controlling and its current value or setting.
21. Knobs Button: Press this button to cycle between up to two banks of knobs for the currently active mode. The
display strip above the knobs will indicate the currently active parameters.
Press and hold this button to quickly select one of several preset knob control modes.
Press Shift and this button to open Knobs Mode, where you can edit knob assignments.
22. Clip Launch Pads: Use the velocity-sensitive pads in this 8x8 to launch clips, play notes, and more, depending on
the active mode.
23. Scene Launch Buttons: Press one of these buttons to launch the corresponding scene, represented by the row of
clips to its left.
Press the Edit button and one of these buttons to quickly insert a new row, capture the currently playing clip(s) as a
new scene or clear a row.
9

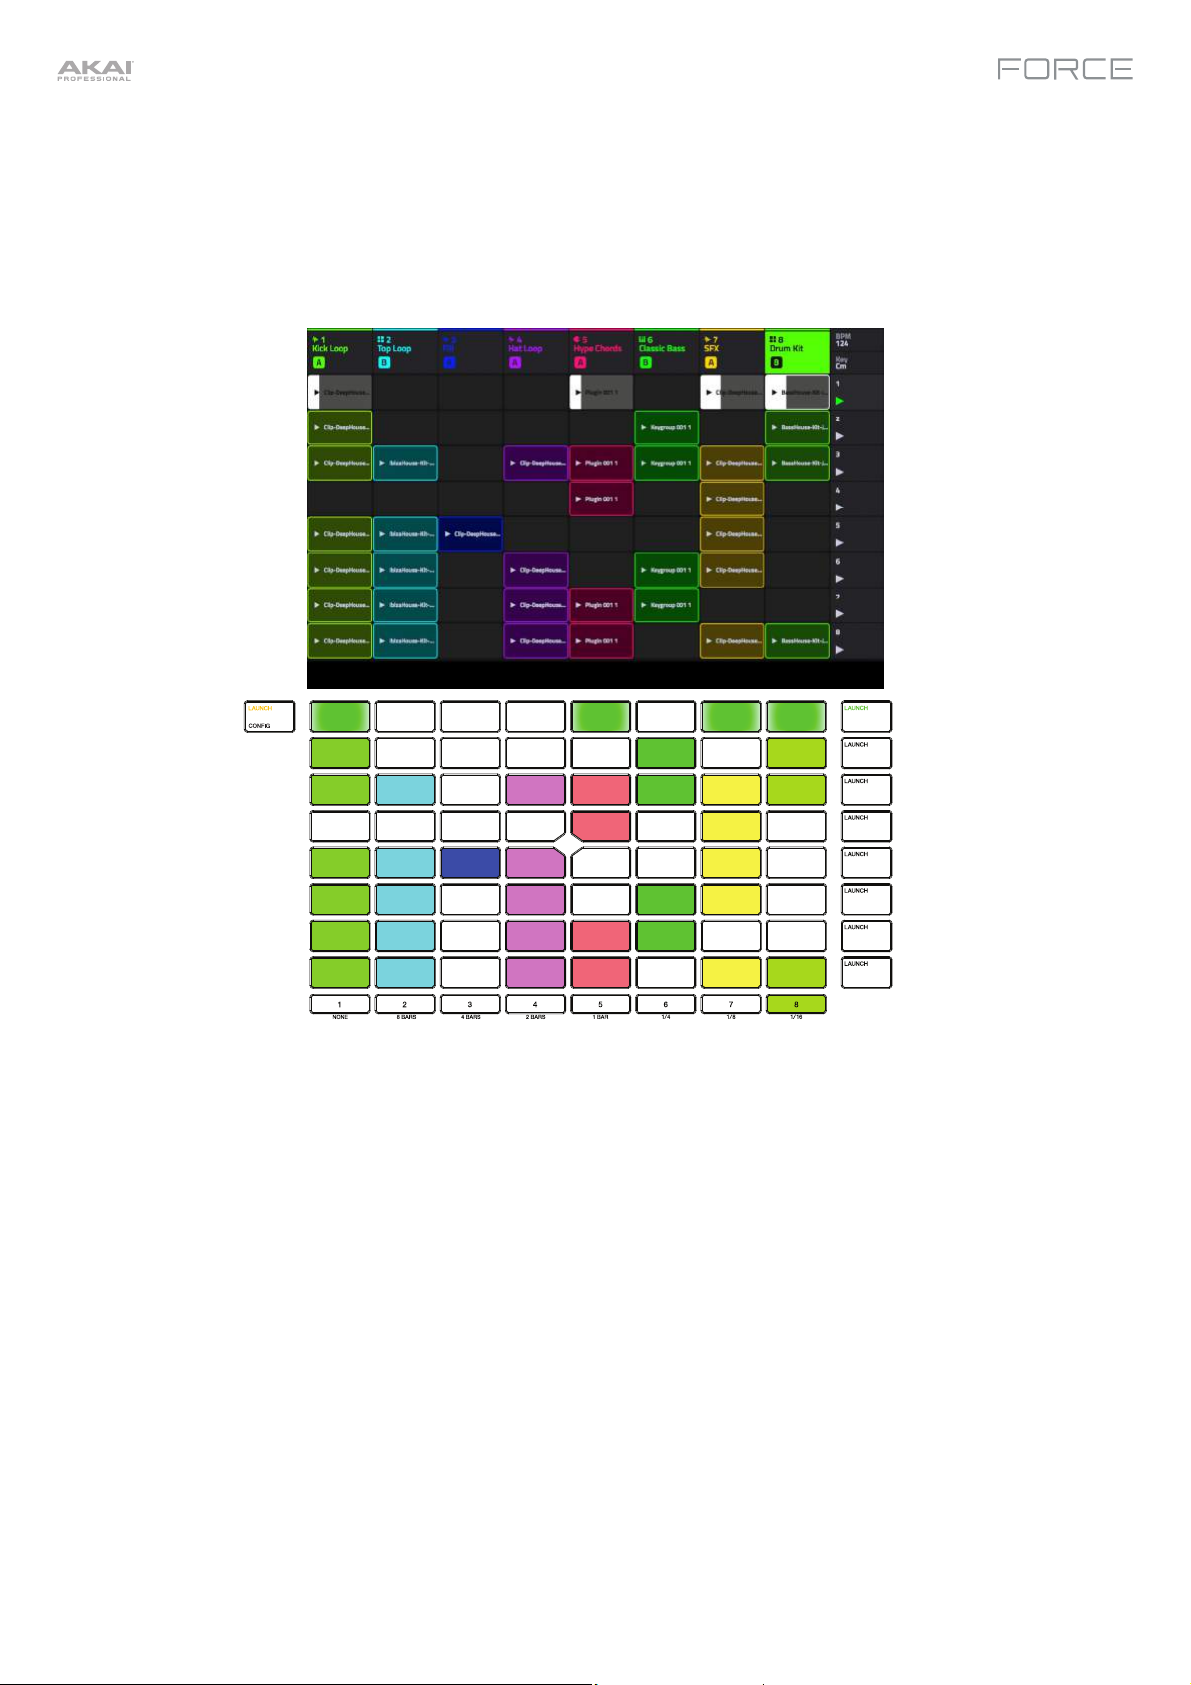
24. Launch/Config: Press this button to set the Clip Launch Pads to Launch mode. In Launch mode, each pad
represents a single clip slot. The eight columns represent eight tracks while the eight rows represent eight scenes.
You can launch the entire scene by pressing the Scene Launch buttons to the right of the row of clips.
Press Shift and press this button to configure the Launch mode settings.
25. Note/Config: Press this button to set the Clip Launch Pads to Note mode. In Note mode, you can use the pads to
play a configurable scale of MIDI notes.
When in Note mode and using a Keygroup, Plugin, MIDI or CV track, press and hold this button to select different
play modes, such as scales, chords, progressions and more. When in Note mode and using a Drum track, press
and hold this button to select a time division for note repeat.
Press Shift and press this button to configure the Note mode settings, such as scale and root note. You can also
press and hold this button to quickly select a mode.
26. Step Seq/Config: Press this button repeatedly to cycle through three different pad views for using the Step
Sequencer.
When in Step Sequencer mode, press and hold this button to quickly select a step sequencer view, select a Step
Sequence page, or change the step size.
Press Shift and press this button to configure the Step Sequencer's settings.
27. Edit Buttons: Press and hold one of these buttons to edit a clip or track according to the following:
• Select: Press and hold this button to view the currently select clip. While holding, tap another Clip Launch Pad
to select another clip. This button can also be used to select a drum pad in a drum kit or select a note in the
Step Sequencer without sounding the note.
• Edit: Press and hold this button then tap a Clip Launch Pad or Track Selector button to edit a clip or track,
respectively.
Hold this button and press any Scene Launch button to open the Edit Row window, where you can quickly add
or clear rows in the Matrix.
• Copy: Press and hold this button to copy a clip or track. While holding, tap the Clip Launch Pad or Track
Selector button of the clip or track you would like to copy, then tap a new pad or button to copy it.
• Delete: Press and hold this button then tap a Clip Launch Pad or Track Selector button to delete it.
28. Arp/Config: Press this button to enable or disable the internal Arpeggiator, whose rate is based on the current
Tempo and Time Division settings.
Press Shift and this button to configure the Arpeggiator's settings.
29. Tap Tempo:
Tap this button at the desired rate to enter a new tempo.
Press Shift and this button to open the Tempo window, where you can enter a new tempo.
30. Track Selectors: Press one of these buttons to select a track, represented by the column of clips just above it. The
right-most button (labeled Master) selects the Master track.
Press and hold Shift and then press one of these buttons to select a Global Quantization setting: None, 8 Bars, 4
Bars, 2 Bars, 1 Bar, 1/4, 1/8, or 1/16.
31. Master: Press this button to view the Master and Return channels.
32. Assign Mode Buttons: Press one of these buttons to set the function of the
Track Assign buttons when pressed:
• Mute: Press this button to mute the track.
• Solo: Press this button to solo the track.
• Rec Arm: Press this button to record-arm the track.
Tip: Hold Shift and press Mute or
Solo to open the Mixer Config
window, where you can set the solo
button and crossfader behaviors.
• Clip Stop: Press this button to stop the clip that is playing in the track.
33. Track Assign: Press one of these buttons to apply an assignment to a track, represented by the column of clips just
above it. Use the Assign Mode buttons to set the assign function.
Press and hold Shift and then press one of these buttons to access secondary functions, printed below the buttons.
34. Stop All Clips: Press this button to stop all clips when they reach the end.
10
Display
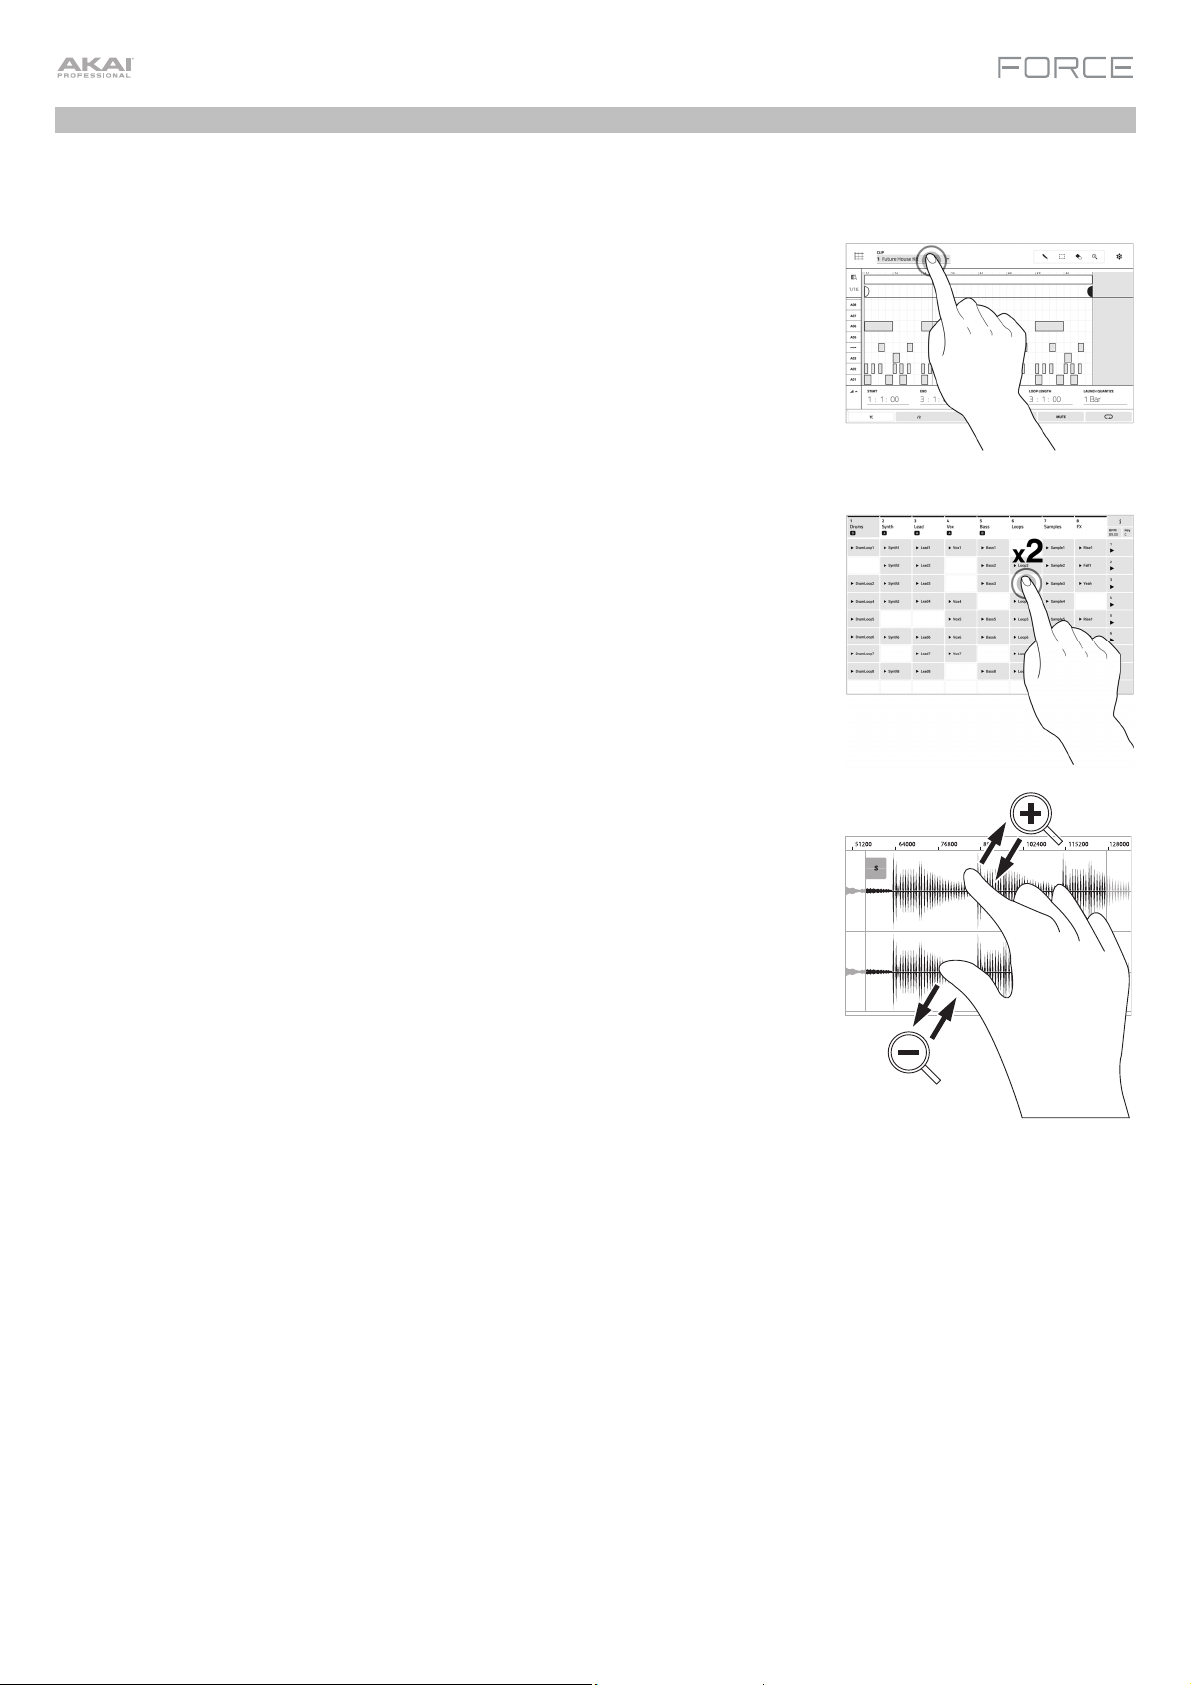
Here is some general information about how to use the Force display:
Tap a button or option to select it. Use the data dial or –/+ buttons to change its
setting or value.
In Matrix View, tap a filled clip slot to launch the clip.
Double-tap a control to access advanced editing options. In some cases, this will
show a numeric keypad that you can use to enter a value (an alternative to the data
dial or –/+ buttons). Tap the upper-left part of the display to return to the previous
view.
In Matrix View, double-tap an empty clip slot in your track to create a new clip.
Spread two fingers to zoom in (into a section of a waveform, for example). Pinch two
fingers to zoom out.
11
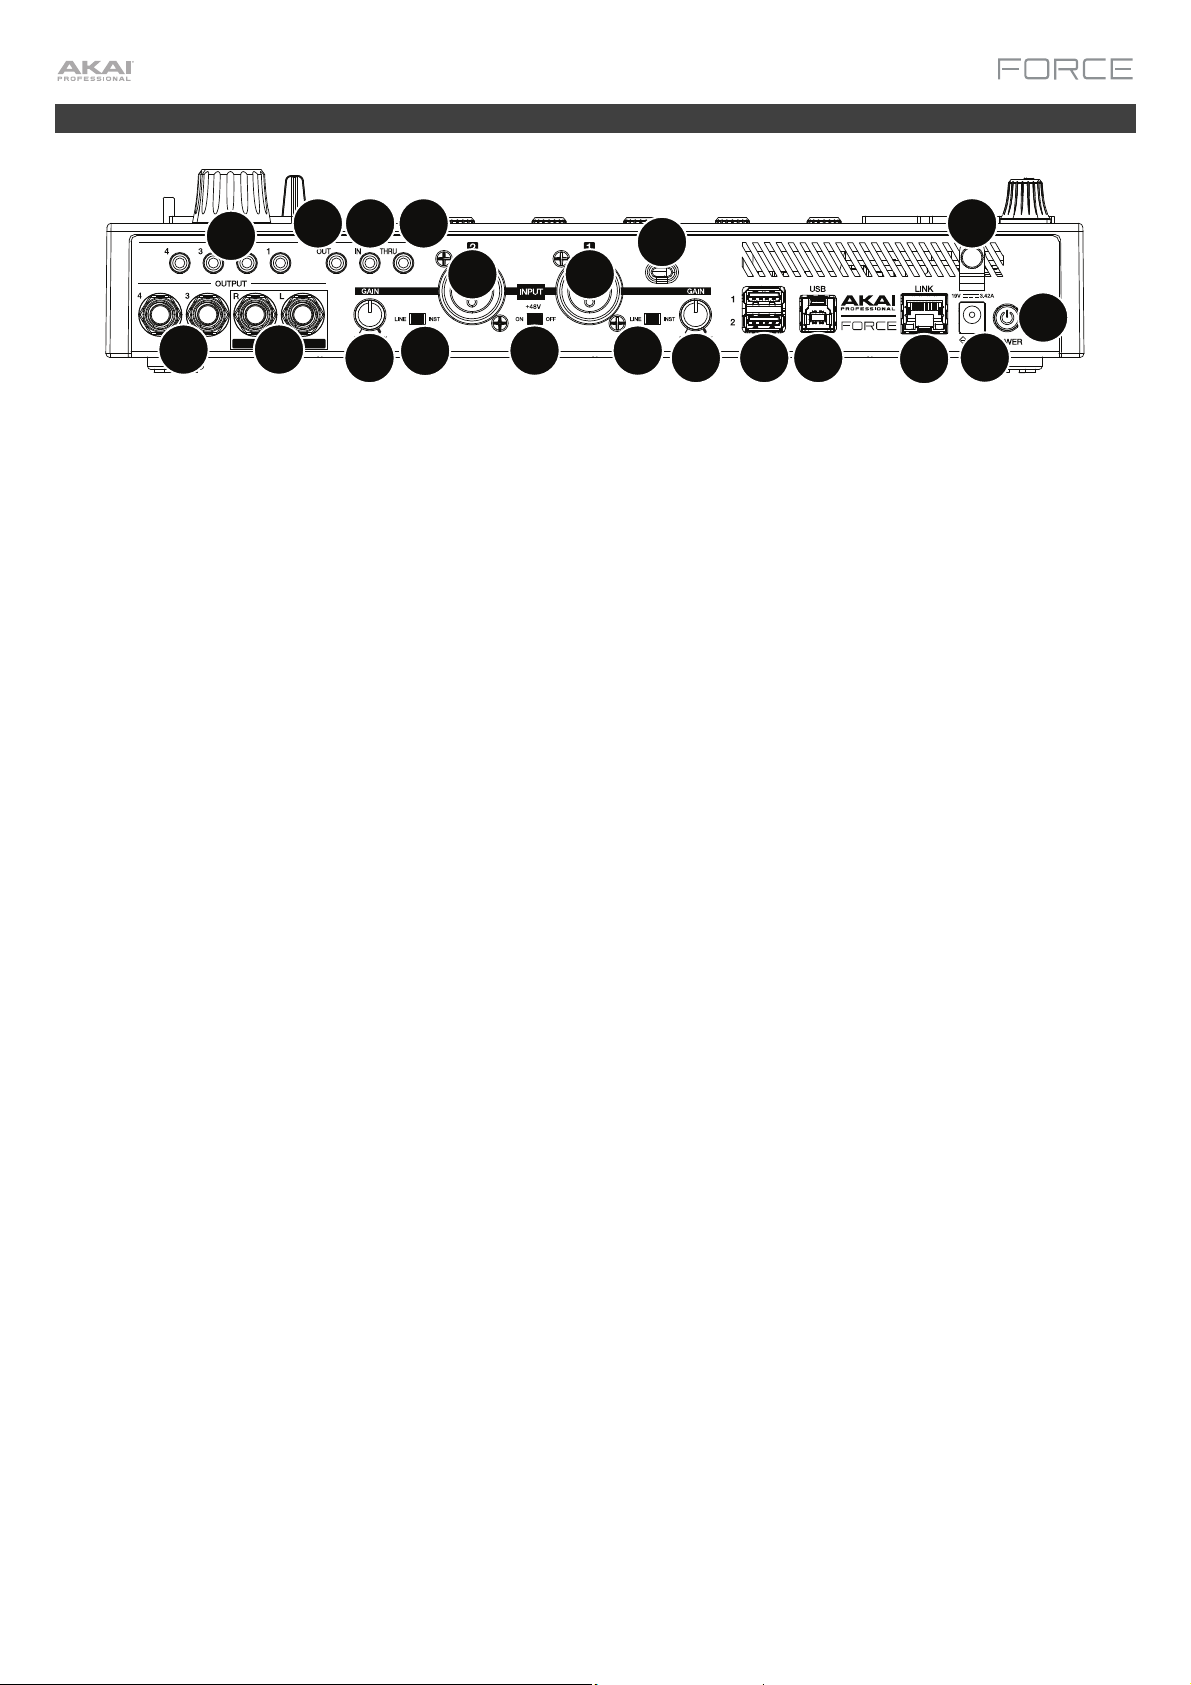
Rear Panel
15
12 13
14
7
16
7
2
3
11
1. Power Input: Connect the included power adapter (19 V, 3.42 A, center-positive) to this jack then into an electrical
outlet.
2. Power Adapter Restraint: Secure the power adapter cable to this restraint to prevent it from accidentally
unplugging.
3. Power Switch: Press this button to turn Force’s power on or off.
4. Link: Connect a standard Ethernet cable to this port to use Ableton Link and other compatible devices with Force.
See Operation > General Features > Menu > Preferences > Sync for more information.
5. USB-B Port: Use the included USB cable to connect this high-retention-force USB port to an available USB port on
your computer.
6. USB-A Ports: Connect USB flash drives to these USB ports to access their files directly using Force.
7. Input 1/2 (XLR or 1/4” / 6.35 mm): Use standard XLR or 1/4” (6.35 mm) TRS cables to connect these inputs to audio
sources (microphone, mixer, synthesizer, etc.). When using a 1/4" cable, the Mic preamp is removed from the
circuit, and the Line/Inst switch can be used to set the impedance.
11
8
9
10
9
8
6
5
4
1
Turn the Gain knobs to set the input level of each one.
8. Gain: Use these knobs to adjust the gain of the incoming signal from Input 1/2 on the rear panel. Be careful when
setting this knob at higher levels, which can cause the signal to distort.
9. Line/Inst: Use these switches to set Input 1/2 to accept either a Line-level or Instrument-level sound source when
using a 1/4" (6.35 mm) connection.
10. Phantom Power (+48V): This switch activates and deactivates phantom power for Inputs 1/2 when using an XLR
connection. When activated, +48V of phantom power will be supplied to both inputs. Note that most dynamic
microphones do not require phantom power, while most condenser microphones do. Refer to your microphone’s
documentation to check if it needs phantom power.
11. Outputs (1/4” / 6.35 mm): Use standard 1/4” (6.35 mm) TRS cables to connect these outputs to your monitors,
mixer, etc. The Master L/R outpu
12. MIDI Out: Connect compatible 1/8" (3.5 mm) MIDI devices to this output, or use the included 1/8"-to-MIDI adapter
to connect a standard 5-pin MIDI cable from this output to the MIDI input of an external MIDI device (synthesizer,
drum machine, etc.).
13. MIDI In: Connect compatible 1/8" (3.5 mm) MIDI devices to this input, or use the included 1/8"-to-MIDI adapter to
connect a standard 5-pin MIDI cable from this input to the MIDI output of an external MIDI device (synthesizer, drum
machine, etc.).
14. MIDI Thru: Connect compatible 1/8" (3.5 mm) MIDI devices to this thru-port, or use the included 1/8"-to-MIDI
adapter to connect a standard 5-pin MIDI cable from this input to the MIDI output of an external MIDI device
(synthesizer, drum machine, etc.). Incoming MIDI from the MIDI In port will be passed along to this output.
15. CV/Gate Out: Use standard 1/8” (3.5 mm) TS cables to connect these outputs to optional modular devices. Force
will send control voltage (CV) and/or Gate data over this connection.
®
16. Kensington
Lock Slot: You can use this slot to secure your Force to a table or other surface.
ts are the same as Outputs 1,2.
12
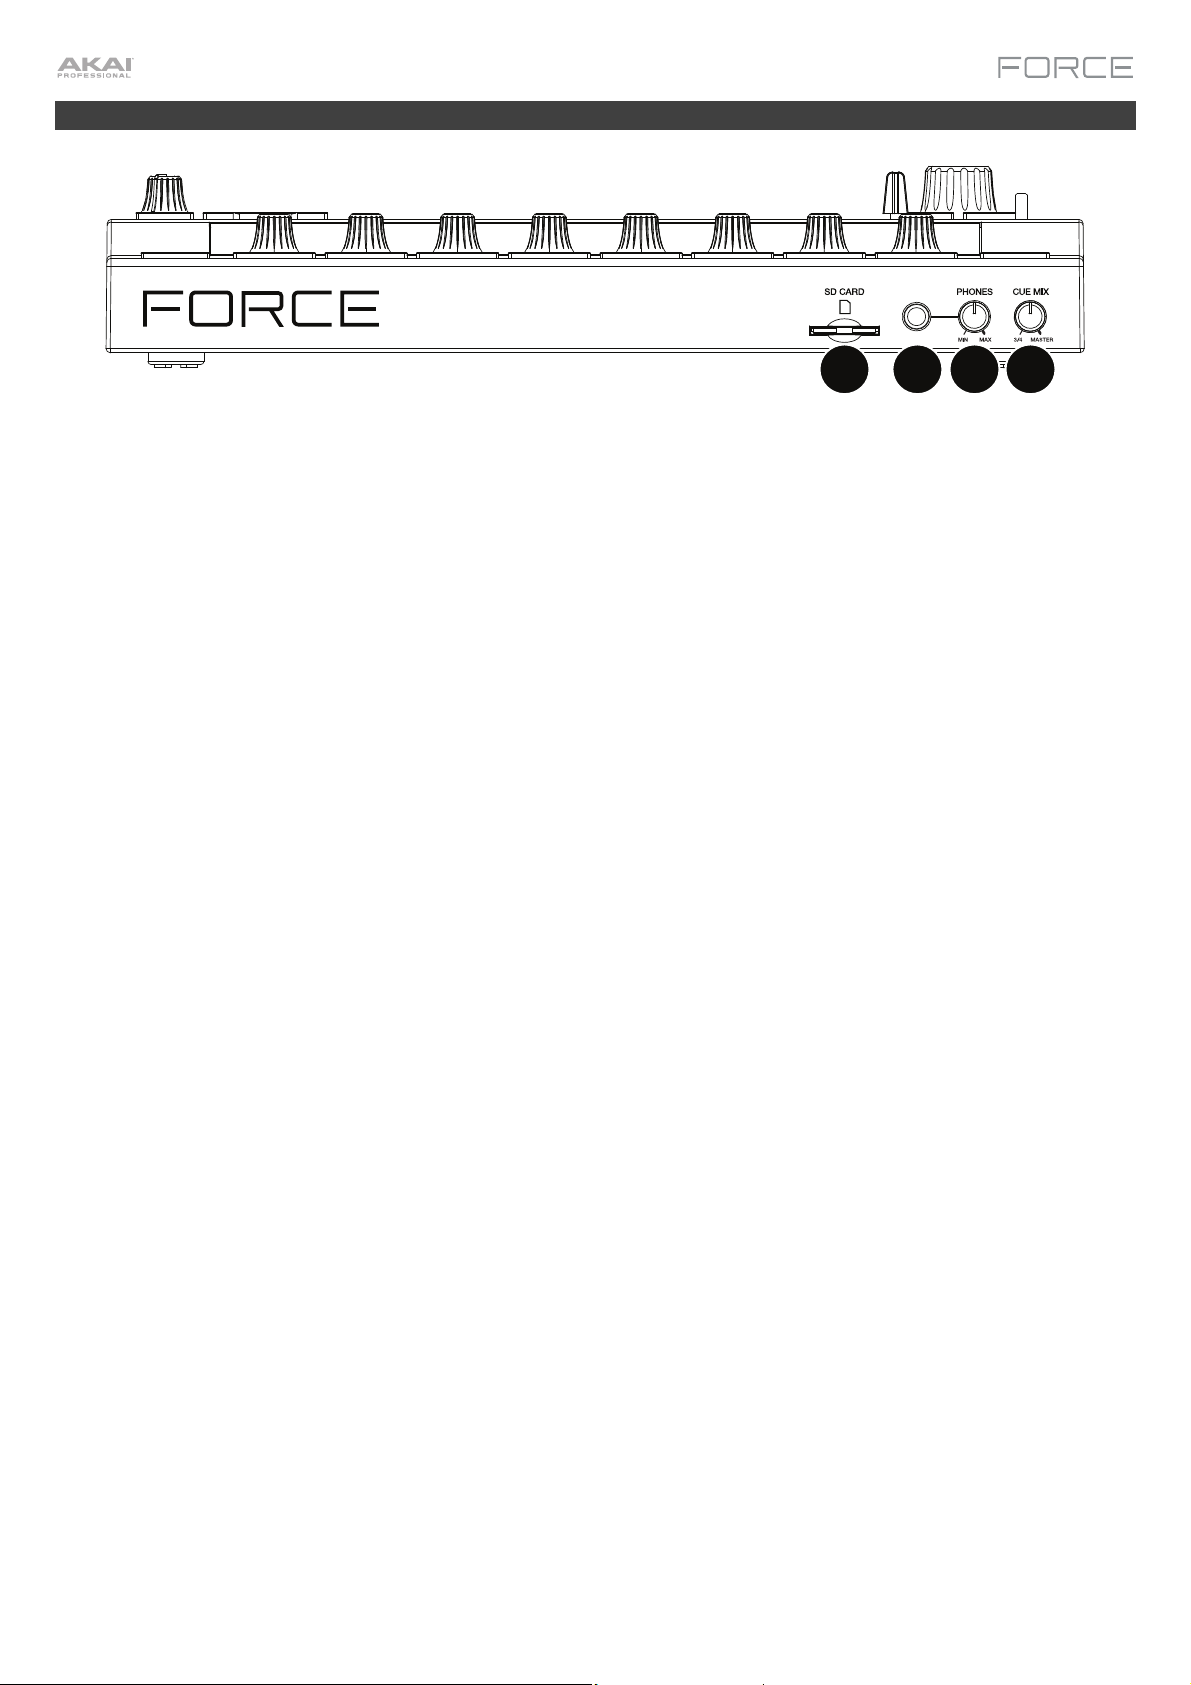
Front Panel
1
1. SD Card Slot: Insert a standard SD/SDHC card into this slot to access its files directly using Force.
2. Phones (1/4” / 6.35 mm): Connect standard 1/4” (6.35 mm) stereo headphones to this output.
3. Phones Volume: Turn this knob to adjust the volume of the phones output.
4. Cue Mix: Turn this knob to adjust the balance between the Master and 3/4 signals in your headphones. Master is
the signal sent from the Master outputs. 3/4 is the signal sent from the Outputs 3/4.
23
4
13
Tutorial
This chapter describes how to get started doing basic tasks using your Force. We'll use one of Force's included Demo
projects to illustrate some of the most important concepts and features. To get the most out of this chapter, we
recommend reproducing each of the described steps.
Starting Up
Make sure you have connected your Force hardware to a power source using the included power adapter and powered
it on.
When you first power on your Force, you can select a demo project to help get you started, select Empty Project at the
bottom of the screen to load a blank template, or select User Template to load a saved custom template.
For this tutorial, tap the Deep House - Colors Demo project to load it.
Launching Clips
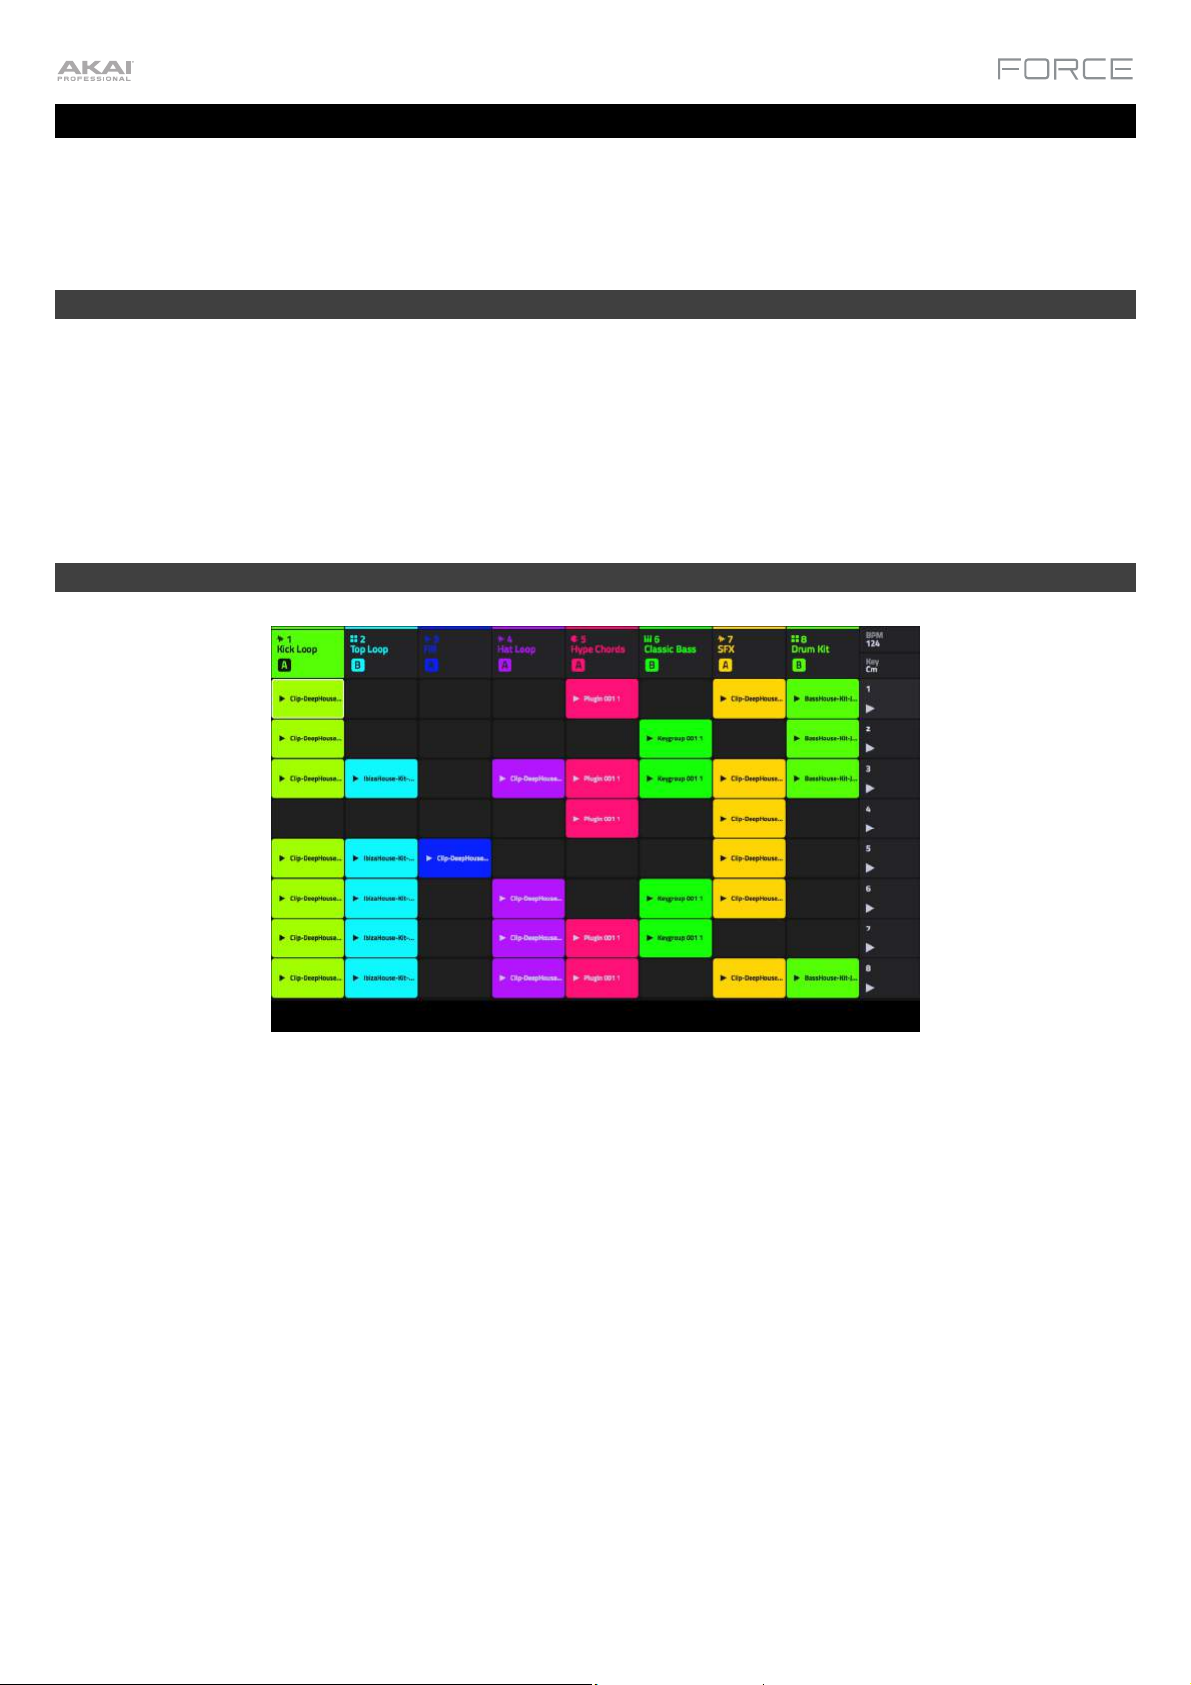
After loading the demo, Force will automatically open Matrix Mode. This display mode gives you an overview of your
project and mirrors the 8x8 layout of the clip launch pads. Use the cursor buttons to move the current view of the
matrix by one row or column at a time.
Each column in Matrix Mode represents a track. Tracks can be used to hold audio samples, drum kits, instrument
plugins and more. On the display, you will see tracks labeled Kick Loop, Top Loop, Fill and more.
Each track is made up of clips, which are short sequences of audio or MIDI. Only one clip in a track can play at a time.
Let's try playing with a few clips to see how they work.
14

Press the Launch button to make sure the clip launch pads are in Launch Mode. In this pad mode, each pad
represents a single clip in a track. The lighted pads represent the clips shown on the display, and the dim pads are
empty clips.
Tap the first clip in Track 8 – Drum Kit to begin playing it. The clip launch pad will slowly blink green to indicate it is
active, and the clip on the display will show the position of the playhead in the clip.
Now, while in Launch mode, press the clip launch pad below the pad that is currently playing. The second clip will start
playing after the next bar.
See Operation > General Features > Pad Modes > Launch Mode to learn more.
Clips will continue to play until another clip in the same track is launched, until playback is stopped or until the clip is
stopped while playback continues.
To stop playback, press the Stop button.
To stop the clip, first press the Clip Stop button to assign the Track Assign buttons to stop mode. Then, press the
Track Assign button for the track with the clip playing. You can also press the Stop All Clips button to stop clips in
all tracks.
15
In addition to launching clips in a track, you can launch multiple clips across tracks in the same row. Each row of clips is
called a scene, and these can be used to arrange different parts of a song.
Press the top-most Scene Launch button to launch the first row of clips, and then continue launching other scenes in
order.
While one scene is playing, try launching clips from other rows to experiment with different variations.
You can also assign Tracks to Force's crossfader. This allows you to seamlessly transition between clips from multiple
tracks.
1. Press and hold the Assign A button and press the Track Assign button for Track 1 – Kick Loop. The track name at
the top of the display will now show an A icon.
2. Next, press and hold the Assign B button and press the Track Assign button for Track 4 – Hat Fill. The track name
at the top of the display will show a B icon.
3. Launch the third scene and then use the crossfader to blend from one clip to the other by moving it from the A side
to the B side and back.
To clear crossfader assignments, hold Shift and press the Assign A or Assign B button.
To edit the slope profile of the crossfader, open the Mixer Config window by tapping Settings when viewing the
Mixer, or by holding Shift and pressing Mute or Solo. Select Linear, Exponential or Logarithmic.
16
Editing Clips & Tracks
Now that you are familiar with the basics of launching clips, let's explore some of the modes and menus that let you edit
clips and tracks for even more customization of your project.
Force's Clip Edit Mode is used to edit the parameters of individual clips. Clip Edit Mode features three additional
pages, the appearance and function of which change based on what kind of clip you have selected.
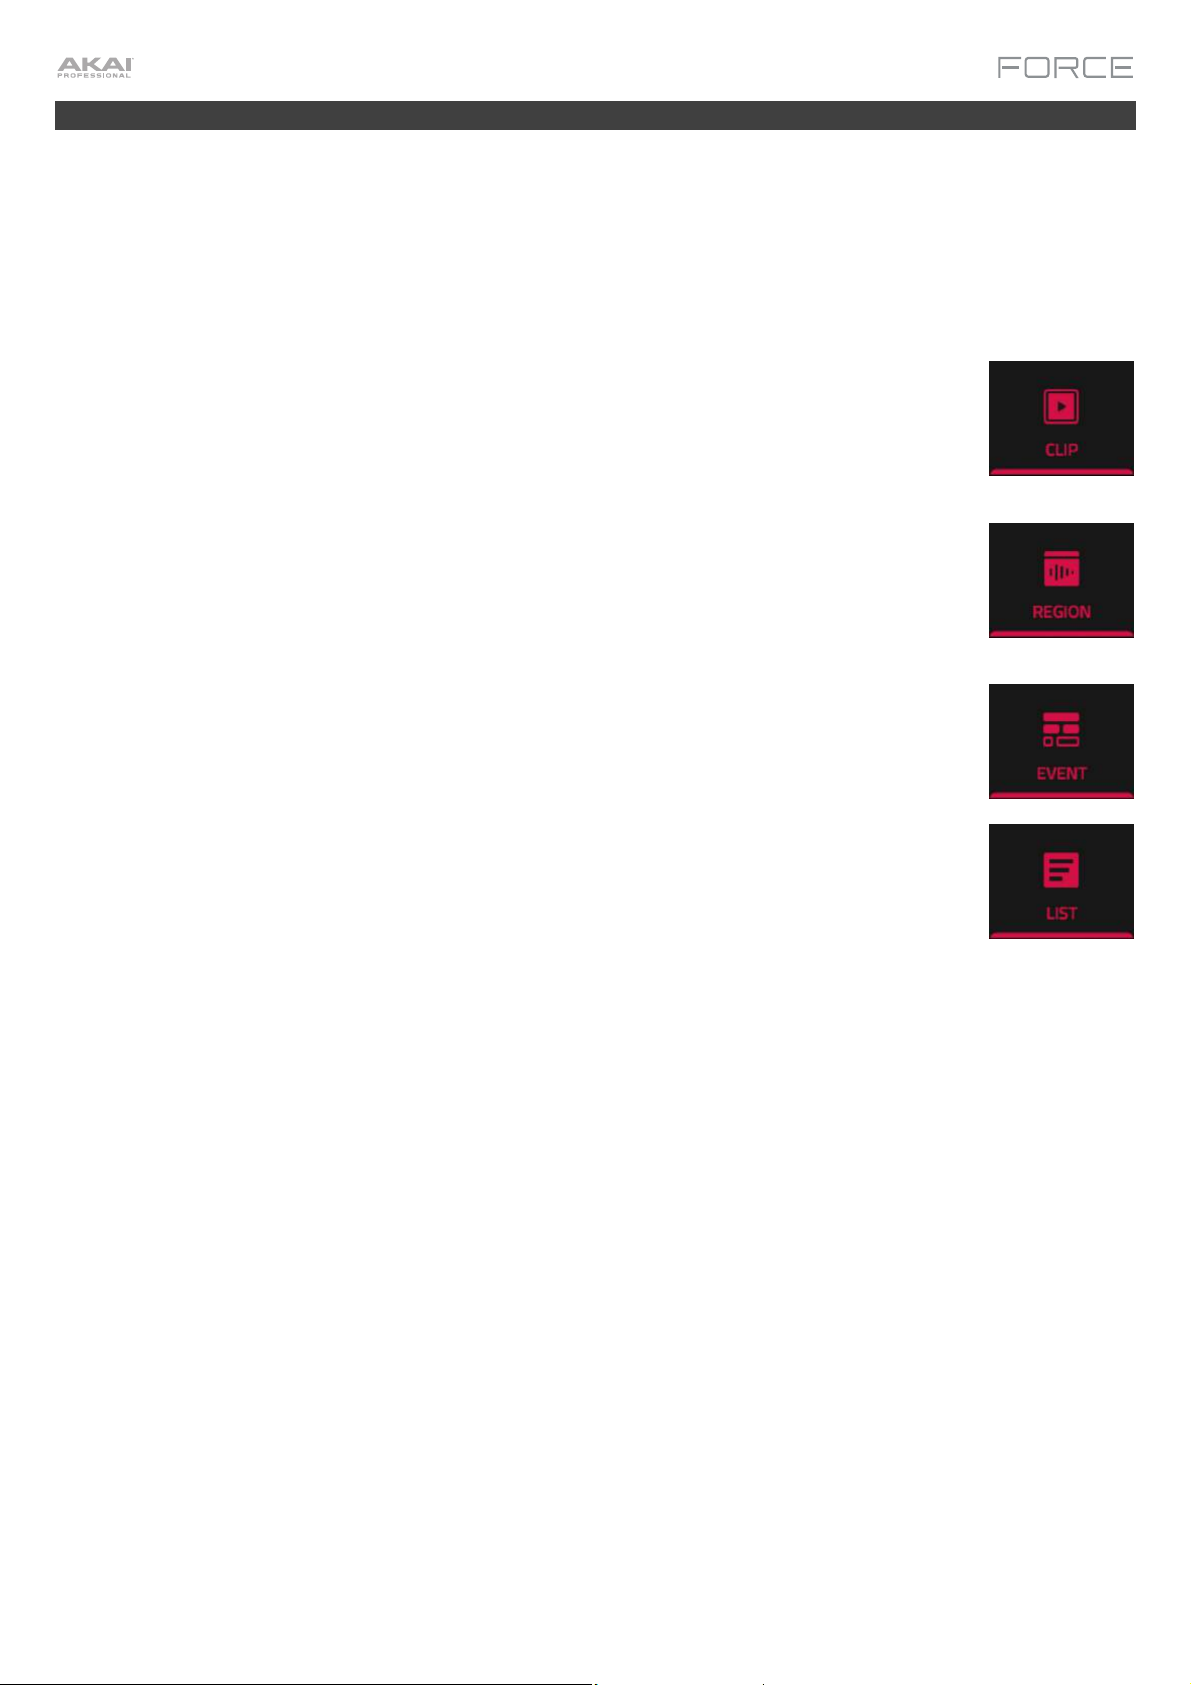
In Clip View, you can view and edit the parameters of the clip container itself, such as its length,
launch mode and quantization. When using an audio clip, this view will show the waveform of the
sample. When using a MIDI clip, such as a drum kit clip or a plugin clip, this view will show either
all available pads in a vertical view with their corresponding data or a vertical “piano roll”
keyboard.
For audio clips, the second page in Clip Edit Mode is Region View, which is used to edit the
audio sample in the clip and its parameters, such as length, volume and tuning. Use the toolbar
at the top of the display to select, move, erase, cut and mute parts of the waveform below. This
page also contains Force's powerful Warp tool, which can be used to adjust the tempo of any
sample to match your project's tempo without changing the pitch.
For MIDI clips such as those in drum, keygroup or plugin tracks, Event View in Clip Edit Mode is
used to edit note events and their parameters, such as length, velocity and transposition. Use the
toolbar at the top of the display to add, erase, or select notes and move around the grid, and use
the Edit menu to further edit the MIDI note events.
Additionally, MIDI clips can be edited using List View in Clip Edit Mode. This view gives you
many of the same features as Event Mode, but in a list workflow. You can use this view to filter
your MIDI events by a particular type, for instance, Aftertouch messages or Track Automation.
Force's Track Edit Mode is used to edit the parameters of the track itself. This mode is not available for audio tracks.
For drum tracks, you can edit the parameters of the four layers as well as all synthesis parameters and insert effect
settings.
For keygroup tracks, you can set the keygroup note ranges and edit the parameters of each keygroup and set their
note ranges. You can also edit all synthesis parameters and insert effect settings.
For plugin tracks, you can parameters of the plugin using the graphic interface for built-in plugins, or an overview of
all plugin parameters with a slider for each for other plugins.
Each of these sections is explained in further detail below and in the Operation > Modes chapter.
17
Clip Edit Mode
First, let's look at Clip Edit Mode, where you can view and edit clip information and parameters.
To enter Clip Edit Mode, do either of the following:
• Press Clip.
• Press Menu and then tap Clip Edit.
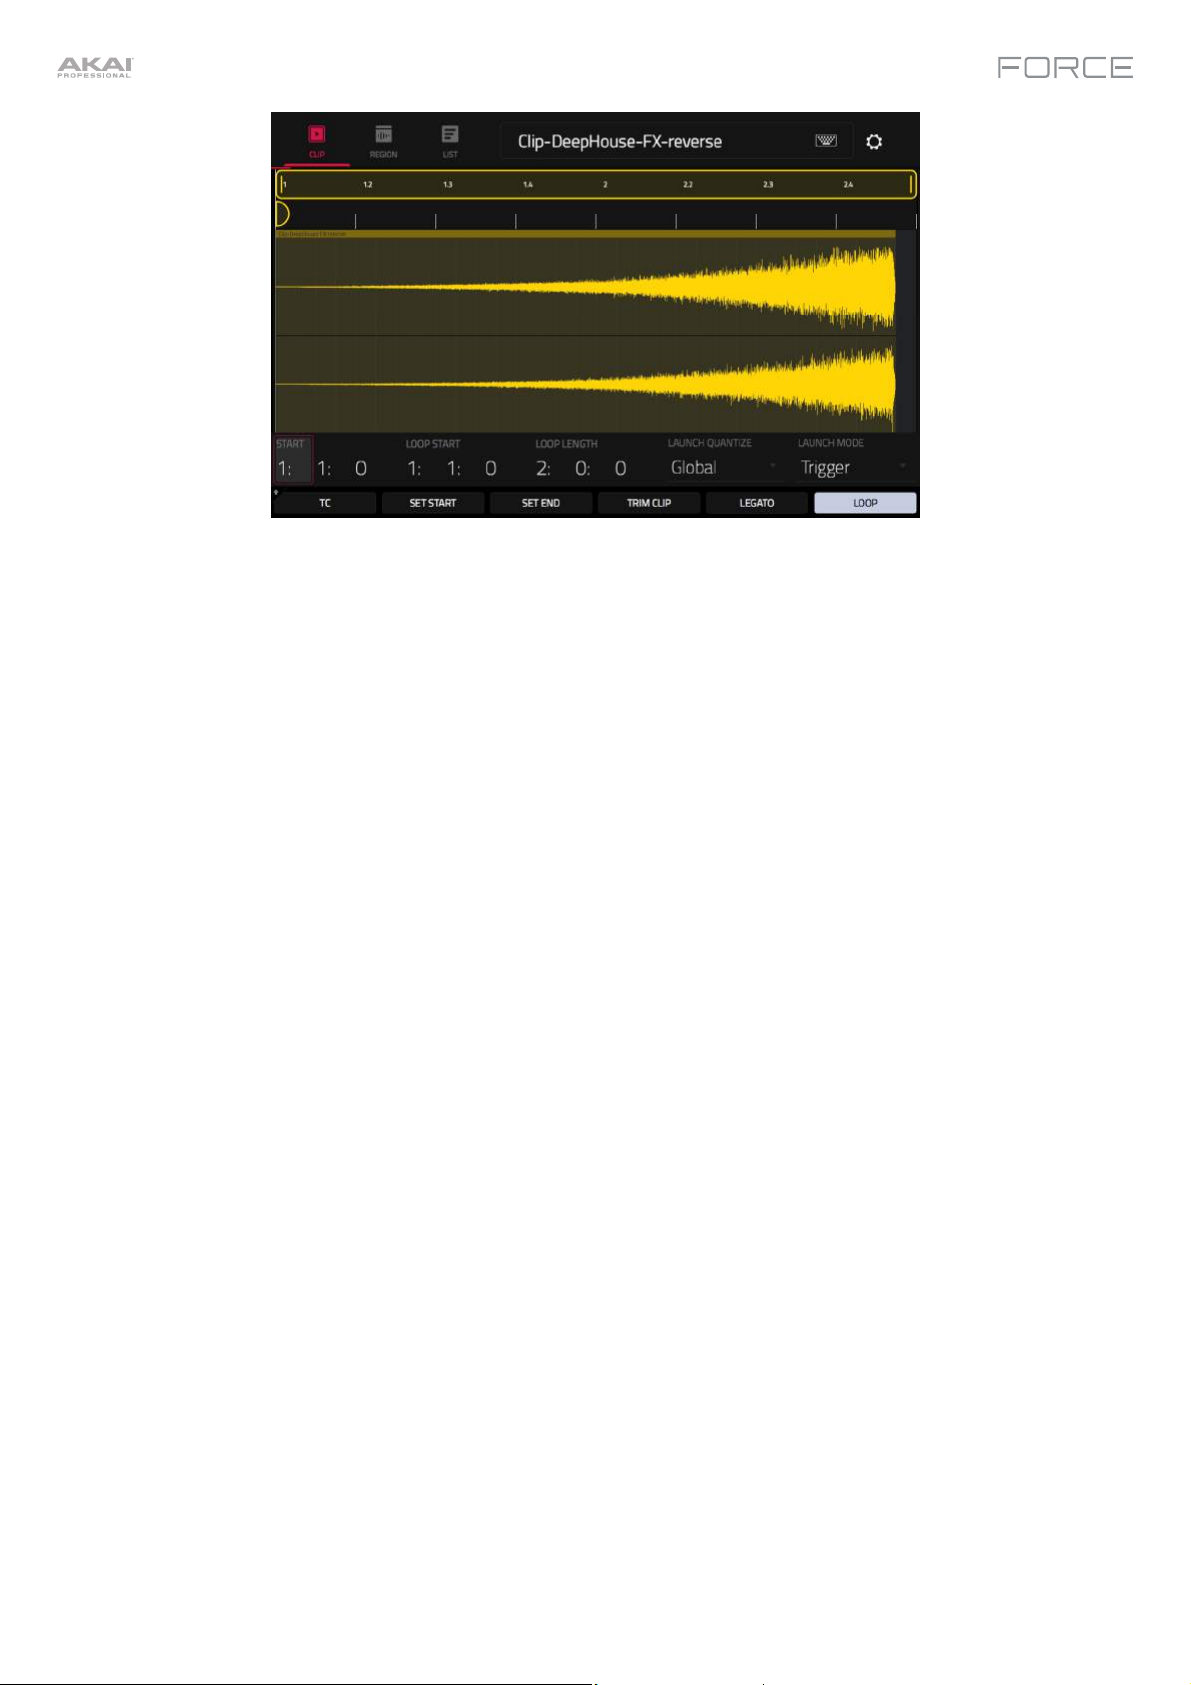
When you first enter Clip Edit Mode, you will see the Clip View page. In Clip View, you can view and edit the parameters
of the clip container itself, such as length, launch mode, and quantization. The appearance of Clip View depends on
what kind of track the clip belongs to:
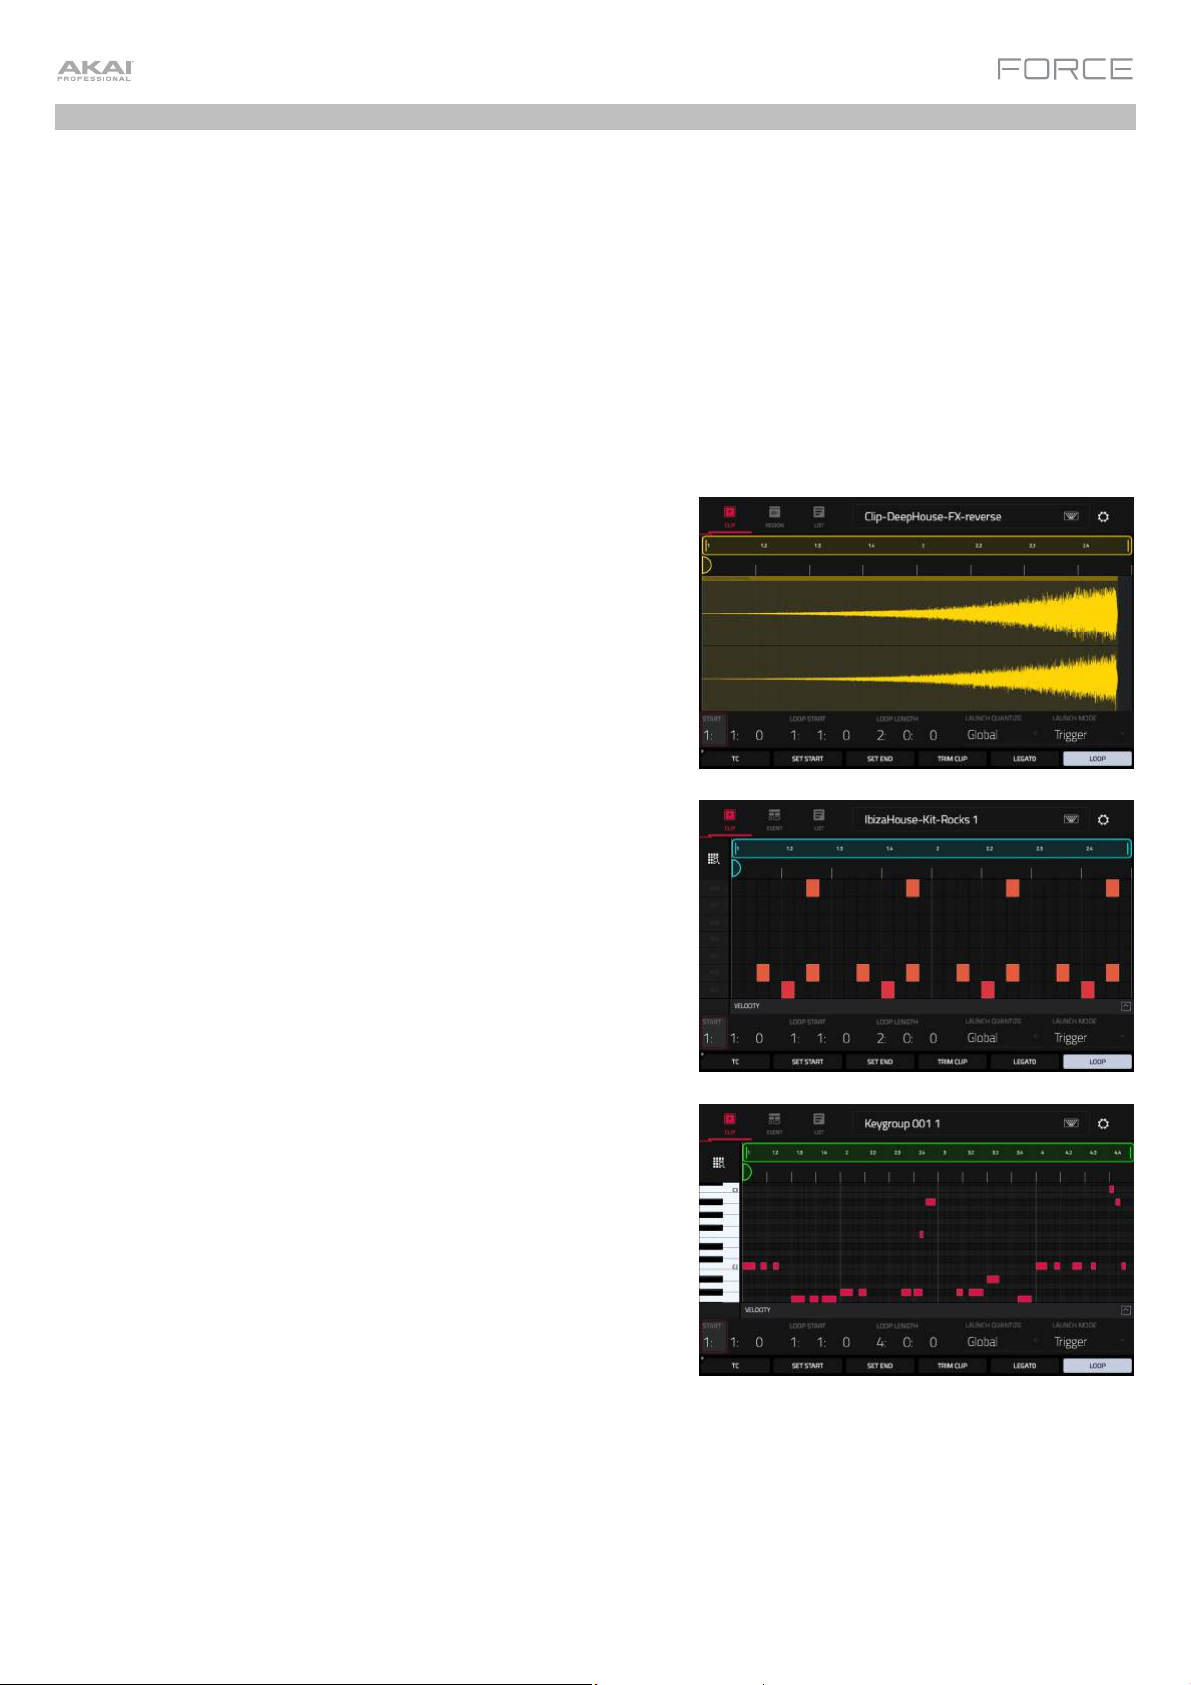
For audio tracks, the waveform of the audio clip is shown:
For drum tracks, the left column shows you all available pads in a
vertical view with their corresponding events in the grid to the right:
For keygroup, plugin, MIDI and CV tracks, the left column shows a
vertical “piano roll” keyboard with the corresponding events in the
grid to the right:
18
Let's edit one of the clips in our demo project:
1. Make sure the clip launch pads are in Launch Mode by pressing the Launch button.
2. Press and hold the Select button, then press the first clip launch pad for Track 7 – SFX.
3. Now, try making some of the edits to the clip described below. At any time, press Undo to revert to the previous
state.
To adjust the length of the clip, use the Start, Loop Start and Loop Length fields. Alternatively, use the Set
Start and Set End buttons during playback. The start or end point will be placed at the position of the playhead
when the button was pressed.
To adjust the launch quantization setting, tap the Launch Quantization field, and then use the data dial or
–/+ buttons to set the timing of how the clip is launched. This can be set separately from the global launch
quantization. For instance, you may keep the global launch quantization at 1 Bar to keep longer clips in sync,
but set sound effects or other "one shots" to a smaller launch quantization, such as 1/8 Bar.
To change the clip launch behavior, tap the Launch Mode field, and then use the data dial or –/+ buttons to
change the mode. Select Toggle for the clip to start or stop with each successive press. Select Trigger for the
clip to start at the beginning with each press. Toggle is useful for clips of full phrases, whereas Trigger is useful
for one shot sound effects.
To adjust the timing correction, tap the TC button to open the Timing Correct window. This window contains
various settings to help quantize the events in your clip (learn about this feature in Operation > General
Features > Timing Correct (TC)).
To trim an audio clip, use the Loop Length field to set the preferred length, then tap Trim Clip to trim the
whole clip to this size.
To carry the playhead position from one clip to another in the same track, tap the Legato button. When
active, the playhead will continue from the
same position as it was in the previous clip of the same track when
switching between clips. This is useful for creating seamless fills in drum breaks, working with an acapella track
or other scenarios where you would like a clip to play across multiple scenes.
To enable or disable clip looping, tap the Looping button. Clips like sound effects, drum hits and other "one
shots" should usually have Loop set to Off. For longer melodic or rhythmic phrases, set Loop to On.
To adjust the loop, hold Shift and tap the <<Loop or Loop>> buttons to shift the loop left or right, or hold Shift
and tap the /2 or 2X buttons to halve or double the loop size.
19
In Clip Edit Mode, depending on the type of clip selected, you can also edit an audio clip using Region View or edit
MIDI note events using Event View.
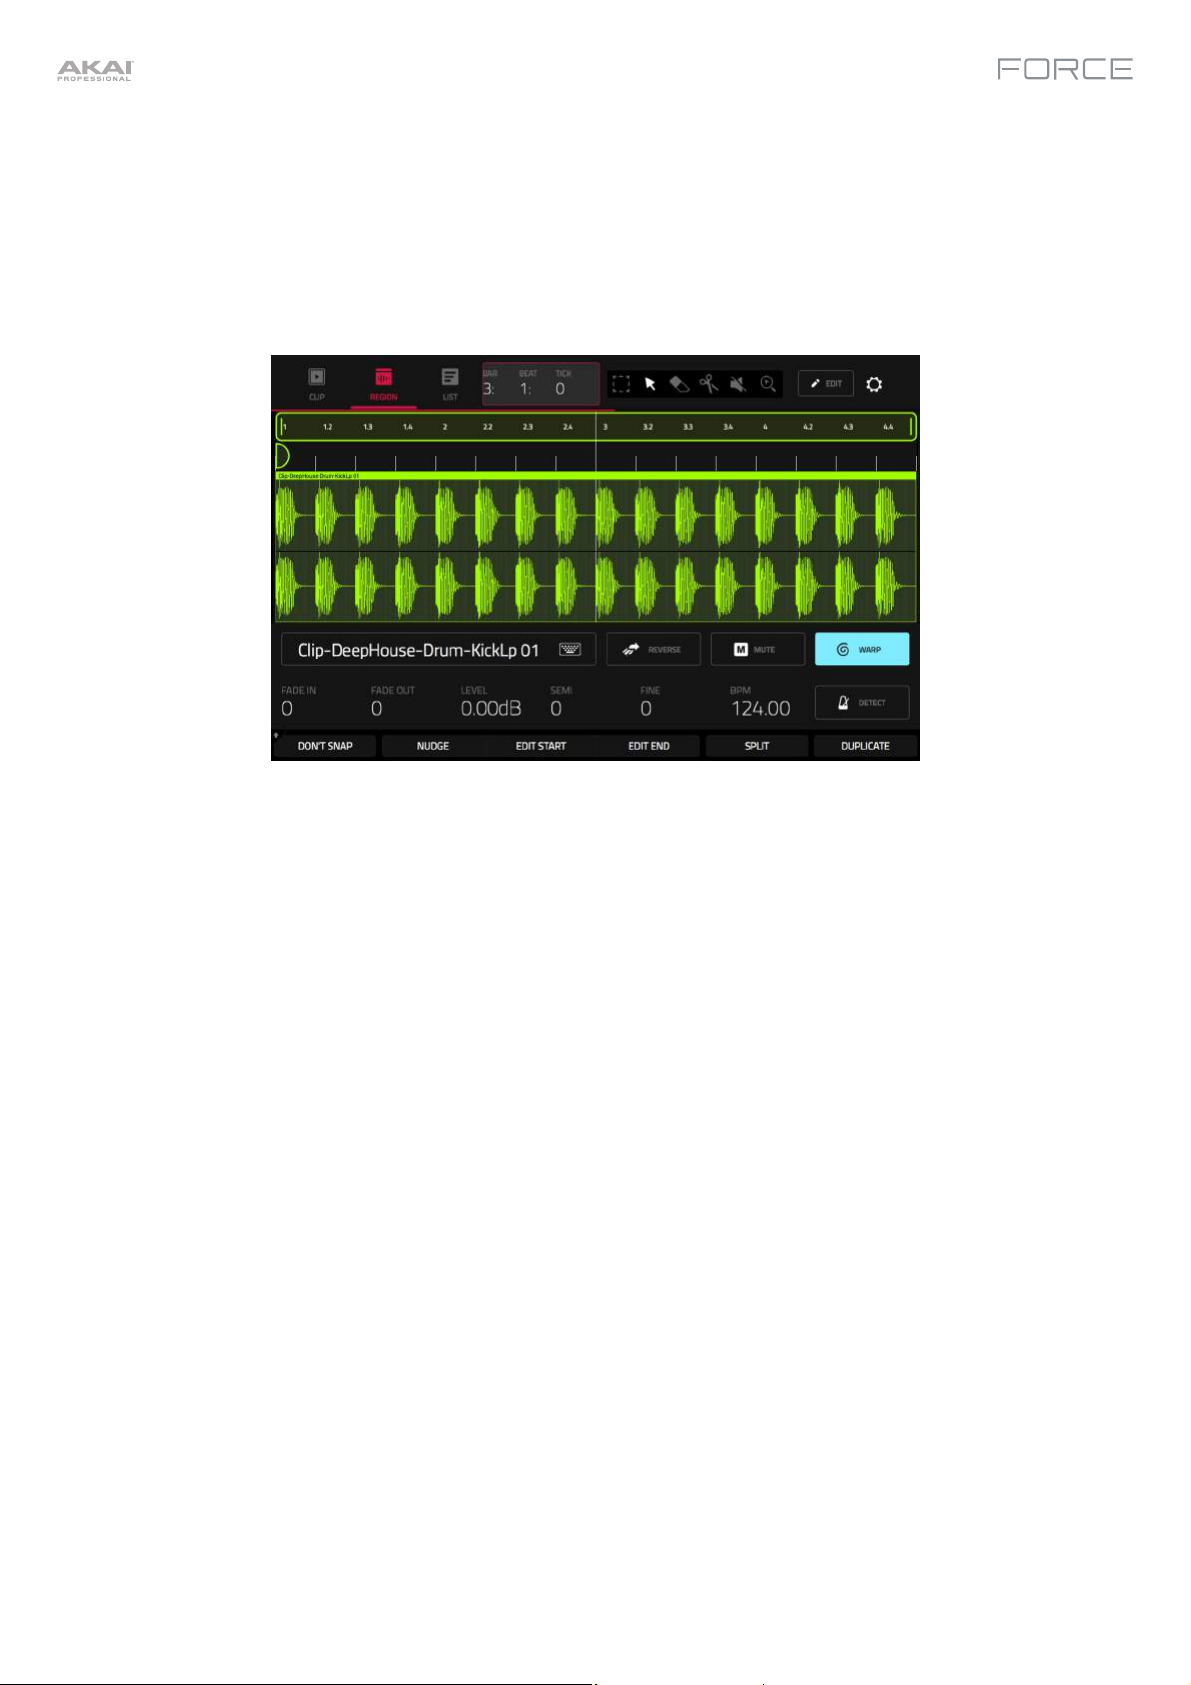
Region View
In Region View, you can edit parameters of the audio clip itself, such as length, levels, tuning and BPM.
Let's start by making some edits to an audio clip using Region View.
1. Launch the first clip in Track 1 – Kick Loop.
2. Press the Clip button to open Clip Edit Mode, or press Menu and tap Clip Edit.
3. In Clip Edit mode, tap the Region icon at the top of the display.
4. Now, try making some of the edits to the audio clip described below. At any time, press Undo to revert to the
previous state.
To select part of the clip, tap the select box icon in the upper-right corner, then tap and drag in the lower-half
of the waveform.
To move all or part of the clip, tap the pointer icon in the upper-right corner, and then tap and drag at the top
part of the waveform.
To shorten or lengthen a clip region (or multiple selected clip regions), tap the select box or pointer icons in
the upper-right corner, and then tap and drag the lower third of it left or right.
To split the clip into multiple parts, tap the scissors icon in the upper-right corner, and then tap anywhere in
the waveform.
To mute all or part of a clip, tap the speaker icon in the upper-right corner, and then tap in the waveform.
Alternatively, select the part of the waveform you want to mute, and then press the Mute button.
To scroll through or change the zoom level of the waveform, tap the magnifying glass icon. Then, tap and
drag to scroll through the waveform, pinch with two fingers to zoom out, or spread with two fingers to zoom in.
20
To change the level of the clip, tap the Level field, and then use the data dial or –/+ buttons.
To change the tuning of the clip, tap Semi or Fine, and then use the data dial or –/+ buttons.
To reverse the clip (or a section of it), tap the Reverse button.
To rename the clip, tap the keyboard icon under the waveform, then use the keyboard on the display to enter
a new name.
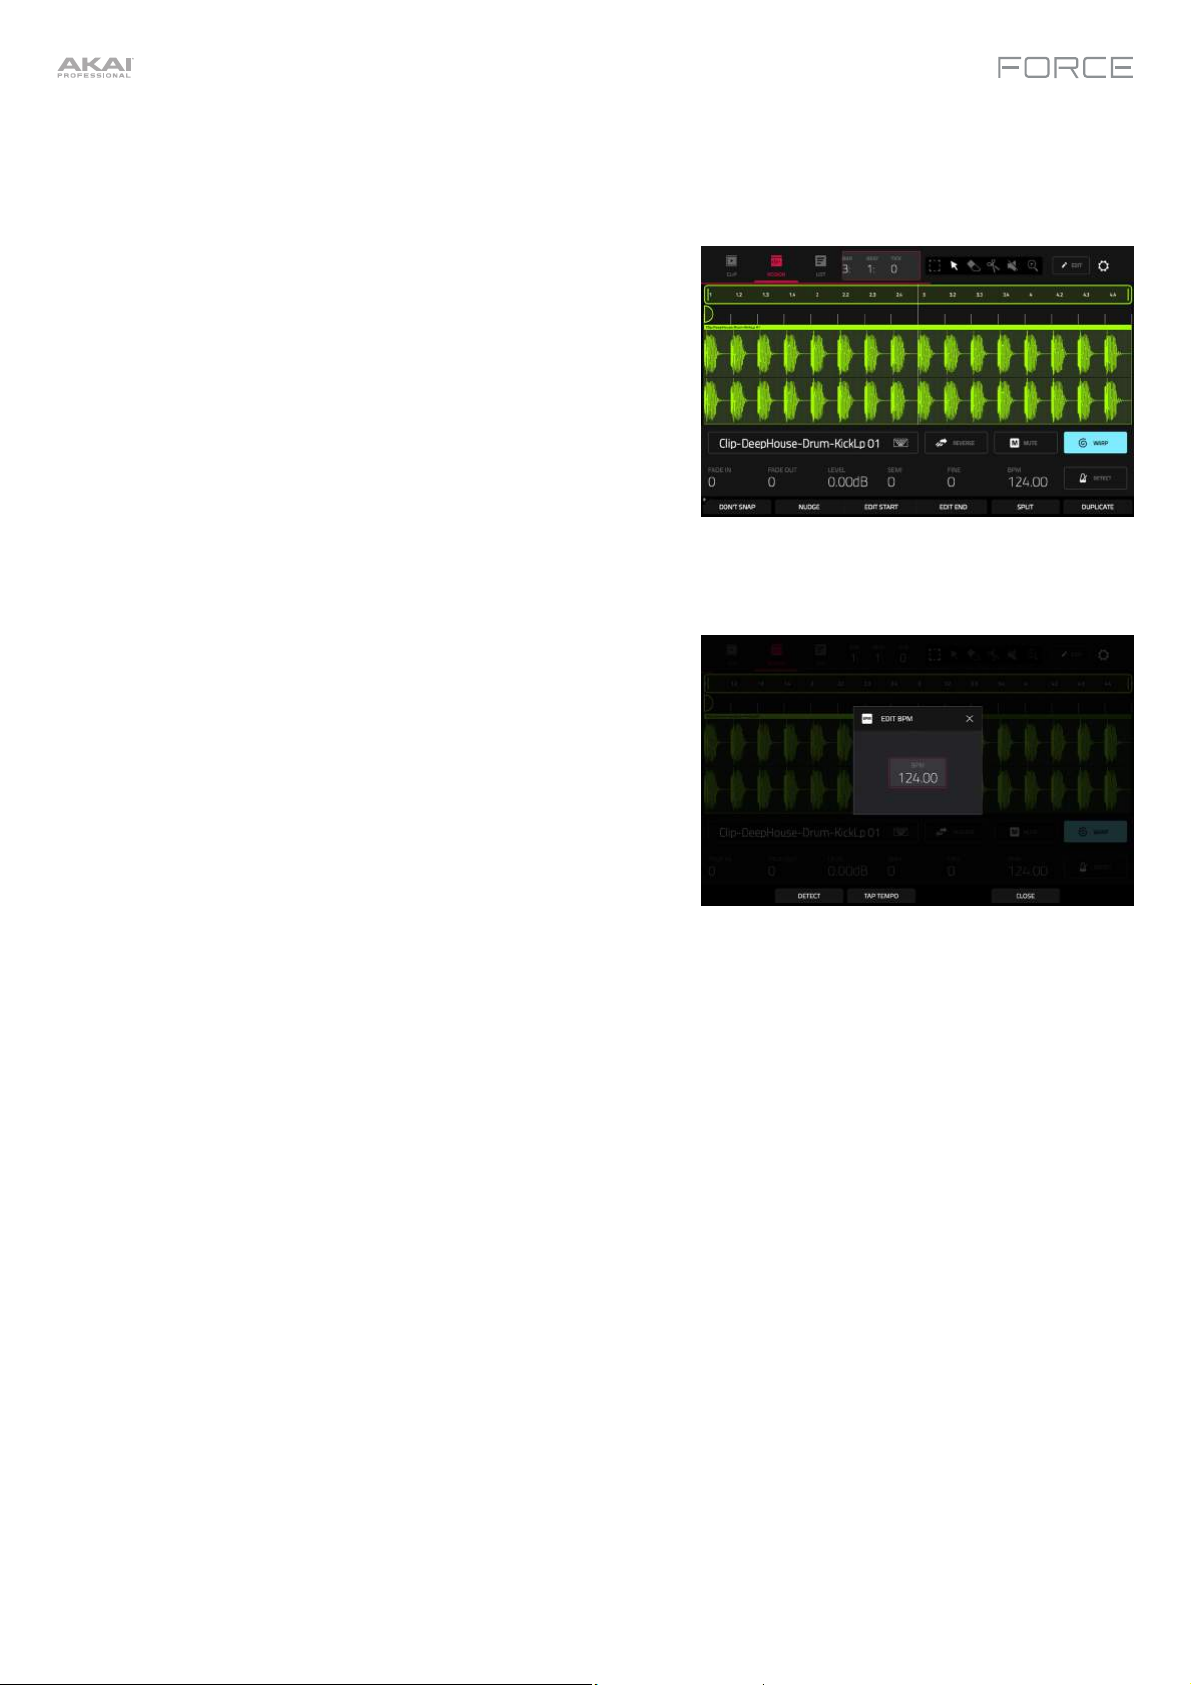
In Region View, you can also use Force's powerful tool to adjust the tempo of any sample to match your project's
tempo without changing the pitch.
To sync an audio clip to the project tempo:
1. Load the desired sample to an empty clip launch pad using the
Browser.
2. With the clip launch pad selected, open Clip View by pressing
Clip or by pressing Menu and tapping Clip Edit.
3. Tap Region to open Region View.
4. If your sample is already cut to a set number of bars and beats,
you can continue to the next step.
If your sample is not already evenly cut, you can use the Edit
Start and Edit End tools to isolate the section of the sample you
would like to use. Alternatively, use the scissors icon to cut the
audio.
5. Tap the Warp button to enable warping of the sample. This will
allow you to lengthen or shorten the selected clip region to the
desired loop length without changing the sample pitch.
6. To adjust the BPM of the sample, tap the Detect button to open
the Edit BPM window. From here, you can set the BPM in one of
three ways:
i. Press Detect to have Force analyze the BPM for you.
ii. Play the clip and use the Tap Tempo button to input the
BPM.
iii. Enter the BPM manually if you know it.
7. As the BPM of the sample is changed, the number of bars and
beats it covers will also change.
See Operation > Modes > Clip Edit Mode > Region View to learn more about this feature.
21
Clip Edit Mode will appear differently when using a clip with MIDI data. Drum, Keygroup, Plugin, MIDI and CV tracks all
use Event View instead of Region View, which allows you to edit MIDI data.
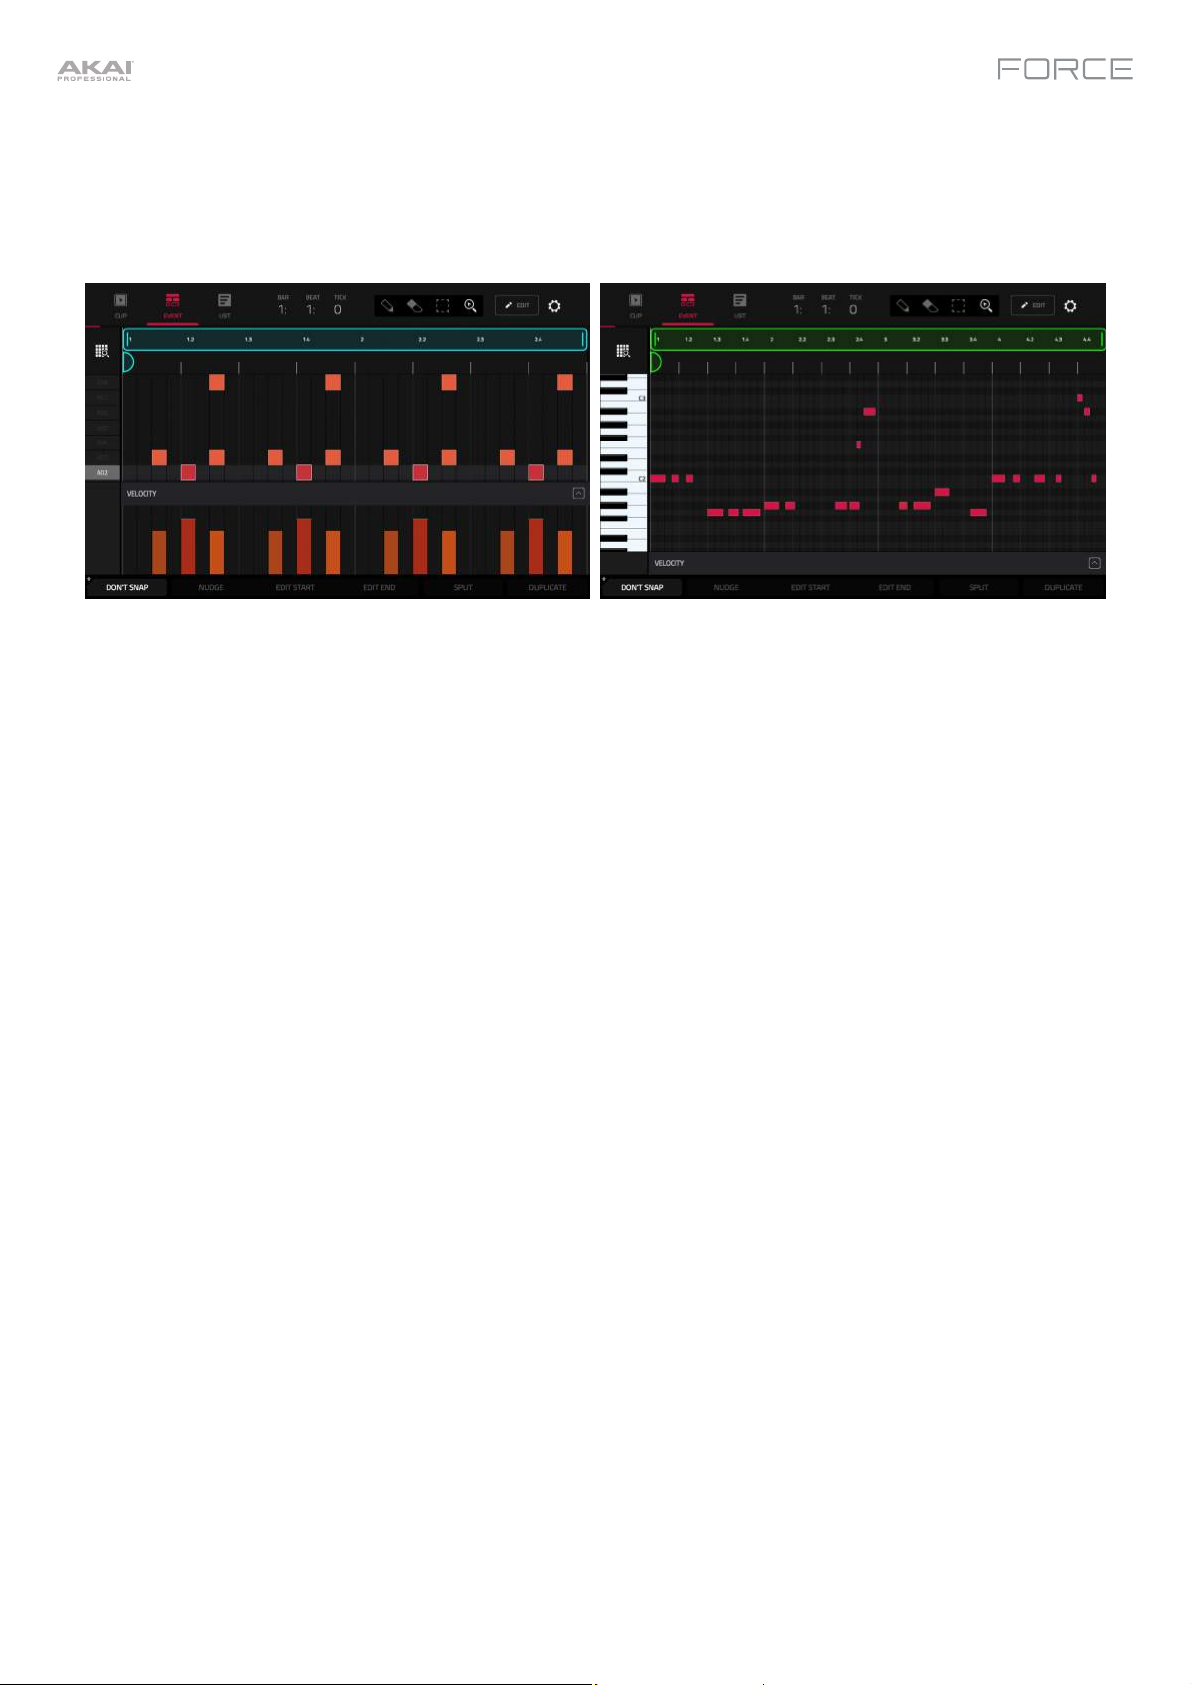
Event View
Event View for a drum track
Event View for a keygroup, plugin, MIDI or CV track
Now let's make some edits to a MIDI clip using Event View.
1. Launch the first clip in Track 2 – Top Loop.
2. Press the Clip button to open Clip Edit Mode, or press Menu and tap Clip Edit.
3. In Clip Edit mode, tap the Event icon at the top of the display.
4. Now, try making some of the edits to note events described below. At any time, press Undo to revert to the
previous state.
To add a note, tap the Pencil icon in the upper-right corner of the display. Then, in the grid, tap a square.
To erase a note, tap the Eraser icon in the upper-right corner. Then, in the grid, tap a note.
To select a note, tap the select box in the upper-right corner. Then, in the grid, tap a note. You can also drag
your finger to select multiple notes.
To move the selected notes, tap Nudge at the bottom of the screen, and then use the data dial or –/+ buttons
to shift the notes left or right. By default, you can position notes only by quantization values defined by the Time
Correct value (learn about this feature in Operation > General Features > Timing Correct (TC)).
To adjust the start point or end point of the selected notes (without changing their position), tap Edit Start
or Edit End at the bottom of the screen, and then use the data dial or –/+ buttons.
To transpose the selected notes up or down, tap Transpose at the bottom of the screen, and then use the
data dial or –/+ buttons.
To adjust the velocity of the selected notes, tap Velocity at the bottom of the screen, and then use the data
dial or –/+ buttons. The numeric
value will appear on the screen.
To show or hide the velocity lane, tap the up arrow (∧) button in the lower-right corner of the screen to show
the velocity lane below the grid. Each note’s velocity is represented by a vertical bar. The higher and more red
the bar is, the higher the velocity is.
Tap the up arrow (∧) button once more to show a taller version of the velocity lane, after which it will turn into a
down arrow (∨) button, which you can then tap to hide the velocity lane.
See Operation > Modes > Clip Edit Mode > Event View to learn more about this feature.
22
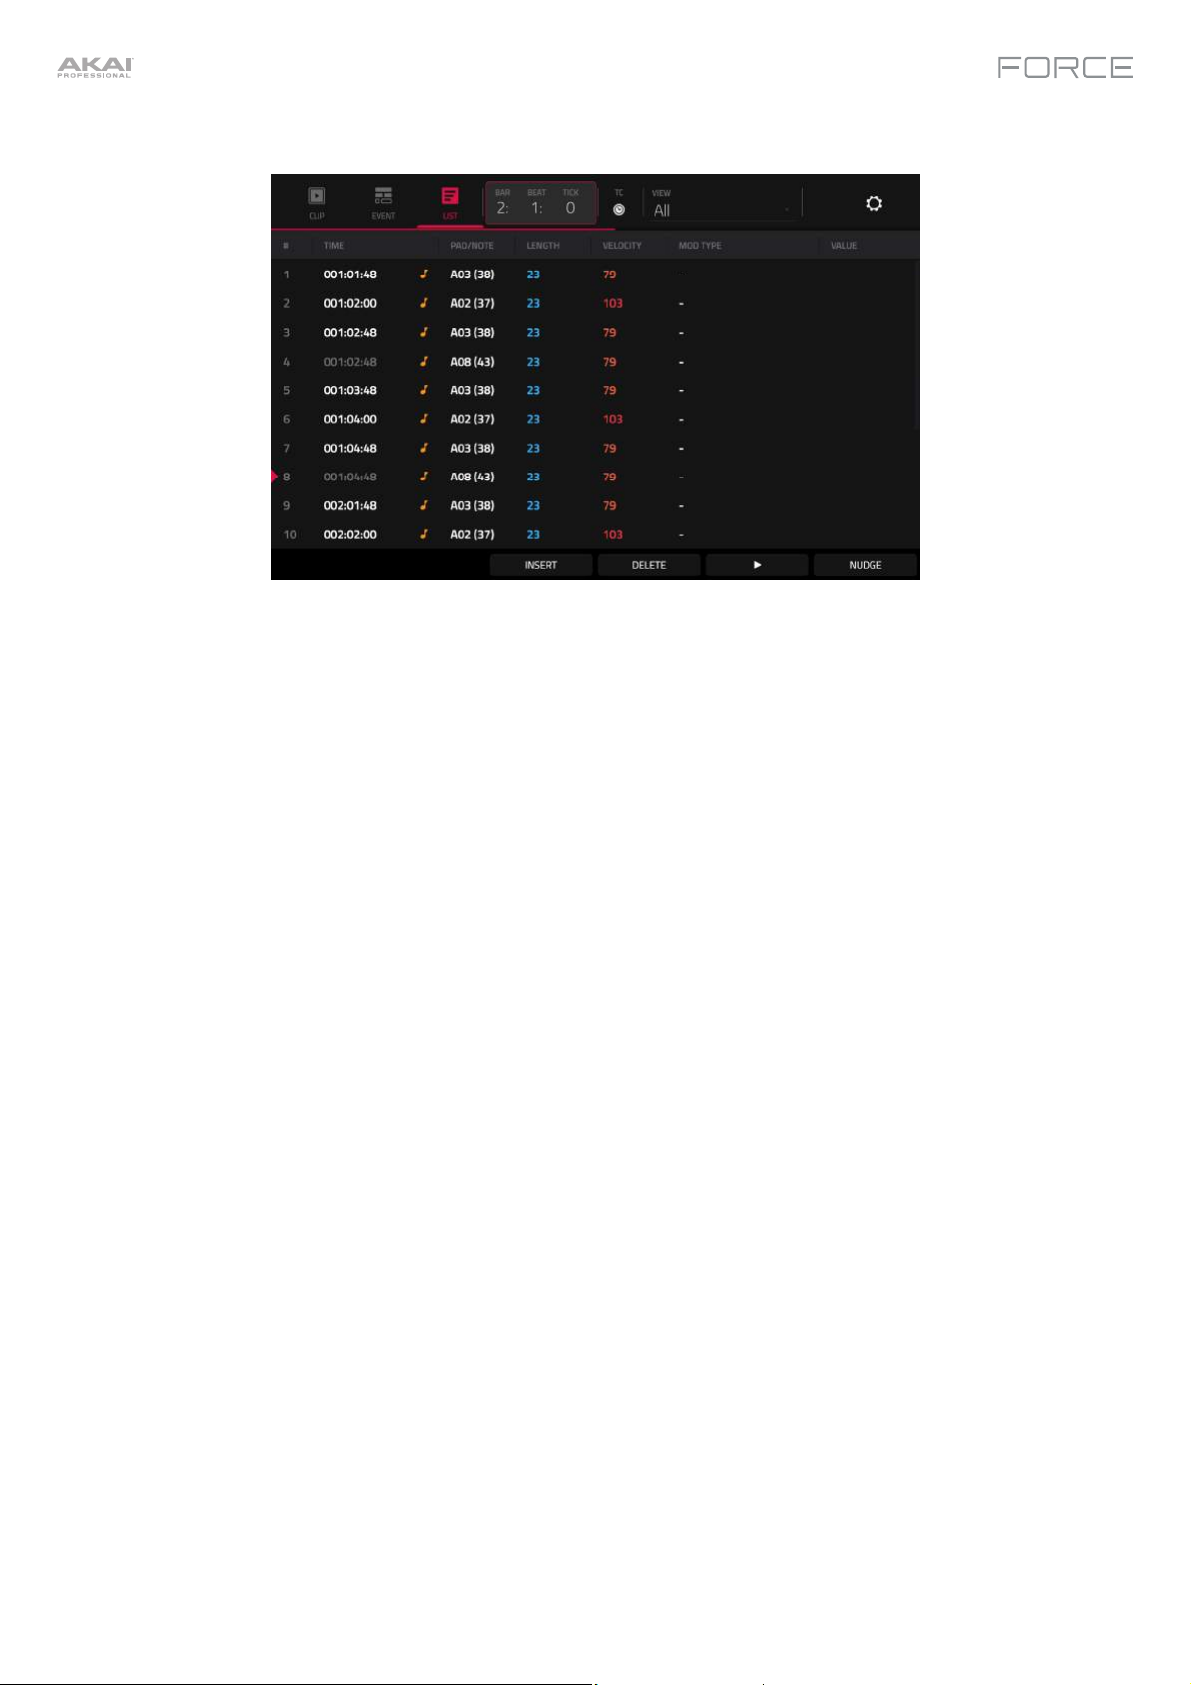
List View
List View in Clip Edit Mode is similar to Event View, but uses a scrolling list workflow to display MIDI note event
parameters. This allows you to quickly filter your MIDI events by a particular type using the View menu or by the current
playhead position using the time counter at the top of the display. You can also insert, delete, play and nudge note
events using the buttons at the bottom of the display.
See Operation > Modes > Clip Edit Mode > List View to learn more about this feature.
23
Track Edit Mode
In addition to editing MIDI note events using Clip Edit Mode, you can edit the parameters of a track using Track Edit
Mode. This mode is not available for audio tracks.
To enter the Track Edit Mode, do either of the following:
• Press Menu and then tap Track Edit.
• Hold Shift and press Clip.
Now, let's make some simple edits to the sounds in a drum track. Try making these edits while a clip is playing to hear
the difference.
1. In Matrix Mode, press and hold the Track Select button for Track 8 – Drum Kit to select the track.
2. Press the Note button to set the clip launch pads to Note mode. The lower left quadrant will now show a typical
16-pad drum kit.
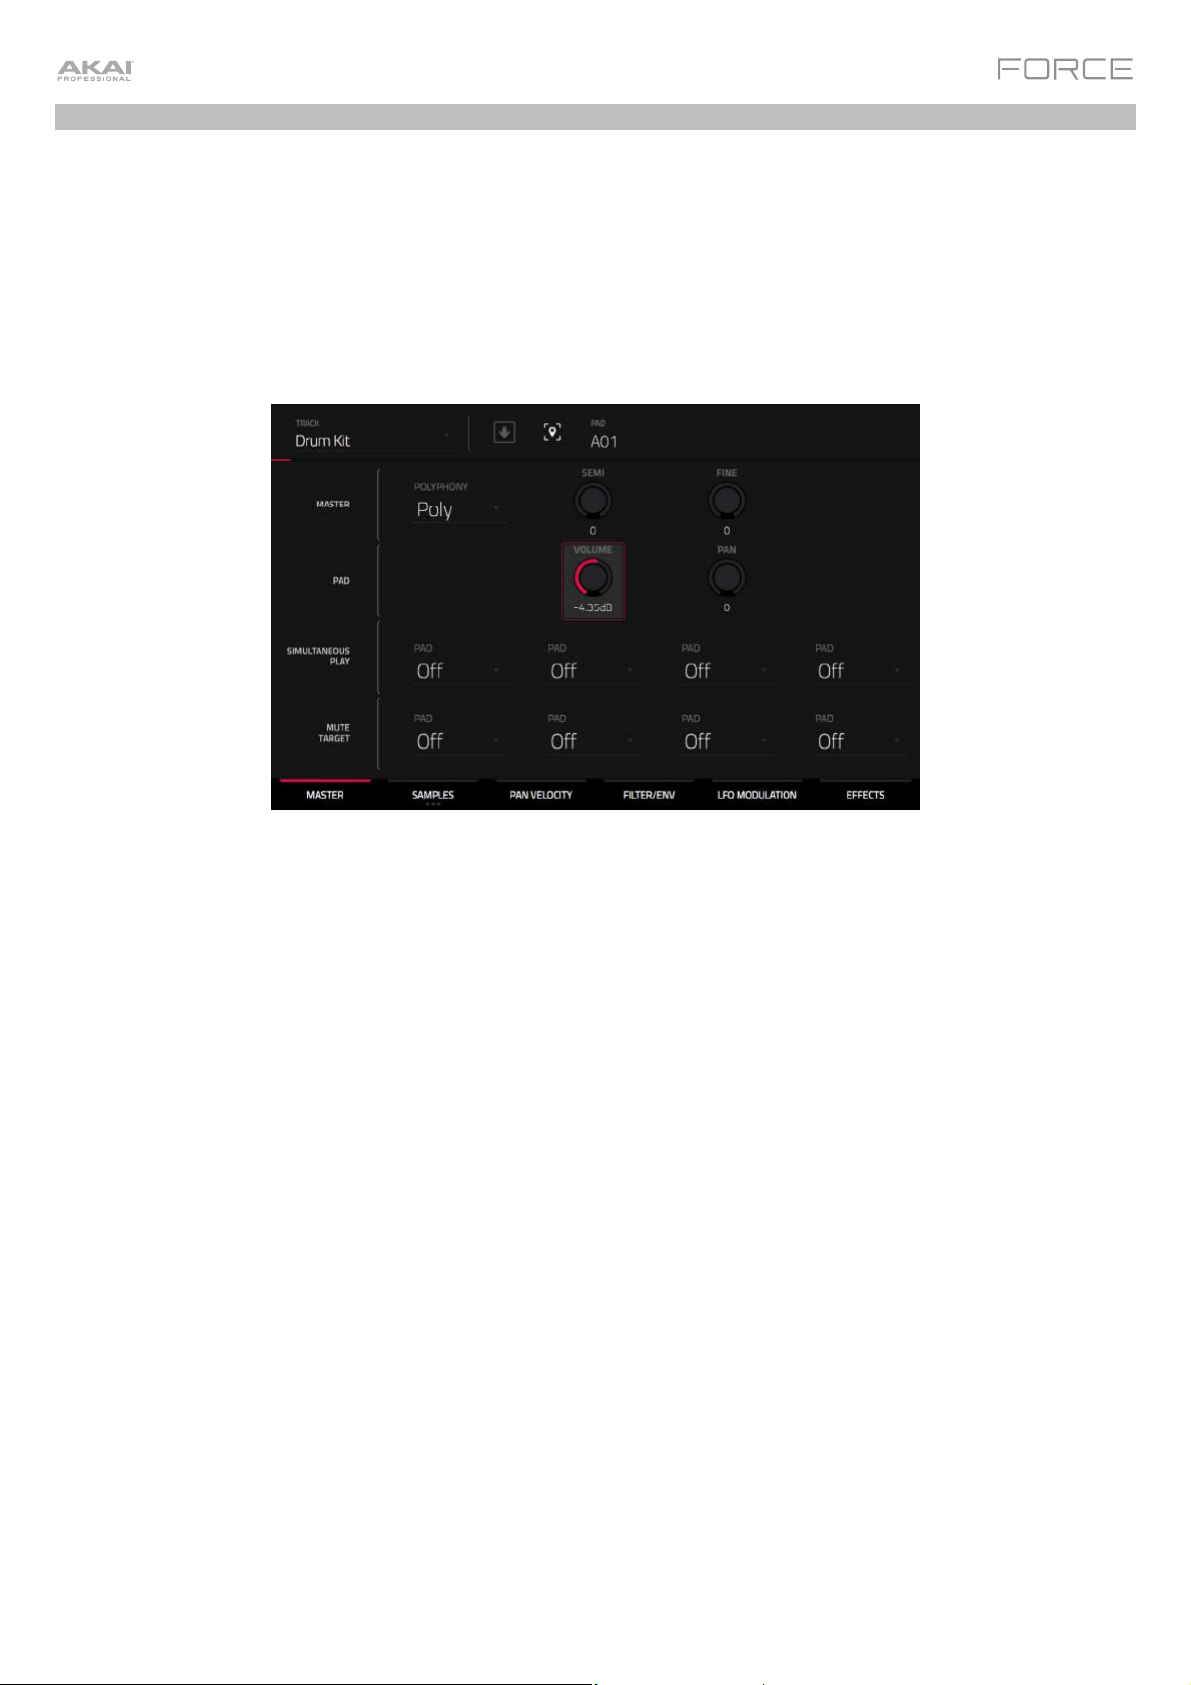
3. Press the kick drum pad (A01) to select it.
4. In the Master tab of Track Edit Mode, adjust the Volume knob up or down.
5. Press the snare drum pad (A02) to select it.
6. Tap and drag the Pan knob up or down to adjust the stereo panning. We recommend spreading the panning of the
bright sounds (e.g., cymbals, snare drum) a little.
7. Press the hi-hat pad (A03) to select it.
8. Tap the Samples tab so the first square under it is lit.
9. Use the Semi and Fine fields to adjust the tuning of the sample.
24
You can also apply effects to a track with Track Edit mode. Let's try
adding an effect to the bass track.
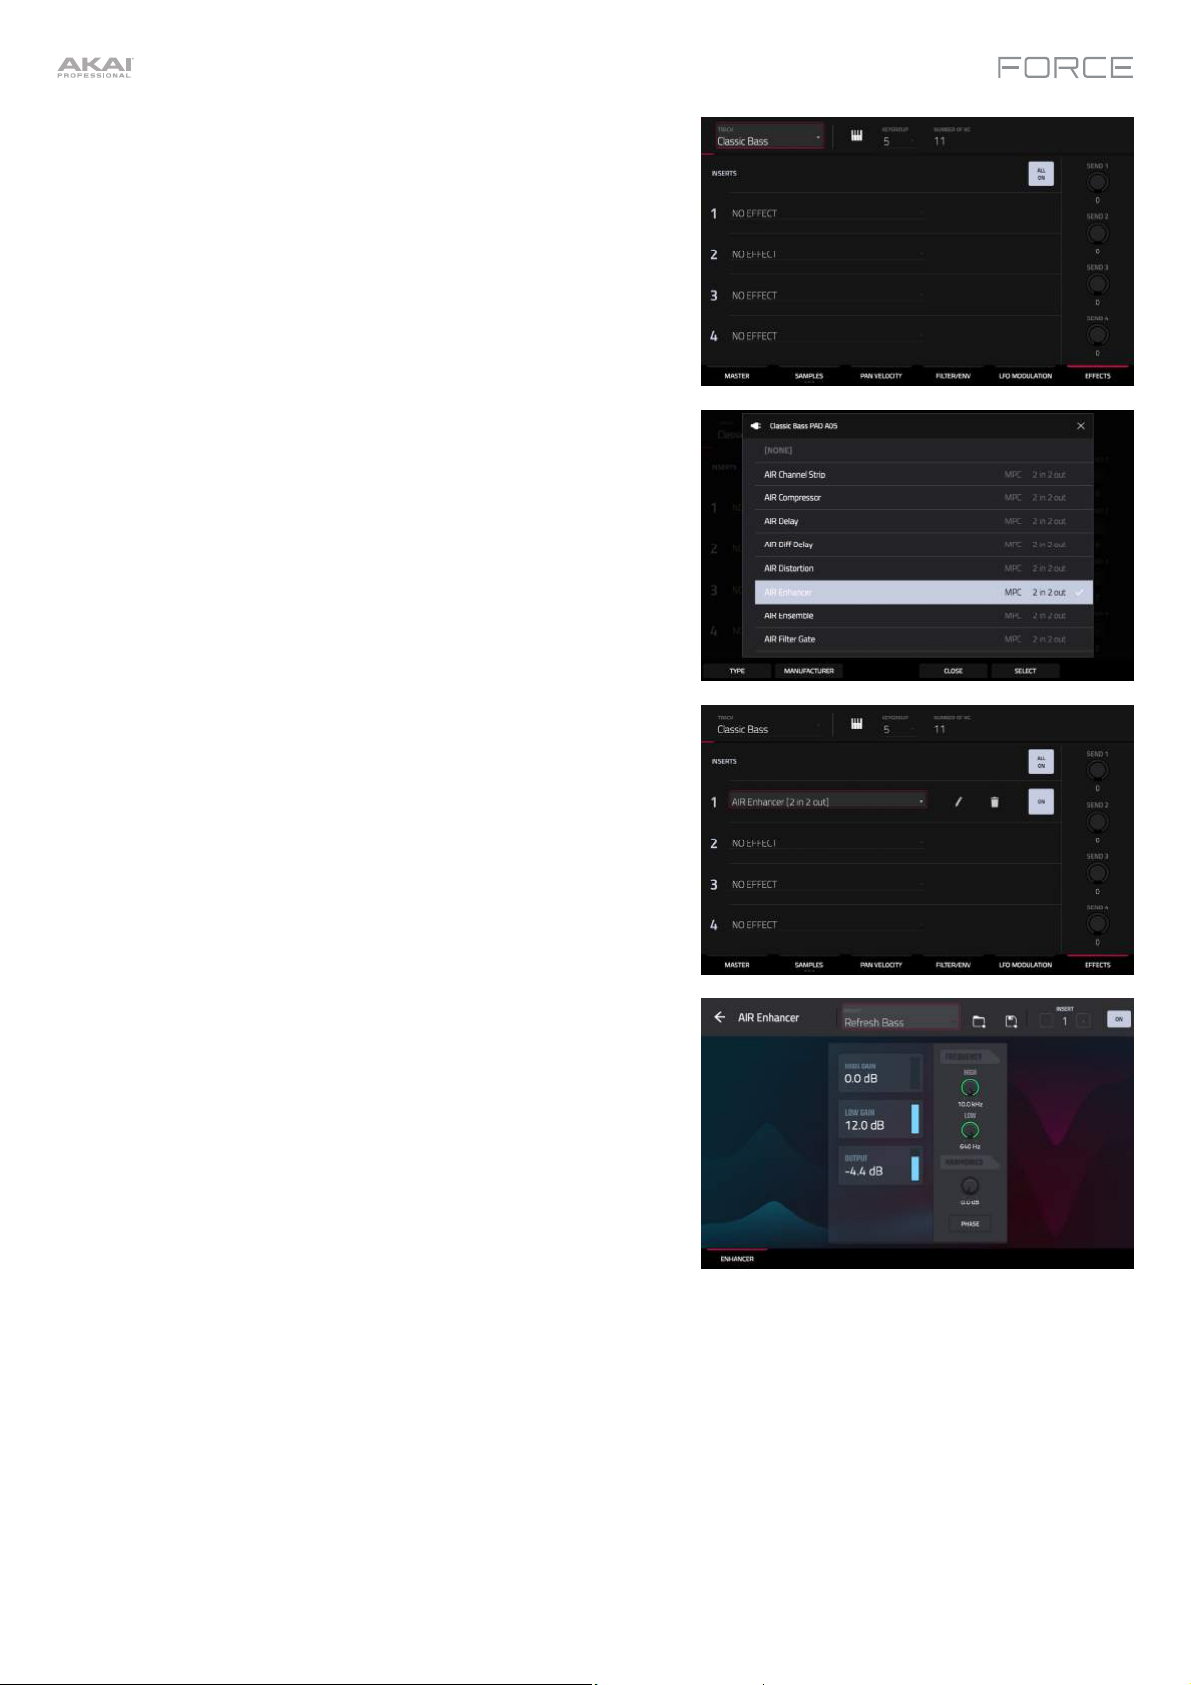
1. While in Track Edit Mode, press and hold the Track Select
button for Track 6 – Classic Bass to select the track.
2. Tap the Effects tab at the bottom of the screen to view the Insert
Effects tab.
3. Double-tap the first effect slot. A list of effects will appear.
4. Swipe up or down to move through the list.
5. To load an effect, double-tap it. Alternatively, tap it once and
then tap Select or push the data dial. Let’s try adding the AIR
Enhancer.
6. To close the list, tap Close.
7. Now that the effect has been added to the bass track, you can
adjust its parameters to your liking.
To adjust the effect's parameters, tap the pencil icon.
To adjust a parameter's value, tap and drag your finger on
a slider. Alternatively, tap the parameter and use the data
dial or –/+ buttons.
To empty the effect slot, tap the trash can icon. Switch the
effect on or off by tapping the On/Off button for the slot.
25
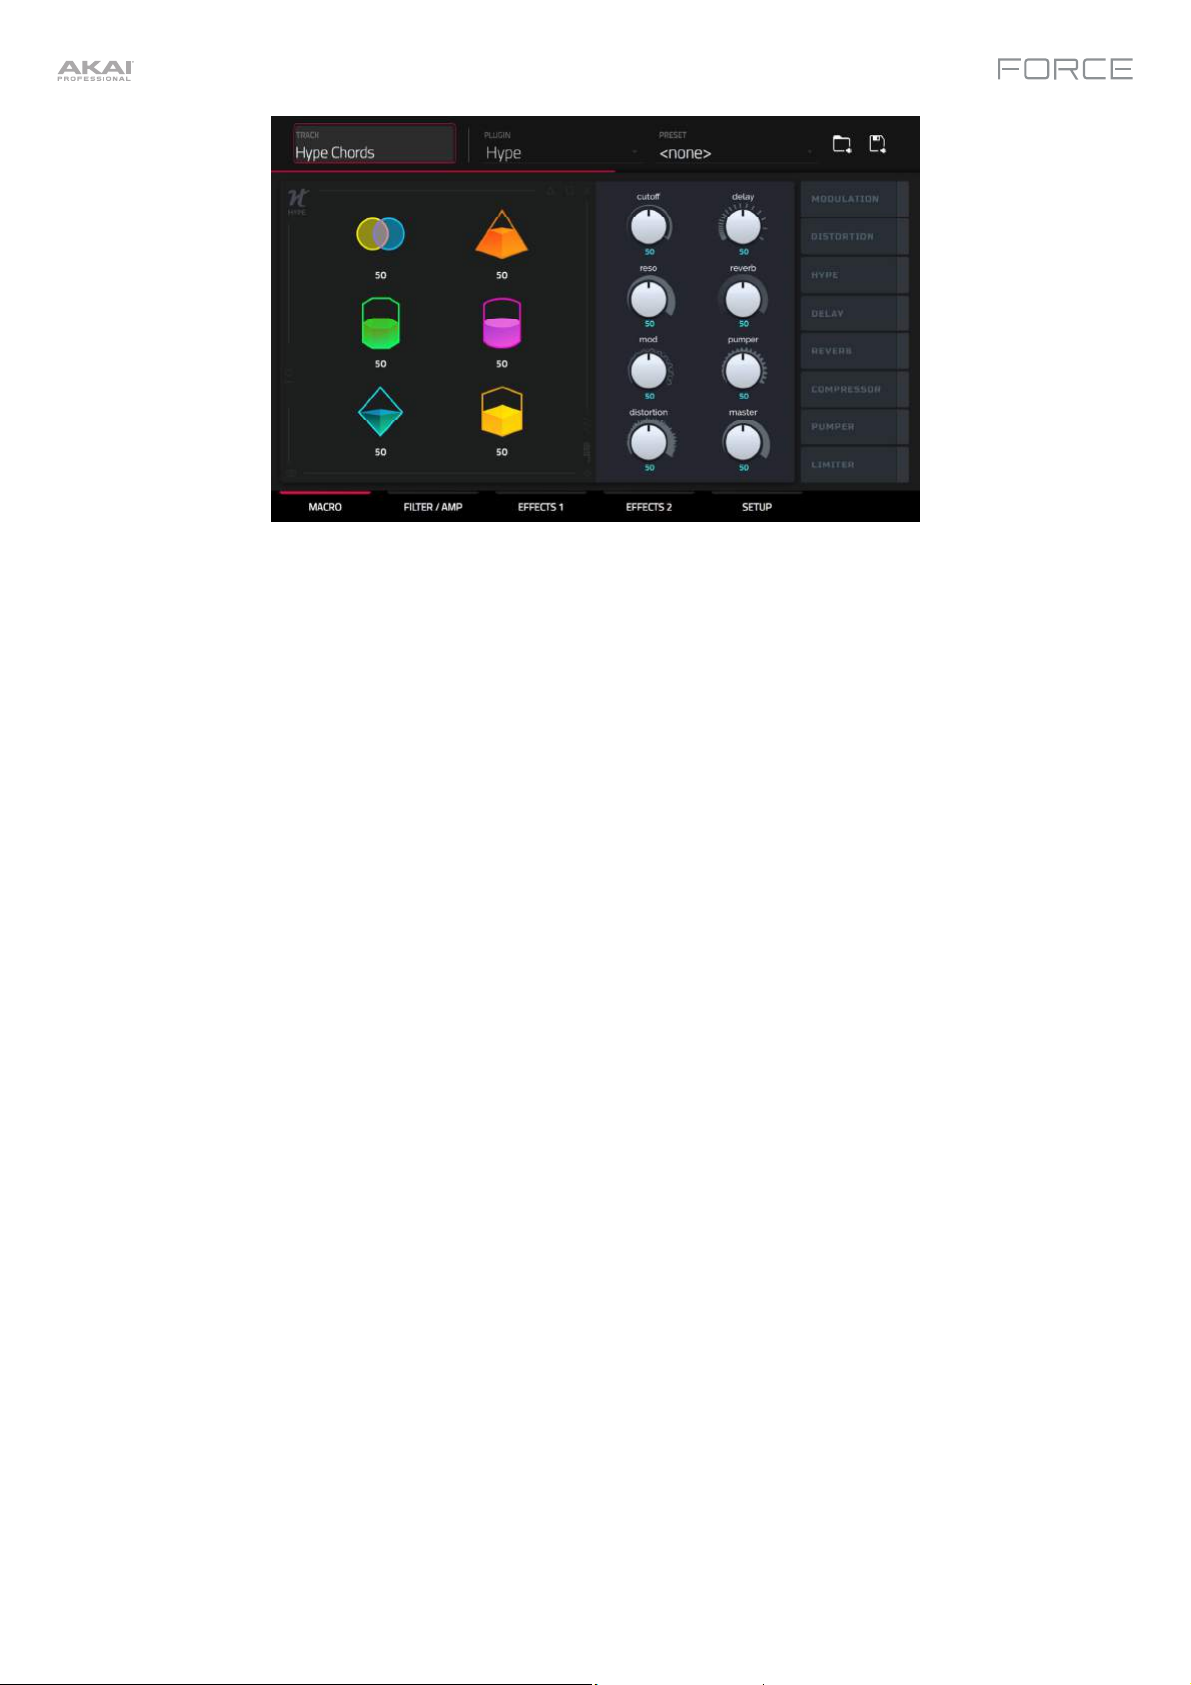
When a Plugin track is selected, Track Edit Mode shows the parameters of the loaded plugin.
1. Press Matrix to enter Matrix Mode.
2. Press and hold the track selector button for Track 5 – Hype Chords.
3. Launch the first clip in Track 5 – Hype Chords.
4. Enter Track Edit Mode.
5. While the clip is playing, try making edits to the various plugin parameters. Use the tabs at the bottom of the page to
view different sets of parameters.
26
Renaming & Saving
After making changes to clips and tracks, you may want to do some renaming and save your project before going
further.
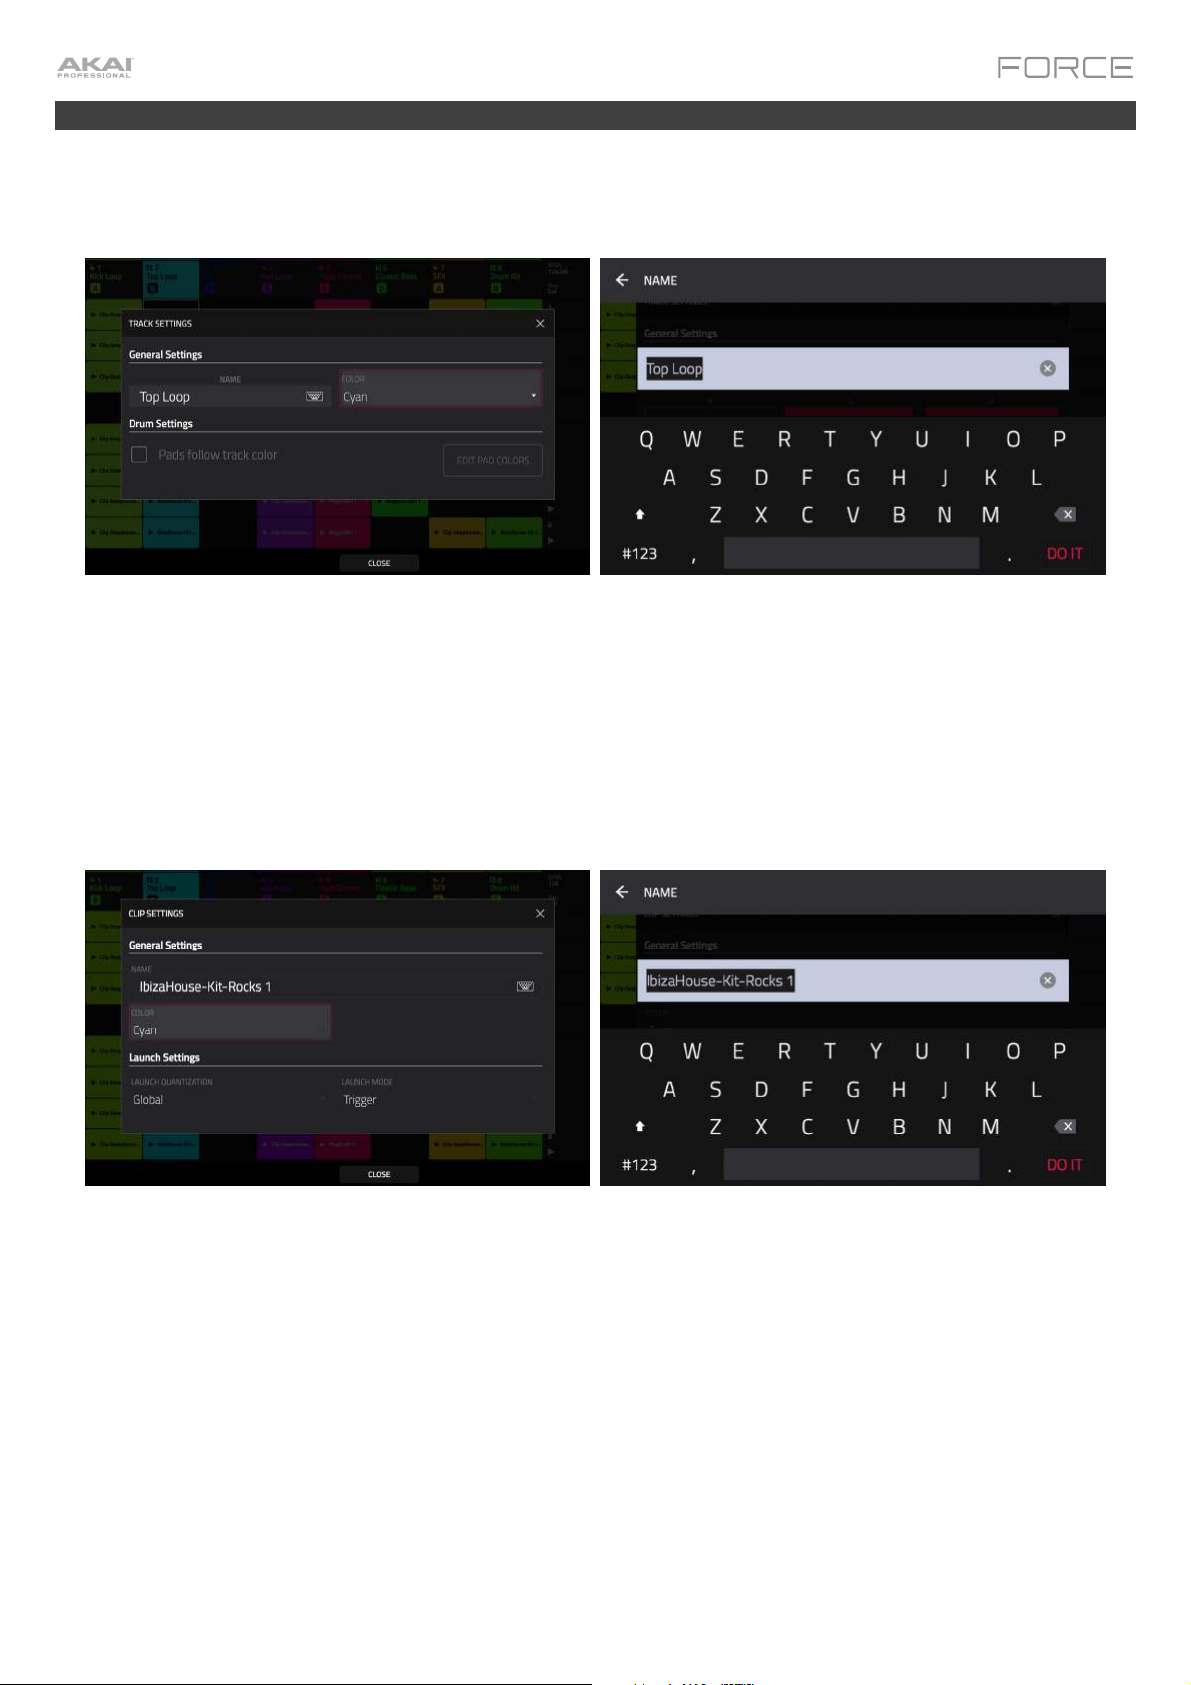
To rename a track:
1. Press Matrix to enter Matrix mode.
2. Double-tap the track name at the top of the display.
3. Under Name, tap the keyboard icon.
4. Use the virtual keyboard that appears to enter a new name (e.g., Synth Lead), and then tap Do It.
To rename a clip:
1. Press Matrix to enter Matrix mode.
2. Hold Edit press a clip launch pad.
3. In the window that appears, tap the keyboard icon next to Name.
4. Use the virtual keyboard that appears to enter a new name (e.g., Drum Fill), and then tap Do It.
27
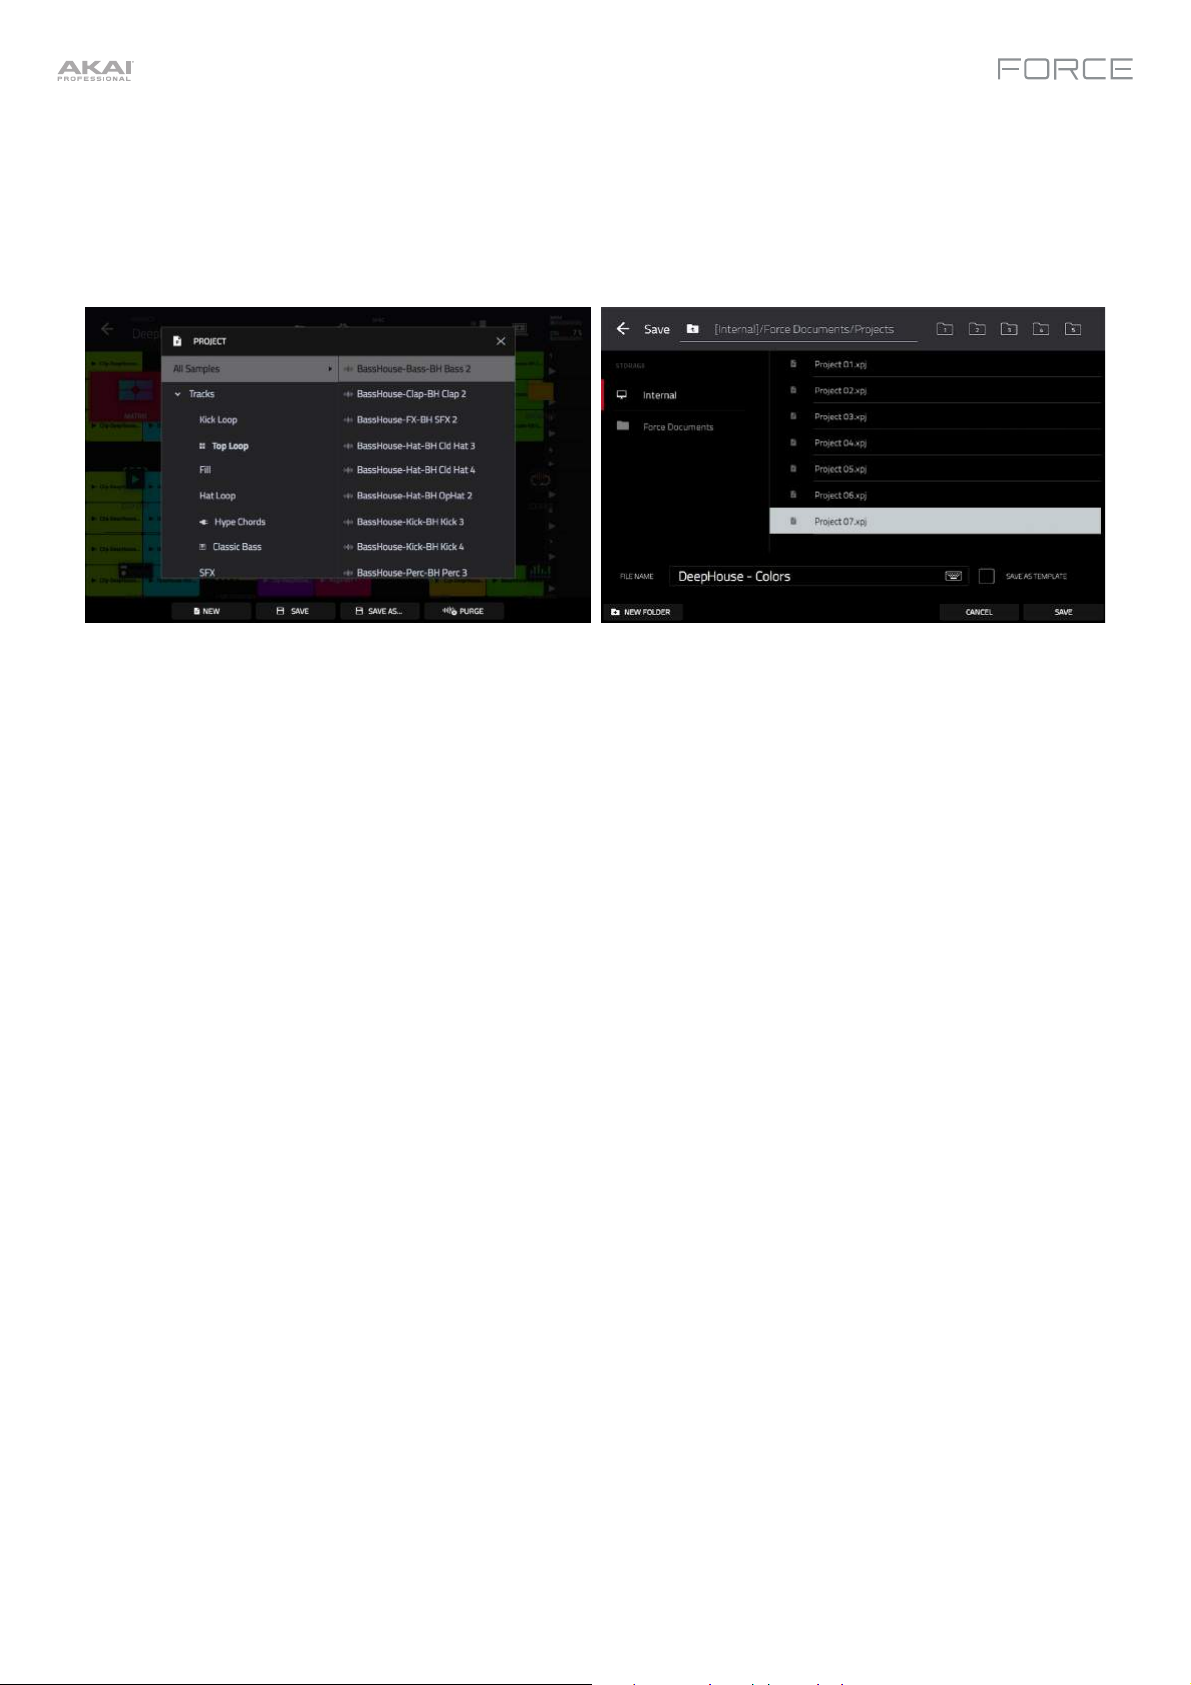
Now that we've made changes to our demo, this would be a good time to save as a new project. You can save your
project by doing either of the following:
• Press Menu to show the Menu, and tap the folder icon at the top of the screen to open the Project window. Then,
select Save As.
• Press Save to open the Save window. Then, select Save As.
In the Save screen, do any of the following:
To select the storage device you want to view, tap it in the Storage column on the left.
Internal is the internal drive of Force.
Force Documents is a shortcut to the Force Documents folder on the internal drive of Force.
If you have storage devices connected to the USB ports or SD card slot of Force, they will appear in this
column, as well.
To enter a folder, double-tap it. Alternatively, turn the data dial or use the –/+ buttons to move through the list, and
press the data dial to enter a folder. You can also tap one of the five folder buttons in the upper-right to jump
immediately to those pre-assigned file paths (see Operation > Modes > Browser to learn how to do this).
To create a new folder, tap New Folder, use the virtual keyboard that appears to enter a name, and then tap Do It.
You will immediately enter the new folder.
To move up one folder level, tap the folder/ icon in the upper-left corner.
To name the file, tap the File Name field at the bottom of the screen, and use the virtual keyboard that appears.
To save the file, tap Save.
To cancel and return to the Menu, tap Cancel. Alternatively, tap the icon in the upper-left corner.
28
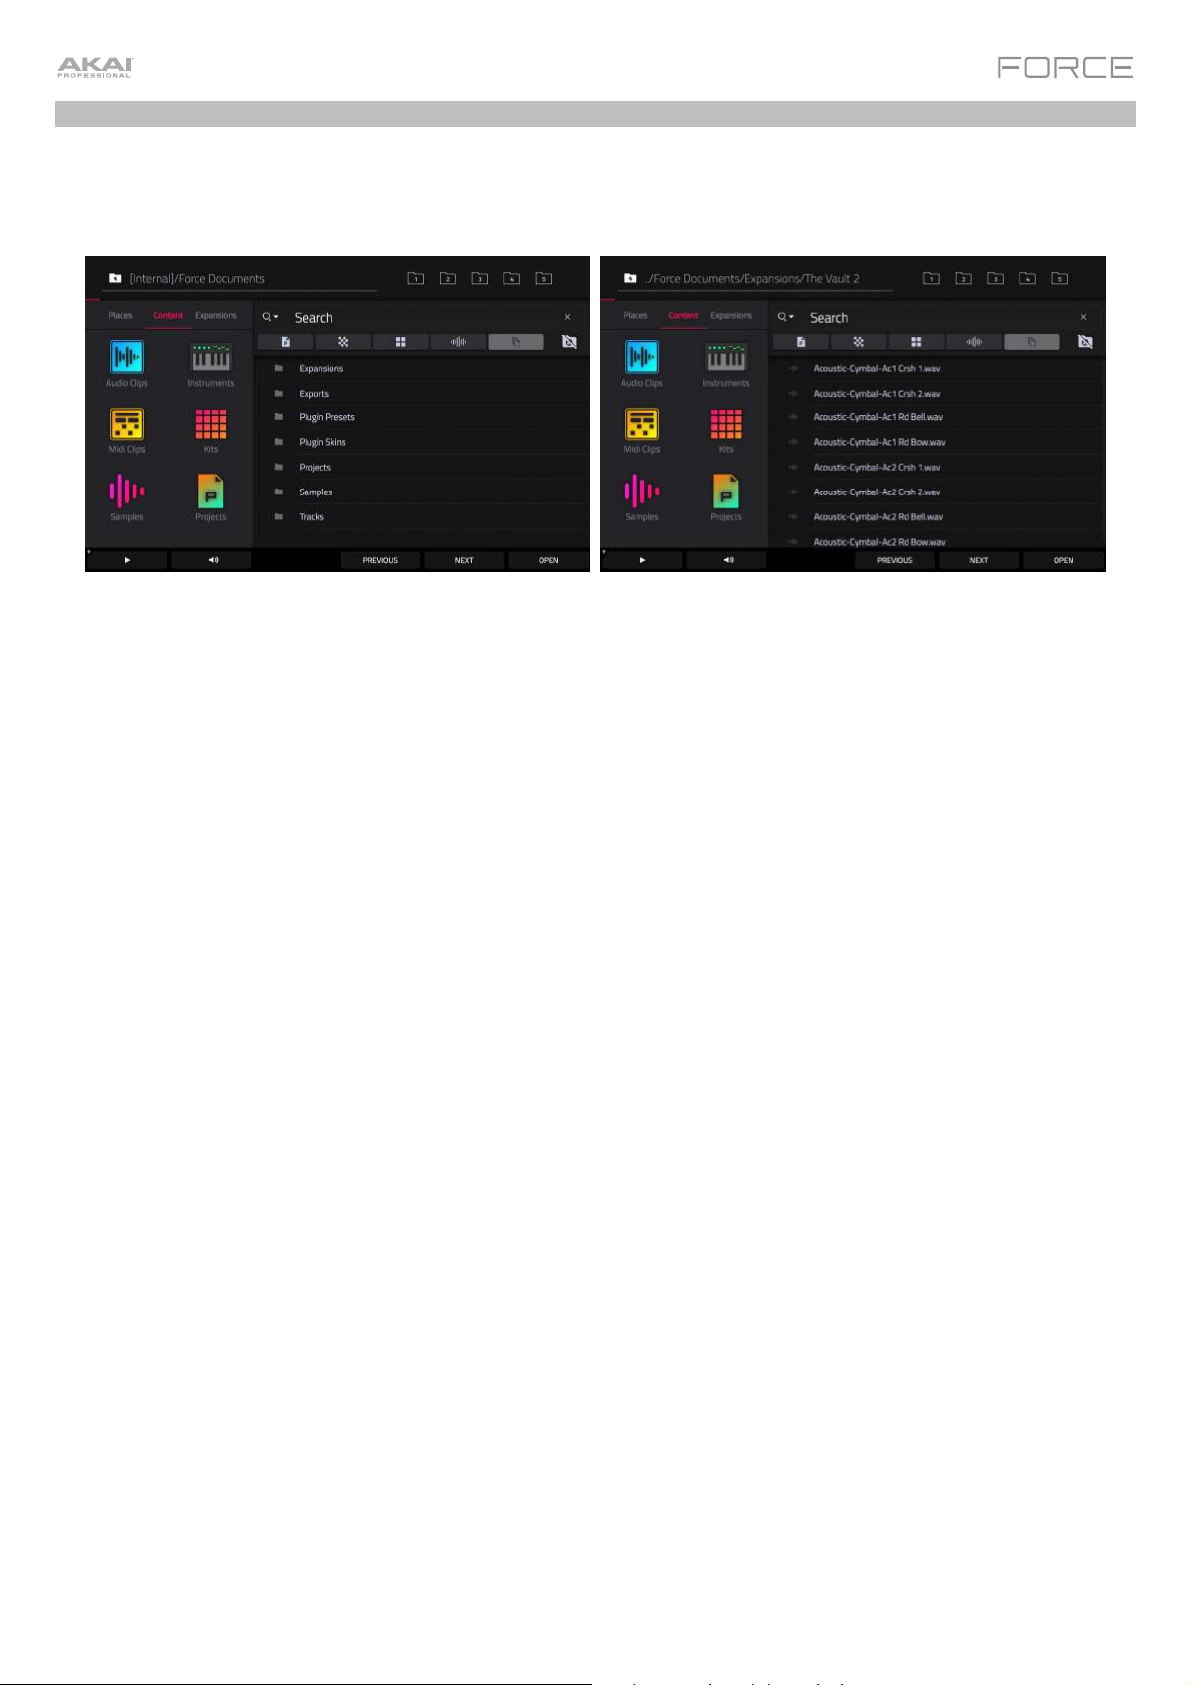
Using the Browser
Force's Browser is where you can browse and load clips, samples, instruments and more from Force's internal library,
as well as the library of any connected devices.
To open the Browser, do either of the following:
• Press Menu to show the Menu, and tap Browser.
• Press Load.
Let's try creating a new drum track and loading samples to it.
1. Press Matrix to open Matrix view.
2. Use the right cursor to scroll the Matrix view all the way to the right, until the last column shows a + sign above the
clips.
3. Tap the + symbol to open the Add Track window. Alternatively, you can press and hold the Track Selector button
under an unused track to open the Add Track window.
4. Select Drum to create a new drum track.
5. Set the pads to Note mode by pressing the Note button.
6. Tap a pad to select it. While in the Browser, the selected pad will be lit bright white. Since we are creating a drum
kit, start by tapping the bottom-left pad.
7. To search for drum samples, first open the Content tab, then select Samples.
8. Start by searching for a kick drum sound. Tap in the Search bar, then use the keyboard that appears to type "kick"
and tap Do It to perform the search. A list of all kick drum samples will now appear.
9. To load a sample, tap the Load button.
10. You can browse and preview samples in two ways:
Turn the data dial to scroll through the list, and tap the Play button to preview the sample. You can enable autopreview by tapping the Speaker icon and tapping the Auto button so it is highlighted.
You can also quickly audition samples by using the Previous and Next buttons on the display, or the – and +
buttons on Force. When you move to a new sample, it will automatically be loaded to the selected pad. If you
decide to not use the sample, the old sample will automatically be deleted when a new one is loaded to the same
pad.
11. Repe
at this process to add a snare, hi-hat or anything else you can think of to your drum kit.
You can use this same general process for browsing and loading other files such as audio or MIDI clips, instruments,
kits and projects.
29

Mixing Tracks
Force's mixer allows you to adjust parameters such as level, stereo panning and routing the same way you would with a
traditional mixer or digital audio workstation.
To open the Mixer, press Mixer. Alternatively, press Menu and tap Mixer.
The Mixer contains four tabs of pages that let you control different settings for the tracks and master. Tap and drag your
finger to scroll through available tracks, or use the cursor buttons.
Let's start with the Pan & Volume tab. Tap the tab at the bottom of
the display to select it. Launch a scene in your project and try making
a few of the following adjustments to the tracks:
To adjust the track volume, tap and drag your finger on the
volume slider, or tap it and then use the data dial or
-/+ buttons.
To adjust the track panning, tap and drag your finger on the
Pan slider, or tap it and then use the data dial or -/+ buttons.
To mute or solo the track, tap the M or S buttons, respectively.
To give a track a crossfader assignment, tap the A or B
buttons at the bottom of the display.
30
 Loading...