

Page 1

User’s Manual
Welcome to Aiptek
Dear user, thank you for purchasing this 3D digital photo frame.
Aiptek 3D P8 is part of the new Aiptek 3D product line with camcorders and digital photo
frames. Thanks to the latest 3D Parallax Barrier technology, P8 is a great companion to view
3D videos and pictures without 3D glasses. With Aiptek 3D P8, you can enjoy 3D videos and
pictures on a 20.3 cm (8”) display wherever you are. Additionally, 2D content is automatically
displayed in 3D powered by the intelligent 3D conversion engine inside the 3D photo frame P8.
The illuminated touch keys make the products easy to use and elegant in any private and
business occasion.
Before you start using the product, we recommend reading this user’s manual to obtain the
best results with your new digital picture frame. We wish you have a lot of fun.
Safety Precautions
1. Keep the device and packaging materials out of the reach of infants and children.
2. Avoid subjecting the power adapter and other contacts to dripping or splashing water and
dry your hands before you use it. Do not place objects filled with liquids such as vases, etc.
on or near the device.
3. Make sure that the used power outlet is always readily available and never hidden. In case
of emergency, use the power adapter to separate the device from the power network.
4. Keep your device away from all flames such as candles and do not set them up in the
vicinity of the device.
5. Keep the unit at least 10 cm away from other objects. Make sure the ventilation is not
covered by newspapers, tablecloths, curtains, etc.
6. For your own safety, do not use the picture frame during thunderstorms or lightning.
7. To ensure safety and the display effect, always use the power adapter supplied by the
manufacturer.
8. The battery is integrated with the device. Do not dissemble and modify. The battery should
be replaced by qualified service staff only.
9. To ensure normal operation of this product and avoid any damage, do not use or store this
product under the following conditions: environment with too low/high temperature; places
with high humidity or long-term direct sunshine; bad conditions involving strong impacts.
10. During the operation, this product may heat lightly, which is normal.
11. Wait before connecting the mains adapter if the device has been moved from a cold
location into a warm one. Any condensation that has formed may in certain circumstances
destroy the device. As soon as the device has reached room temperature it can be used
without risk.
12. Handle the product with care. Avoid contact with sharp objects. Keep device away from
metallic objects.
13. Place the digital photo frame on a flat surface. Any collision or falling to the ground is likely
to damage the product.
14. The screen (LCD panel) of this product is made of glass, which can easily be damaged by
abnormal external force or sharp objects.
15. Never press the LCD, lest it be damaged. If liquid crystal leaks, you need to clean it
immediately with soap and water.
16. Do not drop the frame or disassemble the product otherwise the warranty voids. Opening
or removing covers may expose you to dangerous voltage or other hazards. Refer all
servicing to qualified service personnel.
17. According to the manufacturer, for the colored LCD a 0.01% pixel-sum flaw rate is
allowable. Your understanding is appreciated.
EN
www.aiptek.eu
Page 2

User’s Manual
18. To clean the screen, cut off the power supply first and use a damp soft cloth to wipe it.
Never apply alcohol, gasoline or other chemical agents. Use only accessories supplied by
the manufacturer.
19. This product supports hot plugging of memory cards. However, it is suggested to power off
EN
the product before plugging/unplugging your memory card to protect the memory card.
20. Use only the accessories supplied by the manufacturer.
21. Both product and user’s manual are subject to further improvement or supplement without
further notice.
FCC Compliance Statement:
This device complies with Part 15 of the FCC Rules. Operation is
subjected to the following two conditions: (1) this device may not cause
harmful interference, and (2) this device must accept any interference
received, including interference that may cause undesired operation.
This equipment has been tested and found to comply with limits for a
Class B digital device, pursuant to Part 15 of the FCC rules. These limits
are designed to provide reasonable protection against harmful interference
in residential installations. This equipment generates, uses, and can radiate radio frequency
energy, and if not installed and used in accordance with the instructions, may cause harmful
interference to radio communications.
However, there is no guarantee that interference will not occur in a particular installation. If this
equipment does cause interference to radio or television equipment reception, which can be
determined by turning the equipment off and on, the user is encouraged to try to correct the
interference by one or more of the following measures:
- Reorient or relocate the receiving antenna.
- Move the equipment away from the receiver.
- Plug the equipment into an outlet on a circuit different from that to which the receiver is
connected.
- Consult the dealer or an experienced radio/television technician for additional suggestions.
You are cautioned that any change or modifications to the equipment not expressly approved
by the party responsible for compliance could void Your authority to operate such equipment.
If the life time of the product ends, try to recycle all
components, if possible. Batteries and rechargeable batteries
must not be disposed with household waste! Please dispose
them at a local recycling center. Together we all contribute to
the protection of our environment.
Disposal of waste batteries (applicable in the European Union
and other European countries with separate collection
systems)
This symbol on the battery or on its packaging indicates that the battery provided
with this product shall not be treated as household waste.
On certain batteries, this symbol might be used in combination with a chemical
battery contains more than 0.0005% mercury or 0.004% lead.
To ensure the battery will be treated properly, hand over the product at end-of-life to the
applicable collection point for the recycling of electrical and electronic equipment and hand the
battery over to the applicable collection point for recycling of waste batteries.
symbol. The chemical symbols of mercury (Hg) or lead (Pb) are added if the
www.aiptek.eu
Page 3

User’s Manual
Table of Contents
Introduction..................................................................................................... 1
The 3D display technology ........................................................................... 1
Viewing 3D images....................................................................................... 1
Extra notice regarding 3D viewing: .......................................................... 1
Product Features.......................................................................................... 1
Package Content.......................................................................................... 2
3D Digital Photo Frame Overview ................................................................ 2
Remote Control ............................................................................................ 3
Getting Started................................................................................................3
How to set up the stand................................................................................ 3
Connecting to AC power............................................................................... 3
Power on/off your photo frame ..................................................................... 4
Charging the battery..................................................................................... 4
Setting up language .......................................................................................4
Organizing 3D content.................................................................................. 5
TIPS ............................................................................................................. 5
Connecting to PC ......................................................................................... 6
Insert memory card ......................................................................................6
Operations and Functions .............................................................................7
Main Menu ................................................................................................... 7
Photo Mode.................................................................................................. 7
Configuring the Photo View Settings........................................................8
Video Mode .................................................................................................. 9
Configuring the Video Playback............................................................... 9
Music Mode................................................................................................ 10
Configuring the Music Playback............................................................. 10
Time/Date mode......................................................................................... 11
Storage mode............................................................................................. 12
SETUP MENU............................................................................................ 13
Troubleshooting............................................................................................ 14
Reset Your Device...................................................................................... 14
Specifications ...............................................................................................15
EN
www.aiptek.eu
Page 4

Page 5
User’s Manual
Introduction
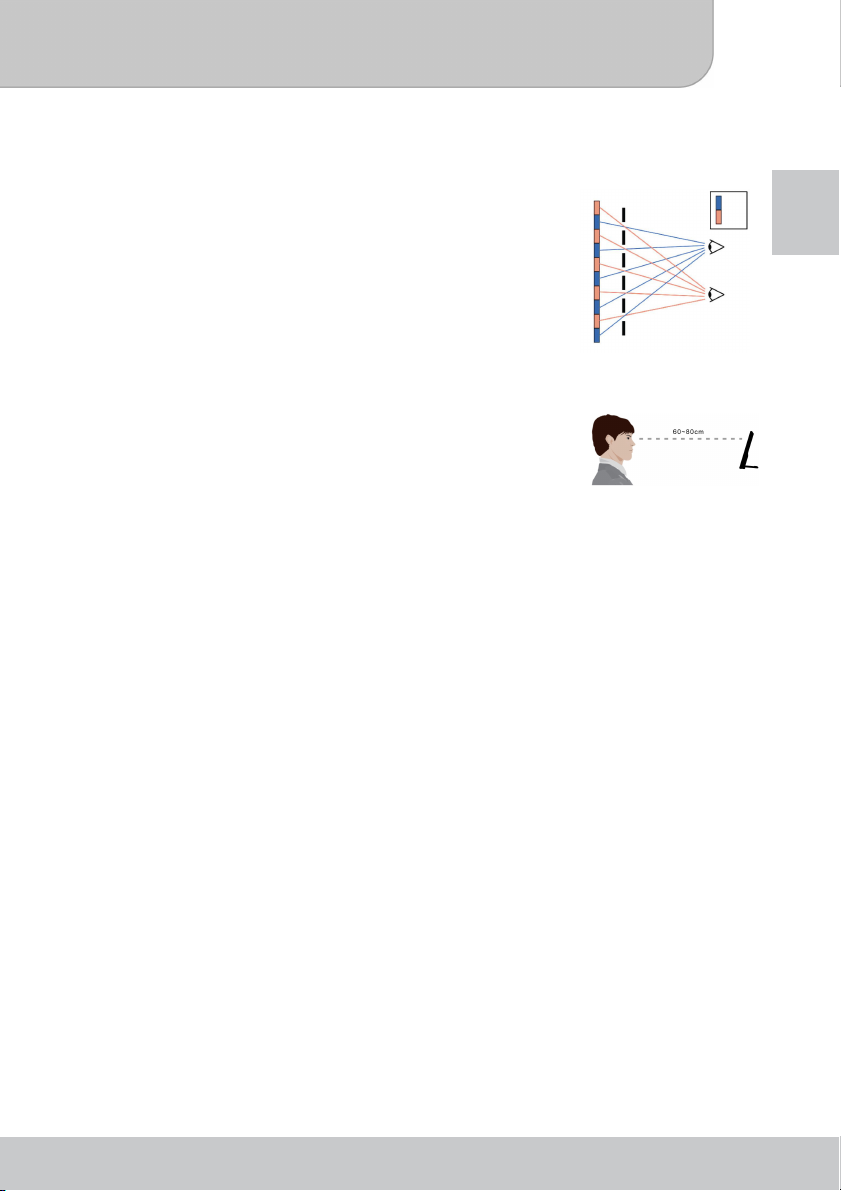
The 3D display technology
This product utilizes the “Parallax Barrier” 3D technology. A
parallax barrier is a device that allows a liquid crystal display
(LCD) to show a stereoscopic image without the need for the
viewer to wear a pair of 3D glasses. Placed in front of the
normal LCD, a parallax barrier consists of a layer of material
with a series of precision slits, allowing each eye to see a
different set of pixels, thus creating a sense of depth and 3D
effect through parallax.
Parallax Barrier
Pixels
Viewing 3D images
To view 3D display and receive 3D effects well, the viewer
should be positioned to face the center of the screen at around
60 ~ 80 cm of distance and not having a steep viewing angle.
Extra notice regarding 3D viewing:
1. Viewing in 3D mode may cause dizziness or even perceptive after effects,
disorientation, and eye strain. It is recommended that viewers take frequent breaks to
alleviate the likelihood of these effects. If you have any of the above symptoms,
immediately cease usage of the 3D display of this device and do not resume until the
symptoms have receded.
2. Young children viewing 3D files should always be accompanied by adults. It is not
recommended to give this device into the hands of young children.
Product Features
● 20.3 cm (8”) 3D digital photo frame for displaying 3D videos and 3D photos without 3D
glasses
● Automatically displays 2D videos and photos in 3D by the intelligent 3D conversion
engine inside
● Parallax barrier 3D technology provides outstanding 3D experience
● Compatible with Aiptek 3D HD camcorder i2
● Playback Aiptek high definition 3D/2D videos in H.264 format (.MP4)
● Auto slideshow with your personal MP3 music in the background
● Illuminated touch keys keep the product elegant in any private or business occasion
● Built-in rechargeable battery for portable usage
● Supports USB flash drive and SD/SDHC/MMC memory card (up to 32GB)
● Automatic power-off setting for power saving
● Clock, alarm and date functions
● Remote control included
Right
Left
Right eye
Left eye
EN
www.aiptek.eu Page 1
Page 6

User’s Manual
r
y
r
play
f
r
j
p
r
Package Content
Please check that the package contains the following items:
EN
3D Digital Photo
Frame
Quick Start Guide Service Guide User’s Manual Remote control
In case the package content is not complete, please contact your dealer immediately.
CD USB Cable Power Adapter
3D Digital Photo Frame Overview
3D dis
Touch bar fo
volume
Infrared receiver fo
Remote Control
Power On/Of
SD/SDHC/MMC Card Slot
USB Connector for USB stick
Menu Navigation
/Pause
OK/Pla
Return
Menu
eake
Speake
Stand
S
Reset
DC power
ack/Mini USB
connector for PC
www.aiptek.eu Page 2
Page 7

User’s Manual
f
Remote Control
Power On/Of
Menu Button
Menu Navigation
Return Button
OK/Play/Pause
EN
Volume Down
Getting Started
How to set up the stand
Pull the stand straight out of the bottom of the digital photo
frame and turn the direction 90°. Then place the digital photo
frame on the flat surface.
Connecting to AC power
Connect one end of the accessory power cable (Mini USB
connector) to the photo frame, and then connect the power
adapter to a power socket.
Always use the accessory power cable only.
Volume Up
www.aiptek.eu Page 3
Page 8

User’s Manual
Power on/off your photo frame
To power on the photo frame, please press the Power button for 2
EN
seconds. To power off the photo frame, please press the Power
button again.
Charging the battery
The internal battery of the device may not be fully charged when you use the photo frame
for the first time. You can charge the battery in the following two ways:
● Plug the AC power adapter into the DC-IN jack of the device, and connect the other
end to the power source.
● Connect the small end of the supplied USB cable to the USB port of the device, and
the large end to a powered PC. Make sure the photo frame is powered off.
Charging Status Charging Time
Power OFF, charging by AC power adapter around 2 hours
Power OFF, charging by USB connection around 12 hours
Setting up language
1. On the Main Menu, select the SETUP item and press OK ( ) to configure the basic
setup of your 3D Digital Photo Frame.
2. Move the Menu Navigation up or down to choose the desired language and press
OK (
www.aiptek.eu Page 4
) to confirm.
Page 9

User’s Manual
Organizing 3D content
3D Digital photo frame P8 supports the following 3D file format:
1. Photo: originally side-by-side 3D photo, JPEG format (*.JPG)
Maximum 12 Mega-pixel resolution
example:
2. Video: originally side-by-side 3D video clip, MPEG-4 H.264 (.MP4)
Maximum resolution 720p (1280x720) / 30fps
example:
EN
If your 3D content is recorded by Aiptek 3D HD Camcorder i2, it is compatible with 3D
digital photo frame P8. You can use the SD /SDHC card from i2 and insert it in the SD
/SDHC card slot of P8 to immediately playback.
TIPS
To view side-by-side 3D pictures and video clips on the 3D display, you are required to
create folder(s) using ‘3D’ as part of the folder name. Then, please save the 3D content
into the 3D folder(s).
2D content is not mandate to be saved under the ‘2D’ folder(s). But it’s recommended to
organize 2D and 3D content separately.
www.aiptek.eu Page 5
Page 10

User’s Manual
Connecting to PC
For copying data into the internal memory, you can connect the 3D Digital Photo Frame
EN
via the USB connection. Use the supplied USB cable and connect it to the picture frame
and your PC. On your PC, a popup window will appear and detect the device as a storage
device. Choose the device and follow the instruction of ‘Organizing 3D content’ to save the
files into internal memory.
Insert memory card
Slide the memory card (optional) gently in the card slot
until it clicks into place. When inserting a SD/SDHC/MMC
card, make sure that the contacts show to the back.
www.aiptek.eu Page 6
Page 11

User’s Manual
Operations and Functions
Main Menu
When you power on the 3D Digital Photo Frame, you will see the Main Menu appearing on
the screen, which allows you to quick access the PHOTO, VIDEO, MUSIC, TIME/DATE,
STORAGE, and SETUP functions.
This chapter will guide you through how to use these functions of the device.
EN
Photo Mode
1. On the Main Menu, select the PHOTO item and press OK ( ) to enter the
Thumbnail Mode. You can browse the thumbnails of all photos.
Thumbnail Mode
2. Use the Navigation buttons to navigate through the pictures.
3. Press OK (
4. While viewing a picture, you can return to the Thumbnail Mode by simply pressing
Return (
5. In the Thumbnail Mode, you can:
● press Return ( ) to Main Menu; or
● press Menu ( ) to enter the Photo Menu.
) on the selected thumbnail to view the picture in single view.
).
www.aiptek.eu Page 7
Page 12

User’s Manual
EN
PHOTO MENU allows you to configure the settings while viewing pictures, such as
slide show speed, display mode, background music playback, etc. See the next section for
detailed information on configuring the settings.
Configuring the Photo View Settings
On the Thumbnail Mode screen, press Menu ( ) button to enter the Photo MENU.
Setting Available Options
Slide show speed Select the interval time between the pictures during the slide
Slide show mode
Picture Mode
Background Music
PHOTO MENU
show: OFF, 5 sec, 10 sec, 15 sec, 30 sec, 1 min, 5 min, 10
min, 30 min, 1 hour, 4 hour, 8 hour or 12 hour.
● Folder - Start slide show of the pictures in the selected
folder.
● All - Start slide show of all pictures in the device.
● Shuffle - Display the pictures randomly during slide show
playback.
● Auto Fit - The selected picture will be displayed to fit the
screen size automatically.
● Full Screen - The selected picture will be displayed in full
screen mode.
● Off - Disable music playback during slide show.
● All - Play all music files during slide show.
● Album - Play the music files in the selected album during
slide show.
● Shuffle - Play music randomly during slide show.
● Single - Play single music during slideshow
www.aiptek.eu Page 8
Page 13

User’s Manual
Video Mode
1. On the Main Menu, select the VIDEO item and press OK ( ) to display the video
list.
2. Use the Navigation buttons Up (
folder. Press OK (
3. After entering the folder, navigate Up (
Press OK (
4. Press navigation key Right (
navigation key Left (
navigation key to stop the fast forward or rewind.
5. To make a pause of the video playback, press OK (
continue playback.
6. To select another video clip, press Return (
) to enter the folder.
) to playback the video clip.
) and hold longer to rewind the video clips. Release the
) and Down ( ) to navigate through the video
) and Down ( ) to select the video clip.
) and hold longer to fast forward the video clip; press
). Press again OK ( ) to
) to the video list.
EN
Video List
Configuring the Video Playback
On the Video List screen, press Menu to enter the VIDEO MENU.
Setting Description
Folder Start playback of the videos in the selected folder.
All Start playback of all videos in the device.
Single Playback single video
www.aiptek.eu Page 9
Page 14

User’s Manual
Music Mode
1. On the Main Menu, select the MUSIC item and press OK ( ) to display the Music
EN
List.
2. Use the Navigation buttons Up (
folders. Press OK (
3. After entering the folder, navigate Up (
OK (
4. To stop the music playback and return to Music List, simply press Return (
Configuring the Music Playback
On the Music List screen, press Menu to enter the MUSIC MENU.
Setting Option Description
Play Mode
Save as the sound
of alarm
) to enter the folder.
) and Down ( ) to navigate through the music
) and Down ( ) to select the music. Press
) to playback the music.
).
Music List
All Start playback of all music files in the device.
Album Start playback of the music files in the selected
album (folder).
Shuffle Play music randomly.
Single Playback single music file.
Alarm 1~4 Set the selected music file as the sound of alarm of
the system.
www.aiptek.eu Page 10
Page 15

User’s Manual
Time/Date mode
On the Main Menu, select the TIME/DATE item and press OK ( ) to set up the date and
time. In addition, you can set up 4 alarms.
EN
Setting Description
Time Use the Navigation buttons UP / Down to set the correct time
settings.
DATE Select the date format (M/D/Y, Y/M/D, or D/M/Y. M: month, D:
day, Y: year) and then use the Navigation buttons UP / Down /
Left / Right to set the correct date settings.
Alarm Select the alarm item (1 to 4) to set up:
● Time - Use the Navigation buttons UP / Down / Left / Right
to set the alarm time.
● Repeat - Select the repeat time for the alarm.
● ON/OFF - Enable or disable the alarm.
To choose the alarm music from your favorite music list, please refer to the
description in Music Mode.
If there is any inconsistency on time settings, the message “Conflict setting” will
appear on the screen.
www.aiptek.eu Page 11
Page 16

User’s Manual
Storage mode
On the Main Menu, select the STORAGE item and press OK ( ) to select the storage
EN
media: SD/SDHC/MMC card, USB device, or Internal memory.
Setting Description
SD/MMC Select the inserted SD/SDHC/MMC card as the storage media
USB Select the connected USB device as the storage media for
Internal Memory Select the internal memory as the storage media for playback.
for playback.
playback.
www.aiptek.eu Page 12
Page 17

User’s Manual
SETUP MENU
On the Main Menu, select the SETUP item and press OK ( ) to configure the basic
setup of your 3D Digital Photo Frame.
Setting Description
Language Choose the language for the system.
Auto Off Choose Auto Off time from Off, 30 min, 1 hour, 2 hours, 4
hours, to 8 hours.
Icon Enable or disable the icons during slideshow and video
playback.
Brightness Adjust the brightness level of the LCD screen.
Contrast Adjust the contrast level of the LCD screen.
Default Select to restore the factory default settings.
EN
www.aiptek.eu Page 13
Page 18

User’s Manual
Troubleshooting
EN
spot when you purchase the memory cards. This digital photo frame could not support
pirate cards. If the memory card is correctly inserted, and the start-up interface is
displayed but the photo frame can not read the card, please turn off and restart the photo
frame, or format the card and re-copy files.
Problem Cause Solution
Power indicator is
not lit.
No start-up interface. AC adapter is not well
USB drive or
memory card is not
working.
The order of image
files is not what I
wanted.
The device
malfunctions and
cannot be powered
on/off.
Since there are many brands of memory cards, please test the compatibility on the
Reset Your Device
Occasionally, you may need to reset your Photo
Frame.
This can be useful when a program is not performing
properly.
Locate the small hole on the back of the device shown
as the RESET.
Using the tip of paper clip, gently push the button
inwards.
Power is off or power indicator
is broken.
connected or does not power
on normally.
Card is not correctly inserted or
card is corrupt or not fully
compatible.
The order of files is sorted by
file name. Numbers have
higher priority than alphabets.
Improper use of the device. Press into the reset
Check whether the AC
adapter is well
connected and power
supply is normal.
Check whether the AC
adapter is well
connected and make
sure the photo frame is
powered on normally.
Insert the card
correctly; format the
card before copy files,
or replace with a new
card.
Rename the files.
hole and hold for 2
seconds. Then press
the Power key to
power on the device
again.
Reset Hole
www.aiptek.eu Page 14
Page 19

User’s Manual
Specifications
Item Description
Panel
3D Display
format
2D File format
(Automatically
displayed as
3D on display)
Music Music Format MP3
Functions
Storage
Power
3D Display Technology Parallex Barrier
Panel size 20.3cm (8”) TFT LCD
Panel Resolution 800 x 600 Pixel RGB
Active Area 20.3 cm (8”) TFT LCD
Viewing Distance Best at 60~80 cm
Photo Format Support original 3D photo side by
Max. Photo Resolution 12 Megapixel
Video Format Support original 3D video “side by
Max. Video Resolution Up to 720P/30fps
Photo Format JPEG
Max. Photo Resolution 12 Megapixel
Video Format *.MP4 (MPEG H.264)
Max. Video Resolution Up to 720P/30fps
Background Music Yes
Speaker Yes
Date/Time/Clock/Calend
ar
Alarm Yes
Auto off Ye s
Internal Memory 128MB
External memory card SD/SDHC/MMC (up to 32GB)
USB flash drive Yes (USB 2.0 host & slave)
Internal Battery Rechargeable Li-polymer 1200mAh,
Power Input AC 100~240V, 50~60 Hz
Power Output DC 5V, 2A
EN
162mm x 121.5mm (WxL)
side format (*.JPG)
side” clip with *.MP4 (MPEG H.264)
Yes
embedded
www.aiptek.eu Page 15
Page 20

User’s Manual
EN
www.aiptek.eu Page 16
 Loading...