

Page 1

Page 2

FCC Compliance Statement:
This device complies with Part 15 of the FCC Rules. Operation is subjected to the
following two conditions: (1) this device may not cause harmful interference, and (2) this
device must accept any interference received, including interference that may cause
undesired operation.
This equipment has been tested and found to comply with limits for a Class B digital
device, pursuant to Part 15 of the FCC rules. These limits are designed to provide
reasonable protection against harmful interference in residential installations. This
equipment generates, uses, and can radiate radio frequency energy, and if not installed and used in accordance
with the instructions, may cause harmful interference to radio communications.
However, there is no guarantee that interference will not occur in a particular installation. If this equipment does
cause interference to radio or television equipment reception, which can be determined by turning the equipment
off and on, the user is encouraged to try to correct the interference by one or more of the following measures:
-Reorient or relocate the receiving antenna.
-Move the equipment away from the receiver.
-Plug the equipment into an outlet on a circuit different from that to which the receiver is
connected.
-Consult the dealer or an experienced radio/television technician for additional suggestions.
You are cautioned that any change or modications to the equipment not expressly approved by the party
responsible for compliance could void Your authority to operate such equipment.
Do not throw the appliance away with
the normal household waste at the end
of its life, but hand it in at an ofcial
collection point for recycling. By doing
this you will help to preserve the
environment.
Welcome:
Dear user, thanks for purchasing this product.
Much investment in time and effort has gone into its development, and it is our hope
that it will give you many years of trouble-free service.
Safety Notice:
1. This product is fragile, so you need to place it to a place relatively at. It cannot suffer the
collision due to falling.
2. This product should be protected against damp, and it will be damaged when damp or
liquid gets inside.
3. The screen (LCD panel) of this product is made of glass, which can easily be damaged by
abnormal external force or sharp object.
4. Never press the LCD, lest it may be damaged. If liquid crystal leaks, you need to clean it
immediately with soap and water.
5. This product supports hot plugging of memory cards. However, it is suggested to power off
this product before plugging/unplugging your memory card to protect the memory card or
other devices.
6. We strongly recommend you to use the power adapter delivered with this product to ensure
the display effect.
7. To clean the screen, cut off the power supply rst and use lightly wet soft cloth to wipe it.
Never apply alcohol, gasoline or other chemical agents.
8. To ensure normal operations of this product and avoid any accident, do not use or store
this product under the following conditions: The environment with too low/high temperature;
The place with heavy dampness or long-term direct sunshine;The bad conditions such as
strong shock.
9. During the operation, this product may heat lightly, which is normal.
10. According to the manufacturer, for the colored LCD, 0.01% of pixel-sum aw rate is
allowable. Your understanding is appreciated.
11. Both product and user’s manual are subject to further improvement or supplement without
further notice.
Page 3

2
EN
EN
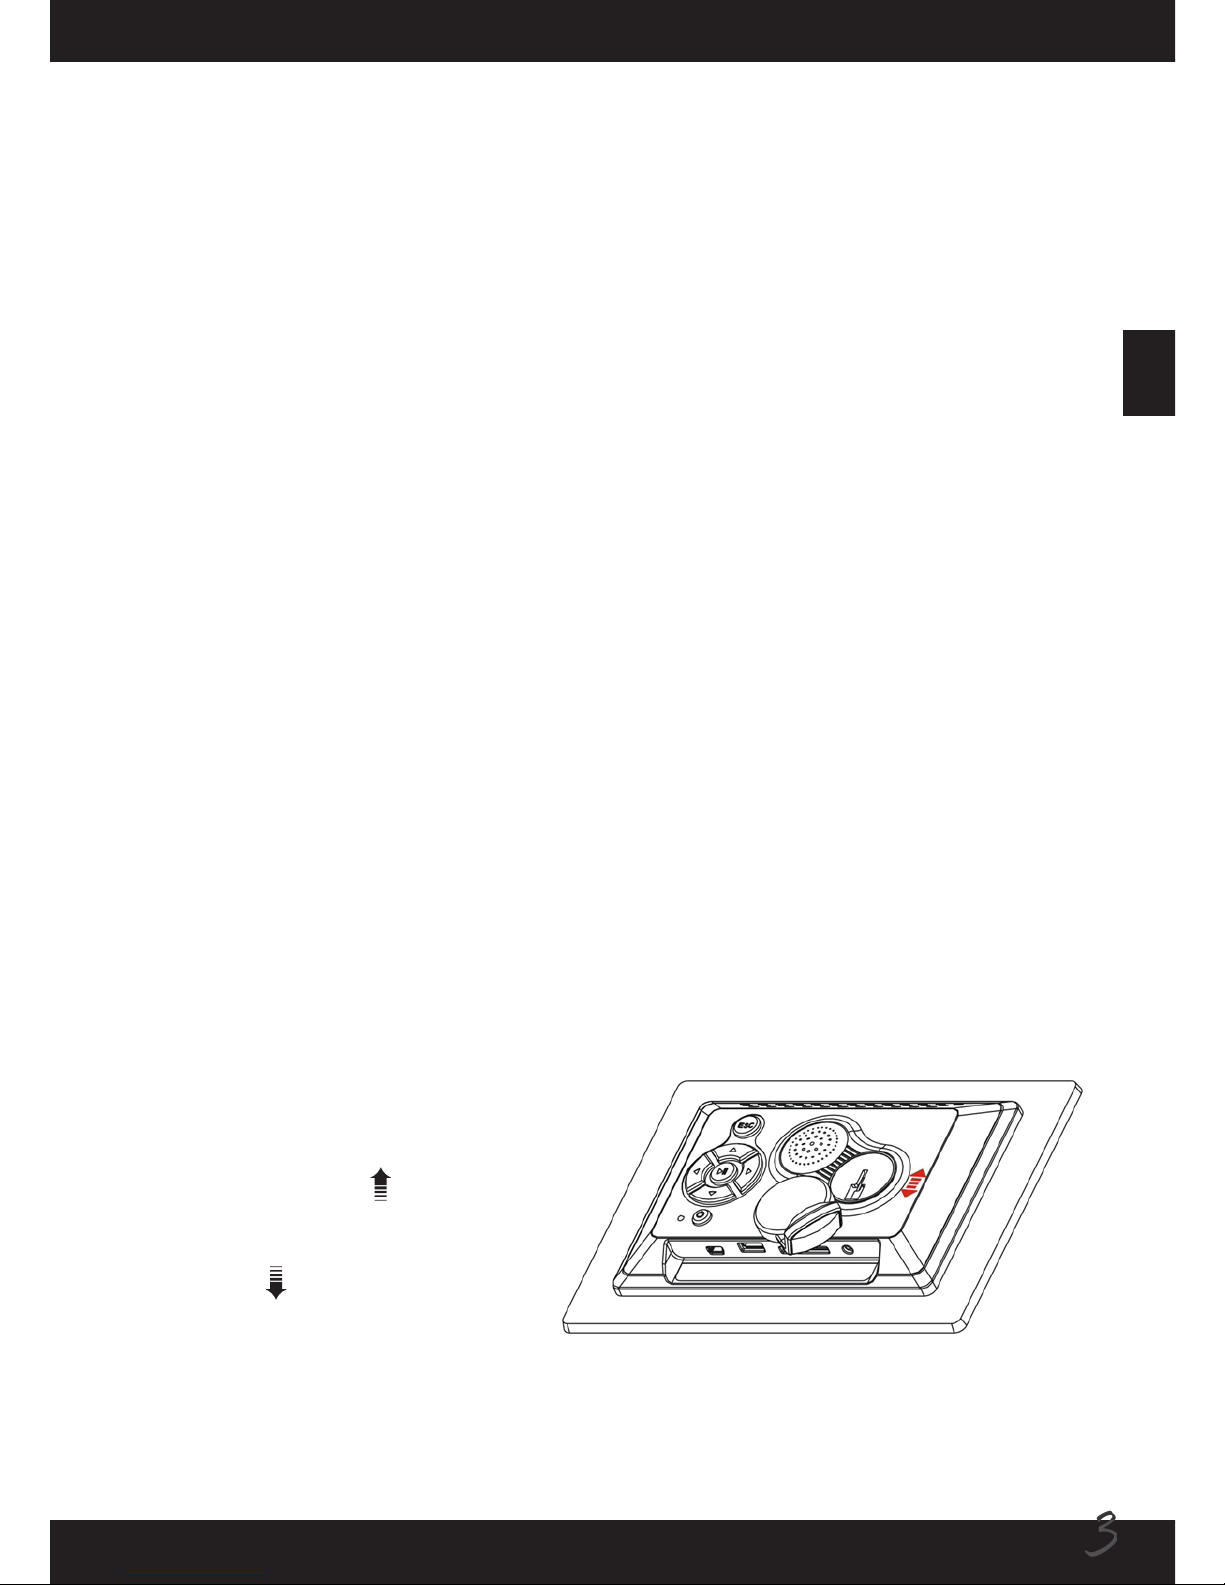
Getting Started
Photo frame parts
LCD Panel
Front Frame
Decoration Board
Venting Openings
ESC Button
Stand
Power Indicator
Right Button
Up Button
Down Button
Power Button
Left Button
Enter Button
SD/MMC Card Slot
DC Power JackUSB Port
Page 4

EN3EN
Product introduction
The digital photo frame boosts a bright 7” (7-inch) TFT-LCD panel and is powered by
multimedia technology. It has the following features:
Automatically start/repeat picture display (15-picture reviewing)
Automatically display pictures in slide show mode, supporting various transition
effects
Supports the customization of display intervals
Supports SD/MMC memory card (up to 2GB)
Supports JPEG-format pictures of up to 12 mega pixels
Supports USB disc drive
Built-in memory for storing favorite pictures
•
•
•
•
•
•
•
Technical specication
Input voltage of power adapter: AC100~240v, 50~60Hz
Input voltage of this equipment: +9VDC
Power consumption: <5W
Picture format: JPEG (YUV code)
Operation mode: Buttons
Resolution of Liquid Crystal Display (LCD): 480×234 pixels
Effective display area: 137 mm × 86.58 mm
•
•
•
•
•
•
•
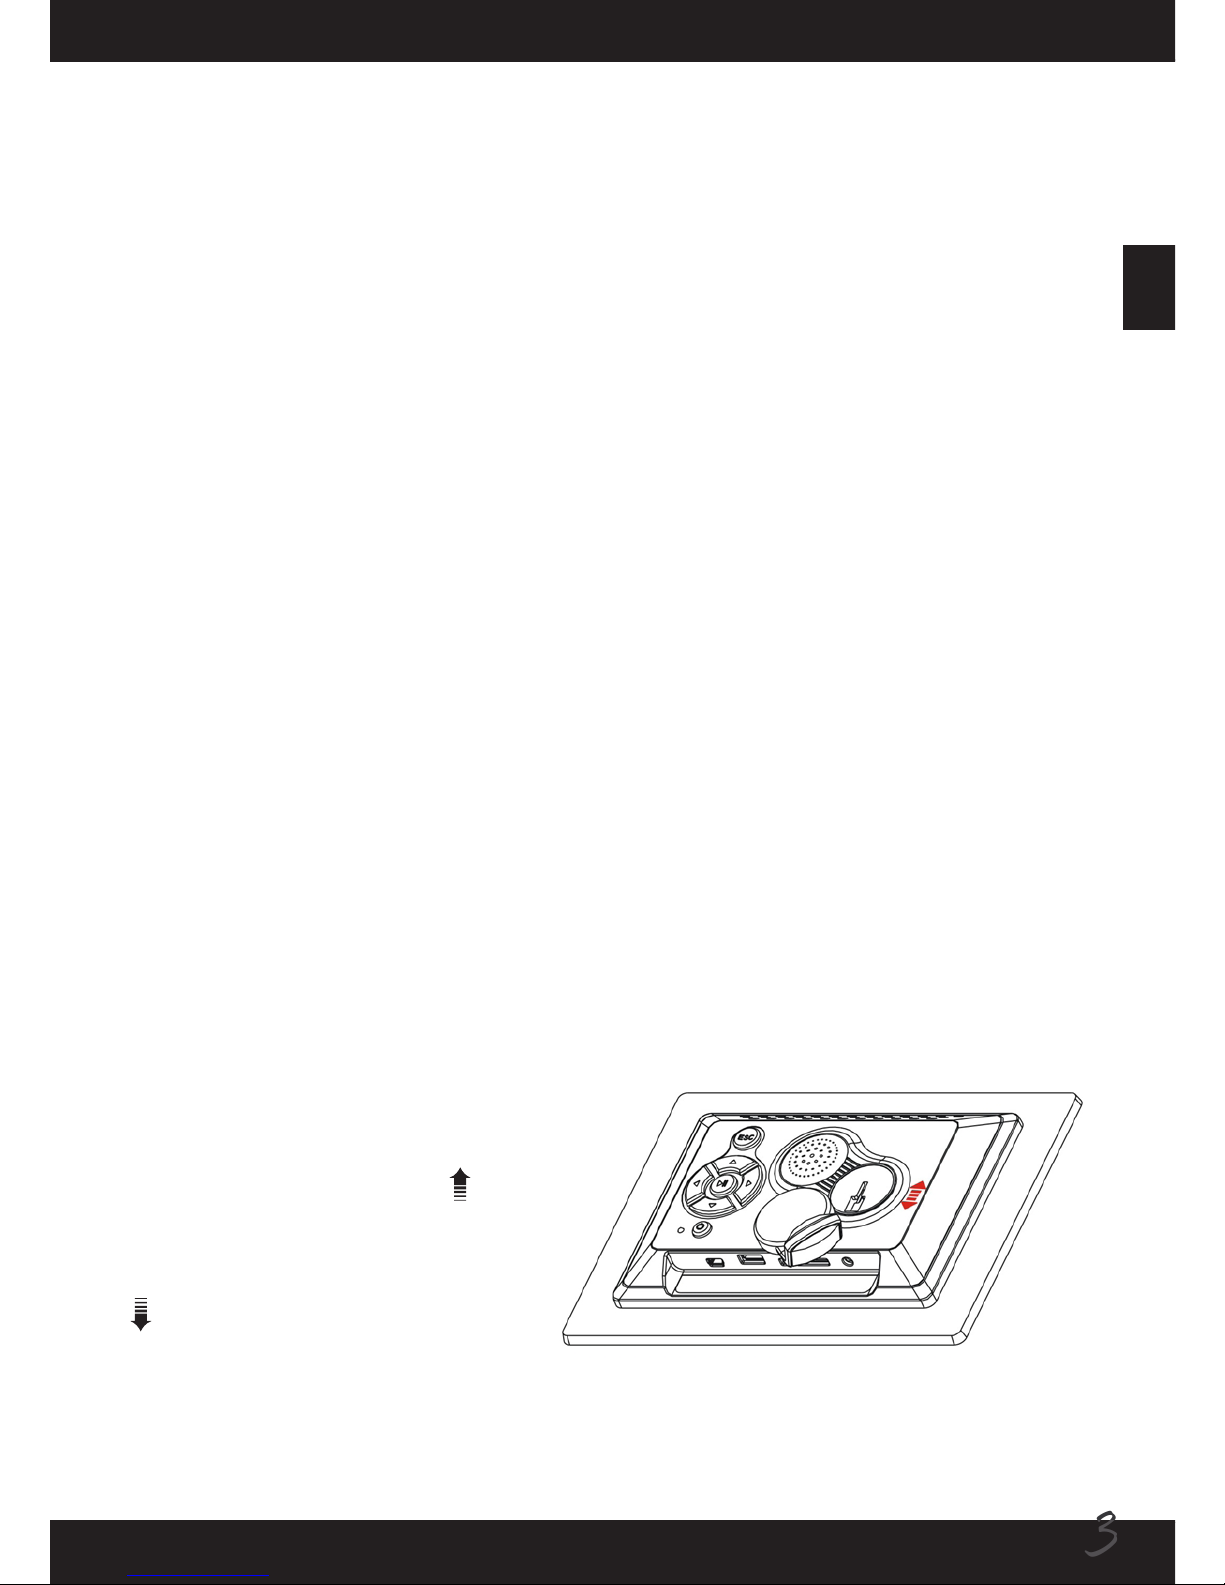
Attaching the stand
Insert the front end of the stand
into the slot on the back frame as
indicated. Push the stand upward
( ) until the stand is properly
locked. To detach the stand, push
the stand downward ( ) until it is
removed.
Page 5
4
EN
EN
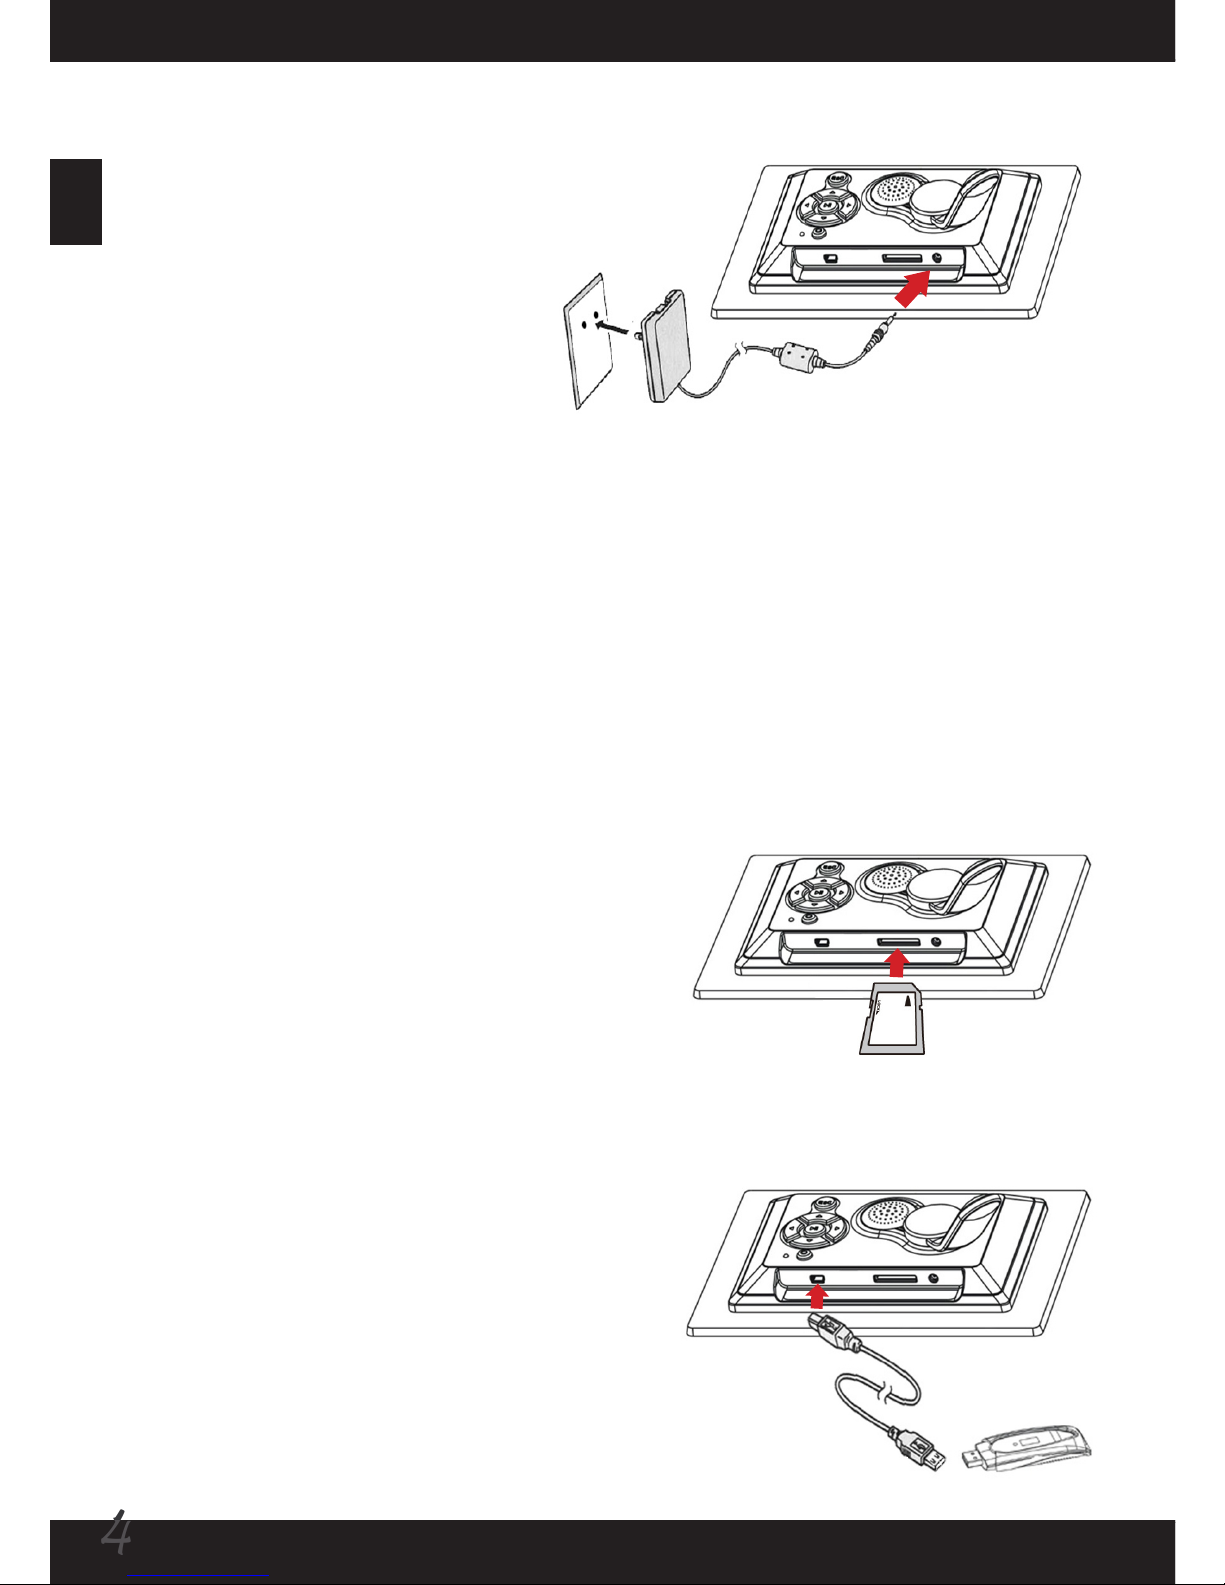
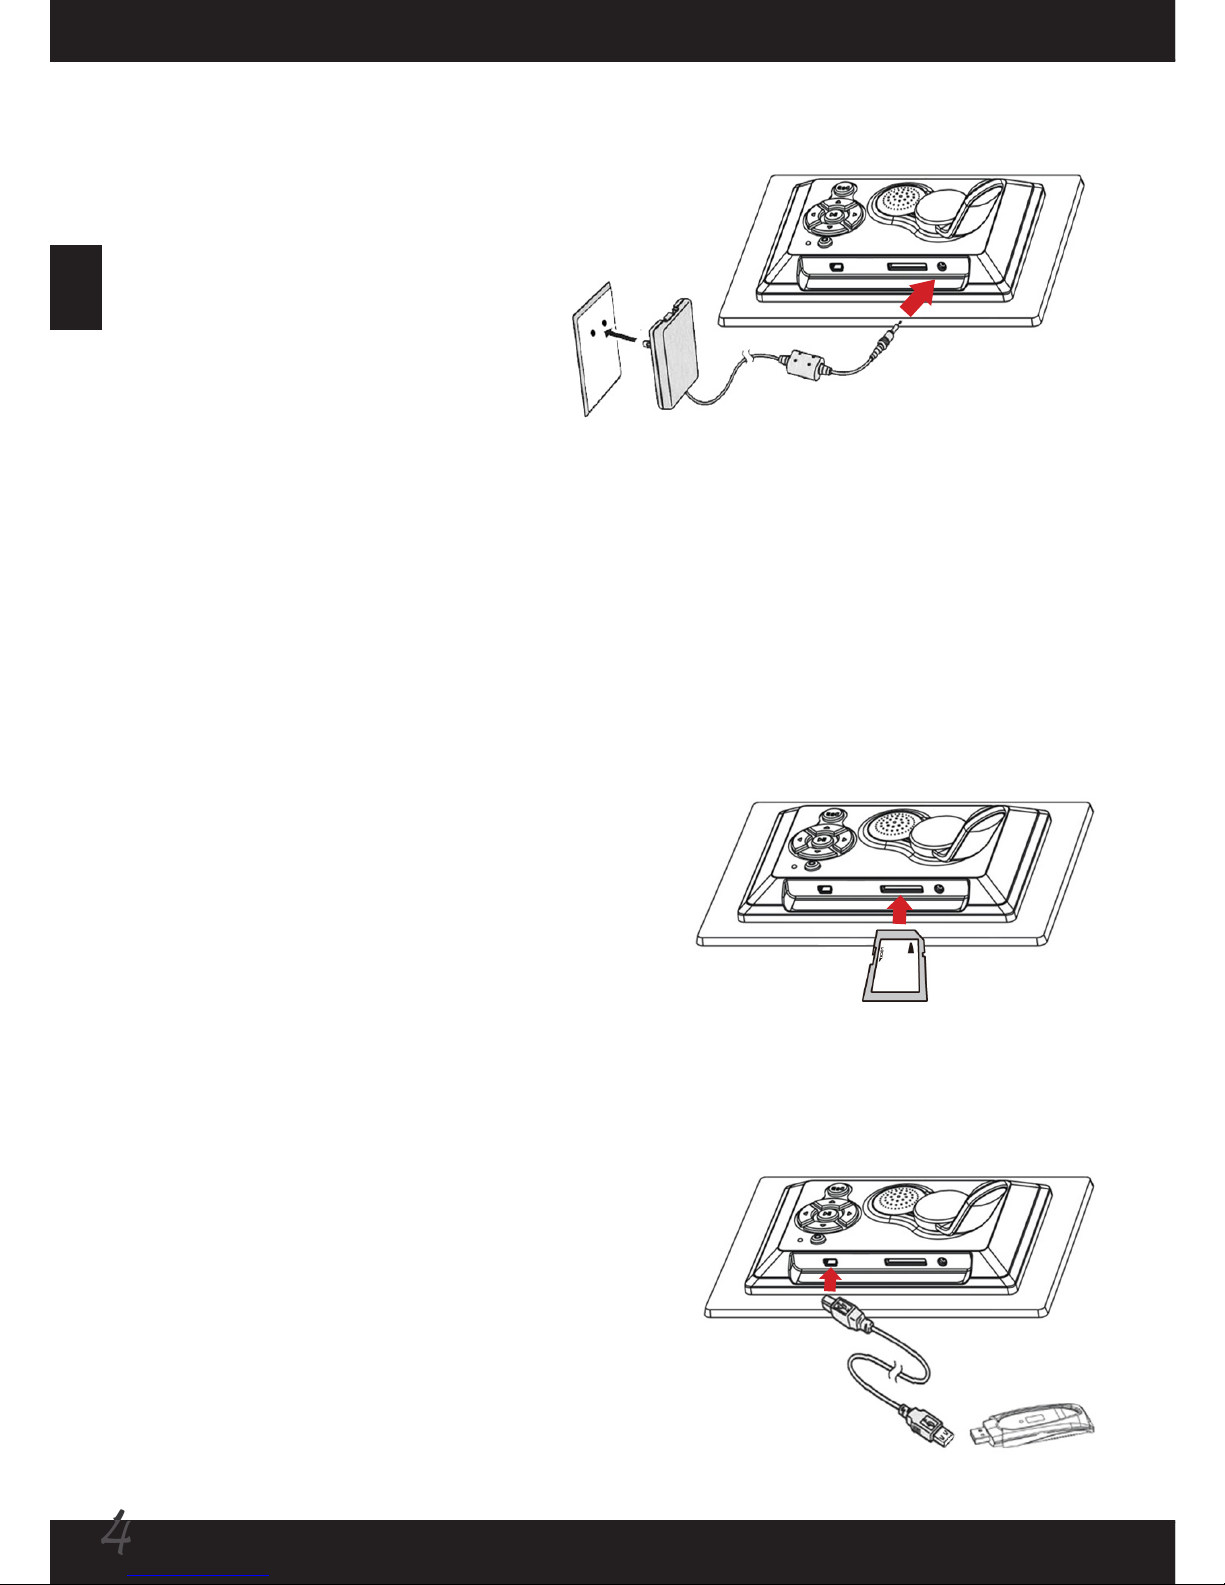
Connecting to AC power
Connect one end of the accessory
power cable to the photo frame,
and then connect the power
adapter to a power socket.
Note: Always use the accessory
power cable only.
Connecting to a USB drive (optional)
Connect one end of the accessory USB cable
to the photo frame, and then connect the
other end to a USB drive.
Powering on/off the photo frame
When connecting to AC power, the power LED will indicate red. Long press the
power button about 2 seconds to power on the photo frame, and the LED will
indicate green. Long press the power button to turn off the photo frame, and the LED
will become red again.
Using SD/MMC card (optional)
To insert a memory card, gently push the card
until the card reaches the bottom of the slot
(make sure the beveled corner is correctly
aligned). To remove the memory card, gently
push the card and it will pop up. Then pull the
card out of the slot.
Page 6

EN5EN
Buttons usage
Button Location Function
Up Button
1) Move up the cursor at the menu.
2) Rotate picture clockwise while viewing.
Down Button
1) Move down the cursor at the menu.
2) Rotate picture counter-clockwise while viewing.
Left Button
1) Move the cursor to the left at the menu.
2) Back to upper-level folder while in le list.
3) Switch to previous picture while viewing.
Right Button
1) Move the cursor to the right at the menu.
2) Back to sub-level folder while in le list.
3) Switch to next picture while viewing.
Enter Button
1) Conrm a selected item or action.
2) Pause playing pictures (when performing a
slideshow).
ESC Button
1) Cancel an action.
2) Exit menu/sub-menu.
3) Go back to function selection interface.
Power Button Turn on/off the power of the photo frame.
Page 7

6
EN
EN
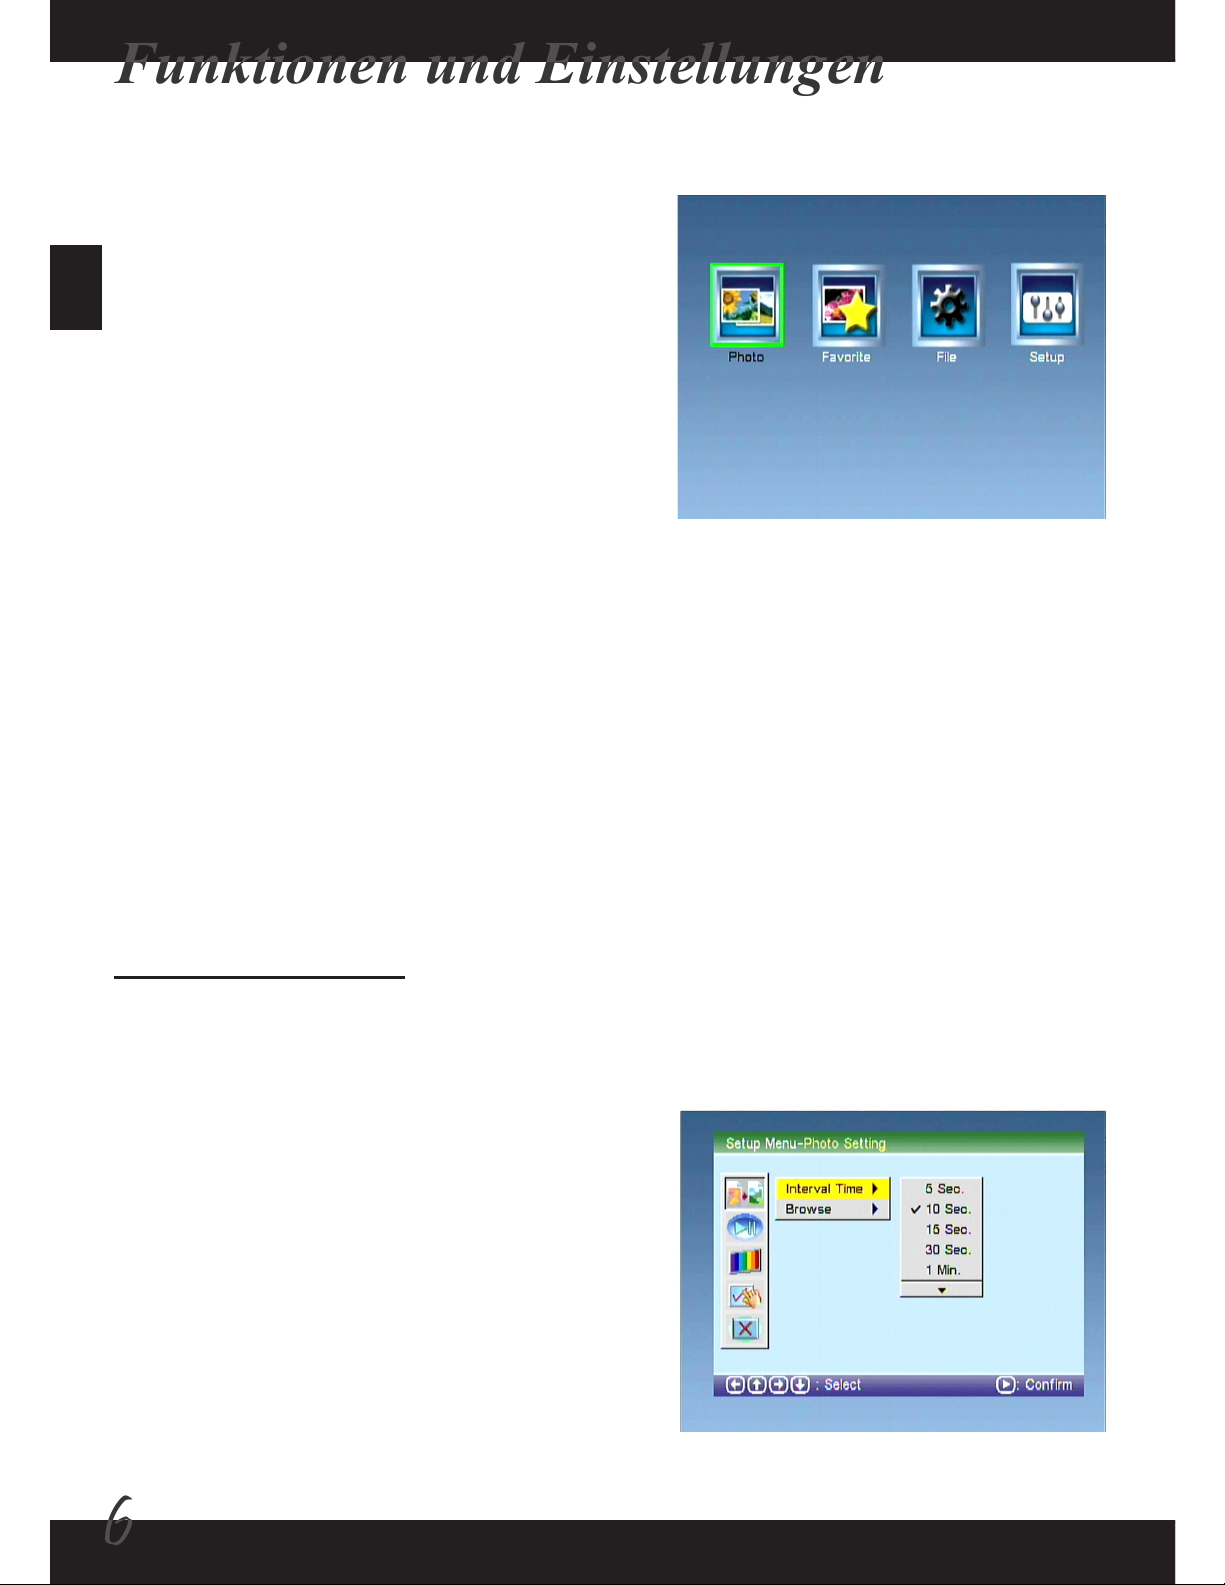
The Setup function provides many menu items for you to ne-tune your photo frame.
Use the left and right buttons to select the Setup item and press the Enter button to
enter the Setup interface. Press the ESC button to return to the main interface.
1) Photo Setting:
Set up the following items by using the directional buttons to move the highlight box
and pressing the Enter button to conrm.
1-1) Interval Time:
Setup the interval time between picture
display in the slideshow. There are 9 options:
5 seconds / 10 seconds / 15 seconds / 30
seconds / 1 minute / 3 minutes / 5 hour / 10
hour / 24 hour.
Functions and Settings
Selecting function
Power on the photo frame, and the main
interface will show up after the start-up
screen. If the “Auto-Play” (slideshow) feature
is enabled, the slideshow of pictures stored
in the internal memory or memory card/USB
drive will be launched automatically. You can
press the ESC button to return to the main
interface at any time. There are four items in
the main interface: Photo, Favorite, File and
Setup.
The Setup function - 1
Page 8

EN7EN
The Setup function - 2
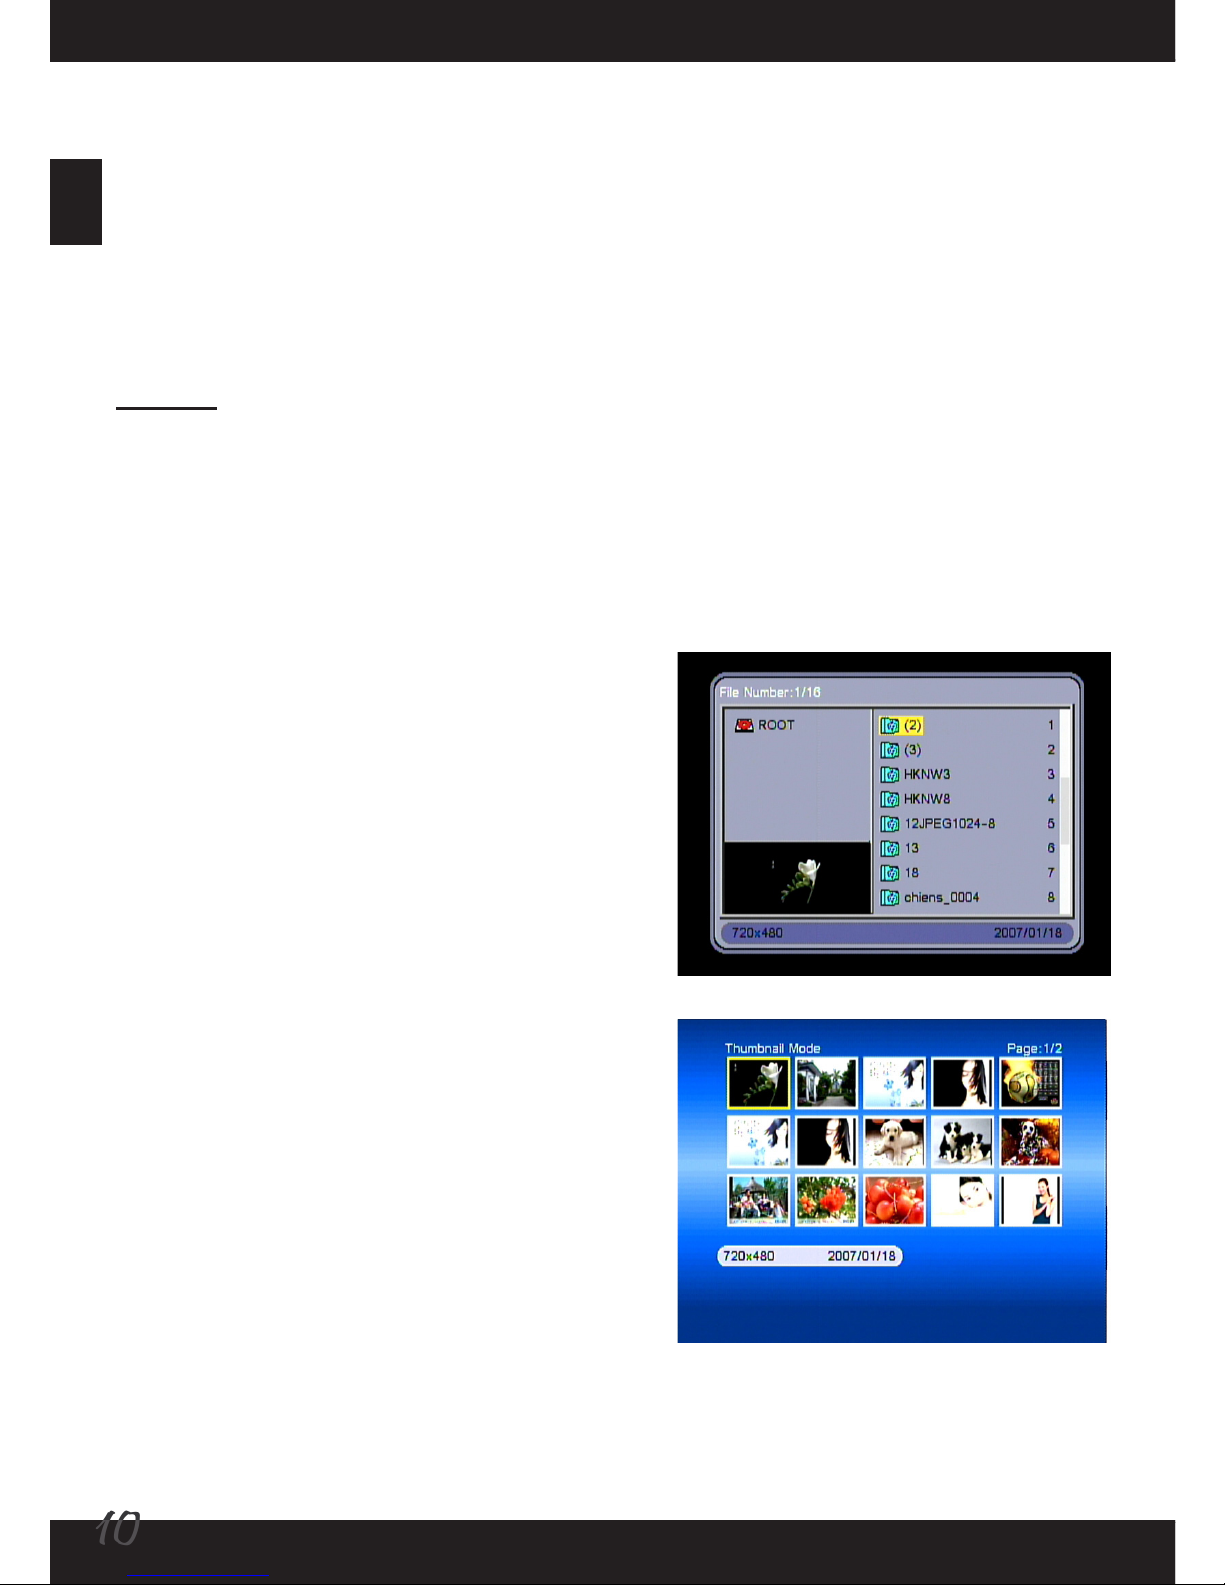
1-2) Browse:
Setup the default view of the browse mode
(when you use the Photo function). There are
2 options: Thumbnail / File Manager.
2) Auto-Play:
Toggle whether slideshow will be
automatically launched when the photo frame
is powered on. If toggled on, pictures will be
played upon powering on. If toggled off, you
can enter Thumbnail or File Manager mode to
browse your pictures manually.
3) Display Setup
3-1) Display Type:
Setup whether the displayed picture will be
stretched (or constrained) to full screen or
stay at its normal size (aspect). There are 2
options: Full Screen / Normal.
Page 9

8
EN
EN
The Setup function - 3
3-2) TFT Brightness:
Setup the brightness of the LCD screen. The
greater the number is, the brighter the screen
will be. There are 9 options: numbers range
from -4 to 4.
3-3) TFT Contrast:
Setup the contrast of the screen image. The
greater the number is, the more contrast
the displayed image will have. There are 9
options: numbers range from -4 to 4.
3-4) TFT Saturation:
Setup the color saturation degree of the
screen image. The greater the number is, the
more saturated the displayed image will be.
Higher saturation provides more vivid and
intensive color. There are 9 options: numbers
range from -4 to 4.
Page 10

EN9EN
The Setup function - 4
4) Custom Setup:
4-1) OSD language:
Setup the OSD language. Select one suitable
language and press the Enter button to
conrm.
4-2) Style:
Setup the style of the OSD background.
There are four styles for your choices.
4-3) Repeat Mode:
Setup the repeat mode of the photo
slideshow:
Off : Disable repeat function
Folder : Repeat playing all the images
in one folder. If you choose this function,
we recommend using “File Manager” as
viewer to select the folder (check 1-2
Browse setting).
All : Repeat playing all pictures
•
•
•
Page 11
10
EN
EN
This function requires a memory card to be
inserted or a USB drive to be connected. If
both a memory card and a USB drive are
present, only the content of the USB drive
will be read. After selecting this function, the
pictures in the memory card or USB drive
will be displayed in either Thumbnail mode
or File Manager mode (depending on the 1-2
Browse setting).
Notes regarding the Photo function:
1) Only JPEG pictures are supported and can
be displayed.
2) If the “Auto-Play” feature is enabled,
entering Photo function will start playing
pictures in the memory card or USB drive.
3) While playing pictures, pressing the Enter
button can pause/resume playing.
4) You can press the up/down button to rotate
the view of the picture.
5) Press the ESC button to cancel an action
or return to the main interface.
The Setup function - 5
4-4) Default:
Restore factory system default. Note that all settings you made will be overridden.
4-5) Version:
Show the current system version.
5) Exit:
Return to the main interface.
The Photo function
Page 12

EN11EN
The File function
The File function allows you to copy pictures
in a memory card to the “Favorite” folder
(internal memory), or delete unwanted
pictures saved in the “Favorite” folder. Upon
entering the File interface, you can select one
of the three items: Copy, Delete, or Exit.
Copy:
You can copy pictures saved in a memory
card to the “Favorite” folder (internal
memory). In the window the content of the
memory card will show and you can select the
folder you want to browse. Choose pictures
by pressing the up or down button and then
pressing the Enter button, and the picture
will be highlighted. Pressing Enter again
will cancel the selection. After selecting all
the pictures you want, move the highlight
box to the “Save” item and press Enter, and
the selected pictures will be copied to the
“Favorite” folder (internal memory).
Note: This function can support 15 pieces
of pictures at most.
Delete:
This function is used to delete unwanted
pictures in the “Favorite” folder (internal
memory). In the window all pictures saved in
the “Favorite” folder will be displayed. Use
the directional buttons to select the picture
you want to delete and press the Enter button
to delete. If you want to erase all pictures at
once, you can select the “Delete All” item and
press Enter to delete all images. Select the
“Return” item to go back to previous view.
Exit:
Return to the main interface.
Page 13

12
EN
EN
The Favorite function
Select this item to start playing your favorite pictures saved in the “Favorite” folder
(internal memory). Note that when the photo frame stays idle for over 5 minutes after
powered on, this function will automatically start and a slideshow will take place. You
can always press the ESC button to interrupt and return to the main interface.
Page 14

EN
13
EN
Appendix
Troubleshooting
Problem Cause Solution
Power indicator is
not lit.
Power is off or power
indicator is broken.
Check whether the AC adapter is well
connected and power supply is normal.
No start-up interface.
AC adapter is not well
connected or does not
power on normally.
Check whether the AC adapter is well
connected and make sure the photo
frame is powered on normally.
Can see start-up
interface, but could
not play.
Card is inserted
reversely or card is not
fully compatible.
Re-insert the card, or format the card
before copy les.
NOTICE: Since there are many brands of memory cards, please test the
compatibility on the spot when you buy the memory cards (this product could not
support pirate cards). If the memory card is correctly inserted, and the start-up
interface is displayed but the photo frame can not read the card, please turn off and
restart the photo frame, or format the card and re-copy the les.
Page 15

Entsorgen Sie das Gerät am Ende
seiner Einsatzzeit nicht mit dem
regulären Hausmüll; bringen Sie das
Gerät zu einer öffentlichen RecyclingSammelstelle.
Dadurch leisten Sie einen Beitrag zum
Schutz unserer Umwelt.
Einleitung!!
Vielen Dank für den Kauf dieses Produktes. Wir haben viel Zeit und Mühe in die
Entwicklung investiert, damit Sie viele Jahre lang Freude an Ihrem digitalen
Fotorahmen haben werden.
Sicherheitshinweise:
1. Lassen Sie den Fotorahmen nicht fallen, beschädigen und zerlegen Sie das Gerät nicht,
andernfalls erlischt die Gewährleistung.
2. Vermeiden Sie jeglichen Kontakt des Gerätes mit Wasser und trocknen Sie sich die Hände
ab, bevor Sie es verwenden.
3. Setzen Sie den Fotorahmen keinen hohen Temperaturen und direkter Sonneneinstrahlung
aus. Dies kann das Gerät beschädigen.
4. Verwenden Sie den Fotorahmen mit Sorgfalt. Drücken Sie nicht fest darauf.
5. Verwenden Sie den Fotorahmen zu Ihrer eigenen Sicherheit nicht bei Gewittern oder
Blitzschlag.
6. Verwenden Sie ausschließlich vom Hersteller angebotenes Zubehör.
7. Bewahren Sie den Fotorahmen außerhalb der Reichweite von Kindern auf.
Page 16

2
DE
DE
Start
Fotorahmenteile
LCD- Bildschirm
Frontrahmen
Dekorationsplatte
Entlüftungsöffnungen
ESC Knopf
Standfuß
Netzstromkon-
trollanzeige
Rechts Knopf
Hoch Knopf
Herunter Knopf
Netzschalter
Links Knopf
Enter Knopf
SD/MMC- Kartenschlitz
DC- NetzsteckdoseUSB- Schlitz
Page 17
DE3DE
Anleitung für Produkt
Digitalbilderrahmen verstärkt einen hellen 7” (7-inch) TFT-LCD Bildschirm und ist mit
Multimedia-Technologie betrieben. Es hat folgende Eigenschaften:
Automatisch Start/Repeat Bild anzeigen (15-Bild durchsehen)
Automatisch Bild anzeigen in Diabetriebsart und unterstützt verschiedene
Übergangseffekten
Es unterstützt Anzeigensabstand eingestellt von Kunden
Es unterstützt SD/MMC Speicherkarte (bis zu 2GB)
Es unterstützt JPEG-Format Bilder bis 12 mega pixels
Es unterstützt einen USB-Adapter Speicher
Eingebauter Speicher für die Abspeicherung von beliebten Bildern
•
•
•
•
•
•
•
Technische Daten
Eingangsspannung des Netzsteckers: AC100~240v, 50~60Hz
Eingangsspannung der Einheit: +9VDC
Leistungsaufnahme: <5W
Bildformat: JPEG (YUV code)
Betriebsart: Knopf
LCD- Auösung : 480×234 pixels
Wirkender Anzeigensbereich: 137 mm × 86.58 mm
•
•
•
•
•
•
•
Standfuß anstecken
Einstecken des Frontende den
Standfuß In den Schlitz am
Rückrahmen wie gezeigt. Schieben
Sie den Standfuß aufwärts ( ) bis
den Standfuß richtig zugeschlossen
ist. Um den Standfuß zu lösen,
schieben Sie den Standfuß abwärts
( ) bis es entfernt ist.
Page 18
4
DE
DE
Verbindung mit AC Spannung
Verbinden Sie ein Ende des
zusätzlichen Netzkabels mit
Bilderrahmen und dann Netzstecker
mit Netzsteckdose.
Bemerkung: Immer nur das
zusätzliche Netzkabel benutzen.
Anschließen an USB Speicher Adapter
Schließen Sie ein Ende des zusätzlichen USB
Kabels an Bilderrahmen an, und dann das
anderes Ende an einen USB Speicher Adapter.
Ein-und Ausschaltung des Bilderrahmens
Bei Anschließen an AC Spannung zeigt LED rot an. Wenn Sie den Netzschalter
länger als 2 sek. drücken, um Bilderrahmen einzuschalten, zeigt LED grün an. Bei
Netzschalter länger drücken, um Bilderrahmen auszuschalten, wird LED wieder rot.
Verwenden einer SD/MMC-Karte (optional)
Schieben Sie zum Einlegen die Karte sanft
bis zum Anschlag in den Steckplatz (achten
Sie dabei auf die richtige Position der
abgeschrägten Ecke). Um die Speicherkarte
zu entnehmen, drücken Sie behutsam auf die
Karte, woraufhin sie ein Stück herausspringt.
Ziehen Sie die Karte anschließend aus dem
Steckplatz heraus.
Page 19

DE5DE
Knopf-Anwendung
Knopf Ortung Funktion
Hoch Knopf
1) Cursor am Menü aufwärts bewegen.
2) Bei Betrachtung das Bild im Uhrzeigersinn drehen.
Herunter Knopf
1) Cursor am Menü abwärts bewegen.
2) Bei Betrachtung das Bild im gegen Uhrzeigersinn
drehen.
Links Knopf
1) Cursor am Menü nach links bewegen.
2) Zurück zu höheren Stufe Datei während in
Dateienliste.
3) Umschaltung zu vorigem Bild bei Ansehen.
Rechts Knopf
1) Cursor am Menü nach rechts bewegen.
2) Zurück zu Unterstufe- Datei während in Dateienliste.
3) Umschaltung zu nächstem Bild bei Ansehen.
Enter Knopf
1) Bestätigung einer gewählten Betätigung.
2) Bilderspiel-Pause (bei Dia- Darstellung).
ESC Knopf
1) Stornierung der Betätigung.
2) Austritt von Menü/Sub-menü.
3) Zurück zu Selection-Schnittstelle.
Netzschalter
Ein-und Ausschaltung des Bilderrahmens.
Page 20
6
DE
DE
Setup Funktion liefert vielen Menü für Feineinstellung Ihres Bilderrahmens. Benutzen
Sie links und rechts Knopf, um Setup zu wählen und drücken den Enter Knopf die
Setup-Schnittstelle einzutreten. Drücken Sie ESC Knopf, nach Hauptschnittstelle
zurückzustellen.
1) Bildereinstellung:
Sie können den beweglichen Rahmen mit den Pfeiltasten auf das gewünschte
Symbol verschieben und ihre Auswahl mit der Entertaste bestätigen.
1-1) Zeit der BetriebspauseInterval :
Stellen Sie die Zeit der Betriebspause
zwischen Bildanzeige in Diadarstellung ein.
Es gibt 9 Optionen: 5 Sekunde / 10 Sekunde
/ 15 Sekunde / 30 SeKunde / 1 Minute /
3 Minuten / 5 Stunde / 10 Stunden / 24
Stunden.
Funktionen und Einstellungen
Wählfunktion
Wenn Bilderrahmen eingeschaltet ist,
wird die hauptschnittstelle nach StartupSchirm gezeigt. Wenn “Auto-Play”
(slideshow) Eigenschaft befähigt ist, wird
die Diadarstellung, gespeichert in interner
Speicher oder Speicherkarte/ USB Speicher
Adapter automatisch gestartet. Sie können
ESC Knopf drücken, um jederzeit nach
Hauptschnittstelle zurückzustellen. Es gibt
vier Posten in der Hauptschnittstelle: Photo,
Favorite, Datei und Setup.
Setup Funktion - 1
Page 21

DE7DE
Setup Funktion - 2
1-2) Durchsuchen:
Stellen Sie die voreingestellte Ansicht von
browse Betrieb ein (wenn Sie Bilder Funktion
benutzen). Es gibt 2 Optionen: Miniaturbild /
Dateimanager.
2) Auto-Wiederg:
Kippschaltung, ob die Diadarstellung
automatisch gestartet, wenn
Bilderrahmeneingeschaltet ist. Wenn
eingeschaltet ist, werden Bilder gespielt,
wenn ausgeschaltet, können Sie Thumbnail
oder File Manager Betriebsart
eintreten, um Ihre Bilder handbetätig
durchzusuchen.
3) Bildschirm Einstellungen
3-1) Bildschirm Type:
Stellen sie hier ein op das Bild in der original
Größe auf dem Bildschirm angezeigt
werden soll oder op das Bild auf die volle
Bildschirmgröße angepasst werden soll.
Durch diese Anpassung können die Bilder
gestreckt oder gestaucht wirken. Es gibt zwei
Optionen : Vollbild oder Normal.
Page 22

8
DE
DE
Setup Funktion - 3
3-2) TFT Helligkeit:
Stellen sie die Helligkeit des LCD Schirms
ein. Je größer die Nummer ist , desto heller
ist der Bildschirm. Es gibt 9 Optionen: von
Nummer –4 bis 4.
3-3) TFT Kontrast:
Stellen Sie den Konstrast von
Schirmbildbereich ein. Je groß der Nummer
ist, desto ist mehren Konstrast des gezeigten
Bildbereiches. Es gibt 9 Optionen: Nummer
reicht von -4 bis 4.
3-4) TFT Saturation:
Stellen Sie die Saturation von
Schirmbildbereich ein. Je groß der Nummer
ist, desto ist mehre Saturation des gezeigten
Bildbereiches. Höhere Saturation liefert mehr
lebhafte Farbe. Es gibt 9 Optionen: Nummer
reicht von -4 bis 4.
Page 23

DE9DE
Setup Funktion - 4
4) Benutzer Setup:
4-1) OSD Sprache:
Stellen Sie die OSD Sprache ein. Wählen Sie
die geeignete Sprache und bestätigen Sie
Ihre Auswahl mit der Enter-Taste.
4-2) Style:
Stellen Sie Style von OSD Hintergrund ein.
Es gibt vier Arten für Ihre Auswahl.
4-3) Wiederholungs Modus:
Stellen Sie den Wiederholungs Modus der
Diavorführung ein:
AUS : Keine Wiederholung.
ORDNER : Alle Bilder aus einem Ordner
werden wiederholt. Wenn sie diese
Funktion nehmen, wählen Sie den „Datei
Manager“. (bitte siehe 1-2 Durchsuchen).
ALL : Alle Bilder werden wiederholt
abgespielt.
•
•
•
Page 24

10
DE
DE
Diese Funktion benötigt eine Speicherkarte, die eingesteckt ist oder einen USBSpeicher Adapter. Wenn die Speicherkarte
und der USB- Speicher Adapter
angesteckt sind, wird nur der Inhalt vom
USB-Speicher Adapter ausgelesen. Nach
wählen dieser Funktion werden die Bilder von
der Speicherkarte oder vom USB-Speicher
Adapter entweder in Miniaturbild-Betriebsart
oder Dateimanager Betriebsart gezeigt (siehe
1-2 Durchsuchen).
Hinsichtlich der Photo Funktion:
1) Nur JPEG Bilder sind unterstützt und
können angezeigt.
2) Wenn die Auto-Start Funktion aktiviert ist,
werden die Bilder von der Speicherkarte
oder vom USB-Speicher Adapter beim
Starten der Foto Funktion gestartet.
3) Durch drücken der Enter-Taste während
der Bildwiedergabe, wird die Pause /
Resume Funktion ausgeführt.
4) Sie können den HOCH/HERUNTER
Knopf drücken, um die Bildbetrachtung zu
drehen.
5) Drücken Sie den ESC Knopf, um eine
Betätigung zu stornieren oder zur Hauptschnittstelle zurückzustellen.
Setup Funktion - 5
4-4) Standard:
Bei Rekonstruieren der Fabriksystemsvoreinstellungm werden alle von Ihnen
gemachten Einstellungen nichtig gemacht.
4-5) Version:
Es zeigt die gegenwärtige System-Version.
5) Exit :
Rückstellung zur Hauptschnittstelle.
Bilder-Funktion
Page 25

DE11DE
Datei-Funktion
Datei-Funktion erlaubt Bilder in einer
Speicherkarte in “Favour” Ordner (interner
Speicher) zu kopieren, oder unerwünschten
Bilder, gespeichert in “Favorite” Ordner
zu löschen. Nach Aufschaltung der
Dateischnittstelle kann eins von drei: Kopie
(Copy), Tilgung (Delete) oder Austritt (Exit)
gewählt werden.
Copy:
Sie können Bilder, gespeichert in der
Speicherkarte in “Favour” Ordner (interner
Speicher) kopieren. Im Fenster kann der
Inhalt der Speicherkarte gezeigt und Sie die
erwünschte Datei wählen um durchzusuchen.
Wählen Sie Bilder durch Drücken auf UP
oder DOWN Knopf und dann Enter. Das Bild
wird betont. Drücken Sie ENTER nochmals,
wird die Auswahl storniert. Nach Wählen aller
erwünschten Bilder, brigen Sie den betonten
Kasten zu “SAVE” und drücken ENTER, so
daß die gewählten Bilder in “Favour” Ordner
(interner Speicher) kopiert werden.
Bemerkung: Diese Funktion kann höchst
15 Bilder unterstützen.
Delete:
Diese Funktion kann unerwünschten Bilder in
“Favour” Ordner (interner Speicher) tilgen. Im
Fenster werden alle in Favorite gespeicherten
Bilder gezeigt. Benutzen Sie die gerichteten
Knöpfen das zu tilgendes Bild zu wählen
und drücken Sie ENTER zu tilgen. Wenn Sie
alle Bilder gleichzeitig tilgen wollen, wählen
Sie “Alles Löschen” und drücken Sie Enter.
Wählen Sie “Zurück”, gehen Sie zurück zur
vorigen Ansicht.
Exit:
Zurück zur Hauptschnittstelle.
Page 26

12
DE
DE
Favorite- Funktion
Wählen Sie dies, um die in “Favour” Ordner (interner Speicher) gespeicherten Bilder
zu spielen. Wenn Bilderrahmen nach Einschaltung länger als 5 Minutne untätig
bleibt, wird diese Funktion automatisch starten und der Dialm anfangen. Sie können
immer ESC Knopf drücken, um zu unterbrechen und zurück zur Hauptschnittestelle.
Page 27

DE
13
DE
Anhang
Fehlerbeseitigung
Problem Ursache Lösung
Stromanzeigenleuchte
leuchtet nicht.
Kein Strom, Netzteil
defekt oder die Anzeige
ist defekt.
Prüfen, ob der AC –Stecker richtig
angeschlossen ist und der Netzanschluß
normal ist.
keine Start-upSchnittstelle.
AC-Stecker ist nicht
richtig angeschlossen
oder nicht richt
eingeschaltet.
Prüfen, ob der AC –Stecker richtig
angeschlossen ist und sicher, daß
Bilderrahmen richtig eingeschaltet.
Start-up-Schnittstelle ist
zu sehen aber nicht zu
spielen.
Karte ist umgekehrt
eingesteckt oder nicht
vollig kompatibel.
Stecken Sie die Karte nochmals ein oder
Format vor Kopieren Dateien.
Bemerkung: Da es viele Fabrikmarken der Speicherkarten gibt, prüfen Sie die
Kompatibilität bei Einkauf. Wenn die Speicherkarte richtig eingesteckt ist und die
Start-up-Schnittstelle angezeigt ist jedoch Bilderrahmen die Karte nicht lessen kann,
schalten Sie bitte aus und starten Bilderrahmen nochmals, oder Format der Karte
und Re-Kopie der Dateien.
Page 28

Ne pas jeter l’appareil avec les déchets
ménagers normaux à la n de sa vie
mais recyclez-le en le déposant dans
un point de collecte ofciel. En faisant
ceci vous contribuez à la préservation
de l’environnement.
Bienvenue:
Chère utilisatrice, cher utilisateur, nous vous remercions pour l’achat de ce produit.
Beaucoup de temps et d’effort ont été investis dans son développement et nous
espérons qu’il vous fournira beaucoup d’années d’utilisation sans problème.
Notice de sécurité:
1. Ce produit étant fragile, il est nécessaire de le placer dans un lieu relativement plat. Il ne
résistera pas à un choc en cas de chute.
2. Ce produit doit être protégé contre l’humidité et s’abîmera si de l’humidité ou un liquide
pénètre à l’intérieur.
3. L’écran (panneau LCD) de ce produit est fabriqué en verre ce qui peut être facilement
endommagé par l’application d’une force externe anormale ou un objet coupant.
4. Ne jamais appuyer sur le LCD pour éviter de l’abîmer. Si le cristal liquide fuit le nettoyer
immédiatement avec du savon et de l’eau.
5. Ce produit supporte le branchement en cours d’utilisation des cartes mémoires. Cependant
nous vous recommandons d’éteindre ce produit avant le branchement/débranchement de
votre carte mémoire an de protéger votre carte mémoire ou d’autres appareils.
6. Nous vous recommandons vivement d’utiliser l’adaptateur livré avec ce produit pour
garantir l’effet d’afchage.
7. Pour nettoyer l’écran, couper d’abord la source d’alimentation et utiliser un chiffon doux
légèrement humide pour l’essuyer. Ne jamais appliquer d’alcool, d’essence ou d’autres
agents chimiques.
8. Pour garantir un fonctionnement normale de ce produit et éviter tout accident, ne pas
utiliser ni entreposer ce produit sous les conditions suivantes: environnement avec
températures trop basses/élevées ; endroit très humide ou exposé directement au soleil
pendant une longue période ; de mauvaises conditions telles qu’un choc puissant.
9. Lors de son fonctionnement, ce produit peut chauffer légèrement ce qui est normal.
10. Selon les directives du fabricant, pour le LCD couleur, un taux de défectuosité de pixels de
0.01% est acceptable. Nous apprécions votre compréhension.
11. Le produit et le manuel d’utilisateur sont soumis à des améliorations et addition sans
avertissement préalable.
Page 29

2
FR
FR
Démarrage
Pièces de cadre photo
Panneau LCD
Cadre avant
Panneau de
décoration
Ouvertures de
ventilation
Bouton ESC
Support
Indicateur
d’alimentation
Bouton droit
Bouton haut
Bouton bas
Bouton
d’alimentation
Bouton gauche
Bouton Ok
Fente de carte SD/MMC
Jack d’alimentation CC
Port USB
Page 30
FR3FR
Présentation du produit
Le cadre photo numérique améliore un écran TFT-LCD lumineux de 7“ (7 pouces)
et est alimenté par une technologie multimédia. Il possède les caractéristiques
suivantes:
Démarrage/répétition automatique de l’afchage de l’image (lecture de 15 photos)
Afchage automatique d’images en mode diaporama, compatible avec divers
effets de transition.
Compatible avec la personnalisation d’intervalles d’afchage
Compatible avec les cartes mémoires SD/MMC (jusqu’à 2Go)
Compatible avec les images de format JPEG jusqu’à 12 méga pixels.
Compatible avec le lecteur de disque USB
Mémoire intégrée pour stockage des images favorites
•
•
•
•
•
•
•
Spécications techniques
Tension d’entrée du bloc d’alimentation: CA 100~240v, 50~60Hz
Tension d’entrée de cet équipement: +9VCC
Consommation: <5W
Format de l’image: JPEG (code YUV)
Mode opératoire: Boutons
Résolution de l’écran d’afchage à cristaux liquides (LCD): 480×234 pixels
Zone d’afchage réelle: 137 mm × 86.58 mm
•
•
•
•
•
•
•
Attacher le support
Insérer l’extrémité avant du support
dans la fente sur le cadre arrière
comme indiqué. Appuyer sur le
support vers le haut ( ) jusqu’à ce
qu’il soit adéquatement verrouillé.
Pour détacher le support, appuyer
vers le bas ( ) jusqu’à ce qu’il
soit ôté.
Page 31

4
FR
FR
Connecter à une prise d’alimentation CA
Connecter une extrémité du câble
d’alimentation accessoire au cadre
photo puis connecter l’adaptateur à
une prise d’alimentation.
Remarque: Utiliser toujours le
câble d’alimentation accessoire
seulement.
Connecter à un lecteur USB
Connecter une extrémité du câble USB
accessoire au cadre photo puis connecter
l’autre extrémité à un lecteur USB.
Allumer/éteindre le cadre photo
Lors de la connexion à une prise de courant continu, le te’moin d’alimentation
devient rouge. Presser longuement le bouton d’alimentation pendant environ 2
secondes pour allumer le cadre photo jusqu’à ce que le te’moin devienne verte.
Presser longuement le bouton d’alimentation pour éteindre le cadre photo jusqu’à ce
que le te’moin devienne à nouveau rouge.
Utilisation de carte SD/MMC (optionnel)
Pour insérer une carte mémoire, poussez
doucement la carte jusqu’à ce qu’elle
atteigne le fond de la fente (assurez-vous
que le appareil photo est éteint et que le coin
biseauté de la carte est correctement aligné).
Pour enlever la carte mémoire, appuyez
doucement sur la carte pour l’éjecter. Enlevez
ensuite la carte de la fente.
Page 32

FR5FR
Usage des boutons
Bouton Location Fonction
Bouton haut
1) Déplacer le curseur vers le haut dans le menu.
2) Faire pivoter l’image dans le sens horaire lors de la
visualisation.
Bouton bas
1) Déplacer le curseur vers le bas dans le menu.
2) Faire pivoter dans le sens antihoraire lors de la
visualisation.
Bouton gauche
1) Déplacer le curseur à gauche dans le menu.
2) Retour au dossier supérieur dans la liste de chiers.
3) passer à l’image précédente pendant la
visualisation.
Bouton droit
1) Déplacer le curseur à droite dans le menu.
2) Retour au dossier supérieur dans la liste de chier.
3) Passer à l’image suivante lors de la visualisation.
Bouton Ok
1) Conrmer une icône sélectionné ou une action.
2) Interrompre la lecture des images (pendant un
diaporama).
Bouton ESC
1) Annuler une action.
2) Sortir du menu/sous-menu.
3) Retourner à l’interface de sélection de fonction.
Bouton d’
alimentation
Allumer/éteindre l’alimentation du cadre photo.
Page 33

6
FR
FR
La fonction Conguration vous offre de nombreux icônes de menu pour vous
permettre d’ajuster votre cadre photo. Utiliser les boutons gauche et droite pour
sélectionner l’icône Conguration et presser le bouton Ok pour entrer dans l’interface
de Conguration. Presser le bouton ESC pour retourner à l’interface principale.
1) Réglage de la photo:
Congurer les icônes suivants en utilisant les boutons de navigation pour déplacer le
boîtier éclairé et en pressant le bouton Ok pour conrmer.
1-1) Temps d’intervalle:
Congurer le temps d’intervalle entre
l’afchage des images dans le diaporama. Il
existe 9 options: 5 secondes / 10 secondes
/ 15 secondes / 30 secondes / 1 minute / 3
minutes / 5 heures / 10 heures / 24 heures.
Fonctions et réglages
Sélection de la fonction
Allumer le cadre photo. L’interface principale
s’afchera après l’écran de démarrage. Si la
caractéristique “Auto-Play” (diaporama) est
activée, le diaporama des images stockées
dans la mémoire interne ou la carte mémoire/
lecteur USB se lancera automatiquement.
Vous pouvez presser le bouton ESC pour
retourner dans l’interface principale à
tout moment. Il existe quatre icônes dans
l’interface principale: Photo, Favoris, Fichier
et Conguration.
La fonction Conguration - 1
Page 34

FR7FR
La fonction Conguration– 2
1-2) Navigation:
Congurer la vue par défaut du mode de
navigation (lorsque vous utilisez la fonction
Photo). Il existe 2 options: Miniatures /
Gestionnaire de chier.
2) Lecture automatique:
Interrompt si le diaporama est lancé
automatiquement lorsque le cadre photo
s’allume. Si activé, les images s’afcheront
lors de l’allumage. Si désactivé, vous pouvez
entrer le mode Miniature ou Gestionnaire de
chier pour naviguer manuellement entre vos
images.
3) Conguration de l’afchage
3-1) Type d’afchage:
Congure si l’image afchée est entièrement
agrandie (ou limitée) à l’écran tout entier ou
conservée à sa taille normale (aspect). Il
existe 2 options : Plain écran / Normal.
Page 35

8
FR
FR
La fonction Conguration – 3
3-2) Luminosité TFT:
Congure la luminosité de l’écran LCD.
Plus le nombre est grand, plus l’écran est
lumineux. Il existe 9 options: nombre entre
-4 et 4.
3-3) Contraste TFT:
Congure le contraste de l’image sur écran.
Plus le nombre est grand, plus l’image
afchée sera contrastée. Il existe 9 options:
nombre entre -4 et 4.
3-4) Saturation TFT:
Congure le degré de saturation de la couleur
de l’image de l’écran. Plus le nombre est
grand, plus l’image afchée sera saturée.
Une saturation plus élevée fournit des
couleurs plus vives et intenses. Il existe 9
options: nombres entre -4 et 4.
Page 36

FR9FR
La fonction Conguration– 4
4) Conguration personnalisée:
4-1) Langage OSD:
Congure la langue de l’OSD. Sélectionner
une langue et presser sur le bouton Ok pour
conrmer.
4-2) Style:
Congure le style de fond de l’OSD. Il existe
quatre styles de votre choix.
4-3) Mode répétition:
Congure le mode répétition du diaporama
photo:
Éteint : Désactive la fonction répétition
Fichier : Répète la lecture de toutes
les images dans un dossier. Si vous
choisissez cette fonction, nous vous
recommandons d’utiliser le “Gestionnaire
de chier” comme visionneuse pour
sélectionner le dossier (vérier
conguration 1-2 Navigation).
Tout : Répète la lecture de toutes les images
•
•
•
Page 37

10
FR
FR
Cette fonction requiert l’insertion d’une carte
mémoire ou la connexion d’un lecteur USB.
Si une carte mémoire et un lecteur USB
sont tous deux présents, seul le contenu
du lecteur USB sera lu. Après avoir
sélectionné cette fonction, les images dans
la carte mémoire ou le lecteur USB seront
afchées soit sous le mode miniatures soit
sous le mode Gestionnaire de cher (selon la
conguration 1-2 Navigation).
Remarques concernant la fonction Photo:
1) Seules les images JPEG sont compatibles
et peuvent être afchées.
2) Si la caractéristique “Auto-Play” est
activée, entrer dans la fonction Photo
lancera la lecture des images dans la carte
mémoire ou le lecteur USB.
3) Pendant la lecture des images, presser le
bouton Ok pour interrompre/reprendre la
lecture.
4) Vous pouvez presser le bouton haut/bas
pour faire pivoter l’image.
5) Presser le bouton ESC pour annuler une
action ou retourner dans l’interface principale.
La fonction Conguration - 5
4-4) Par défaut:
Restore le règlage d’usine du système. Notez que toutes les congurations que vous
avez faites ne seront pas tenues en compte.
4-5) Version:
Afche la version actuelle du système.
5) Sortie :
Retourne à l’interface principale.
La fonction Photo
Page 38

FR11FR
La fonction Fichier
La fonction Fichier vous permet de copier
des images dans une carte mémoire vers
le dossier “Favoris” (mémoire interne) ou
de supprimer les images non désirées et
sauvegardées dans le dossier “Favoris”. Une
fois entré dans l’interface du Fichier, vous
pouvez sélectionner une des trois fonctions:
Copier, Supprimer ou Sortir.
Copier:
Vous pouvez copier des images
sauvegardées dans une carte mémoire vers
le dossier “Favoris” (mémoire interne). Dans
la fenêtre, le contenu de la carte mémoire
s’afchera et vous pouvez sélectionner le
dossier dans lequel vous souhaitez naviguer.
Choisissez les images en pressant le bouton
haut ou bas puis en pressant le bouton Ok
pour rehausser l’image. Presser encore une
fois sur Ok pour annuler la sélection. Après
avoir sélectionné toutes les images que
vous souhaitez, déplacer le surligneur sur la
fonction “Save” et presser Ok. Les images
sélectionnées seront copiées vers le dossier
“Favoris” (mémoire interne).
Remarque: Cette fonction peut supporter
au mieux 15 images.
Supprimer:
Cette fonction est utilisée pour supprimer
des images non voulues dans le dossier
“Favorite” (mémoire interne). Dans la fenêtre,
toutes les images sauvegardées dans le
dossier “Favoris” seront afchées. Utilisez
les boutons de directions pour sélectionner
l’image que vous désirez supprimer et
pressez sur le bouton Ok pour supprimer. Si
vous voulez effacer toutes les images à la
fois, vous pouvez sélectionner la fonction “Supprimer tout” et presser sur le bouton
Ok pour supprimer toutes les images. Sélectionner la fonction “Retourner” pour
retourner à la vue précédente.
Sortie :
Retour dans l’interface principale.
Page 39

12
FR
FR
La fonction Favoris
Sélectionner cet fonction pour commencer à lire vos images favorites sauvegardées
dans le dossier “Favoris” (mémoire interne). Notez que lorsque le cadre photo
reste inactive pendant plus de 5 minutes après l’allumage, cette fonction démarre
automatiquement et un diaporama est lancé. Vous pouvez toujours presser sur le
bouton ESC pour interrompre et retourner dans l’interface principale.
Page 40

FR
13
FR
Appendice
Dépannage
Problème Cause Solution
Indicateur d’alimentation
non allumé.
L’alimentation est
éteinte ou l’indicateur
d’alimentation est
cassé.
Vérier si l’adaptateur de CA est bien
connecté et si l’alimentation est normale.
Pas d’interface de
démarrage.
L’adaptateur CA n’est
pas bien connecté
ou ne s’allume pas
normalement.
Vérier si l’adaptateur de CA est bien
connecté et assurez-vous que le cadre
photo est normalement allumé.
Interface de démarrage
visible mais lecture
impossible.
La carte est insérée
à l’envers ou la carte
n’est pas entièrement
compatible.
Réinsérer la carte ou formater la carte
avant de copier les chiers.
AVIS: En raison de la grande quantité de marques de cartes mémoires disponibles,
veuillez tester la compatibilité des cartes sur place lorsque vous les achetez (ce
produit n’est pas compatible avec des cartes piratées). Si la carte mémoire est
correctement insérée et que l’interface de démarrage s’afche mais que le cadre
photo ne peut lire la carte, veuillez éteindre et redémarrer le cadre photo ou formater
la carte et recopier les chiers.
Page 41

Non gettare via l’apparecchio insieme
ai riuti normali della casa quando
ha nito la sua vita; ma consegnarlo
ad un punto ufciale di raccolta per il
riciclaggio. Così facendo, aiuterete a
conservare l’ambiente.
Benvenuti:
Cari utenti, noi vi ringraziamo per l’acquisto di questo prodotto.
Per realizzarlo, abbiamo investito molto tempo e fatica, e siamo duciosi che potrà
offrirvi molti anni di servizio senza problemi.
Notica per la sicurezza:
1. Questo prodotto è fragile, perciò si deve posizionare in un posto relativamente piano. Non
sopporterebbe l’urto dovuto ad una caduta.
2. Questo prodotto si deve proteggere dall’umidità, e viene danneggiato quando l’umidità o dei
liquidi vi penetrano.
3. Lo schermo (Pannello LCD) di questo prodotto è fatto di vetro, che può essere rovinato
facilmente da una forza esterna anormale o da un oggetto acuminato.
4. Non premere mai l’LCD, perché non si rovini. Se il cristallo liquido perde, va pulito
immediatamente con acqua e sapone.
5. Questo prodotto supporta la inserzione on line di schede di memoria. Tuttavia si consiglia di
spegnere questo prodotto prima di inserire/disinserire la scheda di memoria per proteggere
la scheda di memoria o altri dispositivi.
6. Consigliamo caldamente di usare l’adattatore di corrente in dotazione a questo prodotto per
garantire l’effetto del display.
7. Per pulire lo schermo, prima togliere l’alimentazione e usare un panno morbido
leggermente inumidito per passarvi sopra. Non usare mai alcool, benzina o altri agenti
chimici.
8. Per assicurare la normale operazione di questo prodotto ed evitare incidenti, non usare
o conservare questo prodotto nelle condizioni seguenti: Un ambiente con troppi sbalzi
di temperatura; un posto con alta umidità o raggi diretti del sole per lungo tempo; cattive
condizioni come una forte scossa.
9. Durante l’operazione, questo prodotto potrebbe riscaldarsi un po’, cosa che è normale.
10. Secondo il fabbricante, per l’LCD a colori, è ammissibile un tasso di difetti di 0.01% della
somma dei pixel. Apprezziamo la tua considerazione.
11. Sia il prodotto che il manuale dell’utente sono soggetti ad ulteriori miglioramenti o aggiunte
senza preavviso.
Page 42

2
IT
IT
Come cominciare
Parti della cornice di foto
Pannello LCD
Cornice frontale
Placca di
decorazione
Aperture di
ventilazione
Pulsante ESC
Supporto
Indicatore della
corrente
Pulsante destro
Pulsante Su
Pulsante giù
Pulsante della
corrente
Pulsante sinistro
Pulsante Enter
(Confermare)
Slot Scheda SD/MMC
Presa di corrente DCPorta USB
Page 43

IT3IT
Introduzione al prodotto
La cornice di foto digitale può vantare di avere un pannello LCD TFT luminoso da
7” (7 pollici) ed è alimentata dalla tecnologia multimediale. Ha le caratteristiche
seguenti:
Automaticamente avvia/ripete sullo schermo/display della foto (revisione di 15
foto)
Automaticamente mostra le foto nella modalità proiezione in continuo,
supportando vari effetti di transizione.
Supporta la personalizzazione degli intervalli del display.
Supporta la scheda di memoria SD/MMC (no a 2GB)
Supporta le foto nel formato JPEG no a 12 mega pixel.
Supporta il lettore disco USB
Memoria incorporata per memorizzare le foto preferite.
•
•
•
•
•
•
•
Specicazioni tecniche
Voltaggio di entrata dell’adattatore di corrente: AC100~240v, 50~60Hz
Voltaggio di entrata di questo apparecchio: +9VDC
Consumo di corrente: <5W
Formato della foto: JPEG (Codice YUV)
Modalità di operazione: Pulsanti
Risoluzione del display a cristalli liquidi (LCD): 480×234 pixel
Area effettiva del display: 137 mm × 86.58 mm
•
•
•
•
•
•
•
Attacco del supporto
Inserire il capo frontale del supporto
nello slot del retro della cornice
come indicato. Spingere il supporto
verso l’alto ( ) no a che è
debitamente bloccato. Per staccare
il supporto, spingere il supporto
verso il basso ( ) no a quando
viene rimosso.
Page 44

4
IT
IT
Collegamento alla corrente AC
Collegare un capo dell’accessorio
cavo di corrente alla cornice di
foto, e poi collegare l’adattatore di
corrente ad una presa di corrente,
dato in dotazione.
Nota: Usare sempre solo
l’accessorio cavo di corrente.
Collegamento a un lettore USB
Collegare un capo dell’accessorio cavo USB alla
cornice di foto, e poi collegare l’altro capo ad un
lettore USB.
Come accendere e spegnere (on/off) la cornice di foto
Quando vi collegate alla corrente AC, il LED della corrente indica rosso. Premere
a lungo il pulsante della corrente per 2 secondi per accendere la cornice di foto, e
allora il LED indica verde. Premere a lungo il pulsante della corrente per spegnere la
cornice di foto, e il LED diventa di nuovo rosso.
Uso della scheda SD/MMC (optional)
Per inserire una scheda memoria, spingerla
con delicatezza come mostrato nché
raggiunge il fondo dell’alloggio (assicurarsi
che l’angolo smussato sia allineato in modo
corretto). Per rimuovere la scheda memoria,
spingerla con delicatezza ed uscirà. Quindi
estrarre la scheda dall’alloggio.
Page 45

IT5IT
Uso dei pulsanti
Pulsante Posizione Funzione
Pulsante Su
1) Sposta in su il cursore nel menu.
2) Ruota la foto in senso orario mentre si visualizza.
Pulsante giù
1) Sposta in giù il cursore nel menu.
2) Ruota la foto in senso antiorario mentre si
visualizza.
Pulsante
sinistro
1) Sposta il cursore verso il menu della sinistra.
2) Indietro alla cartella di livello superiore quando si è
nell’elenco dei le.
3) Passa alla foto precedente mentre si visualizza.
Pulsante destro
1) Sposta il cursore verso il menu della destra.
2) Indietro alla cartello di sottolivello quando si è
nell’elenco dei le.
3) Passa alla foto successiva mentre si visualizza.
Pulsante Enter
1) Conferma una voce o azione selezionata.
2) Fa pausa nell’esecuzione delle foto (Mentre si
esegue una proiezione continuata).
Pulsante ESC
1) Annulla un’azione.
2) Esce dal menu/sottomenu.
3) Ritorna all’interfaccia di selezione della funzione.
Pulsante della
corrente
Accende/spegne la corrente della cornice di foto.
Page 46

6
IT
IT
La funzione di Impostazione fornisce molte voci del menu con cui potete regolare
in modo ane alla vostra cornice di foto. Usare i pulsanti sinistro e destro per
selezionare la voce dell’Impostazione e premere il Pulsante Enter per accedere
all’interfaccia dell’Impostazione. Premere il Pulsante ESC per ritornare all’interfaccia
principale.
1) Impostazione Foto:
Impostare le voci seguenti usando i pulsanti direzionali per spostare la casella di
evidenziatura e premendo il Pulsante Enter
per confermare.
1-1) Tempo dell’intervallo:
Imposta il tempo dell’intervallo della
visualisazione fra le foto nella proiezione
continuata. Ci sono 9 opzioni: 5 secondi / 10
secondi / 15 secondi / 30 secondi / 1 minuto /
3 minuti / 5 ore / 10 ore / 24 ore.
Funzioni e Impostazioni
Selezione della funzione
Accendere la cornice di foto, e si mostra
lo schermo dell’interfaccia principale
dopo l’avvio. Se è attivata la funzione
di Riproduzione automatica “Auto-Play”
(proiezione continuata), viene lanciata la
proiezione in continuo delle foto memorizzate
nella memoria interna o nella scheda di
memoria/lettore USB automaticamente.
Potete premere il Pulsante ESC per tornare
all’interfaccia principale in qualsiasi momento.
Nell’interfaccia principale ci sono quattro
voci: Foto, Preferite, File e Congurazione/
Impostazione.
Funzione di Impostazione / Congurazione - 1
Page 47

IT7IT
Funzione di Impostazione / Congurazione - 2
1-2) Sfoglia/Esplora:
Imposta della visualizzazione predenita
della modalità sfoglia (quando usate la
funzione Foto). Ci sono 2 opzioni: Anteprima
/ Gestione File.
2) Riproduzione automatica- AutoPlay:
Alterna la proiezione in continuo se si
vuole lanciata automaticamente quando la
cornice di foto viene accesa (ON). Se è così
impostata, le foto vengono eseguite appena
si accende la cornice. Se è spenta (OFF),
potete enter la modalità Anteprima oppure
Gestione File per sfogliare manualmente le
foto.
3) Impostazione dello Schermo/
display
3-1) Tipo di Display:
Imposta se la foto mostrata viene allargata (o
ristretta) per riempire lo schermo o se rimane
nella sua dimensione normale (aspetto). Ci
sono 2 opzioni: Schermo Pieno / Normale.
Page 48

8
IT
IT
Funzione di Impostazione dello Schermo/display - 3
3-2) Luminosità TFT:
Imposta la luminosità dello schermo LCD.
Più grande è il numero, più luminoso sarà lo
schermo. Ci sono 9 opzioni: i numeri vanno
da -4 a 4.
3-3) Contrasto TFT:
Imposta il contrasto dell’immagine dello
schermo. Più grande è il numero, più
contrasto ha l’immagine mostrata. Ci sono 9
opzioni: i numeri vanno da -4 a 4.
3-4) Saturazione TFT:
Imposta il grado di saturazione del colore
dell’immagine dello schermo. Più grande
è il numero, più saturata sarà l’immagine
mostrata. Una maggiore saturazione fornisce
un colore più vivido e intenso. Ci sono 9
opzioni: i nmeri vallo da -4 a 4.
Page 49

IT9IT
Funzione di Impostazione / Congurazione - 4
4) Impostazione personalizzata:
4-1) Lingua OSD (lingua sullo schermo):
Imposta la lingua OSD. Selezionare la lingua
adatta e premere il Pulsante Enter per
confermare.
4-2) Stile:
Imposta lo stile dello sfondo OSD della
proezione continuata delle foto. Ci sono
quattro stili fra cui scegliere.
4-3) Modalità ripeti:
Imposta la modalità ripeti della proiezione
continuata delle foto:
Spenta(Off) : Disattiva la funzione di ripeti.
Cartella : Ripete l’esecuzione di tutte
le immagini di una cartella. Se scegliete
questa funzione, vi consigliamo di usare
“Gestione File” come visualizzatore
per selezionare la cartella (vedere 1-2
Impostazione di Sfoglia).
Tutto : Ripete l’esecuzione di tutte le
foto.
•
•
•
Page 50

10
IT
IT
Questa funzione richiede che una scheda di
memoria sia inserita o che un lettore USB
sia collegato. Se sono presenti ambedue
una scheda di memoria e un lettore USB,
viene letto solo il contenuto del lettore
USB. Dopo aver selezionato questa funzione,
le foto della scheda di memoria o del lettore
USB vengono mostrate nella modalità
Anteprima o nella modalità Gestione File (a
seconda dell’impostazione di Sfoglia 1-2).
Note riguardanti la funzione Foto:
1) Sono supportate e possono essere
mostrate solo le foto JPEG.
2) Se la funzione Riproduzione automatica“Auto-Play” è attivata, quando si enter la
funzione Foto si comincia ad eseguire le
foto della scheda di memoria o del lettore
USB.
3) Mentre vengono eseguite le foto,
premendo il Pulsante Enter si può fare
pausa/riprendere l’esecuzione.
4) Potete premere il pulsante su/giù per far
ruotare la visualizzazione della foto.
5) Premere il Pulsante ESC per annullare un’azione o ritornare all’interfaccia
principale.
Funzione di Impostazione / Congurazione - 5
4-4) Predenita:
Ripristina i predeniti del sistema della fabbrica. Notare che tutte le impostazioni che
avete fatto saranno cancellate.
4-5) Versione:
Mostra l’attuale versione del sistema.
5) Esci :
Ritorna all’interfaccia principale.
Funzione Foto
Page 51

IT11IT
Funzione File
La funzione File vi permette di copiare le
foto della scheda di memoria nella cartella
“Preferite” (memoria interna), o eliminare
le foto non volute salvate nella cartella
“Preferite”. Dopo aver enter l’interfaccia del
File, potete selezionare una delle tre voci
seguenti: Copia, Elimina o Esci.
Copia:
Potete copiare le foto salvate nella scheda di
memoria nella cartella “Preferite” (memoria
interna). Nella nestra viene mostrato il
contenuto della scheda di memoria e voi
potete selezionare la cartella che volete
sfogliare. Scegliere le foto premendo il
pulsante su o giù e poi premendo il Pulsante
Enter, e la foto viene evidenziata. Premendo
di nuovo Enter si annulla la selezione. Dopo
aver selezionato tutte le foto che desiderate,
spostate la casella di evidenziatura sulla voce
“Salva” e premete Enter, e le foto selezionate
verranno copiate nella cartella “Preferite”
(memoria interna).
Nota: Questa funzione supporta al
massimo 15 foto.
Elimina:
Questa funzione è usata per eliminare le
foto non desiderate nella cartella “Preferite”
(memoria interna). Nella nestra tutte le foto
salvate nella cartella “Preferite” vengono
mostrate. Usare i pulsanti direzionali per
selezionare la foto che desiderate eliminare
e premete il Pulsante Enter per eliminare. Se
volete cancellare tutte le foto in una volta,
potete selezionare la voce “Elimina Tutto”
e premere Enter per eliminare tutte le immagini. Selezionare la voce “Ritorna” per
tornare alla visualizzazione precedente.
Esci:
Ritorna all’interfaccia principale.
Page 52

12
IT
IT
Funzione Preferite
Selezionare questa voce per cominciare ad eseguire le foto preferite salvate
nella cartella “Preferite” (memoria interna). Notare che quando la cornice di foto
rimane inattiva per oltre 5 minuti dopo essere stata accesa, questa funzione
automaticamente comincia e avviene una proiezione continuata. Potete sempre
premere il Pulsante ESC per interrompere e ritornare all’interfaccia principale.
Page 53

IT
13
IT
Appendice
Ricerca guasti
Problema Causa Soluzione
Indicatore della corrente
non è acceso.
Corrente è spenta o
l’indicatore di corrente
è rotto.
Controllare se l’adattatore AC è collegato
bene e l’alimentazione è normale.
Nessun interfaccia di
avvio.
Adattatore AC non è
ben collegato o non
alimenta in modo
normale.
Controllare se l’adattatore AC è ben
collegato e assicurarsi che la cornice di
foto è accesa in modo normale.
Si vede l’interfaccia di
avvio, ma non si può
eseguire nulla.
La scheda è inserita
a rovescio oppure la
scheda non è del tutto
compatibile.
Inserire di nuovo la scheda, o formattare
la scheda prima di copiare i le.
NOTIFICA: Siccome ci sono molte marche di schede di memoria, occorre testare la
compatibilità al momento quando comprate le schede di memoria (questo prodotto
non può supportare le schede piratate). Se la scheda di memoria è inserita in modo
corretto, e l’interfaccia di avviamento è mostrata ma la cornice di foto non riesce
a leggere la scheda, spegnere e riavviare la cornice di foto, oppure formattare la
scheda e ricopiare i le.
Page 54

No bote el aparato como otro desperdicio doméstico cuando se acabe su vida
útil; em cambio, lo deja en un lugar
designado para reciclo. Haciéndolo de
esta manera, Ud. ayuda a preservar el
ambiente.
Bienvenido:
Estimado usuario, le agradecemos por su compra de este producto.
Hemos invertido mucho tiempo y esfuerzo en el desarrollo de este producto y
esperamos que el servicio sin problema le dure muchos años.
Aviso de seguridad:
1. Por ser frágil este producto, se le ruega colocarlo de manera plana. No debe quedar sujeto
a choque por caida.
2. Este producto debe venir protegido contra humedad, y quedará dañado con humedad o
líquido en su interior.
3. La pantalla (panel LCD) de este producto viene hecho de vidrio, lo que quedaría dañado
con facilidad por anormal fuerza externa u objetos agudos.
4. Nunca presionar el LCD, ya que puede quedar dañado. En caso de escape de cristal
líquido, Ud. necesitaría limpiarlo inmediatamente con jabón y agua.
5. Este producto soporta la incorporación on line de tarjetas de memoria. Sin embargo, se le
recomienda apagar este producto antes de incorporar/retirar su tarjeta de memoria para
proteger la misma u otros dispositivos.
6. Le recomendamos vigorosamente usar el adaptador eléctrico que viene con este producto
para asegurar el efecto de visualización.
7. Para limpiar la pantalla, corte la fuente eléctrica primero para limpiarlo con un paño
húmedo. Nunca aplique alcohol, gasolina u otros agentes químicos.
8. Para asegurar las normales operaciones de este producto y evitar accidentes, no use o
guarde este producto bajo las siguientes condiciones: Ambientes con demasiados cambios
de temperatura; lugares con mucha humedad o directo bajo los rayos del sol durante largo
período de tiempo y malas condiciones tales como fuertes sacudidas.
9. Durante la operación, este producto puede calentarse un poco, lo que es normal.
10.Segúnelfabricante,paraelLCDdecolor,unatasadeujode0.01%depixelespermitido.
Agradecemos su comprensión
11. Tanto el producto como el manual del usuario vienen sujetos a cambio o suplemento sin
aviso.
Page 55

2
ES
ES
Inicio
Piezas del marco para fotos
Panel LCD
Marco frontal
Placa decorativa
Aperturas de
ventilación
Botón ESC
Base
Indicadora de
electricidad
Botón Derecha
Botón Arriba
Botón Abajo
Botón Prendido/
Encendido
Botón Izquierda
Botón Entrar
Ranura tarjeta
SD/MMC
Enchufe eléctrico DC
Puerto USB
Page 56

ES3ES
Introducción del producto
El digital marco para fotos propulsa un brillante panel TFT-LCD de 7” (7 pulgadas)
y viene apoyado por la tecnología multimedia. Cuenta con las siguientes
características:
Iniciar/repetir fotos de manera automática (15 fotos)
Mostrar fotos de manera automática en modo diapositiva, apoyando varios
efectos de transición
Permite la personalización de intervalos de visualización
Soporta la tarjeta de memoria SD/MMC (hasta 2GB)
Soporta a fotos de formato JPEG de hasta 12 mega pixeles
Soporta unidad de disco USB
Incorporada memoria para guardar fotos favoritas
•
•
•
•
•
•
•
Especicaciones técnicas
Voltaje de entrada de adaptador eléctrico: AC100~240v, 50~60Hz
Voltaje de entrada de este equipo: +9VDC
Consumo de electricidad: <5W
Formato de foto: JPEG (Código YUV)
Modo de operación: Botones
Resolución de Visualización Cristal Líquido (LCD): 480×234 pixeles
Efectiva área de visualización: 137 mm × 86.58 mm
•
•
•
•
•
•
•
Pegado de la base
Inserte la punta frontal de la base
en la ranura en el marco trasero
como indicado. Empuje la base
hacia arriba ( ) hasta que la base
quede enganchada debidamente.
Para despegar la base, empuje la
base hacia abajo ( ) hasta que
sea removida.
Page 57

4
ES
ES
Uso de la tarjeta SD/MMC (opcional)
Para insertar una tarjeta de memoria, empuje
ligeramente la tarjeta hasta que llegue al fondo
de la ranura (estando seguro de que la punta
biselada viene alineada). Para remover la
tarjeta, la empuje ligeramente hasta que se
asome. Luego retire la tarjeta de la ranura.
Conexión de electricidad AC
Haga conexión de una punta de
cable eléctrico accesorio con
el marco para fotos para luego
hacer conexión del adaptador a un
soquete eléctrico.
Nota: Siempre use solo el cable
eléctrico suministrado.
Conexión a la unidad de disco USB
Haga conexión de una punta del cable USB con
el marco para fotos para luego hacer conexión
de la otra punta con una unidad de disco USB.
Prendido (encendido)/apagado del marco para fotos
Al hacer conexión a la fuente eléctrica AC, el LED eléctrico se pondrá rojo. Presione
el botón durante 2 segundos para prender el marco para fotos, el LED se pondrá
verde. Presione el botón prendido durante un rato para apagar el marco para fotos y
el LED se pondrá rojo nuevamente.
Page 58

ES5ES
Uso de los botones
Botón Localización Función
Botón Arriba
1) Mover el cursor hacia arriba en el menú.
2) Girar la foto en el sentido del reloj para visualizar.
Botón abajo
1) Mover el cursor hacia abajo en el menú.
2) Girar la foto en el sentido contrario del reloj para
visualizar.
Botón izquierda
1) Mover el cursor hacia el menú de la izquierda.
2) Volver a la carpeta de nivel superior en la lista de
archivos.
3) Cambiar a la foto anterior para visualizar.
Botón derecha
1) Mover el cursor hacia el menú de la derecha.
2) Volver a la carpeta de nivel inferior en la lista de
archivos.
3) Cambiar a la foto siguiente para visualizar.
Botón entrar
1)Conrmarunelementooacciónseleccionada.
2) Dejar la reproducción en pausa (durante un
espectáculo de diapositivas).
Botón ESC
1) Cancelar una acción.
2) Salir del menú/sub-menú.
3) Volver a la función de seleccionar entre las
interfases.
Botón prendido
(Encendido)
Prender/apagar el marco para fotos.
Page 59

6
ES
ES
LaconguraciónvieneconmuchoselementosdemenúparaqueUd.denasu
marco para fotos. Use los botones izquierdo y derecho para seleccionar Instalación
y presionar Entrar para entrar en la interfase Instalación. Presione ESC para volver
a la interfase principal.
1) Conguración fotográca:
Programe los siguientes elementos usando los botones direccionales para mover la
opciónresaltadaypresionarEntrarparaconrmar.
1-1) Tiempo de intervalo:
Programe el tiempo de intervalo entre
visualización de fotos en el espectáculo de
diapositivas. Hay 9 opciones: 5 segundos /
10 segundos / 15 segundos / 30 segundos /
1 minuto / 3 minutos / 5 horas / 10 horas / 24
horas.
Funciones y programaciones
Seleccionar funciones
Prenda el marco para fotos y en la
interfase principal aparecerá después de
la pantalla inicio. De activar Reproduccion
automática “Auto-Play” (espectáculo de
diapositivas), las fotos de diapositiva se
guardan en la memoria interna o la tarjeta
de memoria/unidad de disco USB se lanzará
automáticamente. Ud. puede presionar el
botón ESC para volver a la interfase principal
en cualquier momento. Hay 4 elementos en
el entreface principal: Foto, Favorito, Archivo
yConguración.
Conguración - 1
Page 60

ES7ES
Conguración Fotográca – 2
1-2) Buscar:
Programe la visión del modo de búsqueda
(en la function Foto). Hay 2 opciones:
Miniaturas/Administrador de archivos.
2) Reproducción automática:
Seleccione si el espectáculo de diapositivas
se lanza de manera automática al tener el
marco para fotos prendido. De seleccionar
activo, la foto aparece al prenderse/
encenderse. De seleccionar apagado/
desactivo, Ud. puede entrar el modo
miniaturas o Administrador de archivos para
buscar sus fotos manualmente.
3) Conguración de Pantalla/
Visualización
3-1) Tipo visualización de Pantalla:
Programe si la foto visualizada viene
ampliada/estirada (u obligada) en pantalla
completa o queda en su tamaño normal
(aspecto). Hay 2 opciones: Pantalla
completa/Normal.
Page 61

8
ES
ES
Conguración de Pantalla – 3
3-2) Brillo TFT:
Programe el brillo de la pantalla LCD. Cuanto
mayor el número, tanto más brillo en la
pantalla. Hay 9 opciones: rango de números
de -4 a 4.
3-3) Contraste TFT:
Programe el contraste de la imagen de la
pantalla. Cuanto mayor el número, tanto
más contraste de la imagen mostrada. Hay 9
opciones: rango de números de -4 a 4.
3-4) Saturación TFT:
Programe el grado de saturación de color
de la imagen de la pantalla. Cuanto mayor
el número, tanto más saturada la imagen
mostrada. La mayor saturación proporciona
colores más vívidos e intensos. Hay 9
opciones: rango de números de -4 a 4.
Page 62

ES9ES
Conguración – 4
4) Conguración personalizada:
4-1) Idioma OSD:
Programe el idioma en la Pantalla (OSD).
Seleccione un idioma apropiado para luego
presionarEntrarparaconrmar.
4-2) Estilo:
Programe el estilo del espectáculo de
diapositivas en la pantalla. Hay 4 estilos para
su selección.
4-3) Modo Repetir:
Programe el modo de repetir del espectáculo
de diapositivas:
Apagado (Desactivo) : Desactivar la
función repetir.
Carpeta : Repetir reproduciendo las
imágenes en una carpeta. De seleccionar
esta función, recomendamos usar
“Administrador de Archivos” para ver la
selección de la carpeta (revisar 1-2 Buscar).
Todo : Repetir la reproducción de todas las fotos.
•
•
•
Page 63

10
ES
ES
Esta función requiere una tarjeta de
memoria insertada o una unidad de disco
USB conectada. De tener una tarjeta de
memoria y una unidad de disco USB
presentes, solamente el contenido de la
unidad de disco USB será leido. Luego
de seleccionar esta función, las fotos en
la tarjeta de memoria o la unidad de disco
USB aparecerá en el modo miniaturas o
Administrador de Archivos (dependiendo de
laconguración1-2 Buscar).
Notas acerca de la función Foto:
1) Solamente las fotos JPEG vienen
soportadas y mostradas.
2) De activar “Reproducción Automática”,
al entrar en la función Foto iniciará
reproduciendo las fotos en la tarjeta de
memoria o la unidad de disco USB.
3) Durante la reproducción de fotos, presione
Entrar para dejar la reproducción en
pausa/resumir la reproducción.
4) Ud. puede presionar los botones arriba/
abajo para darle vuelta a la vista de la foto.
5) Presione ESC para cancelar una acción o
volver a la interfase principal.
Conguración - 5
4-4) Predeterminado:
Restaurelasopcionesdelsistemadefábrica.Nótesequetodaslasconguraciones
que Ud. tenga hechas serán eliminadas.
4-5) Versión:
Para mostrar la actual versión del sistema.
5) Salida :
Volver a la interfase principal.
La función Foto
Page 64

ES11ES
La función Archivo
La función Archivo le permite a Ud. copiar
fotos de una tarjeta de memoria a la carpeta
“Favorita” (memoria interna), o borrar
fotos que Ud. no desee y guardadas en la
carpeta “Favorita”. Al entrar en la interfase
Archivo, Ud. puede seleccionar uno de los 3
elementos: Copiar, Eliminar o Salir.
Copiar:
Ud. puede copiar fotos guardadas de una
tarjeta de memoria a la carpeta “Favorita”
(memoria interna). Aparecerá la pantalla con
contenidos de la tarjeta de memoria y Ud.
puede seleccionar la carpeta que Ud. desee
buscar. Seleccione fotos presionando los
botones arriba o abajo para luego presionar
Entrar, y la foto aparecerá destacada.
Presionando Entrar nuevamente puede
cancelar la selección. Luego de seleccionar
todas las fotos que Ud. desee, mueva la
opción resaltada al elemento “Grabar” para
presionar Entrar, y las fotos seleccionadas
aparecerán copiadas a la carpeta “Favorita”
(memoria interna).
Nota: Esta función permite 15 fotos como máximo.
Borrar:
Esta función se usa para borrar fotos no
deseadas en la carpeta “Favorita” (memoria
interna). En la imagen, todas las fotos
vienen grabadas en la carpeta “Favorita”
aparecerán. Use los botones direccionales
para seleccionar las fotos que Ud. desee
borrar y presionar Entrar para borrar. De
desear borrar todas las fotos de una vez, Ud.
puede seleccionar “Borrar Todas” y presione
Entrar para borrar todas las imágenes.
Seleccione “Volver” para volver a la imagen
anterior.
Salir:
Volver a la interfase principal.
Page 65

12
ES
ES
La función Favorito
Seleccione este elemento para iniciar reproduciendo sus fotos favoritas guardadas
en la carpeta “Favorita” (memoria interna). Nótese que cuando el marco para fotos
queda inactivo por más de 5 minutos luego del prendido, esta función sóla inicia un
espectáculo de diapositivas. Ud puede siempre presionar ESC para interrumpir y
volver a la interfase principal.
Page 66

ES
13
ES
Apéndice
Fallas y soluciones
Problema Causa Solución
Indicadora Prendido no
está iluminada.
Dispositivo apagado o
la indicadora Prendido
rota.
Revisar si el adaptador AC viene bien
conectado y la fuente eléctrica está
normal.
No interfase de
conguración.
Adaptador AC no viene
bien conectado o no se
prende normalmente.
Revisar si el adaptador AC vienen
bien conectado y estar seguro de
que el marco para fotos se prende
normalmente.
Se puede ver
la interfase de
conguración,perono
reproduce.
La tarjeta viene
insertada de manera
inversa o la tarjeta no
es completamente
compatible.
Reinsertar la tarjeta, o formatear la
misma antes de copiar archivos.
AVISO: Por las tantas marcas de tarjeta de memoria, se le ruega probar la
compatibilidad inmediatamente de comprar la tarjeta de memoria (este producto
no soportaría tarjetas piratas). Si la tarjeta de memoria viene bien insertada y la
interfasedeconguraciónaparece,peroelmarcoparafotosnoleelatarjeta,sele
ruega apagar para luego reiniciar el marco para fotos, o formatear la tarjeta para
recopiar los archivos.
Page 67

Elektrisch en elektronisch apparatuur
kunnen materialen bevatten, die schadelijk zijn voor het milieu en de gezondheid,
en moeten daarom ingeleverd worden bij
een gespecialiseerde afvalverwerkingsinstallatie of teruggebracht worden naar uw
leverancier, zodat de juiste recycling kan
plaatsvinden.
Welkom,
Dank u voor de aankoop van dit product.
Er werd veel tijd en moeite geïnvesteerd in de ontwikkeling van dit product en we hopen
dat u er vele jaren optimaal en zonder problemen gebruik van kunt maken.
Algemene veiligheidsinstructies:
1. Dit is een breekbaar product dat op een vlak oppervlak dient geplaatst te worden. Vermijdt
hevige stoten en vallen.
2. Plaats dit product in een niet-vochtige omgeving. De aanwezigheid van vocht of vloeistoffen
in het product zullen het toestel beschadigen.
3. Het scherm (LCD-scherm) van dit product is vervaardigd uit glas en kan gemakkelijk
beschadigd worden door overdreven druk of een scherp voorwerp.
4. Overdreven druk op het LCD-scherm, kan het scherm ernstig beschadigen. Indien het LCDscherm zou lekken dient u het onmiddellijk te reinigen met water en zeep.
5. De geheugenkaarten kunnen te allen tijde worden ingestoken of verwijderd (dit wordt “hot
plugging” genoemd). Desondanks wordt u toch aangeraden het toestel uit te schakelen
wanneer u een geheugen kaart plaatst of verwijdert. Het uitschakelen van het apparaat kan
schade aan de geheugenkaart vermijden.
6. U wordt aanbevolen de met dit product meegeleverde voedingsadapter te gebruiken om
optimale beeldkwaliteit te verkrijgen.
7. Schakel eerst het product uit en trek de stekker uit het stopcontact alvorens het product met
een lichtjes vochtige doek te reinigen. Gebruik geen alcohol, benzine of andere chemische
reinigingsmiddelen om het product te reinigen.
8. Om een normale werking van dit product te verzekeren, dienen de volgende
omstandigheden vermeden te worden: een te koude of warme omgeving, een vochtige
omgeving, een langdurige blootstelling aan direct zonlicht, of onderwerping aan
mechanische schokken.
9. Een lichte opwarming van dit product tijdens het gebruik is normaal
10. Voor dit LCD kleurenscherm dient u rekening te houden met een maximale toegelaten
pixelsom foutfactor van 0,01%.
11. Dit product en de gebruikershandleiding ervan zijn onderhevig aan verbeteringen of
veranderingen zonder voorafgaande kennisgeving.
Page 68

2
NL
NL
Om te beginnen
Onderdelen van de digitale fotolijst
LCD-scherm
Voorste lijst
Decoratieve rand
Ventilatieopeningen
ESC-knop
Voet
Voedingsindicator
Knop naar rechts
Knop omhoog
Knop omlaag
Aan/uitschakelaar
Knop naar links
Enter-knop
Sleuf voor de
SD/MMC-kaart
Aansluiting van de gelijkstroomUSB-poort
Page 69

NL3NL
Kenmerken van het product
Deze digitale fotolijst heeft een helder TFT-LCD-scherm van 7” (7 duim) en is
voorzien van hoogstaande multimedia technologie. Het is voorzien van de volgende
functies:
Automatisch starten/herhalen van de weergave (weergave van 15 foto’s)
Automatisch foto’s weergeven in de modus Diavoorstelling, met ondersteuning
van verschillende overgangseffecten
Ondersteunt het regelen van de weergave intervallen
Ondersteunt SD/MMC geheugenkaarten (tot 2GB)
Ondersteunt foto’s in het JPEG-formaat tot 12 mega pixels
Ondersteunt USB-station
Geïntegreerd geheugen voor opslag van favoriete foto’s
•
•
•
•
•
•
•
Technische specicaties
Ingangsvoltage van de adapter: 100~240 V wisselstroom, 50~60Hz
Ingangsvoltage van toestel: 9 V gelijkstroom
Energieverbruik: <5W
Beeldformaat: JPEG (YUV code)
Werkingsmodus: knoppen
Resolutie van het LCD-scherm: 480×234 pixels
Effectieve weergavegebied: 137 mm × 86.58 mm
•
•
•
•
•
•
•
Het bevestigen van de voet
Plaats de voorste kant van de voet
in de sleuf op de achterkant van
de lijst, zoals aangegeven. Druk
de voet naar boven ( ) totdat de
voet volledig vast zit. Om de voet
los te maken, dient u de voet naar
beneden ( ) te duwen.
Page 70

4
NL
NL
Aansluiten van het netsnoer
Sluit de gelijkstroomkant van het
netsnoer aan op de fotolijst en sluit
de kant met de netstroomadapter
aan op het stopcontact.
Opmerking: Gebruik steeds het
meegeleverde netsnoer.
Aansluiten van een USB-station
Sluit de ene kant van de USB-kabel aan op
de fotolijst en sluit de andere kant aan op een
USB-station.
In/ uitschakelen van de fotolijst
Na het aansluiten van het netsnoer op de wisselstroom, zal het indicatorlichtje
rood oplichten. Om de fotolijst aan te zetten, drukt u gedurende 2 seconden op de
aan/uitschakelaar; het indicatorlichtje licht groen op. Om de fotolijst uit te schakelen,
drukt u nogmaals gedurende 2 seconden op de aan/uitschakelaar; het indicatorlichtje
licht rood op.
De SD/MMC-kaart gebruiken (optie)
Om een geheugenkaart te plaatsen, duwt u
de kaart voorzichtig tot deze het einde van de
sleuf bereikt (controleer of de schuine hoek
correct is uitgelijnd). Om de geheugenkaart te
verwijderen, duwt u voorzichtig tegen de kaart
tot deze uit de sleuf springt. Trek vervolgens
de kaart uit de sleuf.
Page 71

NL5NL
Gebruik van de knoppen
Knop Locatie Functie
Knop omhoog
1) Verplaatst de cursor omhoog in het menu.
2) Draait de afbeelding met de klok mee tijdens de
weergave.
Knop omlaag
1) Verplaatst de cursor omlaag in het menu.
2) Draait de afbeelding tegen de klok in tijdens de
weergave.
Knop naar links
1) Verplaatst de cursor naar links in het menu.
2) Gaat terug naar de bovenliggende map in de
bestandenlijst.
3) Gaat naar de vorige afbeelding tijdens de weergave.
Knop naar
rechts
1) Verplaatst de cursor naar rechts in het menu.
2) Gaat naar de onderliggende map in de
bestandenlijst.
3) Gaat naar de volgende afbeelding tijdens de
weergave.
Enter-knop
1) Bevestig een geselecteerd item of actie.
2) Pauzeert het afspelen van afbeeldingen (tijdens
weergave van een diavoorstelling).
ESC-knop
1) Annuleert een actie.
2) Afsluiten van een menu/sub-menu.
3) Gaat terug naar de functieselectie interface.
Aan/
uitschakelaar
In- en uitschakelen van de fotolijst.
Page 72

6
NL
NL
De functie Setup (Instelling) is voorzien van verschillende menu-items om uw fotolijst
naar believen te regelen. Gebruik de knoppen naar links en naar rechts om het in
te stellen item te selecteren en druk vervolgens op de Enter-knop om te bevestigen.
Druk op de ESC-knop om terug te keren naar het hoofdmenu.
1) Photo Setting (Instelling van de foto):
Stel de volgende item in door gebruik te maken van de directionele knoppen om het
selectievenster te verplaatsen. Druk op Enter-knop om te bevestigen.
1-1) Interval time (Intervaltijd):
Deze functie stelt de intervaltijd in tussen
het weergeven van afbeeldingen in de
diavoorstelling. Er zijn 9 opties: 5 seconds
(5 seconden) / 10 seconds (10 seconden) /
15 seconds (15 seconden) / 30 seconds (30
seconden) / 1 minute (1 minuut) / 3 minutes (3
minuten) / 5 hour (5 uur) / 10 hour (10 uur) /
24 hour (24 uur).
Functies en instellingen
Functies selecteren
Wanneer u de fotolijst aanzet zal eerst
het opstartscherm weergegeven worden
en vervolgens het hoofdmenu. Indien de
functie “Auto-Play” (automatisch afspelen
van diavoorstelling) ingeschakeld is, zal een
diavoorstelling van de afbeeldingen in het
intern geheugen of geheugenkaart/USBstation automatisch van start gaan. U kunt
op de ESC-knop drukken om te allen tijde
terug te gaan naar het hoofdmenu. Er zijn
vier items in het hoofdmenu: Photo (Foto),
Favorite (Favorieten), File (Bestand) en Setup
(Instellingen).
De functie Setup (Instellingen) - 1
Page 73

NL7NL
De functie Setup (Instellingen) – 2
1-2) Browse (Bladeren):
Stel de standaardfunctie van de bladermodus
in (wanneer u de functie Photo gebruikt).
De 2 opties zijn: Thumbnail (Miniatuur) / File
Manager (Bestandsbeheer).
2) Auto-Play (Automatisch afspelen):
Bepaal of de diavoorstelling al dan niet
automatisch gestart zal worden wanneer
de fotolijst aanstaat. Indien u deze functie
inschakelt, zullen de foto’s automatisch
weergegeven worden wanneer u de fotolijst
aanzet. Indien u deze functie uitschakelt,
dient u manueel door de foto’s te bladeren in
de modus Thumbnail of File Manager.
3) Display Setup (Instelling van het
beeld)
3-1) Display Type (Beeldsoort):
Stel in of de foto gespreid (stretched) op het
volledige scherm of volgens zijn normale
grootte (aspect) weergegeven dient te
worden. Er zijn 2 opties: Full Screen (Volledig
scherm) / Normal (Normaal).
Page 74

8
NL
NL
De functie Setup (Instellingen) – 3
3-2) TFT Brightness (TFT helderheid):
Stel de helderheid van het LCD-scherm
in. Een hoger getal geeft een hogere
helderheidgraad aan. Er zijn 9 opties: getallen
van -4 tot 4.
3-3) TFT Contrast (TFT contrast):
Stel het contrast van het weergeven beeld in.
Een hoger getal geeft een hoger contrast van
het weergegeven beeld aan. Er zijn 9 opties:
getallen van -4 tot 4.
3-4) TFT Saturation (TFT verzadiging):
Stel kleurverzadiging van het weergeven
beeld in. Een hoger getal geeft een hogere
kleurverzadiging van het weergegeven beeld
aan. Hogere verzadiging resulteert in meer
levendige en intensieve kleuren. Er zijn 9
opties: getallen van -4 tot 4.
Page 75

NL9NL
De functie Setup (Instellingen) – 4
4) Custom Setup (gebruiksinstellingen):
4-1) OSD language (OSD taal):
Stel de taal van het OSD-menu in. Selecteer
de taal naar keuze en druk op de Enter-knop
om te bevestigen.
4-2) Style (Stijl):
Stel de stijl van de achtergrond van het OSDmenu in. U kunt kiezen uit vier verschillende
stijlen.
4-3) Repeat Mode (Herhaalmodus):
Stel de herhalingsmodus van de
diavoorstelling in:
Off (Uitgeschakeld) : Herhalingsmodus is
uitgeschakeld
Folder (Map) : Alle afbeeldingen
die zich in dezelfde map bevinden zullen
herhaald worden. Indien u deze functie
gebruikt, wordt u aanbevolen om “File
Manager” te gebruiken om de map te
selecteren (raadpleeg 1-2 Browse (Bladeren)).
All (Alles) : Alle afbeeldingen zullen herhaald worden
•
•
•
Page 76

10
NL
NL
Deze functie vereist het insteken van
een geheugenkaart of het aansluiten van
een USB-station. Indien er zowel een
geheugenkaart en een USB-station
aanwezig zijn, dan zal enkel de inhoud
van het USB-station gelezen worden. Na
het selecteren van deze functie, zullen de
afbeeldingen van de geheugenkaart of het
USB-station weergegeven worden in de
modus Thumbnail (Miniatuur) of de modus
File Manager (Bestandsbeheer) (afhankelijk
van de instelling in 1-2 Browse (Bladeren)).
Opmerkingen betreffende de functie Photo:
1) Enkel JPEG afbeeldingen kunnen
weergegeven worden.
2)
Indien de functie “Auto-Play” ingeschakeld
is, zal u met de functie Photo de
diavoorstelling van de afbeeldingen van de
geheugenkaart of USB-station automatisch
starten.
3) Tijdens het weergeven van afbeeldingen,
kunt u op de Enter-knop drukken om de
weergave te pauzeren of verder te zetten.
4) U kunt op de knop omhoog/omlaag
drukken om de weergegeven afbeelding te
draaien.
5) Druk op de ESC-knop om een actie te annuleren of om terug te keren naar het
hoofdmenu.
De functie Setup (Instellingen) - 5
4-4) Default (standaardinstellingen):
Herstel de standaard fabrieksinstellingen. Merk op dat alle door u gemaakte
instellingen opgegeven zullen worden.
4-5) Version (Versie):
Toon de huidige systeemversie.
5) Exit (Afsluiten):
Ga terug naar het hoofdmenu.
De functie Photo (Foto)
Page 77

NL11NL
De functie File (Bestand)
Met deze functie kunt u afbeeldingen
van de geheugenkaart kopiëren naar
de map “Favorite” (intern geheugen), of
ongewenste afbeeldingen uit de map
“Favorite” verwijderen. Onder de functie File
(bestand), kunt u één van de volgende drie
items selecteren: Copy (kopiëren), Delete
(Verwijderen), of Exit (Afscuiten).
Copy (Kopiëren):
U kunt afbeeldingen die opgeslagen zijn
in een geheugenkaart kopiëren naar de
map “Favorite” (intern geheugen). In het
venster zal de inhoud van de geheugenkaart
weergegeven worden en vervolgens kunt u
naar de gewenste map bladeren. Verplaats
u doorheen de afbeeldingen aan de hand
van de knop Omhoog of de knop Omlaag en
druk op de Enter-knop om de afbeelding te
selecteren. Druk nogmaals op de Enterknop om een geselecteerde afbeelding
te annuleren. Na het selecteren van alle
gewenste afbeeldingen, selecteert u het
item “Save” (Opslaan) en drukt u nogmaals
op Enter. De geselecteerde afbeeldingen
zullen nu van de geheugenkaart naar de
map “Favorite” (intern geheugen) gekopieerd
worden.
Opmerking: Deze functie kan maximaal 15
foto’s ondersteunen.
Delete (Verwijderen):
Met deze functie verwijdert u ongewenste
afbeeldingen uit de map “Favorite (intern
geheugen). In het venster zullen alle
afbeeldingen die opgeslagen zijn in de map
“Favorite” weergegeven worden. Gebruik de
directionele knoppen om de afbeeldingen
te selecteren die u wenst te verwijderen en
druk vervolgens op de Enter-knop om het
verwijderen te bevestigen. Indien u onmiddellijk alle afbeeldingen wilt verwijderen,
kunt u het item “Delete All” selecteren en vervolgens op Enter drukken. Selecteer het
item “Return” om terug te gaan naar het vorige menu.
Exit (Afsluiten):
Ga terug naar het hoofdmenu.
Page 78

12
NL
NL
De functie Favorite (Favorieten)
Selecteer deze functie om uw favoriete afbeeldingen, die zich in de map “Favorite”
(van het intern geheugen) bevinden, weer te geven. Indien de fotolijst na het
aanzetten 5 minuten inactief blijft, zal deze functie automatisch van start gaan en zal
er een diavoorstelling van uw favoriete foto’s weergegeven worden. U kunt te allen
tijde op de ESC-knop om de weergave stop te zetten en terug te keren naar het
hoofdmenu.
Page 79

NL
13
NL
Appendix
Oplossen van problemen
Probleem Oorzaak Oplossing
De voedingsindicator
licht niet op.
Problemen met de
voeding of indicator
is stuk.
Controleer of de netstroomadapter
juist aangesloten is en ga na of het
stopcontact werkt.
Opstartscherm wordt
niet weergegeven.
Netstroomadapter is
niet juist aangesloten of
Er is een probleem bij
het aanzetten van de
fotolijst.
Controleer of de netstroomadapter juist
aangesloten en ga na of de fotolijst
normaal opstart.
Opstartscherm
wordt weergegeven,
maar Afbeeldingen
kunnen niet worden
weergegeven.
Geheugenkaart is
foutief ingestoken
of incompatibele
geheugenkaart.
Steek de kaart opnieuw in of formatteer
de kaart alvorens de bestanden te
kopiëren.
OPMERKING: Bij aankoop van een nieuwe geheugenkaart, wordt u aanbevolen zo
vlug mogelijk de compatibiliteit met de digitale fotolijst te testen. De digitale fotolijst
ondersteunt geen illegale geheugenkaarten. Indien u de geheugenkaart op een juiste
manier in de fotolijst gestoken heeft en het opstartscherm wordt weergegeven maar
de fotolijst is niet in staat de geheugenkaart te lezen, wordt u aangeraden om de
fotolijst opnieuw te starten of de geheugenkaart te formatteren.
Page 80

Não dispor o aparelho como outro
deserto doméstico quando termine sua
vida útil; em vez de iso, deixa-o em um
lugar indicado para recíclo. O fazer-o
desta maneira, você ajuda a preservar
o ambiente.
Boas-vindas:
Prezado usuário, agradecemos pela sua compra deste produto.
Temos invertido muito tempo e esforço no desenvolvimento deste produto e esperamos
o serviço sem problema seja por muitos aoos para você.
Aviso de segurança:
1. Por ser frágil este produto, recomendamos coloca-o de maneira plana. Não deve quedar
sujeito a choques por caída.
2. Este produto deve ter protegido por umidade, e quedará danado com umidade ou líquido
no seu interior.
3. A pantalha (painel LCD) deste produto te feito de vidro e quedaria danado com facilidade
pela anormal força externa ou objetos agudos.
4. Nunca pressionar o LCD, já que pode quedar danado. Em caso de escape de cristal
líquido, você necessitaria limpa-o imediatamente com sabãn e água.
5. Este produto apoia rolhas quentes de cartão de memória. Sem embargo, recomendamos
desligar este produto antes de ligar/desligar a sua cartão de memória para proteger a
mesma ou outros dispositivos.
6. Recomendamos vigorosamente usar o adaptador elétrico com este produto para assegurar
o efeito de visualização.
7. Para limpar a pantalha, corte a fonte elétrica primeiro para limpar-o com um paoo pouco
molhado. Nunca use álcool, gasolina ou outros agents químicos.
8. Para assegurar as normais operações deste produto e evitar acidentes, não use ou guarde
este produto nas seguintes condições: Ambientes com muito baixa/alta temperatura; sítios
com muita umidade ou com direito raio do sol durante longo período de tempo e maus
condições tais como fortes schoques.
9. Durante a operação, este produto pode quedar quente um pouco e iso é normal.
10.Segundoomanufatureiro,paraoLCDdecor,umataxadeuxode0.01%depixelé
permitido. Agradecemos sua compreensão.
11. Ambos produto e o manual do usuário tem sujeitos a câmbio ou suplemento sem aviso.
Page 81

2
PT
PT
Início
Peças do marco para fotos
Painel LCD
Marco frontal
Placa decorativa
Aperturas de
ventilação
Botão ESC
Base
Indicador de
eletricidade
Botão Direita
Botão Acima
Botão Abaixo
Botão Ligado
Botão Esquerda
Botão Entrar
Ranhura cartão SD/MMC
Rolha elétrica DCPorto USB
Page 82

PT3PT
Introdução do produto
O digital marco para fotos empurra um brilhante painel TFT-LCD de 7” (7 polegadas)
e te apoiado pela tecnologia multimedia. Conta com as seguintes características:
Iniciar/repetir fotos de maneira automática (15 fotos)
Mostrar fotos de maneira automática no modo diapositiva, apoiando vários efeitos
de transição
Apoia a personalização de intervalos de visualização
Apoia a cartão de memória SD/MMC (até 2GB)
Apoia a fotos de formato JPEG de até 12 mega pixeles
Apoia a unidade de disco USB
Incorporada memória para guardar fotos favoritas
•
•
•
•
•
•
•
Especicações técnicas
Voltagem de input do adaptador elétrico: AC100~240v, 50~60Hz
Voltagem de input deste equipamento: +9VDC
Consumo de eletricidade: <5W
Formato de foto: JPEG (Código YUV)
Modo de operação: Botões
Resolução de Visualização Cristal Líquido (LCD): 480×234 pixeles
Efetiva área de visualização: 137 mm × 86.58 mm
•
•
•
•
•
•
•
Fixação da base
Inserir a ponta frontal da base na
ranhura no marco traseiro como
indicado. Empurrar a base acima
( ) até a base quede ligada
devidamente. Para desligar a base,
empurrar a base abaixo ( ) até
seja movida.
Page 83

4
PT
PT
Conexão de eletricidade AC
Fazer conexão de uma ponta de
cabo elétrico acessório com o
marco para fotos para logo fazer
conexão do adaptador em um
soquete elétrico.
Nota: Sempre usar o cabo
elétrico acessório somente.
Conexão á unidade de disco USB
Fazer conexão de uma ponta do cabo USB
acessório com o marco para fotos para logo
fazer conexão da outra ponta con uma unidade
de disco USB.
Ligado/desligado do marco para fotos
No fazer conexão a uma fonte elétrica AC, o LED elétrico faze-se vermelho. Deter o
botão durante 2 segundos para ligar o marco para fotos, o LED faze-se verde. Deter
o botão ligado durante um momento para fechar o marco para fotos e o LED faze-se
vermelho novamente.
Utilização de cartões de memória SD/MMC (opcional)
Para introduzir um cartão de memória na
câmara, empurre cuidadosamente o cartão
atéesteatingiromdaranhura(certique-se
de que o canto recortado está devidamente
alinhado). Para remover o cartão de memória,
exerça uma ligeira pressão sobre o cartão para
que este seja ejectado. De seguida, puxe o
cartão de memória para fora da ranhura.
Page 84

PT5PT
Uso dos botões
Botão Localização Função
Botão Acima
1) Mover o cursor acima do menu.
2) Tornar a foto no sentido do relógio para visualizar.
Botão abaixo
1) Mover o cursor abaixo do menu.
2) Tornar a foto no sentido contrário do relógio para
visualizar.
Botão esquerda
1) Mover o cursor esquerda do menu.
2) Tornar a dobradeira de nível superior na lista de
arquivos.
3) Cambiar á foto anterior para visualizar.
Botão direita
1) Mover o cursor direita do menu.
2) Tornar a dobradeira de nível inferior na lista de
arquivos.
3) Cambiar á foto seguinte para visualizar.
Botão entrar
1)Conrmarumelementoouaçãoselecionada.
2) Deixar a reprodução em pausa (durante uma
exibição de diapositivas).
Botão ESC
1) Cancelar uma ação.
2) Sair do menu/sub-menu.
3) Tornar á função de selecionar entreface.
Botão ligado
Ligar/desligar o marco para fotos.
Page 85

6
PT
PT
Programaçãotemuitoselementosdemenuparaanaroseumarcoparafotos.Usar
os botões esquerda e direita para selecionar Instalação e pressionar Entrar para
entrar o Entreface Instalação. Pressione ESC para tornar ao entreface principal.
1) Programação de fotos:
Programe os seguintes elementos usando os botões direcionaies para mover a
caixarealçadaepressionarEntrarparaconrmar.
1-1) Tempo intervalo:
Programe o tempo de intervalo entre
visualização de fotos na exibição de
diapositivas. Há 9 opções: 5 segundos / 10
segundos / 15 segundos / 30 segundos /
1 minuto / 3 minutos / 5 hora / 10 hora / 24
hora.
Funções e programações
Selecionar funções
Ligar o marco para fotos e o entrepace
principal aparecerá depois do início da
pantalha. O ativar “Auto-Play” (e exibição
de diapositivas), as fotos de diapositiva tem
guardadas na memória interna ou a cartão de
memória/unidade de disco USB te lançado
automáticamente. Você pode pressionar
ESC para tornar o entreface principal em
qualquer momento. Há 4 elementos no
entreface principal: Foto, Favorito, Arquivo e
Programação.
Programação - 1
Page 86

PT7PT
Programação - 2
1-2) Folhear:
Programe a vista falta do modo folhear (na
função Foto). Há 2 opções: Unha de Polegar/
Administrador de arquivos.
2) Reprodução automática:
Selecione se a exibição de diapositivas se
lança de maneira automática no ter o marco
para fotos ligado. O selecionar ligado, a
foto aparece com o ligado. O selecionar
desligado, você pode entrar o modo Unhas
de Polegar ou Administrador de Arquivos
para folhear as suas fotos manualmente.
3) Programação Visualização
3-1) Tipo visualização:
Programe se a foto visualizada te estirada
(ou obligada) na pantalha completa ou queda
no seu tamanho normal (aspecto). Há 2
opções: Pantalha completa/Normal.
Page 87

8
PT
PT
Programação - 3
3-2) Brilho TFT:
Programe o brilho da pantalha LCD. Quanto
maior o número, tanto mais brilhante a
pantalha. Há 9 opções: esfera de números
de -4 a 4.
3-3) Contraste TFT:
Programe o contraste do imagem da
pantalha. Quanto maior o número, tanto mais
contraste do imagem mostrado. Há 9 opções:
esfera de números de -4 a 4.
3-4) Saturação TFT:
Programe de grado de saturação de cor
da imagem da pantalha. Quanto maior o
número, tanto mais saturada o imagem
mostrado. A maior saturação proporciona
cores mais vívidos e intensivos. Há 9 opções:
esfera de números de -4 a 4.
Page 88

PT9PT
Programação - 4
4) Programação personalizada:
4-1) Idioma OSD:
Programe de idioma OSD. Selecione um
idioma apropriado para logo pressionar
Entrarparaconrmar.
4-2) Estilo:
Programe de estilo de fundo OSD. Há 4
estilos para sua seleção.
4-3) Modo Repetir:
Programe de modo repetir da exibição de
diapositivas:
Desligado : Desativar a função repetir.
Dobradeira : Repetir reproduzindo
as imagens em uma dobradeira. O
selecionar esta função, recomendamos
usar “Administrador de Arquivos” para
ver a seleção da dobradeira (revisar 1-2
Folhear).
Todo : Repetir a reprodução de todas as fotos
•
•
•
Page 89

10
PT
PT
Esta função requer uma cartão de memória
inserida ou uma unidade de disco USB
conetada. O ter uma cartão de memória
e uma unidade de disco USB presentes,
somente o conteúdo da unidade de disco
USB será leido. Logo de selecionar esta
função, as fotos na cartão de memória
ou a unidade de disco USB aparecerá no
modo Unha de Polegar ou Administrador de
Arquivos (dependindo da programação 1-2
Folhear).
Notas da função Foto:
1) Somente as fotos JPEG tem apoiadas e
mostradas.
2) O ativar “Reprodução Automática”, o entrar
na função Foto iniciará reproduzindo as
fotos na cartão de memória ou a unidade
de disco USB.
3) Durante a reprodução de fotos, pressione
Entrar para deixar a reprodução em pausa/
reassumir a reprodução.
4) Você pode pressionar os botões acima/
abaoxo para tornar na vista da foto.
5) Pressione ESC para cancelar uma ação ou tornar ao entreface principal.
Programação - 5
4-4) Falta:
Restaure a falta do sistema da fábrica. Notar que todas as programações você
tenha feitas serão sobreescritas.
4-5) Versão:
Para mostrar a atual versão do sistema.
5) Saída :
Tornar ao entreface principal.
La função Foto
Page 90

PT11PT
A função Arquivo
A função Arquivo permite a você copiar fotos
de uma cartão de memória na dobradeira
“Favorita” (memória interna), ou delir fotos
que você não deseje e guardadas na
dobradeira “Favorita”. O entrar no entreface
Arquivo, você pode selecionar um dos 3
elementos: Copiar, Delir ou Sair.
Copiar:
Você pode copiar fotos guardadas de uma
cartão de memória á dobradeira “Favorita”
(memória interna). Aparecerá a pantalha com
conteúdos da cartão de memória e você pode
selecionar a dobradeira você deseje folhear.
Selecione fotos pressionando os botões
acima ou abaixo para logo pressionar Entrar,
e a foto aparecerá realçada. Pressionando
Entrar novamente pode cancelar a seleção.
Logo de selecionar todas as fotos você
deseje, mova a caixa realçada ao elemento
“Gravar” para pressionar Entrar, e as
fotos selecionadas aparecerão copiadas á
dobradeira “Favorita” (memória interna).
Nota: Esta função apoia 15 fotos como
máximo.
Delir:
Esta função te usada delir fotos não
realçadas na dobradeira “Favorita” (memória
interna). Na imagem, todas as fotos
tem gravadas na dobradeira “Favorita”
aparecerão. Use os botões direcionais
para selecionar as fotos você deseje delir
e pressionar Entrar para delir. O desejar
delir todas as fotos de uma vez, você pode
selecionar “Delir Todas” e pressione Entrar
para delir todas as imagens. Selecione
“Tornar” para tornar á imagem anterior.
Sair:
Tornar ao entreface principal.
Page 91

12
PT
PT
A função Favorito
Selecione este elemento para iniciar reproduzindo suas fotos favoritas guardadas
na dobradeira “Favorita” (memória interna). Notar-se que quando o marco para fotos
queda inativo por mais de 5 minutos logo do ligado, esta função somente inicia para
uma exibição de diapositivas. Você pode sempre pressionar ESC para interrumper e
tornar ao entreface principal.
Page 92

PT
13
PT
Apêndice
Faltas e soluções
Problema Causa Solução
Indicador Ligado não
está iluminado.
Dispositivo desligado ou
o indicador Ligado roto.
Revisar se o adaptador AC te bem
conetado e a fonte elétrica está normal.
Não entreface de
programação.
Adaptador AC não te
bem conetado ou não
liga normalmente.
Revisar se o adaptador AC te bem
conetado e estar seguro que o marco
para fotos liga normalmente.
Por vr o entreface de
programação, e não
reproduz.
A cartão te inserida
de maneira inverse
ou a cartão não
te completamente
compatível.
Reinserir a cartão, ou formatear a
mesma antes de copiar arquivos.
AVISO: Peas tantas marcas de cartão de memória, recomendamos provar a
compatibilidade inmediatamente de comprar a cartão de memória (este produto
não apoiaria cartões cópia). Se a cartão de memória te bem inserida e o entreface
programação aparece, e o marco para fotos não le a cartão, agradecemos desligar
para logo reiniciar o marco para fotos, ou formatear a cartão para recopiar os
arquivos.
Page 93

Nie wyrzucaj tego urządzenia razem
z codziennymi odpadami domowymi,
kiedy się zużyje. Przekaż je do odpowiedniego punktu zbierania odpadów
do przetworzenia. Tym sposobem
pomagasz chronić środowisko.
Witajcie:
Drogi użytkowniku, dziękujemy za nabycie tego produktu.
W jego stworzenie włożyliśmy wiele czasu i wysiłku, i mamy nadzieję, że będzie Ci
bezproblemowo służył przez wiele lat.
Uwagi dotyczące bezpieczeństwa:
1. Ten produkt jest delikatny, więc należy go umiejscowić na możliwie płaskiej powierzchni.
Urządzenie nie może upaść.
2. Produkt należy chronić przed wilgocią – jeśli wilgoć lub jakaś ciecz się do niego dostanie,
doprowadzi to do jego uszkodzenia.
3. Ekran (panel LCD) w tym produkcie wykonany jest ze szkła, które łatwo może ulec
uszkodzeniu w skutek nadmiernego nacisku lub styczności z ostrymi przedmiotami.
4. Nigdy nie naciskaj panelu LCD, ponieważ może to go uszkodzić. Jeśli ciekły kryształ
wycieknie, należy go natychmiast zmyć, używając mydła i wody.
5. Produkt ten obsługuje podłączanie kart pamięci bez konieczności wyłączenia zasilania (tzw.
hot plugging). Mimo to, zaleca się odłączanie zasilania w urządzeniu przed wkładaniem /
wyjmowaniem kart pamięci, w celu ochrony kart lub innych urządzeń.
6. Mocno zalecamy korzystanie z zasilacza dostarczonego wraz z produktem, w celu
zapewnienia najwyższej jakości obrazu.
7. Aby wyczyścić ekran, wyłącz urządzenie z prądu a następnie użyj delikatnie wilgotnej
miękkiej szmatki przy przecieraniu powierzchni panelu. Nigdy nie stosuj alkoholu, benzyny
ani innych środków chemicznych.
8. Aby zapewnić prawidłowe działanie tego urządzenia i uniknąć wszelkich wypadków, nie
korzystaj z urządzenia ani nie przechowuj go w następujących warunkach: Otoczenie
o zbyt niskiej / wysokiej temperaturze; Miejsca wilgotne lub narażone na długotrwałe
działanie promieni słonecznych; Niekorzystne warunki takie jak wstrząsy.
9. W czasie pracy, urządzenie może się trochę rozgrzać - jest to normalne.
10. Według producenta, dla kolorowych wyświetlaczy LCD przyjmuje się, że akceptowalna
jest ilość 0,01% wadliwych pikseli w stosunku do ogólnej liczby pikseli. Dziękujemy za
zrozumienie.
11. Urządzenie oraz instrukcja obsługi mogą być poddane ulepszeniom lub rozszerzeniom bez
powiadomienia.
Page 94

2
PO
PO
Na początek
Części ramki na fotograe
Panel LCD
Rama przednia
Płyta dekoracyjna
Otwory wentylacyjne
Przycisk Escape
Statyw
Kontrolka zasilania
Przycisk „w prawo”
Przycisk „do góry”
Przycisk „w dół”
Przycisk zasilania
Przycisk „w lewo”
Przycisk „enter”
Gniazdo kart
pamięci SD/MMC
Gniazdo zasilaniaPort USB
Page 95

PO3PO
Opis urządzenia
Cyfrowa ramka na fotograe wyróżnia się 7-calowym ekranem TFT-LCD i napędzana
jest multimedialną technologią. Posiada następujące funkcje:
Automatyczne rozpoczęcie / powtórzenie wyświetlania zdjęcia (przegląd 15 zdjęć)
Automatyczną prezentację zdjęć w trybie pokazu slajdów, z zastosowaniem
różnych efektów przejściowych
Możliwość ustawienia szybkości przesuwania
Obsługę kart pamięci SD/MMC (do 2GB)
Obsługę zdjęć w formacie JPEG o rozdzielczości do 12 mega pikseli
Obsługę zewnętrznych pamięci USB
Wbudowaną pamięć dla przechowywania ulubionych zdjęć
•
•
•
•
•
•
•
Dane techniczne
Napięcie wejściowe zasilacza: AC100~240v, 50~60Hz
Napięcie wejściowe urządzenia: +9VDC
Pobór energii: <5WF
Ormat obrazu: JPEG (YUV code)
Sposób obsługi: Przyciski
Rozdzielczość wyświetlacza LCD: 480×234 pikseli
Rzeczywisty obszar wyświetlania: 137 mm × 86.58 mm
•
•
•
•
•
•
•
Mocowanie statywu
Włóż przedni koniec statywu do
gniazda z tyłu ramki tak jak to
pokazano. Wyciągaj statyw do góry
( ) dopóki nie będzie prawidłowo
zablokowany. Aby odłączyć statyw,
naciskaj go w dół ( ) dopóki się
nie odłączy od ramki.
Page 96

4
PO
PO
Podłączanie do źródła zasilania
Podłącz jeden koniec kabla
zasilania do ramki, a następnie
drugi koniec podłącz do gniazdka.
UWAGA: Używaj tylko kabla
dostarczonego razem z
urządzeniem.
Podłączanie do zewnętrznych pamięci USB
Podłącz jeden koniec kabla USB do ramki, a
następnie drugi koniec podłącz do nośnika
USB.
Włączanie i wyłączanie ramki
Po podłączeniu do prądu, kontrolka zasilania zaświeci się na czerwono. Wciśnij
przycisk zasilania na ramce i przytrzymaj go przez około 2 sekundy, a dioda zmieni
kolor na zielony. Ponownie wciśnij przycisk zasilania na ramce i przytrzymaj go przez
chwilę - ramka się wyłączy a dioda stanie się z powrotem czerwona.
Używanie karty SD/MMC (opcjonalne)
Aby włożyć kartę pamięci, delikatnie pchnij
kartę, aż wejdzie do końca gniazda (sprawdź,
czy ścięty róg jest ustawiony we właściwym
kierunku). Aby wyjąć kartę pamięci, naciśnij
ją delikatnie, co spowoduje jej wysunięcie.
Następnie wyjmij kartę z gniazda.
Page 97

PO5PO
Funkcje przycisków
Przycisk Położenie Funkcja
Do gory
1) W menu - przesuń kursor do góry.
2) W czasie oglądania - obróć zdjęcie w prawo.
W dół
1) W menu - przesuń kursor w dół.
2) W czasie oglądania - obróć zdjęcie w lewo.
W lewo
1) W menu - przesuń kursor w lewo.
2) W liście katalogów – powrót do wyższego katalogu.
3) W czasie oglądania – cofnij o jedno zdjęcie.
W prawo
1) W menu - przesuń kursor w prawo.
2) W liście katalogów – powrót do niższego katalogu.
3) W czasie oglądania – do przodu o jedno zdjęcie.
Enter
1) Potwierdź pozycję lub operację.
2) W czasie pokazu slajdów – zatrzymaj.
ESC
1) Anuluj operację.
2) Wyjdź z menu/pod-menu.
3) Wróć do menu wyboru funkcji.
Przycisk
zasilania
Włącz/wyłącz zasilanie ramki na fotograe.
Page 98

6
PO
PO
Funkcja Setup udostępnia wiele opcji, które pozwolą dostosować ramkę na fotograe
do Twoich potrzeb. Korzystając z przycisków „lewo” i „prawo” wybierz pozycję menu
Setup a następnie naciśnij przycisk Enter aby ją otworzyć. Aby wrócić do głównego
menu, naciśnij przycisk ESC.
1) Photo Setting - Ustawienia zdjęć:
Ustaw następujące opcje używając klawiszy kierunkowych do przesuwania
podświetlonej ramki a następnie zatwierdź wybór przyciskiem enter.
1-1) Interval Time – Odstęp pomiędzy
zdjęciami:
Ustaw odstępy, z jakimi wyświetlane będą
zdjęcia w pokazie slajdów. Do dyspozycji
masz 9 ustawień: 5 sekund / 10 sekund / 15
sekund / 30 sekund / 1 minuta / 3 minuty / 5
godzin / 10 godzin / 24 godziny.
Funkcje i ustawienia
Wybór funkcji
Włącz ramkę na fotograe – po ekranie
powitalnym pokaże się główne menu. Jeśli
włączona jest funkcja „auto-play” (pokaz
slajdów), automatycznie rozpocznie się pokaz
zdjęć zapisanych w pamięci wewnętrznej, lub
na karcie pamięci / napędzie USB. W każdej
chwili możesz nacisnąć przycisk ESC, aby
wrócić do głównego menu. W głównym menu
znajdują się cztery pozycje: Foto, Ulubione,
Plik i Ustawienia.
Funkcja Ustawienia - 1
Page 99

PO7PO
Funkcja Ustawienia - 2
1-2) Przeglądaj:
Ustaw domyślny widok w trybie przeglądania
fotograi (kiedy korzystasz z funkcji Foto).
Do dyspozycji masz 2 ustawienia: Miniaturki /
Menadżer plików.
2) Autoodtwarzanie:
Wybierz, czy pokaz slajdów rozpocznie
się automatycznie po włączeniu ramki.
Jeśli włączysz tą opcję, zdjęcia zostaną
automatycznie wyświetlone po włączeniu
ramki. Po wyłączeniu tej opcji możesz ręcznie
przeglądać swoje zdjęcia w trybie Miniaturek
lub Menadżera plików.
3) Ustawienia wyświetlania
3-1) Rodzaj wyświetlania:
Przy pomocy tej możesz wybrać, czy
wyświetlane zdjęcia będą rozciągane
(lub pomniejszone) tak, aby zajmowały
cały wyświetlacz, czy pozostaną w swoim
oruginalnym rozmiarze. Do dyspozycji masz 2
ustawienia: Pełny ekran / Normalne.
Page 100

8
PO
PO
Funkcja Ustawienia - 3
3-2) Jasność panelu LCD:
Ustaw jasność wyświetlacza LCD. Im większa
wartość, tym jaśniejszy będzie ekran. Do
dyspozycji masz 9 ustawień: wartości
mieszczą się w zakresie od -4 do 4
3-3) Ostrość panelu LCD:
Ustaw ostrość obrazu na ekranie. Im
większa jest wartość, tym ostrzejszy będzie
wyświetlany obraz. Do dyspozycji masz 9
ustawień: wartości mieszczą się w zakresie
od -4 do 4.
3-4) Nasycenie kolorów:
Ustawia nasycenie kolorów obrazu na
ekranie. Im większa jest wartość, tym bardziej
nasycone będą kolory wyświetlanego obrazu.
Wyższe nasycenie sprawia, że kolor zdjęć
jest żywszy i intensywniejszy. Do dyspozycji
masz 9 ustawień: wartości mieszczą się w
zakresie od -4 do 4.
 Loading...