

Page 1
User’s Manual
Care and Safety Information
1. Keep the device and packaging materials out of the reach of infants and
children.
2. Avoid subjecting the power adapter and other contacts to dripping or splashing
water and dry your hands before you use it. Do not place objects filled with
liquids such as vases, etc. on or near the device.
3. Make sure that the used power outlet is always readily available and never
hidden. In case of emergency, use the power adapter to separate the device
from the power network.
4. Keep your device away from all flames such as candles and do not set them up
in the vicinity of the device.
5. Keep the unit at least 10 cm away from other objects. Make sure the ventilation
is not covered by newspapers, tablecloths, curtains, etc.
6. For your own safety, do not use the projector during thunderstorms or lightning.
7. Relative Humidity is 5~35°C, 80% (Max.), non-condensing.
8. The battery is integrated with the device. Do not dissemble and modify. The battery
should be replaced by qualified service staff only.
9. Ensure that the ambient room temperature is within -10~55°C
10. During the operation, this product may heat lightly, which is normal.
11. Wait before using if the device has been moved from a cold location into a
warm one. Any condensation that has formed may in certain circumstances
destroy the device. As soon as the device has reached room temperature it can
be used without risk.
12. Handle the product with care. Avoid contact with sharp objects. Keep device
away from metallic objects.
13. Place the projector on a flat surface. Any collision or falling to the ground is
likely to damage the product.
14. Do not drop or disassemble the product otherwise the warranty voids. Opening
or removing covers may expose you to dangerous voltage or other hazards.
Refer all servicing to qualified service personnel.
15. Use only the accessories supplied by the
manufacturer.
16. Both product and user’s manual are subject to
further improvement or supplement without further
notice.
17. Avoid facing directly into the projector’s lens.
I
Page 2
User’s Manual
Sicherheitshinweise:
1. Das Gerät und das Verpackungsmaterial außerhalb der Reichweite von
Kindern halten.
2. Das Netzteil nicht in Kontakt mit tropfendem oder fließendem Wasser kommen
lassen und Hände vor der Benutzung abtrocknen. Keine mit Flüssigkeiten
gefüllte Gegenstände, wie z.B. Vasen usw. auf oder in die Nähe des Gerätes
stellen.
3. Stellen Sie sicher, dass die verwendete Steckdose immer verfügbar und
niemals blockiert ist. Verwenden Sie im Notfall das Netzteil, um das Gerät vom
Stromnetz zu trennen.
4. Das Gerät von Flammen, wie z.B. Kerzen fernhalten und diese nicht in der
Nähe des Gerätes aufstellen.
5. Das Gerät mindestens 10 cm von anderen Gegenständen entfernt halten.
Stellen Sie sicher, dass die Lüftungsschlitze nicht durch Zeitungen,
Tischdecken, Vorhänge usw. blockiert werden.
6. Den Projektor zu Ihrer eigenen Sicherheit nicht während eines Gewitters oder
Blitzschlages verwenden.
7. Relative Luftfeuchtigkeit liegt bei 5 bis 35°C, 80% (max.), nicht kondensierend.
8. Der Akku ist im Gerät integriert. Nicht auseinander nehmen oder ändern. Der
Akku sollte nur von einer Fachkraft ausgetauscht werden.
9. Stellen Sie sicher, dass die Raumtemperatur innerhalb von -10 ist ~ 55°C liegt.
10. Dieses Produkt kann während des Betriebes etwas warm werden, was normal ist.
11. Warten Sie mit der Verwendung des Geräts etwas, wenn das es von einem
kalten an einen warmen Ort gebracht wurde. Kondenswasser kann das Gerät
unter bestimmten Umständen zerstören. Sobald das Gerät Raumtemperatur
erreicht hat, kann es ohne Risiko verwendet werden.
12. Produkt mit Vorsicht handhaben. Kontakt mit scharfen Gegenständen
vermeiden. Von Gegenständen aus Metall fernhalten.
13. Den Projektor auf eine flache Unterlage stellen. Stöße oder ein Herunterfallen auf den
Boden führt wahrscheinlich zu Schäden des Produktes.
14. Das Produkt nicht fallen lassen oder auseinander nehmen, da sonst die
Gewährleistung erlischt. Das Öffnen oder Entfernen von Abdeckungen kann sie
gefährlichen Spannungen und anderen Risiken aussetzen. Alle
Wartungsarbeiten von Fachpersonal durchführen lassen.
15. Nur vom Hersteller empfohlenes Zubehör
verwenden.
16. Sowohl das Produkt als auch das
Benutzerhandbuch unterliegen fortlaufenden
Verbesserungen oder Ergänzungen ohne
vorherige Mitteilung.
17. Nicht direkt in das Objektiv des Projektors sehen.
II
Page 3
User’s Manual
Entretien et précaustion d’emploi (FR)
1. Attention - Evitez de vous placer en face de la lentille du
vidéo projecteur.
2. Evitez tout contact avec de l’eau, et gardez vos mains
sèches lors de l’utilisation.
3. Assurez-vous que la température de la pièce est comprise entre -10 et 55°C
4. Le taux d’humidité relative doit être de 80% au maximum entre 5 et 35°C, sans
condensation.
5. Ne pas faire tomber, frapper ou démonter cet appareil ; sinon la garantie sera
annulée.
Informazioni sulla cura e sulla sicurezza (IT)
1. Attenzione - Non guardare l’obiettivo in modo diretto.
2. Evitare il contatto con liquidi e utilizzare con mani asciutte.
3. Assicurarsi che la temperatura ambiente della stanza sia
compresa tra -10 e 55°C
4. L’umidità relativa deve essere compresa tra 5 e 35
condensazione.
5. Non far cadere, non colpire e non smontare il dispositivo; in caso contrario la
garanzia verrà annullata.
°
C, all’80% (max.), senza
Información de seguridad (ES)
1. Advertencia - Evite ponerse directamente en frente de las
lentes del proyector.
2. Avite cualquier contacto con el agua. Mantenga sus manos
secas durante su uso.
3. Asegúrese de que la temperatura ambiente de la sala sea de -10~55°C
4. Humedad relativa de 5~35°C, 80% (Máx.), no-condensada.
5. No caiga, golpee o desmonte el dispositivo, ya que de lo contrario se
invalidaría la garantía.
Δϣϼδϟ ΕΎϣϮϠόϣΔϳΎϋήϟϭ(AR)
ΔϔΜϜϣ.
III
1. ήϳάΤΗ-νήόϟ ίΎϬΟ ΔγΪόϟ ήηΎΒϣ ϞϜθΑ νήόΘϟ ΐϨΠΗ.
2. ϟϭ ˬ˯ΎϤϟΎΑ ίΎϬΠϟ ϝΎμΗ ΐϨΠΗϡΪΨΘγϻ ˯ΎϨΛ ϦϴΘϓΎΟ ϚϳΪϳ ϰϠϋ υΎϔΤ.
3.ϦϴΑ Ύϣ ΔτϴΤϤϟ Δϓήϐϟ ΓέήΣ ΔΟέΩ ϥ Ϧϣ Ϊϛ΄Θϟ10ϰϟ·55ΔϳϮΌϣ ΔΟέΩ .
4. Ϧϣ ΔϴΒδϨϟ ΔΑϮσήϟ ϥϮϜΗ ϥ5 ϰϟ·35ϝΩΎόϳ ΎϤΑ ˬΔΟέΩ80) %ϰμϗ ΪΤΑ( ήϴϏ ˬ
5. ϥΎϤπϟ ϖΣ ϞτΑ ϻ·ϭ ˭ίΎϬΠϟ ϚϔΑ ϡϮϘΗ ϭ ΐϘΜΗ ϭ ςϘδΗ ϻ.
Page 4
User’s Manual
FCC Compliance Statement:
This device complies with Part 15 of the FCC Rules.
Operation is subjected to the following two conditions: (1)
this device may not cause harmful interference, and (2) this
device must accept any interference received, including
interference that may cause undesired operation.
This equipment has been tested and found to comply with limits for a Class B
digital device, pursuant to Part 15 of the FCC rules. These limits are designed to
provide reasonable protection against harmful interference in residential
installations. This equipment generates, uses, and can radiate radio frequency
energy, and if not installed and used in accordance with the instructions, may
cause harmful interference to radio communications.
However, there is no guarantee that interference will not occur in a particular
installation. If this equipment does cause interference to radio or television
equipment reception, which can be determined by turning the equipment off and on,
the user is encouraged to try to correct the interference by one or more of the
following measures:
- Reorient or relocate the receiving antenna.
- Move the equipment away from the receiver.
- Plug the equipment into an outlet on a circuit different from that to which the
receiver is connected.
- Consult the dealer or an experienced radio/television technician for additional
suggestions.
You are cautioned that any change or modifications to the equipment not expressly
approved by the party responsible for compliance could void your authority to
operate such equipment.
(EN)
If the time arises to throw away your
product, please recycle all the
components possible.
Batteries and rechargeable batteries are
not to be disposed in your domestic
waste! Please recycle them at your local
recycling point.
Together we can help to protect the
environment.
IV
Page 5
User’s Manual
(DE)
Wenn die Lebensdauer des Produkts zu Ende
kommt, lassen Sie bitte möglichst alle
Komponenten recyceln. Bitte recyceln Sie
dieses Produkt ordnungsgemäß, wenn es
nicht mehr verwendet werden kann. Es kann
nicht als Haushaltsmüll behandelt werden. Es
muss separat über die verfügbaren
Rücknahme- und Sammelsysteme entsorgt
werden.
(FR)
Si il est temps de jeter votre produit, veuillez recycler tous les composants possibles. Si ce
produit est arrivé en fin de vie, veuillez s’il vous plait le recycler correctement. Il ne peut pas
être traité comme les ordures ménagères. Il doit être être apporté à un point de collecte
approprié pour le recyclage.
(IT)
Al momento di buttare via il prodotto, riciclare il maggior numero di componenti. Se questo
prodotto giunge alla fine del suo ciclo di vita, lo ricicli correttamente. Non può essere trattato
come rifiuto urbano. Deve essere smaltito separatamente attraverso l'appropriato sistema di
reso e di raccolta.
(ES)
Si ha llegado la hora de deshacerse del producto, recicle todos los componentes que pueda.
Si ha finalizado la vida útil de este producto, recíclelo adecuadamente. Debe deshacerse
del mismo de forma separada a través de los sistemas de recogida disponibles.
(AR)
Ϋ·ϥΎΣΖϗϭκϠΨΘϟϦϣˬΞΘϨϤϟ˯ΎΟήϟΓΩΎϋ·ήϳϭΪΗΔϓΎϛ˯ΰΟϷΔϨϜϤϤϟ.
ϻϢΘϳκϠΨΘϟϦϣΕΎϳέΎτΒϟΕΎϳέΎτΒϟϭΔϠΑΎϘϟΓΩΎϋϹϦΤθϟ
ϦϤοΕΎϔϠΨϤϟΔϴϟΰϨϤϟ!˯ΎΟήϟΓΩΎϋ·ΎϫήϳϭΪΗϯΪϟΰϛήϣΓΩΎϋ·
ήϳϭΪΘϟϲϠΤϤϟϚϳΪϟ.
Ύ˱όϣΎϨϨϜϤϳΓΪϋΎδϤϟϲϓΔϳΎϤΣΔΌϴΒϟ.
(NL)
Als het einde van de levensduur van het product is bereikt, moet u alle mogelijke
componenten recyclen. Batterijen en oplaadbare batterijen mogen niet bij het huishoudelijke
afval worden gegooid. Lever ze af bij uw lokale dienst voor recycling. Samen kunnen we
helpen bij de bescherming van het milieu.
(BPT)
Se você decidir descartar o produto, faça-o de modo que seja possível a reciclagem de
todos os componentes. As baterias e pilhas recarregáveis não devem ser descartadas em
seu lixo doméstico! Favor reciclá-las em seu ponto de reciclagem local. Juntos, podemos
ajudar a proteger o meio ambiente.
V
Page 6
User’s Manual
r
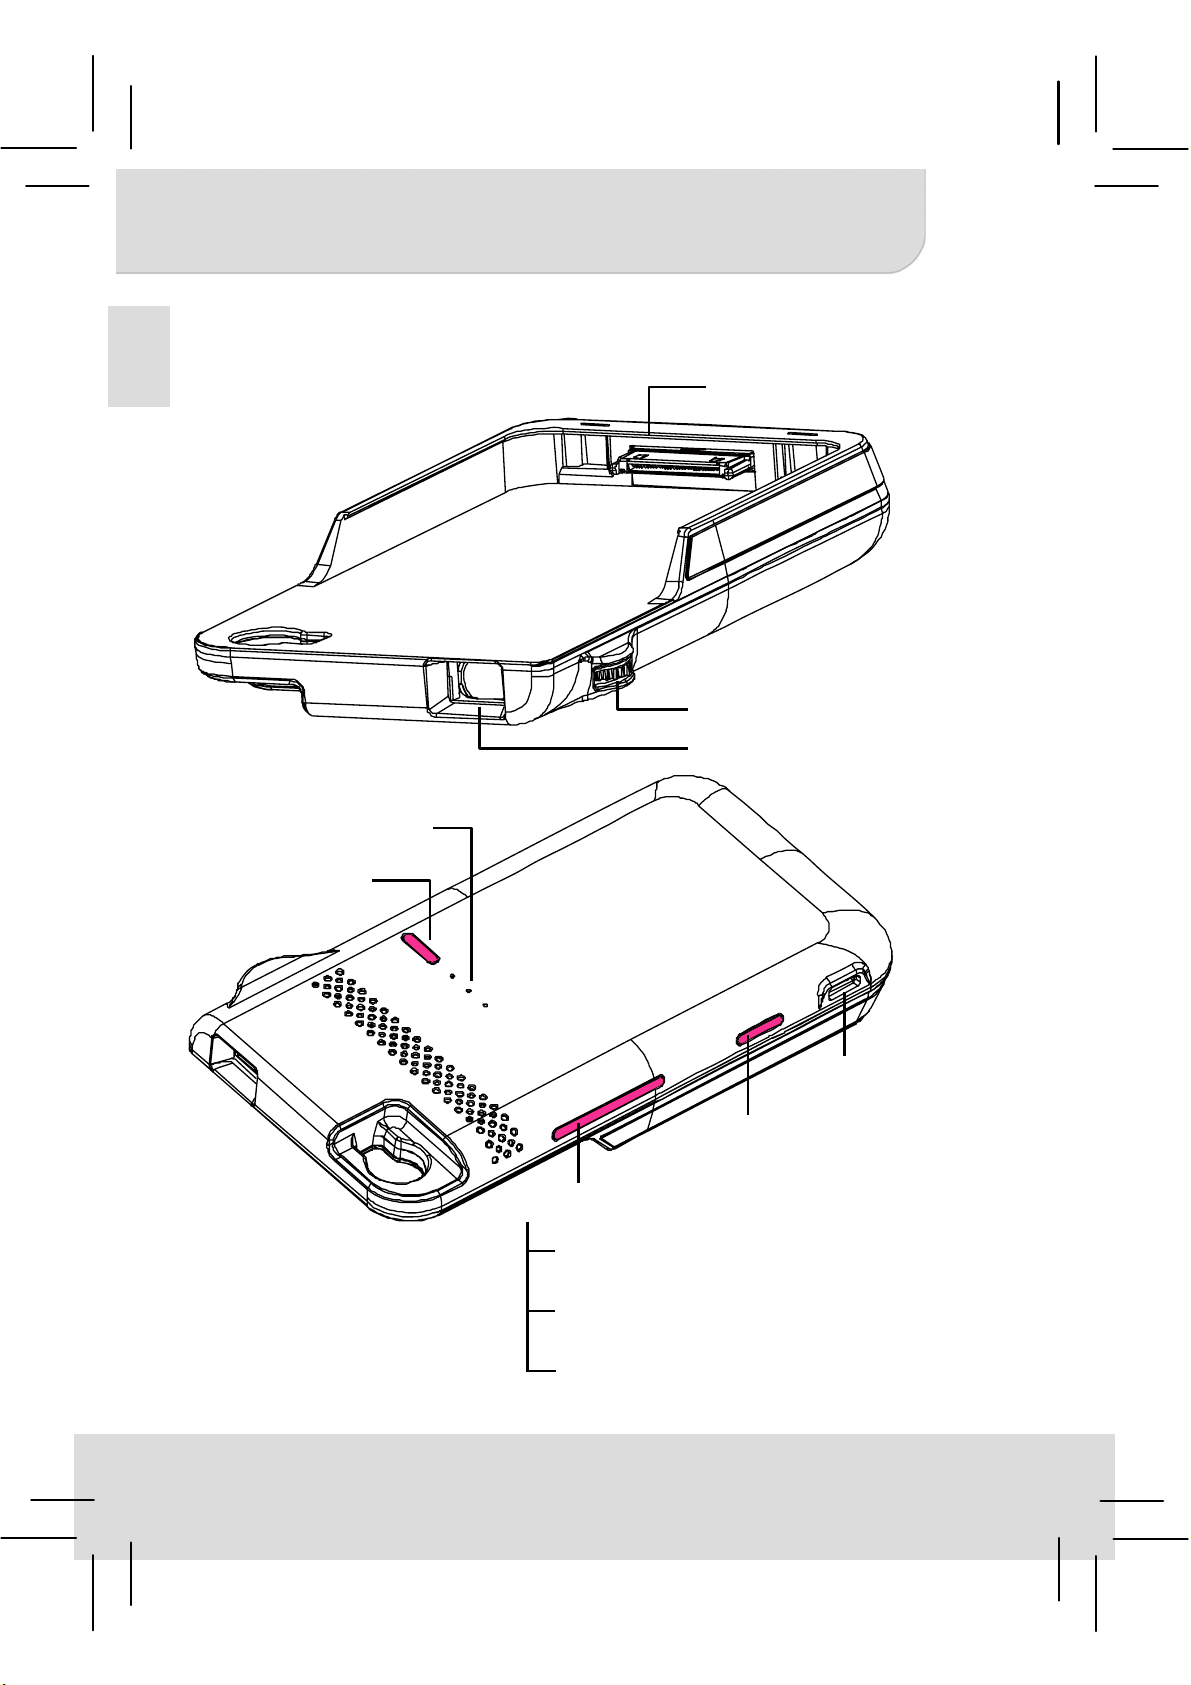
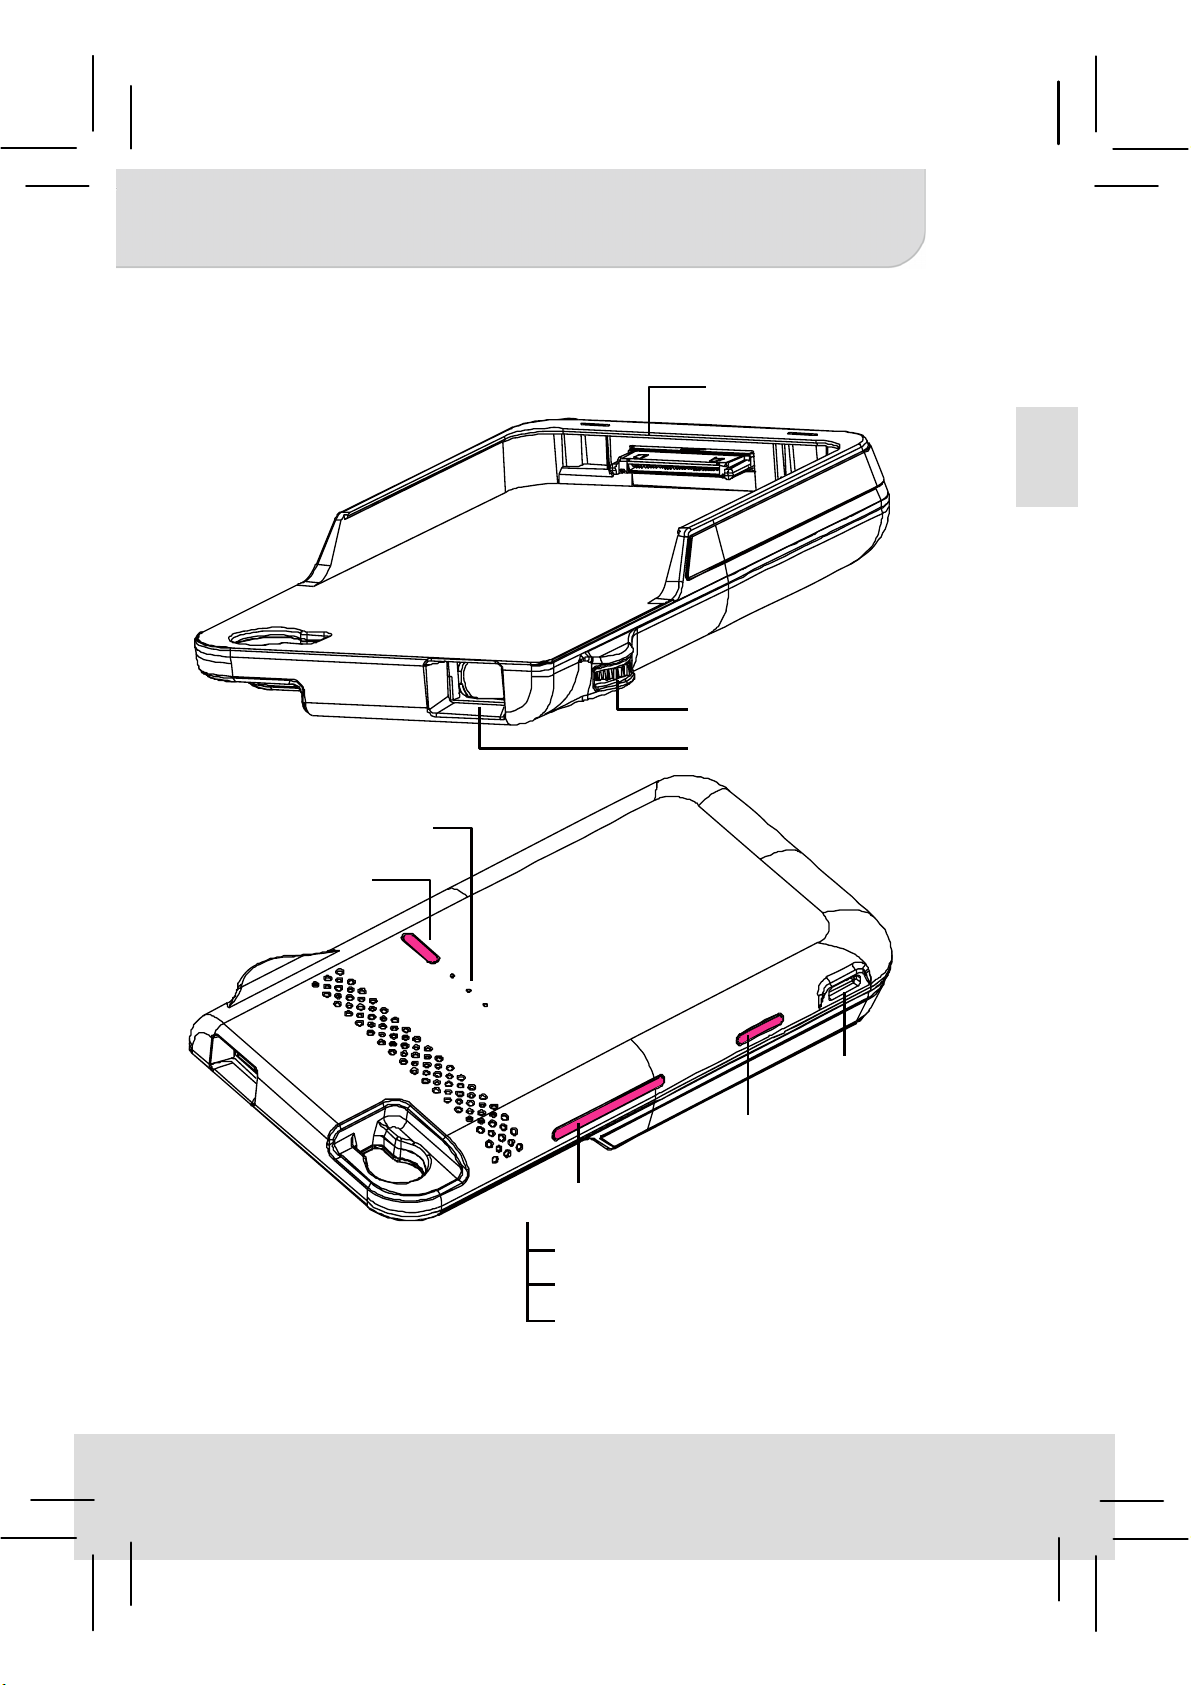
Product Overview
EN
iPhone Connector
Focus Wheel
Projector Lens
LED Indicato
iPhone
Charging Mode
Button
Micro USB
Charging Port
Projection
Mode Button
Scene mode Switch
Cinema mode: Enhance color
performance.
Web mode: Enhance text
performance.
Eco mode: Decrease brightness for
power saving.
1
Page 7
User’s Manual
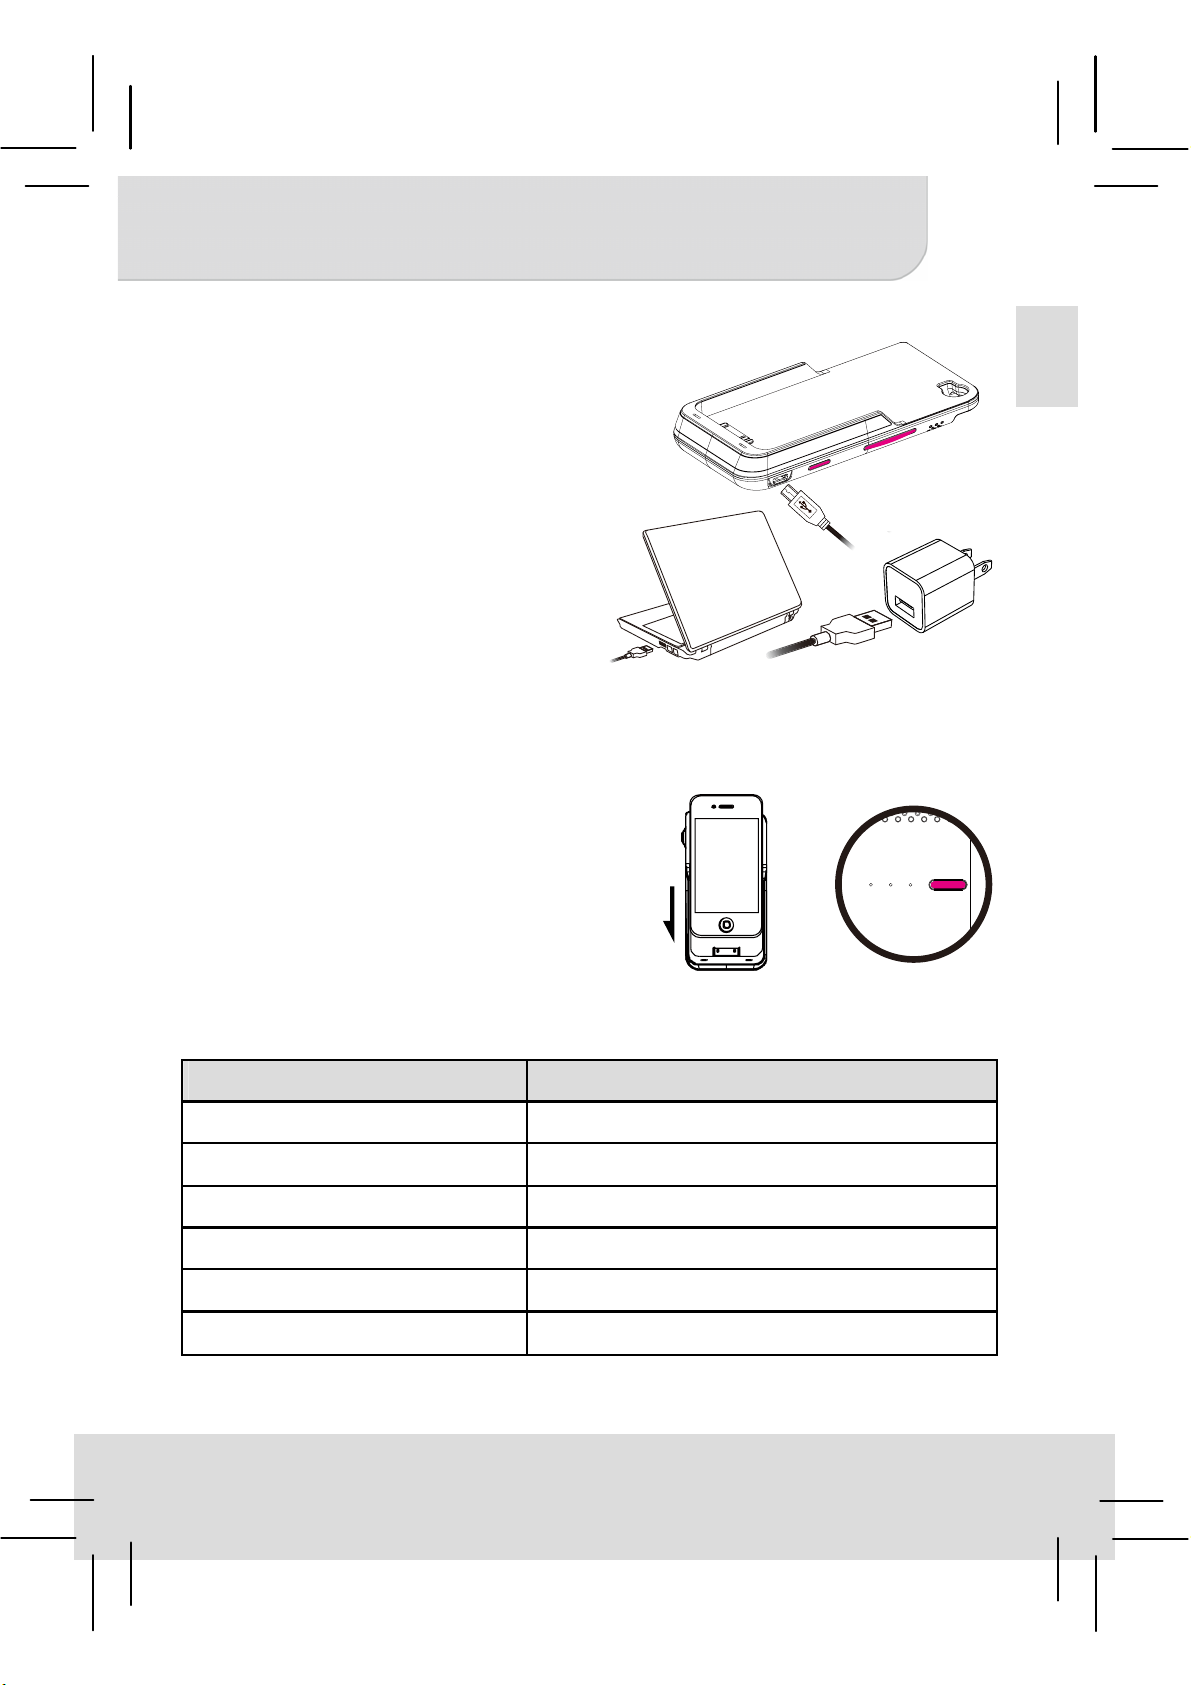
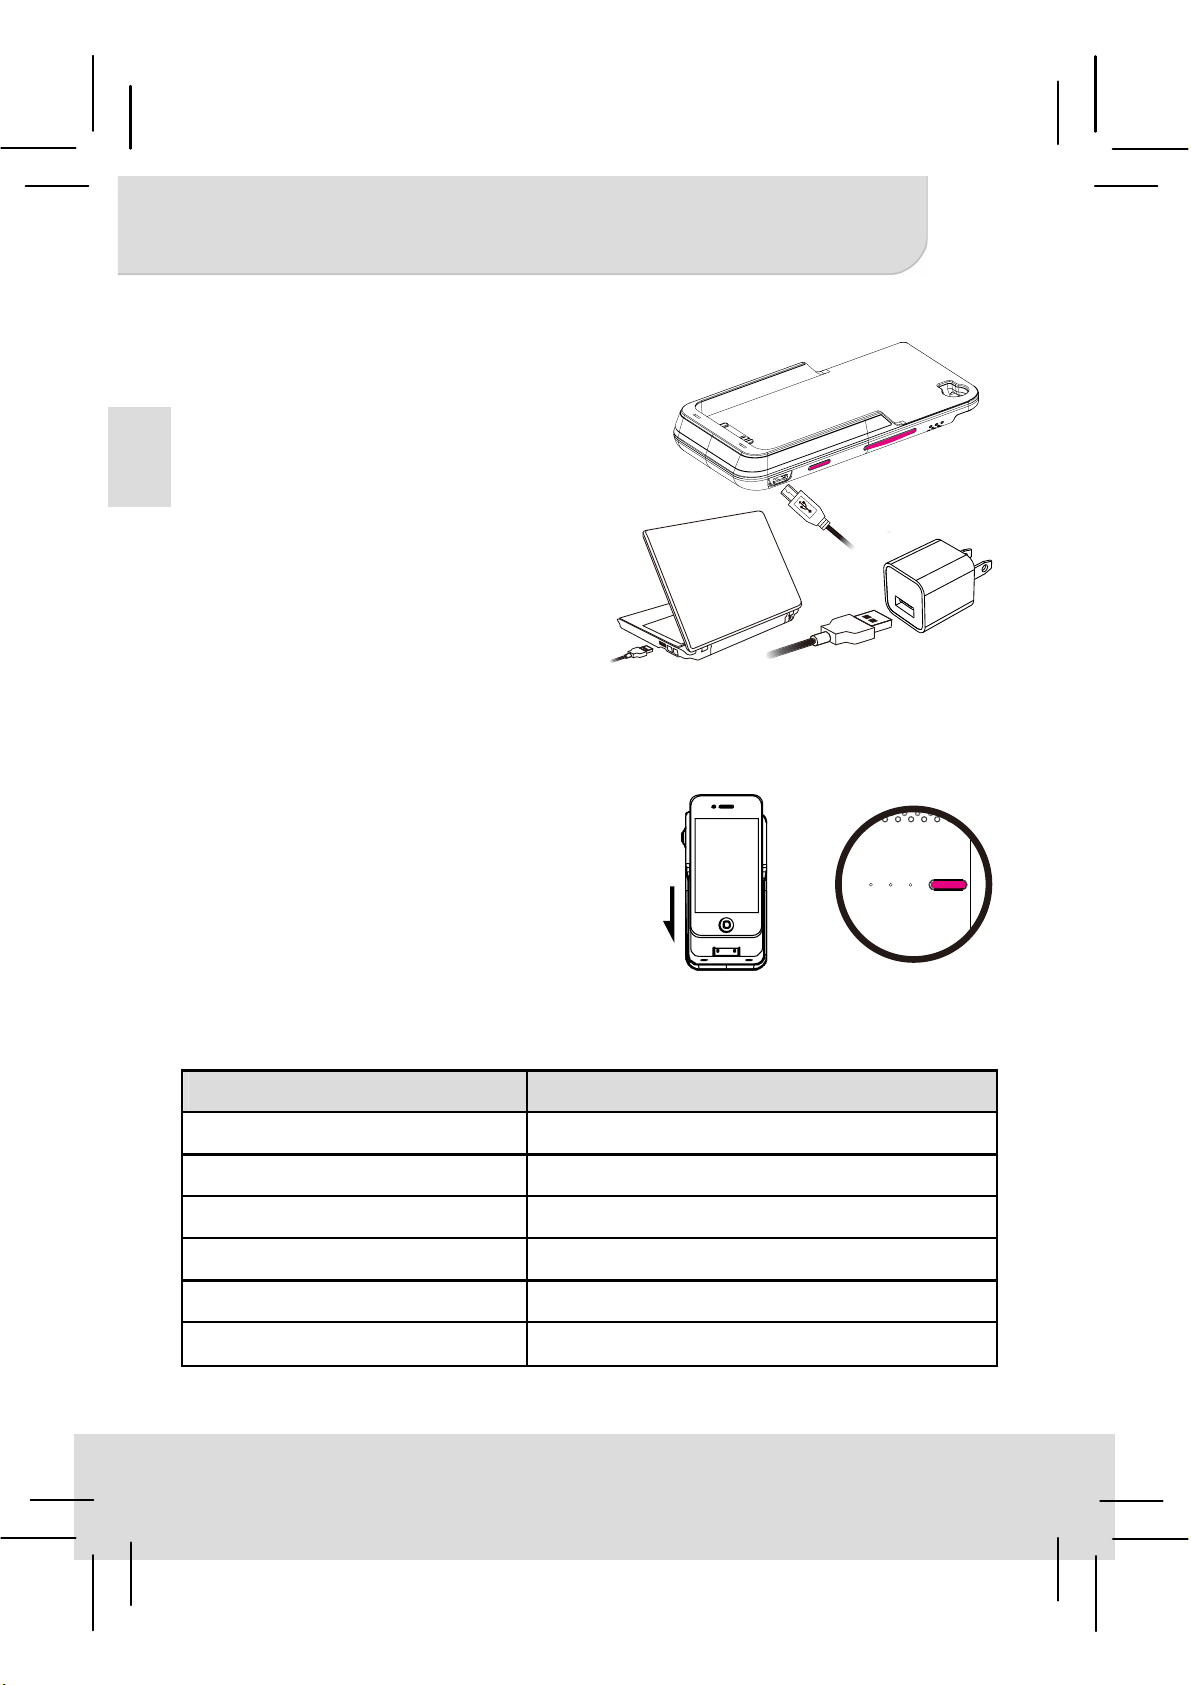
Charging the product
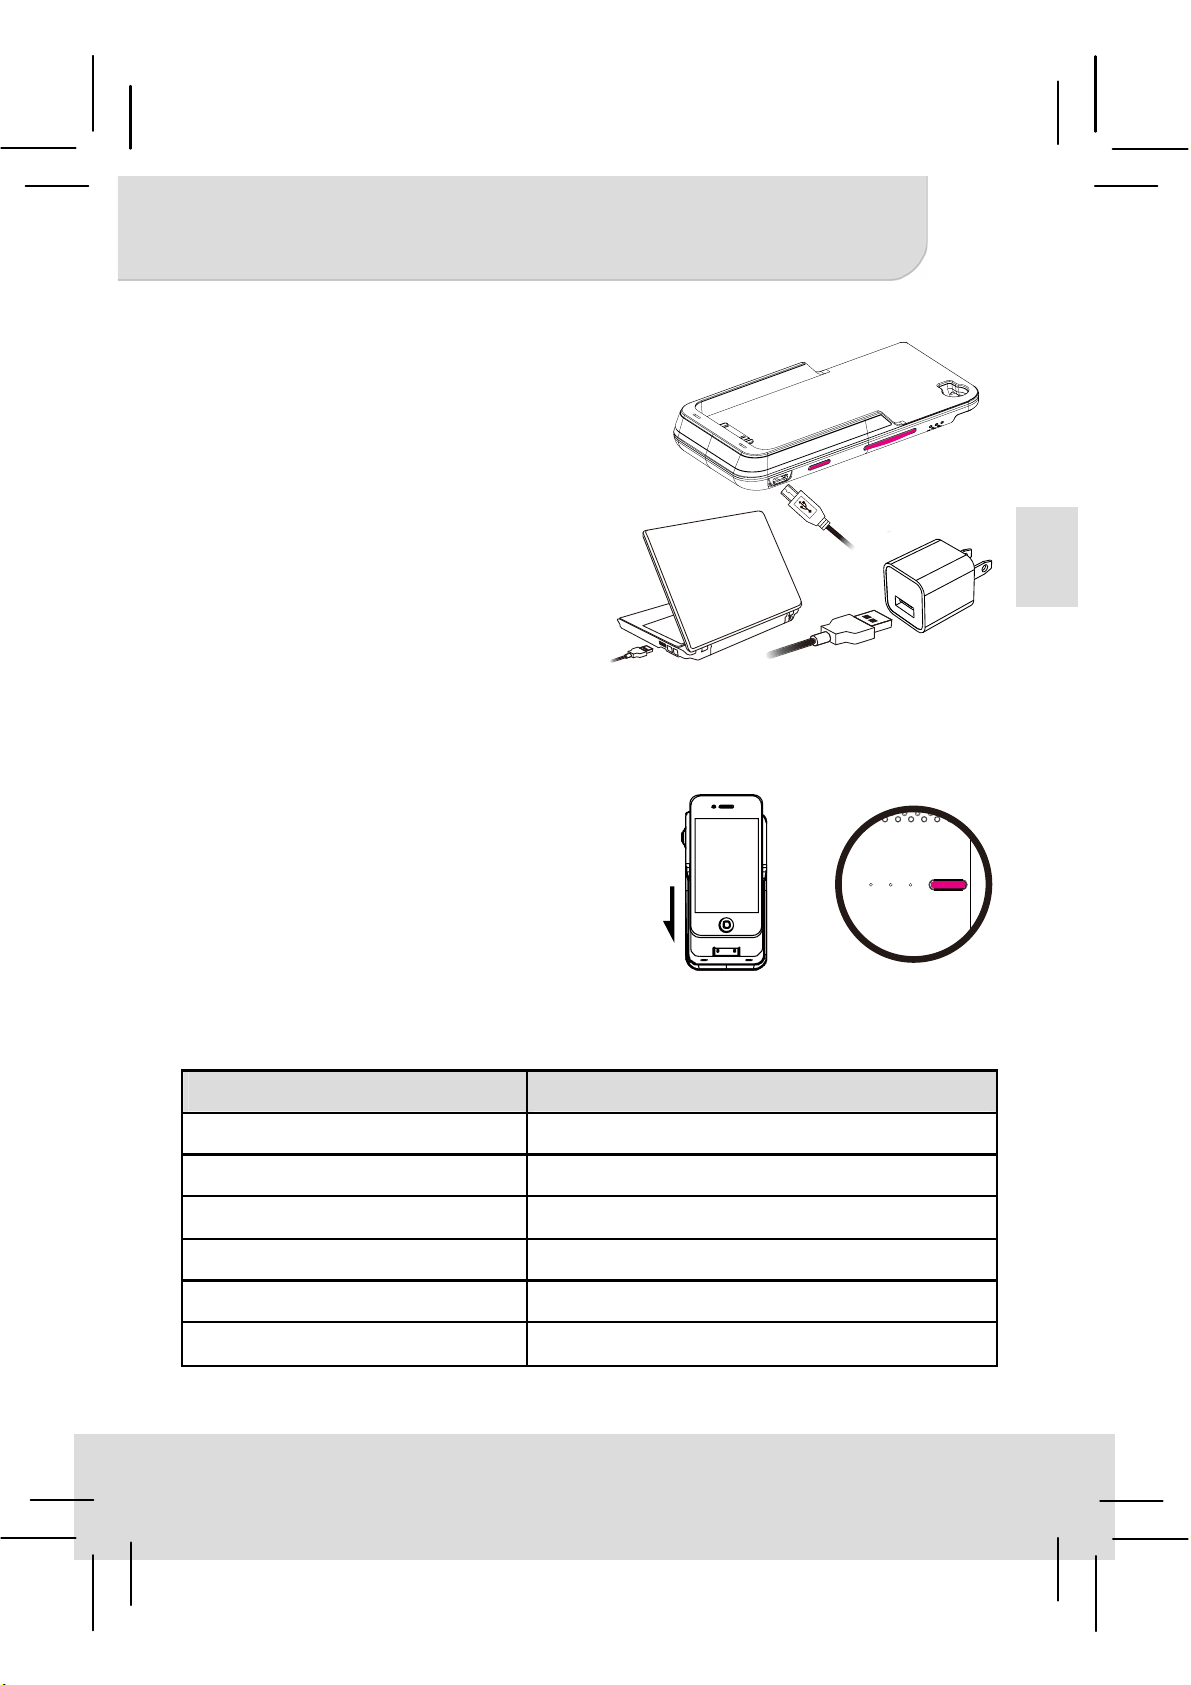
Connect one end of the bundled
USB cable to the Micro USB port
of the product and the other end to
PC / Notebook or iPhone USB
power adapter for charging.
* The Product can be fully
charged around 5 hrs from
empty.
Charging for iPhone
1. Connect the iPhone to the
product.
2. Press the iPhone charging
mode button to start or stop
charging for iPhone.
1
2
1.
EN
1
2.
or
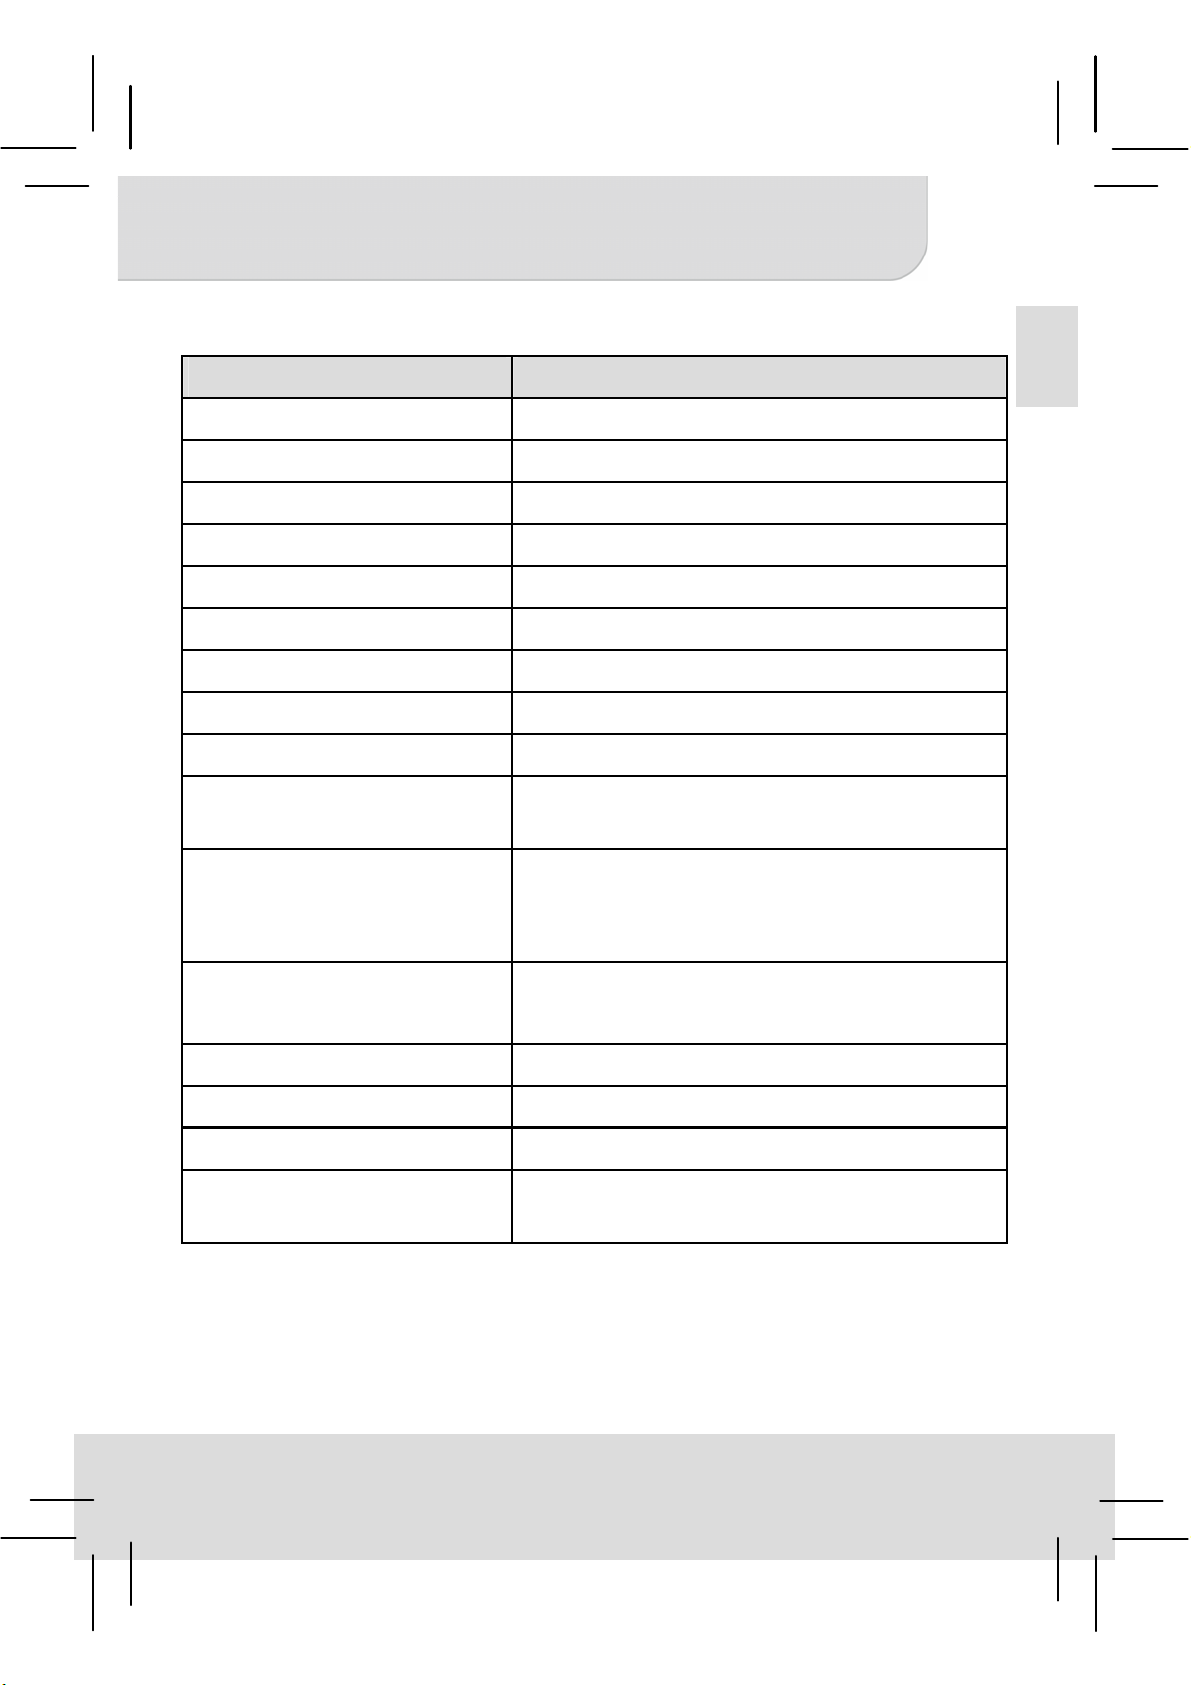
LED Indicator Modes
LED Status Indication
3 white LEDs stay on Power capacity is between 80% to 100%
2 white LEDs stay on Power capacity is between 45% to 80%
1 white LED stays on Power capacity is between 10% to 45%
1 white LED blinks Power capacity is below 10%
LED Marquee Product is being charged
LED blinks Charging for iPhone
2
Page 8
User’s Manual
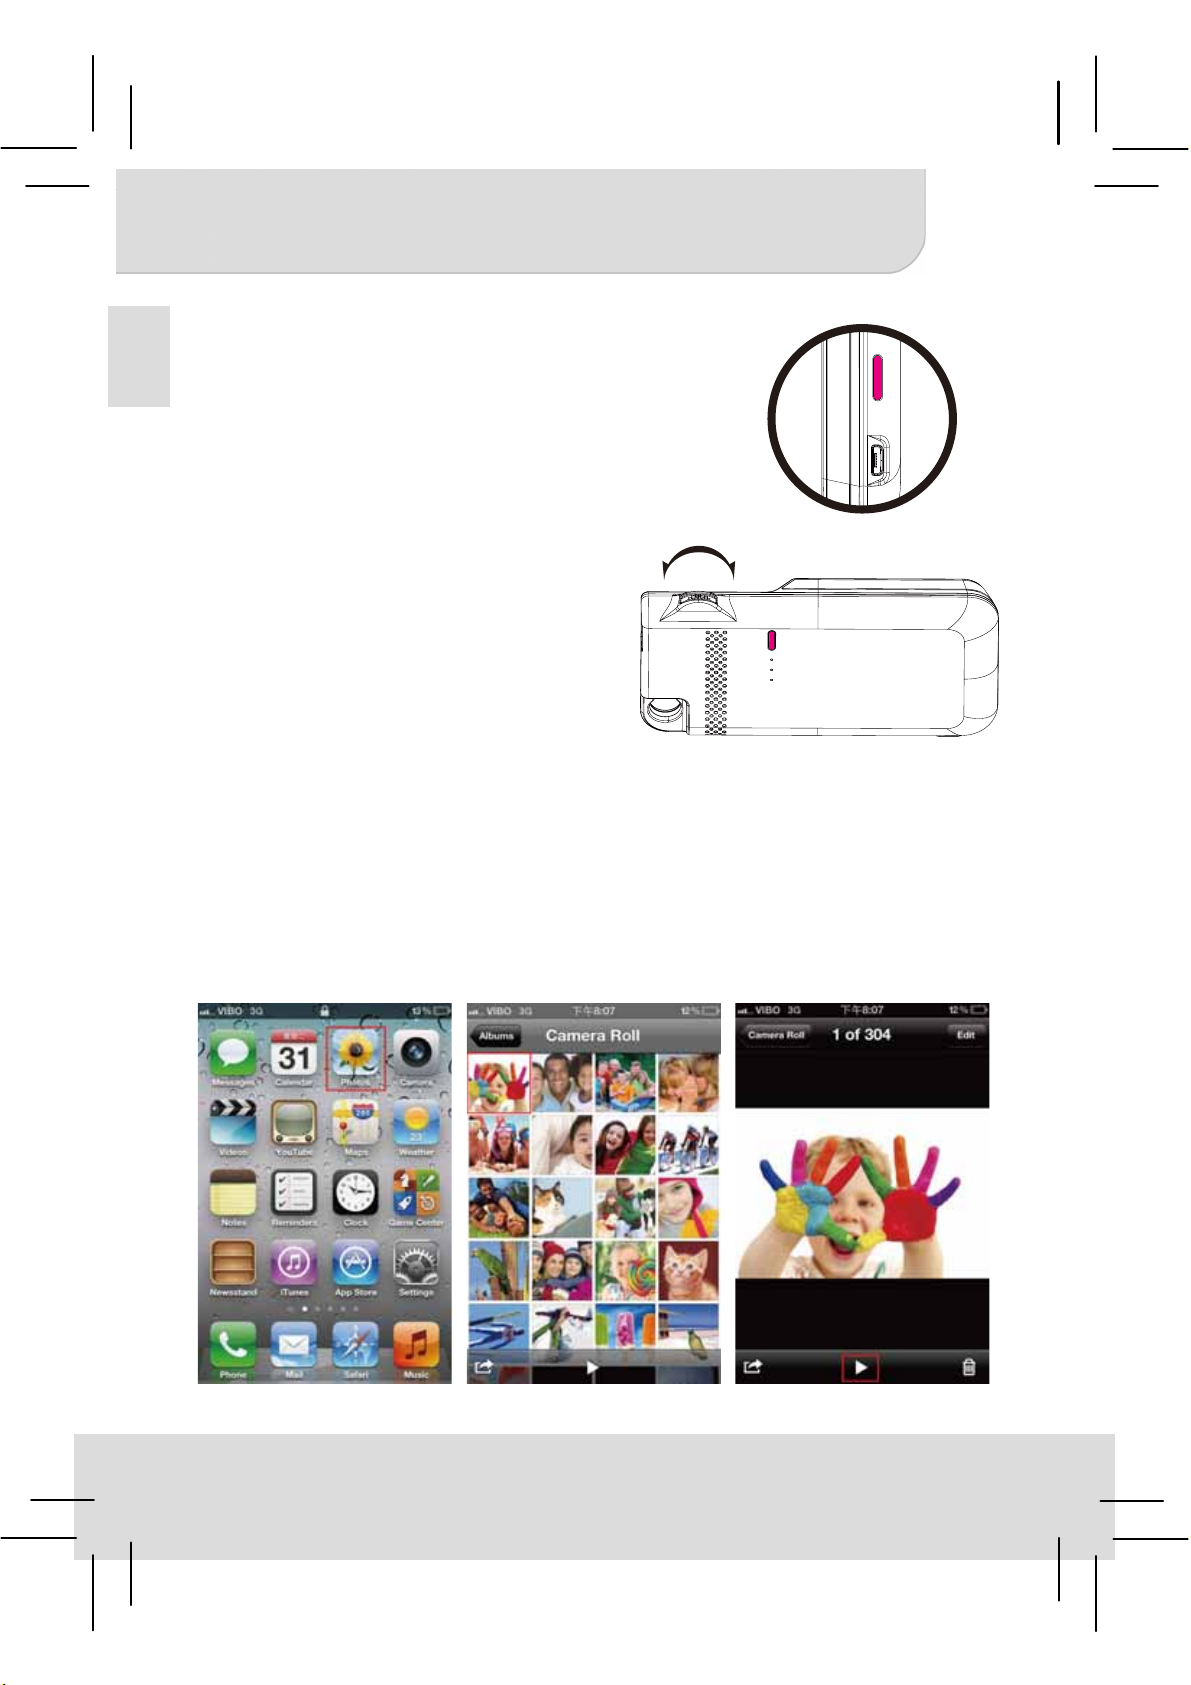
Turning on/off the projector
EN
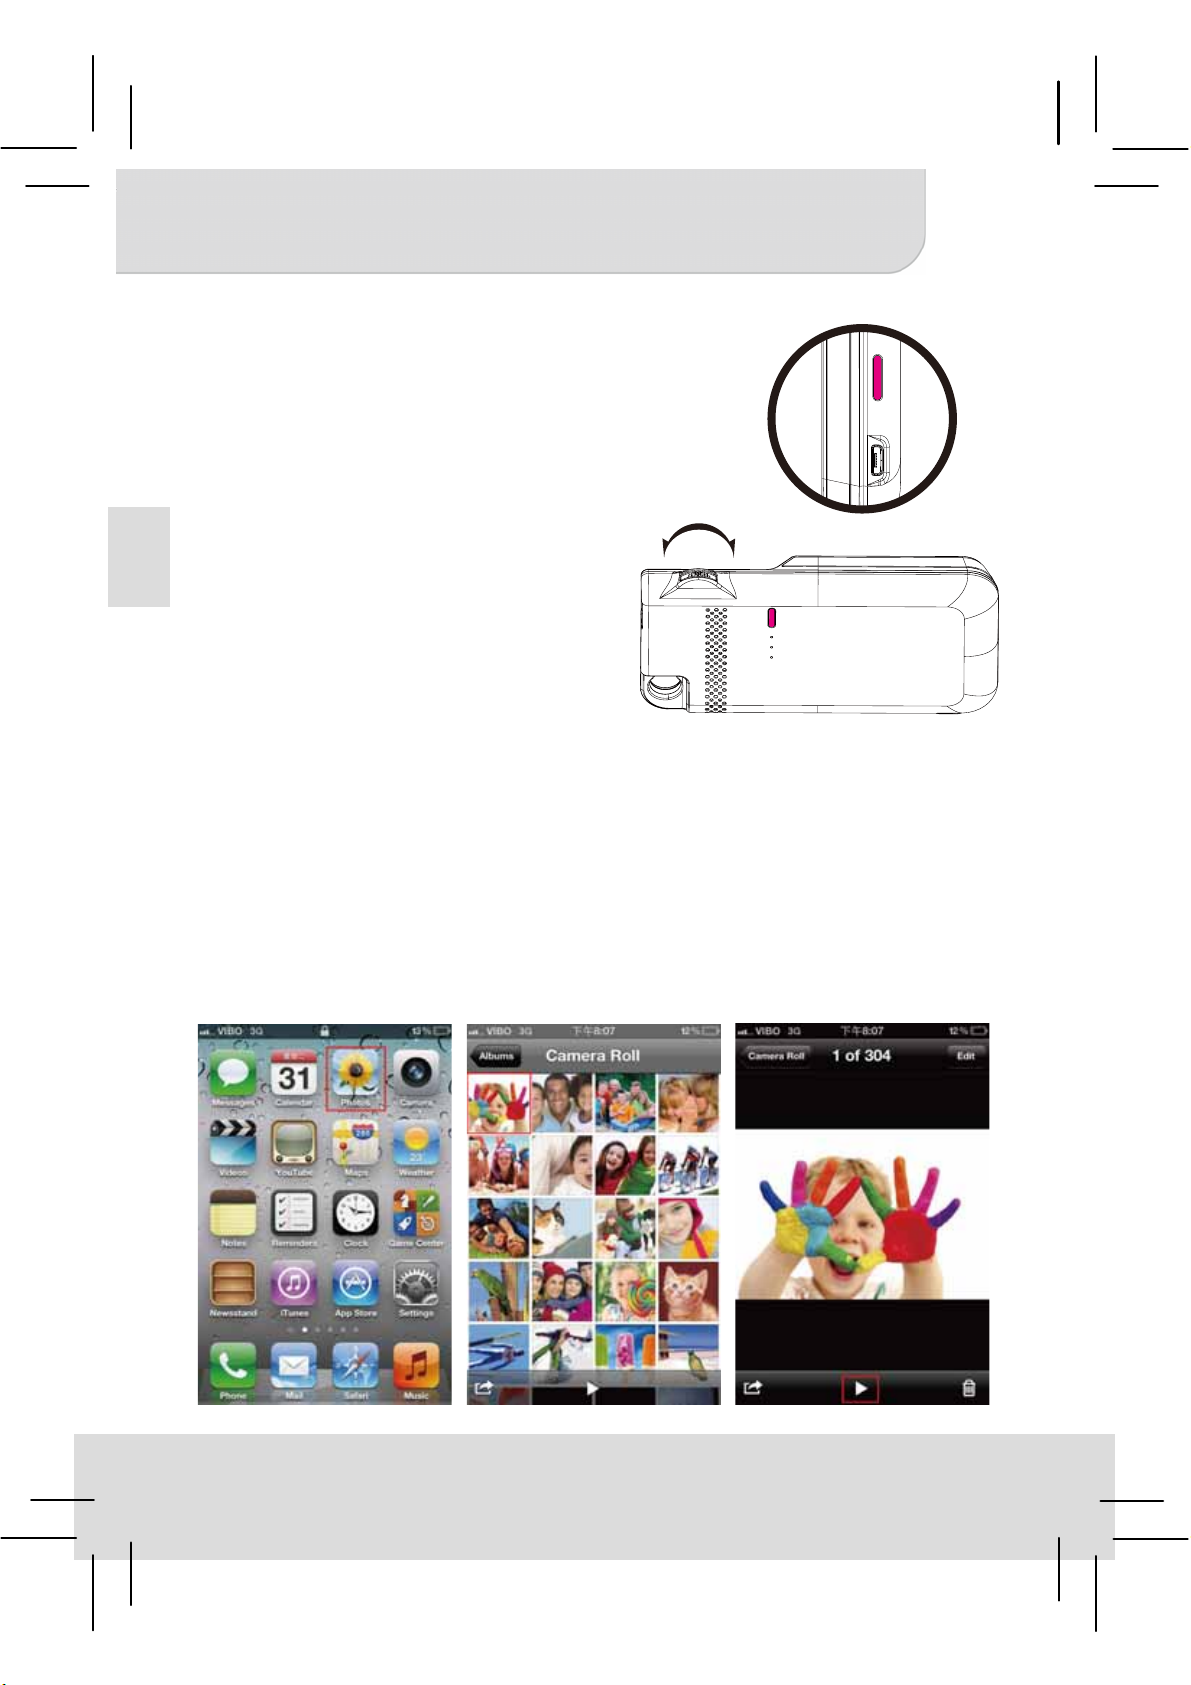
Press the Projection Mode Button
for 3 seconds to turn ON or turn
OFF the projector.
Adjusting the Focus
Adjust the focus by using the
focus wheel to get a sharper and
clear picture.
Projecting photos and videos via iPhone native app
1. Select the “Photos” manually icon on iPhone main menu.
2. Choose the photo or video you want to project.
* Photos can only be projected as a slideshow.
**Please push the volume control button on iPhone to adjust the
volume during playback.
3
Page 9
User’s Manual
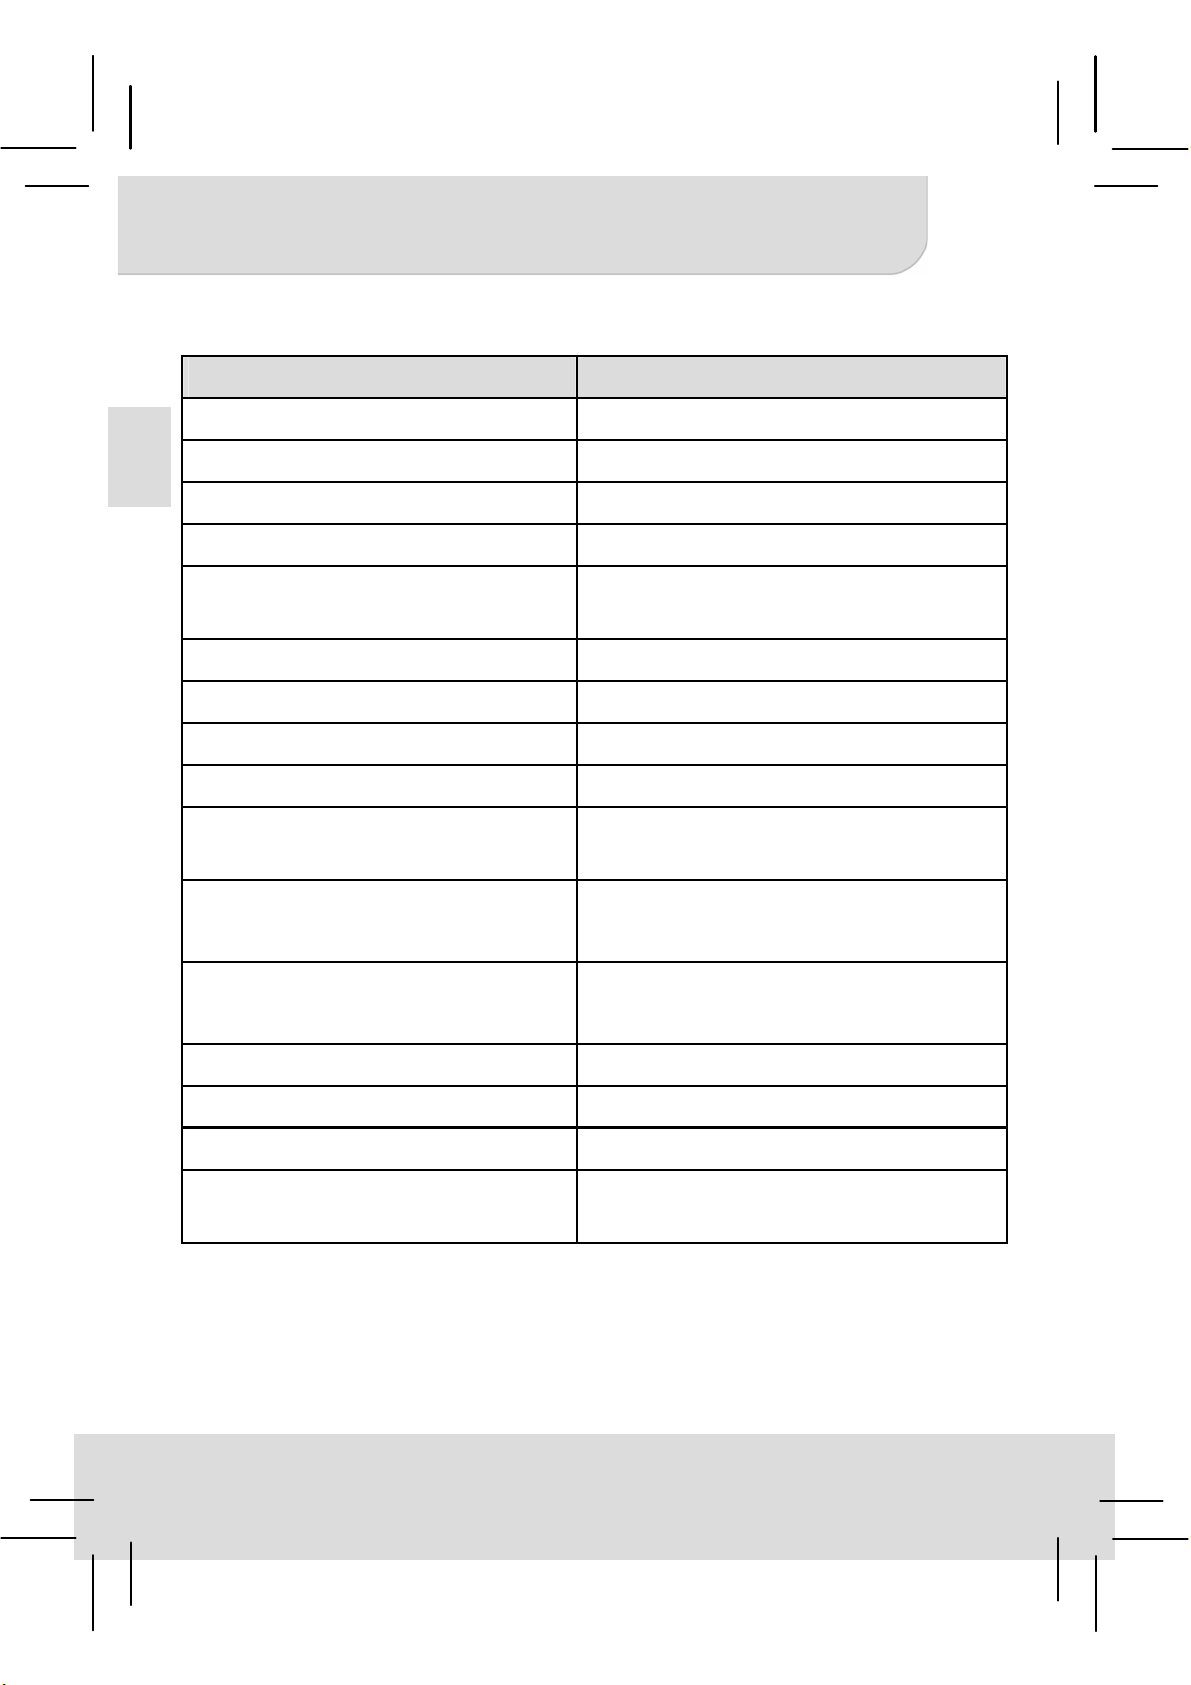
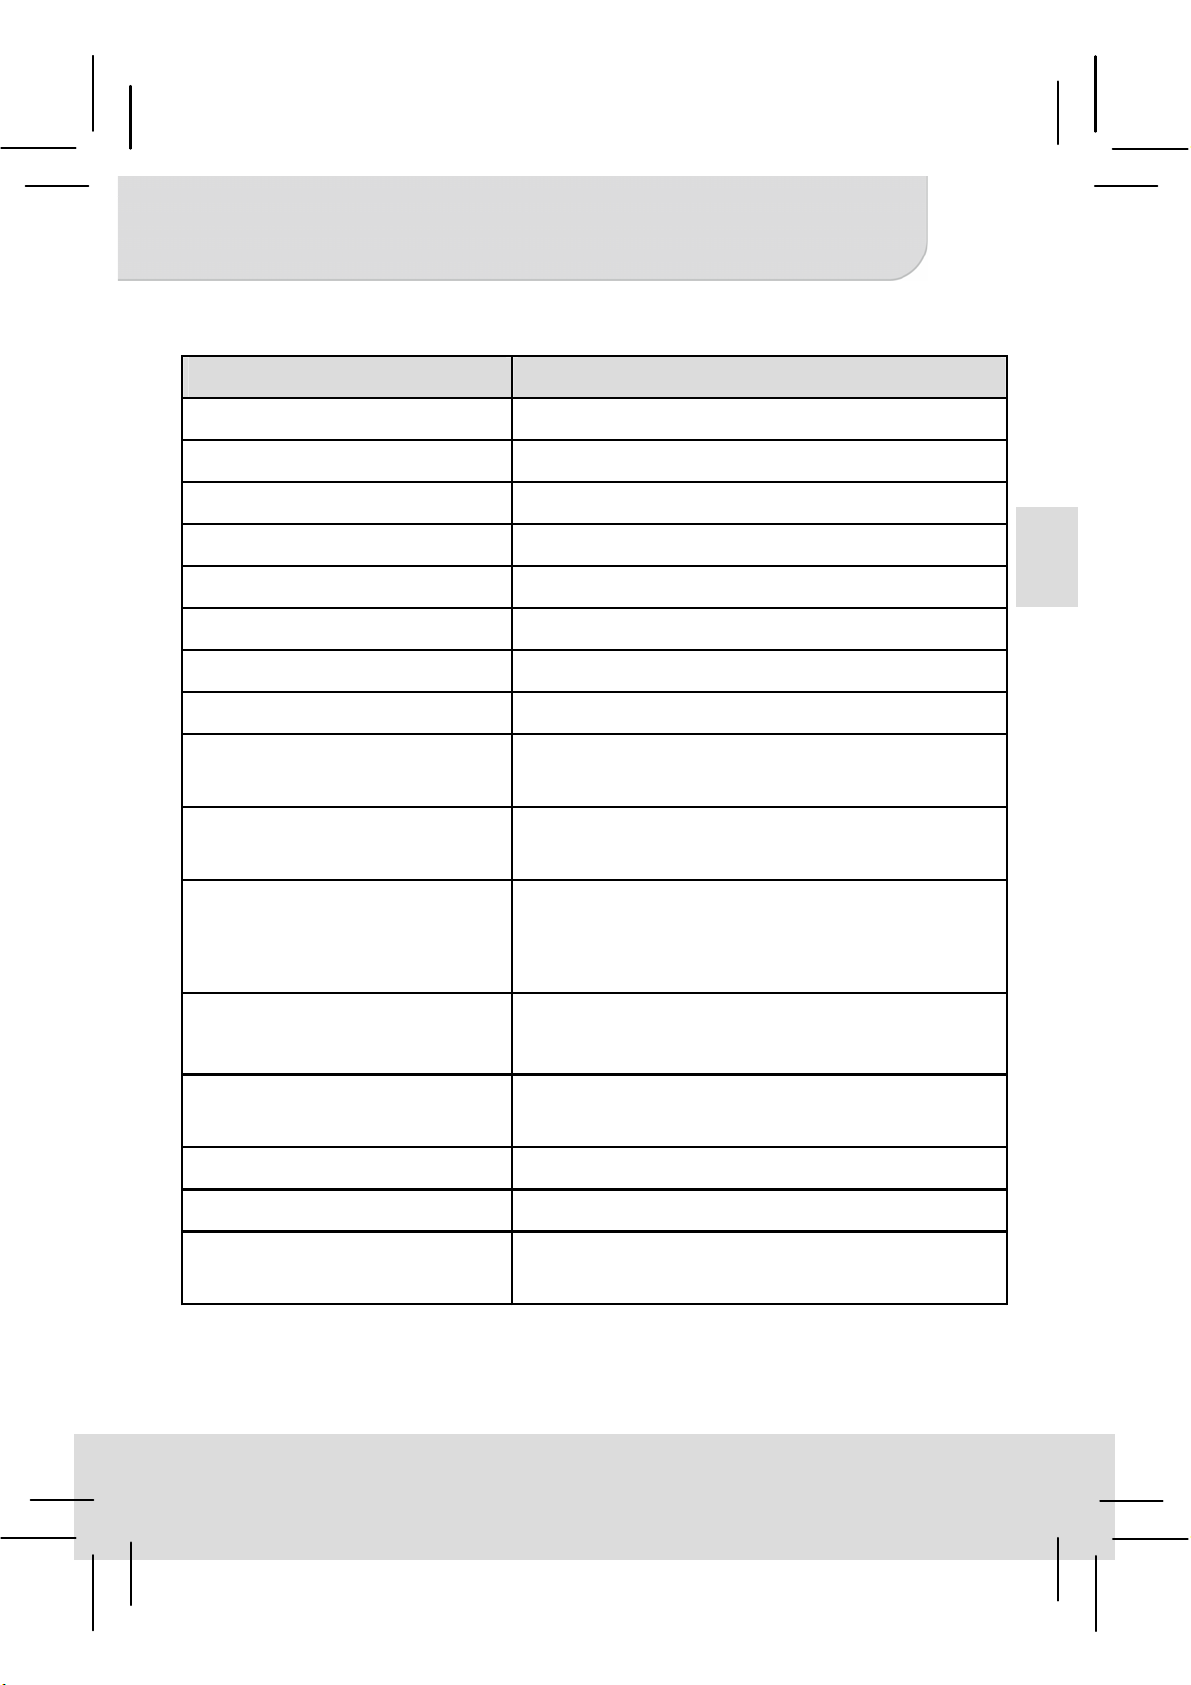
Product specifications
Item Description
Optical Technology DLP
Light Source RGB LED
Resolution 640 x 480 Pixels (VGA)
Luminous Flux Up to 35 lumens
Projection Image Size 152 mm ~ 1524 mm (6” ~ 60” Diagonal)
Operating System iOS4, iOS5
Projection Source iPhone 4, iPhone 4S
Power Input 5V / 1A
Power Output 5V / 1A
Battery Type Embedded 1850 mAh, Li-polymer
rechargeable battery
Battery Life Projection mode: 120 min
iPhone charging mode: 80% iPhone
battery capacity
EN
Power Consumption Projection mode: 4.5W
iPhone charging mode: 5W
Operation Temperature 5 °C ~ 35 °C
Dimension (L x W x H) 126 x 68 x 20 mm
Weight 125 g
Package Content Pico Projector, User‘s Manual, USB
cable
* All specifications are subject to change without notice.
4
Page 10

User’s Manual
Troubleshooting
EN
Symptom Check Point
The projector can not turn on. Ensure the battery is fully charged.
The projecting image is too
dark.
The projecting image is too
blurry.
The projector can turn on, but
the image can not be
projected.
The temperature of the
projector’s surface is warm.
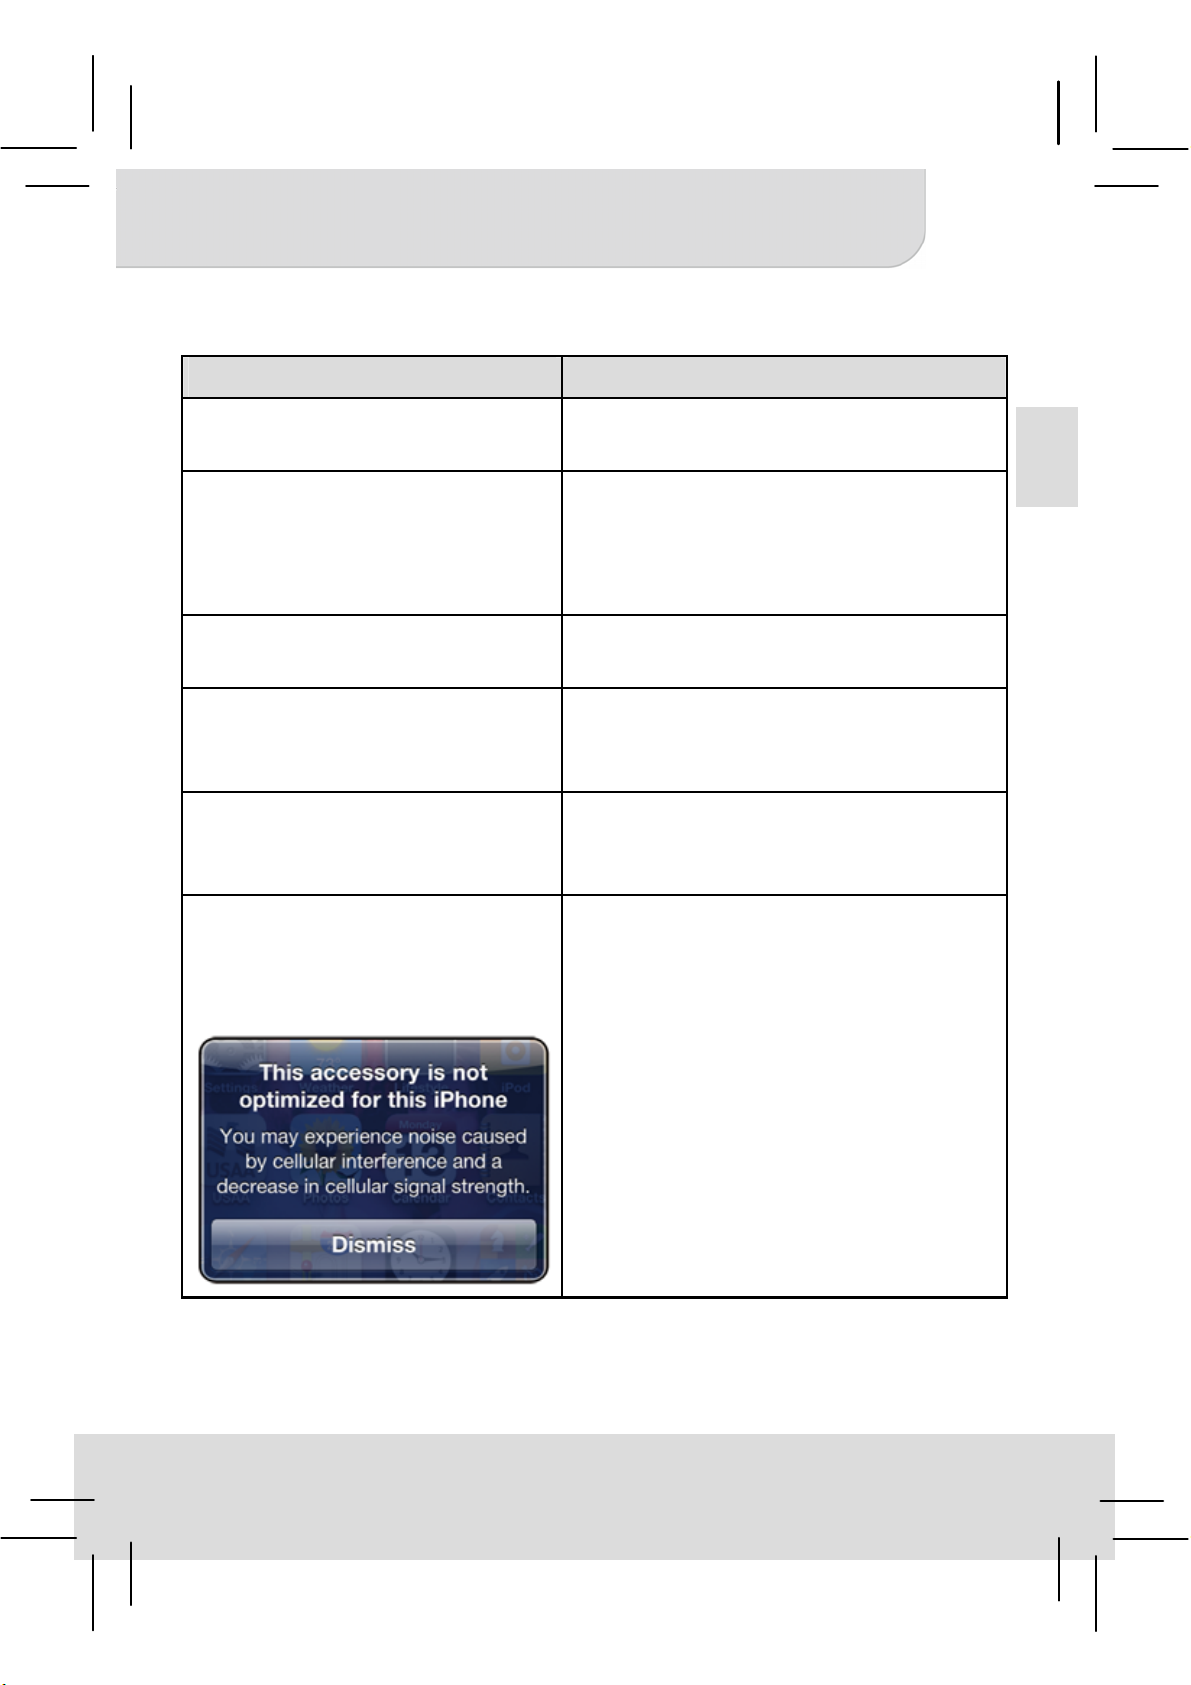
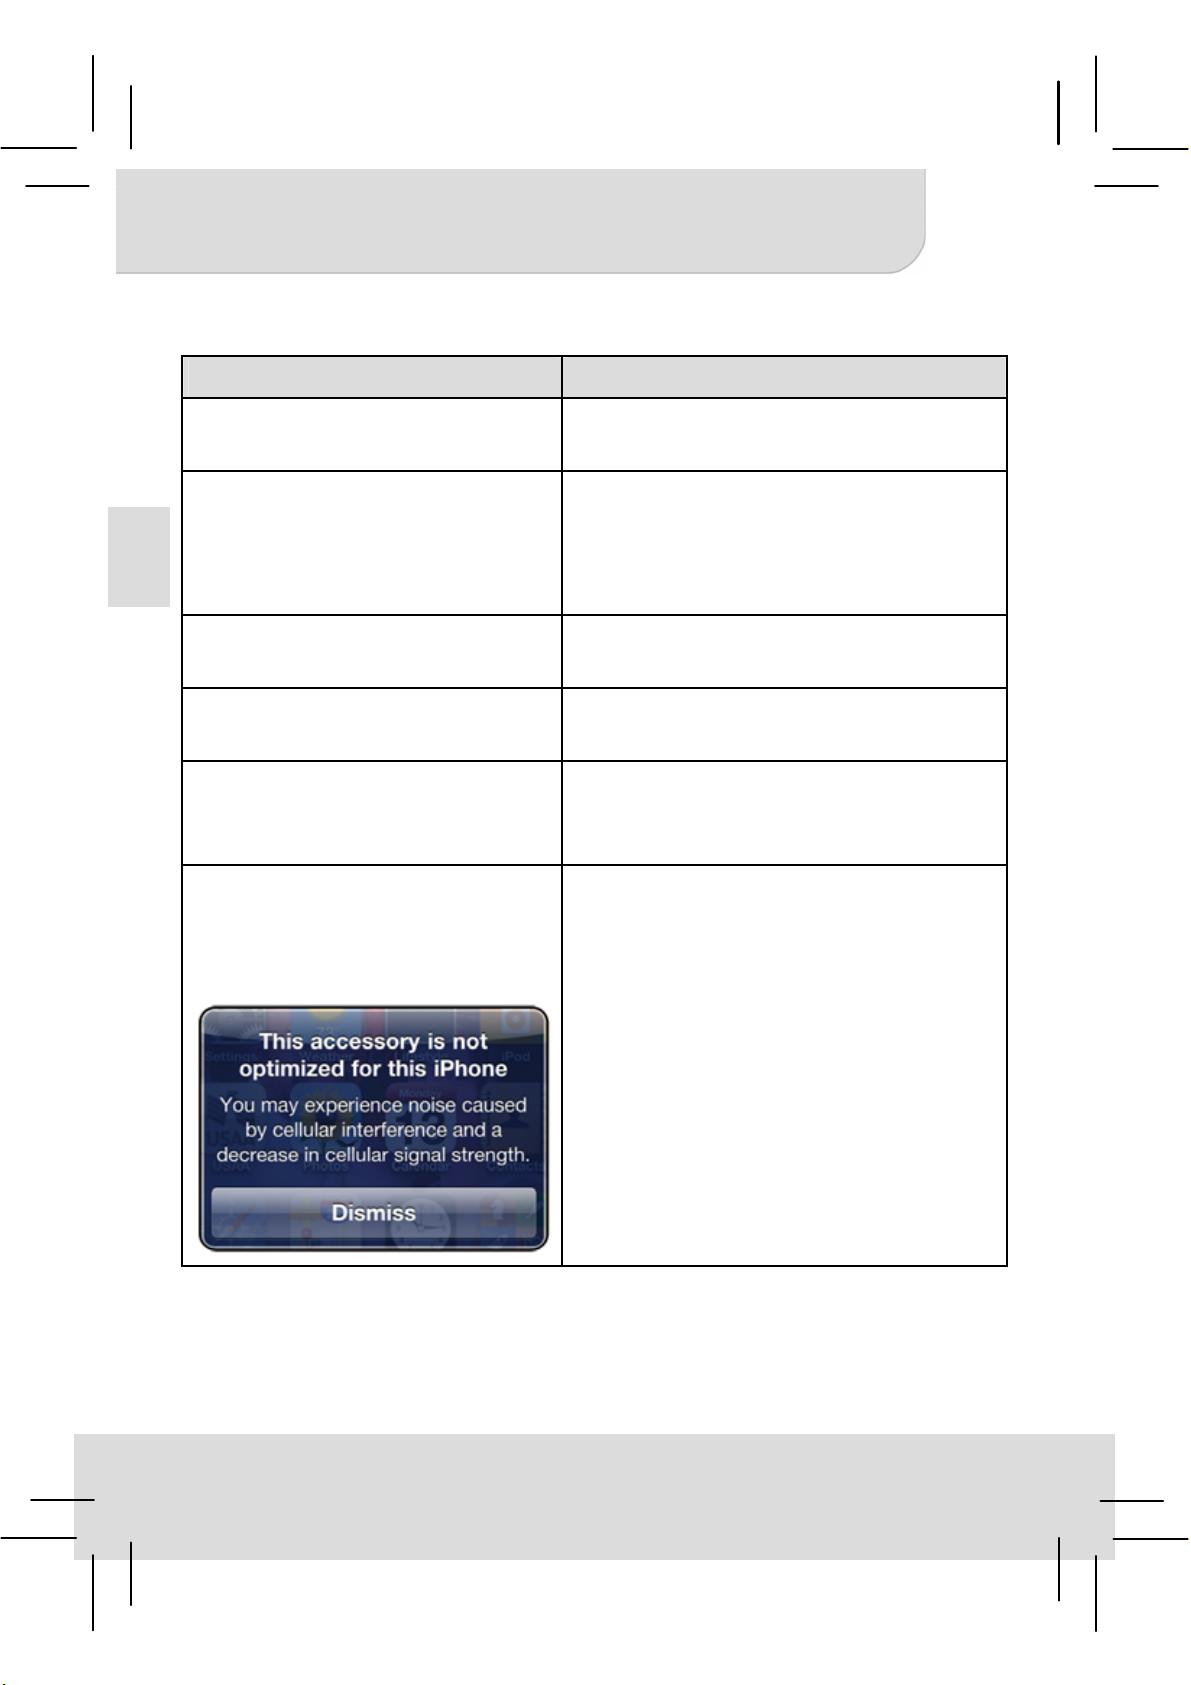
When connecting the iPhone
to the projector and see the
error message displayed in
iPhone screen as below.
* Use the Projector in a darker
environment.
* Decrease the size of projecting
image.
Adjust the focus by using focus
wheel.
Ensure the App is equipped with
TV-out function.
It is normal for this projector to
generate moderate heat during
normal operation.
It may cause the bad connection
between iPhone and the projector.
Please reconnect iPhone and the
projector again.
5
Page 11
Benutzerhandbuch
Produktübersicht
iPhone Anschluss
DE
Fokusrad
Projektor-Objektiv
LED Anzeige
iPhone
LademodusTas te
Mikro USB
Ladeanschluss
Projektionsmod
us-Taste
Szenemodus Schalter
Kino-Modus: Farbanzeige verbessern.
Web-Modus: Textanzeige verbessern.
Öko-Modus: Hellgkeit für
Energiesparen
verringern.
1
Page 12
Benutzerhandbuch
Das Produkt aufladen
Schließen Sie ein Ende des
beiliegenden Mikro-USB-Kabels
DE
an den USB-Anschluss des
Produktes und das andere Ende
an den PC/Notebook oder iPhone
USB-Netzteil an.
* Das Produkt kann in etwa 5
Stunden aufgeladen werden,
wenn der Akku leer ist.
Laden des iPhone
1. Verbinden Sie das iPhone mit
dem Produkt.
2. Drücken Sie auf die iPhone
Lademodus-Taste, um den
Ladevorgang für das iPhone zu
starten oder zu stoppen.
1
2
1.
1
2.
oder
LED Anzeigemodi
LED Status Anzeige
3 weiße LEDs leuchten Ladestand liegt zwischen 80% und 100%
2 weiße LEDs leuchten Ladestand liegt zwischen 45% und 80%
1 weiße LED leuchtet Ladestand liegt zwischen 10% und 45%
1 weiße LED blinkt Ladestand beträgt weniger als 10%
LED Fortlaufend Produkt wird aufgeladen
LED blinkt Laden für iPhone
2
Page 13

Benutzerhandbuch
Den Projektor ein/ausschalten
Drücken Sie 3 Sekunden lang auf
die Projektionsmodus-Taste, um
den Projektor EIN oder AUS zu
schalten.
Einstellen des Fokus
Stellen Sie den Fokus ein, indem
Sie das Fokusrad drehen, um ein
schärferes und klareres Bild zu
erhalten.
Fotos und Videos über iPhone App projizieren
DE
1. Wählen Sie “Fotos” aus dem iPhone Menü.
2. Wählen Sie das Foto oder Video aus, das Sie projizieren möchten.
* Fotos können nur als Diashow projiziert werden.
**Bitte drücken Sie die Lautstärketaste am iPhone, um die
Lautstärke des Videos während der Wiedergabe zu steuern.
3
Page 14
Benutzerhandbuch
Technische Daten
Element Beschreibung
Optische Technologie DLP
DE
Lichtquelle RGB LED
Auflösung 640 x 480 Pixel (VGA)
Helligkeit Bis zu 35 Lumen
Projektion Bildgröße 152 cm ~ 1524 cm (6” ~ 60”
Diagonale)
Interner Lautsprecher iOS4, iOS5
Projektionsquelle iPhone 4, iPhone 4S
Eingangsleistung 5V / 1A
Ausgangsleistung 5V / 1A
Akkutyp Integrierter 1850 mAh, Li-Polymer
Akku
Batterielaufzeit Projektionsmodus: 120 Min.
iPhone Lademodus: 80% iPhone
Stromverbrauch Projektionsmodus: 4.5W
iPhone Lademodus: 5W
Betriebstemperatur 5 °C ~ 35 °C
Abmessungen (L x B x H) 126 x 68 x 20 mm
Gewicht 125 g
Lieferumfang Pico Projektor,
Benutzerhandbuch, USB-Kabel
* Änderungen der technischen Daten vorbehalten.
4
Page 15
Benutzerhandbuch
Fehlerbehebung
Symptom Prüfpunkt
Der Projektor kann nicht
eingeschaltet werden.
Das projizierte Bild ist zu
dunkel.
Das projizierte Bild ist zu
verschwommen.
Der Projektor kann
eingeschaltet, aber das Bild
nicht projiziert werden.
Die Oberfläche des Projektors
ist warm.
Beim Anschluss des iPhone
an den Projektor wird die
folgende Meldung auf dem
iPhone Display angezeigt.
Stellen Sie sicher, dass der Akku
voll aufgeladen ist.
* Verwenden Sie den Projektor in
einer dunkleren Umgebung.
* Verringern Sie die Größe des
projizierten Bildes.
Stellen Sie den Fokus über das
Fokusrad ein.
Stellen Sie sicher, dass die App
über eine TV-Out Funktion verfügt.
Während des Betriebes des
Projektors ist es normal, wenn er
sich etwas erwärmt.
Dies kann durch eine schlechte
Verbindung zwischen dem iPhone
und dem Projektor verursacht
werden.
DE
Bitte schließen Sie das iPhone und
den Projektor erneut an.
5
Page 16

Guide de l’utilisateur
Aperçu
FR
Connecteur iPhone
Molette de mise au point
Objectif du projecteur
Indicateur à DEL
Bouton du
mode recharge
iPhone
Port de chargement
Micro USB
Bouton de mode
Projection
Commutateur de mode Scène
Mode Cinéma : améliore les couleurs.
Mode Web : améliore le texte.
Mode Eco : diminue la luminosité
pour économiser de
l'énergie.
1
Page 17
Guide de l’utilisateur
Recharger le produit
Connectez une extrémité du câble
USB fourni au port Micro USB du
produit et l'autre extrémité sur le
PC /ordinateur portable ou à un
adapteur d'alimentation USB pour
iPhone pour le recharger.
* Le produit sera entièrement
chargé en 5 heures (lorsque la
batterie était entièrement
déchargée).
Chargeur iPhone
1. Connectez l’iPhone au produit.
2. Appuyez sur le bouton de
recharge iPhone pour démarrer
ou arrêter la recharge de
l'iPhone.
2.
1.
1
ou
FR
1
2
DEL indicatrices de Modes
Statut LED Indication
3 LEDs blanches constantes La batterie est entre 80% et 100%
2 LEDs blanches constantes La batterie est entre 45% et 80%
1 LED blanche constante La batterie est entre 10% et 45%
1 LED blanche clignotante La batterie est en dessous de 10%
Panneau LEDs Le produit est en charge
LEDs clignotantes iPhone en cours de chargement
2
Page 18
Guide de l’utilisateur
Allumer/éteindre le projecteur
Appuyez sur le bouton de mode
Projection pendant 3 secondes
pour allumer ou éteindre le
projecteur.
FR
Mettre au point
Ajustez la mise au point en
utilisant la molette de mise au
point pour obtenir une image plus
nette et claire.
Projection des photos et des vidéos par l'intermédiaire
de l’application native iPhone
1. Sélectionnez manuellement l'option « Photos » l’icône sur le menu
principal de l’iPhone.
2. Choisissez la photo ou la vidéo que vous voulez projeter.
* Les photos ne peuvent être projetées que sous forme de
diaporama.
**Veuillez appuyez sur le bouton de contrôle du volume de l'iPhone
pour ajuster le volume lors de la lecture d'une vidéo.
3
Page 19
Guide de l’utilisateur
Spécifications produit
Élément Description
Technologie optique DLP
Source lumineuse LED RGB
Résolution 640 x 480 Pixels (VGA)
Flux lumineux Jusqu'à 35 Lumens
Taille de l’image projetée 152 cm ~ 1524 cm (diagonale 6” ~ 60”)
Système d’exploitation iOS4, iOS5
Source de projection iPhone 4, iPhone 4S
Tension et intensité d'entrée 5V / 1A
Tension et intensité de
sortie
Type de batterie Batterie Li-polymer rechargeable
Autonomie Mode projection : 120 min
Consommation électrique Mode projection : 4.5W
Température de
fonctionnement
5V / 1A
intégrée de 1850 mAh
Mode charge iPhone : 80% de la
capacité de la batterie iPhone
Mode charge iPhone : 5W
5 °C ~ 35 °C
FR
Dimensions (L x l x H) 126 x 68 x 20 mm
Poids 125 g
Contenu de la boîte Projecteur Pico, Manuel de l'utilisateur,
Câble USB
* Toutes les spécifications sont sujettes à changement sans préavis.
4
Page 20
Guide de l’utilisateur
Dépannage
Symptôme Point à vérifier
Le projecteur ne peut pas
démarrer.
L’image projetée est trop
sombre.
FR
L’image projetée est trop
floue.
Le projecteur s’allume mais
aucune image n’est projetée.
La température à la surface
du projecteur est élevée.
Lors de la connexion de
l’iPhone sur le projecteur, le
message d’erreur suivant
s’affiche sur l’écran iPhone.
Vérifiez que la batterie est bien
chargée.
* Utilisez le projecteur dans un
environnement plus sombre.
* Diminuez la taille de l’image
projetée.
Ajustez la mise au point en utilisant
la molette de mise au point.
Assurez-vous de l’App est équipée
de la fonction sortie TV (TV-out).
Il est normal pour ce projecteur à
produire modérément de la chaleur
durant le fonctionnement normal.
Cela peut-être du à une mauvaise
connexion entre l'iPhone et le
projecteur.
Veuillez reconnectez l'iPhone et le
projecteur.
5
Page 21

Manuale utente
Panoramica del prodotto
Connettore iPhone
IT
Messa a fuoco
Obiettivo del proiettore
Indicatore LED
Tasto modalità
ricarica iPhone
Micro porta USB
per ricaricare
Tasto modalità
proiezione
Modo scena Interruttore
Modo cinema: Ottimizza la prestazioni
di colore.
Modo Web: Ottimizza la prestazioni
di testo.
Modo Eco: Riduce la luminosità per
risparmiare energia.
1
Page 22

Manuale utente
Ricaricare il prodotto
Collegare una estremità del cavo
USB alla micro porta USB del
prodotto e l’altra estremità al PC/
Notebook o all’adattatore USB
iPhone apposito.
* Il prodotto impiega circa 5 ore
per ricaricarsi completamente.
IT
Ricarica per iPhone
1. Collegare l’iPhone al prodotto.
2. Premere il tasto modalità
ricarica dell’ iPhone per avviare
o fermare il processo di
ricarica.
1
2
1.
1
2.
o
Stato indicatori LED
Stato LED Indicazione
3 LED bianchi accesi Autonomia tra 80% e 100%
2 LED bianchi accesi Autonomia tra 45% e 80%
1 LED bianco acceso Autonomia tra 10% e 45%
1 LED bianco lampeggiante Autonomia inferiore al 10%
Cornice LED Ricarica prodotto
LED lampeggiante Ricarica per iPhone
2
Page 23

Manuale utente
Accensione/spegnimento del proiettore
Premere il tasto modalità proiezione
per 3 secondi per accendere o
spegnere il proiettore.
Regolazione della messa a fuoco
Regolare la messa a fuoco
agendo sulla relativa ghiera per
avere immagini più nitide e chiare.
Proiezione di foto e video utilizzando la app nativa di
IT
iPhone
1. Selezionare a mano l’icona “Foto” dal menu principale dell’iPhone.
2. Selezionare la foto o il video da proiettare.
* Le foto possono essere proiettate solo come presentazione.
**Premere il tasto del volume dell’iPhone per regolare il volume
durante l’esecuzione di video.
3
Page 24

Manuale utente
Specifiche del prodotto
Elemento Descrizione
Tecnologia dell’ottica DLP
Sorgente luminosa LED RGB
Risoluzione 640 x 480 Pixel (VGA)
Flusso luminoso Fino a 35 lumen
Dimensioni immagini
proiettate
IT
Sistema operativo iOS4, iOS5
Origine della proiezione iPhone 4, iPhone 4S
Entrata corrente 5V / 1A
Uscita corrente 5V / 1A
Tipo di batteria Batteria al litio-ione-polimero
Autonomia della batteria Modalità proiezione: 120 min
Assorbimento Modalità proiezione: 4.5W
Temperatura di
funzionamento
Da 152 cm a 1524 cm (da 6” a 60”
diagonale)
ricaricabile a 1850 mAh integrati
Modalità ricarica iPhone: 80%
dell’autonomia della batteria dell’iPhone
Modalità ricarica iPhone: 5W
5 °C ~ 35 °C
Dimensioni (L x P x H) 126 x 68 x 20 mm
Peso 125 g
Contenuto della
confezione
* Tutte le specifiche sono soggette a modifiche senza preavviso.
Proiettore Pico, manual utente, cavo
USB
4
Page 25

Manuale utente
Risoluzione dei problemi
Problema Controllo
Il proiettore non si accende. Verificare che la batteria sia
completamente carica.
L’immagine proiettata risulta
troppo scura.
L’immagine proiettata risulta
troppo sfocata.
Il proiettore si accende, ma
non è possibile proiettare
l’immagine.
La superficie del proiettore è
calda.
Quando si collega l’iPhone al
proiettore si riceve un
messaggio di errore simile a
quello visualizzato nello
schermo dell’iPhone riportato
sotto.
* Usare il proiettore in un ambiente
più scuro.
* Ridurre le dimensioni
dell’immagine proiettata.
Regolare la messa a fuoco
utilizzando la ghiera per la messa a
fuoco.
Verificare che la App sia dotata
della funzione TV-out.
È normale che questo proiettore
generi una moderata quantità di calore
durante il funzionamento normale.
Potrebbe essere la causa di una
cattiva connessione tra l’iPhone e il
proiettore.
Ricollegare nuovamente l’iPhone e
il proiettore.
IT
5
Page 26

Manual del usuario
Presentación del producto
ES
Conector del iPhone
Rueda de enfoque
Lentes del proyector
Indicador LED
Botón de modo
de carga del
iPhone
Puerto de carga
Micro USB
Botón del modo de
proyección
Modo Escena Cambiar
Modo Cine: Mejora el rendimiento
del color.
Modo Web: Mejora del rendimiento
de texto.
Modo Eco: Disminuir el brillo para
el ahorro energético.
1
Page 27

Manual del usuario
Carga del producto
Conecte un extremo del cable
USB suministrado del producto y
el otro extremo en el ordenador /
portátil o el adaptador USB del
iPhone para su carga.
* El producto puede cargarse
completamente en unas 5 horas.
Carga del iPhone
1. Conecte el iPhone en el
dispositivo.
2. Pulse el botón de modo de
carga del iPhone para iniciar o
detener la carga del iPhone.
1
2
1.
1
2.
o
ES
Modos del indicator LED
Estado de la LED Indicación
3 LEDs blancas encendidas fijas Capacidad de la potencia está entre el 80% al 100%
2 LEDs blancas encendidas fijas Capacidad de la potencia está entre el 45% al 80%
1 LED blanca encendida fija Capacidad de la potencia está entre el 10% al 45%
1 LED parpadeante Capacidad de la potencia está por debajo del 10%
LED del dosel Se está cargando el dispositivo
LED parpadea Carga Del iPhone
2
Page 28

Manual del usuario
Encendido y apagado del proyector
Pulse el botón del Modo de
Proyección por 3 segundos para
encender o apagar el proyector.
Ajuste del enfoque
Ajuste el enfoque utilizando la
rueda del enfoque para obtener
una imagen más clara y nítida.
ES
Proyección de fotos y vídeos a través de la app nativa
de iPhone
1. Seleccione manualmente el icono “Photos” en el menú prinicpal del
iPhone.
2. Seleccione la foto o vídeo que desee proyectar.
* Fotos que solo pueden proyectarse como un pase de diapositiva.
**Presione el botón de control del volumen en el iPhone para ajustar
el volumen del vídeo durante su reproducción.
3
Page 29

Manual del usuario
Especificaciones de producto
Elemento Descripción
Technología óptica DLP
Fuente de luz LED RGB
Resolución 640 x 480 Píxeles (VGA)
Flux Luminoso Hasta 35 lúmenes
Tamaño de la imagen
proyectada
Sistema operativo iOS4, iOS5
Fuente de la proyección iPhone 4, iPhone 4S
Entrada de la fuente de
alimentación
Salida de la fuente de
alimentación
Tipo de batería Batería recargable integrada de Li-polymer
Vida útil de la batería Modo proyección: 120 min
Consumo de potencia Modo de proyección: 4.5W
Temperatura de
funcionamiento
Dimensiones (L x A x P) 126 x 68 x 20 mm
152 cm ~ 1524 cm (6” ~ 60” Diagonal)
5V / 1A
5V / 1A
y 1850 mAh
Modo de carga del iPhone: 80% de la
capacidad de la batería del iPhone
Modo de carga del iPhone: 5W
5 °C ~ 35 °C
ES
Peso 125 g
Contenido del paquete Proyector Pico, Manual del usuario y cable
USB.
* Todas las especificaciones están sujetas a cambio sin previo aviso.
4
Page 30

Manual del usuario
Resolución de problemas
Síntomas Punto de comprobación
No se puede encender el
proyector.
La imagen proyectada es
demasiado oscura.
La imagen proyectada se ve
muy borrosa.
Se puede encender el
ES
proyector, pero la imagen no
se puede proyectar.
La temperatura de la
superficie del proyector es
alta.
Cuando conecte el iPhone al
proyector y visualice el
mensaje de error en la
pantalla del iPhone como se
ve a continuación.
Asegúrese de que la batería esté
cargada.
* Utilice el proyector en un
ambiente más oscuro.
* Disminuya el tamaño de la
imagen proyectada.
Ajuste el enfoque utilizando la
rueda de enfoque.
Asegúrese de que la App esté
equipada con la función de salida
de TV.
Es normal que este proyector
genere un calor moderado durante
su funcionamiento normal.
Puede causar una mala conexión
entre el iPhone y el proyector.
Conecte de nuevo el iPhone y el
proyector.
5
Page 31

ϡΪΨΘδϤϟ ϞϴϟΩ
ϭ
ϭ
ϭ
Δ
ΞΘϨϤϟ ϰϠϋ ΔϣΎϋ Γήψϧ
ϞλϮϣiPhone
ΰϴϛήΘϟ ΔϠΠϋ
νήόϟ ίΎϬΟ ΔϠΠϋ
ϦΤη ϊοϭ έί
iPhone
ήηΆϣLED
AR
ϦΤη άϔϨϣUSB
ήϴϐλ
νήόϟ ϊοϭ έί
ϞϳϮΤΗ ΪϬθϤϟ ϊοϭ
ΎϤϴϨδϟ ϊο
: ϥϮϠϟ ΔϟΩ ΰϳΰόΗ.
: κϨϟ ˯Ω ΰϳΰόΗ.
ΐϳϮϟ ϊο
ϊο
Eco: ϳήϴϓϮΘϟ ωϮτδϟ ΔΟέΩ ϞϠϘ
ϗΎτϟ.
1
Page 32

ϡΪΨΘδϤϟ ϞϴϟΩ
AR
2.
1.
1
ΞΘϨϤϟ ϦΤη
ϞΒϛ ϑήσ ΪΣ ϞλϭUSBΔϣΰΤΑ ϖϓήϤϟ
άϔϨϣUSBήΧϵ ϑήτϟϭ ΞΘϨϤϠϟ ήϴϐμϟ
ήΗϮϴΒϤϜϟ ίΎϬΠΑ/ϝϮΤϣ ϭ ϝϮϤΤϤϟ ήΗϮϴΒϤϜϟ
ΔϗΎσUSBiPhoneϦΤθϟ ΔϴϠϤόΑ ϡΎϴϘϠϟ.
*ϲϟϮΣ ϞϣΎϜϟΎΑ ΞΘϨϤϟ ϦΤη ϦϜϤϳ5 ΕΎϋΎγ
Ύ˱ϏέΎϓ ϥϮϜϳ ΎϣΪϨϋ.
ϭ
1
2
ίΎϬΟ ϦΤηiPhone
1- ίΎϬΟ ϞλϭiPhoneΞΘϨϤϟΎΑ .
2-ϦΤη ϊοϭ έί ϰϠϋ ςϐοiPhone˯ΪΒϟ
ίΎϬΠϟ ΔΒδϨϟΎΑ ϦΤθϟ ϑΎϘϳ· ϭiPhone.
ήηΆϣ ωΎοϭLED
ΡΎΒμϤϟ ΔϟΎΣϴοϮΘϟ
3ϞϴϐθΘϟ ϊοϭ ϲϓ ϝΰΗ ϻ ˯ΎπϴΑ ϴΑΎμϣϦϴΑ ΔϗΎτϟ ΓέΪϗ80 %ϰϟ·100 %
2ϻ ˯ΎπϴΑ ϴΑΎμϣϞϴϐθΘϟ ϊοϭ ϲϓ ϝΰΗϦϴΑ ΔϗΎτϟ ΓέΪϗ45 %ϰϟ·80 %
ϦϴΑ ΔϗΎτϟ ΓέΪϗ10 %ϰϟ·45 %
2
ϊοϭ ϲϓ ϝΰϳ ϻ ξϴΑ ΪΣϭ ΡΎΒμϣ
ϞϴϐθΘϟ
ξϣϮϳ ξϴΑ ΪΣϭ ΡΎΒμϣϦϣ Ϟϗ ΔϗΎτϟ ΓέΪϗ10%
ΡΎΒμϤϟ ξϴϣϭ έήϤΘγΞΘϨϤϟ ϦΤη ϱέΎΟ
ξϣϮϳ ΡΎΒμϤϟίΎϬΟ ϦΤηiPhone
Page 33

ϡΪΨΘδϤϟ ϞϴϟΩ
ϞϴϐθΗ/Ο ϞϴϐθΗ ϑΎϘϳ·νήόϟ ίΎϬ
νήόϟ ϊοϭ έί ϰϠϋ ςϐοΓΪϤϟ 3ϲϧϮΛ
νήόϟ ίΎϬΟ ϞϴϐθΗ ϑΎϘϳϹ ϭ ϞϴϐθΘϟ.
ΰϴϛήΘϟ ςΒο
ϝϮμΤϠϟ ΰϴϛήΘϟ ΔϠΠϋ ϡΪΨΘγΎΑ ΰϴϛήΘϟ ςΒο
ΓΪΣ ήΜϛϭ ΔΤοϭ ΓέϮλ ϰϠϋ.
ίΎϬΠϟ ϲϠλϷ ϖϴΒτΘϟ ϡΪΨΘγΎΑ ϮϳΪϴϔϟϭ έϮμϟ νήϋiPhone
-1 ΩΪΣϮϘϳΔϧ"έϮμϟ "ΔϤΎϘϟ ϰϠϋ Ύ˱ϳϭΪϳ
ίΎϬΠϟ ΔϴδϴήϟiPhone .
-2μϟ ήΘΧΓέϮϭϪοήϋ ΪϳήΗ ϲΘϟ ϮϳΪϴϔϟ.
* ήθϟ νήϋ ΔϘϳήτΑ ςϘϓ έϮμϟ νήϋ ϦϜϤϳ.
**ίΎϬΠΑ ΩϮΟϮϤϟ ΕϮμϟ ϲϓ ϢϜΤΘϟ έί ϰϠϋ ςϐο ˱˯ΎΟέiPhoneΕϮλ ϯϮΘδϣ ςΒπϟ
ϞϴϐθΘϟ ˯ΎϨΛ ϮϳΪϴϔϟ.
AR
3
Page 34

ϡΪΨΘδϤϟ ϞϴϟΩ
ΞΘϨϤϟ ΕΎϔλϮϣ
AR
ϒλϮϟ
ήμϨόϟ
ΔϳήμΑ ΎϴΟϮϟϮϨϜΗDLP
˯Ϯπϟ έΪμϣΡΎΒμϣRGB
ΔϗΪϟ640×480ϞδϜΑ(VGA)
ΔϣΪΨΘδϤϟ Γ˯ΎοϷϰϟ· Ϟμϳ35ΡΎΒμϣ
νήόϟ ΓέϮλ ϢΠΣ152ϰϟ· Ϣγ1524Ϣγ )6 ϰϟ· ΔλϮΑ60ΔλϮΑ
Δϳήτϗ ϒμϧ(
ϞϴϐθΘϟ ϡΎψϧiOS4, iOS5
νήόϟ έΪμϣiPhone 4, iPhone 4S
ΔϗΎτϟ ϞΧΩ5V / 1A
ΔϗΎτϟ ΝήΧ5V / 1A
ΔϳέΎτΒϟ ωϮϧΔΠϣΪϣ ΔϳέΎτΑ1850ήϤϴϟϮΑ ϲϟ ωϮϧ Ϧϣ ˬήϴΒϣ ϲϠϣ
ϦΤθϟ ΓΩΎϋϹ ΔϠΑΎϘϟ.
ΔϳέΎτΒϠϟ ϲοήΘϓϻ ήϤόϟνήόϟ ϊοϭ :120ΔϘϴϗΩ
ϦΤη ϊοϭiPhone :80 %ΔόγίΎϬΟ ΔϳέΎτΑ
iPhone
ΔϗΎτϟ ϙϼϬΘγνήόϟ ϊοϭ :4.5Εϭ
ίΎϬΟ ϦΤη ϊοϭiPhone :5Εϭ
ϞϴϐθΘϟ ΓέήΣ ΔΟέΩ5 °C ~ 35 °C
20 x 68 x 126ϢϠϣ
ΔϣΰΤϟ ΕΎϳϮΘΤϣϞΒϛ ˬϡΪΨΘδϤϟ ϞϴϟΩ ˬϮϜϴΑ νήϋ ίΎϬΟUSB
4
ΩΎόΑϷ) ϝϮτϟ ×νήόϟ ×
ωΎϔΗέϻ(
ϥίϮϟ125ϡήΟ
*έΎτΧ· ϥϭΩ ήϴϐΘϠϟ ΕΎϔλϮϤϟ ΔϓΎϛ ϊπΨΗ.
Page 35

ϡΪΨΘδϤϟ ϞϴϟΩ
ΎϬϠΣϭ ϞϛΎθϤϟ ϑΎθΘϛ
ΔϠϜθϤϟ ϖϘΤΘϟ ΔτϘϧ
νήόϟ ίΎϬΟ ϞϴϐθΗ έάόΗ. ϡΎϤΗ Ϧϣ Ϊϛ΄ΗϞϣΎϜϟΎΑ ΔϳέΎτΒϟ ϦΤη.
* Ύ˱ϣϼχ ήΜϛ ΔΌϴΑ ϲϓ νήόϟ ίΎϬΟ ϡΪΨΘγ. ΔϳΎϐϠϟ ΔϤϠψϣ ΔοϭήόϤϟ ΓέϮμϟ.
* ΔοϭήόϤϟ ΓέϮμϟ ϢΠΣ ϞϠϗ.
ΰϴ ΔϳΎϐϠϟ ΔΘϫΎΑ ΔοϭήόϤϟ ΓέϮμϟ. ϛήΘϟ ΔϠΠϋ ϡΪΨΘγΎΑ ΰϴϛήΘϟ ςΒο.
χϮΑ ϖϴΒτΘϟ έάόΗ ϊϣ νήόϟ ίΎϬΟ ϞϴϐθΗ ϦϜϤϳ
ΔϟΪΘόϣ ΔΌϓΩ νήόϟ ίΎϬΟ τγ ΓέήΣ ΔΟέΩ .ΓέήΣ ΪϴϟϮΗ άϫ νήόϟ ίΎϬΠϟ ΩΎΘόϤϟ Ϧϣ
ΎϬΟ ϞϴλϮΗ ˯Ϯγ ϲϓ ϚϟΫ ΐΒδΘϳ ΪϗίiPhone
ίΎϬΟ ϞϴλϮΗ ΓΩΎϋ· ˱˯ΎΟέiPhoneίΎϬΠΑ
ΪϳϭΰΗ Ϧϣ Ϊϛ΄ΗϥϮϳΰϔϠΘϟ ΝήΧ Δϔϴ.
ΩΎΘόϤϟ ϞϴϐθΘϟ ˯ΎϨΛ.
νήόϟ ίΎϬΠΑ.
ϯήΧ Γήϣ νήόϟ.
ΓέϮμϟ νήϋ.
ίΎϬΟ ϞϴλϮΗ ΪϨϋiPhoneίΎϬΠΑ
ΔϟΎγέ ϯήΗϭ νήόϟΩϮΟϮΑ ΄τΧ
ίΎϬΟ ΔηΎη ϰϠϋ ΔοϭήόϣiPhoneΎϤϛ
ϞϔγϷΎΑ οϮϣ.
AR
5
Page 36

Handleiding
Aan de slag Onderdelen van de projector
iPhone aansluiting
Focus Wiel
Projector Lens
LED indicatie
iPhone
Oplaad modus
toets
NL
Micro USB
Oplaadpoort
Projectie modus toets
Scene modus Schakelaar
Bioscoop modus: Kleurprestaties
verhogen.
Web mode: Tekstprestaties
verhogen.
Eco modus: Helderheid voor
netspanning
verlagen. beparen.
1
Page 37

Handleiding
Het product opladen
Sluit een eind van de gebundelder
USB kabel aan op de Micro USB
poort van het product en het
andere eind op de PC / Notebook
of iPhone USB voedingsadapter
om op te laden.
* Het product kan circa 5 uur
volledig worden opgeladen
voordat het leeg is.
Opladen voor iPhone
1. Verbind de iPhone met het
product.
2. Druk op de iPhone oplaad
modus toets om het opladen
van de iPhone te starten of te
stoppen.
1
2
1.
1
2.
of
NL
LED Indicatie modussen
LED Stand Indicatie
3 witte LED’s aan Voedingscapaciteit is tussen 80% tot 100%
2 witte LED’s aan Voedingscapaciteit is tussen 45% tot 80%
1 witte LED’s aan Voedingscapaciteit is tussen 10% tot 45%
1 witte LED’s knippert Voedingscapaciteit minder dan 10%
LED's Lopen Product wordt opgeladen
LED knippert Opladen voor iPhone
2
Page 38

Handleiding
De projector aan/uit schakelen
Druk 3 seconden op de projectie
modus toets om de projector AAN
of UIT te zetten.
Focus instellen
De focus instellen gebruik van het
focus wiel voor een scherper en
duidelijker beeld.
Foto’s en video’s projecteren via iPhone native app
NL
1. Selecteer het “Foto’s” handmatig icoon in het iPhone hoofdmenu.
2. Kies de foto of video die u wilt projecteren.
* Foto’s kunnen alleen als diashow worden geprojecteerd.
**Druk op de volume regeltoets op de iPhone om het volume van de
video tijdens afspelen af te stellen.
3
Page 39

Handleiding
Product specificaties
Item Omschrijving
Optische technologie DLP
Lichtbron RGB LED
Resolutie 640 x 480 Pixels (VGA)
Luminous Flux Op tot 35 lumens
Projectie beeldgrootte 152 cm ~ 1524 cm (6” ~ 60” Diagonaal)
Besturingssysteem iOS4, iOS5
Projectiebron iPhone 4, iPhone 4S
Spanningsinvoer 5V / 1A
Spanningsuitvoer 5V / 1A
Batterijtype Geintegreerde 1850 mAh, Li-polymeer
oplaadbare batterij
Batterij levensduur Projectiemodus: 120 min
iPhone oplaadmodus: 80% iPhone
batterij capaciteit
Voedingsverbruik Projectiemodus: 4.5W
iPhone oplaadmodus: 5W
Gebruikstemparatuur 5 °C ~ 35 °C
Afmetingen (L x W x H) 126 x 68 x 20 mm
Gewicht 125 g
Inhound verpakking Pico Projector, gebruikershandleidingl,
USB kabel
* Alle specificaties zijn onderhevig aan verandering zonder
voorafgaande mededeling.
NL
4
Page 40

Handleiding
Problemen oplossen
Symptoom Controlepunt
De projector kan niet
aangezet worden.
Het geprojecteerd beeld is te
donker.
Het geprojecteerde beeld is te
wazig.
De projector kan aangezet
worden maar het beeld wordt
niet geprojecteerd.
De temperatuur van het
oppervlak van de projector is
warm.
Wanneer de iPhone is
NL
verbonden met de projector
wordt de volgende
onderstaande foutmelding
weergegeven in het iPhone
scherm.
Controleer of de batterij geheel is
opgeladen.
* Gebruik de projector in een
omgeving die donkerder is.
* Verklein de grootte van de
afbeelding.
Stel de focus in met het focus wiel.
Controleer of de App voorzien is
van de tv-uit functie.
Het is normal voor deze projector
om een beetje warmte te genereren
tijdens het projecteren.
Het kan een slechte verbinding
tussen iPhone en de projector
veroorzaken.
Sluit de iPhone en de projector
opnieuw aan.
5
Page 41

Manual do Usuário
Visão Geral do Produto
Indicador LED
Conector de iPhone
Roda de Focalização
Lente do Projetor
Botão do Modo
de Carregamento
do iPhone
Micro Porta de
Carregamento USB
Botão do Modo
de Projeção
Modo Cenário Alterna
Modo Cinema: Aumenta a performance
da cor.
Modo Web: Aumenta a performance
texto.
Modo Eco: Reduz o brilho para
economizar energia.
BPT
1
Page 42

Manual do Usuário
Carregando o produto
Conecte uma ponta do cabo
incorporado USB na Micro porta
USB do produto e a outra ponta
ao PC / Computador Portátil ou
adaptador de alimentação US do
iPhone para o carregamento.
* O Produto pode ser carregado
completamente em 5 hrs a partir
do estado vazio.
Carregando o iPhone
1. Conecte o iPhone ao produto.
2. Pressione o botão do modo de
carregamento do iPhone para
iniciar ou parar o carregamento
para iPhone.
1
2
1.
1
2.
ou
Modos do Indicador LED
BPT
Estado do LED Indicação
3 LEDs brancos acesos Capacidade de energia está entre 80% a 100%
2 LEDs brancos acesos Capacidade de energia está entre 45% a 80%
1 LED branco aceso Capacidade de energia está entre 10% a 45%
1 LED branco piscante Capacidade de energia está abaixo de 10%
Letreiro de LED Produto está sendo carregado
LED piscante Carregamento de iPhone
2
Page 43

Manual do Usuário
Ligando/desligando o projetor
Pressione o Botão do Modo de
Projeção por 3 segundos para
LIGAR ou DESLIGAR o projetor.
Ajustando o Foco
Ajuste o foco usando a roda de
focalização para obter uma
imagem mais nítida e clara.
Projetando as fotos e vídeos através do aplicatovo
original do iPhone
1. Selecione manualmente o ícone “Fotos” no menu principal do iPhone.
2. Escolha a foto ou vídeo que você deseja projetar.
* Fotos podem ser projetados somente como uma presentação de
diapositivas.
**Aperte o botão de controle do volume no iPhone para ajustar o
volume de vídeo durante a reprodução.
BPT
3
Page 44

Manual do Usuário
Especificações do produto
Item Descrição
Tecnologia Óptica DLP
Fonte de Luz RGB LED
Resolução 640 x 480 Pixels (VGA)
Fluxo Luminoso Até 35 lumens
Tamanho da Imagem de
Projeção
Sistema Operacional iOS4, iOS5
Fonte de Projeção iPhone 4, iPhone 4S
Entrada de Energia 5V / 1A
Saída de Energia 5V / 1A
Tipo de Bateria Bateria recarregável de Li-polímero
Vida da Bateria Modo de Projeção: 120 min
Consumo de Energia Modo de projeção: 4.5W
BPT
Temperatura de
Operação
152 cm ~ 1524 cm (6” ~ 60” Diagonal)
1850 mAh
Modo de carregamento do iPhone: 80%
capacidade dabateria do iPhone
Modo de carregamento do iPhone: 5W
5 °C ~ 35 °C
Dimensão (C x L x A) 126 x 68 x 20 mm
Peso 125 g
Conteúdo do Pacote Pico Projector, Manual do Usuároi,
cabo USB
* Todas as especificações estão sujeitas à mudanças sem aviso.
4
Page 45

Manual do Usuário
Resolução de Problemas
Sintoma Ponto de Verificação
O projetor não consegue ser
ligado.
A imagem de projeção é
muito escura.
A imagem de projeção está
muito indistinta.
O projetor pode ser ligado,
mas a imagem não pode ser
projetada.
A temperatura da superfície
do projetor está quente.
Ao conectar o iPhone ao
projetor e ver a mensagem de
erro mostrado na tela abaixo
do iPhone.
Assegure-se de que a bateria
esteja completamente carregada.
* Use o Projetor em um ambiente
mais escuro.
* Reduza o tamanho da imagem
de projeção.
Ajuste o foco usando a roda de
focalização.
Assegure-se de que o App esteja
equipado com a função de saída
de TV.
É normal que este projetor gere
calor moderado durante a
operação normal.
Pode causar conexão ruim entre
iPhone e o projetor.
Reconecte o iPhone e o projetor
novamente.
BPT
5
Page 46

ٺҢЙы
ࠢ྅
LED ࡾҰᐷ
iPhone шႫ
Ԓࡸ໖
iPhone ᓞ
ᄇฐᐌᕗ
ኇᐠᜢᓞ
TC
ཌ USB шႫ
ஃ
ኇԒࡸ໖
ൟශԒϸ
ቑԒȈ ՓிȄ
ᆩԒȈ МԅȄ
ࣸႫԒȈ ճ࡙߫оࣸႫȄ
1
Page 47

ٺҢЙы
࣏ࠢшႫ
࣏
шႫ
ࡾҰᐷԒ
ޑᄘ ᇳ݂
USB ጣޟΙᆒࠢޟཌ
USB ஃȂѪΙᆒএΡႫ
သ/๋Ⴋသܖ iPhone USB Ⴋྛ
ᙽᏢ໌шႫȄ
* ࠢฒႫΨڗׇӒшᅖႫ 5
ωȄ
iPhone
1. iPhone ڗҏࠢȄ
2. ࡸή iPhone шႫԒࡸ໖Ȃо
ంଢ଼ܖୄХᄇ iPhone шႫȄ
1
2
1.
1
2.
ܖ
LED
LED
3 এҩՓ LED ߫ ႫΨϭܻ 80%ڗ 100%Ϟ
2 এҩՓ LED ߫ ႫΨϭܻ 45%ڗ 80%Ϟ
1 এҩՓ LED ߫ ႫΨϭܻ 10%ڗ 45%Ϟ
1 এҩՓ LED ରᛗ ႫΨճܻ 10%
LED ເᐷ ࠢғӵшႫ
LED ରᛗ ғӵ࣏ iPhone шႫ
2
TC
Page 48

ٺҢЙы
ం/ᜰഖኇᐠ
ᐌฐᘈ
ആႆ
ϱ࡚ᔖҢแԒኇࣺаЅຜଉ
ࡸ՞ኇԒࡸ໖ 3 មȂоం
ܖᜰഖኇᐠȄ
ցҢᄇฐᙽዺᐌฐᘈȂџоᡱყ
аё఼ᎠցȄ
iPhone
TC
1. Йଢ଼ᒵᐅ iPhone кᒵΰޟȶࣺаȷყҰȄ
2. ᒵᐅௌདኇޟࣺаܖຜଉȄ
* ࣺаѫоВᐷаԒ໌ኇȄ
**ࡸή iPhone ΰޟ໔ڙࡸ໖Ȃоᐌኇаኬܹޟ໔Ȅ
3
Page 49

ٺҢЙы
ࠢೣ
Ҭ ᇳ݂
ӎᏰ DLP
ӎྛ RGB LED
၌ݙ࡙ 640 x 480 શ(VGA)
ӎ໔ ശଽՍ 35 ࢺ݂
ኇኇЏψ 152 ϴϷ ~ 1524 ϴϷ(ᄇُጣ 6 ӧ~ 60
հཾفಛ iOS4ȃiOS5
ኇپྛ iPhone 4ȃiPhone 4S
ႫྛᒯΣ 5V / 1A
Ⴋྛᒯю 5V / 1A
ႫԱ ϱ࡚ 1850 mAhȃᎤᆹӫސџшႫႫԱ
ႫԱჰڼ ኇԒȈ120 Ϸម
ૉႫ໔ ኇԒȈ4.5W
ӧ)
iPhone шႫԒȈ80%ޟ iPhone ႫΨ
iPhone шႫԒȈ5W
հཾྣ࡙ 5 °C ~ 35 °C
Џψ(ߝ x ቶ x ଽ) 126 x 68 x 20 ϴᚄ
໔ 125 պ
ѓ၆ϱৠ ཌኇᐠȃٺҢЙыȃUSB ጣ
* ܚԤೣԃԤᡐȂ৽ϚѪޣȄ
4
TC
Page 50

ٺҢЙы
ᅸᜲ௶၌
Ӑ ᔮࢥᘈ
ฒݲంኇᐠȄ ጂᇯႫԱ֏ϐшᅖႫΨȄ
ኇޟኇЊུȄ * ӵၶུޟᕗცϛٺҢኇᐠȄ
ኇޟኇЊጙȄ ցҢᄇฐᙽዺᐌฐᘈȄ
џоంኇᐠȂծฒݲ
ኇኇȄ
ኇᐠߒ࡞ዥȄ ኇᐠӵғலၼհོҡཌ
iPhone ڗኇᐠȂ
iPhone ᒉᄍΰᡗҰԃήܚҰޟ
ᒿᇲଉȄ
* ᕻωኇኇޟЏψȄ
ጂᇯᔖҢแԒ֏ڎര TV-out ђ
Ȅ
ዥȂԪ࣏ғல౪ຫȄ
џҥܻ iPhone ڷኇᐠϞ
ϚيഅԙȄ
Ӕԩཱི iPhone ЅኇᐠȄ
TC
5
Page 51

Փ⫼䇈ᯢ
ѻકㅔҟ
LED ᣛ⼎♃
iPhone ܙ⬉
ᓣᣝ䪂
iPhone 䖲ッষ
䇗⛺䕂
ᡩᕅҾ䬰༈
ᖂൟ USB
ܙ⬉ッষ
ᡩᕅᓣᣝ䪂
ᚙ᱃ᓣᓔ݇
⬉ᕅᓣ˖ ᔎ㡆ᔽ㸼⦄DŽ
Web (㔥义)ᓣ˖ ᦤ催᭛ᴀᗻ㛑DŽ
Eco ᓣ˖ 䰡Ԣ҂ᑺҹ㡖㛑DŽ
1
SC
Page 52

Փ⫼䇈ᯢ
ѻકܙ⬉
ܙ⬉
ᣛ⼎♃ᓣ
⢊ᗕ ᣛ⼎
ᇚ USB⬉㓚ᴳⱘϔッϢѻકⱘᖂൟ
USB ッষⳌ䖲ˈ㗠ᇚ݊ϔッϢ
PC/ヨ䆄ᴀ iPhone USB ܙ⬉⬉
⑤䗖䜡఼Ⳍ䖲DŽ
* ᴀѻકҢぎ⬉⢊ᗕ㟇ܙ⬉ᅠ៤㑺
䳔 5 ᇣᯊDŽ
iPhone
1. ᇚ iPhone 䖲㟇ѻકDŽ
2. ᣝϟ iPhone ܙ⬉ᓣᣝ䪂ҹᓔ
ྟذℶܙ⬉DŽ
1
2
1.
1
2.
LED
LED
3 Ͼ LED ⱑ㡆ᣛ⼎♃ֱᣕ҂䍋 ࡳ⥛ᆍ䞣ҟѢ 80%㟇 100%П䯈
2 Ͼ LED ⱑ㡆ᣛ⼎♃ֱᣕ҂䍋 ࡳ⥛ᆍ䞣ҟѢ 45%㟇 80%П䯈
1 Ͼ LED ⱑ㡆ᣛ⼎♃ֱᣕ҂䍋 ࡳ⥛ᆍ䞣ҟѢ 10%㟇 45%П䯈
1 Ͼ LED ⱑ㡆ᣛ⼎♃䮾⚕ ࡳ⥛ᆍ䞣ԢѢ 10%
LED 䎥偀♃ ѻકℷܙ⬉
SC
LED ᣛ⼎♃䮾⚕ Ў iPhone ܙ⬉
2
Page 53

Փ⫼䇈ᯢ
ᠧᓔ/݇䯁ᡩᕅᴎ
䇗㡖⛺⚍
䗮䖛
ᴀഄᑨ⫼ᑣᡩᕅ✻⠛㾚乥
ᣝϟᡩᕅᓣᣝ䪂ᣕ㓁 3 ⾦ˈҹᠧ
ᓔ݇䯁ᡩᕅҾDŽ
Փ⫼㘮⛺䕂䇗㡖⛺⚍ˈҹ㦋প⏙
᱄ⱘ✻⠛DŽ
iPhone
1. ࡼ䗝ᢽ iPhone Џ㦰ϞⱘĀ✻⠛āDŽ
2. 䗝ᢽᙼᏠᳯᡩᕅⱘ✻⠛㾚乥DŽ
* া㛑ҹᑏ♃⠛ᬒⱘᮍᓣᡩᕅ✻⠛DŽ
**䇋ᣝϟ iPhone Ϟⱘ䷇䞣ࠊᣝ䪂ҹ䇗ᭈ㾚乥䞡ᬒⱘ䷇䞣DŽ
SC
3
Page 54

Փ⫼䇈ᯢ
ѻક㾘Ḑ
乍Ⳃ ᦣ䗄
ܝᄺᡔᴃ
ܝ⑤
ߚ䕼⥛ 640 x 480 ڣ㋴(VGA)
ܝ䗮䞣 ᳔催 35 ⌕ᯢ
ᡩᕅڣሎᇌ 152 ㉇~1524 ㉇(6” ~60”ᇍ㾦㒓)
᪡㋏㒳 iOS4ǃiOS5
ᡩᕅܝ⑤ iPhone 4 ҷǃiPhone 4S
⬉⑤䕧ܹ
⬉⑤䕧ߎ
⬉∴㉏ൟ ݙ㕂 1850 mAh 䫖㘮ড়⠽ৃܙ⬉⬉∴
⬉∴ᇓ ᡩᕅᓣ˖120 min
ࡳ㗫 ᡩᕅᓣ˖4.5W
DLP
RGB LED
5V / 1A
5V / 1A
iPhone ܙ⬉ᓣ˖80%ⱘ iPhone ⬉䞣
iPhone ܙ⬉ᓣ˖5W
䖤㸠⏽ᑺ
ሎᇌ(䭓 x ᆑ x 催) 126 x 68 x 20 ↿㉇
䞡䞣 125 ܟ
ࣙ㺙ݙᆍ ᖂൟᡩᕅҾǃ⫼᠋ݠǃUSB ⬉㓚
SC
* ᠔᳝㾘Ḑ䛑ৃ㛑ϡᯊবˈᘩϡ㸠䗮ⶹDŽ
5 °C ~ 35 °C
4
Page 55

Փ⫼䇈ᯢ
Ẕׂ
ᬙ䱰 Ẕᶹ⚍
ᡩᕅᴎ᮴⊩ᓔDŽ ⹂ֱ⬉∴ⱘ⬉䞣ܙ䎇DŽ
ᡩᕅ⠛咥DŽ * 咥ᱫⱘ⦃๗ЁՓ⫼ᡩᕅᴎDŽ
ᡩᕅ⠛䖛Ѣ㊞DŽ 䗮䖛Փ⫼㘮⛺䕂ˈҢ㗠䇗ᭈ⛺⚍DŽ
ᡩᕅᴎৃҹᓔˈԚᰃ᮴⊩ᡩ
ᕅ⠛DŽ
ᡩᕅᴎⱘ㸼䴶থ⛁DŽ ℷᐌ᪡ᳳ䯈ˈᡩᕅᴎӮѻ⫳䗖ᑺ
ᇚ iPhone 䖲㟇ᡩᕅᴎⱘᯊ
ˈⳟࠄ iPhone ሣᐩϞᰒ⼎њ
བϟ䫭䇃ֵᙃDŽ
* ޣᇣᡩᕅ⠛ⱘሎᇌDŽ
⹂ֱᑨ⫼ᑣ᳝⬉㾚䕧ߎࡳ㛑DŽ
ⱘ⛁䞣ˈ䖭ᕜℷᐌDŽ
iPhone ᡩᕅҾП䯈ৃ㛑Ӯ䖲ϡ
㡃DŽ
䇋䞡䆩䖲DŽ
SC
5
Page 56

䊡䊷䉱䊷䊙䊆䊠䉝䊦
ຠⷐ
JP
LED ␜Ἦ
iPhone ల㔚
䊝䊷䊄䊗䉺䊮
iPhone 䉮䊈䉪䉺
ὶὐ䉿䊙䊚
䊒䊨䉳䉢䉪䉺䊷䊧䊮䉵
ᛩᓇ䊝䊷䊄䊗䉺䊮
㘑᥊䊝䊷䊄ಾ䉍ᦧ䈋
ᤋ↹䊝䊷䊄䋺 ⦡ᓀᕈ⢻䉕ᒝൻ䇯
䉡䉢䊑䊝䊷䊄䋺䊁䉨䉴䊃ᕈ⢻䉕ᒝൻ䇯
ECO 䊝䊷䊄䋺!ᶖ⾌㔚ജ▵⚂䈱䈢䉄䈮ノ
1
Micro USB
ల㔚䊘䊷䊃
ᐲ䉕ૐ䇯
Page 57

䊡䊷䉱䊷䊙䊆䊠䉝䊦
ⵝ⟎䈱ల㔚
䈱ల㔚
␜Ἦ䊝䊷䊄
䈱⁁ᘒ
ᗧ
ઃዻ䈱 USB 䉬䊷䊑䊦䈱৻┵䉕ຠ
䈱 Micro USB 䊘䊷䊃䈮ធ⛯䈚䇮ઁ┵
䉕 PC / Notebook 䉁䈢䈲 iPhone
USB 㔚Ḯ䉝䉻䊒䉺䈮ធ⛯䈚䈩ల㔚䈚
䉁䈜䇯
* ຠ䈲ⓨ䈐⁁ᘒ䈎䉌⚂ 5 ᤨ㑆䈪䊐
䊦ల㔚䈮䈭䉍䉁䈜䇯
iPhone
1. iPhone 䉕ⵝ⟎䈮ធ⛯䈚䉁䈜䇯
2. iPhone ల㔚䊝䊷䊄䊗䉺䊮䉕䈜䈫
iPhone 䈻䈱ల㔚䉕㐿ᆎ䊶⚳䈚
䉁䈜䇯
2.
1.
1
䉁䈢䈲
JP
1
2
LED
LED
3 䈱 LED 䈏䉥䊮 䊋䉾䊁䊥䊷ᱷ㊂䈏 80䌾100%
2 䈱 LED 䈏䉥䊮 䊋䉾䊁䊥䊷ᱷ㊂䈏 45䌾80%
1 䈱 LED 䈏䉥䊮 䊋䉾䊁䊥䊷ᱷ㊂䈏 10䌾45%
1 䈱⊕⦡ LED 䈏ὐṌ 䊋䉾䊁䊥䊷ᱷ㊂䈏 10%ᧂḩ
LED 䈏⒖േ䈚䈭䈏䉌ὐἮ ⵝ⟎䈲ల㔚䈪䈜䇯
LED 䈏ὐṌ iPhone 䈱ల㔚
2
Indication
Page 58

䊡䊷䉱䊷䊙䊆䊠䉝䊦
䊒䊨䉳䉢䉪䉺䊷䈱䉥䊮/䉥䊐
ὶὐ䈱⺞▵
䊈䉟䊁䉞䊑䉝䊒䊥⚻↱䈱౮⌀䈫䊎䊂䉥䈱ᤋ౮
JP
䊒䊨䉳䉢䉪䉺䊷䉕䉥䊮䊶䉥䊐䈜䉎䈮䈲䇮
ᛩᓇ䊝䊷䊄䊗䉺䊮䉕 3 ⑽㑆䈚䉁䈜䇯
䊐䉤䊷䉦䉴䈧䉁䉂䉕↪䈚䈩ὶὐ䉕
⺞▵䈚䇮㞲䈪⍎䈭↹䉕ᓧ䉁
䈜䇯
iPhone
1. iPhone 䈱䊜䉟䊮䊜䊆䊠䊷䈮䈍䈇䈩ᚻേ䈪䇸౮⌀䇹䉕ㆬᛯ䈚䉁䈜䇯
2. ᤋ౮䈚䈢䈇౮⌀䉁䈢䈲䊎䊂䉥䉕ㆬᛯ䈚䉁䈜䇯
* ౮⌀䈱ᤋ౮䈲䇮䉴䊤䉟䊄䉲䊢䊷ᣇᑼ䈱䉂䈪䈜䇯
**䊎䊂䉥ౣ↢䈱㖸㊂⺞▵䈲䇮iPhone 䈱㖸㊂⺞▵䊗䉺䊮䉕䈚䈩䈒䈣
䈘䈇䇯
3
Page 59

䊡䊷䉱䊷䊙䊆䊠䉝䊦
ຠ᭽
㗄⋡ ⺑
JP
శᛛⴚ DLP
శḮ RGB LED
⸃ᐲ 640 x 480 䊏䉪䉶䊦(VGA)
శ᧤ ᦨᄢ 35 䊦䊷䊜䊮䉴
ᤋ౮↹䉰䉟䉵 152~1524 cm (6䌾60 䉟䊮䉼 ኻⷺ✢)
䉥䊕䊧䊷䊁䉞䊮䉫䉲䉴䊁䊛 iOS4䇮iOS5
ᤋ౮Ḯ iPhone 4䇮iPhone 4S
㔚Ḯജ 5V / 1A
㔚Ḯജ 5V / 1A
䊋䉾䊁䊥䊷䉺䉟䊒 ౝ⬿ 1850 mAh 䊥䉼䉡䊛䊘䊥䊙䊷ల㔚ᑼ
䊋䉾䊁䊥䊷ኼ ᤋ౮䊝䊷䊄 120 ಽ
ᶖ⾌㔚ജ ᤋ౮䊝䊷䊄 4.5W
䊋䉾䊁䊥䊷
iPhone ల㔚䊝䊷䊄䋺iPhone 䊋䉾䊁䊥ᱷ㊂
80%
iPhone ల㔚䊝䊷䊄䋺5W
േᐲ 5 °C ~ 35 °C
ኸᴺ(L x W x H) 126 x 68 x 20 mm
㊀㊂ 125 g
䊌䉾䉬䊷䉳ౝኈ‛ Pico 䊒䊨䉳䉢䉪䉺䊷䇮䊡䊷䉱䊷䉵䊙䊆䊠䉝
䊦䇮USB 䉬䊷䊑䊦
* 䈜䈼䈩䈱᭽䈲೨䈱๔䈭䈚䈮ᄌᦝ䈘䉏䉎䈖䈫䈏䈅䉍䉁䈜䇯
4
Page 60

䊡䊷䉱䊷䊙䊆䊠䉝䊦
䊃䊤䊑䊦䉲䊠䊷䊁䉞䊮䉫
∝⁁ 䉼䉢䉾䉪䊘䉟䊮䊃
JP
䊒䊨䉳䉢䉪䉺䊷䈱㔚Ḯ䈏䉥䊮䈮
䈭䉌䈭䈇䇯
ᤋ౮↹䈏ᥧ䈜䈑䉎䇯 * 䉅䈦䈫ᥧ䈇ⅣႺ䈪䊒䊨䉳䉢䉪䉺䊷䉕
ᤋ౮↹䈏㞲䈪䈅䉎䇯 䊐䉤䊷䉦䉴䈧䉁䉂䉕↪䈚䈩ὶὐ䉕⺞
䊒䊨䉳䉢䉪䉺䊷䈱㔚Ḯ䈏䉥䊮䈮
䈭䉎䈏䇮↹䈏ᤋ౮䈘䉏䈭䈇䇯
䊒䊨䉳䉢䉪䉺䊷㕙䈱ᐲ䈏ᥦ
䈎䈇䇯
iPhone 䉕䊒䊨䉳䉢䉪䉺䊷䈮ធ⛯
䈜䉎䈫䇮iPhone 䈱↹㕙䈮એ
䊋䉾䊁䊥䈏ቢో䈮ల㔚䈘䉏䈩䈇䉎䈎⏕
䈚䈩䈒䈣䈘䈇䇯
↪䈚䈩䈒䈣䈘䈇䇯
* ᤋ౮↹䈱䉰䉟䉵䉕ዊ䈘䈒䈚䈩䈒䈣
䈘䈇䇯
▵䈚䈩䈒䈣䈘䈇䇯
App (䉝䊒䊥)䈮 TV-out ᯏ⢻䈏ⵝ䈘
䉏䈩䈇䉎䈎⏕䈚䈩䈒䈣䈘䈇䇯
䊒䊨䉳䉢䉪䉺䊷䈏ᱜᏱ䈮േ䈚䈩䈇䉎
䈫䈐䇮ㆡᐲ䈭ᾲ䉕⊒↢䈜䉎䈱䈲⇣Ᏹ䈪
䈲䈅䉍䉁䈞䉖䇯
䈖䉏䈲 iPhone 䈫䊒䊨䉳䉢䉪䉺䊷㑆䈱
ធ⛯⦟䈏ේ࿃䈪䈅䉎น⢻ᕈ䈏䈅䉍
䈱䉋䈉䈭䉣䊤䊷䊜䉾䉶䊷䉳䈏␜
䈘䉏䉎䇯
䉁䈜䇯
iPhone 䈍䉋䈶䊒䊨䉳䉢䉪䉺䊷䉕ធ⛯䈚
⋥䈚䈩䈒䈣䈘䈇䇯
5
Page 61

㇠㟝㣄 ㉘⮹㉐
㥐䖼 ᵐ㟈
LED 䖐㐐☥
iPhone 㻝㤸ʳ
⯜☐ʳ ⶸ䏰
iPhone 䀘≙䉤
KO
㸼㥄ʳ 䡔
䘸⦐㥑䉤ʳ ⥀㪼
Micro USB
㻝㤸ʳ 䔠䏬
䘸⦐㥑㊌ʳ ⯜☐ʳ ⶸ䏰
㣙⮨ ⯜☐ 㤸䞌
㜵䞈 ⯜☐: 䛙ㇵ═ ㇽㇵ ㉥⏙.
㠭⯜☐: 䛙ㇵ═ 䊁㏘䏬 ㉥⏙.
㤼㚱 ⯜☐: 㤸㠄 㤼㚱㡸 㠸䚐 ⵑὤ
ᵄ㋀.
1
Page 62

㇠㟝㣄 ㉘⮹㉐
㥐䖼 㻝㤸䚌ὤ
㻝㤸䚌ὤ
䖐㐐☥ ⯜☐
ㇵ䈐 㢌
㻝㤸㡸 㠸䚨 ⶼ☘ USB 䀴㢨⽈㢌
䚐㯱↑㡸㥐䖼㢌 Micro USB
KO
䔠䏬㜄, ␘⪬ 㯱 ↑㡸 PC /
⊬䏬⺵ ❄⏈ iPhone USB 㤸㠄
㛨⑅䉤㜄 㜤䚝⏼␘.
* 㥐䖼㡴 ⵝ㤸 ㇵ䈐㜄㉐ 㝸㻝ᾀ㫴
㚱 5㐐ᴸ 㥉⓸ᴴ ㋀㟈╝⏼␘.
iPhone
1. iPhone 㡸 㥐䖼㜄 㜤䚝⏼␘.
2. iPhone 㻝㤸 ⯜☐ ⶸ䏰㡸
⍀⤠ 㻝㤸㡸 㐐㣅䚌ᶤ⇌
㩅㫴䚝⏼␘.
1
2
1.
1
2.
❄⏈
LED
LED
䢤ㇽ LED 3 ᵐ 䁐㬄 㤸⥙⣽ 80%㜄㉐ 100%㇠㢨
䢤ㇽ LED 2 ᵐ 䁐㬄 㤸⥙⣽ 45%㜄㉐ 80%㇠㢨
䢤ㇽ LED 1 ᵐ 䁐㬄 㤸⥙⣽ 10%㜄㉐ 45%㇠㢨
䢤ㇽ LED 1 ᵐ ᾐⵉ㢸 㤸⥙⣽ 10% 㢨䚌
LED ᵉ㦤 㥐䖼 㻝㤸 㩅
LED ᾐⵉ㢸 iPhone 㻝㤸 㩅
2
Page 63

㇠㟝㣄 ㉘⮹㉐
䘸⦐㥑䉤 䁐ὤ/ⅸὤ
㸼㥄 㦤㤼䚌ὤ
≘㢨䐤⽀ 㛨䙀㡸 䋩䚐 ㇠㫸 ⵃ ⽸♈㝘 䍠㇠䚌ὤ
䘸⦐㥑㊌ ⯜☐ ⶸ䏰㡸 3㸼ᴸ
⍀⤠ 䘸⦐㥑䉤⪰ 䁐ᶤ⇌ ↉⏼␘.
㸼㥄 䡔㡸 㢨㟝䚨 㸼㥄㡸
㦤㤼䚌㜠 ⒈ ⇔㾨⦡Ḕ ㉔⮹䚐
䞈⮨㡸 㛯㏩⏼␘.
iPhone
KO
1. iPhone ⮈㢬 ⮈⎨㜄㉐ “㇠㫸” 㙸㢨䂌㡸 ㍌┍㡰⦐ ㉔䈑䚝⏼␘.
2. 䍠㇠䚌⥘⏈ ㇠㫸 ❄⏈ ⽸♈㝘⪰ ㉔䈑䚝⏼␘.
* ㇠㫸㡴 ㏠⢰㢨☐ ㌰⦐⬀ 䍠㇠╝⏼␘.
**㣠㈑ 㩅 iPhone 㢌 ⸰⪜ 㦤㤼 ⶸ䏰㡸 ⍀⤠ ⽸♈㝘㢌 ⸰⪜㡸
㦤㤼䚝⏼␘.
3
Page 64

㇠㟝㣄 ㉘⮹㉐
㥐䖼 ㇠㛅
䚡⯝ ㉘⮹
ṅ䚍 ὤ㍔ DLP
KO
ṅ㠄 RGB LED
䚨ㇵ⓸ 640 x 480 䙱㉴ (VGA)
ṅ㋁ 㺐 35 ⨜⮌
䍠㇠ 㢨㫴 䆠ὤ 152 cm ~ 1524 cm (6” ~ 60” ᴵ㉔)
㟨㜵 㷨㥐 iOS4, iOS5
䘸⦐㥑㊌ ㋀㏘ iPhone 4, iPhone 4S
㤸㠄 㢹⥙ 5V / 1A
㤸㠄 㻐⥙ 5V / 1A
ⵤ䉤⫠ 䇴㢹 㢹ⷔ♈☐ 1850 mAh, 㣠㻝㤸 ᴴ⏙䚐
⫠䏠 䔨⫠⭬ ⵤ䉤⫠
ⵤ䉤⫠ ㍌⮹ 䍠㇠ ⯜☐: 120 ⺸
iPhone 㻝㤸 ⯜☐: 80% iPhone ⵤ䉤⫠
㟝⣽
㤸⥙ ㋀⽸ 䍠㇠ ⯜☐: 4.5W
iPhone 㻝㤸 ⯜☐: 5W
㣅┍ 㝜⓸ 5 °C ~ 35 °C
㾌㍌ (L x W x H) 126 x 68 x 20 mm
ⱨ 125 g
䑜䇘㫴 ⇨㟝Ɒ Pico Projector, ㇠㟝㣄 ㉘⮹㉐, USB
䀴㢨⽈
* ⯜☔ ㇠㛅㡴 ㇠㤸 ḩ㫴 㛺㢨 ⷴ╔ ㍌ 㢼㏩⏼␘.
4
Page 65

㇠㟝㣄 ㉘⮹㉐
ⱬ㥐 䚨
㫑ㇵ 㷨䆠 䔠㢬䏬
䘸⦐㥑䉤㢌 㤸㠄㢨 䁐㫴㫴
㙾㏩⏼␘.
䍠㇠ 㢨㫴ᴴ ∼ⱨ
㛨▕㏩⏼␘.
䍠㇠ 㢨㫴ᴴ ∼ⱨ
䢄⫱⏼␘.
䘸⦐㥑䉤ᴴ 䁐㫴㫴⬀
㢨㫴ᴴ 䍠㇠╌㫴 㙾㏩⏼␘.
䘸⦐㥑䉤 䖐⮨㢌 㝜⓸ᴴ
♤⡯䚝⏼␘.
iPhone 㡸 䘸⦐㥑䉤㜄 㜤䚔
⚀ iPhone 䞈⮨㜄 㙸⣌㝴
ᵍ㢨 㝘⪌ ⮈㐐㫴ᴴ
ⵤ䉤⫠ᴴ 㝸㻝╌㛼⏈㫴
䞉㢬䚝⏼␘.
* 䘸⦐㥑䉤⪰ ⒈ 㛨▄㟨 䞌㜄㉐
㇠㟝䚝⏼␘.
* 䍠㇠ 㢨㫴㢌 䆠ὤ⪰ 㨸㢹⏼␘.
㸼㥄 䡔㡸 ㇠㟝䚌㜠 㸼㥄㡸
㦤㥉䚝⏼␘.
㛨䙀㜄 TV 㻐⥙ ὤ⏙㢨
⇨㣙╌㛼⏈㫴 䞉㢬䚝⏼␘.
㥉ㇵ 㣅┍ 㩅 䘸⦐㥑䉤㜄 ⸨䋩
㥉⓸㢌 㜨㢨 ⇌⏈ ᶷ㡴
㥉ㇵ㢹⏼␘.
iPhone Ḱ 䘸⦐㥑䉤 ㇠㢨㢌 㜤
⺼⣽㡸 㡔ⵐ䚔 ㍌ 㢼㏩⏼␘.
iPhone Ḱ 䘸⦐㥑䉤⪰ ␘㐐 㜤䚨
KO
⇌䇴⇝⏼␘.
㨰㐡㐐㝘.
5
 Loading...