

AIPTEK HYPERPEN 12000U, HYPERPEN 8000U PRO, HYPERPEN 8000U, HYPERPEN 6000U, HYPERPEN 12000U HPT User Manual
Page 1
82-032-90010 V1.0
Tablet
E-manual
Page 2

English
Introduction
The product provides you with good-quality writing and drawing
convenience. It offers you 7 kinds of software, including Tablet
Manager, NetMeeting, CADIX, Pen Soft, Free Notes, Office Ink and
Art Dabbler. With those applications, it's easier for you to interact with
your PC and to do more creative works. To make the best use of the
product, please read the contents carefully.
Safety Information
Avoid
- Dampening the products.
- Using volatile chemicals to clean the products .
- Dropping the products off the table or to the ground.
- Strongly bumping the products into hard stuffs.
- Stepping on the products.
- Putting heavy stuffs on the products.
- Disassembling the products.
If you find any problems, please have the device repaired by qualified
personnel. Do not repair this device by yourself.
Page 3
English
Chapter 1: Installation
Hardware
Step 1
Step 2
Step 3
Software
Step 1
Step 2
Connect the Product with Your PC
Plug the USB cable into the USB port of your PC.
Check the Power
Check the small square on the tablet. If the small square shows
blinking light, your product is successfully powered.
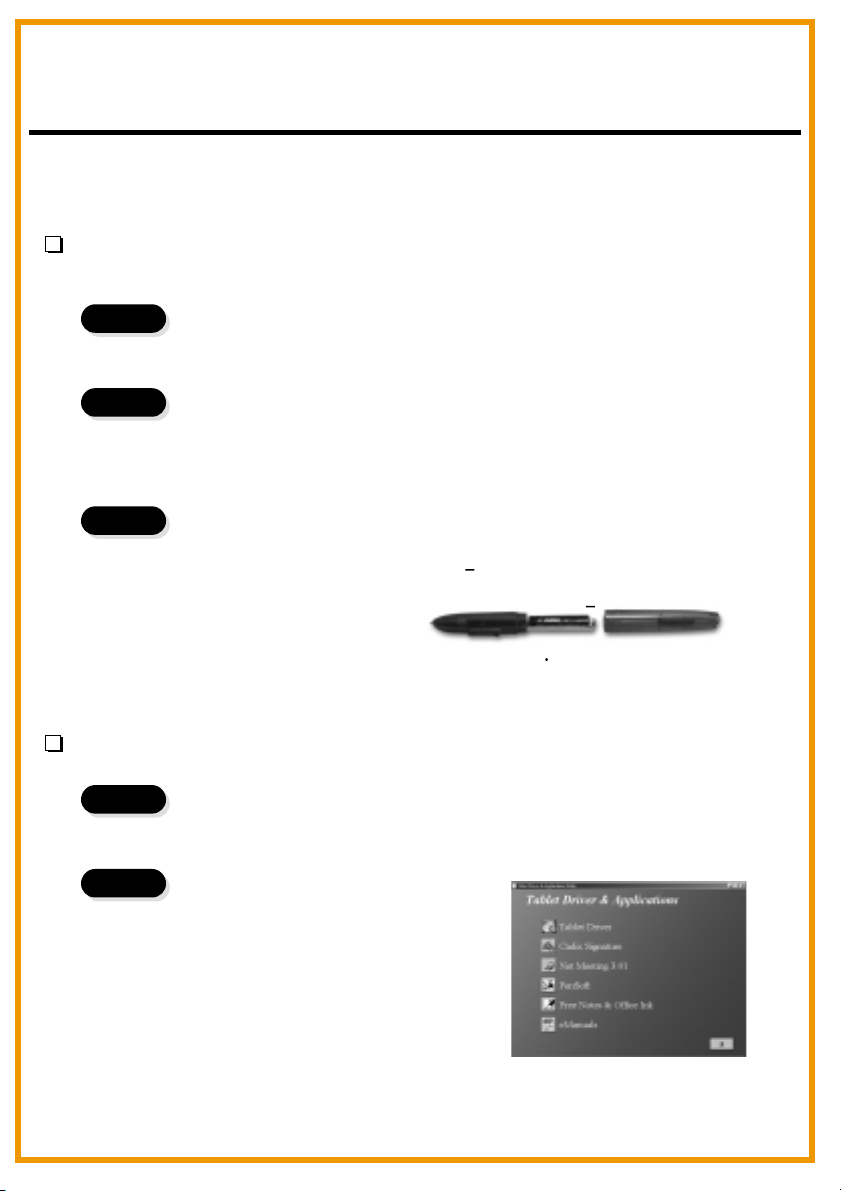
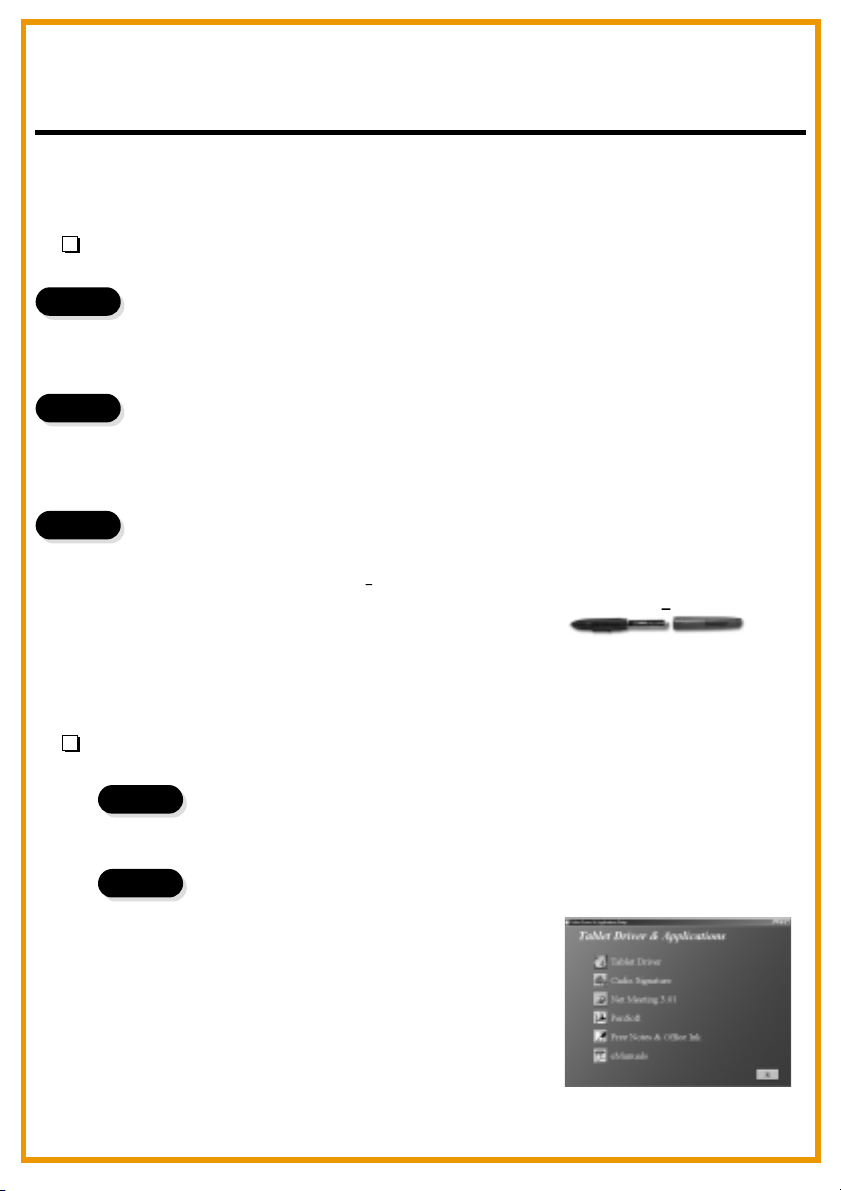
Insert the Battery
Unwind your pen and insert one AAA battery into the
compartment, positioning the + and ends as shown
below. Then wind your pen.
* The battery life span is around one year
+
Placing the CD driver
Place the installation CD in your CD drive.
Showing Tablet
The screen shows the Tablet.
OR
If the screen doesn't show the
Tablet, click and choose .
Type " " or where your CD drive is
located and click .
Start Run
d
OK
Page 4
English
Step 3
Note
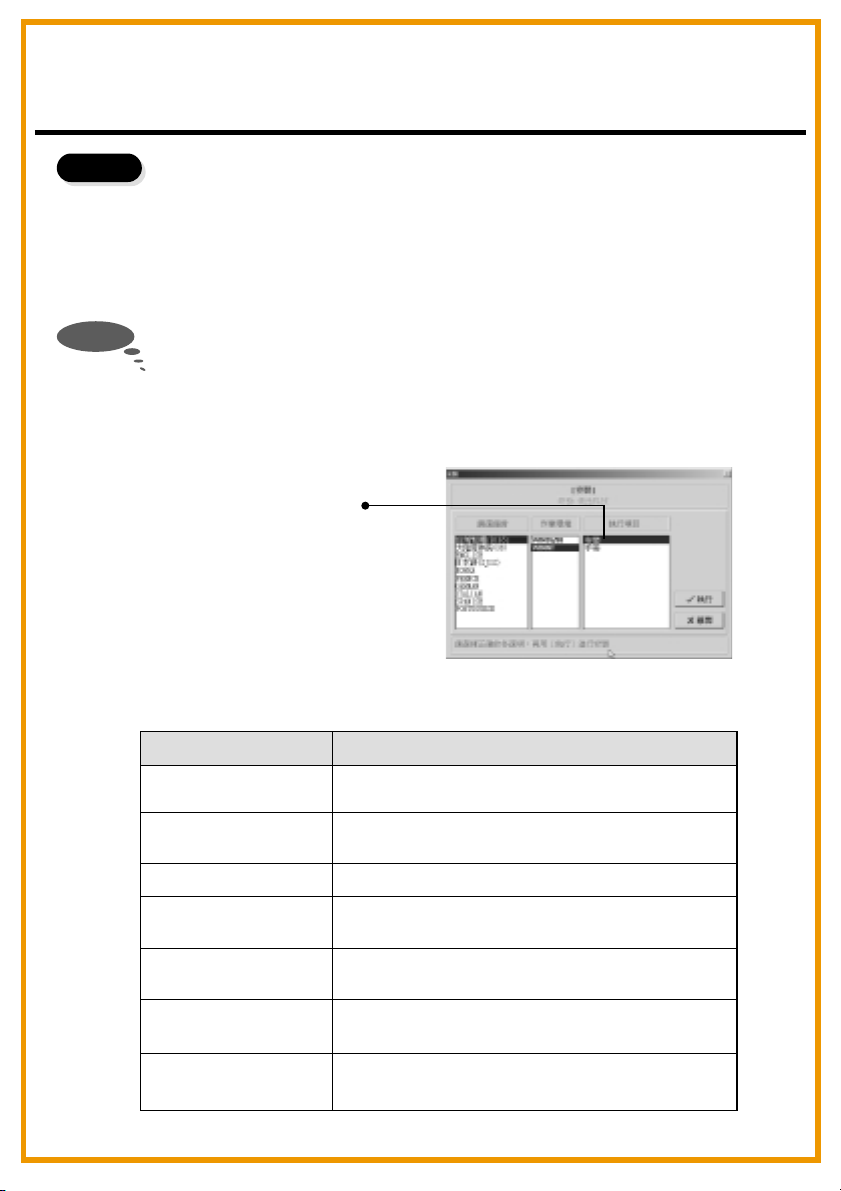
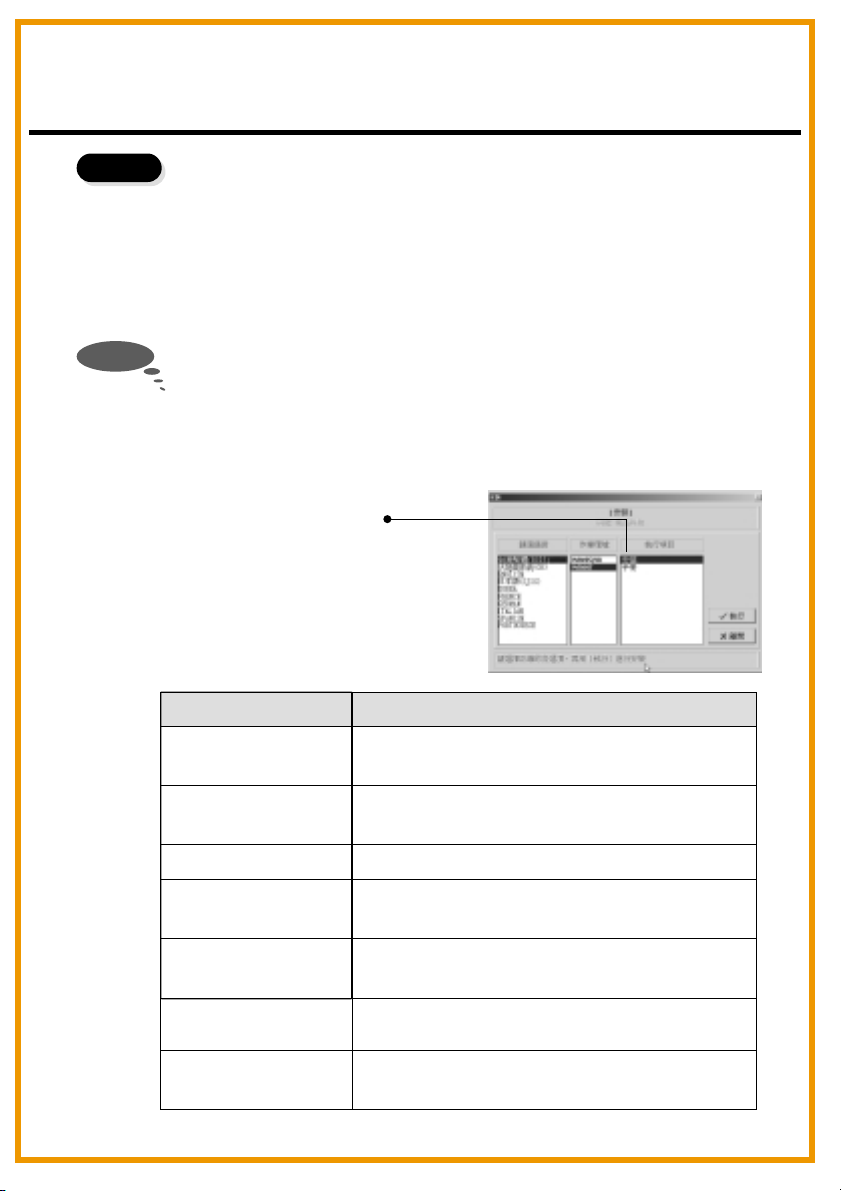
Choosing the Application You Want
There are7 applications on the Tablet. They are Tablet Driver, Cardix
Signature, Net Meeting 3.01, Free Notes, Office Ink and Pen Soft. To
use Art Dabbler, please insert the other Art Dabbler CD driver. To
choose the application, click the icon beside each application. Please
follow the directions on the screen to install.
The guidelines of Cardix Signature, Net Meeting 3.01, Pen Soft, Free
Notes, Office Ink and Art Dabbler are not included in this user guide.
To see more information of the applications, go to the Tablet.
you click the AP icon, the next screen shows the installation guideline
icon on the right. This would be ineffective if your PC is unable to
connect to the web.
Installation guideline
Tablet
As
Application
Tablet Driver
Cardix Signature
Net Meeting 3.01
Pen Soft
Art Dabbler
(in the other CD)
Free Notes
Office Ink
Use
Adjusts functions of the tablet and the pen
in the Tablet.
Supports handwriting signature recognition
when opening screen saver.
Supports on-line handwriting talk.
Supports handwriting recognition &
annotation functions.
Supports a variety of drawing functions.
Shows your real handwriting and drawing in
Email.
Special handwriting inking in any software.
Page 5
English
Chapter 2: Getting Started
Step 1
Step 2
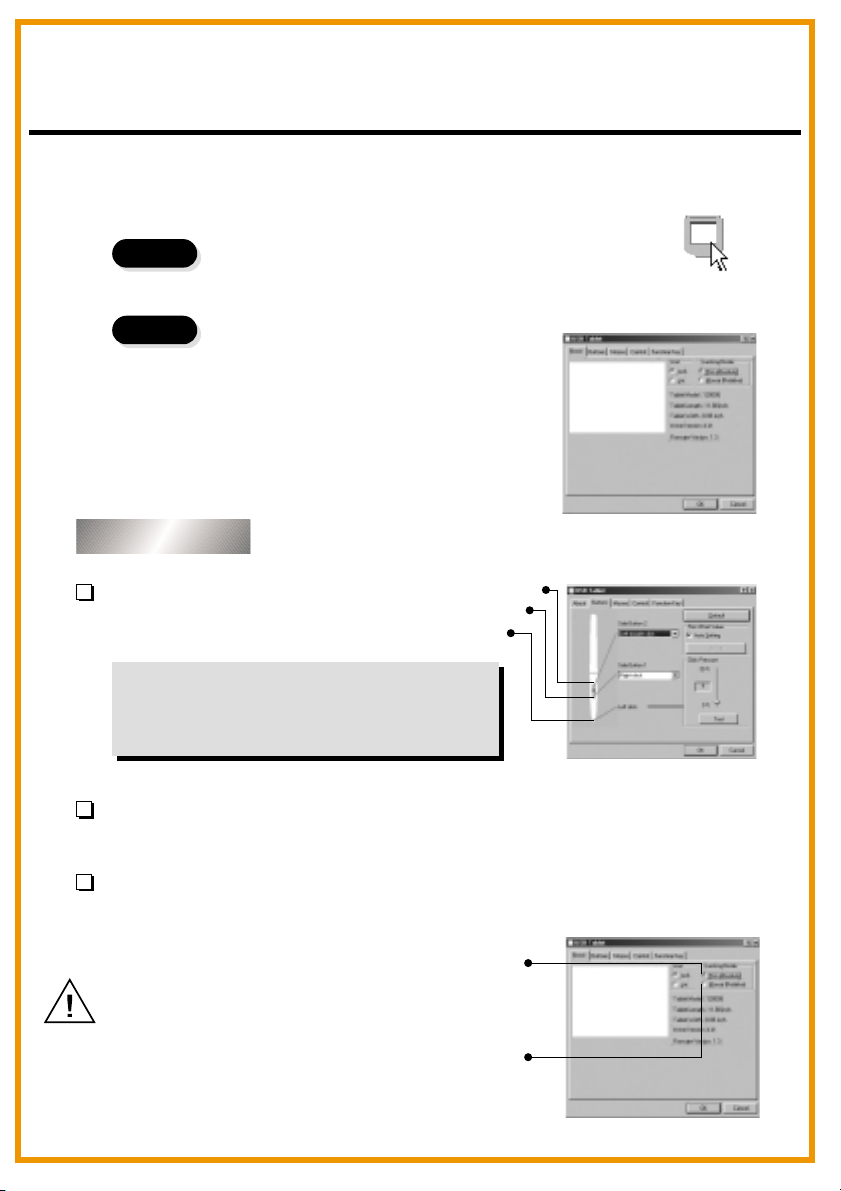
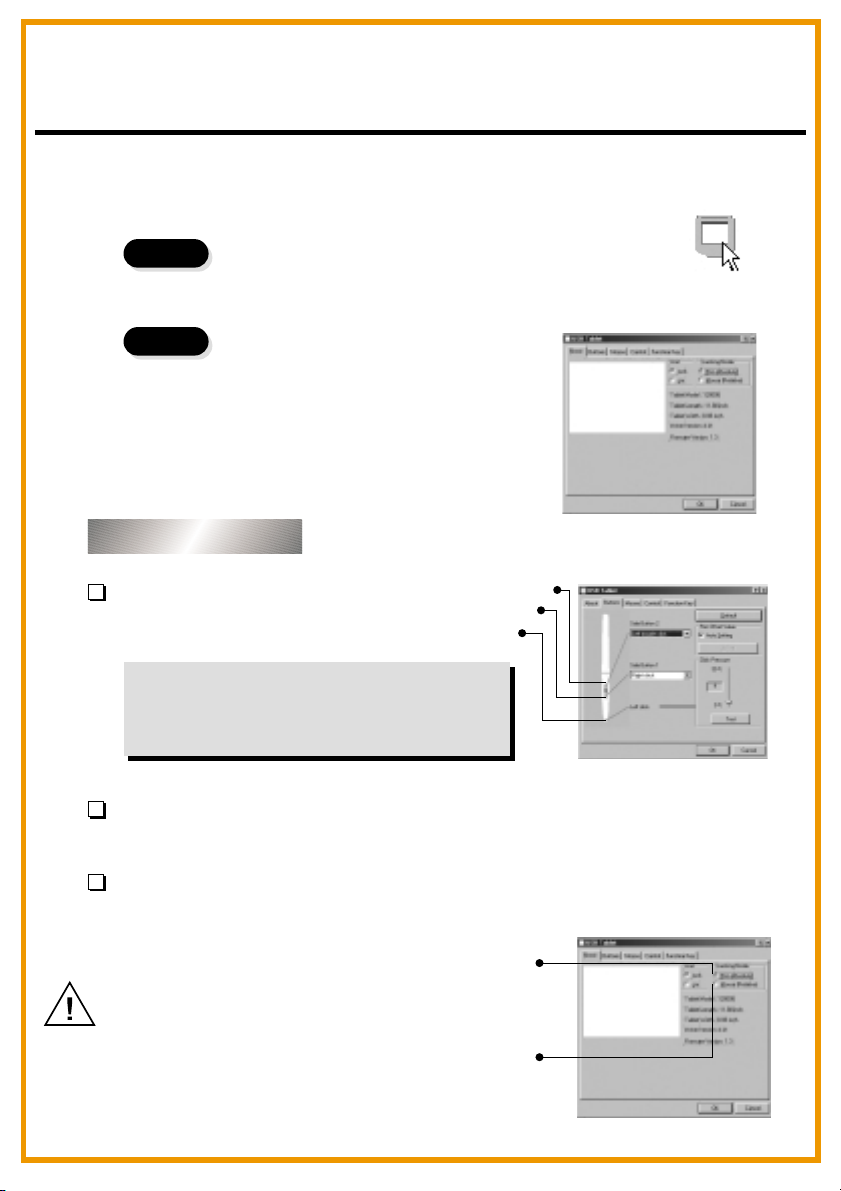
Click on the tablet icon at the bottom right of the tool bar
(The tablet icon appears when the cable is plugged in .)
You enter the Tablet screen.
To select functions, click on buttons on
the tool bar.
Using the Pen
Side buttons/
Click on Buttons to customize
side buttons.
Default settings
The upper button = left double-click mouse button.
The lower button = right mouse button.
The pen point = left mouse button.
Upper button
Lower button
Pen point
Pressure/
Move the slide up and down to adjust the pen pressure.
Mouse/
The pen is used as normal handwriting pen or mouse. To change mode, select
"Pen" or "Mouse".
Pen
Please put your pen on the hollow of
the tablet while idle. If you place the
pen on the tablet, the mouse is
seriously affected.
Mouse
Page 6
English
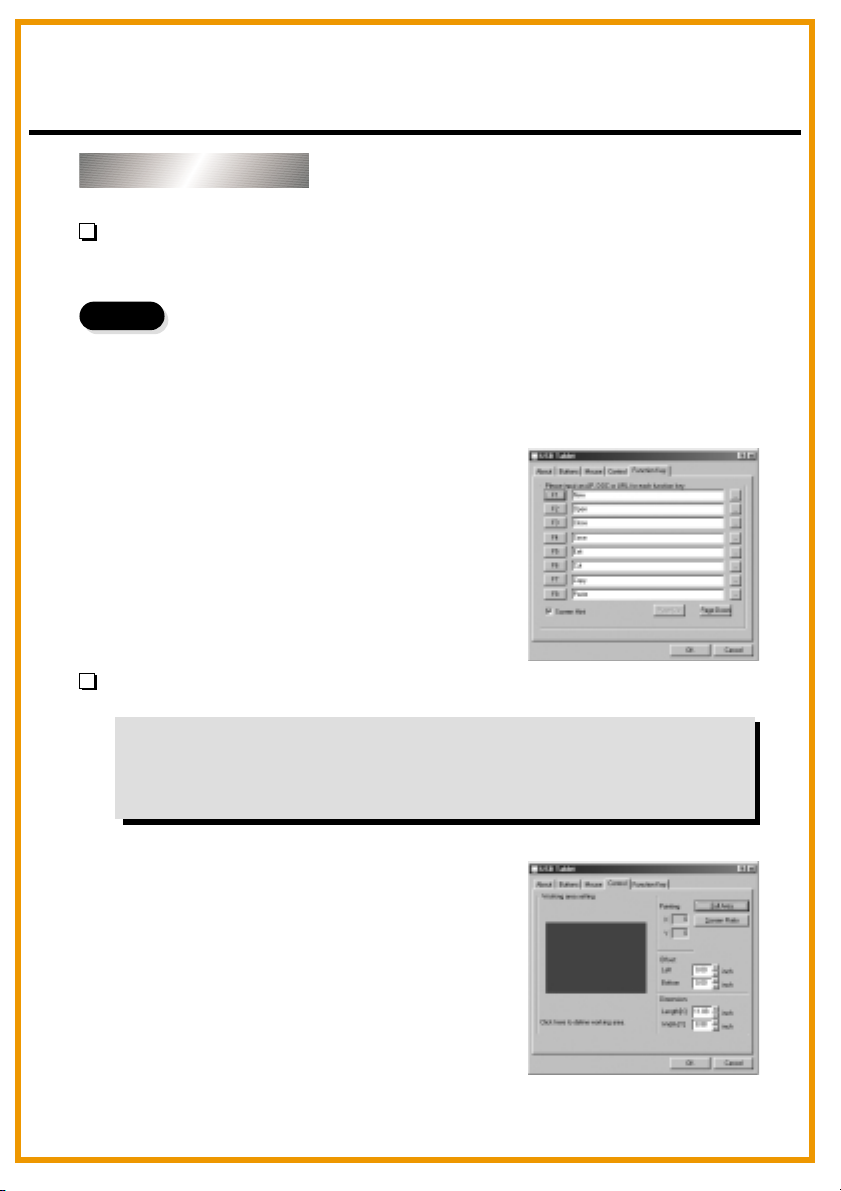
Using the Tablet
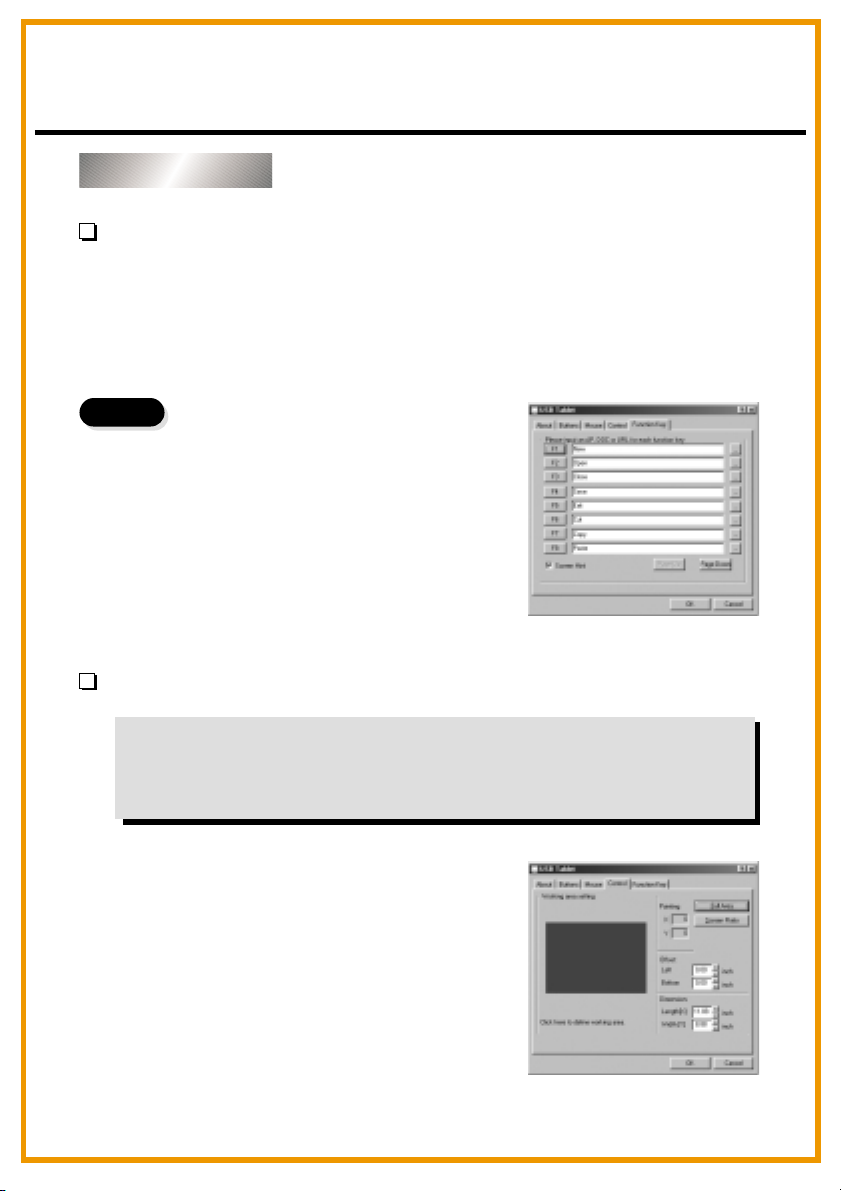
Selecting the function keys
Steps
1. Click on the Function Key icon on
the tool bar.
2. Key in the path name or URL.
3. Click "OK".
Adjusting the workspace
The workspace of your tablet is in proportion to the size of the screen.
To reduce the scope of the workspace, click "Control" and customize
the size .
Page 7
English
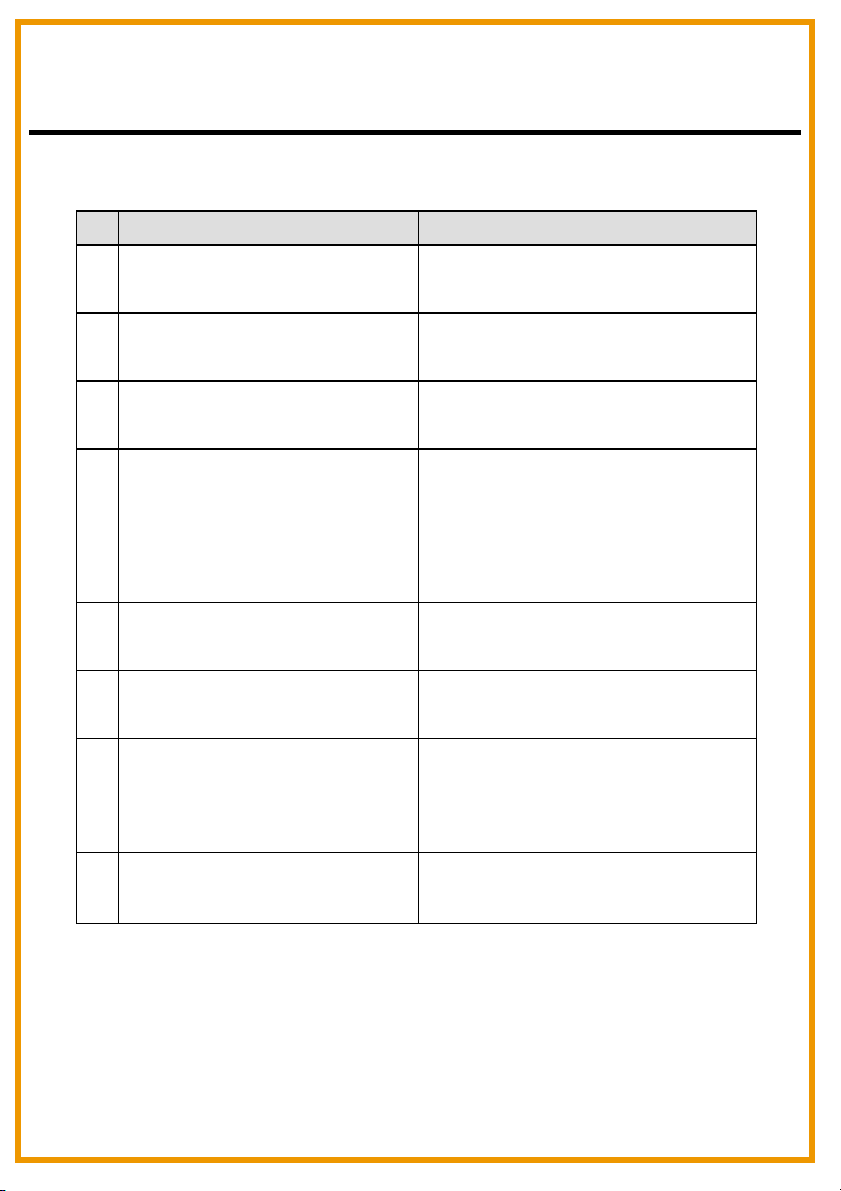
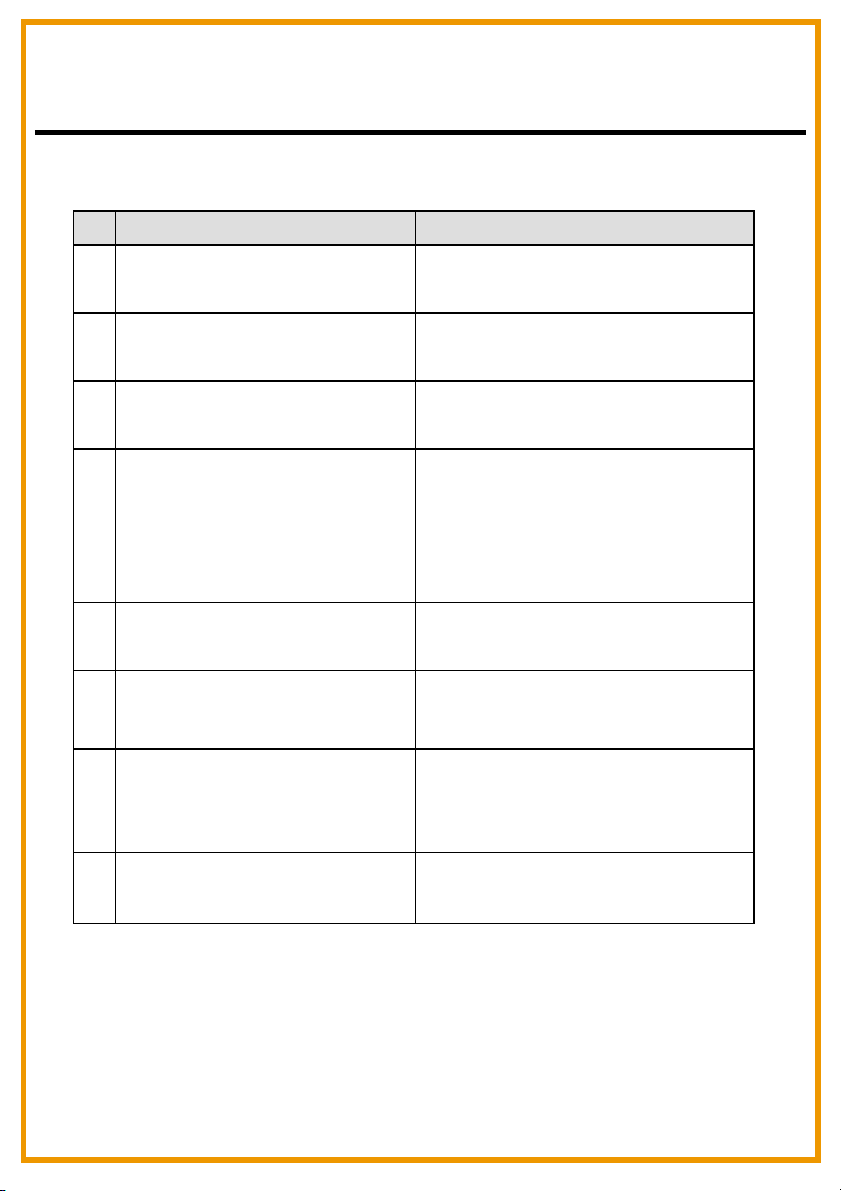
Chapter :3Q&A
No
Does Mac support the
1.
product?
Standard mouse can't move
2.
on the screen.
The tablet can't work with the
3.
other PC peripherals.
What is proximity?
4.
What can't be put on the
5.
tablet?
PC screen is interfered when
6.
the tablet placed aside.
The pen has leaking problem
7.
Question
Answer
Only for OS 9.0 version.
Remove the wireless pen from
the tablet.
Please go to upgrade new driver.
It's the height between the
wireless pen and the tablet.
Within a certain height, the
wireless pen is effective on
the tablet.
Heavy stuffs or stuffs with
frequency.
Move the tablet away from the
PC screen.
Go to the Tablet icon and
click "Button". Then select "Pen
offset value" to test the pen.
No connection to the
8.
computer
Re-plug in the cable.
Page 8
Deutsch
Einführung
Der produkt ermöglicht ein hochqualitatives Schreiben und Zeichnen
und bietet 7 verschiedene Softwarepakete, inklusive Tablet Manager,
NetMeeting, CADIX, Pen Soft, Free Notes, Office Ink und Art
Dabbler. Diese Anwendungen erleichtern den Dialog mit dem PC und
fördern das kreatives Arbeiten. Um die Qualitäten des Tablet
kennenzulernen, sollten sie sich den Inhalt dieser Anleitung sorgfältig
durchlesen.
Informationen zur Sicherheit
Vermeiden
Sie
- Ein Feuchtwerden der Produkte.
- Das Benutzen von flüchtigen Chemikalien zum Säubern der
Produkte.
- Ein Fallenlassen der Produkte vom Tisch oder auf den Boden.
- Ein starkes Stoßen gegen harte Gegenstände.
- Ein Treten auf die Produkte.
- Ein Plazieren von schweren Gegenständen auf die Produkte.
- Ein Öffnen der Produkte.
Wenden Sie sich bei Problemen und wegen einer Reparatur an qualifiziertes
Servicepersonal. Versuchen Sie nicht, das Gerät selbst zu reparieren.
Page 9
Deutsch
Kapitel 1: Installation
Hardware
1. Schritt
2. Schritt
3. Schritt
Software
Schritt Das produkt mit dem PC verbinden
Schließen Sie das USB-Kabel an den USB-Port des PC.
Schritt Netzspannung überprüfen
Kontrollieren Sie das schmale Quadrat in Tablet. Falls dieses schmale
Quadrat blinkt, ist das produkt erfolgreich versorgt.
Schritt Einsetzen der Batterie
Öffnen Sie den Stift und setzen Sie die AAA Batterie in das Fach, achten
Sie auf die Polung (+ und ), wie unten gezeigt.
Schließen Sie dann den Stift wieder.
*
Die Lebensdauer der Batterie beträgt etwa ein Jahr.
1. Schritt
Schritt Anbringen der CD Treiber
Legen Sie die Installations-CD in das CD-Laufwerk.
+
2. Schritt
Schritt Anzeigen des Tablets
Der Bildschirm zeigt das ablet.
ODER
Falls der Bildschirm das Tablet nicht
anzeigt, klicken Sie auf Start und wählen
Ausführen. Geben Sie “d” oder die
entsprechende Bezeichnung des CDLaufwerks an und klicken Sie auf OK.
Page 10
Deutsch
3. Schritt
Hinweis
Tablet
Schritt Wahl der gewünschten Applikationen
Das produkt bietet 7Applikationen. Die Tablet Treiber, Cardix Signature,
Net Meeting 3.01, Free Notes, Office Ink und Pen Soft. Vor der
Benutzung von Art Dabbler muss der andere Art Dabbler CD Treiber
eingelegt werden. Die Wahl der Applikation geschieht mit einem Klick
auf das Symbol neben der jeweiligen Applikation.
Die Anweisungen für Cardix Signature, NetMeeting 3.01, Pen Soft,
Free Notes, Office Ink und Art Dabbler sind dem Benutzerhandbuch
nicht beigefügt. Weitere Informationen zu den Applikationen finden Sie
im Tablet. Nach einem Klick auf das AP Symbol zeigt der nächste
Bildschirm rechts das Symbol der Installationsanweisung. Ohne Zugang
des PCs zum Internet ist dies uneffektiv.
Installationsanweisung
Applikation
Tablet Treiber
Regelt Funktionen des Tablets und des Stiftes
im Tablet.
Benutzen
Cardix Signature
Net Meeting 3.01
Pen Soft
Art Dabbler
(auf der anderen CD)
Free Notes
Office Ink
Unterstützt das Erkennen handgeschriebener
Unterschrift, wenn Screensaver aktiviert wird.
Unterstützt On-Line Handwriting Talk.
Unterstützt Supports Handschriftenerkennung
& Anmerkungsfunktionen.
Unterstützt verschiedene Zeichenfunktionen.
Email mit echter Handschrift und
Zeichnungen.
Spezielle Handschrifttinte in jeder
Software.
Page 11
Deutsch
Kapitel 2: Los geht's
1. Schritt
2. Schritt
Schritt Klicken Sie auf das Tabletsymbol unten rechts auf
der Symbolleiste (das Tabletsymbol erscheint, wenn das
Kabel angeschlossen ist.)
Schritt Öffnen Sie den Tablet
Bildschirm.
Klicken Sie zur Funktionsauswahl auf
Tasten der Symbolleiste.
Den Stift benutzen
Seitentasten/
Klicken Sie auf “Tasten” zum Anpassen
der Seitentasten.
Standardeinstellungen
Die obere Taste = Doppelklick linke Maustaste.
Die untere Taste = rechte Maustaste.
Die Stiftspitze = linke Maustaste.
Obere Taste
Untere Taste
Stiftspitze
Druck/
Schieben Sie den Regler rauf und runter, um den Stiftdruck zu ändern.
Maus/
Der Stift wird als normaler Schreibstift oder Maus benutzt. Zum Wechseln des
Modus, wählen Sie “Stift” oder “Maus”.
Stift
Legen Sie den Stift auf die Mulde des
Tablets, wenn er nicht benutzt wird.
Das Plazieren des Stifts auf dem Tablet
zieht die Maus in Mitleidenschaft.
Maus
Page 12
Deutsch
Das Tablet benutzen
Auswahl der Funktionstasten
1.
Schritte
Regeln des Arbeitsbereichs
Klicken Sie auf das Funktionstastensymbol auf der Symbolleiste.
2.
Geben Sie die Pfadnamen oder die URL an.
3.
Klicken Sie auf “OK“.
Der Arbeitsbereich des Tablets steht im Verhältnis zur Größe des
Bildschirms. Um die Arbeitsfläche zu verringern, klicken Sie auf
“Kontrolle” und passen Sie die Größe an.
Page 13
Deutsch
Kapitel 3: Fragen & Antworten
Nr.
Unterstützt Mac produkt?
1.
Standardmaus kann nicht auf dem
2.
Bildschirm bewegt werden.
Das Tablet funktioniert nicht mit
3.
anderen PC-Peripheriegeräten.
Was bedeutet Proximity?
4.
Welche Gegenstände sollten nicht
5.
auf das Tablet platziert werden?
Der PC-Bildschirm wird gestört,
wenn das Tablet auf der Seite
6.
platziert wird.
Der Stift ist undicht.
7.
Fragen
Antworten
Nur für das Betriebssystem Version 9.0.
Entfernt den kabellosen Stift vom
Tablet.
Aktualisieren Sie die neuen Treiber.
Es ist der Abstand zwischen dem
kabellosen Stift und dem Tablet.
Die Effektivität beschränkt sich
auf eine bestimmte Distanz.
Schwere Gegenstände, oder solche die
eine Frequenz ausstrahlen.
Entfernen Sie das Tablet vom
PC-Bildschirm.
Wählen Sie das Tablet symbol und
klicken Sie “Taste”. Wählen Sie nun
“Stift Offsetwert” um den Stift zu testen.
Keine Verbindung zum Computer
8.
Schließen Sie das Kabel wieder an.
Page 14

Français
Introduction
Le produit vous offre un outil pratique de qualité supérieure pour
écrire et dessiner. Il vous offre 7 sortes de logiciel: Tablet Manager,
NetMeeting, CADIX, Pen Soft, Free Notes, Office Ink et Art Dabbler.
Avec ces applications, l'utilisation de l'ordinateur devient plus facile et
vous serez capable de faire des créations plus créatives. Lisez
attentivement les instructions dans ce manuel pour obtenir une
utilisation optimale.
Information de sécurité
Evitez
De mouiller les produits.
-
D'utiliser des produits chimiques pour nettoyer les produits.
-
De laisser tomber les produits.
-
De heurter les produits contre des choses dures.
-
De marcher sur les produits.
-
De mettre des choses lourds sur les produits.
-
De démonter les produits.
-
Toutes réparations doivent être faites par du personnel qualifié. N'essayez
pas de réparer l'appareil vous-même.
Page 15

Français
Chapitre 1: Installation
Etape 1
Etape 2
Etape 3
Logiciel
Etape 1
Connectez le produit avec votre ordinateur
Connectez le câble USB avec le port USB de votre ordinateur.
Contrôlez l'alimentation
Contrôlez le petit carré dans la tablette. Si vous voyez une lumière qui
clignote, votre le produit et alimentée avec succès.
Insérez la batterie
Ouvrez votre crayon et insérez une batterie AAA dans le compartiment,
positionner les côtés + et comme montrée ci-dessous. Maintenant
fermez votre crayon.
La durée de batterie est environ un an.
*
Insérer le CD-ROM de pilote
Insérez le CD-ROM d'installation dans votre lecteur de CD-ROM.
+
Etape 2
Affichez la tablette
L'écran affiche la tablette.
OU
Si l'écran n'affiche pas la tablette
, cliquez sur Démarrer et
sélectionnez Exécuter. Type “D”
ou la lettre du lecteur de CD-ROM
et cliquez sur OK.
Page 16

Français
Etape 3
Note
Tablette
Choisir l'application désirée
Il y a 7 applications sur la produit. Elles sont: Tablet Driver, Cardix
Signature, Net Meeting 3.01, Free Notes, Office Ink et Pen Soft. Pour
utiliser Art Dabbler, vous devez insérer le CD-ROM de pilote Art
Dabbler. Pour choisir l'application, cliquez sur l'icône à côté de
l'application. Suivez les instructions qui apparaissent sur l'écran pour
l'installation.
Les instructions pour Cardix Signature, NetMeeting 3.01, Pen Soft, Free
Notes, Office Ink et Art Dabbler ne se trouvent pas dans cette guide de
l'utilisateur. Pour plus de détails à propos de ces information, vous
devez conseiller la tablette. Quand vous cliquez sur l'icône AP, l'écran
suivante affichera l'icône des instructions d'installation à droite. Cette
icône est inutile si vous ne pouvez pas vous connecter à Internet.
Instructions d'installation
Application
Pilote de la tablette
Ajuste les fonctions de la tablette et du crayon
dans la tablette .
Utilisation
Cardix Signature
Net Meeting 3.01
Pen Soft
Art Dabbler
(sur l'autre CD-ROM)
Free Notes
Office Ink
Prend en charge reconnaissance d'écriture &
signature quand l'écran de veille s'active.
Prend en charge conversation d'écriture en ligne.
Prend en charge reconnaissance d'écriture &
fonctions d'annotation.
Prend en charge plusieurs fonctions pour dessiner.
Affichez votre écritureà la main et vos
dessins dans une messagerie électronique.
De l'encre spéciale pour l'écriture à la main
dans n'importe quel logiciel.
Page 17

Français
Chapitre 2: Commencer
Etape 1
Etape 2
Cliquez sur l'icône de tablette en bas à droite la barre d'outils
(L'icône de la tablette s'affiche quand le câble câble est branché.)
L'écran tablette s'affiche.
Pour sélectionner les fonctions, cliquez
sur les boutons sur la barre d'outils.
Utiliser le crayon
Boutons latéraux/
Cliquez sur les “ Buttons” pour
personnaliser les boutons latéraux.
Paramètres par défaut
Le bouton supérieur = double cliquez sur le bouton
gauche de la souris.
Le bouton inférieur = bouton droit de la souris.
Pointe de crayon = bouton gauche de la souris.
Bouton supérieur
Bouton inférieur
Pointe de crayon
Pression/
Déplacez la pente de la pointe du crayon pour ajuster la pression sur le crayon.
Souris/
Le crayon est utilisé comme un crayon normal ou un souris. Pour changer le
mode, sélectionnez “Pen” ou “Mouse”.
Crayon
Veuillez mettre votre crayon sur le
creux de la tablette quand la tablette
est inactive. Si vous placez le crayon
sur la tablette, le souris sera affecté.
Souris
Page 18

Français
Utiliser la tablette
Sélectionnez les touches de fonction
Cliquez sur l'icône de touches de
Etapes
Ajuster l'espace de travail
1.
fonction dans la barre d'outils.
Entrez un chemin d'accès ou une
2.
URL.
Cliquez sur “OK “.
3.
L'espace de travail de votre tablette est en proportion avec la taille de
l'écran. Pour réduire l'espace de travail, cliquer sur “ Control” et
personnaliser la taille.
Page 19

Français
Chapitre 3: Ques tio ns & répons es
No
Est-ce que le Mac prend en
1.
charge le produit?
Le souris standard ne bouge
2.
pas sur l'écran.
La tablette ne fonctionne pas
3.
avec d'autres périphériques.
Qu'est-ce que c'est proximity
4.
(proximité)?
Quels objets peuvent pas être
5.
mis sur la tablette?
La tablette provoque de
6.
l'interférence à l'écran.
Le crayon n'affiche pas tous
les informations (fuite
7.
d'information).
Question
Réponse
Seulement pour la version OS 9.0.
Enlevez le crayon sans fil de la
tablette.
Mettez à jour le pilote existant.
Ceci est la hauteur entre le
crayon sans fil et la tablette.
Compris entre une certaine
hauteur, le crayon sans fil peut
être utilisé sur la tablette.
Des objets lourds et des appareils
qui fonctionnent avec une fréquence.
Laisser plus d'espace entre la
tablette et l'écran.
Atteindre l'icône de la tablette
et cliquez sur “ Button”.
Ensuite sélectionnez “ Pen offset
value” pour tester le crayon.
Pas de connexion à
8.
l'ordinateur
Branchez le câble de nouveau.
Page 20

Italiano
Introduzione
Con il prodotto Vi offre la possibilità di scrivere e disegnare con una
qualità alta. 7 tipi di software sono disponibili, come Tablet Manager,
NetMeeting, CADIX, Pen Soft, Free Notes, Office Ink e Art Dabbler.
Con l'aiuto di queste applicazioni, si può utilizzare il PC in un modo
facile e fare lavori più creativi. Per un rendimento ottimo
dell'prodotto, leggere attentamente il contenuto.
Informazioni di sicurezza
Evitare
Mettere i prodotti in contatto con acqua.
-
Usare solventi volatili per pulire il prodotto.
-
Lasciar cadere il prodotto dal tavolo sulla terra.
-
Urtare il prodotto contro oggetti duri.
-
Calpestare sul prodotto.
-
Porre oggetti pesanti sul prodotto.
-
Smontare il prodotto.
-
Se dovesse capitare una qualsiasi delle seguenti situazioni, contattate un
tecnico autorizzato Non cercare di fare manutenzione da soli.
Page 21

Italiano
Capito lo 1: Ins tallazio ne
Hardware
Passaggio 1
Passaggio 2
Passaggio 3
Software
Passaggio 1
Collegare il prodotto al PC
Inserire il cavo USB nella porta USB del PC.
Controllare l'alimentazione
Controllare il quadrato piccolo della tavoletta. Se si vede una luce
lampeggiante, il prodotto funziona.
Inserire la batteria
Aprire la penna ed inserire una batteria tipo AAA nel vano, assicurarsi
che la polarità è giusta, come nella grafica seguente.
Poi chiudere la penna.
La durata della batteria è circa un anno.
*
+
Piazzare l'unità CD
Inserire il CD d'installazione nell'unità CD.
Passaggio 2
Visualizzare la tavoletta
Lo schermo dispone la tavoletta .
O
Se lo schermo non visualizza la
tavoletta, fare clic su Avvio
e scegliere Esegui. Digitare “ d”
oppure la lettera dell'unità CD e
fare clic su OK.
Page 22

Italiano
Passaggio 3
Nota
Tavoletta
Driver tavoletta
Scegliere l'applicazione desiderata
Ci sono 7 applicazioni sulla tavoletta . Tablet Driver, Cardix Signature,
Net Meeting 3.01, Free Notes, Office Ink e Pen Soft. Per utilizzare Art
Dabbler, inserire l'altro Art Dabbler CD driver. Per scegliere
l'applicazione, fare clic sull'icona al lato dell'applicazione. Effettuare le
indicazioni sullo schermo.
Le istruzioni del Cardix Signature, NetMeeting 3.01, Pen Soft, Free
Notes, Office Ink e Art Dabbler non sono incluse in questo manuale.
Per ottenere ulteriori informazioni, selezionare la tavoletta . Fare clic
sull'icona AP, lo schermo prossimo visualizza l'icona della guida
d'installazione sulla destra. Questo è senza effetto se il PC non può
essere connesso alla web.
Guida d'installazione
Applicazione
Regolare funzioni della tavoletta e della penna
nella tavoletta .
Utilizzare
Cardix Signature
Net Meeting 3.01
Pen Soft
Art Dabbler
(sul altro CD)
Free Notes
Office Ink
Supporta riconoscimento della firma scrittura
a mano quando si apre lo screen saver.
Supporta on-line Handwriting Talk.
Supporta riconoscimento della scrittura a mano
& funzioni d'annotazione.
Supporta una varietà di funzioni drawing.
Si può usare scrittura a mano e disegni in Email.
Chiostro speciale da scrittura a mano per
qualsiasi software.
Page 23

Italiano
Capitolo 2: Avviamento
Passaggio 1
Passaggio 2
Passaggio1 Fare clic sull'icona della tavoletta sul fondo alla
destra della barra degli strumenti. (L'icona della tavoletta
apparisce quando il cavo è inserito.)
prire lo schermo della tavoletta . Per
A
selezionare funzioni, fare clic sui pulsanti
sulla barra degli strumenti.
Utilizzare la penna
Pulsanti laterali/
Fare clic su “ Pulsanti” per
personalizzare pulsanti laterali.
Pulsante superiore
Pulsante inferiore
Punta della penna
Impostazioni predefinite
Pulsante superiore = doppio clic con pulsante
sinistro del mouse.
Pulsante inferiore = pulsante destro del mouse.
La punta della penna = pulsante sinistro del mouse.
Pressione/
Spostare l'indicatore su e giù per regolare la pressione della penna.
Mouse/
La penna è usata come penna normale per scrittura a mano o mouse. Per
cambiare modalità, selezionare “Penna” o “Mouse.”
Penna
Mettere giù la penna sulla conca della
tavoletta in stato di pausa. Porre la
penna sulla tavoletta influenza il
mouse seriamente.
Mouse
Page 24

Italiano
Utilizzare la tavoletta
Selezionare tasti funzione
Fare clic sull'icona tasti funzione
Passaggi
1.
sulla barra degli strumenti.
Digitare il nome del percorso o URL.
2.
Fare clic su “OK “.
3.
Regolare lo spazio di lavoro
Lo spazio di lavoro della tavoletta sta in proporzione della dimensione
dello schermo. Per ridurre lo scopo dello spazio di lavoro fare clic su
“Controllo” e personalizzare poi la dimensione .
Page 25

Italiano
Capitolo3:D&R
No
Mac supporta il produtto ?
1.
Il mouse standard non si
2.
muove sullo schermo.
La tavoletta non funziona con
3.
altre periferiche del PC.
Proximity, che cos'è
4.
Che cosa non si può mettere
5.
sulla tavoletta?
Lo schermo del PC è
6.
interferito quando la tavoletta
è messa da parte.
La penna ha problemi di
7.
perdita.
Domande
Risposte
Solo per OS versione 9.0.
Rimuovere la penna senza cavi
dalla tavoletta.
Aggiornare i driver.
È la distanza della pena senza
cavi dalla tavoletta. L'effetto
della penna sulla tavoletta è
limitato ad un'altezza definita.
Ogetti pesanti od oggetti con
frequenza.
Allontanare la tavoletta dallo
schermo del PC.
Selezionare l'icona della tavoletta
e fare clic su “pulsanti”. Poi
scegliere “penna valore offset”
per provare la penna.
Nessun collegamento con il
8.
computer
Reinserire il cavo.
Page 26

Español
Introducción
La producción provee calidad-buena en conveniencia de escritura y
dibujo. Le ofrece 7 tipos de software, incluyendo Administrador de
Tablet Maganager, NetMeeting, CADIX, Pen Soft, Free Notes, Office
Ink y Art Dabbler. Con estas aplicaciones, es más fácil para usted de
operar recíprocamente con su PC y para hacer más trabajos creativos.
Para hacer el mejor uso de la producción, favor de leer
cuidadosamente los contenidos.
Información de Seguridad
Evitar
Mojando los productos.
-
Utilizando químicos volátiles para limpiar los productos.
-
Dejando caer los productos en la mesa o en el piso.
-
Golpeando fuertemente los productos en objetos duros.
-
Pisando en los productos.
-
Colocando objetos pesados sobre los productos.
-
Desmontando los productos.
-
Si usted encuentra cualquieres problemas, favor de tener reparado el
dispositivo por un personel calificado. No repare este producto por sí
mismo.
Page 27

Español
Capítulo 1: Ins talac ión
Hardware
Paso 1
Paso 2
Paso 3
Software
Paso 1
Paso 2
Conectar la producción con Su PC
Enchufe el cable de USB en el puerto de USB de su PC.
Examinar la Energía
Examinar el cuadro pequeño en la tabla. Si el pequeño cuadro muestra una
luz parpadeada, es exitosamente enchufado su producción.
Insertar la Batería
Desenrrollar su pluma e insertar una batería de AAA en el compartimiento,
colocando los terminales + y como mostrado por debajo. Luego desenrrola
su pluma.
*
La duración de la batería es alrededor de un año.
+
Paso 1 Colocando el controlador de CD
Colocar el CD de instalación en su unidad de CD.
Mostrando la Tabla
La pantalla muestra la Tabla .
O
Si la pantalla no muestra la Tabla
, clic en Iniciary elegir Correr.
Teclea “ d” o donde su unidad de CD
es situado y clic ACEPTAR.
Page 28

Español
Paso 3
Nota
Tabla
Eligiendo la Aplicación que Usted Desea
Hay 7 aplicaciones en la Tabla. Hay Controlador de la Tabla, Firma de
Cardix, Net Meeting 3.01, Free Note, Office Ink y Pen Soft. Para
utilizar Art Dabbler, favor de insertar el otro controlador de CD de Art
Dabbler. Para elegir la aplicación, clic en el ícono al lado de cada
aplicación. Para instalar favor de seguir las direcciones en la pantalla.
Las guías de consulta de la Firma Cardix, NetMeeting 3.01, Pen Soft,
Free Note, Office Ink y Art Dabbler no son incluidos en esta guía de
usuario. Para ver más información de las aplicaciones, ir a la tabla.
Como usted clic en el ícono de AP, el siguiente pantalla muestra el
ícono de la guía de consulta de la instalación en la derecha. Este será
ineficaz si su PC no puede conectar al web.
La guía de consulta de la Instalación
Aplicación
Controlador de la
Tabla
Funciones de ajuste de la tabla y de la pluma
en la Tabla.
Utilizar
Firma de Cardix
Net Meeting 3.01
Pen Soft
Art Dabbler
(en el otro CD)
Free Notes
Office Ink
Soporta el reconocimiento de firma de
manuscrito cuando abre el protector de pantalla.
Soporta conversación de handwriting en-línea.
Soporta las funciones de anotación &
reconocimiendo del handwriting.
Soporta la variedad de las funciones de dibujar.
Mostrarsuescrituraamanorealydibujos
en el e-mail.
Mostrar su escritura especial en cualquier
programa.
Page 29

Español
Capítulo 2: Para empezar
Paso 1
Paso 2
Clic en el ícono de la tabla en el fondo derecho de la barra de
herramienta (El ícono de la tabla aparece cuando el cable de
es enchufado .)
Entra usted a la pantalla de la Tabla .
Para seleccionar las funciones, clic en los
botonesen la barra de herramienta.
Utilizando la pluma
Botones laterales/
Clic en los “ Botones” para
modificar los botones laterales.
Configuraciones del implícito
El botón superior = clic doblemente el botón
izquierdo del ratón.
El botón inferior = el botón derecho del ratón.
El punto de la pluma = el botón izquierdo del ratón.
Botón superior
Botón infereior
Punto de la pluma
Presión/
Mover el deslizador hacia arriba y abajo para ajustar la presión de la pluma.
Ratón/
La pluma es utilizada como una pluma o ratón de handwriting normal. Para
cambiar el modo,seleccionar “Pluma” o “Ratón.”
Pluma
Favor de colocar su pluma en la
depresión de la tabla mientras es
inactiva. Si usted coloca la pluma en la
tabla, es seriamente afectado el ratón.
Ratón
Page 30

Español
Utilizando la Tabla
Seleccionando las teclas de función
1.
Pasos
Ajustando el espacio de trabajo
Clic en el ícono de la Tecla de
Función en la barra de herramienta.
2.
Teclea el nombre de ruta o URL.
3.
Clic en “ACEPTAR “.
El espacio de trabajo de su tabla es en proporción al tamaño de la
pantalla. Para reducir la extensión del espacio de trabajo, clic en
“Control” y modificar el tamaño .
Page 31

Español
Capítulo 3: P & R
No
Soporta Mac la producción?
1.
O puede mover el Ratón
2.
estándar en la pantalla.
La tabla no puede trabajar con
3.
los otros periféricos del PC.
Qué es proximidad?
4.
Qué se puede poner en la
5.
tabla?
La pantalla de PC es
intervenido cuando la tabla es
6.
colocada aparte.
La pluma tiene problema de
7.
gotera.
Pregunta
Respuesta
Sólo para la versión OS 9.0.
Quitar la pluma inalámbrica
desde la tabla.
Favor de actualizar un nuevo
controlador
Es la altura entre la pluma
inalámbrica y la tabla. En una
cierta altura, la pluma inalámbrica
es efectiva en la tabla.
Con frecuencia objetos u objetos
pesados.
Mover la tabla desde la pantalla
de PC.
Ir hacia el ícono de la Tabla y
clic en“ Botón”. Luego selecciona
“Valor de compensación de la
pluma” para probar la pluma.
No hay conexión a la
8.
computadora
Volver a enchufar en el cable.
Page 32

Hollands
Inleiding
De produktie voorziet u van een kwalitatief hoogstaande oplossing
voor schrijven en tekenen. Het voorziet u van 7 soorten software,
zoals: Tablet Manager, NetMeeting, CADIX, Pen Soft, Free Notes,
Office Ink en Art Dabbler. Met deze applicaties, is het gemakkelijker
interactief te werken met uw computer en creatiever werk te
verrichten. Lees zorgvuldig deze handleiding om uw produktie,
optimaal te benuttigen.
Veiligheidsinformatie
Te
vermijden
- De producten blootstellen aan vochtigheid
- Het gebruik van chemische producten om de producten te reinigen
- De producten laten vallen.
- De producten tegen harde voorwerpen aanstoten.
- Op de producten stappen.
- Zware voorwerpen op de producten plaatsen.
- De producten uit elkaar halen.
Indien u op enige problemen stuit, moet u het apparaat laten repareren
door bevoegd personeel. Repareer het apparaat niet zelf.
Page 33

Hollands
Hoofdstuk 1: Installatie
Hardware
Stap 1
Stap 2
Step 3
Software
Stap 1
Verbindt het produktie met uw computer
Steek de USB-kabel in de USB-poort van uw computer.
Controleer de stroomtoevoer
Controleer het kleine vierkantje in uw schrijftablet. Indien het kleine
vierkantje een knipperend licht toont, dan wil dit zeggen dat uw
produktie voorzien is van een correcte stroomtoevoer.
Plaats de batterij
Open uw pen en plaats een AAA batterij in het compartiment, plaats
de + en- einden zoals hieronder getoond wordt. Sluit vervolgens de pen.
* De levensduur van de batterij is ongeveer een jaar.
+
De cd-rom met het stuurprogramma plaatsen
Plaats de installatie-cd-rom in uw cd-rom-station.
Stap 2
Het schrijftablet tonen
Het scherm toont het schrijftablet.
OF
Indien het scherm, het schrijftablet niet
weergeeft, moet u op Start klikken en
Uitvoeren selecteren. Typ "D" of de
juiste stationletter van uw cd-romstation en klik vervolgens op OK.
Page 34

Hollands
Step 3
Noot
De gewenste applicatie kiezen
Hetschrijftablet is voorzien van vier 7Meeting 3.01Free Notes, Office
Ink en Pen Soft. Om u Art Dabbler te gebruiken, moet u de cd-rom met
Art Dabbler in het cd-rom-station plaatsen. Om de gewenste applicatie
te kiezen, klikt u op de pictogram dat zich naast iedere applicatie
bevindt. Volg de instructies die op het scherm verschijnen voor de
installatie.
De richtlijnen van Cardix Signature, NetMeeting 3.01, Pen Soft, Free
Notes, Office Ink en Art Dabbler zijn niet inbegrepen in deze
gebruikersgids. Voor meer details betreffende deze applicaties, moet u
het schrijftablet raadplegen. Wanneer u op het AP-pictogram klikt, zal
het volgende scherm het pictogram voor de installatierichtlijnen aan de
rechterkant tonen. Deze zijn echter niet nuttig indien u geen verbinding
kunt maken met het Internet.
Schrijftablet
Applicatie
Installatierichtlijnen
Gebruik
Stuurprogramma van
het schrijftablet
Cardix Signature
Net Meeting 3.01
Pen Soft
Art Dabbler
(op de andere cd-rom)
Free Notes
Office Ink
De functies van het schrijftablet en de pen in
het schrijftablet aanpassen.
Ondersteund handschrift- & handtekeningherkenning
wanneer de schermbeveiliging ingeschakeld wordt.
Ondersteunt on-line handschrift spraak.
Ondersteunt handschriftherkenning &
aantekeningfuncties.
Ondersteunt verscheidene tekenfuncties.
Toon uw echt handschrift en uw tekeningen in een
e-mail.
Speciale inkt voor het handschrift, bruikbaar in
alle softwareprogramma's .
Page 35

Hollands
Hoofdstuk 2: Beginnen
Stap 1
Stap 2
Klik op het pictogram van het schrijftablet dat aan de rechter
onderkant van de werkbalk bevindt (Het pictogram van het
schrijftablet verschijnt wanneer de kabel verbonden is.)
Nu opent het schrijftablet scherm zich.
Om de functies te selecteren, klikt u op de
knoppen in de werkbalk.
De pen gebruiken
Zijknoppen/
Klik op de "knoppen" om de zijknoppen
naar eigen behoefte aan te passen
(persoonlijke instelling).
Standaardinstellingen
De bovenste knop button = dubbelklikken op de
linkermuisknop.
De onderste knop = rechtermuisknop.
De pentip = linkermuisknop.
Bovenste knop
Onderste knop
Pentip
Druk/
Verander de helling van de pentip om de druk op de pen aan te passen.
Muis/
De pen wordt gebruikt net zoals een normale schrijfpen of een muis. Om de
modus te veranderen, selecteert u "Pen" of "Mouse".
Pen
Plaats u pen op de holte van het
schrijftablet wanneer ze niet gebruikt
wordt. Indien u de pen op het
schrijftablet plaatst zal de muis
hierdoor worden.
be vloedïn
Muis
Page 36

Hollands
Het tablet gebruiken
De functietoetsen selecteren
Stappen
1. Klik in de werkbalk op het pictogram
van de functietoets.
2. Typ het padnaam of de URL in.
3. Klik op "OK".
De werkruimte aanpassen
De werkruimte van uw schrijftablet is in verhouding met de grootte van
uw scherm. Om de werkruimte te verkleinen, klikt u op "Control" en
past u de grootte aan.
Page 37

Hollands
Hoofdstuk 3: Problemen oplossen
Nr.
Ondersteunt Mac de productie?
1.
De standaard muis kan niet
2.
bewegen op het scherm.
Het schrijftablet werkt niet in
combinatie met andere
3.
randapparatuur.
Wat is proximity (nabijheid)?
4.
Wat mag ik niet op het schrijftablet
5.
plaatsen?
Het computerscherm wordt gestoord
wanneer het schrijftablet geplaatst
6.
wordt.
De pen heeft niet alle informatie
7.
weer.
Probleem
Oplossing
Enkel de OS 9.0 versie.
Verwijder de draadloze pen van het
schrijftablet.
Upgrade (bijwerken) het stuurprogramma.
Dit is de hoogte tussen de draadloze pen
en het schrijftablet. Binnen een bepaalde
hoogte kan de pen gebruikt worden op
het schrijftablet.
Zware voorwerpen of toestellen die op
een bepaalde frequentie werken.
Verwijder het schrijftablet van het
computerscherm.
Ga naar het pictogram van het
schrijftablet en klik op "Button".
Selecteer vervolgens "Pen offset value"
om de pen te testen.
Geen verbinding met de computer
8.
Verbindt de kabel opnieuw.
Page 38

Portugu sê
Introdução
A produto traz a você a conveniência de uma escrita e desenho de
boa qualidade. Ele oferece 7 tipos de software, incluindo Tablet
Manager, NetMeeting, CADIX, Pen Soft, Free Notes, Office Ink e Art
Dabbler. Com estas aplicações, é mais fácil para você se interar ao seu
computador e fazer mais trabalhos criativos. Para se fazer o melhor
uso do produto, leia o conteúdo atentamente.
Informações de Segurança
Evite
Umedecer os produtos
-
Usando produtos químicos para limpar
-
Deixando cair os produtos na mesa ou no chão.
-
Chocando fortemente os produtos contra objetos rígidos.
-
Pisar nos produtos.
-
Colocando objetos pesados sobre os produtos.
-
Desmontando os produtos.
-
Se você encontrar qualquer problema, não tente consertar, e sim procurar
um agente especializado.
Page 39

Portugu sê
Capítulo 1: Ins talaç ão
Hardware
Passo 1
Passo 2
Passo 3
O software
Passo 1
Passo 2
Conecte a Produto ao seu Computador
Plug o cabo do USB na porta do USB de seu PC.
Verificar o Power
Verifique o pequeno quadrado da placa. Se o pequeno quadrado mostrar
a luz piscando, significa que a sua produto foi ligado com sucesso.
Inserir a Bateria
Desligue a sua caneta e insira uma pilha AAA no compartimento,
posicionando o terminal + e como mostra abaixo. Depois ligue a
sua caneta.
* A vida média da pilha dura em torno de um ano.
+
+
Colocando o CD driver
Coloque a instalação de CD em seu CD driver
Mostrando a Placa
A tela exibirá a Placa
OU
Se a tela não exibir a Placa ,
clique no Start e escolha o Run.
Tecle “d” ou onde o seu CD driver
se localiza e clique OK.
Page 40

Portugu sê
Passo 3
Atenção
Placa
Escolhendo a Aplicação que você deseja.
Há 7aplicações na Placa. Eles são : Placa Driver, Cardix Signature,
NetMeeting 3.01Free Notes, Office Ink e o Pen Soft. Para usar o Art
Dabbler, insira o outro CD driver do Art Dabbler. Para escolher a
aplicação, clique no ícone ao lado de cada aplicação. Siga instruções da
tela para instalar.
A diretriz do Cardix Signature, NetMeeting 3.01 Pen Soft, Free Notes,
Office Ink e Art Dabbler não estão incluídos neste guia do usuário. Para
ter mais informação das aplicações, vá para a placa. Quando você clicar
no ícone AP, a proxima tela exibe o ícone da diretriz no lado direito.
Porém este pode não funcionar se o seu computador for incapaz de
conectar a Web.
Instalando a diretriz
Aplicação
Driver da Placa
Ajusta funções da placa e da caneta na Placa
Usar
Assinatura Cardix
Net Meeting 3.01
Caneta Soft
Arte Dabbler
(em outro CD)
Free Notes
Office Ink
Contribui ao reconhecimento da assinatura
manuscrita quando abrir o screen saver.
Assiste à conversação on-line manuscrita
Assiste ao reconhecimento manuscrito &
funções de anotação.
Assiste a uma variedade de funções de desenho.
Mostra o seu real manuscrito e desenho no
correio eletrônico.
Manuscritura especial em qualquer
software.
Page 41

Portugu sê
Capítulo 2: Inic iando
Passo 1
Passo 2
Clique no ícone da placa no lado direito inferior da barra
de ferramentas (O ícone da placa aparece quando o cabo
é conectado)
Entre na tela da Placa . Para selecionar
funções, clique nos botões da barra de
ferramentas
Usando a caneta
Botões laterais/
Cleque no “Buttons”para familiarizar
botões laterais.
Programações omitidas
O botão superior = clique duplo no lado
esquerdo do mouse.
O botão inferior = lado direito do mouse.
Ponta da caneta = esquerda do mouse
Botão superior
Botão inferior
Ponta da caneta
Pressão/
Mover o slide para cima e para baixo para ajustar a pressão da caneta
Mouse/
A caneta é usado como caneta ou mouse manuscrita normal. Para mudar o
mode, selecte “Pen”or “Mouse”.
Deixe a sua caneta no orifício da
placa enquanto aguarda. Se você
colocar a caneta diretamente na placa,
o mouse pode ser afetado seriamente.
Caneta
Mouse
Page 42

Portugu sê
Usando a Placa
Selecionando teclados da função
Clique no ícone da Função na barra
Passos
Ajustando o espaço de trabalho
1.
de ferramentas
Teclado no nome de passagem ou
2.
URL.
Clique OK”
3.
O espaço de trabalho da sua placa é na proporção do tamanho da sua
tela. Para reduzir a extensão do espaçode trabalho, clique “Control”e
acerte o tamanho.
Page 43

Portugu sê
Capítulo 3 : Perguntas e Res pos tas
Não.
Mac assiste produto?
1.
Mouse padrão não pode se
2.
mover na tela
A placa não trabalha com
outros computadores
3.
periféricos.
O que é proximidade?
4.
O que não pode ser colocado
5.
em cima da placa?
Tela do computador é
6.
interferido quando a placa é
deixado ao lado.
A caneta tem problema de
7.
vazamento
Pergunta
Resposta
Somente para versão de OS9.0
Remove a caneta sem fio da placa
Vá para novo diretório de nível
superior
É a altura entre caneta sem fio e
a placa. Dentro de uma certa
altura, a caneta é efetico na placa.
Objetos pesados ou objetos que
carregam frequencia.
Mova a placa longe da tela do
computador
Ir para o ícone da Placa e clique
“Button”. Então selecte “Pen
offset value” para testar a
caneta.
Sem conexão com o
8.
computador
Religar o cabo.
 Loading...