


PF3000 and PF3000 Pro
Ag Leader Technology
Using PF with HarvestMaster
Installation and Cable Connections
Hooking Up PF3000 or PF3000 Pro
Step-by-Step
Procedure
NOTE: Insert these instructions in the Options Section of the PF3000 or PF3000 Pro Operator's Manual.
Parts required for this procedure:
∙PF3000 Tall U-bracket (PN 2000105-1)
∙PF3000 Pro U-bracket (PN 3001124)
∙Battery Cable for PF3000 or PF3000 Pro PN 2000497-1 (8 ft) or 2000497-2 (16ft)
∙HarvestMaster Serial Cable (comes with HarvestMaster yield monitor)
1.Attach the monitor bracket to the monitor
2.Determine a mounting location for the monitor and mark the holes for the bracket at the location you determined in Step 1. Remove the monitor from the bracket.
3.Drill the holes for the mounting bracket and mount the bracket.
4.Attach the HarvestMaster serial cable to Port 3 of the monitor and run the cable to the HarvestMaster unit and attach to the Host port. See Figure 1.
PF3000 or PF3000 Pro |
HM 500 or 570 |
|
GPS |
HarvestMaster |
Host Port |
Antenna |
||
|
Serial Cable |
|
Battery Cable |
|
|
Figure 1. Cable attachment on HarvestMaster Unit
September 2000 |
1 |

Using PF with HarvestMaster
Installation and Cable Connections
PF3000 and PF3000 Pro
Ag Leader Technology
5.Attach the Battery power cable at the battery. The red wire connects to the positive batter terminal. The black wire connects to the negative battery terminal. Route the cable to the monitor, securing the cable away from moving parts every 12 to 18 inches.
6.Attach the battery cable to the 25-pin port on the monitor.
7.Power up the monitor to ensure the monitor is working. If not recheck the cable connections at the battery.
2 |
September 2000 |
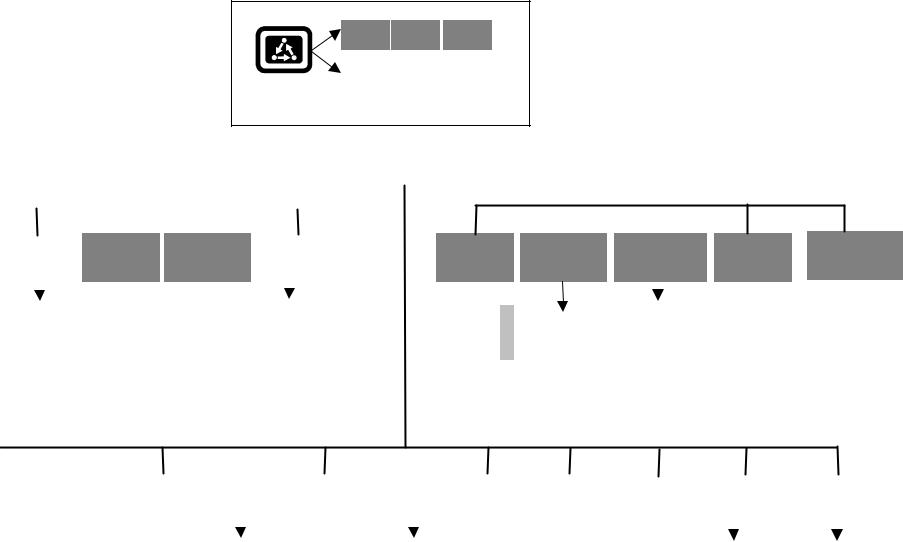
PF3000 or PF3000 Pro – Menu Tree for Harvest Master – September 2000
Menu Key
FIELD LOAD OPTIONS
CAL |
|
SETUP |
|
DIAG |
|
|
|
|
|
Press Menu Key to switch between Main Menu keys
|
|
|
|
|
|
SETUP |
|
|
DIAG |
|
|
CAL |
|
|
|
|
|||||
|
|
|
|
|
|
|
|
|
|
|
|
|
|
|
|
|
|
|
|
|
|
|
|
|
|
|
|
|
|
|
|
|
WEIGHT |
AREA |
DISTANCE |
TARE |
|
SYSTEM HARVMAST |
HARVMAST |
GPS |
RAW NEMA |
|||||
|
|
|
|
|
|
|
|
DATA |
|
SENSOR |
|
|
|
|
|
|
|
|
|
|
|
|
|
|
|
|
|
|
|
|
|
|
|
|
|
|
|
|
|
|
|
Enter actual |
|
|
Tare, Load Cell A |
|
Version |
|
Weight A |
|
|
||||
weights and |
|
|
Tare, Load Cell B |
|
OPTION |
|
Weight B |
|
|
||||
|
|
|
Calibrated Crop Flow |
|
|
|
|||||||
perform |
|
|
-or- |
|
Uncalibrated Crop Flow |
|
Tilt |
|
|
||||
calibration |
|
|
Tare, Profile A |
|
Ground Speed (Serial Only) |
|
Profile A |
|
|
||||
|
|
|
|
|
|
|
|
S |
|
|
|
|
|
|
|
|
|
Tare, Profile B |
|
Belt Speed |
|
Profile B |
|
|
|||
|
|
|
|
Tare, Profile C |
|
Belt 2 Speed |
|
Profile C |
|
|
|||
|
|
|
|
Tare, Profile D |
|
Discharge Status |
|
Profile D |
|
|
|||
|
|
|
|
Tare, Profile E |
|
Flow Direction |
|
Profile E |
|
|
|||
|
|
|
|
|
|
|
|
|
|
|
|
|
|
|
|
|
|
|
|
|
|
|
|
|
|
|
|
|
|
|
|
|
|
|
|
|
|
|
|
|
|
|
|
|
|
|
|
|
|
|
|
|
|
|
|
|
|
|
|
|
|
|
|
|
|
|
|
|
|
SWATH |
|
MARKS |
|
CROP |
|
CARD |
|
LOAD |
|
VEHICLE |
|
CONSOLE |
|
MEMORY |
|
GPS |
|
HARVMAST |
|
HARVMAST |
|||||||
|
|
|
|
|
|
|
|
|
|
|
|
|
|
|
|
|
|
|
|
|
|
|
SENSOR |
|
VEHICLE |
||
|
|
|
|
|
|
|
|
|
|
|
|
|
|
|
|
|
|
|
|
|
|
|
|
|
|
|
|
|
|
|
|
|
|
|
|
|
|
|
|
|
|
|
|
|
|
|
|
|
|
|
|
|
|
|
|
Logging Device
Logging Interval
Log File
Area count stop beeps Primary Speed Sensor Secondary Speed Sensor Speed Sensor Pulses/100ft
Yield Sensor Type |
Area Count Switch Source |
Load Cell A Multiplier |
Belt Length |
Load Cell B Multiplier |
Belt Distance Per Pulse |
Load Cell A Offset |
Travel Distance Per Pulse |
Load Cell B Offset |
Tank Type |
Tilt Sensor Multiplier |
Discharge Delay |
Tilt Sensor Offset |
Discharge Rate |
Flow Cutoff |
|
Profile Height Multiplier |
|
Profile Threshold
Number of Profile Sensors
Yield Multiplier
 Loading...