

Page 1

Agilent 7683 Automatic Liquid Sampler
Service Manual
Page 2

Page 3

Agilent 7683 Automatic Liquid Sampler
Service Manual
Table of Contents
Chapter 1 System Overview
Modules ................................................................................................................ 2
Compatibility ....................................................................................................... 2
Safety .................................................................................................................... 3
Caution ......................................................................................................... 3
Warnings ....................................................................................................... 3
Chapter 2 Installation
Tray (7683 Installation Guide).................................................................
Injector (7683 Installation Guide)............................................................
Bar code reader (7683 Installation Guide)...............................................
Chapter 3 Configuration and Cabling
Connecting cabling (7683 Installation Guide)..............................................
Cabling pinouts, 6890 GC (6890 Service Manual).........................................
Pinouts ................................................................................................................. 8
Tray connector P1, to 6850/6890 GC ......................................................... 8
Tray connector P9, to the bar code reader .............................................. 9
Tray connector J1, auxiliary ...................................................................... 9
Chapter 4 Diagnostics
Theory of operation ............................................................................................ 12
G2612A ALS Interface board ...................................................................... 12
6850 GC ......................................................................................................... 12
G2613A Injector ........................................................................................... 12
G2614A Tray ................................................................................................. 13
MAR 2000 i
Page 4

Contents
Correcting syringe problems (7683 Installation Guide).......................
Correcting vial delivery problems (7683 Installation Guide) ..............
Fault lights (7683 Installation Guide).....................................................
Error messages (7683 Installation Guide) .............................................
Chapter 5 Replacement Procedures
Replacing the mounting post ............................................................................ 16
Replacing the G2614A Tray ............................................................................... 17
Replacing the G2613A Injector ......................................................................... 19
Replacing the G1926A Bar Code Reader ......................................................... 21
Adjusting the bar code reader position .................................................... 22
Replacing the ALS interface board, 6890 GC
(6890 Service Manual)...................................................................................
Replacing the needle support assembly
(7683 Installation Guide) .............................................................................
Replacing the needle guide in the support foot
(7683 Installation Guide) .............................................................................
Removing the turret (7683 Installation Guide).............................................
Turret alignment (7683 Installation Guide) ..................................................
Making a trial run ............................................................................................... 23
Chapter 6 Illustrated Parts Breakdown
ALS Interface Board, part no. G2612A...............................................................
Injector, part no. G2613A ................................................................................... 26
Tray, part no. G2614A ........................................................................................ 28
ii MAR 2000
Page 5

1
Modules......................................................................................2
Compatibility.............................................................................2
Safety..........................................................................................3
System Overview
Page 6
Chapter 1
System Overview
Modules
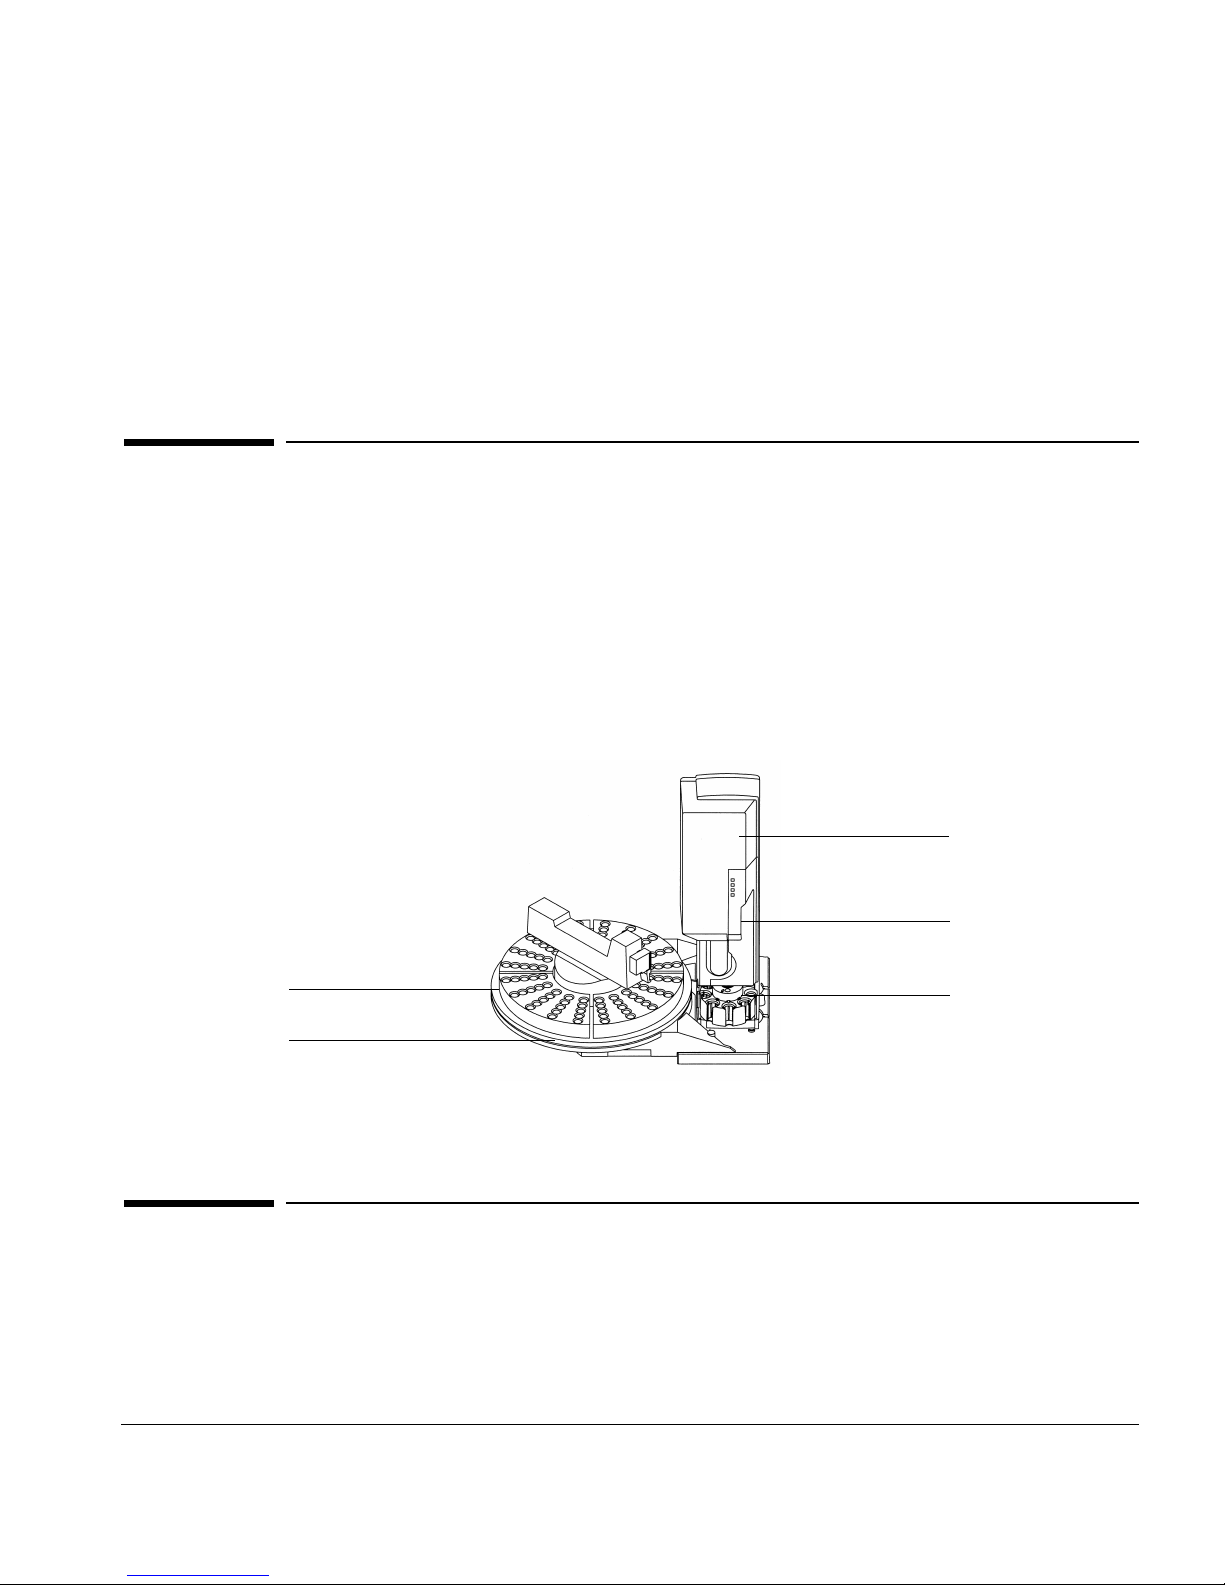
The 7683 Automatic Liquid Sampler system, shown in Figure 1, can include:
• One G2612A ALS interface board (required on 6890 GC, not used on 6850 GC)
• One or two G2613A injector module(s)
• One G2614A 100 vial tray (optional, 6890 GC only)
• One G1926A Bar Code Reader (optional, 6890 GC only)–requires INET
integrator or ChemStation
G2613A Injector
Open injector door here
Sample tray quadrant
G2614A Tray
Figure 1 The 7683 Automatic Liquid Sampler system
Turret
Compatibility
A 6890 GC without the ALS interface board can use only the 7673 ALS.
A 6890 GC with the ALS interface board can use only the 7683 ALS.
The 6850 GC uses only the 7683 ALS.
2 MAR 2000
Page 7

System Overview
Safety
Safety
Before servicing the various components of the GC, observe the following safety
precautions.
Caution
Follow the precautions below when servicing the instrument to avoid data loss
or damage to the instrument.
Printed circuit boards
When storing printed circuit boards (PCBs), always place them in static control
envelopes or enclosures.
Always make sure you are properly grounded (e.g., wearing an ESD strap) before
handling electrostatic sensitive components such as printed circuit boards.
Voltage carrying components
When disconnecting plugs, pull on the plug, not its wires. Pulling on the wires
may cause breakage.
Warnings
The following are potential hazards that can cause personal injury.
Heated components
Parts of the injector may become hot. Turn off the GC oven and inlet/detector
heated zones and allow them sufficient time to cool before servicing those areas.
If you must perform service on components that have not fully cooled, wear
protective gloves.
Voltage carrying components
Whenever possible, disconnect the G2613A Injector and G2614A Tray from the
GC before working on them.
MAR 2000 3
Page 8

System Overview
Safety
Whenever possible, disconnect the GC from its power source before working on
or near voltage carrying components of the GC.
The following components carry voltage when the GC is plugged in even if the
power switch is off:
• The AC power cord
• The AC power supply
When the power to the GC is turned on, potentially dangerous voltages exist on
these additional components:
• The power transformer
• All electronics boards
• All internal wires and cables connected to these boards
• The injector, tray, and bar code reader cables that connect to the GC
• All internal wires, cables, and boards in the injector, tray, and bar code
reader
4 MAR 2000
Page 9

2
Tray .......................................................................................
Injector..................................................................................
Bar code reader ...................................................................
Installation
Page 10

6 MAR 2000
Page 11

3
Connecting cabling (7683 Installation Guide)................
Cabling pinouts, 6890 GC (6890 Service Manual)...........
Pinouts .................................................................................. 8
Configuration and Cabling
Page 12

Chapter 3
Configuration and Cabling
Pinouts
Tray connector P1, to 6850/6890 GC
Pin Signal
A1 TXD
A2 RTS
A3 DTR
A4 MRESET
A5 GND
A6 VAC1
A7 GND
A8 VAC2
B1 RXD
B2 CTS
B3 DSR
B4 GND
B5 GND
B6 VAC1
B7 GND
B8 VAC2
8 MAR 2000
Page 13

Tray connector P9, to the bar code reader
Pin Signal
1 +5 VDC
2 NC
3 NC
4 RRD0 (motor)
5 RRD1 (motor)
6
7 GND
8 RR5V
PMH1 GND
PMH2 GND
Configuration and Cabling
Pinouts
Tray connector J1, auxiliary
Pin Signal
1 CD
2 RXD
3 TXD
4 DTR
5 GND
6 DSR
7 RTS
8 CTS
9 RI
PMH1 GND
PMH2 GND
MAR 2000 9
Page 14

Configuration and Cabling
Pinouts
10 MAR 2000
Page 15

4
Theory of operation............................................................. 12
Correcting syringe problems
(7683 Installation Guide)..................................
Correcting vial delivery problems
(7683 Installation Guide)..................................
Fault lights (7683 Installation Guide)..............................
Error messages (7683 Installation Guide) ......................
Diagnostics
Page 16

Chapter 4
Diagnostics
Theory of operation
G2612A ALS Interface board
The ALS Interface board routes messages between the GC main board and the
components of the automatic liquid sampler system, and transmits power to the
injector(s) and the tray. Errors detected by the injector or the tray are routed to
this board, which then displays the error message on the 6890 GC or at the
ChemStation.
Power from the transformer enters the board at J5. This voltage is partially
rectified through half a diode bridge before being transmitted to the tray and the
injector(s) at approximately 33 VAC. The other half of the diode bridge resides
within the injector and the tray.
The ALS Interface board runs on +5 VDC from the main board through P5.
One fuse is located on this board at F1 to protect the transformer from
overvoltage.
6850 GC
The 6850 GC directly controls and powers the injector and tray. The power
circuitry is identical to that on the ALS interface board.
G2613A Injector
The G2613A Injector completes the rectification of power delivered by the ALS
Interface board (6890 only) or the 6850, and interprets all commands received
into the motions required to make an injection. Sensors and encoders are used
12 MAR 2000
Page 17

Diagnostics
Theory of operation
on the syringe carriage, plunger, and turret to locate the position of these parts
and to control injection speed. Any errors detected are reported to the ALS
interface board/GC main board, which displays the error on the GC.
G2614A Tray
The G2614A Tray consists of a platen which holds the sample vial quadrants, a
bracket, a control board, and a robotic arm assembly that manipulates and moves
the sample vials to the injector.
Half-rectified power to the assembly arrives through the cable to the ALS
interface board, along with control signals. The board within the tray completes
rectification of the 33 VAC power input, interprets all commands, and drives the
robotic arm motors and the bar code reader.
Sensors are located within the tray and robotic arm assemblies to allow the tray
board to determine the location of the gripper and to determine whether or not
the gripper is carrying a vial.
MAR 2000 13
Page 18

Diagnostics
Theory of operation
14 MAR 2000
Page 19

5
Replacing the mounting post ............................................. 16
Replacing the G2614A Tray................................................ 17
Replacing the G2613A Injector .......................................... 19
Replacing the G1926A Bar Code Reader .......................... 21
Replacing the ALS Interface board
(6890 Service Manual)...................................................
Replacing the needle support assembly
(7683 Installation Guide) .............................................
Replacing the needle guide in the support foot
(7683 Installation Guide) .............................................
Removing the turret (7683 Installation Guide)..............
Turret alignment (7683 Installation Guide)....................
Making a trial run ................................................................ 23
Replacement Procedures
Page 20

Chapter 5
Replacement Procedures
Replacing the mounting post
The 6890 GC mounting post locations are shown below.
Back injector
Front post location
Front injector
Back post location
Figure 2 Mounting post locations
There is only one post location for the 6850 GC.
16 MAR 2000
Page 21

Replacement Procedures
Replacing the G2614A Tray
Replacing the G2614A Tray
1. Unplug the tray cable from the GC.
2. Remove the three injection port cover Torx screws shown in Figure 3 and
remove the old tray.
Tray
Injection port cover
Figure 3 Installing the tray
Tray mounting
Captive screw
Remove screws from
cover
screws
(install first)
MAR 2000 17
Page 22

Replacement Procedures
Replacing the G2614A Tray
Caution Do not move or manipulate the robotic arm or gripper. Moving the arm or gripper
back and forth can cause damage. If necessary, rotate the arm assembly a few
degrees until there is enough clearance.
3. Align the new tray over the three holes in the injection port cover and locate
in place. Tighten the captive screw in the center of the tray mounting arm
to hold the tray in place. Install the two mounting screws into the tray and
tighten until the tray is secure.
4. Install the tray quadrants. Slide the leading edge of each quadrant under the
guides on the tray, then snap the front tab into the slot on the tray. See
Figure 4.
Tray quadrant
Front tab
Guide tab
Slot
Figure 4 Install the tray quadrants
18 MAR 2000
Page 23

Replacement Procedures
Replacing the G2613A Injector
Replacing the G2613A Injector
Note Do not mount the G2613A Injector on a mounting post for a 7673 Injector.
Remove the old post and replace it with the new one.
1. Unplug the injector cable from the GC.
2. Lift the injector off of the mounting post.
3. If necessary, install/replace the mounting post on the injection port cover
in the front or back location, as desired.
4. Open the new injector’s door. Slide the packing material and syringe carriage
down, then remove the packing.
5. Mount the new injector. Line up the hole in the base of the injector that is
nearest the cable with the mounting post. Lower the injector about an inch
(2.5 cm) onto the post. See Figure 5.
Alignment pin
Cable
Hole in injector base
Back mounting post
location
Mounting post (front)
Inlet cover
Alignment hole
Figure 5 Mounting the injector (6890 GC shown)
MAR 2000 19
Page 24

Replacement Procedures
Replacing the G2613A Injector
6. Front location: Turn the injector so that the turret is facing the front of the
GC. Lower the injector until the alignment pin in the base enters the
alignment hole in the injection port cover.
Back location: Turn the injector so the turret faces the left side of the GC.
Lower the injector until the alignment pin in the base enters the alignment
hole in the injection port cover.
7. Check your work:
• The injector must be vertical.
• The alignment pin must be properly seated in the alignment hole.
• The injector feet should touch the injection port cover.
If the injector will not sit upright on the GC, check that the plumbing and
cabling under the injection port cover are properly routed in their channels.
20 MAR 2000
Page 25

Replacement Procedures
Replacing the G1926A Bar Code Reader
Replacing the G1926A Bar Code Reader
1. Unplug the old bar code reader cable from the tray. See Figure 6.
Connect bar code reader
Figure 6 Connecting the bar code reader
2. Remove the bar code reader from the tray.
3. Install the new bar code reader. See Figure 7.
Mounting clips
Bar code reader
Figure 7 Mounting location for the bar code reader
MAR 2000 21
Page 26

Replacement Procedures
Replacing the G1926A Bar Code Reader
Adjusting the bar code reader position
To adjust the bar code reader position:
1. Loosen the bracket mounting screws and the height adjustment screw.
See Figure 8.
Adjust this space
Tray
Mounting screws (2)
GC
Support bracket
Height adjustment screws
Figure 8 The bar code reader support bracket
2. Slide the support bracket towards or away from the tray until the top of the
bar code reader is parallel with the tray surface. Tighten the mounting
screws.
3. Adjust the bar code reader’s height. Slightly loosen the height adjustment
screw on the side of the support bracket and raise or lower the bracket until
there is a very small gap—about the thickness of a piece of paper—between
the mounting clips on the bar code reader and the tray. See Figure 8. Tighten
the height adjustment screw.
22 MAR 2000
Page 27

Replacement Procedures
Making a trial run
Making a trial run
Use the following trial run to quickly check injector and tray operation.
1. Install an empty syringe in the injector.
2. Place empty bottles in the Solvent A and Waste A turret positions. Place an
empty capped sample vial in the tray 1 position (or the turret sample 1
position, if not using the tray).
3. Set these following parameters on the GC:
Parameter Setting
Injection volume 1
# Sample pumps 1
Viscosity delay 0
# Sample washes 1
# Solve A washes 1
# Solve B washes 0
Slow plunger off
Pre-dwell time 0
Post-dwell time 0
Sampling offset off (on if cool on-column inlet used)
# Solve A pre-wash 1
# Solve B pre-wash 0
# Injections/vial 1
Samples 1–1 (101–101 for turret with ChemStation control)
4. Set the GC oven program to 25°C with a 0°C/min ramp, a hold time of
0.1 minutes, an equilibrium time of 0.3 minutes, and an initial time of
0.3 minutes.
MAR 2000 23
Page 28

Replacement Procedures
Making a trial run
5. Store, load, then run the sequence.
• If there are no faults, the injector will make one "injection" from the
first vial position.
• If any faults occur, see the 7683 Installation Guide.
24 MAR 2000
Page 29

6
Injector, part no. G2613A.......................................................26
Tray, part no. G2614A ............................................................28
Illustrated Parts Breakdown
Page 30

Chapter 6
Illustrated Parts Breakdown
The following pages list the replacement parts for the 7683 Automatic Liquid
Sampler.
Injector, part no. G2613A
Description Part No. Qty/Assy
1. Injector module (new)
Injector module (exchange)
2. Mounting post–G2613A
3. Hi–density injector turret kit
4. Injector turret–standard
5. Needle support assembly, 530 µm
6. Needle support assembly, 250/320 µm
(accessory 18599T)
NS Software upgrade kit
NS Injector install instructions
G2613–60910 —
G2613–69910 —
G2613–20500 2
G2306–60500 1
G1513–40000 1
G2613-60977 1
G1513-61295 1
G2613–60550 —
G2613–90195 —
26 MAR 2000
Page 31

Illustrated Parts Breakdown
Injector, part no. G2613A
1
2
5
6
3
4
Figure 9 G2613A injector replacement parts
MAR 2000 27
Page 32

Illustrated Parts Breakdown
Tray, part no. G2614A
Tray, part no. G2614A
Description Part No. Qty/Assy
1. Tray module assembly (new)
2. Torx screw, T–20, m4 × 45 mm
3. Quadrant/ 4pk
4. Torx screw, T–20, m4 × 20 mm
NS Main tray cable
Tray module assembly (exchange)
G2614–60965 —
G2614—69965 —
0515–2484 2
18596–40015 1
1390–1024 1
G2614–60610 1
28 MAR 2000
Page 33

Illustrated Parts Breakdown
Tray, part no. G2614A
3
1
2
4
Figure 10 G2614A Tray replacement parts
MAR 2000 29
 Loading...