

Page 1

Thank you for purchasing this AgfaPhoto digital camera. Please read these operating
instructions carefully in order to use the digital camera correctly. Keep the instructions in a
safe place after reading so that you can refer to them later.
Precautions
• Do not point the camera directly into the sun or other intense light sources which could
damage your eyesight.
Do not try to open the casing of the camera or attempt to modify this camera in any way.
•
High-voltage internal components create the risk of electric shock when exposed.
Maintenance and repairs should be carried out only by authorized service providers.
• Do not fire the flash too close to the eyes of animals or young children. Eye damage
may result. Please remain at least one meter away from infants when using the flash.
Keep the camera away from water and other liquids. Do not use the camera with wet
•
hands. Never use the camera in the rain or snow. Internal moisture is dangerous and
may lead to electric shock.
• Keep the camera and its accessories out of the reach of children and animals to prevent
accidents or damage to the camera.
If you notice smoke or a strange odor coming from the camera, turn the power off
•
immediately. Take the camera to the nearest authorized service center for repair. Never
attempt to repair the camera yourself.
• Use only the recommended power accessories. Use of power sources not expressly
recommended for this equipment may lead to overheating, distortion of the equipment,
fire, electrical shock or other hazards.
Disclaimer
We assume no responsibility over and above the provisions of the Product Liability Law for
damages suffered by the user or third parties as a result of the inappropriate handling of the
product or its accessories, or by their operational failure and by their use. We reserve the
right to make changes to this product and its accessories without prior notice.
Warning!
Never open the camera or remove any parts of it. This will void all warranty claims.
Using your batteries
For best performance and prolonged battery life, we recommend the use of rechargeable NiMH batteries.
Extending battery life
Excessive use of the following functions use up a great deal of battery power and should
therefore only be used occasionally:
• Flash
• Editing images on the camera display
The battery life can be affected by soiling. Please clean the contacts with a clean, dry cloth
before putting the batteries in the camera. Battery performance drops at temperatures below
0° C. If you use the camera at low temperatures you should have replacement batteries to
hand and ensure they do not get too cold.
Please note: you should not dispose of cold and seemingly flat batteries because these
batteries may work again at room temperature.
1
Page 2

1. Table of Contents
Precautions.............................................. 1
Disclaimer.................................................. 1
Warning! .................................................... 1
Using your batteries .................................. 1
Extending battery life................................. 1
1. Table of Contents .............................. 2
2. General Introduction ......................... 3
Package Contents ..................................... 3
External View ............................................ 3
Display Information.................................... 5
3. Getting Started................................... 7
Turning Power On & Off ............................ 7
Inserting / Removing the Batteries ............ 7
Inserting /Removing a Memory Card......... 8
Attaching the Wrist Strap........................... 8
4. Buttons & Functions ......................... 9
Turning Power On & Off ............................ 9
Shutter....................................................... 9
Tele / Wide ................................................ 9
Playback.................................................. 10
Mode 10
Basic Operations ..................................... 10
EV............................................................ 10
ISO .......................................................... 11
WB........................................................... 11
Menu 12
Up / Play & Pause / Macro ...................... 12
Right / Flash ............................................ 12
Down / Voice Memo ................................ 12
Left / Self-timer ........................................ 13
5. Still Image Mode .............................. 14
Capturing Images .................................... 14
Mode Set ................................................. 14
Auto Mode ............................................... 14
Program Mode......................................... 15
Portrait Mode........................................... 15
Night Portrait Mode ................................. 15
Sunset Mode ........................................... 15
Fireworks Mode....................................... 15
Beach Mode ............................................ 16
Landscape Mode..................................... 16
Night Landscape Mode ........................... 16
Backlight Mode........................................ 16
Candle Light Mode .................................. 16
Auction Mode .......................................... 17
6. Menu Mode ....................................... 18
Mode Set ................................................. 18
Image Size (Default: 8M)......................... 18
Metering (Default: Multi) .......................... 18
Sharpness (Default: Normal)................... 18
Quality (Default: FINE) ............................ 18
Shooting (Continuous) (Default: Single).. 18
Effect (Default: Normal)........................... 19
OSD Information (Default: Detail)............ 19
Face Detection (Default: On)................... 19
7. Movie Clip Mode .............................. 20
Size 20
Metering .................................................. 20
Multi Metering:......................................... 20
Spot Metering: ......................................... 20
Effect 20
OSD Information...................................... 20
8. Voice Recording Mode .................... 21
9. Playback Mode................................. 22
Protect ..................................................... 22
Slide 22
Delete ...................................................... 23
DPOF ...................................................... 23
Copy To Card .......................................... 23
Resize ..................................................... 24
Rotate...................................................... 24
Effect 24
10. Set Up Mode ..................................... 25
11. PC Connection ................................. 27
12. Specifications .................................. 28
13. Customer care.................................. 30
Customer care......................................... 30
Disposal of Waste Equipment by Users
in Private Households in the European
Union ....................................................... 31
FCC Compliance and Advisory ............... 31
2
Page 3
2. General Introduction
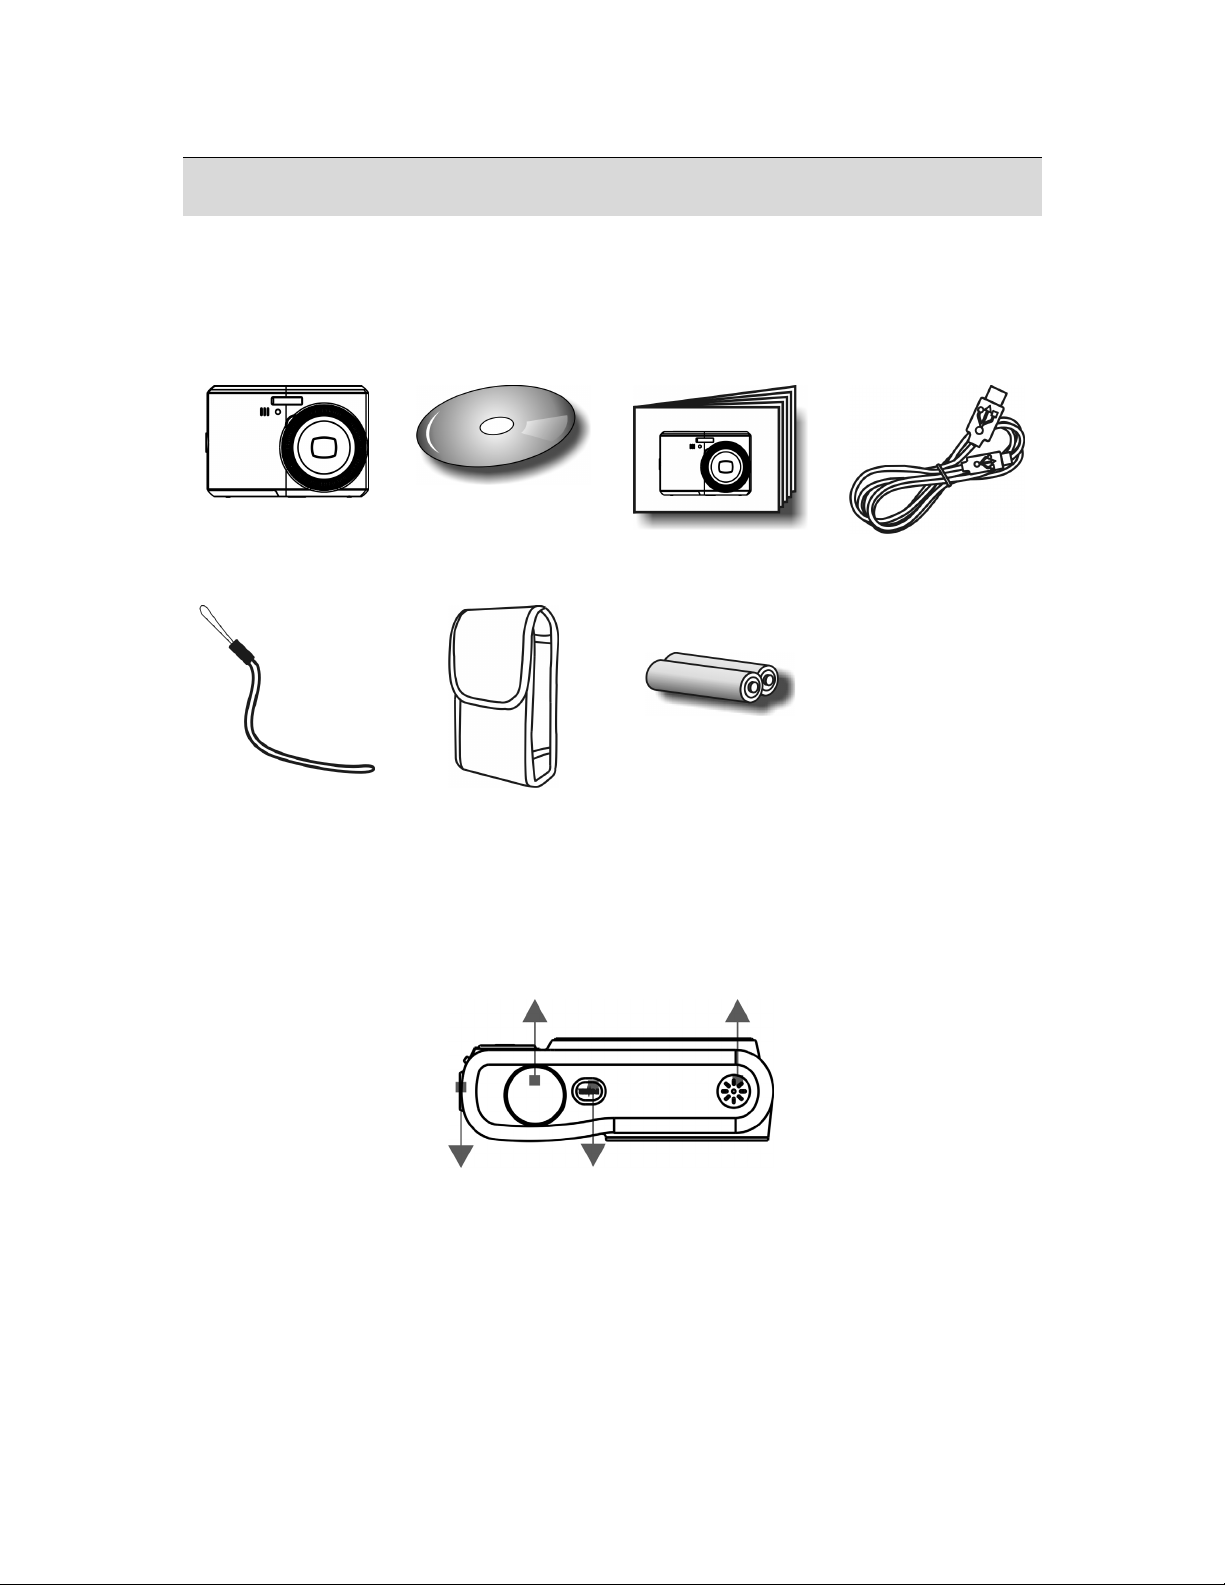
Package Contents
AgfaPhoto Sensor
830s
Camera Driver &
Software CD
Quick Guide USB Cable
Wrist Strap
External View
Top
Camera Pouch 2xAA Batteries
Shutter Button
Microphone
Strap Eyelet
Power Button
3
Page 4
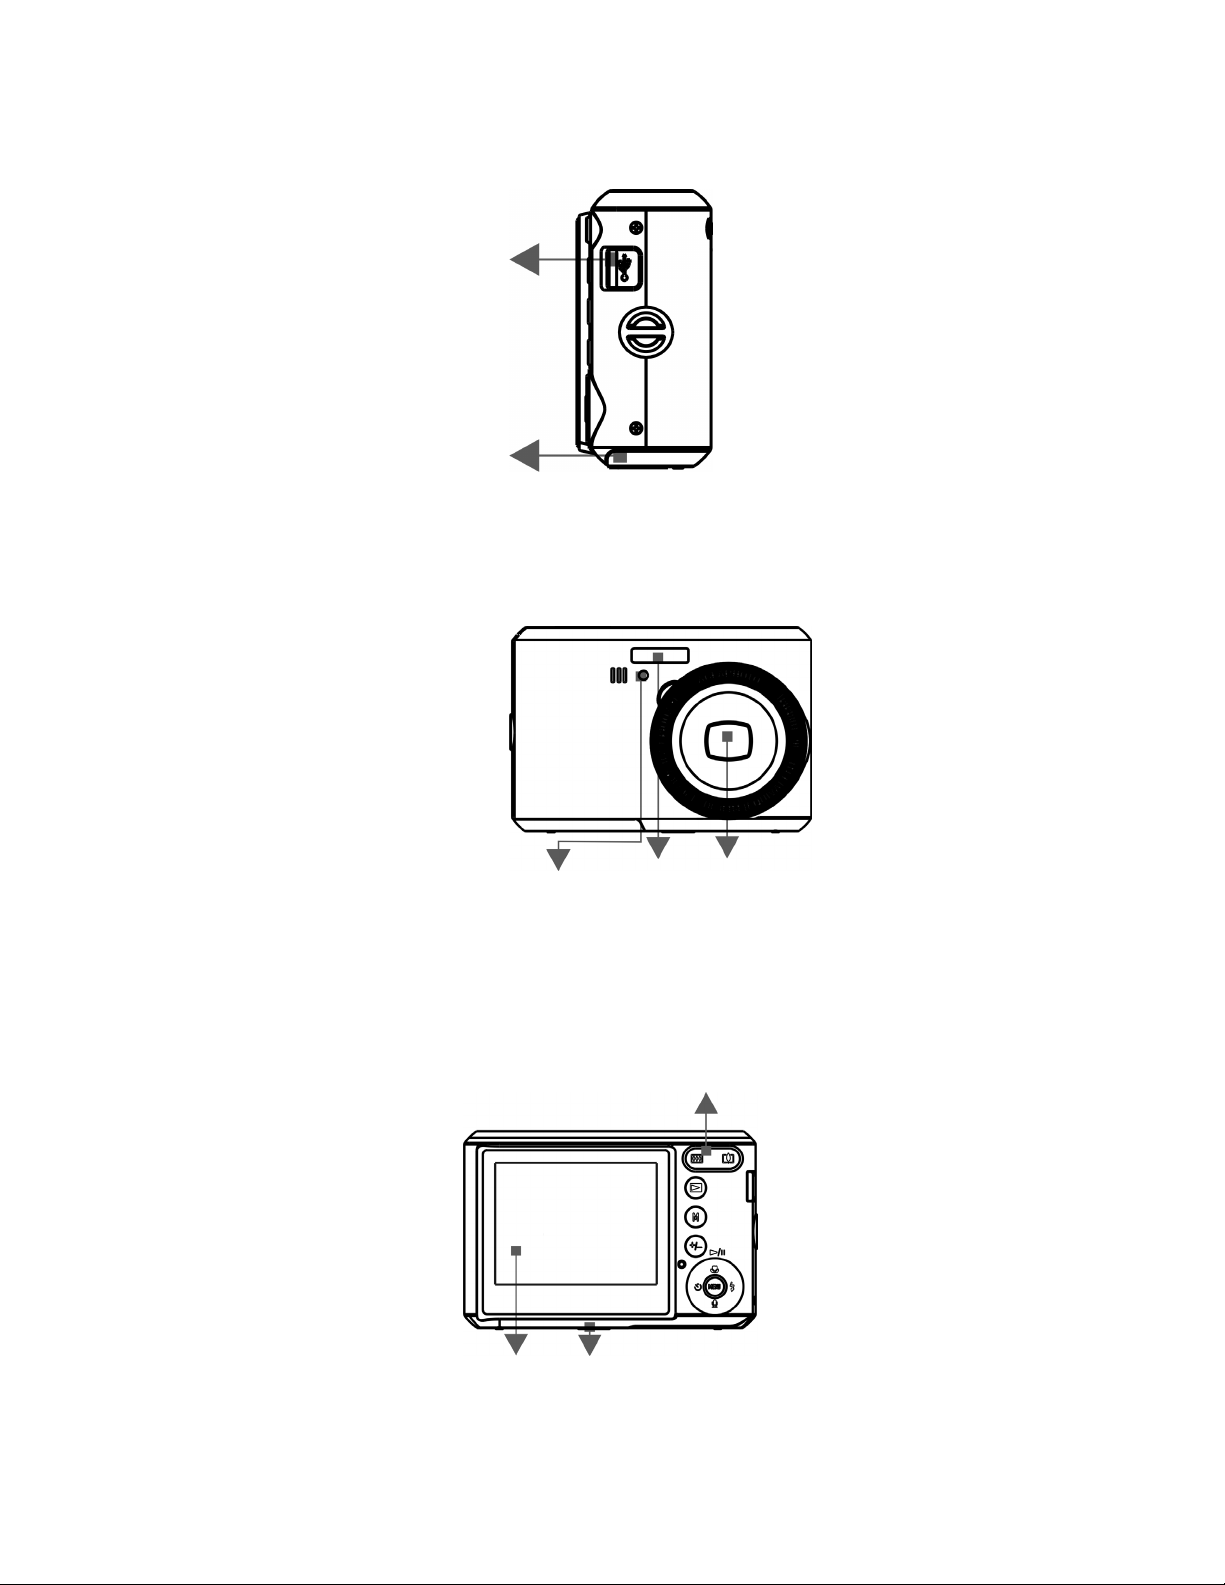
Side
Front
USB Connector
Battery/Memory
Card/Compartment Cover
LED
Lens Flash
Back
LCD Monitor
Wide/Tele Button
Tripod Socket
4
Page 5

Menu Button
Display Information
Wide/Tele Button
Playback Button
Mode Button
Delete/Exposure Button
Play/Pause/Up Button
Flash/Right Button
Self-Timer/Left Button
Voice Memo/Down Button
1. Operation Mode
(
) Auto
(
) Program
(
) Portrait
(
) Landscape
(
) Night Portrait
(
) Night Landscape
(
) Sunset
(
) Backlight
) Fireworks
(
) Candle Light
(
(
) Beach
) Auction
(
(
) Movie Clip Mode
(
) Voice Recording Mode
2. Battery Status
(
) Batteries Full
(
) Batteries Half Full
(
) Batteries Empty
5
Page 6
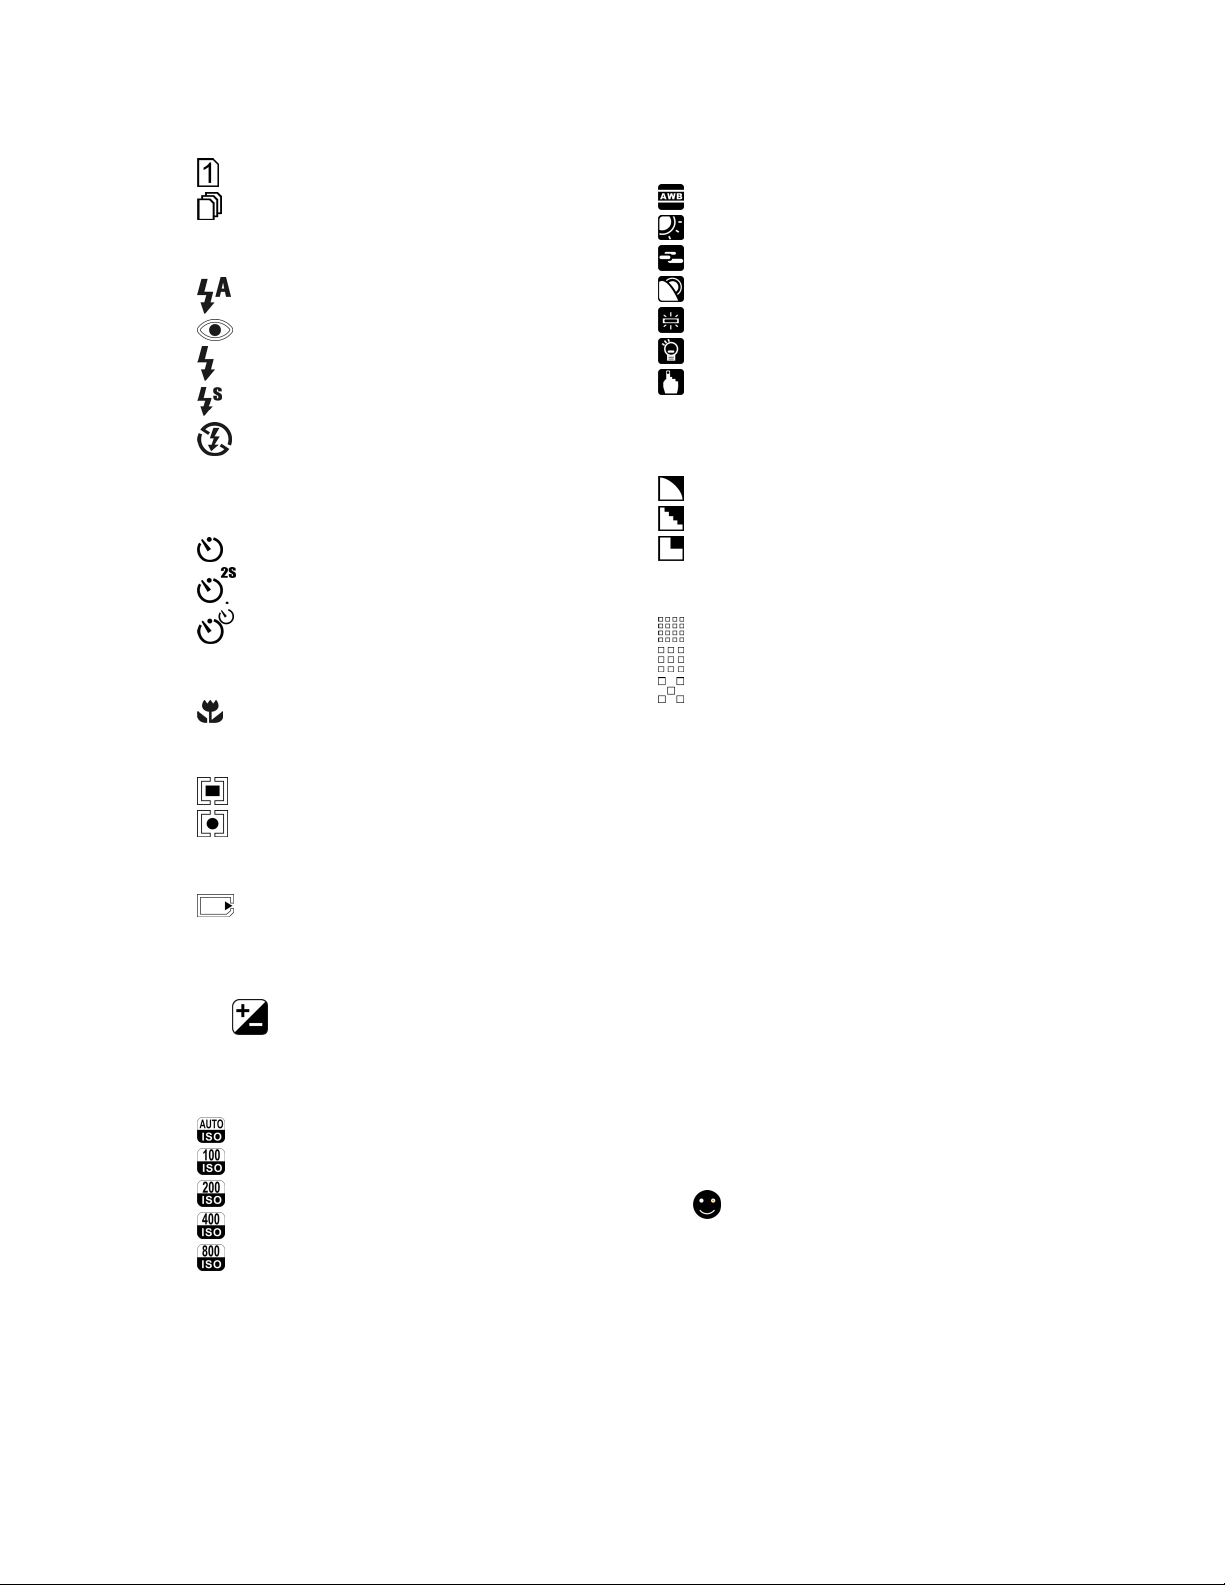
3. Shooting Mode
) Single
(
( ) Continuous
4. Flash Mode
(
) Auto Flash
(
) Red-Eye
(
) Fill-in Flash
(
) Slow Sync
) Flash Off
(
5. Self-timer
(
) 10 Seconds
) 2 Seconds
(
(
) Double
6. Focus Range
(
) Macro
7. Metering
(
) Multi
(
) Spot
8. Memory Status
(
) Memory Card Inserted
9. Time & Date
10. (
) Exposure ± 2EV
0.5 EV Steps
11. ISO Value
(
) Auto
) 100
(
(
) 200
) 400
(
) 800
(
12. W. Balance
) Auto
(
) Daylight
(
) Cloudy
(
(
) Sunset
(
) Fluorescent
) Tungsten
(
) Custom
(
13. Sharpness
(
) Soft
(
) Normal
(
) Vivid
14. Quality
(
) Super Fine
) Fine
(
(
) Normal
15. Image Size
Still Image
(8M) 3264 x 2448
(5M) 2592 x 1944
(3M) 2048 x 1536
(1M) 1280 x 960
Movie Clip
(720) 720 x 480
(640) 640 x 480
(320) 320 x 240
16. Estimated Available Shots & Video
Time
17. F No. & Shutter Speed
18. Zoom Status Indicator
19. (
) Face Detection
6
Page 7
3. Getting Started
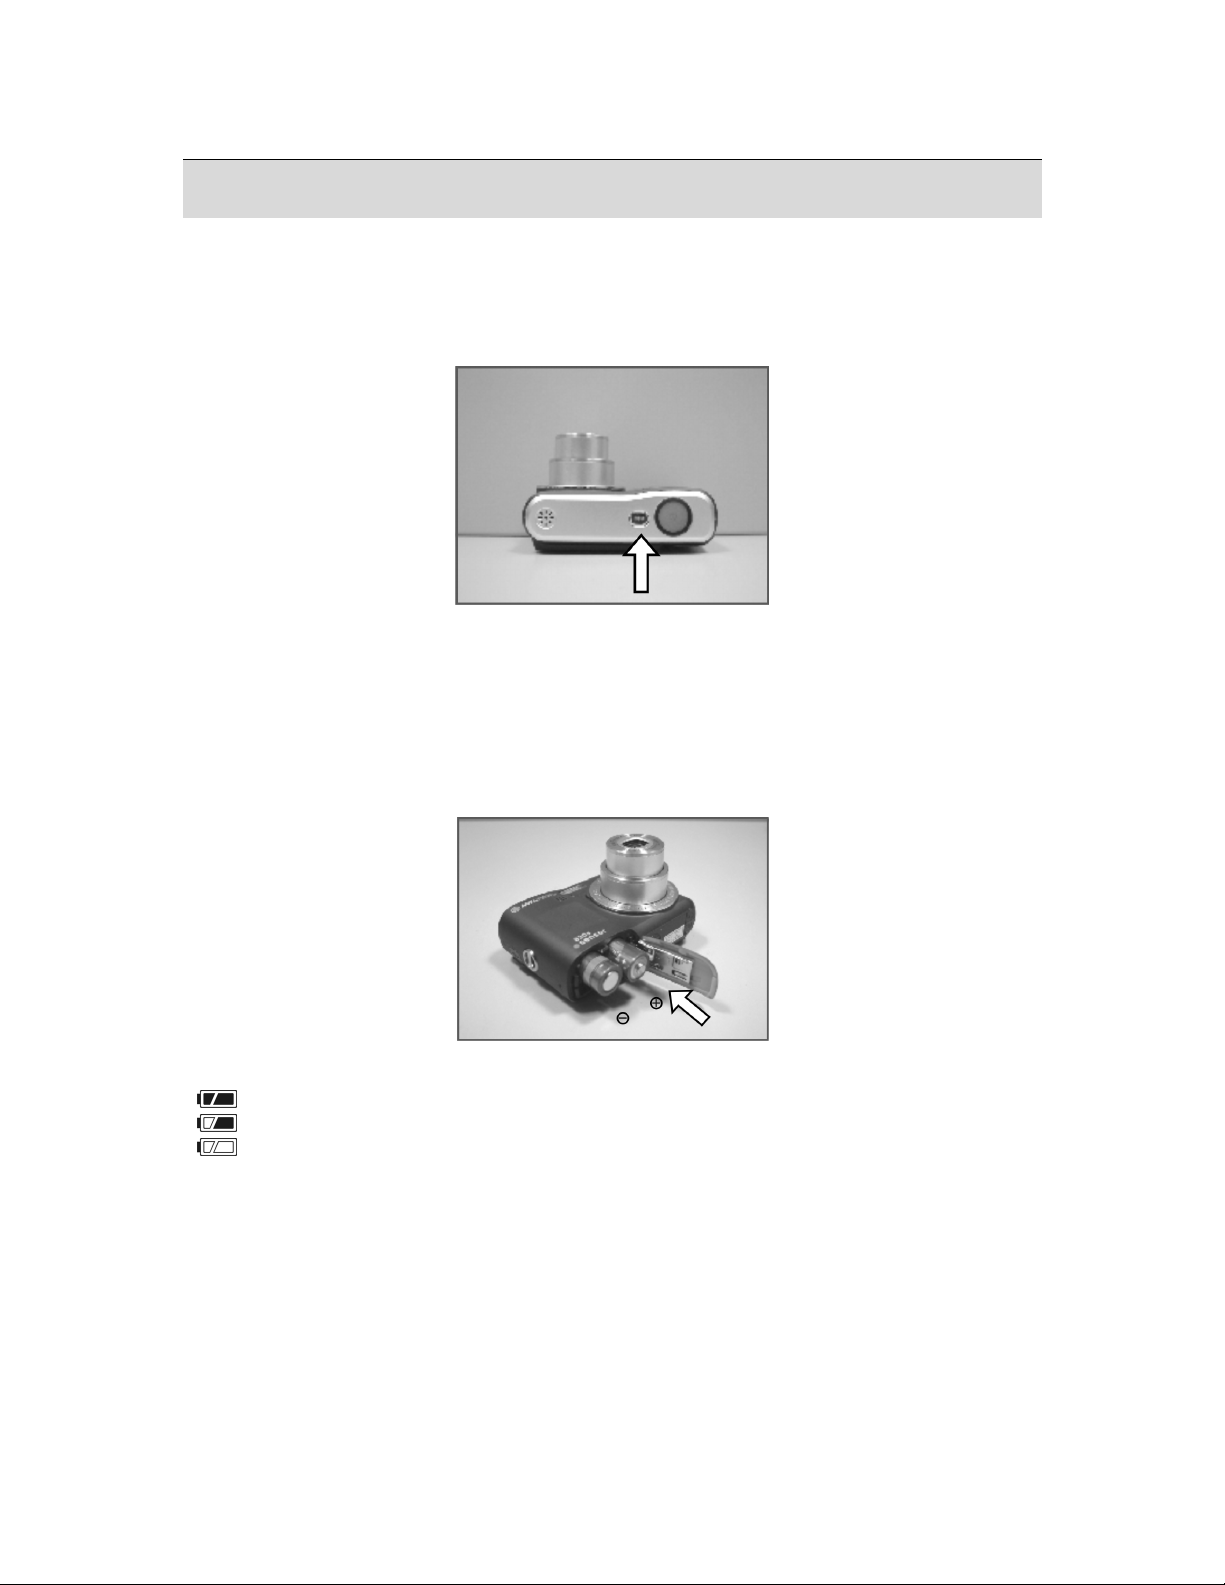
Turning Power On & Off
• Press the Power Button to turn the camera on.
• Press the Power Button again to turn the camera off.
Inserting / Removing the Batteries
1. Power off the camera.
2. Slide open the battery compartment cover.
3. Remove the batteries or, respecting the polarity indications, insert them.
4. Close the battery cover.
5.
Battery status indicator.
(
): Batteries full.
(
): Batteries half full.
(
): Batteries empty. Replace with new batteries.
• The batteries will discharge if kept inside the camera for a long time without use.
Remove the batteries when the camera is not in use.
• The batteries may not work normally under 0
o
C or over 40oC.
7
Page 8
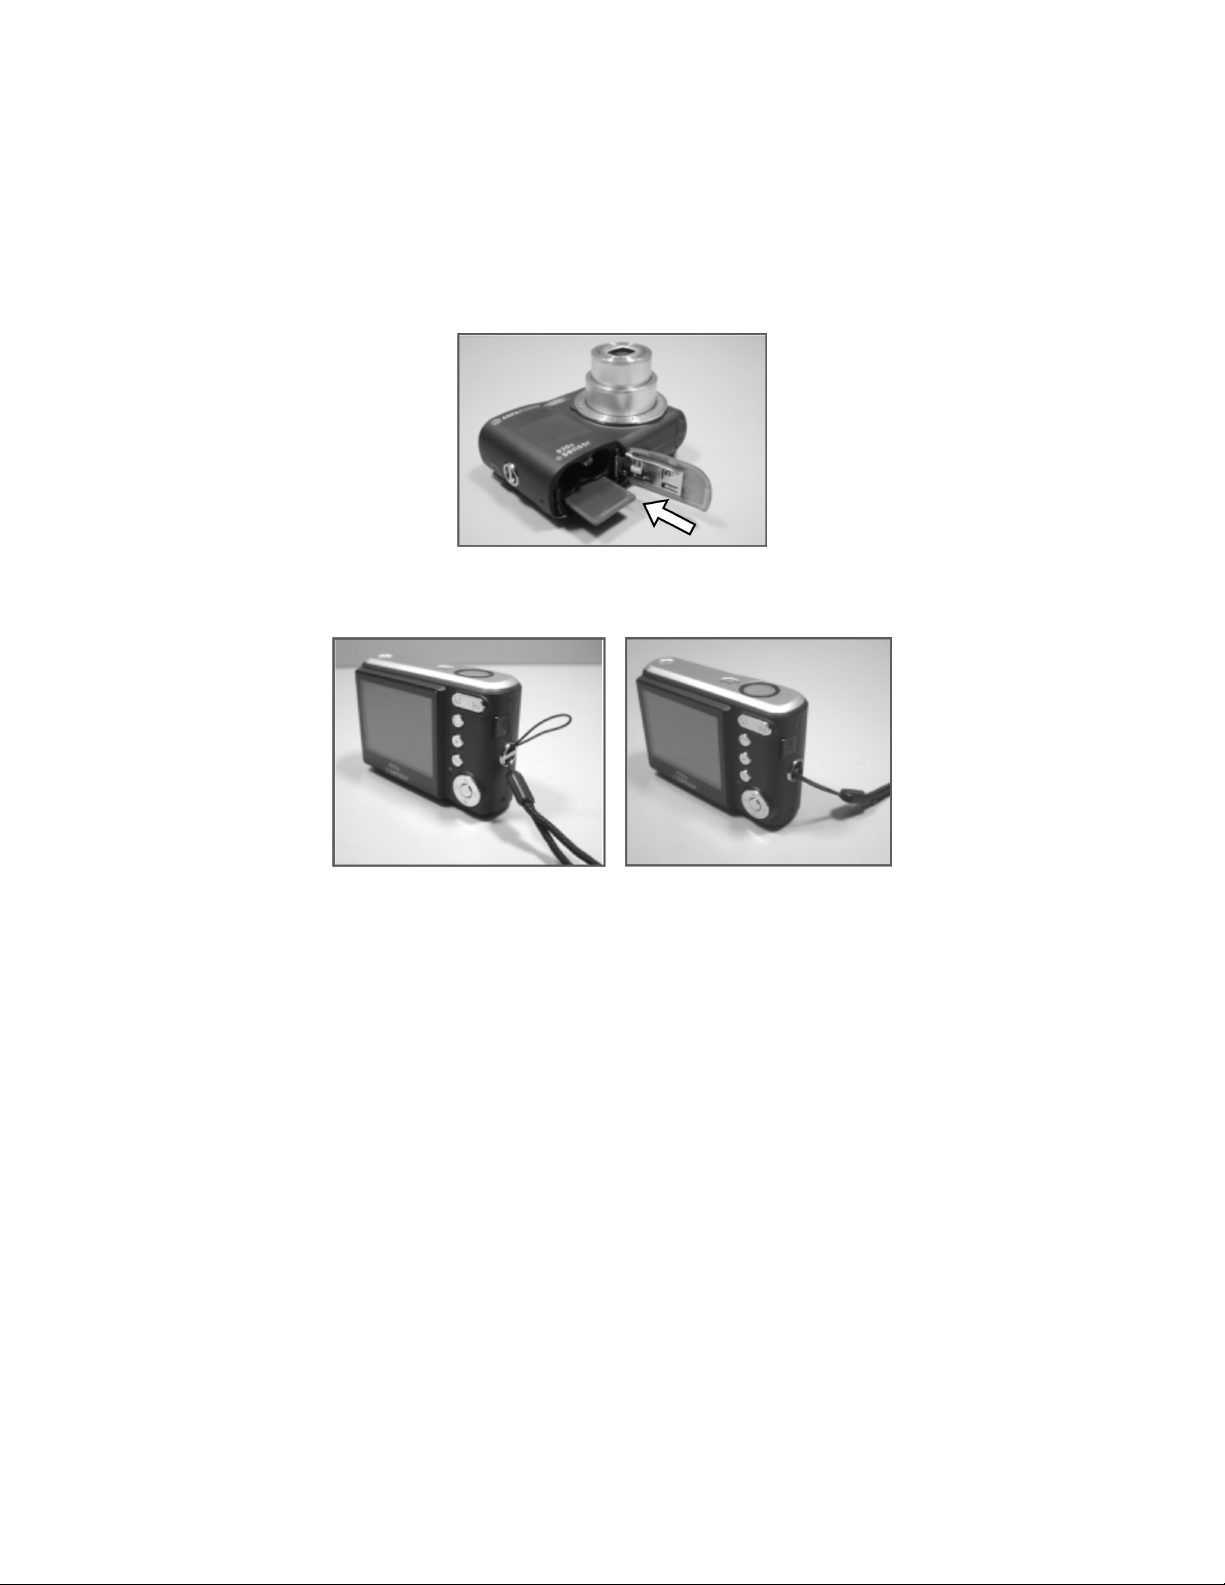
Inserting /Removing a Memory Card
1. Power off the camera.
2. Open the battery compartment cover.
3. Insert the memory card into the card slot and press it gently until you hear a click.
4. To remove, gently press on the edge of the card and pull it out.
5. Close the battery cover.
Attaching the Wrist Strap
8
Page 9
4. Buttons & Functions
Turning Power On & Off
• Press the Power Button to turn the camera on.
• Press the Power Button again to turn the camera off.
Power
• If the camera is left idle for a certain period of time, the camera will power off
automatically.
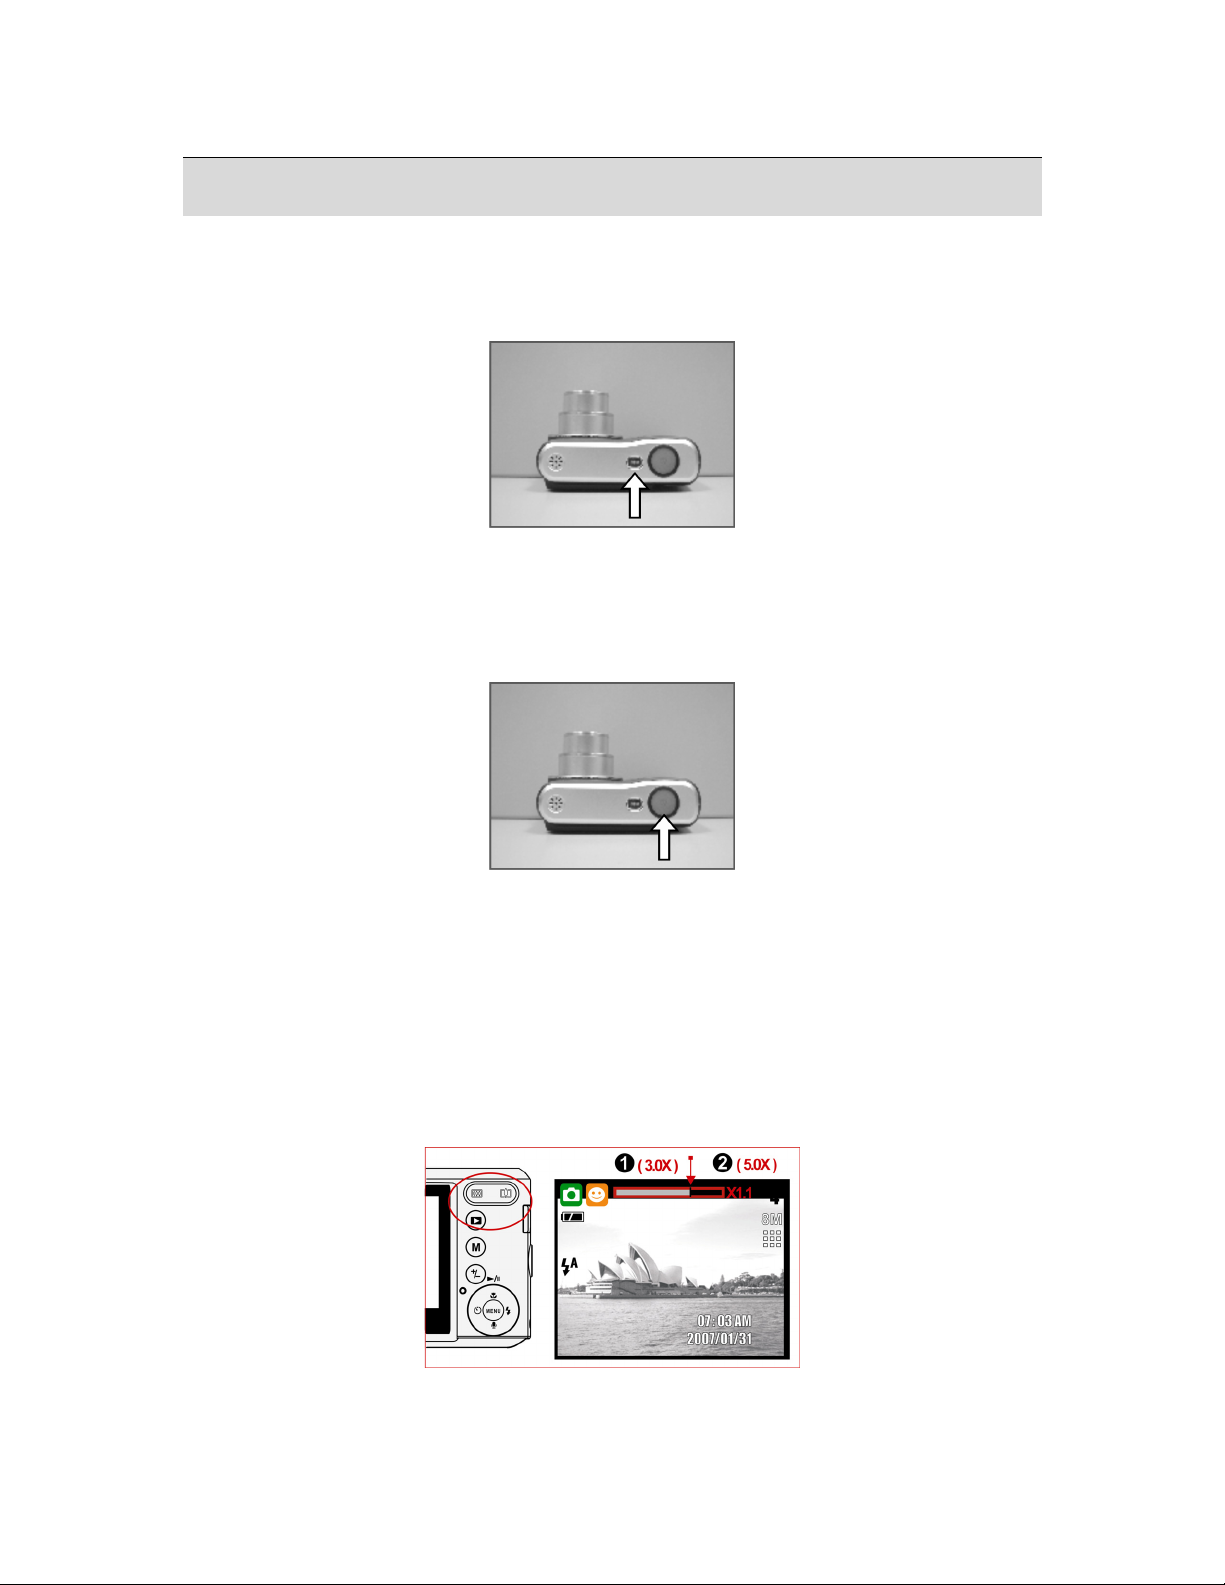
Shutter
Shutter
• Press the shutter button half way to focus and then press it fully down to capture an
image.
Tele / Wide
Press the Tele Button. The Zoom Bar Indicator will appear in the top of the LCD display
•
showing the current zoom status.
• Press the Wide Button. The Zoom Bar Indicator will return to the Wide view.
The camera allows maximum 3.0x optical zoom and 5.0x digital zoom.
•
9
Page 10
Playback
You can use the playback mode to replay, delete or edit images on the LCD.
•
• Select the Playback Mode by pressing the Playback Button (
• Playback Mode displays still images, movie clips and voice recordings.
• Select an image by pressing the Left or Right Button.
• Press and hold the Left or Right Button to fast forward the images.
).
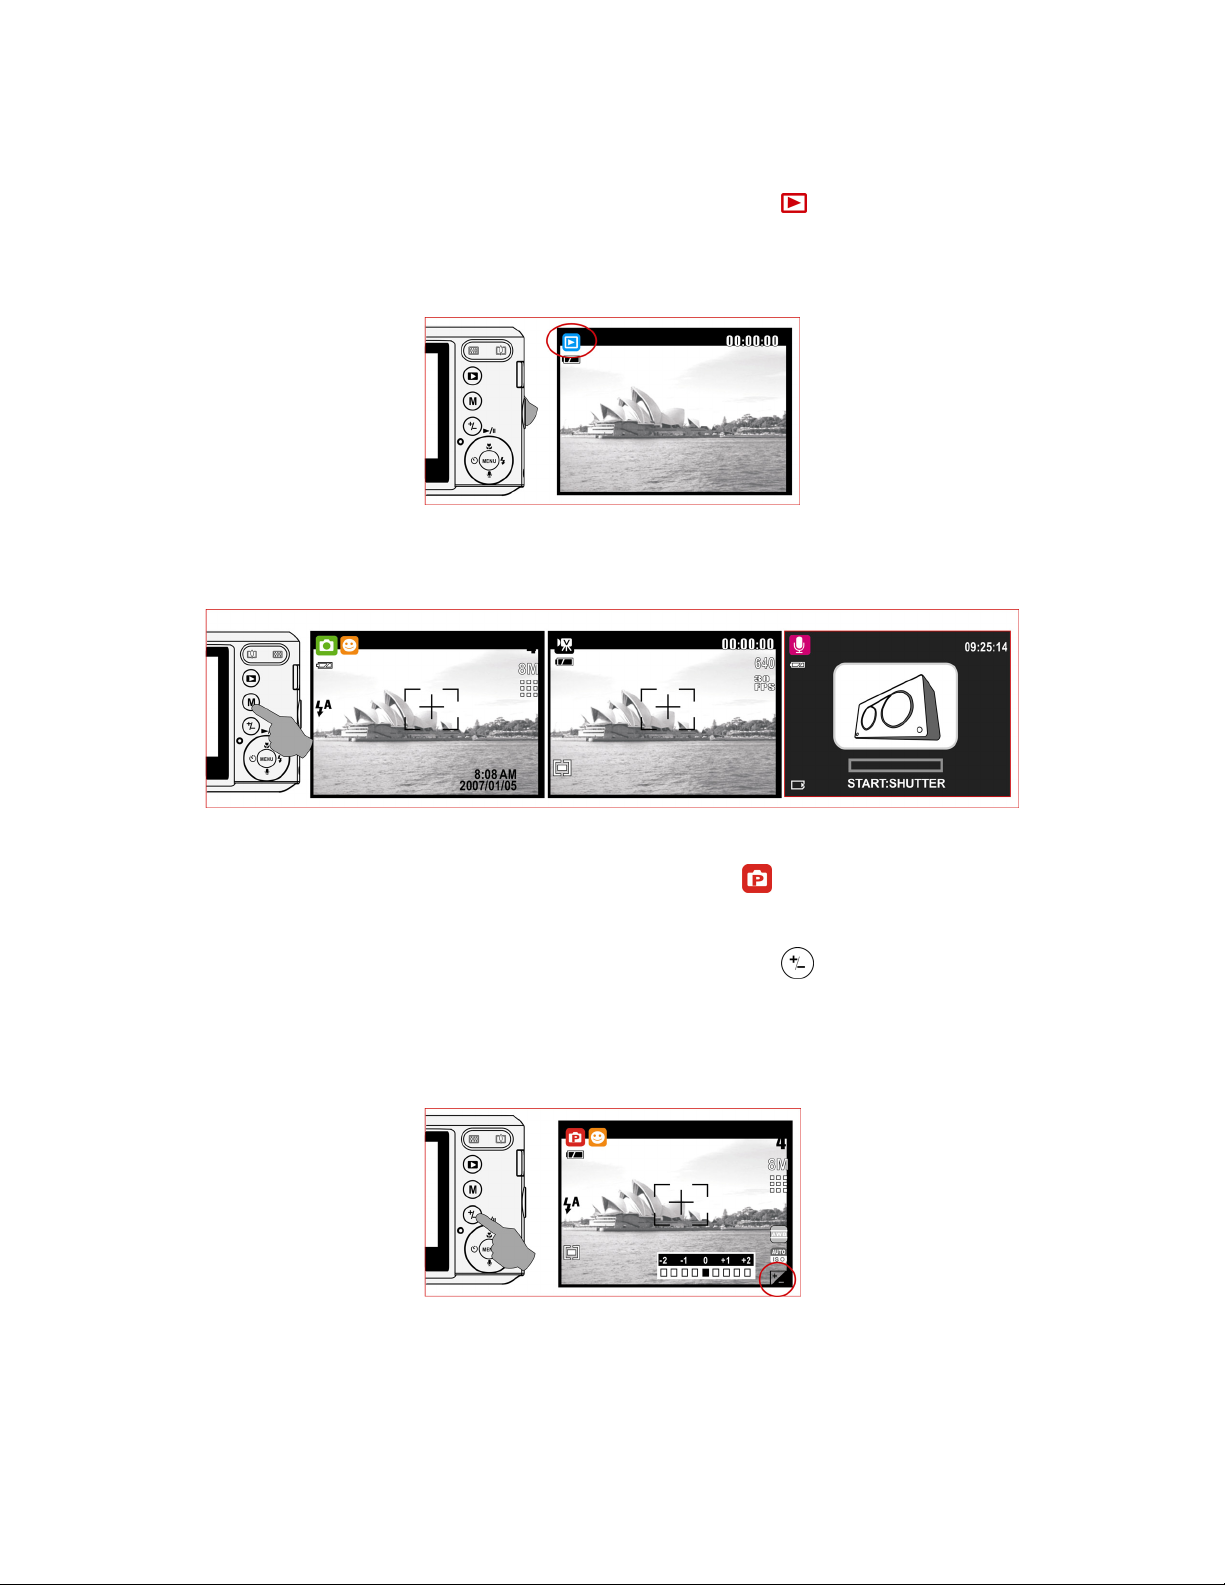
Mode
Still Image Movie Clip Voice Recording
Basic Operations
• To adjust white balance and ISO select Program Mode ( ).
EV
• To adjust the EV value, press the Delete / Exposure Button ( ).
• Press Left / Right Button to set the Exposure Value.
• You can adjust from -2.0EV to +2.0EV (in 0.5EV steps).
• After the preferred value has been selected press the Menu Button to confirm the setting.
• The higher the EV value, the brighter the image will be.
10
Page 11

ISO
• To adjust the ISO value, select Program Mode and press the Delete / Exposure Button
(
).
• Press the up or down button to toggle between EV, ISO and white balance.
Press the Right / Left Button to set the ISO value and press the Menu Button to confirm.
•
WB
• To adjust the WB value, select Program Mode and press the Delete / Exposure Button
(
).
• Press the up or down button to toggle between EV, ISO and white balance.
• Press the Right / Left Button to set the WB value and press the Menu Button to confirm.
Auto Adjusts the white balance automatically
Daylight For bright light conditions
Cloudy For cloudy conditions
Sunset For sunsets/twilight conditions
Fluorescent For florescent light
Tungsten For tungsten light
Custom Under lighting conditions different from the above ones
11
Page 12

Menu
Press the Menu Button open the menu.
•
• When the menu appears on the LCD display, the Menu Button is used to move through
the highlighted items in the submenu or to select a menu item.
Up / Play & Pause / Macro
• Press the Up Button (
• When the menu is not displayed on the LCD display, the Up Button (
the Macro function.
The Up Button also operates as the Play & Pause function to play voice recordings &
•
movie clips in Playback Mode.
Right / Flash
) to move up the submenu.
) operates as
• Press the Right Button (
• The Right Button (
) also operates as the Flash function.
) to highlight items in the right tab.
Down / Voice Memo
• Press the Voice Button (
• There are two ways you can add your voice to a stored still image.
1. Shooting Mode
2. Playback Mode
) to highlight items in the down tab.
12
Page 13

Left / Self-timer
• Press the Left Button to highlight items in the left tab.
10 sec. Self-timer (
released.
The image will be taken 10 seconds after the shutter is
):
2 sec. Self-timer (
released.
With the Double Self-timer (
second image will be taken a few seconds after the first shot. Two pictures will be taken
once the shutter is released.
): The image will be taken 2 seconds after the shutter is
): The first image will be taken after 10 seconds. The
13
Page 14

5. Still Image Mode
Capturing Images
Taking a Picture
1. Press Power Button to power on the camera.
2. Press the Shutter Button half way to focus.
3. Press Shutter Button fully to capture the image.
• Using the Zoom
Press T or W on the Zoom Button
It is recommended that you take photos with the camera mounted on a tripod or
other device if the Shaking Hand (
) icon appears.
Mode Set
Auto Mode
In this mode the following settings will be automatically locked at the factory default settings
and cannot be adjusted.
(a) Metering: Multi
(b) Sharpness: Normal
(c) Effect: Normal
(d) Shooting (Continuous Shooting): Single
(e) Available Flash modes:
(1) Auto Flash
(2) Red-eye Reduction
(3) Flash Off
14
Page 15

Program Mode
After the above procedure, you can press the Menu Button again to configure your own
settings for the image.
In Program Mode, metering, sharpness, effect, white balance, shooting flash & ISO can be
adjusted.
Portrait Mode
In this mode the settings will be locked as indicated below:
(a) Metering: Multi
(b) Sharpness: Normal
(c) Shooting (Continuous Shooting): Single
(d) Available Flash modes:
(1) Auto Flash
(2) Red-eye Reduction
(3) Flash Off
Night Portrait Mode
In this mode the settings will be locked as indicated below:
(a) Metering: Multi
(b) Sharpness: Normal
(c) Effect: Normal
(d) Shooting (Continuous Shooting): Single
(e) Available Flash modes:
(1) Auto Flash
(2) Red-eye Reduction
(3) Fill-in Flash
(4) Slow Sync
(5) Flash off
Sunset Mode
In this mode the settings will be locked as indicated below:
(a) Metering: Multi
(b) Sharpness: Normal
(c) Effect: Normal
(d) White Balance: Daylight
(e) Shooting (Continuous Shooting): Single
(f) Flash: Off
Fireworks Mode
In this mode the settings will be locked as indicated below:
(a) Metering: Multi
(b) Sharpness: Normal
(c) Effect: Normal
(d) White Balance: Daylight
(e) Shooting (Continuous Shooting): Single
(f) Flash: Off
15
Page 16

Beach Mode
In this mode the settings will be locked as indicated below:
(a) Metering: Multi
(b) Sharpness: Normal
(c) Effect: Normal
(d) Shooting (Continuous Shooting): Single
(e) Available Flash modes:
(1) Auto Flash
(2) Red-eye Reduction
(3) Flash off
Landscape Mode
In this mode the settings will be locked as indicated below:
(a) Metering: Multi
(b) Sharpness: Normal
(c) Effect: Normal
(d) Shooting (Continuous Shooting): Single
(e) Available Flash modes:
(1) Auto Flash
(2) Red-eye Reduction
(3) Flash Off
Night Landscape Mode
In this mode the settings will be locked as indicated below:
(a) Metering: Multi
(b) Sharpness: Normal
(c) Effect: Normal
(d) White Balance: Auto
(e) Photo Frame: Off
(f ) Shooting (Continuous Shooting): Single
(g) Available Flash modes:
(1) Slow Sync
(2) Flash Off
Backlight Mode
In this mode the settings will be locked as indicated below:
(a) Metering: Multi
(b) Sharpness: Normal
(c) Effect: Normal
(d ) Shooting (Continuous Shooting): Single
(e) Flash: Fill-in
Candle Light Mode
In this mode the settings will be locked as indicated below:
(a) Metering: Multi
(b) Sharpness: Normal
(c) Effect: Normal
(d) White Balance: Daylight
(e) Shooting (Continuous Shooting): Single
(f) Flash: Off
16
Page 17

Auction Mode
In this mode the settings will be locked as indicated below:
(a) Metering: Multi
(b) Sharpness: Normal
(c) Effect: Normal
(d) Shooting (Continuous Shooting): Single
(e) Flash: Off
17
Page 18

6. Menu Mode
Mode Set
Here you can select the scene mode from the following options:
) Sunset
(
) Auto
(
) Program
(
) Portrait
(
) Landscape
(
) Night Portrait
(
) Night Landscape
Image Size (Default: 8M)
This feature is for you to select the image resolution.
( 8M ) 3264 x 2448
( 5M ) 2592 x 1944
( 3M ) 2048 x 1536
( 1M ) 1280 x 960
Metering (Default: Multi)
The Metering Setting allows you to obtain superior exposure conditions and to capture a
brighter picture.
Multi Metering (
Exposure will be evaluated according to the average of the available light sources in the
image area. This is suitable for general use.
Spot Metering (
If the subject is against the light source or has little contrast, you can use this function to
have the subject made brighter.
)
)
Sharpness (Default: Normal)
This effect makes the edges of the captured image look smoother,
SOFT
NORMAL
VIVID
Quality (Default: FINE)
This feature allows you to select image quality for photo & video from the following options.
(
) S. FINE ( Super Fine )
(
) FINE
(
) NORMAL
making it suitable for image editing on PC.
This effect emphasizes the edges, making the captured image
suitable for printing.
This effect emphasizes the edges.
The captured image looks sharper but may result in more image
noise.
Shooting (Continuous) (Default: Single)
1. SINGLE ( ): Single Image capture.
2. CONTINUOUS (
shooting function and release to end.
Note:
): Press and hold down the Shutter Button to start the continuous
(
(
) Backlight
(
) Fireworks
(
) Candle Light
(
) Beach
(
) Auction
18
Page 19

The Continuous Shooting function will not be cancelled until “ Single" is selected.
Effect (Default: Normal)
NORMAL
B&W
SEPIA
NEGATIVE
No special effect is added to the picture.
Turns the image black and white.
Gives the image a yellowish brown tone.
Gives the image a negative photo effect.
OSD Information (Default: Detail)
There are 5 options for the OSD information.
1. OFF: No OSD information is displayed.
2. BASIC: Only basic information is displayed.
3. DETAIL: Detailed information is displayed.
4. GRID 3X3: Grid lines for 9 grids will show on the LCD display for you to compose an
image.
5. GRID 6X4: Grid lines for 24 grids will show on the LCD display for you to compose an
image.
Note:
Select "OFF" to cancel the grid lines if you prefer not to use them for the next image.
Face Detection (Default: On)
What You Should Know Before Using Face Detection
Face Detection allows you to focus on human faces. It is effective with the camera held
horizontally or vertically.
• Face Detection can only be used for still images.
• Face Detection is effective within a range of 2.5m.
Subjects not suitable for Face Detection:
1. A face that is obscured by glasses, a hat or hair.
2. A person who is turned sideways, or who has their head turned.
3. A subject who is too far away to distinguish a face.
19
Page 20

7. Movie Clip Mode
Size
The video size options provided are as follows:
1.
2.
3.
Metering
The Metering Setting allows you to obtain superior exposure conditions and to capture a
brighter picture.
Multi Metering:
Press the ( ) Button on the camera to switch to Movie Clip Mode. Press the Menu Button,
then select Metering Mode. The Exposure will be evaluated according to the average of the
available light sources in the image area. This is suitable for general use.
Spot Metering:
Press the ( ) Button on the camera to switch to Movie Clip Mode. Press the Menu Button,
then select Metering Mode. If the subject is against the light source or has little contrast, you
can use this function to have the subject made brighter.
Effect
NEGATIVE
OSD Information
There are 3 options for the OSD information.
1. OFF : No OSD information is displayed.
2. BASIC : Only basic information is displayed.
3. DETAIL : Detailed information is displayed.
720 x 480
640x 480
320 x 240
NORMAL
B&W
SEPIA
No special effect is added to the picture.
Turns the image black and white.
Gives the image a yellowish brown tone.
Gives the image a negative photo effect.
20
Page 21

8. Voice Recording Mode
1. Press the Mode Button and select the Voice Recording Mode (
2. Press the Shutter Button to start recording and press the Shutter Button again to stop
recording.
3. Press the Play / Pause Button (
the Play / Pause Button again to continue recording.
) during recording to pause recording and press
).
21
Page 22

9. Playback Mode
Protect
Protecting Selected Image(s)
1. Press the Menu Button and select "PROTECT".
2. Choose "SELECT" and press the Menu Button to confirm the request.
3. Choose one image and press the T Button (
4. (
5. Press the Menu Button to confirm the protection of the selected image(s).
6. To cancel the protection, press the T Button (
7. Press the Shutter Button (
Protecting All Images
1. Press the Menu Button and select "PROTECT"..
2. Select "ALL" and press the Menu Button to confirm.
3. To cancel the protection, press the T Button (
) will appear on the LCD when a file is protected.
)( ).
) or W Button ( ).
) to return to "Playback Mode".
) and W Button ( ).
Slide
Operation Steps
1. MENU
2.
X
or W
3.
or T
S
SHOW: This option allows you to start the slide show after you have made the INTERVAL
and EFFECT settings.
Here you can also choose whether to play the slide show once or repeatedly.
INTERVAL: This option allows you to select the interval time between each still image.
EFFECT: This option allows you to select the effects of the slide show. There are 5 effects to
choose from.
Note:
After having completed setting up INTERVAL and EFFECT, enter SHOW to select PLAY /
REPEAT to start the slide show.
22
Page 23

Delete
Operation Steps
1. MENU
2.
X
or W
3.
S
or T
There are 2 ways to DELETE images:
1. Press the Delete / Exposure Button (
2. Select "Delete" on the display to delete the image or select "Cancel" to cancel the
request.
Deleting All Images
1. Press the Menu Button and select "DELETE".
2. Select "ALL" and press the Menu Button.
3. Select "DELETE" to confirm the file deleting request or select "CANCEL" to cancel the
request.
4. Press the Menu Button again to proceed.
)
DPOF
Operation Steps
1. MENU
2.
or W
X
3.
S
or T
This function can only be used when a memory card is inserted.
This option allows you to store the number of copies to print (MAX. 30 pcs) on your memory
card.
[ONE PIC] - specifies the number of copies for a selected image.
[ALL PICS] - specifies the number of copies for all pictures apart from movie clips and voice
recording files.
Note:
You cannot see the "PRINT" function on the LCD display if a memory card is not inserted.
Copy To Card
Operation Steps
1. MENU
2.
X
or W
3.
S
or T
This function allows you to copy the images stored in the internal flash memory onto a
memory card.
23
Page 24

Resize
Operation Steps
1. MENU
2.
X
or W
3.
S
or T
This function allows you to resize a still image.
1. Select the image you want to resize
2. Press the Menu Button and select “RESIZE”.
3. Select the image size you prefer.
4. You can choose your own image as the start-up image by selecting “USER IMAGE 1” &
“USER IMAGE 2”.
Note:
To set the “USER IMAGE 1” & “USER IMAGE 2” as the start-up image please refer to “Startup image” under Set Up Mode
Rotate
Operation Steps
1. MENU
2.
X
or W
3.
S
or T
This setting allows you to rotate the image RIGHT 90°, LEFT 90°, 180°, HORIZONTAL and
VERTICAL.
1. Select the image you want to rotate.
2. Press Menu Button and select "ROTATE".
3. Select the rotation you prefer and press the Menu Button.
4. After rotating, the image will be stored as a new image.
Effect
Operation Steps
1. MENU
2.
X
or W
3.
or T
S
This function allows you to apply a special effect to an image.
1. Select the image you want to apply a special effect to.
2. Press the Menu Button and select "EFFECT".
3. Select the special effect you prefer and press the Menu Button.
4. The image with the special effect will be stored as a new image.
24
Page 25

10. Set Up Mode
You can enter the SETUP Mode by pressing the Menu Button and selecting SETUP.
Operation Steps
1. MENU
2.
X
or W
3.
or
S
T
1. LCD
2. S. IMAGE
3. S. SOUND
4. SH. SOUND
5. SYS. VOLUME
6. Q.VIEW
7. PWR SAVE
8. IMPRINT
9. DATE &TIME
10. LANGUAGE
11. FILE
12. USB
13. FREQUENCY
14. RESET ALL
15. FORMAT
25
Page 26

LCD
Start-up Image
Start Sound
Shutter Sound
Power Save
Language
Sys Vol
Imprint
File
Quick View
Date & Time
USB
Frequency
Reset All
26
Format
Page 27

11. PC Connection
Computer / Notebook Connection
When the USB cable is connected to a Computer / Notebook / Disk Drive while the camera is
on, the camera will automatically go to the PC mass storage Mode from any working mode.
The display will turn off. In this Mode, you can download images to your computer.
Computer
27
Page 28

12. Specifications
Image Sensor
Lens
LCD Display 2.4" Color LTPS LCD
Flash Modes Auto, Auto & Red Eye Reduction, SlowSync, Fill-in
Effect Normal, Sepia, Negative, B&W
White Balance Auto, Daylight, Cloudy, Fluorescent, Tungsten,
Voice Recording Voice Recording (depends on capacity)
Date Imprinting Date, Date & Time, Off (user selectable)
Shooting
Photo Frame 9 frame options
Storage
Still Image
Self-Timer 10 sec. , 2 sec., Double, with LED indicator
Red-Eye Removal Supported
Face Detection Automatically finds faces and optimizes focus, AWB
Scene Mode Auto, Program, Portrait, Landscape, Night Portrait,
Movie Clip
Media Internal memory: 32M
File Format
Type 1/2.5″ 8M CMOS Sensor
Effective
Pixels
Lens Type Optical 3X Zoom (35mm Film Equivalent: 36~108
F No. F2.8~F4.8
Digital Zoom Still Image mode: 1.0X ~ 5.0X
Type Auto Focus, Face Recognition AF Focusing
Range Macro: 5cm~40cm (Wide only)
Type Mechanical and Electrical Shutter Shutter
Speed Normal: 1/2 sec. – 1/2000 sec.,
Control Programmed AE Exposure
ISO
Equivalent
Mode Single Image, Continuous Shooting
Image Size [8M]: 3264 X 2448 pixels
Image Quality Super Fine, Fine, Normal
Movie Size 720 x 480 (D1), 640 x 480 (VGA), 320 x 240
Frame Rate 30fps
Still Image JPEG (DCF), EXIF 2.2, DPOF 1.1, PictBridge 1.0
Movie Clip AVI, (Motion JPEG format)
Audio Audio for Voice Recording and Memo: WAV
8.0 Mega Pixels (3,264 × 2,448)
mm)
Play mode: 1.0X ~ 8.0X (depends on image size)
Normal: 40cm ~ infinity
Night Scene: 4 sec. - 1/2000 sec.
Auto, 100, 200, 400, 800
Flash, Flash Off
Sunset, Custom
Voice Memo in Still Image (max. 10 sec.)
[5M]: 2592 X 1944 pixels
[3M]: 2048 X 1536 pixels
[1M]: 1280 X 960 pixels
and exposure.
Night Landscape, Sunset, Backlight, Fireworks,
Candle-light, Beach, Auction
(QVGA)
External memory: supporting SD card (up to 4G,
SDHC supported)
28
Page 29

Interface Digital output connector: USB 2.0 (High Speed)
Other interface: MIC-in,
Power Source 2 x AA alkaline, Ni-MH Battery
Dimensions (WxHxD) 91.7 x 30 x 61.5 mm
Weight Approx.120g (without battery and card)
Camera
Driver
Application Arcsoft MediaImpression
Windows 2000/ME/XP, Vista32/64 Software
29
Page 30

13. Customer care
Customer care
More information on the complete AgfaPhoto digital camera product range can be found
under www.plawa.com / www.plawausa.com
Service & Repair (USA/ Canada):
1-866 475 2605
www.plawausa.com
Support Service (USA/ Canada)
Support-apdc@plawausa.com
Service & Repair Hotline (EU):
00800 752 921 00 (from a landline only)
Service & Support Hotline (Germany):
0900 1000 042 (1.49 Euro/ min. from a German landline only)
Online Service / International contact (Not for USA/ Canada):
support-apdc@plawa.com
Manufactured by
plawa-feinwerktechnik GmbH & Co. KG
Bleichereistraße 18
73066 Uhingen
Germany
AgfaPhoto is used under license of Agfa-Gevaert NV & Co. KG. Agfa-Gevaert NV & Co. KG.
does not manufacture this product or provide any product warranty or support.
For service, support and warranty information, contact the distributor or manufacturer.
Contact: AgfaPhoto Holding GmbH, www.agfaphoto.com
30
Page 31

Disposal of Waste Equipment by Users in Private
Households in the European Union
This symbol on the product or on its packaging indicates that this product must not be
disposed of with your other household waste. Instead, it is your responsibility to dispose of
your waste equipment by handing it over to a designated collection point for the recycling of
waste electrical and electronic equipment. The separate collection and recycling of your
waste equipment at the time of disposal will help to conserve natural resources and ensure
that it is recycled in a manner that protects human health and the environment. For more
information about where you can drop off your waste equipment for recycling, please contact
your local city office, your household waste disposal service or the shop where you
purchased the product.
FCC Compliance and Advisory
This device complies with Part 15 of the FCC Rules. Operation is subject to the following two
conditions: 1.) this device may not cause harmful interference, and 2.) this device must
accept any interference received, including interference that may cause unsatisfactory
operation. This equipment has been tested and found to comply with the limits for a Class B
peripheral, pursuant to Part 15 of the FCC Rules. These limits are designed to provide
reasonable protection against harmful interference in a residential installation. This
equipment generates, uses, and can radiate radio frequency energy and, if not installed and
used in accordance with the instructions, may cause harmful interference to radio
communication. However, there is no guarantee that interference will not occur in a particular
installation. If this equipment does cause harmful interference to radio or television reception,
which can be determined by turning the equipment off and on, the user is encouraged to try
to correct the interference by one or more of the following measures.
Reorient or relocate the receiving antenna.
•
• Increase the separation between the equipment and receiver.
• Connect the equipment to an outlet on a circuit different from that to which the receiver is
connected.
• Consult the dealer or an experienced radio/TV technician for help.
Any changes or modifications not expressly approved by the party responsible for
compliance could void the user's authority to operate the equipment. When shielded interface
cables have been provided with the product or when specified additional components or
accessories have elsewhere been designated to be used with the installation of the product,
they must be used in order to ensure compliance with FCC regulations.
31
 Loading...