


2
Front |
Back |
|
|
|
|
English |
|
|
|
|
|
|
|
|
|
|
|
|
|
|
|
|
|
|
||
Table of contents |
|
|
. . . . . . . . . |
|
. |
|
|
. 4. . |
||||||||||||
Unpacking and assembly. . . . . . . . . . . . . . . . . . . . . . . . . . . . |
4 |
. . . . |
|
|
|
|||||||||||||||
Charging .. . . . . . . . . . . . . . . . . . . . . . . . . . . . . . . . . . . . . . . . . . |
. 5 |
.. .. .. .. .. .. .. .. .. .. |
.. .. .. .. .. .. |
.. |
.. |
|
.. |
.. |
.. |
|
.. |
.. |
.. |
|
.. |
.. |
|
.. 5 |
||
Vacuuming.. . . . . . . . . . . . . . . . . . . . . . . . . . . . . . . . . . . . . . . . |
. 6 |
. . . . . . . . . . . . . . . . .6 . |
||||||||||||||||||
Emptying and cleaning.. .. .. .. .. .. .. .. .. .. .. .. .. .. .. .. .. .. .. .. .. .. .. .. .. .. .. .. .. .. 7 |
.. . |
. . . . |
. |
. |
. |
. |
. |
. |
. |
. |
. |
. |
. |
. |
. |
. |
.7 . |
|||
Cleaning brush roll, hose and wheels.. . . . . . . . . . . . . . . |
. 8 |
, . . |
|
|
|
|
|
|
|
.8. |
||||||||||
Removing the batteries .. . . . . . . . . . . . . . . . . . . . . . . . . . . . |
11 |
.. .. .. .. .. .. .. .. |
..... ... ..... ... ..... ... ..... ... ..... |
|
... .. |
|
11 |
|||||||||||||
Safety precautions.. . . . . . . . . . . . . . . . . . . . . . . . . . . . . . . . . |
12 |
. . . . . |
|
. 12. . |
||||||||||||||||
Consumer information.. . . . . . . . . . . . . . . . . . . . . . . . . . . . . |
13 |
.. .. .. .. .. .. .. .. |
.. .. .. .. .. .. .. |
|
.. |
.. |
.. |
|
.. |
.. |
.. |
|
.. |
|
.. .. |
|
|
13 |
||
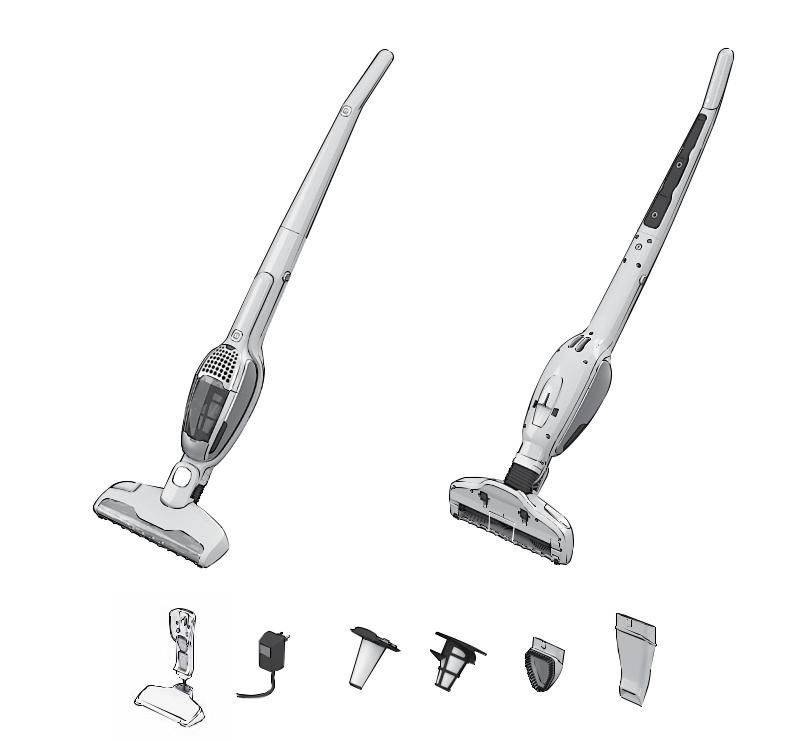
Features/Accessories |
|
/ |
|
|
|
|
|
|
|
|
|
|
|
|
|
|
|
|
||
1 |
On/off button |
|
1 |
|
|
|
|
|
|
|
|
|
|
|
|
|
|
|
|
|
2 |
On/off button, hand unit |
|
2 |
, |
|
|
|
|
|
|
|
|
|
|
|
|
|
|
|
|
3 |
Handle |
|
3 |
|
|
|
|
|
|
|
|
|
|
|
|
|
|
|
|
|
4 |
Locking screw |
|
4 |
|
|
|
|
|
|
|
|
|
|
|
|
|
|
|
|
|
5 |
Release button, hand unit |
|
5 |
, |
|
|
|
|
|
|
|
|
|
|
|
|
|
|
|
|
6 |
Charging station, wall unit |
|
6 |
, |
|
|
|
|
|
|
|
|
|
|
|
|
|
|
|
|
7 |
Charging station, floor unit |
|
7 |
, |
|
|
|
|
|
|
|
|
|
|
|
|
|
|
|
|
8 |
Adaptor |
|
8 |
|
|
|
|
|
|
|
|
|
|
|
|
|
|
|
|
|
9 |
Fine filter (inner filter) |
|
9 |
( ) |
|
|
|
|
|
|
|
|
|
|
|
|
|
|
|
|
10 |
Pre filter (outer filter) |
|
10 |
( ) |
|
|
|
|
|
|
|
|
|
|
|
|
|
|
|
|
11 |
Release button, dust container |
|
11 |
, |
|
|
|
|
|
|
|
|
|
|
|
|
|
|
|
|
12 |
Battery display, Lithium version* |
|
12 |
, * |
|
|
|
|
|
|||||||||||
13 |
Dust container |
|
13 |
|
|
|
|
|
|
|
|
|
|
|
|
|
|
|
|
|
14 |
Vacuum cleaner lid |
|
14 |
|
|
|
|
|
|
|
|
|
|
|
|
|
|
|
|
|
15 |
Brush |
|
15 |
|
|
|
|
|
|
|
|
|
|
|
|
|
|
|
|
|
16 |
Crevice nozzle |
|
16 |
|
|
|
|
|
|
|
|
|
|
|
|
|
|
|
|
|
17 |
Brush roll release button* |
|
17 |
* |
|
|
|
|
|
|
|
|
|
|
|
|
|
|
|
|
18 |
Hatch cover for brush roll* |
|
18 |
* |
|
|
|
|
|
|
|
|
|
|
|
|
|
|
|
|
19 |
Brush roll |
|
19 |
|
* |
|
|
|
|
|
|
|
|
|
|
|
|
|
|
|
20 |
BRUSHROLLCLEAN™ button* |
|
20 |
BRUSHROLLCLEAN™ |
|
|
|
|
|
|
|
|
|
|
|
|
|
|
|
|
21 |
Nozzle front lights |
|
21 |
|
* |
|
|
|
|
|
|
|
|
|
|
|
||||
22 |
Charging indicator, NiMH version* |
|
22 |
, NiMH |
|
|
|
|
|
|
|
|
|
|
|
|||||
23 |
Parking strip |
|
23 |
|
|
|
|
|
|
|
|
|
|
|
|
|
|
|
|
|
* Certain models only |
* |
...
.
Content / / 3
|
|
|
|
|
|
|
|
|
GB |
|
. . . . . |
|
|
|
|
|
|
|
. . . |
||
.. . . . . . . . . . . . . . . . . 4.. . |
||||||||||
.. . . . . . . . . . . . . . . . |
. . . . . |
. |
. |
5.. |
. . . . |
|||||
. . . |
. |
|
. |
|
|
|
|
|
KOR |
|
.. . |
. |
. |
|
. . . . . . . . . . . . . |
. . . . . |
. |
. |
6.. |
. . . . |
|
. . . |
|
|
|
. . . . . |
. |
. |
7. . |
. CHS. . . |
||
. . . . . . . . . . . . . |
||||||||||
. . |
|
|
|
|
|
|
|
|
|
|
. . . . . . . . . . . . . . 8. . |
. . . |
|||||||||
. . . . . . . . . . . . . . |
. . . . . |
. .11. . |
. . . . |
|||||||
. . . . |
|
|
|
|
|
|
|
CHT |
||
|
|
|
|
|
|
|
. . . . |
|||
.. . . . . . . . . . . . . . . . . . 12.. . |
||||||||||
. . . . . . . . . . . . . . |
. . . . . |
. .13. . |
. . . . |
|||||||
|
|
|
|
|
|
|
|
|
|
THA |
/ |
|
|
|
|
|
IND |
||||
1 |
|
|
|
|
|
|
||||
|
|
|
|
|
||||||
2 |
|
|
|
|
|
|
||||
|
|
|
|
VIE |
||||||
3 |
|
|
|
|
|
|
|
|
||
4 |
|
|
|
|
|
|
||||
5 |
|
|
|
|
|
|
||||
6 |
|
|
|
|
|
|
||||
7 |
|
|
|
|
|
|
||||
8 |
|
|
|
|
|
|
|
|||
9 |
|
|
|
|
|
|
||||
12*
17*
18*
20BRUSHROLLCLEAN™ *
22*
*
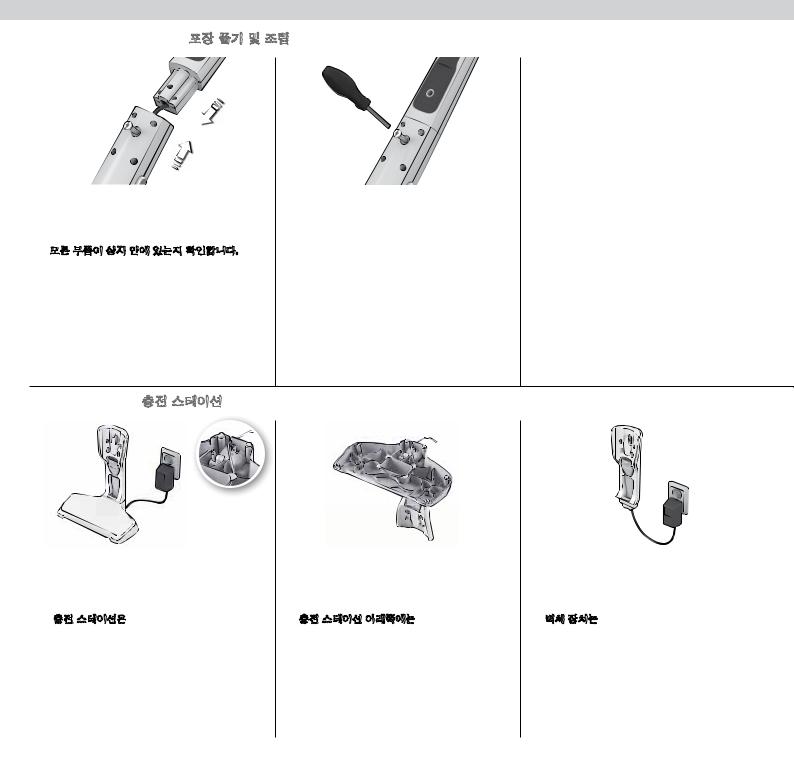
4 Unpacking and assembly / /
Unpacking and assembly / /
1.Check that all parts are in the box. Fit the handle by carefully inserting it into the lower main body.. Make sure that the cable does not jam..
1.....
..
1. 地插入吸尘器的下部主体。 确保线缆没有纠缠或阻塞。
2.Secure the handle by tightening the locking screw supplied.. Use a screwdriver or a coin..
2. 고정시킵니다....
2. 或硬币。
Charging station / /
1. |
Position the charging station well away from |
2. |
On the bottom of the charging station there is a |
3. |
The wall unit can also be mounted on a wall.. |
|
heat sources, direct sunlight or wet places.. Insert |
|
hollow space where unused cable can be wound.. |
|
Separate it from the floor unit.. Always ensure that |
|
the adaptor into the mains and connect it to the |
|
|
|
the wall can withstand the weight of Ergorapido.. |
|
charging station.. |
|
|
|
|
1. |
, |
2. |
|
3. |
.. |
|
.. |
|
|
|
.. Ergorapido |
|
.. |
|
.. |
|
.. |
1. |
|
2. |
|
3. |
|
|
|
|
|
|
|
|
|
|
|
|
Ergorapido |
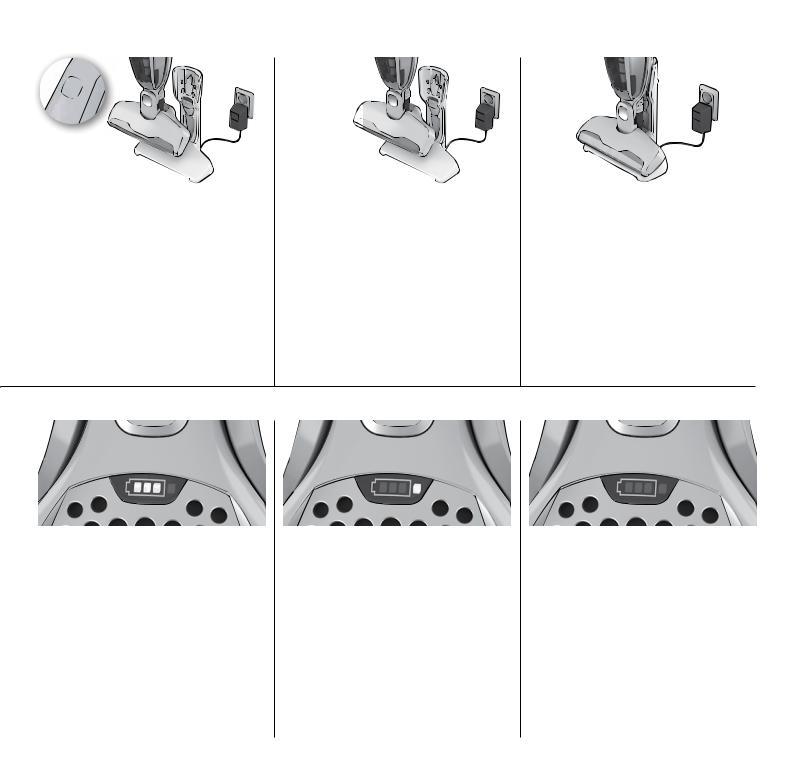
Charging / / 5
Charging / /
1.Ergorapido: The indicator light will come on once the Ergorapido is positioned correctly in the charging station.. When fully charged, the LED will be on for a few seconds per minute..
1.Ergorapido: Ergorapido.. ,LED 1(NiMH )
1.Ergorapido: LED
2.Ergorapido Plus: The battery capacity display lights will come on one after another as the machine is charging after being positioned correctly in the charging station..
2.Ergorapido Plus: .. ()
2.Ergorapido
3.When fully discharged, approximately 16 hours’ charging is required to regain full battery capacity (4 hours for Ergorapido Plus).. Leave Ergorapido on charge when not used to maintain battery performance..
3.,16
(Ergorapido Plus 4 )..Ergorapido..
3.16Ergorapido 4 Ergorapido
Battery capacity display* / * / *
1. 3 blue lights: battery capacity >75% |
2 |
If a red light is lit: Unit is too hot.. Clean filters, |
4. |
When fully charged: LED’s will turn off and |
|
|
2 blue lights: battery capacity 75-25% |
|
brush roll, hose and put on charge.. |
|
go into standby mode = much lower power |
|
1 blue light: battery capacity <25% |
3. |
If a red light is blinking: Motor is overloaded.. |
|
. |
|
|
consumption, indicated with one blink per minute.. |
|||
|
1 blue blinking light: battery capacity – empty |
|
Clean brush roll.. |
5. If red and blue light are blinking: please refer to |
|
|
|
|
|
||
|
|
|
|
|
page 9.. |
1. |
3 : 75% |
2 |
: |
4. |
: LED |
|
2 : 75-25% |
|
.. , |
|
.. |
|
1 : 25% |
|
.. |
|
1 .. |
|
1 : - |
3. |
: |
5. |
: 9 |
|
|
|
.. .. |
||
|
|
|
.. |
||
|
|
|
|
|
|
1. |
3 >75% |
2 |
|
4. |
LED |
|
2 75-25% |
|
|
|
= |
|
1 <25% |
3. |
|
5. . |
|
|
1 - |
|
|
||
|
|
|
9 |
||
|
|
|
|
|
|
|
|
|
*Ergorapido Plus / *Ergorapido ZB2904X, ZB2904B, ZB2904C, ZB2941, ZB2942, ZB2943 |
||
GB
KOR CHS
CHT THA IND
VIE

6 Vacuuming / /
Vacuuming floors and carpets / /
1. |
You should regularly check that the nozzle |
2. |
|
3. |
|
|
|
|
|
|
|
|
|
|
|
|
|
|
|
|
|
|
|
|
|
|
|
|
|
|
|
|
|
|
|
|
|
|
|
||||
Start Ergorapido by pushing the on/off button.. |
Adjust the power level by pushing the lower part |
||||||||||||||||||||
|
wheels and the brush roll are clean in order to |
|
|
|
of the on/off button.. |
||||||||||||||||
|
avoid scratching sensitive floors.. |
|
|
|
|
|
|
|
|
|
|
|
|
|
|
|
|
|
|
|
|
1. |
|
2. |
Ergorapido .. |
3. |
|
||||||||||||||||
|
.. |
|
|
|
.. |
||||||||||||||||
1. |
|
2. |
Ergorapido |
3. |
|
||||||||||||||||
|
|
|
|
|
|
|
|
|
|
|
|
|
|
|
|
|
|
|
|
|
|
|
|
|
|
|
|
|
|
|
|
|
|
|
|
|
|
|
|
|
|
|
|
Vacuuming furniture, car seats etc. / /
1.Remove the hand unit by pressing the release buttons. The crevice nozzle and small brush are stored in the charging station..
1.....
1. 嘴和小刷头存放在充电站中。
2. |
Attach the crevice nozzle to facilitate cleaning |
3. |
Start/stop the hand unit by pushing the start |
|
of areas difficult to reach, or attach the brush for |
|
button.. |
|
dusting.. |
|
|
2. |
|
3. |
|
|
|
|
.. |
|
.. |
|
|
2. |
|
3. |
/ |
|
|
|
|

Emptying and cleaning / / 7
Emptying and cleaning |
|
|
|
Ergorapido’s dust container must be emptied |
|
|
|
regularly and the dust container and the filters need |
|
|
|
to be cleaned to maintain a high suction power.. |
|
|
|
Never wash dust containers or filters in a dishwasher.. |
|
|
|
|
|
|
|
Ergorapido |
|
|
|
|
|
|
|
.. |
|
|
|
|
1. |
Quick emptying of the dust container. Open the |
2. Emptying of the dust container. Remove the |
.. |
|
vacuum cleaner lid.. Clean the dust container by |
filters, empty the contents into a dustbin.. Return |
|
|
placing the hose of another vacuum cleaner at the |
filters and click dust container back into place.. |
|
|
opening.. |
|
|
.. |
2. .. |
|
|
1. |
||
Ergorapido |
|
.. |
.. |
|
|
.. |
.. |
|
|
|
|
|
1. |
|
2. |
|
|
|
|
3. |
Quick cleaning of the fine filter. (Recommended |
4a. Cleaning of dust container and filters. |
4b. Separate both filters. Dust container and filters |
|
every cleaning).. Release the dust container, pull/ |
(Recommended every 5th cleaning).. Release dust |
can be shaken clean or rinsed in warm water |
|
release spring 5-6 times to dislodge dust.. |
container, take out both filters by pressing release |
(never in dishwasher).. All parts must be dry before |
|
|
buttons.. |
reassembled in reverse order.. |
3. |
.. ( |
4a.. .. |
4b.. .. |
|
).. |
( 5 ).. , |
.. |
|
5 ~ 6 |
.. |
( ).. |
|
.. |
|
.. |
3. |
|
4a. |
4b. |
|
/ 5-6 |
5 |
|
|
|
|
|
|
|
|
|
GB
KOR CHS
CHT THA IND
VIE
8 Cleaning / /
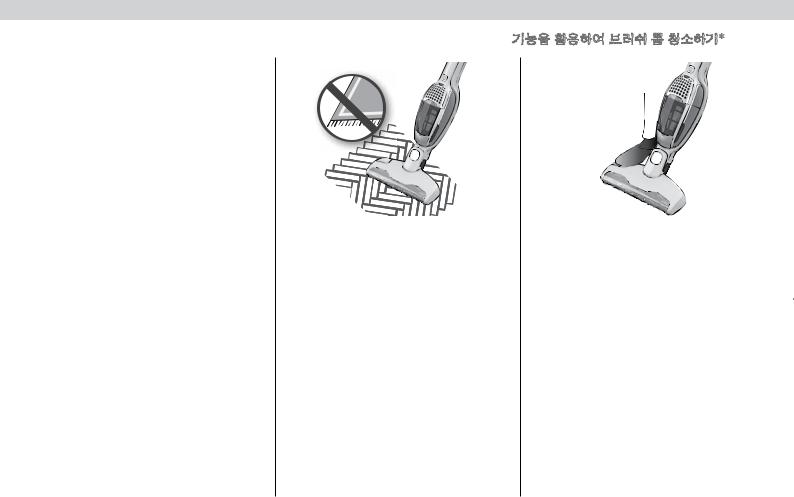
Cleaning the brush roll with the BRUSHROLLCLEAN™ function* / BRUSHROLLCLEAN™ * /BRUSHROLLCLEAN™ * *
The brush roll, the hose and the wheels may need to be cleaned if they become blocked or jammed for any
reason..
Some Ergorapido models are equipped with BRUSHROLLCLEAN™ – a brush cleaning function that
helps to keep a clean brush easily..
Please note that the BRUSHROLLCLEAN™ function might not be able to remove thick threads, wires or thick carpet fibres caught in the brush roll..
It is recommended to use this function once a week.. For best results use the BRUSHROLLCLEAN™ function when the Ergorapido is fully charged..
, |
1. Make sure the cleaner is switched on and |
2. Press the BRUSHROLLCLEAN™ button with your |
||
.. |
|
stands on hard even surface.. Do not use the |
|
foot while the cleaner is switched on.. Hold for |
Ergorapido BRUSHROLLCLEAN™ |
|
BRUSHROLLCLEAN™ function on deep carpets or |
|
ca.. 5 seconds or until all dirt and hair is removed.. |
.. |
|
long haired rugs.. |
|
Release the button.. |
.. |
|
|
|
During BRUSHROLLCLEAN™ use the sound level |
BRUSHROLLCLEAN™ |
|
|
|
will be increased which is normal.. |
|
|
|
|
|
.. |
1. |
|
2. |
BRUSHROLLCLEAN™ |
1 .. |
|
.. |
|
.. 5 |
BRUSHROLLCLEAN™ |
|
BRUSHROLLCLEAN™ |
|
|
Ergorapido |
|
.. |
|
.. .. |
.. |
|
|
|
BRUSHROLLCLEAN™ |
|
|
|
|
.. |
|
|
|
|
|
|
1. |
|
2. |
|
Ergorapido BRUSHROLLCLEAN™ |
|
|
|
BRUSHROLLCLEAN™ 5 . |
|
|
BRUSHROLLCLEAN™ |
|
. |
BRUSHROLLCLEAN™ |
|
|
|
. |
|
|
|
|
BRUSHROLLCLEAN™ |
|
|
|
|
|
BRUSHROLLCLEAN™ . |
|
|
|
|
Ergorapido |
|
|
|
|
|
|
|
|
|
* ZB2932, ZB2933, ZB2934, ZB2935, ZB2941, ZB2942, ZB2943
Cleaning / / 9
Cleaning the brush roll with the BRUSHROLLCLEAN™ function* / BRUSHROLLCLEAN™ * /BRUSHROLLCLEAN™ * *
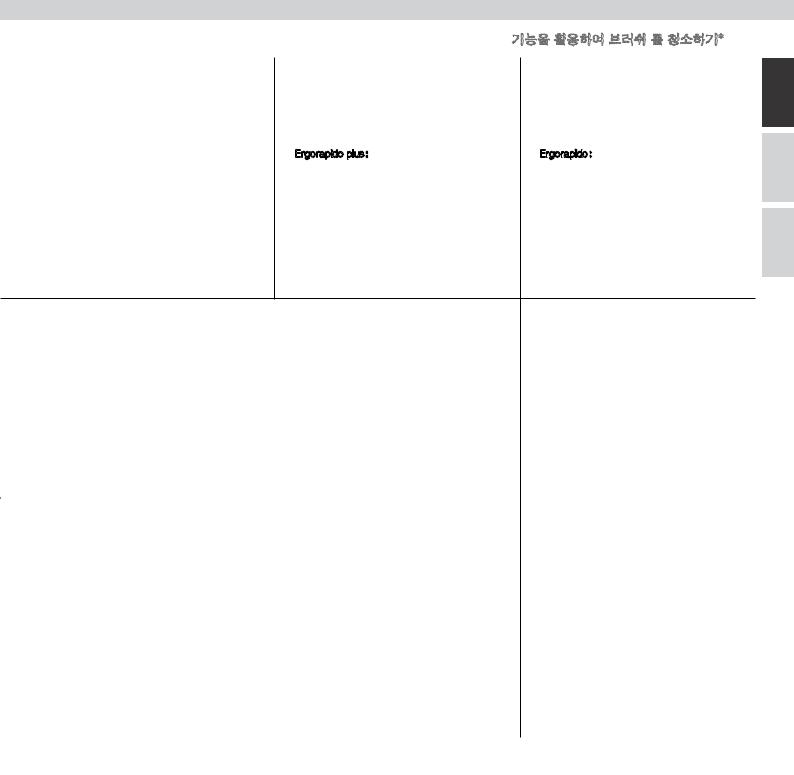
The BRUSHROLLCLEAN™ function is equipped with |
1. Ergorapido plus: |
2. Ergorapido: |
|
an overheating protection.. It will deactivate the |
If - while holding the BRUSHROLLCLEAN™ button |
If - while holding the BRUSHROLLCLEAN™ button |
|
brush roll if the BRUSHROLLCLEAN™ function has |
pressed down – the brush stops rotating, the |
pressed down – the brush stops rotating and |
|
been activated for more than 30 sec (constant or |
nozzle front lights -switch off and the battery |
the nozzle front lights switch off, release the |
|
interrupted) within one discharging period.. |
indicator light blinks red and blue, release the |
BRUSHROLLCLEAN™ button.. |
|
BRUSHROLLCLEAN™ |
BRUSHROLLCLEAN™ button.. |
2. Ergorapido: |
|
1. Ergorapido plus: |
|||
.. |
BRUSHROLLCLEAN™ |
BRUSHROLLCLEAN™ |
|
BRUSHROLLCLEAN™ 30 ( |
, |
|
|
) |
, BRUSHROLLCLEAN™ |
, BRUSHROLLCLEAN™ |
|
.. |
.. |
.. |
|
|
1. Ergorapido |
2. Ergorapido |
|
BRUSHROLLCLEAN™ |
BRUSHROLLCLEAN™ |
BRUSHROLLCLEAN™ |
|
|
|
||
BRUSHROLLCLEAN™ . |
|||
BRUSHROLLCLEAN™ . |
BRUSHROLLCLEAN™ |
||
30 |
|||
|
|
||
|
|
||
|
|
When the button is released, the brush is rotating and the nozzle front lights are on again.. You can continue to use the Ergorapido for vacuuming as usual.. The BRUSHROLLCLEAN™ function will remain disabled.. To reset, the Ergorapido must be charged continuously for at least 10 minutes in the charging stand..
, .. Ergorapido.. BRUSHROLLCLEAN™.. , Ergorapido 10 ..
ErgorapidoBRUSHROLLCLEAN™ Ergorapido10
GB
KOR CHS
CHT THA IND
VIE
* ZB2932, ZB2933, ZB2934, ZB2935, ZB2941, ZB2942, ZB2943

10 Cleaning / /
Cleaning the brush roll / /
To remove thicker threads or wires as well as on models that are not equipped with the
BRUSHROLLCLEAN™, the brush should be cleaned according to the following instructions..
BRUSHROLLCLEAN™ ,..
号是否具有BRUSHROLLCLEAN™
1.First turn Ergorapido off. Push the brush roll release button.. The hatch cover will come slightly free and the brush roll can be removed..
1.Ergorapido .... ..
1.Ergorapido
2.Lift out the brush roll and clean it. Use a sharp object to remove threads.. Reassemble the roll, making sure it can spin freely.. Close hatch cover..
2..... ....
2. 动。合上刷辊盖。
Cleaning the hose and wheels / /
1. |
Loosen the catch and pull the hose from the |
2. |
If the wheels needs to be cleaned, remove them |
3. |
Remove objects that may have become jammed |
|
attachment.. Remove any debris.. Put the hose back, |
|
carefully by using a small screwdriver.. |
|
in the wheel shafts.. Reassemble the wheels by |
|
lock using the catch.. |
|
|
|
pressing them back into their tracks.. |
1. |
|
2. |
, |
3. |
.. |
|
.. .. |
|
.. |
|
|
|
.. |
|
|
|
.. |
1. |
|
2. |
|
3. |
|
|
|
|
|
|
|
Removing the batteries / / 11
Removing the batteries / /
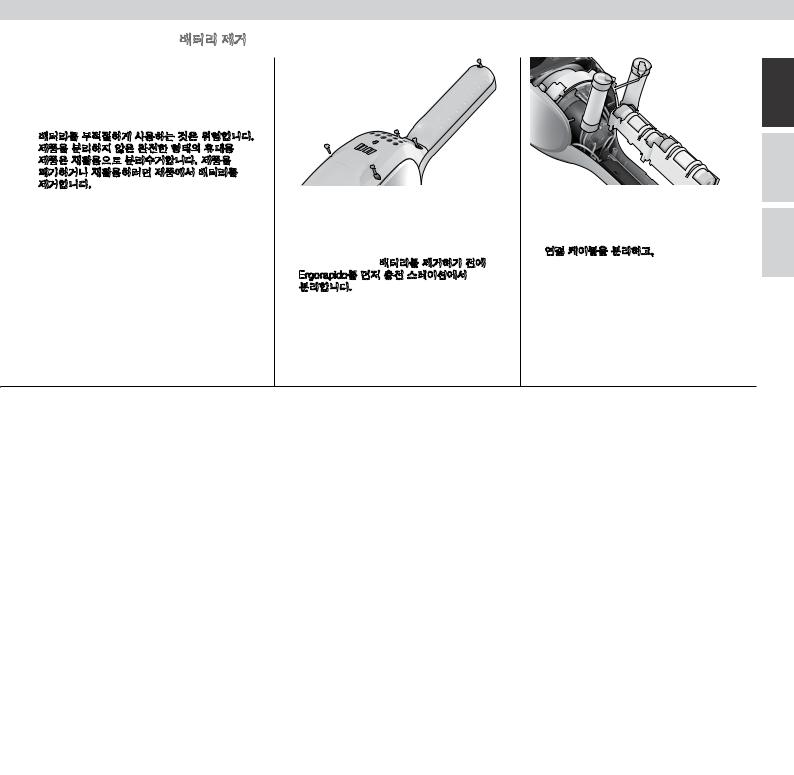
Improper handling of the batteries may be hazardous. Return the complete handheld unit to a recycling station. Batteries must be removed from the appliance before it is scrapped or recycled.
Never dispose used batteries with household waste..
......
않습니다..
1.Batteries should always be run flat before removed.. Ergorapido must be disconnected from the charging station when removing the batteries. Undo the screws.. Carefully lift the hood..
1... Ergorapido .. ....
Ergorapido
2.Cut the connecting cables, remove the batteries, put tape over the visible metal areas.. Place batteries in suitable packaging..
2., ,....
2. 包裹绝缘带。将电池放置在适当的包装中。
GB
KOR CHS
CHT THA IND
VIE
 Loading...