


|
|
|
|
|
|
|
|
|
|
|
|
|
|
|
|
|
|
|
|
|
|
|
|
|
|
|
|
|
|
|
|
|
|
|
|
|
|
|
|
|
|
|
|
|
|
|
|
|
|
|
|
|
|
|
|
|
|
|
|
|
|
|
|
|
|
|
|
|
|
|
|
|
|
|
|
|
|
|
|
|
|
|
|
|
|
|
|
|
|
|
|
|
|
English |
2–14 |
|
|
2–14 |
|
16–28 |
|||||||||||||||||||||||
|
||||||||||||||||||||||||||||||
|
Thank you for choosing an Electrolux UltraOne vacuum |
|
|
Electrolux UltraOne |
||||||||||||||||||||||||||
|
cleaner. These Operating Instructions cover all UltraOne |
|
. |
|
UltraOne |
|||||||||||||||||||||||||
|
models. This means that with your specific model, some |
|
. , |
/ |
||||||||||||||||||||||||||
|
accessories/features may not be included. In order to ensure |
|
|
Electrolux |
||||||||||||||||||||||||||
|
the best results, always use original Electrolux accessories. |
|
|
|
|
|
|
|
||||||||||||||||||||||
|
They have been designed especially for your vacuum cleaner. |
|
. |
|
|
|
|
|
|
|
|
|
|
|
|
|
||||||||||||||
|
|
|
|
|
|
|
|
|
|
|
|
|
|
|
|
|
|
|
|
|
|
|
|
|
|
|
||||
|
|
|
|
|
|
|
|
|
|
|
|
|
. |
|
|
|
|
|
|
|
|
|
|
|
|
|
|
|||
|
........................................................................ |
16–28 |
|
....................................................................... |
30-42 |
Bahasa Indonesia ........................................ |
30–42 |
|||||||||||||||||||||||
|
Electrolux UltraOne |
|
UltraOnTerima kasih Anda telah memilih pengisap debu Electrolux |
|||||||||||||||||||||||||||
|
UltraOne |
|
UltraOne. Petunjuk Pengoperasian ini mencakup semua model |
|||||||||||||||||||||||||||
|
/ |
|
UltraOne /UltrOne. Ini berarti, bahwa pada model tertentu, beberapa |
|||||||||||||||||||||||||||
|
|
|
aksesori/fitur mungkin tidak disertakan. Untuk mendapatkan |
|||||||||||||||||||||||||||
|
Electrolux |
|
|
hasil terbaik, gunakan selalu aksesori asli Electrolux. |
|
|
|
|
||||||||||||||||||||||
|
|
|
|
|
|
Aksesori tersebut dirancang khusus untuk penghisap debu |
||||||||||||||||||||||||
|
|
|
|
|
|
|
|
|
|
|
|
|
Anda. |
|
|
|
|
|||||||||||||
|
|
|
|
|
|
|
|
|
|
|
|
|
|
|
|
|
|
|
|
|
|
|
|
|
|
|
|
|||
|
|
|
|
|
|
|
|
|
|
|
|
|
|
|
|
|
|
|
|
|
|
|
|
|
|
|
|
|
|
|
|
|
|
|
|
|
|
|
|
|
|
|
|
|
|
|
|
|
|
|
|
|
|
|
|
|
|
|
|
|
|
|
|
|
|
|
|
|
|
|
|
|
|
|
|
|
|
|
|
|
|
|
|
|
|
|
|
|
|
|
|
|
|
|
|
|
|
|
|
|
|
|
|
|
|
|
|
|
|
|
|
|
|
|
|
|
|
|
|
|
|
|
|

2
14
12
|
13 |
|
15 |
1 |
2 |
|
||
|
|
|
11 |
|
3 |
10 |
|
4 |
|
|
5
16
9 8 7 6 4
17 |
18 |
19 |
20 |
25 |
21 |
22 |
23 |
24 |
26 |

Content 3
English |
|
|
|
|
|
|
||
|
|
|
|
|||||
Before starting |
|
|
|
|
|
|
||
• Unpack your UltraOne model and the Aeropro system and check that all accessories are |
|
• |
||||||
|
included*. |
|
|
|
|
*. |
|
|
• The Aeropro system consists of a hose, handle, tube and nozzle specifically designed |
|
• , , |
|
|
||||
|
for your UltraOne and which may vary from model to model. |
|
|
|
|
. |
|
|
• Read the Operating Instructions. |
|
|
|
• . |
|
|
||
• Pay special attention to the Safety advice chapter. |
|
|
|
• . |
|
|
||
Enjoy your Electrolux UltraOne! |
|
|
|
. |
|
|
||
Table of contents: |
|
|
|
|
|
|
||
How to use the vacuum cleaner. . . . . . . . . . . . . . . . . . . . . . . . . . |
. .4-5 |
|
|
. . . . . . . . . . . . . . . . .. . |
. |
4-5 |
||
Tips on how to get the best results . . . . . . . . . . . . . . . . . . . . . . . . . |
. 6-7 |
|
|
. . . . . . . . . . . . . . . .. . |
. |
6-7 |
||
Replacing the filters. . . . . . . . . . . . . . . . . . . . . . . . . . . . . . . . . |
.8-9 |
|
|
. . . . . . . . . . . . . . . . . . .. . |
. |
8-9 |
||
Cleaning the Aeropro nozzle and changing the battery in remote handle. . . . . . |
10-11 |
|
|
. .. . |
10-11 |
|||
Troubleshooting. . . . . . . . . . . . . . . . . . . . . . . . . . . . . . . . . . |
. 12 |
|
|
. . . . . . . . . . . . . . . . . . . . .. . |
. |
12 |
||
Safety advice . . . . . . . . . . . . . . . . . . . . . . . . . . . . . . . . . . . . |
. 13 |
|
|
. . . . . . . . . . . . . . . . . . . . . 13. . |
||||
Consumer information and sustainability policy. . . . . . . . . . . . . . . . . . . . . . . . . . . . . . . . . . . . . |
. . 14 |
|
|
. . . . . . . . . . . . . .. . |
. |
. 14 |
||
Description of your UltraOne: |
|
|
|
|
|
|
||
1 |
Display |
|
|
1 |
|
|
|
|
2 |
Hepa filter cover |
|
|
2 |
|
|
|
|
3 |
Hepa filter |
|
|
3 |
|
|
|
|
4 |
Parking slot |
|
|
4 |
/ |
|
|
|
5 |
Power cord |
|
|
5 |
|
|
|
|
6 |
Motor filter |
|
|
6 |
|
|
|
|
7 |
Motor filter holder |
|
|
7 |
|
|
|
|
8 |
S-bag® |
|
|
8 |
S-bag® |
|
|
|
9 |
Dust compartment cover |
|
|
9 |
|
|
|
|
10 |
Button for Aeropro 3in1 compartment and dustbag comparment |
|
|
10 |
3in1 |
|
|
|
11 |
Aeropro 3in1 compartment |
|
|
11 |
3in1 |
|
|
|
12 |
Aeropro 3in1 nozzle |
|
|
12 |
3in1 ( ) |
|
|
|
13 |
Aeropro hose |
|
|
13 |
|
|
|
|
14 |
Handle |
|
|
14 |
|
|
|
|
15 |
Aeropro telescopic tube |
|
|
15 |
|
|
|
|
16 |
Parking clip |
|
|
16 |
|
|
|
|
17 |
Display for models with manual control |
|
|
17 |
|
|
|
|
18 |
Aeropro classic handle |
|
|
18 |
|
|
|
|
19 |
Aeropro ergo handle |
|
|
19 |
|
|
|
|
20 |
Aeropro nozzle |
|
|
20 |
|
|
|
|
21 |
Display for models with remote control |
|
|
21 |
|
|
|
|
22 |
Aeropro remote control handle |
|
|
22 |
|
|
|
|
23 |
Aeropro remote control handle for motorized nozzle |
|
|
23 |
|
|
|
|
24 |
Aeropro motorized nozzle |
|
|
24 |
|
|
|
|
25 |
Aeropro turbo nozzle* |
|
|
25 |
* |
|
|
|
26 |
Aeropro parketto nozzle* |
|
|
26 |
* |
|
|
|
* Accessories may vary from model to model. |
|
|
|
* . |
|
|
||
|
|
|
|
|
|
|
|
|
|
|
|
|
|
|
|
|
|
|
|
|
|
|
|
|
|
|
|
|
|
|
|
|
|
|
|
eng cho
chn chn
tha ind
4
Click!
Click!
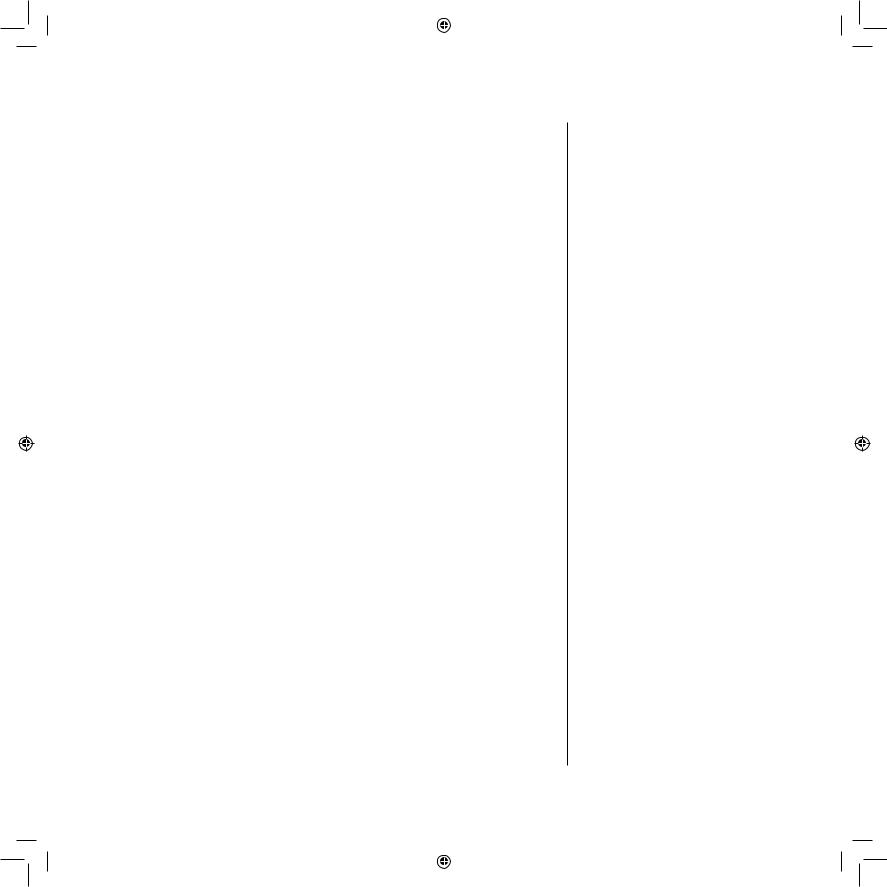
1. Open the cover by pulling the button. Check that the |
2. Insert the hose (to remove it, press the lock buttons |
3. Attach the telescopic tube to the floor nozzle (to |
||||
s-bag® is in place. |
and pull the hose out). |
remove it, press the lock button and pull the nozzle |
||||
|
|
|
|
|
|
off). |
1. . S-bag® |
2. . ( |
3. . ( |
||||
. |
.) |
.) |
||||
|
|
|
|
|
|
|
|
|
|
|
|
|
|
|
|
|
|
|
|
|
|
|
|
|
|
|
|
Click!
|
|
|
|
|
4. Attach the telescopic tube to the hose handle (to |
5. Adjust the telescopic tube by holding the lock with |
6. Pull out the power cord and plug it into the mains. |
||
remove it, press the lock button and pull the hose |
one hand and pulling the handle with the other hand. |
|
|
|
handle out). |
|
|
|
|
4. . ( |
5. |
6. . |
||
|
|
|
|
|
.) |
. |
|
|
|

How to use the vacuum cleaner / 5
Start/stop the vacuum cleaner and adjust suction power / /
7.Switch on/off the vacuum cleaner by pushing the ON/OFF button.
7. .
10.Adjust suction power. Models with remote control.
The cleaner starts in auto-function (automatic suction power regulation). To regulate manually press MIN/ MAX button.To go back to auto-function, press AUTO button.
10..(AUTO). MIN/MAX.AUTO .
8.Models with remote control can also be operated by the ON/OFF button on the handle.
8.. .
11.Models with remote control and Aeropro motorized nozzle. To turn the motorized nozzle on and off, press BRUSH button on the handle.
11..BRUSH .
eng cho
9.Adjust suction power. Models with manual regulation. Push +/- button with your hand to adjust suction power.
9..+/- .
chn chn
12.After vacuuming rewind the cable by pushing the
REWIND button.
tha ind
12. 되감습니다.
6
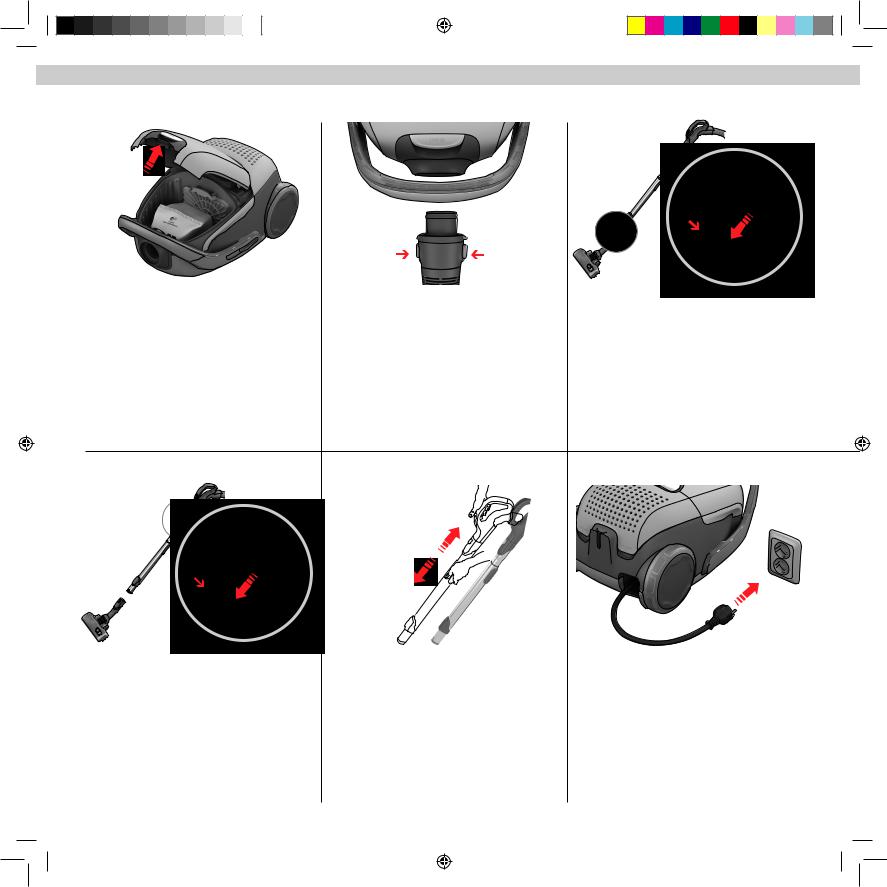
Models with manual regulation: follow graphics for |
|
1. |
3. |
|
|
|
optimal performance. |
|
|
|
|
|
|
Models with autofunction:* automatically adjust the |
|
|
|
|
|
|
suction power in order to give an optimal cleaning |
|
|
|
|
|
|
performance and comfort on every surface. |
|
|
|
|
|
|
* Certain models only. |
|
2. |
|
|
3. |
|
|
|
|
|
|||
|
|
|
|
|
|
|
: |
5. |
|
|
|
|
|
|
|
|
|
|
||
. |
|
|
|
|
|
|
:* |
|
|
|
|
|
|
|
|
|
|
6. |
|
|
. |
|
|
|
|
|
|
|
|
|
|
|
|
|
* |
|
|
|
|
|
|
|
|
4. |
|
|
|
|
1. Curtains |
|
2. Crevices, corners |
|
3. Bookshelves, upholstery |
||
1. , |
2. , |
|
3. , |
|||
|
Power setting |
|
Power setting |
|
|
Power setting |
|
|
|
|
|
|
|
4. Hard floors |
|
5. Rugs |
|
|
6. Delicate carpets |
|
4. |
5. |
|
|
6. |
|
|
|
Power setting |
|
Power setting |
|
|
Power setting |
|
|
|
|
|
|
|
Brushes down. |
Brush roller on or off as preferred. |
Brushes up. |
Motorized nozzle gives the best dust |
|
Brushes up. Attention: on fur rugs, rugs with long |
|
|
|
|
pick-up and deep cleaning of carpets |
|
|
fringes or deep pile exceeding 15 mm |
|
|
|
through the rotating brush roller |
|
|
the motorized nozzle should have the |
|
agitating the carpet. Do not leave the |
|
|
brush roller off. Press BRUSH button to |
||
. |
.* |
|
|
|
||
|
motorized nozzle stationary with brush |
|
turn the brush roller off. |
|||
|
( ) |
|
|
|||
|
|
roller on. |
|
|
|
|
|
|
|
|
|
|
|
|
|
|
|
|
: , |
|
|
|
. |
|
|
. |
15mm |
|
|
|
|
|
|
|
|
|
|
. |
|
|
|
|
|
|
|
|
|
. BRUSH( ) |
|
|
|
.*( ) |
|
|
|
|
|
|
|
|
|
.*( ) |
Tips on how to get the best results / 7
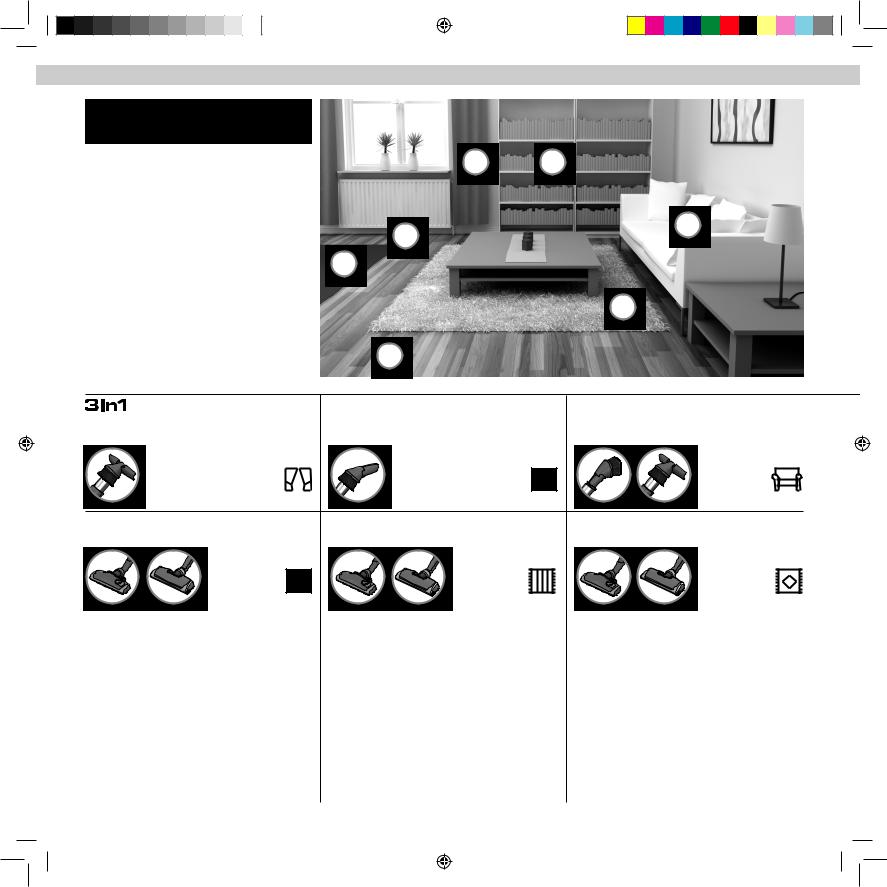
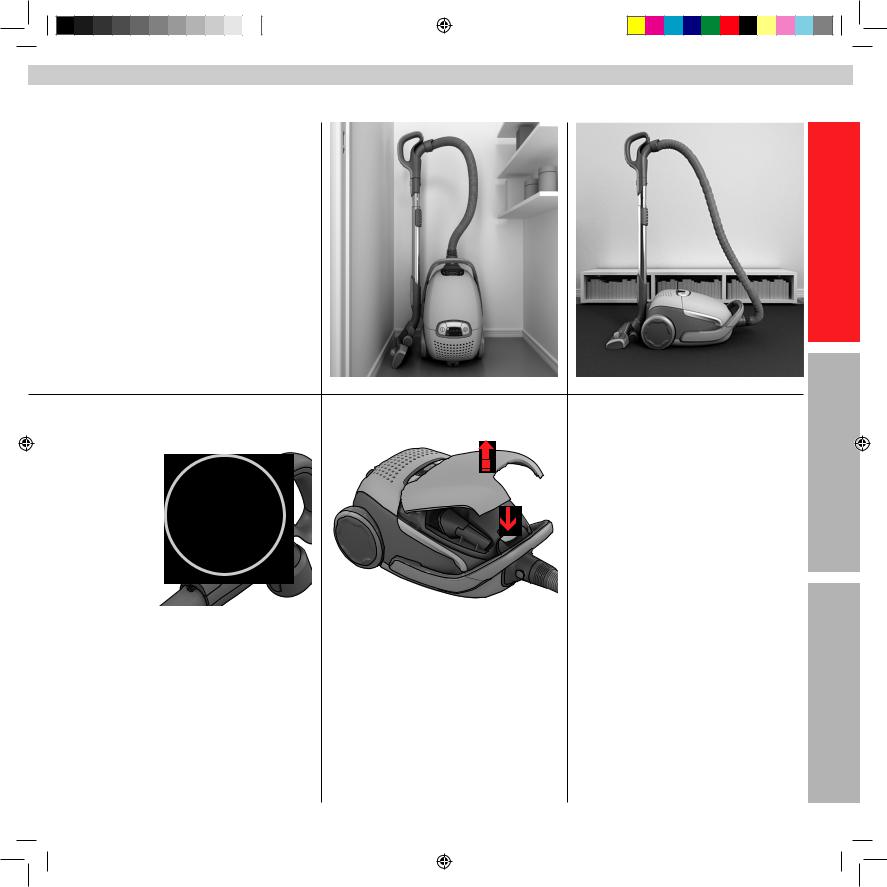
Parking positions /
Insert the nozzle parking clip into one of the two parking slots on the side or on the back.
/.
eng cho
Air valve |
Aeropro 3in1 nozzle |
|
3in1 |
chn chn
On manually controlled models, the air valve can help |
Press the 3in1 button to open the compartment. After |
|
adjust the suction power. |
usage, put the accessory back in its place. |
|
, |
3in1 |
|
.*( ) |
. . |
tha |
|
|
ind |
8
Replacing the dustbag, s-bag® / S-bag®
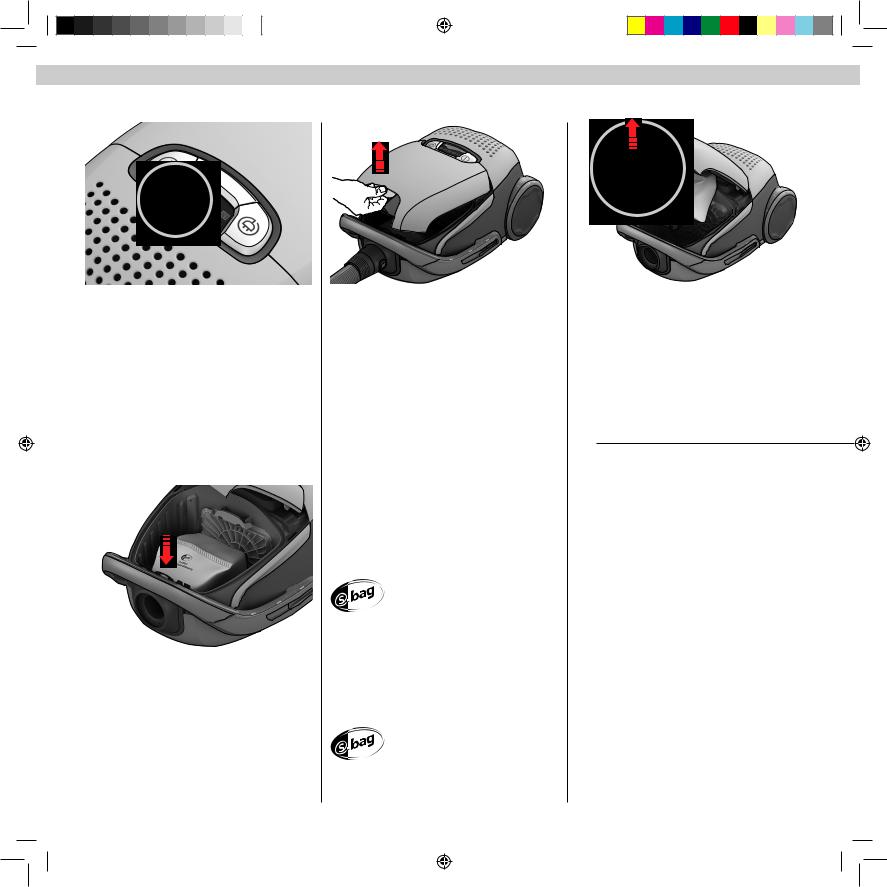
1.Change the dustbag when the s-bag® indicator is illuminated.
1.“S-BAG”.
4.Insert a new s-bag® by pushing the cardboard straight down in its tracks. Close the lid. If the s-bag® is not properly placed or is missing, the lid will not close.
4. S-bag® .. S-bag®.
2. Open the dust compartment cover by pulling the |
3. Pull the cardboard handle to close and remove the |
3in1 button. |
s-bag® |
2. 3in1 . |
3. , |
|
S-bag® . |
NB: Always change the s-bag® when the indicator signal is illuminated even if the s-bag® is not full (it may be blocked) and after using carpet cleaning powder. For best performance use the Ultra Long Performance bag which has been developed specifically for your UltraOne or alternatively any Electrolux original synthetic s-bag®.
®
: S-BAG.(.) .
®
1.Replace the Hepa filter when the “filter” indicator is illuminated. If the Hepa filter is non-washable, replace it with a new one. If the filter is washable rinse it in cold running water. Ensure it is totally dry before replacing.
1.“FILTER”. . () ..
Replacing the motor filter
Click!
Click!
1.Replace the motor filter when dirty or after every 5th s-bag®. Push the filter holder down and pull it out. Exchange the filter and close the lid.
1.5 , ., .
Replacing the filters / 9
Replacing the Hepa filter /
2.Open the rear lid lifting the two lower wings marked “filter”, pull it backwards and change the filter. Use Electrolux original filters: EFH 12, 12W, 13W or s-filter.
2.“FILTER”..
eng cho
3.To close the lid, insert the front hooks in the rails, push the lid forward and press down.
3..
chn chn
tha ind
10
Cleaning the Aeropro nozzle /
1.Disconnect the nozzle from the tube. Use the hose handle to clean the nozzle.
2.If the wheels are stuck, clean them by removing the wheel cap with a small screwdriver.
3.Unscrew the wheel axis and clean all parts. Refit in reverse order.
1. . |
2. , |
3. . |
. |
. |
. |
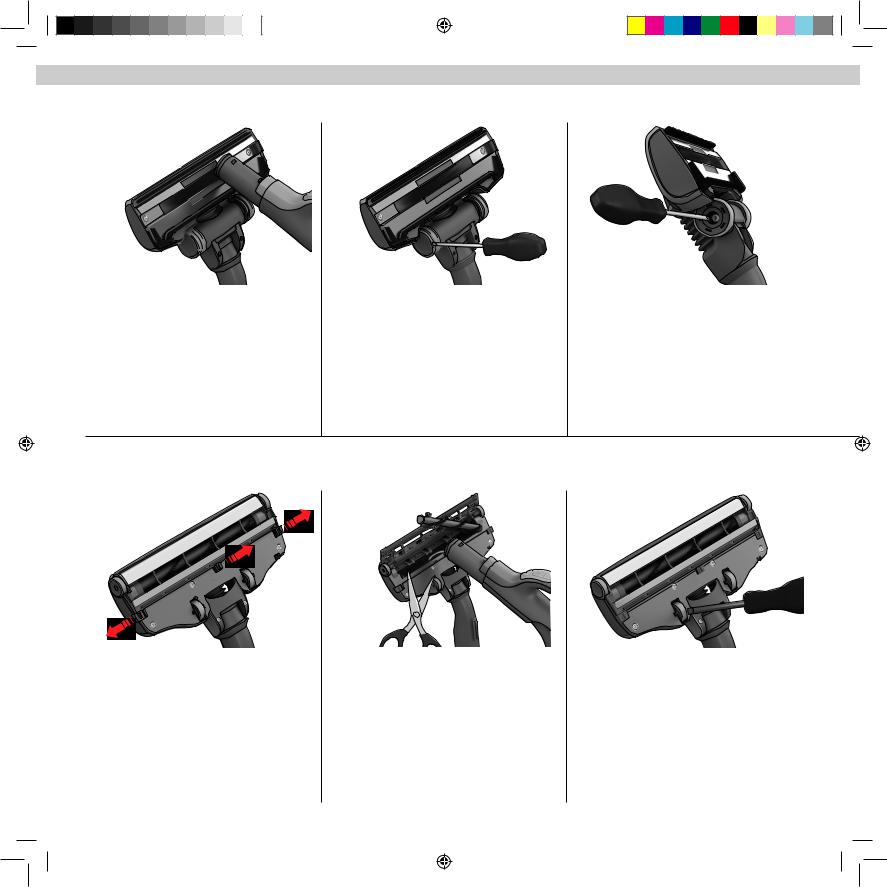
Cleaning the Aeropro motorized nozzle / * ( )
 Always disconnect the nozzle before cleaning it. /
  .
.
1. Open brush roll cover by pushing the latches. This |
2. Pull out the brush roll and remove entangled threads |
3. If the wheels are stuck, remove them carefully by |
will free the front wheels for cleaning. |
by snipping them away with scissors. Use the hose |
using a small screwdriver. |
|
handle to clean the nozzle. Refit in reverse order. |
|
1. . |
2. |
3. , |
. |
. |
. |
|
. |
|
|
. |
|
 Loading...