


English |
|
Español |
|
Thank you for choosing an Electrolux Oxygen vacuum cleaner. |
|
Gracias por elegir una aspiradora Electrolux Oxygen. Este manual |
|
These Operating Instructions cover all Oxygen models. This |
|
de instrucciones cubre todos los modelos Oxygen, con lo que puede |
|
means that with your specific model, some accessories may not be |
que su modelo no incluya algunos accesorios. |
|
|
included. |
|
Accesorios y advertencias de seguridad |
7 |
|
|
||
Accessories and safety precautions |
6 |
Introducción |
9 |
|
|
||
Before starting |
8 |
Logro de los mejores resultados |
11 |
|
|
||
Getting the best results |
10 |
Oxygen cuida su espalda – Easy Reach® system |
13 |
|
|
||
Oxygen saves your back – Easy Reach® system |
12 |
Cambiar la bolsa s-bag™ |
15 |
|
|
||
Replacing the dust bag, s-bag™ |
14 |
Cambiar el filtro del motor y el del escape |
15 |
|
|
||
Replacing the motor filter and exhaust filter |
14 |
Limpieza del tubo elástico y de la boquilla. |
|
|
|
|
|
Cleaning the hose and nozzle/battery replacement |
16 |
Cambio de la pila |
17 |
Troubleshooting and consumer information |
18 |
Solución de problemas e información al consumidor |
19 |
Deutsch
Vielen Dank, dass Sie sich für den Electrolux Oxygen-Staubsauger entschieden haben. Diese Bedienungsanleitung gilt für alle OxygenModelle. Das bedeutet, dass Ihr Modell u. U. bestimmte Zubehörteile nicht enthält.
Italiano
Grazie per aver scelto un aspirapolvere Electrolux Oxygen. Queste Istruzioni per l’uso sono valide per tutti i modelli Oxygen. Questo significa che per il modello specifico acquistato alcuni accessori potrebbero non essere inclusi.
Zubehör und Sicherheitsvorkehrungen |
7 |
Accessori e norme di sicurezza |
0 |
Vorbereitungen |
9 |
Prima di cominciare |
|
Bestmögliche Resultate erzielen |
11 |
Per ottenere i migliori risultati |
4 |
Oxygen entlastet Ihren Rücken – Easy Reach® system |
13 |
Oxygen consente di salvaguardare la schiena – Easy |
|
Austauschen des Staubbeutels, s-bag™ |
15 |
Reach® system |
6 |
Austauschen des Motorschutzfilters und Abluftfilters |
15 |
Sostituzione del sacchetto raccoglipolvere s-bag™ |
28 |
Schlauchund Düsenreinigung/Batterieaustausch |
17 |
Sostituzione del filtro del motore e del microfiltro |
|
Fehlersuche und Verbraucherinformationen |
19 |
antiallergico |
8 |
Pulizia del flessibile e della bocchetta/Sostituzione |
|
||
|
|
|
|
|
|
della batteria |
30 |
|
|
Ricerca dei guasti e informazioni per l’utente |
32 |
Français
Merci d’avoir choisi l’aspirateur Oxygen d’Electrolux. Ces instructions d’utilisation portent sur l’ensemble des modèles Oxygen. Cela signifie qu’il est possible que certains accessoires ne soient pas fournis pour le modèle que vous avez en votre possession.
Português
Obrigado por escolher um aspirador Electrolux Oxygen. Estas Instruções de Funcionamento cobrem todos os modelos Oxygen. Isto significa que o seu modelo em particular pode não incluir alguns dos acessórios.
Accessoires et précautions de sécurité Avant de commencer
Comment obtenir les meilleurs résultats
L’aspirateur Oxygen protège votre dos – Easy Reach® system
Remplacer le sac à poussière s-bag™
Remplacer le filtre moteur et le filtre de sortie d’air Nettoyer le flexible et les brosses / remplacer les piles Gestion des pannes et informations consommateur
7 |
Acessórios e precauções de segurança |
1 |
|
Antes de começar |
3 |
||
9 |
|||
Obter os melhores resultados |
5 |
||
11 |
|||
O Oxygen protege as suas costas – Easy Reach® |
|
||
|
|
||
13 |
system |
7 |
|
Substituição do saco de pó, s-bag™ |
9 |
||
15 |
|||
Substituição do filtro do motor e do filtro de escape |
29 |
||
15 |
|||
Limpeza da mangueira e do bocal/substituição |
|
||
17 |
|
||
das pilhas |
31 |
||
19 |
|||
Resolução de problemas e informação ao consumidor |
33 |
||
|

|
Norsk |
|
Latviski |
|
|
Takk for at du har valgt en Electrolux Oxygen-støvsuger. Denne |
|
Paldies, ka izvēlējāties Electrolux Oxygen putekļsūcēju. Šīs |
|
|
bruksanvisningen gjelder for alle Oxygen-modeller. Dette |
|
ekspluatācijas instrukcijas attiecas uz visiem Oxygen modeļiem. |
|
|
innebærer at noe av tilbehøret kanskje ikke følger med din modell. |
Tas nozīmē, ka jūsu iegādātā modeļa komplektācijā daži |
|
|
|
Tilbehør og sikkerhetsforskrifter |
35 |
piederumi, iespējams, nav iekļauti. |
|
|
|
|
||
1 |
Før du starter |
37 |
Piederumi un drošības tehnikas noteikumi |
48 |
|
|
|
||
3 |
Hvordan oppnå de beste resultater |
39 |
Sagatavošana ekspluatācijai |
50 |
|
|
|
||
5 |
Oxygen sparer ryggen din – Easy Reach® system |
41 |
Optimāla ekspluatācija |
52 |
|
|
|
||
7 |
Skifte støvpose, s-bag™ |
43 |
Oxygen saudzē jūsu muguru – Easy Reach® system |
54 |
|
|
|
||
9 |
Bytte motorfilter og utblåsningsfilter |
43 |
Putekļu maisiņa s-bag™ aizstāšana |
56 |
|
|
|
||
9 |
Rengjøre slangen og bytte munnstykke/batteri |
45 |
Motora filtra un gaisa izplūdes filtra nomaiņa |
56 |
|
|
|
||
|
Problemløsning og forbrukeropplysninger |
47 |
Šļūtenes un uzgaļa tīrīšana/barošanas elementu maiņa |
58 |
31 |
|
|
||
|
|
Darbības traucējumu novēršana un informācija |
|
|
|
|
|
|
|
33 |
|
|
patērētājiem |
60 |
|
|
Suomi |
|
Lietuviškai |
|
|
|
|
Kiitos, että olet valinnut Electrolux Oxygen -pölynimurin. Nämä |
|
Dėkojame, kad pasirinkote dulkių siurblį “Electrolux Oxygen”. Ši |
|
|
|
|
käyttöohjeet kattavat kaikki Oxygen-mallit. Tämä tarkoittaa, että |
instrukcija taikoma visiems “Oxygen” modeliams. Tai reiškia, kad |
|||
|
|
osa lisälaitteista ei ehkä tule ostamasi mallin mukana. |
|
tam tikri priedai gali neįeiti į Jūsų konkretaus modelio komplektą. |
||
Tilbehør og sikkerhedsforanstaltninger |
1 |
Varusteet ja turvaohjeet |
35 |
Priedai ir saugumo priemonės |
49 |
|
Ennen aloitusta |
37 |
Prieš pradedant naudotis |
51 |
|||
Inden start |
3 |
Paras tulos |
39 |
Kaip pasiekti geriausią rezultatą |
53 |
|
Hvordan man opnår de bedste resultater |
5 |
Oxygen säästää selkääsi – Easy Reach® system |
41 |
„Oxygen“ saugo Jūsų nugarą – jame įmontuota |
|
|
Skån ryggen med Oxygen – Easy Reach® system |
27 |
s-bag™-pölypussin vaihtaminen |
43 |
sistema Easy Reach® |
55 |
|
Udskiftning af støvsugerposen s-bag™ |
9 |
Kaip keisti dulkų maišelį “s-bag™” |
57 |
|||
Moottorin suodattimen ja poistoilman suodattimen |
|
|||||
Udskiftning af motorfilter og udsugningsfilter |
9 |
|
Kaip keisti variklio filtrą ir išmetimo filtrą |
57 |
||
vaihtaminen |
43 |
|||||
Rengøring af slange og mundstykke/batteriudskiftning |
31 |
Letkun ja suuttimen puhdistus sekä paristojen |
|
Kaip valyti žarną ir antgalį/ kaip pakeisti elementą |
59 |
|
Fejlfinding og forbrugerinformation |
33 |
vaihtaminen |
45 |
Sutrikimų šalinimas ir informacija vartotojams |
61 |
|
|
|
Vianetsintä ja kuluttajaneuvonta |
47 |
|
|
|
|
Eesti keeles |
|
Pусский |
|
|
|
|
Täname Teid, et valisite Electroluxi tolmuimeja Oxygen. Käesolev |
Благодарим Вас за покупку пылесоса Electrolux Oxygen. Данное |
||||
|
kasutusjuhend kehtib kõikide Oxygen mudelite kohta. See |
|
руководство по эксплуатации содержит сведения обо всех |
|
|
|
|
tähendab, et Teie konkreetsel mudelil võivad puududa mõned |
|
моделях серии Oxygen. Поэтому некоторые принадлежности |
|||
34 |
siinmainitud tarvikutest. |
|
могут отсутствовать в комплекте выбранной Вами |
|
|
|
Tarvikud ja turvameetmed |
35 |
модели. |
|
|
||
36 |
|
|
|
|||
Enne töö alustamist |
37 |
Принадлежности и правила техники безопасности |
49 |
|||
38 |
||||||
|
|
|
||||
Parima tulemuse tagamiseks |
39 |
Перед началом работы |
51 |
|||
40 |
||||||
|
|
|
||||
Oxygen säästab Teie selga – Easy Reach® system |
41 |
Правила пользования и рекомендации |
53 |
|||
42 |
||||||
|
|
|
||||
Tolmukoti paigaldamine, s-bag™ |
43 |
Oxygen позаботится о вашей спине – |
|
|
||
42 |
|
|
||||
Easy Reach® system |
55 |
|||||
Mootori filtri ja tõmbefiltri paigaldamine |
43 |
|||||
|
||||||
44 |
Замена пылесборника s-bag™ |
57 |
||||
Vooliku puhastamine ja otsiku/patarei vahetamine |
45 |
|||||
|
||||||
46 |
Замена фильтра двигателя и выпускного фильтра |
57 |
||||
Veaotsing ja kliendiinfo 4 |
47 |
|||||
|
||||||
|
Чистка шланга и насадок, замена батарей |
59 |
||||
|
|
|
||||
|
|
|
Устранение неполадок и информация |
|
|
|
|
|
|
для потребителя |
61 |
||
|
|
|
|
|
|
|
|
|
|
|
|
|
|

Polski
Dziękujemy za wybranie odkurzacza Oxygen firmy Electrolux. Ta instrukcja obsługi dotyczy wszystkich modeli odkurzacza Oxygen. Oznacza to, że do konkretnego modelu mogą nie być dołączone niektóre akcesoria.
Akcesoria i wskazówki dotyczące bezpieczeństwa |
62 |
Przed uruchomieniem odkurzacza |
64 |
Uzyskanie najlepszych rezultatów |
66 |
Odkurzacz Oxygen oszczędza Ci schylania się |
|
– Easy Reach® system |
68 |
Wymiana worka na kurz s-bag™ |
70 |
Wymiana filtra silnika i filtra strumienia wyjściowego |
70 |
Czyszczenie węża i ssawek/wymiana baterii |
72 |
Usuwanie usterek oraz informacje dla klienta |
74 |
Български
Благодарим Ви за избора на Електролукс прахосмукачката. Инструкцията за употреба покрива всички Oxigen модели. Това означава, че за вашия модел някои аксесоари могат да отсъстват.
Аксесоари и инструкции за безопасност |
63 |
Преди да започнете |
65 |
Как да постигнем максимален резултат |
67 |
Oxygen запазва вашият гръб – Easy Reach® system |
69 |
Смяна на торбичката за прах, s-bag™ |
71 |
Смяна на филтъра на двигателя и филтъра на |
|
изпускателна тръба |
71 |
Почистване на маркуча и накрайника/смяна на |
|
батерията |
73 |
Потребителска информация и отстраняване на |
|
проблеми |
75 |
Česky
Děkujeme vám, že jste si zakoupili vysavač Electrolux Oxygen. Tyto instrukce se vztahují ke všem modelům Oxygen. Některá příslušenství vašeho modelu proto nemusí být ve výbavě vašeho modelu.
|
Příslušenství a bezpečnostní opatření |
63 |
|
Před uvedením do provozu |
65 |
|
Dosažení nejlepších výsledků |
67 |
|
Vysavač Oxygen šetří vaše záda |
|
|
– Easy Reach® system |
69 |
|
Výměna prachových sáčků s-bag™ |
71 |
|
Výměna filtru motoru a výfukového filtru |
71 |
|
Čištění hadice a hubice/ výměna baterie |
73 |
|
Odstraňování závad a informace pro uživatele |
75 |
|
|
|
|
|
|

Hrvatski |
|
Türçe |
Zahvaljujemo što ste izabrali Electrolux Oxygen usisivač. Ove |
|
Electrolux Oxygen elektrikli süpürgesini seçtiğiniz için teșekkür |
Upute za rukovanje se odnose na sve modele Oxygen usisivača. |
|
ederiz. Bu Kullanım Talimatları tüm Oxygen modelleri için |
To znači da uz vaš model neki dijelovi pribora ne moraju biti |
|
geçerlidir. Bu nedenle, elinizdeki modelde bazı aksesuarlar |
uključeni. |
|
bulunmayabilir. |
Pribor i sigurnosne napomene |
63 |
Aksesuarlar ve güvenlik önlemleri |
Prije početka |
65 |
Çalıștırmadan önce |
Postizanje najboljeg učinka |
67 |
En iyi sonuçları almak için |
Oxygen čuva vaša leđa – Easy Reach® system |
69 |
Oxygen sırtınızı korur – Easy Reach® system |
Zamjena vrećice za prašinu, s-bag™ |
71 |
s-bag™ toz torbasının değiștirilmesi |
Zamjena filtra motora i ispušnog filtra |
71 |
Motor filtresinin ve tahliye filtresinin değiștirilmesi |
Čišćenje savitljive cijevi i nastavka/zamjena baterije |
73 |
Hortum ve ucun temizlenmesi/pil değiștirme |
Otklanjanje smetnji i obavijesti za korisnike |
75 |
Sorun giderme ve tüketici bilgileri |
Slovensky
Ďakujeme Vám, že ste si vybrali vysávač Electrolux Oxygen. Tento návod na použitie slúži pre všetky modely Oxygen. To znamená, že vo vašom konkrétnom modeli niektoré doplnky nemusia byť.
|
Doplnky a bezpečnostné opatrenia |
91 |
77 |
Pred spustením |
93 |
|
||
79 |
Dosahovanie najlepších výsledkov |
95 |
|
||
81 |
Vysávač Oxygen šetrí vašu chrbticu |
|
|
|
|
83 |
– Easy Reach® system |
97 |
85 |
Výmena prachového vrecka s-bag™ |
99 |
85 |
Výmena filtra motora a výfukového filtra |
99 |
87 |
Čistenie hadice a hubice/výmena batérie |
101 |
89 |
Odstraňovanie porúch a informácie pre spotrebiteľov |
103 |
Srpski |
|
Magyar |
|
Română |
|
Zahvaljujemo što ste izabrali Electrolux Oxygen usisivač. Ova |
|
Köszönjük, hogy az Electrolux Oxygen porszívót választotta. Ez az |
Vă mulţumim pentru alegerea unui aspirator Electrolux Oxygen. |
||
Uputstva za rukovanje odnose se na sve modele Oxygen usisivača. |
üzemeltetési tájékoztató az összes Oxygen típushoz készült. Ez azt |
Aceste instrucţiuni de folosire sunt valabile pentru toate modelele |
|||
To znači da uz vaš model neki delovi pribora ne moraju biti |
|
jelenti, hogy egy konkrét típusnál néhány tartozék hiányozhat. |
|
Oxygen. Acest lucru înseamnă că modelul dumneavoastră poate să |
|
uključeni. |
|
Tartozékok és biztonsági előírások |
77 |
nu cuprindă anumite accesorii. |
|
|
|
|
|
||
Pribor i sigurnosne napomene |
76 |
Üzembe helyezés előtt |
79 |
Accesorii și măsuri de protecţie |
91 |
|
|
|
|
||
Pre početka |
78 |
A legjobb eredmények elérése |
81 |
Înainte de a începe |
93 |
|
|
|
|
||
Postizanje najboljih rezultata |
80 |
Az Oxygen kíméli a hátát – Easy Reach® system |
83 |
Pentru a obţine cele mai bune rezultate |
95 |
|
|
|
|
||
Oxygen čuva vaša leđa – Easy Reach® system |
82 |
Az s-bag™ porzsák cseréje |
85 |
Oxygen vă menajează spatele – Easy Reach® system |
97 |
|
|
|
|
||
Zamena vrećice za prašinu, s-bag™ |
84 |
A motorszűrő és a kimeneti szűrő cseréje |
85 |
Înlocuirea pungii de colectare a prafului, s-bag™ |
99 |
|
|
|
|
||
Zamena filtera motora i izduvnog filtera |
84 |
A tömlő és a szívófej tisztítása/elemek cseréje |
87 |
Înlocuirea filtrului motorului și a filtrului de eșapament |
99 |
|
|
|
|
||
Čišćenje fleksibilne cevi i nastavka/zamena baterija |
86 |
Hibaelhárítás és ügyféltájékoztatás |
89 |
Curăţarea furtunului și a duzei/înlocuirea bateriilor |
101 |
|
|
|
|
||
Otklanjanje smetnji i informacije za korisnike |
88 |
|
|
Rezolvarea problemelor și informaţii pentru clienţi |
103 |
Ελληνικά |
Slovenščina |
Σας ευχαριστούμε που επιλέξατε την ηλεκτρική σκούπα Oxygen της Electrolux. Αυτές οι Οδηγίες Λειτουργίας καλύπτουν όλα τα μοντέλα Oxygen. Αυτό σημαίνει ότι στο συγκεκριμένο μοντέλο, πιθανόν ορισμένα εξαρτήματα να μην συμπεριλαμβάνονται.
Εξαρτήματα και προφυλάξεις ασφαλείας Πριν την εκκίνηση Για να επιτύχετε τα καλύτερα αποτελέσματα
Ηηλεκτρική σκούπα Oxygen προφυλάσσει την πλάτη σας με το Easy Reach® system
Αντικατάσταση της σακούλας s-bag™
Αντικατάσταση του φίλτρου κινητήρα και του φίλτρου εξαγωγής
Καθαρισμός του εύκαμπτου σωλήνα και του ακροφυσίου/αντικατάσταση μπαταρίας
Hvala, da ste se odločili za nakup sesalnika Electrolux Oxygen. Ta navodila služijo za vse modele Oxygen. Zato ni nujno, da so k vašemu modelu priloženi prav vsi deli dodatne opreme.
77 |
Dodatni pribor in previdnostni ukrepi |
90 |
|
Pred uporabo |
92 |
||
79 |
|||
Doseganje najboljših rezultatov |
94 |
||
81 |
|||
Sesalnik Oxygen varuje vašo hrbtenico |
|
||
|
|
||
83 |
– Easy Reach® system |
96 |
|
Zamenjava vrečke za prah, s-bag™ |
98 |
||
85 |
|||
Zamenjava motornega in izhodnega filtra |
100 |
||
|
|||
85 |
Čiščenje cevi in nastavkov za talno čiščenje/ |
|
|
Zamenjava baterije |
100 |
||
|
|||
87 |
Odpravljanje težav in obveščanje kupcev |
102 |
|
|
|
Επίλυση προβλημάτων και πληροφορίες για τον πελάτη |
89 |
|
|
|
|
|
|
|
1 |
2 |
3 |
5
English
ACCESSORIES AND SAFETY PRECAUTIONS
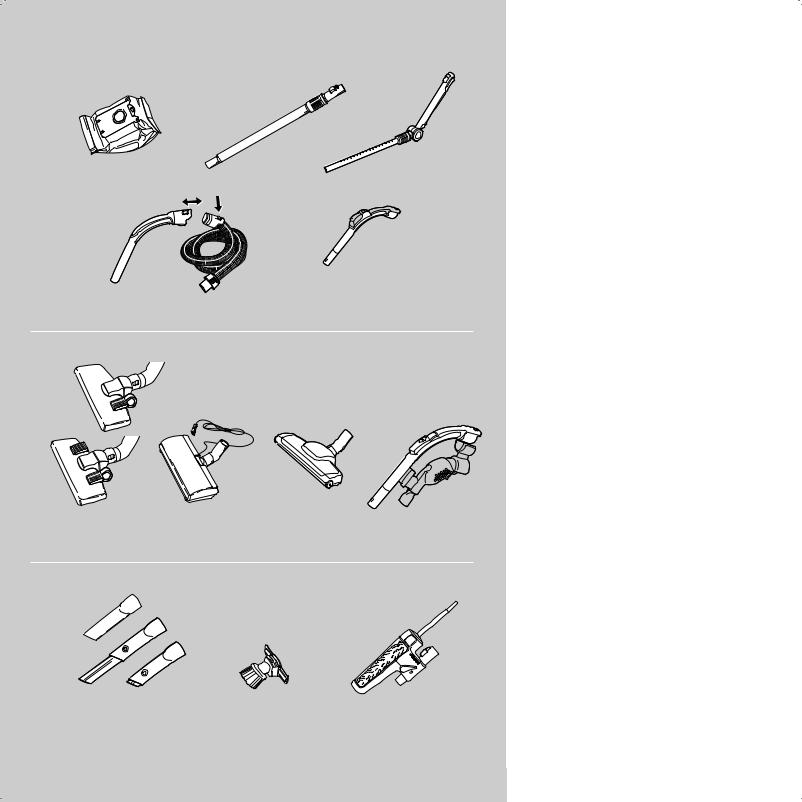
Accessories
1 |
s-sbag™,- s-sbag™- Classic, |
98 CaddieTurboaccessorynozzle*holder*. |
||||
|
sbag™- |
Clinic, s-bag™ |
9 |
|
Caddie accessory |
|
|
s- |
Clin s-bag™ |
|
Contains a combination nozzle/ |
||
|
Anti-od |
|
dust bags |
|
brush and a telescopic crevice |
|
|
Anti-odour dust bags |
|
|
holder*. Contains a com- |
||
2 |
|
|
tube |
|
nozzle |
|
Telescopic tube |
|
|
bination nozzle/ brush |
|||
3 |
Easy Reach® system |
10 Wide crevice nozzle* |
||||
|
|
and a telescopic crevice |
||||
|
Easy Reach® system lescopic |
|
|
|
||
|
tube* |
|
|
11 a + b Cr vice nozzle (b = |
||
|
telescopic tube* |
|
|
nozzle |
||
4 |
a + b Hose |
|
telescopic*) |
|||
10 |
a+ b Crevice nozzle (b = |
|||||
4 |
Hosehandle + hose |
12 Combination nozzle/brush |
||||
5 |
Hose handle with remote |
|
|
telescopic*) |
||
5 |
Hose handle with |
13 Feather duster* |
||||
|
control* |
|
|
|||
6 |
remote control* |
11 |
Combination nozzle/ |
|||
a + b Carpet/hard floor |
|
|
brush |
|||
6 |
a + b Carpet/hard floor nozzle (b |
|
|
|
||
|
= double pedal*) |
12 |
Feather duster* |
|||
7 |
nozzle (b = double |
|||||
Power nozzle* |
|
|
|
|||
8 |
pedal*) |
|
|
|
|
|
Turbo nozzle* |
|
|
|
|||
7 |
Power nozzle* |
|
|
|
||
Safety precautions
Oxygen should only be used by adults and only for normal vacuuming in a domestic environment. The vacuum cleaner features double insulation and does not need to be earthed.
Never vacuum:
• In wet areas
• Close to flammable gases, etc.
• Without an s-bag™ (this may damage the cleaner). A safety device is fitted which prevents the cover closing without an s-bag™. Do not attempt to force cover shut.
|
|
|
|
Never vacuum: |
|
|
|
|
|
• |
Sharp objects |
|
|
|
|
• Fluids (this can cause serious damage to the machine) |
|
|
|
|
|
• Hot or cold cinders, lit cigarette butts, etc. |
|
|
|
|
|
• Fine dust from plaster, concrete, flour or ash, for example. |
|
|
|
|
|
The above can cause serious damage to the motor – damage |
|
|
|
|
|
which is not covered by the warranty. |
|
|
|
|
|
Electrical cable precautions: |
|
6b |
7 |
8 |
9 |
• |
A damaged cable must be replaced by an authorised |
Electrolux service centre. Damage to the cleaner cable will not be covered by the warranty.
• Never pull or lift the vacuum cleaner by the cable
• Disconnect the plug from the mains before cleaning or maintenance of the vacuum cleaner.
• Regularly check that the cable is not damaged. Never use the vacuum cleaner if the cable is damaged.
All service and repairs must be carried out by an authorised Electrolux service centre.
Always keep the vacuum cleaner in a dry place.
10b |
11 |
12 |
*Certain models only

Deutsch
ZUBEHÖR UND SICHERHEITSVORKEHRUNGEN
Zubehör
1 |
sbag™- |
-, sbag™- Classic-, |
9 |
8 |
|
Turbobürste* |
||
|
s- |
-, s- |
-, s- |
|
Zubehörhalter mit Rollen*. |
|||
|
bag™ Clinic-, s-bag™ |
|
|
9 |
Enthält eine Kombinationsdüse/ |
|||
|
sbag ™ Clinic-, s-bag™ |
|
|
Zubehörhalter mit Rol- |
||||
|
Anti-od -Staubbeutel |
|
|
|
-bürste und eine |
|||
|
Anti-odour-Staubbeutel |
|
|
|
len*. Enthält eine Kombi- |
|||
2 |
Teleskoprohr |
|
|
|
Teleskopfugendüse |
|||
Teleskoprohr |
|
|
|
|
nationsdüse/ -bürste und |
|||
|
Easy Reach® system- |
|
10 Breite Fugendüse* |
|||||
3 |
|
|
|
|
eine Teleskopfugendüse |
|||
Easy Reach® system- |
|
|
|
|
||||
|
Teleskoprohr* |
|
11 Fugendüse a + b (b = Teleskop*) |
|||||
|
Teleskoprohr* |
|
|
10 |
Fugendüse a + b (b = |
|||
4 Schlauch a + b |
|
12 Kombinati nsdüse/-bürste |
||||||
4 |
Schlauchgriff + Schlauch |
|
|
|
Teleskop*) |
|||
5 |
Schlauchgriff mit Fernbedienung* |
13 Staubwedel* |
||||||
5 |
Schlauchgriff mit Fernbe- |
|
11 |
Kombinationsdüse/-bür- |
||||
6 |
Düsedienung*für Teppiche und harte |
|
|
|
ste |
|||
6 |
Böden (b = Doppelpedal*) |
|
|
12 |
Staubwedel* |
|||
Düse für Teppiche und |
|
|||||||
7 |
Elektrosaugbürste* |
|
|
|
|
|
||
8 |
harte Böden (b = Doppel- |
|
|
|
|
|||
Turbobürste* |
|
|
|
|
|
|||
|
pedal*) |
|
|
|
|
|
||
7 |
Elektrosaugbürste* |
|
|
|
|
|
||
Sicherheitsvorkehrungen
Der Staubsauger von Oxygen sollte nur von Erwachsenen und nur für normales Staubsaugen im Haushalt verwendet werden. Der Staubsauger ist doppelt isoliert und muss nicht geerdet werden.
Niemals Staubsaugen:
•Auf nassen Bereichen
•In der Nähe von brennbaren Gasen, etc.
•Ohne einen s-bag™ (das könnte den Staubsauber beschädigen). Damit vermieden wird, den Deckel ohne einen s-bag™ zu schließen, ist eine Sicherheitsvorrichtung vorhanden. Nicht versuchen, den Deckel mit Gewalt zu schließen.
Niemals Staubsaugen:
•Scharfe Objekte
•Flüssigkeiten (dies kann schwere Beschädigungen des Geräts verursachen.)
•Heiße oder kalte Asche, brennende Zigarettenkippen etc.
•Z. B. feiner Gips-, Beton-, Mehloder Aschenstaub.
Oben Genanntes kann den Motor ernsthaft beschädigen - Schäden, die nicht durch die Garantie abgedeckt sind.
Vorkehrungen bei elektrischen Kabeln:
•Ein beschädigtes Kabel sollte nur von einem autorisierten Elektrolux-Servicecenter ausgetauscht werden. Ein beschädigtes Staubsaugerkabel ist nicht durch die Garantie abgedeckt.
•Den Staubsauger niemals am Kabel ziehen oder anheben.
•Vor dem Reinigen oder der Durchführung von Servicearbeiten am Staubsauger den Netzstecker aus der Steckdose ziehen.
•Regelmäßig Kabel auf Schäden prüfen. Den Staubsauger niemals benutzen, wenn das Kabel beschädigt ist.
Alle Wartungsund Reparaturarbeiten sind von autorisierten Electrolux-Servicecentren durchzuführen.
Bewahren Sie den Staubsauger immer an einem trockenen Ort auf.
*Nur bestimmte Modelle
Françaisçais
ACCESSOIRES ET PRÉCAUTIONS DE SÉCURITÉ
Accessoires
1Sacsààpoussières-bag™s-bag™ Classic,s-sbag™-bag™ClinicClinicet et
|
s-bag™ Anti-od |
|
s-bag™ Anti-odour |
2 |
Tube télescopique |
Tube télescopique |
|
3 |
Tube télescopique de protection |
Tube télescopique de |
|
|
du dos Easy Reach® system* |
4 |
protection du dos Easy |
Flexible + b |
|
|
Reach® system* |
5 |
Poignée du flexible avec |
4 |
Poignée du flexible + |
|
télécommande* |
6 |
flexible |
Suceur pour tapis/sols durs |
|
5 |
Poignée du flexible avec |
|
a + b (b = double pédale*) |
7 |
télécommande* |
Brosse électrique* |
|
6 |
Suceur pour tapis/sols |
8 |
Turbobrosse* |
|
durs a + b (b = double |
pédale*)
97 SuppBrossert deélectrique*fixation
8 d'accessoires*. Contient un
Turbobrosse* combiné petit suceur/brosse
9 meublesSupportet undesuceurfixationl g télescopiqued'accessoires*pour fentes. Contient
10 |
un combiné petit suceur/ |
Suceur long pour fentes larges* |
|
11 |
brosse meubles et un |
Suceur long pour fentes a + b |
|
|
suceur long télescopique |
|
(b = télescopique*) |
12 |
pour fentes |
Combiné petit suceur/brosse |
|
10meublesSuceur long pour fentes |
|
13 |
a + b (b = télescopique*) |
Plumeau* |
|
11Combiné petit suceur/ brosse meubles
12Plumeau*
Précautions de sécurité
L'aspirateur Oxygen ne doit être utilisé que par des adultes pour aspirer dans un environnement domestique normal. L'aspirateur présente une double isolation et n'a pas besoin d'être relié à la terre.
Ne jamais aspirer :
•Dans les endroits humides
•A proximité de gaz inflammables, etc.
•Sans sac à poussière s-bag™ (cela pourrait endommager l'aspirateur). Il existe un dispositif de sécurité qui empêche de fermer le couvercle s'il n'y a pas de sac s-bag™. Ne pas essayer de forcer pour fermer le couvercle.
Ne jamais aspirer :
•D'objets pointus
•De liquides (cela peut provoquer de graves dommages à l'appareil)
•De cendres chaudes ou refroidies, de mégots de cigarettes incandescents, etc.
•De particules de poussière très fines issues entre autres du plâtre, du béton, de la farine ou de cendres.
Les éléments susmentionnés peuvent provoquer de graves dommages au moteur. La garantie ne prend pas en charge ce type de dommages.
Précautions liées au câble électrique :
•Si un câble est endommagé, il ne doit être remplacé que par un Centre Service Agréé Electrolux. La garantie ne prendra pas en charge les dommages portés au câble de l'aspirateur.
•Ne jamais tirer ni soulever l'aspirateur par le câble.
•Débrancher la prise avant de nettoyer ou d'entretenir votre aspirateur.
•Vérifier régulièrement que le câble n'est pas endommagé. Ne jamais utiliser l'aspirateur si le câble est endommagé.
Toutes les révisions et réparations doivent être effectuées par un Centre Service Agréé Electrolux.
Toujours entreposer l'aspirateur dans un endroit sec.
*Suivant les modèles
Españolspañol
ACCESORIOS Y ADVERTENCIAS DE SEGURIDAD
Accesorios
1Bolsasparaparael polvoel polvos-bag™, s-sbag™,- Classic,-bag™s-bag™Classic,Clinic,
s-bag™ Anti-odour
s-bag™ Clinic, s-bag™
2 TuboAntitelescópico-odour
32 TubotelescópicoEasy Reach®
3 system*
Tubo telescópico Easy
4 TuboReach®elásticosystem**a + b
54 MangoMangodeldetubola elásticomangueracon control remoto*
flexible y manguera
6 Boquilla para alfombras/
5 Mango del tubo elástico superficies duras a + b (b = con control remoto*
pedal doble*)
6Boquilla para alfombras/
7Boquilla potente* superficies duras a + b (b
8Boquilla turbo*
=pedal doble*)
9 7 CompartimentoBoquilla potente*de accesorios
8 portátil*. Contiene una
Boquilla turbo* combinación de boquilla y
9 cepilloCompartimentoy una boquilla conde acceranura-
|
te-lescópicasorios portátil*. |
. Contiene |
10 |
una combinación de |
|
Boquilla con ranura ancha* |
||
11 |
boquilla y cepillo y una |
|
Boquilla con ranura a+ b (b = |
||
|
boquilla con ranura te- |
|
|
telescópico*) |
|
12 |
lescópica. |
|
Combinación de boquilla y ce- |
||
10pilloBoquilla con ranura a+ b |
||
13 |
(b = telescópico*) |
|
Plumero* |
|
|
11Combinación de boquilla y cepillo
12Plumero*
Advertencias de seguridad
Sólo personas adultas deberían utilizar Oxygen y con la finalidad de pasar la aspiradora en el hogar. La aspiradora dispone de un dispositivo de doble aislamiento y no necesita ser conectada a tierra.
Nunca pase la aspiradora:
•En zonas mojadas
•Cerca de gases inflamables, etc.
•Sin colocar antes una bolsa para el polvo ya que podría dañarse la aspiradora. Un dispositivo de seguridad evita que se cierre la tapa sin que haya una bolsa para el polvo en el interior. No intente forzar la tapa para cerrarla.
Nunca pase la aspiradora sobre:
•Objetos cortantes
•Fluido (esto podría ocasionar graves daños al aparato)
•Cenizas candentes o frías, colillas de cigarro encendidas, etc.
•Polvo fino como yeso, cemento, harina, cenizas, etc.
Estas materias podrían ocasionar graves daños en el motor (este tipo de daños no está cubierto por la garantía).
Advertencias acerca del cable de alimentación:
•Un cable dañado sólo debe ser reemplazado en un servicio técnico autorizado de Electrolux. La garantía no cubre los daños en el cable de la aspiradora.
•No utilice el cable para tirar de la aspiradora o levantarla.
•Desconecte el enchufe de la toma de corriente antes de limpiar o llevar a cabo tareas de mantenimiento en la aspiradora.
•Compruebe regularmente que el cable no está dañado. No utilice nunca la aspiradora si el cable de alimentación está dañado.
La totalidad de los servicios y reparaciones los efectuará un servicio técnico autorizado de Electrolux.
Asegúrese de guardar la aspiradora en un lugar seco.
*Sólo algunos modelos
English
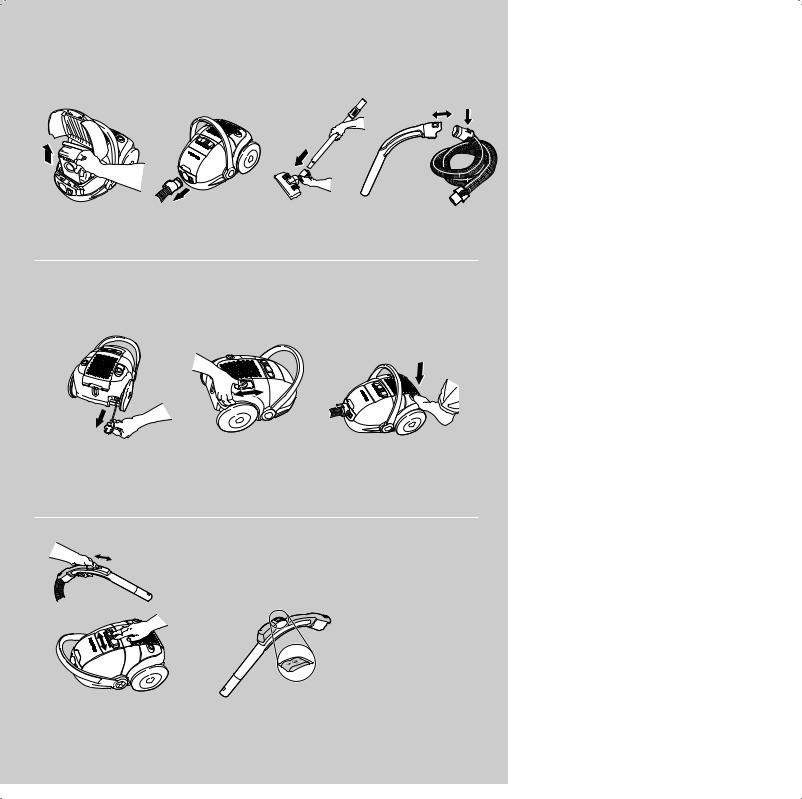
BEFORE STARTING
|
|
|
1 |
Check that the s-bag™ is in place. |
|
|
|
2 |
Insert the hose until the catch clicks to engage (press the |
|
|
|
|
catch to release the hose). |
|
|
|
3 |
Attach the telescopic tube or Easy Reach® system telescop- |
|
|
|
|
ic tube (certain models only) to the hose handle and the floor |
|
|
|
|
nozzle (to disconnect, press the lock button and pull apart). |
|
|
|
4 |
InsertThe hosethecanhoseasilyinto thebe removedhose handlefromuntilthe thehandlecatchesby pressingclick to |
|
|
|
|
engagethe retaining(pressbuttonthe catchesand pullingto releaseout thethehose). . |
|
|
|
5 |
Pull out the cable and plug it in. Press the foot pedal to |
|
|
|
|
rewind the cable (take hold of the plug to prevent it striking |
1 |
2 |
3 |
4 |
you). |
|
||||
|
|
|
6 |
Some vacuum cleaners, depending on the model, are fitted |
|
|
|
|
with an automatic cable winder (Autoreverse). Pull out the |
|
|
|
|
cable and plug it in. Move the control forwards to roll the |
|
|
|
|
cable in and out as required. Move it backwards to lock the |
|
|
|
|
cable in position once it has been rolled out. |
|
|
|
7 |
Press the On/Off button with the foot to start the vacuum |
|
|
|
|
cleaner. |
|
|
|
8 |
Adjust suction power using the suction control on the vacu- |
|
|
|
|
um cleaner or the suction control on the hose handle. |
|
|
|
9 |
If you have a vacuum cleaner with remote control, press |
|
|
|
|
the +/- buttons to adjust suction control (be sure batteries |
|
|
|
|
have been inserted beforehand). You can also start/stop the |
|
|
|
|
cleaner by pressing the centre of the control (as long as the |
|
|
|
|
main cleaner switch is set to on). |
5 |
6 |
7 |
8 |
9 |
|
|
|
|
 Loading...