

Page 1

SANTO Z 9 18 02-4i
Návod k použití Chladnička
Gebruiksaanwijzing Koelkast
User manual Fridge
Benutzerinformation Kühlschrank
Instrukcja obsługi Chłodziarka
Page 2
2
Obsah
Děkujeme, že jste si vybrali jeden z našich vysoce kvalitních výrobků.
Přečtěte si prosím pozorně tento návod k použití, abyste zajistili
optimální a správný chod svého spotřebiče. Najdete v něm rady k
dokonalému a co nejúčinnějšímu používání spotřebiče. Doporučujeme
vám, abyste návod uložili na bezpečném místě, a mohli ho kdykoliv
znovu použít. Předejte ho prosím i případnému dalšímu majiteli
spotřebiče.
Přejeme vám s novým spotřebičem hodně radosti.
Obsah
Bezpečnostní informace 2
Bezpečnost dětí a hendikepovaných
osob 3
Všeobecné bezpečnostní informace
Denní používání 4
Čištění a údržba 4
Instalace 5
Servis 5
Ovládací panel 5
Zapnutí chladničky 6
Vypnutí chladničky 6
Tlačítka nastavení teploty 6
Kontrolka teploty 6
Nastavení teploty 6
Funkce TURBO COOLMATIC 7
Při prvním použití 7
Čistění vnitřku spotřebiče 7
Denní používání 7
Přemístitelné police 8
Umístění dveřních poliček 8
Umístění dveřních poliček 8
Uhlíkový vzduchový filtr 9
LONGFRESH Přihrádka 9
Regulace vlhkosti 9
Zásuvky Longfresh 10
Doba uchování v oddílu Longfresh 0°C
pro čerstvé potraviny 10
Užitečné rady a tipy 12
3
Tipy pro úsporu energie 12
Tipy pro chlazení čerstvých potravin
Tipy pro chlazení 12
Čištění a údržba 13
Pravidelné čištění 13
Výměna uhlíkového filtru 14
Odmrazování chladničky 14
Vyřazení spotřebiče z provozu 14
Co dělat, když... 15
Výměna žárovky 17
Zavření dveří 17
Technické údaje 17
Instalace 17
Umístění 17
Připojení k elektrické síti 18
Požadavky na větrání 18
Instalace uhlíkového vzduchového
filtru 18
Poznámky k životnímu prostředí 19
Zmĕny vyhrazeny
12
Bezpečnostní informace
V zájmu své bezpečnosti a správného chodu spotřebiče si před jeho instalací
a prvním použitím pozorně Přečtěte návod k použití včetně rad a upozornění.
K ochraně před nežádoucími omyly a nehodami je důležité, aby se všechny
osoby, které budou používat tento spotřebič, seznámily s jeho provozem a
Page 3

Bezpečnostní informace
bezpečnostními funkcemi. Tyto pokyny uschovejte a zajistěte, aby zůstaly u
spotřebiče i v případě jeho přestěhování na jiné místo nebo prodeje dalším
osobám, aby se tak všichni uživatelé po celou dobu životnosti spotřebiče mohli
řádně informovat o jeho používání a bezpečnosti.
Dodržujte pokyny uvedené v tomto návodu k použití, abyste neohrozili své
zdraví a majetek, a uvědomte si, že výrobce neručí za úrazy a poškození způ‐
sobené jejich nedodržením.
Bezpečnost dětí a hendikepovaných osob
• Tento spotřebič nesmějí používat osoby (včetně dětí) se sníženými fyzický‐
mi, smyslovými nebo duševními schopnostmi, nebo bez patřičných zkuše‐
ností a znalostí, pokud je nesledují osoby odpovědné za jejich bezpečnost,
nebo jim nedávají příslušné pokyny k použití spotřebiče.
Na děti je třeba dohlédnout, aby si se spotřebičem nehrály.
• Všechny obaly uschovejte z dosahu dětí. Hrozí nebezpečí udušení.
• Jestliže likvidujete starý spotřebič, vytáhněte zástrčku ze zásuvky, odřízněte
napájecí kabel (co nejblíže u spotřebiče) a odstraňte dveře, aby nedošlo k
úrazu dětí elektrickým proudem, nebo se děti nemohly zavřít uvnitř.
• Jestliže je tento spotřebič vybaven magnetickým těsněním dveří a nahrazuje
starší spotřebič s pružinovým zámkem (západkou) na dveřích nebo víku,
nezapomeňte před likvidací pružinový zámek znehodnotit. Děti se pak ne‐
mohou ve spotřebiči zavřít jako ve smrtelně nebezpečné pasti.
Všeobecné bezpečnostní informace
POZOR
Udržujte větrací otvory volně průchodné.
3
• Tento spotřebič je určen k uchování potravin a nápojů v běžné domácnosti,
jak je uvedeno v návodu k použití.
• K urychlení odmrazování nepoužívejte mechanické ani jiné pomocné
prostředky.
• V prostoru chladicích spotřebičů nepoužívejte jiné elektrické přístroje (např.
zmrzlinové strojky), než typy schválené k tomuto účelu výrobcem.
• Nepoškozujte okruh chladicí kapaliny.
• Chladivo isobutan (R600a) je obsaženo v chladicím okruhu spotřebiče; je to
zemní plyn s vysokým stupněm slučitelnosti s životním prostředím, ale je
hořlavý.
Během přepravy a instalace spotřebiče dbejte na to, aby nedošlo k poško‐
zení žádné části chladicího okruhu.
Pokud dojde k poškození chladicího okruhu:
– odstraňte z blízkosti spotřebiče otevřený plamen a všechny zdroje ohně
– důkladně vyvětrejte místnost, ve které je spotřebič umístěný.
Page 4

4
Bezpečnostní informace
• Změna technických parametrů nebo jakákoli jiná úprava spotřebiče je ne‐
bezpečná. Jakékoli poškození kabelu může mít za následek zkrat, požár a/
nebo úraz elektrickým proudem.
UPOZORNĚNÍ
Jakýkoli elektrický díl (napájecí kabel, zástrčka, kompresor) smí vyměnit pouze
autorizovaný zástupce servisu nebo kvalifikovaný pracovník servisu.
1. Napájecí kabel nelze nastavovat.
2. Zkontrolujte, zda není zástrčka stlačená nebo poškozená zadní stranou
spotřebiče. Stlačená nebo poškozená zástrčka se může přehřát a způ‐
sobit požár.
3. Ověřte si, že je zástrčka spotřebiče dobře přístupná.
4. Netahejte za napájecí kabel.
5. Pokud je zásuvka uvolněná, nezasunujte do ní zástrčku. Hrozí nebez‐
pečí úrazu elektrickým proudem nebo požár.
6.
Nespouštějte spotřebič bez krytu žárovky
1)
vnitřního osvětlení.
• Tento spotřebič je těžký. Při přemisťování spotřebiče buďte proto opatrní.
• Nevytahujte věci z mrazničky, ani se jich nedotýkejte, máte-li vlhké nebo
mokré ruce, protože byste si mohli odřít pokožku nebo způsobit omrzliny.
• Spotřebič nesmí být dlouhodobě vystaven přímému slunečnímu záření.
Denní používání
• Ve spotřebiči nestavte horké nádoby na plastové části spotřebiče.
• Neskladujte v něm hořlavý plyn nebo tekutiny, protože by mohly vybuchnout.
•
Potraviny neukládejte přímo na větrací otvory v zadní stěně.
• Zmrazené potraviny se nesmí po rozmrznutí znovu zmrazovat.
• Zakoupené zmrazené potraviny skladujte podle pokynů daného výrobce.
• Pokyny výrobce spotřebiče týkající se uchování potravin je nutné přísně do‐
držovat. Řiďte se příslušnými pokyny.
• Do mrazicího oddílu nevkládejte nápoje s vysokým obsahem kysličníku uhli‐
čitého nebo nápoje s bublinkami, protože vytvářejí tlak na nádobu, a mohou
dokonce vybuchnout a poškodit spotřebič.
• Nejezte zmrzlinu ihned po vyjmutí z mrazničky, hrozí nebezpečí popálení.
2)
Čištění a údržba
• Před čištěním nebo údržbou vždy spotřebič vypněte a vytáhněte síťovou
zástrčku ze sítě. Jestliže nemůžete vytáhnout zástrčku, přerušte přívod pro‐
udu.
• Nečistěte spotřebič kovovými předměty.
• K odstranění námrazy nepoužívejte ostré předměty. Použijte plastovou
škrabku.
• Pravidelně kontrolujte a čistěte odtokový otvor na rozmrazenou vodu. Je-li
zanesený, uvolněte ho. Jestliže je otvor ucpaný, rozlije se voda na dno
chladničky.
1) Pokud je spotřebič vybaven krytem žárovky.
2) Pokud je spotřebič beznámrazový.
Page 5
Ovládací panel
Instalace
U elektrického připojení se pečlivě řiďte pokyny uvedenými v příslušných od‐
stavcích.
• Vybalte spotřebič a zkontrolujte, zda není poškozený. Je-li spotřebič poško‐
zený, nezapojujte ho do sítě. Případné poškození okamžitě nahlaste pro‐
dejci, u kterého jste spotřebič koupili. V tomto případě si uschovejte obal.
• Doporučujeme vám, abyste se zapojením spotřebiče počkali nejméně čtyři
hodiny, aby olej mohl natéct zpět do kompresoru.
• Okolo spotřebiče musí být dostatečná cirkulace vzduchu, jinak by se
přehříval. K dosažení dostatečného větrání se řiďte pokyny k instalaci.
• Pokud je to možné, měl by spotřebič stát zadní stranou ke stěně, aby byly
jeho horké části nepřístupné (kompresor, kondenzátor), a nemohli jste o ně
zachytit nebo se spálit.
• Spotřebič nesmí být umístěn v blízkosti radiátorů nebo sporáků.
• Zkontrolujte, zda je zástrčka po instalaci spotřebiče přístupná.
•
Spotřebič připojte výhradně k přívodu pitné vody.
3)
Servis
• Jakékoliv elektrikářské práce, nutné pro zapojení tohoto spotřebiče, smí
provádět pouze kvalifikovaný elektrikář nebo osoba s příslušným oprávně‐
ním.
• Pokud je spotřebič nutné opravit, obraťte se na autorizované servisní středi‐
sko, které smí použít výhradně originální náhradní díly.
5
Ochrana životního prostředí
Tento přístroj neobsahuje plyny, které mohou poškodit ozónovou vrstvu, ani v
chladicím okruhu, ani v izolačních materiálech. Spotřebič nelikvidujte společně
s domácím odpadem a smetím. Izolační pěna obsahuje hořlavé plyny:
spotřebič je nutné zlikvidovat podle příslušných předpisů, které získáte na
obecním úřadě. Zabraňte poškození chladicí jednotky, hlavně vzadu v blízkosti
výměníku tepla. Materiály použité u tohoto spotřebiče označené symbolem
jsou recyklovatelné.
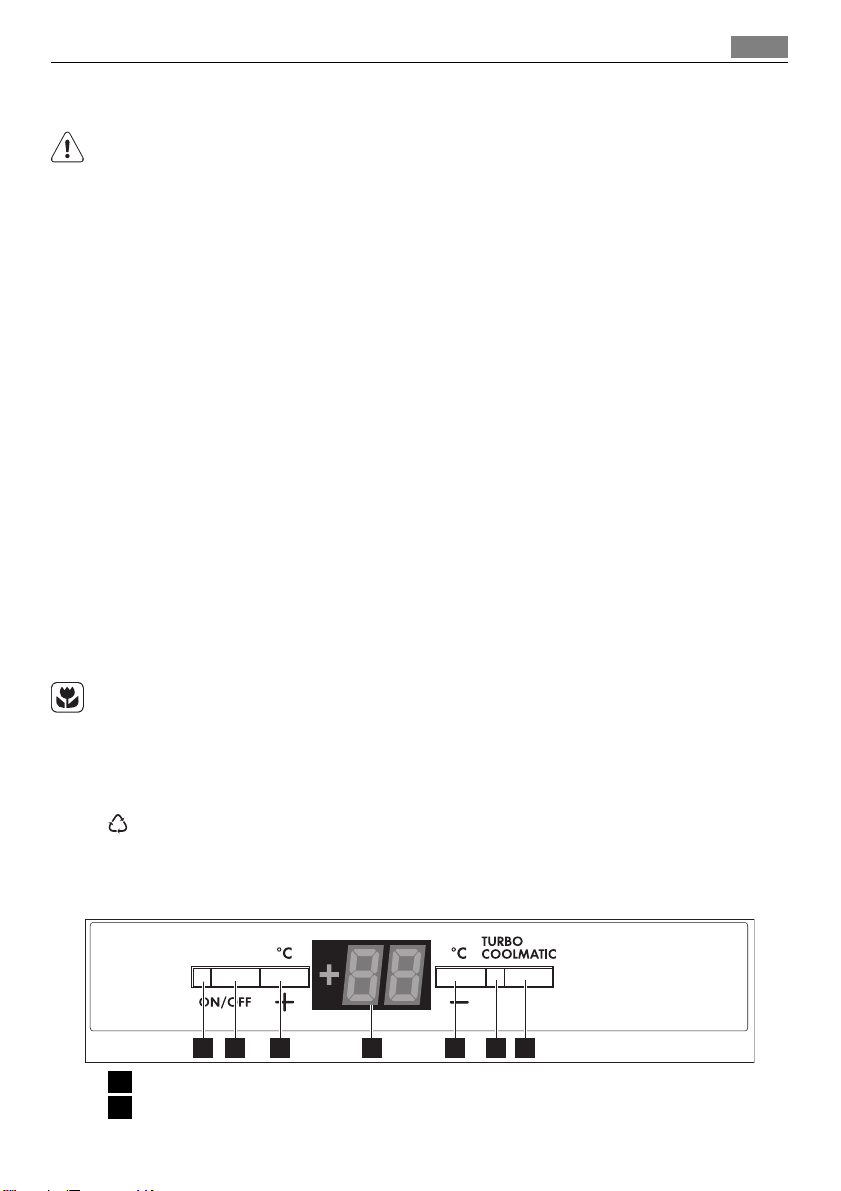
Ovládací panel
1 2 3 4 5 6 7
1 Provozní kontrolka chladničky
2 Vypínač ON/OFF chladničky
3) Pokud je spotřebič vybaven vodovodní přípojkou
Page 6

6
Ovládací panel
3 Regulátor teploty chladničky, tlačítko +
4 Displej teploty chladničky
5 Regulátor teploty chladničky, tlačítko -
6 Kontrolka TURBO COOLMATIC
7 Tlačítko TURBO COOLMATIC
Zapnutí chladničky
1. Zasuňte zástrčku do síťové zásuvky.
2. Stiskněte vypínač ON/OFF.
3. Provozní kontrolka se rozsvítí.
Vypnutí chladničky
1. Ovladač ON/OFF podržte stisknutý déle než 5 vteřin.
2. Poté se zobrazí odpočítávání teploty od -3-2-1. Když se zobrazí "1" , je
chladnička vypnutá. Displej teploty zhasne. Provozní kontrolka zhasne.
Tlačítka nastavení teploty
Teplota se nastavuje pomocí tlačítek nastavení teploty. Tato tlačítka jsou spo‐
jena s displejem teploty.
• Displej teploty se přepíná z displeje SKUTEČNÉ teploty (displej teploty svítí)
na displej POŽADOVANÉ teploty (displej teploty bliká) stisknutím jednoho
ze dvou tlačítek nastavení teploty.
• Při každém stisknutí jednoho z těchto dvou tlačítek se POŽADOVANÁ te‐
plota změní o 1°C. POŽADOVANÉ teploty musí být dosaženo do 24 hodin.
Jestliže nestisknete ani jedno tlačítko, displej teploty se automaticky za okam‐
žik přepne zpět (asi po 5 s) na displej SKUTEČNÉ teploty.
POŽADOVANÁ teplota je:
Teplota zvolená pro vnitřní prostor chladničky. POŽADOVANÁ teplota je sig‐
nalizována blikajícími čísly.
SKUTEČNÁ teplota je:
Displej teploty ukazuje skutečnou teplotu uvnitř chladničky. SKUTEČNÁ te‐
plota je signalizována svítícími čísly.
Kontrolka teploty
Displej teploty zobrazuje různé informace:
• Během běžného provozu se zobrazuje současná teplota uvnitř mrazničky
(SKUTEČNÁ teplota).
• Po seřízení teploty na displeji bliká právě nastavená teplota chladničky (PO‐
ŽADOVANÁ teplota).
Po nastavení teploty počkejte asi 24 hodin, až se displej teploty ustálí.
Nastavení teploty
Chcete-li spotřebič nastavit, postupujte takto:
1. Nastavte požadovanou teplotu stisknutím příslušného ovladače teploty.
Displej teploty bude okamžitě ukáže změněné nastavení (POŽADOVA‐
NOU teplotu) a bude blikat.
Page 7
Při prvním použití
2. Při každém stisknutí ovladače teploty se POŽADOVANÁ teplota změní o
1 °C. POŽADOVANÉ teploty musí být dosaženo do 24 hodin.
3. Po nastavení požadované teploty se za krátkou dobu (asi 5 s) displej teploty
změní a opět zobrazuje současnou SKUTEČNOU teplotu uvnitř příslušné‐
ho oddílu. Displej teploty přestane blikat a bude stále svítit.
Pro správné uložení potravin nastavte následující teplotu:
• +5 °C v chladničce
Jestliže změníte nastavení, kompresor se nespustí hned, pokud právě probíhá
automatické odmrazování. Protože chladnička rychle dosáhne skladovací te‐
ploty, můžete do ní vložit potraviny ihned po zapnutí.
Funkce TURBO COOLMATIC
Funkce TURBO COOLMATIC je vhodná pro rychlé zchlazení velkého množ‐
ství potravin v chladničce.
Chcete-li tuto funkci zapnout, postupujte takto:
1. Stiskněte tlačítko TURBO COOLMATIC.
2. Rozsvítí se kontrolka TURBO COOLMATIC.
Funkce TURBO COOLMATIC pak zajišťuje intenzivní chlazení. Automaticky
se zvolí POŽADOVANÁ teplota +3°C.
Funkce TURBO COOLMATIC je ukončena automaticky po 6 hodinách.
Funkci můžete kdykoli vypnout:
1. Stiskněte tlačítko TURBO COOLMATIC.
2. Kontrolka TURBO COOLMATIC zhasne.
7
Při prvním použití
Čistění vnitřku spotřebiče
Před prvním použitím spotřebiče vymyjte vnitřek a všechno vnitřní příslušen‐
ství vlažnou vodou s trochou neutrálního mycího prostředku, abyste odstranili
typický pach nového výrobku, a pak vše důkladně utřete do sucha.
Nepoužívejte čisticí prostředky nebo abrazivní prášky, které mohou poškodit
povrch spotřebiče.
Denní používání
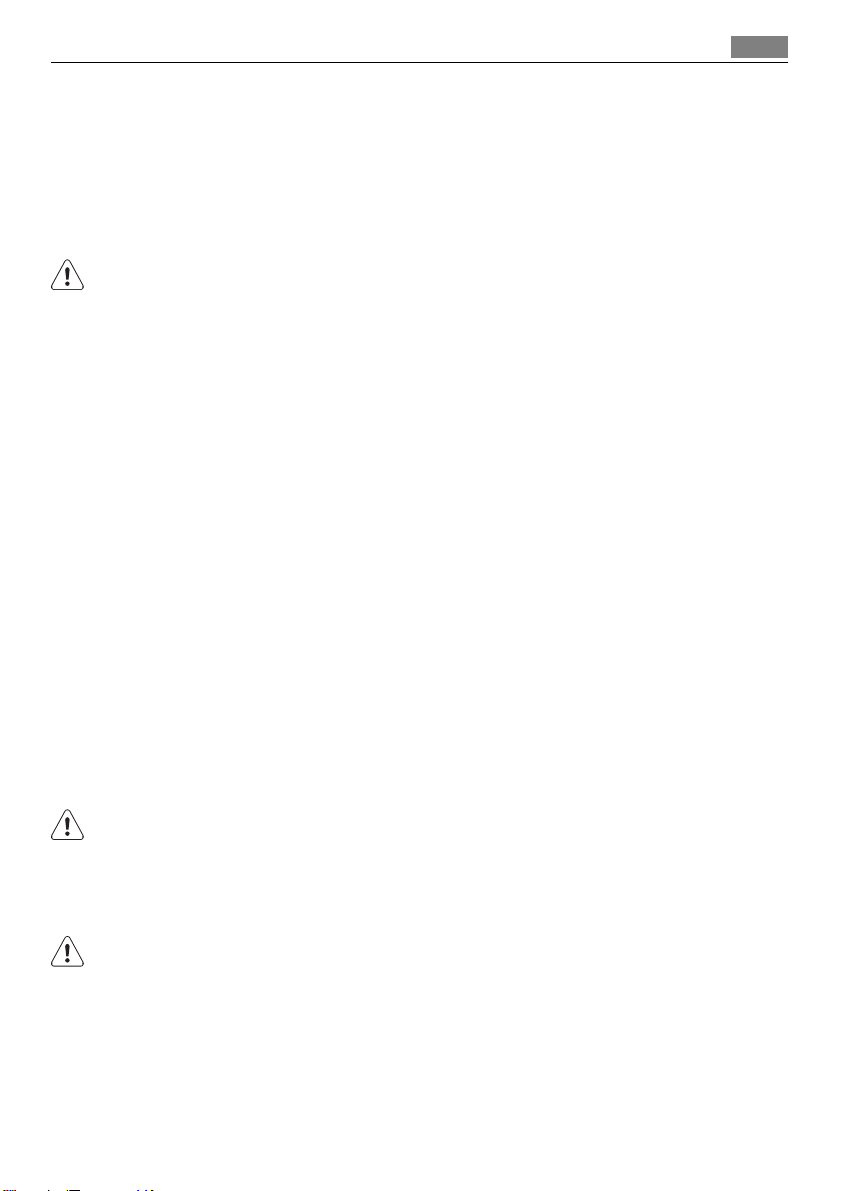
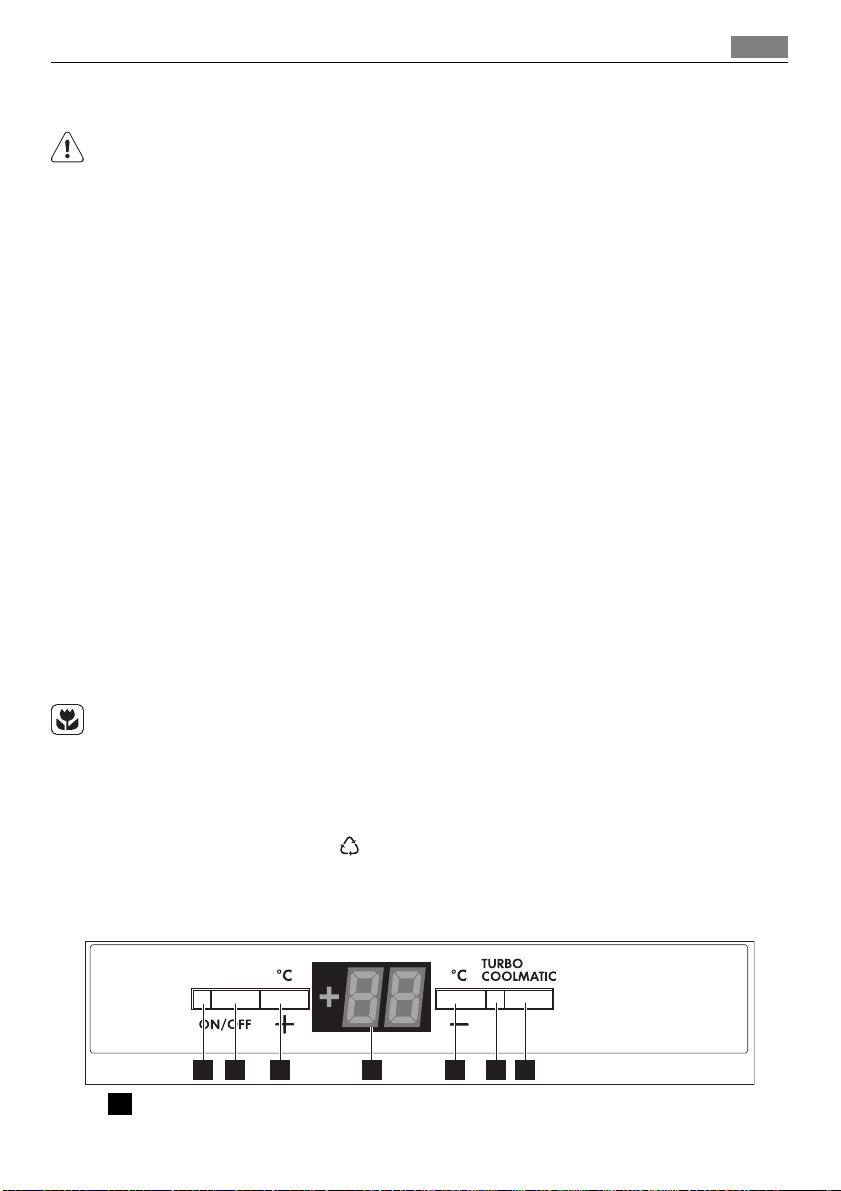
Tento spotřebič se prodává ve Francii.
V souladu s předpisy platnými v této zemi musí být vybaven speciálním ozna‐
čením (viz obrázek) umístěným v dolním oddílu chladničky, které udává nej‐
chladnější zónu chladničky.
Page 8

8
Denní používání
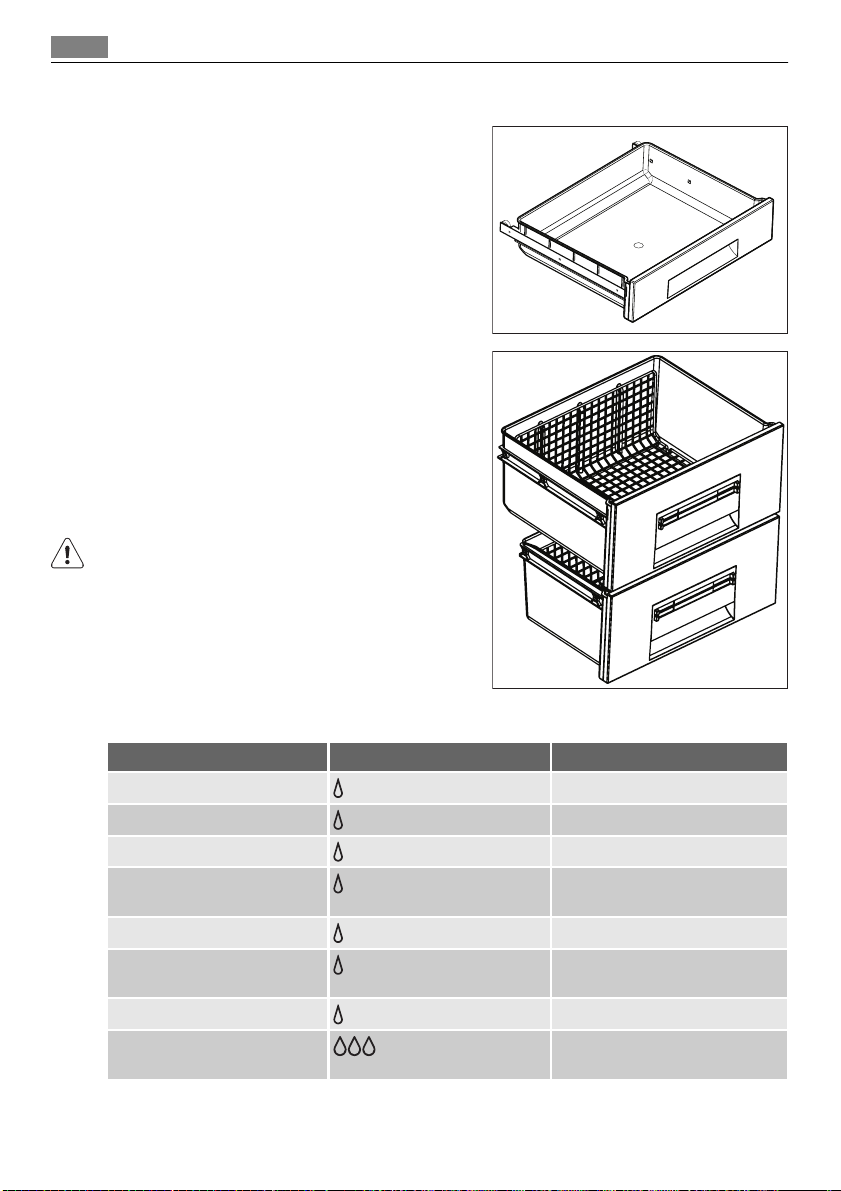
Přemístitelné police
Na stěnách chladničky jsou kolejničky, do
kterých se podle přání zasunují police.
K lepšímu využití prostoru mohou přední
poloviční police ležet na zadních policích.
Umístění dveřních poliček
Dveřní poličky můžete umístit do různé výšky a vkládat tak do nich různě velká
balení potravin.
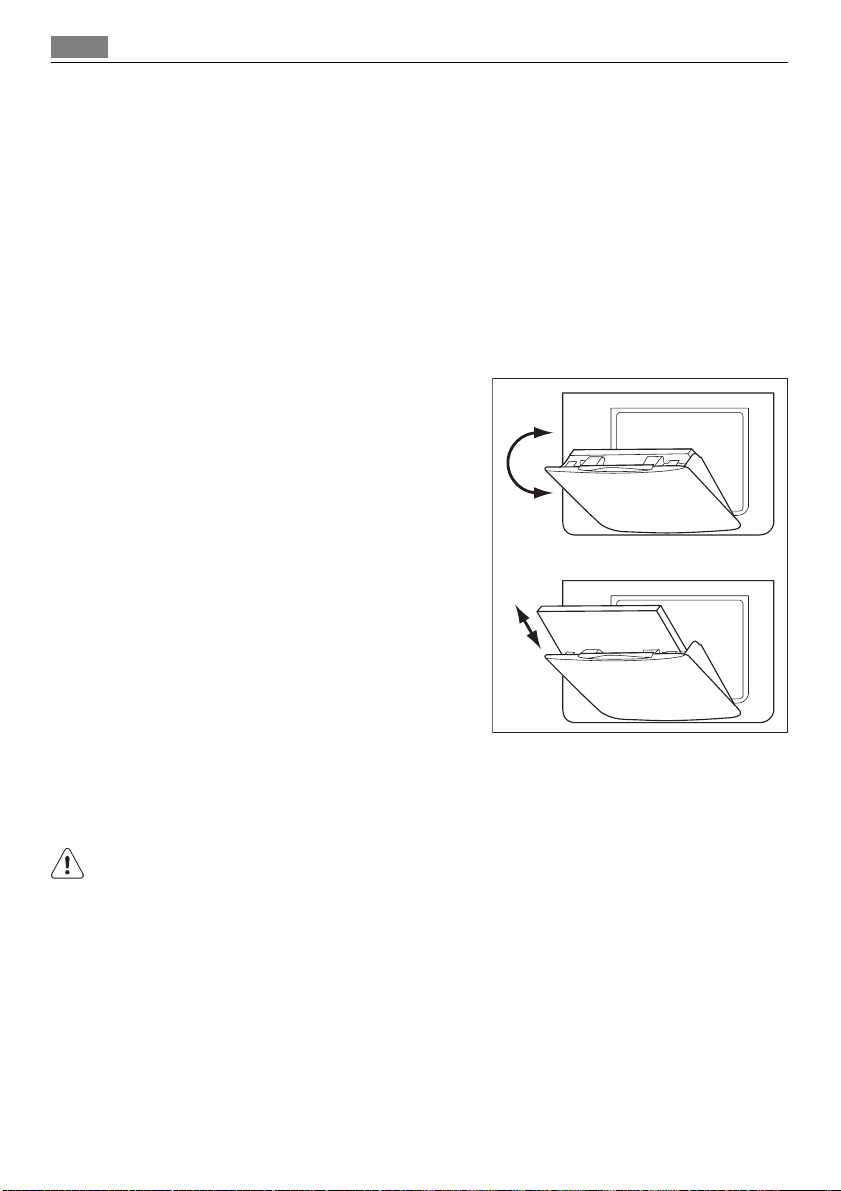
Umístění dveřních poliček
Dveřní poloviční polici můžete umístit do různé výšky.
Postupujte následovně:
1. Zvedněte polici s poloviční dveřní
policí nahoru a vytáhněte ji z
dveřních držáků.
2. Odstraňte podpěru z vodicí lišty pod
policí.
3. Stejným postupem v obráceném
pořadí zasuňte polici do jiné výšky.
Page 9
Denní používání
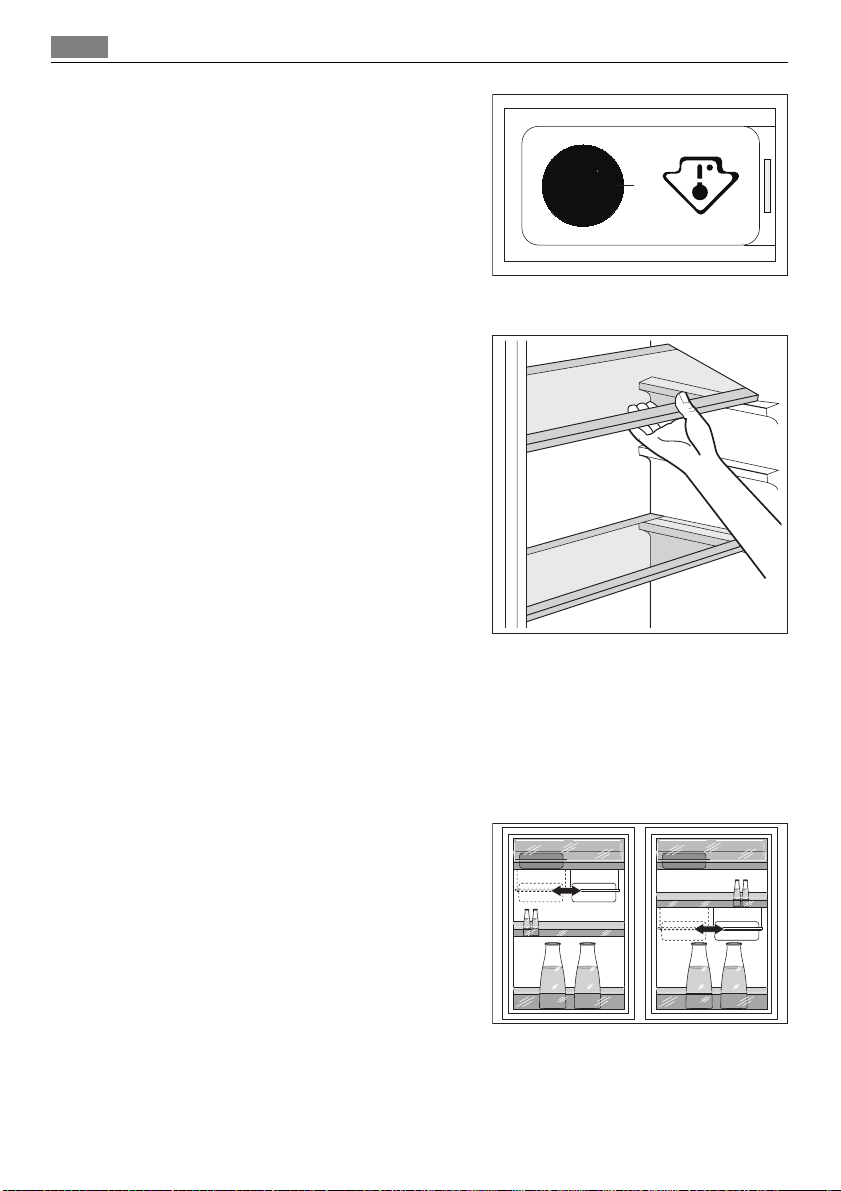
Uhlíkový vzduchový filtr
Tento spotřebič je vybavený uhlíkovým fil‐
trem CLEAN AIR CONTROL umístěným v
krytu na zadní stěně chladicího oddílu.
Filtr čistí vzduch odstraňováním nežádou‐
cích pachů v chladničce a oddílu LONGF‐
RESH , a tím dále zlepšuje kvalitu sklado‐
vání potravin.
Při provozu musí být kryt vzduchového větrání vždy zavřený.
LONGFRESH Přihrádka
V oddílu LONGFRESH 0°C se teplota kontroluje automaticky. Zůstává stále
na 0 °C, žádné seřizování není nutné.
Stálá skladovací teplota kolem 0 °C a relativní vlhkost mezi 45 a 90 % zajišťují
optimální podmínky pro různé druhy potravin.
V oddílu LONGFRESH 0°C můžete proto skladovat různé druhy čerstvých po‐
travin, a v porovnání s normálními oddíly chladničky v něm vydrží až 3 x déle
a v lepší kvalitě. Tímto způsobem vydrží potraviny díle čerstvé. Dobře se
uchová chuť, svěžest, kvalita i vyživovací hodnoty (vitamíny a minerály) po‐
travin. Ztráta váhy zeleniny i ovoce bude nižší. Potraviny budou mít celkově
vyšší vyživovací hodnotu.
9
Oddíl LONGFRESH 0°C je také vhodný pro rozmrazování potravin.
V takovém případě můžete rozmrazené potraviny uchovat až dva dny.
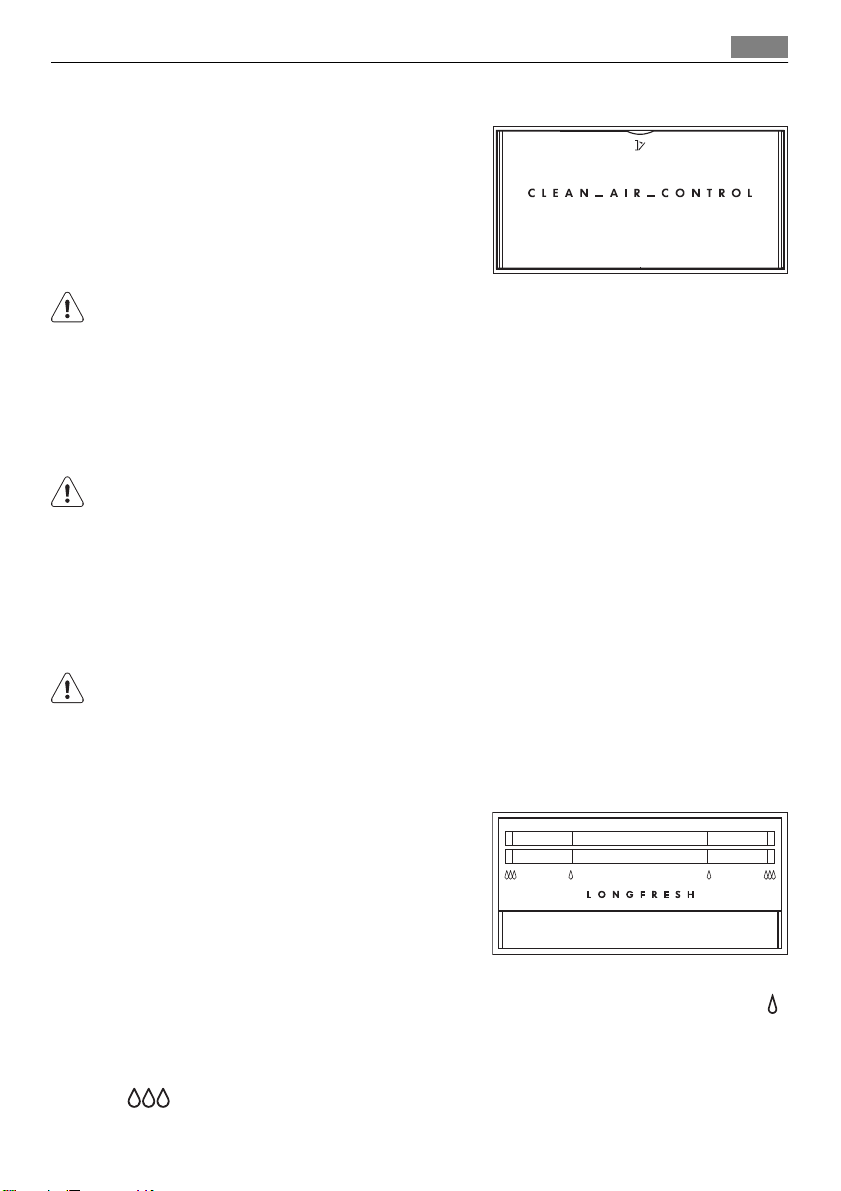
Regulace vlhkosti
Obě zásuvky lze použít podle požadova‐
ných podmínek pro uskladnění nezávisle
na sobě s nižší nebo vyšší vlhkostí.
Regulace se provádí pro každou zásuvku
samostatně pomocí šoupátka na přední
straně zásuvky.
• "Sucho": nízká vlhkost vzduchu - až 50
% relativní vlhkost
Tohoto stupně vlhkosti dosáhnete nastavením obou šoupátek do polohy
větrací otvory jsou široce otevřené.
• "Vlhko": vysoká relativní vlhkost - až 90 %
Tohoto stupně vlhkosti dosáhnete nastavením obou šoupátek do polohy
, větrací otvory jsou zavřené. Vlhkost je uzavřena uvnitř zásuvky a ne‐
může unikat ven.
,
Page 10
10
Denní používání
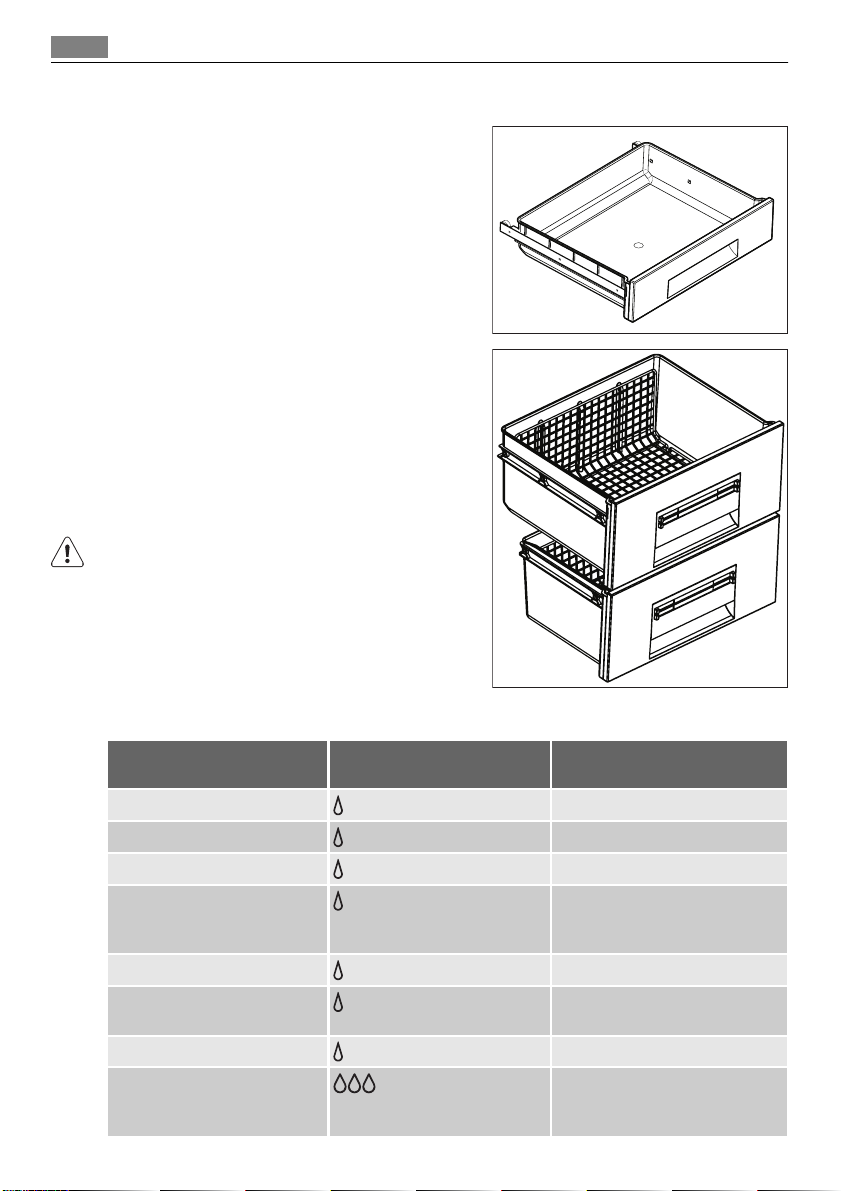
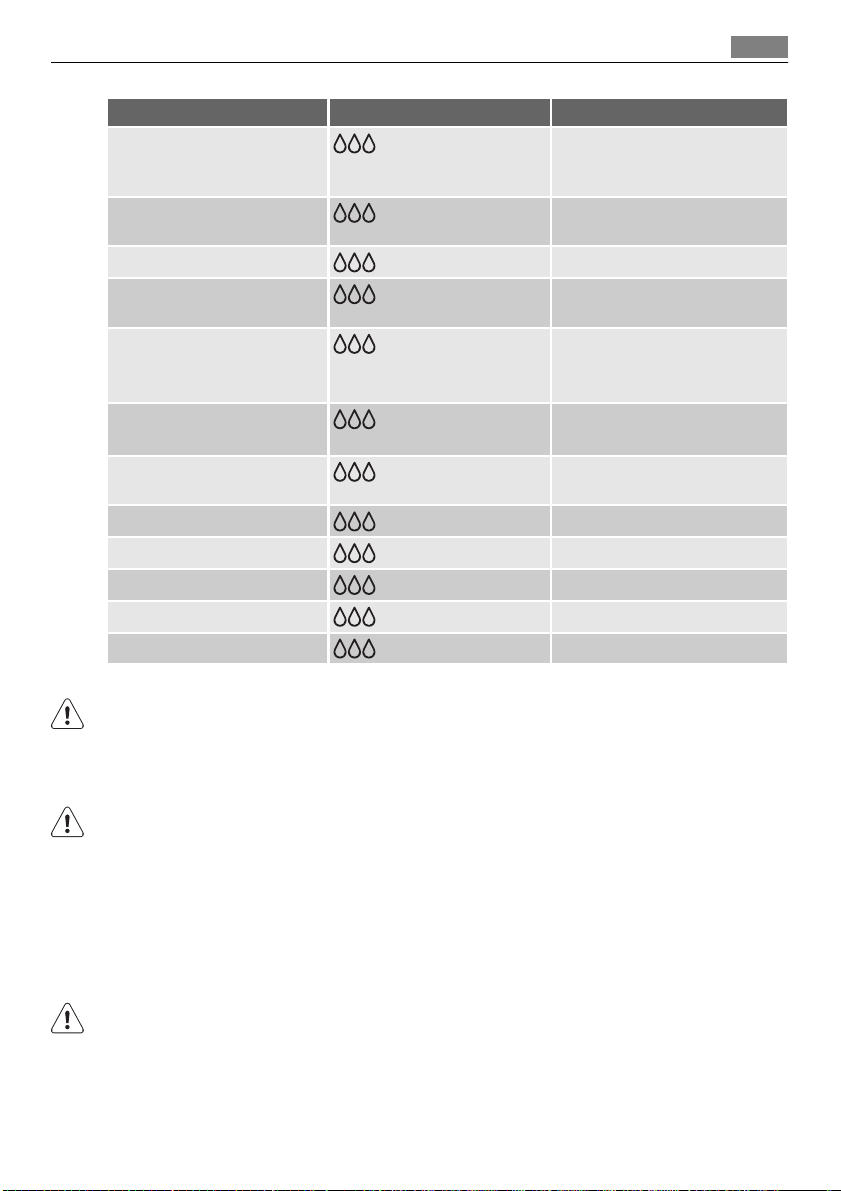
Zásuvky Longfresh
Vlhkost nelze nastavit.
Drátěné police uvnitř zásuvky umožňují
volný oběh vzduchu a tedy lepší uchování
potravin.
Oddíl má zarážky, které brání vypadnutí
zásuvek při jejich úplném vytažení.
Chcete-li zásuvky odstranit (např. k čiště‐
ní), vytáhněte je až na doraz, nadzdvihněte
a vyjměte.
Jestliže vytáhnete všechny zásuvky, mů‐
žete uložit velké množství potravin.
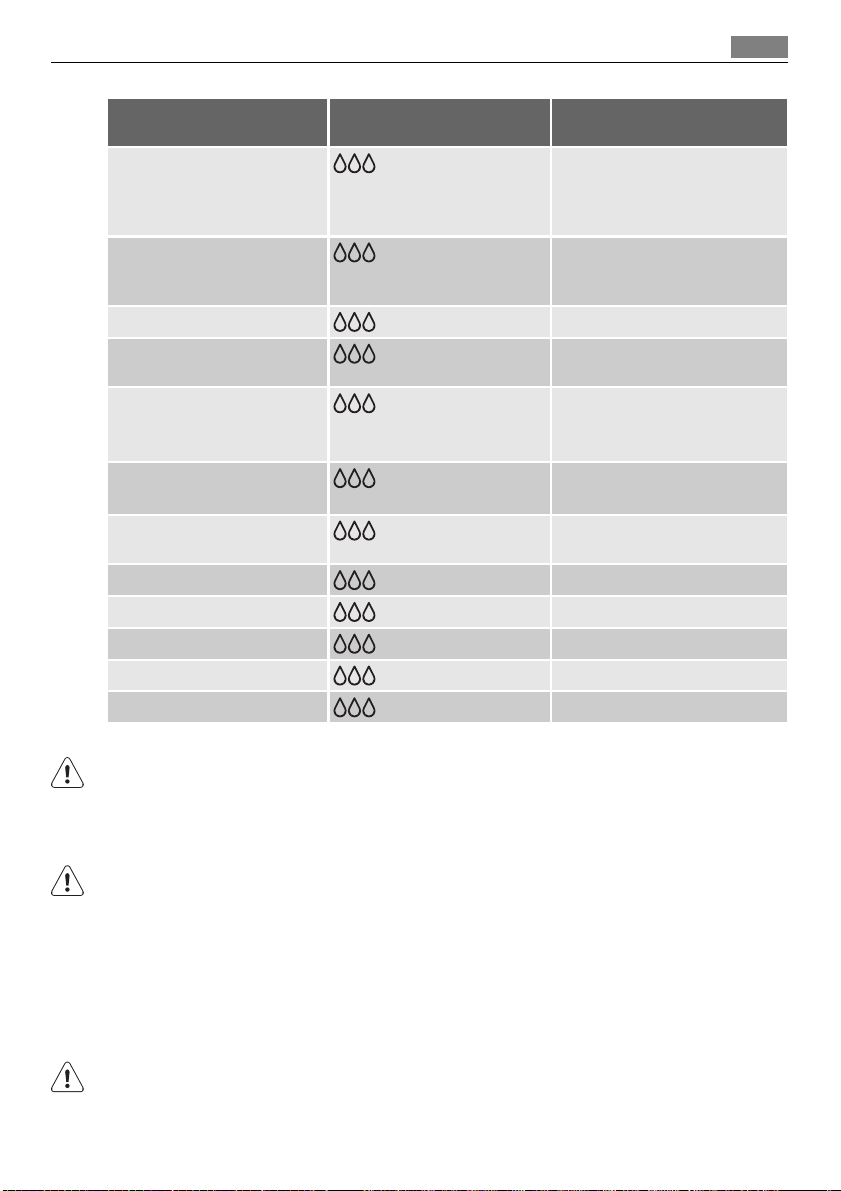
Doba uchování v oddílu Longfresh 0°C pro čerstvé potraviny
Druh potravin Nastavení vlhkosti vzdu‐
Cibule
Máslo
Velké kusy vepřového
Hovězí, zvěřina, malé
kousky vepřového, drů‐
bež
Rajská omáčka
Ryba, korýše, vařené
masné výrobky
Vařené mořské plody
Salát, zelenina mrkve, by‐
linky, růžičková kapusta,
celer
"sucho"
"sucho"
"sucho"
"sucho"
"sucho"
"sucho"
"sucho"
chu
"vlhko"
Doba uchování
až 5 měsíců
až 1 měsíc
až 10 dní
až 7 dní
až 4 dny
až 3 dny
až 2 dny
až 1 měsíc
Page 11
Denní používání
11
Druh potravin Nastavení vlhkosti vzdu‐
Artyčoky, květák, cikorka,
ledový salát, čekanka, po‐
lní salát, hlávkový salát,
pórek, ředkvička
Brokolice, čínské zelí, ka‐
pusta, zelí, ředkev, kapu‐
sta kadeřavá
Hrášek, kedlubny
Jarní cibulky, ředkev,
chřest, špenát
Ovoce
Hrušky, datle (čerstvé), ja‐
hody, broskve
Švestky
rebarbora, angrešt
Jablka (odolná vůči chla‐
du), kdoule
Meruňky, třešně
Slívy, hroznové víno
Ostružiny, hrozinky
Fíky (čerstvé)
Borůvky, maliny
1) Čím je ovoce zralejší, tím kratší je doba uchování.
1)
1)
1)
chu
"vlhko"
"vlhko"
"vlhko"
"vlhko"
"vlhko"
"vlhko"
"vlhko"
"vlhko"
"vlhko"
"vlhko"
"vlhko"
"vlhko"
Doba uchování
až 21 dní
až 14 dní
až 10 dní
až 7 dní
až 1 měsíc
až 21 dní
až 20 dní
až 14 dní
až 10 dní
až 8 dní
až 7 dní
až 5 dní
Moučníky obsahující smetanu a další druhy pečiva lze uložit do oddílu Longf‐
resh 0 °C na 2 nebo 3 dny.
Do oddílu Longfresh 0 °C se nesmí dávat:
• ovoce citlivé na chlad, které se má uložit do sklípku nebo do pokojové te‐
ploty, jako jsou ananas, banány, grapefruit, melouny, mango, papája, po‐
meranče, citrony, kiwi.
• Další druhy potravin se musí uložit do chladicího oddílu (např. všechny druhy
sýrů, studené řezy, apod.)
Page 12

12
Užitečné rady a tipy
Stupeň vlhkosti vzduchu v zásuvkách závisí na množství vlhkosti v uložených
potravinách, ovoci a zelenině a četnosti otvírání dveří.
Oddíl Longfresh 0 °C je také vhodný pro pomalé rozmrazování potravin. V
tomto případě můžete rozmrazené potraviny nechat v oddílu Longfresh 0 °C
až dva dny.
Tipy:
• Sledujte čerstvost potravin, hlavně datum doporučené spotřeby. Kvalita a
svěžest potravin mají vliv na dobu uchování.
• Celá doba uložení závisí na podmínkách uchování potravin ještě před ulo‐
žením v chladničce.
• Jídlo, ovoce nebo zelenina musíte před uložením vždy zabalit nebo dát do
krabičky.
• Krmivo pro zvířata skladujte vždy zabalené a suché.
• Potraviny bohaté na bílkoviny se kazí rychleji. Mořské plody se tedy zkazí
rychleji než ryba, a ta zase rychleji než maso. Při uložení potravin v oddílu
0 °C se doba uchování pro tyto druhy potravin může prodloužit až třikrát bez
zhoršení kvality.
• Všechny potraviny uložené v oddílu 0 °C se musí ze zásuvky vyjmout asi
15-30 min před spotřebou, zvláště ovoce a zelenina určené k jídlu bez dal‐
šího vaření. Když takto dovolíte ovoci a zelenině dosáhnout znovu teploty
místnosti, zlepšit se jejich konzistence i chuť.
Užitečné rady a tipy
Tipy pro úsporu energie
• Neotvírejte často dveře, ani je nenechávejte otevřené déle, než je nezbytně
nutné.
• Jestliže je okolní teplota vysoká, regulátor teploty je na vyšším nastavení a
spotřebič je zcela zaplněný, může kompresor běžet nepřetržitě a na výpar‐
níku se pak tvoří námraza nebo led. V tomto případě je nutné nastavit re‐
gulátor teploty na nižší nastavení, aby se spotřebič automaticky odmrazil, a
tím snížil spotřebu energie.
Tipy pro chlazení čerstvých potravin
K dosažení nejlepšího výkonu:
• do chladničky nevkládejte teplé potraviny nebo tekutiny, které se odpařují;
• potraviny zakrývejte nebo je zabalujte, zejména mají-li silnou vůni;
• potraviny položte tak, aby okolo nich mohl proudit volně vzduch.
Tipy pro chlazení
Užitečné rady:
Maso (všechny druhy): zabalte do polyetylénového sáčku a položte na skle‐
něnou polici nad zásuvku se zeleninou.
Z hlediska bezpečné konzumace takto skladujte maso pouze jeden nebo dva
dny.
Vařená jídla, studená jídla apod.: můžete zakrýt a položit na jakoukoli polici.
Page 13
Čištění a údržba
Ovoce a zelenina: musí být důkladně očištěné, vložte je do speciální zásuvky
(nebo zásuvek), které jsou součástí vybavení.
Máslo a sýr: musí být ve speciální vzduchotěsné nádobě nebo zabalené do
hliníkové fólie či do polyetylénového sáčku, aby k nim měl vzduch co nejméně
přístup.
Láhve s mlékem: musí být uzavřeny víčkem a uloženy v držáku na láhve ve
dveřích.
Banány, brambory, cibule a česnek smí být v chladničce pouze tehdy, jsou-li
zabalené.
Čištění a údržba
POZOR
Před každou údržbou vytáhněte zástrčku spotřebiče ze zdroje elektrického
napájení.
Tento spotřebič obsahuje uhlovodíky v chladicí jednotce; údržbu a doplňování
smí proto provádět pouze autorizovaný pracovník.
Pravidelné čištění
Spotřebič je nutné pravidelně čistit:
• vnitřek a všechno vnitřní příslušenství omyjte vlažnou vodou s trochou ne‐
utrálního mycího prostředku;
• pravidelně kontrolujte těsnění dvířek a otírejte je, aby bylo čisté, bez usa‐
zených nečistot;
• důkladně vše opláchněte a osušte.
Nehýbejte s žádnými trubkami nebo kabely uvnitř spotřebiče, netahejte za ně
a nepoškozujte je.
Nikdy nepoužívejte k čištění vnitřku spotřebiče abrazivní prášky, vysoce pa‐
rfémované čisticí prostředky nebo vosková leštidla, protože mohou poškodit
povrch a zanechat silný pach.
13
Kondenzátor (černá mřížka) a kompresor na zadní straně spotřebiče čistěte
kartáčem nebo vysavačem. Tím se zlepší výkon spotřebiče a sníží spotřeba
energie.
Nejnižší polici, oddělující chladnější oddíl od oddílu LONGFRESH 0°C lze vy‐
jmout pouze při čištění. Chcete-li ji odstranit, prostě ji vytáhněte.
Kryty zásuvek v oddílu můžete k čištění také vytáhnout.
Po vyčištění musíte tuto polici a kryty vrátit zpět na jejich místo, jinak by oddíl
LONGFRESH 0°C správně nefungoval.
Dbejte na to, abyste nepoškodili chladicí systém.
Page 14
14
Čištění a údržba
Řada prostředků na čistění povrchů v kuchyni obsahuje chemikálie, které mo‐
hou poškodit umělou hmotu použitou v tomto spotřebiči. Doporučujeme proto
čistit povrch spotřebiče pouze teplou vodou s trochou tekutého mycího
prostředku na nádobí.
Po čištění znovu připojte spotřebič k elektrické síti.
Výměna uhlíkového filtru
Uhlíkový filtr pomáhá omezovat nepříjemné pachy uvnitř chladničky a brání
tak vzniku nepříjemné příchuti v choulostivých potravinách.
K zajištění nejlepší účinnosti uhlíkového vzduchového filtru je nutné ho každý
rok vyměnit.
Nové aktivní vzduchové filtry lze koupit v příslušných prodejnách v místě by‐
dliště.
• Vzduchový filtr se instaluje za kryt a
můžete ho vyjmout vytažením krytu
směrem ven (1).
• Vypotřebovaný uhlíkový filtr vytáhněte
ze štěrbiny.
1
2
• Do štěrbiny vložte nový filtr (2).
• Kryt zavřete.
Uhlíkový filtr je příslušenství ze spotřebního materiálu a proto se na něj ne‐
vztahuje záruka.
Při provozu musí být kryt vzduchového větrání vždy zavřený.
Se vzduchovým filtrem zacházejte opatrně, abyste nepoškrábali povrch filtru.
Odmrazování chladničky
Odmrazování chladicího oddílu je automatické.
Rozmrazená voda teče do nádoby na kompresoru a odpařuje se. Tuto nádobu
nelze odstranit.
Vyřazení spotřebiče z provozu
Jestliže spotřebič nebudete po dlouhou dobu používat, proveďte následná
opatření:
• odpojte spotřebič od sítě
• vyjměte všechny potraviny
Page 15
Co dělat, když...
15
•
odmrazte
4)
a vyčistěte spotřebič a všechno příslušenství
• nechte dveře pootevřené, abyste zabránili vzniku nepříjemných pachů.
Pokud necháte spotřebič zapnutý, požádejte někoho, aby ho občas zkontro‐
loval, zda se potraviny nekazí, např. z důvodu výpadku proudu.
Co dělat, když...
UPOZORNĚNÍ
Při hledání a odstraňování závady vytáhněte zástrčku ze síťové zásuvky.
Odstraňování závady, které není uvedeno v tomto návodu, smí provádět po‐
uze kvalifikovaný elektrikář nebo osoba s příslušným oprávněním.
Během normálního používání vydává spotřebič různé zvuky (kompresor, chla‐
dicí okruh).
Problém Možná příčina Řešení
Spotřebič je hlučný Spotřebič není správně in‐
Spotřebič nefunguje.
Osvětlení nefunguje.
Zástrčka není zasunutá
Spotřebič je bez proudu.
Osvětlení nefunguje. Osvětlení je v klidovém sta‐
Vadná žárovka. Viz "Výměna žárovky".
Provozní kontrolka bli‐
ká.
Kompresor funguje
nepřetržitě.
Dveře nejsou správně
Otvírali jste příliš často
Teplota spotřebiče je příliš
stalovaný
Spotřebič je vypnutý. Zapněte spotřebič.
správně do zásuvky.
Zásuvka není pod pro‐
udem.
vu.
Spotřebič nefunguje správ‐
ně.
Není správně nastavená te‐
plota.
zavřené.
dveře.
vysoká.
Zkontrolujte, zda je ve stabil‐
ní poloze (všechny čtyři no‐
žičky musejí být na podlaze)
Zástrčku zasuňte správně do
zásuvky.
Zasuňte do zásuvky zástrčku
jiného elektrického spotřebi‐
če.
Obraťte se na kvalifikované‐
ho elektrikáře.
Zavřete a otevřete dveře.
Obraťte se na kvalifikované‐
ho elektrikáře.
Nastavte vyšší teplotu.
Viz "Zavření dveří".
Nenechávejte dveře
otevřené déle, než je nezbyt‐
ně nutné.
Nechte jídlo vychladnout na
teplotu místnosti, a teprve
pak ho vložte do spotřebiče.
4) Pokud je to možné.
Page 16
16
Co dělat, když...
Problém Možná příčina Řešení
Teplota místnosti je příliš
Po stisknutí tlačítka
TURBO COOLMATIC
nebo po změně teploty
se kompresor nespustí
okamžitě.
Po vnitřní zadní stěně
chladničky stéká voda.
V chladničce teče voda. Odtokový otvor je ucpaný. Vyčistěte odtokový otvor.
Vložené potraviny brání od‐
Teplotu nelze nastavit. TURBO COOLMATIC funk‐
Teplota ve spotřebiči je
příliš nízká/vysoká.
Dveře nejsou správně
Teplota spotřebiče je příliš
Vložili jste příliš velké množ‐
Teplota v chladničce je
příliš vysoká.
vysoká.
Kompresor se spouští až po
určité době.
Během automatického od‐
mrazování se na zadní stě‐
ně rozmrazuje námraza.
toku vody do odtokového
otvoru.
ce je zapnutá.
Není správně nastavená te‐
plota.
zavřené.
vysoká.
ství potravin najednou.
Ve spotřebiči neobíhá
chladný vzduch.
Snižte teplotu místnosti.
Nejde o závadu.
Nejde o závadu.
Přemístěte potraviny tak,
aby se nedotýkaly zadní stě‐
ny.
Vypněte TURBO COOLMA‐
TIC ručně, nebo počkejte s
nastavením teploty, až se
funkce resetuje automaticky.
Viz funkci " TURBO COOL‐
MATIC".
Nastavte vyšší/nižší teplotu.
Viz "Zavření dveří".
Nechte jídlo vychladnout na
teplotu místnosti, a teprve
pak ho vložte do spotřebiče.
Dávejte do spotřebiče raději
méně potravin.
Vždy zkontrolujte, zda ve
spotřebiči může dobře obíhat
chladný vzduch.
Page 17
Technické údaje
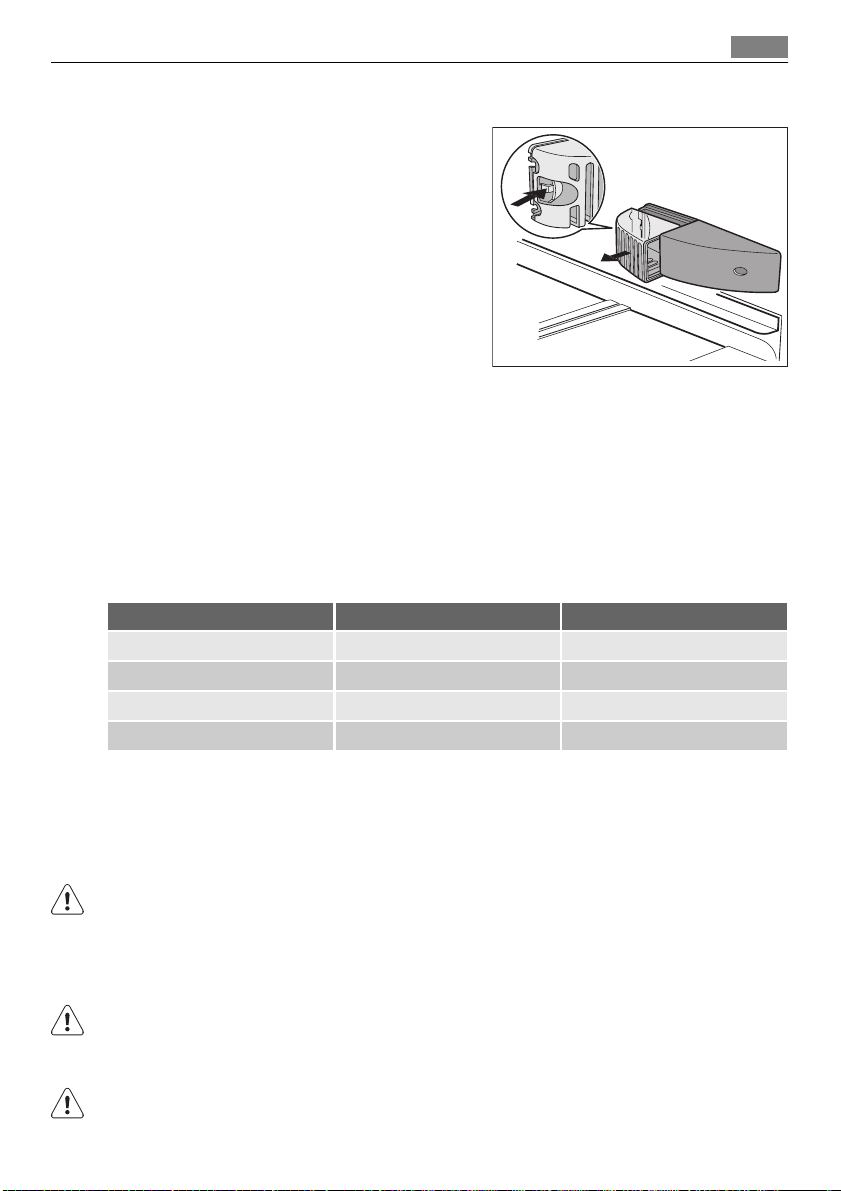
Výměna žárovky
1. Vypněte spotřebič.
2. Stiskněte zadní háček a současně
posuňte kryt ve směru označeném
šipkou.
3. Použitou žárovku vyměňte za novou
se stejným příkonem (maximální
příkon je uveden na krytu světla).
4. Nasaďte kryt žárovky zasunutím
zpět do původní polohy.
5. Zapněte spotřebič.
6. Otevřete dveře. Přesvědčte se, že
se osvětlení rozsvítí.
Zavření dveří
1. Vyčistěte těsnění dveří.
2. Pokud je to nutné, dveře seřiďte. Řiďte se pokyny v části "Instalace".
3. V případě potřeby vadné těsnění dveří vyměňte. Obraťte se na servisní
středisko.
Technické údaje
Rozměry výklenku
Výška 1780 mm
Šířka 560 mm
Hloubka 550 mm
Technické údaje jsou uvedeny na typovém štítku umístěném na vnitřní levé
straně spotřebiče a na energetickém štítku.
17
Instalace
UPOZORNĚNÍ
Přečtěte si pečlivě "Bezpečnostní informace" ještě před instalací k zajištění
bezpečnosti a správného provozu spotřebiče.
Umístění
UPOZORNĚNÍ
Jestliže likvidujete starý spotřebič se zámkem nebo západkou na dveřích, mu‐
síte ho znehodnotit tak, aby se malé děti nemohly uvnitř zavřít.
Síťová zástrčka musí být po instalaci volně přístupná.
Page 18
18
Instalace
Spotřebič instalujte na místě, jehož okolní teplota odpovídá klimatické třídě
uvedené na typovém štítku spotřebiče:
Klimatická třída Okolní teplota
SN +10°C až + 32°C
N +16°C až + 32°C
ST +16°C až + 38°C
T +16°C až + 43°C
Připojení k elektrické síti
Spotřebič smí být připojen k síti až po ověření, že napětí a frekvence uvedené
na typovém štítku odpovídají napětí v domácí síti.
Spotřebič musí být podle zákona uzemněn. Zástrčka napájecího kabelu je k
tomuto účelu vybavena příslušným kontaktem. Pokud není domácí zásuvka
uzemněná, poraďte se s odborníkem a připojte spotřebič k samostatnému
uzemnění v souladu s platnými předpisy .
Výrobce odmítá veškerou odpovědnost v případě nedodržení výše uvedených
pokynů.
Tento spotřebič je v souladu se směrnicemi EHS.
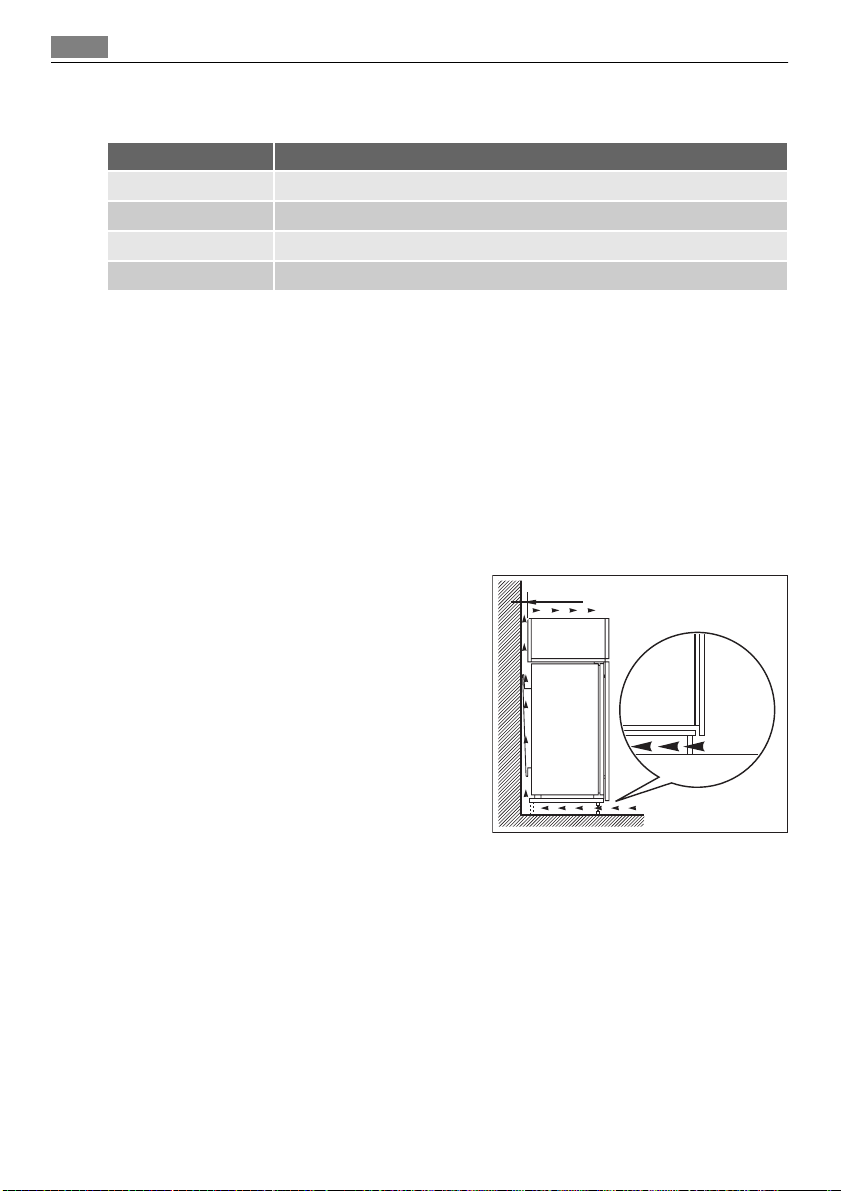
Požadavky na větrání
Prostor za spotřebičem musí umožňovat
dostatečné proudění vzduchu.
50 mm
min.
200 cm
2
Instalace uhlíkového vzduchového filtru
Uhlíkový vzduchový filtr je filtr z aktivního uhlíku, který pohlcuje nepříjemné
pachy a umožňuje zachování té nejlepší chuti a vůně všech potravin bez ne‐
bezpečí mísení vůní.
min.
200 cm
2
Page 19

Poznámky k životnímu prostředí
19
Uhlíkový filtr se dodává v plastovém sáčku,
aby se zachovaly jeho vlastnosti a život‐
nost. Filtr je nutné umístit do štěrbiny krytu
ještě před zapnutím spotřebiče.
1. Otevřete kryt klapky (1).
2. Vyjměte filtr z plastového sáčku.
3. Vložte filtr do štěrbiny na zadní straně
krytu klapky (2).
4. Zavřete kryt klapky.
Při provozu musí být klapka vzduchového
větrání zavřená.
S filtrem zacházejte opatrně, aby se z jeho
povrchu nemohlo nic uvolnit.
1
2
Poznámky k životnímu prostředí
Symbol na výrobku nebo jeho balení udává, že tento výrobek nepatří do
domácího odpadu. Je nutné odvézt ho do sběrného místa pro recyklaci
elektrického a elektronického zařízení. Zajištěním správné likvidace tohoto
výrobku pomůžete zabránit negativním důsledkům pro životní prostředí a
lidské zdraví, které by jinak byly způsobeny nevhodnou likvidací tohoto
výrobku. Podrobnější informace o recyklaci tohoto výrobku zjistíte u
příslušného místního úřadu, služby pro likvidaci domovního odpadu nebo v
obchodě, kde jste výrobek zakoupili.
Page 20
Inhoud
20
Wij danken u voor uw keuze voor een van onze producten van hoogwaardige
kwaliteit.
Lees deze gebruiksaanwijzing alstublieft zorgvuldig door, zo kunt u zeker zijn van
optimale en professionele prestaties van uw apparaat. De handleiding zal u in staat
stellen om alle processen perfect en op de meest efficiënte wijze te laten verlopen.
Wij adviseren u deze handleiding op een veilige plaats te bewaren, dan kunt u hem
te allen tijde raadplegen. Geef deze handleiding ook aan een eventuele toekomstige
eigenaar van het apparaat.
Wij wensen u veel plezier met uw nieuwe apparaat.
Inhoud
Veiligheidsinformatie 20
Veiligheid van kinderen en kwetsbare
mensen 21
Algemene veiligheid 21
Dagelijks gebruik 22
Onderhoud en reiniging 22
Installatie 23
Onderhoud 23
Bedieningspaneel 23
De koelkast inschakelen 24
De koelkast uitschakelen 24
Toetsen temperatuurinstelling 24
Temperatuurdisplay 24
Temperatuurregeling 24
TURBO COOLMATIC-functie 25
Het eerste gebruik 25
De binnenkant schoonmaken 25
Dagelijks gebruik 25
Verplaatsbare schappen 26
Het plaatsen van de deurschappen 26
Het plaatsen van de deurhelftplateaus
26
Koolstofluchtfilter 27
LONGFRESH -vak 27
Vochtigheidsregeling 27
Longfresh-laden 28
Bewaardtijd in het longfresh 0°C-vak voor
vers voedsel 28
Nuttige aanwijzingen en tips 30
Tips voor energiebesparing 30
Tips voor het koelen van vers voedsel 30
Nuttige tips voor het koelen 30
Onderhoud en reiniging 31
Periodieke reiniging 31
Het koolstoffilter vervangen 32
Het ontdooien van de koelkast 32
Periodes dat het apparaat niet gebruikt
wordt 32
Problemen oplossen 33
Het lampje vervangen 34
De deur sluiten 34
Technische gegevens 35
Montage 35
Opstelling 35
Elektrische aansluiting 35
Ventilatievereisten 36
Installatie van het koolstofluchtfilter 36
Het milieu 36
Wijzigingen voorbehouden
Veiligheidsinformatie
In het belang van uw veiligheid en om een correct gebruik te kunnen waarborgen is het
van belang dat u, alvorens het apparaat te installeren en in gebruik te nemen, deze gebruiksaanwijzing, inclusief de tips en waarschuwingen, grondig doorleest. Om onnodige
Page 21

Veiligheidsinformatie
vergissingen en ongevallen te voorkomen is het belangrijk ervoor te zorgen dat alle mensen
die het apparaat gebruiken, volledig bekend zijn met de werking ervan en de veiligheidsvoorzieningen. Bewaar deze instructies en zorg ervoor dat zij bij het apparaat blijven als
het wordt verplaatst of verkocht, zodat iedereen die het apparaat gedurende zijn hele
levensduur gebruikt, naar behoren is geïnformeerd over het gebruik en de veiligheid van
het apparaat.
Voor de veiligheid van mensen en eigendommen dient u zich aan de voorzorgsmaatregelen
uit dit instructieboekje te houden, de fabrikant is niet verantwoordelijk voor schade die
door het niet opvolgen van de aanwijzingen veroorzaakt is.
Veiligheid van kinderen en kwetsbare mensen
• Dit apparaat is niet bedoeld voor gebruik door personen (waaronder begrepen kinderen)
met verminderde fysieke, zintuiglijke vermogens of een gebrek aan ervaring en kennis,
tenzij dit onder toezicht gebeurt van een voor hun veiligheid verantwoordelijke persoon
of tenzij zij van een dergelijke persoon instructie hebben ontvangen over het gebruik
van het apparaat.
Houd kinderen uit de buurt om te voorkomen dat ze met het apparaat gaan spelen.
• Houd alle verpakkingsmateriaal buiten het bereik van kinderen. Gevaar voor verstikking.
• Als u het apparaat afdankt trek dan de stekker uit het stopcontact, snij de voedingskabel
door (zo dicht mogelijk bij het apparaat) en verwijder de deur om te voorkomen dat
kinderen een elektrische schok krijgen of zichzelf in het apparaat opsluiten.
• Als dit apparaat, dat voorzien is van een magnetische deursluiting, een ouder apparaat
vervangt, dat voorzien is van een veerslot (slot) op de deur of het deksel, zorg er dan
voor dat u het slot onbruikbaar maakt voordat u het oude apparaat weggooit. Dit voorkomt dat kinderen er in opgesloten kunnen raken.
21
Algemene veiligheid
LET OP!
Houd de ventilatie-openingen altijd vrij van obstructies.
• Dit apparaat is bedoeld voor het bewaren van levensmiddelen en/of dranken in een
gewoon huishouden, zoals uitgelegd in dit instructieboekje.
• Gebruik geen mechanische hulpmiddelen of kunstgrepen om het ontdooiproces te ver-
snellen.
• Gebruik geen andere elektrische apparaten (bijvoorbeeld ijsmachines) in koelkasten, ten-
zij ze voor dit doel goedgekeurd zijn door de fabrikant.
• Let op dat u het koelcircuit niet beschadigt.
• Het koelmiddel isobutaan (R600a) bevindt zich in het koelcircuit van het apparaat, dit is
een natuurlijk gas dat weliswaar milieuvriendelijk is, maar ook uiterst ontvlambaar.
Controleer of de onderdelen van het koelcircuit tijdens transport en installatie van het
apparaat niet beschadigd zijn geraakt.
Indien het koelcircuit beschadigd is:
– open vuur en ontstekingsbronnen vermijden
– de ruimte waar het apparaat zich bevindt grondig ventileren
Page 22

Veiligheidsinformatie
22
• Het is gevaarlijk om wijzigingen aan te brengen in de specificaties of dit product op
enigerlei wijze te modificeren. Een beschadigd netsnoer kan kortsluiting, brand en/of een
elektrische schok veroorzaken.
WAARSCHUWING!
Alle elektrische onderdelen (netsnoer, stekker, compressor) mogen uitsluitend vervangen
worden door een erkende onderhoudsdienst of gekwalificeerd onderhoudspersoneel.
1. Het netsnoer mag niet verlengd worden.
2. Verzeker u ervan dat de stekker niet platgedrukt of beschadigd wordt door de achterkant van het apparaat. Een platgedrukte of beschadigde stekker kan oververhit
raken en brand veroorzaken.
3. Verzeker u ervan dat u de stekker van het apparaat kunt bereiken.
4. Trek niet aan het snoer.
5. Als de stekker los zit, steek hem dan niet in het stopcontact. Dit kan gevaar opleveren
van een elektrische schok of brand.
6.
U mag het apparaat niet gebruiken zonder de afdekking van het lampje
binnenverlichting.
• Dit apparaat is zwaar. Wees voorzichtig als u het apparaat verplaatst.
• Haal geen artikelen uit het vriesvak en raak ze niet aan als uw handen vochtig/nat zijn,
dit kan uw huid beschadigen of vrieswonden veroorzaken.
• Stel het apparaat niet langdurig bloot aan direct zonlicht.
Dagelijks gebruik
• Zet geen hete potten op de kunststof onderdelen in het apparaat.
• Bewaar geen brandbare gassen of vloeistoffen in het apparaat, deze kunnen ontploffen.
•
Zet geen levensmiddelen direct tegen de luchtopening in de achterwand.
• Diepgevroren voedsel mag niet opnieuw worden ingevroren als het eenmaal ontdooid
is.
• Bewaar voorverpakte diepvriesproducten volgens de aanwijzingen van de fabrikant.
• U dient zich strikt te houden aan de aanbevelingen van de fabrikant van het apparaat
met betrekking tot het bewaren van voedsel. Raadpleeg de betreffende aanwijzingen.
• Leg geen koolzuurhoudende of mousserende dranken in de vriezer, deze veroorzaken
druk op de fles die daardoor kan ontploffen, dit kan schade toebrengen aan het apparaat.
• IJslollies kunnen vrieswonden veroorzaken als ze rechtstreeks vanuit het apparaat geconsumeerd worden.
6)
5)
voor de
Onderhoud en reiniging
• Schakel het apparaat uit en trek de stekker uit het stopcontact voordat u onderhoudshandelingen verricht. Als u het stopcontact niet kunt bereiken, onderbreek dan de
stroomtoevoer.
• Maak het apparaat niet schoon met metalen voorwerpen.
• Gebruik geen scherpe voorwerpen om ijs van het apparaat te krabben. Gebruik een
kunststof schraper.
• Controleer de afvoer in de koelkast regelmatig op dooiwater. Maak de afvoer, indien
nodig, schoon. Als de afvoer verstopt is, zal er water op de bodem van het apparaat
liggen.
5) Als er een afdekking voor het lampje is voorzien
6) Als het apparaat vorstvrij is
Page 23
Bedieningspaneel
Installatie
Voor de aansluiting van elektriciteit dienen de instructies in de desbetreffende paragrafen
nauwgezet te worden opgevolgd.
• Pak het apparaat uit en controleer of er beschadigingen zijn. Sluit het apparaat niet aan
als het beschadigd is. Meld mogelijke beschadigingen onmiddellijk bij de winkel waar u
het apparaat gekocht heeft. Gooi in dat geval de verpakking niet weg.
• Wij adviseren u om 4 uur te wachten voordat u het apparaat aansluit, dan kan de olie
terugvloeien in de compressor.
• Rond het apparaat dient adequate luchtcirculatie te zijn, anders kan dit tot oververhitting
leiden. Om voldoende ventilatie te verkrijgen de instructies met betrekking tot de installatie opvolgen.
• De achterkant dient zo mogelijk tegen een muur geplaatst te worden, teneinde te voorkomen dat hete onderdelen (compressor, condensator) aangeraakt kunnen worden en
brandwonden veroorzaken.
• Het apparaat mag niet vlakbij radiatoren of kooktoestellen geplaatst worden.
• Verzeker u ervan dat de stekker bereikbaar is nadat het apparaat geïnstalleerd is.
•
Sluit het apparaat alleen aan op een drinkwaterleiding.
7)
Onderhoud
• Alle elektrotechnische werkzaamheden die noodzakelijk zijn voor het uitvoeren van onderhoud aan het apparaat, dienen uitgevoerd te worden door een gekwalificeerd elektricien of competent persoon.
• Dit product mag alleen worden onderhouden door een erkend onderhoudscentrum en
er dient alleen gebruik te worden gemaakt van originele reserveonderdelen.
23
Bescherming van het milieu
Dit apparaat bevat geen gassen die de ozonlaag kunnen beschadigen, niet in het koelcircuit
en evenmin in de isolatiematerialen. Het apparaat mag niet worden weggegooid bij het
normale huishoudelijke afval. Het isolatieschuim bevat ontvlambare gassen: het apparaat
moet weggegooid worden conform de van toepassing zijnde regels die u bij de lokale overheidsinstanties kunt verkrijgen. Voorkom beschadiging aan de koeleenheid, vooral aan de
achterkant bij de warmtewisselaar. De materialen die gebruikt zijn voor dit apparaat en die
voorzien zijn van het symbool
zijn recyclebaar.
Bedieningspaneel
1 2 3 4 5 6 7
1 Controlelampje koelkast
7) Indien er een wateraansluiting voorzien is
Page 24

Bedieningspaneel
24
2 ON/OFF-schakelaar koelkast
3 Temperatuurregeling koelkast, + toets
4 Temperatuurdisplay
5 Temperatuurregeling koelkast, - toets
6 TURBO COOLMATIC-controlelampje
7 TURBO COOLMATIC-schakelaar
De koelkast inschakelen
1. Steek de stekker in het stopcontact.
2. Druk op de ON/OFF-schakelaar .
3. Het controlelampje gaat aan.
De koelkast uitschakelen
1. Houd de ON/OFF schakelaar langer dan 5 seconden ingedrukt.
2. Daarna wordt het aftellen van de temperatuur van -3 -2 -1 weergegeven. Als "1" ver-
schijnt wordt het apparaat uitgeschakeld. Het temperatuurdisplay gaat uit. Het controlelampje gaat uit.
Toetsen temperatuurinstelling
De temperatuur wordt aangepast met de toetsen temperatuurinstelling. Deze toetsen zijn
gekoppeld aan het temperatuurdisplay.
• Het temperatuurdisplay schakelt over van het tonen van de ACTUELE temperatuur (temperatuurdisplay is verlicht) naar het tonen van de GEWENSTE temperatuur (temperatuurdisplay knippert) door op een van de toetsen temperatuurinstelling te drukken.
• Iedere keer dat een van deze twee toetsen wordt ingedrukt, wordt de GEWENSTE temperatuur aangepast met 1°C. De GEWENSTE temperatuur moet binnen 24 uur bereikt
worden.
Als op geen van de toetsen wordt gedrukt, schakelt het temperatuurdisplay automatisch
terug na een korte tijd (ong. 5 sec.) naar het tonen van de ACTUELE temperatuur.
GEWENSTE temperatuur betekent:
De temperatuur die voor de koelkast werd geselecteerd. De GEWENSTE temperatuur wordt
aangeduid met knipperende getallen.
ACTUELE temperatuur betekent:
De temperatuur die de huidige temperatuur in de koelkast weergeeft. De ACTUELE temperatuur wordt aangegeven met verlichte getallen.
Temperatuurdisplay
Het temperatuurdisplay geeft verschillende informatie weer:
• Tijdens normale werking wordt de huidige temperatuur binnen in de koelkast (ACTUELE
temperatuur) weergegeven.
• Als de temperatuur wordt aangepast, gaat de momenteel voor de koelkast ingestelde
temperatuur op het display knipperen (GEWENSTE temperatuur).
Wanneer u de temperatuurinstelling verandert, moet u ongeveer 24 uur wachten tot de
temperatuur gestabiliseerd is.
Temperatuurregeling
Ga als volgt te werk om het apparaat in werking te stellen:
Page 25

Het eerste gebruik
1. Stel de gewenste temperatuur in door op de temperatuurregelaar te drukken. Het tem-
peratuurdisplay geeft onmiddellijk de gewijzigde instelling weer (GEWENSTE temperatuur) en het temperatuurdisplay knippert.
2. Telkens wanneer u op de temperatuurregelaar drukt wordt de GEWENSTE temperatuur
met 1 °C aangepast. De GEWENSTE temperatuur moet binnen 24 uur bereikt worden.
3. Als de vereiste temperatuur is ingesteld, zal na een korte periode (ong. 5 sec.) het
temperatuurdisplay weer de huidige ACTUELE temperatuur binnen de koelkast weer-
geven. Het temperatuurdisplay verandert van knipperende naar continue verlichting.
Voor een juiste conservering van het voedsel moet de volgende temperatuur worden ingesteld:
• +5 °C in de koelkast
Als de instelling is gewijzigd, start de compressor niet meteen als op dat moment auto-
matisch ontdooien plaatsvindt. Aangezien de conserveringstemperatuur binnen in de koelkast snel wordt bereikt, kunt u meteen na het inschakelen voedsel in de koelkast leggen.
TURBO COOLMATIC-functie
De TURBO COOLMATIC-functie is geschikt voor het snel koelen van grote hoeveelheden
voedsel in de koelkast.
Voer de volgende stappen uit om de functie in te schakelen:
1. Druk op de TURBO COOLMATIC-toets.
2. Het TURBO COOLMATIC-display wordt ingeschakeld.
De TURBO COOLMATIC -functie zorgt nu voor intensieve koeling. Een GEWENSTE temperatuur van +3°C wordt automatisch gekozen.
De TURBO COOLMATIC-functie stopt automatisch na 6 uur.
U kunt de functie te allen tijde uitschakelen:
1. Druk op de TURBO COOLMATIC-toets.
2. Het TURBO COOLMATIC-lampje gaat uit.
25
Het eerste gebruik
De binnenkant schoonmaken
Voordat u het apparaat voor de eerste keer gebruikt, wast u de binnenkant en de interne
accessoires met lauwwarm water en een beetje neutrale zeep om de typische geur van een
nieuw product weg te nemen. Droog daarna grondig af.
Gebruik geen oplosmiddelen of schuurpoeders. Deze beschadigen de lak.
Dagelijks gebruik
Dit apparaat wordt in Frankrijk verkocht.
In overeenstemming met de regelgeving die in dit land geldig is, moet hij worden geleverd
met een speciaal apparaat (zie afbeelding) dat in het onderste deel van de koelkast moet
worden geplaatst om de koudste zone daarvan aan te geven.
Page 26
Dagelijks gebruik
26
Verplaatsbare schappen
De wanden van de koelkast zijn voorzien van een
aantal geleiders zodat de schappen op de gewenste plaats gezet kunnen worden.
Voor een beter gebruik van de ruimte kunnen de
voorste halve schappen over de achterste worden
geplaatst.
Het plaatsen van de deurschappen
Om het bewaren van voedselpakketten van verschillende afmetingen mogelijk te maken,
kunnen de schappen op verschillende hoogtes geplaatst worden.
Het plaatsen van de deurhelftplateaus
Het deurhelftplateau kan op verschillende hoogtes worden geplaatst.
Om deze aanpassingen uit te voeren, gaat u als volgt te werk:
1. til het schap met het deurhelftplateau
naar boven en haal het uit de houders in
de deur
2. verwijder de sluitbeugel uit de geleiding
onder het plateau
3. Om het plateau op een andere hoogte te-
rug te plaatsen, doet u hetzelfde in om-
gekeerde volgorde.
Page 27
Dagelijks gebruik
Koolstofluchtfilter
Uw apparaat is voorzien van een koolstoffilter
CLEAN AIR CONTROL dat zich achter een klepje op
de achterwand van het koelcompartiment bevindt.
Het filter zuivert de lucht van ongewenste geuren
in de koelruimte en LONGFRESH -vakje, waardoor
de bewaarkwaliteit verder wordt verbeterd.
Houd tijdens de werking de ventilatieklep altijd gesloten.
LONGFRESH -vak
In het LONGFRESH 0°C -vak wordt de temperatuur automatisch geregeld. Deze blijft constant op ongeveer 0°C; u hoeft niets in te stellen.
De constante conserveringstemperatuur van ongeveer 0°C en de relatieve vochtigheid van
tussen de 45 en 90 % bieden optimale omstandigheden voor verschillende soorten voedsel.
U kunt daarom verschillende soorten voedsel in het LONGFRESH 0°C -vak bewaren, waar
het tot 3 keer langer houdbaar blijft met een betere kwaliteit vergeleken met normale
koelkastvakken. Hierdoor kunt u meer vers voedsel bewaren. Smaak, versheid, kwaliteit en
voedingswaarde (vitamines en mineralen) blijven goed behouden. Het gewichtsverlies van
groenten en fruit wordt minder. Het voedsel levert een hogere voedingswaarde.
27
Het LONGFRESH 0°C -vak is ook geschikt voor het ontdooien van voedsel.
In dit geval kan het ontdooide voedsel maximaal twee dagen bewaard worden.
Vochtigheidsregeling
Beide laden kunnen onafhankelijk van elkaar met
een hogere of lagere vochtigheidsgraad gebruikt
worden volgens de gewenste opslagomstandigheden.
Elke lade wordt afzonderlijk en met behulp van de
schuifklep aan de voorkant van de lade geregeld.
• "Droog": lage luchtvochtigheid - tot 50 % re-
latieve vochtigheid
Dit vochtigheidsniveau wordt bereikt als beide schuifkleppen in deze stand
gezet en de ventilatieopeningen wijd open staan.
• Vochtig": hoge relatieve vochtigheid - tot 90%
Dit vochtigheidsniveau wordt bereikt als beide schuifkleppen in deze stand
gezet en de ventilatieopeningen worden gesloten. De vochtigheid wordt behouden en
kan niet ontsnappen.
worden
worden
Page 28
Dagelijks gebruik
28
Longfresh-laden
De vochtigheid kan niet aangepast worden.
De draadmanden binnen de laden zorgen ervoor
dat de lucht vrij kan circuleren, waardoor het
voedsel beter geconserveerd wordt.
Het vak heeft stoppen, die voorkomen dat de laden
eruitvallen als ze volledig worden uitgetrokken.
Om de laden te verwijderen (b.v. om ze schoon te
maken) trekt u deze zover mogelijk naar buiten,
tilt u ze op en haalt u ze eruit.
U kunt alle laden verwijderen om grote hoeveelheden voedsel op te slaan.
Bewaardtijd in het longfresh 0°C-vak voor vers voedsel
Soort voedsel Instelling luchtvochtigheid Bewaartijd
Uien
Boter
Grote stukken varkensvlees
Rundvlees, wild, kleine stukken
varkensvlees, gevogelte
Tomatensaus
Vis, schelpdieren, gekookte
vleesproducten
Gekookte vis en schelpdieren
Salade, groenten Wortels,
kruiden, spruitjes, selderij
"droog"
"droog"
"droog"
"droog"
"droog"
"droog"
"droog"
"vochtig"
max. 5 maanden
max. 1 maand
max. 10 dagen
max. 7 dagen
max. 4 dagen
max. 3 dagen
max. 2 dagen
max. 1 maand
Page 29
Soort voedsel Instelling luchtvochtigheid Bewaartijd
Artisjokken, bloemkool, cichorei, ijsbergsla, andijvie, veldsla,
botersla, prei, radicchio
Broccoli, paksoi, boerenkool,
kool, radijsjes, savooiekool
Erwten, koolrabi
Lente-ui, radijsjes, asperges,
spinazie
1)
Fruit
Peren, dadels (vers), aardbeien,
1)
perziken
Pruimen
rabarber, kruisbessen
Appels (niet gevoelig voor
koude), kweeperen
Abrikozen, kersen
Kriekpruimen, druiven
Zwarte bessen, aalbessen
Vijgen (verse)
Bosbessen, frambozen
1) Hoe rijper het fruit, hoe korter de bewaartijd
1)
"vochtig"
"vochtig"
"vochtig"
"vochtig"
"vochtig"
"vochtig"
"vochtig"
"vochtig"
"vochtig"
"vochtig"
"vochtig"
"vochtig"
Dagelijks gebruik
max. 21 dagen
max. 14 dagen
max. 10 dagen
max. 7 dagen
max. 1 maand
max. 21 dagen
max. 20 dagen
max. 14 dagen
max. 10 dagen
max. 8 dagen
max. 7 dagen
max. 5 dagen
29
Taarten met room en andere banketbakkersproducten kunnen 2 tot 3 dagen worden bewaard in het longfresh 0°C-vak.
De volgende producten mogen niet in het longfresh 0°C-vak worden gelegd:
• fruit dat gevoelig is voor koude dat in een kelder of op kamertemperatuur moet worden
bewaard, zoals ananas, bananen, grapefruits, meloenen, mango, papaya, sinaasappels,
citroenen, kiwi's.
• Soorten voedsel die niet in bovenstaande tabel worden genoemd moeten in het koelvak
worden bewaard (b.v. alle soorten kaas, vleeswaren etc.)
De luchtvochtigheid in de laden is afhankelijk van de hoeveelheid vocht in het bewaarde
voedsel, groenten en fruit en van de frequentie waarmee de deur wordt geopend
Page 30

Nuttige aanwijzingen en tips
30
Het longfresh 0°C-vak is ook geschikt voor het langzaam laten ontdooien van voedsel. In
dit geval kan het ontdooide voedsel maximaal twee dagen worden bewaard in het longfresh
0°C-vak.
Tips:
• Let op de versheid van het voedsel, vooral op de houdbaarheidsdatum. De kwaliteit en
de versheid zijn van invloed op de bewaartijd.
• De volledige bewaarcyclustijd is afhankelijk van de maatregelen die genomen worden
voordat het voedsel in de koelkast wordt gelegd.
• Voedsel, fruit of groenten moeten altijd worden verpakt voordat ze worden bewaard.
• Dierenvoeding moet altijd verpakt en droog worden bewaard.
• Voedsel dat rijk is aan eiwitten bederft sneller. Dit betekent dat schelpdieren eerder
bederven dan vis, dat op zijn beurt eerder bederft dan vlees. Bij het bewaren van voedsel
in een 0°C-vak kan de bewaartijd voor dat soort voedsel wel drie keer zo lang worden,
zonder verlies van kwaliteit.
• Al het voedsel dat bewaard wordt in een 0°C-vak moet ongeveer 15-30 min. voor con-
sumptie uit de laden worden gehaald, vooral fruit en groenten die u zonder ze te verhitten
gaat eten. Door fruit en groente op kamertemperatuur te laten komen, worden de smaak
en de textuur beter.
Nuttige aanwijzingen en tips
Tips voor energiebesparing
• De deur niet vaker openen of open laten staan dan strikt noodzakelijk.
• Als de omgevingstemperatuur hoog is, de thermostaatknop op een lage temperatuur
staat en het apparaat volledig gevuld is, kan de compressor continu aan staan waardoor
er ijs op de verdamper ontstaat. Als dit gebeurt, zet u de thermostaatknop naar een
warmere instelling om de koelkast automatisch te laten ontdooien en zo elektriciteitsverbruik te besparen.
Tips voor het koelen van vers voedsel
Om de beste prestatie te verkrijgen:
• Zet geen warm voedsel of verdampende vloeistoffen in de koelkast
• dek het voedsel af of verpak het, in het bijzonder als het een sterke geur heeft
• plaats het voedsel zodanig dat de lucht er vrijelijk omheen kan circuleren
Nuttige tips voor het koelen
Nuttige tips:
Vlees (alle soorten) in plastic zakken verpakken en op het glazen schap leggen, boven de
groentelade.
Bewaar het, voor de veiligheid, slechts een of maximaal twee dagen op deze manier.
Gekookt voedsel, koude schotels, enz.: deze moeten afgedekt worden en mogen op willekeurig welk schap gezet worden.
Fruit en groente: deze moeten zorgvuldig schoongemaakt worden en in de speciaal daarvoor bedoelde lade(n) geplaatst worden.
Boter en kaas: dit moet in speciale luchtdichte bakjes gelegd of in aluminiumfolie of plastic
zakjes gewikkeld worden om zoveel mogelijk lucht buiten te sluiten.
Page 31

Onderhoud en reiniging
Melkflessen: deze moeten een afdekdop hebben en opgeslagen worden in het flessenrek in
de deur.
Bananen, aardappelen, uien en knoflook, indien niet verpakt, mogen niet in de koelkast
bewaard worden.
Onderhoud en reiniging
LET OP!
Voordat u welke onderhoudshandeling dan ook verricht, de stekker uit het stopcontact
trekken.
Het koelcircuit van dit apparaat bevat koolwaterstoffen; onderhoud en herladen mag alleen
uitgevoerd worden door bevoegde technici.
Periodieke reiniging
Het apparaat moet regelmatig worden schoongemaakt:
• maak de binnenkant en de accessoires schoon met lauw water en wat neutrale zeep.
• controleer de afdichtingen regelmatig en wrijf ze schoon om u ervan te verzekeren dat
ze schoon en vrij van restjes zijn.
• spoel ze af en maak ze grondig droog.
Trek niet aan leidingen en/of kabels aan de binnenkant van de kast en verplaats of beschadig
ze niet.
Gebruik nooit schoonmaakmiddelen, schuurpoeders, erg geparfumeerde reinigingsproducten en waspolijstmiddelen om de binnenkant schoon te maken, aangezien deze het oppervlak beschadigen en een sterke geur achterlaten.
31
Maak de condensor (zwart rooster) en de compressor op de achterkant van het apparaat
schoon met een borstel of stofzuiger. Deze handeling zal de prestatie van het apparaat
verbeteren en het elektriciteitsverbruik verminderen.
Het onderste schap, tussen het koelvak en het LONGFRESH 0°C -vak, kan verwijderd worden
om schoongemaakt te worden. Om het te verwijderen het schap recht naar buiten trekken.
De afdekplaten boven de lades in het vak kunnen verwijderd worden om ze schoon te
kunnen maken.
Om de volledige functionaliteit van het LONGFRESH 0°C -vak te garanderen moeten het
onderste schap en de afdekplaten, na reiniging, weer op hun oorspronkelijke plaats gezet
worden.
Zorg ervoor dat u het koelsysteem niet beschadigt.
Veel normaal verkrijgbare keukenreinigers bevatten chemicaliën die de kunststoffen die in
dit apparaat gebruikt zijn kunnen aantasten/beschadigen. Daarom wordt het aanbevolen
de buitenkant van dit apparaat alleen schoon te maken met warm water met een beetje
afwasmiddel.
Steek, na het schoonmaken van het apparaat, de stekker weer in het stopcontact.
Page 32

Onderhoud en reiniging
32
Het koolstoffilter vervangen
Het koolstoffilter draagt bij tot minder geurtjes in de koelkast, waardoor het risico van
ongewenste aroma's in delicate levensmiddelen beperkt blijft.
Voor optimale prestaties moet het koolstoffilter eenmaal per jaar vervangen worden.
Nieuwe actieve luchtfilters zijn verkrijgbaar bij uw vakhandelaar.
• Het luchtfilter wordt achter het klepje ge-
plaatst en kan worden bereikt door het klepje
naar buiten te trekken (1)
• Trek het gebruikte luchtfilter uit de gleuf.
1
2
• Plaats het nieuwe luchtfilter in de gleuf (2)
• Sluit het klepje.
Het luchtfilter is een verbruiksartikel en als zodanig geldt hiervoor geen garantie.
Houd tijdens de werking de ventilatieklep altijd gesloten.
Het luchtfilter dient zorgvuldig te worden behandeld om te voorkomen dat het oppervlak
bekrast wordt.
Het ontdooien van de koelkast
Het koelvak wordt automatisch ontdooid.
Het vrijkomende water stroomt in een bak bovenop de compressor en verdampt. Deze bak
kan niet verwijderd worden.
Periodes dat het apparaat niet gebruikt wordt
Als het apparaat gedurende lange tijd niet gebruikt wordt, neem dan de volgende voorzorgsmaatregelen:
•
trek de stekker uit het stopcontact,
• verwijder al het voedsel,
•
ontdooi de koelkast,
• laat de deur/deuren op een kier staan om de vorming van onaangename luchtjes te
voorkomen.
Als uw apparaat aan blijft staan, vraag dan iemand om het zo nu en dan te controleren,
om te voorkomen dat het bewaarde voedsel bederft, als de stroom uitvalt.
8) indien nodig,
8)
en maak het apparaat en alle accessoires schoon,
Page 33

Problemen oplossen
Problemen oplossen
WAARSCHUWING!
Voordat u problemen oplost, trekt u eerst de stekker uit het stopcontact.
Het opsporen van storingen die niet in deze handleiding vermeld zijn, dient te worden
verricht door een gekwalificeerd technicus of deskundig persoon.
Er zijn tijdens de normale werking geluiden te horen (compressor, koelcircuit).
Probleem Mogelijke oorzaak Oplossing
Het apparaat maakt lawaai
Het apparaat werkt niet.
Het lampje brandt niet.
De stekker zit niet goed in het
Het apparaat krijgt geen stroom.
Het lampje brandt niet.
Het lampje is stuk. Zie "Het lampje vervangen".
Het controlelampje gaat
aan.
De compressor werkt
continu.
De deur is niet goed gesloten. Zie "De deur sluiten".
De deur is te vaak open gedaan. Laat de deur niet langer open
De temperatuur van het voedsel
De kamertemperatuur is te
De compressor start niet
onmiddellijk na het drukken op de TURBO COOLMATIC-knop, of na het
veranderen van de temperatuur.
Het apparaat wordt niet goed
ondersteund
Het apparaat is uitgeschakeld. Schakel het apparaat in.
stopcontact.
Er staat geen spanning op het
stopcontact.
Het lampje staat in stand-by. Open en sluit de deur.
Het apparaat werkt niet goed. Neem contact op met een gekwa-
De temperatuur is niet goed ingesteld.
is te hoog.
hoog.
De compressor start na enige
tijd.
Controleer of het apparaat stabiel
staat (alle vier de voetjes moeten
op de vloer staan)
Steek de stekker goed in het stopcontact.
Sluit een ander elektrisch apparaat aan op het stopcontact.
Neem contact op met een gekwalificeerde elektricien.
lificeerde elektricien.
Stel een hogere temperatuur in.
staan dan noodzakelijk.
Laat het voedsel afkoelen tot ka-
mertemperatuur voordat u het
conserveert.
Verlaag de kamertemperatuur.
Dat is normaal.
33
Page 34

Problemen oplossen
34
Probleem Mogelijke oorzaak Oplossing
Er loopt water over de
achterkant van de koelkast.
Er loopt water in de koelkast.
Producten verhinderen het wa-
De temperatuur kan niet
worden ingesteld .
De temperatuur in het
apparaat is te laag/hoog.
De deur is niet goed gesloten. Zie "De deur sluiten".
De temperatuur van het voedsel
Er zijn veel producten tegelijk
De temperatuur in de
koelkast is te hoog.
Tijdens het automatische ontdooiproces, ontdooit de rijp tegen de achterwand.
De waterafvoer is verstopt. Maak de waterafvoer schoon.
ter om in de wateropvangbak te
lopen.
TURBO COOLMATIC-functie is
ingeschakeld.
De temperatuur is niet goed ingesteld.
is te hoog.
geconserveerd.
Er is geen koude luchtcirculatie
in het apparaat.
Dat is normaal.
Zorg ervoor dat de producten de
achterwand niet raken.
Schakel de TURBO COOLMATICfunctie handmatig uit, of wacht
met het instellen van de temperatuur tot de functie automatisch
wordt uitgeschakeld. Raadpleeg "
TURBO COOLMATIC-functie".
Stel een hogere/lagere temperatuur in.
Laat het voedsel afkoelen tot kamertemperatuur voordat u het
conserveert.
Conserveer minder producten tegelijk.
Zorg ervoor dat er koude luchtcirculatie in het apparaat is.
Het lampje vervangen
1. Schakel het apparaat uit.
2. Druk op de achterste haak en schuif het
kapje tegelijkertijd in de richting van de
pijl.
3. Vervang het lampje met één van hetzelfde
vermogen (het maximale vermogen wordt
weergegeven op de lamp zelf).
4. Installeer het lampenkapje door het terug
te schuiven in zijn oorspronkelijke positie.
5. Schakel het apparaat in.
6. Open de deur. Controleer of het lampje
gaat branden.
De deur sluiten
1. Maak de afdichtingen van de deur schoon.
2. Stel de deur, indien nodig, af. Raadpleeg "Montage".
3. Vervang, indien nodig, de defecte deurafdichtingen. Neem contact met de service-
afdeling.
Page 35

Technische gegevens
Technische gegevens
Afmetingen van de uitsparing
Hoogte 1780 mm
Breedte 560 mm
Diepte 550 mm
De technische gegevens staan op het typeplaatje aan de linker binnenkant in het apparaat
en op het energielabel.
Montage
WAARSCHUWING!
Lees voor uw eigen veiligheid en correcte werking van het apparaat eerst de "veiligheidsinformatie" aandachtig door, alvorens het apparaat te installeren.
Opstelling
WAARSCHUWING!
Als u een oud apparaat weggooit dat voorzien is van een deurslot of vergrendeling, zorg
er dan voor dat dit onbruikbaar gemaakt wordt, zodat kinderen er niet in opgesloten kunnen
raken.
35
De stekker van het apparaat moet na installatie toegankelijk zijn.
Installeer dit apparaat op een plaats waar de omgevingstemperatuur overeenkomt met de
klimaatklasse die vermeld is op het typeplaatje van het apparaat:
Klimaatklasse Omgevingstemperatuur
SN +10°C tot + 32°C
N +16°C tot + 32°C
ST +16°C tot + 38°C
T +16°C tot + 43°C
Elektrische aansluiting
Zorg er vóór het aansluiten voor dat het voltage en de frequentie op het typeplaatje overeenkomen met de stroomtoevoer in uw huis.
Het apparaat moet geaard zijn. De netsnoerstekker is voorzien van een contact voor dit
doel. Als het stopcontact niet geaard is, sluit het apparaat dan aan op een afzonderlijk
aardepunt, in overeenstemming met de geldende regels, raadpleeg hiervoor een gekwalificeerd elektricien.
De fabrikant kan niet aansprakelijk gesteld worden als bovenstaande veiligheidsvoorschriften niet opgevolgd worden.
Dit apparaat voldoet aan de EU. richtlijnen.
Page 36

Het milieu
36
Ventilatievereisten
De luchtstroom achter het apparaat moet voldoende zijn.
50 mm
min.
200 cm
2
Installatie van het koolstofluchtfilter
Het koolstofluchtfilter is een filter met actieve koolstof dat vervelende geurtjes absorbeert.
Hierdoor blijven de optimale smaak en het aroma van het voedsel bewaard zonder dat
luchtjes van het ene levensmiddel op het andere worden overgebracht.
Bij aflevering zit het koolstoffilter in een plastic
zak om de levensduur en eigenschappen ervan te
garanderen. Het filter moet achter de klep geplaatst worden voordat het apparaat wordt ingeschakeld.
1. Open de klep (1)
2. Haal het filter uit de plastic zak
3. Plaats het filter in de gleuf in de achterkant
van het klepdeksel (2)
4. Sluit het klepje
Houd tijdens de werking de ventilatieklep altijd
gesloten.
Het filter moet voorzichtig worden gehanteerd
om te voorkomen dat deeltjes van het oppervlak
loskomen.
1
2
min.
200 cm
2
Het milieu
Het symbool op het product of op de verpakking wijst erop dat dit product niet als
huishoudafval mag worden behandeld, maar moet worden afgegeven bij een verzamelpunt
waar elektrische en elektronische apparatuur wordt gerecycled. Als u ervoor zorgt dat dit
product op de juiste manier wordt verwijderd, voorkomt u mogelijke negatieve gevolgen
voor mens en milieu die zich zouden kunnen voordoen in geval van verkeerde
afvalverwerking. Voor gedetailleerdere informatie over het recyclen van dit product, kunt
u contact opnemen met de gemeente, de gemeentereiniging of de winkel waar u het
product hebt gekocht.
Page 37

Thank you for choosing one of our high-quality products.
To ensure optimal and regular performance of your appliance please read this
instruction manual carefully. It will enable you to navigate all processes perfectly
and most efficiently. To refer to this manual any time you need to, we recommend
you to keep it i n a safe pla ce. An d pl ea se pass it to any future owner of the appliance.
We wish you much joy with your new appliance.
Contents
Contents
37
Safety information 37
Children and vulnerable people safety
38
General safety 38
Daily Use 39
Care and cleaning 39
Installation 39
Service 40
Control panel 40
Switching on the fridge 41
Switching off the fridge 41
Temperature setting buttons 41
Temperature indicator 41
Temperature regulation 41
TURBO COOLMATIC function 42
First use 42
Cleaning the interior 42
Daily use 42
Movable shelves 43
Positioning the door shelves 43
Positioning the door half shelf 43
Carbon Air Filter 44
LONGFRESH Compartment 44
Humidity control 44
Safety information
Longfresh drawers 45
Storage time in the longfresh 0°C
compartment for fresh food 45
Helpful hints and tips 47
Hints for energy saving 47
Hints for fresh food refrigeration 47
Hints for refrigeration 47
Care and cleaning 48
Periodic cleaning 48
Replacing the carbon filter 48
Defrosting of the refrigerator 49
Periods of non-operation 49
What to do if… 49
Replacing the lamp 51
Closing the door 51
Technical data 52
Installation 52
Positioning 52
Electrical connection 52
Ventilation requirements 53
Installation of the carbon air filter 53
Environmental concerns 53
Subject to change without notice
222346604-00-072009
In the interest of your safety and to ensure the correct use, before installing and first using
the appliance, read this user manual carefully, including its hints and warnings. To avoid
unnecessary mistakes and accidents, it is important to ensure that all people using the
appliance are thoroughly familiar with its operation and safety features. Save these instructions and make sure that they remain with the appliance if it is moved or sold, so that
everyone using it through its life will be properly informed on appliance use and safety.
Page 38

Safety information
38
For the safety of life and property keep the precautions of these user's instructions as the
manufacturer is not responsible for damages caused by omission.
Children and vulnerable people safety
• This appliance is not intended for use by persons (including children) with reduced
physical, sensory or mental capabilities, or lack of experience and knowledge, unless they
have been given supervision or instruction concerning use of the appliance by a person
responsible for their safety.
Children should be supervised to ensure that they do not play with the appliance.
• Keep all packaging well away from children. There is risk of suffocation.
• If you are discarding the appliance pull the plug out of the socket, cut the connection
cable (as close to the appliance as you can) and remove the door to prevent playing
children to suffer electric shock or to close themselves into it.
• If this appliance featuring magnetic door seals is to replace an older appliance having a
spring lock (latch) on the door or lid, be sure to make that spring lock unusable before
you discard the old appliance. This will prevent it from becoming a death trap for a child.
General safety
CAUTION!
Keep ventilation openings clear of obstruction.
• The appliance is intended for keeping foodstuff and/or beverages in a normal household
as explained in this instruction booklet.
• Do not use a mechanical device or any artificial means to speed up the thawing process.
• Do not use other electrical appliances (such as ice cream makers) inside of refrigerating
appliances, unless they are approved for this purpose by the manufacturer.
• Do not damage the refrigerant circuit.
• The refrigerant isobutane (R600a) is contained within the refrigerant circuit of the ap-
pliance, a natural gas with a high level of environmental compatibility, which is nevertheless flammable.
During transportation and installation of the appliance, be certain that none of the
components of the refrigerant circuit become damaged.
If the refrigerant circuit should become damaged:
– avoid open flames and sources of ignition
– thoroughly ventilate the room in which the appliance is situated
Page 39

Safety information
• It is dangerous to alter the specifications or modify this product in any way. Any damage
to the cord may cause a short-circuit, fire and/or electric shock.
WARNING!
Any electrical component (power cord, plug, compressor) must be replaced by a certified
service agent or qualified service personnel.
1. Power cord must not be lengthened.
2. Make sure that the power plug is not squashed or damaged by the back of the
appliance. A squashed or damaged power plug may overheat and cause a fire.
3. Make sure that you can come to the mains plug of the appliance.
4. Do not pull the mains cable.
5. If the power plug socket is loose, do not insert the power plug. There is a risk of
electric shock or fire.
6.
You must not operate the appliance without the lamp cover
9)
of interior lighting.
• This appliance is heavy. Care should be taken when moving it.
• Do not remove nor touch items from the freezer compartment if your hands are damp/
wet, as this could cause skin abrasions or frost/freezer burns.
• Avoid prolonged exposure of the appliance to direct sunlight.
Daily Use
• Do not put hot pot on the plastic parts in the appliance.
• Do not store flammable gas and liquid in the appliance, because they may explode.
•
Do not place food products directly against the air outlet on the rear wall.
• Frozen food must not be re-frozen once it has been thawed out.
• Store pre-packed frozen food in accordance with the frozen food manufacturer's instructions.
• Appliance's manufacturers storage recommendations should be strictly adhered to. Refer
to relevant instructions.
• Do not place carbonated or fizzy drinks in the freezer compartment as it creates pressure
on the container, which may cause it to explode, resulting in damage to the appliance.
• Ice lollies can cause frost burns if consumed straight from the appliance.
39
10)
Care and cleaning
• Before maintenance, switch off the appliance and disconnect the mains plug from the
mains socket.
• Do not clean the appliance with metal objects.
• Do not use sharp objects to remove frost from the appliance. Use a plastic scraper.
• Regularly examine the drain in the refrigerator for defrosted water. If necessary, clean
the drain. If the drain is blocked, water will collect in the bottom of the appliance.
Installation
For electrical connection carefully follow the instructions given in specific paragraphs.
9) If the lamp cover is foreseen
10) If the appliance is Frost Free
Page 40

Control panel
40
• Unpack the appliance and check if there are damages on it. Do not connect the appliance
if it is damaged. Report possible damages immediately to the place you bought it. In that
case retain packing.
• It is advisable to wait at least four hours before connecting the appliance to allow the
oil to flow back in the compressor.
• Adequate air circulation should be around the appliance, lacking this leads to overheating. To achieve sufficient ventilation follow the instructions relevant to installation.
• Wherever possible the back of the product should be against a wall to avoid touching
or catching warm parts (compressor, condenser) to prevent possible burn.
• The appliance must not be located close to radiators or cookers.
• Make sure that the mains plug is accessible after the installation of the appliance.
•
Connect to potable water supply only.
11)
Service
• Any electrical work required to do the servicing of the appliance should be carried out
by a qualified electrician or competent person.
• This product must be serviced by an authorized Service Centre, and only genuine spare
parts must be used.
Environment Protection
This appliance does not contain gasses which could damage the ozone layer, in either its
refrigerant circuit or insulation materials. The appliance shall not be discarded together
with the urban refuse and rubbish. The insulation foam contains flammable gases: the
appliance shall be disposed according to the applicable regulations to obtain from your
local authorities. Avoid damaging the cooling unit, especially at the rear near the heat
exchanger. The materials used on this appliance marked by the symbol
are recyclable.
Control panel
1 2 3 4 5 6 7
1 Fridge Pilot light
2 Fridge ON/OFF switch
3 Fridge temperature regulator, + button
4 Fridge temperature indicator
5 Fridge temperature regulator, - button
6 TURBO COOLMATIC indicator
7 TURBO COOLMATIC button
11) If a water connection is foreseen
Page 41

Control panel
Switching on the fridge
1. Insert the plug into the mains socket.
2. Press ON/OFF switch .
3. The Pilot Light will light up.
Switching off the fridge
1. Keep ON/OFF switch pressed for more than 5 seconds.
2. After that, a countdown of the temperature from -3 -2 -1 will be shown. When “1”
appears the fridge is turned off. The temperature indicator switches off. The Pilot light
switches off.
Temperature setting buttons
The temperature is adjusted using the temperature setting buttons. These buttons are connected to the temperature indicator.
• The temperature indicator is switched over from the indicator of the ACTUAL temperature (Temperature indicator is illuminated) to the indicator of the DESIRED temperature
(Temperature indicator flashes) by pressing one of the Temperature setting buttons.
• Each time one of the two buttons is pressed again the DESIRED temperature is adjusted
by 1°C. The DESIRED temperature must be reached within 24 hours.
If neither button is pressed, the temperature indicator automatically switches back after a
short period (approx. 5 sec.) to the indicator of the ACTUAL temperature.
DESIRED temperature means:
The temperature that has been selected for inside the fridge. The DESIRED temperature is
indicated by flashing numbers.
ACTUAL temperature means:
The temperature indicator shows the current temperature inside the fridge. The ACTUAL
temperature is indicated with illuminated numbers.
41
Temperature indicator
The temperature indicator shows several information:
• During normal operation, the temperature currently present in the fridge (ACTUAL temperature) is displayed.
• When the temperature is being adjusted a flashing display indicates the fridge temperature currently set (DESIRED temperature).
When changing the temperature setting wait about 24 hours until the temperature display
has stabilised.
Temperature regulation
To operate the appliance, proceed as follows:
1. Set the required temperature by pressing the corresponding temperature regulator. The
temperature indicator will immediately show the changed setting (DESIRED temperature) and the temperature indicator flashes.
2. Each time the temperature regulator is pressed the DESIRED temperature is adjusted
by 1 °C. The DESIRED temperature must be reached within 24 hours.
3. Once the required temperature has been set, after a short period (approx. 5 sec.) the
temperature indicator will show again the current ACTUAL temperature inside the cor-
Page 42

First use
42
responding compartment. The temperature indicator will change from flashing to continuous illumination.
For a correct storage of the food the following temperature should be set:
• +5 °C in the fridge
When the setting is changed, the compressor does not start immediately if automatic
defrosting is currently taking place. As the storage temperature within the fridge is reached
quickly you can store food immediately after switching on.
TURBO COOLMATIC function
The TURBO COOLMATIC function is suited for quick cooling of large quantities of goods in
the refrigerator.
To activate the function, do these steps:
1. Press the TURBO COOLMATIC button.
2. The TURBO COOLMATIC indicator switches on.
The TURBO COOLMATIC function now provides for intensive cooling. A DESIRED temperature of +3°C is automatically selected.
The TURBO COOLMATIC function is ended automatically after a period of 6 hours.
You can deactivate the function at any time:
1. Press the TURBO COOLMATIC button.
2. The TURBO COOLMATIC indicator switches off.
First use
Cleaning the interior
Before using the appliance for the first time, wash the interior and all internal accessories
with lukewarm water and some neutral soap so as to remove the typical smell of a brandnew product, then dry thoroughly.
Do not use detergents or abrasive powders, as these will damage the finish.
Daily use
this appliance is sold in France.
In accordance with regulations valid in this country it must be provided with a special
device (see figure) placed in the lower compartment of the fridge to indicate the coldest
zone of it.
Page 43

Movable shelves
The walls of the refrigerator are equipped with a
series of runners so that the shelves can be positioned as desired.
For better use of space, the front half-shelves can
lie over the rear ones.
Daily use
43
Positioning the door shelves
To permit storage of food packages of various sizes, the door shelves can be placed at
different heights.
Positioning the door half shelf
The door half shelf can be placed at different heights.
To make these adjustments proceed as follow:
1. lift the shelf with the door half shelf up-
wards and out of the holders in the door
2. remove the retaining bracket out of the
guide under the shelf
3. Reverse the above operation to insert the
half shelf at a different height.
Page 44

Daily use
44
Carbon Air Filter
Your appliance is equipped with a carbon filter
CLEAN AIR CONTROL behind a flap in the rear wall
of the fridge compartment.
The filter purifies the air from unwanted odours
in the fridge and LONGFRESH compartment
meaning that the storage quality will be further
improved.
During the operation, always keep the air ventilation flap closed.
LONGFRESH Compartment
In the LONGFRESH 0°C compartment the temperature is controlled automatically. It stays
constantly at about 0°C, no adjustment is necessary.
The constant storage temperature of about 0°C and the relative humidity of between 45
and 90 % provide optimal conditions for the various kinds of food.
You can therefore store a variety of fresh food in the LONGFRESH 0°C compartment, where
it will last up to 3 times longer with better quality compared to normal refrigerator compartments. This allows you to stock more fresh food. Taste, degree of freshness, quality and
nutritional values (vitamins and minerals) are well preserved. Loss of weight in vegetables
and fruit diminishes. Food yields a higher degree of nutritional value.
The LONGFRESH 0°C compartment is also suitable for defrosting food.
In this case the thawed food can be stored up to two days .
Humidity control
Both drawers can be used according to the desired
storage conditions independently of each other
with lower or higher humidity.
Regulation for each drawer is separate and is controlled using the slide valve at the front of the
drawer.
• „Dry“: low air humidity - up to 50 % relative
humidity
This humidity level is reached when both sliders are set into this position
ventilation openings are wide open.
• Humid“: high relative humidity - up to 90%
This humidity level is reached when both sliders are set in this position
ventilation openings are closed. Humidity is kept and can not escape.
and the
and the
Page 45

Longfresh drawers
The humidity is not adjustable.
The wire shelves inside the drawers permit that air
can circulate freely and consequently a better
conservation of foods.
The compartment has stops to prevent the drawers from falling out when fully extended.
To remove the drawers (e.g. for cleaning purposes),
pull them out as far as the stops, lift and remove.
You can remove all drawers to store large quantities of foods.
Daily use
45
Storage time in the longfresh 0°C compartment for fresh food
Type of food Air humidity adjustment Storage time
Onion
Butter
Large pork cuts
Beef, venison, small pork cuts,
poultry
Tomato sauce
Fish, shellfish, cooked meat
products
Cooked seafood
Salad, vegetables Carrots,
herbs, Brussels sprouts, celery
"dry”
“dry”
“dry”
“dry”
“dry”
“dry”
“dry”
“humid”
up to 5 months
up to 1 month
up to 10 days
up to 7 days
up to 4 days
up to 3 days
up to 2 days
up to 1 month
Page 46

Daily use
46
Type of food Air humidity adjustment Storage time
Artichokes, cauliflower, chicory, iceberg lettuce, endive,
lamb’s lettuce, lettuce, leeks,
radicchio
Broccoli, Chinese leaves, kale,
cabbage, radishes, Savoy cabbage
Peas, kohlrabi
Spring onions, radishes, asparagus, spinach
1)
Fruit
Pears, dates (fresh), strawber-
ries, peaches
Plums
rhubarb, gooseberries
Apples (not sensitive to cold),
quinces
Apricots, cherries
Damsons, grapes
Blackberries, currants
Figs (fresh)
Blueberries, raspberries
1) The riper the fruit, the shorter the storage time
1)
1)
“humid”
“humid”
“humid”
“humid”
“humid”
“humid”
“humid”
“humid”
“humid”
“humid”
“humid”
“humid”
up to 21 days
up to 14 days
up to 10 days
up to 7 days
up to 1 month
up to 21 days
up to 20 days
up to 14 days
up to 10 days
up to 8 days
up to 7 days
up to 5 days
Cakes containing cream and other kinds of pastry products can be stored in the longfresh
0°C compartment for 2 or 3 days.
Not to be placed in the longfresh 0°C compartment:
• cold sensitive fruit which have to be stored at cellar or room temperature like pineapple,
bananas, grapefruit, melons, mango, papaya, oranges, lemons, kiwi fruit.
• The types of food not mentioned above should be stored in the refrigerator compartment
(e.g. all sorts of cheese, cold cuts, etc.)
The level of air humidity in the drawers depends on the content of humidity in the stored
food, vegetable and fruit and on the frequency of door opening
Page 47

Helpful hints and tips
The longfresh 0°C compartment is also suitable for slow thawing of food. In this case the
thawed food can be stored in the longfresh 0°C compartment for up to two days.
Tips:
• Pay attention to the freshness of the food, especially on the expiry date. Quality and
freshness influence the storage time.
• The whole storage cycle time will depend on the preservation conditions made prior to
the final storage in the fridge.
• Food, fruit or vegetables should always be packed or wrapped up before storage.
• Animal food always store packed and dry.
• Food rich in proteins will go bad quicker. This means seafood will spoil before fish which
in turn will spoil before meat. While storing food in a 0°C compartment storage time for
that kind of food can be increased by up to three times as well without loss on quality.
• All food stored in a 0°C compartment should be taken out of the drawers roughly 15-30
min before consumption, particularly fruit and vegetables to be consumed without any
additional cooking process. Allowing fruit and vegetables to return to room temperature
will improve the texture and flavour.
Helpful hints and tips
Hints for energy saving
• Do not open the door frequently or leave it open longer than absolutely necessary.
• If the ambient temperature is high and the Temperature Regulator is set to low temperature and the appliance is fully loaded, the compressor may run continuously, causing
frost or ice on the evaporator. If this happens, set the Temperature Regulator toward
warmer settings to allow automatic defrosting and so a saving in electricity consumption.
47
Hints for fresh food refrigeration
To obtain the best performance:
• do not store warm food or evaporating liquids in the refrigerator
• do cover or wrap the food, particularly if it has a strong flavour
• position food so that air can circulate freely around it
Hints for refrigeration
Useful hints:
Meat (all types) : wrap in polythene bags and place on the glass shelf above the vegetable
drawer.
For safety, store in this way only one or two days at the most.
Cooked foods, cold dishes, etc..: these should be covered and may be placed on any shelf.
Fruit and vegetables: these should be thoroughly cleaned and placed in the special drawer(s)
provided.
Butter and cheese: these should be placed in special airtight containers or wrapped in
aluminium foil or polythene bags to exclude as much air as possible.
Milk bottles: these should have a cap and should be stored in the bottle rack on the door.
Bananas, potatoes, onions and garlic, if not packed, must not be kept in the refrigerator.
Page 48

Care and cleaning
48
Care and cleaning
CAUTION!
Unplug the appliance before carrying out any maintenance operation.
This appliance contains hydrocarbons in its cooling unit; maintenance and recharging must
therefore only be carried out by authorized technicians.
Periodic cleaning
The equipment has to be cleaned regularly:
• clean the inside and accessories with lukewarm water and some neutral soap.
• regularly check the door seals and wipe clean to ensure they are clean and free from
debris.
• rinse and dry thoroughly.
Do not pull, move or damage any pipes and/or cables inside the cabinet.
Never use detergents, abrasive powders, highly perfumed cleaning products or wax polishes
to clean the interior as this will damage the surface and leave a strong odour.
Clean the condenser (black grill) and the compressor at the back of the appliance with a
brush or a vacuum cleaner. This operation will improve the performance of the appliance
and save electricity consumption.
The lowest shelf, dividing the cooler compartment from the LONGFRESH 0°C compartment
can be removed only for cleaning. To remove pull out the shelf straight.
The cover plates above the drawers in the compartment can be taken out for cleaning.
To make sure fully functionality of the LONGFRESH 0°C compartment the lowest shelf and
cover plates must be put back in their original position after cleaning.
Take care of not to damage the cooling system.
Many proprietary kitchen surface cleaners contain chemicals that can attack/damage the
plastics used in this appliance. For this reason it is recommended that the outer casing of
this appliance is only cleaned with warm water with a little washing-up liquid added.
After cleaning, reconnect the equipment to the mains supply.
Replacing the carbon filter
The carbon filter helps to reduce the odours inside the fridge limiting the risk of unwanted
aroma in sensitive food
To get the best performance the carbon filter should be changed once every year.
New active air filters can be purchased from your local dealer.
Page 49

What to do if…
49
• The air filter is placed behind the flap and can
be reached by pulling the flap outward (1)
• pull out of the slot the exhausted air filter.
1
2
• insert the new air filter in the slot (2)
•close the flap.
The air filter is a consumable accessory and as such is not covered by the guarantee.
During the operation, always keep the air ventilation flap closed.
The air filter should be handled carefully to prevent its surface from being scratched.
Defrosting of the refrigerator
Defrosting of the fridge compartment is automatic.
The water that forms flows into a recipient on the compressor and evaporates. This recipient
cannot be removed.
Periods of non-operation
When the appliance is not in use for long periods, take the following precautions:
•
disconnect the appliance from electricity supply
• remove all food
•
• leave the door/doors ajar to prevent unpleasant smells.
If the cabinet will be kept on, ask somebody to check it once in a while to prevent the food
inside from spoiling in case of a power failure.
defrost
12)
and clean the appliance and all accessories
What to do if…
WARNING!
Before troubleshooting, disconnect the mains plug from the mains socket.
Only a qualified electrician or competent person must do the troubleshooting that is not
in this manual.
There are some sounds during normal use (compressor, refrigerant circulation).
12) If foreseen.
Page 50

What to do if…
50
Problem Possible cause Solution
The appliance is noisy
The appliance does not
operate. The lamp does
not operate.
The mains plug is not connected
The appliance has no power.
The lamp does not work.
The lamp is defective. Refer to "Replacing the lamp".
The Pilot light flashes.
The compressor operates
continually.
The door is not closed correctly. Refer to "Closing the door".
The door has been opened too
The product temperature is too
The room temperature is too
The compressor does not
start immediately after
pressing theTURBO
COOLMATIC button, or
after changing the temperature.
Water flows on the rear
plate of the refrigerator.
Water flows into the refrigerator.
Products prevent that water
The appliance is not supported
properly
The appliance is switched off. Switch on the appliance.
to the mains socket correctly.
There is no voltage in the mains
socket.
The lamp is in stand-by. Close and open the door.
The appliance is not working
properly.
The temperature is not set correctly.
frequently.
high.
high.
The compressor starts after a pe-
riod of time.
During the automatic defrosting
process, frost defrosts on the
rear plate.
The water outlet is clogged. Clean the water outlet.
flows into the water collector.
Check if the appliance stands stable (all the four feet should be on
the floor)
Connect the mains plug to the
mains socket correctly.
Connect a different electrical appliance to the mains socket.
Contact a qualified electrician.
Contact a qualified electrician.
Set a higher temperature.
Do not keep the door open longer
than necessary.
Let the product temperature decrease to room temperature before storage.
Decrease the room temperature.
This is correct.
This is correct.
Make sure that products do not
touch the rear plate.
Page 51

Problem Possible cause Solution
Temperature cannot be
set .
The temperature in the
appliance is too low/high.
The door is not closed correctly. Refer to "Closing the door".
The product temperature is too
Many products are stored at the
The temperature in the
refrigerator is too high.
TURBO COOLMATIC function
switched on.
The temperature regulator is not
set correctly.
high.
same time.
There is no cold air circulation in
the appliance.
Replacing the lamp
1. Switch off the appliance.
2. Press on the rear hook and at the same
time slide the cover in the direction of the
arrow.
3. Replace the lamp with one of the same
power (the maximum power is shown on
the lamp cover).
4. Install the lamp cover by sliding it into its
original position.
5. Switch on the appliance.
6. Open the door. Make sure that the light
comes on.
What to do if…
Switch off TURBO COOLMATIC
manually, or wait to set the temperature until the function has
reset automatically. Refer to
"TURBO COOLMATIC function"..
Set a higher/lower temperature.
Let the product temperature decrease to room temperature before storage.
Store less products at the same
time.
Make sure that there is cold air
circulation in the appliance.
51
Closing the door
1. Clean the door gaskets.
2. If necessary, adjust the door. Refer to "Installation".
3. If necessary, replace the defective door gaskets. Contact the Service Force Center.
Page 52

Technical data
52
Technical data
Dimension of the recess
Height 1780 mm
Width 560 mm
Depth 550 mm
The technical information are situated in the rating plate on the internal left side of the
appliance and in the energy label.
Installation
WARNING!
Read the "Safety Information" carefully for your safety and correct operation of the appliance before installing the appliance.
Positioning
WARNING!
If you are discarding an old appliance that has a lock or catch on the door, you must ensure
that it is made unusable to prevent young children being trapped inside.
The appliance shall have the plug accessible after installation.
Install this appliance at a location where the ambient temperature corresponds to the
climate class indicated on the rating plate of the appliance:
Climate class Ambient temperature
SN +10°C to + 32°C
N +16°C to + 32°C
ST +16°C to + 38°C
T +16°C to + 43°C
Electrical connection
Before plugging in, ensure that the voltage and frequency shown on the rating plate correspond to your domestic power supply.
The appliance must be earthed. The power supply cable plug is provided with a contact for
this purpose. If the domestic power supply socket is not earthed, connect the appliance to
a separate earth in compliance with current regulations, consulting a qualified electrician.
The manufacturer declines all responsibility if the above safety precautions are not observed.
This appliance complies with the E.E.C. Directives.
Page 53

Environmental concerns
Ventilation requirements
The airflow behind the appliance must be sufficient.
50 mm
min.
200 cm
Installation of the carbon air filter
The carbon air filter is an active carbon filter which absorbs bad odours and permits to
maintain the best flavour and aroma for all foodstuffs without risk of odour cross contamination.
On delivery the carbon filter is in a plastic bag to
maintain it’s duration and characteristics. The filter should be placed behind the flap before the
appliance is turned on.
1. Open the flap cover (1)
2. Remove the filter from the plastic bag
3. Insert the filter in the slot found in the back
of the flap cover (2)
4. Close the flap cover
During operation, always keep the air ventilation
flap closed.
The filter should be handled carefully so fragments
do not loosen from the surface.
1
2
53
2
min.
2
200 cm
Environmental concerns
The symbol on the product or on its packaging indicates that this product may not be
treated as household waste. Instead it should be taken to the appropriate collection point
for the recycling of electrical and electronic equipment. By ensuring this product is disposed
of correctly, you will help prevent potential negative consequences for the environment
and human health, which could otherwise be caused by inappropriate waste handling of
this product. For more detailed information about recycling of this product, please contact
your local council, your household waste disposal service or the shop where you purchased
the product.
Page 54

Inhalt
54
Danke, dass Sie sich für eines unserer hochqualitativen Produkte entschieden haben.
Lesen Sie für eine optimale und gleichmäßige Leistung Ihres Gerätes diese
Benutzerinformation bitte sorgfältig durch. Sie wird Ihnen helfen, alle Vorgänge
perfekt und äußerst effizient zu steuern. Damit Sie diese Benutzerinformation bei
Bedarf stets zur Hand haben, empfehlen wir Ihnen, sie an einem sicheren Ort
aufzubewahren. Und geben Sie diese Benutzerinformation bitte an einen
eventuellen neuen Besitzer dieses Gerätes weiter.
Wir wünschen Ihnen viel Freude mit Ihrem neuen Gerät.
Inhalt
Sicherheitshinweise 54
Sicherheitshinweis 55
Allgemeine Sicherheitshinweise 55
Täglicher Gebrauch 56
Reinigung und Pflege 56
Inbetriebnahme 57
Kundendienst 57
Bedienblende 57
Kühlschrank einschalten 58
Ausschalten des Kühlschranks 58
Temperatureinstellung 58
Temperaturanzeige 58
Temperaturregelung 58
TURBO COOLMATIC-Funktion 59
Erste Inbetriebnahme 59
Reinigung des Innenraums 59
Täglicher Gebrauch 60
Verstellbare Ablagen/Einsätze 60
Positionierung der Türeinsätze 60
Positionierung der variablen Ablagebox
60
Kohlefilter 61
LONGFRESH -Fach 61
Feuchtigkeitsregulierung 62
Sicherheitshinweise
Longfresh Schubladen 62
Lagerzeit in der 0°C-Frischebox 63
Praktische Tipps und Hinweise 64
Energiespartipps 64
Hinweise für die Kühlung frischer
Lebensmittel 65
Hinweise für die Kühlung 65
Reinigung und Pflege 65
Regelmäßige Reinigung 65
Wechseln des Kohlefilters 66
Abtauen des Kühlschranks 67
Stillstandzeiten 67
Was tun, wenn … 68
Austauschen der Lampe für die
Innenbeleuchtung 70
Schließen Sie die Tür 70
Technische Daten 70
Gerät aufstellen 70
Aufstellung 70
Elektrischer Anschluss 71
Anforderungen an die Belüftung 71
Einsetzen des Kohlefilters 71
Hinweise zum Umweltschutz 72
Änderungen vorbehalten
Lesen Sie zu Ihrer Sicherheit und für die optimale Geräteanwendung vor der Installation
und dem Gebrauch des Gerätes die vorliegende Benutzerinformation aufmerksam durch,
einschließlich der Ratschläge und Warnungen. Es ist wichtig, dass zur Vermeidung von
Fehlern und Unfällen alle Personen, die das Gerät benutzen, mit der Bedienung und den
Sicherheitsvorschriften vertraut sind. Heben Sie die Benutzerinformation gut auf und
Page 55

Sicherheitshinweise
übergeben Sie sie bei einem Weiterverkauf des Gerätes dem neuen Besitzer, so dass jeder
während der gesamten Lebensdauer des Gerätes über Gebrauch und Sicherheit informiert
ist.
Halten Sie sich zu Ihrer Sicherheit und zum Schutz Ihres Eigentums strikt an die Vorsichtsmaßnahmen der vorliegenden Benutzerinformation, da der Hersteller bei Missachtung
derselben von jeder Haftung freigestellt ist.
Sicherheitshinweis
• Das Gerät darf von Personen (einschließlich Kindern), deren physische, sensorische Fä-
higkeiten und deren Mangel an Erfahrung und Kenntnissen einen sicheren Gebrauch des
Gerätes ausschließen nur unter Aufsicht oder nach ausreichender Einweisung durch eine
verantwortungsbewusste Person benutzt werden, die sicherstellt, dass sie sich der Gefahren des Gebrauchs bewusst sind.
Kinder müssen beaufsichtigt werden, damit sie nicht am Gerät herumspielen können.
• Halten Sie das Verpackungsmaterial unbedingt von Kindern fern. Erstickungsgefahr!
• Ziehen Sie vor der Entsorgung des Gerätes den Netzstecker, schneiden Sie das Netzkabel
(so nah wie möglich am Gerät) ab und entfernen Sie die Tür, so dass spielende Kinder
vor elektrischem Schlag geschützt sind und sich nicht in dem Gerät einschließen können.
• Wenn dieses Gerät mit magnetischer Türdichtung ein älteres Modell mit Schnappver-
schluss (Türlasche) an der Tür oder auf dem Deckel ersetzt, machen Sie den Schnappverschluss vor dem Entsorgen des Altgerätes unbrauchbar. So verhindern Sie, dass das
Gerät nicht zu einer Todesfalle für Kinder wird.
Allgemeine Sicherheitshinweise
55
VORSICHT!
Die Belüftungsöffnungen müssen immer frei von Hindernissen sein.
• Das Gerät ist für die Aufbewahrung von Lebensmitteln und/oder Getränken in einem
normalen Haushalt bestimmt, wie in den vorliegenden Bedienungsanweisungen beschrieben wird.
• Benutzen Sie keine mechanischen oder sonstigen Hilfsmittel, um den Abtauprozess zu
beschleunigen.
• Verwenden Sie keine anderen Elektrogeräte (wie Speiseeisbereiter) in Kühlgeräten, wenn
solche Geräte nicht ausdrücklich vom Hersteller für diesen Zweck zugelassen sind.
• Achten Sie darauf, den Kühlkreislauf nicht zu beschädigen.
• Das Kältemittel Isobutan (R600a) im Kältekreislauf des Gerätes ist ein natürliches und
sehr umweltfreundliches Gas, das jedoch leicht entflammbar ist.
Achten Sie beim Transport und bei der Aufstellung des Gerätes darauf, nicht die Kom-
ponenten des Kältekreislaufs zu beschädigen.
Bei einer eventuellen Beschädigung des Kältekreislaufs:
– offene Flammen und Zündfunken vermeiden
– den Raum, in dem das Gerät installiert ist, gut lüften
Page 56

Sicherheitshinweise
56
• Änderungen der Spezifikationen und am Gerät sind gefährlich. Ein defektes Netzkabel
kann Kurzschlüsse und Feuer verursachen und/oder zu Stromschlägen führen.
WARNUNG!
Elektrische Bauteile (Netzkabel, Stecker, Kompressor) dürfen nur vom Kundendienst oder
einer kompetenten Fachkraft ausgewechselt werden.
1. Das Netzkabel darf nicht verlängert werden.
2. Vergewissern Sie sich, dass der Netzstecker nicht von der Geräterückseite gequetscht
oder beschädigt wird. Ein gequetschter oder beschädigter Netzstecker überhitzt und
kann einen Brand verursachen.
3. Vergewissern Sie sich, dass der Netzstecker des Gerätes frei zugänglich ist.
4. Ziehen Sie nicht am Netzkabel.
5. Stecken Sie den Netzstecker nie in eine lockere Steckdose. Es besteht Brand- und
Stromschlaggefahr.
6.
Betreiben Sie das Gerät nicht ohne Lampenabdeckung,
13)
Innenbeleuchtung vor-
gesehen ist.
• Dieses Gerät ist schwer. Vorsicht beim Transport.
• Entnehmen oder berühren Sie nie mit nassen/feuchten Händen Tiefkühlgut, da dies zu
Hautverletzungen oder Kälteverbrennungen führen kann.
• Das Gerät nicht direkter Sonneneinstrahlung aussetzen.
Täglicher Gebrauch
• Stellen Sie keine heißen Töpfe auf die Kunststoffteile des Gerätes.
• Lagern Sie keine feuergefährlichen Gase oder Flüssigkeiten in dem Gerät. Explosionsgefahr.
•
Legen Sie Lebensmittel nicht direkt vor den Luftauslass auf der Rückwand.
• Ein aufgetautes Produkt darf nicht wieder eingefroren werden.
• Abgepackte Tiefkühlkost immer entsprechend den Herstellerangaben aufbewahren.
• Die Lagerempfehlungen des Geräteherstellers sollten strikt eingehalten werden. Halten
Sie sich an die betreffenden Anweisungen.
• Keine kohlensäurehaltigen Getränke oder Sprudel in den Tiefkühlschrank stellen, da der
Druckanstieg in den Behältern zur Explosion führen und das Gerät beschädigen kann.
• Eis am Stiel kann Kälteverbrennungen verursachen, wenn es direkt nach der Entnahme
aus dem Gefrierschrank gegessen wird.
14)
Reinigung und Pflege
• Schalten Sie vor Wartungsarbeiten immer das Gerät ab und ziehen Sie den Netzstecker
aus der Steckdose.
• Reinigen Sie das Gerät nicht mit Metallgegenständen.
• Keine scharfen Gegenstände zum Entfernen von Reif und Eis im Gerät verwenden. Verwenden Sie einen Kunststoffschaber.
• Kontrollieren Sie den Tauwasserabfluss im Kühlraum in regelmäßigen Abständen. Reinigen Sie den Ablauf, falls nötig. Bei verstopftem Wasserabfluss sammelt sich das Wasser
auf dem Boden des Geräts an.
13) wenn eine Abdeckung der
14) No-Frost-Geräte
Page 57

Bedienblende
Inbetriebnahme
Halten Sie sich für den elektrischen Anschluss strikt an die Anweisungen der betreffenden
Abschnitte.
• Kontrollieren Sie nach dem Auspacken das Gerät auf eventuelle Beschädigungen. Nehmen Sie das Gerät nicht in Betrieb, wenn es beschädigt ist. Melden Sie die Schäden
umgehend dem Händler, bei dem Sie es erworben haben. Bewahren Sie in diesem Fall
die Verpackung auf.
• Lassen Sie das Gerät mindestens vier Stunden stehen, bevor Sie es elektrisch anschließen,
damit das Öl in den Kompressor zurückfließen kann.
• Ausreichenden Freiraum zur Luftzirkulation um das Gerät lassen; anderenfalls besteht
Überhitzungsgefahr. Halten Sie sich für die Belüftung an die Installationsanweisungen.
• Das Gerät sollte zur Vermeidung von Verbrennungen durch Berührung von heißen Bauteilen (Kompressor, Kondensator) möglichst mit der Rückseite gegen eine Wand aufgestellt werden.
• Das Gerät darf nicht in der Nähe von Heizkörpern oder Kochern installiert werden.
• Vergewissern Sie sich, dass der Netzstecker des Gerätes nach der Installation frei zugänglich ist.
•
Verbinden Sie das Gerät ausschließlich mit einer Trinkwasserzuleitung.
Kundendienst
• Sollte die Wartung des Gerätes elektrische Arbeiten verlangen, so dürfen diese nur von
einem qualifizierten Elektriker oder einem Elektro-Fachmann durchgeführt werden.
• Wenden Sie sich für Reparaturen und Wartung nur an Fachkräfte der autorisierten Kundendienststellen und verlangen Sie stets Original-Ersatzteile.
57
15)
Umweltschutz
Das Gerät enthält im Kältekreis oder in dem Isoliermaterial keine ozonschädigenden Gase.
Das Gerät darf nicht wie normaler Hausmüll entsorgt werden. Die Isolierung enthält entzündliche Gase: das Gerät muss gemäß den geltenden Vorschriften entsorgt werden; sie
erhalten diese bei Ihrer Gemeindeverwaltung. Nicht das Kälteaggregat beschädigen, insbesondere nicht in der Nähe des Wärmetauschers. Die Materialien, die bei der Herstellung
dieses Geräts verwendet wurden und mit dem Symbol
werden.
markiert sind, können recycelt
Bedienblende
1 2 3 4 5 6 7
1 Kontrolllampe Kühlschrank
15) Falls ein Wasseranschluss erforderlich ist
Page 58

Bedienblende
58
2 ON/OFF-Taste, Kühlschrank
3 Temperaturregelung Kühlschrank, Taste +
4 Temperaturanzeige Kühlschrank
5 Temperaturregelung Kühlschrank, Taste -
6 TURBO COOLMATIC-Anzeige
7 TURBO COOLMATIC-Taste
Kühlschrank einschalten
1. Stecken Sie den Stecker in die Netzsteckdose.
2. Drücken Sie den Schalter ON/OFF.
3. Die Kontrolllampe leuchtet auf.
Ausschalten des Kühlschranks
1. Halten Sie die ON/OFF-Taste mehr als 5 Sekunden lang gedrückt.
2. Danach wird ein Countdown der Temperatur (-3 -2 -1) angezeigt. Wenn die "1" er-
scheint, wird der Kühlschrank abgeschaltet. Die Temperaturanzeige schaltet sich aus,
ebenso wie die Kontrolllampe.
Temperatureinstellung
Die Temperatur wird mit den Temperatur-Einstelltasten eingestellt. Diese Tasten sind mit
der Temperaturanzeige verbunden.
• Die Temperaturanzeige schaltet von der Anzeige der IST-Temperatur (Temperaturanzeige
leuchtet) zur Anzeige der SOLL-Temperatur (Temperaturanzeige blinkt) um, wenn Sie
eine der Temperatur-Einstelltasten drücken.
• Mit jeder weiteren Betätigung einer der beiden Tasten ändert sich die SOLL-Temperatur
um 1°C. Das Gerät muss die SOLL-Temperatur innerhalb von 24 Stunden erreichen.
Wird keine Taste betätigt, schaltet die Temperaturanzeige automatisch nach einer kurzen
Weile (ca. 5 Sekunden) zurück zur Anzeige der IST-Temperatur.
SOLL-Temperatur bedeutet:
Die Temperatur, die für den Kühlraum ausgewählt wurde. Die SOLL-Temperatur wird durch
blinkende Ziffern dargestellt.
IST-Temperatur bedeutet:
Die Temperaturanzeige zeigt die aktuelle Temperatur im Kühlraum an. Die IST-Temperatur
wird durch stetig leuchtende Ziffern dargestellt.
Temperaturanzeige
Die Temperaturanzeige hat unterschiedliche Bedeutungen:
• Im Normalbetrieb wird die zurzeit im Kühlschrank herrschende Temperatur (IST-Temperatur) angezeigt.
• Wenn die Temperatur eingestellt wird, blinkt der zurzeit eingestellte Temperaturwert des
Kühlschranks (SOLL-Temperatur) in der Anzeige.
Warten Sie nach einer Änderung der Temperatureinstellung ungefähr 24 Stunden, bis sich
die Temperatur stabilisiert hat.
Temperaturregelung
Bedienen Sie das Gerät wie folgt:
Page 59

Erste Inbetriebnahme
1. Stellen Sie die gewünschte Temperatur ein, indem Sie auf die entsprechende Taste
Temperatureinstellung drücken. In der Temperaturanzeige erscheint sofort die geänderte Einstellung (SOLL-Temperatur), und zwar in blinkenden Ziffern.
2. Jedes Mal, wenn Sie auf eine Taste Temperatureinstellung drücken, ändert sich die
angezeigte SOLL-Temperatur um 1 °C. Das Gerät muss die SOLL-Temperatur innerhalb
von 24 Stunden erreichen.
3. Wenn die gewünschte Temperatur erreicht ist, wechselt die Temperaturanzeige nach
kurzer Zeit (ca. 5 Sek.) zur Anzeige der zurzeit im Gerät herrschenden IST-Temperatur.
Außerdem hören die Ziffern in der Temperaturanzeige auf zu blinken und leuchten
stattdessen stetig.
Für eine ordnungsgemäße Lagerung von Lebensmitteln sollten Sie folgende Temperatur
einstellen:
• +5 °C für den Kühlschrank
Wird die Einstellung geändert, so läuft der Kompressor nicht sofort an, wenn gerade au-
tomatisch abgetaut wird. Da die Lagertemperatur im Kühlschrank schnell erreicht wird,
können Sie das Gerät gleich nach dem Einschalten mit Lebensmitteln füllen.
TURBO COOLMATIC-Funktion
Die TURBO COOLMATIC-Funktion dient zum schnellen Herunterkühlen großer Lebensmittelmengen im Kühlschrank.
So schalten Sie die Funktion ein:
1. Drücken Sie die Taste TURBO COOLMATIC.
2. Die TURBO COOLMATIC-Anzeige schaltet sich ein.
Die TURBO COOLMATIC -Funktion sorgt jetzt für intensives Kühlen. Eine SOLL-Temperatur
von +3°C wird automatisch gewählt.
Die TURBO COOLMATIC-Funktion endet automatisch nach einer Dauer von 6 Stunden.
Sie können die Funktion jederzeit ausschalten:
1. Drücken Sie die Taste TURBO COOLMATIC.
2. Die TURBO COOLMATIC Kontrolllampe erlischt.
59
Erste Inbetriebnahme
Reinigung des Innenraums
Bevor Sie das Gerät in Betrieb nehmen, beseitigen Sie den typischen "Neugeruch" am besten
durch Auswaschen der Innenteile mit lauwarmem Wasser und einem neutralen Reinigungsmittel. Sorgfältig nachtrocknen.
Verwenden Sie keine Reinigungsmittel oder Scheuerpulver, da hierdurch die Oberfläche
beschädigt wird.
Page 60

Täglicher Gebrauch
60
Täglicher Gebrauch
Das Gerät wird in Frankreich verkauft.
Entsprechend den Vorschriften in diesem Land muss das Gerät mit einer speziellen Vorrichtung ausgestattet sein (siehe Abbildung), die im unteren Fach des Kühlraums angebracht ist und den kältesten Bereich des Kühlraums anzeigt.
Verstellbare Ablagen/Einsätze
Die Wände des Kühlschranks sind mit einer Anzahl
von Führungsschienen ausgestattet, die verschiedene Möglichkeiten für das Einsetzen der Ablagen
bieten.
Zur besseren Raumnutzung können die vorderen
Halbteile der Ablagen auf die rückwärtigen hinaufgelegt werden.
Positionierung der Türeinsätze
Die Türeinsätze können in verschiedener Höhe positioniert werden; damit ermöglichen Sie
das Lagern verschieden großer Lebensmittelpackungen.
Positionierung der variablen Ablagebox
Die Ablagebox kann in verschiedenen Höhen positioniert werden.
Bitte nehmen Sie diese Einstellungen wie folgt vor:
Page 61

Täglicher Gebrauch
1. Zum Umsetzen das Abstellfach mit der
Ablagebox nach oben aus den Aufnahmen
in der Tür herausheben
2. Haltebügel aus der Führung unter der Ab-
lage herausnehmen
3. Das Einsetzen in eine andere Höhe bitte in
umgekehrter Reihenfolge vornehmen.
Kohlefilter
Ihr Gerät ist mit einem Kohlefilter CLEAN AIR
CONTROL hinter einer Klappe in der Rückwand des
Kühlgeräts ausgerüstet.
Der Filter reinigt die Luft von unerwünschten Gerüchen in der Kühleinheit und im LONGFRESH Fach und verbessert so die Aufbewahrungseigenschaften.
Die Lüftungsklappe muss während des Betriebs stets geschlossen sein.
LONGFRESH -Fach
Im LONGFRESH 0°C -Fach wird die Temperatur automatisch geregelt. Sie liegt konstant bei
ca. 0 °C und es ist keine Einstellung erforderlich.
Die konstante Lagertemperatur von ca. 0 °C und die relative Feuchte zwischen 45 und 90
% bieten optimale Bedingungen für alle Arten von Lebensmitteln.
61
Daher können Sie eine Vielzahl frischer Lebensmittel im LONGFRESH 0°C -Fach lagern, denn
hier halten sie bis zu 3-mal frischer und qualitativ besser im Vergleich zu normalen Kühlfächern. Dies ermöglicht die Lagerung größerer Mengen frischer Lebensmittel. Geschmack,
Frische, Qualität und Nährstoffe (Vitamine und Mineralstoffe) in den Lebensmitteln bleiben
sehr gut erhalten. Es entsteht nur minimaler Gewichtsverlust bei Gemüse und Obst. Der
Nährwert der Lebensmittel bleibt weitgehend erhalten.
Das LONGFRESH 0°C -Fach eignet sich auch zum Auftauen von Lebensmitteln.
Die aufgetauten Lebensmittel können in diesem Fall bis zu zwei Tagen gelagert werden.
Page 62

Täglicher Gebrauch
62
Feuchtigkeitsregulierung
Je nach gewünschter Lagerbedingung können
beide Fächer unabhängig voneinander mit einem
unterschiedlichen Feuchtigkeitsgehalt verwendet
werden.
Jedes Fach kann mit dem Schieberegler auf der
Vorderseite des Faches separat eingestellt werden.
• "Trocken": geringe Luftfeuchtigkeit - bis zu 50
% relative Feuchtigkeit
Dieser Feuchtigkeitgrad wird erreicht, wenn sich beide Schieberegler in der Position
befinden und die Belüftungsöffnungen weit geöffnet sind.
• "Feucht": hohe relative Feuchtigkeit - bis zu 90 %
Dieser Feuchtigkeitgrad wird erreicht, wenn sich beide Schieberegler in der Position
befinden und die Belüftungsöffnungen geschlossen sind. Die Feuchtigkeit ist jetzt
eingeschlossen und kann nicht entweichen.
Longfresh Schubladen
Der Feuchtigkeitsgrad kann nicht eingestellt werden.
Die Metalleinsätze in den Schubladen ermöglichen die freie Luftzirkulation und damit eine verbesserte Frischhaltung der Lebensmittel.
Das Fach hat Anschläge, die ein Herausfallen der
Schublade verhindern, wenn sie ganz herausgezogen wird.
Um die Schubladen (z.B. zum Reinigen) herauszunehmen, ziehen Sie diese bis zum Anschlag heraus,
heben Sie sie an und nehmen Sie sie aus dem Gerät.
Sie können alle Schubladen entfernen, wenn Sie
große Mengen an Lebensmitteln aufbewahren
möchten.
Page 63

Lagerzeit in der 0°C-Frischebox
Täglicher Gebrauch
63
Lebensmittelsorte Einstellung der Luftfeuchtig-
keit
Zwiebeln
Butter
Große Stücke Schweinefleisch
Rindfleisch, Kalb, kleinere Stü-
"trocken"
"trocken"
"trocken"
"trocken"
cke Schweinefleisch, Geflügel
Tomatensoße
Fisch, Schellfisch, gekochte
"trocken"
"trocken"
Fleischgerichte
Gekochte Fischgerichte
Salat, Gemüse Karotten,
"trocken"
"feucht"
Kräuter, Rosenkohl, Sellerie
Artischocken, Blumenkohl,
"feucht"
Chicoree, Eisbergsalat, Endiviensalat, Romana, Kopfsalat,
Lauch, Radicchio
Broccoli, Chinakohl, Grünkohl,
"feucht"
Weiß- und Rotkohl, Rettich,
Wirsing
Erbsen, Kohlrabi
Frühlingszwiebeln, Radies-
"feucht"
"feucht"
chen, Spargel, Spinat
Obst
1)
"feucht"
Birnen, (frische) Datteln, Erdbeeren, Pfirsiche
Pflaumen
1)
1)
"feucht"
Rhabarber, Stachelbeeren
Äpfel (keine kälteempfindliche
"feucht"
Sorten), Quitten
Aprikosen, Kirschen
Zwetschgen, Trauben
Brombeeren, schwarze Johan-
"feucht"
"feucht"
"feucht"
nisbeeren
Feigen (frisch)
Blaubeeren, Himbeeren
1) Je reifer die Frucht, desto kürzer die Lagerzeit
"feucht"
"feucht"
Lagerzeit
bis zu 5 Monaten
bis zu 1 Monat
bis zu 10 Tagen
bis zu 7 Tagen
bis zu 4 Tagen
bis zu 3 Tagen
bis zu 2 Tagen
bis zu 1 Monat
bis zu 21 Tagen
bis zu 14 Tagen
bis zu 10 Tagen
bis zu 7 Tagen
bis zu 1 Monat
bis zu 21 Tagen
bis zu 20 Tagen
bis zu 14 Tagen
bis zu 10 Tagen
bis zu 8 Tagen
bis zu 7 Tagen
bis zu 5 Tagen
Page 64

Praktische Tipps und Hinweise
64
Kuchen, die Sahne oder andere Füllungen enthalten, können im 0°C-Frischefach 2 bis 3
Tage lang gelagert werden.
Folgende Lebensmittel dürfen nicht ins 0°C-Frischefach:
• kälteempfindliches Obst, das in einem Keller oder bei Raumtemperatur gelagert werden
sollte wie Bananen, Grapefruit, Melonen, Mangos, Papayas, Orangen, Zitronen/Limonen
und Kiwi.
• Oben nicht erwähnte Lebensmittel sollten im Kühlschrankfach gelagert werden (z.B. alle
Käsesorten, Wurstaufschnitt usw.)
Der Feuchtigkeitsgrad in den Schubladen hängt vom Feuchtigkeitsgehalt der gelagerten
Lebensmittel (Gemüse und Obst) und der Häufigkeit des Türöffnens ab.
Das 0°C-Frischefach eignet sich auch zum langsamen Auftauen von gefrorenen Lebensmitteln. Die aufgetauten Lebensmittel können in diesem Fall bis zu zwei Tagen im 0°CFrischefach gelagert werden.
Tipps:
• Bitte achten Sie beim Einkauf auf die Frische der Lebensmittel und besonders auf das
Verfalldatum. Qualität und Frische beeinflussen die Lagerzeit.
• Die gesamte Lagerzeit hängt von den Lagerbedingungen der Lebensmittel vor dem Einlagern in den Kühlschrank ab.
• Alle Lebensmittel, Obst und Gemüse sollten vor dem Einlagern verpackt oder eingewickelt
werden.
• Tiernahrung sollte stets gesondert verpackt und trocken gelagert werden.
• Eiweißreiche Lebensmittel verderben schneller als andere. Das bedeutet, dass Meeresfrüchte vor Fisch verderben, und Fisch vor Fleisch. Durch die Lagerung im 0°C-Frischefach
lässt sich diese Art von Lebensmitteln bis zu dreimal länger und ohne Qualitätsverlust
lagern.
• Alle im 0°C-Frischefach gelagerten Lebensmittel sollten etwa 15-30 Min. vor dem Verzehr
herausgenommen werden, besonders Obst und Gemüse, das roh verzehrt wird. Geschmack und Beschaffenheit von Obst und Gemüse verbessern sich bei Raumtemperatur.
Praktische Tipps und Hinweise
Energiespartipps
• Öffnen Sie die Tür nicht zu häufig, und lassen Sie diese nicht länger offen als unbedingt
notwendig.
Page 65

Reinigung und Pflege
• Wenn die Umgebungstemperatur hoch ist und der Temperaturregler auf eine niedrige
Temperatur eingestellt und das Gerät voll beladen ist, kann es zu andauerndem Betrieb
des Kompressors und damit zu Reif- oder Eisbildung am Verdampfer kommen. Stellen
Sie in diesem Fall den Temperaturregler auf eine höhere Einstellung ein, die ein automatisches Abtauen und damit auch einen niedrigeren Energieverbrauch ermöglicht.
Hinweise für die Kühlung frischer Lebensmittel
So erzielen Sie beste Ergebnisse:
• legen Sie bitte keine warmen Lebensmittel oder dampfende Flüssigkeiten in den Kühlschrank
• decken Sie die Lebensmittel ab oder verpacken Sie diese entsprechend, besonders wenn
diese stark riechen
• legen Sie die Lebensmittel so hinein, dass um sie Luft frei zirkulieren kann
Hinweise für die Kühlung
Tipps:
Fleisch (alle Sorten): wickeln Sie Fleisch in lebensmittelechte Tüten und legen Sie diese auf
die Glasablage über der Gemüseschublade.
Bitte lagern Sie Fleisch aus Sicherheitsgründen nur einen oder maximal zwei Tage auf diese
Weise.
Gekochte Lebensmittel, kalte Gerichte usw.: diese können abgedeckt auf eine Ablage gelegt
werden.
Obst und Gemüse: bitte waschen Sie Obst und Gemüse gründlich und legen Sie es in die
speziell dafür vorgesehene(n) Schublade(n).
Butter und Käse: diese sollten stets in speziellen luftdichten Behältern verpackt sein oder
in Aluminiumfolie bzw. in lebensmittelechte Tüten eingepackt werden, um so wenig Luft
wie möglich in der Verpackung zu haben.
Milchflaschen: bitte bewahren Sie Milchflaschen stets mit Deckel im Flaschenregal in der
Tür auf.
Bananen, Kartoffeln, Zwiebeln und Knoblauch sollten nicht im Kühlschrank aufbewahrt
werden, außer diese sind dafür speziell verpackt.
65
Reinigung und Pflege
VORSICHT!
Ziehen Sie bitte vor jeder Reinigungsarbeit immer den Netzstecker aus der Steckdose.
Der Kältekreis des Gerätes enthält Kohlenwasserstoffe; Wartungsarbeiten und Nachfüllen
von Kältemittel dürfen daher nur durch vom Hersteller autorisiertes Fachpersonal ausgeführt werden.
Regelmäßige Reinigung
Das Gerät und der Zubehör müssen regelmäßig gereinigt werden:
• Reinigen Sie die Innenseiten und die Zubehörteile mit lauwarmem Wasser und etwas
Neutralseife.
• Prüfen und säubern Sie die Türdichtungen in regelmäßigen Abständen und kontrollieren
Sie, dass diese sauber und frei von Verunreinigungen sind.
Page 66

Reinigung und Pflege
66
• Spülen und trocknen Sie diese sorgfältig ab.
Ziehen Sie nicht an Leitungen und/oder Kabeln im Gerät und achten Sie darauf, diese nicht
zu verschieben oder zu beschädigen.
Benutzen Sie zur Reinigung des Innenraums keinesfalls Putzmittel, Scheuerpulver, stark
parfümierte Reinigungsmittel oder Wachspolituren, da diese die Oberfläche des Innenraums beschädigen und einen starken Eigengeruch hinterlassen können.
Reinigen Sie den Kondensator (schwarzes Gitter) und den Motorkompressor auf der Geräterückseite mit einer Bürste oder einem Staubsauger. Dadurch verbessert sich die Leistung
des Geräts und es verbraucht weniger Strom.
Die unterste Ablage, die das Kühlfach vom LONGFRESH 0°C -Fach abtrennt, sollte nur für
Reinigungszwecke entfernt werden. Ziehen Sie die Ablage gerade aus dem Gerät heraus.
Die Abdeckplatten über den Schubladen im Fach können zu Reinigungszwecken herausgenommen werden.
Damit die volle Funktionalität des LONGFRESH 0°C -Fachs gewährleistet ist, müssen die
unterste Ablage und die Abdeckplatten nach der Reinigung wieder in ihre ursprüngliche
Position eingesetzt werden.
Bitte achten Sie darauf, das Kühlsystem nicht zu beschädigen.
Viele Haushaltsreiniger für Küchen enthalten Chemikalien, die den im Gerät verwendeten
Kunststoff angreifen können. Aus diesem Grund ist es empfehlenswert, das Gerät außen
nur mit warmem Wasser und etwas flüssigem Tellerspülmittel zu reinigen.
Schließen Sie das Gerät nach der Reinigung wieder an die Netzversorgung an.
Wechseln des Kohlefilters
Der Kohlefilter trägt dazu bei, die Gerüche im Innern des Kühlschranks zu reduzieren. Dadurch wird eine Übertragung unerwünschter Aromen auf empfindliche Lebensmittel eingeschränkt.
Das beste Ergebnis wird erzielt, wenn Sie den Kohlefilter einmal jährlich wechseln.
Neue Aktivluftfilter erhalten Sie bei Ihrem Händler vor Ort.
Page 67

Reinigung und Pflege
67
• Der Luftfilter befindet sich hinter einer Klappe und ist zugänglich, wenn diese nach außen (1) gezogen wird.
• Ziehen Sie den verbrauchten Luftfilter aus
dem Schlitz.
1
2
• Setzen Sie den neuen Luftfilter in den Schlitz (2) ein.
• Schließen Sie die Klappe.
Bei dem Luftfilter handelt es sich um Verbrauchsmaterial, das nicht unter die Garantie fällt.
Die Lüftungsklappe muss während des Betriebs stets geschlossen sein.
Behandeln Sie den Luftfilter sehr vorsichtig, da die Oberfläche leicht verkratzt.
Abtauen des Kühlschranks
Das Abtauen des Kühlschranks erfolgt automatisch.
Das dabei entstehende Wasser fließt in eine Schale am Kompressor und verdampft dort.
Diese Schale kann nicht entfernt werden.
Stillstandzeiten
Bei längerem Stillstand des Gerätes müssen Sie folgendermaßen vorgehen:
•
trennen Sie das Gerät von der Netzversorgung
• entnehmen Sie alle Lebensmittel
•
tauen Sie das Gerät ab,
• lassen Sie die Türen offen/angelehnt, um das Entstehen unangenehmer Gerüche zu vermeiden.
Möchten Sie bei einer längeren Abwesenheit den Gefrierschrank weiter laufen lassen, bitten
Sie jemanden, gelegentlich die Temperatur zu prüfen, damit das Gefriergut bei einem möglichen Stromausfall nicht im Innern des Gerätes verdirbt.
16) falls dies vorgesehen ist.
16)
Reinigen Sie das Gerät und alle Zubehörteile
Page 68

Was tun, wenn …
68
Was tun, wenn …
WARNUNG!
Ziehen Sie vor der Fehlersuche immer den Netzstecker aus der Steckdose.
Die Fehlersuche, die in der vorliegenden Gebrauchsanweisung nicht beschrieben ist, darf
nur von einem qualifizierten Elektriker oder einer kompetenten Person durchgeführt werden.
Während das Gerät in Betrieb ist, entstehen bestimmte Geräusche (Kompressor und Kühlkreislauf).
Störung Mögliche Ursache Abhilfe
Das Gerät ist zu laut
Das Gerät funktioniert
nicht. Die Lampe funktioniert nicht.
Der Netzstecker steckt nicht
Das Gerät bekommt keinen
Die Lampe funktioniert
nicht.
Die Lampe ist defekt. Siehe hierzu "Austauschen der
Die Kontrolllampe blinkt.
Der Kompressor arbeitet
ständig.
Die Tür ist nicht richtig geschl os-
Die Tür wurde zu häufig geöff-
Die Temperatur der zu kühlen-
Die Raumtemperatur ist zu
Unebenheiten im Boden sind
durch Unterlegen nicht ausgeglichen worden
Das Gerät ist abgeschaltet. Schalten Sie das Gerät ein.
richtig in der Steckdose.
Strom. Es liegt keine Spannung
an der Netzsteckdose an.
Die Lampe ist im Standby-Modus.
Das Gerät arbeitet nicht korrekt. Kontaktieren Sie gegebenenfalls
Die Temperatur ist nicht richtig
eingestellt.
sen.
net.
den Lebensmittel ist zu hoch.
hoch.
Kontrollieren Sie, ob eventuelle
Unebenheiten der Standfläche
korrekt ausgeglichen wurden, so
dass alle vier Füße fest auf dem
Boden stehen
Stecken Sie den Netzstecker richtig in die Steckdose.
Testen Sie bitte, ob ein anderes
Gerät an dieser Steckdose funktioniert.
Kontaktieren Sie gegebenenfalls
einen qualifizierten Elektriker.
Öffnen und schließen Sie die Tür.
Lampe".
einen qualifizierten Elektriker.
Stellen Sie eine höhere Tempera-
tur ein.
Siehe hierzu "Schließen der Tür".
Lassen Sie die Tür nicht länger als
unbedingt erforderlich offen.
Lassen Sie Lebensmittel auf
Raumtemperatur abkühlen, bevor
Sie sie in das Gerät stellen.
Senken Sie die Raumtemperatur.
Page 69

Störung Mögliche Ursache Abhilfe
Der Kompressor schaltet
sich nicht sofort ein,
nachdem Sie die TURBO
COOLMATIC-Taste gedrückt oder die Temperatur geändert haben.
Wasser fließt an der
Rückwand des Kühlschranks hinunter.
Wasser fließt in den
Kühlschrank.
Die eingelagerten Lebensmittel
Die Temperatur lässt sich
nicht einstellen.
Die Temperatur im Gerät
ist zu hoch/niedrig.
Die Tür ist nicht richtig geschl os-
Die Temperatur der zu kühlen-
Es wurden zu viele Lebensmittel
Die Temperatur im Kühlschrank ist zu hoch.
Der Kompressor schaltet sich
nach einer Weile ein.
Beim automatischen Abtauen
fließt das abgetaute Wasser an
der Rückwand des Kühlschranks
hinunter.
Der Wasserabflusskanal ist verstopft.
verhindern, dass das Wasser zum
Kollektor fließt.
Die TURBO COOLMATIC-Funktion ist eingeschaltet.
Die Temperatur ist nicht richtig
eingestellt.
sen.
den Lebensmittel ist zu hoch.
auf einmal eingelegt.
Die Kaltluft kann nicht im Gerät
zirkulieren.
Was tun, wenn …
Das ist normal.
Das ist normal.
Reinigen Sie den Ablauf.
Stellen Sie sicher, dass die Lebensmittel nicht die Rückwand berühren.
Schalten Sie die TURBO COOLMATIC-Funktion von Hand aus oder
warten Sie mit dem Einstellen der
Temperatur, bis sich die Funktion
automatisch ausschaltet. Siehe
hierzu "TURBO COOLMATICFunktion".
Stellen Sie eine höhere/niedrigere
Temperatur ein.
Siehe hierzu "Schließen der Tür".
Lassen Sie Lebensmittel auf
Raumtemperatur abkühlen, bevor
Sie sie in das Gerät stellen.
Legen Sie weniger Lebensmittel
auf einmal ein.
Stellen Sie sicher, dass die Kaltluft
im Gerät zirkulieren kann.
69
Page 70

Technische Daten
70
Austauschen der Lampe für die Innenbeleuchtung
1. Schalten Sie das Gerät aus.
2. Drücken Sie auf den Haken hinten und
schieben Sie die Abdeckung der Lampe
gleichzeitig in Pfeilrichtung.
3. Ersetzen Sie die Lampe durch eine Lampe
der gleichen Leistung (die maximal erlaubte Leistung steht auf der Abdeckung
der Lampe).
4. Bringen Sie die Abdeckung der Lampe
wieder an, indem Sie sie an die ursprüngliche Position zurückschieben.
5. Schalten Sie das Gerät ein.
6. Öffnen Sie die Tür. Vergewissern Sie sich, dass die Lampe leuchtet.
Schließen Sie die Tür
1. Reinigen Sie die Türdichtungen.
2. Stellen Sie die Tür nach Bedarf ein. Siehe hierzu "Gerät aufstellen".
3. Ersetzen Sie die defekten Türdichtungen, falls erforderlich. Kontaktieren Sie den Kun-
dendienst.
Technische Daten
Abmessung der Aussparung
Höhe 1780 mm
Breite 560 mm
Tiefe 550 mm
Die technischen Informationen befinden sich auf dem Typschild innen links im Gerät sowie
auf der Energieplakette.
Gerät aufstellen
WARNUNG!
Lesen Sie bitte die "Sicherheitshinweise" vor der Aufstellung des Geräts sorgfältig durch,
um Gefahren für Sie selbst zu vermeiden und einen korrekten Betrieb des Geräts zu gewährleisten.
Aufstellung
WARNUNG!
Wenn Sie ein altes Gerät entsorgen möchten, das ein Schloss oder einen Riegel an der Tür
besitzt, müssen Sie das Schloss bzw. den Riegel zunächst unbrauchbar machen, um zu
verhindern, dass sich spielende Kinder darin einschließen können.
Page 71

Gerät aufstellen
Die Steckdose für den Anschluss des Geräts muss nach der Installation zugänglich sein.
Installieren Sie dieses Gerät an einem Ort, an dem die Umgebungstemperatur mit der Klimaklasse übereinstimmt, die auf dem Typschild des Geräts angegeben ist:
Klimaklasse Umgebungstemperatur
SN +10°C bis + 32°C
N +16°C bis + 32°C
ST +16°C bis + 38°C
T +16°C bis + 43°C
Elektrischer Anschluss
Kontrollieren Sie vor der ersten Benutzung des Gerätes, ob die Netzspannung und -frequenz
Ihres Hausanschlusses mit den auf dem Typenschild angegebenen Anschlusswerten übereinstimmen.
Das Gerät muss geerdet sein. Zu diesem Zweck ist die Netzkabelsteckdose mit einem
Schutzkontakt ausgestattet. Falls die Steckdose Ihres Hausanschlusses nicht geerdet sein
sollte, lassen Sie das Gerät bitte gemäß den geltenden Vorschriften erden und fragen Sie
dafür einen qualifizierten Elektriker.
Der Hersteller übernimmt keinerlei Haftung für Schäden oder Verletzungen, die durch
Missachtung der oben genannten Sicherheitshinweise entstehen.
Das Gerät entspricht den EU- Richtlinien.
71
Anforderungen an die Belüftung
Die Luftzirkulation hinter dem Gerät muss ausreichend groß sein.
50 mm
min.
200 cm
Einsetzen des Kohlefilters
Der Kohlefilter ist ein Aktivkohlefilter, der schlechte Gerüche aufsaugt und so den Geschmack und das Aroma der Lebensmittel ohne Risiko von Geruchsübertragung optimal
aufrecht erhält.
2
min.
2
200 cm
Page 72

Hinweise zum Umweltschutz
72
Der Filter wird mit einer Plastikumhüllung geliefert, die seine Haltbarkeit und die Bewahrung seiner Eigenschaften gewährleistet. Der Filter muss
hinter der Klappe eingesetzt werden, bevor das
Gerät eingeschaltet wird.
1. Öffnen Sie die Klappenabdeckung (1).
2. Entnehmen Sie den Filter aus der Plastikumhüllung.
3. Setzen Sie den Filter in den Schlitz an der
Rückseite der Klappenabdeckung (2) ein.
4. Schließen Sie die Klappenabdeckung.
Die Lüftungsklappe muss während des Betriebs
stets geschlossen sein.
Behandeln Sie den Filter sorgfältig, damit sich keine Partikel von der Oberfläche ablösen.
1
2
Hinweise zum Umweltschutz
Das Symbol auf dem Produkt oder seiner Verpackung weist darauf hin, dass dieses
Produkt nicht als normaler Haushaltsabfall zu behandeln ist, sondern an einem
Sammelpunkt für das Recycling von elektrischen und elektronischen Geräten abgegeben
werden muss. Durch Ihren Beitrag zum korrekten Entsorgen dieses Produkts schützen Sie
die Umwelt und die Gesundheit Ihrer Mitmenschen. Umwelt und Gesundheit werden durch
falsches Entsorgen gefährdet. Weitere Informationen über das Recycling dieses Produkts
erhalten Sie von Ihrem Rathaus, Ihrer Müllabfuhr oder dem Geschäft, in dem Sie das Produkt
gekauft haben.
Page 73

Spis treści
Dziękujemy za wybranie jednego z naszych produktów o wysokiej
jakości.
Aby zapewnić optymalne i prawidłowe działanie Państwa urządzenia
prosimy o dokładne przeczytanie niniejszej instrukcji obsługi. Pozwoli to
Państwu na doskonałe i najbardziej wydajne kierowanie wszystkimi
procesami. Zalecamy przechowywanie instrukcji obsługi w
bezpiecznym miejscu, co pozwoli na korzystanie z niej również w
przyszłości. Ponadto prosimy o przekazanie jej przyszłemu
właścicielowi urządzenia.
Życzymy Państwu wiele radości z używania nowego urządzenia.
Spis treści
73
Informacje dotyczące bezpieczeństwa
Bezpieczeństwo dzieci i osób
upośledzonych 74
Ogólne zasady bezpieczeństwa
Codzienna eksploatacja 75
Konserwacja i czyszczenie 76
Instalacja 76
Serwis 76
Panel sterowania 77
Włączanie chłodziarki 77
Wyłączanie chłodziarki 77
Przyciski regulacji temperatury 77
Wskaźnik temperatury 78
Regulacja temperatury 78
Funkcja TURBO COOLMATIC 79
Pierwsze użycie 79
Czyszczenie wnętrza 79
Codzienna eksploatacja 79
Zmiana położenia półek 80
Rozmieszczanie półek na drzwiach
Rozmieszczanie wąskich półek na
drzwiach 80
Węglowy filtr powietrza 80
Komora LONGFRESH 81
Kontrola wilgotności 81
Szuflady Longfresh 82
Czas przechowywania artykułów
spożywczych w komorze na świeżą
żywność w temp. 0°C 82
222346604-00-072009
Przydatne rady i wskazówki 84
74
74
80
Wskazówki dotyczące oszczędzania
energii 84
Wskazówki dotyczące
przechowywania świeżej żywności
Wskazówki dotyczące
przechowywania żywności 85
Konserwacja i czyszczenie 85
Okresowe czyszczenie 85
Wymiana filtra węglowego 86
Rozmrażanie chłodziarki 87
Okresy przerw w eksploatacji
urządzenia 87
Co zrobić, gdy… 87
Wymiana żarówki 89
Zamykanie drzwi 89
Dane techniczne 90
Instalacja 90
Miejsce instalacji 90
Przyłącze elektryczne 90
Wymagania dotyczące wentylacji
Instalacja węglowego filtra powietrza
Ochrona środowiska 91
Może ulec zmianie bez powiadomienia
84
91
91
Page 74

74
Informacje dotyczące bezpieczeństwa
Informacje dotyczące bezpieczeństwa
W celu zapewnienia bezpieczeństwa użytkownika i bezawaryjnej pracy urzą‐
dzenia przed instalacją i pierwszym użyciem należy uważnie przeczytać in‐
strukcję obsługi, zwracając szczególną uwagę na wskazówki oraz ostrzeżenia.
Wszyscy użytkownicy urządzenia powinni poznać zasady jego bezpiecznej
obsługi. Pozwoli to uniknąć niepotrzebnych pomyłek i wypadków. Prosimy o
zachowanie instrukcji obsługi przez cały czas używania urządzenia oraz prze‐
kazanie jej kolejnemu użytkownikowi w razie odstąpienia lub sprzedaży urzą‐
dzenia.
W celu uniknięcia szkód na zdrowiu i życiu osób oraz szkód materialnych na‐
leży przestrzegać środków ostrożności podanych w niniejszej instrukcji obsłu‐
gi, gdyż producent nie jest odpowiedzialny za szkody spowodowane wskutek
ich nieprzestrzegania.
Bezpieczeństwo dzieci i osób upośledzonych
• Niniejsze urządzenie nie jest przeznaczone do użytku przez osoby (w tym
dzieci) o ograniczonych zdolnościach fizycznych, sensorycznych czy umy‐
słowych, a także nieposiadające wiedzy lub doświadczenia w użytkowaniu
tego typu urządzeń, chyba, że będą one nadzorowane lub zostaną poin‐
struowane na temat korzystania z tego urządzenia przez osobę odpowie‐
dzialną za ich bezpieczeństwo.
Dzieci należy pilnować, aby mieć pewność, że nie bawią się urządzeniem.
• Opakowanie należy przechowywać w miejscu niedostępnym dla dzieci. Ist‐
nieje ryzyko uduszenia.
• W przypadku utylizacji urządzenia należy wyjąć wtyczkę z gniazdka, odciąć
przewód zasilający (jak najbliżej urządzenia) i odkręcić drzwi, aby uchronić
bawiące się dzieci przed porażeniem prądem lub przed zamknięciem się w
środku urządzenia.
• Jeśli to urządzenie zawierające magnetyczne uszczelnienie drzwi ma za‐
stąpić urządzenie z blokadą sprężynową (ryglem) w drzwiach lub w pokry‐
wie, przed oddaniem starego urządzenia do utylizacji należy usunąć bloka‐
dę. Zapobiegnie to przypadkowemu uwięzieniu dziecka.
Ogólne zasady bezpieczeństwa
UWAGA!
Nie zasłaniać otworów wentylacyjnych.
• Urządzenie jest przeznaczone do przechowywania żywności i/lub napojów
w zwykłych warunkach domowych zgodnie z opisem zawartym w niniejszej
instrukcji obsługi.
• Do przyśpieszenia procesu rozmrażania nie wolno używać urządzeń me‐
chanicznych ani żadnych innych sztucznych metod.
• Nie wolno stosować innych urządzeń elektrycznych (np. maszynek do lo‐
dów) wewnątrz urządzeń chłodniczych, jeśli nie zostały one zaakceptowane
do tego celu do tego celu przez producenta.
• Należy uważać, aby nie uszkodzić układu chłodniczego.
Page 75

Informacje dotyczące bezpieczeństwa
75
• W układzie chłodniczym urządzenia znajduje się czynnik chłodniczy izobu‐
tan (R600a), ekologiczny gaz naturalny, lecz łatwopalny.
Należy upewnić się, że podczas transportu i instalacji urządzenia nie zostały
uszkodzone żadne elementy układu chłodniczego.
Jeśli układ chłodniczy został uszkodzony, należy:
– unikać otwartego płomienia oraz innych źródeł zapłonu,
– dokładnie przewietrzyć pomieszczenie, w którym znajduje się urządzenie.
• Zmiany parametrów lub jakiekolwiek modyfikacje urządzenia stanowią po‐
tencjalne zagrożenie. Uszkodzenia przewodu zasilającego mogą spowodo‐
wać zwarcie, pożar i/lub porażenie prądem.
OSTRZEŻENIE!
Wszelkie elementy elektryczne (przewód zasilający, wtyczka, sprężarka) mo‐
gą zostać wymienione wyłącznie przez technika autoryzowanego serwisu lub
w przez wykwalifikowany personel techniczny.
1. Nie wolno przedłużać przewodu zasilającego.
2. Należy upewnić się, że wtyczka przewodu zasilającego nie jest zmiaż‐
dżona ani uszkodzona przez tylną ściankę urządzenia. Zmiażdżona lub
uszkodzona wtyczka może się przegrzewać i spowodować pożar.
3. Należy zapewnić dostęp do wtyczki przewodu zasilającego.
4. Nie wolno ciągnąć za przewód zasilający.
5. Jeżeli gniazdo jest poluzowane, nie wolno podłączać do niego wtyczki
przewodu zasilającego. Występuje niebezpieczeństwo porażenia prą‐
dem lub pożaru.
6.
Nie wolno używać urządzenia bez nałożonej osłony oświetlenia
17)
wew‐
nętrznego.
• Urządzenie jest ciężkie. Przy jego przemieszczaniu należy zachować os‐
trożność.
• Nie wolno usuwać ani dotykać przedmiotów znajdujących się w komorze
zamrażarki wilgotnymi lub mokrymi rękoma, gdyż może to spowodować
uszkodzenie skóry lub odmrożenie.
• Nie należy wystawiać urządzenia na bezpośrednie działanie promieni sło‐
necznych.
Codzienna eksploatacja
• Nie wolno stawiać gorących naczyń na plastikowych elementach urządze‐
nia.
• Nie wolno przechowywać łatwopalnych gazów ani płynów w urządzeniu,
ponieważ mogą spowodować wybuch.
• Nie wolno umieszczać żywności bezpośrednio przy otworze wentylacyjnym
na tylnej ściance.
• Mrożonek nie wolno ponownie zamrażać po rozmrożeniu.
• Zapakowaną zamrożoną żywność należy przechowywać zgodnie z instruk‐
cjami jej producenta.
17) Jeśli urządzenie posiada osłonę oświetlenia
18) Jeśli urządzenie posiada system Frost Free (nie wymaga rozmrażania)
18)
Page 76

76
Informacje dotyczące bezpieczeństwa
• Należy ściśle stosować się do wskazówek dotyczących przechowywania
podanych przez producenta urządzenia. Patrz odpowiednie instrukcje.
• W zamrażarce nie należy przechowywać napojów gazowanych, ponieważ
duże ciśnienie w pojemniku może spowodować ich eksplozję i w rezultacie
uszkodzenie urządzenia.
• Lody na patyku mogą być przyczyną odmrożeń w przypadku konsumpcji
bezpośrednio po ich wyjęciu z zamrażarki.
Konserwacja i czyszczenie
• Przed przeprowadzeniem konserwacji należy wyłączyć urządzenie i wyjąć
wtyczkę przewodu zasilającego z gniazdka. Jeśli nie ma dostępu do gniazd‐
ka zasilania, należy wyłączyć prąd.
• Nie wolno czyścić urządzenia metalowymi przedmiotami.
• Nie wolno używać ostrych przedmiotów do usuwania szronu z urządzenia.
Należy stosować plastikową skrobaczkę.
• Należy regularnie sprawdzać otwór odpływowy skroplin w chłodziarce. W
razie konieczności należy go wyczyścić. Jeżeli otwór odpływowy jest zablo‐
kowany, woda zacznie się zbierać na dnie chłodziarki.
Instalacja
Podłączenie elektryczne urządzenia należy wykonać zgodnie z wskazówkami
podanymi w odpowiednich rozdziałach.
• Rozpakować urządzenie i sprawdzić, czy nie jest w żaden sposób uszko‐
dzone. Nie wolno podłączać urządzenia, jeśli jest uszkodzone. Ewentualne
uszkodzenia należy natychmiast zgłosić sprzedawcy. W tym przypadku na‐
leży zachować opakowanie.
• Zaleca się odczekanie co najmniej czterech godzin przed podłączeniem
urządzenia, aby olej mógł spłynąć z powrotem do sprężarki.
• Należy zapewnić odpowiednią wentylację ze wszystkich stron urządzenia.
Nieodpowiednia wentylacja prowadzi do jego przegrzewania. Aby uzyskać
wystarczającą wentylację, należy postępować zgodnie z wskazówkami do‐
tyczącymi instalacji.
• W razie możliwości tylną ściankę urządzenia należy ustawić od ściany, aby
uniknąć dotykania lub chwytania za ciepłe elementy (sprężarka, skraplacz)
i zapobiec ewentualnym oparzeniom.
• Urządzenia nie wolno umieszczać w pobliżu kaloryferów lub kuchenek.
• Należy zadbać o to, aby po instalacji urządzenia możliwy był dostęp do
wtyczki sieciowej.
• Urządzenie można podłączyć wyłącznie do instalacji doprowadzającej wodę
pitną.
19)
Serwis
• Wszelkie prace elektryczne związane z serwisowaniem urządzenia powinny
być przeprowadzone przez wykwalifikowanego elektryka lub inną kompe‐
tentną osobę.
19) Jeśli przewidziane jest podłączenie do sieci wodociągowej
Page 77

Panel sterowania
• Naprawy tego produktu muszą być wykonywane w autoryzowanym punkcie
serwisowym. Należy stosować wyłącznie oryginalne części zamienne.
Ochrona środowiska
W obiegu czynnika chłodniczego ani w materiałach izolacyjnych urządzenia
nie ma gazów szkodliwych dla warstwy ozonowej. Urządzenia nie należy wy‐
rzucać wraz z odpadami komunalnymi i śmieciami. Pianka izolacyjna zawiera
łatwopalne gazy: urządzenie należy utylizować zgodnie z obowiązującymi
przepisami, które można uzyskać od władz lokalnych. Należy unikać uszko‐
dzenia układu chłodniczego, szczególnie z tyłu przy wymienniku ciepła. Ma‐
teriały zastosowane w urządzeniu, które są oznaczone symbolem
się do ponownego przetworzenia.
Panel sterowania
1 2 3 4 5 6 7
1 Lampka kontrolna chłodziarki
2 Wyłącznik chłodziarki ON/OFF
3 Przycisk regulacji temperatury chłodziarki +
4 Wskaźnik temperatury chłodziarki
5 Przycisk regulacji temperatury chłodziarki -
6 Wskaźnik TURBO COOLMATIC
7 Przycisk TURBO COOLMATIC
77
, nadają
Włączanie chłodziarki
1. Włożyć wtyczkę do gniazdka.
2. Nacisnąć wyłącznik ON/OFF.
3. Zaświeci się lampka kontrolna.
Wyłączanie chłodziarki
1. Nacisnąć wyłącznik ON/OFF i przytrzymać przez ponad 5 sekund.
2. Następnie wyświetli się wskazanie odliczania temperatury w kolejności -3
-2 -1. Po wyświetleniu "1" chłodziarka zostaje wyłączona. Wskaźnik tem‐
peratury gaśnie. Lampka kontrolna zgaśnie.
Przyciski regulacji temperatury
Temperaturę reguluje się za pomocą przycisków regulacji. Przyciski te połą‐
czone są ze wskaźnikiem temperatury.
Page 78

78
Panel sterowania
• Wskaźnik temperatury przełącza się z wyświetlania BIEŻĄCEJ temperatury
(wskaźnik temperatury jest podświetlony) do wyświetlania ŻĄDANEJ tem‐
peratury (wskaźnik temperatury miga) po wciśnięciu jednego z przycisków
regulacji temperatury.
• Za każdym razem, gdy naciśnięty zostanie jeden z przycisków, ŻĄDANA
temperatura jest zmieniana o 1°C. ŻĄDANA temperatura zostanie osiąg‐
nięta w ciągu 24 godzin.
Jeżeli żaden przycisk nie zostanie naciśnięty, wskaźnik temperatury automa‐
tycznie (w ciągu ok. 5 sekund) powróci do wyświetlania BIEŻĄCEJ tempera‐
tury.
ŻĄDANA temperatura to:
Temperatura, którą ustawiono dla wnętrza komory chłodziarki. ŻĄDANA tem‐
peratura jest wyświetlana w postaci migających cyfr.
BIEŻĄCA temperatura to:
Rzeczywista temperatura w komorze chłodziarki. BIEŻĄCA temperatura jest
wyświetlana w postaci świecących cyfr.
Wskaźnik temperatury
Wskaźnik temperatury wyświetla różne informacje:
• Podczas normalnej pracy wyświetlana jest temperatura aktualnie panująca
w chłodziarce (BIEŻĄCA temperatura).
• Podczas regulacji temperatury migający wskaźnik pokazuje właśnie usta‐
wianą temperaturę chłodziarki (ŻĄDANĄ temperaturę).
Po zmianie ustawienia temperatury należy odczekać około 24 godzin, aż tem‐
peratura się ustabilizuje.
Regulacja temperatury
W celu ustawienia temperatury należy postępować w następujący sposób:
1. Ustawić wymaganą temperaturę odpowiednim regulatorem temperatury.
Na wyświetlaczu temperatury natychmiast pojawi się zmieniona wartość
(ŻĄDANA temperatura) i wskaźnik temperatury miga.
2. Po każdym naciśnięciu regulatora temperatury ŻĄDANA temperatura jest
zmieniana o 1°C. ŻĄDANA temperatura zostanie osiągnięta w ciągu 24
godzin.
3. Po ustawieniu wymaganej temperatury i po upływie krótkiej chwili (ok. 5
sekund) wskaźnik temperatury ponownie będzie wyświetlać BIEŻĄCĄ te m‐
peraturę w odpowiedniej komorze. Wskaźnik temperatury przestanie mi‐
gać i świeci światłem stałym.
Aby zapewnić odpowiednie przechowywanie żywności, należy ustawić nastę‐
pującą temperaturę:
• +5°C w komorze chłodziarki
Sprężarka nie rozpocznie pracy natychmiast po wprowadzeniu opisanej zmia‐
ny, jeśli w danym momencie trwa automatyczne odszranianie. Ponieważ chło‐
dziarka szybko osiąga ustawioną temperaturę przechowywania, artykuły spo‐
żywcze można wkładać natychmiast po jej włączeniu.
Page 79

Pierwsze użycie
Funkcja TURBO COOLMATIC
Funkcja TURBO COOLMATIC służy do szybkiego schłodzenia większej ilości
artykułów spożywczych w chłodziarce.
Aby włączyć tę funkcję, należy:
1. Nacisnąć przycisk TURBO COOLMATIC.
2. Włącza się wskaźnik TURBO COOLMATIC.
Funkcja TURBO COOLMATIC zapewnia teraz intensywne chłodzenie. Auto‐
matycznie zostanie wybrana ŻĄDANA temperatura +3°C.
Funkcja TURBO COOLMATIC wyłącza się samoczynnie po upływie 6 godzin.
Funkcję można wyłączyć w dowolnym momencie:
1. Nacisnąć przycisk TURBO COOLMATIC.
2. Wskaźnik TURBO COOLMATIC gaśnie.
Pierwsze użycie
Czyszczenie wnętrza
W celu usunięcia zapachu nowego produktu przed pierwszym uruchomieniem
urządzenia należy wymyć jego wnętrze i znajdujące się w nim elementy letnią
wodą z łagodnym mydłem, a następnie dokładnie je wysuszyć.
Nie należy stosować detergentów ani proszków do szorowania, ponieważ mo‐
gą one uszkodzić powierzchni urządzenia.
79
Codzienna eksploatacja
niniejsze urządzenie jest sprzedawane we Francji
Zgodnie z prawem tego kraju w dolnej szufladzie chłodziarki powinno znajdo‐
wać się specjalne urządzenie (patrz rysunek), które wskazuje jej najchłodniej‐
szą strefę.
Page 80

80
Codzienna eksploatacja
Zmiana położenia półek
Ściany komory chłodziarki wyposażono w
kilka prowadnic umożliwiających umie‐
szczenie półek zgodnie z aktualnymi po‐
trzebami.
W celu lepszego wykorzystania miejsca
przednie wąskie półki mogą zostać umie‐
szczone nad tylnymi.
Rozmieszczanie półek na drzwiach
Aby umożliwić przechowywanie artykułów spożywczych w opakowaniach o
różnej wielkości, półki w drzwiach można umieszczać na różnych wysokoś‐
ciach.
Rozmieszczanie wąskich półek na drzwiach
Wąskie półki drzwiowe można umieszczać na różnych wysokościach.
Aby dokonać odpowiedniego ustawienia, należy:
1. podnieść półkę z wąską półką
drzwiową do góry i wyjąć z obsady
w drzwiach
2. wyjąć wspornik mocujący z prowad‐
nicy pod półką
3. Aby włożyć półkę na innej wysokoś‐
ci, należy wykonać te same czyn‐
ności w odwrotnej kolejności.
Węglowy filtr powietrza
Urządzenie wyposażone jest w węglowy
filtr CLEAN AIR CONTROLznajdujący się
za pokrywą na tylnej ściance w osłonie ka‐
nału wentylacyjnego.
Filtr usuwa niepożądane zapachy z powie‐
trza w chłodziarce i w komorze LONG‐
FRESH , podnosząc jakość przechowywa‐
nej żywności.
Podczas pracy urządzenia, pokrywa filtra powinna być zawsze zamknięta.
Page 81

Codzienna eksploatacja
Komora LONGFRESH
Temperatura w komorze LONGFRESH 0°C kontrolowana jest automatycznie.
Pozostaje przez cały czas w granicach 0°C i nie wymaga żadnej regulacji.
Stała temperatura w granicach 0°C oraz wilgotność względna mieszcząca się
w przedziale od 45 do 90 % zapewniają optymalne warunki do przechowywa‐
nia różnych rodzajów artykułów spożywczych.
Z tego powodu komora LONGFRESH 0°C nadaje się do przechowywania róż‐
nych rodzajów żywności przez okres czasu nawet 3-krotnie dłuższy w porów‐
naniu do zwykłych komór chłodziarek, równocześnie gwarantując ich lepszą
jakość. Umożliwia to przechowywanie większej ilości świeżej żywności. Smak,
świeżość, jakość i wartości odżywcze (witaminy i minerały) pozostają zacho‐
wane. Zminimalizowane są również straty wagi warzyw i owoców. Żywność
zachowuje więcej wartości odżywczych.
Komora LONGFRESH 0°C nadaje się również do rozmrażania żywności.
W tym przypadku rozmrożoną żywność można przechowywać do dwóch dni.
Kontrola wilgotności
W obu szufladach można ustawić różne
warunki przechowywania - z niższą lub wy‐
ższą wilgotnością, co umożliwia korzysta‐
nie z nich w niezależny sposób.
Ustawienia każdej z szuflad regulowane są
oddzielnie przy pomocy zaworu suwako‐
wego znajdującego się z przodu szuflady.
• "Sucho" niska wilgotność powietrza - do
50 % wilgotności względnej
Taki poziom wilgotności uzyskuje się, gdy oba suwaki ustawione są w po‐
łożeniu
• "Wilgotno" wysoka wilgotność względna - do 90%
Taki poziom wilgotności uzyskuje się, gdy oba suwaki ustawione są w po‐
łożeniu
na jest w szufladzie i nie może się rozprzestrzenić na pozostałe części urzą‐
dzenia.
, a otwory wentylacyjne są szeroko otwarte.
, a otwory wentylacyjne są zamknięte. Wilgotność utrzymywa‐
81
Page 82

82
Codzienna eksploatacja
Szuflady Longfresh
Poziom wilgotności nie może być regulo‐
wany.
Kratki wewnątrz szuflad umożliwiają swo‐
bodny obieg powietrza, zapewniając tym
samym lepszą konserwację żywności.
Komora posiada ograniczniki zapobiegają‐
ce przypadkowemu wypadnięciu szuflad
po ich wysunięciu.
Aby wyjąć szuflady (np. w celu ich wyczy‐
szczenia), należy je wyciągnąć do oporu,
podnieść i wyjąć.
Aby zmieścić w urządzeniu większą ilość
żywności, można wyjąć wszystkie szufla‐
dy.
Czas przechowywania artykułów spożywczych w komorze na świeżą
żywność w temp. 0°C
Typ żywności Regulacja wilgotności po‐
Cebula
Masło
Duże kawałki wieprzowiny
Wołowina, dziczyzna, ma‐
łe kawałki wieprzowiny,
drób
Sos pomidorowy
Ryby, skorupiaki, gotowa‐
ne potrawy mięsne
Gotowane owoce morza
"sucho"
"sucho"
"sucho"
"sucho"
"sucho"
"sucho"
"sucho"
wietrza
Czas przechowywania
do 5 miesięcy
do 1 miesiąca
do 10 dni
do 7 dni
do 4 dni
do 3 dni
do 2 dni
Page 83

Codzienna eksploatacja
83
Typ żywności Regulacja wilgotności po‐
Sałatka, warzywna mar‐
chew, zioła, brukselka, se‐
ler
Karczochy, kalafior, cyko‐
ria, sałata lodowa, endy‐
wia, roszponka, sałata,
pory, cykoria czerwona
Brokuły, kapusta pekiń‐
ska, kapusta włoska, ka‐
pusta, rzodkiewki, kapus‐
ta głowiasta
Groszek, kalarepa
Dymka, rzodkiewki, szpa‐
ragi, szpinak
1)
Owoce
Gruszki, daktyle (świeże)
truskawki, brzoskwinie
1)
Śliwki
rabarbar, agrest
Jabłka (niewrażliwe na
zimno), pigwy
Morele, wiśnie/czereśnie
Damascenki, winogrona
Jeżyny, porzeczki
Figi (świeże)
Jagody, maliny
1) Im dojrzalsze owoce, tym krótszy czas ich przechowywania.
"wilgotno"
"wilgotno"
"wilgotno"
"wilgotno"
"wilgotno"
"wilgotno"
1)
"wilgotno"
"wilgotno"
"wilgotno"
"wilgotno"
"wilgotno"
"wilgotno"
"wilgotno"
wietrza
Czas przechowywania
do 1 miesiąca
do 21 dni
do 14 dni
do 10 dni
do 7 dni
do 1 miesiąca
do 21 dni
do 20 dni
do 14 dni
do 10 dni
do 8 dni
do 7 dni
do 5 dni
Ciasta z kremem i inne typy wyrobów cukierniczych można przechowywać w
komorze na świeżą żywność (temp. 0°C) przez 2-3 dni.
Do komory na świeżą żywność (temp. 0°C) nie należy wkładać następujących
artykułów spożywczych:
• owoców wrażliwych na zimno, które należy przechowywać w spiżarni/piw‐
nicy lub w temperaturze pokojowej, takie jak ananas, banany, grejpfruty,
melony, mango, papaje, pomarańcze, cytryny, kiwi.
Page 84

84
Przydatne rady i wskazówki
• Rodzaje produktów spożywczych niewymienione powyżej powinny być
przechowywane w komorze chłodziarki (np. wszystkie rodzaje sera, pokro‐
jone wędliny itp.)
Poziom wilgotności w szufladach uzależniony jest od zawartości wilgoci w
przechowywanej żywności, warzywach i owocach, a także od częstotliwości
otwierania drzwi.
Komora na świeżą żywność o temp. 0°C nadaje się również do rozmrażania
żywności. W tym przypadku rozmrożoną żywność można przechowywać w
komorze na świeżą żywność o temp. 0°C przez okres do dwóch dni.
Wskazówki:
• Należy zwracać uwagę na świeżość potraw, zwłaszcza na datę przydatności
do spożycia. Jakość i świeżość żywności mają wpływ na okres jej przecho‐
wywania.
• Całkowity czas przechowywania uzależniony jest od warunków, w których
żywność była przechowywania przed włożeniem do chłodziarki.
• Przed włożeniem do chłodziarki żywność, owoce lub warzywa należy za‐
wsze zapakować lub owinąć.
• Produkty pochodzenia zwierzęcego należy przechowywać w stanie zapa‐
kowanym i suchym.
• Produkty zawierające dużo białka psują się szybciej. Oznacza to, że owoce
morza będą się psuć szybciej od ryby, która z kolei zepsuje się szybciej od
mięsa. W przypadku komory, w której panuje temperatura 0°C, czas prze‐
chowywania tego typu żywności można zwiększyć niemal trzykrotnie bez
utraty jakości.
• Wszystkie produkty żywnościowe przechowywane w komorze o temp. 0°C
należy wyjąć z szuflad około 15-30 min. przed spożyciem, zwłaszcza owoce
i warzywa przeznaczone do spożycia na surowo. Odczekanie, aż owoce i
warzywa powrócą do temperatury pokojowej, poprawi ich strukturę i smak.
Przydatne rady i wskazówki
Wskazówki dotyczące oszczędzania energii
• Nie otwierać zbyt często drzwi zamrażarki i nie zostawiać ich otwartych dłu‐
żej niż jest to absolutnie konieczne.
• Jeśli temperatura otoczenia jest wysoka, pokrętło regulacji temperatury jest
ustawione w najwyższej pozycji, urządzenie jest w pełni załadowane sprę‐
żarka będzie pracowała bezustannie, powodując zbieranie się szronu lub
lodu na parowniku. W takim przypadku należy obrócić pokrętło regulacji
temperatury w kierunku niższego ustawienia, aby umożliwić automatyczne
usuwanie szronu i jednocześnie zmniejszyć zużycie energii.
Wskazówki dotyczące przechowywania świeżej żywności
Aby uzyskać najlepsze wyniki:
Page 85

Konserwacja i czyszczenie
• Nie przechowywać w chłodziarce przechowywać ciepłej żywności ani paru‐
jących płynów.
• Artykuły spożywcze należy przykryć lub owinąć, szczególnie te, które mają
silny zapach.
• Zapewnić swobodny przepływ powietrza wokół artykułów spożywczych.
Wskazówki dotyczące przechowywania żywności
Przydatne wskazówki:
Mięso (każdy rodzaj): zapakować do polietylenowych worków i umieścić na
szklanej półce nad szufladą na warzywa.
Ze względów bezpieczeństwa można je przechowywać w ten sposób najwyżej
przez jeden lub dwa dni.
Żywność gotowana, potrawy na zimno itp.: należy je przykryć i umieścić na
dowolnej półce.
Owoce i warzywa: należy je dokładnie oczyścić i umieścić w przeznaczonych
dla nich szufladach.
Masło i ser: należy je umieszczać w specjalnych hermetycznych pojemnikach
lub zapakować w folię aluminiową lub woreczki polietylenowe, aby maksymal‐
nie ograniczyć dostęp powietrza.
Butelki z mlekiem: należy założyć na nie nakrętki i przechowywać na półce na
butelki na drzwiach.
Bananów, ziemniaków, cebuli i czosnku, jeśli nie są zapakowane, nie należy
przechowywać w chłodziarce.
85
Konserwacja i czyszczenie
UWAGA!
Przed przeprowadzeniem jakichkolwiek prac konserwacyjnych, należy odłą‐
czyć urządzenie od zasilania.
Układ chłodniczy urządzenia zawiera węglowodory. Prace konserwacyjne i
uzupełnianie mogą wykonywać wyłącznie technicy autoryzowanego serwisu.
Okresowe czyszczenie
Urządzenie należy regularnie czyścić:
• wnętrze i akcesoria należy umyć ciepłą wodą z dodatkiem neutralnego myd‐
ła.
• regularnie sprawdzać i przecierać uszczelki drzwi, aby upewnić się, że są
czyste.
• Dokładnie opłukać i wysuszyć.
Nie należy ciągnąć, przesuwać ani uszkadzać rurek i/lub przewodów w urzą‐
dzeniu.
Nigdy nie należy stosować środków czyszczących, ściernych, produktów do
czyszczenia o intensywnym zapachu lub woskowych środków czyszczących
do czyszczenia wnętrza urządzenia, ponieważ mogłoby to spowodować usz‐
kodzenie powierzchni i pozostawić silny zapach.
Page 86

86
Konserwacja i czyszczenie
Oczyścić skraplacz (czarna kratka) i sprężarkę z tyłu urządzenia za pomocą
szczotki lub odkurzacza. Zwiększy to wydajność urządzenia i zmniejszy zuży‐
cie energii elektrycznej.
Najniższą półkę, oddzielającą komorę chłodziarki od komory LONGFRESH
0°C można wyjmować tylko w celu jej wyczyszczenia. Aby wyjąć półkę, należy
ją wyciągnąć, trzymając prosto.
Płyty przykrywające szuflady w komorze chłodziarki można wyjąć w celu ich
wyczyszczenia.
Aby zapewnić prawidłowe działanie komory LONGFRESH 0°C , po wyczy‐
szczeniu najniższa półka i płyty przykrywające szuflady muszą zostać ponow‐
nie włożone na miejsce.
Należy chronić system chłodzący przed uszkodzeniem.
Niektóre kuchenne środki czyszczące zawierają substancje chemiczne, które
mogą uszkodzić tworzywo zastosowane w urządzeniu. Z tego względu zaleca
się mycie zewnętrznych części urządzenia ciepłą wodą z niewielką ilością pły‐
nu do mycia naczyń.
Po czyszczeniu ponownie podłączyć urządzenie do zasilania.
Wymiana filtra węglowego
Filtr węglowy pomaga zmniejszyć powstawanie nieprzyjemnych zapachów w
chłodziarce, ograniczając ryzyko przeniknięcia niepożądanego zapachu do
pozostałych potraw.
W celu uzyskania najlepszych wyników filtr węglowy należy wymieniać co naj‐
mniej raz na rok.
Nowe filtry powietrza z węglem aktywnym można nabyć u lokalnego sprze‐
dawcy.
• Filtr powietrza znajduje się za klapką,
a dostęp do niego uzyskać można po‐
przez pociągnięcie klapki na zewnątrz
(1)
• wyciągnąć z rowków zużyty filtr powie‐
trza.
1
2
Page 87

Co zrobić, gdy…
• wsunąć do rowków nowy filtr powietrza (2)
• Zamknąć pokrywę.
Filtr powietrza należy do materiałów eksploatacyjnych podlegających zużyciu,
w związku z czym nie jest objęty gwarancją.
Podczas pracy urządzenia, pokrywa filtra powinna być zawsze zamknięta.
Z filtrem powietrza należy się obchodzić ostrożnie, aby nie dopuścić do jego
porysowania.
Rozmrażanie chłodziarki
Odszranianie komory chłodziarki przebiega automatycznie.
Woda powstająca z topniejącego szronu spływa do pojemnika zamontowane‐
go na sprężarce i paruje. Tego pojemnika nie można wyjąć.
Okresy przerw w eksploatacji urządzenia
Jeśli urządzenie nie jest używane przez długi czas, należy wykonać następu‐
jące czynności:
• odłączyć urządzenie od zasilania
• wyjąć wszystkie artykuły spożywcze
•
rozmrozić
• pozostawić uchylone drzwi, aby uniknąć powstawania nieprzyjemnych za‐
pachów.
Jeśli urządzenie pozostanie włączone, należy poprosić kogoś o regularne
sprawdzanie, aby uniknąć zepsucia się żywności w przypadku przerwy w za‐
silaniu.
20)
i wyczyścić urządzenie oraz wszystkie elementy
87
Co zrobić, gdy…
OSTRZEŻENIE!
Przed przystąpieniem do usunięcia problemu należy wyjąć wtyczkę z gniazd‐
ka.
Usuwanie problemów nieuwzględnionych w niniejszej instrukcji można po‐
wierzyć wyłącznie wykwalifikowanemu elektrykowi lub innej kompetentnej
osobie.
Podczas normalnej pracy urządzenia słychać odgłosy pracy urządzenia (sprę‐
żarka, obieg czynnika chłodniczego).
Problem Możliwa przyczyna Rozwiązanie
Urządzenie głośno pra‐
cuje
Urządzenie nie działa.
Nie działa oświetlenie.
20) Jeśli przewidziano.
Urządzenie nie jest prawid‐
łowo ustawione
Urządzenie jest wyłączone. Włączyć urządzenie.
Należy sprawdzić, czy urzą‐
dzenie stoi stabilnie (wszyst‐
kie cztery nóżki powinny stać
na podłodze)
Page 88

88
Co zrobić, gdy…
Problem Możliwa przyczyna Rozwiązanie
Wtyczka przewodu zasila‐
Brak zasilania urządzenia.
Nie działa oświetlenie. Żarówka jest w trybie czu‐
Żarówka jest uszkodzona. Patrz "Wymiana żarówki".
Lampka kontrolna mi‐
ga.
Sprężarka pracuje bez‐
ustannie.
Drzwi nie są prawidłowo za‐
Drzwi są otwierane zbyt
Temperatura produktów
Temperatura w pomie‐
Sprężarka nie urucha‐
mia się natychmiast po
naciśnięciu przycisku
TURBO COOLMATIC
lub zmianie temperatu‐
ry.
Po tylnej ściance chło‐
dziarki spływa woda.
Woda spływa do komo‐
ry chłodziarki.
Produkty uniemożliwiają
jącego nie została właści‐
wie włożona do gniazdka.
Brak napięcia w gniazdku.
wania.
Urządzenie nie działa pra‐
widłowo.
Temperatura nie jest pra‐
widłowo ustawiona.
mknięte.
często.
jest zbyt wysoka.
szczeniu jest zbyt wysoka.
Sprężarka rozpoczyna pra‐
cę dopiero po pewnym cza‐
sie.
Podczas procesu automa‐
tycznego rozmrażania
szron rozmraża się na tylnej
ściance.
Odpływ skroplin jest zatka‐
ny.
spływanie skroplin do ry‐
nienki na tylnej ścianie.
Włożyć wtyczkę prawidłowo
do gniazdka.
Podłączyć inne urządzenie
elektryczne do tego gniazd‐
ka.
Skontaktować się z wykwali‐
fikowanym elektrykiem.
Zamknąć i otworzyć drzwi.
Skontaktować się z wykwali‐
fikowanym elektrykiem.
Ustawić wyższą temperatu‐
rę.
Patrz "Zamykanie drzwi".
Nie pozostawiać drzwi ot‐
wartych dłużej, niż to ko‐
nieczne.
Pozostawić produkty, aby
ostygły do temperatury poko‐
jowej i dopiero wtedy włożyć
je do urządzenia.
Obniżyć temperaturę w po‐
mieszczeniu.
Jest to właściwe.
Jest to właściwe.
Wyczyścić odpływ skroplin.
Upewnić się, że produkty nie
stykają się z tylną ścianką.
Page 89

Co zrobić, gdy…
Problem Możliwa przyczyna Rozwiązanie
Nie można ustawić tem‐
peratury.
Temperatura w urzą‐
dzeniu jest zbyt niska/
wysoka.
Drzwi nie są prawidłowo za‐
Temperatura produktów
Zbyt wiele produktów wło‐
Temperatura w chło‐
dziarce jest zbyt wyso‐
ka.
Funkcja TURBO COOLMA‐
TIC jest włączona.
Temperatura nie jest pra‐
widłowo ustawiona.
mknięte.
jest zbyt wysoka.
żono na raz do przechowa‐
nia.
Brak cyrkulacji zimnego po‐
wietrza w urządzeniu.
Wyłączyć funkcję TURBO
COOLMATIC ręcznie lub po‐
czekać z ustawieniem tem‐
peratury do samoczynnego
wyłączenia funkcji. Patrz
"Funkcja TURBO COOLMA‐
TIC".
Ustawić wyższą/niższą tem‐
peraturę.
Patrz "Zamykanie drzwi".
Pozostawić produkty, aby
ostygły do temperatury poko‐
jowej i dopiero wtedy włożyć
je do urządzenia.
Ograniczyć ilość produktów
wkładanych jednocześnie do
przechowania.
Zapewnić cyrkulację zimne‐
go powietrza w urządzeniu.
89
Wymiana żarówki
1. Wyłączyć urządzenie.
2. Nacisnąć tylny zaczep i jednocześ‐
nie przesunąć osłonę oświetlenia w
kierunku wskazanym za pomocą
strzałki.
3. Wymienić starą żarówkę na nową o
takiej samej mocy (maksymalną
moc podano na kloszu).
4. Założyć klosz, wsuwając go na
właściwe miejsce.
5. Włączyć urządzenie.
6. Otworzyć drzwi. Upewnić się, że oś‐
wietlenie się włącza.
Zamykanie drzwi
1. Wyczyścić uszczelki drzwi.
2. W razie konieczności wyregulować drzwi. Patrz punkt "Instalacja".
3. W razie konieczności wymienić uszkodzone uszczelki drzwi. W tym celu
skontaktować się z autoryzowanym punktem serwisowym.
Page 90

90
Dane techniczne
Dane techniczne
Wymiary wnęki
Wysokość 1780 mm
Szerokość 560 mm
Głębokość 550 mm
Dane techniczne podane są na tabliczce znamionowej znajdującej się z lewej
strony wewnątrz urządzenia oraz na etykiecie efektywności energetycznej.
Instalacja
OSTRZEŻENIE!
Przed instalacją urządzenia należy dokładnie przeczytać rozdział "Informacje
dotyczące bezpieczeństwa" w celu zapewnienia własnego bezpieczeństwa
oraz prawidłowego działania urządzenia.
Miejsce instalacji
OSTRZEŻENIE!
W przypadku utylizacji starego urządzenia posiadającego zamek lub rygiel na
drzwiach, należy najpierw go unieszkodliwić, aby dzieci nie mogły zatrzasnąć
się wewnątrz.
Należy pozostawić dostęp do wtyczki przewodu zasilającego po zainstalowa‐
niu urządzenia.
Urządzenie należy instalować w miejscu, w którym temperatura otoczenia bę‐
dzie odpowiadać klasie klimatycznej wskazanej na tabliczce znamionowej
urządzenia:
Klasa klimatyczna Temperatura otoczenia
SN +10°C do +32°C
N +16°C do +32°C
ST +16°C do +38°C
T +16°C do +43°C
Przyłącze elektryczne
Przed podłączeniem urządzenia do sieci elektrycznej należy sprawdzić, czy
napięcie oraz częstotliwość podane na tabliczce znamionowej odpowiadają
parametrom domowej instalacji zasilającej.
Urządzenie musi być uziemione. Wtyczka przewodu zasilającego dołączone‐
go do urządzenia posiada styk uziemiający . Jeśli gniazdko zasilania nie jest
Page 91

Ochrona środowiska
uziemione, urządzenie należy odrębnie uziemić zgodnie z aktualnymi przepi‐
sami, uzgadniając to z wykwalifikowanym elektrykiem.
Producent nie ponosi żadnej odpowiedzialności w przypadku nieprzestrzega‐
nia powyższych wskazówek dotyczących bezpieczeństwa.
Niniejsze urządzenie spełnia wymogi dyrektyw Unii Europejskiej.
Wymagania dotyczące wentylacji
Przepływ powietrza za urządzeniem musi
być wystarczający.
50 mm
min.
200 cm
2
Instalacja węglowego filtra powietrza
Węglowy filtr powietrza zawiera węgiel aktywny, który pochłania nieprzyjemne
zapachy, umożliwiając tym samym zachowanie smaków i zapachów wszyst‐
kich artykułów żywnościowych bez r yzyka ich pr zenikania do i nnych artykułów.
Filtr węglowy jest dostarczony w woreczku
foliowym w celu wydłużenia jego żywot‐
ności i zachowania jego właściwości. Filtr
należy umieścić za pokrywą przed włącze‐
niem urządzenia.
1. Otworzyć pokrywę (1).
2. Wyjąć filtr z woreczka foliowego.
3. Wsunąć filtr do rowków znajdujących
się z tyłu pokrywy (2).
4. Zamknąć pokrywę.
Podczas pracy urządzenia, pokrywa filtra
powinna być zawsze zamknięta.
Z filtrem należy obchodzić się delikatnie,
aby zapobiec odczepianiu się fragmentów
z jego powierzchni.
1
2
min.
200 cm
91
2
Ochrona środowiska
Symbol na produkcie lub na opakowaniu oznacza, że tego produktu nie
wolno traktować tak, jak innych odpadów domowych. Należy oddać go do
właściwego punktu skupu surowców wtórnych zajmującego się złomowanym
Page 92

929394
sprzętem elektrycznym i elektronicznym. Właściwa utylizacja i złomowanie
pomaga w eliminacji niekorzystnego wpływu złomowanych produktów na
środowisko naturalne oraz zdrowie. Aby uzyskać szczegółowe dane
dotyczące możliwości recyklingu niniejszego urządzenia, należy
skontaktować się z lokalnym urzędem miasta, służbami oczyszczania miasta
lub sklepem, w którym produkt został zakupiony.
Page 93

Page 94

Page 95

95
Page 96

www.electrolux.com
U kan toebehoren, verbruiksprodukten en onderdelen bestellen via onze webwinkel op:
www.aeg-electrolux.be
www.aeg-electrolux.cz
Benötigen Sie Zubehör, Verbrauchsmaterial und Ersatzteile? Dann besuchen Sie bitte unseren
Onlineshop unter:
www.aeg-electrolux.de
www.aeg-electrolux.lu
Voor het on-line bestellen van accessoires, consumables en onderdelen gaat u naar de ’webwinkel’
op:
www.aeg-electrolux.nl
www.aeg-electrolux.pl
222346604-00-072009
 Loading...