

AEG-Electrolux SANTO1641-1, OKO SANTO1641-1, OEKOS1643-1TK, OEKOS1659-1TK, S1643-1TK User Manual
...Page 1

Tisch-Kühlautomaten
Automatic Table Top Refrigerators
Réfrigérateurs table-top
Frigoríficos automáticos de mesa
Frigoriferi tavolo
Tafelmodel koelautomaten
Pöytäjääkaapit
Kylskåp av bordsmodell
Gebrauchsanweisung
Operating Instructions
Mode d’emploi
Instrucciones
para el uso
Istruzioni per l’uso
Gebruiksaanwijzing
Käyttöohjeet
Bruksanvisning
AUS
ERFAHRUNG
GUT
Page 2
2
C/D
105
200 cm
2
AEG52
1
AEG53
2
850-860
900-910
E
570
550
93-103
A
AEG55
4
F
G
B
H
A
AEG56
5
AEG54
3
130
300
F
AEG57
6
Page 3

3
3 4
L
AEG58
7
AEG59
8
12 mm
AEG60
9
2
AEG75
9a
max. 16
F
8
1
AEG61
K
10
F
8
Page 4
AEG62
11
AEG64
13
6
6
5
5
4 4 3
AEG66
12
1
2
2
AEG65
14
Page 5

D
_______________________
D
Inhalt
Bildseiten (bitte ausklappen) 2-4
Allgemeine Hinweise, Platzwahl 7/8
Elektrischer Anschluß 8
Ihr Kühlgerät braucht Luft 8
Wechsel des Türanschlages 9
Inbetriebnahme und Temperaturregelung 9/10
Richtig lagern 10
Reinigung und Pflege 10
Störungen und Kundendienst 11
Tips zur zweckmäßigen Benutzung
und Energie-Einsparung 11
_______________________
GB
Contents
lllustration pages (please unfold) 2-4
General instructions, Choice of location 12/13
Electrical connection 13
Your refrigerator needs air 13/14
Changing over the door hinges 14
Starting up and temperature regulation, 15
Correct storage 15
Cleaning and care 16
Faults and servicing 16
Hints on energy-saving 17
_______________________
F
Contenu
Pages avec figures
(que vous voudrez bien déplier) 2-4
Remarques générales,
choix de l'emplacement 18/19
Raccordement électrique 19
Votre réfrigérateur a besoin d'air 19
Changement du côté d'ouverture de la porte 20
Mise en service et régulation de la
température 20/21
Rangement correct 21
Nettoyage et entretien 21
Pannes et service après-vente 22
Conseils pour une utilisation judicieuse
et économiser de l'énergie 23
Seite
Page
Page
_______________________
E
Indice
llustraciones (por favor desplegarlas) 2-4
Indicaciones generales, emplazamiento 24/25
Conexión eléctrica 25
Su aparato de refrigeración necesita aire 25
Cambio del batiente de la puerta 26
Puesta en servicio y regulación de
la temperatura, 26/27
Almacenamiento correcto 27
Limpieza y cuidados 28
Perturbaciones y Servicio Postventa 28
Consejos para el uso adecuado y para
economizar energía 29
_______________________
I
Indice
Pagine illustrate (vi preghiamo di aprire) 2-4
Indicazioni generali, luogo di installazione 30/31
Collegamento elettrico 31
ll vostro apparecchio ha bisogno di aria 31/32
Inversione della cernieratura della porta 32
Avviamento in funzione e regolazione
della temperatura 33
Esatta disposizione 33
Difetti e servizio tecnico assistenza clienti 34
Consigli per l'utilizzazione appropriata e
l'economizzazione di energia 35
_______________________
NL
Inhoud
Afbeeldingen (uitklapbare pagina's) 2-4
Algemene aanwijzingen, opstelling 36/37
Elektrische aansluiting 37
Uw koeltoestel heeft lucht nodig 37
Overzetten van het deurscharnier 38
In gebruik nemen en temperatuurregeling, 38
Op de juiste wijze indelen 38
Reiniging en onderhoud 39
Storingen en klantenservice 39
Tips voor een doelmatig gebruik en het
besparen van energie 40
Página
Pagina
pagina
5
Page 6

D
_______________________
SF
Sisällys
Kuvitetut sivut (pyydämme avaamaan). 2-4
Yleistä,Sijoitus 41
Sähköliitännät 42
Kylmälaite tarvitsee ilmaa 42
Oven avaussuunna muuttaminen 42
Käyttöönotto ja lämpötilan säätö 43
Elintarvikkeiden oikea säilytys 43
Puhdistus ja hoito 43/44
Häiriöt ja asiakaspalvelu 44
Oikea käyttö 44
Energiansäästöohjeita 44
_______________________
S
Innehåll
Sidor med bilder (öppna gärna). 2-4
Allmänna anvisningar, Uppställningsplats 45
Elektrisk anslutning 46
Kylskåpet behöver luft 46
Omhängning av dörren 46/47
Idrifttagning och temperaturreglering 47
Rätt forvaring 47
Rengöring och skötsel 48
Fel och kundtjänst 48
Tips för att spara energi 48/49
Sivu
Sida
6
Page 7

GB
CAUTION!
If your new appliance is to take the place of an old
model, please make the old one unusable in the
following way: pull the plug out of the socket, cut off
the electric lead, and dispose of the plug and the
rest of the lead in an environmentally friendly
manner.
If your old appliance has a snap-lock or bolt-type
door catch, please make it completely ineffective
before storing the appliance away or sending it for
environmentally friendly disposal. You will thus
ensure that children at play cannot lock themselves
in, which could even put their lives in danger . Please
also make sure that the pipes in your old appliance
are not damaged before being taken away for
proper, environmentally friendly disposal.
We recommend that you read the following instructions before using the appliance for the first time, as
this is the only way in which you can make full use
of all its advantages. The instructions have been
written for a number of technically comparable
models with various different features. Please note
only the instructions that apply to your appliance.
Please fold out the extra page with the illustrations,
so that you can check off the text against the
pictures.
Removing the adhesive tape
The door is secured against the housing with adhesive tape. If any residues of adhesive remain,
remove them with cleaning or washing benzene.
Information on the packaging
of the appliance
All materials used are environmentally compatible.
They can be safely thrown away on a rubbish dump
or burnt in a refuse incinerator.
Concerning the materials: the plastics can also be
re-used and are labelled as follows:
>PE< for polyethylene (polythene), e.g. for the outer
foil and for the bags inside
>PS< for polystyrol foam, e.g. for the padding,
manufactured entirely without chlorofluoro-
carbons (CFC).
The cardboard parts are manufactured from recycled paper and should be returned for collection as
scrap paper.
General tips
You have acquired a domestic refrigerator which
has been produced in compliance with the industrial standards for appliances of this kind. The
measures were taken in particular that are required
by the German Appliance Safety Act (GSG), the
Accident Prevention Regulations for refrigeration
equipment (VBG 20), and the regulations of the
German Association of Electrical Engineers (VDE).
This appliance complies with the following EC
Directives:
- 73/23/EEC of 19.02.1973 - Low-Voltage Directive
- 89/336/EEC of 03.05.1989 (including Amendment
Directive 92/31/EEC) - EMC (Electromagnetic
Compatibily) Directive.
Commercial use
If you intend to use your appliance commercially, or
for any other purpose than keeping food and drinks
cool, please take note of the statutory regulations in
force for your area.
Location
The most suitable location is a dry, well ventilated
room.
The ambient temperature has an effect on the
amount of current the refrigerating unit consumes.
The appliance should therefore:
- not be placed in the direct sunlight or next to a
radiator or the oven, and
- stand in a place where the ambient temperature
is in line with the climate category for which the
appliance is designed.
You will find the relevant data on the rating plate
located on the left inside the interior of the appliance. The following are the possible climate categories:
Climate category Ambient temperature
from ... to ...
SN +10 to +32°C
N +16 to +32°C
ST +18 to +38°C
T +18 to +43°C.
If there is no avoiding a position next to a source of
heat, the following are the minimum side-to-side
distances that must be observed: electric ovens: 3
cm; oil or coal fired boilers: 30 cm. Otherwise it will
be necessary to fit a heat-insulating panel. If this
12
Page 8

appliance is to be positioned alongside another
fridge or freezer, the distance between them must
be at least 5 cm for technical reasons connected
with ventilation and to avoid "sweating".
The appliance must stand on a firm, horizontal
surface. Compensate for any unevenness in the
floor by screwing the adjustable feet inwards or
outwards.
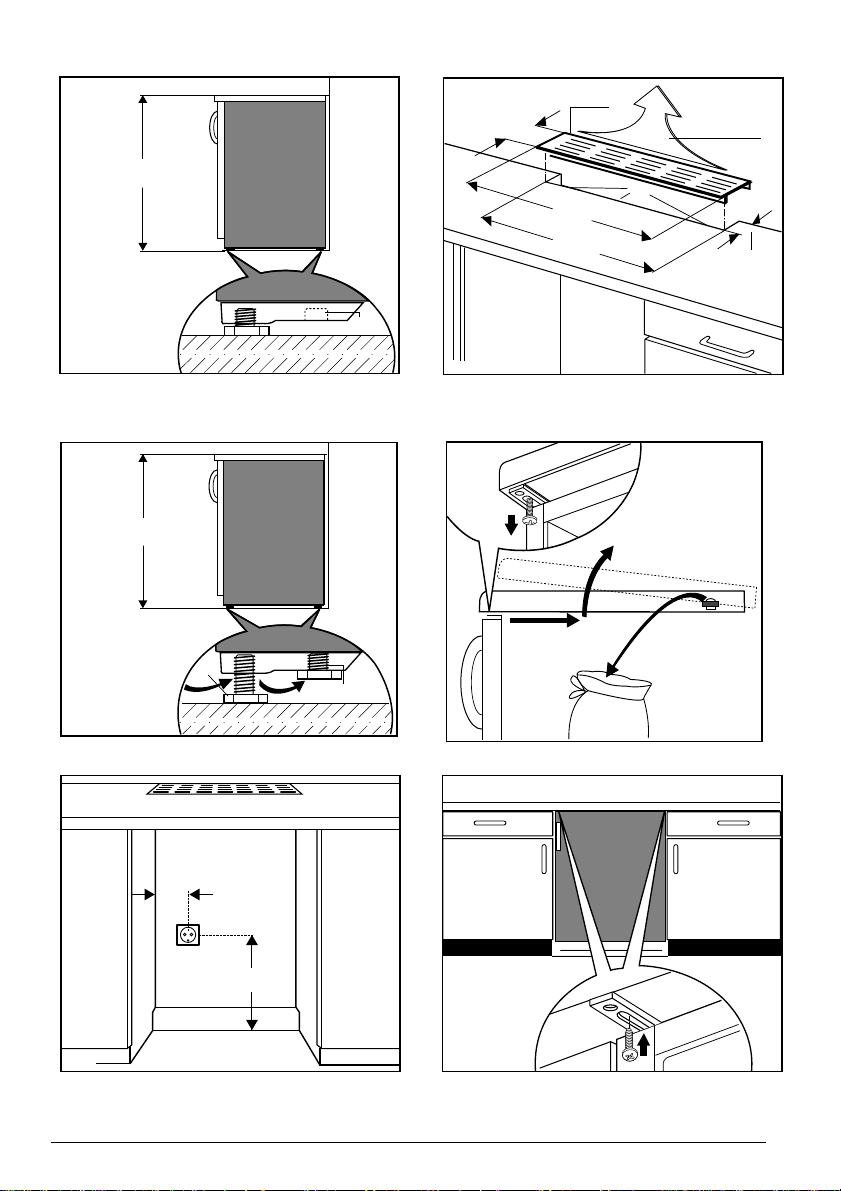
Adjustable feet for a working
height of 85 /86 cm
Fig.1
Y our appliance is fitted as standard with four adjustable feet, so that you can compensate for any
unevenness in the floor by turning them inwards or
outwards. If the appliance is to be installed underneath a continuous work-top, all four feet will need
to be turned to the position (A) which place the
appliance as low down as possible.
Special accessories adjustable feet for a working
height of 90/91 cm
Fig. 2
If the appliance is to be installed with a working
height of 90/91 cm, four adjustable feet (B) 6 cm
long must be bought as special accessories and
screwed into place. The standard feet can be left in
the low-down position (A).
Electrical connection
WARNING - THIS APPLIANCE MUST BE
EARTHED
Please ensure that the voltage and current indicated
on the rating plate agree with the voltage of your
electricity supply.
220/240 volts (i. e. 220/240 V AC).
If your appliance has been equipped with a mains
lead with a moulded-on type plug, you must comply
with the following regulations: The plug moulded on
to the cord incorporates a fuse. For replacement,
use a 13 amp BS 1362 fuse. Only ASTA approved
or certified fuses should be used. The fuse cover/
carrier must be replaced in the event of changing
the fuse. The plug must not be used if the fuse
cover/carrier is lost. A replacement cover/carrier
must be obtained from an electrical goods retailer. If
GB
the socket outlets in your home are not suitable for
the plug fitted to the appliance, then the plug must
be cut off and an appropriate one fitted. When
fitting the plug please note the following points:
Important
The wires in the mains lead are coloured in accordance with the following code:
Green and Yellow Earth
Blue Neutral
Brown Live
As the colours of the wires in the mains lead of this
appliance may not correspond with the coloured
markings identifying the terminals in your plug,
proceed as follows:
1. The wire which is coloured green and yellow
must be connected to the earth terminal in your
plug, which is marked with the letter E or by the
earth symbol or coloured green, or green
and yellow.
2. The wire which is coloured brown must be connected to the live terminal which is marked with
the letter L or coloured red.
3. The wire which is coloured blue must be connected to the neutral terminal which is marked
with the letter N or coloured black.
When wiring the plug, ensure that all strands of wire
are securely retained in each terminal. Do not forget
to tighten the mains lead clamp on the plug.
Warning! A cut-off plug inserted into a 13 amp
socket is a serious safety (shock) hazard. Ensure
that the cut-off plug is disposed of safely.
Voltage 220/240 V AC
Fuse rating 13 amps
See rating plate for further information.
The rating plate is inside, on the left.
If the appliance is installed under a continuous
worktop, the plug socket should be provided as in
Fig. 3.
Your refrigerator needs air
Fig. 4
The refrigerating unit operates without any maintenance, but the one thing it must have is sufficient
ventilation. The air is drawn in underneath the door,
through the ventilation slots in the plinth front panel,
passes through the slot behind it between the
refrigerating unit and the storage surface, and is
then expelled through the upper air-outlet grille.
Please make sure these openings are never
13
Page 9

GB
covered over.
The minimum distance between the top edge of the
appliance and any cabinet installed above it, such
as a hanging cupboard, should be 10 cm.
If the appliance is to be built in underneath a
continuous work-top, an air-outlet opening of at
least 200 cm must be provided at the back of the
work-top and fitted with a grille (C/D) in a suitable
design (Fig.4).
Paint over any cut edges in the work-top (E) to
prevent it from swelling if humidity enters it.
The distance between the appliance and the wall
must be at least 30 mm, and should be checked
before the air-outlet grille is inserted.
Available as special accessories:
C Air outlet grille, brown
D Air outlet grille, white.
Remove the work-top
Fig. 5
After the work-top has been removed the appliance
can be installed underneath a continuous work-top.
The procedure is as follows:
Unscrew the Phillips screws (F) on the right and the
left.
Lift the work-top slightly, push it about 20 mm
towards the rear, and lift it off upwards (G).
Unscrew the holding bracket (H) and keep it in a
safe place.
Fastening to a continuous
work-top
Fig.6
To install the appliance underneath a continuous
work-top, fix it on the left and the right underneath
the work-top with a fixing screw (F) passing through
the elongated slot in the door bearing.
The screws taken out when the work-top was
removed can be used for this purpose.
Changing over the door hinges
Figs. 7 to 9a
Before you connect the appliance to the power
supply you should check whether the door should
close to the right (as delivered) or should better be
changed over to the left if the position and ease of
use require. If so:
1. Tilt the appliance slightly towards the rear and
prop it securely.
2. Pull the front facia of the plinth off (Fig. 7).
3. Unscrew the door hinge screws (K) and take the
door bearing (1) downwards out of its cavity
(Fig. 8).
4. Open the door a little way and take it out downwards. Put it in a safe place where it will not be
damaged.
5. Unscrew the upper pin (2) and screw it into
place on the opposite side.
6. Fit the door into the upper pin (2) and close it.
7. Insert the pin of the door bearing (1) into the left
hand cavity and screw the bearing firmly into
place with the screws (K).
8. Move the separate part of the plinth facia (L)
from the left to the right and press the facia back
into position (Fig. 9).
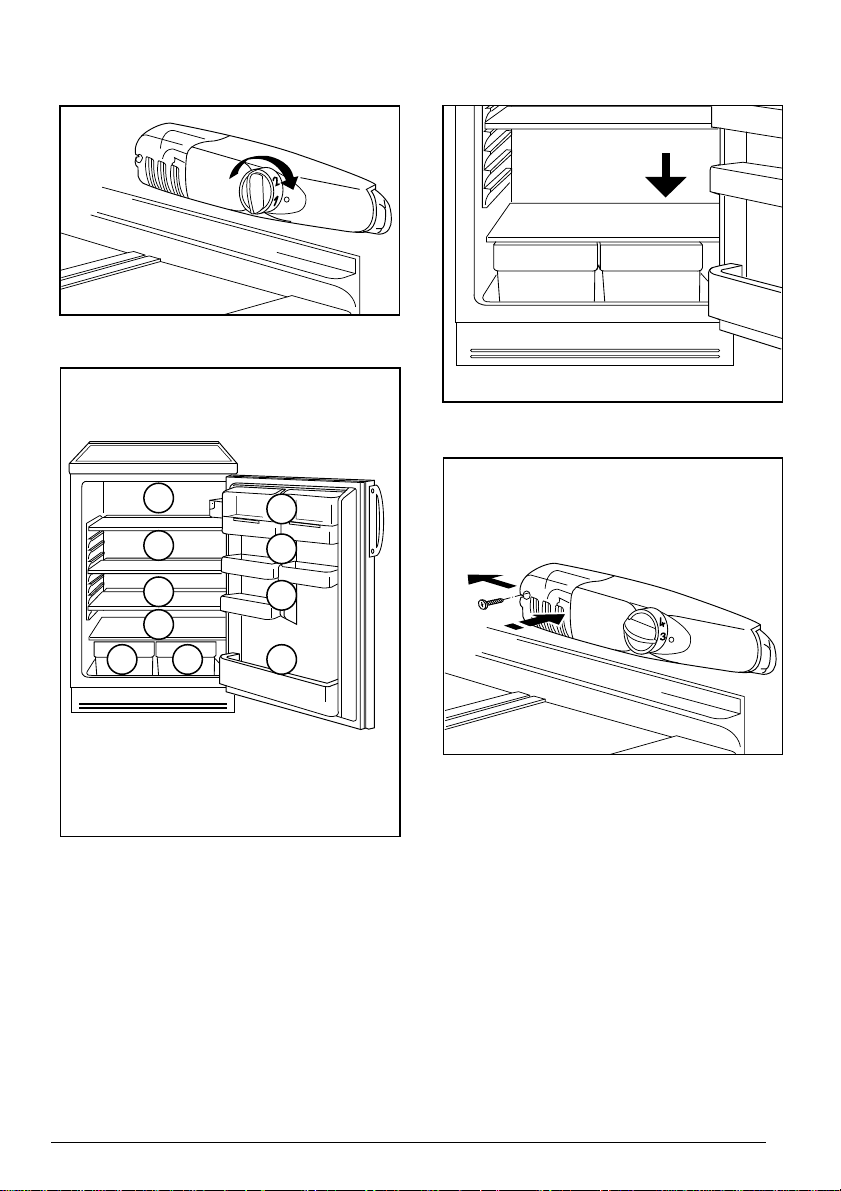
9. Unscrew the handle. Refit it on the opposite side
after having pierced the plugs with a punch.
Cover the holes left open with the plugs contained in the documentation pack.
Variable work-top adjustment
Fig. 10
The variable work-top permits the front face of the
appliance to be lined up with absolute precision
with the fronts of the other appliances or kitchen
cabinets. To this end, the work-top can be adjusted
forwards in two stages to a maximum of 16 mm. It's
this easy:
1. Open the door.
2. Loosen the two Phillips screws (F) on the left and
the right.
3. Push the work-top forwards to the required
position.
4. Fasten the screws (F) again.
If it is necessary to bring the work-top more than 8
mm forwards, take the screws (F) out, push the
work-top forwards, and insert the screws into the
second group of holes (see lower picture).
14
Page 10

GB
Before starting up
Like all new appliances, your new refrigerator will
have a certain odour of its own, so it is advisable to
clean the interior and all the internal fittings (see:
"Care and cleaning" ).
Starting up and setting
the temperature
Fig. 11
Push the plug on the connecting lead into a socket
protected by a fuse.
The knob for setting the temperature is inside the
refrigerator, on the right.
Setting "0" = Off
Turning the knob in the direction of "1" (clock-
wise) = refrigerator unit comes on and then works
automatically.
Setting "1" = highest, warmest internal temperature.
Setting "6" (the furthest it will go) = lowest, coldest
internal temperature.
If the ambient temperature is lower than about 10 to
16°C, select setting "1" to "2". If it is around 25°C,
select setting "3" to "4". Select "5" or "6" if you need
an even lower temperature.
A high room temperature (25°C to 32°C) combined
with one of the colder settings on the temperature
regulator can lead to the refrigerating unit running
continuously, which can then mean that the
condenser behind the rear wall of the refrigerator no
longer defrosts automatically. If so, turn the temperature regulator back to "3" or "4" so that the refrigerator unit can regulate itself and the defrosting
cycle can start automatically.
The ambient temperature, loading, and frequent
door opening affect the internal temperature. When
the setting is changed, the refrigerating unit does
not start immediately if defrosting is in progress at
that moment.
Correct storage
Fig.12
1 =Butter, cheese
2 = Eggs, mustard and tomato sauce etc. in
tubes, preserves
3 =Drinks
4 = Cheese in store, fruit, and vegetables
5 =Meat, sausage, cold meats, dairy products
6 =Ready meals, cakes and tarts, preserves
For safety reasons (such as the risk of an explosion!) it is not allowed to store containers holding
inflammable liquids or gases, e.g. aerosol cans or
cigarette-lighter refill cartridges, in the appliance.
Adjusting the heights of the
storage shelves and wire trays
Various glass or plastic storage shelves and wire
storage trays are included with your appliance different models have different combinations.
You should always place a glass or plastic shelf into
the first set of guides, above the fruit and vegetable
containers, and keep it in this position.
In order to arrange the internal space to suit your
individual requirements, you can adjust the heights
of the other shelves and wire trays to a number of
different positions to accommodate stored goods of
various sizes.To do this, pull the shelf or tray slightly
forwards until it can be tilted upwards or downwards and taken out. To fit it at a different level,
reverse the procedure.
VARIO glass storage shelf *)
If, for instance, you intend to store bottles, cans, or
jars in an upright position, please push the front half
of the VARIO storage shelf underneath the rear half.
This will provide space for tall items to be stored on
the next shelf below it.
*) not supplied with all models.
15
Page 11

GB
Care and cleaning
Your refrigerator should be cleaned at regular intervals. This is best done when it is empty or nearly
empty. It must never be connected to the mains
supply during cleaning - pull out the mains plug or
remove the fuse.
For safety reasons, the refrigerator must never be
cleaned with a steam-cleaner; moisture could penetrate into the electrical components and hot steam
could cause damage to the plastic parts.
Make sure the drain opening of the gutter (Fig. 13)
on the rear wall is always clear. If it should be
choked, it should be cleaned with the aid of a wire.
Certain organic solvents as well as essential oils,
such as the juice from orange or lemon peel and
butyric acid, attack plastic parts. Do not forget that,
even in the refrigerator, food may spoil if stored for
too long a time. To prevent any odours from
forming, the contents should therefore be checked
from time to time (including accessories) and thoroughly cleaned with lukewarm water to which a
mild, non-abrasive detergent can be added. Finally,
wash with clean water and wipe dry. After cleaning
the refrigerator compartment, reconnect the
appliance to the power supply straight away and
start the refrigerator in operation again.
Switching the appliance off
If your refrigerator is to remain unused for any length
of time, it must be disconnected from the mains
(unplugged) and the frozen and refrigerated food
taken out. The interior should be cleaned carefully
and the door left open, to prevent any odours from
forming.
Faults and servicing
In order to keep your appliance in perfectly
safe condition, you should arrange for repairs,
particularly to the "live" parts, to be carried
out only by qualified electricians.
In the event of a break-down you should therefore
contact your electrical dealer or our Customer
Service Centre.
Before calling the Service Centre, please check
whether there is power in the mains socket (e g. by
plugging a lamp in). Your local electrician will repair
any defects in the mains supply.
If the defect lies in the appliance, please inform the
nearest Service Centre. In order to avoid unnecessary travel or expense, please state:
- Model description
- E-number
- F-number of your appliance.
Y ou will find these data on the rating plate on the left
inside your appliance. We recommend that you
enter them here:
- Model description. . . . . . . . . . . . . . . . . . . . . . .
- E-number. . . . . . . . . . . . . . . . . . . . . . . . . . . . .
- F-number.. . . . . . . . . . . . . . . . . . . . . . . . . . . . .
Please note: We have to make a charge if our
Customer Service technician is called in for no
adequate reason, even if the guarantee has
not yet expired.
Minor repairs you can carry
out yourself
Interior light
Fig. 14
If the bulb has stopped working you can replace it
quite easily.
1. Before removing the bulb, pull the plug out or
remove the fuse.
2. Unscrew the screw holding the bulb cover.
3. Press the bulb cover as shown in Fig. 14, and
press it towards the rear.
4. Unscrew the defective bulb and replace it with a
new one of the same type: 240 V, 15 W (and
never insert a bulb with more power than 15 W!).
5. Re-insert the bulb cover and screw the holding
screw in again.
6. Start the appliance up again.
Spare parts
Spare parts can be ordered from the service centr e.
You can fit these yourself without any special skill or
training, e.g. such interior fittings as:
- butter/cheese compartment
- egg-racks
- holders in the door
- fruit and vegetable containers
- shelves.
16
Page 12

Hints on correct use
Store your food, depending on the type and degree
of sensitivity, in the appropriate temperature zones.
This will enable you to achieve an optimum storage
duration (see: "Correct storage"). Ensure the food is
packed or wrapped well if it is to be stored in your
refrigerator to ensure that aroma, colour, moisture,
and freshness are retained.
Clean the interior regularly. This ensures that your
food is hygienically stored and avoids unwanted
odours.
Keep an eye on the length of storage of deepfrozen food in the freezer compartment in order to
avoid any loss of quality.
Never place hot food in your refrigerator for cooling.
Hints on saving energy
- Do not install your refrigerator close to a radiator
or an oven, or in direct sunlight, because a high
ambient temperature will cause the temperature
regulator to switch the refrigerating unit on more
frequently and for longer.
- Never put any hot food into the refrigerator;
allow it to cool to room temperature first.
- Only open the door as infrequently as necessary ,
and close it again as quickly as possible.
- Set the temperature which uses the least energy
(see: "Starting up and setting the temperature").
- Ensure the appliance is properly ventilated.
- Keep the heat-dispensing liquefier clean (otherwise called a heat-exchanger - the metal grid on
the back wall of your appliance). Give it a thorough clean-up at least once a year.
GB
17
Page 13

AEG Hausgeräte GmbH
Postfach 1036
D-90327 Nürnberg
AUS
ERFAHRUNG
GUT
Copyright by AEG
H 271 281 800 - 0297/151
2222 629-24 ET 123456789101112/97
 Loading...