

Page 1
SBL 288
g
f
k
s
Instruction book............................... 4
Mode d’emploi................................. 7
Brugsanvisning.............................. 10
Bruksanvisning ..............................13
PAG E
Bruksanvisning................................... 16
n
Käyttöohje........................................... 19
q
Инструкцию по
u
эксплуатации................................22
Page 2
1
A
C
B
D
E
F
G
K
J
L
M
H
2
Page 3

2
3
4
5
3
Page 4

g
Dear Customer,
g
Please read these operating instructions through carefully. Above all
please follow the safety instructions on
the first few pages of these operating
instructions! Please keep the operating
instructions for future reference. If
applicable pass these instructions on to
the next owner of the appliance.
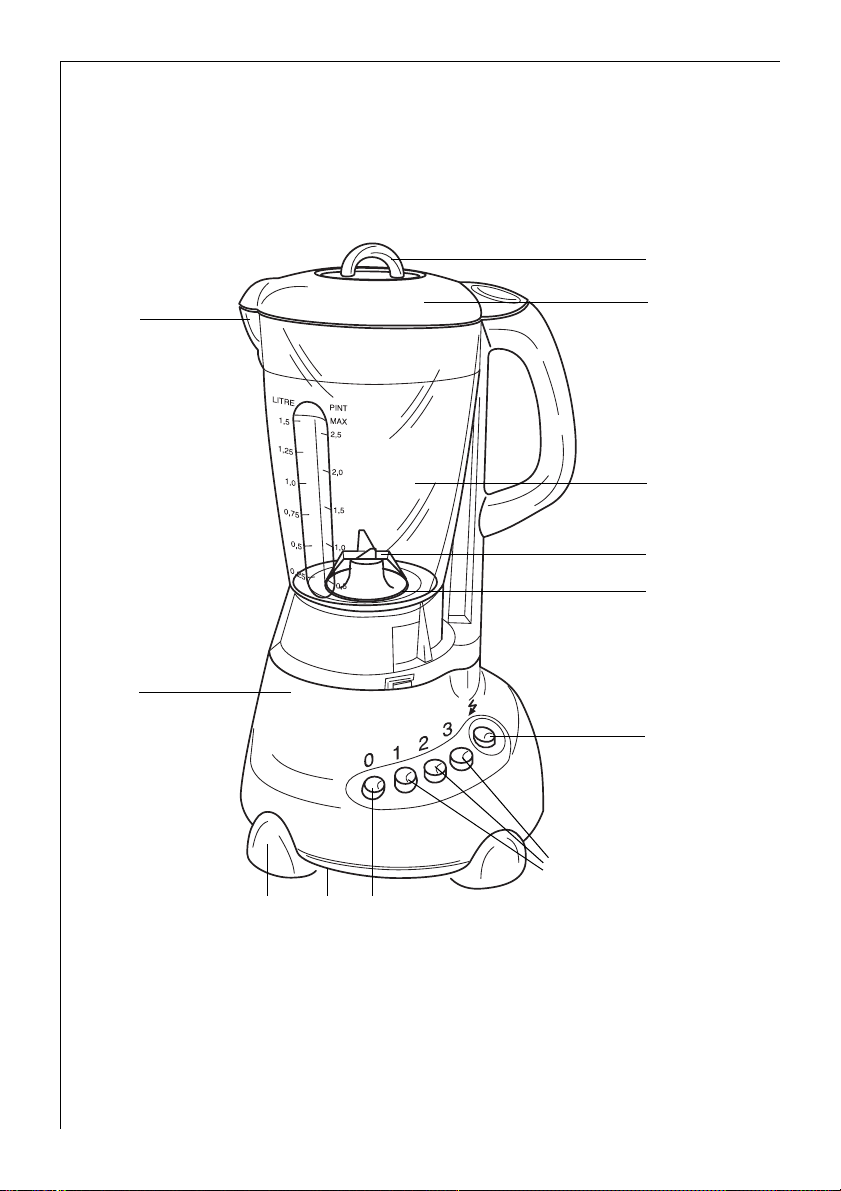
Description of the appliance
(fig 1)
A Pouring hole cover
B Lid
C Spout
D Jar
E Blade assembly
F Rubber sealing ring
G Motor base
H Stop button
J Speed buttons (1, 2 and 3)
K Pulse button
L Non-slip rubber feet (not shown)
M Rating label
1 Safety instructions
The safety standards of Electrolux electric appliances are in keeping with the
recognised rules of technology and the
law governing the safety of appliances.
Nevertheless as a manufacturer we are
committed to familiarise you with the
following safety instructions:
General safety
• The appliance may only be connected
to a power supply whose voltage and
frequency comply with the specificati-ons on the rating plate!
• Never pick up the blender if
– the lead is damaged,
– the housing is damaged.
• Never use the lead to pull the plug out
from the socket.
• In order to avoid danger, if the connec-tion lead of this appliance is damaged,
it must be replaced by the manufactu-rer, its customer service dept. or a
simi-larly qualified person.
• Repairs to the appliance may only be
carried out by trained personnel. As a
result of incorrect repairs considerable
dangers for the user may result. Please
contact the Electrolux customer service
department or your dealer in the event
of repairs being necessary.
Safety of children
Never leave the appliance unattended
when on and supervise particularly
carefully if young children are around!
When using your blender
• Never use the blender if you have wet
hands.
• Plastic parts may not be placed on or
directly near to heaters.
• Do not use this appliance to stir paints
(lacquers, polyesters etc.) This could
result in an explosion!
• The appliance should be switched off
and unplugged before any cleaning or
maintenance work is done on it.
• The blade assembly is only to be dismantled by authorised service engineers.
• Never clean the appliance under running water or submerge it in washingup water.
• Do not hold any hard objects (e.g. a
spoon) in the blade when running and
do not reach into the blender jar with
your hands. There is a risk of injury!
• The manufacturer is not liable for any
damages which are caused by using the
appliance for any other purpose than
that intended or incorrect use.
• When you have finished working with
the appliance, switch it off and unplug
ist from the electricity supply.
4
Page 5

g
This appliance complies with the fol-
;
lowing EC directives:
• 73/23/EEC of 19/2/1973
„Low voltage directive", including
the Modification directive 93/68/EEC
• 89/336/EEC of 3/5/1989
„EMC directive", including
the Modification directive 92/31/EEC
Technical Data
Mains voltage: 230V
Power: 400W
2 Disposal
Dispose of the packaging!
Dispose the packaging material of your
appliance correctly. All packaging
materials are environmentally friendly
and can be disposed of without any
danger or burnt in the refuse incinerator. The boxes are made from recycled
paper and should be returned to the
old paper collection.
Dispose of your old appliance!
When you eventually stop using your
appliance please bring it to the nearest
recycling centre or to your dealer who
will take it back for a small fee.
Operating instructions
The blender can be used for mixing liquids, crushing ice, chopping, grinding
and grating of fruits and vegetables,
whipping cream etc.
Assembling the blender
To use the blender start by assembling
the jar, then place the jar on the motor
base as described below.
0 Place the rubber sealing ring on the
blade assembly (fig 2).
0 Position the blade assembly on the
inside of the jar (fig 3). Turn it anti-
clockwise to lock it tightly into position. Important: There is a risk of
injury!
0 Position the jar on the base and turn it
clockwise to lock it into position
(fig 4).
0 Position the lid on the jar and turn it
clockwise to lock it into position
(fig 5).
Thanks to the 2-way safety system it is
3
only possible to operate the blender
when the jar and the lid are located in
the proper position (fig 4 and 5). See
also „2-way safety system“.
Operating the blender
Always place the blender on a flat,
3
clean and non-slippery surface before
operating it.
0 Open the lid (fig 1/B) and add all nec-
essary ingredients to the blender jar.
Replace the lid and the pouring hole
cover. Important: Do not exceed the
maximum capacity!
Additional ingredients may be added
3
through the pouring hole while the
blender is operating. Always replace
the pouring hole lid to avoid splashing.
0 Start the blender by pressing one of
the speed buttons (fig 1/J) or the Pulse
button (fig 1/K).
It is advisable to start at speed setting
3
1 and then increase to speed 2 or 3.
Pushing the Pulse button will operate
the blender at the highest speed setting.
0 When the blending is finished, turn the
jar anti-clockwise and lift it off the
base. Then turn the lid anti-clockwise
as well and remove the lid. Pour the
ingredients out through the spout.
Do not operate the blender longer than
1
2 minutes. After each the 2 minute
session the blender must be allowed to
cool down for at least 10 minutes.
5
Page 6

g
2-Way safety system
A 2-way safety system prevents the
blender from being operated unless the
jar and the lid are locked into position.
Nevertheless, always keep children
1
away from the appliance!
Ice-crushing
The blender is suited for ice-crushing.
Always pour some water into the jar
before starting the ice-crushing.
0 Pour the water into the jar.
0 Turn the blender on. Any speed can be
used, but it is recommended to use the
Pulse button since the ice is crushed
very fast.
0 Add the ice to the jar through the
pou-ring hole in the lid while the
blender is running.
Cleaning and care
Always pull out the mains plug before
1
cleaning the blender.
Make sure no water enters the inside of
1
the appliance! Never clean the motor
base of the appliance under running
water or submerge it in washing-up
water.
0 Clean the housing with a damp cloth.
Only use water and dishwashing liquid
1
to clean the blender. Never put any
parts in the dishwasher.
Customer Service
Our appliances comply with the highest quality standards. If nevertheless a
problem should arise for which you can
find no solution in the operating
instructions, please contact your dealer
or the Electrolux customer services
dept.
With the Pulse button the jar and the
blade assembly can be easily and
secu-rely cleaned.
0 Pour warm water and some drops of
washing liquid into the jar.
0 Mix the liquid by pressing the Pulse
button for a short while.
0 Rinse the jar under running water.
0 Clean the motor base by whipping it
with a damp cloth.
Should there be a need, the blade
3
assembly can be cleaned separately.
When you replace the blade assembly,
turn it anti-clockwise. See also
"Assembling the Blender" section.
6
 Loading...