

Page 1

Adobe® Dreamweaver® CC Help
Page 2

Legal notices
Legal notices
For legal notices, see http://help.adobe.com/en_US/legalnotices/index.html.
Last updated 3/8/2018
Page 3

Contents
Chapter 1: Introduction to Dreamweaver
New features summary . . . . . . . . . . . . . . . . . . . . . . . . . . . . . . . . . . . . . . . . . . . . . . . . . . . . . . . . . . . . . . . . . . . . . . . . . . . . . . . . . . . . . . . . . . . . . . . . .1
Web development using Dreamweaver - An Overview . . . . . . . . . . . . . . . . . . . . . . . . . . . . . . . . . . . . . . . . . . . . . . . . . . . . . . . . . . . . . . . . . . .4
Dreamweaver CC / Common Questions . . . . . . . . . . . . . . . . . . . . . . . . . . . . . . . . . . . . . . . . . . . . . . . . . . . . . . . . . . . . . . . . . . . . . . . . . . . . . . . . .7
System requirements | Dreamweaver . . . . . . . . . . . . . . . . . . . . . . . . . . . . . . . . . . . . . . . . . . . . . . . . . . . . . . . . . . . . . . . . . . . . . . . . . . . . . . . . . . . .9
Feature summary . . . . . . . . . . . . . . . . . . . . . . . . . . . . . . . . . . . . . . . . . . . . . . . . . . . . . . . . . . . . . . . . . . . . . . . . . . . . . . . . . . . . . . . . . . . . . . . . . . . . . 24
Chapter 2: Dreamweaver and Creative Cloud
Creative Cloud Libraries in Dreamweaver . . . . . . . . . . . . . . . . . . . . . . . . . . . . . . . . . . . . . . . . . . . . . . . . . . . . . . . . . . . . . . . . . . . . . . . . . . . . . . 36
Extract web-optimized SVG files from CC Libraries . . . . . . . . . . . . . . . . . . . . . . . . . . . . . . . . . . . . . . . . . . . . . . . . . . . . . . . . . . . . . . . . . . . . . 43
Using Photoshop files in Dreamweaver . . . . . . . . . . . . . . . . . . . . . . . . . . . . . . . . . . . . . . . . . . . . . . . . . . . . . . . . . . . . . . . . . . . . . . . . . . . . . . . . 45
Work with Adobe Animate CC and Dreamweaver . . . . . . . . . . . . . . . . . . . . . . . . . . . . . . . . . . . . . . . . . . . . . . . . . . . . . . . . . . . . . . . . . . . . . . 51
Chapter 3: Dreamweaver workspaces and views
The Dreamweaver workspace . . . . . . . . . . . . . . . . . . . . . . . . . . . . . . . . . . . . . . . . . . . . . . . . . . . . . . . . . . . . . . . . . . . . . . . . . . . . . . . . . . . . . . . . . 52
Optimize Dreamweaver workspace for visual development . . . . . . . . . . . . . . . . . . . . . . . . . . . . . . . . . . . . . . . . . . . . . . . . . . . . . . . . . . . . 73
Search files based on filename or content | Mac OS . . . . . . . . . . . . . . . . . . . . . . . . . . . . . . . . . . . . . . . . . . . . . . . . . . . . . . . . . . . . . . . . . . . . 75
iii
Chapter 4: Set up sites
About Dreamweaver sites . . . . . . . . . . . . . . . . . . . . . . . . . . . . . . . . . . . . . . . . . . . . . . . . . . . . . . . . . . . . . . . . . . . . . . . . . . . . . . . . . . . . . . . . . . . . 77
Set up a local version of your site . . . . . . . . . . . . . . . . . . . . . . . . . . . . . . . . . . . . . . . . . . . . . . . . . . . . . . . . . . . . . . . . . . . . . . . . . . . . . . . . . . . . . . 79
Set up a testing server . . . . . . . . . . . . . . . . . . . . . . . . . . . . . . . . . . . . . . . . . . . . . . . . . . . . . . . . . . . . . . . . . . . . . . . . . . . . . . . . . . . . . . . . . . . . . . . . 82
Import and export Dreamweaver site settings . . . . . . . . . . . . . . . . . . . . . . . . . . . . . . . . . . . . . . . . . . . . . . . . . . . . . . . . . . . . . . . . . . . . . . . . . 86
Bring existing websites from a remote server to your local site root . . . . . . . . . . . . . . . . . . . . . . . . . . . . . . . . . . . . . . . . . . . . . . . . . . . . 88
Accessibility features in Dreamweaver . . . . . . . . . . . . . . . . . . . . . . . . . . . . . . . . . . . . . . . . . . . . . . . . . . . . . . . . . . . . . . . . . . . . . . . . . . . . . . . . . 88
Set site preferences for transferring files . . . . . . . . . . . . . . . . . . . . . . . . . . . . . . . . . . . . . . . . . . . . . . . . . . . . . . . . . . . . . . . . . . . . . . . . . . . . . . . 91
Specify proxy server settings in Dreamweaver . . . . . . . . . . . . . . . . . . . . . . . . . . . . . . . . . . . . . . . . . . . . . . . . . . . . . . . . . . . . . . . . . . . . . . . . . 93
Chapter 5: Manage files
Create and open files . . . . . . . . . . . . . . . . . . . . . . . . . . . . . . . . . . . . . . . . . . . . . . . . . . . . . . . . . . . . . . . . . . . . . . . . . . . . . . . . . . . . . . . . . . . . . . . . . 96
Manage files and folders . . . . . . . . . . . . . . . . . . . . . . . . . . . . . . . . . . . . . . . . . . . . . . . . . . . . . . . . . . . . . . . . . . . . . . . . . . . . . . . . . . . . . . . . . . . . . 109
Getting and putting files to and from your server . . . . . . . . . . . . . . . . . . . . . . . . . . . . . . . . . . . . . . . . . . . . . . . . . . . . . . . . . . . . . . . . . . . . . 125
Check in and check out files . . . . . . . . . . . . . . . . . . . . . . . . . . . . . . . . . . . . . . . . . . . . . . . . . . . . . . . . . . . . . . . . . . . . . . . . . . . . . . . . . . . . . . . . . 129
Synchronize files . . . . . . . . . . . . . . . . . . . . . . . . . . . . . . . . . . . . . . . . . . . . . . . . . . . . . . . . . . . . . . . . . . . . . . . . . . . . . . . . . . . . . . . . . . . . . . . . . . . . 136
Compare files for differences . . . . . . . . . . . . . . . . . . . . . . . . . . . . . . . . . . . . . . . . . . . . . . . . . . . . . . . . . . . . . . . . . . . . . . . . . . . . . . . . . . . . . . . . . 138
Cloak files and folders in your Dreamweaver site . . . . . . . . . . . . . . . . . . . . . . . . . . . . . . . . . . . . . . . . . . . . . . . . . . . . . . . . . . . . . . . . . . . . . . 140
Enable Design Notes for Dreamweaver sites . . . . . . . . . . . . . . . . . . . . . . . . . . . . . . . . . . . . . . . . . . . . . . . . . . . . . . . . . . . . . . . . . . . . . . . . . . 143
Preventing potential Gatekeeper exploit . . . . . . . . . . . . . . . . . . . . . . . . . . . . . . . . . . . . . . . . . . . . . . . . . . . . . . . . . . . . . . . . . . . . . . . . . . . . . 145
Chapter 6: Layout and design
Use visual aids for layout . . . . . . . . . . . . . . . . . . . . . . . . . . . . . . . . . . . . . . . . . . . . . . . . . . . . . . . . . . . . . . . . . . . . . . . . . . . . . . . . . . . . . . . . . . . . . 147
About using CSS to lay out your page . . . . . . . . . . . . . . . . . . . . . . . . . . . . . . . . . . . . . . . . . . . . . . . . . . . . . . . . . . . . . . . . . . . . . . . . . . . . . . . . 150
Design responsive websites using Bootstrap . . . . . . . . . . . . . . . . . . . . . . . . . . . . . . . . . . . . . . . . . . . . . . . . . . . . . . . . . . . . . . . . . . . . . . . . . 156
Creating and using media queries in Dreamweaver . . . . . . . . . . . . . . . . . . . . . . . . . . . . . . . . . . . . . . . . . . . . . . . . . . . . . . . . . . . . . . . . . . . 163
Last updated 3/8/2018
Page 4

DREAMWEAVER
Content s
Present content with tables . . . . . . . . . . . . . . . . . . . . . . . . . . . . . . . . . . . . . . . . . . . . . . . . . . . . . . . . . . . . . . . . . . . . . . . . . . . . . . . . . . . . . . . . . . 168
Colors . . . . . . . . . . . . . . . . . . . . . . . . . . . . . . . . . . . . . . . . . . . . . . . . . . . . . . . . . . . . . . . . . . . . . . . . . . . . . . . . . . . . . . . . . . . . . . . . . . . . . . . . . . . . . . . 182
Responsive design using fluid grid layouts . . . . . . . . . . . . . . . . . . . . . . . . . . . . . . . . . . . . . . . . . . . . . . . . . . . . . . . . . . . . . . . . . . . . . . . . . . . 183
Extract in Dreamweaver CC . . . . . . . . . . . . . . . . . . . . . . . . . . . . . . . . . . . . . . . . . . . . . . . . . . . . . . . . . . . . . . . . . . . . . . . . . . . . . . . . . . . . . . . . . . 185
Chapter 7: CSS
Understand Cascading Style Sheets . . . . . . . . . . . . . . . . . . . . . . . . . . . . . . . . . . . . . . . . . . . . . . . . . . . . . . . . . . . . . . . . . . . . . . . . . . . . . . . . . . 204
Laying out pages using CSS Designer . . . . . . . . . . . . . . . . . . . . . . . . . . . . . . . . . . . . . . . . . . . . . . . . . . . . . . . . . . . . . . . . . . . . . . . . . . . . . . . . 208
Using CSS preprocessors in Dreamweaver . . . . . . . . . . . . . . . . . . . . . . . . . . . . . . . . . . . . . . . . . . . . . . . . . . . . . . . . . . . . . . . . . . . . . . . . . . . . 217
How to set CSS Style preferences in Dreamweaver . . . . . . . . . . . . . . . . . . . . . . . . . . . . . . . . . . . . . . . . . . . . . . . . . . . . . . . . . . . . . . . . . . . . 229
Move CSS rules in Dreamweaver . . . . . . . . . . . . . . . . . . . . . . . . . . . . . . . . . . . . . . . . . . . . . . . . . . . . . . . . . . . . . . . . . . . . . . . . . . . . . . . . . . . . . 230
Convert inline CSS to a CSS rule in Dreamweaver . . . . . . . . . . . . . . . . . . . . . . . . . . . . . . . . . . . . . . . . . . . . . . . . . . . . . . . . . . . . . . . . . . . . . 230
Format CSS code . . . . . . . . . . . . . . . . . . . . . . . . . . . . . . . . . . . . . . . . . . . . . . . . . . . . . . . . . . . . . . . . . . . . . . . . . . . . . . . . . . . . . . . . . . . . . . . . . . . . 231
Work with div tags . . . . . . . . . . . . . . . . . . . . . . . . . . . . . . . . . . . . . . . . . . . . . . . . . . . . . . . . . . . . . . . . . . . . . . . . . . . . . . . . . . . . . . . . . . . . . . . . . . . 231
Apply gradients to background . . . . . . . . . . . . . . . . . . . . . . . . . . . . . . . . . . . . . . . . . . . . . . . . . . . . . . . . . . . . . . . . . . . . . . . . . . . . . . . . . . . . . . 233
Create and edit CSS3 transition effects in Dreamweaver . . . . . . . . . . . . . . . . . . . . . . . . . . . . . . . . . . . . . . . . . . . . . . . . . . . . . . . . . . . . . . 235
Chapter 8: Page content and assets
Set page properties . . . . . . . . . . . . . . . . . . . . . . . . . . . . . . . . . . . . . . . . . . . . . . . . . . . . . . . . . . . . . . . . . . . . . . . . . . . . . . . . . . . . . . . . . . . . . . . . . 237
Set CSS heading properties and CSS link properties . . . . . . . . . . . . . . . . . . . . . . . . . . . . . . . . . . . . . . . . . . . . . . . . . . . . . . . . . . . . . . . . . . . 239
Work with text . . . . . . . . . . . . . . . . . . . . . . . . . . . . . . . . . . . . . . . . . . . . . . . . . . . . . . . . . . . . . . . . . . . . . . . . . . . . . . . . . . . . . . . . . . . . . . . . . . . . . . 240
Find and replace text, tags, and attributes . . . . . . . . . . . . . . . . . . . . . . . . . . . . . . . . . . . . . . . . . . . . . . . . . . . . . . . . . . . . . . . . . . . . . . . . . . . . 244
DOM panel . . . . . . . . . . . . . . . . . . . . . . . . . . . . . . . . . . . . . . . . . . . . . . . . . . . . . . . . . . . . . . . . . . . . . . . . . . . . . . . . . . . . . . . . . . . . . . . . . . . . . . . . . . 252
Edit in Live View . . . . . . . . . . . . . . . . . . . . . . . . . . . . . . . . . . . . . . . . . . . . . . . . . . . . . . . . . . . . . . . . . . . . . . . . . . . . . . . . . . . . . . . . . . . . . . . . . . . . . 259
Encoding documents in Dreamweaver . . . . . . . . . . . . . . . . . . . . . . . . . . . . . . . . . . . . . . . . . . . . . . . . . . . . . . . . . . . . . . . . . . . . . . . . . . . . . . . 271
Select and view elements in the Document window . . . . . . . . . . . . . . . . . . . . . . . . . . . . . . . . . . . . . . . . . . . . . . . . . . . . . . . . . . . . . . . . . . 271
Set text properties in the Property inspector . . . . . . . . . . . . . . . . . . . . . . . . . . . . . . . . . . . . . . . . . . . . . . . . . . . . . . . . . . . . . . . . . . . . . . . . . 273
Spell check a web page . . . . . . . . . . . . . . . . . . . . . . . . . . . . . . . . . . . . . . . . . . . . . . . . . . . . . . . . . . . . . . . . . . . . . . . . . . . . . . . . . . . . . . . . . . . . . . 278
Using horizontal rules in Dreamweaver . . . . . . . . . . . . . . . . . . . . . . . . . . . . . . . . . . . . . . . . . . . . . . . . . . . . . . . . . . . . . . . . . . . . . . . . . . . . . . . 278
Add and modify font combinations in Dreamweaver . . . . . . . . . . . . . . . . . . . . . . . . . . . . . . . . . . . . . . . . . . . . . . . . . . . . . . . . . . . . . . . . . 279
Work with assets . . . . . . . . . . . . . . . . . . . . . . . . . . . . . . . . . . . . . . . . . . . . . . . . . . . . . . . . . . . . . . . . . . . . . . . . . . . . . . . . . . . . . . . . . . . . . . . . . . . . 282
Insert and update dates in Dreamweaver . . . . . . . . . . . . . . . . . . . . . . . . . . . . . . . . . . . . . . . . . . . . . . . . . . . . . . . . . . . . . . . . . . . . . . . . . . . . . 288
Create and manage favorite assets in Dreamweaver . . . . . . . . . . . . . . . . . . . . . . . . . . . . . . . . . . . . . . . . . . . . . . . . . . . . . . . . . . . . . . . . . . 289
Insert and edit images in Dreamweaver . . . . . . . . . . . . . . . . . . . . . . . . . . . . . . . . . . . . . . . . . . . . . . . . . . . . . . . . . . . . . . . . . . . . . . . . . . . . . . 291
Add media objects . . . . . . . . . . . . . . . . . . . . . . . . . . . . . . . . . . . . . . . . . . . . . . . . . . . . . . . . . . . . . . . . . . . . . . . . . . . . . . . . . . . . . . . . . . . . . . . . . . 302
Adding videos in Dreamweaver . . . . . . . . . . . . . . . . . . . . . . . . . . . . . . . . . . . . . . . . . . . . . . . . . . . . . . . . . . . . . . . . . . . . . . . . . . . . . . . . . . . . . . 307
Insert HTML5 video . . . . . . . . . . . . . . . . . . . . . . . . . . . . . . . . . . . . . . . . . . . . . . . . . . . . . . . . . . . . . . . . . . . . . . . . . . . . . . . . . . . . . . . . . . . . . . . . . . 314
Insert SWF files . . . . . . . . . . . . . . . . . . . . . . . . . . . . . . . . . . . . . . . . . . . . . . . . . . . . . . . . . . . . . . . . . . . . . . . . . . . . . . . . . . . . . . . . . . . . . . . . . . . . . . 315
Add audio effects . . . . . . . . . . . . . . . . . . . . . . . . . . . . . . . . . . . . . . . . . . . . . . . . . . . . . . . . . . . . . . . . . . . . . . . . . . . . . . . . . . . . . . . . . . . . . . . . . . . . 318
Insert HTML5 audio in Dreamweaver . . . . . . . . . . . . . . . . . . . . . . . . . . . . . . . . . . . . . . . . . . . . . . . . . . . . . . . . . . . . . . . . . . . . . . . . . . . . . . . . . 319
Work with library items . . . . . . . . . . . . . . . . . . . . . . . . . . . . . . . . . . . . . . . . . . . . . . . . . . . . . . . . . . . . . . . . . . . . . . . . . . . . . . . . . . . . . . . . . . . . . . 320
Using Arabic and Hebrew text in Dreamweaver . . . . . . . . . . . . . . . . . . . . . . . . . . . . . . . . . . . . . . . . . . . . . . . . . . . . . . . . . . . . . . . . . . . . . . . 324
iv
Chapter 9: Linking and navigation
About linking and navigation . . . . . . . . . . . . . . . . . . . . . . . . . . . . . . . . . . . . . . . . . . . . . . . . . . . . . . . . . . . . . . . . . . . . . . . . . . . . . . . . . . . . . . . . 325
Linking . . . . . . . . . . . . . . . . . . . . . . . . . . . . . . . . . . . . . . . . . . . . . . . . . . . . . . . . . . . . . . . . . . . . . . . . . . . . . . . . . . . . . . . . . . . . . . . . . . . . . . . . . . . . . . 327
Last updated 3/8/2018
Page 5

DREAMWEAVER
Content s
Image maps . . . . . . . . . . . . . . . . . . . . . . . . . . . . . . . . . . . . . . . . . . . . . . . . . . . . . . . . . . . . . . . . . . . . . . . . . . . . . . . . . . . . . . . . . . . . . . . . . . . . . . . . . 334
Troubleshoot links . . . . . . . . . . . . . . . . . . . . . . . . . . . . . . . . . . . . . . . . . . . . . . . . . . . . . . . . . . . . . . . . . . . . . . . . . . . . . . . . . . . . . . . . . . . . . . . . . . . 336
Chapter 10: jQuery widgets and effects
Use jQuery effects in Dreamweaver . . . . . . . . . . . . . . . . . . . . . . . . . . . . . . . . . . . . . . . . . . . . . . . . . . . . . . . . . . . . . . . . . . . . . . . . . . . . . . . . . . 338
Enhanced jQuery - TEST PAGE . . . . . . . . . . . . . . . . . . . . . . . . . . . . . . . . . . . . . . . . . . . . . . . . . . . . . . . . . . . . . . . . . . . . . . . . . . . . . . . . . . . . . . . . 340
Enhanced jQuery mobile support . . . . . . . . . . . . . . . . . . . . . . . . . . . . . . . . . . . . . . . . . . . . . . . . . . . . . . . . . . . . . . . . . . . . . . . . . . . . . . . . . . . . 340
Chapter 11: Coding websites
About coding in Dreamweaver . . . . . . . . . . . . . . . . . . . . . . . . . . . . . . . . . . . . . . . . . . . . . . . . . . . . . . . . . . . . . . . . . . . . . . . . . . . . . . . . . . . . . . . 341
Coding environment in Dreamweaver . . . . . . . . . . . . . . . . . . . . . . . . . . . . . . . . . . . . . . . . . . . . . . . . . . . . . . . . . . . . . . . . . . . . . . . . . . . . . . . . 345
Set coding preferences . . . . . . . . . . . . . . . . . . . . . . . . . . . . . . . . . . . . . . . . . . . . . . . . . . . . . . . . . . . . . . . . . . . . . . . . . . . . . . . . . . . . . . . . . . . . . . 349
Customize code coloring . . . . . . . . . . . . . . . . . . . . . . . . . . . . . . . . . . . . . . . . . . . . . . . . . . . . . . . . . . . . . . . . . . . . . . . . . . . . . . . . . . . . . . . . . . . . 354
Write and edit code . . . . . . . . . . . . . . . . . . . . . . . . . . . . . . . . . . . . . . . . . . . . . . . . . . . . . . . . . . . . . . . . . . . . . . . . . . . . . . . . . . . . . . . . . . . . . . . . . . 362
Code hinting and code completion . . . . . . . . . . . . . . . . . . . . . . . . . . . . . . . . . . . . . . . . . . . . . . . . . . . . . . . . . . . . . . . . . . . . . . . . . . . . . . . . . . 375
Collapse and expand code . . . . . . . . . . . . . . . . . . . . . . . . . . . . . . . . . . . . . . . . . . . . . . . . . . . . . . . . . . . . . . . . . . . . . . . . . . . . . . . . . . . . . . . . . . . 387
Reuse code with snippets . . . . . . . . . . . . . . . . . . . . . . . . . . . . . . . . . . . . . . . . . . . . . . . . . . . . . . . . . . . . . . . . . . . . . . . . . . . . . . . . . . . . . . . . . . . . 390
Optimize code . . . . . . . . . . . . . . . . . . . . . . . . . . . . . . . . . . . . . . . . . . . . . . . . . . . . . . . . . . . . . . . . . . . . . . . . . . . . . . . . . . . . . . . . . . . . . . . . . . . . . . 396
Edit code in Design view . . . . . . . . . . . . . . . . . . . . . . . . . . . . . . . . . . . . . . . . . . . . . . . . . . . . . . . . . . . . . . . . . . . . . . . . . . . . . . . . . . . . . . . . . . . . . 400
Work with head content for pages . . . . . . . . . . . . . . . . . . . . . . . . . . . . . . . . . . . . . . . . . . . . . . . . . . . . . . . . . . . . . . . . . . . . . . . . . . . . . . . . . . . 405
Insert server-side includes in Dreamweaver . . . . . . . . . . . . . . . . . . . . . . . . . . . . . . . . . . . . . . . . . . . . . . . . . . . . . . . . . . . . . . . . . . . . . . . . . . 408
Using tag libraries in Dreamweaver . . . . . . . . . . . . . . . . . . . . . . . . . . . . . . . . . . . . . . . . . . . . . . . . . . . . . . . . . . . . . . . . . . . . . . . . . . . . . . . . . . 411
Importing custom tags into Dreamweaver . . . . . . . . . . . . . . . . . . . . . . . . . . . . . . . . . . . . . . . . . . . . . . . . . . . . . . . . . . . . . . . . . . . . . . . . . . . 413
Use JavaScript behaviors (general instructions) . . . . . . . . . . . . . . . . . . . . . . . . . . . . . . . . . . . . . . . . . . . . . . . . . . . . . . . . . . . . . . . . . . . . . . . 415
Apply built-in JavaScript behaviors . . . . . . . . . . . . . . . . . . . . . . . . . . . . . . . . . . . . . . . . . . . . . . . . . . . . . . . . . . . . . . . . . . . . . . . . . . . . . . . . . . . 418
About XML and XSLT . . . . . . . . . . . . . . . . . . . . . . . . . . . . . . . . . . . . . . . . . . . . . . . . . . . . . . . . . . . . . . . . . . . . . . . . . . . . . . . . . . . . . . . . . . . . . . . . 427
Perform server-side XSL transformations in Dreamweaver . . . . . . . . . . . . . . . . . . . . . . . . . . . . . . . . . . . . . . . . . . . . . . . . . . . . . . . . . . . . 434
Performing client-side XSL transformations in Dreamweaver . . . . . . . . . . . . . . . . . . . . . . . . . . . . . . . . . . . . . . . . . . . . . . . . . . . . . . . . . . 450
Add character entities for XSLT in Dreamweaver . . . . . . . . . . . . . . . . . . . . . . . . . . . . . . . . . . . . . . . . . . . . . . . . . . . . . . . . . . . . . . . . . . . . . . 452
v
Chapter 12: Cross-product workflows
Installing and using extensions to Dreamweaver . . . . . . . . . . . . . . . . . . . . . . . . . . . . . . . . . . . . . . . . . . . . . . . . . . . . . . . . . . . . . . . . . . . . . 454
In-App updates in Dreamweaver . . . . . . . . . . . . . . . . . . . . . . . . . . . . . . . . . . . . . . . . . . . . . . . . . . . . . . . . . . . . . . . . . . . . . . . . . . . . . . . . . . . . . 459
Import Microsoft Office documents in Dreamweaver (Windows only) . . . . . . . . . . . . . . . . . . . . . . . . . . . . . . . . . . . . . . . . . . . . . . . . . 462
Working with Fireworks and Dreamweaver . . . . . . . . . . . . . . . . . . . . . . . . . . . . . . . . . . . . . . . . . . . . . . . . . . . . . . . . . . . . . . . . . . . . . . . . . . . 463
Edit content in Dreamweaver sites using Contribute . . . . . . . . . . . . . . . . . . . . . . . . . . . . . . . . . . . . . . . . . . . . . . . . . . . . . . . . . . . . . . . . . . 469
Dreamweaver-Business Catalyst integration . . . . . . . . . . . . . . . . . . . . . . . . . . . . . . . . . . . . . . . . . . . . . . . . . . . . . . . . . . . . . . . . . . . . . . . . . . 475
Create personalized email campaigns . . . . . . . . . . . . . . . . . . . . . . . . . . . . . . . . . . . . . . . . . . . . . . . . . . . . . . . . . . . . . . . . . . . . . . . . . . . . . . . . 477
Chapter 13: Templates
About Dreamweaver templates . . . . . . . . . . . . . . . . . . . . . . . . . . . . . . . . . . . . . . . . . . . . . . . . . . . . . . . . . . . . . . . . . . . . . . . . . . . . . . . . . . . . . . 486
Recognizing templates and template-based documents . . . . . . . . . . . . . . . . . . . . . . . . . . . . . . . . . . . . . . . . . . . . . . . . . . . . . . . . . . . . . . 489
Create a Dreamweaver template . . . . . . . . . . . . . . . . . . . . . . . . . . . . . . . . . . . . . . . . . . . . . . . . . . . . . . . . . . . . . . . . . . . . . . . . . . . . . . . . . . . . . 491
Create editable regions in templates . . . . . . . . . . . . . . . . . . . . . . . . . . . . . . . . . . . . . . . . . . . . . . . . . . . . . . . . . . . . . . . . . . . . . . . . . . . . . . . . . 494
Create repeating regions and tables in Dreamweaver . . . . . . . . . . . . . . . . . . . . . . . . . . . . . . . . . . . . . . . . . . . . . . . . . . . . . . . . . . . . . . . . . 496
Use optional regions in templates . . . . . . . . . . . . . . . . . . . . . . . . . . . . . . . . . . . . . . . . . . . . . . . . . . . . . . . . . . . . . . . . . . . . . . . . . . . . . . . . . . . . 498
Define editable tag attributes in Dreamweaver . . . . . . . . . . . . . . . . . . . . . . . . . . . . . . . . . . . . . . . . . . . . . . . . . . . . . . . . . . . . . . . . . . . . . . . 500
How to create nested templates in Dreamweaver . . . . . . . . . . . . . . . . . . . . . . . . . . . . . . . . . . . . . . . . . . . . . . . . . . . . . . . . . . . . . . . . . . . . . 502
Last updated 3/8/2018
Page 6

DREAMWEAVER
Content s
Edit, update, and delete templates . . . . . . . . . . . . . . . . . . . . . . . . . . . . . . . . . . . . . . . . . . . . . . . . . . . . . . . . . . . . . . . . . . . . . . . . . . . . . . . . . . . 504
Export and import xml content in Dreamweaver . . . . . . . . . . . . . . . . . . . . . . . . . . . . . . . . . . . . . . . . . . . . . . . . . . . . . . . . . . . . . . . . . . . . . . 507
Apply or remove a template from an existing document . . . . . . . . . . . . . . . . . . . . . . . . . . . . . . . . . . . . . . . . . . . . . . . . . . . . . . . . . . . . . . 508
Edit content in Dreamweaver templates . . . . . . . . . . . . . . . . . . . . . . . . . . . . . . . . . . . . . . . . . . . . . . . . . . . . . . . . . . . . . . . . . . . . . . . . . . . . . . 510
Syntax rules for template tags in Dreamweaver . . . . . . . . . . . . . . . . . . . . . . . . . . . . . . . . . . . . . . . . . . . . . . . . . . . . . . . . . . . . . . . . . . . . . . . 512
Set highlighting preferences for template regions . . . . . . . . . . . . . . . . . . . . . . . . . . . . . . . . . . . . . . . . . . . . . . . . . . . . . . . . . . . . . . . . . . . . 513
Chapter 14: Mobile and multiscreen
Create media queries . . . . . . . . . . . . . . . . . . . . . . . . . . . . . . . . . . . . . . . . . . . . . . . . . . . . . . . . . . . . . . . . . . . . . . . . . . . . . . . . . . . . . . . . . . . . . . . . 515
Changing page orientation for mobile devices . . . . . . . . . . . . . . . . . . . . . . . . . . . . . . . . . . . . . . . . . . . . . . . . . . . . . . . . . . . . . . . . . . . . . . . 517
Create web apps for mobile devices using Dreamweaver . . . . . . . . . . . . . . . . . . . . . . . . . . . . . . . . . . . . . . . . . . . . . . . . . . . . . . . . . . . . . 517
Chapter 15: Dynamic sites, pages and web forms
Understand web applications . . . . . . . . . . . . . . . . . . . . . . . . . . . . . . . . . . . . . . . . . . . . . . . . . . . . . . . . . . . . . . . . . . . . . . . . . . . . . . . . . . . . . . . . 520
Set up your computer for application development . . . . . . . . . . . . . . . . . . . . . . . . . . . . . . . . . . . . . . . . . . . . . . . . . . . . . . . . . . . . . . . . . . 527
Troubleshoot database connections . . . . . . . . . . . . . . . . . . . . . . . . . . . . . . . . . . . . . . . . . . . . . . . . . . . . . . . . . . . . . . . . . . . . . . . . . . . . . . . . . 532
Removing connection scripts in Dreamweaver . . . . . . . . . . . . . . . . . . . . . . . . . . . . . . . . . . . . . . . . . . . . . . . . . . . . . . . . . . . . . . . . . . . . . . . 537
Design dynamic pages . . . . . . . . . . . . . . . . . . . . . . . . . . . . . . . . . . . . . . . . . . . . . . . . . . . . . . . . . . . . . . . . . . . . . . . . . . . . . . . . . . . . . . . . . . . . . . 537
Dynamic content sources overview . . . . . . . . . . . . . . . . . . . . . . . . . . . . . . . . . . . . . . . . . . . . . . . . . . . . . . . . . . . . . . . . . . . . . . . . . . . . . . . . . . 539
Define sources of dynamic content . . . . . . . . . . . . . . . . . . . . . . . . . . . . . . . . . . . . . . . . . . . . . . . . . . . . . . . . . . . . . . . . . . . . . . . . . . . . . . . . . . 543
Add dynamic content to pages . . . . . . . . . . . . . . . . . . . . . . . . . . . . . . . . . . . . . . . . . . . . . . . . . . . . . . . . . . . . . . . . . . . . . . . . . . . . . . . . . . . . . . 557
Changing dynamic content in Dreamweaver . . . . . . . . . . . . . . . . . . . . . . . . . . . . . . . . . . . . . . . . . . . . . . . . . . . . . . . . . . . . . . . . . . . . . . . . . 560
Display database records . . . . . . . . . . . . . . . . . . . . . . . . . . . . . . . . . . . . . . . . . . . . . . . . . . . . . . . . . . . . . . . . . . . . . . . . . . . . . . . . . . . . . . . . . . . . 561
Provide and troubleshoot live data in Dreamweaver . . . . . . . . . . . . . . . . . . . . . . . . . . . . . . . . . . . . . . . . . . . . . . . . . . . . . . . . . . . . . . . . . . 570
Add custom server behaviors in Dreamweaver . . . . . . . . . . . . . . . . . . . . . . . . . . . . . . . . . . . . . . . . . . . . . . . . . . . . . . . . . . . . . . . . . . . . . . . 571
Building forms using Dreamweaver . . . . . . . . . . . . . . . . . . . . . . . . . . . . . . . . . . . . . . . . . . . . . . . . . . . . . . . . . . . . . . . . . . . . . . . . . . . . . . . . . . 581
Use forms to collect information from users . . . . . . . . . . . . . . . . . . . . . . . . . . . . . . . . . . . . . . . . . . . . . . . . . . . . . . . . . . . . . . . . . . . . . . . . . . 581
Create and enable ColdFusion forms in Dreamweaver . . . . . . . . . . . . . . . . . . . . . . . . . . . . . . . . . . . . . . . . . . . . . . . . . . . . . . . . . . . . . . . . 584
Create web forms . . . . . . . . . . . . . . . . . . . . . . . . . . . . . . . . . . . . . . . . . . . . . . . . . . . . . . . . . . . . . . . . . . . . . . . . . . . . . . . . . . . . . . . . . . . . . . . . . . . . 595
Enhanced HTML5 support for form elements . . . . . . . . . . . . . . . . . . . . . . . . . . . . . . . . . . . . . . . . . . . . . . . . . . . . . . . . . . . . . . . . . . . . . . . . . 608
Revised Forms workflow in Dreamweaver . . . . . . . . . . . . . . . . . . . . . . . . . . . . . . . . . . . . . . . . . . . . . . . . . . . . . . . . . . . . . . . . . . . . . . . . . . . . 608
Develop a form using Dreamweaver . . . . . . . . . . . . . . . . . . . . . . . . . . . . . . . . . . . . . . . . . . . . . . . . . . . . . . . . . . . . . . . . . . . . . . . . . . . . . . . . . 610
vi
Chapter 16: Building applications visually
Build master and detail pages in Dreamweaver . . . . . . . . . . . . . . . . . . . . . . . . . . . . . . . . . . . . . . . . . . . . . . . . . . . . . . . . . . . . . . . . . . . . . . . 612
Build search and results pages . . . . . . . . . . . . . . . . . . . . . . . . . . . . . . . . . . . . . . . . . . . . . . . . . . . . . . . . . . . . . . . . . . . . . . . . . . . . . . . . . . . . . . . 619
Build a record insert page . . . . . . . . . . . . . . . . . . . . . . . . . . . . . . . . . . . . . . . . . . . . . . . . . . . . . . . . . . . . . . . . . . . . . . . . . . . . . . . . . . . . . . . . . . . . 624
Build an update record page in Dreamweaver . . . . . . . . . . . . . . . . . . . . . . . . . . . . . . . . . . . . . . . . . . . . . . . . . . . . . . . . . . . . . . . . . . . . . . . . 627
Building record delete pages in Dreamweaver . . . . . . . . . . . . . . . . . . . . . . . . . . . . . . . . . . . . . . . . . . . . . . . . . . . . . . . . . . . . . . . . . . . . . . . . 632
Use ASP commands to modify database in Dreamweaver . . . . . . . . . . . . . . . . . . . . . . . . . . . . . . . . . . . . . . . . . . . . . . . . . . . . . . . . . . . . . 639
Build a registration page . . . . . . . . . . . . . . . . . . . . . . . . . . . . . . . . . . . . . . . . . . . . . . . . . . . . . . . . . . . . . . . . . . . . . . . . . . . . . . . . . . . . . . . . . . . . . 643
Build a login page . . . . . . . . . . . . . . . . . . . . . . . . . . . . . . . . . . . . . . . . . . . . . . . . . . . . . . . . . . . . . . . . . . . . . . . . . . . . . . . . . . . . . . . . . . . . . . . . . . . 645
Build a page that only authorized users can access . . . . . . . . . . . . . . . . . . . . . . . . . . . . . . . . . . . . . . . . . . . . . . . . . . . . . . . . . . . . . . . . . . . 647
Securing folders in Coldfusion using Dreamweaver . . . . . . . . . . . . . . . . . . . . . . . . . . . . . . . . . . . . . . . . . . . . . . . . . . . . . . . . . . . . . . . . . . . 649
Using ColdFusion components in Dreamweaver . . . . . . . . . . . . . . . . . . . . . . . . . . . . . . . . . . . . . . . . . . . . . . . . . . . . . . . . . . . . . . . . . . . . . . 650
Last updated 3/8/2018
Page 7

DREAMWEAVER
Content s
Chapter 17: Test, preview, and publish websites
Preview pages . . . . . . . . . . . . . . . . . . . . . . . . . . . . . . . . . . . . . . . . . . . . . . . . . . . . . . . . . . . . . . . . . . . . . . . . . . . . . . . . . . . . . . . . . . . . . . . . . . . . . . . 657
Preview Dreamweaver web pages on multiple devices . . . . . . . . . . . . . . . . . . . . . . . . . . . . . . . . . . . . . . . . . . . . . . . . . . . . . . . . . . . . . . . . 662
Test your Dreamweaver site . . . . . . . . . . . . . . . . . . . . . . . . . . . . . . . . . . . . . . . . . . . . . . . . . . . . . . . . . . . . . . . . . . . . . . . . . . . . . . . . . . . . . . . . . 665
vii
Last updated 3/8/2018
Page 8

Chapter 1: Introduction to Dreamweaver
New features summary
The October 2017 release of Dreamweaver CC (version 18.0) now supports HiDPI on Windows, multi-monitors on
Windows, and enhancements to the Git feature.
Read on for a quick introduction to these new features and enhancements.
For a summary of features introduced in earlier releases of Dreamweaver CC, see Feature summary
Support for HiDPI display in Dreamweaver (Windows)
New in the October 2017 release
1
Dreamweaver CC now supports HiDPI displays for Windows and is per-monitor DPI-aware. That is, the application
scales as per the scaling set of the monitor.
Earlier, in 4k displays, the UI elements in Dreamweaver did not scale properly. Items like menus, fonts, icons were
pixelated and appeared small and blurry. With the support for HiDPI, Dreamweaver offers improved user experience.
The UI elements appear crisper, without any pixelation. Further, you do not experience issues like overflow of UI
elements.
Support for multi-monitors in Dreamweaver (Windows)
New in the October 2017 release
Dreamweaver CC now offers multi-monitor support for Windows. The application automatically scales according to
the resolution of the monitor.
Multi-monitor support offers several benefits. For example, you can untab a document and view the document in
another monitor. By doing so, you can easily open and compare versions of a document, or two different documents.
It is also possible to view and edit different types of Dreamweaver documents in multi-monitors. For example, you can
edit an HTML document in one monitor while viewing or editing a CSS document in another monitor.
Last updated 3/8/2018
Page 9
Introduction to Dreamweaver
Multi-monitor support in Dreamweaver
Enhancements to Git support
Enhanced in the October 2017 release
The following are the enhancements introduced in this release for Git support:
2
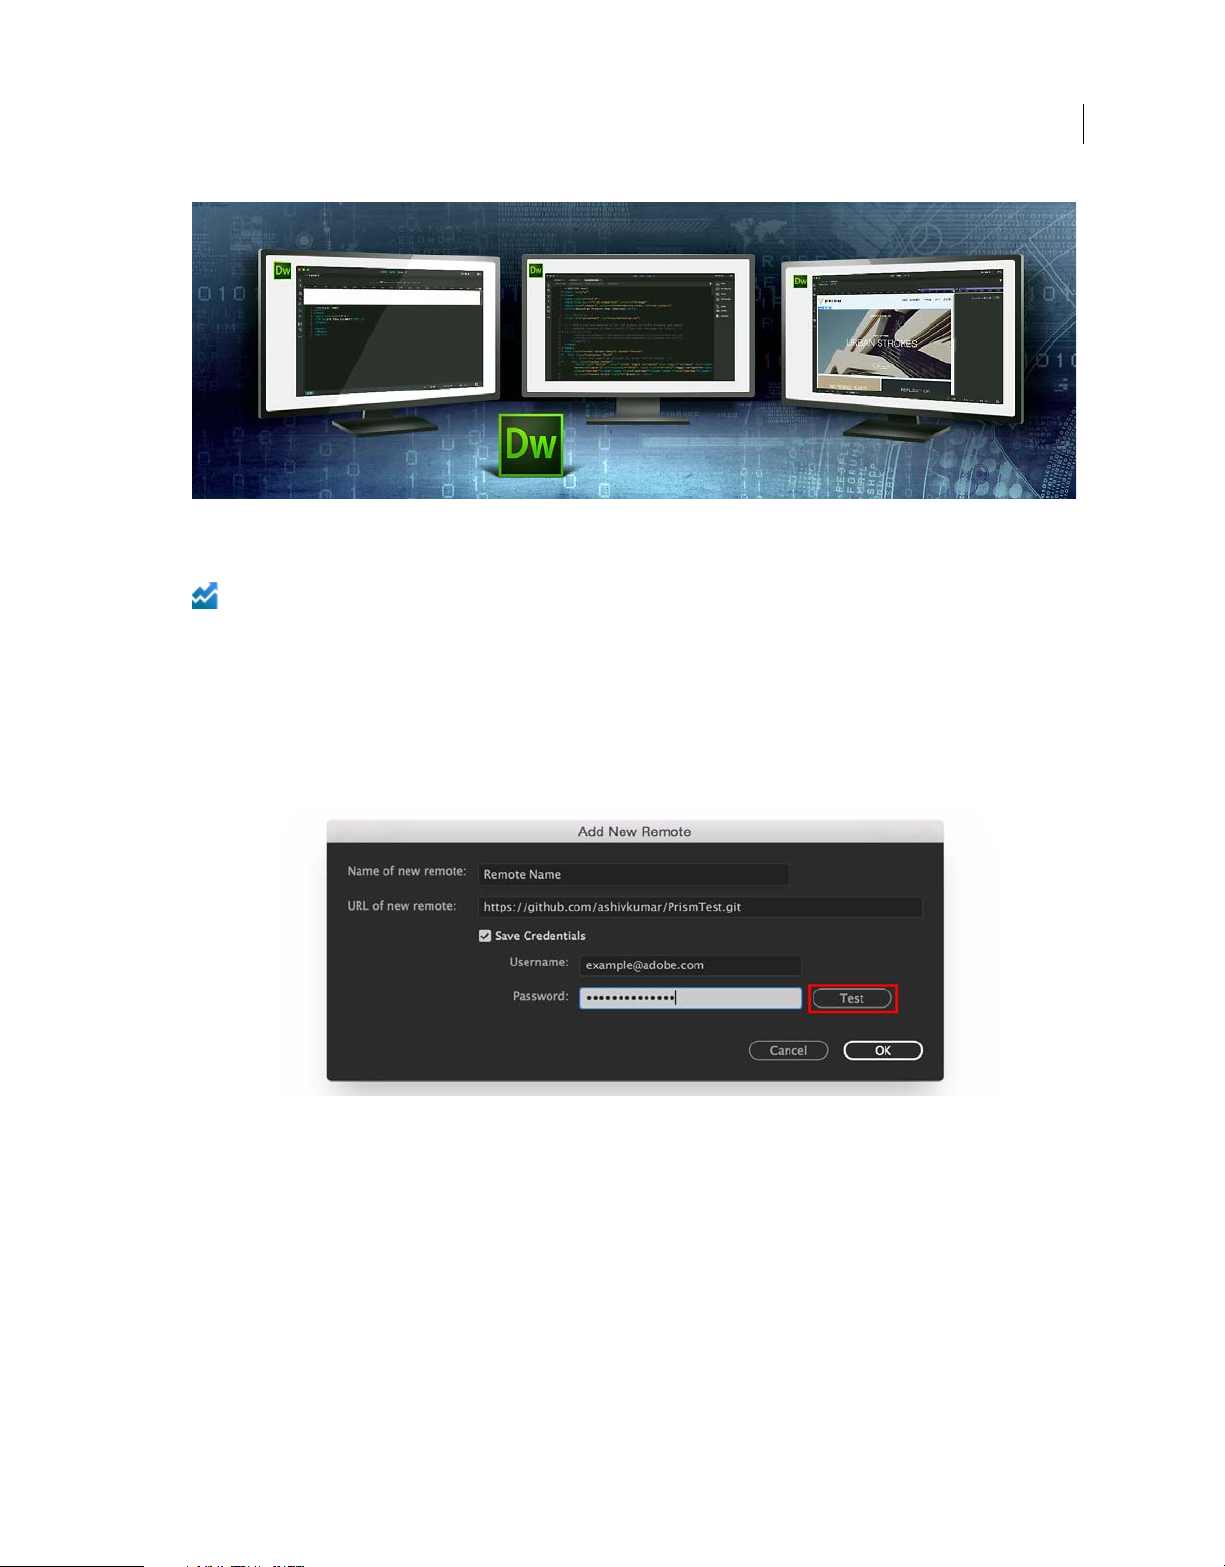
Test the connectivity to remote repositories
You can now check the connectivity to your remote Git repository from within Dreamweaver. Click Test in the Site
Setup dialog box or the Add New Remote dialog box. Dreamweaver tests whether or not the URL of your remote
repository is valid.
Test remote connection for remote Git repositories
Note: The credentials that you enter while adding or connecting to the remote repository are not verified.
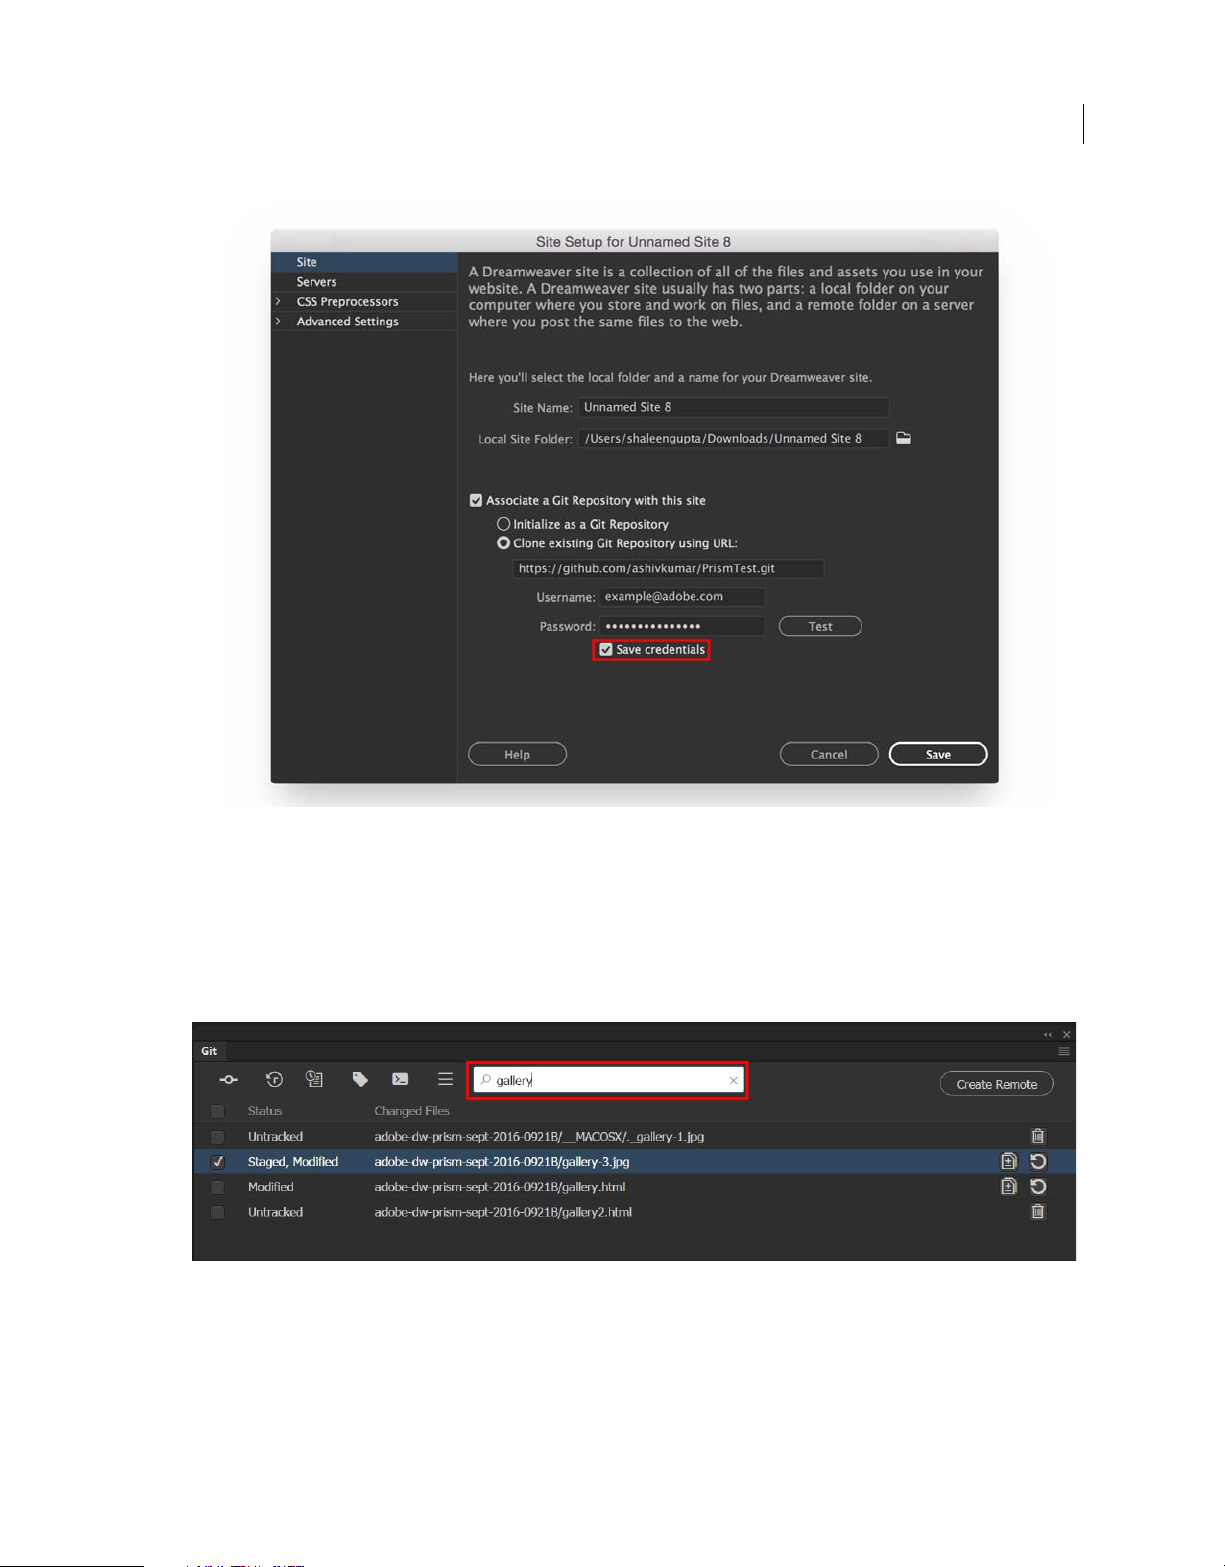
Save credentials
Dreamweaver now allows you to save your credentials when you clone a repository. You can save your credentials when
you enter your credentials in the
remote Git actions such as Push, Pull.
Site Setup dialog box. You need not enter your credentials every time you perform
Earlier, the Save Credentials option was available in the Add Remote and Manage Remote dialog box. Every time you
had to up date your credentials, you had to go to these dialog box to reenter your credentials. Now, you can directly save
your credentials when you clone a repository.
Last updated 3/8/2018
Page 10
Introduction to Dreamweaver
3
Select Save Credentials to save your user name and password
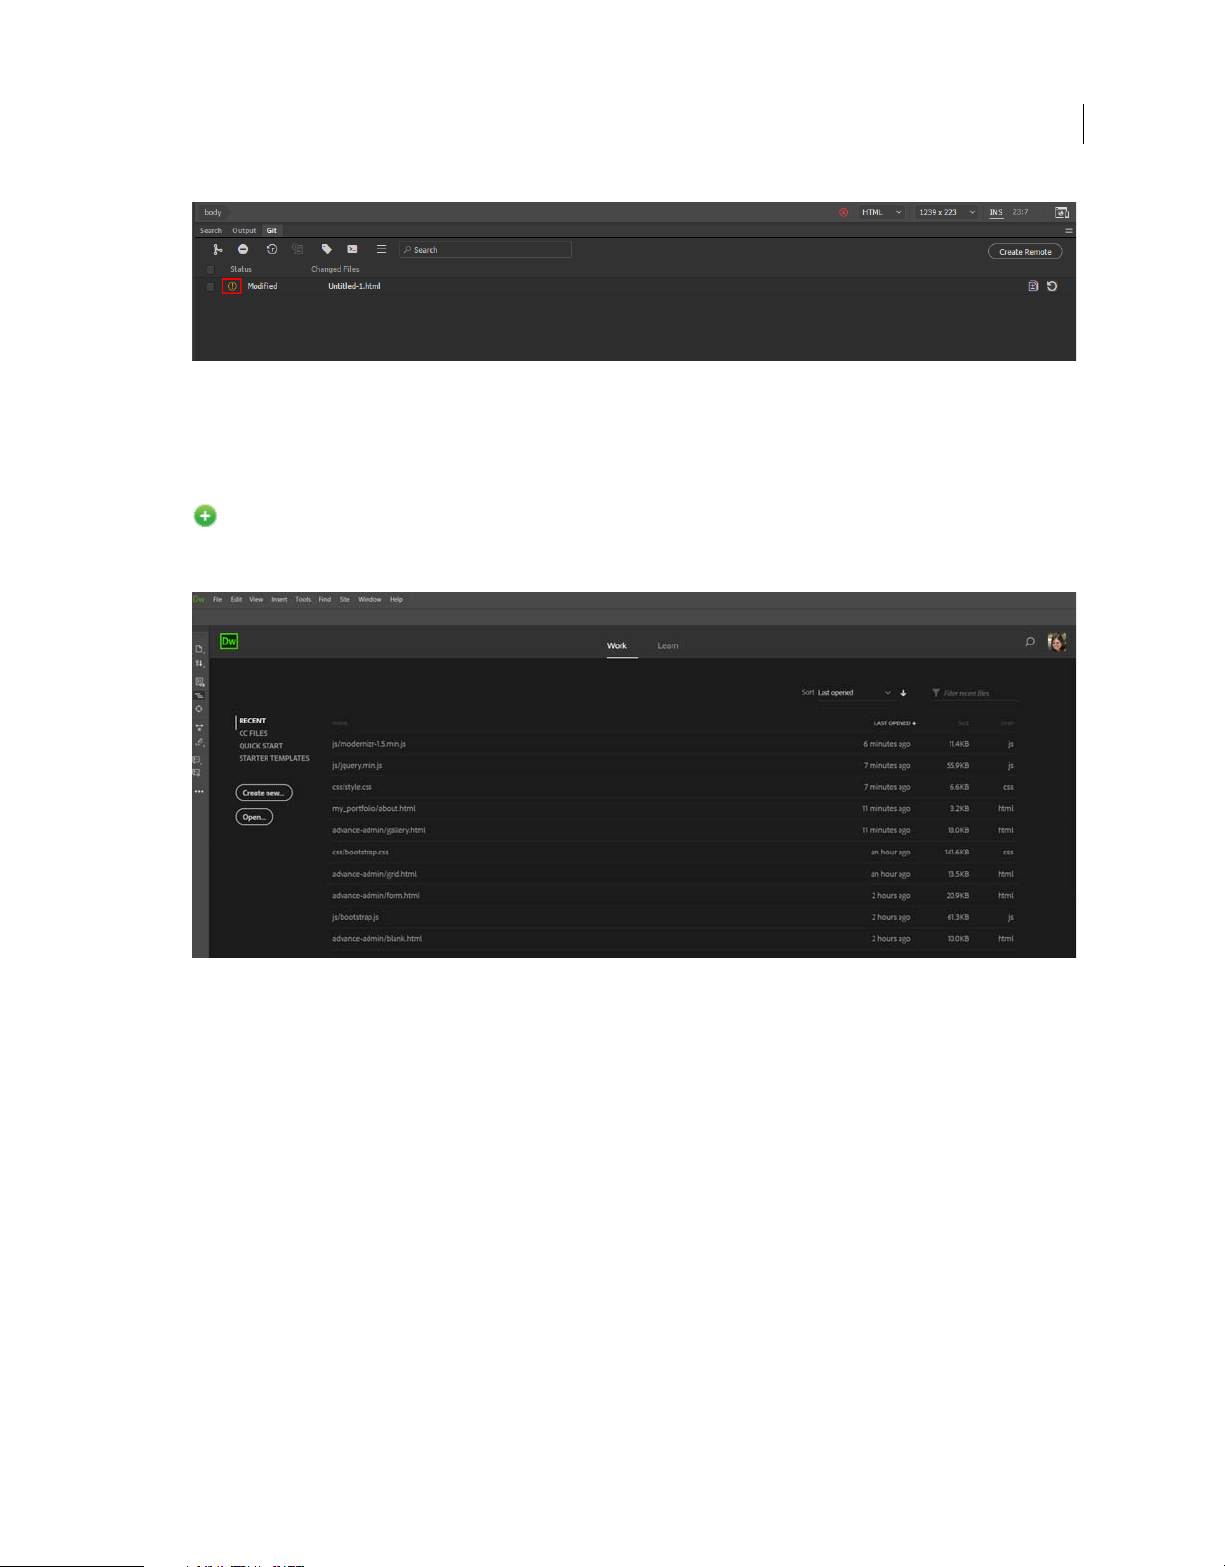
Searching files in the Git panel
Dreamweaver allows you to search for files in the Git panel. As a user, when you have large number of files in your
repository, you can search for files using the filename.
When you type the filename in the Search box, all the files that contain the search phrase are displayed instantly. You
can also see the status of these files in the search result, helping you track your staged, modified, and untracked files.
Search for files in the Git panel
Indicator for Merge Conflict
When you merge branches in Git, and if there is a conflict, a Merge Conflict indicator is now displayed in the Git panel.
An exclamatory icon next to a file indicates that the file has a conflict.
Last updated 3/8/2018
Page 11
Introduction to Dreamweaver
New icon that indicates Merge Conflict in Git
To read the detailed help article on Git support, see Using Git in Dreamweaver .
New Welcome screen
New in the October 2017 release
When you open the latest version of Dreamweaver for the first time, you see a new Welcome screen.
4
New Welcome screen in Dreamweaver CC
The Welcome screen in Dreamweaver provides quick access to your recent files, Creative Cloud files, and starter
templates. In addition, the new screen has a Work tab and a Learn tab.
To access your recently opened files, click the Work tab. To access the learn videos for Dreamweaver, click the Learn
tab and then click the required video.
Notice the search icon in the upper-right corner of the screen. When you type a search query, the application displays
the recent files, Creative Cloud assets, help links, and stock images that match your search query.
Web development using Dreamweaver - An Overview
This article helps you understand how you can complete various stages or phases of web development using
Dreamweaver.
Last updated 3/8/2018
Page 12

Introduction to Dreamweaver
Note: This article assumes that you have a beginner to intermediate level of understanding of the web domain, and HTML,
CSS, and JavaScript.
1 The first stage in web development is the planning phase in which you analyze the audience needs, technical, and
marketing requirements. You also gather necessary information required for designing and publishing your website
and have answers for questions like some of these:
• Which service provider do I choose for hosting the website? Do I have access to upload files to the publishing
server?
• What domain name is to be used for the website?
• In case you are migrating existing websites into Dreamweaver, where are the files and assets stored currently? Do
I have access to the server where this information is stored?
• If you want a dynamic website, which server can I use to test if data is being displayed dynamically? Do I have
the details of the web application server that I want to use for loading dynamic data?
• What kind of assets are required for the website?
• Will these be assets designed from scratch? If the assets are already available, do I have access to them?
• What apps do I want to use for designing assets?
• Do I plan to create a responsive website?
5
Assuming that you have a clear understanding of the website you want to develop and how and where you want to
host it, and have chosen Dreamweaver and Creative Cloud for the web development process, proceed to the next
step.
2 Check if you have all the assets required for your website. Gather and organize them together in your local folders
or in Adobe's Creative Cloud Libraries.
3 Create a new document in Dreamweaver using:
• A new blank document,
• Starter templates packaged with Dreamweaver, or
• Template files (*.dwt) created by someone else
Note: If you are not familiar with Dreamweaver or just learning web development, starter templates are a great help in
getting you up and running with designing web pages. Even if you are planning to start from scratch, it is a good idea
to peek a little into these pages to understand the elements of a good web page design.
4 Take a few minutes to familiarize yourself with the Dreamweaver workspace. Find a workspace you are comfortable
with, and set a color theme. Reorganize the different panels in a way that suits you.
5 Set up your site in Dreamweaver. Set about creating a folder structure with files and assets. After you’ve organized
your information and determined a structure, you can begin creating your
site. (See About Dreamweaver sites
.)About Dreamweaver sites
At this stage, it is a good idea to also set up connections to remote servers, and set up testing servers (if you have
dynamic content).
6 Start coding your web pages in Code view, or designing them in Design / Live view.
If you plan to use Photoshop comps, you can extract them into Dreamweaver and work on them too. For more
information on working with Photoshop comps, see
Extract in Dreamweaver CC.
Add design elements such as text, images, rollover images, image maps, colors, movies, sound, HTML links, tables,
and more.
Last updated 3/8/2018
Page 13

Introduction to Dreamweaver
7 Style the appearance of your web page using CSS. Using CSS preprocessors in Dreamweaver Coding environment
in Dreamweaver
You can work with CSS in different ways in Dreamweaver:
• You can hand code the CSS. For information on Dreamweaver's coding features that help you hand code your
CSS, see
Coding environment in Dreamweaver.
• If you are not very familiar with creating CSS pages, you can use the CSS Designer panel to help build your CSS.
For more information, see
Laying out pages using CSS Designer.
• If you prefer to work with Sass and Less files, Dreamweaver supports that option as well, allowing you to bring
in Sass and Less files into your Dreamweaver site, and work with them. Dreamweaver then autocompiles them
(or you can choose to manually compile them) and see the results of your CSS changes in real time.
information on using Sass and Less files with Dreamweaver, see
8 Set up a web application for creating dynamic content.
Using CSS preprocessors in Dreamweaver .
For
Many websites contain dynamic pages that allow visitors to view information stored in databases, and usually allow
some visitors to add new information and edit information in the databases. To create such pages, you must first set
up a web server and application server, create or modify a Dreamweaver site, and connect to a database. For more
information, see
9 Create dynamic pages.
Dynamic sites, pages and web forms .
In Dreamweaver, you can define a variety of sources of dynamic content, including recordsets extracted from
databases, form parameters, and JavaBeans components. To add the dynamic content to a page, simply drag it on to
the page.
6
You can set your page to display one record or many records at a time, display more than one page of records, add
special links to move from one page of records to the next (and back), and create record counters to help users keep
track of the records. For more information, see
10 Test, preview, and publish your website.
Dynamic sites, pages and web forms .
As you create pages, you need to preview them to see that your website is progressing according to the design. You
can code in Split view keeping your Code and Live views side-by-side.
You can also preview web pages in real time on a device (if you are creating responsive web pages), or on a browser.
If you don't need a live preview experience, you can use the regular preview in browser experience.
If you have already defined connections to remote servers, then to publish your website, you need to put your files
in the remote server to make them live.
Last updated 3/8/2018
Page 14

Introduction to Dreamweaver
Dreamweaver CC / Common Questions
Basics
• What is Dreamweaver CC and who is it for?
Adobe Dreamweaver CC is the world’s most complete tool for web designers and front-end developers. It combines
a powerful design surface and best-in-class code editor with robust site management tools, for you to easily design,
code, and manage websites.
Dreamweaver CC 2017 has been redesigned with a modern interface and fast, flexible coding engine to give web
designers and front-end developers easier ways to create, code and manage websites that look amazing on any size
screen. This release of Adobe Dreamweaver CC 2017 includes an
interface with selectable dark and light themes, support for modern web workflows such as CSS Preprocessors, and
lots more.
First-class integration with Bootstrap lets you build responsive websites that adapt and scale to any browser,
regardless of the size, screen resolution, or orientation. Deep integration with Adobe CreativeSync makes it easy to
work with design assets from tools like Photoshop and Illustrator, along with the ability to browse and access stock
photos from Adobe Stock.
As Dreamweaver is a part of Adobe’s Creative Cloud, you get access to all the latest updates as soon as they’re
available. Learn more about
Creative Cloud.
all-new code engine, completely refreshed user
7
• What makes Dreamweaver CC different from other web tools?
Dreamweaver CC is a unique web development tool that lets you visualize your site in real-time as you are coding.
• Code faster and with greater flexibility with Dreamweaver's new coding engine. Code hints help new users learn
HTML, CSS, and other web standards, and visual aids like auto-indentation, code coloring, and resizable fonts
help reduce errors and make your code easier to read.
• Dreamweaver supports common CSS pre-processors like SASS, Less, and SCSS, with full code coloring, and
compilation, so you can save time and produce cleaner code.
• Write more th an on e line of co de at a time to quickly do things lik e creat e a bulle ted list, updat e a ser ies of stri ngs,
and make multiple edits simultaneously.
• Quick Edit offers an inline editor for the relevant CSS within an HTML file, so you can make changes fast.
• Quick Docs saves you time by displaying relevant Web Platform Docs reference information for CSS properties
directly within Code View.
• Load and open files quickly and get through projects faster with a new performance-boosted and clutter-free
workspace designed for developers.
• Preview your page edits in real time as you code without having to manually refresh your browser.
• Use Dreamweaver's FTP features to push your files on to a web server.
• Where can I learn more about new features?
See the What’s New page for details.
• How does Dreamweaver CC compare with earlier versions?
Check out the Dreamweaver version comparison.
• How does Dreamweaver CC integrate with other Adobe creative applications?
Last updated 3/8/2018
Page 15

Introduction to Dreamweaver
Dreamweaver CC can be used with other Creative Cloud tools such as Adobe Photoshop, Illustrator, Animate CC,
and more to build beautiful, modern websites. You can also share assets and collaborate with others with the
Creative Cloud Libraries integration.
Te c h ni ca l q u es ti on s
• What are the minimum system requirements to run Dreamweaver CC?
See the System requirements | Dreamweaverfor information.
• Is Dreamweaver CC compatible with Windows 10?
Ye s . System requirements | Dreamweaver
• Is Dreamweaver CC compatible with macOS v10.12 or OS X v10.11?
Ye s . System requirements | Dreamweaver
• What types of documents can I open with Dreamweaver CC?
Dreamweaver CC 2017 can open and edit multiple document types. Some of the document file types that
Dreamweaver can open and edit are:
• HTML documents
• Server-side Includes
• JavaScript documents
8
• PHP files
• XML files
• SQL files
• SVG files
• Json files
• Library files (*.lbi)
• Template files (*.dwt)
• Style sheets (*.css, *.less, *.sass, *.scss)
• Active Server Pages and Active Server Plus Pages
• ColdFusion templates
• Manifest (*.appcache)
• Directory Configuration files (*.htaccess)
• Text files (*.txt)
• What type of code does Dreamweaver CC produce?
All the features in Dreamweaver CC produce HTML5 code to align with the latest standards in web development.
With use of the code editor, you have the ability to write and edit code to suit your own development needs.
• Can I create responsive web and mobile content in Dreamweaver CC?
Yes. Dreamweaver CC supports Bootstrap framework for mobile-first, responsive websites. Dreamweaver CC also
includes responsive features such as Visual Media Queries and Fluid Grid Layouts.
• Can I continue to use earlier versions of Dreamweaver?
Last updated 3/8/2018
Page 16

Introduction to Dreamweaver
Yes. If you already have a prior installation of Dreamweaver CS6, you can continue to use it as is. With a Creative
Cloud membership, you can download previous versions of Dreamweaver at any time to use alongside your current
Dreamweaver CC installation.
Free trials
• Where can I get a trial version of Dreamweaver CC?
With a f ree Creative Cloud membership, you can download a 7-day trial version of Dreamweaver CC — and other
applications in Creative Cloud. When you upgrade to an All Apps plan, you’ll be able to download the full version
of every Creative Cloud application.
• Can I convert my trial version to a paid membership?
Yes. You can convert your trial to a Creative Cloud All Apps or Single App membership by purchasing on the
Creative Cloud website. After you purchase your membership, your desktop product trial will automatically be
licensed upon relaunch.
Purchasing options
• How can I purchase Dreamweaver CC?
Learn more about purchasing options on the Creative Cloud plans page.
Using Dreamweaver
9
• How can I get started with Dreamweaver CC?
Check out Dreamweaver CC Learn & Support for all you need to get started, with video and step-by-step-tutorials
as well as comprehensive product support from Adobe and our knowledgeable community.
• Where can I find the manual?
You can find web and PDF versions of the Dreamweaver CC manual on the Dreamweaver Help page.
• How can I give comments or leave feedback on Dreamweaver CC?
Visit t h e Dreamweaver CC forums to provide feedback or have your support questions answered.
• Where can I report a bug or submit a feature request?
You c an use t his form to request new features or suggest changes to existing features. You can also get to this link
from the Help menu in Dreamweaver CC (Help > Submit Bug/Feature Request).
System requirements | Dreamweaver
System requirements | October 2017 (18.0) release of Dreamweaver CC
Windows
• Intel® Core 2 or AMD Athlon® 64 processor; 2 GHz or faster processor
• Microsoft Windows 7 with Service Pack 1, Windows 8.1, or Windows 10
• 2 GB of RAM (4 GB recommended)
Last updated 3/8/2018
Page 17

Introduction to Dreamweaver
• 2 GB of available hard-disk space for installation; additional free space (approximately 2 GB) required during
installation. Dreamweaver cannot be installed on removable flash storage devices.
• 1280x1024 display with 16-bit video card
• Internet connection and registration are necessary for required software activation, validation of subscriptions, and
access to online services.
macOS
• Multicore Intel processor with 64-bit support
• macOS v10.13, macOS v10.12, or OS X v10.11
• 2 GB of RAM (4 GB recommended)
• 2 GB of available hard-disk space for installation; additional free space (approximately 2 GB) required during
installation. Dreamweaver cannot be installed on removable flash storage devices.
• 1280x1024 display with 16-bit video card
• Internet connection and registration are necessary for required software activation, validation of subscriptions, and
access to online services.
Language versions
Dreamweaver CC is available in the following languages:
10
Deutsch
English
Español
Français
Français*
Hebrew*
Italiano
Nederlands
Polish
Português (Brasil)
Svenska
Tu rk i s h
čeština
Русский
????*
???
????*????*???*
Last updated 3/8/2018
Page 18

Introduction to Dreamweaver
System requirements | 2017.5 release of Dreamweaver CC
Windows
• Intel® Core 2 or AMD Athlon® 64 processor; 2 GHz or faster processor
• Microsoft Windows 7 with Service Pack 1, Windows 8.1, or Windows 10
• 2 GB of RAM (4 GB recommended)
• 2 GB of available hard-disk space for installation; additional free space (approximately 2 GB) required during
installation. Dreamweaver cannot be installed on removable flash storage devices.
• 1280x1024 display with 16-bit video card
• Internet connection and registration are necessary for required software activation, validation of subscriptions, and
access to online services.
macOS
• Multicore Intel processor with 64-bit support
• macOS v10.12, or OS X v10.11, or v10.10
11
• 2 GB of RAM (4 GB recommended)
• 2 GB of available hard-disk space for installation; additional free space (approximately 2 GB) required during
installation. Dreamweaver cannot be installed on removable flash storage devices.
• 1280x1024 display with 16-bit video card
• Internet connection and registration are necessary for required software activation, validation of subscriptions, and
access to online services.
Language versions
Dreamweaver CC is available in the following languages:
Deutsch
English
Español
Français
Français*
Hebrew*
Italiano
Nederlands
Polish
Português (Brasil)
Svenska
Tu rk i s h
čeština
Last updated 3/8/2018
Page 19

Introduction to Dreamweaver
Русский
????*
???
????*????*???*
System requirements | 2017, 2017.01, 2017.02, and 2017.1 releases of Dreamweaver CC
Windows
• Intel® Core 2 or AMD Athlon® 64 processor; 2 GHz or faster processor
• Microsoft Windows 7 with Service Pack 1, Windows 8.1, or Windows 10
• 2 GB of RAM (4 GB recommended)
• 1.1 GB of available hard-disk space for installation; additional free space (approximately 1.5 GB) required during
installation. Dreamweaver cannot be installed on removable flash storage devices.
12
• 1280x1024 display with 16-bit video card
• Internet connection and registration are necessary for required software activation, validation of subscriptions, and
access to online services.
Mac OS
• Multicore Intel processor with 64-bit support
• macOS v10.12, or OS X v10.11, or v10.10
• 2 GB of RAM
• 1.1 GB of available hard-disk space for installation; additional free space (approximately 1.5 GB) required during
installation (cannot install on a volume that uses a case-sensitive file system or on removable flash storage devices)
• 1280x1024 display with 16-bit video card
• Internet connection and registration are necessary for required software activation, validation of subscriptions, and
access to online services.
Language versions
Dreamweaver CC is available in the following languages:
Deutsch
English
Español
Français
Français*
Hebrew*
Italiano
Nederlands
Last updated 3/8/2018
Page 20

Introduction to Dreamweaver
Polish
Português (Brasil)
Svenska
Tu rk i s h
čeština
Русский
????*
???
????*????*???*
* Chinese Simplified, Chinese Traditional, and Korean are available for Windows only. Arabic and Hebrew versions
have localized support and features with an English interface. North African French (Français*) version has localized
support and features with a French interface.
System requirements | 2015, 2015.1, and 2015.2 releases of Dreamweaver CC
13
Windows
• Intel Pentium 4 or AMD Athlon 64 processor
• Microsoft Windows 7, Windows 8, Windows 8.1, or Windows 10
• 2 GB of RAM
• 1.1 GB of available hard-disk space for installation; additional free space required during installation (cannot install
on removable flash storage devices)
• 1280x1024 display with 16-bit video card
• Internet connection and registration are necessary for required software activation, validation of subscriptions, and
access to online services.
Mac OS
• Multicore Intel processor
• macOS v10.12, or OS X v10.11, or v10.10
• 2 GB of RAM
• 1.1 GB of available hard-disk space for installation; additional free space required during installation (cannot install
on a volume that uses a case-sensitive fi le system or on removable flash storage devices)
• 1280x1024 display with 16-bit video card
• Internet connection and registration are necessary for required software activation, validation of subscriptions, and
access to online services.
Language versions
Dreamweaver CC is available in the following languages:
Deutsch
Last updated 3/8/2018
Page 21

Introduction to Dreamweaver
English
Español
Français
Français*
Hebrew*
Italiano
Nederlands
Polish
Português (Brasil)
Svenska
Tu rk i s h
čeština
Русский
????*
14
???
????*????*???*
* Chinese Simplified, Chinese Traditional, and Korean are available for Windows only. Arabic and Hebrew versions
have localized support and features with an English interface. North African French (Français*) version has localized
support and features with a French interface.
System requirements | 2014.1 release of Dreamweaver CC
Windows
• Intel Pentium 4 or AMD Athlon 64 processor
• Microsoft Windows 7, Windows 8, or Windows 8.1
• 2 GB of RAM
• 1 GB of available hard-disk space for installation; additional free space required during installation (cannot install
on removable flash storage devices)
• 1280 x 1024 display with 16-bit video card
• Internet connection and registration are necessary for required software activation, validation of subscriptions, and
access to online services.*
Mac OS
• Multicore Intel processor
• Mac OS X v10.7.5, v10.8, v10.9, or v10.10
• 2 GB of RAM
Last updated 3/8/2018
Page 22

Introduction to Dreamweaver
• 1 GB of available hard-disk space for installation; additional free space required during installation (cannot install
on a volume that uses a case-sensitive file system or on removable flash storage devices)
• 1280 x 1024 display with 16-bit video card
• QuickTime 7.6.6 software required for HTML5 media playback
• Internet connection and registration are necessary for required software activation, validation of subscriptions, and
access to online services.*
Language versions
Dreamweaver CC is available in the following languages:
Deutsch
English
Español
Français
Français*
Hebrew*
15
Italiano
Nederlands
Polish
Português (Brasil)
Svenska
Tu rk i s h
čeština
Русский
????*
???
????*
????*
???*
* Chinese Simplified, Chinese Traditional, and Korean are available for Windows only. Arabic and Hebrew versions
have localized support and features with an English interface. North African French (Français*) version has localized
support and features with a French interface.
System requirements | 2014 release of Dreamweaver CC
Windows
• Intel Pentium 4 or AMD Athlon 64 processor
Last updated 3/8/2018
Page 23

Introduction to Dreamweaver
• Microsoft Windows 7, Windows 8, or Windows 8.1
• 1 GB of RAM
• 1 GB of available hard-disk space for installation; additional free space required during installation (cannot install
on removable flash storage devices)
• 1280 x 1024 display with 16-bit video card
• Internet connection and registration are necessary for required software activation, validation of subscriptions, and
access to online services.*
Mac OS
• Multicore Intel processor
• Mac OS X v10.7.5, v10.8, or v10.9
• 2 GB of RAM
• 1 GB of available hard-disk space for installation; additional free space required during installation (cannot install
on a volume that uses a case-sensitive file system or on removable flash storage devices)
• 1280 x 1024 display with 16-bit video card
• QuickTime 7.6.6 software required for HTML5 media playback
• Internet connection and registration are necessary for required software activation, validation of subscriptions, and
access to online services.*
16
Language versions
Dreamweaver CC is available in the following languages:
Deutsch
English
Español
Français
Français*
Hebrew*
Italiano
Nederlands
Polish
Português (Brasil)
Svenska
Tu rk i s h
čeština
Русский
????*
???
Last updated 3/8/2018
Page 24

Introduction to Dreamweaver
????*
????*
???*
* Chinese Simplified, Chinese Traditional, and Korean are available for Windows only. Arabic and Hebrew versions
have localized support and features with an English interface. North African French (Français*) version has localized
support and features with a French interface.
System requirements | Older versions of Dreamweaver CC
Wi nd ow s
• Intel® Pentium® 4 or AMD Athlon® 64 processor
• Windows 7 with Service Pack 1, Windows 8 or Windows 8.1
• 1 GB of RAM
• 1 GB of available hard-disk space for installation; additional free space required during installation (cannot install
on removable flash storage devices)
• 1280 x 800 display with 16-bit video card
17
• Java™ Runtime Environment 1.6 (included)
• Internet connection and registration are necessary for required software activation, membership validation, and
access to online services.*
Mac OS
• Multicore Intel processor
• Mac OS X v10.7, v10.8, v10.9
• 1 GB of RAM
• 1 GB of available hard-disk space for installation; additional free space required during installation (cannot install
on a volume that uses a case-sensitive file system or on removable flash storage devices)
• 1280 x 1024 display with 16-bit video card
• Java Runtime Environment 1.6
• QuickTime 7.6.6 software required for HTML5 media playback
• Internet connection and registration are necessary for required software activation, membership validation, and
access to online services.*
* This product may integrate with or allow access to certain Adobe or third-party hosted online services ("Online
Services"). Online Services are available only to users 13 and older and require agreement to additional
Adobe's online privacy policy. Online Services are not available in all countries or languages, may require user
registration, and may be discontinued or modified in whole or in part without notice. Additional fees or subscription
charges may apply.
terms and
Dreamweaver CS6 system requirements
Wi nd ow s
• Intel® Pentium® 4 or AMD Athlon® 64 processor
• Microsoft® Windows® XP with Service Pack 3 or Windows 7 with Service Pack 1. Adobe® Creative Suite® 5.5.
Last updated 3/8/2018
Page 25

Introduction to Dreamweaver
• 512 MB of RAM
• 1 GB of available hard-disk space for installation; additional free space required during installation (cannot install
on removable flash storage devices)
• 1280 x 800 display with 16-bit graphics adapter
• Java™ Runtime Environment 1.6 (included)
• DVD-ROM drive
• QuickTime 7.6.6 software required for HTML5 media playback
• This software doesn't operate without activation. Broadband Internet connection and registration are required for
software activation, validation of subscriptions, and access to online services.* Phone activation is not available.
* Learn more about Windows Support
Mac OS
• Multicore Intel processor
• Mac OS X v10.6.8 or v10.7. Adobe Creative Suite 5, CS5.5, and CS6 applications support OS X v10.8 and v10.9 when
installed on Intel-based systems.**
• 512 MB of RAM
• 1.8 GB of available hard-disk space for installation; additional free space required during installation (cannot install
on a volume that uses a case-sensitive file system or on removable flash storage devices)
• 1280 x 800 display with 16-bit graphics adapter
• Java Runtime Environment 1.6
18
• DVD-ROM drive
• QuickTime 7.6.6 software required for HTML5 media playback
• This software does not operate without activation. Broadband Internet connection and registration are required for
software activation, validation of subscriptions, and access to online services.* Phone activation is not available.
* This product may integrate with or allow access to certain Adobe or third-party hosted online services ("Online
Services"). Online Services are available only to users 13 and older and require agreement to additional terms of use
and Adobe's
registration, and may be discontinued or modified in whole or in part without notice. Additional fees or subscription
charges may apply.
** Learn more about OS X Mavericks Support
online privacy policy. Online Services are not available in all countries or languages, may require user
Dreamweaver CS5.5 system requirements
Windows
• Intel® Pentium® 4 or AMD Athlon® 64 processor
• Microsoft® Windows® XP with Service Pack 2 (Service Pack 3 recommended); Windows Vista® Home Premium,
Business, Ultimate, or Enterprise with Service Pack 1; or Windows 7
• 512 MB of RAM
• 1 GB of available hard-disk space for installation; additional free space required during installation (cannot install
on removable flash-based storage devices)
Last updated 3/8/2018
Page 26

Introduction to Dreamweaver
• 1280 x 800 display with 16-bit graphics adapter
• DVD-ROM drive
• Broadband Internet connection required for online services and to validate Subscription Edition (if applicable) on
an ongoing basis*
Mac OS
• Multicore Intel® processor
• Mac OS X v10.5.8 or v10.6
• 512 MB of RAM
• 1.8 GB of available hard-disk space for installation; additional free space required during installation (cannot install
on a volume that uses a case-sensitive file system or on removable flash-based storage devices)
• 1280 x 800 display with 16-bit graphics adapter
• DVD-ROM drive
• Broadband Internet connection required for online services and to validate Subscription Edition (if applicable) on
an ongoing basis*
Mac OS X Lion compatibility Learn about Creative Suite compatibility with Mac OS X Lion (v10.7). Read the FAQ.
19
Activation It's necessary to activate this product over the Internet before using it. Visit the Product Activation Center
to learn more about activation.
*Adobe online services, including Adobe CS Live Services, are available only to users 13 and older. They require
agreement to additional terms and Adobe's
languages, may require user registration and may be subject to change or discontinuation without notice. Additional
fees or subscription charges may apply.
online privacy policy. Online services are not available in all countries or
Dreamweaver CS5 system requirements
Windows
• Intel Pentium 4 or AMD Athlon 64 processor
• Microsoft Windows XP with Service Pack 2 (Service Pack 3 recommended); Windows Vista Home Premium,
Business, Ultimate, or Enterprise with Service Pack 1; or Windows 7
• 512 MB of RAM
• 1 GB of available hard-disk space for installation; additional free space required during installation (cannot install
on removable flash-based storage devices)
• 1280 x 800 display with 16-bit graphics adapter
• DVD-ROM drive
• Broadband Internet connection required for online services*
Mac OS
• Multicore Intel processor
• Mac OS X v10.5.7 or v10.6
• 512 MB of RAM
Last updated 3/8/2018
Page 27

Introduction to Dreamweaver
• 1.8 GB of available hard-disk space for installation; additional free space required during installation (cannot install
on a volume that uses a case-sensitive file system or on removable flash-based storage devices)
• 1280 x 800 display with 16-bit graphics adapter
• DVD-ROM drive
• Broadband Internet connection required for online services*
*This product may allow you to extend its functionality by accessing certain features that are hosted online, including
CS Live online services ("Online Services"), provided you have a high-speed Internet connection. The Online Services,
and some features thereof, aren't available in all countries, languages, or currencies and can be discontinued in whole
or in part without notice. Use of the Online Services is governed by separate terms of use and by the Online Privacy
Policy. Access to services sometimes requires user registration. Some Online Services, including services that are
initially offered at no charge, may be subject to additional fees and require a separate subscription. For more details and
to review the applicable terms of use and Online Privacy Policy, visit
www.adobe.com.
Dreamweaver CS4 system requirements
Windows
• 1 GHz or faster processor
• Microsoft Windows XP with Service Pack 2 (Service Pack 3 recommended) or Windows Vista Home Premium,
Business, Ultimate, or Enterprise with Service Pack 1 (certified for 32-bit Windows XP and Windows Vista)
• 512 MB of RAM
• 1 GB of available hard-disk space for installation; additional free space required during installation (cannot install
on flash-based storage devices)
• 1280 x 800 display with 16-bit graphics adapter
• DVD-ROM drive
20
• Broadband Internet connection required for online services*
Windows 7 compatibility
Mac OS
• PowerPC G5 or multicore Intel processor
• Mac OS X v10.4.11–10.5.4
• 512 MB of RAM
• 1.8 GB of available hard-disk space for installation; additional free space required during installation (cannot install
on a volume that uses a case-sensitive file system or on flash-based storage devices)
• 1280 x 800 display with 16-bit graphics adapter
• DVD-ROM drive
• Broadband Internet connection required for online services*
Snow Leopard compatibility
Last updated 3/8/2018
Page 28

Introduction to Dreamweaver
*This product may allow you to extend its functionality by accessing certain features that are hosted online, including
CS Live online services ("Online Services"), provided you have a high-speed Internet connection. The Online Services,
and some features thereof, aren't available in all countries, languages, or currencies and can be discontinued in whole
or in part without notice. Use of the Online Services is governed by separate terms of use and by the Online Privacy
Policy. Access to services sometimes requires user registration. Some Online Services, including services that are
initially offered at no charge, may be subject to additional fees and require a separate subscription. For more details and
to review the applicable terms of use and Online Privacy Policy, visit
www.adobe.com.
Dreamweaver CS3 system requirements
Windows
• Intel Pentium 4, Intel Centrino, Intel Xeon, or Intel Core Duo (or compatible) processor
• Microsoft Windows XP with Service Pack 2 or Windows Vista Home Premium, Business, Ultimate, or Enterprise
(certified for 32-bit editions)
• 512 MB of RAM
• 1 GB of available hard-disk space (additional free space required during installation)
• 1024 x 768 monitor resolution with 16-bit graphics adapter
• DVD-ROM drive
21
• Internet or phone connection required for product activation
• Broadband Internet connection required for Adobe Stock Photos* and other services
Mac OS
• PowerPC G4 or G5 or multicore Intel processor
• Mac OS X v10.4.810.5 (Leopard)
• 512 MB of RAM
• 1.4 GB of available hard-disk space (additional free space required during installation)
• 1024 x 768 monitor resolution with 16-bit graphics adapter
• DVD-ROM drive
• Internet or phone connection required for product activation
• Broadband Internet connection required for Adobe Stock Photos* and other services
*Online services, including, but not limited to, Adobe Stock Photos and Adobe Connect, may not be available in all
countries, languages, and currencies. Availability of services is subject to change. Use of online services is governed by
terms and conditions of a separate agreement and may be subject to additional fees.
Dreamweaver 8 system requirements
Windows
• 800-MHz Intel Pentium III processor (or equivalent) and later
• Windows 2000, Windows XP
Last updated 3/8/2018
Page 29

Introduction to Dreamweaver
• 256 MB of RAM (1 GB recommended if you're running more than one Studio 8 product simultaneously)
• 1024 x 768, 16-bit display (32 bit recommended)
• 650 MB of available disk space
Mac OS
• 600-MHz PowerPC G3 and later
• Mac OS X 10.3, 10.4
• 256 MB of RAM (1 GB recommended if you're running more than one Studio 8 product simultaneously)
• 1024 x 768, thousands of colors display (millions of colors recommended)
• 300 MB of available disk space
Dreamweaver MX 2004 system requirements
Windows
• 600-MHz Intel Pentium III processor or equivalent
• Windows 98 SE (4.10.2222 A), Windows 2000, or Windows XP
22
• 128 MB of RAM (256 MB recommended)
• 275 MB of available disk space
Mac OS
• 5000-MHz Power PC G3 processor
• Mac OS X 10.2.6 and later, 10.3
• 128 MB of RAM (256 MB recommended)
• 275 MB of available disk space
• 16-bit (thousands of colors) monitor capable of 1024 x 768 pixel resolution (millions of colors recommended)
Dreamweaver MX system requirements
Windows
• Intel Pentium II processor or equivalent, 300 MHz or faster
• Windows 98, 2000, NT (with Service Pack 3 or later), ME or XP
• Version 4.0 or later of Netscape Navigator or Microsoft Internet Explorer
• 96 MB of RAM (128 MB recommended)
• 275 MB of available disk space
• monitor capable of 800 x 600 pixel resolution (millions of colors and 1024 x 768 pixel resolution recommended)
• CD-ROM drive
Last updated 3/8/2018
Page 30

Introduction to Dreamweaver
Mac OS
• Power Macintosh G3 or later
• Mac OS 9.1, Mac OS 9.2.1, or Mac OS X 10.1 and later
• Mac OS Runtime for Java (MRJ) 2.2 or above (included on the Dreamweaver MX CD)
• Version 4.0 or later of Netscape Navigator or Microsoft Internet Explorer
• 96 MB of RAM (128 MB recommended)
• 275 of MB available disk space
• monitor capable of 800 x 600 pixel resolution (millions of colors and 1024 x 768 pixel resolution recommended)
Dreamweaver 4 and Dreamweaver UltraDev 4 system requirements
Windows
• Intel Pentium processor or equivalent, 166 MHz or faster
• Windows 95, 98, ME, 2000, NT 4 (with Service Pack 5), XP
• Version 4.0 or later of Netscape Navigator or Microsoft Internet Explorer
• 32 MB of RAM (64 MB of RAM for UltraDev)
23
• 110 of MB available disk space (170 MB for UltraDev)
• 256-color monitor capable of 800 x 600 pixel resolution
• CD-ROM drive
• Adobe Flash Player to view the Guided Tours and Lessons
Mac OS
• Power Macintosh
• Mac OS 8.6 or 9.x
• 32 MB of RAM (64 MB of RAM for UltraDev) - 128 MB recommended under Mac OS X
• 135 MB of available disk space
• 256-color monitor capable of 800 x 600 pixel resolution
• CD-ROM drive
• Adobe Flash Player to view the Guided Tours and Lessons
• Note: After extensive testing, Adobe has determined that Dreamweaver 4 runs in Classic Mode on Mac OS X 10.1.x
without any new problems.
Dreamweaver UltraDev 1 system requirements
Windows
• Intel Pentium processor or equivalent, 166 MHz or faster
• Windows 95, 98, ME, 2000, NT 4 (with Service Pack 5)
Last updated 3/8/2018
Page 31

Introduction to Dreamweaver
• 48 MB of RAM
• 30 MB of available disk space
• Microsoft Data Access Components (MDAC) 2.1
• if using JDBC, Sun's Java Development Kit version 1.1.8
• Adobe Shockwave 8 to view the Guided Tours and Show Me movies
• 256-color monitor capable of 800 x 600 pixel resolution
• CD-ROM drive
Mac OS
• Power Macintosh
• Mac OS 8.5 or later
• 48 MB of RAM
• 30 MB of available disk space
• 256-color monitor capable of 800 x 600 pixel resolution
• CD-ROM drive
• Mac OS Runtime for Java (MRJ) version 2.2
• Adobe Shockwave 8 to view the Guided Tours and Show Me movies
24
Feature summary
Note: The Dreamweaver CC October 2017 (18.0) release is now available! See the New features summary.
The 2017 releases of Dreamweaver CC brings in several new features and enhancements including support for Git,
an all-new code editor, more intuitive user interface with a selectable dark theme, and several enhancements
including an improved onboarding experience.
Read on for a quick introduction to these new features and enhancements.
For a summary of features introduced in earlier releases of Dreamweaver CC, see Feature summary | Dreamweaver
CC 2015 releases.
Adobe Dreamweaver CC 2017.5 release
Dreamweaver CC 2017.5 supports the following new features and enhancements:
• Git support to manage files in Dreamweaver
• New code themes
• Improved onboarding experience for new users
Read on to know more about these features and enhancements.
Git support in Dreamweaver
Dreamweaver CC 2017.5 release supports Git, which is an open source version control system. With the new Git
support, you can now easily manage your files, including source code, from within Dreamweaver.
Last updated 3/8/2018
Page 32

Introduction to Dreamweaver
You can now perform common Git operations from within Dreamweaver, without the need for third-party tools. The
new Git panel (Windows > Git) allows you to perform various Git operations including Commit, Push, Pull, and Fetch.
You can also use Git as a collaboration tool by creating and merging branches and remote repositories. You can also
view the differences between two versions of a file, and view file and repository histories.
Further, the Files panel in Dreamweaver now supports a new Git view. Using this view, you can manage the untracked,
modified, staged, and committed files associated with your site.
To learn more about using Git for version control and collaboration, see Using Git in Dreamweaver .
New code themes
Dreamweaver CC 2017.5 now supports two new code themes: Monaki and Classic. You can select and use these code
themes that provide code colors similar to Dreamweaver CC 2015.
Select Dreamweaver > Preferences (macOS) or Edit > Preferences > Interface (Windows), to try the new code themes
for improved readability and visual appeal.
25
New code themes in Dreamweaver 2017.5 - Monaki and Classic
Last updated 3/8/2018
Page 33

Introduction to Dreamweaver
Improved onboarding experience
When you launch Dreamweaver CC 2017.5 for the first time, the Welcome screen displays an improved on-boarding
experience. The new onboarding experience showcases one of the following two video tutorials, based on the
workspace you choose:
• A quick tutorial on Developer workspace
• A quick tutorial on Standard workspace
26
Improved onboarding experience in Dreamweaver 2017.5
You can also access the two video tutorials from the Help menu. Click Help > Quick Tutorial to view the tutorials.
Access the new onboarding videos from the Help menu
Other enhancements
Dreamweaver CC 2017.5 is now integrated with a new version of CEF. With the new CEF version, the Live View in
Dreamweaver displays custom HTML elements, custom properties for CSS, and more.
Last updated 3/8/2018
Page 34

Introduction to Dreamweaver
Adobe Dreamweaver CC 2017.1 release
Dreamweaver CC 2017.1 provides additional coding support by including the following features:
• Support for PHP 7.1
• Improved find and replace
Read on for a quick introduction to these enhancements.
Support for PHP 7.1
In earlier versions of Dreamweaver, you could access code hints and parser checks for PHP 5.6. Dreamweaver 17.1 is
set up for PHP versions 5.6 and 7.1.
You can choose to compile your site’s PHP files with 5.6 or 7.1 through the Site Setup dialog box, or Edit > Preferences.
For more information on PHP 7.1 support, see the following articles:
• Set PHP preferences
• PHP code hints
Improved find and replace
This release includes important enhancements to the find and replace features.
27
You can now search for attributes and tags using the Find and Replace dialog box (Find > Find and Replace in
You can use this dialog even if no files are open in Dreamweaver (searching within a folder, for instance).
Files).
In addition, the Find and Replace Quick Find bar (Find > Find and Replace) is now moved to the bottom of the
Dreamweaver workspace. Use this panel to quickly find and replace text and attributes within the current document.
For more information on find and replace, see Find and replace text, tags, and attributes . For known issues with find
and replace in Dreamweaver 17.1, see Known issues and defects fixed in Dreamweaver CC 2017 releases .
New keyboard shortcuts for find and replace:
• Find in Current Document: Ctrl + F (on Windows), and Cmd + F (on Mac)
• Find and Replace in Files: Ctrl + Shift + F (on Windows), and Cmd + Shift + F (on Mac)
• Replace in Current Document: Ctrl + H (on Windows), and Cmd + Alt + F (on Mac)
For a complete list of find and replace keyboard shortcuts, see Find and replace keyboard shortcuts .
Update to Dreamweaver CC 2017 release (17.0.2)
Create email campaigns using Dreamweaver with Campaign
You can now use the Campaign extension for Dreamweaver to create personalized email campaigns.
Creating personalized content is very important to make an immediate connection with the reader, and hopefully
increase your success rates with email marketing.
If you use Dreamweaver to create email campaigns, you can now go a step further and add personalized content (such
as the reader's name, or a personalized call to action) using data from Adobe Campaign.
Last updated 3/8/2018
Page 35

Introduction to Dreamweaver
To get started, download the Campaign extension by clicking Window > Extensions > Browse Extensions, create a new
email newsletter, or edit an existing one. After you finish designing, personalize content using Campaign's
personalization fields and content blocks, and you are ready to go.
Dreamweaver automatically syncs up with Campaign so that your content changes in Dreamweaver are available for
you in Campaign. All you then have to do is enter an email address, and send a personalized campaign to your email
recipient.
For more information, see Create personalized email campaigns .
Update to Dreamweaver CC 2017 release (17.0.1)
In-built code coloring support
You can now create and customize code themes, based on the default Light and Dark themes. You can then customize
the code colors by
Select the light or dark default code theme in Edit > Preferences > Interface, and if you want to change the code colors,
save the theme with a new name, and start editing the theme file.
For more information on customizing your code colors, see Customize code coloring.
modifying the right selectors in the theme file.
28
Note: This release also includes fixes for a number of defects. For more information on defects fixed, see Known issues and
defects fixed in Dreamweaver CC 2017 releases .
Dreamweaver CC 2017 release (17.0)
The Dreamweaver CC 2017 release brings to you an all-new code editor, a more intuitive user interface with selectable
dark and light themes, and several enhancements including support for new workflows such as CSS preprocessors.
Read on for a complete list of what's new and changed in Dreamweaver CC 2017:
• Redesigned Code Editor
• CSS preprocessor support
• Real-time Preview in browser
• Quick editing of related code files (Quick Edit)
• In-context CSS documentation (Quick Docs)
• Multiple cursors to write and edit code
• Modern user interface
• Changes in menus, workspaces, and toolbars
• Snippets panel changes
• Files panel changes
• Changes in the Welcome screen and on-boarding experience
• Live Highlighting in Find and Replace
• Enhancements to Creative Cloud Libraries
• Auto-recovery of files after a crash
Last updated 3/8/2018
Page 36

Introduction to Dreamweaver
Redesigned Code Editor
Several productivity enhancements have been made to the Code Editor in Dreamweaver to enable you to get on with
the task of coding quickly and efficiently.
Code hints help new users learn HTML, CSS, and other web standards, and visual aids like auto-indentation, code
coloring, and resizable fonts help reduce errors and make your code easier to read.
Code hints
The code hinting functionality in Dreamweaver is enhanced to provide more useful information for the selected code.
In earlier versions of Dreamweaver, when you type a right-angle bracket, you get a drop-down list of relevant code.
In this release, you not only get the relevant code, you also get additional information that helps you to quickly ramp
up on HTML, CSS, and other web technologies within Dreamweaver itself.
For more information, see Code hinting and code completion.
Code display enhancements
The overall appearance of the code is now enhanced for better readability. You can see improvements in code
formatting, and code coloring.
29
Code formatting
When you write code, Dreamweaver auto-indents the code to circumvent erroneous manual indentation and improve
readability.
Code coloring
Dreamweaver now supports code coloring for additional number of file types.
Code coloring support is now available for HTML, JS, CSS, PHP, XML, LESS, Sass, SCSS, SVG, Bash, C, C#, C++,
clojure, CoffeeScript, Dart, Diff, EJS, Embedded Ruby, Groovy, Handlebars, Haskell, Haxe, Java, JSON, Lua,
Markdown, Markdown (GitHub), Perl, Properties, Python, RDF Turtle, Ruby, Scala, SQL, Stylus, Text, VB, VBScript,
XML, and YAML.
You can change syntax highlighting for different file types directly from the status bar in code view.
For more information on all these changes, see Coding environment in Dreamweaver.
CSS preprocessor support
Dreamweaver now supports common CSS preprocessors like Sass, Less, and SCSS, with full code coloring, and
compilation, so you can save time and produce cleaner code.
For more information on Dreamweaver support for CSS preprocessors, see Using CSS preprocessors in
Dreamweaver.Using CSS preprocessors in Dreamweaver
Real-time Preview in browser
Quickly preview your code changes in browser in real time without manually refreshing your browser. Dreamweaver
now connects with your browser so changes
appear in your browser instantly without page reloads.
For more information, see Real-time Preview in browser .
Last updated 3/8/2018
Page 37

Introduction to Dreamweaver
Quick editing of related code files (Quick Edit)
To make quick changes to your code, place the cursor on specific code snippets and use the context menu, or press CtrlE (on Windows) or Cmd-E (on Mac) to access Quick Edit.
Dreamweaver offers context-specific code options and inline tools.
For more information, see Quick Edit.
In-context CSS documentation (Quick Docs)
Dreamweaver provides in-context documentation for CSS properties, right within the code view.
Now you don't have to navigate outside Dreamweaver to a web page to learn or refer to CSS properties. To bring up
help for CSS, press Ctrl+K (on Windows) or Cmd+K (on Mac).
30
Quick docs help for CSS within the Dreamweaver code view interface
For more information, see Get help with CSS within Dreamweaver using Quick Docs .
Multiple cursors to write and edit code
To write multiple lines of code simultaneously, use multi-cursors.
This feature is a huge productivity booster, as you don't have to write the same line of code multiple times.
To invoke mult i p l e cu r s ors, y o u c an:
• To add cursors to multiple continous lines - Hold down the Alt key, then click drag vertically.
• To add cursors in multiple discontinuous lines - Press the Ctrl key, and click the different lines where you want to
place the cursor.
• To select text in multiple continuous lines - Press the Alt key and drag diagonally
• To select text in multiple discontinuous lines - Select some text, then press the Ctrl key (Windows), or Cmd key
(Mac), and continue to make further selections.
For more information, see Use multiple cursors to add or change text in multiple places.
Modern user interface
Dreamweaver is redesigned with a more intuitive and customizable interface, more accessible menus and panels, and a
contextual and configurable toolbar that shows you only the tools you need.
Last updated 3/8/2018
Page 38

Introduction to Dreamweaver
The new interface also offers four levels of contrast from light to dark, so it’s easier to read and edit lines of code.
Here are before and after snapshots of the new user interface.
31
User interface - Dreamweaver 2015 releases
Last updated 3/8/2018
Page 39

Introduction to Dreamweaver
32
New user interface - Dreamweaver CC 2017 release
Changes in menus, workspaces, and toolbars
Dreamweaver's menus, toolbars, and workspaces are also redesigned in this release. Read on to learn more about these
changes.
Workspace changes
The Dreamweaver interface is optimized to include the following default workspaces:
• Developer workspace
This workspace is minimal, and by default, includes only those panels that are most essential for developers who code
websites - for instance, the Files, and Snippets panels.
• Standard workspace
This workspace includes everything you need when you work with both code and design - such as Files, CC Libraries,
CSS Designer, Insert, DOM, Assets, and Snippets panels.
Note: After you select a workspace, you can customize it by adding or removing panels. For more information on
customizing workspaces, see
Here is a summary of the differences in the workspaces provided in Dreamweaver CC 2015 and Dreamweaver CC 2017.
Dreamweaver CC 2015
Create custom workspaces.
• Beginner
• Code
• Default
Last updated 3/8/2018
Page 40

Introduction to Dreamweaver
• Design
• Extract
Dreamweaver CC 2017
• Developer
• Standard
For more information on workspace changes, see The Dreamweaver workspace .
Menu changes
The application menu is revamped to remove sparingly used menu items, and move others to more intuitive menu
locations.
For a detailed description of the changes in Dreamweaver's application menu, see Redesigned Menus .
Toolbar changes
The toolbar is now common across all views. The toolbar displays only the tools that are required for the view in which
you are working.
However, you can customize the toolbar to display the required set of tools you need.
Toolbar overview
33
For more information, see Too l bar o v e r vi ew .
Status bar changes
The status bar now displays useful information when you work in Code view. Status bar overview
You c an now :
• Toggle between INS (Insert) and OVR (Overwrite) modes
• See the line and column number at the bottom of the screen. These numbers indicate the line and column where the
mouse is placed.
• Select a desired code coloring for different types of code files.
For more information, see Status bar overview.
Snippets panel changes
The snippets panel now wears a new cleaner look, and is also redesigned to make the process of inserting snippets
easier.
The following image highlights the major changes in the Snippets panel:
Last updated 3/8/2018
Page 41

Introduction to Dreamweaver
34
UI changes in the Snippets panel
In the previous releases of Dreamweaver, you had to insert snippets using keyboard shortcuts.
Inserting snippets using keyboard shortcuts was not an efficient process due to the following reasons:
• The need to remember non-intuitive shortcuts
• Possible clashes with product keyword shortcuts
In this version of Dreamweaver, you can use trigger keys to insert code snippets.
Trigger keys are user-friendly text strings assigned to code snippets. For example, for a code snippets that creates a
mailto link, you can type "mailto" and make that the trigger key.
After you assign a trigger key, place the cursor in your document, type "mailto", and press Tab. Dreamweaver then
inserts the related code snippet in your document.
For more information on the Snippets panel, see Reuse code with snippets.
Files panel changes
The Files panel is redesigned to make it simpler and more intuitive to use.
At its simplest, the Files panel displays a list of only the local files in your computer. As you work more with the Files
panel - setting up a site, setting up connections to remote servers, enabling check in and check out, more options appear
in the Files panel.
For more information on the changes to the Files panel, see Redesigned Files panel .
Last updated 3/8/2018
Page 42

Introduction to Dreamweaver
Changes in the Welcome screen and on-boarding experience
When you launch Dreamweaver or when you close all Dreamweaver documents, a new Start workspace is displayed.
You have convenient access to your recently used files, Libraries, and starter templates with the Start workspace.
If you prefer the older dialogs, you can still type Ctrl/Cmd + O to launch the Open dialog, or Ctrl/Cmd + N to launch
the New Document dialog.
To help you ramp up quickly on the changes in the Dreamweaver CC 2017 workspace, an onboarding experience is
available to you. Quickly go through the customization experience, and you will be presented with a workspace and
theme options that are right for you.
For more information, see The Dreamweaver workspace .
Live Highlighting in Find and Replace
The new, non-obtrusive, Find and Replace toolbar sits at the top of your window without blocking any portion of your
screen.
Find and replace, in general, is faster and more efficient, as compared to previous versions of Dreamweaver.
Dreamweaver now looks for search strings as you type in the Find panel and highlights all instances of the string in the
current document.
35
For more information, see Find and replace text, tags, and attributes.
Enhancements to Creative Cloud Libraries
Archive, restore, add comments, and see version history for all your assets stored in Creative Cloud, including files in
your Creative Cloud Libraries, assets created with CC desktop products, and mobile projects.
Auto-recovery of files after a crash
If Dreamweaver shuts down unexpectedly because of system errors, power outages, or other problems, then you can
recover any unsaved changes in the files that you were editing.
For more information, see Auto-recovery of files.
Manage files and folders
Last updated 3/8/2018
Page 43

Chapter 2: Dreamweaver and Creative Cloud
Creative Cloud Libraries in Dreamweaver
Creative Cloud Libraries make your favorite assets available to you anywhere. You can create or capture images, colors,
text styles, and more in several Creative Cloud desktop and mobile apps, and then easily access them across other
desktop and mobile apps for a seamless creative workflow.
You can access CC Libraries right from within Dreamweaver to reuse colors and graphics in your web pages. You can
also keep the inserted graphics up-to-date with those on the cloud by inserting them as 'linked' assets.
Read on for more information on using CC Libraries in Dreamweaver.
36
The CC Libraries panel
The CC Libraries panel (Window > CC Libraries) is the main access point to your assets saved on Creative Cloud. The
panel also lets you search for assets in Adobe Stock.
Last updated 3/8/2018
Page 44

Dreamweaver and Creative Cloud
37
CC Libraries panel
Using this panel, you can:
• Browse a specific library for the assets stored in the library
• Create a library
Last updated 3/8/2018
Page 45

Dreamweaver and Creative Cloud
• Preview assets in the selected library
• Drag or copy assets to be inserted onto your web page
• Enter a key word, such as, full name or part of a name of an image to search on Adobe Stock
Getting started
Define a site in Dreamweaver
A site in Dreamweaver is a folder where all the images, videos, scripts, stylesheets, and other files related to your web
pages are stored. Defining a site upfront helps you easily save the assets that you import from CC Libraries to the site.
Ensure that the web page into which you want to import assets from CC Libraries is also saved in the site folder.
For information on creating sites, see Set up a local version of your site.Set up a local version of your site
Add assets to CC Libraries
Ensuring that all the required assets are available on Creative Cloud helps you import the assets into your web page in
Dreamweaver quickly.
If you are looking for stock images, then Adobe Stock is a good place to start with. For detailed information, see Get
assets from Adobe Stock .
38
Graphics and colors that you capture or create from various Adobe mobile and desktop apps can be stored on Creative
Cloud and imported into your web pages. For example, a vector graphic created using Adobe Shape CC or an image
processed using Photoshop. Creative Cloud also lets you and your team collaborate and share assets, so you can reuse
assets created by others too.
For more information on Creative Cloud Libraries, see Creative Cloud Libraries .
Get assets from Adobe Stock
Adobe Stock is deeply integrated with Creative Cloud Libraries. You can search for images and add them to any of your
CC Libraries in one of the following ways:
• Directly from the Adobe Stock website.
• Using the CC Libraries panel in Dreamweaver.
• Using the CC Libraries panels in other Adobe applications, such as Photoshop and Illustrator.
Once you add the images to a CC Library, you can follow the instructions in the Reuse graphics in CC Libraries topic
to use these images in your web pages.
If you are unsure about purchasing Stock images right away, you can add only wartermarked Stock images (previews)
to your libraries and use these images as placeholders. When you are ready to purchase these images, you can do so in
the CC Libraries panel in Dreamweaver and other apps, or directly from the Adobe Stock website.
Last updated 3/8/2018
Page 46

Dreamweaver and Creative Cloud
39
Searching for images on Adobe Stock using CC Libraries panel
When you license an image, all instances of the watermarked asset in your open documents are updated to the highresolution version of the licensed image.
Last updated 3/8/2018
Page 47

Dreamweaver and Creative Cloud
Reuse colors and color themes saved in CC Libraries
• Reuse colors in Live view
• Reuse colors in Code view
Reuse colors and color themes in Live view
You can save colors and color themes in your Creative Cloud Libraries from apps such as Illustrator, Photoshop, or
Adobe Color CC. You can import these colors and color themes in your web pages using the CC Libraries panel in
Dreamweaver using the following steps:
1 In the CC Libraries panel, perform one of the following actions:
• Click the required color or color theme. The HEX value of the color or color theme is copied to the clipboard.
• Right-click the required color or color theme, and then click Copy RGB or Copy HEX.
2 Paste the color value in Code view or CSS Designer.
Reuse colors in Code view
Colors saved on Creative Cloud are available as code hints in Code view. You can select the required colors from the
code hints as you code in Code view. The Creative Cloud icon adjacent to the color in code hints indicates that these
colors are stored on Creative Cloud.
40
Colors in Creative Cloud Library displayed in code hints
The code hints pick colors from the library that is currently opened in the CC Libraries panel. In the image above, colors
in the library 'My Library' are made available as code hints. To get colors in another Creative Cloud Library as code
hints, open the required library in the CC Libraries panel and then resume your work in Code view.
Reuse graphics saved in CC Libraries
You can save graphics created using Adobe desktop and mobile apps, such as, Photoshop, Illustrator, Adobe Shape CC,
or Adobe Sketch CC, in your Creative Cloud Libraries.
and the code hints help you insert graphics directly into your code.
You can insert graphics from CC Libraries as:
• Linked assets: When graphics are inserted as linked assets, a small cloud icon appears at the lower right corner of
the asset in Live view. This icon indicates that the asset is linked to the original asset on the cloud. The cloud icon is
also displayed adjacent to the asset in the Assets panel.
Last updated 3/8/2018
The CC Libraries panel helps you insert graphics into Live view
Page 48

Dreamweaver and Creative Cloud
• Unl inked asset s: You can i nse rt a n as set as a loc al c opy in you r web p age s. In L ive vie w, r ight-cli ck t he requir ed a sse t
in the CC Libraries panel, and select 'Insert Unlinked'. When you insert a copy of a graphic, the asset is copied to
your local machine and is not linked to the original asset on the cloud. This means, any changes or updates to the
asset on the cloud is not reflected in Dreamweaver.
You can also batch download assets and save on your computer for later use.
• Reuse graphics in Live view
• Reuse graphics in Code view
• Specify sampling options for graphics
• Resample or rename linked graphics
• Download graphics
Reuse graphics in Live view
1 Perform one of the following actions:
a Drag the graphic from the CC Libraries panel onto your page in Live view.
Note: When you drag graphics from the CC Libraries panel onto Live view, the graphic is inserted as a 'Linked'
graphic (if you have defined a site).
41
Illustrator files are inserted as web-optimized, SVG files by default. If you want to customize the properties of
SVG files, you can edit the preferences in
SVG files from CC Libraries.
b Right-click the required asset in the CC Libraries panel, and select:
options.json file. For more information, see Extract web-optimized
• 'Insert Linked' to insert the graphic as a linked asset. This means that the asset will maintain its reference to
the corresponding asset on the cloud. Any change to the asset on the cloud will be reflected in the linked asset
in Dreamweaver.
• 'Insert Unlinked' to insert the graphic as an unlinked asset.
2 In the Sampling dialog box that appears, specify the file name and the dimensions of the image. For detailed
information, see
Specify sampling options for graphics.
Reuse graphics in Code view
Graphics saved in your Creative Cloud Libraries are available as code hints in Code view. First, open the required
library by selecting it in the CC Libraries panel. Then, switch to Code view and select the required graphic from the
co de h int s as yo u co de. The Creativ e Cl oud icon a dja cent t o th e gr aphic in c ode hints ind icate s th at the graph ic i s st ored
on Creative Cloud.
Last updated 3/8/2018
Page 49

Dreamweaver and Creative Cloud
Graphics in CC Libraries displayed as code hints
Note: When you insert graphics using code hints, the graphics are inserted as 'unlinked' graphics.
To get colors in another Creative Cloud Library as code hints, open the required library in the CC Libraries panel and
then resume your work in Code view.
42
Specify sampling options for graphics
The Height and Width boxes resample the asset using the Dreamweaver image optimization engine. You can also select
the format type in which you want the asset to be placed. The enabled cloud icon indicates that the asset will be placed
as a linked asset. After specifying the file name and sampling options, press Enter to insert the asset.
Resampling images
Note:
• The SVG option is available for Illustrator (.ai) files only and is set as default for such files. You can change the format
of such files to JPEG using the drop-down list in the resampling dialog box.
Last updated 3/8/2018
Page 50

Dreamweaver and Creative Cloud
• A JPEG file can be inserted only as a JPEG file, and so no other format option is available for such files.
Edit graphics
Using the CC Libraries panel, you can quickly open and edit InDesign and Illustrator assets in their native applications.
To do so, right-click the asset in the CC Libraries panel, and then click Edit.
Ensure that the native applications - InDesign or Illustrator - are installed on the same computer as the Dreamweaver
instance you are using. Also, ensure that you have installed the latest updates to these applications from Creative Cloud.
Unlink, resample, and rename linked graphics
You can change the name, size, or resample images imported into your web page from CC Libraries using one of the
following options:
• Click the asset in Live view and then click the cloud icon.
• Right-click the asset and click Linked asset options.
• Double-click the cloud icon adjacent to the asset name in the Assets panel.
The resampling dialog box appears to let you change the required properties. To unlink the asset from its source in CC
Libraries, click the cloud icon in the resampling dialog box.
When you unlink an asset, any changes to the source file on Creative Cloud will not be reflected in the image in your
web page.
43
Download graphics
You can download the required graphics as linked assets from CC Libraries in bulk and insert them in your project at
a later point in time. When you use these assets in your projects, they will still maintain the link to the corresponding
library item.
• Linked: To download graphics as linked assets, right-click the asset in CC Libraries panel and select Download
Linked. The popup with filename and resampling options is displayed. Save the asset in your site folder by specifying
the filename and sampling options, and pressing Enter.
• Unlinked: To download graphics as unlinked assets, right-click the required asset in the CC Libraries panel and
select Download Copy.
folder by specifying the filename and sampling options, and pressing Enter.
The popup with filename and resampling options is displayed. Save the asset in your site
Extract web-optimized SVG files from CC Libraries
If you have saved Illustrator or licensed, Adobe Stock images in your Creative Cloud Libraries, you can extract them as
web-opti mized SVG files in your D reamwe aver web pages. When you d rag the i mage s from th e CC Librar ies panel i nto
your web pages, they are inserted as SVG files by default. For more information, see
Libraries .
If you want to customize the properties of SVG files, you can edit the preferences in options.json file that is present in
the following location:
• Wi n d ow s : %appdata%\Adobe\Dreamweaver CC 2015\<locale>\Configuration\SVGOptions\
• Mac: ~/Library/Application Support/Adobe/Dreamweaver CC 2015/<locale>/Configuration/SVGOptions/
The JSon Object for converting .ai files to SVG files can contain the following properties:
Reuse graphics stored in CC
Last updated 3/8/2018
Page 51

Dreamweaver and Creative Cloud
Property Name Val ue Description
44
trimToArtBounds boolean The SVG covers the art bounds independent
useViewBox boolean If trimToArtBounds and useViewBox are set to
constrainToDocBounds boolean Clips the visible content to the document
preserveAspectRatio string Aspect ratio as defined by the SVG
styling string This property is optional and defaults to class:
of the dimension of the OMG document.
true, the content of the document will not be
shifted. Instead, the viewBox value of the root
SVG element is modified to slice and zoom the
content to fit the needs.
bounds.
specification. Setting preserveAspectRatio
overrides the computed value of svgWriter.
Therefore, it is recommended to not set this
value.
Note: For meet or xMidYMid meet use the
equivilant string, xMidYMid, for reduced file
size.
• class: Use the global element and
reference the style block with
class attribute.
the
• style: Use the style attribute to
apply styling properties to
elements.
• attribute: Use presentation
attributes to apply styling
properties to elements.
prefix string A prefix that will be added to every ID and
cropRect object A rectangle with the
minify Avoids indentations, newlines and
class name. This allows unique naming
schemes for every SVG document. Multiple
SVG documents can be inlined to a single
HTML document without an ID or class name
clashes as long as the provided prefixes are
unique.
properties x, y, width and height. x and y are
optional. Defines a rectangle to which the SV G
document gets cropped. Padding is created if
the dimension is smaller than the crop
rectangle.
whitespaces in the SVG output. Uses minimal
IDs.
Last updated 3/8/2018
Page 52

Dreamweaver and Creative Cloud
45
idType string
• regular: The default way to create IDs.
Preferable based on layer/object names in
the application.
• minimal: Creates shortest possible IDs
independent of user defined layer/object
names in the application.
• unique: Create UUIDs based on rfc4122 in
the format xxxxxxxx-xxxx-4xxx-yxxxxxxxxxxxxxxx.
precision number The number of digits after the floating point.
isResponsive boolean If set to true,the SVG document fills the
carriageReturn boolean By default, svgWriter uses the line ending LF.
indentation string Use a custom string as indentation. For
fillFilter boolean Filters apply only to the fill of an element. The
The number must be in the range of 0 to 10,
and if specified otherwise, the number is
trimmed. Default is 3.
viewport/image area (no width and height
attribtues set on SVG root.)
With carriageReturn set to true, line endings
use CRLF.
example, use tab indentation. The default
value in this case is 2 spaces.
stroke is unaffected and gets drawn on top of
the filtered content.
documentUnits string mm | cm | pc | in - Specified document units
will be used on the width and height attribute
of the root element.
Using Photoshop files in Dreamweaver
About Photoshop integration
You can insert Photoshop image files (PSD format) into web pages in Dreamweaver and let Dreamweaver optimize
them as web-ready images (GIF, JPEG, and PNG formats). When you do this, Dreamweaver inserts the image as a
Smart Object and maintains a live connection to the original PSD file.
You can also paste all or part of a multi-layered or multi-sliced Photoshop image into a web page in Dreamweaver.
When you copy and paste from Photoshop, however, no live connection to the original file is maintained. To update
the image, make your changes in Photoshop, and copy and paste again.
Note: If you use this integration feature often, you may want to store your Photoshop files in your Dreamweaver site for
easier access. If you do, be sure to cloak them to avoid exposure of the original assets, as well as unnecessary transfers
between the local site and the remote server.
For a tutorial on Photoshop integration with Dreamweaver, see Integrating Dreamweaver with Photoshop.
Last updated 3/8/2018
Page 53

Dreamweaver and Creative Cloud
About Smart Objects and Photoshop-Dreamweaver workflows
There are two main workflows for working with Photoshop files in Dreamweaver: the copy/paste workflow, and the
Smart Objects workflow.
Copy/paste workflow
The copy/paste workflow lets you select slices or layers in a Photoshop file, and then use Dreamweaver to insert them
as web-ready images. If you want to update the content later on, however, you must open the original Photoshop file,
make your changes, copy your slice or layer to the clipboard again, and then paste the updated slice or layer into
Dreamweaver. This workflow is only recommended when you want to insert part of a Photoshop file (for example, a
section of a design comp) as an image on a web page.
Smart Objects workflow
When working with complete Photoshop files, Adobe recommends the Smart Objects workflow. A Smart Object in
Dreamweaver is an image asset placed on a web page that has a live connection to an original Photoshop (PSD) file. In
Dreamweaver Design view, a Smart Object is denoted by an icon in the upper left corner of the image.
46
Smart Object
When the web image (that is, the image on the Dreamweaver page) is out of sync with the original Photoshop file,
Dreamweaver detects that the original file has been updated, and displays one of the Smart Object icon’s arrows in red.
When you select the web image in Design view and click the Update from Original button in the Property inspector,
the image updates automatically, reflecting any changes that you made to the original Photoshop file.
When you use the Smart Objects workflow, you do not need to open Photoshop to update a web image. Additionally,
any updates you make to a Smart Object in Dreamweaver are non-destructive. That is, you can change the web version
of the image on your page while keeping the original Photoshop image intact.
You can also update a Smart Object without selecting the web image in Design view. The Assets panel lets you update
all Smart Objects, including images that might not be selectable in the Document window (for example, CSS
background images).
Image optimization settings
Last updated 3/8/2018
Page 54

Dreamweaver and Creative Cloud
For both the copy/paste and the Smart Object workflows, you can specify optimization settings in the Image
Optimization dialog box. This dialog box lets you specify the file format and image quality. If you are copying a slice or
a layer, or inserting a Photoshop file as a Smart Object for the first time, Dreamweaver displays this dialog so that you
can easily create the web image.
If you copy and paste an update to a particular slice or layer, Dreameaver remembers the original settings and re-creates
the web image with those settings. Likewise, when you update a Smart Object using the Property inspector,
Dreamweaver uses the same settings you used when you first inserted the image. You can change an image’s settings at
any time by selecting the web image in Design view, and then clicking the Edit Image Settings button in the Property
inspector.
Storing Photoshop files
If you’ve inserted a web image, and have not stored the original Photoshop file in your Dreamweaver site, Dreamweaver
recognizes the path to the original file as an absolute local file path. (This is true for both the copy/paste and Smart
Object workflows.) For example, if the path to your Dreamweaver site is C:\Sites\mySite, and your Photoshop file is
stored in C:\Images\Photoshop, Dreameaver will not recognize the original asset as part of the site called mySite. This
will cause problems if you ever want to share the Photoshop file with other team members because Dreamweaver will
only recognize the file as being available on a particular local hard drive.
If you store the Photoshop file inside your site, however, Dreamweaver establishes a site-relative path to the file. Any
user with access to the site will also be able to establish the correct path to the file, assuming that you have also provided
the original file for them to download.
47
For a video tutorial on roundtrip editing with Photoshop, see Roundtrip editing with Photoshop.
Create a Smart Object
When you insert a Photoshop image (PSD file) into your page, Dreamweaver creates a Smart Object. A Smart Object is
a web-ready image that maintains a live connection to the original Photoshop image. Whenever you update the original
image in Photoshop, Dreamweaver gives you the option of updating the image in Dreamweaver with the click of a
button.
1 In Dreamweaver (Design or Code view), place the insertion point on your page where you want the image inserted.
2 Select Insert > Image.
You can also drag the PSD file to the page from the Files panel if you’re storing your Photoshop files in your website.
If you do so, you’ll skip the next step.
3 Locate your Photoshop PSD image file in the Select Image Source dialog box by clicking the Browse button and
navigating to it.
4 In the Image Optimization dialog box that appears, adjust optimization settings as needed and click OK.
5 Save the web-ready image file to a location within your website’s root folder.
Dreamweaver creates the Smart Object based on the selected optimization settings and places a web-ready version of
the image on your page. The Smart Object maintains a live connection to the original image and lets you know when
the two are out of synch.
Note: If you decide late r that you want to change the optimization settings for an image placed in your pages, you can s elect
the image, click the Edit Image Settings button in the Property inspector, and make changes in the Image Optimization
dialog box. Changes made in the Image Optimization dialog box are applied non-destructively. Dreamweaver never
modifies the original Photoshop file, and always re-creates the web image based on the original data.
For a video tutorial on roundtrip editing with Photoshop, see Roundtrip editing with Photoshop.
Last updated 3/8/2018
Page 55

Dreamweaver and Creative Cloud
Update a Smart Object
If you change the Photoshop file to which your Smart Object is linked, Dreamweaver notifies you that the web-ready
image is out of sync with the original. In Dreamweaver, Smart Objects are denoted by an icon at the upper left corner
of the image . When the web -re ady im age in D reamweave r is in s ync wit h th e origi nal Photosh op f ile , bo th o f th e ar rows
in the icon are green. When the web-ready image is out of sync with the original Photoshop file, one of the icon’s arrows
turns read.
?
To update a Smart Object with the current contents of the original Photoshop file, select the Smart Object in the
Document window, and then click the Update from Original button in the Property inspector.
Note: You do not need Photoshop installed to make the update from Dreamweaver.
Update multiple Smart Objects
You can update multiple Smart Objects at once using the Assets panel. The Assets panel also lets you see Smart Objects
that might not be selectable in the Document window (for example, CSS background images).
1 In the Files panel, click the Assets tab to view site assets.
2 Make sure that Images view is selected. If it isn’t, click the Images button.
3 Select each image asset in the Assets panel. When you select a Smart Object, you’ll see the Smart Object icon in the
upper left corner of the image. Regular images do not have this icon.
4 For each Smart Object that you want to update, right-click the filename and select Update from Original. You can
also Control-click to select multiple filenames and update them all at once.
48
Note: You do not need Photoshop installed to make the update from Dreamweaver.
Resize a Smart Object
You can resize a Smart Object in the Document window just as you would any other image.
1 Select the Smart Object in the Document window and drag the resize handles to resize the image. You can maintain
the width and height proportions by holding down the Shift key as you drag.
2 Click the Update from Original button in the Property inspector.
When you update the Smart Object, the web image non-destructively re-renders at the new size, based on the
current contents of the original file, and the original optimization settings.
Edit a Smart Object’s original Photoshop file
After you create a Smart Object on your Dreamweaver page, you can edit the original PSD file in Photoshop. After you
make your changes in Photoshop, you can then easily update the web image in Dreamweaver.
Note: Make sure that you have Photoshop set as your primary external image editor.
1 Select the Smart Object in the Document window.
2 Click the Edit button in the Property inspector.
3 Make your changes in Photoshop and save the new PSD file.
4 In Dreamweaver, select the Smart Object again and click the Update from Original button.
Note: If you changed the size of your image in Photoshop, you need to reset the size of the web image in Dreamweaver.
Dreamweaver updates a Smart Object based only on the contents of the original Photoshop file, and not its size. To sync
the size of a web image with the size of the original Photoshop file, right-click the image and select Reset Size To Original.
Last updated 3/8/2018
Page 56

Dreamweaver and Creative Cloud
Smart Object states
The following table lists the various states for Smart Objects.
SmartObject state Description Recommended action
49
Images synched The web image is in sync with the current
Original asset modified The original Photoshop file has been modified
Dimensions of web image are different from
selected HTML width and height
Dimensions of original asset are too small for
selected HTML width and height
Original asset not found Dreamweaver cannot find the original
contents of the original Photoshop file. Width
and height attributes in the HTML code match
the dimensions of the web image.
after the creation of the web image in
Dreamweaver.
The width and height attributes in the HTML
code are different from the width and height
dimensions of the web image that
Dreamweaver created upon insertion. If the
web image’s dimensions are smaller than the
selected HTML width and height values, the
web image can appear pixelated.
The width and height attributes in the HTML
code are larger than the width and height
dimensions of the original Photoshop file. The
web image can appear pixelated.
Photoshop file specified in the Original text
box of the Property inspector.
None
Use the Update From Original button in the
Property inspector to sync the two images.
Use the Update From Original button in the
Property inspector to re-create the web image
from the original Photoshop file.
Dreamweaver uses the currently specified
HTML width and height dimensions when it
re-creates the image.
Don’t create web images with dimensions
larger than the dimensions of the original
Photoshop file.
Correct the file path in the Original text box of
the Property inspector, or move the
Photoshop file to the location that’s currently
specified.
Copy and paste a selection from Photoshop
You can copy all or some of a Photoshop image and paste the selection into your Dreamweaver page as a web-ready
image. You can copy a single layer or a set of layers for a selected area of the image or you can copy a slice of the image.
When you do this, however, Dreamweaver does not create a Smart Object.
Note: While the Update from Original functionality is not available for pasted images, you can still open and edit the
original Photoshop file by selecting the pasted image and clicking the Edit button in the Property inspector.
1 In Photoshop, do one of the following:
• C opy all o r par t of a sin gle l aye r by u sin g the Mar que e tool to s elec t t he p orti on yo u wa nt t o copy, a nd t he n ch oose
> Copy. This copies only the active layer for the selected area into the clipboard. If you have layer-based
Edit
effects, they are not copied.
• Copy and merge multiple layers by using the Marquee tool to select the portion you want to copy, and then
choose Edit
> Copy Merged. This flattens and copies all the selected area’s active and lower layers into the
clipboard. If you have layer-based effects associated with any of these layers, they are copied.
• Copy a slice by using the Slice Select tool to select the slice, and then choose Edit > Copy. This flattens and copies
all the slice’s active and lower layers into the clipboard.
You can choose Select > All to quickly select all of an image for copying.
2 In Dreamweaver (Design or Code view), place the insertion point on your page where you want the image inserted.
3 Select Edit > Paste.
4 In the Image Optimization dialog box, adjust optimization settings as needed and click OK.
Last updated 3/8/2018
Page 57

Dreamweaver and Creative Cloud
5 Save the web-ready image file to a location within your website’s root folder.
Dreamweaver defines the image according to your optimization settings and places a web-ready version of your image
in your page. Information about the image, such as the location of the original PSD source file, is saved in a Design
Note, regardless of whether you have enabled Design Notes for your site. The Design Note allows you to return to edit
the original Photoshop file from Dreamweaver.
Edit pasted images
After you paste Photoshop images in your Dreamweaver pages, you can edit the original PSD file in Photoshop. When
using the copy/paste workflow, Adobe recommends that you always make your edits to the original PSD file (rather
than the web-ready image itself), and then repaste to maintain single sourcing.
Note: Make sure that you have Photoshop set as your primary external image editor for the file type you want to edit.
1 In Dreamweaver, select a web-ready image that was originally created in Photoshop and do one of the following:
• Click the Edit button in the image’s Property inspector.
• Press Control (Windows) or Command (Macintosh) as you double-click the file.
• Right-click (Windows) or Control-click (Macintosh) an image, choose Edit Original With from the context
menu, and then choose Photoshop.
Note: This assumes that Photoshop is set as the primary external image editor for PSD image files. You may also want
to set Photoshop as the default editor for JPEG, GIF, and PNG file types.
50
2 Edit the file in Photoshop.
3 Return to Dreamweaver and paste the updated image or selection into your page.
If you want to reoptimize the image at any time, you can select the image and click the Edit Image Settings button in
the Property inspector.
Setting Image Optimization dialog box options
When you create a Smart Object or paste a selection from Photoshop, Dreamweaver displays the Image Optimization
dialog box. (Dreamweaver also displays this dialog box for any other kind of image if you select the image and click the
Edit Image Settings button in the Property inspector.) This dialog box lets you define and preview settings for webready images using the right mix of color, compression, and quality.
A web-ready image is one that can be displayed by all modern web browsers and looks the same no matter what system
or browser the viewer is using. In general, the settings result in a trade-off between quality and file size.
Note: Whatever settings you select only affect the imported version of the image file. The original Photoshop PSD or
Fireworks PNG file always remains untouched.
Preset Choose a Preset that best suits your requirements. The file size of the image changes based on your chosen
preset. An instant preview of the image with the applied setting is displayed in the background.
For example, for images that have to be displayed with a high degree of clarity, choose PNG24 for Photos (Sharp
Details).
the page.
When you select a preset, the configurable options for the preset are displayed. If you want to further customize
optimization settings, modify the values for these options.
Select GIF For Background Images (Patterns) if you are inserting a pattern that will act as the background of
Last updated 3/8/2018
Page 58

Dreamweaver and Creative Cloud
Work with Adobe Animate CC and Dreamweaver
Edit a SWF file from Dreamweaver in Animate CC
If you have both Animate CC and Dreamweaver installed, you can select a SWF file in a Dreamweaver document and
use Animate CC to edit it. Animate CC does not edit the SWF file directly; it edits the source document (FLA file) and
re-exports the SWF file.
1 In Dreamweaver, open the Property inspector (Window > Properties).
2 In the Dreamweaver document, do one of the following:
• Click the SWF file placeholder to select it; then in the Property inspector click Edit.
• Right-click (Windows) or Control-click (Macintosh) the placeholder for the SWF file, and select Edit With Flash
from the context menu.
Dreamweaver switches the focus to Animate CC, and Animate CC attempts to locate the Flash authoring file
(FLA) for the selected SWF file. If Animate CC cannot locate the Flash authoring file, you are prompted to locate
it.
51
Note: If the FLA file or SWF file is locked, check out the file in Dreamweaver.
3 In Animate CC, edit the FLA file. The Animate CC Document window indicates that you are modifying the file
from within Dreamweaver.
4 When you finish making edits, click Done.
Animate CC updates the FLA file, re-exports it as a SWF file, closes, and then returns the focus to the Dreamweaver
document.
Note: To update the SWF file and keep Animate CC open, in Animate CC select File > Update for Dreamweaver.
5 To view the updated file in the document, click Play in the Dreamweaver Property inspector or press F12 to preview
your page in a browser window.
Last updated 3/8/2018
Page 59

Chapter 3: Dreamweaver workspaces and views
The Dreamweaver workspace
Onboarding Dreamweaver
After installing Dreamweaver, when you first launch the application, a QuickStart menu appears on the screen asking
you three questions that help you personalize your Dreamweaver workspace according to your needs.
Based on your responses to these questions, Dreamweaver opens in a Developer workspace (a minimal code-focused
layout), or a Standard workspace (a split layout with visual tools and an in-app preview as you code).
52
After you choose a workspace, you choose a color theme that you are comfortable with. You can then get started.
Note: You can change these workspace preferences any time later using the Edit > Preferences dialog.
The Start experience
The Start screen in Dreamweaver gives you quick access to your recent files, CC library files, and starter templates.
Depending on your subscription status, the Start workspace may also display content tailored for your requirements.
Dreamweaver displays the Start screen at launch or when no documents are open.
The Start workspace in Dreamweaver
Options in the Dreamweaver Start experience
Recent Files Open a recently-opened file from a list of recent files.
Last updated 3/8/2018
Page 60

Dreamweaver workspaces and views
CC Files Open recently opened files present in your CC Libraries cloud.
Quick Start Get started creating documents in Dreamweaver by clicking any of the file types displayed.
Starter Templates Open one of the starter templates packaged with Dreamweaver.
Notice the Work and Learn tabs on top of this screen. Click the Work tab to access the recent files that you have worked
on. If you do not have any recent files, this tab is blank.
Click the Learn tab to instantly access the Dreamweaver tutorials from this screen.
You can also use the search functionality by using the Search icon on the upper-right corner of this screen. When you
type a search query, the application displays your recent files, Creative Cloud assets, help links, and stock images that
match the search query.
Note: This Start screen is enabled, and is opened by default. If you don't need this Start screen, uncheck Show Start Screen
in the Preferences > General dialog box.
For information on creating and opening documents in Dreamweaver, see Create and open files.
Workspace overview
The Dreamweaver workspace lets you view documents and object properties. The workspace also places many of the
most common operations in toolbars so that you can quickly make changes to your documents.
53
Dreamweaver workspace
A Application bar B Document toolbar C Document window D Workspace switcher E Panels F Code View G Status bar H Tag selec to r I Live
View J
Toolbar
Last updated 3/8/2018
Page 61

Dreamweaver workspaces and views
Workspace elements overview
The workspace includes the following elements:
The Application bar Is across the top of the application window and contains a workspace switcher, menus (Windows
only), and other application controls.
The Document toolbar Contains buttons that provide options for different views of the Document window (such as
Design view, Live view, and Code view).
The Standard toolbar To display the Standard toolbar, select Window > Toolbars > Standard. The toolbar contains
buttons for common operations from the File and Edit menus: Ne w, Open, Save, Save A ll, Print Code, Cut, Copy, Paste,
Undo, and Redo.
The toolbar Is on the left side of the application window and contains view-specific buttons.
The Document window Displays the current document as you create and edit it.
The Property inspector Lets you view and change a variety of properties for the selected object or text. Each object has
different properties.
The Tag selector Located in the Status bar at the bottom of the Document window. Shows the hierarchy of tags
surrounding the current selection. Click any tag in the hierarchy to select that tag and all its
Panels Help you monitor and modify your work. Examples include the Insert panel, the CSS Designer panel, and the
Files panel. To expand a panel, double-click its tab.
contents.
54
The Extract panel Lets you upload and view your PSD files on Creative Cloud. Using this panel, you can extract CSS,
text, images, fonts, colors, gradients, and measurements from your PSD comps into your document.
The Insert panel Contains buttons for inserting various types of objects, such as images, tables, and media elements,
into a document. Each object is a piece of HTML code that lets you set various attributes as you insert it. For example,
you can insert a table by clicking the Table button in the Insert panel. If you prefer, you can insert objects using the
Insert menu instead of the Insert panel.
The Files panel Lets you manage your files and folders, whether they are part of a Dreamweaver site or on a remote
server. The Files panel also lets you access all the files on your local disk. For more information, see
Manage files and
folders.
The Snippets panel Lets you save and reuse your code snippets across different web pages, different sites, and different
installations of Dreamweaver (using sync settings). For more information, see
The CSS Designer panel is a CSS Property Inspector that lets you "visually"create CSS styles, files, and set properties,
Reuse code with snippets.
along with media queries.
Note: Dreamweaver provides many other panels, inspectors, and windows. To open the panels, inspectors, and windows,
use the Window menu.
Document window overview
The Document window shows the current document. To switch views of the document, use the view options on the
Document toolbar.
You can also switch views, using the View options in the View menu.
Live view displays a realistic representation of what your document will look like in a browser, and lets you interact
with the document exactly as you would in a browser. You can edit HTML elements directly in Live View and instantly
preview your changes in the same view as well. For more information on editing in Live View, see
Live View Property
Inspector.
Last updated 3/8/2018
Page 62

Dreamweaver workspaces and views
Design view is a design environment for visual page layout, visual editing, and rapid application development. In this
view, Dreamweaver displays a fully editable, visual representation of the document, similar to what you would see when
viewing the page in a browser.
Code view is a hand-coding environment for writing and editing HTML, JavaScript, and any other kind of code.
Code - Code is a split ver sion of Cod e view that lets you scroll to wo rk on different se ctions of t he docum ent at t he same
time.
Code - Live lets you see both Code view and Live view for the same document in a single window.
Code - Design lets you see both Code view and Design view for the same document in a single window.
Live Code displays the actual code that a browser uses to execute the page, and can dynamically change as you interact
with the page in Live view.
When a Document window is maximized (the default), tabs appear at the top of the Document window showing the
filenames of all open documents. Dreamweaver displays an asterisk after the filename if you have made changes that
you haven’t saved yet.
Dreamweaver also displays the Related Files toolbar below the document’s tab (or below the document’s title bar if you
are viewing documents in separate windows). Related documents are documents associated with the current file, such
as CSS files or JavaScript files. To open one of these related files in the Document window, click its filename in the
Related Files toolbar.
55
Switch between views
Use the Document toolbar to toggle between different views quickly. For more information, see Document toolbar
overview.
You can also switch between views using the following options in the View menu:
• Code view only: Select Code
• Split view: Select Split and select any of the split options
• View mode: Toggle between Live and Design views
• Switch Views: To switch views from one view to another.
Switching views using the View menu options
Cascade, tile, or rearrange document windows
If you have many documents open at once, you can cascade or tile them.
Last updated 3/8/2018
Page 63

Dreamweaver workspaces and views
To cascade document windows: select Window > Arrange > Cascade.
To tile document windows:
• (Windows) Select Window > Arrange > Tile Horizontally or Tile Vertically.
• (Macintosh) Select Window > Arrange >Tile.
When you open more than one file, the Document windows are tabbed. To rearrange the order of tabbed Document
windows, drag a window’s tab to a new location in the group.
Resize document window
The Status bar displays the Document window’s current dimensions (in pixels). To design a page that looks its best at
a specific size, you can adjust the Document window to any of the predetermined sizes, edit those predetermined sizes,
or create sizes.
When you change the view size of a page in design or live view only the dimensions of the view size change. The
document size is unaltered.
In addition to predetermined and custom sizes, Dreamweaver also lists sizes specified in a media query. When you
select a size corresponding to a media query, Dreamweaver uses the media query to display the page. You can also
change the page orientation to preview the page for mobile devices where the page layout changes based on how the
device is held.
56
To resize the document window, select one of the sizes from the Window Size pop-up menu at the bottom of the
Document window.
Document resize options
The window size shown reflects the inside dimensions of the browser window, without borders; the monitor size or
mobile device is listed to the right.
Note: For less precise resizing, use your operating system’s standard methods of resizing windows, such as dragging the
lower-right corner of a window.
Last updated 3/8/2018
Page 64

Dreamweaver workspaces and views
Note: (Windows only) Documents within the Document window are maximized by default, and you can't resize a
document when it's maximized. To de-maximize the document, click the de-maximize button
in the upper right corner of
the document.
Change the values listed in the Window Size pop-up menu
1 Select Edit Sizes from the Window Size pop-up menu.
2 Click any of the width or height values in the Window Sizes list, and type a new value.To make the Document
window adjust only to a specific width (leaving the height unchanged), select a height value and delete it.
3 Click the Description box to enter descriptive text about a specific size.
Add a new size to the Window Size pop-up menu
1 Select Edit Sizes from the Window Size pop-up menu.
57
Adding window sizes to the Window size pop-up menu
2 Click the blank space below the last value in the Width column.
3 Enter values for Width and Height.
To set the Width or Height only, simply leave one field empty.
4 Click the Description field to enter descriptive text about the size you added.
For example, you might type SVGA or average PC next to the entry for an 800 x 600 pixel monitor, and 17-in.
Macnext to the entry for an 832 x 624 pixel monitor. Most monitors can be adjusted to a variety of pixel dimensions.
5 Click Apply and close the dialog box.
Last updated 3/8/2018
Page 65

Dreamweaver workspaces and views
Your new window size is now available to use in the Window Size pop-up menu.
Document toolbar overview
The Document toolbar contains buttons that let you toggle between different views of your document quickly. The
toolbar also contains some common commands and options related to viewing the document and transferring it
between the local and remote sites.
Document toolbar
The following options appear in the Document toolbar:
Code View Displays only the Code view in the Document window.
Split View Splits the Document window between the Code and the Live/Design views. Design view option is not
available for fluid grid documents.
58
Live View Is an interactive preview that accurately renders HTML5 projects and updates in real time to show your
changes as you make them.
options lets you switch between Live and Design views. This drop-down list is not available in fluid grid documents.
Design View Displays a representation of the document showing how the user views it in a web browser.
You can also edit HTML elements in Live View. The drop-down list adjacent to the Live
Standard toolbar overview
The Standard toolbar To display the Standard toolbar, select Window > Toolbars > Standard. The toolbar contains
buttons for common operations from the File and Edit menus: Ne w, Open, Save, Save A ll, Print Code, Cut, Copy, Paste,
Undo, and Redo.
Browser Navigation toolbar overview
The Browser Navigation toolbar becomes active in Live view (only if you have enabled it by selecting Window>Toolbars->Standard), and shows you the address of the page you’re looking at in the Document window. Live view
acts like a regular browser, so even if you browse to a site outside of your local site (for example,
http://www.adobe.com), Dreamweaver will load the page in the Document window.
Last updated 3/8/2018
Page 66

Dreamweaver workspaces and views
Browser navigation toolbar
A Browser controls B Address box
By default, links are not active in Live view. Having links non-active lets you select or click link text in the Document
window without being taken to another page. To test links in Live view, you can enable one-time clicking or continuous
clicking by selecting View > Live View Options >
Follow Links (Ctrl+Click Link) or Follow Links Continuously.
Toolbar over view
The toolbar appears vertically on the left side of the Document window, and is visible in all views - Code, Live, and
Design. The buttons on the toolbar are view-specific and appear only if they are applicable to the view you are working
in. For example, if you are working in Live view, then Code view-specific options such as Format Source Code are not
visible.
59
Customize toolbar
You can choose to customize this toolbar according to your needs by adding menu options, or removing unwanted
menu options from the toolbar.
To customize the toolbar, do the following:
1 Click in the Toolbar, to open the Customize Toolbar dialog box.
Last updated 3/8/2018
Page 67

Dreamweaver workspaces and views
60
Customize toolbars
2 Select or deselect the menu options that you want available in the toolbar and click Done to save your toolbar.
To restore the default toolbar buttons, click Restore Default in the Customize Toolbar dialog box.
Status bar overview
The Status bar at the bottom of the Document window provides additional information about the document you are
creating.
Status bar
A Tag s el e ctor B Output panel C Code coloring D Insert and Overwrite toggle E Line and column number
Tag sel e c tor
Shows the hierarchy of tags surrounding the current selection. Click any tag in the hierarchy to select that tag and all
its contents. Click <body> to select the entire body of the document. To set the class or ID attributes for a tag in the tag
selector, right-click (Windows) or Control-click (Macintosh) the tag and select a class or ID from the context menu.
Output panel
Click this icon to display the Output panel that shows coding errors in your document.
Last updated 3/8/2018
Page 68

Dreamweaver workspaces and views
Code coloring
(Only available in Code view)
Select any of the coding languages from this pop-up menu to change the coloring of the code to display according to
the programming language.
Insert and Overwrite toggle
(Only available in Code view)
Allows you to toggle between Insert and Overwrite modes while working in Code view.
Line and column number
(Only available in Code view.)
Displays the line number and column number where the cursor is located.
Property inspector overview
The Property Inspector (Window > Properties) lets you examine and edit the most common properties for the
currently selected page element, such as text or an inserted object.
The contents of the Property Inspector vary depending on the element selected. For example, if you select an image on
your page, the Property Inspector changes to show properties for the image (such as the file path to the image, the width
and height of the image, the border around the image, if any, and so on).
61
Property Inspector
The Property Inspector is at the lower edge of the workspace by default, but you can undock it and make it a floating
panel in the workspace.
Note: Use the Tag inspector to view and edit every attribute associated with a given tag’s properties.
To access help for a particular Property inspector, click the help button in the upper right corner of the Property
inspector, or select Help from a Property inspector’s Options menu.
View and change properties of a page element
1 Select the page element in the Document window.
You may have to expand the Property inspector to view all the properties of the selected element.
2 Change any of the properties in the Property inspector.
Note: For information on specific properties, select an element in the Document window, and then click the Help icon
in the upper-right corner of the
3 If your changes are not immediately applied in the Document window, apply the changes in one of these ways:
• Click outside the property-editing text fields.
• Press Enter (Windows) or Return (Macintosh).
Property inspector.
Last updated 3/8/2018
Page 69

Dreamweaver workspaces and views
• Press Tab to switch to another property.
Context menus
Context menus provide convenient access to the most useful commands and properties related to the object or window
you’re working with. Context menus list only those commands that are applicable to the current selection.
To open a context menu, right-click (Windows) or Ctrl+Click (Mac) a section of code in Code view, or an object in Live
or Design Views.
Rearranging panels in Dreamweaver
You can customize the placement and appearance of all the Dreamweaver panels according to your requirements.
Dock and undock panels
• To dock a panel, drag it by its tab into the dock, at the top, bottom, or in between other panels.
• To dock a panel group, drag it by its title bar (the solid empty bar above the tabs) into the dock.
• To remove a panel or panel group, drag it out of the dock by its tab or title bar. You can drag it into another dock or
make it free-floating.
Move panels
62
As you move panels, you see blue highlighted drop zones, areas where you can move the panel. For example, you can
move a panel up or down in a dock by dragging it to the narrow blue drop zone above or below another panel. If you
drag to an area that is not a drop zone, the panel floats freely in the workspace.
• To move a panel, drag it by its tab.
• To move a panel group, drag the title bar.
Note: Press Ctrl (Windows) or Command (Mac OS) while moving a panel to prevent it from docking. Press Esc while
moving the panel to cancel the operation.
Add and remove panels
If you remove all panels from a dock, the dock disappears. You can create a dock by moving panels to the right edge of
the workspace until a drop zone appears.
• To remove a panel, right-click (Windows) or Control-click (Mac) its tab and then select Close, or deselect it from
the Window menu.
• To add a panel, select it from the Window menu and dock it wherever you want.
Manipulate panel groups
• To move a panel into a group, drag the panel’s tab to the highlighted drop zone in the group.
• To rearrange panels in a group, drag a panel’s tab to a new location in the group.
• To remove a panel from a group so that it floats freely, drag the panel by its tab outside the group.
• To move a group, drag the title bar (the area above the tabs).
Stack floating panels
When you drag a panel out of its dock but not into a drop zone, the panel floats freely. The floating panel allows you to
position it anywhere in the workspace. You can stack floating panels or panel groups so that they move as a unit when
you drag the topmost title bar.
• To stack floating panels, drag a panel by its tab to the drop zone at the bottom of another panel.
Last updated 3/8/2018
Page 70

Dreamweaver workspaces and views
• To change the stacking order, drag a panel up or down by its tab.
• To remove a panel or panel group from the stack, so that it floats by itself, drag it out by its tab or title bar.
Resize panels
• To minimize or maximize a panel, panel group, or stack of panels, double-click a tab. You can also double-click the
tab area (the empty space next to the tabs).
• To resize a panel, drag any side of the panel.
Collapse and expand panel icons
You can collapse panels to icons to reduce clutter on the workspace. In some cases, panels are collapsed to icons in the
default workspace.
• To collapse or expand all panel icons in a column, click the double arrow at the top of the dock.
• To expand a single panel icon, click it.
• To resize panel icons so that you see only the icons (and not the labels), adjust the width of the dock until the text
disappears. To display the icon text again, make the dock wider.
• To collapse an expanded panel back to its icon, click its tab, its icon, or the double arrow in the panel’s title bar.
63
Create custom workspaces
You can customize your workspace by adding or removing panels according to your requirements. You can then save
these changes to your workspace by saving it to access later from the Workspace Switcher in the Document toolbar.
By saving the current size and position of panels as a named workspace, you can restore that workspace even if you
move or close a panel.
To save a custom workspace:
1 Choose Window > Workspace Layout > New Workspace.
2 Type a name for the workspace.
The workspace is saved and is visible in the Workspace switcher in the Document toolbar.
To delete a custom workspace:
Select Manage Workspaces from the workspace switcher in the Application bar to open the Manage Workspaces dialog
box. Select the workspace, and then click Delete.
Display or switch workspaces
Select a workspace from the workspace switcher in the Document toolbar.
Customizing Dreamweaver in multi-user systems
You can customize Dreamweaver to suit your needs even in a multiuser operating system such as Windows XP or
OS X.
Mac
Dreamweaver prevents any user’s customized configuration from affecting any other user’s customized configuration.
To accomplish this goal, the first time you run Dreamweaver in one of the multiuser operating systems that it
recognizes, the application creates copies of a variety of configuration files. These user configuration files are stored in
a folder that belongs to you.
If you reinstall or upgrade Dreamweaver, Dreamweaver automatically makes backup copies of existing user
configuration files, so if you customized those files by hand, you still have access to the changes you made.
Last updated 3/8/2018
Page 71

Dreamweaver workspaces and views
Display tabbed documents (On Mac only)
You can view multiple documents in a single Document window by using tabs to identify each document. You can also
display them as part of a floating workspace, in which each document appears in its own window.
Open a tabbed document in a separate window
Control-click the tab and select Move To New Window from the context menu.
Change the default tabbed document setting
1 Select Dreamweaver > Preferences, and then select the General category.
2 Select or deselect Open Documents in Tabs, and click OK.
Dreamweaver does not alter the display of documents that are currently open when you change preferences.
Documents opened after you select a new preference, however, display according to the preference you selected.
The Welcome screen appears when you start Dreamweaver and anytime that you do not have any documents open. You
can choose to hide the Welcome screen, and then later display it again. When the Welcome screen is hidden and no
documents are open, the Document window is
blank.
Common Dreamweaver panels
You work with a number of panels in Dreamweaver. Some of the commonly used panels are described here.
64
Insert panel overview
The Insert panel (Window > Insert) contains buttons for creating and inserting objects such as tables, images, and links.
The buttons are organized into several categories, which you can switch by selecting the desired category from the dropdown list at the top.
Last updated 3/8/2018
Page 72

Dreamweaver workspaces and views
65
Insert panel
Some categories have buttons with pop-up menus. When you select an option from a pop-up menu, it becomes the
default action for the button. For example, if you select Line Break
from the Character button’s pop-up menu, the next
time you click the Character button, Dreamweaver inserts a line break. Anytime you select a new option from the popup menu, the default action for the button changes.
Last updated 3/8/2018
Page 73

Dreamweaver workspaces and views
The Insert panel is organized in the following categories:
HTML Lets you cre ate and i nser t t he m ost c omm only used HTML elem ent s su ch as div t ags a nd ob jec ts , su ch as ima ges,
and tables.
Form Contains buttons for creating forms and inserting form elements, such as search, month, and password.
Te mp l at es Lets you save the document as a template and mark specific regiions as editable, optional, repeating, or
editable optional regions.
Bootstrap components Contains Bootstrap components to provide navigation, containers, dropdowns, and more that
you can use in responsive projects.
jQuery Mobile Contains buttons for building sites that use jQuery Mobile.
jQuery UI Lets you insert jQuery UI elements such as accordion, sliders, and buttons.
Favo rites Lets you group and organize the Insert panel buttons you use the most in one common place.
Note: If you are working with certain types of files, such as XML, JavaScript, Java, and CSS, the Insert panel and the Design
view option are dimmed because you cannot insert items into these code files.
Insert object
To insert an object using the Insert panel:
66
1 Select the appropriate category from the Category pop-up menu of the Insert panel.
2 Do one of the following:
• Click an object button or drag the button’s icon into the Document window (into Design, Live, or Code View).
• Click the arrow on a button, then select an option from the menu.
Depending on the object, a corresponding object-insertion dialog box may appear, prompting you to browse to
a file or specify parameters for an object. Or, Dreamweaver may insert code into the document, or open a tag
editor or a panel for you to specify information before the code is inserted.
For some objects, no dialog box appears if you insert the object in Design view, but a tag editor appears if you
insert the object in Code view. For a few objects, inserting the object in Design view causes Dreamweaver to
switch to Code view before inserting the object.
Edit Insert panel preferences
1 Select Edit > Preferences (Windows) or Dreamweaver > Preferences (Macintosh).
2 In the General category of the Preferences dialog box, deselect Show Dialog When Inserting Objects to suppress
dialog boxes when you insert objects such as images, tables, scripts, and head elements or by holding down the
Control key (Windows) or the Option key (Macintosh) while creating the object.
Note: When you insert an object with this option off, the object is given default attribute values. Use the Property inspector
to change object properties after inserting the object.
Add, delete, or manage items in the Favorites category of the Insert panel
1 Select any category in the Insert panel.
2 Right-click (Windows) or Control-click (Macintosh) in the area where the buttons appear, and then select
Customize Favorites.
3 In the Cutomize Favorite Objects dialog box, make changes as necessary, and click OK.
Last updated 3/8/2018
Page 74

Dreamweaver workspaces and views
To add an object, select an object in the Available Objects pane on the left, and then click the arrow between the two
panes or double-click the object in the Available Objects pane.
Customize favorites in the Insert panel
Note: You can add one object at a time. You cannot select a category name, such as Common, to add an entire category
to your favorites list.
67
• To delete an object or separator, select an object in the Favorite Objects pane on the right, and then click the
Remove Selected Object in Favorite Objects List button above the pane.
• To move an object, select an object in the Favorite Objects pane on the right, and then click the Up or Down
arrow button above the pane.
• To add a separator below an object, select an object in the Favorite Objects pane on the right, and then click the
Add Separator button below the pane.
4 If you’re not in the Favorites category of the Insert panel, select that category to see your changes.
Files panel overview
Use the Files panel to view and manage the files on your Dreamweaver site.
You can use the Files panel to view files and folders, check whether they are associated with a Dreamweaver site or not,
and perform standard file maintenance operations, such as opening and moving files.
The Files panel also helps you manage and transfer files to and from a remote server.
Last updated 3/8/2018
Page 75

Dreamweaver workspaces and views
68
Files panel
For more information on all you can do with the Files panel, see Manage files and folders .Manage files and folders
CSS Designer
CSS Designer panel (Windows > CSS Designer) is a CSS Property Inspector that lets you 'visually' create CSS styles,
files, and set properties, along with media queries.
You can use Ctrl/Cmd+ Z to undo or Ctrl/Cmd + Y to redo all actions you perform in CSS Designer. The changes are
automatically reflected in Live View and the relevant CSS file is also refreshed. To let you know that the related file has
changed, the affected file’s tab is highlighted for a while (around 8 seconds).
Last updated 3/8/2018
Page 76

Dreamweaver workspaces and views
69
CSS Designer panel
The CSS Designer panel consists of the following panes and options:
All Lists all the CSS, media queries, and selectors associated with the current document. You can filter for the required
CSS rules and modify the properties. You can also use this mode to begin creating selectors or media queries.
This mode is not sensitive to the selection. This means, when you select an element on the page, the associated selector,
media query, or CSS are not highlighted in CSS Designer.
Current Lists all the computed styles for any selected element in Design or Live view of the current document. When
you use this mode for a CSS file in Code view, all the properties for the selector in focus are displayed.
This mode is context-sensitive. Use this option to edit the properties of selectors associated with selected elements in
the document.
Sources Lists all the CSS style sheets associated with the document. Using this pane, you can create and attach a CSS to
the document, or define styles within the document.
Last updated 3/8/2018
Page 77

Dreamweaver workspaces and views
@Media Lists all the media queries in the source selected in the Sources pane. If you do not select a specific CSS, this
pane displays all the media queries associated with the document.
Selectors Lists all the selectors in the source selected in the Sources pane. If you also select a media query, this pane
narrows down the list of selectors for that media query. If no CSS or media queries are selected, this pane displays all
the selectors in the document.
When you select Global in the @Media pane, all the selectors that are not included in a media query of the selected
source are displayed.
Properties Displays properties that you can set for the specified selector. For more information, see Set CSS properties .
If you collapse or expand the panes in CSS Designer, the sizes of the panes are remembered within a session. Sources
and Media panes stick to the customized sizes until you change their sizes again.
Note: When you select a page element, the most specific Selector is selected in the Selectors pane. To view the
properties of a specific Selector, click the name of that Selector in the pane.
To view all the selectors, you can choose All Sources in the Sources pane. To view selectors that do not belong to any
media query in the selected source, click
Global in the @Media pane.
Visual guides overview
Dreamweaver provides several kinds of visual guides to help you design documents and predict approximately how
they appear in browsers. You can do any of the following:
70
• Instantly snap the Document window to a desired window size to see how the elements fit on the page.
• Use a tracing image as the page background to help you duplicate a design create d in an i llust rat ion or image -ed iti ng
application such as Adobe® Photoshop® or Adobe® Fireworks®.
• Use rulers and guides to provide a visual cue for precise positioning and resizing of page elements.
• Use the grid for precise positioning and resizing of absolutely positioned elements (AP elements).
Grid marks on the page help you align AP elements, and when snapping is enabled, AP element s automatically snap
to the closest grid point when moved or resized. (Other objects, such as images and paragraphs, do not snap to the
grid.) Snapping works regardless of whether the grid is visible.
Zoom in and out of a page
Dreamweaver lets you increase the magnification (zoom in) in the Document window so that you can check the pixel
accuracy of graphics, select small items more easily, design pages with small text, design large pages, and so on.
To zoom in or out of a page, select View > Design View Options > Magnification, and choose any of the magnification
options available.
You can choose from a variety of magnification options. You can also choose to:
• Fit Selection - Select an object or text, and choose this option to fill the Document window with the selection.
• Fit All - Fill the Document window with an entire page
• Fit Width - Fill the Document window with the entire width of a page
Note: You can also zoom in without using the Zoom tool by pressing Control+= (Windows) or Command+=
(Macintosh).
(Macintosh).
You can also zoom out without using the Zoom tool by pressing Control+- (Windows) or Command+-
Last updated 3/8/2018
Page 78

Dreamweaver workspaces and views
Set General preferences for Dreamweaver
1 Select Edit > Preferences (Windows) or Dreamweaver > Preferences (Macintosh).
2 Set any of the following options:
Open Documents In Tabs Update links automatically Opens all documents in a single window with tabs that let
you switch between documents (Mac only).
Show Start Screen Displays the Dreamweaver Welcome screen when you start Dreamweaver or when you don’t
have any documents open.
Reopen Documents on Startup Opens any documents that were open when you closed Dreamweaver. If this
option is not selected, Dreamweaver displays the Welcome screen or a blank screen when you start (depending on
your Show Welcome Screen setting).
Warn When Opening Read-Only Files Alerts you when you open a read-only (locked) file. Choose to
unlock/check out the file, view the file, or cancel.
Enable Related Files Lets you s ee wh ich f il es a re c onne cted to th e cur rent doc um ent (fo r ex amp le, C SS or JavaS cr ipt
files). Dreamweaver displays a button for each related file at the top of the document, and opens the file if you click
the button.
Discover Dynamically-Related Files Lets you select whether Dynamically-Related Files appear in the Related Files
toolbar automatically, or after manual interaction. You can also choose to disable the discovery of DynamicallyRelated Files.
71
Update Links When Moving Files Determines what happens when you move, rename, or delete a document within
your site. Set this preference to always update links automatically, never update links, or prompt you to perform an
update. (See
Update links automatically .)
Show Dialog When Inserting Objects Determines whether Dreamweaver prompts you to enter additional
information when inserting images, tables, Shockwave movies, and certain other objects by using the Insert panel
or the Insert menu. If this option is off, the dialog box does not appear and you must use the Property inspector to
specify the source file for images, the number of rows in a table, and so on. For roll over images and Fireworks
HTML, a dialog box always appears when you insert the object, regardless of this option setting. (To temporarily
override this setting, Control-click (Windows) or Command-click (Macintosh) when creating and inserting
objects.)
Enable Double-Byte Inline Input Lets you enter double-byte text directly into the Document window if you are
using a development environment or language kit that facilitates double-byte text (such as Japanese characters).
When this option is deselected, a text input window appears for entering and converting double-byte text; the text
appears in the Document window after it is accepted.
Switch To Plain Paragraph After Heading Specifies that pressing Enter (Windows) or Return (Macintosh) at the
end of a heading paragraph in Design or Live view creates a new paragraph tagged with a
paragraph is one that’s tagged with a heading tag such as
h1 or h2.) When the option is disabled, pressing Enter or
p tag. (A heading
Return at the end of a heading paragraph creates a new paragraph tagged with the same heading tag (allowing you
to type multiple headings in a row and then go back and fill in details).
Allow Multiple Consecutive Spaces Specifies that typing two or more spaces in Design or Live view creates
nonbreaking spaces that appear in a browser as multiple spaces. (For example, you can type two spaces between
sentences, as you would on a typewriter.) This option is designed mostly for people who are used to typing in word
processors. When the option is disabled, multiple spaces are treated as a single space (because browsers treat
multiple spaces as single spaces).
Last updated 3/8/2018
Page 79

Dreamweaver workspaces and views
Use <strong> and <em> in Place of <b> and <i> Specifies that Dreamweaver applies the strong tag whenever you
perform an action that would normally apply the
would normally apply the
in HTML mode and choosing Format
i tag. Such actions include clicking the Bold or Italic buttons in the text Property inspector
> Style > Bold or Format > Style > Italic. To use the b and i tags in your
b tag, and applies the em tag whenever you perform an action that
documents, deselect this option.
Note: The World Wide Web Consortium discourages use of the b and i tags; the strong and em tags provide more
semantic information than the b and i tags do.
Warn when placing editable regions within <p> or <h1> - <h6> tags Specifies whether a warning message is
di splayed w henever y ou s ave a D reamwea ver te mplate t hat has an edi table reg ion within a p ara graph or h ead ing tag .
The message tells you that users will not be able to create more paragraphs in the region. It is enabled by default.
Limit undo actions to the active document Limits the undo actions to the current file being edited. For example,
if you are editing a CSS file, you can undo changes made only to the CSS file.
However if this checkbox is disabled, HTML source and all related CSS files make use of a single undo history and
you can undo your actions irrespective of whether you are working with HTML code or in a related CSS file.
Maximum Number of History Steps Determines the number of steps that is remembered by Dreamweaver. (The
default value should be sufficient for most
discarded.
are
users.) If you exceed the given number of steps, the oldest steps
72
Spelling Dictionary Lists the available spelling dictionaries. If a dictionary contains multiple dialects or spelling
conventions (such as American English and British English), the dialects are listed separately in the Dictionary
pop-up menu.
Set Fonts preferences for documents in Dreamweaver
A document’s encoding determines how the document appears in a browser. Dreamweaver font preferences let you
view a given encoding in the font and size you prefer. The fonts you select in the Fonts Preferences dialog, however,
only affect the way fonts appear in Dreamweaver; they do not affect the way the document appears in a visitor’s browser.
To change the way fonts appear in a browser, you need to change the text by using the Property inspector or by applying
a CSS rule.
For information on setting a default encoding for new documents, see Creating and opening documents.
1 Select Edit > Preferences (Windows) or Dreamweaver > Preferences (Mac).
2 Select Fonts from the Category list on the left.
3 Select an encoding type (such as Western European or Japanese) from the Font Settings list.
Note: To display an Asian language, you must be using an operating system that supports double-byte fonts.
4 Select a font and size to use for each category of the selected encoding.
Note: To appear in the font pop-up menus, a font must be installed on your computer. For example, to see Japanese text
you must have a Japanese font installed.
Proportional Font The font that Dreamweaver uses to display normal text (for example, text in paragraphs,
headings, and tables). The default depends on your system’s installed fonts. For most U.S. systems, the default is
Times New Roman 12 pt. (Medium) on Windows and Times 12 pt. on Mac
OS.
Fixed Font The font Dreamweaver uses to display text within pre, code, and tt tags. The default depends on your
system’s installed fonts. For most U.S. systems, the default is Courier New 10 pt. (Small) on Windows and Monaco
12 pt. on Mac
OS.
Last updated 3/8/2018
Page 80

Dreamweaver workspaces and views
Code View The font used for all text that appears in the Code view and Code inspector. The default depends on your
system’s installed fonts.
Customize Dreamweaver highlighting colors
Use the Highlighting preferences to customize the colors that identify template regions, library items, third-party tags,
layout elements, and code in Dreamweaver.
1 Select Edit > Preferences and select the Highlighting category.
2 Beside the object you want to change the highlighting color for, click the color box, and then use the color picker to
select a new color, or enter a hexadecimal value.
3 To activate or deactivate highlighting for a particular option, select or deselect the Show option.
Optimize Dreamweaver workspace for visual development
73
Display web-application development panels
Select the Data category from the Category pop-up menu of the Insert panel to display a set of buttons that let you add
dynamic content and server behaviors to your page.
The number and type of buttons that appear vary depending upon the document type opened in the Document
window. Move your mouse over an icon to display a tooltip that describes what that button does.
The Insert panel includes buttons to add the following items to the page:
• Recordsets
• Dynamic text or tables
• Record navigation bars
If you switch to Code view (View > Code), additional panels might appear in their own Insert panel category,
allowing you to insert code in the page. For example, if you view a ColdFusion page in Code view, a CFML panel
becomes available in the CFML category of the Insert panel.
Several panels provide ways for you to create dynamic pages:
• Select the Bindings panel (Window > Bindings) to define sources of dynamic content for your page and add the
content to the page.
• Select the Server Behaviors panel (Window > Server Behaviors) to add server-side logic to your dynamic pages.
• Select the Databases panel (Window >Databases) to explore databases or create database connections.
• Select the Components panel (Window > Components) to inspect, add, or modify code for ColdFusion
components.
Note: The Components panel is enabled only if you open a ColdFusion page.
A server behavior is the set of instructions inserted in a dynamic page at design time and executed on the server at run
time.
Last updated 3/8/2018
Page 81

Dreamweaver workspaces and views
For a tutorial on setting up the development workspace, see www.adobe.com/go/vid0144.
View your database within Dreamweaver
After connecting to your database, you can view its structure and data within Dreamweaver.
1 Open the Databases panel (Window > Databases).
The Databases panel displays all the databases for which you created connections. If you’re developing a ColdFusion
site, the panel displays all the databases that have data sources defined in the ColdFusion Administrator.
Note: Dreamweaver looks at the ColdFusion server you defined for the current site.
If no database appears in the panel, you must create a database connection.
2 To display the tables, stored procedures, and views in the database, click the Plus (+) sign beside a connection in the
list.
3 To display the columns in the table, click a table name.
The column icons reflect the data type and indicate the primary key of the table.
4 To view the data in a table, right-click (Windows) or Control-click (Macintosh) the table name in the list, and select
View Data from the pop-up menu.
74
Preview dynamic pages in a browser
Web application developers often debug their pages by checking them often in a web browser. You can quickly view
dynamic pages in a browser without first manually uploading them to a server (press F12).
To preview dynamic pages, you must complete the Testing Server category of the Site Definition dialog box.
You can specify that Dreamweaver use temporary files instead of the original files. With this option, Dreamweaver runs
a temporary copy of the page on a web server before displaying it in your browser. (Dreamweaver then deletes the
temporary file from the server.) To set this option, select Edit
The Preview In Browser option does not upload related pages such as a results or a detail page, dependent files such as
image files, or server-side includes. To upload a missing file, select Window
under Local Folder, and click the blue up arrow in the toolbar to copy the file to the web server folder.
> Preferences > Preview In Browser.
> Site to open the Site panel, select the file
Restrict database information displayed in Dreamweaver
Advanced users of large database systems like Oracle should restrict the number of database items retrieved and
displayed by Dreamweaver at design time. An Oracle database may contain items that Dreamweaver cannot process at
design time. You can create a schema in Oracle and use it in Dreamweaver to filter out unnecessary items at design time.
Note: You cannot create a schema or catalog in Microsoft Access.
Other users may benefit from restricting the amount of information Dreamweaver retrieves at design time. Some
databases contain dozens or even hundreds of tables, and you might prefer not to list them all while you work. A schema
or catalog can restrict the number of database items that are retrieved at design time.
You must create a schema or catalog in your database system before you can apply it in Dreamweaver. Consult your
database system documentation or your system administrator.
Last updated 3/8/2018
Page 82

Dreamweaver workspaces and views
Note: You cannot apply a schema or catalog in Dreamweaver if you’re developing a ColdFusion application, or using
Microsoft Access.
1 Open a dynamic page in Dreamweaver; then open the Databases panel (Window > Databases).
• If the database connection exists, right-click (Windows) or Control-click (Macintosh) the connection in the list,
and select Edit Connection from the pop-up menu.
• If the connection does not exist, click the Plus (+) button at the top of the panel and create it.
2 In the dialog box for the connection, click Advanced.
3 Specify your schema or catalog, and click OK.
Set the Property inspector for ColdFusion stored procedures and ASP commands
Modify the selected stored procedure. The available options vary depending on the server technology.
?
Edit any of the options. When you select a new option in the inspector, Dreamweaver updates the page.
Input Name options
This Property inspector appears when Dreamweaver encounters an unrecognized input type. Typically this occurs
because of a typing or other data entry error.
75
If you change the field type in the Property inspector to a value that Dreamweaver recognizes—for example, if you
correct the spelling error—the Property inspector updates to show the properties for the recognized type. Set any of the
following options in the Property inspector:
Input Name Assigns a name to the field. This box is required, and the name must be unique.
Typ e Sets the input type of the field. The contents of this box reflect the input type value that currently appears in your
HTML source code.
Val ue Sets the value of the field.
Parameters Opens the Parameters dialog box so you can view the current attributes of the field, as well as add or
remove attributes.
Search files based on filename or content | Mac OS
This feature is available only for Mac OS.
Use Live Search to locate files based on filename or text present in files. The site selected in the Files panel is used for
search. If there is no site selected in the panel, the search option does not appear.
Live Search uses the Spotlight API in Mac OS. Any customization that you apply to Spotlight preferences is also used
for Live Search. Spotlight displays all files on your computer that match your search query. Live Search searches files in
the local root folder of the site currently selected in the Files panel.
1 Select Edit > Live Search. Alternatively, use CMD+SHIFT+F. The focus is set to the Live Search text box in Files
Panel.
Last updated 3/8/2018
Page 83

Dreamweaver workspaces and views
2 Enter the word or phrase in the text box. The results are displayed as you enter text in the text box.
Matching files Displays a maximum of 10 filenames that match your search criteria. The message More Than 10
Results Found is displayed if there are more than 10 matching files. Refine your search criteria if you do not find
your desired file in the options displayed.
Matching Text In Displays a maximum of 10 files that contain text matching the word or phrase you entered. For
more options, click Find All. The results are displayed in the Search panel.
3 When you move the mouse cursor over a search result, a tool tip with the root-relative path of the file is displayed.
Press Enter, or click the item to open the file.
For files containing matching text, the first instance of the text is highlighted. Use Cmd+G to navigate to other
instances.
Note: To close the Live Search results panel, click outside the panel, or press Escape / Esc
76
Last updated 3/8/2018
Page 84

Chapter 4: Set up sites
About Dreamweaver sites
In Dreamweaver the term “site” refers to a local or remote storage location for the documents that belong to a website.
A D reamwe ave r sit e pr ovi des a way to or gan ize a nd m ana ge al l of y our web d ocum ents , up load you r sit e to a web serve r,
track and maintain your links, and manage and share files. You should define a site to take full advantage of
Dreamweaver features.
Adobe Dreamweaver site is a collection of all of the files and assets in your website. You can create web pages on your
computer, upload them to a web server, and maintain the site by transferring updated files whenever you save them.
You can also edit and maintain websites that were created without Dreamweaver.
Why define a Dreamweaver site?
You can work in Dreamweaver without setting up (or defining) a site.
77
However, defining a site has many benefits:
• It helps prevent broken links, automatically updating files site-wide if you move or rename a file.
• It helps you perform site-wise find and replace operations, which greatly boosts productivity.
• It helps you publish your site easily, as well as synchronize files between your local hard drive and remote files on
the web or a staging server.
To get the best out of Dreamweaver functionalities, start by defining a site. For more information on defining a site, see
Set up a local version of your site.
Components of a Dreamweaver site
In Dreamweaver, a site organizes all the documents on your local computer associated with your website and lets you
track and maintain links, manage files, and transfer your site files to a web server.
A Dreamweaver site consists of as many as three parts, or folders, depending on your development environment and
the type of website you are developing:
• Local Folder: T his i s you r wo rki ng di rect ory—u sua lly a fold er on you r ha rd dr ive . Dre amw eav er r efe rs to this fol der
as your local site root. This folder can also be on a network server. For more information, see
of your site.
• Remote Folder: This is where you store your files on the computer that's running your web server. The web server
is often (but not always) the computer that makes your site publicly available on the web.
Once you finish creating or updating your site, you can then publish your site to a remote server on the internet
retaining a local copy to update files when necessary.
Set up a local version
For more information, see Connect to a publishing server .
• Te st i n g f o l de r: This is the folder where Dreamweaver processes dynamic pages. If you have dynamic forms, PHP
content, you can set up the testing folder for your site.
Last updated 3/8/2018
Page 85

Set up sites
For more information, see Set up a testing server.
Note: To define a Dreamweaver site, you only need to set up a local folder. To transfer files to a web server or to develop
web applications, you must also add information for a remote site and testing server.
Understanding local and remote folder structure
When you want to use Dreamweaver to connect to a remote folder, you specify the remote folder in the Servers category
of the Site Setup dialog box. The remote folder that you specify (also referred to as the “host directory”) should
correspond to the local root folder of your Dreamweaver site. (The local root folder is the top-level folder of your
Dreamweaver site.) Remote folders, like local folders, can have any title, but commonly, Internet Service Providers
(ISPs) name the top-level remote folders for individual user accounts public_html, pub_html, or something similar. If
you are in charge of your own remote server, and can name the remote folder anything you want, it is a good idea for
your local root folder and remote folder to have the same name.
The following example shows a sample local root folder on the left and a sample remote folder on the right. The local
root folder on the local machine maps directly to the remote folder on the web server, rather than to any of the remote
folder’s sub folders, or folders that exist above the remote folder in the directory structure.
78
Local root folder (left) and a remote folder (right)
Note: The above example illustrates one local root folder on the local machine, and one top-level remote folder on the
remote web server. If, however, you are maintaining a number of Dreamweaver sites on your local machine, you would need
an equal number of remote folders on the remote server. In such a case the above example would not apply, and you would
instead create different remote folders within the public_html folder, and then map them to their corresponding local root
folders on your local machine.
When you first establish a remote connection, the remote folder on the web server is usually empty. Then, when you
use Dreamweaver to upload all of the files in your local root folder, the remote folder populates with all of your web
files. The directory structure of the remote folder and the local root folder should always be the same. (That is, there
should always be a one-to-one correspondence between the files and folders in your local root folder, and the files and
folders in your remote folder.) If the structure of the remote folder doesn’t match the structure of the local root folder,
Dreamweaver uploads files to the wrong place, where they might not be visible to site visitors. Additionally, image and
link paths can easily break when folder and file structures are not in synch.
The remote folder must exist before Dreamweaver can connect to it. If you don’t have a designated folder that acts as
your remote folder on the web server, create one or ask your ISP’s server administrator to create one for
you.
Last updated 3/8/2018
Page 86

Set up sites
Set up a local version of your site
Although you can work in Dreamweaver without creating a local site root folder, it is a good idea to define a
Dreamweaver local
Creating a local site folder enables Dreamweaver to know where your site files are to create all the internal links
correctly, and to update them when you move files to a different location
For more information on why it is beneficial to create local sites, see Benefits of a Dreamweaver site .
To set up a local version of your site, you must specify the local folder where you plan to store all of your site files.
The local folder can be on your local computer or on a network server. You can use the Site > New Site or Site > Manage
Sites dialog boxes in Dreamweaver to set up multiple sites and manage them.
Before you start
Identify or create the folder on your computer where you want to store the local version of your site files. The folder
can be anywhere on your computer. You then specify this folder as your local site in Dreamweaver.
For a video tutorial on setting up a new Dreamweaver site, Define a site in Dreamweaver.
site folder for each new website you create.
within your site.
79
Best practices for naming files and folders
Follow these general guidelines for naming files and folders:
• File and folder names in websites should never contain spaces or any of the following characters: /\?%*:|"<>.
• A lth oug h othe r sp ec ial char acte rs are p er mit ted , it is bet ter to co nfi ne yo urs elf t o alp han ume ric c har ac ter s, hyph ens ,
and underscores.
• Most file and folder names end up as part of a web page's URL, so keep them short, but meaningful. Long URLs are
difficult for users to remember and type into browsers on a mobile device.
• Stick to lowercase letters for file and folder names to avoid file not found issues. Most web servers are Linux –based,
which are case-sensitive.
The Site Setup dialog
The Manage Sites dialog box is your gateway into various Dreamweaver site functions. From this dialog box, you can
initiate the process for creating a new site, editing an existing site, duplicating a site, removing a site, or importing or
exporting a site’s settings.
To set up and manage a site, use the Site > New Site, or Site > Manage Sites dialogs.
Last updated 3/8/2018
Page 87

Set up sites
80
The Site setup dialog
New Site Click the New Site button to create a new Dreamweaver site. Then specify the name and location for your new
site in the Site Setup dialog box.
Import Site Click the Import Site button to import a site. For more information, see Import and export Dreamweaver
site settings.
Note: The import site feature only imports site settings that have previously been exported from Dreamweaver. It does not
import site files to create a new Dreamweaver site.
For existing sites, the following options are also available:
Delete Deletes the selected site and all of its setup information from your list of Dreamweaver sites; it does not
delete the actual site files. (If you want to remove the site files from your computer, you need to do that manually.) To
delete a site from Dreamweaver, select the site in the site list and then click the Delete button. You cannot undo this
action.
Edit Enables you to edit information such as username, password, and server information for an existing
Dreamweaver site. Select the existing site in the site list and click the Edit button to edit the existing site. (The Site Setup
dialog box opens once you click the Edit button for a selected site.) For more information on editing existing site
options, click the Help button in the various screens of the Site Setup dialog box.
Duplicate Creates a copy of an existing site. To duplicate a site, select the site in the site list and click the Duplicate
button. The duplicated site appears in the site list with the word “copy” appended to the name of the site. To change the
name of the duplicated site, leave the site selected and click the Edit button.
Export Enables you to export the selected site’s settings as an XML file (*.ste). For more information, see Import
and export site settings .
Setting up a local version of your site
1 In Dreamweaver, choose Site > New Site.
Last updated 3/8/2018
Page 88

Set up sites
2 In the Site Setup dialog box, make sure the Site category is selected.
3 In the Site Name text box, enter a name for your site. This name appears in the Files panel and in the Manage Sites
dialog box; it does not appear in the browser.
4 In the Local Site Folder text box, specify the folder you identified earlier—the folder on your computer where you
want to store the local version of your site files. Click the folder icon to the right of the text box to browse to the
folder.
81
Setting up a local site folder
5 If you want to use Git to manage your files for your site, select the Associate a Git Repository With This Site check
box.
• If you are a first time Git user, and you want to associate the site that you are creating with Git, select Initialize
As a Git Respository.
• If you already have a Git login, and want to associate the site that you are creating with an existing repository,
select Clone Existing Git Repository Using URL.
6 Click Save to close the Site Setup dialog box. You can now begin working on your local site files in Dreamweaver.
This folder location is where you keep the working copies of web pages on your local computer.
Last updated 3/8/2018
Page 89

Set up sites
Later, if you want to publish your pages and make them publicly available, you have to define a remote folder (or a
publishing server)—a place on a remote computer, running a web server that will hold published copies of your local
files.
For information on defining and connecting to a remote server (or a publishing server), see Connect to a publishing
server .
Set up a testing server
If you plan to develop dynamic pages using server-side languages such as PHP, set up a testing server to generate and
display dynamic content while you work.
The testing server can be your local computer, a development server, a staging server, or a production server.
For a detailed overview about the purposes of a testing server, see David Powers’s article, Setting up a local testing server
in Dreamweaver CS5.
Benefits of setting up a testing server
Setting up a testing server allows you to test all your dynamic code safely without causing any damage to your live
website.
82
You can also work virtually uninterrupted from network failures and Internet outages that might keep you from
uploading everything onto a remote server.
In addition by having a local test server, you do not have to waste any time uploading, testing, fixing, reuploading, and
retesting your pages.
So if you are testing layouts, shopping carts, or any other script – set up a testing server.
Another benefit of a testing server is that Dreamweaver automatically syncs dynamic documents to your testing server
when you open, create, or save changes made to dynamic documents. For more information, see
dynamic files.
Note: Analytics and load times will not be accurate unless you are accessing the site from a remote location.This is especially
true of load times – since loading a web site from your local computer is always faster than loading the same web site
through a network.
Automatic pushing of
Before you start
Before you set up a testing server from within Dreamweaver, you must set up and install the following:
• A web-server such as Apache
• A database server such as MySQL
• Server-side language such as PHP
Set up a testing server
1 Select Site > Manage Sites.
2 Click New to set up a new site, or select an existing Dreamweaver site and click the edit icon.
Last updated 3/8/2018
Page 90

Set up sites
3 In the Site Setup dialog box, select the Servers category and do one of the following:
• Click the Add New Server button to add a new server
• Select an existing server and click the Edit Existing Server button
4 Specify Basic options just like you would for a remote server connection, and then click the Advanced button. While
setting up the basic options, make sure you specify a Web URL in the Basic screen.
For information on setting up a remote server connection, see Connect to a publishing server .
For more information on the web URL for the testing server, see About the Web URL for the testing server.
5 Under Testing Server, select the server model you want to use for your web application.
6 Click Save to close the Advanced screen. Then in the Servers category, specify the server you just added or edited as
a testing server.
About the Web URL for the testing server
You must specify a Web URL so Dreamweaver can use the services of a testing server to display data and to connect to
databases while you work. Dreamweaver uses the design-time connection to provide you with useful information about
the database, such as the names of the tables in your database and the names of the columns in your tables.
A Web URL for a testing server consists of the domain name and any of your website’s home directory’s subdirectories
or virtual directories.
83
Note: The terminology used in Microsoft IIS may vary from server to server, but the same concepts apply to most web
servers.
The home directory The folder on the server mapped to your site’s domain name. Suppose the folder you want to use
to process dynamic pages is c:\sites\company\, and this folder is your home directory (that is, this folder is mapped to
your site’s domain name—for example, www.mystartup.com). In that case, the URL prefix is
http://www.mystartup.com/.
If the folder you want to use to process dynamic pages is a subfolder of your home directory, simply add the subfolder
to the URL. If
you want to use to process dynamic pages is
your home directory is c:\sites\company\, your site’s domain name is www.mystartup.com, and the folder
c:\sites\company\inventory. Enter the following Web URL:
http://www.mystartup.com/inventory/
If the folder you want to use to process dynamic pages is not your home directory or any of its subdirectories, you must
create a virtual directory.
A virtual directory A folder that is not physically contained in the home directory of the server even though it appears
to be in the URL. To create a virtual directory, specify an alias for the folder’s path in the URL. Suppose your home
directory is c:\sites\company, your processing folder is d:\apps\inventory, and you define an alias for this folder called
warehouse. Enter the following Web URL:
http://www.mystartup.com/warehouse/
Localhost Re fer s to the home d ire ctory i n yo ur U RLs whe n th e cl ient ( usu ally a b rowse r, but i n th is case D reamwea ver)
ru ns on the same system as your web ser ver. Suppo se Dreamweaver is running on the s ame Windows s ystem as the web
server, your home directory is c:\sites\company, and you defined a virtual directory called warehouse to refer to the
folder you want to use to process dynamic pages. The following are the Web URLs you would enter for selected web
servers:
Last updated 3/8/2018
Page 91

Set up sites
Web server Web U RL
ColdFusion MX 7 http://localhost:8500/warehouse/
IIS http://localhost/warehouse/
Apache (Windows) http://localhost:80/warehouse/
Jakarta Tomcat (Windows) http://localhost:8080/warehouse/
Note: By default the ColdFusion MX 7 web server runs on port 8500, the Apache web server runs on port 80, and the
Jakarta Tomcat web server runs on port 8080.
For Macintosh users running the Apache web server, your personal home directory is Users/MyUserName/Sites, where
MyUserName is your Macintosh user name. An alias called ~MyUserName is automatically defined for this folder
when you install Mac
OS 10.1 or higher. Therefore, your default Web URL in Dreamweaver is as follows:
http://localhost/~MyUserName/
If the folder you want to use to process dynamic pages is Users:MyUserName:Sites:inventory, then the Web URL is as
follows:
http://localhost/~MyUserName/inventory/Choose an application server
84
For more information, see Choose an application server.
Automatic pushing of dynamic files
A dynamic document is automatically pushed to the testing server when you edit and save it in Live view or Code view.
If you want to disable auto push of dynami c file s, you can do so i n the ser ver settings. For more informati on, see
auto push of dynamic files .
When the files are auto-pushed, Dreamweaver also pushes the dependent files if they are not present on the testing
server. If the dependent files are already present on the server, then only the server-side document is pushed to the
testing server.
Consider the following scenarios:
Scenario 1: You make changes to the source code and dependent files. The focus is in thesource code when you click
Save.
In this case, the following dialog box that lists all the affected, dependent files appears:
I was not able to get this screen displayed. Would you be able to give me a screencap?
Disable
Last updated 3/8/2018
Page 92

Set up sites
Prompt for saving dependent files
You can then choose the files that you want to push to the testing server.
Note: You can select Always Auto Save the Dependent Files to not see the prompt for subsequent operations. To revert
this preference at any point in time, go to the settings of the testing server (Site Setup), and in the Advanced tab,
uncheck Always Auto Save Dependent Files.
85
Auto save dependent files option in server setup
Last updated 3/8/2018
Page 93

Set up sites
Scenario 2: You make changes to the source code and dependent files. The focus is on one of the dependent files when
you click Save.
In this case, only the dependent file is saved and pushed to the testing server.
Disable auto push of dynamic files
You can disable auto-push of dynamic files in the server settings.
1 Go to Site > Manage Sites.
2 Choose your Site and click the edit button. The Site Setup dialog box appears.
3 Go to Servers category.
4 Choose the testing server and click the edit icon.
5 In the popup that appears, click Advanced.
6 Deselect Automatically Push Files To Testing Server.
86
Disabling auto-push of dynamic files
Import and export Dreamweaver site settings
When you define a site, Dreamweaver stores that site's information in its files.
You can export your site settings as an XML file that you can later import into Dreamweaver. Migrating site settings in
this way transfers valuable site information to other machines and product versions. You can also share site settings
with other
of your site .
Scenarios where you want to import or export site settings
• Export your site settings regularly so that you have a backup copy if anything happens to the site.
• If you have set up a site, and then are working with several other people, then you can export and then import site
users, and back up site settings.
The import/export feature does not import or export site files. It only imports/exports site settings to save you the time
of recreating sites in Dreamweaver. For information on creating a new site in Dreamweaver, see Set up a local version
settings on the different computers.
Last updated 3/8/2018
Page 94

Set up sites
Export your site settings
1 Select Site > Manage sites.
2 Select one or more sites whose settings you want to export and click the Export icon.
• To select more than one site, Control-click (Windows) or Command-click (Macintosh) each site.
• To select a range of sites, Shift-click the first and last site in the range.
3 If you have created remote server connections with user name and password information, then Dreamweaver
prompts you asking if you want to back up site settings for yourself, or if you want to share settings with others.
If you want to back up your site settings for yourself, select Back up my settings and click OK.
Dreamweaver saves remote server login information, such as the user name and password, as well as local path
information.
If you want to share your settings with other users, select Share settings with other users and click OK. Dreamweaver
does not save information that would not work for other users, such as your remote server login information and
local paths.
87
Options to export site settings
4 For each site whose settings you want to export, browse to a location where you want to save the site file and click
Save. (Dreamweaver saves each site’s settings as an XML file, with an .ste file extension.)
5 Click Done.
Note: Save the *.ste file to your site root folder or to your desktop to make it easy to find. If you cannot remember where
you put it, do a file search on your computer for files with the *.ste extension to locate it.
Import site settings
1 Select Site > Manage sites.
2 Click Import Site.
3 Browse to and select one or more sites—defined in files with an .ste file extension—whose settings you want to
import.
To select more than one site, Control-click (Windows) or Command-click (Macintosh) each .ste file. To select a
range of sites, Shift-click the first and last file in the range.
4 Click Open and then click Done.
After Dreamweaver imports the site settings, the site names appear in the Manage Sites dialog box.
Last updated 3/8/2018
Page 95

Set up sites
Bring existing websites from a remote server to your local site root
You can use Dreamweaver to copy an existing remote site (or any branch of a remote site) to your local disk and edit it
there, even if you didn’t use Dreamweaver to create the original site. You must have the correct connection information,
and connect to the site’s remote server, before you can edit the site.
Scenario when you want to bring websites from a remote server and edit them
Sometimes you have to work on websites that are already published on the web, and for which you no longer have the
files.
In such a scenario, you can bring in the files to your local system and edit them in Dreamweaver.
High-level workflow
To get files from a remote server to edit them in Dreamweaver, do the following tasks:
1 Create a local folder to contain the existing site and set up the folder as the local folder for the site.
For more information, see Set up a local version of your site .
88
Note: You must locally duplicate the entire structure of the relevant branch of the existing remote site.
2 Set up a remote folder, using the remote access information about the existing site. You must connect to the remote
site to download the files to your computer before you can edit them.
For more information, see Connect to a publishing server .
Make sure to choose the correct root folder for the remote site.
3 In the Files panel (Window > Files), click the Connects To Remote Server button (for FTP access) or the Refresh
button (for network access) in the toolbar to view the remote site.
4 Edit the site:
• If you want to work with the entire site, select the root folder of the remote site in the Files panel, and click Get
File(s) from Remote Server
• If you want to work with just one of the files or folders of the site, locate the file or folder in the Remote view of
the Files panel, and click Get File(s) from Remote Server
Note: When editing only one part of a site, make sure you include dependent files, such as image files.
Dreamweaver automatically duplicates as much of the remote site’s structure as is necessary to place the downloaded
file in the correct part of the site hierarchy.
Once the files are downloaded, you can see the files appear in the Files panel.
After you are done with your edits, you can then repost the new versions of the files back to the server, or you can set
up another remote site in relation to this same local directory, and post the edited files to a different server entirely.
in the toolbar to download the entire site to your local disk.
in the toolbar to download that file to your local disk.
Accessibility features in Dreamweaver
Last updated 3/8/2018
Page 96

Set up sites
About accessible content
Accessibility refers to making websites and web products usable for people with visual, auditory, motor, and other
disabilities. Examples of accessibility features for software products and websites include screen reader support, text
equivalents for graphics, keyboard shortcuts, change of display colors to high contrast, and so on. Dreamweaver
provides tools that make it accessible to use and tools that help you author accessible content.
For Dreamweaver developers who need to use accessibility features, the application offers screen reader support,
keyboard navigation, and operating system accessibility support.
For web designers who need to create accessible content, Dreamweaver assists you in creating accessible pages that
contain useful content for screen readers and comply with federal government guidelines. For example, dialog boxes
prompt you to enter accessibility attributes—such as text equivalents for an image—when you insert page elements.
Then, when the image appears on a page for a user with visual disabilities, the screen reader reads the description.
Note: For more information about two significant accessibility initiatives, see the World Wide Web Consortium Web
Accessibility Initiative (
Note: For more information about Japan Industry Standard accessibility guidelines, see JIS X 8341-3 (www.jisc.go.jp).
No authoring tool can automate the development process. Designing accessible websites requires you to understand
accessibility requirements and make ongoing decisions about how users with disabilities interact with web pages. The
best way to ensure that a website is accessible is through deliberate planning, development, testing, and evaluation.
www.w3.org/wai) and Section 508 of the U.S. Federal Rehabilitation Act (www.section508.gov).
89
Use screen readers with Dreamweaver
A screen reader recites text that appears on the computer screen. It also reads non-textual information, such as button
labels or image descriptions in the application, provided in accessibility tags or attributes during authoring.
As a Dreamweaver designer, you can use a screen reader to assist you in creating your web pages. The screen reader
starts reading from the upper-left corner of the Document window.
Dreamweaver supports JAWS for Windows, from Freedom Scientific (www.freedomscientific.com), and Window-Eyes
screen readers, from GW Micro (www.gwmicro.com).
Support for operating system accessibility features
Dreamweaver supports accessibility features in both the Windows and Macintosh operating systems. For example, on
the Macintosh you set the visual preferences in the Universal Access Preferences dialog box (Apple
Preferences). Your settings are reflected in the Dreamweaver work space.
The Windows operating system’s high contrast setting is also supported. You activate this option through the Windows
Control Panel and it affects Dreamweaver as follows:
• Dialog boxes and panels use system color settings. For example, if you set the color to White on Black, all
Dreamweaver dialog boxes and panels appear with a white foreground color and black background.
• Code view uses the system and window text color. For example, if you set the system color to White on Black, and
then change text colors in Edit
displays the code text with a white foreground color and black background.
> Preferences > Code Coloring, Dreamweaver ignores those color settings and
• Design view uses the background and text colors you set in Modify > Page Properties so that pages you design
render colors as a browser will.
> System
Last updated 3/8/2018
Page 97

Set up sites
Optimize the work space for accessible page design
When you create accessible pages, you need to associate information, such as labels and descriptions, with your page
objects to make your content accessible to all users.
To do this, activate the Accessibility dialog box for each object, so that Dreamweaver prompts you for accessibility
information when you insert objects. You can activate a dialog box for any of the objects in the Accessibility category
in Preferences.
1 Select Edit > Preferences (Windows) or Dreamweaver > Preferences (Macintosh).
2 Select Accessibility from the Category list on the left, select an object, set any of the following options, and click OK.
Show Attributes When Inserting Select the objects for which you want to activate accessibility dialog boxes. For
example, form objects, frames, media, and images.
Keep Focus In The Panel Maintains focus on the panel, which makes it accessible to the screen reader. (If you don’t
select this option, the focus remains in Design or Code view when a user opens a panel.)
Offscreen Rendering Select this option when using a screen reader.
Note: Accessibility attributes appear in the Insert Table dialog box when you insert a new table.
Navigate Dreamweaver using the keyboard
You can use the keyboard to navigate panels, inspectors, dialog boxes, frames, and tables without a mouse.
90
Note: Tabbing and the use of arrow keys are supported for Windows only.
Navigate panels
1 In the Document window, press Control+F6 to shift focus to a panel.
A dotted line around the panel title indicates that focus is on that panel. The screen reader reads the panel title bar
that has focus.
2 Press Control+F6 again to shift focus until you have focus on the panel you want to work in. (Press
Control+Shift+F6 to shift focus to the previous panel.)
3 If the panel you want to work in is not open, use the keyboard shortcuts in the Windows menu to display the
appropriate panel; then press Control+F6.
If the panel you want to work in is open, but not expanded, place focus on the panel title bar, and then press the
Spacebar. Press the Spacebar again to collapse the panel.
4 Press the Tab key to move through the options in the panel.
5 Use the arrow keys as appropriate:
• If an option has choices, use the arrow keys to scroll through the choices, and then press the Spacebar to make a
selection.
• If there are tabs in the panel group to open other panels, place focus on the open tab, and then use the left or right
arrow key to open another tabs. Once you open a new tab, press the Tab key to move through the options in that
panel.
Navigate the Property inspector
1 Press Control+F3 to display the Property inspector, if it is not visible.
2 Press Control+F6 (Windows only) until you shift focus to the Property inspector.
Last updated 3/8/2018
Page 98

Set up sites
3 Press the Tab key to move through the Property inspector options.
4 Use the arrow keys as appropriate to move through option choices.
5 Press Control+Down arrow/Up arrow (Windows) or Command Down arrow/Up arrow (Macintosh) to open and
close the expanded section of the Property inspector, as necessary, or, with focus on the expander arrow in the lowerright corner, press the Spacebar.
Note: Keyboard focus must be inside the Property inspector (and not on the panel title) for expanding and collapsing to
work.
Navigate a dialog box
1 Press the Tab key to move through the options in a dialog box.
2 Use the arrow keys to move through choices for an option.
3 If the dialog box has a Category list, press Control+Tab (Windows) to shift focus to the category list, and then use
the arrow keys to move up or down the list.
4 Press Control+Tab again to shift to the options for a category.
5 Press Enter to exit the dialog box.
Navigate frames
?
If your document contains frames, you can use the arrow keys to shift focus to a frame.
91
Select a frame
1 Press Alt+Down Arrow to place the insertion point in the Document window.
2 Press Alt+Up Arrow to select the frame that currently has focus.
3 Continue pressing Alt+Up Arrow to shift focus to the frameset, and then to the parent framesets, if there are nested
framesets.
4 Press Alt+Down Arrow to shift focus to a child frameset or a single frame within the frameset.
5 With focus on a single frame, press Alt+Left or Right Arrow to move between frames.
Navigate a table
1 Use the arrow keys or press Tab to move to other cells in a table as necessary.
Pressing Tab in a right-most cell adds another row to the table.
2 To select a cell, press Control+A (Windows only) while the insertion point is in the cell.
3 To select the entire table, press Control+A twice if the insertion point is in a cell, or once if a cell is selected.
4 To exit the table, press Control+A three times if the insertion point is in a cell, twice if the cell is selected, or once if
the table is selected, and then press the Up, Left, or Right Arrow key.
Set site preferences for transferring files
You can set preferences to control how files are transferred between local and remote sites in the Files panel.
1 Select Edit > Preferences (Windows) or Dreamweaver > Preferences (Macintosh).
Last updated 3/8/2018
Page 99

Set up sites
2 In the Preferences dialog box, select Site from the category list on the left.
92
Site preferences dialog
3 Set the options and click OK.
Always Show Specifies which site (remote or local) is always shown, and in which Files panel pane (left or right) the
local and remote files appear.
By default, the local site always appears on the right. Whichever pane is not chosen (the left one by default) is the
changeable pane: this pane can display the files in the other site (the remote site by default).
Dependent Files Displays a prompt for transferring dependent files (such as images, external style sheets, and other
files referenced in the HTML file) that the browser loads when it loads the HTML file. By default, both Prompt on
Get/Check Out and Prompt on Put/Check In are selected.
It’s usually a good idea to download dependent files when checking out a new file, but if the latest versions of the
dependent files are already on the local disk, there’s no need to d ownload them again. This is also true for uploading
and checking in files: no need if up-to-date copies are already at the destination.
If you deselect these options, your dependent files are not transferred. Therefore, to force the Dependent Files dialog
box to appear even when these options are deselected, hold down Alt (Windows) or Option (Macintosh) while
choosing the Get, Put, Check In, or Check Out commands.
FTP Connection Determines whether the connection to the remote site is terminated after the specified number of
minutes have passed with no activity.
FTP Time Out Specifies the number of seconds in which Dreamweaver attempts to make a connection with the
remote server.
Last updated 3/8/2018
Page 100

Set up sites
If there is no response after the specified amount of time, Dreamweaver displays a warning dialog box alerting you
to this fact.
FTP Transfer options Determines whether Dreamweaver selects the default option, after a specified number of
seconds, when a dialog box appears during a file transfer and there is no user response.
Proxy Host Specifies the address of the proxy server through which you connect to outside servers if you are behind
a firewall.
If you are not behind a firewall, leave this space blank. If you are behind a firewall, select the Use Proxy option in
the Site Definition dialog box (Servers > Edit Existing Server (pencil icon) > More Options).
Proxy Port Specifies the port in your proxy or firewall through which you pass to connect to the remote server. If
you connect through a port other than 21 (the default for FTP), enter the number here.
Put Options: Save Files Before Putting Indicates that unsaved files are saved automatically before being put onto the
remote site.
Move Options: Prompt Before Moving Files on Server Alerts you when you attempt to move files on the remote site.
Manage Sites Opens the Manage Sites dialog box, where you can edit an existing site or create a new one.
You can define whether the types of files that you transfer are transferred as ASCII (text) or binary, by customizing
the FTPExtensionMap.txt file in the Dreamweaver/Configuration folder (on the Macintosh,
FTPExtensionMapMac.txt). For more information see, Extending Dreamweaver.
93
Specify proxy server settings in Dreamweaver
Several Dreamweaver features require Internet connectivity. If you or your organization is routing Internet connections
through a proxy server, you must provide the server credentials for Dreamweaver to connect to the Internet
successfully.
You can specify the proxy server credentials in the Adobe Creative Cloud for desktop app. When the Creative Cloud
desktop app is first launched, it determines whether or not the Internet connections are routed through a proxy server.
If a proxy server is set up, it prompts you to provide the credentials. If the Creative Cloud desktop app is already
installed and the proxy server is then set up at a later point in time, then too, the app detects the proxy server
automatically and prompts for credentials:
Last updated 3/8/2018
 Loading...