

Page 1

Using
Updated 24 September 2009
ADOBE® DREAMWEAVER® CS4
Page 2
Copyright
Updated 24 September 2009
© 2008 Adobe Systems Incorporated and its licensors. All rights reserved.
Using Adobe
This user guide is protected under copyright law, furnished for informational use only, is subject to change without notice, and should not be construed as a
commitment by Adobe Systems Incorporated. Adobe Systems Incorporated assumes no responsibility or liability for any errors or inaccuracies that may appear
in the informational content contained in this guide.
This user guide is licensed for use under the terms of the Creative Commons Attribution Non-Commercial 3.0 License. This License allows users to copy,
distribute, and transmit the user guide for noncommercial purposes only so long as (1) proper attribution to Adobe is given as the owner of the user guide; and
(2) any reuse or distribution of the user guide contains a notice that use of the user guide is governed by these terms. The best way to provide notice is to include
the following link. To view a copy of this license, visit
Adobe, the Adobe logo, ActionScript, ColdFusion, Contribute, Creative Suite, Director, Dreamweaver, Fireworks, Flash, FlashPaper, FreeHand, HomeSite,
Illustrator, InDesign, JRun, Shockwave, and Version Cue are either registered trademarks or trademarks of Adobe Systems Incorporated in the United States
and/or other countries.
ActiveX, Microsoft, Windows, and Windows Vista are either registered trademarks or trademarks of Microsoft Corporation in the United States and/or other
countries. Apple, Macintosh, and Mac OS are trademarks of Apple Inc., registered in the United States and other countries. Java, Solaris, and SunOS are
trademarks or registered trademarks of Sun Microsystems, Inc. in the United States and other countries. Linux is the registered trademark of Linus Torvalds in
the U.S. and other countries. UNIX is a registered trademark of The Open Group in the US and other countries. Arial is a trademark of The Monotype
Corporation registered in the U.S. Patent and Trademark Office and certain other jurisdictions. Times New Roman is a registered trademark of The Monotype
Corporation registered in the U.S. Patent and Trademark Office and may be registered in certain other jurisdictions. All other trademarks are the property of
their respective owners.
Updated Information/Additional Third Party Code Information available at
This product includes software developed by the Apache Software Foundation (
The Graphics Interchange Format © is the Copyright property of CompuServe Incorporated. GIF is a Service Mark property of CompuServe Incorporated.
MPEG Layer-3 audio compression technology licensed by Fraunhofer IIS and Thomson Multimedia (
compressed audio within the Software for real time or live broadcasts. If you require an MP3 decoder for real time or live broadcasts, you are responsible for
obtaining this MP3 technology license.
Speech compression and decompression technology licensed from Nellymoser, Inc. (
Video in Flash Player is powered by On2 TrueMotion video technology. © 1992-2005 On2 Technologies, Inc. All Rights Reserved.
This product includes software developed by the OpenSymphony Group (
Sorenson Spark
® Dreamweaver® CS4 for Windows® and Mac OS
http://creativecommons.org/licenses/by-nc-sa/3.0/
http://www.adobe.com/go/thirdparty.
http://www.apache.org/).
http://www.mp3licensing.com). You cannot use the MP3
www.nellymoser.com)
http://www.on2.com.
http://www.opensymphony.com/)
™ video compression and decompression technology licensed from Sorenson Media, Inc.
The Proximity/Merriam-Webster Inc./Franklin Electronic Publishers Inc. Database © 1990/1994 Merriam-Webster Inc./Franklin Electronic Publishers Inc., ©
1994. All Rights Reserved. Proximity Technology Inc. The Proximity/Merriam-Webster Inc./Franklin Electronic Publishers Inc. © 1990 Williams Collins Sons
& Co. Ltd. © 1997 - All rights reserved Proximity Technology Inc. © 1990 Williams Collins Sons & Co. Ltd. © 1990 - All rights reserved Proximity Technology
Inc. © Oxford University Press © 2000. All rights reserved Proximity Technology Inc. © 1990 IDE a.s. © 1990 - All rights reserved Proximity Technology Inc.
This product includes software developed by Fourthought, Inc. (
This product includes software developed by CollabNet (
Adobe Systems Incorporated, 345 Park Avenue, San Jose, California 95110, USA.
Notice to U.S. Government End Users. The Software and Documentation are “Commercial Items,” as that term is defined at 48 C.F.R. §2.101, consisting of
“Commercial Computer Software” and “Commercial Computer Software Documentation,” as such terms are used in 48 C.F.R. §12.212 or 48 C.F.R. §227.7202,
as applicable. Consistent with 48 C.F.R. §12.212 or 48 C.F.R. §§227.7202-1 through 227.7202-4, as applicable, the Commercial Computer Software and
Commercial Computer Software Documentation are being licensed to U.S. Government end users (a) only as Commercial Items and (b) with only those rights
as are granted to all other end users pursuant to the terms and conditions herein. Unpublishedrights reserved under the copyright laws of the United States.
Adobe Systems Incorporated, 345 Park Avenue, San Jose, CA 95110-2704, USA. For U.S. Government End Users, Adobe agrees to comply with all applicable
equal opportunity laws including, if appropriate, the provisions of Executive Order 11246, as amended, Section 402 of the Vietnam Era Veterans Readjustment
Assistance Act of 1974 (38 USC 4212), and Section 503 of the Rehabilitation Act of 1973, as amended, and the regulations at 41 CFR Parts 60-1 through 60-60,
60-250, and 60-741. The affirmative action clause and regulations contained in the preceding sentence shall be incorporated by reference.
http://www.fourthought.com).
http://www.Collab.Net/)
Page 3

Contents
Updated 24 September 2009
Chapter 1: Resources
Activation and registration
Tutorials
Help and support
Services, downloads, and extras
What’s new
Chapter 2: Workspace
Dreamweaver workflow and workspace
Working in the Document window
Using toolbars, inspectors, and context menus
Customizing the CS4 workspace
Keyboard shortcuts
Extensions
. . . . . . . . . . . . . . . . . . . . . . . . . . . . . . . . . . . . . . . . . . . . . . . . . . . . . . . . . . . . . . . . . . . . . . . . . . . . . . . . . . . . . . . . . . . . . . . . . . . . . . . . . . . . . . 2
. . . . . . . . . . . . . . . . . . . . . . . . . . . . . . . . . . . . . . . . . . . . . . . . . . . . . . . . . . . . . . . . . . . . . . . . . . . . . . . . . . . . . . . . . . . . . . . . . . . . . . 3
. . . . . . . . . . . . . . . . . . . . . . . . . . . . . . . . . . . . . . . . . . . . . . . . . . . . . . . . . . . . . . . . . . . . . . . . . . . . . . . . . . . . . . . . . . . . . . . . . . . . . . . . . . . 5
. . . . . . . . . . . . . . . . . . . . . . . . . . . . . . . . . . . . . . . . . . . . . . . . . . . . . . . . . . . . . . . . . . . . . . . . . . . . . . . . . . . . . . . . . . . . . . . . . . . . . . . . . . . 37
. . . . . . . . . . . . . . . . . . . . . . . . . . . . . . . . . . . . . . . . . . . . . . . . . . . . . . . . . . . . . . . . . . . . . . . . . . . . . . . . . . . . . . . . . . . . 1
. . . . . . . . . . . . . . . . . . . . . . . . . . . . . . . . . . . . . . . . . . . . . . . . . . . . . . . . . . . . . . . . . . . . . . . . . . . . . . . . . . . . . . . . 4
. . . . . . . . . . . . . . . . . . . . . . . . . . . . . . . . . . . . . . . . . . . . . . . . . . . . . . . . . . . . . . . . . . . . . . . . . . . . . . . . . . . . . . 25
. . . . . . . . . . . . . . . . . . . . . . . . . . . . . . . . . . . . . . . . . . . . . . . . . . . . . . . . . . . . . . . . . . . . . . . . . . . . . . . . . . . . . . . . . . . . . . . . . . . 34
iii
. . . . . . . . . . . . . . . . . . . . . . . . . . . . . . . . . . . . . . . . . . . . . . . . . . . . . . . . . . . . . . . . . . . . . . . . . . . . . . . . 7
. . . . . . . . . . . . . . . . . . . . . . . . . . . . . . . . . . . . . . . . . . . . . . . . . . . . . . . . . . . . . . . . . . . . . . . . . . . . . . . . . . . . 20
. . . . . . . . . . . . . . . . . . . . . . . . . . . . . . . . . . . . . . . . . . . . . . . . . . . . . . . . . . . . . . . . . . . . . . . . 24
Chapter 3: Working with Dreamweaver sites
Setting up a Dreamweaver site
Managing Contribute sites with Dreamweaver
Working on files without defining a site
Basic tab options
Chapter 4: Creating and Managing Files
Creating and opening documents
Managing files and folders
Getting and putting files to and from your server
Checking in and checking out files
Synchronizing files
Creating InContext Editing files
Comparing files for differences
Rolling back files (Contribute users)
Cloaking files and folders in your site
Storing file information in Design Notes
Testing your site
Chapter 5: Managing assets and libraries
About assets and libraries
Working with assets
Creating and managing a list of favorite assets
Working with library items
. . . . . . . . . . . . . . . . . . . . . . . . . . . . . . . . . . . . . . . . . . . . . . . . . . . . . . . . . . . . . . . . . . . . . . . . . . . . . . . . . . . . . . . . . . . . . . . . . . . . . 59
. . . . . . . . . . . . . . . . . . . . . . . . . . . . . . . . . . . . . . . . . . . . . . . . . . . . . . . . . . . . . . . . . . . . . . . . . . . . . . . . . . . . . . . . . . . . . . . . . . . 96
. . . . . . . . . . . . . . . . . . . . . . . . . . . . . . . . . . . . . . . . . . . . . . . . . . . . . . . . . . . . . . . . . . . . . . . . . . . . . . . . . . . . . . . . . . . . . . . . . . . . 111
. . . . . . . . . . . . . . . . . . . . . . . . . . . . . . . . . . . . . . . . . . . . . . . . . . . . . . . . . . . . . . . . . . . . . . . . . . . . . . . . . . . . . . . . . . . . . . . . . 116
. . . . . . . . . . . . . . . . . . . . . . . . . . . . . . . . . . . . . . . . . . . . . . . . . . . . . . . . . . . . . . . . . . . . . . . . . . . . . . . . . . . . . . . . 38
. . . . . . . . . . . . . . . . . . . . . . . . . . . . . . . . . . . . . . . . . . . . . . . . . . . . . . . . . . . . . . . . . . . . . . . . . . . . . . . 58
. . . . . . . . . . . . . . . . . . . . . . . . . . . . . . . . . . . . . . . . . . . . . . . . . . . . . . . . . . . . . . . . . . . . . . . . . . . . . . . . . . . . 64
. . . . . . . . . . . . . . . . . . . . . . . . . . . . . . . . . . . . . . . . . . . . . . . . . . . . . . . . . . . . . . . . . . . . . . . . . . . . . . . . . . . . . . . . . . . . 75
. . . . . . . . . . . . . . . . . . . . . . . . . . . . . . . . . . . . . . . . . . . . . . . . . . . . . . . . . . . . . . . . . . . . . . . . . . . . . . . . . . . . 88
. . . . . . . . . . . . . . . . . . . . . . . . . . . . . . . . . . . . . . . . . . . . . . . . . . . . . . . . . . . . . . . . . . . . . . . . . . . . . . . . . . . . . . . 98
. . . . . . . . . . . . . . . . . . . . . . . . . . . . . . . . . . . . . . . . . . . . . . . . . . . . . . . . . . . . . . . . . . . . . . . . . . . . . . . . . . . . . . 103
. . . . . . . . . . . . . . . . . . . . . . . . . . . . . . . . . . . . . . . . . . . . . . . . . . . . . . . . . . . . . . . . . . . . . . . . . . . . . . . . . . 106
. . . . . . . . . . . . . . . . . . . . . . . . . . . . . . . . . . . . . . . . . . . . . . . . . . . . . . . . . . . . . . . . . . . . . . . . . . . . . . . . . 106
. . . . . . . . . . . . . . . . . . . . . . . . . . . . . . . . . . . . . . . . . . . . . . . . . . . . . . . . . . . . . . . . . . . . . . . . . . . . . . 109
. . . . . . . . . . . . . . . . . . . . . . . . . . . . . . . . . . . . . . . . . . . . . . . . . . . . . . . . . . . . . . . . . . . . . . . . . . . . . . . . . . . . . . . . . . . . 115
. . . . . . . . . . . . . . . . . . . . . . . . . . . . . . . . . . . . . . . . . . . . . . . . . . . . . . . . . . . . . . . . . . . . . . . . . . . . . . . . . . . . . . . . . . . 122
. . . . . . . . . . . . . . . . . . . . . . . . . . . . . . . . . . . . . . . . . . . . . . . . . . . . . . . . . . . . . . . . . . . . . . . . 52
. . . . . . . . . . . . . . . . . . . . . . . . . . . . . . . . . . . . . . . . . . . . . . . . . . . . . . . . . . . . . . . . . . . . . . 84
. . . . . . . . . . . . . . . . . . . . . . . . . . . . . . . . . . . . . . . . . . . . . . . . . . . . . . . . . . . . . . . . . . . . . . . 120
Chapter 6: Creating pages with CSS
Understanding Cascading Style Sheets
Creating and managing CSS
. . . . . . . . . . . . . . . . . . . . . . . . . . . . . . . . . . . . . . . . . . . . . . . . . . . . . . . . . . . . . . . . . . . . . . . . . . . . . . . . . . . . . . . . . 131
. . . . . . . . . . . . . . . . . . . . . . . . . . . . . . . . . . . . . . . . . . . . . . . . . . . . . . . . . . . . . . . . . . . . . . . . . . . . . . . 127
Page 4

USING DREAMWEAVER CS4
Updated 24 September 2009
Contents
Laying out pages with CSS . . . . . . . . . . . . . . . . . . . . . . . . . . . . . . . . . . . . . . . . . . . . . . . . . . . . . . . . . . . . . . . . . . . . . . . . . . . . . . . . . . . . . . . . . . . 152
Working with div tags . . . . . . . . . . . . . . . . . . . . . . . . . . . . . . . . . . . . . . . . . . . . . . . . . . . . . . . . . . . . . . . . . . . . . . . . . . . . . . . . . . . . . . . . . . . . . . . 158
Chapter 7: Laying out pages with HTML
Using visual aids for layout
Presenting content with tables
Using Frames
. . . . . . . . . . . . . . . . . . . . . . . . . . . . . . . . . . . . . . . . . . . . . . . . . . . . . . . . . . . . . . . . . . . . . . . . . . . . . . . . . . . . . . . . . . . . . . . . . . . . . . . . 191
. . . . . . . . . . . . . . . . . . . . . . . . . . . . . . . . . . . . . . . . . . . . . . . . . . . . . . . . . . . . . . . . . . . . . . . . . . . . . . . . . . . . . . . . . . 173
. . . . . . . . . . . . . . . . . . . . . . . . . . . . . . . . . . . . . . . . . . . . . . . . . . . . . . . . . . . . . . . . . . . . . . . . . . . . . . . . . . . . . . 176
Chapter 8: Adding content to pages
Working with pages
Adding and formatting text
Adding and modifying images
Inserting SWF files
Inserting FLV files
Adding Sound
Adding other media objects
Automating tasks
. . . . . . . . . . . . . . . . . . . . . . . . . . . . . . . . . . . . . . . . . . . . . . . . . . . . . . . . . . . . . . . . . . . . . . . . . . . . . . . . . . . . . . . . . . . . . . . . . 204
. . . . . . . . . . . . . . . . . . . . . . . . . . . . . . . . . . . . . . . . . . . . . . . . . . . . . . . . . . . . . . . . . . . . . . . . . . . . . . . . . . . . . . . . . . 216
. . . . . . . . . . . . . . . . . . . . . . . . . . . . . . . . . . . . . . . . . . . . . . . . . . . . . . . . . . . . . . . . . . . . . . . . . . . . . . . . . . . . . . . 232
. . . . . . . . . . . . . . . . . . . . . . . . . . . . . . . . . . . . . . . . . . . . . . . . . . . . . . . . . . . . . . . . . . . . . . . . . . . . . . . . . . . . . . . . . . . . . . . . . . . 243
. . . . . . . . . . . . . . . . . . . . . . . . . . . . . . . . . . . . . . . . . . . . . . . . . . . . . . . . . . . . . . . . . . . . . . . . . . . . . . . . . . . . . . . . . . . . . . . . . . . . 247
. . . . . . . . . . . . . . . . . . . . . . . . . . . . . . . . . . . . . . . . . . . . . . . . . . . . . . . . . . . . . . . . . . . . . . . . . . . . . . . . . . . . . . . . . . . . . . . . . . . . . . . 252
. . . . . . . . . . . . . . . . . . . . . . . . . . . . . . . . . . . . . . . . . . . . . . . . . . . . . . . . . . . . . . . . . . . . . . . . . . . . . . . . . . . . . . . . . 253
. . . . . . . . . . . . . . . . . . . . . . . . . . . . . . . . . . . . . . . . . . . . . . . . . . . . . . . . . . . . . . . . . . . . . . . . . . . . . . . . . . . . . . . . . . . . . . . . . . . 261
Chapter 9: Linking and navigation
About linking and navigation
Linking
Jump menus
Navigation bars
Image maps
. . . . . . . . . . . . . . . . . . . . . . . . . . . . . . . . . . . . . . . . . . . . . . . . . . . . . . . . . . . . . . . . . . . . . . . . . . . . . . . . . . . . . . . . . . . . . . . . . . . . . . . . . . . . . . 268
. . . . . . . . . . . . . . . . . . . . . . . . . . . . . . . . . . . . . . . . . . . . . . . . . . . . . . . . . . . . . . . . . . . . . . . . . . . . . . . . . . . . . . . . . . . . . . . . . . . . . . . . 275
. . . . . . . . . . . . . . . . . . . . . . . . . . . . . . . . . . . . . . . . . . . . . . . . . . . . . . . . . . . . . . . . . . . . . . . . . . . . . . . . . . . . . . . . . . . . . . . . . . . . . 277
. . . . . . . . . . . . . . . . . . . . . . . . . . . . . . . . . . . . . . . . . . . . . . . . . . . . . . . . . . . . . . . . . . . . . . . . . . . . . . . . . . . . . . . . . . . . . . . . . . . . . . . . . 279
Troubleshooting links
. . . . . . . . . . . . . . . . . . . . . . . . . . . . . . . . . . . . . . . . . . . . . . . . . . . . . . . . . . . . . . . . . . . . . . . . . . . . . . . . . . . . . . . . 266
. . . . . . . . . . . . . . . . . . . . . . . . . . . . . . . . . . . . . . . . . . . . . . . . . . . . . . . . . . . . . . . . . . . . . . . . . . . . . . . . . . . . . . . . . . . . . . . 280
iv
Chapter 10: Previewing pages
Previewing pages in Dreamweaver
Previewing pages in browsers
Previewing pages in mobile devices
. . . . . . . . . . . . . . . . . . . . . . . . . . . . . . . . . . . . . . . . . . . . . . . . . . . . . . . . . . . . . . . . . . . . . . . . . . . . . . . . . . . 283
. . . . . . . . . . . . . . . . . . . . . . . . . . . . . . . . . . . . . . . . . . . . . . . . . . . . . . . . . . . . . . . . . . . . . . . . . . . . . . . . . . . . . . . 285
. . . . . . . . . . . . . . . . . . . . . . . . . . . . . . . . . . . . . . . . . . . . . . . . . . . . . . . . . . . . . . . . . . . . . . . . . . . . . . . . . 286
Chapter 11: Working with page code
General information about coding in Dreamweaver
Setting up your coding environment
Setting coding preferences
Writing and editing code
Collapsing code
. . . . . . . . . . . . . . . . . . . . . . . . . . . . . . . . . . . . . . . . . . . . . . . . . . . . . . . . . . . . . . . . . . . . . . . . . . . . . . . . . . . . . . . . . . . . . . . . . . . . . 313
. . . . . . . . . . . . . . . . . . . . . . . . . . . . . . . . . . . . . . . . . . . . . . . . . . . . . . . . . . . . . . . . . . . . . . . . . . . . . . . . . . . . . . . . . . 294
. . . . . . . . . . . . . . . . . . . . . . . . . . . . . . . . . . . . . . . . . . . . . . . . . . . . . . . . . . . . . . . . . . . . . . . . . . . . . . . . . . . . . . . . . . . . 299
Optimizing and debugging code
Editing code in Design view
. . . . . . . . . . . . . . . . . . . . . . . . . . . . . . . . . . . . . . . . . . . . . . . . . . . . . . . . . . . . . . . . . . . . . . . . . . . . . . . . . . . . . . . . . 319
Working with head content for pages
Working with server-side includes
Managing tag libraries
. . . . . . . . . . . . . . . . . . . . . . . . . . . . . . . . . . . . . . . . . . . . . . . . . . . . . . . . . . . . . . . . . . . . . . . . . . . . . . . . . . . . . . . . . . . . . . . 332
Importing custom tags into Dreamweaver
. . . . . . . . . . . . . . . . . . . . . . . . . . . . . . . . . . . . . . . . . . . . . . . . . . . . . . . . . . . . . . . . . . . . . . . . . . . . . . . . . 292
. . . . . . . . . . . . . . . . . . . . . . . . . . . . . . . . . . . . . . . . . . . . . . . . . . . . . . . . . . . . . . . . . . . . . . . . . . . . . . . . . . . . 315
. . . . . . . . . . . . . . . . . . . . . . . . . . . . . . . . . . . . . . . . . . . . . . . . . . . . . . . . . . . . . . . . . . . . . . . . . . . . . . . . 325
. . . . . . . . . . . . . . . . . . . . . . . . . . . . . . . . . . . . . . . . . . . . . . . . . . . . . . . . . . . . . . . . . . . . . . . . . . . . . . . . . . . 329
. . . . . . . . . . . . . . . . . . . . . . . . . . . . . . . . . . . . . . . . . . . . . . . . . . . . . . . . . . . . . . . . . . . . . . . . . . . 334
Chapter 12: Adding JavaScript behaviors
Using JavaScript behaviors
Applying built-in Dreamweaver behaviors
. . . . . . . . . . . . . . . . . . . . . . . . . . . . . . . . . . . . . . . . . . . . . . . . . . . . . . . . . . . . . . . . . . . . . . . . . . . . . . . . . . . . . . . . . . 337
. . . . . . . . . . . . . . . . . . . . . . . . . . . . . . . . . . . . . . . . . . . . . . . . . . . . . . . . . . . . . . . . . . . . . . . . . . . 340
. . . . . . . . . . . . . . . . . . . . . . . . . . . . . . . . . . . . . . . . . . . . . . . . . . . . . . . . . . . . . . . . . . 288
Page 5

USING DREAMWEAVER CS4
Updated 24 September 2009
Contents
Chapter 13: Working with other applications
Cross-application integration . . . . . . . . . . . . . . . . . . . . . . . . . . . . . . . . . . . . . . . . . . . . . . . . . . . . . . . . . . . . . . . . . . . . . . . . . . . . . . . . . . . . . . . . 355
Working with Fireworks
Working with Photoshop
Working with Flash
Working with Bridge
Working with Device Central
Working with ConnectNow
Manage connections to web services
. . . . . . . . . . . . . . . . . . . . . . . . . . . . . . . . . . . . . . . . . . . . . . . . . . . . . . . . . . . . . . . . . . . . . . . . . . . . . . . . . . . . . . . . . . . . . 356
. . . . . . . . . . . . . . . . . . . . . . . . . . . . . . . . . . . . . . . . . . . . . . . . . . . . . . . . . . . . . . . . . . . . . . . . . . . . . . . . . . . . . . . . . . . . 361
. . . . . . . . . . . . . . . . . . . . . . . . . . . . . . . . . . . . . . . . . . . . . . . . . . . . . . . . . . . . . . . . . . . . . . . . . . . . . . . . . . . . . . . . . . . . . . . . . . 371
. . . . . . . . . . . . . . . . . . . . . . . . . . . . . . . . . . . . . . . . . . . . . . . . . . . . . . . . . . . . . . . . . . . . . . . . . . . . . . . . . . . . . . . . . . . . . . . . . 371
. . . . . . . . . . . . . . . . . . . . . . . . . . . . . . . . . . . . . . . . . . . . . . . . . . . . . . . . . . . . . . . . . . . . . . . . . . . . . . . . . . . . . . . . . 373
. . . . . . . . . . . . . . . . . . . . . . . . . . . . . . . . . . . . . . . . . . . . . . . . . . . . . . . . . . . . . . . . . . . . . . . . . . . . . . . . . . . . . . . . . . 374
. . . . . . . . . . . . . . . . . . . . . . . . . . . . . . . . . . . . . . . . . . . . . . . . . . . . . . . . . . . . . . . . . . . . . . . . . . . . . . . . 375
Chapter 14: Creating and managing templates
About Dreamweaver templates
Recognizing templates and template-based documents
Creating a Dreamweaver template
Creating editable regions
Creating repeating regions
Using optional regions
. . . . . . . . . . . . . . . . . . . . . . . . . . . . . . . . . . . . . . . . . . . . . . . . . . . . . . . . . . . . . . . . . . . . . . . . . . . . . . . . . . . . . . . . . . . . . . 392
Defining editable tag attributes
Creating a nested template
Editing, updating, and deleting templates
Exporting and importing template content
Applying or removing a template from an existing document
Editing content in a template-based document
Template syntax
. . . . . . . . . . . . . . . . . . . . . . . . . . . . . . . . . . . . . . . . . . . . . . . . . . . . . . . . . . . . . . . . . . . . . . . . . . . . . . . . . . . . . . . . . . . . . . . . . . . . . 406
Setting authoring preferences for templates
. . . . . . . . . . . . . . . . . . . . . . . . . . . . . . . . . . . . . . . . . . . . . . . . . . . . . . . . . . . . . . . . . . . . . . . . . . . . . . . . . . . . . . 377
. . . . . . . . . . . . . . . . . . . . . . . . . . . . . . . . . . . . . . . . . . . . . . . . . . . . . . . . . . . . . . 382
. . . . . . . . . . . . . . . . . . . . . . . . . . . . . . . . . . . . . . . . . . . . . . . . . . . . . . . . . . . . . . . . . . . . . . . . . . . . . . . . . . . 385
. . . . . . . . . . . . . . . . . . . . . . . . . . . . . . . . . . . . . . . . . . . . . . . . . . . . . . . . . . . . . . . . . . . . . . . . . . . . . . . . . . . . . . . . . . . . 388
. . . . . . . . . . . . . . . . . . . . . . . . . . . . . . . . . . . . . . . . . . . . . . . . . . . . . . . . . . . . . . . . . . . . . . . . . . . . . . . . . . . . . . . . . . 389
. . . . . . . . . . . . . . . . . . . . . . . . . . . . . . . . . . . . . . . . . . . . . . . . . . . . . . . . . . . . . . . . . . . . . . . . . . . . . . . . . . . . . . 394
. . . . . . . . . . . . . . . . . . . . . . . . . . . . . . . . . . . . . . . . . . . . . . . . . . . . . . . . . . . . . . . . . . . . . . . . . . . . . . . . . . . . . . . . . . 395
. . . . . . . . . . . . . . . . . . . . . . . . . . . . . . . . . . . . . . . . . . . . . . . . . . . . . . . . . . . . . . . . . . . . . . . . . . . . 398
. . . . . . . . . . . . . . . . . . . . . . . . . . . . . . . . . . . . . . . . . . . . . . . . . . . . . . . . . . . . . . . . . . . . . . . . . . . 401
. . . . . . . . . . . . . . . . . . . . . . . . . . . . . . . . . . . . . . . . . . . . . . . . . . . . . . . . 402
. . . . . . . . . . . . . . . . . . . . . . . . . . . . . . . . . . . . . . . . . . . . . . . . . . . . . . . . . . . . . . . . . . . . . . 404
. . . . . . . . . . . . . . . . . . . . . . . . . . . . . . . . . . . . . . . . . . . . . . . . . . . . . . . . . . . . . . . . . . . . . . . . . 407
v
Chapter 15: Building Spry pages visually
About the Spry framework
. . . . . . . . . . . . . . . . . . . . . . . . . . . . . . . . . . . . . . . . . . . . . . . . . . . . . . . . . . . . . . . . . . . . . . . . . . . . . . . . . . . . . . . . . . . 409
Working with Spry widgets (general instructions)
Working with the Accordion widget
Working with the Menu Bar widget
. . . . . . . . . . . . . . . . . . . . . . . . . . . . . . . . . . . . . . . . . . . . . . . . . . . . . . . . . . . . . . . . . . . . . . . . . . . . . . . . . . 411
. . . . . . . . . . . . . . . . . . . . . . . . . . . . . . . . . . . . . . . . . . . . . . . . . . . . . . . . . . . . . . . . . . . . . . . . . . . . . . . . . . 414
Working with the Collapsible Panel widget
Working with the Tabbed Panels widget
Working with the Tooltip widget
. . . . . . . . . . . . . . . . . . . . . . . . . . . . . . . . . . . . . . . . . . . . . . . . . . . . . . . . . . . . . . . . . . . . . . . . . . . . . 421
. . . . . . . . . . . . . . . . . . . . . . . . . . . . . . . . . . . . . . . . . . . . . . . . . . . . . . . . . . . . . . . . . . . . . . . . . . . . . . . . . . . . . 424
Working with the Validation Radio Group widget
Working with the Validation Text Field widget
Working with the Validation Text Area widget
Working with the Validation Select widget
Working with the Validation Checkbox widget
Working with the Validation Password widget
Working with the Validation Confirm widget
Displaying data with Spry
Adding Spry effects
. . . . . . . . . . . . . . . . . . . . . . . . . . . . . . . . . . . . . . . . . . . . . . . . . . . . . . . . . . . . . . . . . . . . . . . . . . . . . . . . . . . . . . . . . . . . 449
. . . . . . . . . . . . . . . . . . . . . . . . . . . . . . . . . . . . . . . . . . . . . . . . . . . . . . . . . . . . . . . . . . . . . . . . . . . . . . . . . . . . . . . . . . . . . . . . . . 460
Chapter 16: Displaying XML data with XSLT
About XML and XSLT
. . . . . . . . . . . . . . . . . . . . . . . . . . . . . . . . . . . . . . . . . . . . . . . . . . . . . . . . . . . . . . . . . . . . . . . . . . . . . . . . . . . . . . . . . . . . . . . . 464
Performing XSL transformations on the server
. . . . . . . . . . . . . . . . . . . . . . . . . . . . . . . . . . . . . . . . . . . . . . . . . . . . . . . . . . . . . . . . . . . . . 409
. . . . . . . . . . . . . . . . . . . . . . . . . . . . . . . . . . . . . . . . . . . . . . . . . . . . . . . . . . . . . . . . . . . . . . . . . . . 419
. . . . . . . . . . . . . . . . . . . . . . . . . . . . . . . . . . . . . . . . . . . . . . . . . . . . . . . . . . . . . . . . . . . . . 425
. . . . . . . . . . . . . . . . . . . . . . . . . . . . . . . . . . . . . . . . . . . . . . . . . . . . . . . . . . . . . . . . . . . . . . . . 429
. . . . . . . . . . . . . . . . . . . . . . . . . . . . . . . . . . . . . . . . . . . . . . . . . . . . . . . . . . . . . . . . . . . . . . . . 433
. . . . . . . . . . . . . . . . . . . . . . . . . . . . . . . . . . . . . . . . . . . . . . . . . . . . . . . . . . . . . . . . . . . . . . . . . . . 437
. . . . . . . . . . . . . . . . . . . . . . . . . . . . . . . . . . . . . . . . . . . . . . . . . . . . . . . . . . . . . . . . . . . . . . . 440
. . . . . . . . . . . . . . . . . . . . . . . . . . . . . . . . . . . . . . . . . . . . . . . . . . . . . . . . . . . . . . . . . . . . . . . . 442
. . . . . . . . . . . . . . . . . . . . . . . . . . . . . . . . . . . . . . . . . . . . . . . . . . . . . . . . . . . . . . . . . . . . . . . . . 446
. . . . . . . . . . . . . . . . . . . . . . . . . . . . . . . . . . . . . . . . . . . . . . . . . . . . . . . . . . . . . . . . . . . . . . . . 471
Page 6

USING DREAMWEAVER CS4
Updated 24 September 2009
Contents
Performing XSL transformations on the client . . . . . . . . . . . . . . . . . . . . . . . . . . . . . . . . . . . . . . . . . . . . . . . . . . . . . . . . . . . . . . . . . . . . . . . . 487
Missing character entities . . . . . . . . . . . . . . . . . . . . . . . . . . . . . . . . . . . . . . . . . . . . . . . . . . . . . . . . . . . . . . . . . . . . . . . . . . . . . . . . . . . . . . . . . . . . 489
Chapter 17: Preparing to build dynamic sites
Understanding web applications
Set up your computer for application development
Database connections for ColdFusion developers
Database connections for ASP developers
Database connections for PHP developers
Troubleshooting database connections
Removing connection scripts
. . . . . . . . . . . . . . . . . . . . . . . . . . . . . . . . . . . . . . . . . . . . . . . . . . . . . . . . . . . . . . . . . . . . . . . . . . . . . . . . . . . . . 492
. . . . . . . . . . . . . . . . . . . . . . . . . . . . . . . . . . . . . . . . . . . . . . . . . . . . . . . . . . . . . . . . . . 499
. . . . . . . . . . . . . . . . . . . . . . . . . . . . . . . . . . . . . . . . . . . . . . . . . . . . . . . . . . . . . . . . . . . . 504
. . . . . . . . . . . . . . . . . . . . . . . . . . . . . . . . . . . . . . . . . . . . . . . . . . . . . . . . . . . . . . . . . . . . . . . . . . . . 506
. . . . . . . . . . . . . . . . . . . . . . . . . . . . . . . . . . . . . . . . . . . . . . . . . . . . . . . . . . . . . . . . . . . . . . . . . . . 513
. . . . . . . . . . . . . . . . . . . . . . . . . . . . . . . . . . . . . . . . . . . . . . . . . . . . . . . . . . . . . . . . . . . . . . . . . . . . . . 514
. . . . . . . . . . . . . . . . . . . . . . . . . . . . . . . . . . . . . . . . . . . . . . . . . . . . . . . . . . . . . . . . . . . . . . . . . . . . . . . . . . . . . . . . 519
Chapter 18: Making pages dynamic
Optimizing the workspace for visual development
Designing dynamic pages
Dynamic content sources overview
Dynamic content panels
Defining sources of dynamic content
Adding dynamic content to pages
Changing dynamic content
Displaying database records
Viewing live data
. . . . . . . . . . . . . . . . . . . . . . . . . . . . . . . . . . . . . . . . . . . . . . . . . . . . . . . . . . . . . . . . . . . . . . . . . . . . . . . . . . . . . . . . . . . . . . . . . . . . 559
Adding custom server behaviors
. . . . . . . . . . . . . . . . . . . . . . . . . . . . . . . . . . . . . . . . . . . . . . . . . . . . . . . . . . . . . . . . . . . . . . . . . . . . . . . . . . . . . . . . . . . 523
. . . . . . . . . . . . . . . . . . . . . . . . . . . . . . . . . . . . . . . . . . . . . . . . . . . . . . . . . . . . . . . . . . . . . . . . . . . . . . . . . . 524
. . . . . . . . . . . . . . . . . . . . . . . . . . . . . . . . . . . . . . . . . . . . . . . . . . . . . . . . . . . . . . . . . . . . . . . . . . . . . . . . . . . . . . . . . . . . . 529
. . . . . . . . . . . . . . . . . . . . . . . . . . . . . . . . . . . . . . . . . . . . . . . . . . . . . . . . . . . . . . . . . . . . . . . . . . . . . . . . 531
. . . . . . . . . . . . . . . . . . . . . . . . . . . . . . . . . . . . . . . . . . . . . . . . . . . . . . . . . . . . . . . . . . . . . . . . . . . . . . . . . . . 544
. . . . . . . . . . . . . . . . . . . . . . . . . . . . . . . . . . . . . . . . . . . . . . . . . . . . . . . . . . . . . . . . . . . . . . . . . . . . . . . . . . . . . . . . . . 548
. . . . . . . . . . . . . . . . . . . . . . . . . . . . . . . . . . . . . . . . . . . . . . . . . . . . . . . . . . . . . . . . . . . . . . . . . . . . . . . . . . . . . . . . . 550
. . . . . . . . . . . . . . . . . . . . . . . . . . . . . . . . . . . . . . . . . . . . . . . . . . . . . . . . . . . . . . . . . . . . . . . . . . . . . . . . . . . . . 563
. . . . . . . . . . . . . . . . . . . . . . . . . . . . . . . . . . . . . . . . . . . . . . . . . . . . . . . . . . . . . . . . . . . 520
vi
Chapter 19: Building applications visually
Building master and detail pages
Building search and results pages
Building a record insert page
Building pages to update a record
Building pages to delete a record
. . . . . . . . . . . . . . . . . . . . . . . . . . . . . . . . . . . . . . . . . . . . . . . . . . . . . . . . . . . . . . . . . . . . . . . . . . . . . . . . . . . . 574
. . . . . . . . . . . . . . . . . . . . . . . . . . . . . . . . . . . . . . . . . . . . . . . . . . . . . . . . . . . . . . . . . . . . . . . . . . . . . . . . . . . . 581
. . . . . . . . . . . . . . . . . . . . . . . . . . . . . . . . . . . . . . . . . . . . . . . . . . . . . . . . . . . . . . . . . . . . . . . . . . . . . . . . . . . . . . . . 587
. . . . . . . . . . . . . . . . . . . . . . . . . . . . . . . . . . . . . . . . . . . . . . . . . . . . . . . . . . . . . . . . . . . . . . . . . . . . . . . . . . . 590
. . . . . . . . . . . . . . . . . . . . . . . . . . . . . . . . . . . . . . . . . . . . . . . . . . . . . . . . . . . . . . . . . . . . . . . . . . . . . . . . . . . . 595
Building pages with advanced data manipulation objects (ColdFusion, ASP)
Building a registration page
Building a login page
Building a page only authorized users can access
Securing a folder in your application (ColdFusion)
Using ColdFusion components
. . . . . . . . . . . . . . . . . . . . . . . . . . . . . . . . . . . . . . . . . . . . . . . . . . . . . . . . . . . . . . . . . . . . . . . . . . . . . . . . . . . . . . . . . 606
. . . . . . . . . . . . . . . . . . . . . . . . . . . . . . . . . . . . . . . . . . . . . . . . . . . . . . . . . . . . . . . . . . . . . . . . . . . . . . . . . . . . . . . . . . . . . . . . 608
. . . . . . . . . . . . . . . . . . . . . . . . . . . . . . . . . . . . . . . . . . . . . . . . . . . . . . . . . . . . . . . . . . . . . 610
. . . . . . . . . . . . . . . . . . . . . . . . . . . . . . . . . . . . . . . . . . . . . . . . . . . . . . . . . . . . . . . . . . . . 613
. . . . . . . . . . . . . . . . . . . . . . . . . . . . . . . . . . . . . . . . . . . . . . . . . . . . . . . . . . . . . . . . . . . . . . . . . . . . . . . . . . . . . . 614
Chapter 20: Building forms
Collecting information from users
Creating web forms
. . . . . . . . . . . . . . . . . . . . . . . . . . . . . . . . . . . . . . . . . . . . . . . . . . . . . . . . . . . . . . . . . . . . . . . . . . . . . . . . . . . . . . . . . . . . . . . . . 624
Building ColdFusion forms
. . . . . . . . . . . . . . . . . . . . . . . . . . . . . . . . . . . . . . . . . . . . . . . . . . . . . . . . . . . . . . . . . . . . . . . . . . . . . . . . . . . . 621
. . . . . . . . . . . . . . . . . . . . . . . . . . . . . . . . . . . . . . . . . . . . . . . . . . . . . . . . . . . . . . . . . . . . . . . . . . . . . . . . . . . . . . . . . . . 637
Chapter 21: Accessibility
Dreamweaver and accessibility
Index
...............................................................................................................654
. . . . . . . . . . . . . . . . . . . . . . . . . . . . . . . . . . . . . . . . . . . . . . . . . . . . . . . . . . . . . . . . . . . . . . . . . . . . . . . . . . . . . . 650
. . . . . . . . . . . . . . . . . . . . . . . . . . . . . . . . . . . . . . . . . . 602
Page 7

Chapter 1: Resources
Updated 24 September 2009
Before you begin working with your software, take a few moments to read an overview about activation and the many
resources available to you. You have access to instructional videos, plug-ins, templates, user communities, seminars,
tutorials, RSS feeds, and much more.
Activation and registration
Help with installation
For help with installation issues, see the Installation Support Center at www.adobe.com/go/cs4install.
License activation
During the installation process, your Adobe software contacts Adobe to complete the license activation process. No
personal data is transmitted. For more information on product activation, visit the Adobe website at
www.adobe.com/go/activation.
1
A single-user retail license activation supports two computers. For example, you can install the product on a desktop
computer at work and on a laptop computer at home. If you want to install the software on a third computer, first
deactivate it on one of the other two computers. Choose Help > Deactivate.
Register
Register your product to receive complimentary installation support, notifications of updates, and other services.
❖ To register, follow the on-screen instructions in the Registration dialog box, which appears after you install the
software.
If you postpone registration, you can register at any time by choosing Help > Registration.
Adobe Product Improvement Program
After you have used your Adobe software a certain number of times, a dialog box appears, asking whether you want
to participate in the Adobe Product Improvement Program.
If you choose to participate, data about your use of Adobe software is sent to Adobe. No personal information is
recorded or sent. The Adobe Product Improvement Program only collects information about the features and tools
that you use in the software and how often you use them.
You can opt in to or opt out of the program at any time:
• To participate, choose Help > Adobe Product Improvement Program and click Yes, Participate.
• To stop participating, choose Help > Adobe Product Improvement Program and click No, Thank You.
Page 8

USING DREAMWEAVER CS4
Updated 24 September 2009
Resources
ReadMe
A ReadMe file for your software is available on-line and on the installation disc. Open the file to read important
information about topics such as the following:
• System requirements
• Installation (including uninstalling the software)
• Activation and registration
• Font installation
• Troubleshooting
• Customer support
• Legal notices
Tutorials
Creating your first website (series)
Part 1: Setting up your site and project files
2
Part 2: Creating the page layout
Part 3: Adding content to pages
Part 4: Adding the main image text
Part 5: Adding the Spry menu
Part 6: Publishing your site
Video tutorials
Getting started and new feature video tutorials
Taming the web (series)
CSS Tutorials
Creating a basic CSS style sheet
From table-based to tableless web design
Dreamweaver CSS starter layouts
Creating a CSS layout from scratch
In Search of the Holy Grail
Page 9

USING DREAMWEAVER CS4
Updated 24 September 2009
Resources
Help and support
Community Help
Community Help is an integrated environment on Adobe.com that gives you access to community-generated content
moderated by Adobe and industry experts. Comments from users help guide you to an answer.
Community Help draws on a number of resources, including:
• Videos, tutorials, tips and techniques, blogs, articles, and examples for designers and developers.
• Complete on-line product Help, which is updated regularly by the Adobe documentation team.
• All other content on Adobe.com, including knowledgebase articles, downloads and updates, Developer
Connection, and more.
Choose Help > product name Help in the application to access the Help and Support page, the portal to all of the
Community Help content for your product. You can also use the Help search field in some Creative Suite 4
applications, or press F1 (Windows), to access Community Help for your product.
The sites searched by the default Community Help search engine are hand-selected and reviewed for quality by Adobe
and Adobe Community Experts. Adobe experts also work to ensure that the top search results include a mixture of
different kinds of content, including results from on-line product Help.
3
For more information on using Community Help, see http://help.adobe.com/en_US/CommunityHelp/.
For a video overview of Community Help, see www.adobe.com/go/lrvid4117_xp.
For frequently asked questions about Community Help, see http://community.adobe.com/help/profile/faq.html
Product Help
Adobe provides a comprehensive user guide for each product in several formats, including on-line product Help, PDF,
and printed book. Results from on-line product Help are included in your results whenever you search Community Help.
If you’re connected to the Internet, the Help menu within the product opens the product Help and Support page by
default. This page is a portal to all of the Community Help content for the product. If you want to consult or search
on-line product Help only, you can access it by clicking the product Help link in the upper-right corner of the Help
and Support page. Be sure to select the This Help System Only option before you do your search.
If you’re not connected to the Internet, the Help menu within the product opens local Help, a subset of the content
available in on-line product Help. Because local Help is not as complete or up-to-date as on-line product Help, Adobe
recommends that you use the PDF version of product Help if you want to stay offline. A downloadable PDF of
complete product Help is available from two places:
• The product’s Help and Support page (upper-right corner of the page)
• Local and web Help (top of the Help interface)
For more information on accessing product help, see http://help.adobe.com/en_US/CommunityHelp/.
If you are working in Adobe InDesign, Photoshop, Illustrator, Flash, Fireworks, or Dreamweaver, and you want to turn
off Community Help so that local Help opens by default, do the following:
1 Open the Connections panel (Window > Extensions > Connections).
2 From the Connections panel menu , select Offline Options.
3 Select Keep Me Offline and click OK.
Page 10

USING DREAMWEAVER CS4
Updated 24 September 2009
Resources
Note: When you disable web services from the Connections panel, all other web services (such as Adobe Kuler and Adobe
ConnectNow) are also disabled.
Printed resources
Printed versions of the complete on-line product Help are available for the cost of shipping and handling at
www.adobe.com/go/store.
Support resources
Visit the Adobe Support website at www.adobe.com/support to learn about free and paid technical support options.
Services, downloads, and extras
You can enhance your product by integrating a variety of services, plug-ins, and extensions in your product. You can
also download samples and other assets to help you get your work done.
Adobe creative on-line services
Adobe® Creative Suite® 4 includes new on-line features that bring the power of the web to your desktop. Use these
features to connect with the community, collaborate, and get more from your Adobe tools. Powerful creative on-line
services let you complete tasks ranging from color matching to data conferencing. The services seamlessly integrate
with desktop applications so you can quickly enhance existing workflows. Some services offer full or partial
functionality when you’re offline too.
4
Visit Adobe.com to learn more about available services. Some Creative Suite 4 applications include these initial
offerings:
Kuler™ panel Quickly create, share, and explore color themes on-line.
Adobe® ConnectNow Collaborate with dispersed working teams over the web, sharing voice, data, and multimedia.
Resource Central Instantly access tutorials, sample files, and extensions for Adobe digital video applications.
For information on managing your services, see the Adobe website at www.adobe.com/go/learn_creativeservices_en.
Adobe Exchange
Visit the Adobe Exchange at www.adobe.com/go/exchange to download samples as well as thousands of plug-ins and
extensions from Adobe and third-party developers. The plug-ins and extensions can help you automate tasks,
customize workflows, create specialized professional effects, and more.
Adobe downloads
Visit www.adobe.com/go/downloads to find free updates, tryouts, and other useful software.
Adobe Labs
Adobe Labs at www.adobe.com/go/labs gives you the opportunity to experience and evaluate new and emerging
technologies and products from Adobe. At Adobe Labs, you have access to resources such as these:
• Prerelease software and technologies
Page 11

USING DREAMWEAVER CS4
Updated 24 September 2009
Resources
• Code samples and best practices to accelerate your learning
• Early versions of product and technical documentation
• Forums, wiki-based content, and other collaborative resources to help you interact with like-minded users.
Adobe Labs fosters a collaborative software development process. In this environment, customers quickly become
productive with new products and technologies. Adobe Labs is also a forum for early feedback. The Adobe
development teams use this feedback to create software that meets the needs and expectations of the community.
Adobe TV
Visit Adobe TV at http://tv.adobe.com to view instructional and inspirational videos.
Extras
The installation disc contains a variety of extras to help you make the most of your Adobe software. Some extras are
installed on your computer during the setup process; others are located on the disc.
To view the extras installed during the setup process, navigate to the application folder on your computer.
• Windows®: [startup drive]\Program Files\Adobe\[Adobe application]
• Mac OS®: [startup drive]/Applications/[Adobe application]
To view the extras on the disc, navigate to the Goodies folder in your language folder on the disc. Example:
5
• /English/Goodies/
What’s new
Following is a list of top new features for Adobe® Dreamweaver® CS4.
Live view
Dreamweaver CS4 lets you design your web pages under real-world browser conditions with new Live view, while still
retaining direct access to the code. Changes to the code are immediately reflected in the rendered display. See
“Previewing pages in Dreamweaver” on page 283.
Code hinting for Ajax and JavaScript frameworks
You can now write JavaScript more quickly and accurately with improved support for JavaScript core objects and
primitive data types. You can also put the extended coding functionality of Dreamweaver to work by incorporating
popular JavaScript frameworks including jQuery, Prototype, and Adobe Spry. See “Use code hints” on page 299.
Related Files and Code Navigator
Dreamweaver CS4 lets you efficiently manage the various files that make up today's web pages. Click any related file
to see both its source in Code view and the parent page in Design view. The new Code Navigator feature shows you all
the code sources that affect your current selection, such as CSS (Cascading Style Sheets) rules, server-side includes,
external JavaScript functions, Dreamweaver templates, iFrame source files, and more. See “Open related files” on
page 73 and “Navigate to related code” on page 307.
Page 12

USING DREAMWEAVER CS4
Updated 24 September 2009
Resources
InContext Editing
You can enable end users to make simple edits to their web pages without help from you or additional software. As a
Dreamweaver designer, you can limit changes to specific pages, distinct regions, and even custom formatting options
quickly and easily. See “Creating InContext Editing files” on page 98.
CSS best practices
The Dreamweaver CS4 Property inspector lets you create new CSS rules, and provides clear, simple explanations of
where each property fits in the cascade of styles. See “Set text properties in the Property inspector” on page 226.
HTML data sets
You can integrate the power of dynamic data in your web pages without the learning curve of mastering databases or
XML (Extensible Markup Language) coding. Spry Data Sets recognize content in a simple HTML table as an
interactive data source. See “Create a Spry HTML data set” on page 449.
Adobe Photoshop Smart Objects
Insert any Adobe® Photoshop PSD (Photoshop Data File) document in Dreamweaver to create an image Smart Object.
Smart Objects are tightly linked to the source file. Make any changes to the source image and update your image in
Dreamweaver without opening Photoshop. See “Working with Photoshop” on page 361.
6
Subversion integration
Dreamweaver CS4 integrates Subversion® software, an open source versioning control system, for a more robust
check-in/check-out experience. Update your site and check in modifications directly from within Dreamweaver. See
“Use Subversion (SVN) to get and check in files” on page 91.
New user interface
Work faster and smarter across Adobe Creative Suite® 4 components with a shared user interface design. Toggle
quickly from one work environment to another with the workspace switcher. See “Workspace” on page 7.
Deprecated features
The following features have been deprecated for Dreamweaver CS4:
• Timelines
• Web services
• Layout mode
• Site Map view
• Java Bean support
• Adobe® Flash elements (Image Viewer)
• Adobe® Flash text and Adobe® Flash buttons
• ASP.NET and JSP server behaviors and recordsets
Page 13

Chapter 2: Workspace
Updated 24 September 2009
The Adobe® Dreamweaver® CS4 workspace contains the toolbars, inspectors, and panels that you use to build web
pages. You can customize the general appearance and behavior of the workspace.
Dreamweaver workflow and workspace
Dreamweaver workflow overview
You can use several approaches to create a website. This is one approach:
Plan and set up your site
Determine where the files will go and examine site requirements, audience profiles, and site goals. Additionally,
consider technical requirements such as user access, as well as browser, plug-in, and download restrictions. After
you’ve organized your information and determined a structure, you can begin creating your site. (See “Working with
Dreamweaver sites” on page 38.)
7
Organize and manage your site files
In the Files panel you can easily add, delete, and rename files and folders to change the organization as needed. The
Files panel also has many tools for managing your site, transferring files to and from a remote server, setting up a Check
In/Check Out process to prevent files from being overwritten, and synchronizing the files on your local and remote
sites. From the Assets panel, you can easily organize the assets in a site; you can then drag most assets directly from the
Assets panel into a Dreamweaver document. You can also use Dreamweaver to manage aspects of your
Adobe®Contribute® sites. (See “Managing files and folders” on page 75 and “Managing assets and libraries” on
page 115.)
Lay out your web pages
Choose the layout technique that works for you, or use the Dreamweaver layout options in conjunction with one
another to create your site’s look. You can use Dreamweaver AP elements, CSS positioning styles, or predesigned CSS
layouts to create your layout. The table tools let you design pages quickly by drawing and then rearranging the page
structure. If you want to display multiple elements at once in a browser, you can use frames to lay out your documents.
Finally, you can create new pages based on a Dreamweaver template, then update the layout of those pages
automatically when the template changes. (See “Creating pages with CSS” on page 127 and “Laying out pages with
HTML” on page 173.)
Add content to pages
Add assets and design elements such as text, images, rollover images, image maps, colors, movies, sound, HTML links,
jump menus, and more. You can use built-in page-creation features for such elements as titles and backgrounds, type
directly in the page, or import content from other documents. Dreamweaver also provides behaviors for performing
tasks in response to specific events, such as validating a form when the visitor clicks the Submit button or opening a
second browser window when the main page has finished loading. Finally, Dreamweaver provides tools for
maximizing website performance and for testing pages to ensure compatibility with different web browsers. (See
“Adding content to pages” on page 204.)
Page 14

USING DREAMWEAVER CS4
Updated 24 September 2009
Workspace
Create pages by hand coding
Coding web pages by hand is another approach to creating pages. Dreamweaver provides easy-to-use visual editing
tools, but it also provides a sophisticated coding environment; you can use either approach, or both, to create and edit
your pages. (See “Working with page code” on page 288.)
Set up a web application for dynamic content
Many websites contain dynamic pages that allow visitors to view information stored in databases, and usually allow
some visitors to add new information and edit information in the databases. To create such pages, you must first set
up a web server and application server, create or modify a Dreamweaver site, and connect to a database. (See
“Preparing to build dynamic sites” on page 492.)
Create dynamic pages
In Dreamweaver, you can define a variety of sources of dynamic content, including recordsets extracted from
databases, form parameters, and JavaBeans components. To add the dynamic content to a page, simply drag it onto
the page.
You can set your page to display one record or many records at a time, display more than one page of records, add
special links to move from one page of records to the next (and back), and create record counters to help users keep
track of the records. You can encapsulate application or business logic using technologies such as Adobe® ColdFusion®
and web services. If you need more flexibility, you can create custom server behaviors and interactive forms. (See
“Making pages dynamic” on page 520.)
8
Test and publish
Testing your pages is an ongoing process that happens throughout the development cycle. At the end of the cycle, you
publish the site on a server. Many developers also schedule periodic maintenance to ensure that the site remains
current and functional. (See “Getting and putting files to and from your server” on page 84.)
For a video tutorial on what you can do with Dreamweaver, see www.adobe.com/go/lrvid4040_dw.
Workspace layout overview
The Dreamweaver workspace lets you view documents and object properties. The workspace also places many of the
most common operations in toolbars so that you can quickly make changes to your documents.
In Windows®, Dreamweaver provides an all-in-one-window integrated layout. In the integrated workspace, all
windows and panels are integrated into a single larger application window.
Page 15
USING DREAMWEAVER CS4
Updated 24 September 2009
A B C D E
9
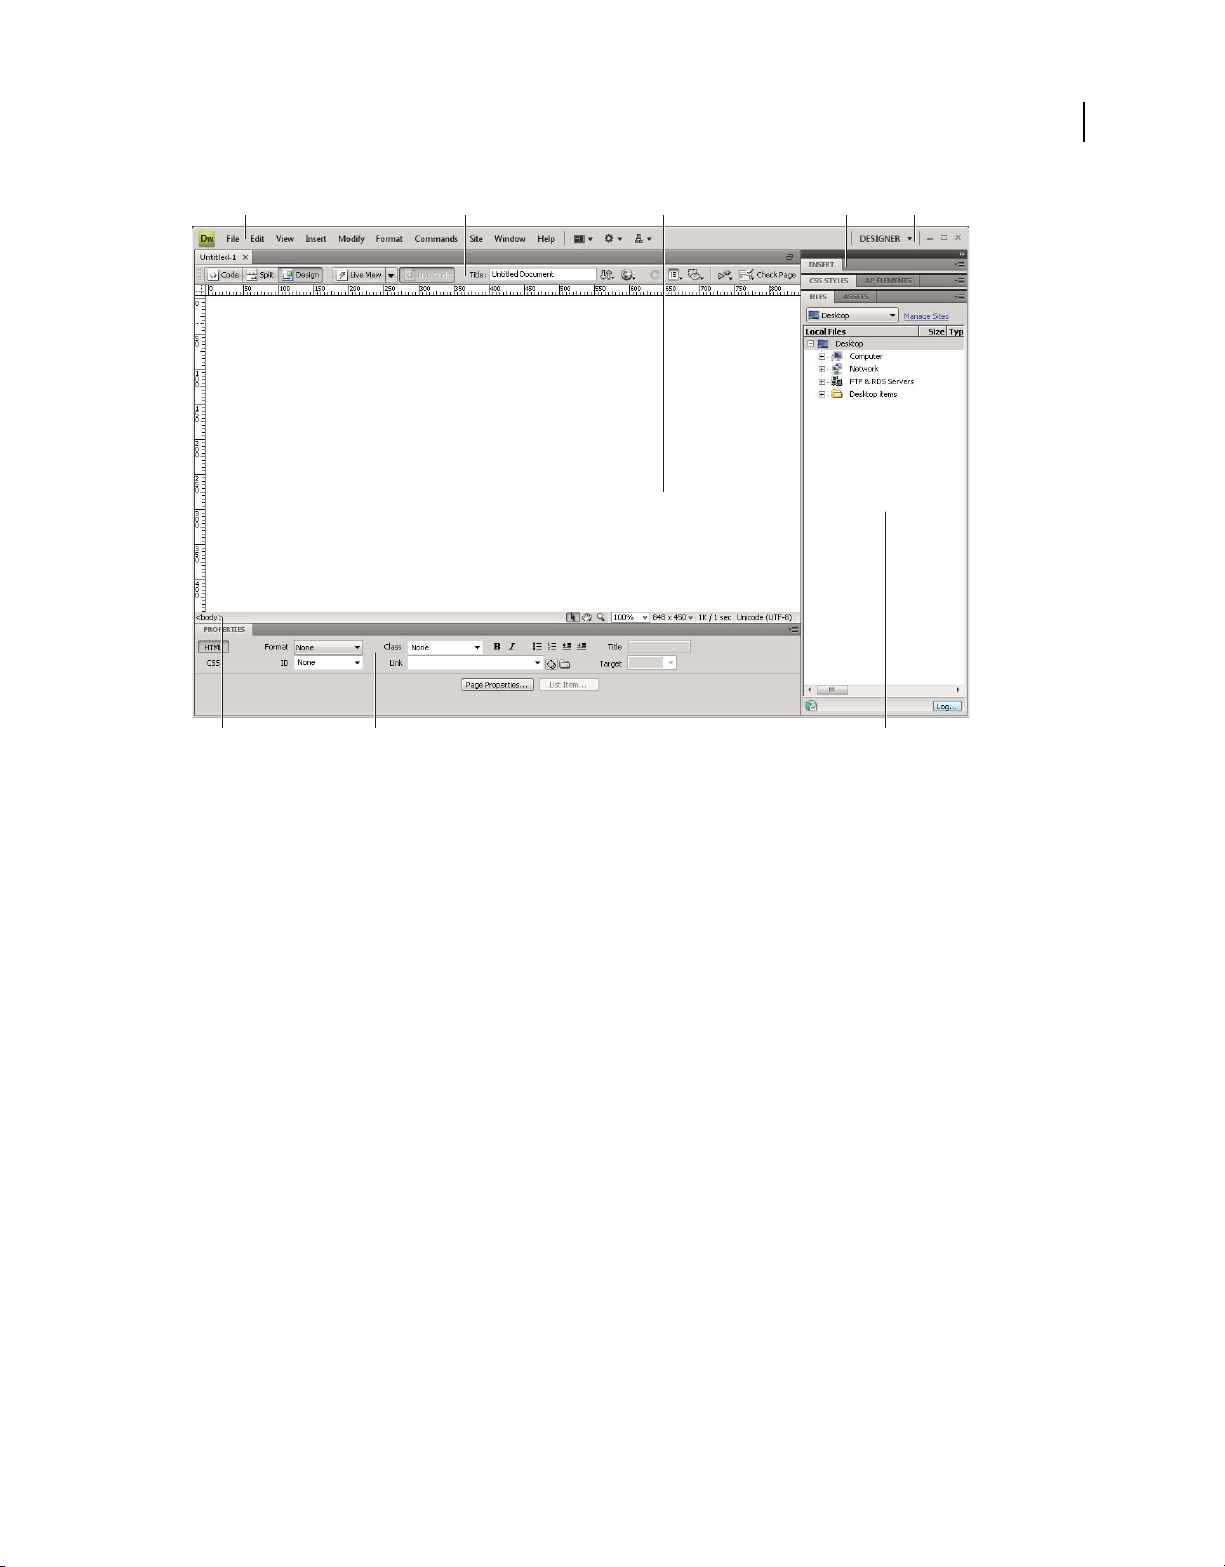
Workspace
F
A. Application bar B. Document toolbar C. Document window D. Panel groups E. Workspace switcher F. Tag selector G. Property inspector
H. Files panel
G H
On Mac OS®, Dreamweaver can display multiple documents in a single window with tabs that identify each document.
Dreamweaver can also display a floating workspace in which each document appears in its own individual window.
Panel groups are initially docked together, but can be undocked into their own windows. When panel groups are
docked and the document area is maximized, resizing or showing and hiding panels auto-sizes the main document,
just as it does on Windows.
Page 16
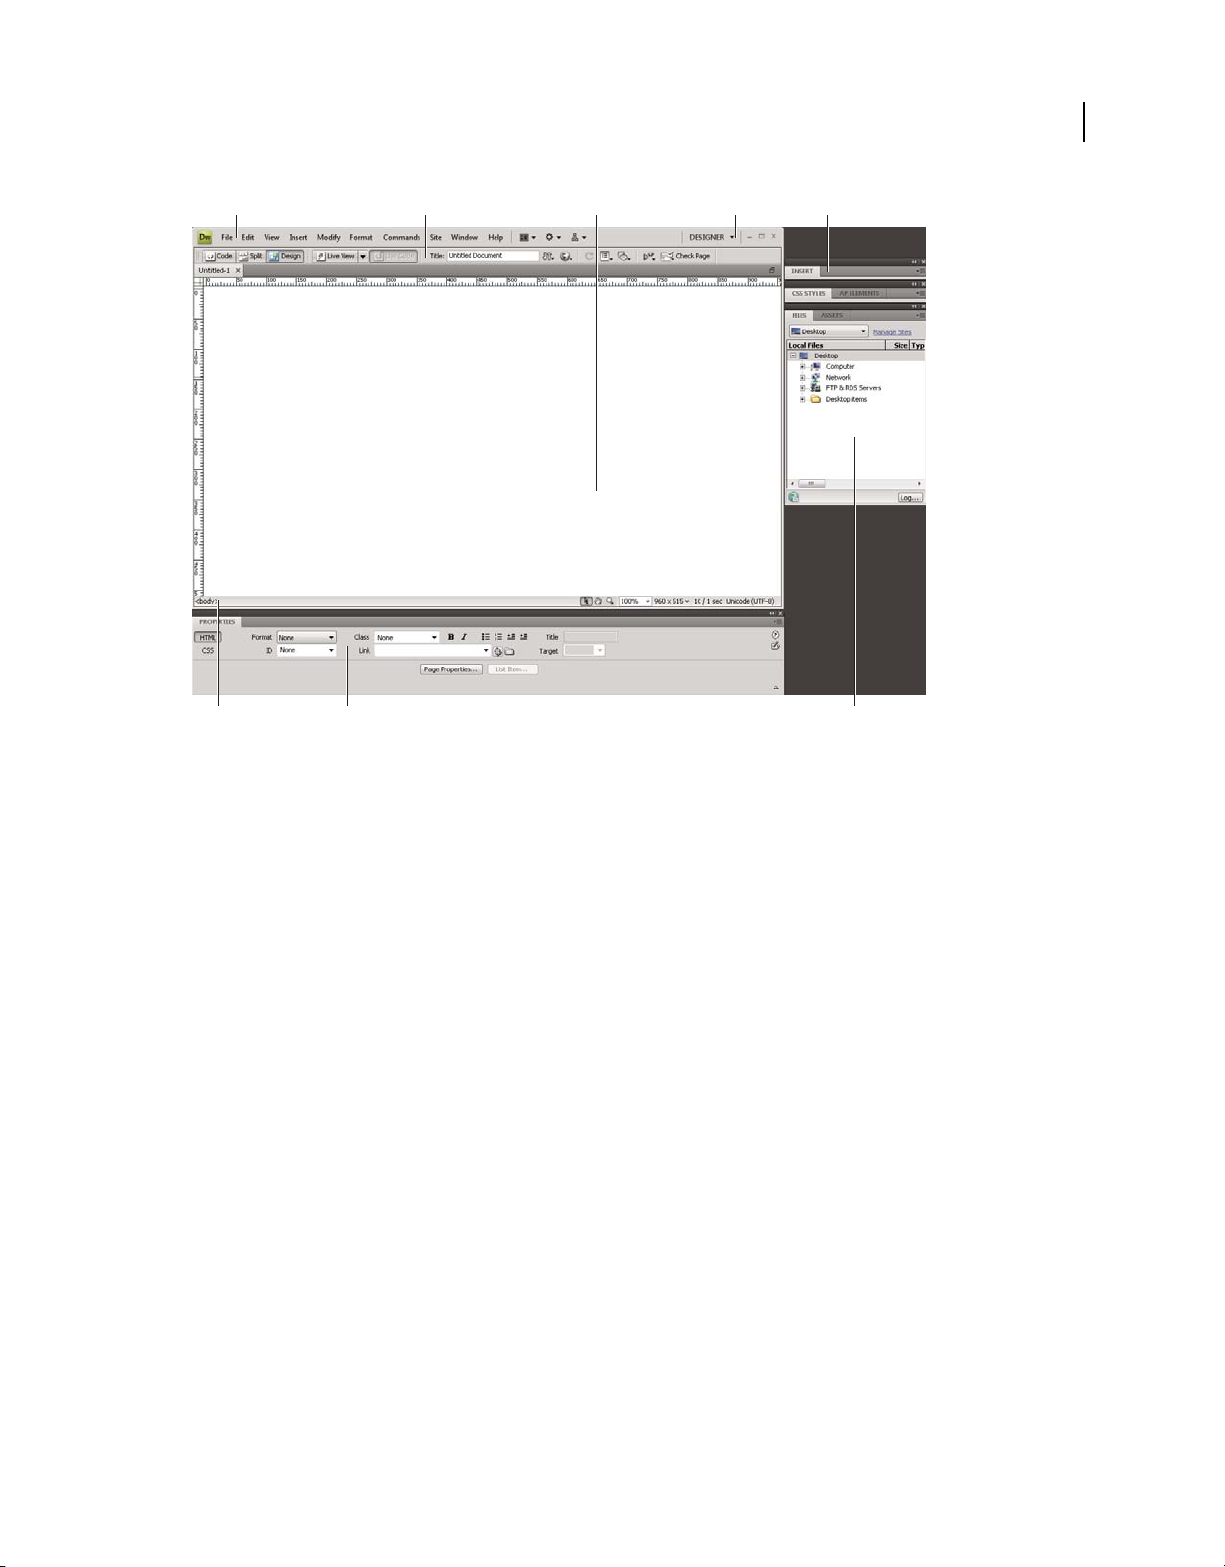
A B C D E
Updated 24 September 2009
USING DREAMWEAVER CS4
Workspace
10
F
A. Application bar B. Document toolbar C. Document window D. Workspace switcher E. Panel groups F. Tag selector G. Property inspector
H. Files panel
G H
For a tutorial on working with different Dreamweaver workspaces, see www.adobe.com/go/lrvid4042_dw.
More Help topics
Using toolbars, inspectors, and context menus
Customizing the CS4 workspace
Display tabbed documents (Dreamweaver Macintosh)
Dreamweaver workspace tutorial
Workspace elements overview
The workspace includes the following elements.
Note: Dreamweaver provides many other panels, inspectors, and windows. To open the panels, inspectors, and windows,
use the Window menu.
The Welcome screen Lets you open a recent document or create a new document. From the Welcome screen, you can
also learn more about Dreamweaver by taking a product tour or a tutorial.
The Application bar Across the top of the application window contains a workspace switcher, menus (Windows only),
and other application controls.
The Document toolbar Contains buttons that provide options for different views of the Document window (such as
Design view and Code view), various viewing options, and some common operations such as previewing in a browser.
The Standard toolbar (Not displayed in the default workspace layout.) Contains buttons for common operations from
the File and Edit menus: New, Open, Browse in Bridge, Save, Save All, Print Code, Cut, Copy, Paste, Undo, and Redo.
To display the Standard toolbar, select View > Toolbars > Standard.
Page 17

USING DREAMWEAVER CS4
Updated 24 September 2009
Workspace
The Coding toolbar (Displayed in Code view only.) Contains buttons that let you perform many standard coding
operations.
The Style Rendering toolbar (Hidden by default.) Contains buttons that let you see how your design would look in
different media types if you use media-dependent style sheets. It also contains a button that lets you enable or disable
Cascading Style Sheets (CSS) styles.
The Document window Displays the current document as you create and edit it.
The Property inspector Lets you view and change a variety of properties for the selected object or text. Each object has
different properties. The Property inspector is not expanded by default in the Coder workspace layout.
The Tag selector Located in the Status bar at the bottom of the Document window. Shows the hierarchy of tags
surrounding the current selection. Click any tag in the hierarchy to select that tag and all its contents.
Panels Help you monitor and modify your work. Examples include the Insert panel, the CSS Styles panel, and the Files
panel. To expand a panel, double-click its tab.
The Insert panel Contains buttons for inserting various types of objects, such as images, tables, and media elements,
into a document. Each object is a piece of HTML code that lets you set various attributes as you insert it. For example,
you can insert a table by clicking the Table button in the Insert panel. If you prefer, you can insert objects using the
Insert menu instead of the Insert panel.
The Files panel Lets you manage your files and folders, whether they are part of a Dreamweaver site or on a remote
server. The Files panel also lets you access all the files on your local disk, much like Windows Explorer (Windows) or
the Finder (Macintosh).
11
More Help topics
“Working in the Document window” on page 20
“Using toolbars, inspectors, and context menus” on page 24
“Manage windows and panels” on page 25
Document window overview
The Document window shows the current document. You can select any of the following views:
Design view A design environment for visual page layout, visual editing, and rapid application development. In this
view, Dreamweaver displays a fully editable, visual representation of the document, similar to what you would see
when viewing the page in a browser.
Code view A hand-coding environment for writing and editing HTML, JavaScript, server-language code—such PHP
or ColdFusion Markup Language (CFML)—and any other kind of code.
Split Code view A split version of Code view that lets you scroll to work on different sections of the document at the
same time.
Code and Design view Lets you see both Code view and Design view for the same document in a single window.
Live view Similar to Design view, Live view displays a more realistic representation of what your document will look
like in a browser, and lets you interact with the document exactly as you would in a browser. Live view is not editable.
However, you can edit in Code view and refresh Live view to see your changes.
Live Code view Only available when viewing a document in Live view. Live Code view displays the actual code that a
browser uses to execute the page, and can dynamically change as you interact with the page in Live view. Live Code
view is not editable.
Page 18
USING DREAMWEAVER CS4
Updated 24 September 2009
Workspace
When a Document window is maximized (the default), tabs appear at the top of the Document window showing the
filenames of all open documents. Dreamweaver displays an asterisk after the filename if you’ve made changes that you
haven’t saved yet.
To switch to a document, click its tab.
Dreamweaver also displays the Related Files toolbar below the document’s tab (or below the document’s title bar if
you’re viewing documents in separate windows). Related documents are documents associated with the current file,
such as CSS files or JavaScript files. To open one of these related files in the Document window, click its filename in
the Related Files toolbar.
More Help topics
“Working in the Document window” on page 20
“About Live view” on page 283
“Open related files” on page 73
“View live data in Design view” on page 559
“General information about coding in Dreamweaver” on page 288
12
Document toolbar overview
The Document toolbar contains buttons that let you toggle between different views of your document quickly. The
toolbar also contains some common commands and options related to viewing the document and transferring it
between the local and remote sites. The illustration below shows the expanded Document toolbar.
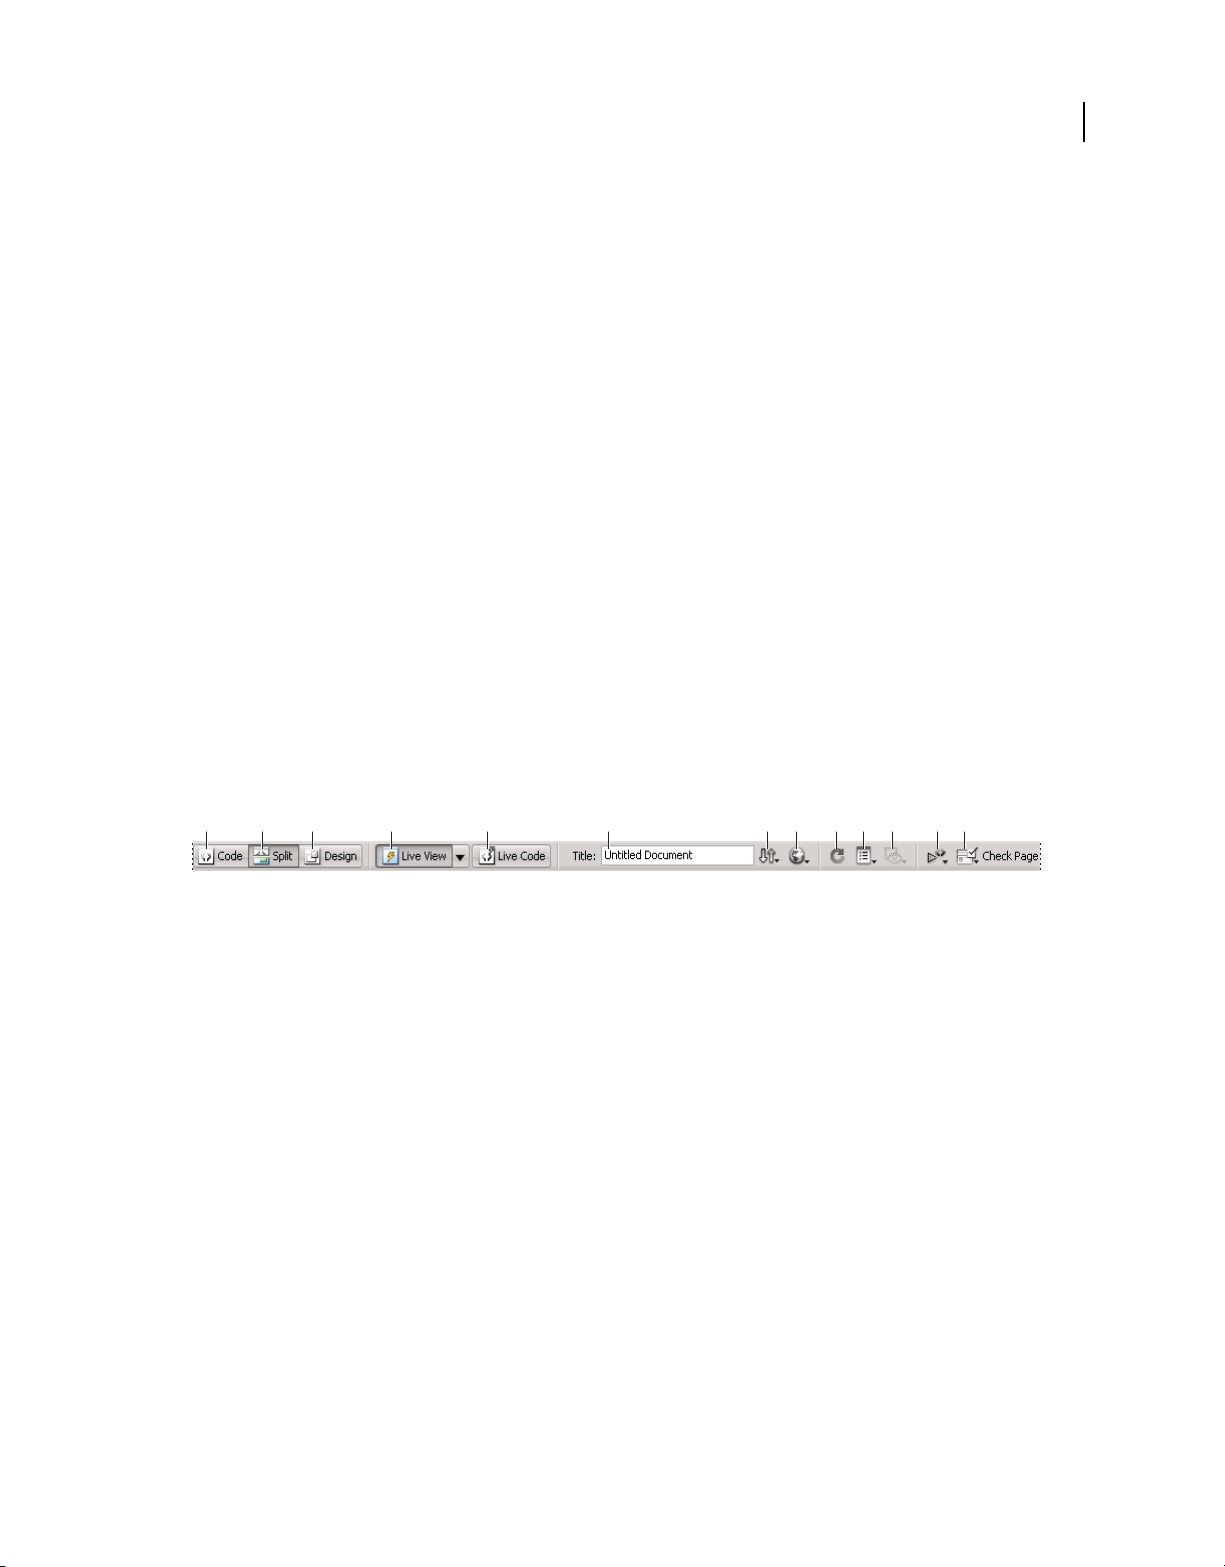
A B C D E G H I J K L MF
A. Show Code View B. Show Code and Design Views C. Show Design View D. Live View E. Live Code View F. Document Title G. File
Management H. Preview/Debug in Browser I. Refresh Design View J. View Options K. Visual Aids L. Validate Markup M. Check Browser
Compatibility
The following options appear in the Document toolbar:
Show Code View Displays only the Code view in the Document window.
Show Code and Design Views Splits the Document window between the Code and the Design views. When you select
this combined view, the option Design View on Top becomes available in the View Options menu.
Show Design View Displays only the Design view in the Document window.
Note: If you are working with XML, JavaScript, CSS, or other code based file types, you cannot view the files in Design
view and the Design and Split buttons are dimmed out.
Live View Displays a non-editable, interactive, browser based view of the document.
Live Code View Displays the actual code used by the browser to execute the page.
Document Title Allows you to enter a title for your document, to be displayed in the browser’s title bar. If your
document already has a title, it appears in this field.
File Management Displays the File Management pop-up menu.
Preview/Debug in Browser Allows you to preview or debug your document in a browser. Select a browser from the
pop-up menu.
Page 19
USING DREAMWEAVER CS4
Updated 24 September 2009
Workspace
Refresh Design View Refreshes the document’s Design view after you make changes in Code view. Changes you make
in Code view don’t automatically appear in Design view until you perform certain actions, such as saving the file or
clicking this button.
Note: Refreshing also updates code features that are DOM (Document Object Model) dependent, such as the ability to
select a code block’s opening or closing tags.
View Options Allows you to set options for Code view and Design view, including which view you want to appear
above the other. Options in the menu are for the current view: Design view, Code view, or both.
Visual Aids Lets you use different visual aids to design your pages.
Validate Markup Lets you validate the current document or a selected tag.
Check Browser Compatibility Lets you check if your CSS is compatible across different browsers.
More Help topics
“Display toolbars” on page 24
“Preview pages in Live view” on page 283
“Setting coding preferences” on page 294
“View and edit head content” on page 325
13
“Using visual aids for layout” on page 173
Standard toolbar overview
The Standard toolbar contains buttons for common operations from the File and Edit menus: New, Open, Browse in
Bridge, Save, Save All, Print Code, Cut, Copy, Paste, Undo, and Redo. Use these buttons just as you would use the
equivalent menu commands.
More Help topics
“Display toolbars” on page 24
“Creating and opening documents” on page 64
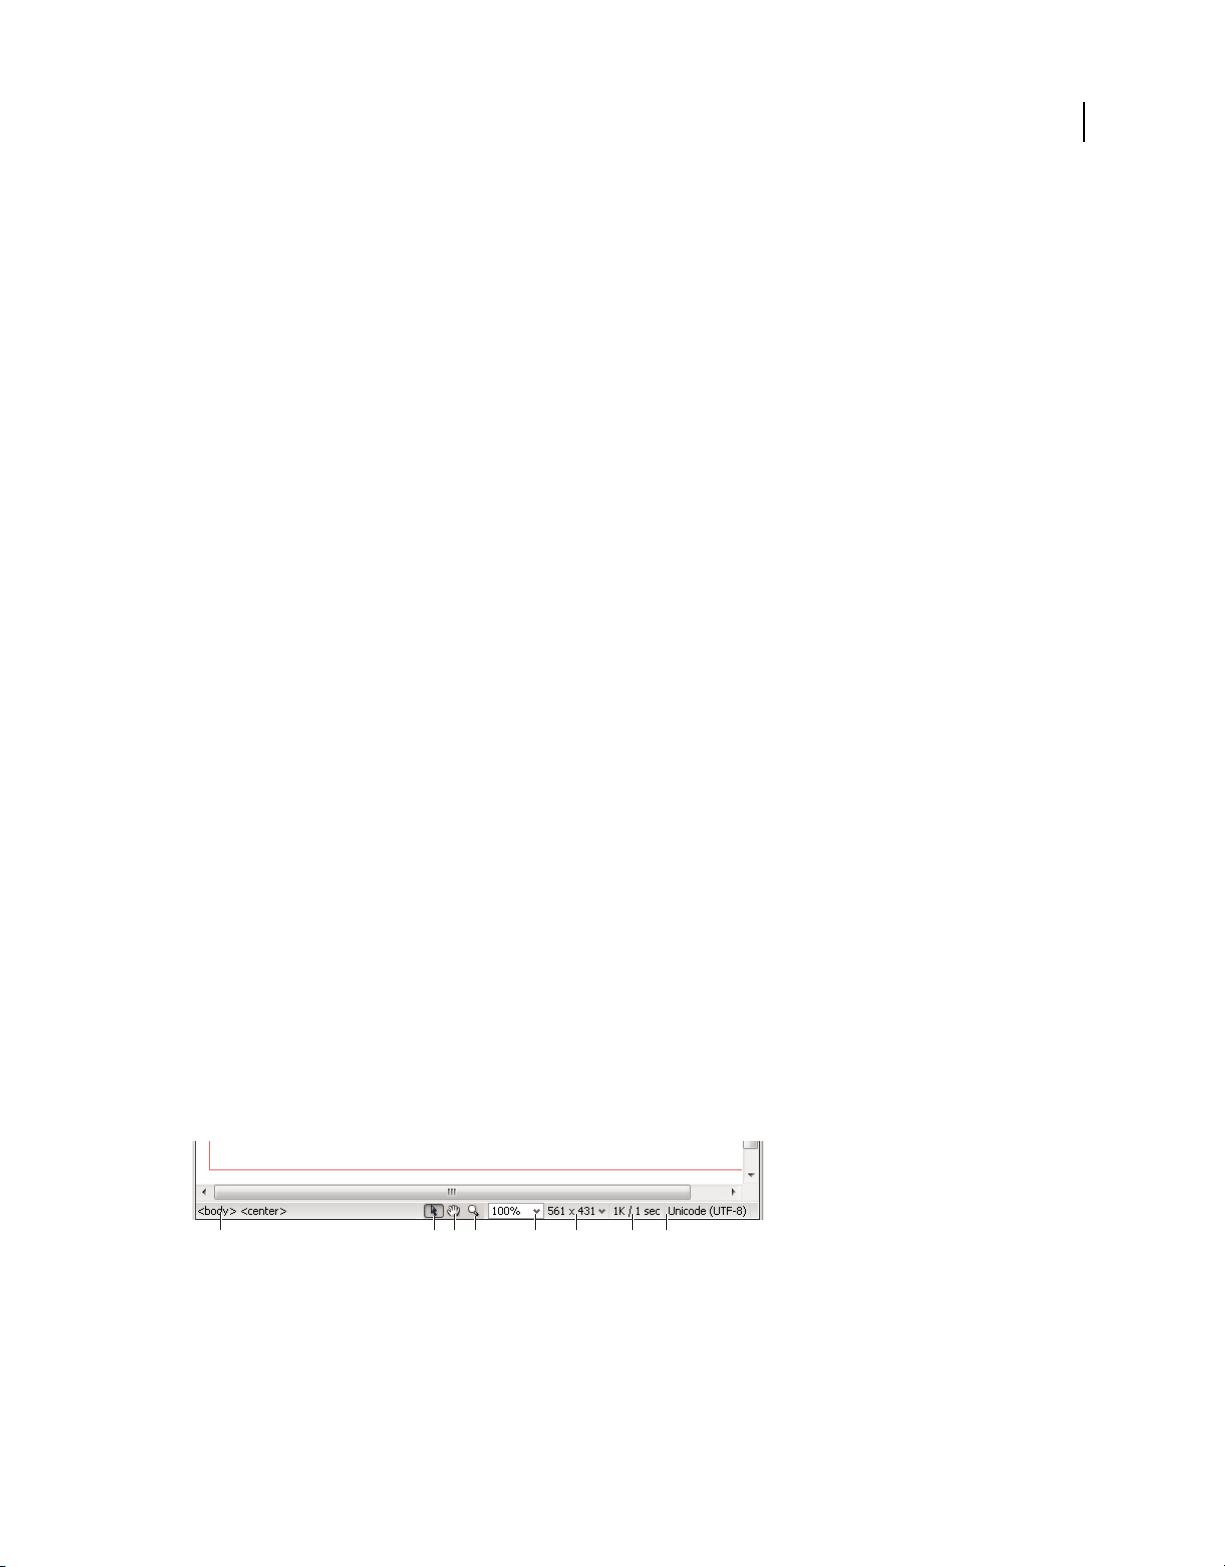
Status bar overview
The Status bar at the bottom of the Document window provides additional information about the document you are
creating.
A B C D E F G H
A. Tag selector B. Select tool C. Hand tool D. Zoom tool E. Set magnification F. Window size pop-up menu G. Document size and estimated
download time H. Encoding indicator
Tag selector Shows the hierarchy of tags surrounding the current selection. Click any tag in the hierarchy to select that
tag and all its contents. Click
<body> to select the entire body of the document. To set the class or ID attributes for a
tag in the tag selector, right-click (Windows) or Control-click (Macintosh) the tag and select a class or ID from the
context menu.
Page 20

USING DREAMWEAVER CS4
Updated 24 September 2009
Workspace
Select tool Enables and disables the Hand tool.
Hand tool Lets you click the document and drag it in the Document window.
Zoom tool and Set Magnification pop-up menu Let you set a magnification level for your document.
Window size pop-up menu (Not available in Code view.) Lets you resize the Document window to predetermined or
custom dimensions.
Document size and download time Shows the estimated document size and estimated download time for the page,
including all dependent files such as images and other media files.
Encoding indicator Shows the text encoding for the current document.
More Help topics
“Set window size and connection speed” on page 22
“Zoom in and out” on page 215
“Resize the Document window” on page 22
“Set download time and size preferences” on page 216
14
Coding toolbar overview
The Coding toolbar contains buttons that let you perform many standard coding operations, such as collapsing and
expanding code selections, highlighting invalid code, applying and removing comments, indenting code, and inserting
recently used code snippets. The Coding toolbar appears vertically on the left side of the Document window, and is
only visible when Code view is showing.
You cannot undock or move the Coding toolbar, but you can hide it (View > Toolbars > Coding).
You can also edit the Coding toolbar to display more buttons (such as Word Wrap, Show Hidden Characters, and Auto
Indent), or hide buttons that you don’t want to use. To do so, however, you must edit the XML file that generates the
toolbar. For more information, see Extending Dreamweaver.
Page 21
USING DREAMWEAVER CS4
Updated 24 September 2009
Workspace
More Help topics
“Display toolbars” on page 24
“Insert code with the Coding toolbar” on page 301
Style Rendering toolbar overview
The Style Rendering toolbar (hidden by default) contains buttons that let you see how your design would look in
different media types if you use media-dependent style sheets. It also contains a button that lets you enable or disable
CSS styles. To display the toolbar, select View > Toolbars > Style Rendering.
This toolbar only works if your documents use media-dependent style sheets. For example, your style sheet might
specify a body rule for print media and a different body rule for handheld devices. For more information on creating
media-dependent style sheets, see the World Wide Web Consortium website at www.w3.org/TR/CSS21/media.html.
By default, Dreamweaver displays your design for the screen media type (which shows you how a page is rendered on
a computer screen). You can view the following media type renderings by clicking the respective buttons in the Style
Rendering toolbar.
15
Render Screen Media Type Shows you how the page appears on a computer screen.
Render Print Media Type Shows you how the page appears on a printed piece of paper.
Render Handheld Media Type Shows you how the page appears on a handheld device, such as a mobile phone or a
BlackBerry device.
Render Projection Media Type Shows you how the page appears on a projection device.
Render TTY Media Type Shows you how the page appears on a teletype machine.
Render TV Media Type Shows you how the page appears on a television screen.
Toggle Displaying Of CSS Styles Lets you enable or disable CSS styles. This button works independently of the other
media buttons.
Design-time Style Sheets Lets you specify a Design-time style sheet.
For a tutorial on designing style sheets for print and handheld devices, see www.adobe.com/go/vid0156.
More Help topics
“Display toolbars” on page 24
Page 22
USING DREAMWEAVER CS4
Updated 24 September 2009
Workspace
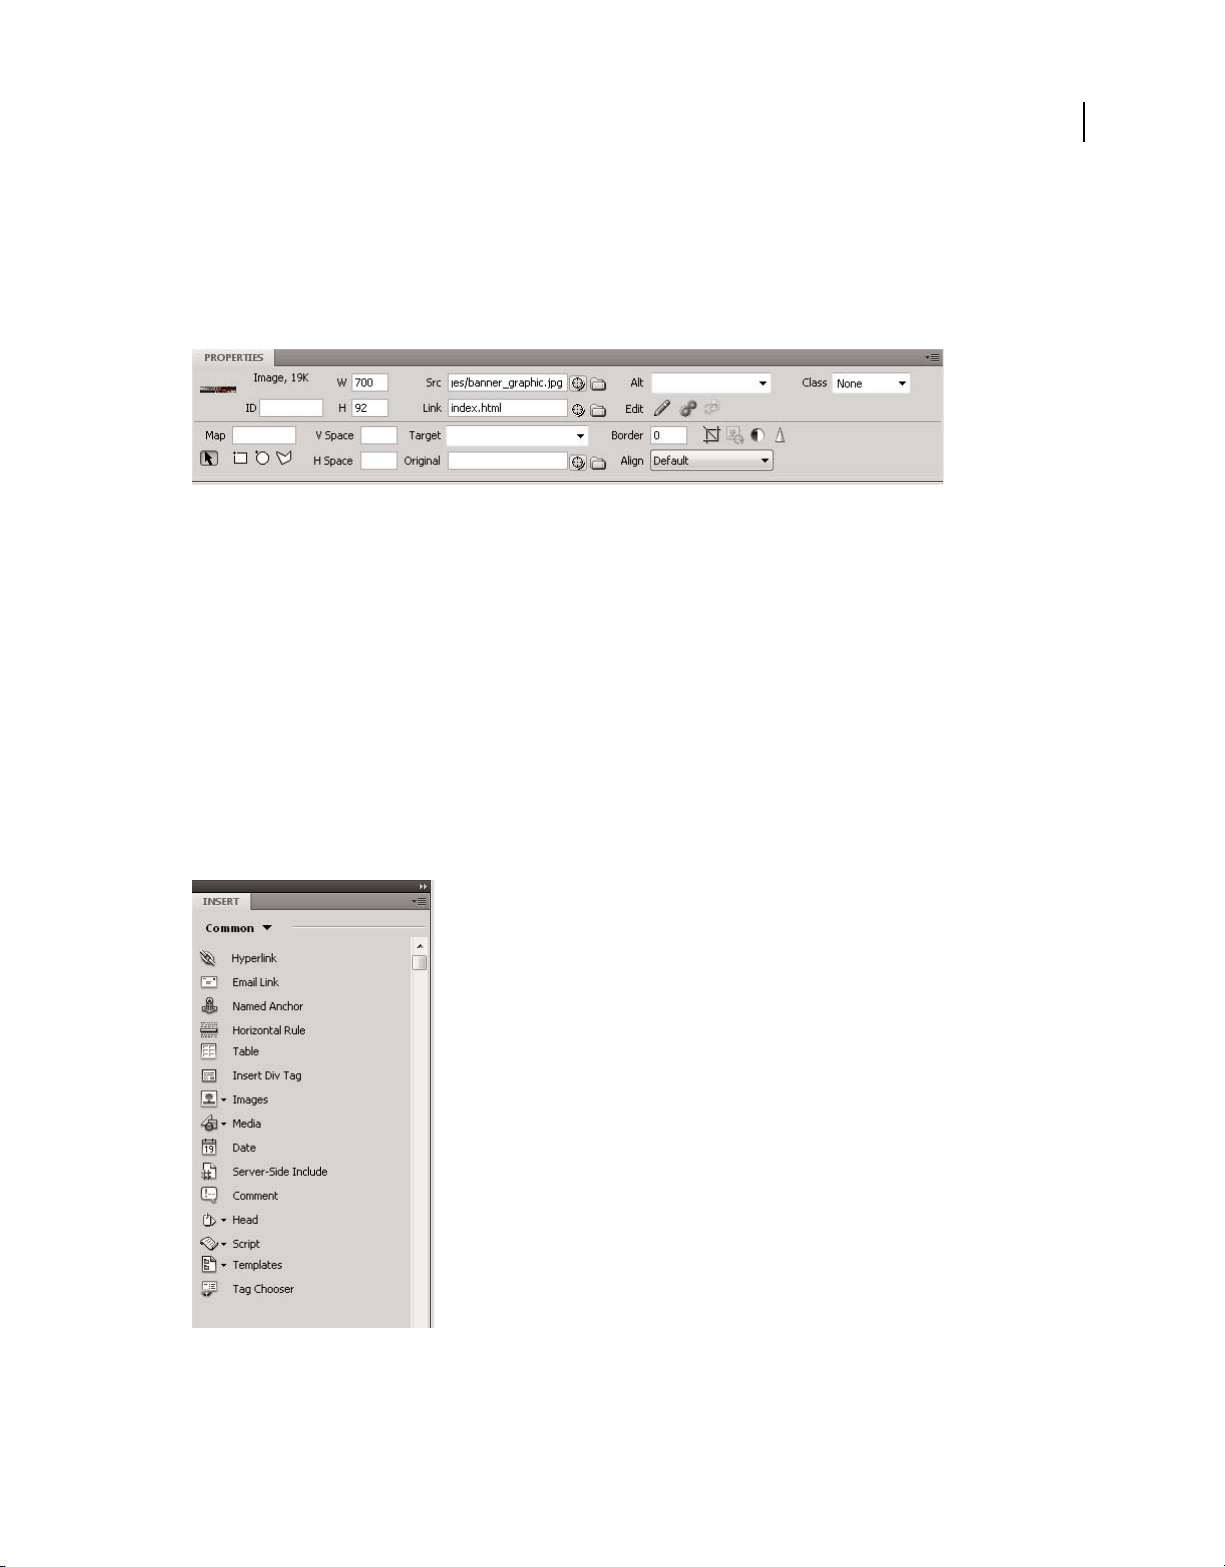
Property inspector overview
The Property inspector lets you examine and edit the most common properties for the currently selected page element,
such as text or an inserted object. The contents of the Property inspector vary depending on the element selected. For
example, if you select an image on your page, the Property inspector changes to show properties for the image (such
as the file path to the image, the width and height of the image, the border around the image, if any, and so on).
The Property inspector is at the lower edge of the workspace by default, but you can undock it and make it a floating
panel in the workspace.
More Help topics
“Dock and undock panels” on page 26
“Use the Property inspector” on page 24
16
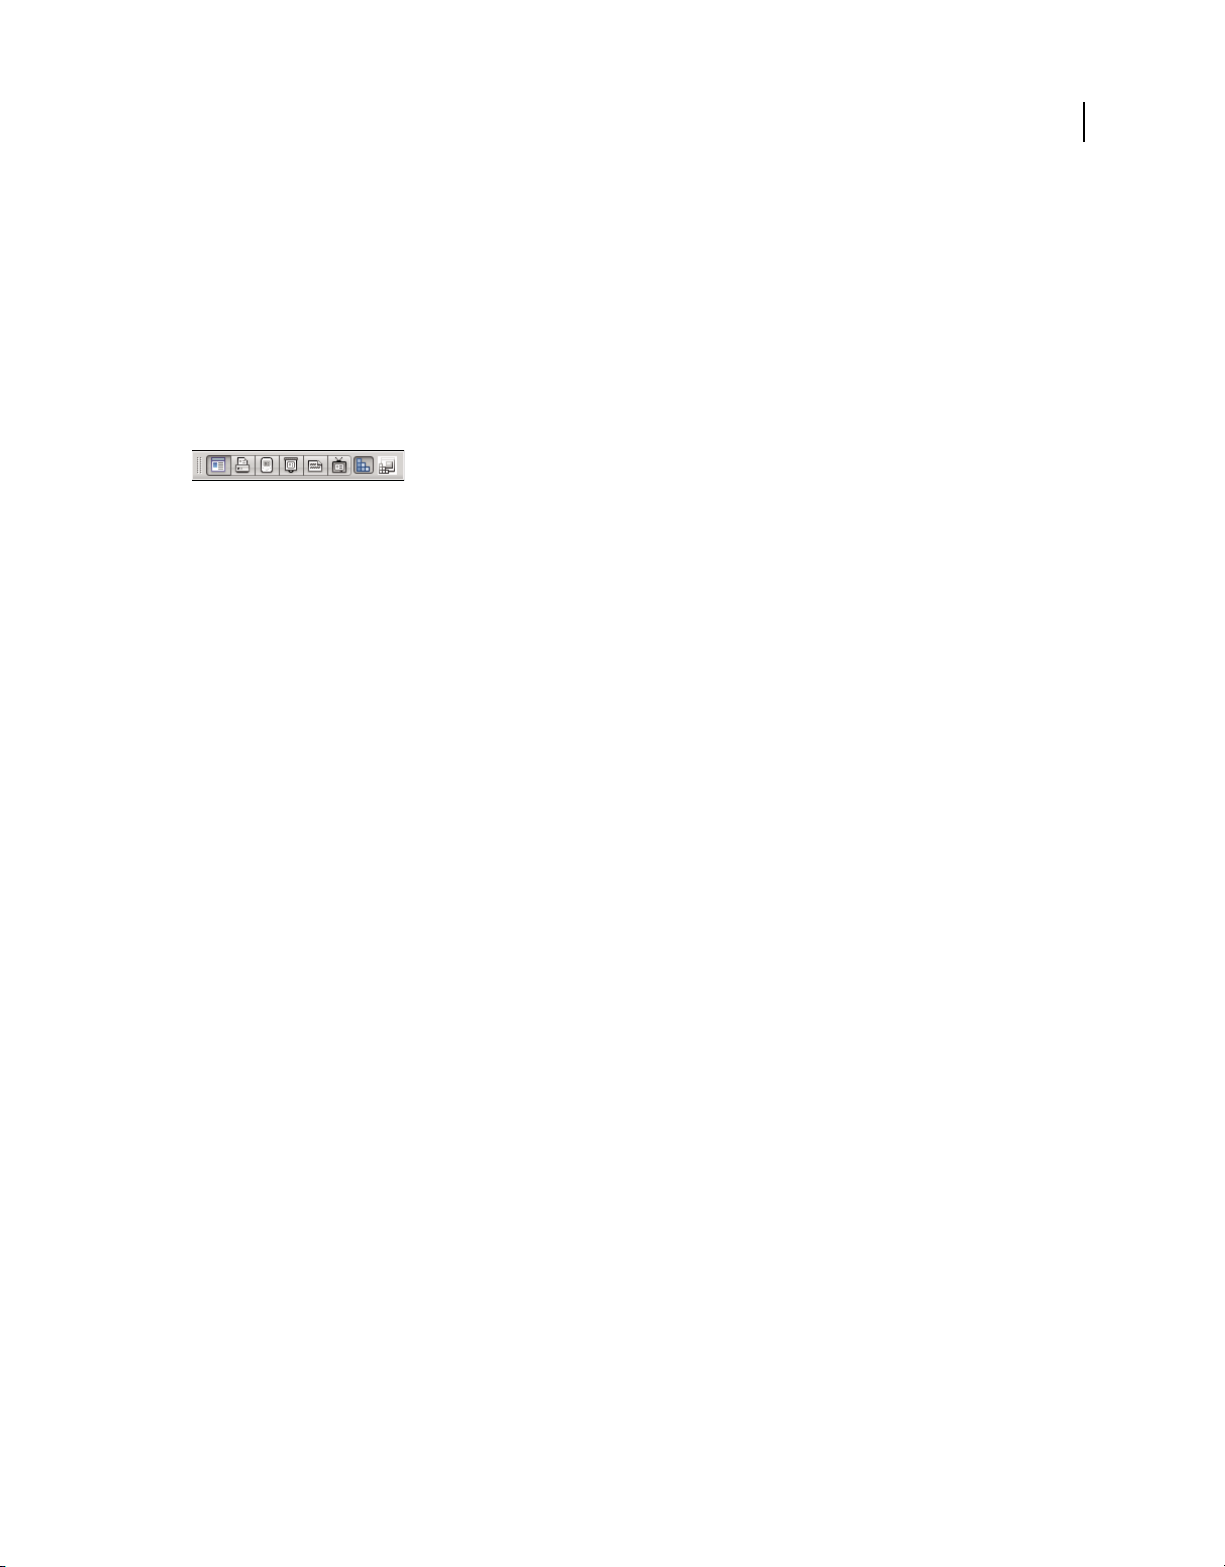
Insert panel overview
The Insert panel contains buttons for creating and inserting objects such as tables, images, and links. The buttons are
organized into several categories, which you can switch by selecting the desired category from the Category pop-up
menu. Additional categories appear when the current document contains server code, such as ASP or CFML
documents.
Page 23

USING DREAMWEAVER CS4
Updated 24 September 2009
Workspace
Some categories have buttons with pop-up menus. When you select an option from a pop-up menu, it becomes the
default action for the button. For example, if you select Image Placeholder from the Image button’s pop-up menu, the
next time you click the Image button, Dreamweaver inserts an image placeholder. Anytime you select a new option
from the pop-up menu, the default action for the button changes.
The Insert panel is organized in the following categories:
The Common category Lets you create and insert the most commonly used objects, such as images and tables.
The Layout category Lets you insert tables, table elements, div tags, frames, and Spry widgets. You can also choose
two views for tables: Standard (default) and Expanded Tables.
The Forms category Contains buttons for creating forms and inserting form elements, including Spry validation
widgets.
The Data category Lets you insert Spry data objects as well as other dynamic elements like recordsets, repeated
regions, and record insertion and update forms.
The Spry category Contains buttons for building Spry pages, including Spry data objects and widgets.
The InContext Editing category Contains buttons for building InContext editing pages, including buttons for Editable
Regions, Repeating Regions, and managing CSS classes.
The Text category Lets you insert a variety of text- and list-formatting tags, such as b, em, p, h1, and ul.
17
The Favorites category Lets you group and organize the Insert panel buttons you use the most in one common place.
Server-code categories Available only for pages that use a particular server language, including ASP, CFML Basic,
CFML Flow, CFML Advanced, and PHP. Each of these categories provides server-code objects that you can insert in
Code view.
Unlike other panels in Dreamweaver, you can drag the Insert panel out of its default dock position and drop it into a
horizontal position at the top of the Document window. When you do so, it changes from a panel to a toolbar (though
you cannot hide and display it in the same way as other toolbars).
More Help topics
“Use the Insert panel” on page 204
“Building Spry pages visually” on page 409
Page 24
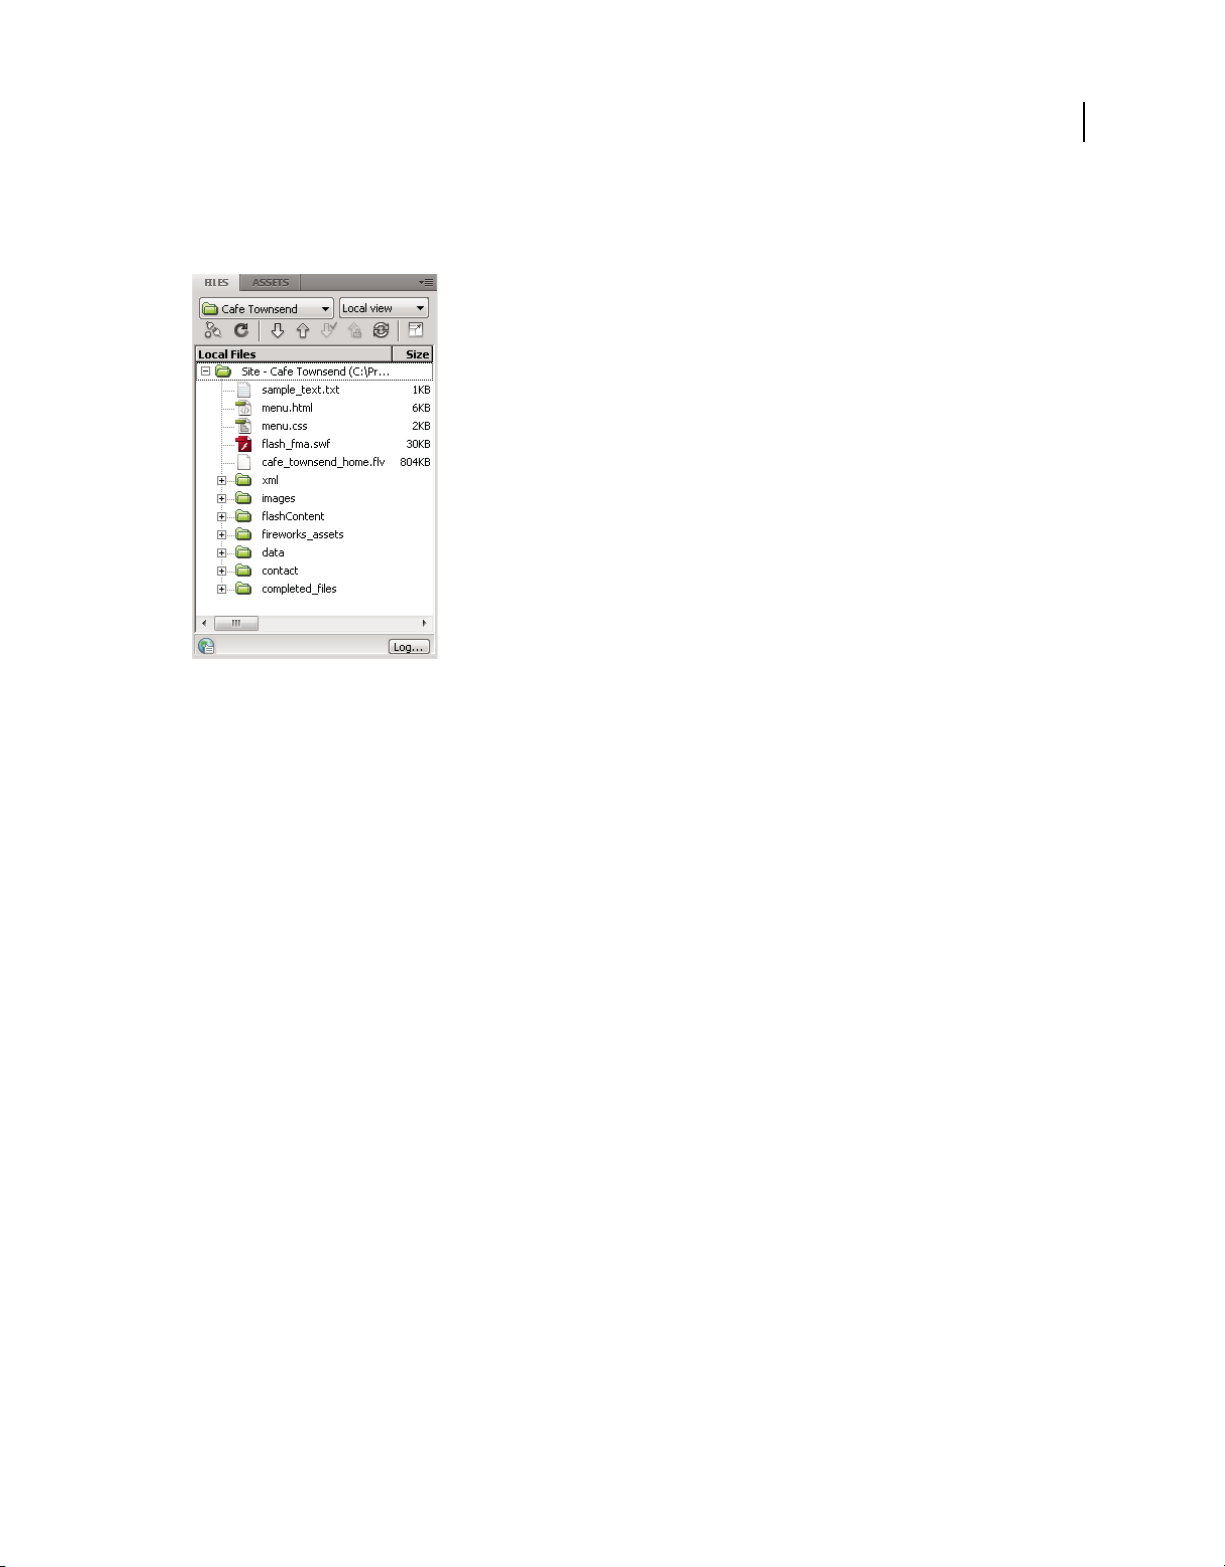
Files panel overview
Updated 24 September 2009
Use the Files panel to view and manage the files in your Dreamweaver site.
USING DREAMWEAVER CS4
Workspace
18
When you view sites, files, or folders in the Files panel, you can change the size of the viewing area, and expand or
collapse the Files panel. When the Files panel is collapsed, it displays the contents of the local site, the remote site, the
testing server, or the SVN repository as a list of files. When expanded, it displays the local site and either the remote
site, the testing server, or the SVN repository.
For Dreamweaver sites, you can also customize the Files panel by changing the view—either your local or remote site—
that appears by default in the collapsed panel.
More Help topics
“Work with files in the Files panel” on page 78
Page 25
USING DREAMWEAVER CS4
Updated 24 September 2009
Workspace
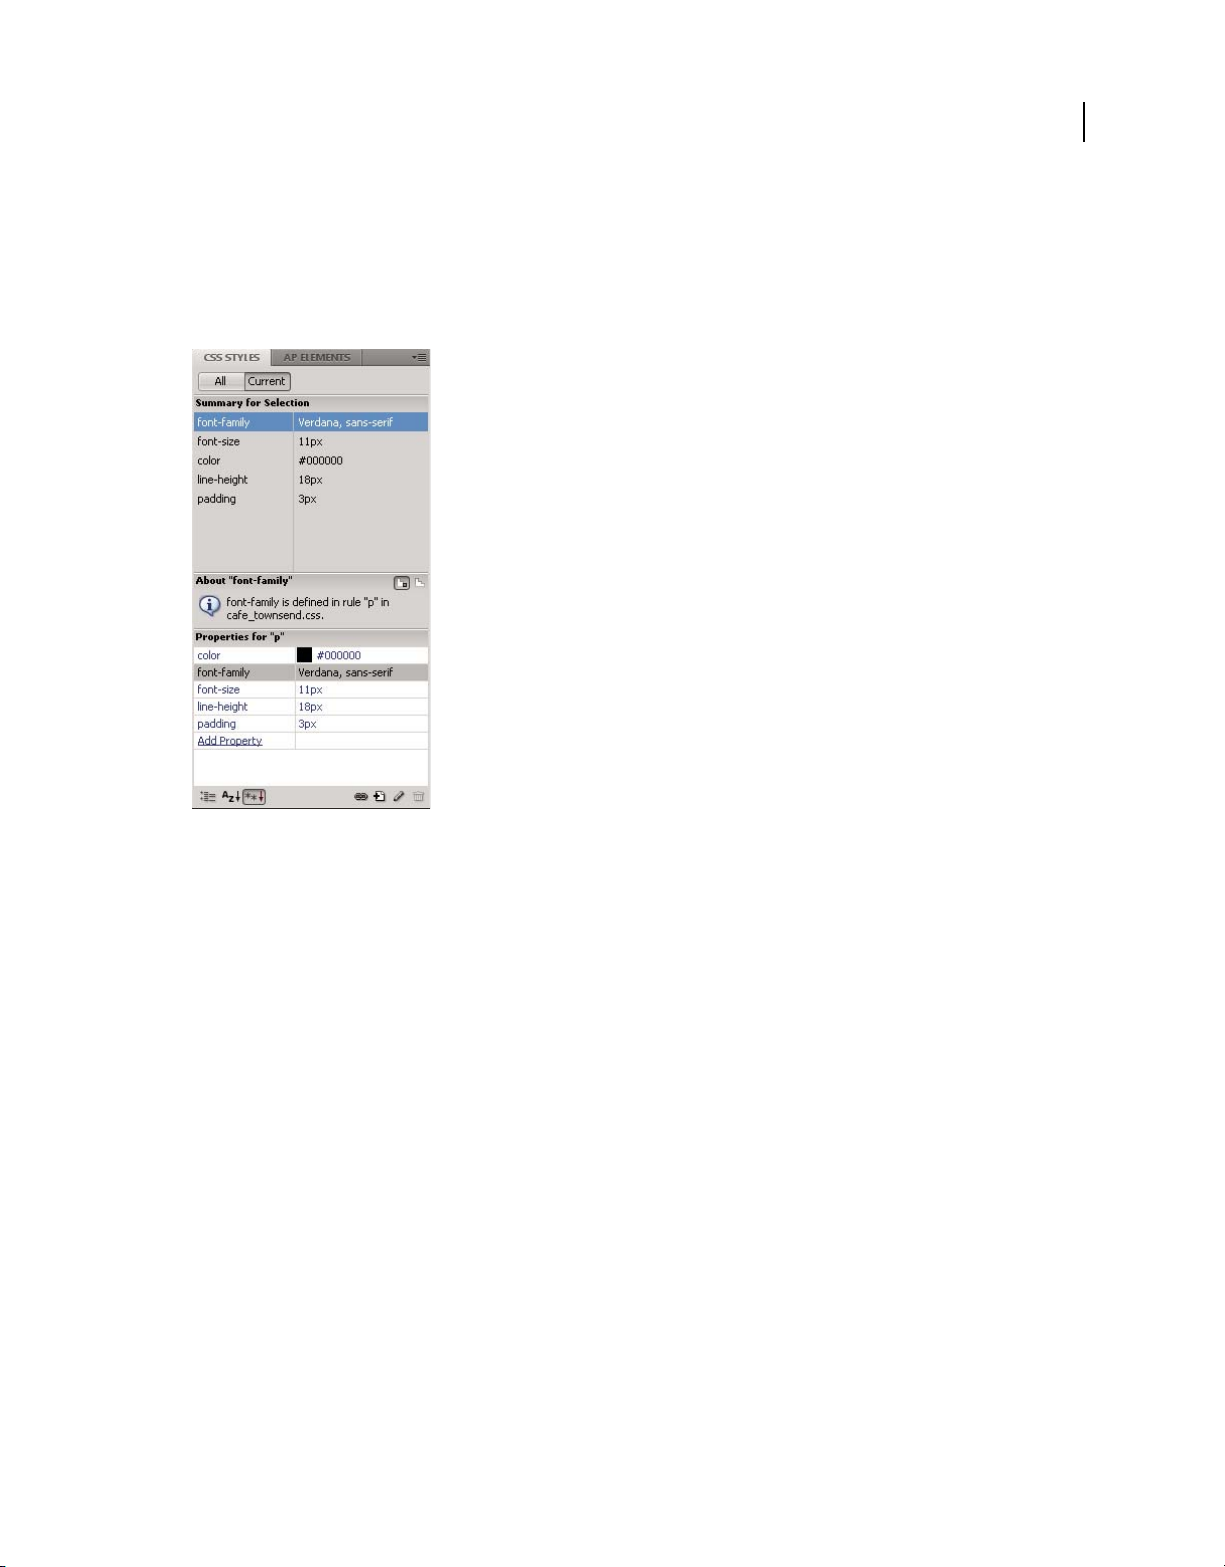
CSS Styles panel overview
The CSS Styles panel lets you track the CSS rules and properties affecting a currently selected page element (Current
mode), or the rules and properties affecting an entire document (All mode). A toggle button at the top of the CSS Styles
panel lets you switch between the two modes. The CSS Styles panel also lets you modify CSS properties in both All and
Current mode.
19
You can resize any of the panes by dragging the borders between the panes.
In Current mode, the CSS Styles panel displays three panes: a Summary for Selection pane that displays the CSS
properties for the current selection in the document, a Rules pane that displays the location of selected properties (or
a cascade of rules for the selected tag, depending on your selection), and a Properties pane that lets you edit CSS
properties for the rule defining the selection.
In All mode, the CSS Styles panel displays two panes: an All Rules pane (on top), and a Properties pane (on bottom). The
All Rules pane displays a list of rules defined in the current document as well as all rules defined in style sheets attached
to the current document. The Properties pane lets you edit CSS properties for any selected rule in the All Rules pane.
Any changes you make in the Properties pane are applied immediately, letting you preview your work as you go.
More Help topics
“Creating and managing CSS” on page 131
Visual guides overview
Dreamweaver provides several kinds of visual guides to help you design documents and predict approximately how
they appear in browsers. You can do any of the following:
• Instantly snap the Document window to a desired window size to see how the elements fit on the page.
• Use a tracing image as the page background to help you duplicate a design created in an illustration or image-
editing application such as Adobe® Photoshop® or Adobe® Fireworks®.
• Use rulers and guides to provide a visual cue for precise positioning and resizing of page elements.
Page 26

USING DREAMWEAVER CS4
Updated 24 September 2009
Workspace
• Use the grid for precise positioning and resizing of absolutely positioned elements (AP elements).
Grid marks on the page help you align AP elements, and when snapping is enabled, AP elements automatically snap
to the closest grid point when moved or resized. (Other objects, such as images and paragraphs, do not snap to the
grid.) Snapping works regardless of whether the grid is visible.
More Help topics
“Using visual aids for layout” on page 173
GoLive users
If you have been using GoLive and want to switch to working with Dreamweaver, you can find an online introduction
to the Dreamweaver workspace and workflow, as well as a discussion of ways to migrate your sites to Dreamweaver.
For more information, see www.adobe.com/go/learn_dw_golive.
More Help topics
Dreamweaver for GoLive users tutorial
20
Working in the Document window
Switch between views in the Document window
You can view a document in the Document window in Code view, Split Code view, Design view, Code and Design
views (Split view), or Live view. You also have the option of viewing Split Code view or Code and Design views
horizontally or vertically. (Horizontal display is the default.)
Switch to Code view
❖ Do one of the following:
• Select View > Code.
• In the Document toolbar, click the Show Code View button
Switch to Split Code view
Split Code view splits your document in two so that you can work on two sections of the code at once.
❖ Select View > Split Code.
Note: If you resize the Document window or application window, or change your workspace layout, Dreamweaver
maintains the split ratio so that the two views are always visible.
Switch to Design view
❖ Do one of the following:
• Select View > Design.
• In the Document toolbar, click the Show Design View button
Page 27

USING DREAMWEAVER CS4
Updated 24 September 2009
Workspace
Show both Code and Design views
❖ Do one of the following:
• Select View > Code and Design.
• In the Document toolbar, click the Show Code and Design Views button
By default, Code view appears at the top of the Document window and Design view appears at the bottom. To display
Design view on top, select View > Design View on Top.
Note: If you resize the Document window or application window, or change your workspace layout, Dreamweaver
maintains the split ratio so that the two views are always visible.
Toggle between Code view and Design view
❖ Press Control+backquote (`).
If both views are showing in the Document window, this keyboard shortcut changes keyboard focus from one view to
the other.
Split views vertically
This option is only available for Split Code view and Code and Design views (Split view). It is disabled for Code view
and Design view.
21
1 Make sure that you are in Split Code view (View > Split Code) or Code and Design views (View > Code and
Design).
2 Select View > Split Vertically.
If you are in Code and Design views, you have the option of displaying Design view on the left (View > Design View
on Left).
Note: If you resize the Document window or application window, or change your workspace layout, Dreamweaver
maintains the split ratio so that the two views are always visible.
More Help topics
“Document window overview” on page 11
“Preview pages in Live view” on page 283
Cascade or tile Document windows
If you have many documents open at once, you can cascade or tile them.
More Help topics
“Manage windows and panels” on page 25
“Display tabbed documents (Dreamweaver Macintosh)” on page 30
Cascade Document windows
❖ Select Window > Cascade.
Tile Document windows
• (Windows) Select Window > Tile Horizontally or Window > Tile Vertically.
• (Macintosh) Select Window > Tile.
Page 28
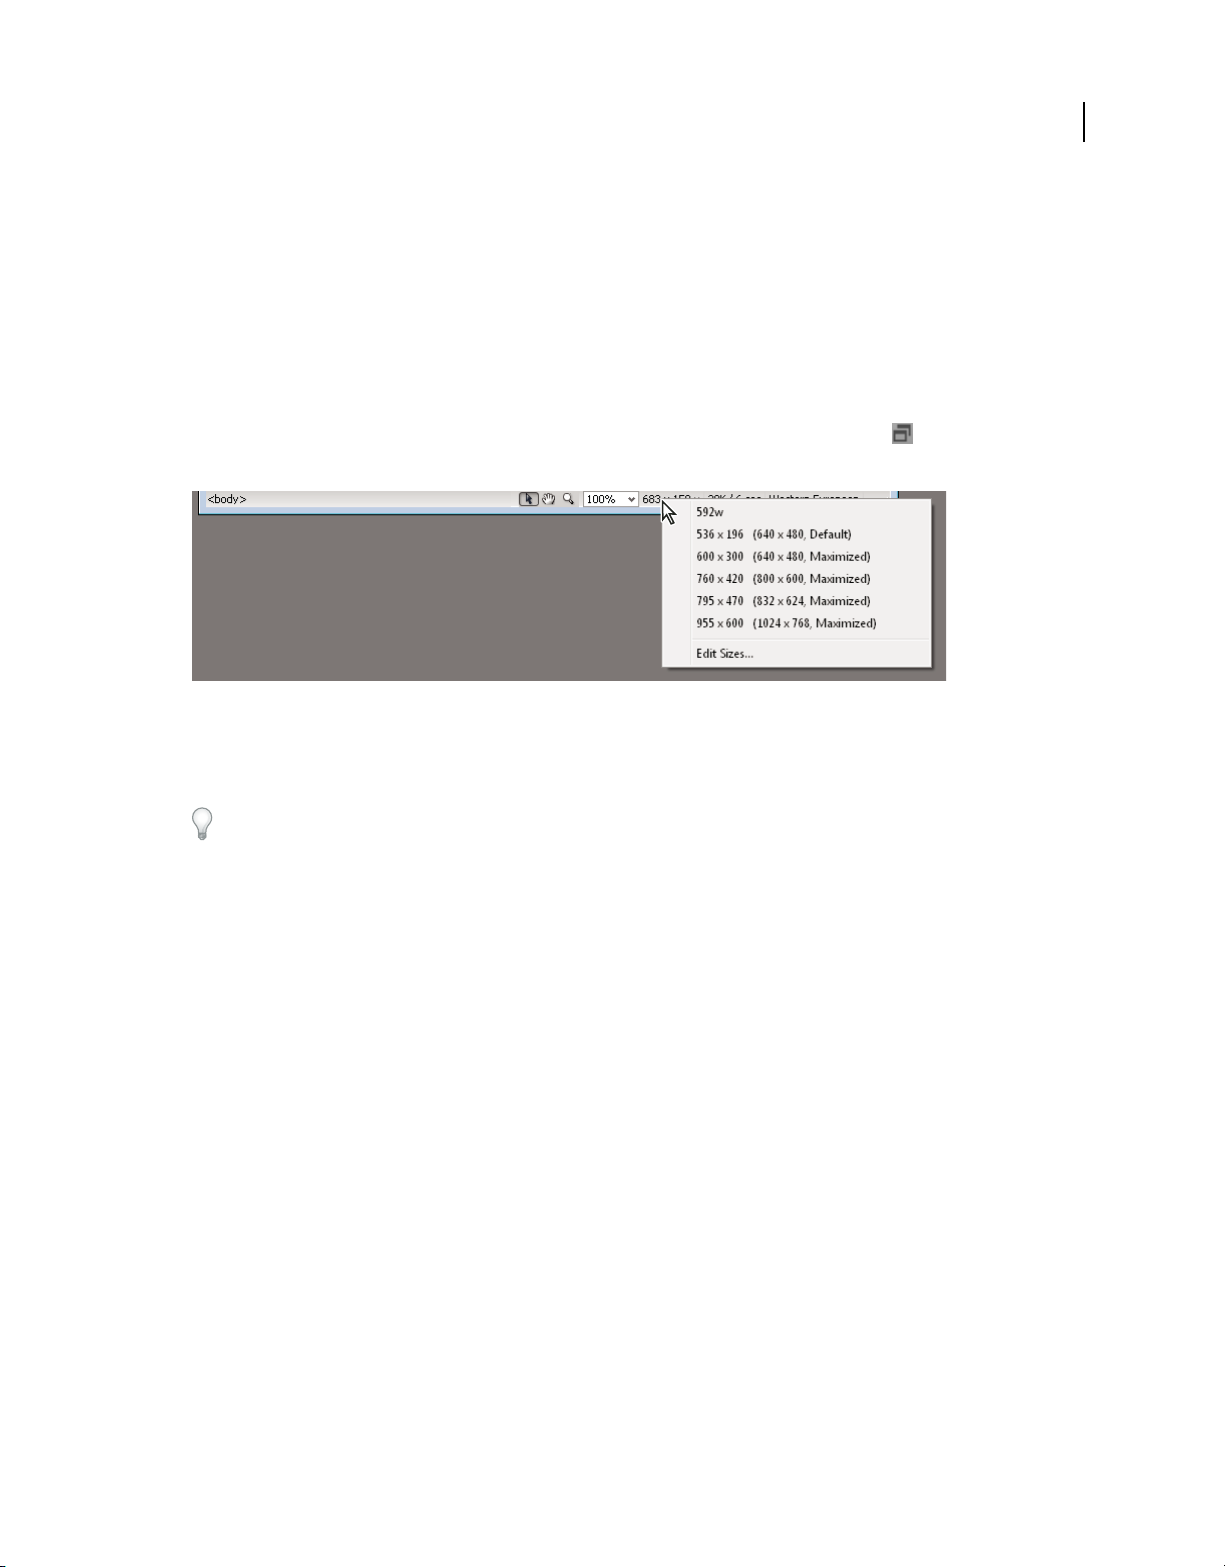
USING DREAMWEAVER CS4
Updated 24 September 2009
Workspace
Resize the Document window
The Status bar displays the Document window’s current dimensions (in pixels). To design a page that looks its best at
a specific size, you can adjust the Document window to any of the predetermined sizes, edit those predetermined sizes,
or create sizes.
Resize the Document window to a predetermined size
❖ Select one of the sizes from the Window Size pop-up menu at the bottom of the Document window.
Note: (Windows only) Documents within the Document window are maximized by default, and you can't resize a
document when it's maximized. To de-maximize the document, click the de-maximize button in the upper right
corner of the document.
22
The window size shown reflects the inside dimensions of the browser window, without borders; the monitor size is
listed in parentheses. For example, you would use the size “536 x 196 (640 x 480, Default)” if your visitors are likely to
be using Microsoft Internet Explorer or Netscape Navigator in their default configurations on a 640 x 480 monitor.
For less precise resizing, use your operating system’s standard methods of resizing windows, such as dragging the
lower-right corner of a window.
Change the values listed in the Window Size pop-up menu
1 Select Edit Sizes from the Window Size pop-up menu.
2 Click any of the width or height values in the Window Sizes list, and type a new value.
To make the Document window adjust only to a specific width (leaving the height unchanged), select a height value
and delete it.
3 Click the Description box to enter descriptive text about a specific size.
Add a new size to the Window Size pop-up menu
1 Select Edit Sizes from the Window Size pop-up menu.
2 Click the blank space below the last value in the Width column.
3 Enter values for Width and Height.
To set the Width or Height only, simply leave one field empty.
4 Click the Description field to enter descriptive text about the size you added.
For example, you might type SVGA or average PC next to the entry for an 800 x 600 pixel monitor, and 17-in. Mac
next to the entry for an 832 x 624 pixel monitor. Most monitors can be adjusted to a variety of pixel dimensions.
Set window size and connection speed
1 Select Edit > Preferences (Windows) or Dreamweaver > Preferences (Macintosh).
Page 29

USING DREAMWEAVER CS4
Updated 24 September 2009
Workspace
2 Select Status Bar from the Category list on the left.
3 Set any of the following options:
Window Sizes lets you customize the window sizes that appear in the Status bar’s pop-up menu.
Connection Speed determines the connection speed (in kilobits per second) used to calculate the download size. The
download size for the page is displayed in the Status bar. When an image is selected in the Document window, the
image’s download size is displayed in the Property inspector.
More Help topics
“Status bar overview” on page 13
“Resize the Document window” on page 22
Reports in Dreamweaver
You can run reports in Dreamweaver to find content, troubleshoot, or test content. You can generate the following
types of reports:
Search Lets you search for tags, attributes, and specific text within tags.
Reference Lets you search for helpful reference information.
23
Validation Lets you check for code or syntax errors.
Browser Compatibility Lets you test the HTML in your documents to see if any tags or attributes are unsupported by
your target browsers.
Link Checker Lets you find and fix broken, external, and orphaned links.
Site Reports Enable you to improve workflow and test HTML attributes in your site. Workflow reports include
checked out by, recently modified, and design notes; HTML reports include combinable nested font tags, accessibility,
missing Alt text, redundant nested tags, removable empty tags, and untitled documents.
FTP Log Enables you to view all FTP file-transfer activity.
Server Debug Lets you view information to debug an Adobe® ColdFusion® application.
More Help topics
“Search for tags, attributes, or text in code” on page 311
“Use language-reference material” on page 312
“Testing your site” on page 111
“Validate tags” on page 317
“Check for browser compatibility” on page 317
“Find broken, external, and orphaned links” on page 280
“Put files on a remote server” on page 86
“Get files from a remote server” on page 85
“Use the ColdFusion debugger (Windows only)” on page 318
Page 30

USING DREAMWEAVER CS4
Updated 24 September 2009
Workspace
Using toolbars, inspectors, and context menus
Display toolbars
Use the Document and Standard toolbars to perform document-related and standard editing operations; the Coding
toolbar to insert code quickly; and the Style Rendering toolbar to display your page as it would appear in different
media types. You can choose to display or hide the toolbars as necessary.
• Select View > Toolbars, and then select the toolbar.
• Right-click (Windows) or Control-click (Macintosh) any of the toolbars and select the toolbar from the context menu.
Note: To display or hide the Coding toolbar in the Code inspector (Window > Code Inspector), select Coding Toolbar
from the View Options pop-up menu at the top of the inspector.
More Help topics
“Document toolbar overview” on page 12
“Standard toolbar overview” on page 13
“Coding toolbar overview” on page 14
24
“Style Rendering toolbar overview” on page 15
Use the Property inspector
The Property inspector lets you examine and edit the most common properties for the currently selected page element,
such as text or an inserted object. The contents of the Property inspector vary depending on the element(s) selected.
To access help for a particular Property inspector, click the help button in the upper right corner of the Property
inspector, or select Help from a Property inspector’s Options menu.
Note: Use the Tag inspector to view and edit every attribute associated with a given tag’s properties.
More Help topics
“Property inspector overview” on page 16
“Set text properties in the Property inspector” on page 226
“Dock and undock panels” on page 26
“Change attributes with the Tag inspector” on page 320
Show or hide the Property inspector
❖ Select Window > Properties.
Expand or collapse the Property inspector
❖ Click the expander arrow in the lower-right corner of the Property inspector.
View and change properties for a page element
1 Select the page element in the Document window.
You might have to expand the Property inspector to view all the properties for the selected element.
2 Change any of the properties in the Property inspector.
Page 31

USING DREAMWEAVER CS4
Updated 24 September 2009
Workspace
Note: For information on specific properties, select an element in the Document window, and then click the Help icon in
the upper-right corner of the Property inspector.
3 If your changes are not immediately applied in the Document window, apply the changes in one of these ways:
• Click outside the property-editing text fields.
• Press Enter (Windows) or Return (Macintosh).
• Press Tab to switch to another property.
Use context menus
Context menus provide convenient access to the most useful commands and properties related to the object or window
you’re working with. Context menus list only those commands that pertain to the current selection.
1 Right-click (Windows) or Control-click (Macintosh) the object or window.
2 Select a command from the context menu.
25
Customizing the CS4 workspace
Manage windows and panels
You can create a custom workspace by moving and manipulating Document windows and panels. You can also save
workspaces and switch among them.
Page 32

USING DREAMWEAVER CS4
Updated 24 September 2009
Workspace
Note: The following examples use Photoshop for demonstration purposes. The workspace behaves the same in all the
products.
A
B
C
Narrow blue drop zone indicates Color panel will be docked on its own above the Layers panel group.
A. Title bar B. Tab C. Drop zone
In Photoshop, you can change the font size of the text in the Control panel, in the panels, and in tool tips. Choose a
size from the UI Font Size menu in Interface preferences.
Manage Document windows
When you open more than one file, the Document windows are tabbed.
26
• To rearrange the order of tabbed Document windows, drag a window’s tab to a new location in the group.
• To undock a Document window from a group of windows, drag the window’s tab out of the group.
• To dock a Document window to a separate group of Document windows, drag the window into the group.
Note: Dreamweaver does not support docking and undocking Document windows. Use the Document window’s
Minimize button to create floating windows.
• To create groups of stacked or tiled documents, drag the window to one of the drop zones along the top, bottom, or
sides of another window. You can also select a layout for the group by using the Layout button on the Application bar.
Note: Some products do not support this functionality. However, your product may have Cascade and Tile commands
in the Window menu to help you lay out your documents.
• To switch to another document in a tabbed group when dragging a selection, drag the selection over the document’s
tab for a moment.
Note: Some products do not support this functionality.
Dock and undock panels
A dock is a collection of panels or panel groups displayed together, generally in a vertical orientation. You dock and
undock panels by moving them into and out of a dock.
Note: Docking is not the same as stacking. A stack is a collection of floating panels or panel groups, joined top to bottom.
• To dock a panel, drag it by its tab into the dock, at the top, bottom, or in between other panels.
• To dock a panel group, drag it by its title bar (the solid empty bar above the tabs) into the dock.
• To remove a panel or panel group, drag it out of the dock by its tab or title bar. You can drag it into another dock
or make it free-floating.
Page 33

Navigator panel being dragged out to new dock, indicated by blue vertical highlight
Updated 24 September 2009
USING DREAMWEAVER CS4
Workspace
27
Navigator panel now in its own dock
You can prevent panels from filling all the space in a dock. Drag the bottom edge of the dock up so it no longer meets
the edge of the workspace.
Move panels
As you move panels, you see blue highlighted drop zones, areas where you can move the panel. For example, you can
move a panel up or down in a dock by dragging it to the narrow blue drop zone above or below another panel. If you
drag to an area that is not a drop zone, the panel floats freely in the workspace.
• To move a panel, drag it by its tab.
• To move a panel group or a stack of floating panels, drag the title bar.
Press Ctrl (Windows) or Command (Mac OS) while moving a panel to prevent it from docking. Press Esc while
moving the panel to cancel the operation.
Note: The dock is stationary and can’t be moved. However, you can create panel groups or stacks and move them
anywhere.
Add and remove panels
If you remove all panels from a dock, the dock disappears. You can create a dock by moving panels to the right edge
of the workspace until a drop zone appears.
• To remove a panel, right-click (Windows) or Control-click (Mac) its tab and then select Close, or deselect it from
the Window menu.
• To add a panel, select it from the Window menu and dock it wherever you want.
Page 34

USING DREAMWEAVER CS4
Updated 24 September 2009
Workspace
Manipulate panel groups
• To move a panel into a group, drag the panel’s tab to the highlighted drop zone in the group.
Adding a panel to a panel group
• To rearrange panels in a group, drag a panel’s tab to a new location in the group.
• To remove a panel from a group so that it floats freely, drag the panel by its tab outside the group.
• To move a group, drag the title bar (the area above the tabs).
Stack floating panels
When you drag a panel out of its dock but not into a drop zone, the panel floats freely. The floating panel allows you
to position it anywhere in the workspace. You can stack floating panels or panel groups so that they move as a unit
when you drag the topmost title bar. (Panels that are part of a dock cannot be stacked or moved as a unit in this way.)
28
Free-floating stacked panels
• To stack floating panels, drag a panel by its tab to the drop zone at the bottom of another panel.
• To change the stacking order, drag a panel up or down by its tab.
Note: Be sure to release the tab over the narrow drop zone between panels, rather than the broad drop zone in a title bar.
• To remove a panel or panel group from the stack, so that it floats by itself, drag it out by its tab or title bar.
Resize panels
• To minimize or maximize a panel, panel group, or stack of panels, double-click a tab. You can also single-click the
tab area (the empty space next to the tabs).
• To resize a panel, drag any side of the panel. Some panels, such as the Color panel in Photoshop, cannot be resized
by dragging.
Manipulate panels collapsed to icons
You can collapse panels to icons to reduce clutter on the workspace. In some cases, panels are collapsed to icons in the
default workspace.
Page 35

Panels collapsed to icons
Updated 24 September 2009
USING DREAMWEAVER CS4
Workspace
29
Panels expanded from icons
• To collapse or expand all panel icons in a dock, click the double arrow at the top of the dock.
• To expand a single panel icon, click it.
• To resize panel icons so that you see only the icons (and not the labels), adjust the width of the dock until the text
disappears. To display the icon text again, make the dock wider.
• To collapse an expanded panel back to its icon, click its tab, its icon, or the double arrow in the panel’s title bar.
In some products, if you select Auto-Collapse Icon Panels from the Interface or User Interface Options preferences,
an expanded panel icon collapses automatically when you click away from it.
• To add a floating panel or panel group to an icon dock, drag it in by its tab or title bar. (Panels are automatically
collapsed to icons when added to an icon dock.)
• To move a panel icon (or panel icon group), drag the icon. You can drag panel icons up and down in the dock, into
other docks (where they appear in the panel style of that dock), or outside the dock (where they appear as floating,
expanded panels).
Restore the default workspace
• Select the default, Essentials workspace from the workspace switcher in the Application bar.
• (Photoshop) Select Window > Workspace > Essentials (Default).
• (InDesign, InCopy) Select Window > Workspace > Reset [Workspace Name].
Save and switch workspaces
By saving the current size and position of panels as a named workspace, you can restore that workspace even if you
move or close a panel. The names of saved workspaces appear in the workspace switcher in the Application bar.
In Photoshop, the saved workspace can include a specific keyboard shortcut set and menu set.
Page 36

USING DREAMWEAVER CS4
Updated 24 September 2009
Save a custom workspace
1 With the workspace in the configuration you want to save, do one of the following:
• (Photoshop, Illustrator) Choose Window > Workspace > Save Workspace.
• (InDesign, InCopy) Choose Window > Workspace > New Workspace.
• (Dreamweaver) Choose Window > Workspace Layout > New Workspace.
• (Flash) Choose New Workspace from the workspace switcher in the Application bar.
• (Fireworks) Choose Save Current from the workspace switcher in the Application bar.
2 Type a name for the workspace.
3 (Photoshop, InDesign) Under Capture, select one or more options:
Panel Locations Saves the current panel locations.
Keyboard shortcuts Saves the current set of keyboard shortcuts (Photoshop only).
Menus Saves the current set of menus.
4 Click OK or Save.
Display or switch workspaces
❖ Select a workspace from the workspace switcher in the Application bar.
In Photoshop, you can assign keyboard shortcuts to each workspace to navigate among them quickly.
30
Workspace
Delete a custom workspace
• Select Manage Workspaces from the workspace switcher in the Application bar, select the workspace, and then
click Delete. (The option is not available in Fireworks.)
• (Photoshop, InDesign, InCopy) Select Delete Workspace from the workspace switcher.
• (Illustrator) Choose Window > Workspace > Manage Workspaces, select the workspace, and then click the Delete icon.
• (InDesign) Choose Window > Workspace > Delete Workspace, select the workspace, and then click Delete.
(Photoshop) Start with the last or default panel locations
When you start Photoshop, panels can either appear in their original default locations, or appear as you last used them.
In Interface preferences:
• To display panels in their last locations on startup, select Remember Panel Locations.
• To display panels in their default locations on startup, deselect Remember Panel Locations.
Display tabbed documents (Dreamweaver Macintosh)
You can view multiple documents in a single Document window by using tabs to identify each document. You can also
display them as part of a floating workspace, in which each document appears in its own window.
Open a tabbed document in a separate window
❖ Control-click the tab and select Move To New Window from the context menu.
Page 37

USING DREAMWEAVER CS4
Updated 24 September 2009
Workspace
Combine separate documents into tabbed windows
❖ Select Window > Combine As Tabs.
Change the default tabbed document setting
1 Select Dreamweaver > Preferences, and then select the General category.
2 Select or deselect Open Documents in Tabs, and click OK.
Dreamweaver does not alter the display of documents that are currently open when you change preferences.
Documents opened after you select a new preference, however, display according to the preference you selected.
Turn on color icons
By default, Dreamweaver CS4 and later uses black and white icons that turn into colored icons when you hover over
them. You can turn color icons on permanently so that no hovering is required.
❖ Do one of the following:
• Choose View > Color Icons.
• Switch to the Classic or Coder workspace.
To turn color icons off again, deselect Color Icons in the View menu, or switch to a different workspace.
31
More Help topics
“Display or switch workspaces” on page 30
Hide and display the Dreamweaver Welcome screen
The Welcome screen appears when you start Dreamweaver and anytime that you do not have any documents open.
You can choose to hide the Welcome screen, and then later display it again. When the Welcome screen is hidden and
no documents are open, the Document window is blank.
Hide the Welcome screen
❖ Select the Don’t Show Again option on the Welcome screen.
Display the Welcome screen
1 Select Edit > Preferences (Windows) or Dreamweaver > Preferences (Macintosh).
2 In the General category, select the Show Welcome Screen option.
About customizing Dreamweaver in multiuser systems
You can customize Dreamweaver to suit your needs even in a multiuser operating system such as Windows XP or
Mac OS X.
Dreamweaver prevents any user’s customized configuration from affecting any other user’s customized configuration.
To accomplish this goal, the first time you run Dreamweaver in one of the multiuser operating systems that it
recognizes, the application creates copies of a variety of configuration files. These user configuration files are stored in
a folder that belongs to you.
For example, in Windows XP, they’re stored in C:\Documents and Settings\username\Application
Data\Adobe\Dreamweaver\en_US\Configuration, which is hidden by default. To show hidden files and folders, select
Tools > Folder Options in Windows Explorer, click the View tab, and select the Show Hidden Files and Folders option.
Page 38

USING DREAMWEAVER CS4
Updated 24 September 2009
Workspace
In Windows Vista, they’re stored in C:\Users\username\AppData\Roaming\Adobe\Dreamweaver
\en_US\Configuration, which is hidden by default. To show hidden files and folders, select Tools > Folder Options in
Windows Explorer, click the View tab, and select the Show Hidden Files and Folders option.
In Mac OS X, they’re stored inside your Home folder; specifically, in Users/username/Library/Application
Support/Adobe/Dreamweaver/Configuration.
If you reinstall or upgrade Dreamweaver, Dreamweaver automatically makes backup copies of existing user
configuration files, so if you customized those files by hand, you still have access to the changes you made.
Set General preferences for Dreamweaver
1 Select Edit > Preferences (Windows) or Dreamweaver > Preferences (Macintosh).
2 Set any of the following options:
Open Documents In Tabs Opens all documents in a single window with tabs that let you switch between documents
(Macintosh only).
Show Welcome Screen Displays the Dreamweaver Welcome screen when you start Dreamweaver or when you don’t
have any documents open.
Reopen Documents on Startup Opens any documents that were open when you closed Dreamweaver. If this option is
not selected, Dreamweaver displays the Welcome screen or a blank screen when you start (depending on your Show
Welcome Screen setting).
32
Warn When Opening Read-Only Files Alerts you when you open a read-only (locked) file. Choose to unlock/check out
the file, view the file, or cancel.
Enable Related Files Lets you see which files are connected to the current document (for example, CSS or JavaScript
files). Dreamweaver displays a button for each related file at the top of the document, and opens the file if you click the
button.
Update Links When Moving Files Determines what happens when you move, rename, or delete a document within
your site. Set this preference to always update links automatically, never update links, or prompt you to perform an
update. (See “Update links automatically” on page 273.)
Show Dialog When Inserting Objects Determines whether Dreamweaver prompts you to enter additional information
when inserting images, tables, Shockwave movies, and certain other objects by using the Insert panel or the Insert
menu. If this option is off, the dialog box does not appear and you must use the Property inspector to specify the source
file for images, the number of rows in a table, and so on. For roll over images and Fireworks HTML, a dialog box always
appears when you insert the object, regardless of this option setting. (To temporarily override this setting, Controlclick (Windows) or Command-click (Macintosh) when creating and inserting objects.)
Enable Double-Byte Inline Input Lets you enter double-byte text directly into the Document window if you are using
a development environment or language kit that facilitates double-byte text (such as Japanese characters). When this
option is deselected, a text input window appears for entering and converting double-byte text; the text appears in the
Document window after it is accepted.
Switch To Plain Paragraph After Heading Specifies that pressing Enter (Windows) or Return (Macintosh) at the end
of a heading paragraph in Design view creates a new paragraph tagged with a
tagged with a heading tag such as
h1 or h2.) When the option is disabled, pressing Enter or Return at the end of a
p tag. (A heading paragraph is one that’s
heading paragraph creates a new paragraph tagged with the same heading tag (allowing you to type multiple headings
in a row and then go back and fill in details).
Allow Multiple Consecutive Spaces Specifies that typing two or more spaces in Design view creates nonbreaking
spaces that appear in a browser as multiple spaces. (For example, you can type two spaces between sentences, as you
Page 39

USING DREAMWEAVER CS4
Updated 24 September 2009
Workspace
would on a typewriter.) This option is designed mostly for people who are used to typing in word processors. When
the option is disabled, multiple spaces are treated as a single space (because browsers treat multiple spaces as single
spaces).
Use <strong> and <em> in Place of <b> and <i> Specifies that Dreamweaver applies the strong tag whenever you
perform an action that would normally apply the
would normally apply the
i tag. Such actions include clicking the Bold or Italic buttons in the text Property inspector
in HTML mode and choosing Format > Style > Bold or Format > Style > Italic. To use the
b tag, and applies the em tag whenever you perform an action that
b and i tags in your
documents, deselect this option.
33
Note: The World Wide Web Consortium discourages use of the
semantic information than the
Warn when placing editable regions within <p> or <h1> - <h6> tags Specifies whether a warning message is displayed
b and i tags do.
b and i tags; the strong and em tags provide more
whenever you save a Dreamweaver template that has an editable region within a paragraph or heading tag. The
message tells you that users will not be able to create more paragraphs in the region. It is enabled by default.
Centering Specifies whether you want to center elements using divalign="center" or the center tag when you
click the Align Center button in the Property inspector.
Note: Both of these approaches to centering have been officially deprecated as of the HTML 4.01 specification; you should
use CSS styles to center text. Both of these approaches are still technically valid as of the XHTML 1.0 Transitional
specification, but they’re no longer valid in the XHTML 1.0 Strict specification.
Maximum Number of History Steps Determines the number of steps that the History panel retains and shows. (The
default value should be sufficient for most users.) If you exceed the given number of steps in the History panel, the
oldest steps are discarded.
For more information, see “Task automation” on page 261.
Spelling Dictionary lists the available spelling dictionaries. If a dictionary contains multiple dialects or spelling
conventions (such as American English and British English), the dialects are listed separately in the Dictionary pop-up
menu.
More Help topics
“Workspace layout overview” on page 8
“Update links automatically” on page 273
Set Fonts preferences for documents in Dreamweaver
A document’s encoding determines how the document appears in a browser. Dreamweaver font preferences let you
view a given encoding in the font and size you prefer. The fonts you select in the Fonts Preferences dialog, however,
only affect the way fonts appear in Dreamweaver; they do not affect the way the document appears in a visitor’s
browser. To change the way fonts appear in a browser, you need to change the text by using the Property inspector or
by applying a CSS rule.
For information on setting a default encoding for new documents, see “Creating and opening documents” on page 64.
1 Select Edit > Preferences (Windows) or Dreamweaver > Preferences (Macintosh).
2 Select Fonts from the Category list on the left.
3 Select an encoding type (such as Western European or Japanese) from the Font Settings list.
Note: To display an Asian language, you must be using an operating system that supports double-byte fonts.
4 Select a font and size to use for each category of the selected encoding.
Page 40

USING DREAMWEAVER CS4
Updated 24 September 2009
Workspace
Note: To appear in the font pop-up menus, a font must be installed on your computer. For example, to see Japanese text
you must have a Japanese font installed.
Proportional Font The font that Dreamweaver uses to display normal text (for example, text in paragraphs, headings,
and tables). The default depends on your system’s installed fonts. For most U.S. systems, the default is Times New
Roman 12 pt. (Medium) on Windows and Times 12 pt. on Mac OS.
Fixed Font The font Dreamweaver uses to display text within pre, code, and tt tags. The default depends on your
system’s installed fonts. For most U.S. systems, the default is Courier New 10 pt. (Small) on Windows and Monaco 12
pt. on Mac OS.
Code View The font used for all text that appears in the Code view and Code inspector. The default depends on your
system’s installed fonts.
More Help topics
“Understanding document encoding” on page 211
Customize Dreamweaver highlighting colors
Use the Highlighting preferences to customize the colors that identify template regions, library items, third-party tags,
layout elements, and code in Dreamweaver.
34
More Help topics
“Use the color picker” on page 214
“Change the highlight color of div tags” on page 160
Change a highlighting color
1 Select Edit > Preferences and select the Highlighting category.
2 Beside the object you want to change the highlighting color for, click the color box, and then use the color picker
to select a new color, or enter a hexadecimal value.
Activate or deactivate highlighting for an object
1 Select Edit > Preferences and select the Highlighting category.
2 Beside the object you want to activate or deactivate highlighting color for, select or deselect the Show option.
Keyboard shortcuts
Create a reference sheet for the current shortcut set
A reference sheet is a record of the current shortcut set. The information is stored in HTML table format. You can view
the reference sheet in a web browser or print it.
1 Select Edit > Keyboard Shortcuts (Windows) or Dreamweaver > Keyboard Shortcuts (Macintosh).
2 Click the Export Set As HTML button, which is the third button in the set of four at the top of the dialog box.
3 In the Save dialog box that appears, enter the name for the reference sheet, and select the appropriate location for
saving the file.
Page 41

USING DREAMWEAVER CS4
Updated 24 September 2009
Workspace
Customize keyboard shortcuts
Use the Keyboard Shortcut Editor to create your own shortcut keys, including keyboard shortcuts for code snippets.
You can also remove shortcuts, edit existing shortcuts, and select a predetermined set of shortcuts in the Keyboard
Shortcut Editor.
More Help topics
“Work with code snippets” on page 309
Create a keyboard shortcut
Create your own shortcut keys, edit existing shortcuts, or select a predetermined set of shortcuts.
1 Select Edit > Keyboard Shortcuts (Windows) or Dreamweaver > Keyboard Shortcuts (Macintosh).
2 Set any of the following options and click OK:
Current Set Allows you to choose a set of predetermined shortcuts included with Dreamweaver, or any custom set
you’ve defined. The predetermined sets are listed at the top of the menu. For example, if you are familiar with the
shortcuts found in HomeSite or BBEdit, you can use those shortcuts by choosing the corresponding predetermined set.
Commands Allows you to select a category of commands to edit. For example, you can edit menu commands, such as
the Open command, or code editing commands, such as Balance Braces.
35
To add or edit a keyboard shortcut for a code snippet, select Snippet from the Commands pop-up menu.
The command list Displays the commands associated with the category you selected from the Commands pop-up
menu, along with the assigned shortcuts. The Menu Commands category displays this list as a tree view that replicates
the structure of the menus. The other categories list the commands by name (such as Quit Application), in a flat list.
Shortcuts Displays all shortcuts assigned to the selected command.
Add Item (+) Adds a new shortcut to the current command. Click this button to add a new blank line to the Shortcuts.
Enter a new key combination and click Change to add a new keyboard shortcut for this command. You can assign two
different keyboard shortcuts for each command; if there are already two shortcuts assigned to a command, the Add
Item button does nothing.
Remove Item (-) Removes the selected shortcut from the list of shortcuts.
Press Key Displays the key combination you enter when you’re adding or changing a shortcut.
Change Adds the key combination shown in the Press Key to the list of shortcuts, or changes the selected shortcut to
the specified key combination.
Duplicate Set Duplicates the current set. Give the new set a name; the default name is the current set’s name with the
word copy appended.
Rename Set Renames the current set.
Export as HTML File Saves the current set in an HTML table format for easy viewing and printing. You can open the
HTML file in your browser and print the shortcuts for easy reference.
Delete Set Deletes a set. (You cannot delete the active set.)
Remove a shortcut from a command
1 Select Edit > Keyboard Shortcuts (Windows) or Dreamweaver > Keyboard Shortcuts (Macintosh).
2 From the Commands pop-up menu, select a command category.
Page 42

USING DREAMWEAVER CS4
Updated 24 September 2009
Workspace
3 In the Commands list, select a command and then select a shortcut.
4 Click the Remove Item (-) button.
Add a shortcut to a command
1 Select Edit > Keyboard Shortcuts (Windows) or Dreamweaver > Keyboard Shortcuts (Macintosh).
2 From the Commands pop-up menu, select a command category.
3 In the Commands list, select a command.
To add a keyboard shortcut for a code snippet, select Snippet from the Commands pop-up menu.
The shortcuts assigned to the command appear in the Shortcuts.
4 Prepare to add a shortcut by doing one of the following:
• If there are fewer than two shortcuts already assigned to the command, click the Add Item (+) button. A new blank
line appears in the Shortcuts and the insertion point moves to the Press Key.
• If there are already two shortcuts assigned to the command, select one of them (that one will be replaced by the new
shortcut). Then click in the Press Key.
5 Press a key combination. The key combination appears in the Press Key.
Note: If there is a problem with the key combination (for example, if the key combination is already assigned to another
command), an explanatory message appears just below the Shortcuts and you may be unable to add or edit the shortcut.
36
6 Click Change. The new key combination is assigned to the command.
Edit an existing shortcut
1 Select Edit > Keyboard Shortcuts (Windows) or Dreamweaver > Keyboard Shortcuts (Macintosh).
2 From the Commands pop-up menu, select a command category.
3 In the Commands list, select a command and then select a shortcut to change.
4 Click in the Press Key and enter a new key combination.
5 Click the Change button to change the shortcut.
Note: If there is a problem with the key combination (for example, if the key combination is already assigned to another
command), an explanatory message appears just below the Shortcuts field and you may be unable to add or edit the
shortcut.
About keyboard shortcuts and non-U.S. keyboards
The default Dreamweaver keyboard shortcuts work primarily on U.S.-standardized keyboards. Keyboards from other
countries (including those produced in the United Kingdom), may not provide the functionality necessary for utilizing
these shortcuts. If your keyboard does not support certain Dreamweaver-enabled shortcuts, Dreamweaver disables
their functionality.
To customize keyboard shortcuts that work with non-U.S.-standardized keyboards, see “Changing keyboard shortcut
mappings” in Extending Dreamweaver.
Page 43

USING DREAMWEAVER CS4
Updated 24 September 2009
Workspace
Extensions
Add and manage extensions in Dreamweaver
Extensions are new features that you can add easily to Dreamweaver. You can use many types of extensions; for
example, there are extensions that let you reformat tables, connect to back-end databases, or help you write scripts for
browsers.
Note: To install extensions that all users have access to in a multiuser operating system, you must be logged in as
Administrator (Windows) or root (Mac OS X).
To find the latest extensions for Dreamweaver, use the Adobe Exchange website at
www.adobe.com/go/dreamweaver_exchange/. Once there, you can log in and download extensions (many of which
are free), join discussion groups, view user ratings and reviews, and install and use the Extension Manager. You must
install the Extension Manager before you can install extensions.
The Extension Manager is a separate application that lets you install and manage extensions in Adobe applications.
Start the Extension Manager from Dreamweaver by choosing Commands > Manage Extensions.
1 On the Adobe Exchange website, click the download link for an extension.
Your browser might let you choose to open and install it directly from the site or save it to disk.
37
• If you are opening the extension directly from the site, the Extension Manager handles the installation
automatically.
• If you are saving the extension to disk, a good place to save the extension package file (.mxp or .mxi) is the
Downloaded Extensions folder within the Dreamweaver application folder on your computer.
2 Double-click the extension package file, or open the Extension Manager and select File > Install Extension. (Some
extensions aren’t accessible until you restart the application.
Note: Use the Extension Manager to remove extensions or to see more information about an extension.
More Help topics
“About customizing Dreamweaver in multiuser systems” on page 31
Page 44

Chapter 3: Working with Dreamweaver
Updated 24 September 2009
sites
An Adobe® Dreamweaver® CS4 site is a collection of all of the files and assets in your website. You can create web pages
on your computer, upload them to a web server, and maintain the site by transferring updated files whenever you save
them. You can also edit and maintain websites that were created without Dreamweaver.
Setting up a Dreamweaver site
About Dreamweaver sites
In Dreamweaver the term “site” refers to a local or remote storage location for the documents that belong to a website.
A Dreamweaver site provides a way to organize and manage all of your web documents, upload your site to a web
server, track and maintain your links, and manage and share files. You should define a site to take full advantage of
Dreamweaver features.
38
Note: To define a Dreamweaver site, you only need to set up a local folder. To transfer files to a web server or to develop
web applications, you must also add information for a remote site and testing server.
A Dreamweaver site consists of as many as three parts, or folders, depending on your development environment and
the type of website you are developing:
Local root folder Stores the files you’re working on. Dreamweaver refers to this folder as your “local site.” This folder
is typically on your local computer, but it can also be on a network server.
Remote folder Stores your files for testing, production, collaboration, and so on. Dreamweaver refers to this folder as
your “remote site” in the Files panel. Typically, your remote folder is on the computer where your web server is
running. The remote folder holds the files that users access on the Internet.
Together, the local and remote folders enable you to transfer files between your local hard disk and web server, making
it easy to manage files in your Dreamweaver sites. You work on files in the local folder, and then publish them to the
remote folder when you want other people to view them.
Testing server folder The folder where Dreamweaver processes dynamic pages.
For a tutorial on defining a Dreamweaver site, see www.adobe.com/go/lrvid4050_dw.
Understanding local and remote folder structure
When you want to use Dreamweaver to connect to a remote folder, you specify the remote folder in the Remote Info
category of the Site Definition dialog box. The remote folder that you specify (also referred to as the “host directory”)
should correspond to the local root folder of your Dreamweaver site. (The local root folder is the top-level folder of
your Dreamweaver site.) Remote folders, like local folders, can have any title, but commonly, Internet Service
Providers name the top-level remote folders for individual user accounts public_html, pub_html, or something
similar. If you are in charge of your own remote server, and can name the remote folder anything you want, it is a good
idea for your local root folder and remote folder to have the same name.
Page 45

USING DREAMWEAVER CS4
Updated 24 September 2009
Working with Dreamweaver sites
The following example shows a sample local root folder on the left and a sample remote folder on the right. The local
root folder on the local machine maps directly to the remote folder on the web server, rather than to any of the remote
folder’s sub folders, or folders that exist above the remote folder in the directory structure.
39
login directory
(Shouldn’t be remote folder
in this case)
public_html
(Should be
remote folder)
Assets
(Shouldn’t be
remote folder)
HTML
Local folder
(root folder)
Assets
HTML
no
yes
no
Note: The above example illustrates one local root folder on the local machine, and one top-level remote folder on the
remote web server. If, however, you are maintaining a number of Dreamweaver sites on your local machine, you would
need an equal number of remote folders on the remote server. In such a case the above example would not apply, and you
would instead create different remote folders within the public_html folder, and then map them to their corresponding
local root folders on your local machine.
When you first establish a remote connection, the remote folder on the web server is usually empty. Then, when you
use Dreamweaver to upload all of the files in your local root folder, the remote folder populates with all of your web
files. The directory structure of the remote folder and the local root folder should always be the same. (That is, there
should always be a one-to-one correspondence between the files and folders in your local root folder, and the files and
folders in your remote folder.) If the structure of the remote folder doesn’t match the structure of the local root folder,
Dreamweaver uploads files to the wrong place, where they might not be visible to site visitors. Additionally, image and
link paths can easily break when folder and file structures are not in synch.
The remote folder must exist before Dreamweaver can connect to it. If you don’t have a designated folder that acts as
your remote folder on the web server, create one or ask the server’s administrator to create one for you.
Using the Manage Sites dialog box
Use the Manage Sites dialog box to create a new site, edit a site, duplicate a site, remove a site, or import or export a
site’s settings.
1 Select Site > Manage Sites and select a site from the list on the left.
2 Click a button to select one of the options and click Done.
New Enables you to create a new site.
Edit Enables you to edit an existing site.
Duplicate Creates a copy of the site you selected. The copy appears in the site list window.
Remove Deletes the selected site; you cannot undo this action.
Export Enables you to export a site’s settings as an XML file (*.ste).
Import Enables you to select a site’s settings file (*.ste) to import.
Page 46

USING DREAMWEAVER CS4
Updated 24 September 2009
Working with Dreamweaver sites
More Help topics
“Import and export site settings” on page 50
Set up and edit a local root folder
After you plan your site structure, you set up (define) a site in Dreamweaver. You should also define a site in order to
edit a website that wasn’t created in Dreamweaver. Setting up a Dreamweaver site is a way to organize all of the
documents associated with a website.
The local root folder is your working directory for your Dreamweaver site. This folder can be on your local computer
or on a network server.
If you want to start editing files on your computer (without publishing them), set up only a local folder, and then add
remote and testing information later.
Note: You don’t need to specify a remote folder if your local root folder is on the system running your web server. This
implies the web server is running on your local computer.
1 Select one of the following:
• To set up a new site, Select Site > New Site.
• To edit the setup of an existing site on your local disk or a remote site (or a branch of a remote site), whether it was
created in Dreamweaver or not, select Site > Manage Sites, select the site, and click Edit.
2 Enter the setup information in the Site Definition dialog box:
• To set up a site using the site setup wizard, click the Basic tab and follow the prompts. For more information, see
“Basic tab options” on page 59.
• To set up local, remote, and testing folders (for processing dynamic pages) directly, click the Advanced tab, select
the Local Info category and set the options. (Recommended)
Note: Only the first two options in the Local Info category of the Advanced tab are required to set up a working site on
your computer.
40
Site Name The name that appears in the Files panel and in the Manage Sites dialog box; it does not appear in the
browser.
Local Root Folder The name of the folder on your local disk where you store site files, templates, and library items.
Create a folder on your hard disk or click the folder icon to browse to the folder. When Dreamweaver resolves rootrelative links, it does so relative to this folder.
Default Images Folder The path to the folder where the images you use in your site are kept. Enter the path or click the
folder icon to browse to the folder.
Links Relative To Changes the relative path of the links you create to other pages in the site. By default, Dreamweaver
creates links using document-relative paths. Select the Site Root option to change the path setting and make sure that
you specify the HTTP address in the HTTP Address option.
Changing this setting does not convert the path of existing links; the setting will only apply to new links you create
visually with Dreamweaver.
Content linked with a site root-relative path does not appear when you preview documents in a local browser unless
you specify a testing server, or select the Preview Using Temporary File option in Edit > Preferences > Preview In
Browser. This is because browsers don’t recognize site roots—servers do.
HTTP Address The URL that your website will use. This enables Dreamweaver to verify links within the site that use
absolute URLs or site root-relative paths. Dreamweaver also uses this address to make sure site root-relative links work
Page 47

USING DREAMWEAVER CS4
Updated 24 September 2009
Working with Dreamweaver sites
on the remote server, which may have a different site root. For example, if you are linking to an image file located on
your hard disk in the C:\Sales\images\ folder (where Sales is your local root folder), and the URL of your completed
site is http://www.mysite.com/SalesApp/ (where SalesApp is your remote root folder), you should enter the URL in the
HTTP Address text box to ensure that the path to the linked file on the remote server is /SalesApp/images/.
Use Case-sensitive Link Checking Checks that the case of the links matches the case of the filenames when
Dreamweaver checks links. This option is useful on UNIX systems where filenames are case-sensitive.
Enable Cache Indicates whether to create a local cache to improve the speed of link and site management tasks. If you
do not select this option, Dreamweaver asks you if you want to create a cache again before it creates the site. It is a good
idea to select this option because the Assets panel (in the Files panel group) only works if a cache is created.
3 Click OK and Done to create the site (displayed in the Files panel).
More Help topics
“Access sites, a server, and local drives” on page 81
“Import and export site settings” on page 50
“Set the relative path of new links” on page 271
“Managing files and folders” on page 75
41
“Set up your computer for application development” on page 499
Set up a remote folder
The remote folder is where you store files for production, collaboration, deployment, or a number of other scenarios.
Typically, the remote folder is on the computer where your web server is running. You can set options for this folder
by answering the wizard questions in the Basic tab or by clicking the Advanced tab and entering the information
directly.
In the Dreamweaver Files panel, the remote folder is referred to as your remote site. When you set up a remote folder,
you must select an access method for Dreamweaver to upload and download files to your web server.
For a tutorial on setting up a remote folder, see www.adobe.com/go/vid0162.
Note: Dreamweaver supports connections to IPv6-enabled servers. Supported connection types include FTP, SFTP,
WebDav, and RDS. For more information, see www.ipv6.org/
More Help topics
“Working on files without defining a site” on page 58
“Get files from a remote server” on page 85
“Use WebDAV to check in and check out files” on page 91
“Access sites, a server, and local drives” on page 81
“Managing files and folders” on page 75
Defining a remote folder tutorial
Select an access method
1 Select Site > Manage Sites.
2 Click New and select Site to set up a new site, or select an existing Dreamweaver site and click Edit.
Page 48

USING DREAMWEAVER CS4
Updated 24 September 2009
Working with Dreamweaver sites
3 Click the Advanced tab, select the Remote Info category and select the access method you want to use to transfer
files between local and remote folders:
None Keep this default setting if you do not plan to upload your site to a server.
FTP Use this setting if you connect to your web server using FTP.
Local/Network Use this setting to access a network folder, or if you are storing files or running your testing server on
your local computer.
RDS (Remote Development Services) Use this setting if you connect to your web server using RDS. For this access
method, your remote folder must be on a computer running Adobe® ColdFusion®.
Microsoft Visual SourceSafe Use this setting if you connect to your web server using Microsoft Visual SourceSafe.
Support for this method is only available for Windows; to use it, you must have Microsoft Visual SourceSafe Client
version 6 installed.
WebDAV (Web-based Distributed Authoring and Versioning) Use this setting if you connect to your web server using
the WebDAV protocol.
For this access method, you must have a server that supports this protocol, such as Microsoft Internet Information
Server (IIS) 5.0 or an appropriately configured installation of Apache web server.
Note: If you select WebDAV as your access method, and you are using Dreamweaver in a multiuser environment, you
should also make sure that all of your users select WebDAV as the access method. If some users select WebDAV, and other
users select other access methods (FTP, for example), Dreamweaver’s check-in/check-out feature will not work as
expected, since WebDAV uses its own locking system.
42
The remaining options in the dialog box change, depending on what you selected for your access method.
Set options for FTP access
1 Select Site > Manage Sites.
2 Click New and select Site to set up a new site, or select an existing Dreamweaver site and click Edit.
3 In the Site Definition dialog box, select the Advanced tab and click the Remote Info category.
The following illustration shows the Remote Info category with the text fields already populated.
Advanced tab of the Site Definition dialog box with the Remote Info category selected.
Page 49

USING DREAMWEAVER CS4
Updated 24 September 2009
Working with Dreamweaver sites
4 Select FTP from the Access pop-up menu.
5 In the FTP Host text box, enter the host name of the FTP host to which you upload files for your website.
Your FTP host is the full Internet name of a computer system, such as ftp.mindspring.com. Enter the full host name
without any additional text. In particular, don’t add a protocol name in front of the host name.
If you do not know your FTP host, contact your web hosting company.
Note: Port 21 is the default port for receiving FTP connections, however server administrators sometimes change the port
setting to another port to prevent unauthorized FTP access. In those situations, you can append a colon and the port
number to the FTP host entry. For example, if the port is 29, you would enter ftp.mindspring.com:29.
6 In the Host Directory text box, enter the host directory (folder) at the remote site where you store documents that
are visible to the public.
If you’re uncertain about what to enter as the host directory, contact the server’s administrator or leave the text box
blank. On some servers, your root directory is the same as the directory you first connect to with FTP. To find out,
connect to the server. If a folder with a name like public_html, or www, or your login name, appears in the Remote File
view in your Files panel, that’s probably the directory you should enter in the Host Directory text box.
7 In the Login and Password text boxes, enter the login name and password that you use to connect to the FTP server.
8 Click Test to test your FTP host, host directory, login name, and password.
Note: You must obtain the FTP Host, Host Directory, Login and Password information from the system administrator
for the company hosting your site. No one else has access to this information. Enter the information exactly as your system
administrator gives it to you.
43
9 Dreamweaver saves your password by default. Deselect the Save option if you prefer that Dreamweaver prompt you
for a password each time you connect to the remote server.
10 Select Use Passive FTP if your firewall configuration requires use of passive FTP.
Passive FTP enables your local software to set up the FTP connection rather than requesting the remote server to set
it up. If you’re not sure whether you use passive FTP, check with your system administrator, or try both checking and
unchecking the Use Passive FTP option.
For more information, see TechNote 15220 on the Adobe website at www.adobe.com/go/tn_15220.
11 Select Use IPv6 Transfer Mode if you are using an IPv6-enabled FTP server.
With the deployment of version 6 of the Internet Protocol (IPv6), EPRT and EPSV have replaced the FTP commands
PORT and PASV, respectively. Thus, if you are trying to connect to an IPv6-enabled FTP server, you must use the
extended passive (EPSV) and the extended active (EPRT) commands for your data connection.
For more information, see www.ipv6.org/.
12 Select Use Firewall if you connect to the remote server from behind a firewall.
13 Click Firewall Settings to open Dreamweaver site preferences and edit your firewall host or port.
For more information, see “Set site preferences for transferring files” on page 50.
14 Select Use Secure FTP (SFTP) if your firewall configuration requires use of secure FTP. SFTP uses encryption and
public keys to secure a connection to your testing server.
Note: Your server must be running an SFTP service for you to select this option. If you don’t know whether your server is
running SFTP, check with your server administrator.
Page 50

USING DREAMWEAVER CS4
Updated 24 September 2009
Working with Dreamweaver sites
In some cases, it might be necessary for you to change the default port number when working with SFTP. To change
the default port number, add a colon and the port number to the FTP host. For example:
• mydomainname.com:22
IPv6 domains must be wrapped in brackets:
• [2001:0db8:85a3:08d3:1319:8a2e:0370:7344]:443
15 Click the Server Compatibility button for more advanced options related to server connection. You should only use
this button for troubleshooting purposes. It is especially useful for sites that worked in previous versions of
Dreamweaver, but for some reason no longer work in the current version.
For more information on these options, see TechNote 14834 on the Adobe website at www.adobe.com/go/tn_14834.
16 Select Maintain Synchronization Information if you want to automatically synchronize your local and remote files.
(This option is selected by default.)
17 Select Automatically Upload Files to Server on Save if you want Dreamweaver to upload your file to your remote
site when you save the file.
18 Select Enable File Check In and Check Out if you want to activate the Check In/Out system.
19 Click OK.
If you’re having trouble connecting, seeTechNote 14834 on the Adobe website at www.adobe.com/go/tn_14834.
44
Connect to or disconnect from a remote folder with FTP access
❖ In the Files panel:
• To connect, click Connects to Remote Host in the toolbar.
• To disconnect, click Disconnect in the toolbar.
Set options for local or network access
1 Select Site > Manage Sites.
2 Click New and select Site to set up a new site, or select an existing Dreamweaver site and click Edit.
3 Select the Advanced tab, click the Remote Info category, and select Local/Network.
4 Click the folder icon beside the Remote Folder text box to browse to and select the folder where you store your site
files.
5 Select Maintain Synchronization Information if you want to automatically synchronize your local and remote files.
(This option is selected by default.)
6 Select Automatically Upload Files To Server On Save if you want Dreamweaver to upload your file to your remote
site when you save the file.
7 Select Enable File Check In And Check Out if you want to activate the Check In/Out system.
8 Click OK.
Set options for WebDAV access
1 Select Site > Manage Sites.
2 Click New and select Site to set up a new site, or select an existing Dreamweaver site and click Edit.
3 Select the Advanced tab, click the Remote Info category, and select WebDAV.
4 For the URL, enter the complete URL to the directory on the WebDAV server you want to connect to.
Page 51

USING DREAMWEAVER CS4
Updated 24 September 2009
Working with Dreamweaver sites
This URL includes the protocol, port, and directory (if not the root directory). For example,
http://webdav.mydomain.net/mysite.
5 Enter your user name and password.
This information is for server authentication and is not related to Dreamweaver. If you are not sure of your user name
and password, check with your system administrator or webmaster.
6 Click Test to test your connection settings.
7 Click Save if you want Dreamweaver to remember your password each time you start a new session.
8 Select Maintain Synchronization Information if you want Dreamweaver to automatically synchronize your local
and remote files. (This option is selected by default.)
9 Select Automatically Upload Files To Server On Save if you want Dreamweaver to upload your file to your remote
site when you save the file.
10 Select Enable File Check In And Check Out if you want to activate the Check In/Out system.
Connect to or disconnect from a remote folder with network access
❖ You don’t need to connect to the remote folder; you’re always connected. Click the Refresh button to see your
remote files.
45
Set options for RDS access
1 Select Site > Manage Sites.
2 Click New and select Site to set up a new site, or select an existing Dreamweaver site and click Edit.
3 Select the Advanced tab, click the Remote Info category, and select RDS.
4 Click the Settings button and provide the following information in the Configure RDS Server dialog box:
• Enter the name of the host computer where your web server is installed.
The host name is probably an IP address or a URL. If you are unsure, ask your administrator.
• Enter the port number that you connect to.
• Enter your root remote folder as the host directory.
For example, c:\inetpub\wwwroot\myHostDir\.
• Enter your RDS user name and password.
Note: These options might not appear if you set your user name and password in the ColdFusion Administrator security
settings.
• Select Save if you want Dreamweaver to remember your settings.
5 Click OK to close the Configure RDS Server dialog box.
6 Select the Automatically Upload Files To Server On Save if you want Dreamweaver to upload your file to your
remote site when you save the file.
7 Select Enable File Check In And Check Out if you want to activate the Check In/Out system and click OK.
Set up Microsoft Visual SourceSafe access
1 Select Site > Manage Sites.
2 Click New and select Site to set up a new site, or select an existing Dreamweaver site and click Edit.
3 Select the Advanced tab, click the Remote Info category, and select Microsoft Visual SourceSafe.
Page 52

USING DREAMWEAVER CS4
Updated 24 September 2009
Working with Dreamweaver sites
4 Click the Settings button and provide the following information in the Open Microsoft Visual SourceSafe Database
dialog box:
•
For the Database Path, click Browse to browse for the Visual SourceSafe database you want, or enter the full file path.
The file you select becomes the srcsafe.ini file used to initialize Visual SourceSafe.
• For Project, enter the project within the Visual SourceSafe database you want to use as the remote site’s root
directory.
• For Username and Password, enter your login user name and password for the selected database.
If you don’t know your user name and password, check with your system administrator.
• Select the Save option if you want Dreamweaver to remember your settings.
5 Click OK to return to the Site Definition dialog box.
6 Select Automatically Upload Files To Server On Save if you want Dreamweaver to upload your file to your remote
site when you save the file.
7 Deselect Check Out Files When Opening if you do not want Dreamweaver to download your files from the server
automatically when you open the local file.
Troubleshoot the remote folder setup
The following list provides information on common problems you may encounter in setting up a remote folder, and
how to resolve them.
46
There is also an extensive tech note that specifically provides FTP troubleshooting information on the Adobe website
at www.adobe.com/go/tn_14834.
• The Dreamweaver FTP implementation might not work properly with certain proxy servers, multilevel firewalls,
and other forms of indirect server access. If you encounter problems with FTP access, ask your local system
administrator for help.
• For a Dreamweaver FTP implementation, you must connect to the remote system’s root folder. Be sure to indicate
the remote system’s root folder as the host directory. If you’ve specified the host directory using a single slash (/),
you might need to specify a relative path from the directory you are connecting to and the remote root folder. For
example, if the remote root folder is a higher level directory, you may need to specify a ../../ for the host directory.
• Use underscores in place of spaces, and avoid special characters in file and folder names wherever possible. Colons,
slashes, periods, and apostrophes in file or folder names can sometimes cause problems.
• If you encounter problems with long filenames, rename them with shorter names. On the Mac OS, filenames
cannot be more than 31 characters long.
• Many servers use symbolic links (UNIX), shortcuts (Windows), or aliases (Macintosh) to connect a folder on one
part of the server’s disk with another folder elsewhere. Such aliases usually have no effect on your ability to connect
to the appropriate folder or directory; however, if you can connect to one part of the server but not another, there
might be an alias discrepancy.
• If you encounter an error message such as “cannot put file,” your remote folder may be out of space. For more
detailed information, look at the FTP log.
Note: In general, when you encounter a problem with an FTP transfer, examine the FTP log by selecting Window >
Results (Windows) or Site > FTP Log (Macintosh), then clicking the FTP Log tag.
Page 53

USING DREAMWEAVER CS4
Updated 24 September 2009
Working with Dreamweaver sites
Set up a testing server
If you plan to develop dynamic pages, Dreamweaver needs the services of a testing server to generate and display
dynamic content while you work. The testing server can be your local computer, a development server, a staging server,
or a production server.
Before you set up a testing server folder, you must define a local and remote folder. You can often use the settings of
your remote folder for your testing server because dynamic pages placed in the remote folder can normally be
processed by an application server.
For a video tutorial on setting up a PHP testing server on Windows, see David Powers’s Defining a local PHP testing
server.
1 Select one of the following:
• To set up a new site, select Site > New Site.
• To edit the setup of an existing site on your local disk or a remote site (or a branch of a remote site), whether it was
created in Dreamweaver or not, select Site > Manage Sites, select your site from the list, and click Edit.
Note: If you haven’t defined any Dreamweaver sites, the Site Definition dialog box appears and you don’t need to click New.
2 Select Testing Server in the Advanced tab of the Site Definition dialog box.
3 Select the server technology you want to use for your web application.
Note: As of Dreamweaver CS4, Dreamweaver no longer installs ASP.NET or JSP server behaviors. If you’re working on
ASP.NET or JSP pages, however, Dreamweaver will still support Live Mode, code coloring, and code hinting for those
pages. You do not need to select ASP.NET or JSP in the Site Definition dialog box for any of these features to work.
47
4 Accept the default Testing Server settings or enter different settings.
By default, Dreamweaver assumes an application server is running on the same system as your web server. If you
defined a remote folder in the Remote Info category in the Site Definition dialog box, and if an application server runs
on the same system as the remote folder (including your local computer), accept the default settings in the Testing
Server category.
If you did not define a remote folder in the Remote Info category, the Testing Server category defaults to the local
folder you defined in the Local Info category. You can leave this setting alone only if you meet the following
two conditions:
Your web server and application server both run on your local computer. For example, if you’re a ColdFusion
developer running both IIS and ColdFusion on your local Windows XP system.
Your local root folder is a subfolder of your website’s home directory. For example, if you’re using IIS, your local root
folder is a subfolder of the c:\Inetpub\wwwroot\ folder, or the folder itself.
If your local root folder is not a subfolder of your home directory, you must define the local root folder as a virtual
directory in your web server.
Note: The application server can run on a different system than your remote site. For example, if the Access option you
selected in the Remote Info category is Microsoft Visual SourceSafe, then you must specify a different server in the Testing
Server category.
5 In the URL Prefix text box, enter the URL that users type in their browsers to open your web application, but do
not include any filename.
The URL prefix comprises the domain name and any of your website’s home directory’s subdirectories or virtual
directories, but not a filename. For example, if your application’s URL is www.adobe.com/mycoolapp/start.php, you
would enter the following URL prefix: www.adobe.com/mycoolapp/.
Page 54

USING DREAMWEAVER CS4
Updated 24 September 2009
Working with Dreamweaver sites
If Dreamweaver runs on the same system as your web server, you can use one of the localhost options as a placeholder
for your domain name. For example, if you run IIS and your application’s URL is
http://buttercup_pc/mycoolapp/start.asp, enter the following URL prefix:
http://localhost/mycoolapp/
For a list of localhost options that pertain to different web servers, see the next section.
6 Click OK, and then click Done to add the new site to your list of sites.
More Help topics
“Choosing an application server” on page 501
“Preparing to build dynamic sites” on page 492
About the URL prefix for the testing server
You must specify a URL prefix so Dreamweaver can use the services of a testing server to display data and to connect
to databases while you work. Dreamweaver uses the design-time connection to provide you with useful information
about the database, such as the names of the tables in your database and the names of the columns in your tables.
A URL prefix comprises the domain name and any of your website’s home directory’s subdirectories or virtual
directories.
48
Note: The terminology used in Microsoft IIS may vary from server to server, but the same concepts apply to most web
servers.
The home directory The folder on the server mapped to your site’s domain name. Suppose the folder you want to use
to process dynamic pages is c:\sites\company\, and this folder is your home directory (that is, this folder is mapped to
your site’s domain name—for example, www.mystartup.com). In that case, the URL prefix is
http://www.mystartup.com/.
If the folder you want to use to process dynamic pages is a subfolder of your home directory, simply add the subfolder
to the URL. If your home directory is c:\sites\company\, your site’s domain name is www.mystartup.com, and the
folder you want to use to process dynamic pages is c:\sites\company\inventory. Enter the following URL prefix:
http://www.mystartup.com/inventory/
If the folder you want to use to process dynamic pages is not your home directory or any of its subdirectories, you must
create a virtual directory.
A virtual directory A folder that is not physically contained in the home directory of the server even though it appears
to be in the URL. To create a virtual directory, specify an alias for the folder’s path in the URL. Suppose your home
directory is c:\sites\company, your processing folder is d:\apps\inventory, and you define an alias for this folder called
warehouse. Enter the following URL prefix:
http://www.mystartup.com/warehouse/
Localhost Refers to the home directory in your URLs when the client (usually a browser, but in this case
Dreamweaver) runs on the same system as your web server. Suppose Dreamweaver is running on the same Windows
system as the web server, your home directory is c:\sites\company, and you defined a virtual directory called
warehouse to refer to the folder you want to use to process dynamic pages. The following are the URL prefixes you
would enter for selected web servers:
Page 55

USING DREAMWEAVER CS4
Updated 24 September 2009
Working with Dreamweaver sites
Web server URL prefix
ColdFusion MX 7 http://localhost:8500/warehouse/
IIS http://localhost/warehouse/
Apache (Windows) http://localhost:80/warehouse/
Jakarta Tomcat (Windows) http://localhost:8080/warehouse/
Note: By default the ColdFusion MX 7 web server runs on port 8500, the Apache web server runs on port 80, and the
Jakarta Tomcat web server runs on port 8080.
For Macintosh users running the Apache web server, your personal home directory is Users:MyUserName:Sites,
where MyUserName is your Macintosh user name. An alias called ~MyUserName is automatically defined for this
folder when you install Mac OS 10.1 or higher. Therefore, your default URL prefix in Dreamweaver is as follows:
http://localhost/~MyUserName/
If the folder you want to use to process dynamic pages is Users:MyUserName:Sites:inventory, then the URL prefix is
as follows:
http://localhost/~MyUserName/inventory/
49
Edit an existing remote website in Dreamweaver
You can use Dreamweaver to copy an existing remote site (or any branch of a remote site) to your local disk and edit
it there, even if you didn’t use Dreamweaver to create the original site.
1 Create a local folder to contain the existing site and set up the folder as the local folder for the site.
Note: You must locally duplicate the entire structure of the relevant branch of the existing remote site.
2 Set up a remote folder, using the remote access information about the existing site. You must connect to the remote
site to download the files to your computer before you can edit them.
Make sure to choose the correct root folder for the remote site.
3 In the Files panel (Window > Files), click the Connects To Remote Host button (for FTP access) or the Refresh
button (for network access) in the toolbar to view the remote site.
4 Edit the site:
• If you want to work with the entire site, select the root folder of the remote site in the Files panel, and click Get
File(s) in the toolbar to download the entire site to your local disk.
• If you want to work with just one of the files or folders of the site, locate the file or folder in the Remote view of the
Files panel, and click Get File(s) in the toolbar to download that file to your local disk.
Dreamweaver automatically duplicates as much of the remote site’s structure as is necessary to place the downloaded
file in the correct part of the site hierarchy. When editing only one part of a site, you should generally include
dependent files, such as image files.
Remove a Dreamweaver site from your list of sites
Removing a Dreamweaver site and all of its setup information from your list of sites does not remove the site files from
your computer.
1 Select Site > Manage Sites.
2 Select a site name.
Page 56

USING DREAMWEAVER CS4
Updated 24 September 2009
Working with Dreamweaver sites
3 Click Remove, click Yes to remove the site from the list or No to leave the site name, and then click Done.
Import and export site settings
You can export your site settings as an XML file that you can import into Dreamweaver later. This enables you to move
sites between machines and product versions or to share settings with other users.
Export your site settings regularly so that you have a backup copy if anything happens to the site.
Export your sites
1 Select Site > Manage sites.
2 Select one or more sites whose settings you want to export and click Export:
• To select more than one site, Control-click (Windows) or Command-click (Macintosh) each site.
• To select a range of sites, Shift-click the first and last site in the range.
3 If you want to back up your site settings, select the first option in the Exporting Site dialog box and click OK.
Dreamweaver saves remote server login information, such as the user name and password, as well as local path
information.
4 If you want to share your settings with other users, select the second option in the Exporting Site dialog box and
click OK. (Dreamweaver does not save information that would not work for other users, such as your remote server
login information and local paths.)
5 For each site whose settings you want to export, browse to a location where you want to save the site and click Save.
(Dreamweaver saves each site’s settings as an XML file, with an .ste file extension.)
6 Click Done.
Note: Save the *.ste file to your site root folder or to your desktop to make it easy to find. If you cannot remember where
you put it, do a file search on your computer for files with the *.ste extension to locate it.
50
Import sites
1 Select Site > Manage sites.
2 Click Import.
3 Browse to and select one or more sites—defined in files with an .ste file extension—whose settings you want to
import.
To select more than one site, Control-click (Windows) or Command-click (Macintosh) each .ste file. To select a range
of sites, Shift-click the first and last file in the range.
4 Click Open and then click Done.
After Dreamweaver imports the site settings, the site names appear in the Manage Sites dialog box.
Set site preferences for transferring files
You select preferences to control file transfer features that appear in the Files panel.
1 Select Edit > Preferences (Windows) or Dreamweaver > Preferences (Macintosh).
2 In the Preferences dialog box, select Site from the category list on the left.
Page 57

USING DREAMWEAVER CS4
Updated 24 September 2009
Working with Dreamweaver sites
3 Set the options and click OK.
Always Show Specifies which site (remote or local) is always shown, and in which Files panel pane (left or right) the
local and remote files appear.
By default, the local site always appears on the right. Whichever pane is not chosen (the left one by default) is the
changeable pane: this pane can display the files in the other site (the remote site by default).
Dependent Files Displays a prompt for transferring dependent files (such as images, external style sheets, and other
files referenced in the HTML file) that the browser loads when it loads the HTML file. By default, both Prompt on
Get/Check Out and Prompt on Put/Check In are selected.
It’s usually a good idea to download dependent files when checking out a new file, but if the latest versions of the
dependent files are already on the local disk, there’s no need to download them again. This is also true for uploading
and checking in files: no need if up-to-date copies are already at the destination.
If you deselect these options, your dependent files are not transferred. Therefore, to force the Dependent Files dialog
box to appear even when these options are deselected, hold down Alt (Windows) or Option (Macintosh) while
choosing the Get, Put, Check In, or Check Out commands.
FTP Connection Determines whether the connection to the remote site is terminated after the specified number of
minutes have passed with no activity.
FTP Time Out Specifies the number of seconds in which Dreamweaver attempts to make a connection with the remote
server.
51
If there is no response after the specified amount of time, Dreamweaver displays a warning dialog box alerting you to
this fact.
FTP Transfer options Determines whether Dreamweaver selects the default option, after a specified number of
seconds, when a dialog box appears during a file transfer and there is no user response.
Firewall Host Specifies the address of the proxy server through which you connect to outside servers if you are behind
a firewall.
If you are not behind a firewall, leave this space blank. If you are behind a firewall, select the Use Firewall option in the
Site Definition dialog box.
Firewall Port Specifies the port in your firewall through which you pass to connect to the remote server. If you connect
through a port other than 21 (the default for FTP), enter the number here.
Put Options: Save Files Before Putting Indicates that unsaved files are saved automatically before being put onto the
remote site.
Move Options: Prompt Before Moving Files on Server Alerts you when you attempt to move files on the remote site.
Manage Sites Opens the Manage Sites dialog box, where you can edit an existing site or create a new one.
You can define whether the types of files that you transfer are transferred as ASCII (text) or binary, by customizing
the FTPExtensionMap.txt file in the Dreamweaver/Configuration folder (on the Macintosh,
FTPExtensionMapMac.txt). For more information see, Extending Dreamweaver.
More Help topics
“Set up a remote folder” on page 41
Page 58

USING DREAMWEAVER CS4
Updated 24 September 2009
Working with Dreamweaver sites
Managing Contribute sites with Dreamweaver
Managing Contribute sites
Adobe® Contribute® CS4 combines a web browser with a web-page editor. It enables your colleagues or clients to
browse to a page in a site that you created, and to edit or update the page if they have permission to do so. Contribute
users can add and update basic web content, including formatted text, images, tables, and links. Contribute site
administrators can limit what ordinary (non-administrator) users can do in a site.
Note: This topic assumes that you are a Contribute administrator.
As the site administrator, you give non-administrators the ability to edit pages by creating a connection key and
sending it to them (for information on how to do this, see Contribute Help. You can also set up a connection to a
Contribute site using Dreamweaver, which lets you or your site designer connect to the Contribute site and use all of
the editing capabilities available in Dreamweaver.
Contribute adds functionality to your website with Contribute Publishing Server (CPS), a suite of publishing
applications and user management tools that lets you integrate Contribute with your organization’s user directory
service—for example, Lightweight Directory Access Protocol (LDAP) or Active Directory. When you enable your
Dreamweaver site as a Contribute site, Dreamweaver reads Contribute’s administration settings whenever you
connect to the remote site. If Dreamweaver detects that CPS is enabled, it inherits some of the functionality of CPS,
such as file rollback and event logging.
52
You can use Dreamweaver to connect to and modify a file in a Contribute site. Most Dreamweaver capabilities work
the same way with a Contribute site as they do with any other site. However, when you use Dreamweaver with a
Contribute site, Dreamweaver automatically performs certain file-management operations, such as saving multiple
revisions of a document, and logging certain events in the CPS Console.
For more information, see Contribute Help.
Site structure and page design for a Contribute site
To enable Contribute users to edit your website, keep the following points in mind when you structure it:
• Keep your site structure simple. Don’t nest folders too deeply. Group related items together in a folder.
• Set up appropriate read and write permissions for folders on the server.
• Add index pages to folders as you create them, to encourage Contribute users to place new pages in the correct
folders. For example, if Contribute users provide pages containing meeting minutes, create a folder in the site root
folder named meeting_minutes, and create an index page in that folder. Then provide a link from your site’s main
page to the index page for meeting minutes. A Contribute user can then navigate to that index page and create a
new page of minutes for a specific meeting, linked from that page.
• On each folder’s index page, provide a list of links to the individual content pages and documents in that folder.
• Keep page designs as simple as possible, minimizing fancy formatting.
• Use CSS rather than HTML tags and name your CSS styles clearly. If the Contribute users use a standard set of styles
in Microsoft Word, use the same names for the CSS styles, so that Contribute can map the styles when a user copies
information from a Word document and pastes it into a Contribute page.
• To prevent a CSS style from being available to Contribute users, change the name of the style so that the name starts
with mmhide_. For example, if you use a style named RightJustified in a page but you don’t want Contribute users
to be able to use that style, rename the style to mmhide_RightJustified.
Note: You have to add mmhide_ to the style name in Code view; you cannot add it in the CSS panel.
Page 59

USING DREAMWEAVER CS4
Updated 24 September 2009
Working with Dreamweaver sites
• Use as few CSS styles as possible, to keep things simple and clean.
• If you use server-side includes for HTML page elements, such as headers or footers, create an unlinked HTML page
that contains links to the include files. Contribute users can then bookmark that page and use it to navigate to the
include files and edit them.
More Help topics
“Creating a Dreamweaver template” on page 385
“Creating and managing CSS” on page 131
“Working with server-side includes” on page 329
File transfer to and from a Contribute site
Contribute uses a system much like the Dreamweaver Check In/Check Out system to ensure that only one user at a
time can edit a given web page. When you enable Contribute compatibility in Dreamweaver, the Dreamweaver Check
In/Check Out system is automatically enabled.
To transfer files to and from a Contribute site using Dreamweaver, always use the Check In and Check Out commands.
If you instead use the PUT and GET commands to transfer files, you might overwrite the modifications that a
Contribute user has recently made to a file.
53
When you check a file in to a Contribute site, Dreamweaver makes a backup copy of the previous checked-in version
of the file in the _baks folder and adds your user name and a date stamp to a Design Notes file.
More Help topics
“Checking in and checking out files” on page 88
Contribute file and folder permissions on the server
Contribute provides a way to manage file and folder permissions for each user role you define; however, Contribute
doesn’t provide a way to manage the underlying read and write permissions assigned to files and folders by the server.
In Dreamweaver, you can manage those permissions directly on the server.
If a Contribute user doesn’t have read access on the server to a dependent file, such as an image displayed in a page,
the contents of the dependent file don’t appear in the Contribute window. For example, if a user doesn’t have read
access to an images folder, the images in that folder appear as broken image icons in Contribute. Similarly,
Dreamweaver templates are stored in a subfolder of the site’s root folder, so if a Contribute user doesn’t have read
access to the root folder, they can’t use templates in that site unless you copy the templates to an appropriate folder.
When you set up a Dreamweaver site, you must give users read access on the server to the /_mm folder (the _mm
subfolder of the root folder), the /Templates folder, and all of the folders containing assets that they will need to use.
If, for security reasons, you can’t give users read access to the /Templates folder, you can still enable Contribute users
to access templates. See “Enable Contribute users to access templates without root folder access” on page 57.
For more information about Contribute permissions, see Administering Contribute in Contribute Help.
Contribute special files
Contribute uses a variety of special files that aren’t intended to be viewed by visitors to your site:
• The shared settings file, which has an obfuscated filename with a CSI extension, appears in a folder named _mm in
the root folder of the site, and contains information that Contribute uses to manage the site
Page 60

USING DREAMWEAVER CS4
Updated 24 September 2009
Working with Dreamweaver sites
• Older versions of files, in folders named _baks
• Temporary versions of pages, so that users can preview changes
• Temporary lock files, indicating that a given page is being edited or previewed
• Design Notes files containing metadata about the site’s pages
In general, you shouldn’t edit any of these Contribute special files using Dreamweaver; Dreamweaver manages
them automatically.
If you don’t want these Contribute special files to appear on your publicly accessible server, you can set up a staging
server where Contribute users work on pages. Then periodically copy those web pages from the staging server to a
production server that’s on the web. If you take this staging-server approach, copy only web pages to the production
server, not any of the above-listed Contribute special files. In particular, don’t copy the _mm and _baks folders to
the production server.
Note: For information about setting up a server to prevent visitors from seeing files in folders that begin with an
underscore, see “Website security” in Contribute Help.
Occasionally you might need to manually delete Contribute special files. For example, there might be
circumstances in which Contribute fails to delete temporary preview pages when the user is finished previewing; in
that case, you would have to manually delete those temporary pages. Temporary preview pages have filenames that
begin with TMP.
54
Similarly, under some circumstances an outdated lock file may be accidentally left on the server. If that happens,
you must manually delete the lock file to allow others to edit the page.
Prepare a site for use with Contribute
If you’re preparing an existing Dreamweaver site for Contribute users, you need to explicitly enable Contribute
compatibility to use Contribute-related features; Dreamweaver does not prompt you to do this; however, when you
connect to a site that’s been set up as a Contribute site (that has an administrator), Dreamweaver prompts you to
enable Contribute compatibility.
Not all connection types support Contribute compatibility. The following restrictions apply to connection types:
• If your remote site connection uses WebDAV or Microsoft Visual SourceSafe, you can’t enable Contribute
compatibility, because those source-control systems aren’t compatible with the Design Notes and Check In/Check
Out systems that Dreamweaver uses for Contribute sites.
• If you use RDS to connect to your remote site, you can enable Contribute compatibility, but you must customize
your connection before you can share it with Contribute users.
• If you’re using your local computer as a web server, you must set up the site using an FTP or network connection
to your computer (rather than just a local folder path) to be able to share your connection with Contribute users.
When you enable Contribute compatibility, Dreamweaver automatically enables Design Notes (including the Upload
Design Notes For Sharing option) and the Check In/Check Out system.
If Contribute Publishing Server (CPS) is enabled on the remote site you are connecting to, Dreamweaver notifies the
CPS every time you trigger a network operation such as checking in, rolling back, or publishing a file. The CPS will log
these events, and you can view the log in the CPS Administration Console. (If you disable CPS, these events are not
logged.) You enable CPS using Contribute. For more information, see Adobe Contribute Help.
Page 61

USING DREAMWEAVER CS4
Updated 24 September 2009
Working with Dreamweaver sites
Note: You can make a site Contribute compatible without having Contribute on your computer; but if you want to be
able to start Contribute Administrator from Dreamweaver, you must have Contribute installed on the same computer as
Dreamweaver and you must be connected to the remote site before you enable Contribute compatibility. Otherwise,
Dreamweaver cannot read Contribute’s administrative settings to determine whether CPS and Rollback are enabled.
Important: You must make sure that the shared settings file (CSI file) that Contribute uses to administer the site is on
the remote server and uncorrupted. Contribute automatically creates this file (and overwrites old versions of it) whenever
you administer in Contribute Administrator. If the shared settings file is not on the server or is corrupted, Dreamweaver
returns the error, "The file required for Contribute compatibility does not exist on the server" whenever you attempt a
network operation (such as put). To ensure that the correct file is on the server, disable the connection to the server in
Dreamweaver, start Contribute Administrator, make an administration change, and then reconnect to the server in
Dreamweaver. For more information, see Adobe Contribute Help.
1 Select Site > Manage Sites.
2 Select a site, click Edit, and click the Advanced tab.
3 Select the Contribute category from the Category list on the left, select Enable Contribute Compatibility.
4 If a dialog box appears saying that you must enable Design Notes and Check In/Check Out, click OK.
5 If you haven’t already provided your Check In/Check Out contact information, type your name and e-mail address
in the dialog box, and then click OK. Rollback status, CPS status, the Site Root URL text box, and the Administer
Site in Contribute button appear in the Site Definition dialog box.
If Rollback is enabled in Contribute, you’ll have the ability to roll back to previous versions of files that you’ve
changed in Dreamweaver.
55
6 Check the URL in the Site Root URL text box and correct it if necessary. Dreamweaver constructs a site root URL
based on other site-definition information you’ve provided, but sometimes the constructed URL isn’t quite right.
7 Click the Test button to verify that you’ve entered the correct URL.
Note: If you are ready to send a connection key or perform Contribute site administration tasks now, skip the
remaining steps.
8 Click Administer Site in Contribute if you want to make administration changes. Remember, you must have
Contribute installed on the same machine if you want to open Contribute Administrator from Dreamweaver.
9 Click OK and then click Done.
More Help topics
“Rolling back files (Contribute users)” on page 106
Administer a Contribute site using Dreamweaver
After you enable Contribute compatibility, you can use Dreamweaver to start Contribute to perform site
administration tasks.
Note: Contribute must be installed on the same computer as Dreamweaver.
As an administrator of a Contribute site, you can:
• Change the administrative settings for the site.
Contribute administrative settings are a collection of settings that apply to all users of your website. These settings
enable you to fine-tune Contribute to provide a better user experience.
• Change the permissions granted to user roles in Contribute.
Page 62

USING DREAMWEAVER CS4
Updated 24 September 2009
Working with Dreamweaver sites
56
• Set up Contribute users.
Contribute users need certain information about the site to be able to connect to it. You can package all of this
information in a file called a connection key to send to Contribute users.
Note: A connection key is not the same as a Dreamweaver exported site file.
Before you give Contribute users the connection information they need to edit pages, use Dreamweaver to create
the basic folder hierarchy for your site, and to create any templates and CSS style sheets needed for the site.
1 Select Site > Manage Sites.
2 Select a site, click Edit, and click the Advanced tab.
3 Select the Contribute category from the category list on the left.
4 Click the Administer Site in Contribute button.
Note: This button does not appear if you have not enabled Contribute compatibility.
5 If prompted, enter the administrator password, and then click OK.
The Administer Website dialog box appears.
• To change administrative settings, select a category from the list on the left, and then change settings as necessary.
• To change role settings, in the Users and Roles category, click Edit Role Settings, and then make changes as
necessary.
• To send a connection key to set up users, in the Users and Roles category, click Send Connection Key, and then
complete the Connection Wizard.
6 Click Close, click OK, and then click Done.
For more information about administrative settings, managing user roles, or creating a connection key, see Contribute Help.
More Help topics
“Import and export site settings” on page 50
Delete, move, or rename a remote file in a Contribute site
Deleting a file from the remote server that hosts a Contribute site works much like deleting a file from the server for
any Dreamweaver site. However, when you delete a file from a Contribute site, Dreamweaver asks whether to delete
all older versions of the file. If you choose to keep the older versions, Dreamweaver saves a copy of the current version
in the _baks folder so you can restore it later.
Renaming a remote file or moving it from one folder to another in a Contribute site works the same way it works in
any Dreamweaver site. In a Contribute site, Dreamweaver also renames or moves the associated previous versions of
the file that are saved in the _baks folder.
1 Select the file in the Remote pane of the Files panel (Window > Files), and then press Backspace (Windows) or
Delete (Macintosh).
A dialog box appears asking you to confirm that you want to delete the file.
2 In the confirmation dialog box:
• To delete all previous versions of the file as well as the current version, select the Delete Rollback Versions option.
• To leave previous versions on the server, deselect the Delete Rollback Versions option.
3 Click Yes to delete the file.
Page 63

USING DREAMWEAVER CS4
Updated 24 September 2009
Working with Dreamweaver sites
Enable Contribute users to access templates without root folder access
In a Contribute site, you manage underlying file and folder permissions directly on the server. If, for security reasons,
you can’t give users read access to the /Templates folder, you can still make the templates available to users.
1 Set up the Contribute site so that its root folder is the folder you want users to see as the root.
2 Manually copy the template folder from the main site’s root folder into the Contribute site’s root folder, using the
Files panel.
3 After you update templates for the main site, recopy the changed templates into appropriate subfolders as needed.
If you take this approach, don’t use site root-relative links in the subfolders. Site root-relative links are relative to the
main root folder on the server, not to the root folder you define in Dreamweaver. Contribute users can’t create site
root-relative links.
If links in a Contribute page appear to be broken, it’s possible that there’s a problem with folder permissions,
particularly if the links link to pages outside of the Contribute user’s root folder. Check read and write permissions for
folders on the server.
More Help topics
“Document locations and paths” on page 266
57
Troubleshoot a Contribute site
If a remote file in a Contribute site appears to be checked out, but the file isn’t actually locked on the user’s computer,
you can unlock the file to enable users to edit it.
When you click any button related to Contribute site administration, Dreamweaver verifies that it can connect to your
remote site and that the Site Root URL you’ve given for the site is valid. If Dreamweaver can’t connect, or if the URL
isn’t valid, an error message appears.
If the administration tools aren’t working properly, there might be something wrong with the _mm folder.
Unlock a file in a Contribute site
Note: Before following this procedure, make sure that the file really isn’t checked out. If you unlock a file while a
Contribute user is editing it, multiple users might edit the file simultaneously.
1 Do one of the following:
• Open the file in the Document window, and then select Site > Undo Check Out.
• In the Files panel (Window > Files), right-click (Windows) or Control-click (Macintosh), and then select Undo
Check Out.
A dialog box might appear, indicating who has the file checked out and asking you to confirm that you want to unlock
the file.
2 If the dialog box appears, click Yes to confirm.
The file is unlocked on the server.
Troubleshoot connection problems for a Contribute site
1 Check the Site Root URL in the Contribute category of the Site Definition dialog box by opening that URL in a
browser, to make sure that the correct page opens.
2 Use the Test button in the Remote Info category of the Site Definition dialog box to make sure that you can connect
to the site.
Page 64

USING DREAMWEAVER CS4
Updated 24 September 2009
Working with Dreamweaver sites
3 If the URL is correct but the Test button results in an error message, ask your system administrator for help.
Troubleshoot Contribute administration tools
1 On the server, make sure that you have read and write permissions, and executable permissions if necessary, for the
_mm folder.
2 Make sure that the _mm folder contains a shared settings file with a CSI extension.
3 If it doesn’t, use the Connection Wizard (Windows) or Connection Assistant (Macintosh) to create a connection
to the site and to become an administrator for the site. The shared settings file is created automatically when you
become an administrator. For more information about becoming an administrator for an existing Contribute
website, see Administering Contribute in Contribute Help.
Working on files without defining a site
Connect to an FTP server without defining a site
You can connect to an FTP server to work on your documents without creating a Dreamweaver site. If you work on
files without creating a Dreamweaver site, you will not be able to perform sitewide operations, such as link checking.
58
1 Select Site > Manage Sites.
2 Click New and select FTP & RDS Servers.
3 Enter a name for the server connection in the Name box. This is the name that will appear in the pop-up menu at
the top of the Files panel.
4 Select FTP from the Access Type menu.
5 Enter the host name of the FTP host to which you upload files for your website.
Your FTP host is the full Internet name of a computer system, such as ftp.mindspring.com. Enter the full host name
without any additional text. In particular, don’t add a protocol name in front of the host name.
Note: If you do not know your FTP host, contact your ISP.
6 Enter the host directory of the remote site where you store documents that are visible to the public.
7 Enter the login name and password that you use to connect to the FTP server, then click Test to test your login name
and password.
8 Select Save if you want Dreamweaver to save your password. (If you do not select this option, Dreamweaver
prompts you for a password each time you connect to the remote server.)
9 Select Use Passive FTP if your firewall configuration requires use of passive FTP.
Passive FTP enables your local software to set up the FTP connection rather than requesting the remote server to set
it up. If you’re not sure whether you use passive FTP, check with your system administrator.
10 Select Use Firewall if you connect to the remote server from behind a firewall, then click Firewall Settings to edit
your firewall host or port.
11 Select Use Secure FTP (SFTP) for secure FTP authentication and click OK.
SFTP uses encryption and public keys to secure a connection to your testing server.
Note: Your server must be running an SFTP server.
Page 65

USING DREAMWEAVER CS4
Updated 24 September 2009
Working with Dreamweaver sites
12 Click OK. The Files panel displays the contents of the remote server folder you connected to, and the server name
appears in the pop-up menu at the top of the panel.
More Help topics
“Set up a remote folder” on page 41
Connect to an RDS server without defining a site
You can connect to an RDS server to work on your documents without creating a Dreamweaver site. If you work on
files without creating a Dreamweaver site, you will not be able to perform sitewide operations, such as link checking.
1 Select Site > Manage Sites.
2 Click New and select FTP & RDS Servers.
3 Enter a name for the server in the Description text field. This is the name that will appear in the menu at the top of
the Files panel.
4 Select RDS from the Access Type menu.
5 Enter the URL that users type in their browsers to open your web application, but do not include any filename.
Suppose your application’s URL is www.adobe.com/mycoolapp/start.html. In this case, you would enter the following
URL prefix: www.adobe.com/mycoolapp/.
59
6 Click the Settings button to complete the access information.
7 Complete the Configure RDS Server dialog box and click OK.
More Help topics
“Set up a remote folder” on page 41
Basic tab options
Set Basic tab Editing Files options
The Site Definition wizard has three sections to help you set up a Dreamweaver site: Editing Files, Testing Files, and
Sharing Files. Each section might have multiple screens depending on the settings you select. At the top of the dialog
box, the bold section name indicates where you are in the setup process. You might not need to set up folders in all
three sections; the questions that appear in the tab help you determine your needs.
The purpose of this dialog box is to name your Dreamweaver site and specify its URL.
More Help topics
“About Dreamweaver sites” on page 38
Name your Dreamweaver site
❖ Enter a name for your Dreamweaver site.
Specify the URL of your site
❖ Enter the URL (HTTP address) of your Dreamweaver site.
Page 66

USING DREAMWEAVER CS4
Updated 24 September 2009
Working with Dreamweaver sites
Dreamweaver uses this address to make sure site root-relative links work on the remote server, which may have a
different folder as the site root. For example, if you are linking to an image file on your hard disk in the C:\Sales\images\
folder (where Sales is your local root folder), and the URL of your completed site is http://www.mysite.com/SalesApp/
(where SalesApp is your remote root folder), you should enter the URL in the HTTP Address text box to ensure that
the path to the linked image on the remote server is /SalesApp/images/.
Set Basic tab Editing Files Part 2 options
The purpose of this dialog box is to indicate whether you are building a web application. A web application is a
collection of web pages that interact with the user, with each other, and with various resources on a web server,
including databases.
If you are building a web application, you need to select the server technology running on your web server.
1 Select No if you do not plan to use a server technology to create a web application, or select Yes if you plan to use a
server technology to create a web application.
2 If you select Yes, select a server technology.
You can use Dreamweaver to build web applications using three server technologies: PHP, ColdFusion, or ASP. Each
of these technologies corresponds to a document type in Dreamweaver. Choosing one for your web application
depends on several factors, including your level of comfort with various scripting languages and the application server
you plan to use.
60
More Help topics
“Choosing an application server” on page 501
Set Basic tab Editing Files Part 3 options
The purpose of this dialog box is to select your development environment.
1 Select the method you will use to work on files during development.
2 Enter a location to store your files or click the folder icon to browse to the folder.
This is your working directory for your Dreamweaver site—it is the place where you store your “in progress” files for
a Dreamweaver site. In the Dreamweaver Files panel, this folder is referred to as your local site.
More Help topics
“Understanding local and remote folder structure” on page 38
Set Basic tab Testing Files options (URL prefix)
This dialog box appears if you selected a server technology earlier in the process. Its purpose is to specify a URL prefix
so Dreamweaver can use your testing server to display data and connect to databases while you work. A URL prefix
comprises the domain name and any of your website’s home directory’s subdirectories or virtual directories.
1 Enter the URL that users type in their browsers to open your web application, but do not include any filename.
Suppose your application’s URL is www.adobe.com/mycoolapp/start.php. In this case, you would enter the following
URL prefix: www.adobe.com/mycoolapp/.
If Dreamweaver runs on the same computer as your web server, you can use the term localhost as a stand-in for your
domain name. For example, suppose your application’s URL is buttercup_pc/mycoolapp/start.php. Then, you can
enter the following URL prefix: http://localhost/mycoolapp/.
Page 67

USING DREAMWEAVER CS4
Updated 24 September 2009
Working with Dreamweaver sites
2 Click Test URL to ensure that your URL works.
More Help topics
“Set up a testing server” on page 47
“About the URL prefix for the testing server” on page 48
Set Basic tab Testing Files options (remote access)
The purpose of this dialog box is to select an access method for Dreamweaver to access your testing server.
Dreamweaver works with a testing server to generate and display dynamic content while you work. The testing server
can be your local computer, a development server, a staging server, or a production server. As long as the server can
process the kind of dynamic pages you plan to develop, the choice doesn’t matter.
❖ Select an access method from the pop-up menu and fill out the appropriate text boxes.
None Keep this default setting if you do not plan to upload your site to a server.
FTP Use this setting if you connect to your web server using FTP.
Local/Network Use this setting to access a network folder, or if you are storing files or running your testing server on
your local computer.
61
RDS (Remote Development Services) Use this setting if you connect to your web server using RDS. For this access
method, your remote folder must be on a computer running ColdFusion.
Microsoft Visual SourceSafe Use if you connect to your web server using Microsoft Visual SourceSafe. Support for this
method is only available for Windows; to use it, you must have Microsoft Visual SourceSafe Client version 6 installed.
WebDAV (Web-based Distributed Authoring and Versioning) Use if you connect to your web server using the
WebDAV protocol.
For this access method, you must have a server that supports this protocol, such as Microsoft Internet Information
Server (IIS) 5.0 or an appropriately configured installation of Apache web server.
More Help topics
“Set up a remote folder” on page 41
Set Basic tab remote folder setup options
The purpose of this dialog box is to decide whether to set up a remote server folder.
Depending on your environment, this folder is where you store files for testing, collaboration, production,
deployment, or a number of other scenarios. Typically, your remote folder is on the machine where your web server
is running.
In the Dreamweaver Files panel, this folder is referred to as your remote site. The remote folder enables you to transfer
files between your local disk and web server; this makes it easy for you to share and manage files in your Dreamweaver
sites.
❖ To choose whether to set up a remote folder, select Yes to set up a remote folder, or No to skip the remote folder
setup.
More Help topics
“Understanding local and remote folder structure” on page 38
Page 68

USING DREAMWEAVER CS4
Updated 24 September 2009
Working with Dreamweaver sites
Set Basic tab Sharing Files options (remote access)
The purpose of this dialog box is to select an access method for Dreamweaver to access your testing server.
Dreamweaver works with a testing server to generate and display dynamic content while you work. The testing server
can be your local computer, a development server, a staging server, or a production server. As long as the server can
process the kind of dynamic pages you plan to develop, the choice doesn’t matter.
❖ Select an access method from the pop-up menu and fill out the appropriate text boxes.
None Keep this default setting if you do not plan to upload your site to a server.
FTP Use this setting if you connect to your web server using FTP.
Local/Network Use this setting to access a network folder, or if you are storing files or running your testing server on
your local computer.
RDS (Remote Development Services) Use if you connect to your web server using RDS. For this access method, your
remote folder must be on a computer running ColdFusion.
Microsoft Visual SourceSafe Use if you connect to your web server using Microsoft Visual SourceSafe. Support for this
method is only available for Windows; to use it, you must have Microsoft Visual SourceSafe Client version 6 installed.
WebDAV (Web-based Distributed Authoring and Versioning) Use if you connect to your web server using the
WebDAV protocol.
62
For this access method, you must have a server that supports this protocol, such as Microsoft Internet Information
Server (IIS) 5.0 or an appropriately configured installation of Apache web server.
More Help topics
“Set up a remote folder” on page 41
Set Basic tab Sharing Files options (check in/check out)
The purpose of this dialog box is to set up the file Check In/Check Out system, if you’re working in a collaborative
environment (or working alone, but on multiple machines).
Checking out a file makes the file unavailable on the server so that other team members cannot edit the file using
Dreamweaver. Checking in a file makes the file available to others to check out and edit.
1 Select Yes to enable file check in/check out if you are working in a team environment (or working alone but from
several different machines), or select No to disable file check in/check out.
This option is useful to let others know that you checked out a file for editing, or to alert yourself that you may have
left a more recent version of a file on another machine.
2
Select Dreamweaver Should Check It Out if you want to automatically check out files when you open them from the
Files panel, or select the alternative option if you do not want to automatically check out files when you open them.
Note: Using File > Open to open a file doesn’t check the file out even when this option is selected.
3 Enter your name.
Your name appears in the Files panel alongside any files that you checked out; this enables team members to
communicate when they are sharing files.
If you work alone from several different machines, use a different check-out name on each machine (for example,
AmyR-HomeMac and AmyR-OfficePC) so you’ll know where the latest version of the file is if you forget to check it in.
4 Enter your e-mail address.
Page 69

USING DREAMWEAVER CS4
Updated 24 September 2009
Working with Dreamweaver sites
If you enter an e-mail address, then when you check out a file, your name appears in the Files panel next to that file as
a link (blue and underlined). If a team member clicks the link, their default e-mail program opens a new message with
your e-mail address and a subject that corresponds to the file and site name.
More Help topics
“Checking in and checking out files” on page 88
Basic tab Summary options
This page displays the settings you selected for your site.
To finish setting up your site, do one of the following:
• Click the Back button to return to a previous page to change a setting.
• Click the Done button if you are satisfied with the settings and want Dreamweaver to create the site.
When you click Done, Dreamweaver creates the site and displays it in the Files panel.
• Click the Cancel button if you do not want Dreamweaver to create the site.
63
Page 70

Chapter 4: Creating and Managing Files
Updated 24 September 2009
In addition to creating web pages, you can easily organize all of the files and assets that belong to your website. You
can create, manage, and synchronize files, check files in and out, and test how your site will work in different browsers.
Creating and opening documents
About creating Dreamweaver documents
Dreamweaver offers a flexible environment for working with a variety of web documents. In addition to HTML
documents, you can create and open a variety of text-based documents, including ColdFusion Markup Language
(CFML), ASP, JavaScript, and Cascading Style Sheets (CSS). Source code files, such as Visual Basic, .NET, C#, and Java,
are also supported.
Dreamweaver provides several options for creating a new document. You can create any of the following:
• A new blank document or template
• A document based on one of the predesigned page layouts that comes with Dreamweaver, including over 30 CSS-
based page layouts
• A document based on one of your existing templates
You can also set document preferences. For example, if you typically work with one type of document, you can set
it as the default document type for new pages you create.
64
You can easily define document properties, such as meta tags, document title, and background colors, and several
other page properties in either Design view or Code view.
Dreamweaver file types
You can work with a variety of file types in Dreamweaver. The primary kind of file you will work with is the HTML
file. HTML files—or Hypertext Markup Language files—contain the tag-based language responsible for displaying a
web page in a browser. You can save HTML files with either the .html or .htm extension. Dreamweaver saves files using
the .html extension by default.
Following are some of the other common file types you might use when working in Dreamweaver:
CSS Cascading Style Sheet files have a .css extension. They are used to format HTML content and control the
positioning of various page elements.
GIF Graphics Interchange Format files have a .gif extension. GIF format is a popular web graphic format for cartoons,
logos, graphics with transparent areas, and animations. GIFs contain a maximum of 256 colors.
JPEG Joint Photographic Experts Group files (named after the organization that created the format) have a .jpg
extension, and are usually photographs or high-color images. The JPEG format is best for digital or scanned
photographs, images using textures, images with gradient color transitions, and any images that require more than 256
colors.
XML Extensible Markup Language files have a .xml extension. They contain data in a raw form that can be formatted
using XSL (Extensible Stylesheet Language).
Page 71

USING DREAMWEAVER CS4
Updated 24 September 2009
Creating and Managing Files
XSL Extensible Stylesheet Language files have a .xsl or .xslt extension. They are used to style XML data that you want
to display on a web page.
CFML ColdFusion Markup Language files have a .cfm extension. They are used to process dynamic pages.
PHP Hypertext Preprocessor files have a .php extension and are used to process dynamic pages.
More Help topics
“Displaying XML data with XSLT” on page 464
“Building applications visually” on page 574
“Understanding Cascading Style Sheets” on page 127
Create a blank page
You can create a page that contains a predesigned CSS layout, or create a completely blank page and then create a
layout of your own.
1 Select File > New.
2 In the Blank Page category of the New Document dialog box, select the kind of page you want to create from the
Page Type column. For example, select HTML to create a plain HTML page, select ColdFusion to create a
ColdFusion page, and so on.
3 If you want your new page to contain a CSS layout, select a predesigned CSS layout from the Layout column;
otherwise, select None. Based on your selection, a preview and description of the selected layout appears on the
right side of the dialog box.
The predesigned CSS layouts provide the following types of columns:
65
Fixed Column width is specified in pixels. The column does not resize based on the size of the browser or the site
visitor’s text settings.
Elastic Column width is specified in a unit of measurement (ems) relative to the size of the text. The design adapts if
the site visitor changes the text settings, but does not change based on the size of the browser window.
Liquid Column width is specified as a percentage of the site visitor’s browser width. The design adapts if the site visitor
makes the browser wider or narrower, but does not change based on the site visitor’s text settings.
Hybrid Columns are a combination of any of the previous three options. For example, in the two-column hybrid, the
right sidebar layout has a liquid main column that scales to the size of the browser, and an elastic column on the right
that scales to the size of the site visitor’s text settings.
4 Select a document type from the DocType pop-up menu. In most cases, you can use the default selection, XHTML
1.0 Transitional.
Selecting one of the XHTML document type definitions from the DocType (DTD) menu makes your page XHTMLcompliant. For example, you can make an HTML document XHTML-compliant by selecting XHTML 1.0 Transitional
or XHTML 1.0 Strict from the menu. XHTML (Extensible Hypertext Markup Language) is a reformulation of HTML
as an XML application. Generally, using XHTML gives you the benefits of XML, while ensuring the backward and
future compatibility of your web documents.
Note: For more information about XHTML, see the World Wide Web Consortium (W3C) website, which contains the
specification for XHTML 1.1 - Module-Based XHTML (www.w3.org/TR/xhtml11/) and XHTML 1.0
(www.w3c.org/TR/xhtml1/), as well as XHTML validator sites for web-based files (http://validator.w3.org/) and local
files (http://validator.w3.org/file-upload.html).
Page 72

USING DREAMWEAVER CS4
Updated 24 September 2009
Creating and Managing Files
5 If you selected a CSS layout in the Layout column, select a location for the layout’s CSS from the Layout CSS pop-
up menu.
Add To Head Adds CSS for the layout to the head of the page you’re creating.
Create New File Adds CSS for the layout to a new external CSS file and attaches the new style sheet to the page you’re
creating.
Link To Existing File Lets you specify an existing CSS file that already contains the CSS rules needed for the layout. To
do this, click the Attach Style Sheet icon above the Attach CSS file pane and select an existing CSS style sheet. This
option is particularly useful when you want to use the same CSS layout (the CSS rules for which are contained in a
single file) across multiple documents.
6 (Optional) You can also attach CSS style sheets to your new page (unrelated to the CSS layout) when you create the
page. To do this, click the Attach Style Sheet icon above the Attach CSS file pane and select a CSS style sheet.
For a detailed walk-through of this process, see David Powers’s article, Automatically attaching a style sheet to new
documents.
7 Click Preferences if you want to set default document preferences, such as a document type, encoding, and a file
extension.
8 Click Get More Content if you want to open Dreamweaver Exchange where you can download more page design
content.
9 Click the Create button.
10 Save the new document (File > Save).
11 In the dialog box that appears, navigate to the folder where you want to save the file.
It’s a good idea to save your file in a Dreamweaver site.
66
12 In the File Name box, type a name for the file.
Avoid using spaces and special characters in file and folder names, and do not begin a filename with a numeral. In
particular, do not use special characters (such as é, ç, or ¥) or punctuation marks (such as colons, slashes, or periods)
in the names of files you intend to put on a remote server; many servers change these characters during upload, which
will cause any links to the files to break.
More Help topics
“XHTML code” on page 289
“Laying out pages with CSS” on page 152
“Set default document type and encoding” on page 70
Create a blank template
You can use the New Document dialog box to create Dreamweaver templates. By default, templates are saved in the
Templates folder of your site.
1 Select File > New.
2 In the New Document dialog box, select the Blank Template category.
3 Select the kind of page you want to create from the Template Type column. For example, select HTML template to
create a plain HTML template, select ColdFusion template to create a ColdFusion template, and so on.
Page 73

USING DREAMWEAVER CS4
Updated 24 September 2009
Creating and Managing Files
4 If you want your new page to contain a CSS layout, select a predesigned CSS layout from the Layout column;
otherwise, select None. Based on your selection, a preview and description of the selected layout appears on the
right side of the dialog box.
The predesigned CSS layouts provide the following types of columns:
Fixed Column width is specified in pixels. The column does not resize based on the size of the browser or the site
visitor’s text settings.
Elastic Column width is specified in a unit of measurement (ems) relative to the size of the text. The design adapts if
the site visitor changes the text settings, but does not change based on the size of the browser window.
Liquid Column width is specified as a percentage of the site visitor’s browser width. The design adapts if the site visitor
makes the browser wider or narrower, but does not change based on the site visitor’s text settings.
Hybrid Columns are a combination of any of the previous three options. For example, in the two-column hybrid, the
right sidebar layout has a main column that scales to the size of the browser, and an elastic column on the right that
scales to the size of the site visitor’s text settings.
5 Select a document type from the DocType pop-up menu. In most cases, you will want to leave this selected to the
default selection, XHTML 1.0 Transitional.
Selecting one of the XHTML document type definitions from the DocType (DTD) menu makes your page XHTMLcompliant. For example, you can make an HTML document XHTML-compliant by selecting XHTML 1.0 Transitional
or XHTML 1.0 Strict from the menu. XHTML (Extensible Hypertext Markup Language) is a reformulation of HTML
as an XML application. Generally, using XHTML gives you the benefits of XML, while ensuring the backward and
future compatibility of your web documents.
67
Note: For more information about XHTML, see the World Wide Web Consortium (W3C) website, which contains the
specification for XHTML 1.1 - Module-Based XHTML (www.w3.org/TR/xhtml11/) and XHTML 1.0
(www.w3c.org/TR/xhtml1/), as well as XHTML validator sites for web-based files (http://validator.w3.org/) and local
files (http://validator.w3.org/file-upload.html).
6 If you selected a CSS layout in the Layout column, select a location for the layout’s CSS from the Layout CSS pop-
up menu.
Add to Head Adds CSS for the layout to the head of the page you’re creating.
Create New File Adds CSS for the layout to a new external CSS styles sheet and attaches the new style sheet to the page
you’re creating.
Link To Existing File Lets you specify an existing CSS file that already contains the CSS rules needed for the layout. To
do this, click the Attach Style Sheet icon above the Attach CSS file pane and select an existing CSS style sheet. This
option is particularly useful when you want to use the same CSS layout (the CSS rules for which are contained in a
single file) across multiple documents.
7 (Optional) You can also attach CSS style sheets to your new page (unrelated to the CSS layout) when you create the
page. To do this, click the Attach Style Sheet icon above the Attach CSS file pane and select a CSS style sheet.
8 Click Preferences if you want to set default document preferences, such as a document type, encoding, and a file
extension.
9 Click Get More Content if you want to open Dreamweaver Exchange where you can download more page design
content.
10 Click the Create button.
11 Save the new document (File > Save). If you haven’t added editable regions to the template yet, a dialog box appears
telling you that there are no editable regions in the document. Click OK to close the dialog box.
Page 74

USING DREAMWEAVER CS4
Updated 24 September 2009
Creating and Managing Files
12 In the Save As dialog box, select a site in which to save the template.
13 In the File Name box, type a name for the new template. You do not need to append a file extension to the name of
the template. When you click Save, the .dwt extension is appended to the new template, which is saved in the
Templates folder of your site.
Avoid using spaces and special characters in file and folder names and do not begin a filename with a numeral. In
particular, do not use special characters (such as é, ç, or ¥) or punctuation (such as colons, slashes, or periods) in the
names of files you intend to put on a remote server; many servers change these characters during upload, which will
cause any links to the files to break.
More Help topics
“XHTML code” on page 289
“Laying out pages with CSS” on page 152
“Creating and managing templates” on page 377
“Setting up a Dreamweaver site” on page 38
“Set default document type and encoding” on page 70
68
Create a page based on an existing template
You can select, preview, and create a new document from an existing template. You can either use the New Document
dialog box to select a template from any of your Dreamweaver-defined sites or use the Assets panel to create a new
document from an existing template.
More Help topics
“Creating and managing templates” on page 377
“Setting up a Dreamweaver site” on page 38
“Set default document type and encoding” on page 70
Create a document based on a template
1 Select File > New.
2 In the New Document dialog box, select the Page From Template category.
3 In the Site column, select the Dreamweaver site that contains the template you want use, and then select a template
from the list on the right.
4 Deselect Update Page When Template Changes if you don’t want to update this page each time you make changes
to the template on which this page is based.
5 Click Preferences if you want to set default document preferences, such as a document type, encoding, and a file
extension.
6 Click Get More Content if you want to open Dreamweaver Exchange where you can download more page design
content.
7 Click Create and save the document (File > Save).
Create a document from a template in the Assets panel
1 Open the Assets panel (Window > Assets), if it is not already open.
Page 75

USING DREAMWEAVER CS4
Updated 24 September 2009
Creating and Managing Files
2 In the Assets panel, click the Templates icon on the left to view the list of templates in your current site.
If you just created the template you want to apply, you might need to click the Refresh button to see it.
3 Right-click (Windows) or Control-click (Macintosh) the template you want to apply, then select New From
Template.
The document opens in the Document window.
4 Save the document.
Create a page based on a Dreamweaver sample file
Dreamweaver comes with several professionally developed frame page layout and CSS design files. You can use these
sample files as starting points for designing pages in your sites. When you create a document based on a sample file,
Dreamweaver creates a copy of the file.
You can preview a sample file and read a brief description of a document’s design elements in the New Document
dialog box. In the case of CSS style sheets, you can copy a predesigned style sheet and apply it to your documents.
Note: If you create a document based on a predefined frameset, only the frameset structure is copied, not the frame
contents; additionally, you must save each frame file separately.
69
1 Select File > New.
2 In the New Document dialog box, select the Page From Sample category.
3 In the Sample Folder column, select CSS Style Sheet or Frameset; then select a sample file from the list on the right.
4 Click the Create button.
The new document opens in the Document window (Code and Design views). If you selected CSS Style Sheet, the CSS
style sheet opens in Code view.
5 Save the document (File > Save).
6 If the Copy Dependent Files dialog box appears, set the options, and then click Copy to copy the assets to the
selected folder.
You can choose your own location for the dependent files or use the default folder location Dreamweaver generates
(based on the sample file’s source name).
More Help topics
“Understanding Cascading Style Sheets” on page 127
“Save frame and frameset files” on page 198
Create other kinds of pages
The Other category of the New Document dialog box lets you create various types of pages that you might want to use
in Dreamweaver, including C#, VBScript, and text-only pages.
1 Select File > New.
2 In the New Document dialog box, select the Other category.
3 Select the kind of document you want to create from the Page Type column and click the Create button.
4 Save the document (File > Save).
Page 76

USING DREAMWEAVER CS4
Updated 24 September 2009
Creating and Managing Files
Save and revert documents
You can save a document using its current name and location, or save a copy of a document using a different name
and location.
When naming files, avoid using spaces and special characters in file and folder names. In particular, do not use special
characters (such as é, ç, or ¥) or punctuation (such as colons, slashes, or periods) in the names of files you intend to
put on a remote server; many servers change these characters during upload, which will cause any links to the files to
break. Also, do not begin a filename with a numeral.
More Help topics
“Create a blank page” on page 65
Save a document
1 Do one of the following:
• To overwrite the current version on the disk, and save any changes you have made, select File > Save.
• To save the file in a different folder or using a different name, select File > Save As.
2 In the Save As dialog box that appears, navigate to the folder where you want to save the file.
3 In the File Name text box, type a name for the file.
4 Click Save to save the file.
70
Save all open documents
1 Select File > Save All.
2 If there are any unsaved documents open, the Save As dialog box is displayed for each unsaved document.
In the dialog box that appears, navigate to the folder where you want to save the file.
3 In the File Name box, type a name for the file and click Save.
Revert to the last saved version of a document
1 Select File > Revert.
A dialog box asks if you want to discard your changes, and revert to the previously saved version.
2 Click Yes to revert to the previous version; click No to keep your changes.
Note: If you save a document, and then exit Dreamweaver, you cannot revert to the previous version of the document
when you restart Dreamweaver.
Set default document type and encoding
You can define which document type is used as a default document for a site.
For example, if most pages in your site are of a specific file type (such as Cold Fusion, HTML, or ASP documents), you
can set document preferences that automatically create new documents of the specified file type.
1 Select Edit > Preferences (Windows) or Dreamweaver > Preferences (Macintosh).
You can also click the Preferences button in the New Document dialog box to set new document preferences when you
create a new document.
2 Click New Document from the category list on the left.
Page 77

USING DREAMWEAVER CS4
Updated 24 September 2009
Creating and Managing Files
3 Set or change preferences as necessary, and click OK to save them.
Default Document Select a document type that will be used for pages that you create.
Default Extension Specify the file extension you prefer (.htm or .html) for new HTML pages you create.
Note: This option is disabled for other file types.
Default Document Type (DDT) Select one of the XHTML document type definitions (DTD) to make new pages
XHTML-compliant. For example, you can make an HTML document XHTML-compliant by selecting XHTML 1.0
Transitional or XHTML 1.0 Strict from the menu.
Default Encoding Specify the encoding to be used when a new page is created, as well as when a document is opened
that does not specify any encoding.
If you select Unicode (UTF-8) as the document encoding, entity encoding is not necessary because UTF-8 can safely
represent all characters. If you select another document encoding, entity encoding may be necessary to represent
certain characters. For more information on character entities, see www.w3.org/TR/REC-html40/sgml/entities.html.
If you select Unicode (UTF-8) as a default encoding, you can include a Byte Order Mark (BOM) in the document by
selecting the Include Unicode Signature (BOM) option.
A BOM is 2-4 bytes at the beginning of a text file that identifies a file as Unicode, as well as the byte order of the
following bytes. Because UTF-8 has no byte order, adding a UTF-8 BOM is optional. For UTF-16 and UTF-32, it is
required.
71
Unicode Normalization Form Select one of these options if you select Unicode (UTF-8) as a default encoding.
There are four Unicode Normalization Forms. The most important is Normalization Form C because it's the most
common one used in the Character Model for the World Wide Web. Adobe provides the other three Unicode
Normalization Forms for completeness.
Show New Document Dialog Box on Control+N Deselect this option (“on Command+N” for Macintosh) to
automatically create a document of the default document type when you use the key command.
In Unicode, there are characters that are visually similar but can be stored within the document in different ways. For
example, “ë” (e-umlaut) can be represented as a single character, “e-umlaut,” or as two characters, “regular Latin e” +
“combining umlaut.” A Unicode combining character is one that gets used with the previous character, so the umlaut
would appear above the “Latin e.” Both forms result in the same visual typography, but what is saved in the file is
different for each form.
Normalization is the process of making sure all characters that can be saved in different forms are all saved using the
same form. That is, all “ë” characters in a document are saved as single “e-umlaut” or as “e” + “combining umlaut,”
and not as both forms in one document.
For more information on Unicode Normalization and the specific forms that can be used, see the Unicode website at
www.unicode.org/reports/tr15.
More Help topics
“XHTML code” on page 289
“Understanding document encoding” on page 211
Page 78

USING DREAMWEAVER CS4
Updated 24 September 2009
Creating and Managing Files
Set the default file extension of new HTML documents
You can define the default file extension of HTML documents created in Dreamweaver. For example, you can use an
.htm or .html extension for all new HTML documents.
1 Select Edit > Preferences (Windows) or Dreamweaver > Preferences (Macintosh).
You can also click the Preferences button in the New Document dialog box to set new document preferences when you
create a new document.
2 Click New Document from the category list on the left.
3 Make sure that HTML is selected in the Default Document pop-up menu.
4 In the Default Extension box, specify the file extension you want for new HTML documents created in
Dreamweaver.
For Windows, you can specify the following extensions: .html, .htm, .shtml, .shtm, .stm, .tpl, .lasso, .xhtml.
For Macintosh, you can specify the following extensions: .html, .htm, .shtml, .shtm, .tpl, .lasso, .xhtml, .ssi.
Open and edit existing documents
You can open an existing web page or text-based document, whether or not it was created in Dreamweaver, and edit
it in either Design view or Code view.
72
If the document you open is a Microsoft Word file that was saved as an HTML document, you can use the Cleanup
Word HTML command to remove the extraneous markup tags that Word inserts into HTML files.
To clean up HTML or XHTML that was not generated by Microsoft Word, use the Cleanup HTML command.
You can also open non-HTML text files, such as JavaScript files, XML files, CSS style sheets, or text files saved by word
processors or text editors.
1 Select File > Open.
You can also use the Files panel to open files.
2 Navigate to and select the file you want to open.
Note: If you haven’t already done so, it’s a good idea to organize files you plan to open and edit in a Dreamweaver site,
instead of opening them from another location.
3 Click Open.
The document opens in the Document window. JavaScript, text, and CSS Style Sheets open in Code view by default.
You can update the document while working in Dreamweaver, and save the changes in the file.
More Help topics
“Clean up code” on page 315
“Start an external editor for media files” on page 254
“Work with files in the Files panel” on page 78
“Set up and edit a local root folder” on page 40
Page 79

USING DREAMWEAVER CS4
Updated 24 September 2009
Creating and Managing Files
Open related files
Dreamweaver lets you view files related to your main document, without losing the main document’s focus. For
example, if you have CSS and JavaScript files attached to a main document, Dreamweaver lets you view and edit these
related files in the Document window while keeping the main document visible.
By default, Dreamweaver displays the names of all files related to a main document in a Related Files toolbar below the
main document’s title. The order of the buttons in the toolbar follows the order of related files links that exist within
the main document.
Note: If a related file is missing, Dreamweaver still displays the corresponding button in the Related Files toolbar. If you
click the button, however, Dreamweaver does not display anything.
Dreamweaver supports the following kinds of related files:
• Client-side script files
• Server Side Includes
• Spry data set sources (XML and HTML)
• External CSS style sheets (including nested style sheets)
For a video overview from the Dreamweaver engineering team about working with related files, see
www.adobe.com/go/dw10relatedfiles.
73
For a video tutorial on working with Live View, related files, and the Code Navigator, see
www.adobe.com/go/lrvid4044_dw.
Open a related file from the Related Files toolbar
Do one of the following:
• In the Related Files toolbar at the top of the document, click the filename of the related file you want to open.
• In the Related Files toolbar, right-click the filename of the related file you want to open and select Open as Separate
File from the context menu. When you open a related file by this method, the main document does not remain
simultaneously visible.
Open a related file from the Code navigator
1 Place the insertion point on a line or in an area that you know is affected by a related file.
2 Wait for the Code Navigator indicator to appear, and then click it to open the Code Navigator.
3 Hover over the items in the Code Navigator to see more information about them. For example, if you want to
change a particular CSS color property, but don’t know which rule it resides in, you can find the property by
hovering over the available rules in the Code Navigator.
4 Click the item you’re interested in to open the corresponding related file.
Return to the source code of the main document
❖ Click the Source Code button in the Related Files toolbar.
Page 80

USING DREAMWEAVER CS4
Updated 24 September 2009
Creating and Managing Files
Change the display of related files
You can view related files in a number of ways:
• When you open a related file from Design view or Code and Design views (Split view), the related file displays in a
split view above the Design view of the main document.
You can select View > Design View on Top if you want the related file to display at the bottom of the Document
window instead.
• When you open a related file from vertically split Code and Design views (View > Split vertically), the related file
displays in a split view alongside the Design view of the main document.
You can select or deselect Design View on Left (View > Design View on Left), depending on where you want the
Design view.
• When you open a related file from Split Code view or Vertical Split Code view (View > Split Code view, and View
> Split vertically), the related file displays in a split view beneath, above, or alongside the source code for the main
document, depending on the options you have selected.
The “code view” in the display option refers to the source code of the main document. For example, if you select
View > Code View on Top, Dreamweaver displays the source code of the main document in the top half of the
Document window. If you select View > Code View on Left, Dreamweaver displays the source code of the main
document on the left side of the Document window.
74
• Standard Code view does not let you display related Documents at the same time as the main document’s source code.
Disable related files
1 Select Edit > Preferences (Windows) or Dreamweaver > Preferences (Macintosh).
2 In the General category, deselect Enable Related Files.
More Help topics
“Switch between views in the Document window” on page 20
“Navigate to related code” on page 307
“Previewing pages in Dreamweaver” on page 283
Related files tutorial
Clean up Microsoft Word HTML files
You can open documents saved by Microsoft Word as HTML files, and then use the Clean Up Word HTML command
to remove the extraneous HTML code generated by Word. The Clean Up Word HTML command is available for
documents saved as HTML files by Word 97 or later.
The code that Dreamweaver removes is primarily used by Word to format and display documents in Word and is not
needed to display the HTML file. Retain a copy of your original Word (.doc) file as a backup, because you may not be
able to reopen the HTML document in Word once you’ve applied the Clean Up Word HTML feature.
To clean up HTML or XHTML that was not generated by Microsoft Word, use the Cleanup HTML command.
1 Save your Microsoft Word document as an HTML file.
Note: In Windows, close the file in Word to avoid a sharing violation.
2 Open the HTML file in Dreamweaver.
Page 81

USING DREAMWEAVER CS4
Updated 24 September 2009
Creating and Managing Files
To view the HTML code generated by Word, switch to Code view (View > Code).
3 Select Commands > Clean Up Word HTML.
Note: If Dreamweaver is unable to determine which version of Word was used to save the file, select the correct version
from the pop-up menu.
4 Select (or deselect) options for the cleanup. The preferences you enter are saved as default cleanup settings.
Dreamweaver applies the cleanup settings to the HTML document and a log of the changes appears (unless you
deselected that option in the dialog box).
Remove All Word Specific Markup Removes all Microsoft Word-specific HTML, including XML from HTMLtags,
Word custom metadata and link tags in the head of the document, Word XML markup, conditional tags and their
contents, and empty paragraphs and margins from styles. You can select each of these options individually using the
Detailed tab.
Clean Up CSS Removes all Word-specific CSS, including inline CSS styles when possible (where the parent style has
the same style properties), style attributes beginning with “mso,” non-CSS style declarations, CSS style attributes from
tables, and all unused style definitions from the head. You can further customize this option using the Detailed tab.
Clean Up <font> Tags Removes HTML tags, converting the default body text to size 2 HTML text.
Fix Invalidly Nested Tags Removes the font markup tags inserted by Word outside the paragraph and heading (block-
level) tags.
75
Apply Source Formatting Applies the source formatting options you specify in HTML Format preferences and
SourceFormat.txt to the document.
Show Log On Completion Displays an alert box with details about the changes made to the document as soon as the
cleanup is finished.
5 Click OK, or click the Detailed tab if you want to further customize the Remove All Word Specific Markup and
Clean Up CSS options, and then click OK.
More Help topics
“Clean up code” on page 315
“Import Microsoft Office documents (Windows only)” on page 224
Managing files and folders
About managing files and folders
Dreamweaver includes a Files panel that helps you manage and transfer files to and from a remote server. When you
transfer files between local and remote sites, parallel file and folder structures between the sites are maintained. When
transferring files between sites, Dreamweaver creates corresponding folders if they do not yet exist in a site. You can
also synchronize the files between your local and remote sites; Dreamweaver copies files in both directions as necessary
and removes unwanted files when appropriate.
Using the Files panel
The Files panel enables you to view files and folders, whether they are associated with a Dreamweaver site or not, and
perform standard file maintenance operations, such as opening and moving files.
Page 82

USING DREAMWEAVER CS4
Updated 24 September 2009
Creating and Managing Files
Note: In previous versions of Dreamweaver the Files panel was called the Site panel.
You can move the Files panel as necessary and set preferences for the panel.
Use this panel to perform the following tasks:
• Access sites, a server, and local drives
• View files and folders
• Manage files and folders in the Files panel
For Dreamweaver sites, use the following options to display or transfer files:
A B C D E F G H I J K L
Expanded Files panel options.
A. Site pop-up menu B. Connect/Disconnect C. Refresh D. Site files view E. Testing server F. Repository view G. Get File(s) H. Put File(s)
I. Check Out File(s) J. Check In File(s) K. Synchronize L. Expand/Collapse
Note: The Site Files view, Testing Server view, and Synchronize buttons appear only in the expanded Files panel.
The Site pop-up menu Lets you select a Dreamweaver site and display that site’s files. You can also use the Site menu
to access all the files on your local disk, much like Windows Explorer (Windows) or the Finder (Macintosh).
76
Connect/Disconnect (FTP, RDS, WebDAV protocol, and Microsoft Visual SourceSafe) Connects to or disconnects
from the remote site. By default, Dreamweaver disconnects from the remote site if it has been idle for more than 30
minutes (FTP only). To change the time limit, select Edit > Preferences (Windows) or Dreamweaver > Preferences
(Macintosh), then select Site from the category list on the left.
Refresh Refreshes the local and remote directory lists. Use this button to manually refresh the directory lists if you
deselected either Refresh Local File List Automatically or Refresh Remote File List Automatically in the Site Definition
dialog box.
Site Files view Displays the file structure of the remote and local sites in the panes of the Files panel. (A preference
setting determines which site appears in the left pane and which appears in the right pane.) Site Files view is the default
view for the Files panel.
Testing Server view Displays the directory structure of the testing server and the local site.
Repository view Displays the Subversion (SVN) Repository.
Get File(s) Copies the selected files from the remote site to your local site (overwriting the existing local copy of the
file, if any). If Enable File Check In And Check Out is enabled, the local copies are read-only; the files remain available
on the remote site for other team members to check out. If Enable File Check In and Check Out is disabled, the file
copies will have both read and write privileges.
Note: The files Dreamweaver copies are the files you select in the active pane of the Files panel. If the Remote pane is
active, the selected remote or testing server files are copied to the local site; if the Local pane is active, Dreamweaver copies
the remote or testing server version of the selected local files to the local site.
Put File(s) Copies the selected files from the local site to the remote site.
Note: The files Dreamweaver copies are the files you select in the active pane of the Files panel. If the Local pane is active,
the selected local files are copied to the remote site or testing server; if the Remote pane is active, Dreamweaver copies the
local versions of the selected remote server files to the remote site.
If you are putting a file that doesn’t already exist on the remote site, and Enable File Check In and Out is enabled, the
file is added to the remote site as “checked out.” Click the Check In Files button if you want to add a file without the
checked out status.
Page 83

USING DREAMWEAVER CS4
Updated 24 September 2009
Creating and Managing Files
Check Out File(s) Transfers a copy of the file from the remote server to your local site (overwriting the existing local
copy of the file, if any) and marks the file as checked out on the server. This option is not available if Enable File Check
In and Check Out in the Site Definitions dialog box is disabled for the current site.
Check In File(s) Transfers a copy of the local file to the remote server and makes the file available for editing by others.
The local file becomes read-only. This option is not available if the Enable File Check In and Check Out option in the
Site Definitions dialog box is disabled for the current site.
Synchronize Synchronizes the files between the local and remote folders.
The Expand/Collapse button Expands or collapses the Files panel to display one or two panes.
More Help topics
“Files panel overview” on page 18
“Set up a remote folder” on page 41
“Check files into and out of a remote folder” on page 89
“Put files on a remote server” on page 86
“Get files from a remote server” on page 85
“Synchronizing files” on page 96
77
View files and folders
You can view files and folders in the Files panel, whether they are associated with a Dreamweaver site or not. When
you view sites, files, or folders in the Files panel, you can change the size of the viewing area, and, for Dreamweaver
sites, you can expand or collapse the Files panel.
For Dreamweaver sites, you can also customize the Files panel by changing the view—either your local or remote site—
that appears by default in the collapsed panel. Or, you can switch the content views in the expanded Files panel using
the Always Show option.
More Help topics
“Set up a remote folder” on page 41
“Set up a testing server” on page 47
Open or close the Files panel
❖ Select Window > Files.
Expand or collapse the Files panel (Dreamweaver sites only)
❖ In the Files panel (Window > Files), click the Expand/Collapse button in the toolbar.
Note: If you click the Expand/Collapse button to expand the panel while it is docked, the panel maximizes so that you
cannot work in the Document window. To return to the Document window, click the Expand/Collapse button again to
collapse the panel. If you click the Expand/Collapse button to expand the panel while it is not docked, you can still work
in the Document window. Before you can dock the panel again, you must first collapse it.
When the Files panel is collapsed it displays the contents of the local site, the remote site, or the testing server as a list
of files. When expanded, it displays the local site and either the remote site or testing server.
Page 84

USING DREAMWEAVER CS4
Updated 24 September 2009
Creating and Managing Files
Change the size of the view area in the expanded Files panel
❖ In the Files panel (Window > Files), with the panel expanded, do one of the following:
• Drag the bar that separates the two views to increase or decrease the view area of the right or left pane.
• Use the scroll bars at the bottom of the Files panel to scroll through the views’ contents.
Change the site view in Files panel (Dreamweaver sites only)
❖ Do one of the following:
• In the collapsed Files panel (Window > Files), select Local View, Remote View, Testing Server, or Repository View
from the Site View pop-up menu.
Note: Local View appears in the Site View menu by default.
• In the expanded Files panel (Window > Files), click the Site Files button (for the remote site), the Testing Server
button, or the Repository Files button.
ABC
78
A. Site Files B. Testing Server C. Repository Files
Note: Before you can view a remote site, testing server or repository, you must set up a remote site, testing server, or SVN
repository.
View files outside of a Dreamweaver site
❖ Navigate your computer using the Site pop-up menu, much as you would if you were using Windows Explorer
(Windows) or the Finder (Macintosh).
Work with files in the Files panel
You can open or rename files; add, move, or delete files; or refresh the Files panel after you make changes.
For Dreamweaver sites, you can also determine which files (on either the local or remote site) have been updated since
the last time they were transferred.
More Help topics
“Synchronizing files” on page 96
“Access sites, a server, and local drives” on page 81
Open a file
1 In the Files panel (Window > Files), select a site, server, or drive from the pop-up menu (where the current site,
server, or drive appears).
2 Navigate to the file you want to open.
Page 85

USING DREAMWEAVER CS4
Updated 24 September 2009
Creating and Managing Files
3 Do one of the following:
• Double-click the file’s icon.
• Right-click (Windows) or Control-click (Macintosh) the file’s icon, then select Open.
Dreamweaver opens the file in the Document window.
Create a file or folder
1 In the Files panel (Window > Files), select a file or folder.
Dreamweaver will create the new file or folder inside the currently selected folder, or in the same folder as the currently
selected file.
2 Right-click (Windows) or Control-click (Macintosh), then select New File or New Folder.
3 Enter a name for the new file or folder.
4 Press Enter (Windows) or Return (Macintosh).
Delete a file or folder
1 In the Files panel (Window > Files), select the file or folder you want to delete.
2 Right-click (Windows) or Control-click (Macintosh), then select Edit > Delete.
79
Rename a file or folder
1 In the Files panel (Window > Files), select the file or folder you want to rename.
2 Do one of the following to activate the name of the file or folder:
• Click in the filename, pause, then click again.
• Right-click (Windows) or Control-click (Macintosh) the file’s icon, then select Edit > Rename.
3 Type the new name over the existing name.
4 Press Enter (Windows) or Return (Macintosh).
Move a file or folder
1 In the Files panel (Window > Files), select the file or folder you want to move.
2 Do one of the following:
• Copy the file or folder, then paste it in a new location.
• Drag the file or folder to a new location.
3 Refresh the Files panel to see the file or folder in its new location.
Refresh the Files panel
❖ Do one of the following:
• Right-click (Windows) or Control-click (Macintosh) any file or folder, then select Refresh.
• (Dreamweaver sites only) Click the Refresh button in the Files panel toolbar (this option refreshes both panes).
Note: Dreamweaver refreshes the Files panel when you make changes in another application, then return to
Dreamweaver.
Page 86

USING DREAMWEAVER CS4
Updated 24 September 2009
Creating and Managing Files
Find files in your Dreamweaver site
Dreamweaver makes it easy to find selected, open, checked out, or recently modified files in your site. You can also
find files that are newer in your local or remote site.
More Help topics
“Use reports to test your site” on page 113
Find an open file in your site
1 Open the file in the Document window.
2 Select Site > Locate in Site.
Dreamweaver selects the file in the Files panel.
Note: If the open file in the Document window is not part of the current site in the Files panel, Dreamweaver attempts to
determine which of your Dreamweaver sites the file belongs to; if the current file belongs to only one local site,
Dreamweaver opens that site in the Files panel, then highlights the file.
Locate and select checked out files in a Dreamweaver site
❖ In the collapsed Files panel (Window > Files), click the Options menu in the upper-right corner of the Files panel,
then select Edit > Select Checked Out Files.
80
Dreamweaver selects the files in the Files panel.
Find a selected file in your local or remote site
1 Select the file in the Local or Remote view of the Files panel (Window > Files).
2 Right-click (Windows) or Control-click (Macintosh), then select Locate in Local Site or Locate in Local Site
(depending on where you selected the file).
Dreamweaver selects the file in the Files panel.
Locate and select files that are newer in the local site than in the remote site
❖ In the collapsed Files panel (Window > Files), click the Options menu in the upper-right corner of the Files panel,
then select Edit > Select Newer Local.
Dreamweaver selects the files in the Files panel.
Locate and select files that are newer in the remote site than in the local site
❖ In the collapsed Files panel (Window > Files), click the Options menu in the upper-right corner of the Files panel,
then select Edit > Select Newer Remote.
Dreamweaver selects the files in the Files panel.
Find recently modified files in your site
1 In the collapsed Files panel (Window > Files), click the Options menu in the upper-right corner of the Files panel,
and then select Edit > Select Recently Modified.
Page 87

USING DREAMWEAVER CS4
Updated 24 September 2009
Creating and Managing Files
2 Do one of the following to indicate search dates for the report:
• To report on all files modified in the last several days, select Files Created or Modified in the Last and enter a
number in the box.
• To report on all files modified within a specific time frame, click the Files Created or Modified in the Between radio
button, then specify a date range.
3 (Optional) Enter a user name in the Modified By box to limit your search to files modified by a specific user between
the dates you indicated.
Note: This option is only available for reports on Contribute sites.
4 Select a radio button to indicate where you want to view files listed in the report, if necessary:
Local Machine if the site contains static pages.
Testing Server if the site contains dynamic pages.
Note: This option assumes you defined a Testing Server in the Site Definition dialog box (XREF). If you have not defined
a Testing Server and entered a URL prefix for that server, or if you are running the report for more than one site, this
option is not available.
Other Location if you want to enter a path in the text box.
5 Click OK to save your settings.
Dreamweaver highlights the files that were modified within the selected time frame in the Files panel.
81
Identify and delete unused files
You can identify and delete files that are no longer used by other files in your site.
1 Select Site > Check Links Sitewide.
Dreamweaver checks all the links in your site and displays the broken ones in the Results panel.
2 Select Orphaned Files from the menu on the Link Checker panel.
Dreamweaver displays all the files with no incoming links. This means that no files in your site link to these files.
3 Select the files you want to delete and press Delete (Windows) or Command+Delete (Macintosh).
Important: Although no other file in the site links to these files, some of the listed files may link to other files. Use caution
when deleting the files.
More Help topics
“Enable and disable site cloaking” on page 107
Access sites, a server, and local drives
You can access, modify, and save files and folders in your Dreamweaver sites, as well as files and folders that are not
part of a Dreamweaver site. In addition to Dreamweaver sites, you can access a server, a local drive, or your desktop.
Before you can access a remote server, you must set up Dreamweaver to work with that server.
Note: The best way to manage your files is to create a Dreamweaver site.
More Help topics
“Set up and edit a local root folder” on page 40
Page 88

USING DREAMWEAVER CS4
Updated 24 September 2009
Creating and Managing Files
Open an existing Dreamweaver site
❖ In the Files panel (Window > Files), select a site from the menu (where the current site, server, or drive appears).
Open a folder on a remote FTP or RDS server
1 In the Files panel (Window > Files), select a server name from the menu (where the current site, server, or drive
appears).
82
Note: Server names appear for servers you’ve configured Dreamweaver to work with.
2 Navigate to and edit files as you normally do.
Access a local drive or your desktop
1 In the Files panel (Window > Files), select Desktop, Local Disk, or CD Drive from the menu (where the current site,
server, or drive appears).
2 Navigate to a file, then do any of the following:
• Open files in Dreamweaver or another application
• Rename files
• Copy files
• Delete files
• Drag files
When you drag a file from one Dreamweaver site to another or to a folder that is not part of a Dreamweaver site,
Dreamweavercopies the file to the location where you drop it. If you drag a file within the same Dreamweaver site,
Dreamweavermoves the file to the location where you drop it. If you drag a file that is not part of a Dreamweaver site
to a folder that is not part of a Dreamweaver site, Dreamweaver moves the file to the location where you drop it.
Note: To move a file that Dreamweaver copies by default, hold down the Shift key (Windows) or the Command key
(Macintosh) while you drag. To copy a file that Dreamweaver moves by default, hold the Control key (Windows) or the
Option key (Macintosh) while you drag.
Page 89

USING DREAMWEAVER CS4
Updated 24 September 2009
Creating and Managing Files
Customize the file and folder details displayed in the expanded Files panel
When you view a Dreamweaver site in the expanded Files panel, information about the files and folders is displayed
in columns. For example, you can see the file type or the date a file was modified.
You can customize the columns by doing any of the following (some operations are only available for columns you
add, not default columns):
• Reorder or realign columns
• Add new columns (for a maximum of 10 columns)
• Hide columns (except the filename column)
• Designate columns to be shared with all users connected to a site
• Delete columns (custom columns only)
• Rename columns (custom columns only)
• Associate columns with a Design Note (custom columns only)
Change the order of the columns
❖ Select a column name, and then click the up or down arrow button to change the position of the selected column.
Note: You can change the order of any column except Name, which is always the first column.
83
Add, delete, or change detail columns
1 Select Site > Manage Sites.
2 Select a site, then click Edit.
3 Make sure that the Advanced tab is selected.
4 Select File View Columns from the Category list on the left.
5 Select a column and click the Plus (+) button to add a column, or the Minus (–) button to delete a column.
Note: The column is deleted immediately and without confirmation, so make certain that you want to delete the column
before clicking the Minus (–) button.
6 In the Column Name box, enter a name for your column.
7 Select a value from the Associate with Design Note menu, or type in your own.
Note: You must associate a new column with a Design Note, so that there is data to display in the Files panel.
8 Select an alignment to determine how text is aligned within the column.
9 Select or deselect Show to reveal or hide the column.
10 Select Share with All Users of This Site to share the column with all users connected to the remote site.
Sort by any detail column in the Files panel
❖ Click the heading for the column you want to sort.
Click the heading again to reverse the order (ascending or descending) by which Dreamweaver sorts the column.
Page 90

USING DREAMWEAVER CS4
Updated 24 September 2009
Creating and Managing Files
Getting and putting files to and from your server
File transfer and dependent files
If you’re working in a collaborative environment, use the Check In/Check Out system to transfer files between local
and remote sites. If you’re the only person working on the remote site, however, you can use the Get and Put
commands to transfer files without checking them in or out.
When you transfer a document between a local and remote folder using the Files panel, you have the option of
transferring the document’s dependent files. Dependent files are images, external style sheets, and other files
referenced in your document that a browser loads when it loads the document.
Note: It’s usually a good idea to download dependent files when checking out a new file, but if the latest versions of the
dependent files are already on the local disk, there’s no need to download them again. This is also true for uploading and
checking in files: no need if up-to-date copies are already at the remote site.
Library items are treated as dependent files.
Some servers report errors when putting library items. However, you can cloak these files to prevent them from being
transferred.
84
More Help topics
“Checking in and checking out files” on page 88
“Enable and disable site cloaking” on page 107
About background file transfers
You can perform other, non-server-related, activities while you’re getting or putting files. Background file transfer
works for all of the transfer protocols supported by Dreamweaver: FTP, SFTP, LAN, WebDAV, Microsoft Visual
SourceSafe, Subversion, and RDS.
Non-server-related activities include common operations like typing, editing external style sheets, generating sitewide reports, and creating new sites.
Server-related activities that Dreamweaver cannot perform during file transfers include the following:
• Put/Get/Check in/Check out files
• Undo check-out
• Create a database connection
• Bind dynamic data
• Preview live data
• Insert a web service
• Delete remote files or folders
• Preview in a browser on a testing server
• Save a file to a remote server
• Insert an image from a remote server
• Open a file from a remote server
• Auto put files upon saving
Page 91

USING DREAMWEAVER CS4
Updated 24 September 2009
Creating and Managing Files
• Drag files to the remote site
• Cut, copy, or paste files on the remote site
• Refresh Remote view
By default, the Background File Activity dialog box is open during file transfers. You can minimize the dialog box by
clicking the Minimize button in the upper right corner. Closing the dialog box during file transfers results in a
cancelation of the operation.
Get files from a remote server
Use the Get command to copy files from the remote site to your local site. You can use the Files panel or the Document
window to get files.
Dreamweaver creates a log of file activity during the transfer that you can view and save.
Note: You cannot turn background file transfer off. If you have the detail log open in the Background File Activity dialog
box, you can close that to improve performance.
Dreamweaver also records all FTP file transfer activity. If an error occurs when you are transferring a file using FTP,
the Site FTP log can help you determine the problem.
85
More Help topics
“Checking in and checking out files” on page 88
“Synchronizing files” on page 96
Get files from a remote server using the Files panel
1 In the Files panel (Window > Files), select the desired files to download.
Usually you select these files in the Remote view, but you can select the corresponding files in the Local view if you
prefer. If the Remote view is active, then Dreamweaver copies the selected files to the local site; if the Local view is
active, then Dreamweaver copies the remote versions of the selected local files to the local site.
Note: To get only those files for which the remote version is more recent than the local version, use the Synchronize
command.
2 Do one of the following to get the file:
• Click the Get button in the Files panel toolbar.
• Right-click (Windows) or Control-click (Macintosh) the file in the Files panel, then select Get from the context menu.
3 Click Yes in the Dependent Files dialog box to download dependent files; if you already have local copies of the
dependent files, click No. The default is to not download dependent files. You can set this option at Edit >
Preferences > Site.
Dreamweaver downloads the selected files, as follows:
• If you’re using the Check In/Check Out system, getting a file results in a read-only local copy of the file; the file
remains available on the remote site or testing server for other team members to check out.
• If you’re not using the Check In/Check Out system, getting a file results in a copy that has both read and write
privileges.
Note: If you’re working in a collaborative environment—that is, if others are working on the same files—you should
not disable Enable File Check In and Check Out. If other people are using the Check In/Check Out system with the
site, you should use that system as well.
Page 92

USING DREAMWEAVER CS4
Updated 24 September 2009
Creating and Managing Files
To stop the file transfer at any time, click the Cancel button in the Background File Activity dialog box.
Get files from a remote server using the Document window
1 Make sure the document is active in the Document window.
2 Do one of the following to get the file:
• Select Site > Get.
• Click the File Management icon in the Document window toolbar, then select Get from the menu.
Note: If the current file is not part of the current site in the Files panel, Dreamweaver attempts to determine which locally
defined site the current file belongs to. If the current file belongs to only one local site, Dreamweaver opens that site, then
performs the Get operation.
Display the FTP log
1 Click the Options menu in the upper right corner of the Files panel.
2 Select View > Site FTP Log.
Note: In the Expanded Files Panel, you can click the FTP Log button to display the log.
86
Put files on a remote server
You can put files from the local site to the remote site, generally without changing the file’s checked out status.
There are two common situations in which you might use the Put command instead of Check In:
• You’re not in a collaborative environment and you aren’t using the Check In/Check Out system.
• You want to put the current version of the file on the server but you’re going to keep editing it.
Note: If you put a file that didn’t previously exist on the remote site and you’re using the Check In/Check Out system,
the file is copied to the remote site and is then checked out to you so that you can continue editing.
You can use the Files panel or the Document window to put files. Dreamweaver creates a log of file activity during
the transfer that you can view and save.
Note: You cannot turn background file transfer off. If you have the detail log open in the Background File Activity
dialog box, you can close that to improve performance.
Dreamweaver also records all FTP file transfer activity. If an error occurs when you are transferring a file using FTP,
the Site FTP log can help you determine the problem.
For a tutorial on putting files on a remote server, see www.adobe.com/go/vid0163.
For a tutorial on troubleshooting publishing problems, see www.adobe.com/go/vid0164.
More Help topics
“Synchronizing files” on page 96
“About the Check In/Check Out system” on page 88
Putting files tutorial
Troubleshoot publishing problems tutorial
Put files on a remote or testing server using the Files panel
1 In the Files panel (Window > Files), select the files to upload.
Page 93

USING DREAMWEAVER CS4
Updated 24 September 2009
Creating and Managing Files
Usually you select these in the Local view, but you may select the corresponding files in the Remote view if you prefer.
Note: You can put only those files for which the local version is more recent than the remote version.
2 Do one of the following to put the file on the remote server:
• Click the Put button in the Files panel toolbar.
• Right-click (Windows) or Control-click (Macintosh) the file in the Files panel, then select Put from the context menu.
3 If the file hasn’t been saved, a dialog box appears (if you set this preference in the Site category of the Preferences
dialog box) allowing you to save the file before putting it on the remote server. Click Yes to save the file or No to
put the previously saved version on the remote server.
Note: If you do not save the file, any changes you’ve made since the last time you saved will not be put onto the remote
server. However, the file remains open, so you can still save the changes after putting the file on the server if you want.
4 Click Yes to upload dependent files along with the selected files, or click No to refrain from uploading dependent
files. The default is to not upload dependent files. You can set this option at Edit > Preferences > Site.
Note: It’s usually a good idea to upload dependent files when checking in a new file, but if the latest versions of the
dependent files are already on the remote server, there’s no need to upload them again.
To stop the file transfer at any time, click the Cancel button in the Background File Activity dialog box.
87
Put files on a remote server using the Document window
1 Make sure the document is active in the Document window.
2 Do one of the following to put the file:
• Select Site > Put.
• Click the File Management icon in the Document window toolbar, then select Put from the menu.
Note: If the current file is not part of the current site in the Files panel, Dreamweaver attempts to determine which locally
defined site the current file belongs to. If the current file belongs to only one local site, Dreamweaver opens that site, then
performs the Put operation.
Display the FTP log
1 Click the Options menu in the upper right corner of the Files panel.
2 Select View > Site FTP Log.
Note: In the Expanded Files Panel, you can click the FTP Log button to display the log.
Manage file transfers
You can view the status of file transfer operations, as well as a list of transferred files and their outcomes (transfer
successful, skipped, or failed). You can also save a log of the file activity.
Note: Dreamweaver lets you perform other non-server-related activities while you’re transferring files to or from a server.
Cancel a file transfer
❖ Click the Cancel button in the Background File Activity dialog box. If the dialog box isn’t showing, click the File
Activity button at the bottom of the Files panel.
Show the Background File Activity dialog box during transfers
❖ Click the File Activity or Log button at the bottom of the Files panel.
Page 94

USING DREAMWEAVER CS4
Updated 24 September 2009
Creating and Managing Files
Note: You cannot hide or remove the Log button. It’s a permanent part of the panel.
View details of the last file transfer
1 Click the Log button at the bottom of the Files panel to open the Background File Activity dialog box.
2 Click the Details expander arrow.
Save a log of the last file transfer
1 Click the Log button at the bottom of the Files panel to open the Background File Activity dialog box.
2 Click the Save Log button and save the information as a text file.
You can review the file activity by opening the log file in Dreamweaver or in any text editor.
Checking in and checking out files
About the Check In/Check Out system
If you’re working in a collaborative environment, you can check files in and out from local and remote servers. If you’re
the only person working on the remote server, you can use the Put and Get commands without checking files in or out.
88
Note: You can use Get and Put functionality with a testing server, but you cannot use the Check In/ Check Out system
with a testing server.
Checking out a file is the equivalent of declaring “I’m working on this file now—don’t touch it!” When a file is checked
out, the name of the person who checked out the file is displayed in the Files panel, along with a red check mark (if a
team member checked out the file) or green check mark (if you checked out the file) next to the file’s icon.
Checking in a file makes the file available for other team members to check out and edit. When you check in a file after
editing it, your local version becomes read-only and a lock symbol appears beside the file in the Files panel to prevent
you from making changes to the file.
Dreamweaver does not make checked-out files read-only on the remote server. If you transfer files with an application
other than Dreamweaver, you can overwrite checked-out files. However, in applications other than Dreamweaver, the
LCK file is visible next to the checked-out file in the file hierarchy to help prevent such accidents.
For more information on LCK files and how the Check In/Check Out system works, see TechNote 15447 on the Adobe
website at www.adobe.com/go/15447.
More Help topics
“Getting and putting files to and from your server” on page 84
Set up the Check In/Check Out system
Before you can use the Check In/Check Out system, you must associate your local site with a remote server.
1 Select Site > Manage Sites.
2 Select a site and click Edit.
3 In the Advanced tab, select Remote Info from the category list on the left.
4 Select Enable File Check In and Check Out if you are working in a team environment (or working alone but from
several different machines). Deselect this option if you want to disable file check in and check out for your website.
Page 95

USING DREAMWEAVER CS4
Updated 24 September 2009
Creating and Managing Files
This option is useful to let others know that you checked out a file for editing, or to alert yourself that you may have
left a more recent version of a file on another machine.
If your remote access option is Microsoft Visual SourceSafe, this is your only Check In/Check Out option. The
remaining options in this section apply to FTP, Local/Network, WebDAV, and RDS access methods only.
If you do not see Check In/Out options, it means that you have not set up a remote server.
5 Select the Check Out Files when Opening option if you want to automatically check out files when you double-click
to open them from the Files panel.
Using File > Open to open a file doesn’t check the file out even when this option is selected.
6 Set the remaining options:
Check Out Name The check-out name appears in the Files panel alongside any files that are checked out; this enables
team members to communicate with the right person if a file they need is checked out.
Note: If you work alone from several different machines, use a different check-out name on each machine (for example,
AmyR-HomeMac and AmyR-OfficePC) so you’ll know where the latest version of the file is if you forget to check it in.
Email Address If you enter an e-mail address, when you check out a file, your name appears in the Files panel as a link
(blue and underlined) next to that file. If a team member clicks on the link, their default e-mail program opens a new
message with the user’s e-mail address and a subject that corresponds to the file and site name.
89
More Help topics
“Set up a remote folder” on page 41
Check files into and out of a remote folder
After you set up the Check In/Check Out system, you can check in and check out files on a remote server using the
Files panel or from the Document window.
More Help topics
“Set site preferences for transferring files” on page 50
Check out files using the Files panel
1 In the Files panel (Window > Files), select files to check out from the remote server.
Note: You can select files in the Local or Remote view, not the Testing Server view.
A red check mark indicates that another team member has the file checked out and a lock symbol indicates that the
file is read-only (Windows) or locked (Macintosh).
2 Do one of the following to check out the file(s):
• Click the Check Out button in the Files panel toolbar.
• Right-click (Windows) or Control-click (Macintosh), then select Check Out from the context menu.
3 In the Dependent Files dialog box, click Yes to download dependent files along with the selected files, or click No
to refrain from downloading dependent files. The default is to not download dependent files. You can set this
option at Edit > Preferences > Site.
Note: It’s usually a good idea to download dependent files when checking out a new file, but if the latest versions of the
dependent files are already on the local disk, there’s no need to download them again.
A green check mark appears beside the local file’s icon indicating that you have checked it out.
Page 96

USING DREAMWEAVER CS4
Updated 24 September 2009
Creating and Managing Files
Important: If you check out the currently active file, the currently open version of the file is overwritten by the new
checked-out version.
Check in files using the Files panel
1 In the Files panel (Window > Files), select checked-out or new file(s).
Note: You can select files in the Local or Remote view, but not the Testing Server view.
2 Do one of the following to check in the file(s):
• Click the Check In button in the Files panel toolbar.
• Right-click (Windows) or Control-click (Macintosh), then select Check In from the context menu.
3 Click Yes to upload dependent files along with the selected files, or click No to refrain from uploading dependent
files. The default is to not upload dependent files. You can set this option at Edit > Preferences > Site.
Note: It’s usually a good idea to upload dependent files when checking in a new file, but if the latest versions of the
dependent files are already on the remote server, there’s no need to upload them again.
A lock symbol appears beside the local file’s icon indicating that the file is now read-only.
Important: If you check in the currently active file, the file may be automatically saved before it’s checked in, depending
on the preference options you’ve set.
90
Check in an open file from the Document window
1 Make sure the file you want to check in is open in the Document window.
Note: You can check in only one open file at a time.
2 Do one of the following:
• Select Site > Check In.
• Click the File Management icon in the Document window toolbar, then select Check In from the menu.
If the current file is not part of the active site in the Files panel, Dreamweaver attempts to determine which locally
defined site the current file belongs to. If the current file belongs to a site other than the one that’s active in the Files
panel, Dreamweaver opens that site, then performs the check in operation.
Important: If you check in the currently active file, the file may be automatically saved before it’s checked in, depending
on the preference options you’ve set.
Undo a file check-out
If you check out a file, then decide not to edit it (or decide to discard the changes you made), you can undo the checkout operation and the file returns to its original state.
To undo a file check-out, do one of the following:
• Open the file in the Document window, then select Site > Undo Check Out.
•
In the Files panel (Window > Files), right-click (Windows) or Control-click (Macintosh), then select Undo Check Out.
The local copy of the file becomes read-only, and any changes you’ve made to it are lost.
Page 97

USING DREAMWEAVER CS4
Updated 24 September 2009
Creating and Managing Files
Use WebDAV to check in and check out files
Dreamweaver can connect to a server that uses WebDAV (Web-based Distributed Authoring and Versioning), which
is a set of extensions to the HTTP protocol that allow users to collaboratively edit and manage files on remote web
servers. For more information, see www.webdav.org.
1 If you have not already done so, define a Dreamweaver site that specifies the local folder you use to store your
project files.
2 Select Site > Manage Sites, and then double-click your site in the list.
3 In the Site Definition dialog box, click the Advanced tab.
4 Click the Remote Info category, and then select WebDAV from the Access menu.
5 Specify how Dreamweaver should connect to your WebDAV server.
6 Select the Enable File Check In and Check Out option and enter the following information:
• In the Check Out Name box, enter a name identifying you to other team members.
• In the Email Address box, enter your e-mail address.
The name and e-mail addresses are used to identify ownership on the WebDAV server and appear in the Files panel
for contact purposes.
7 Click OK.
Dreamweaver configures the site for WebDAV access. When you use the Check In or Check Out command on any
site file, the file is transferred using WebDAV.
91
Note: WebDAV may be unable to properly check out any files with dynamic content like PHP tags or SSIs because the
HTTP GET renders these as they are checked out.
Use Subversion (SVN) to get and check in files
Dreamweaver can connect to a server that uses Subversion (SVN), a versioning control system that lets users
collaboratively edit and manage files on remote web servers. Dreamweaver is not a full SVN client, but does let users
get the latest versions of files, make changes, and commit the files.
Important: Dreamweaver CS4 uses the Subversion 1.4.5 client library. Later versions of the Subversion client library are
not backward-compatible. Be aware, if you update a third-party client application (for example, TortoiseSVN) to work
with Subversion 1.5 or later, the updated Subversion application will update local Subversion meta data, and
Dreamweaver will no longer be able to communicate with Subversion. This issue is not affected by updates to the
Subversion server as those updates are backward-compatible. For more information on this issue, see
www.adobe.com/go/dw_svn_en.
Adobe recommends that you use a third-party file comparison tool as you work with SVN version-controlled files.
When you compare files for differences, you can learn exactly what kinds of changes other users made to the files. For
more information on file comparison tools, use a web search engine such as Google Search to search for “file
comparison” or “diff” tools. Dreamweaver works with most third-party tools.
For a video overview of working with SVN and Dreamweaver, see www.adobe.com/go/lrvid4049_dw.
Set up an SVN connection
Before you use Subversion (SVN) as a version control system with Dreamweaver, you must set up a connection to an
SVN server. You set up a connection to an SVN server in the Version Control category of the Site Definition dialog box.
Page 98

USING DREAMWEAVER CS4
Updated 24 September 2009
Creating and Managing Files
The SVN server is a repository of files from which you and other users can get and commit files. It is different from
the remote server you typically use with Dreamweaver. When using SVN, the remote server remains the “live” server
for your web pages, and the SVN server exists to hold the repository of files over which you want to maintain version
control. The typical workflow is to get and commit files back and forth between the SVN server, and then publish them
to your remote server from Dreamweaver. The remote server setup is completely separate from the SVN set up.
You must have access to an SVN server and an SVN repository before you begin this set up. For more information
about SVN, see the Subversion website at http://subversion.tigris.org/.
To set up the SVN connection, follow these steps:
1 Choose Sites > Manage Sites, select the site you want to set up version control for, and click the Edit button.
Note: If you haven’t already set up local and remote folders for a Dreamweaver site, you’ll at least need to set up a
local site before proceeding. (The remote site is not required at this stage, but you will eventually need to set it up before
publishing your files to the Web.) For more information, see “Setting up a Dreamweaver site” on page 38.
2 Make sure the Advanced tab of the Site Definition dialog box is selected.
3 Select the Version Control category in the Category column of the Site Definition dialog box.
4 Select Subversion from the Access pop-up menu.
5 Set access options as follows:
• Select a protocol from the Protocol pop-up menu. The available protocols are HTTP, HTTPS, SVN, and
SVN+SSH.
Note: Using the SVN+SSH protocol requires special configuration. For more information, see
www.adobe.com/go/learn_dw_svn_ssh_en.
92
• Enter the address for the SVN server in the Server address text box (typically in the form of
servername.domain.com).
• Enter the path to your repository on the SVN server in the Repository path text box (typically something like
/svn/your_root_directory. It is up to the server administrator to name the root folder for the SVN repository.)
• (Optional) If you want to use a server port other than the default server port, select Non Default and enter the
port number in the text box.
• Enter your SVN server user name and password.
6 Click Test to test your connection, or click OK to close the dialog box. Then click Done to close the Manage Sites
dialog box.
Once the connection with the server established, your SVN repository is available for viewing in the Files panel. To
view it, you can select Repository View from the View pop-up menu, or click the Repository Files button in the
expanded Files panel.
More Help topics
“Set up and edit a local root folder” on page 40
“Set up a remote folder” on page 41
“Using the Files panel” on page 75
Mount folders from the SVN repository
The process of mounting folders from the SVN repository to your local machine creates an exact mapping of the folder
structure in the SVN repository. When you mount a folder from the SVN repository, Dreamweaver gets all of the files
that are in that folder, as well as any subfolders.
Page 99

USING DREAMWEAVER CS4
Updated 24 September 2009
Creating and Managing Files
Note: When getting files for the first time from the repository, you should work with a local directory that is empty, or a
local directory that does not contain files with the same names as files in the repository. Dreamweaver will not mount
repository files to the local drive upon first try if the local drive contains files whose names match files in the remote
repository.
1 Make sure that you’ve successfully set up an SVN connection.
2 Display the SVN repository files by selecting Repository View from the View pop-up menu in the Files panel, or by
clicking the Repository Files button in the expanded Files panel.
3 Right-click (Windows) or Control-click (Macintosh) the folder from the SVN repository that you want to mount,
and select Mount Folders.
Get the latest versions of files
When you get the latest version of a file from the SVN repository, Dreamweaver merges the contents of that file with
the contents of its corresponding local copy. (In other words, if someone else has updated the file since you last
committed it, those updates are merged into the local version of the file on your computer.) If the file does not yet exist
on the local hard drive, Dreamweaver simply gets the file.
Note: When getting files for the first time from the repository, you should work with a local directory that is empty, or a
local directory that does not contain files with the same names as files in the repository. Dreamweaver will not mount
repository files to the local drive upon first try if the local drive contains files whose names match files in the remote
repository.
93
1 Make sure that you’ve successfully set up an SVN connection.
2 Do one of the following:
• Display the local version of your SVN files in the Files panel by selecting Local view from the View pop-up menu.
(If you are working in the expanded Files panel, the Local view is automatically displayed.) Then right-click
(Windows) or Control-click (Macintosh) the file or folder you’re interested in and select Version Control > Get
Latest Versions.
• Display the SVN repository files by selecting Repository View from the View pop-up menu in the Files panel,
or by clicking the Repository Files button in the expanded Files panel. Then right-click (Windows) or Controlclick (Macintosh) the file or folder you’re interested in and select Get Latest Versions.
Note: You can also either right-click a file and choose Check Out from the context menu, or select the file and click the
Check Out button to get the latest version. Because SVN does not support a check-out workflow, however, this action does
not actually check out the file in the traditional sense.
Commit files
1 Make sure that you’ve successfully set up an SVN connection.
2 Do one of the following:
• Display the local version of your SVN files in the Files panel by selecting Local view from the View pop-up menu.
(If you are working in the expanded Files panel, the Local view is automatically displayed.) Then select the file
you want to commit and click the Check In button.
• Display the SVN repository files by selecting Repository View from the View pop-up menu in the Files panel,
or by clicking the Repository Files button in the expanded Files panel. Then right-click (Windows) or Controlclick (Macintosh) the file you want to commit and select Check In.
3 Review the actions in the Commit dialog box, make changes if necessary, and click OK.
You can change actions by selecting the file whose action you want to change, and clicking the buttons at the bottom
of the Commit dialog box. Two choices are available: commit and ignore.
Page 100

USING DREAMWEAVER CS4
Updated 24 September 2009
Creating and Managing Files
Note: A green check mark on a file in the Files panel denotes a changed file that has not yet been committed to the
repository.
Update status of files or folders in the repository
You can update the SVN status of a single file or folder. The update does not refresh the entire display.
1 Make sure that you’ve successfully set up an SVN connection.
2 Display the SVN repository files by selecting Repository View from the View pop-up menu in the Files panel, or by
clicking the Repository Files button in the expanded Files panel.
3 Right-click (Windows) or Control-click (Macintosh) any folder or file in the repository and select Update Status.
Update status of local file or folders
You can update the SVN status of a single file or folder. The update does not refresh the entire display.
1 Make sure that you’ve successfully set up an SVN connection.
2 Display the local version of your SVN files in the Files panel by selecting Local view from the View pop-up menu.
(If you are working in the expanded Files panel, the Local view is automatically displayed.)
3 Right-click (Windows) or Control-click (Macintosh) any folder or file in the Files panel and select Update Status.
94
View revisions for a file
1 Make sure that you’ve successfully set up an SVN connection.
2 Do one of the following:
• Display the local version of your SVN files in the Files panel by selecting Local view from the View pop-up menu.
(If you are working in the expanded Files panel, the Local view is automatically displayed.) Then right-click
(Windows) or Control-click (Macintosh) the file you want to see revisions for and select Version Control >
Show Revisions.
• Display the SVN repository files by selecting Repository View from the View pop-up menu in the Files panel,
or by clicking the Repository Files button in the expanded Files panel. Then right-click (Windows) or Controlclick (Macintosh) the file you want to see revisions for and select Show Revisions.
3 In the Revision History dialog box, select the revision or revisions you’re interested in and do one of the following:
• Click Compare to Local to compare the selected revision with the local version of the file.
Note: You must install a third-party file comparison tool before you can compare files. For more information on
file comparison tools, use a web search engine such as Google Search to search for “file comparison” or “diff” tools.
Dreamweaver works with most third-party tools.
• Click Compare to compare two selected revisions. Control-click to select two revisions simultaneously.
• Click View to view the selected revision. This action does not overwrite the current local copy of the same file.
You can save the selected revision to your hard drive just as you would save any other file.
• Click Promote to make the selected revision the most current revision in the repository.
Lock and unlock files
Locking a file in the SVN repository lets other users know that you are working on a file. Other users can still edit the
file locally, but will not be able to commit the file until you’ve unlocked it. When you lock a file in the repository, you’ll
see an open-lock icon on the file. Other users see a completely locked icon.
1 Make sure that you’ve successfully set up an SVN connection.
 Loading...