

Page 1

Adept DeskTop 4.3 Online User Guide
June 2007
Adept DeskTop Online User Guide
Welcome to the Adept DeskTop 4.3 Online User Guide. To help get you started, use links below to
selected topics.
What would you like to do?
Connect to a controller
Learn about the Using Adept DeskTop Interface
Learn about Adept DeskTop Layouts
Learn about Access Levels
Find information on the following:
• Task Manager Control
• Program Manager Control
• Robot Control
• Tool Transformation Control
• Digital I/O Control
• Switches and Parameters Control
• System Information Control
• Variable Manager Control
• Code Library Control
• Frame Manager Control
• Monitor Terminal Control
• Watch Variable Control
• Jog Pendant Control
• Keyword Browser Control
• Operator Control
Look for additional help on the Adept Website
Page 2

Installing Adept DeskTop
The following procedures describe pre-installation steps as well as the installation procedures.
The Adept DeskTop software for the PC is distributed on CD-ROM. The media contains installation
programs to properly install the software on the PC. The following software will be installed:
• Microsoft .NET Framework 2.0
•Adept DeskTop
• Help Files
Before Installing Adept DeskTop Software
Before you install Adept DeskTop you must complete the following steps:
1. Install the Adept controller.
2. Uninstall any previous Adept DeskTop versions installed on your computer before installing the
new version.
Installing Adept DeskTop Software
To install Adept DeskTop:
1. Insert the CD-ROM into the CD-ROM drive of your PC. If Autoplay is enabled, the Adept DeskTop
CD-ROM menu is displayed. If Autoplay is disabled, you will need to manually start the CD-ROM.
2. Click Read Important Information. Information about the CD-ROM, the Adept online
documentation, and any last-minute release notes is displayed.
3. After reviewing the information, click the 'Close' icon in the upper-right corner of the information
window to close it.
4. Follow the instructions on screen.
5. Do not change the default destination folder to which Adept DeskTop will be installed.
After installation, Adept DeskTop can be started from the Start menu bar in Windows.
Adept DeskTop 4.3 - Online Help 2
Page 3

System Requirements
To run and use Adept DeskTop Software, the following hardware and software are required.
PC Requirements
Hardware
• Processor: Minimum: P4 / 1 GHz or higher
• Disk Space: 500MB recommended minimum
• Memory: Minimum: 256 MB RAM. Your operating system may require more.
• Monitor: SVGA, minimum resolution 800x600
• Ethernet card and networking hardware required for Ethernet connection.
• Serial-interface cable required for serial connection.
Software
• Operating System (OS): Windows XP (SP1 or SP2) or Windows 2000 (SP3 or SP4), with
latest critical updates for the version of Windows that you are running.
• Microsoft .NET Framework version 2.0 (included in the Adept DeskTop installer)
• Microsoft Internet Explorer version 5.01 or later. Necessary for viewing Online help.
Controller Requirements
• Adept SmartController or AIB (amp in base) controller
• V+: version 16.2D3 or higher
• MicroV+: 2.1A8 for Adept Cobra i600/800
Network Requirements
A fixed IP address is required for both the PC and the Controller. Typically, IP addresses are allocated by
your IT department.
Adept DeskTop 4.3 - Online Help 3
Page 4

Configuring Ethernet Communications
There are many ways to configure the Ethernet communications for your Adept DeskTop system. You
can set up a basic Ethernet installation between one PC and one Adept controller. Or you can set up
more complex systems involving multiple PCs and controllers.
For complete information on using Ethernet in your Adept system refer to the online documentation in
the Adept Document Library on the Adept Website at http://www.adept.com/main/KE/DATA/
adept_title_index.htm
Once in the Adept Document Library, go to Software Titles/PC Software and select AdeptWindows. Open
the Installation topic to view numerous subtopics on installing and configuring Ethernet and NFS
servers.
In addition, refer to the Procedures, FAQs, & Troubleshooting section under Quick Links, for topics that
include:
• Ethernet Troubleshooting Guide
• Methods for mounting an NFS Drive
• Using NFS Server with Windows
• Using Omni-NFS Server with Windows XP Service Pack 2 (SP2)
Adept DeskTop 4.3 - Online Help 4
Page 5

Getting Started with Adept DeskTop
To access the full functionality of Adept DeskTop, you will need to connect to a Controller. For example,
you must connect to a controller to create or edit programs.See Connecting to a Controller.
Before Starting an Adept DeskTop Session
• If you are currently running TFTP, you must stop the session. TFTP is integrated in Adept
DeskTop and running TFTP separately will interfere with some functions, such as the File
Manager utility.
• Verify if you will need an Access Level password. See the Access Levels
section.
Starting an Adept DeskTop Session
To start Adept DeskTop:
6. Open Adept DeskTop. From Windows select Start > Programs > Adept Technology> Adept
DeskTop 4.3.
7. Typically, you will have to log in to an Access Level with a password. See the Access Levels
section.
8. Connect to a controller. This is necessary to access the full functionality of Adept DeskTop. See
Connecting to a Controller
9. If needed, configure personal preferences in the Options form. See Setting Adept DeskTop
Options.
10.See Using Adept DeskTop Interface
.
for information on the Adept DeskTop environment.
Related Topics
Using Adept DeskTop Interface
Opening and Displaying Control Windows
Adept DeskTop Menus
Adept DeskTop 4.3 - Online Help 5
Page 6
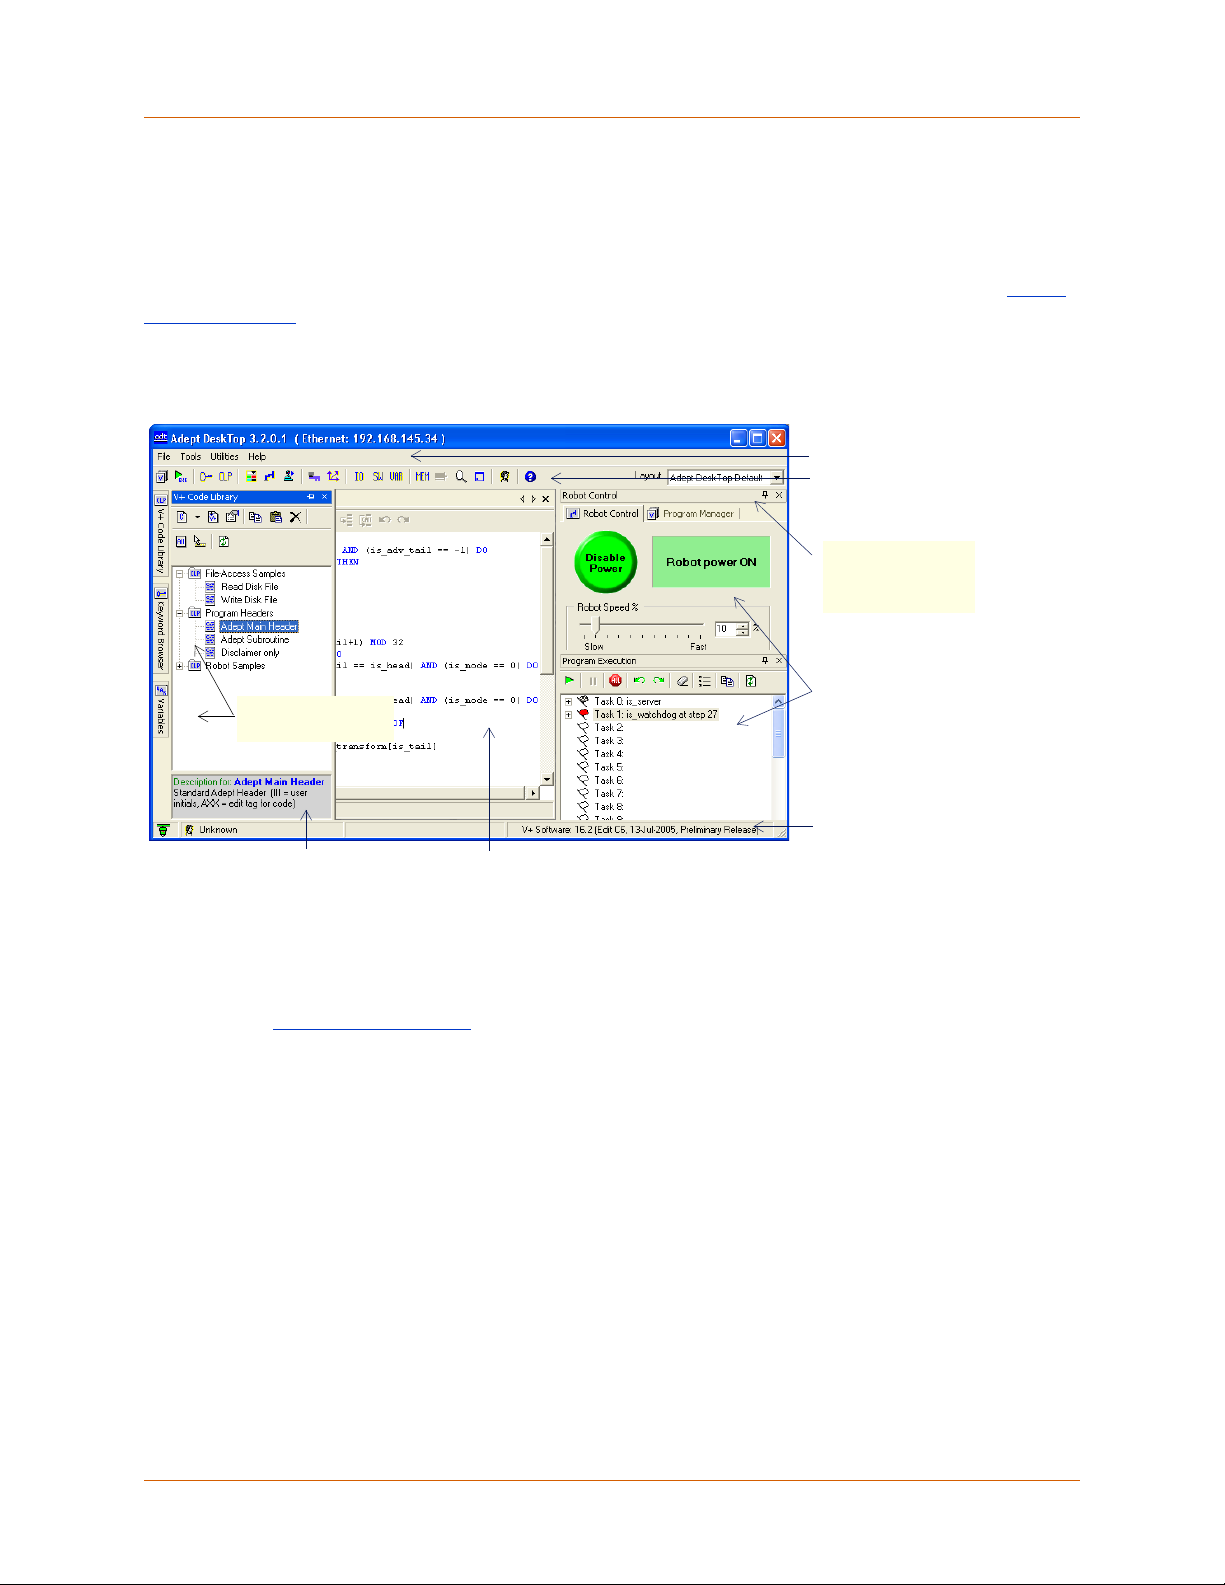
Using Adept DeskTop Interface
The Adept DeskTop interface is based on the Windows Visual Studio development interface and Window
standards.
The appearance of the Adept DeskTop interface can be modified using the multiple document interface
(MDI) functionality. You can modify and save the configuration of the desktop as 'layouts'. See Adept
DeskTop Layouts.
This section illustrates and explains different parts of the Adept DeskTop interface, including: Menus,
Toolbar, Status bar, Program Editor window, and Control windows.
Menu
Toolb a r
Toggle 'pushpin'
icon to autohide a
docked window
'Hidden' Control
Windows
Program EditorKeyword description
Control Windows
Status bar
Figure 1 Adept DeskTop - Docked Windows
Menus
The following drop-down menus are available in the menu bar: File, View, Utilities, Tools, Windows, and
Help. See the Adept DeskTop Menus topic for more information on these menus.
Toolbar
The toolbar appears directly under the menu bar. Icons in the toolbar provide quick access to Adept
DeskTop controls. Hover the cursor over an icon to see the name.
Status Bar
The Status Bar displays the information on the following:
• Access Level (on bottom left)
• Controller OS version
• IP Address
• Connection State (icon at bottom right)
Adept DeskTop 4.3 - Online Help 6
Page 7
Control Windows
A Control, sometimes called a Tool, is a module that provides specific functionalities to Adept DeskTop.
• Controls interfaces can be docked almost anywhere in the interface as shown in Figure 1. For
additional help on docking or displaying windows, see Opening and Displaying Control
Windows
• Most control windows provide a toolbar, for executing processes and tasks to the control.
• Other interface elements that can be found in control windows are message boxes, displays,
status bars, and context menus.
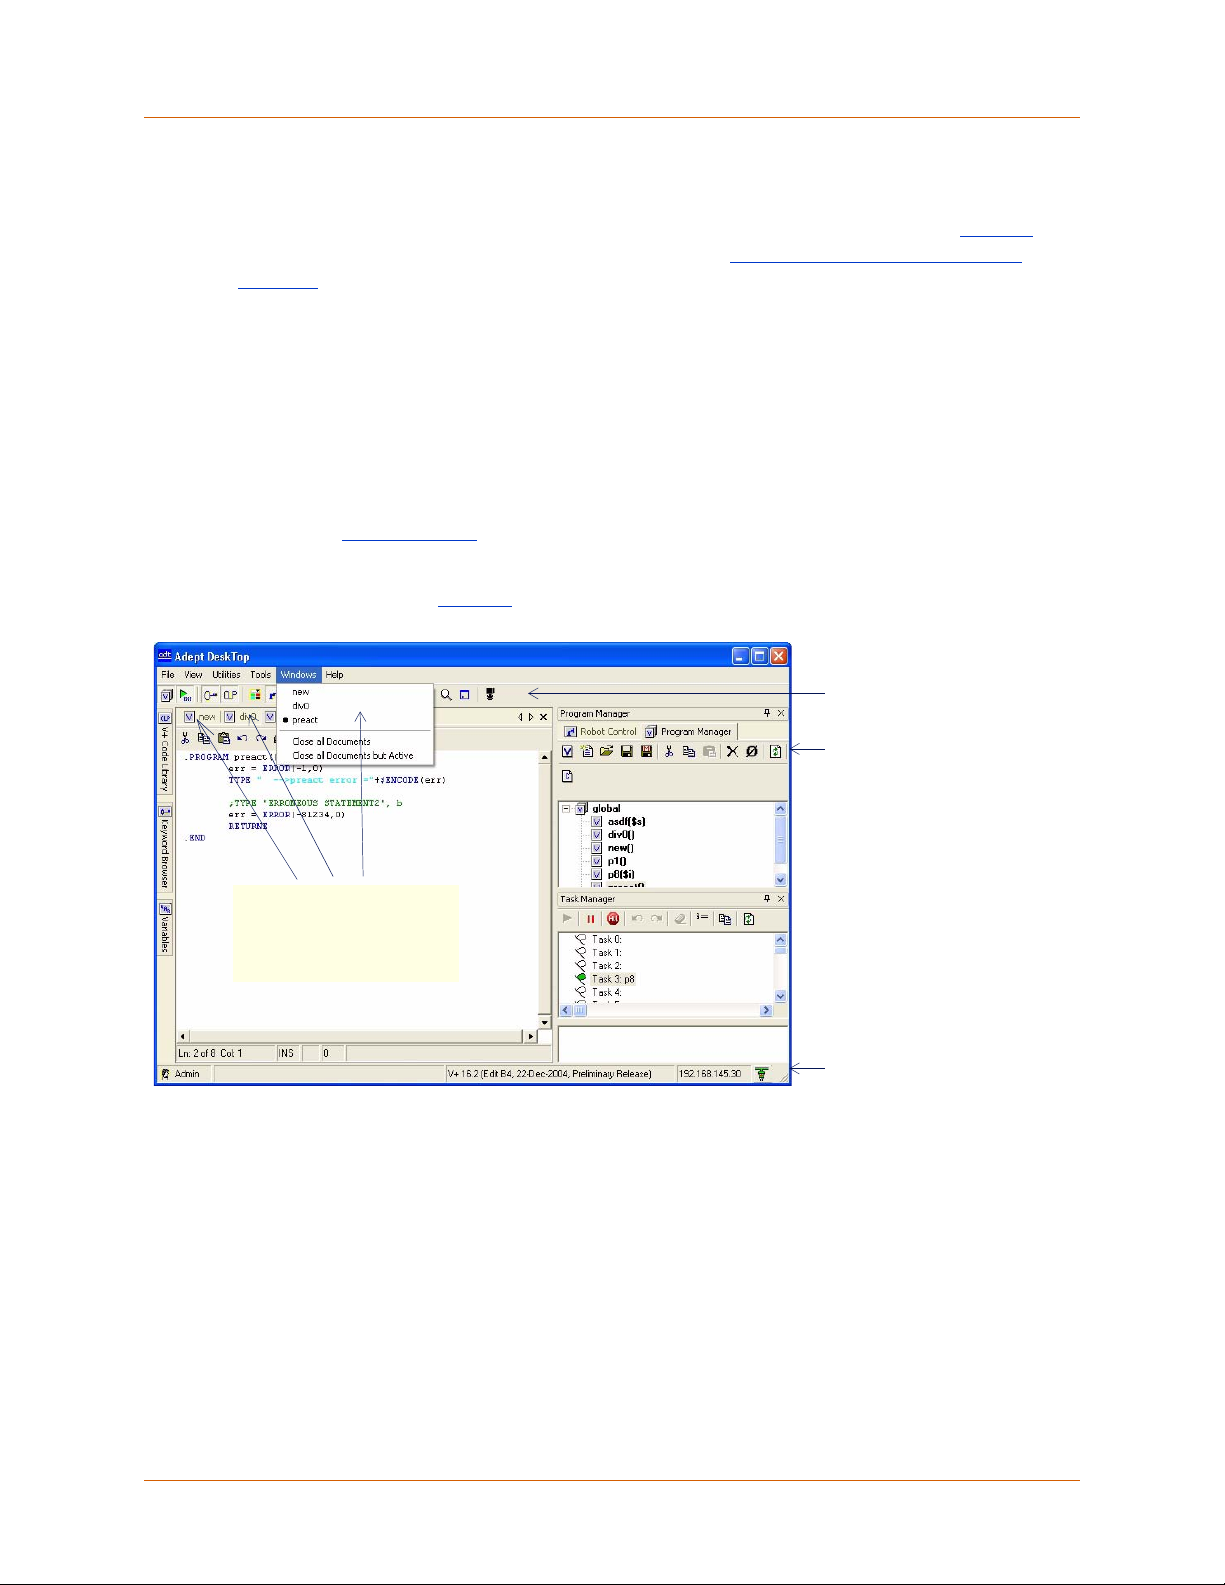
Program Editor Window
The Program Editor is an online, interactive editor for V+ and MicroV+ programs. The Program Editor
performs syntax checking and formatting while you are programming. It also provides debugging
functionality. See the Program Editor topic for more details.
The Program Editor cannot be moved or docked in the interface. However you can open multiple pages
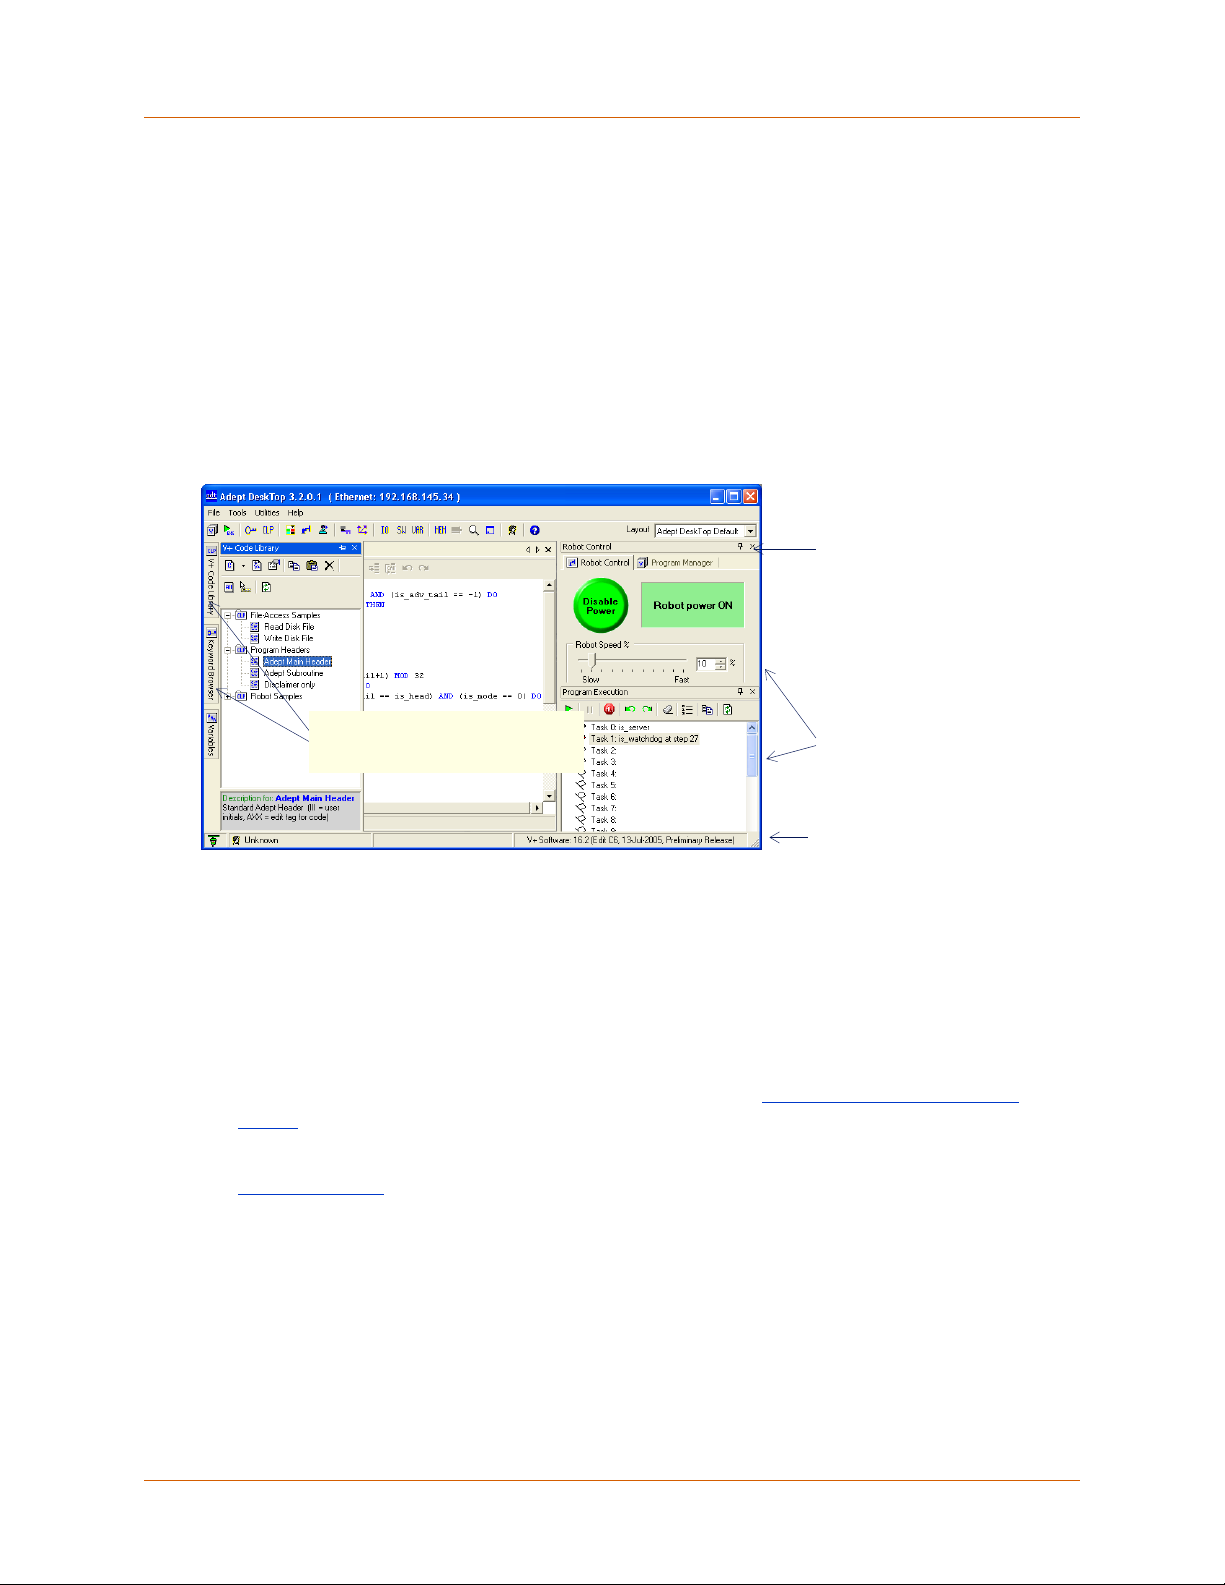
(program windows, as shown in Figure 2
.)
Adept DeskTop
toolbar
Control window
toolbar
Various program windows
are currently open in the
Program Editor
Connection status
Figure 2 Multiple Program Editor Windows Displaying Various Programs
Adept DeskTop 4.3 - Online Help 7
Page 8

Opening and Displaying Control Windows
Controls can be opened from the Adept DeskTop toolbar. The positions and state of control widows can
be saved: See Adept DeskTop Layouts.
Control windows can be placed in several different positions and configurations relative to the main
window of the Adept DeskTop interface:
Docked Windows: A dockable window can be connected to the border of the primary interface
window to create a docked window.
• To dock a window, drag the title bar of the window to an edge of the main interface window.
• To undock a window, drag the title bar of the window away from away from the edges of the
main interface.
Tabbed Window: Windows can dragged on top of each other and combined to form a single tabbed
window. There is no limit to the number of tabbed windows the user can put on top of each other.
However, it may make it difficult to see the complete description of the tab if there are too many.
Floating Window: Any docked window can be dragged off to become a separate, floating window.
You can drag and add other controls window to a floating window.
Auto Hide Mode: Windows in auto-hide mode are automatically hidden when not in use. To auto-hide
a window, click the pushpin icon at top right of the window (See Figure 1
identified by a tab.
• To display a hidden window, hover above the tab that identifies the window
• To remove the auto-hide mode, hover over the tab to display the window and click the
pushpin icon.
• You cannot auto-hide a floating window.
.) The hidden window is visibly
Related Topics
Adept DeskTop Layouts
Adept DeskTop Menus
Adept DeskTop 4.3 - Online Help 8
Page 9
Adept DeskTop Menus
The following section gives an overview of the Adept DeskTop menus. Depending on your system,
setup, and user licenses, the menus in your interface may differ from the descriptions and images
below.
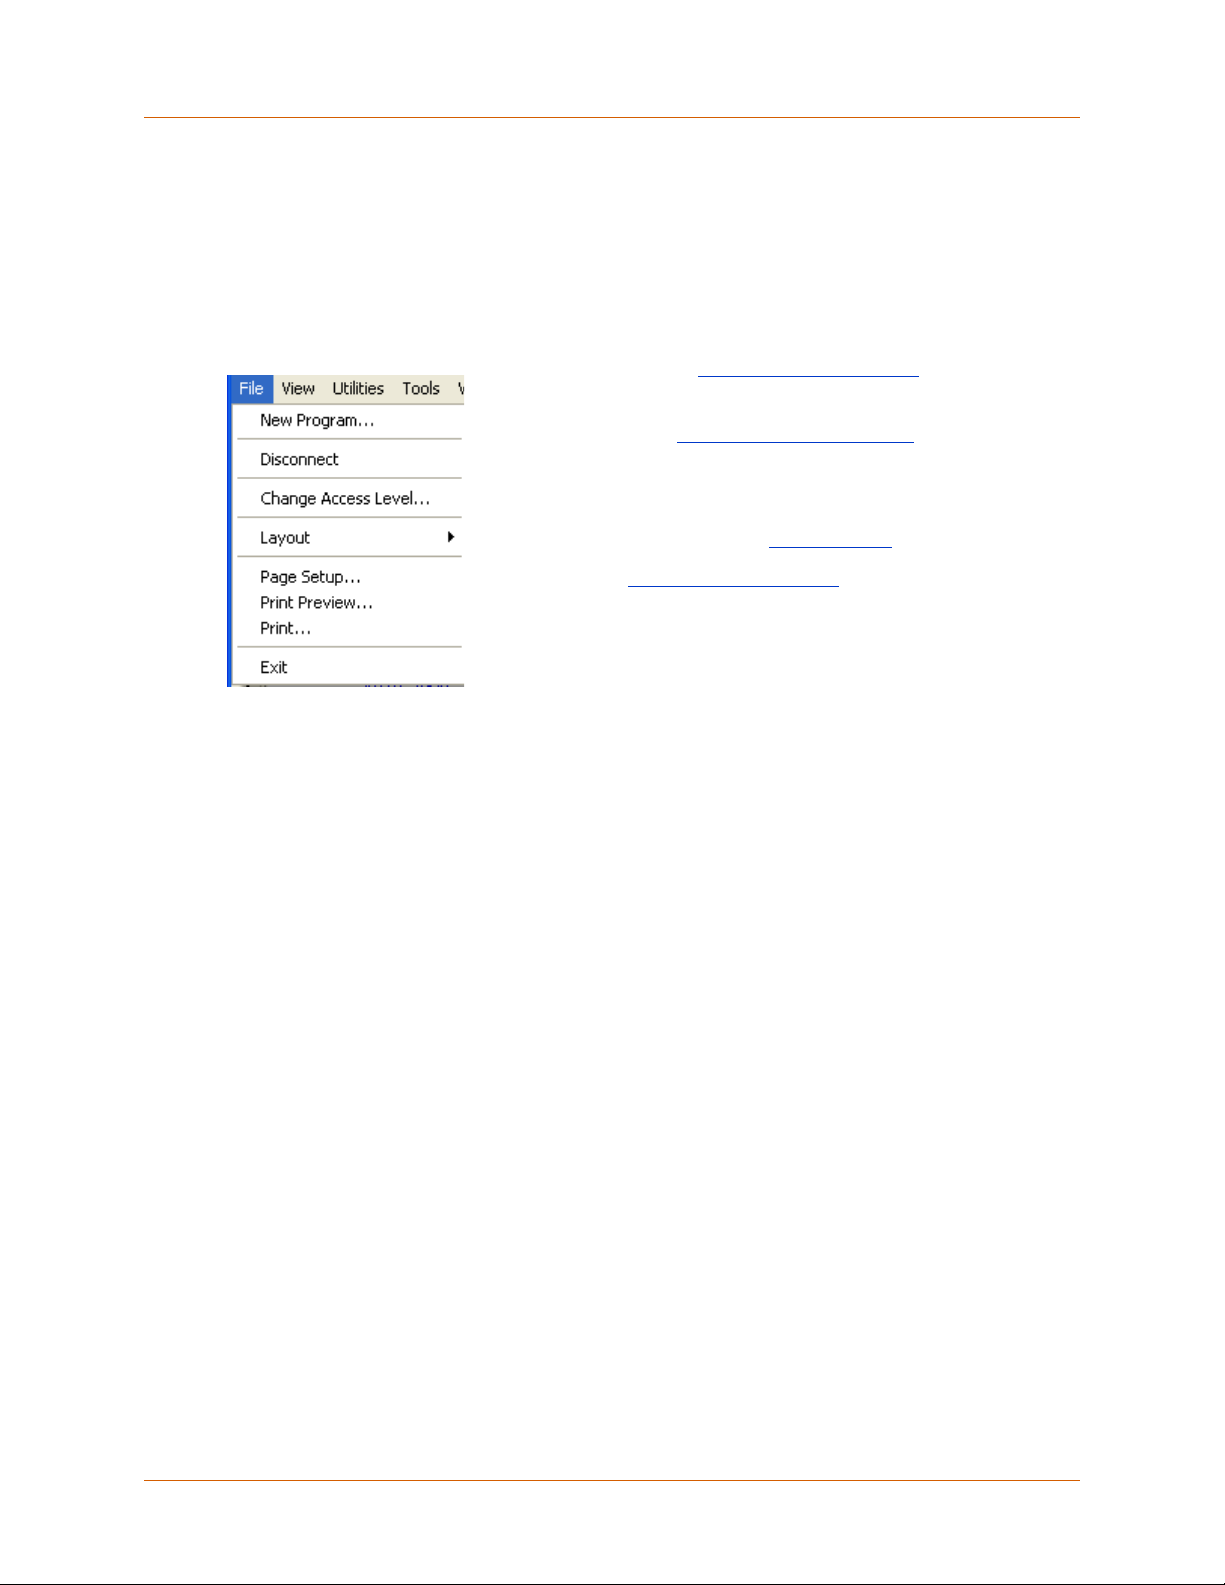
File Menu
New Program: See Creating a New Program.
Connect: Establishes communication between DeskTop and
the controller. See Connecting to a Controller
Disconnect: Halts communications between Adept DeskTop
the controller.
.
Change Access Level: See Access Levels
Layout: See Adept DeskTop Layouts
Page Setup..., Print Preview..., Print...: Provides options
for printing documents (programs) that are open in the
Program Editor.
Exit: Closes Adept DeskTop.
.
.
Adept DeskTop 4.3 - Online Help 9
Page 10
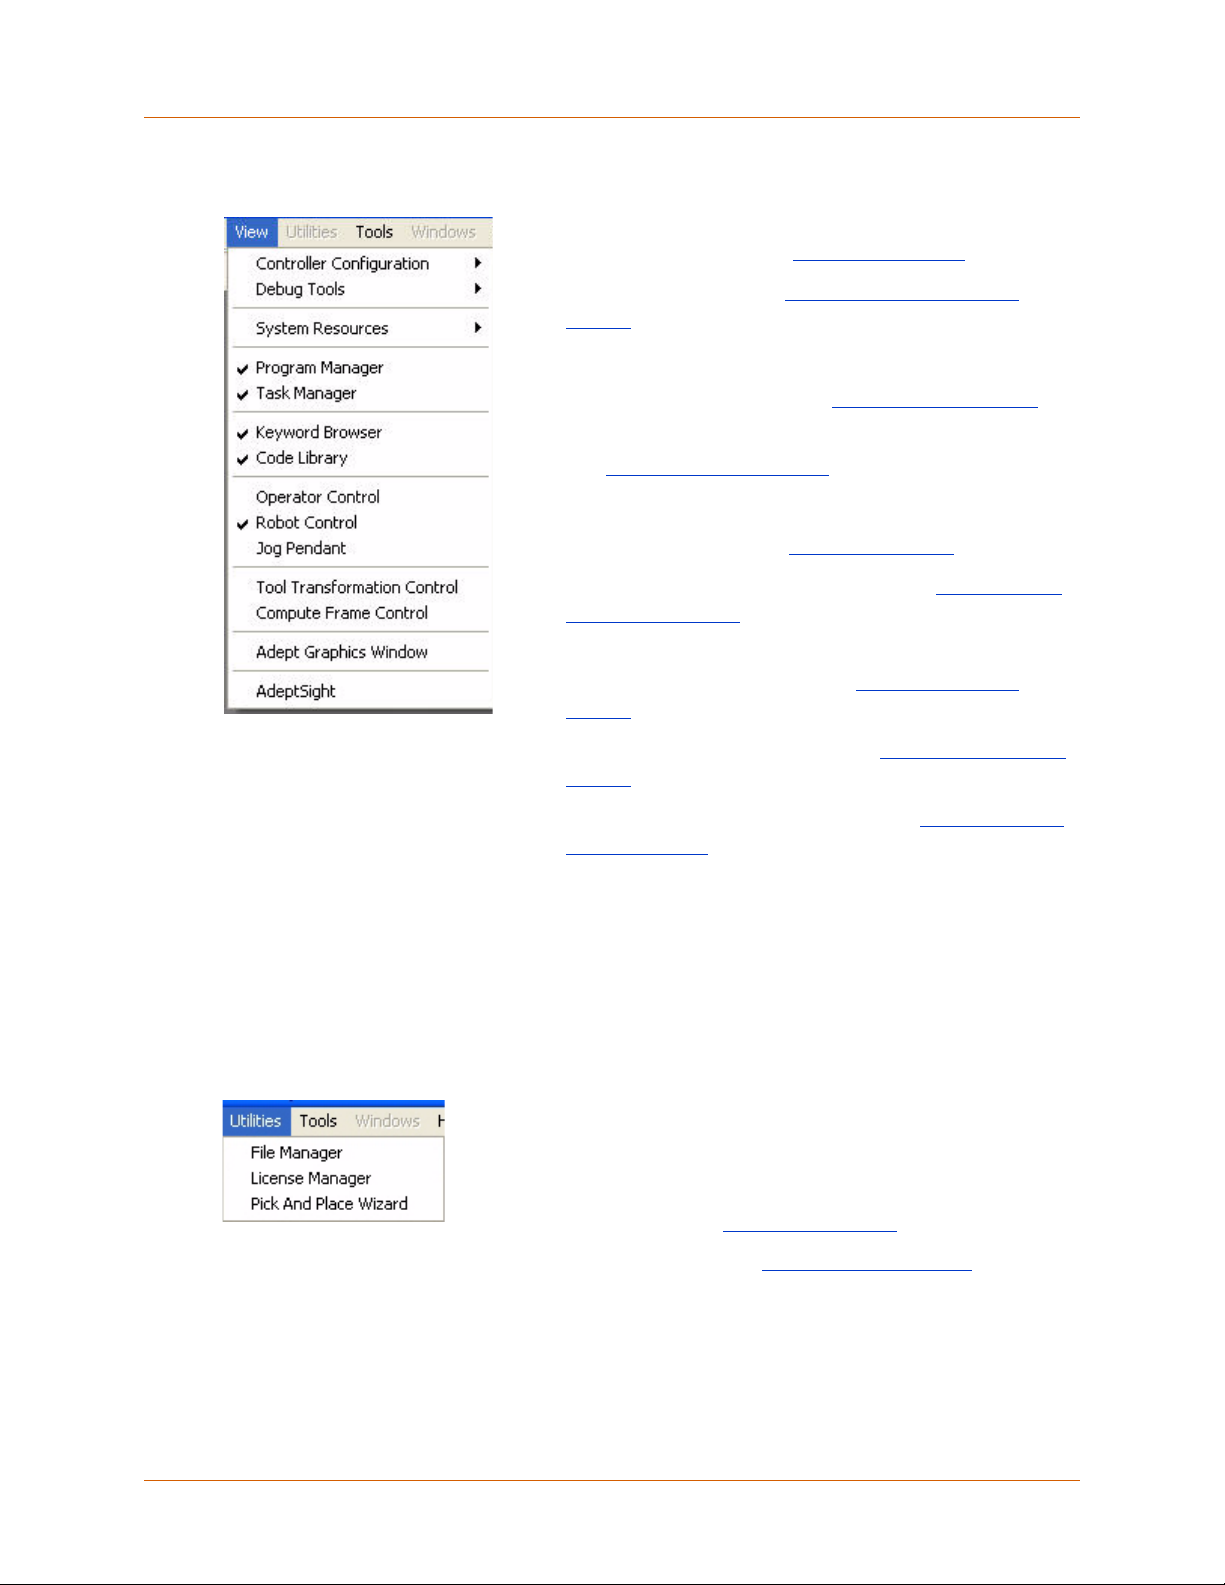
View Menu
Controller Configuration:
• V+ Utilities: Opens the V+ Utilities Control
• Auto-Start: Opens the Switches and Parameters
Control.
Debug Tools:
• Watch Variable: Opens the Watch Variable Control
• Monitor Terminal: Opens a Monitor Terminal window.
See Monitor Terminal Control.
System Resources:
• Digital I/O: Opens the Digital I/O Control
• Switches and Parameters: Opens the Switches and
Parameters Control to the Auto Start switch. MicroV+
systems only.
• Variable Manager: Opens the Variable Manager
Control.
• System Information: Opens the System Information
Control.
• Adept Graphics Window: Opens the Adept Graphics
Window Control.
.
.
.
Utilities Menu
The remaining selections can be toggled on or off the
displaying of Adept DeskTop controls. See related sections on
controls.
For AdeptSight, see the AdeptSight online help.
The utilities available from this menu depend on the type
of system and the active licenses that are installed on the
system. The following are usually available to all systems
and users.
File Manager: Opens the File Manager Utility
License Manager: Opens the License Manager Utility
Pick and Place Wizard: Opens the Pick and Place
Wizard.
.
.
Adept DeskTop 4.3 - Online Help 10
Page 11
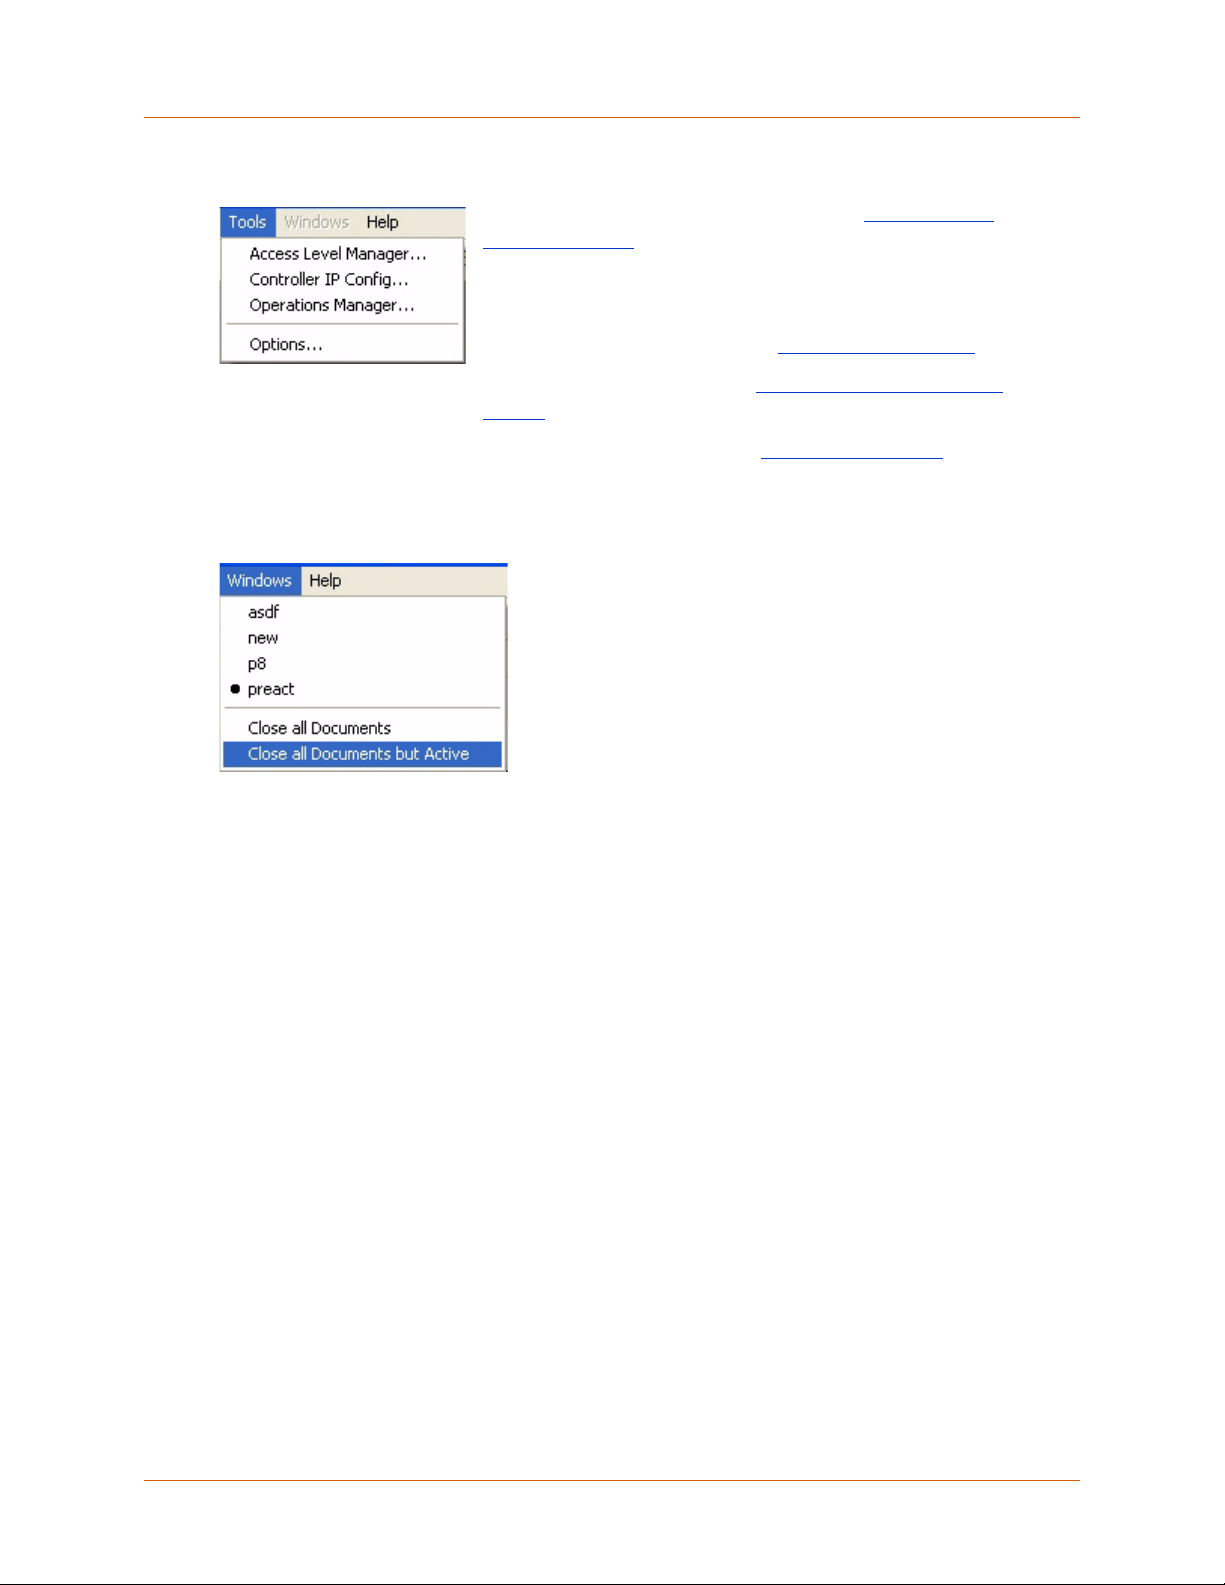
Tools Menu
Options...: Opens the Options form. See Setting Adept
DeskTop Options.
The following may be available depending on the Access
Level of the user.
Windows Menu
Access Level Manager...: See Access Level Manager
Controller IP Config...: See Controller IP Configuration
Wizard.
Operations Manager...: See Operations Manager
Shows list of all windows currently open in the
Program Editor and provides options for closing
these windows.
A dot indicates the topmost (active) window in the
Program Editor.
.
.
Adept DeskTop 4.3 - Online Help 11
Page 12
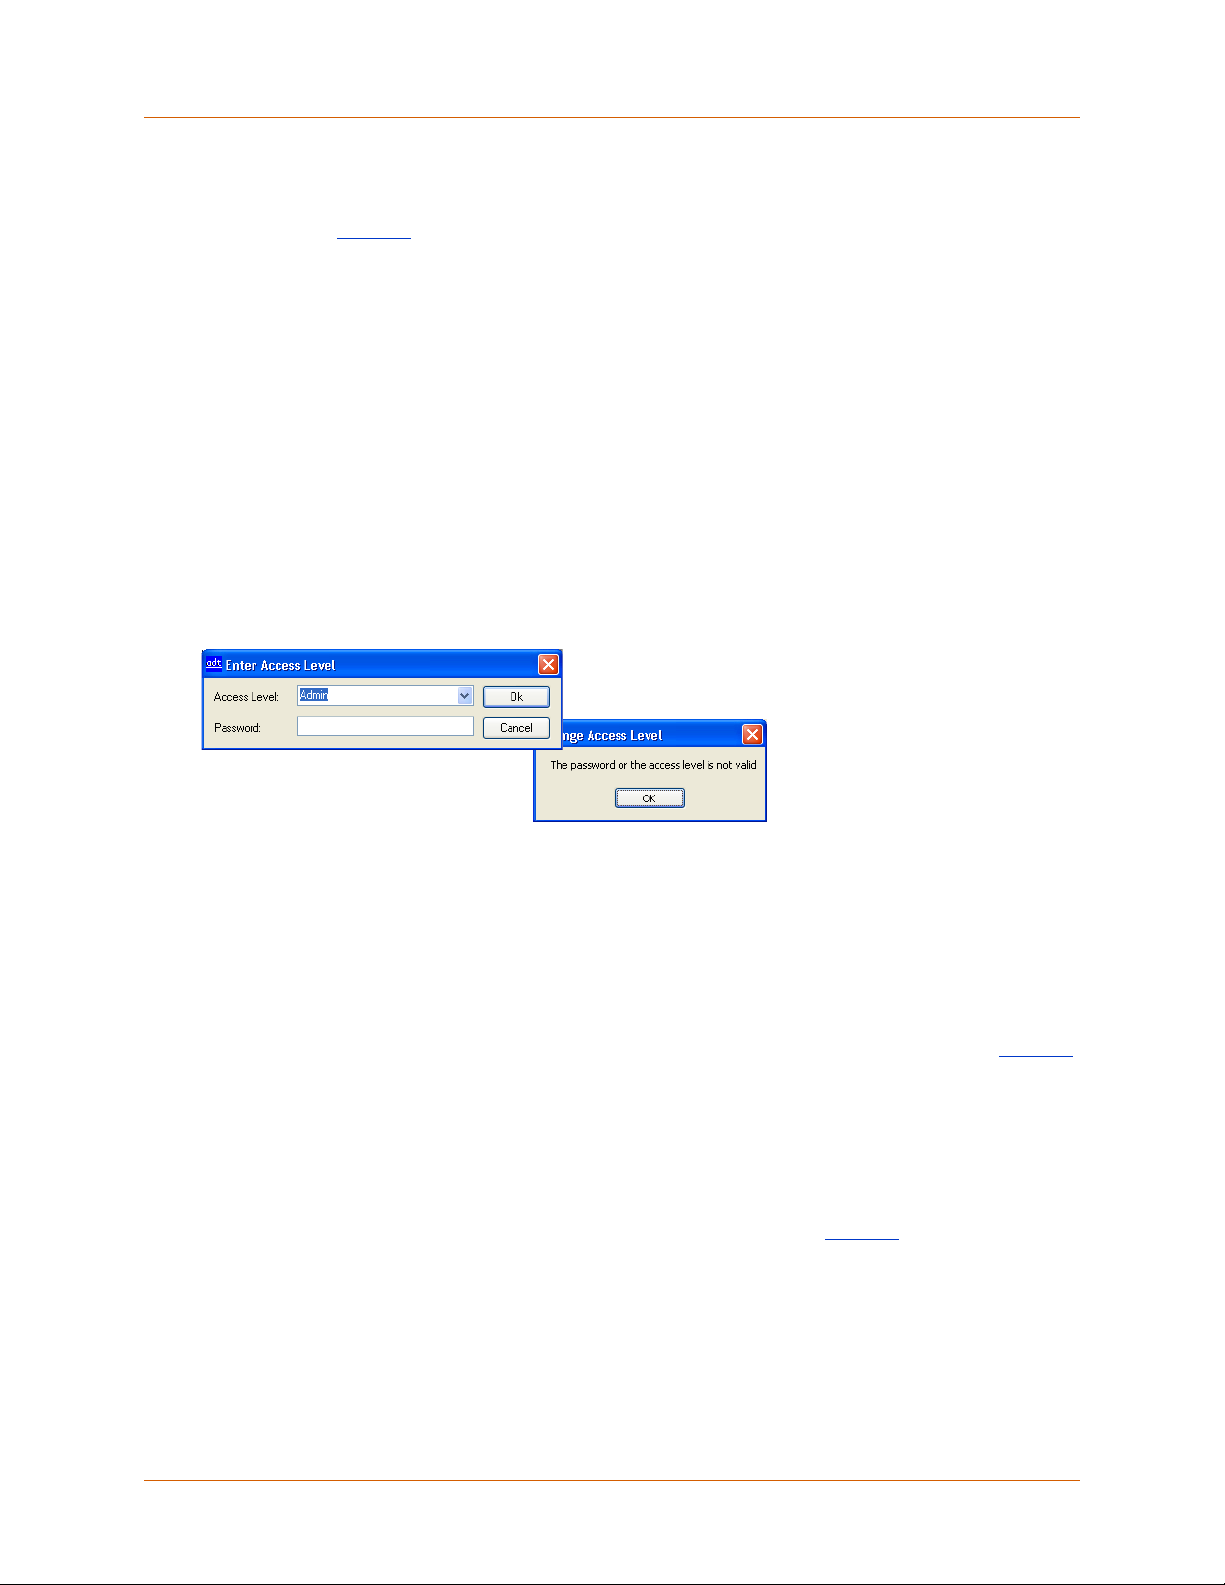
Access Levels
When you first open an Adept DeskTop session, you are prompted for a Access Level (user name) and
password as show in Figure 6.
What Are Access Levels?
An Access Level is a set of parameters that define user access to Adept DeskTop controls, utilities and
functionality. An Access Level includes a name, a password, and permissions. Permissions for controls
and utilities can be set as Full, Read-Only, or Hidden.
Only a system administrator can change and create passwords, and create and modify Access Levels. A
system administrator logs in at the Level 1 access level.
• The Level1 access level cannot be deleted.
• It is strongly recommended that on the first Adept DeskTop session, the system
administrator create a password through the Access Level Manager.
• Once additional levels have been set by the Administrator, subsequent Adept DeskTop
sessions will display the Access Level of the user of the previous Adept DeskTop session.
Figure 6 Enter Access Level and Password
Entering an Access Level
The Enter Level Access form allows you to enter an Access Level, with a valid name and password.
Access Level
Enter a valid Access level, or select an existing access level from the dropdown list.
• If an incorrect or non-existent Access Level is entered, the error message shown in Figure 6
appears.
Password
Passwords can only be created and assigned by a top-level administrator (Level 1 access level).
• Passwords are encrypted.
• If an incorrect password is entered, the error message shown in Figure 6
• If you have lost or forgotten your password you must contact the administrator of your Adept
DeskTop software for a new password.
• If you are the top-level administrator and have lost your password, you will have to contact
Adept Customer Support.
appears.
Adept DeskTop 4.3 - Online Help 19
Page 13

Changing Access Levels
You can at any time change Access Levels. Before changing Access Levels you should save any changes
made to programs if necessary; these changes may be lost if you change to a level that does not have
full access to saving programs.
To change the Access Level:
1. From the menu select File > Change Access Level.
2. Alternatively you can double-click on the Access Level in the Adept DeskTop status bar.
3. You will be prompted to save any changes you have made to programs while in the current
Access Level.
4. To make changes, Click No, save changes and restart step 1.
5. Enter the new access level name and password
Adept DeskTop 4.3 - Online Help 20
Page 14
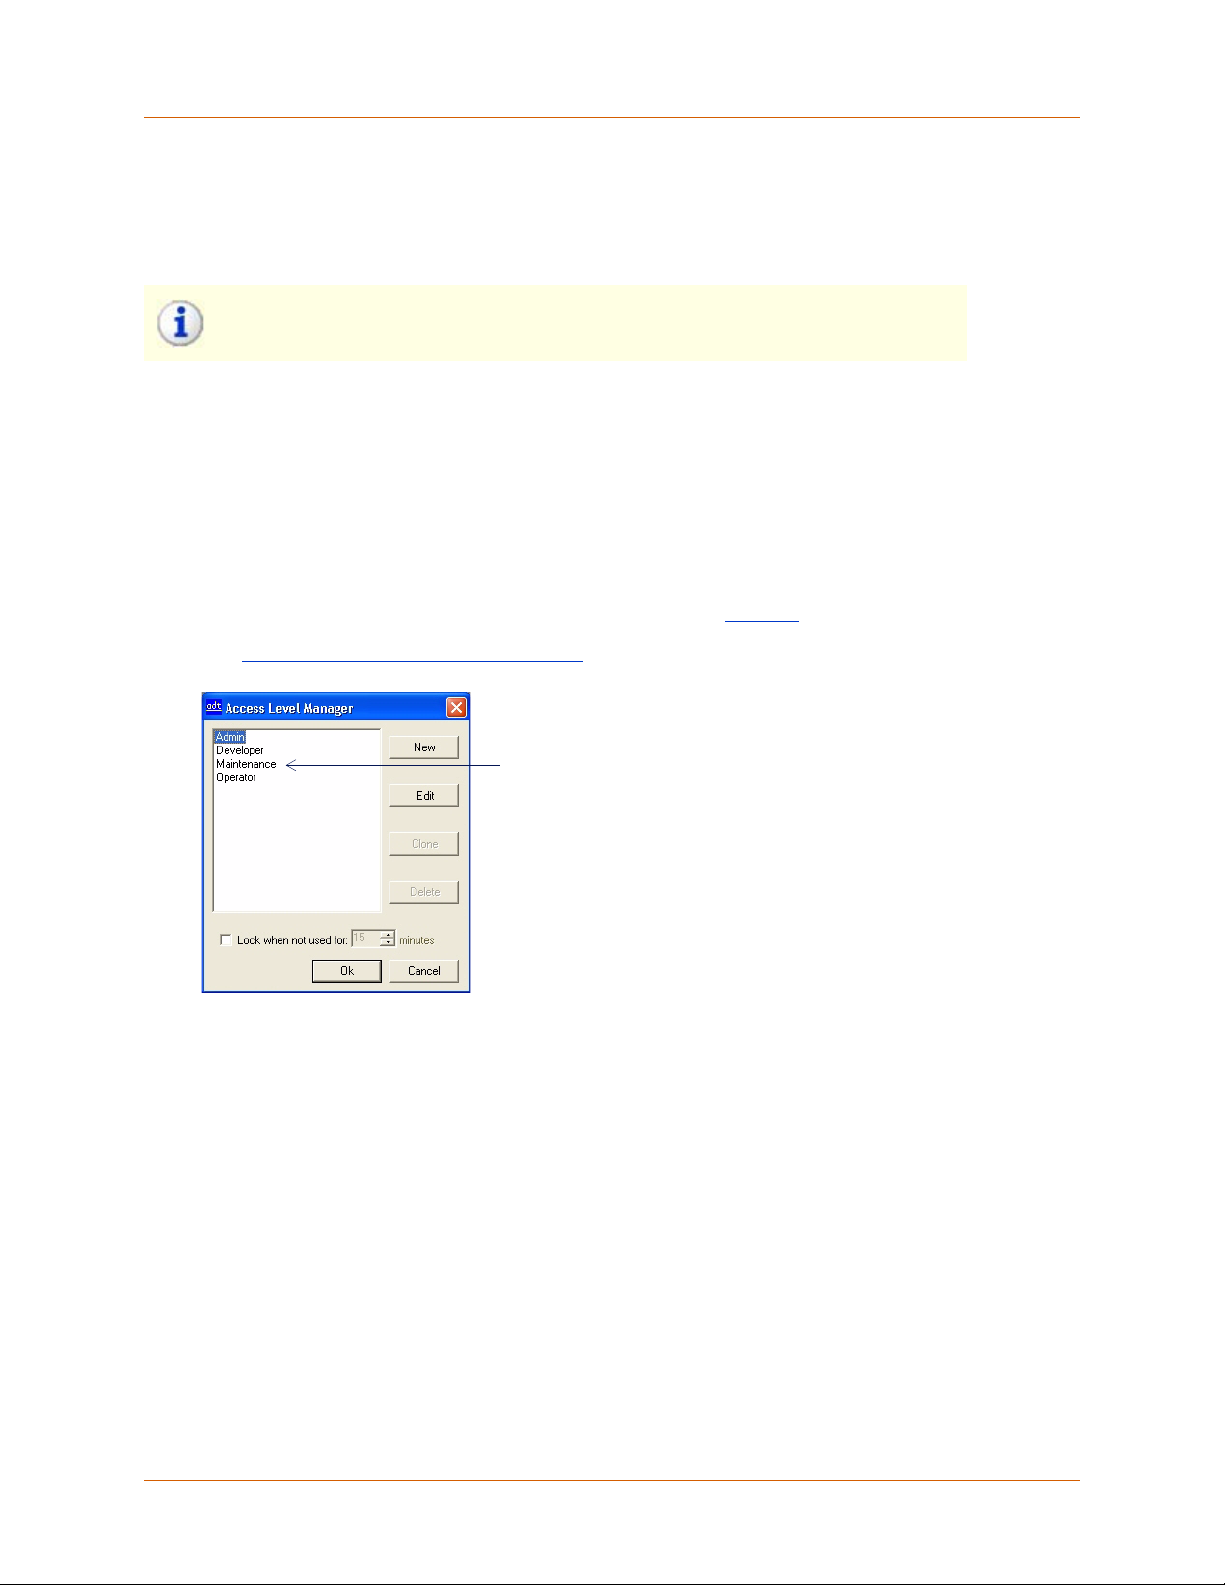
Access Level Manager
The Access Level Manager allows the system administrator to set access levels for all the controls,
utilities, and functions of the Adept DeskTop program. This tool is restricted to the top-level
administrators of the system, who are logged in at Access Level 1, by default named 'Admin'.
Note:If you are not logged into the session as the 'Admin' system administrator
of Adept DeskTop, the Access Level Manager is not available.
Purpose of the Access Level Manager
The Access Level Manager is used to manage the list of access levels and add, delete or edit the
settings Access levels.
To open the Access Level Manager:
1. Make sure you are logged in at the Level 1 access level.
2. Choose Tools > Access Level Manager...
3. The Access Level Manager control opens, as illustrated in Figure 7
4. See Configuring and Adding Access Levels for details on creating and editing Access Levels.
List of all currently
existing access
levels
Figure 7 Access Level Manager
.
Using the Access Level Manager
The Access Level manager displays the list of existing Access Levels. Use the New, Edit, Clone,
Delete buttons to make modifications to this list. In this dialog, you can also enable Adept DeskTop to
'lock' after a certain time of inactivity.
New
Opens the Access Level Editor for creation of a new level. Permissions to all controls and utilities will
initially set to Hidden.
Edit
Opens the Access Level Editor for editing of the selected Access Level.
Adept DeskTop 4.3 - Online Help 21
Page 15

Clone
Opens the Access Level Editor with same settings as the selected Access Level. The administrator level
cannot be cloned.
Delete
Deletes the selected Access Level. The administrator level cannot be deleted.
Lock when not used for
When enabled, Adept DeskTop will lock when it has been idle for the set number of minutes. Once
locked, the user must log in with an access level name and password.
If you reenter at the same access level as before the lock up, your session will continue. If you enter
another access level, your session will be closed and a new session will be opened with the new access
level.
Related Topics
Configuring and Adding Access Levels
Adept DeskTop 4.3 - Online Help 22
Page 16
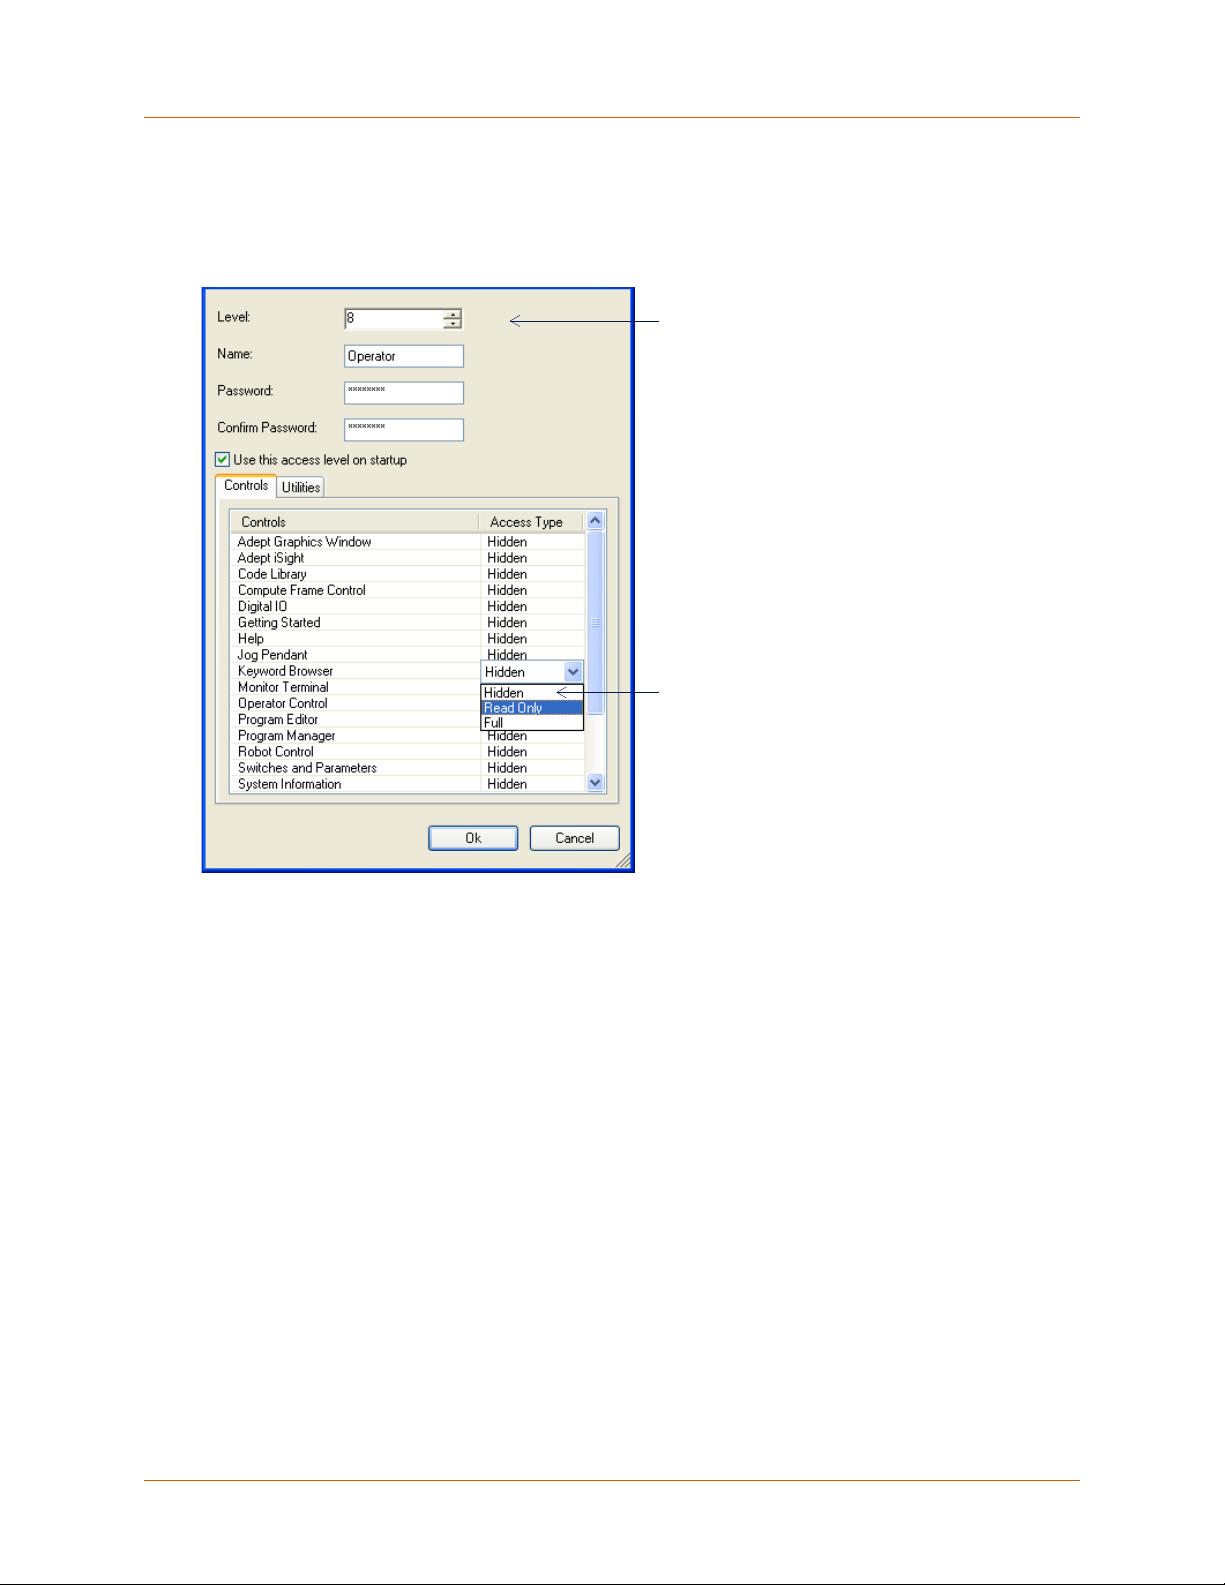
Configuring and Adding Access Levels
The Access Level Editor provides the interface in which an administrator can set and modify the Access
Level parameters. Level 1 administrators can modify all settings but cannot modify the permissions for
Level 1, which is the administrator level for Adept DeskTop.
Relative value assigned to the
current level.
Higher numbers indicate more
restrictions.
Lower numbers indicate less
restrictions
Drop-down menu provides
permission options
Figure 8 Access Level Settings
Level
Levels values range from 1 to 10. The permissions associated with each level are relative and can be
set by the Administrator. Only Level 1 permissions cannot be modified.
• Level 1 is the top level and is reserved for administrators of the system. You cannot delete
Level 1, nor change the permissions for this access level.
• The only changes allowed to Level 1 are modifications to the name and password.
• You cannot create another Level 1 access level; if you try to create another Level 1, it will be
automatically changed to Level 2.
Name
The name assigned to the Access Level should reflects the status or function of users who will use the
Access Level. When Adept DeskTop is installed, there are initially four predefined Access Levels, which
can be modified by a Level 1 administrator.
• Admin. Level 1. Full access to all controls and utilities visible in the Access Level Editor. This
is the only level that can access the Access Level Manager and a few other tools such as the
Operations Manager and the Controller Network Configuration Utility.
Adept DeskTop 4.3 - Online Help 23
Page 17

• Developer. Level 2. Full access to all controls and utilities visible in the Access Level
Manager. Cannot administrate or configure Access Levels.
• Maintenance.Level 5. Full access to most controls. Read only access to Program Editor and
variables.
• Operator. Level 10. Full access only to Operator Control, Robot Control and Adept Graphics
Window. All other controls and utilities are hidden.
Password/Confirm Password
Create and confirm passwords in these fields. Passwords are optional, but strongly recommended.
Note:If you are a Level 1 administrator make sure that you do not lose your
password. If you forget or lose your administrator password, you will need to
contact Adept Technical Support.
Controls and Utilities
The Controls and Utilities tabs display elements for which permissions can be set. Use the drop-down
list to set permissions for the Adept DeskTop controls and utilities. The available permissions (Access
Type) are:
• Full: Full capacity to use, edit, and set properties of a controls and utilities.
• Read Only: the user can open a control or utility but not modify properties.
• Hidden: A hidden control or utility cannot be opened nor seen by the user.
To modify the permission on a control or utility:
1. Select an item from the Control or Utilities tab.
2. Double-click in the Access Type column.
3. Select the permission type (Access Type) from the drop-down box.
4. You can also set all access types (permissions) to a same value from the context menu. To do so,
right-click in the list to display the context menu then select Set all items to > type. See Figure
9.
Adept DeskTop 4.3 - Online Help 24
Page 18
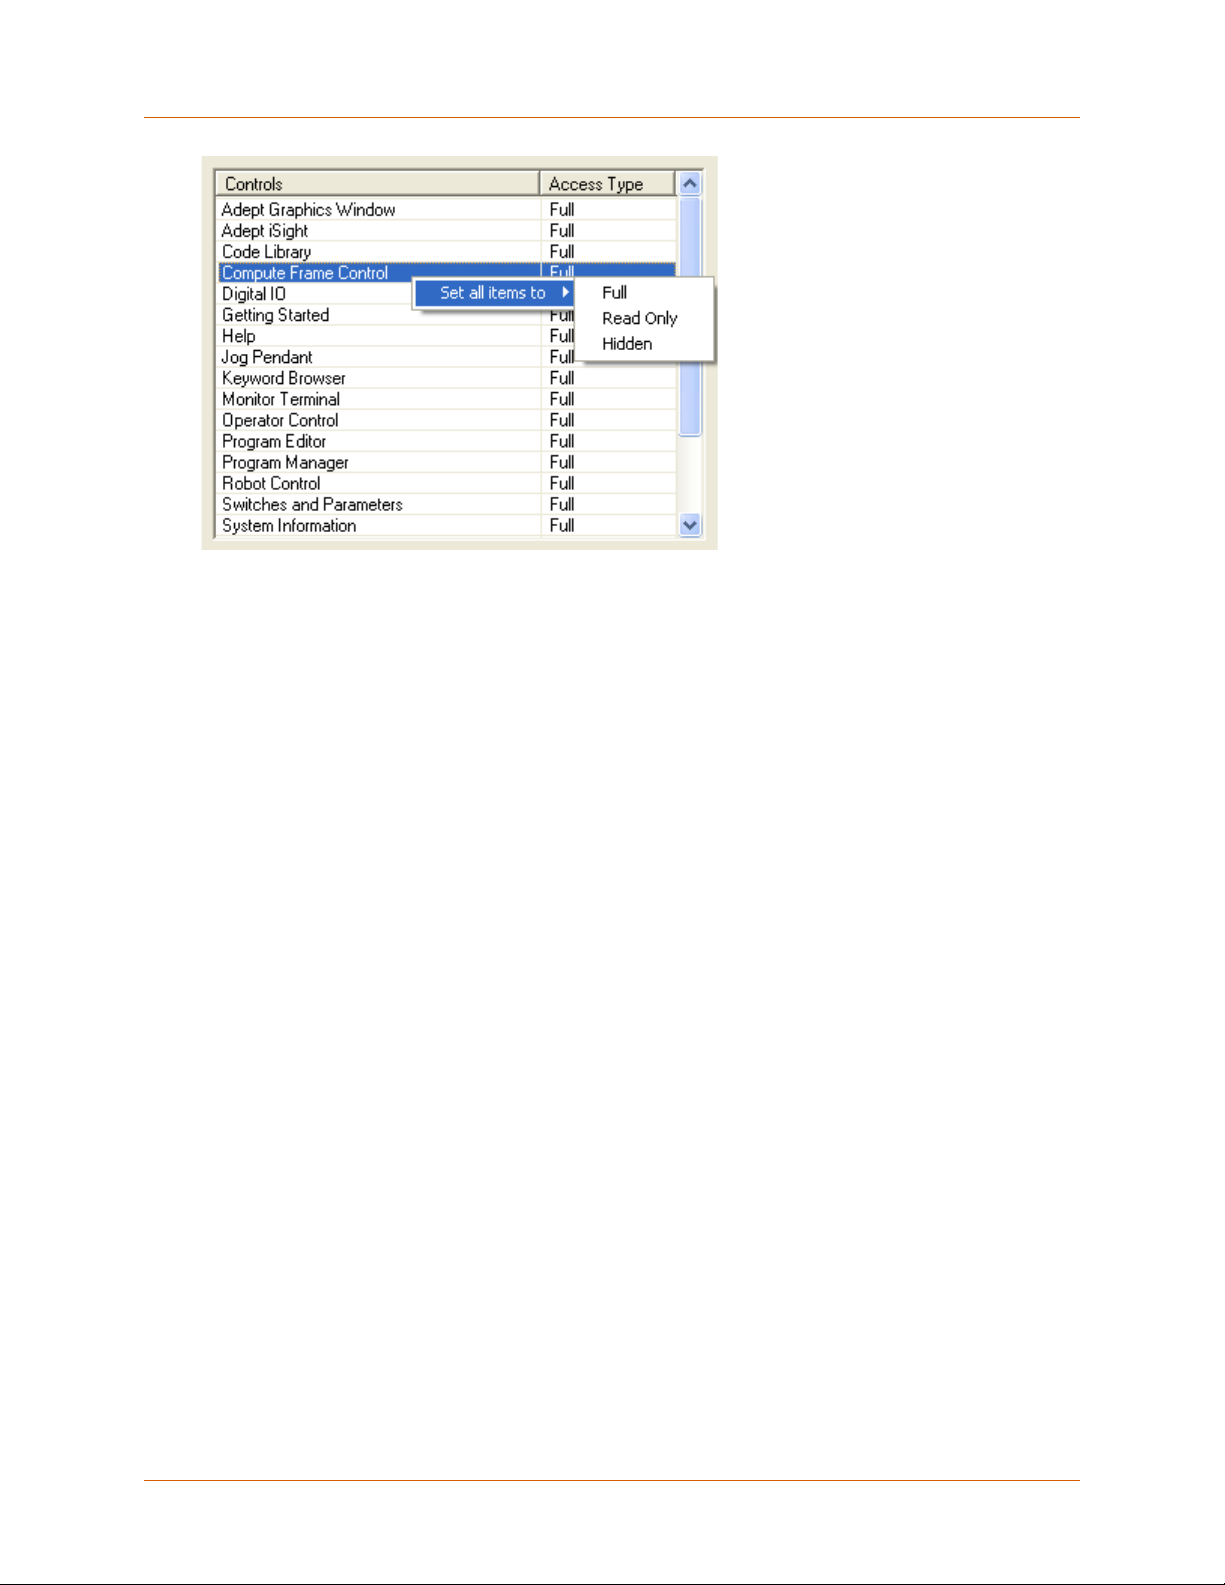
Figure 9 Setting all Access Types to the Same Value
Cancel
Cancels changes and closes the form.
OK
Makes changes to access level settings and parameters, and closes the form.
Adept DeskTop 4.3 - Online Help 25
Page 19
Connecting to a Controller
To use most of the Adept DeskTop tools and functions you must be connected to a controller. Adept
DeskTop can be used with the following controllers:
• Adept SmartController CX
• Adept AIB controller in an Adept Cobra i600 or Adept Cobra i800 robot
• Adept AIB in Smart Amp/SmartAxis
Note:When you attempt scan/connect to a controller for the first time in Adept
DeskTop, the Windows XP Firewall may block the scanning or connecting
operations.
In such a case, Click 'Off' in the Windows Firewall window. This will add Adept
DeskTop to the list of exceptions, and unblock scanning and connecting.
After this, you may have to close the connection dialog and reattempt the
operation
To connect to a controller:
1. From the menu, select File>Connect...
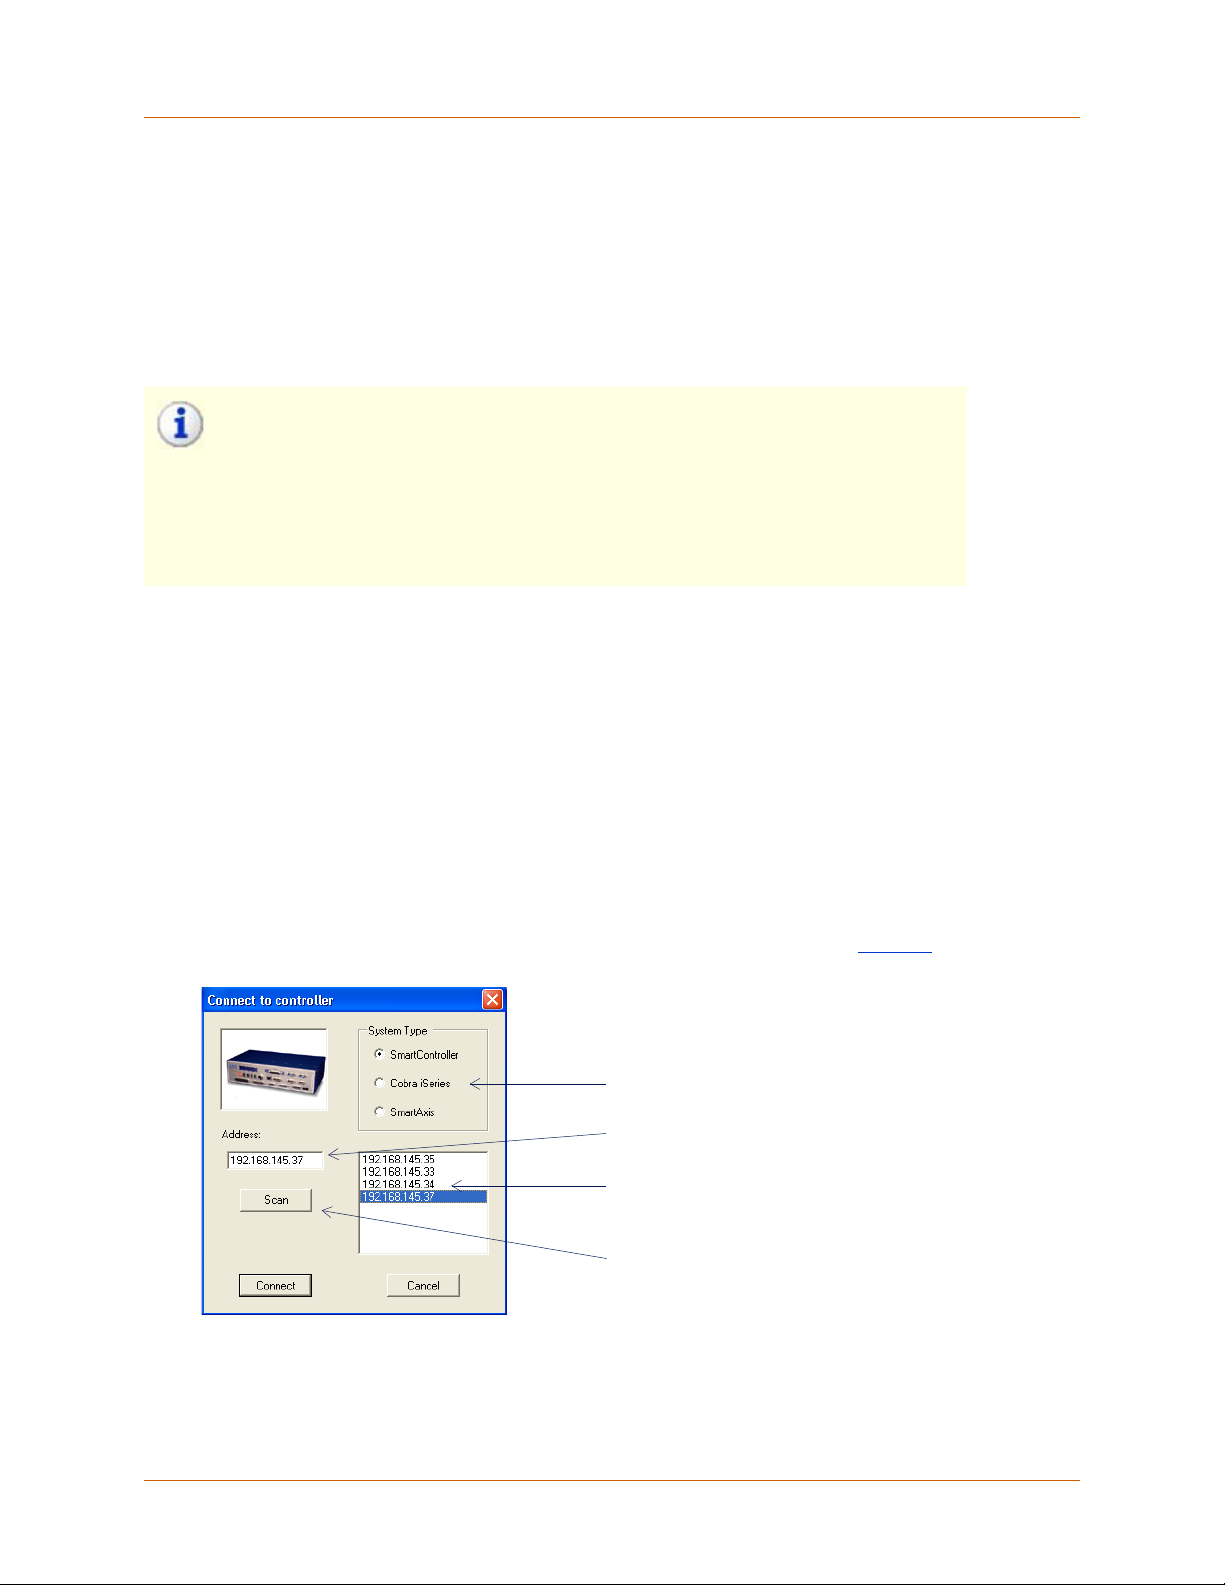
2. In the Connect To Controller form, select the System Type.
3. Depending on the System Type, select either the required COM port or the Ethernet address.
4. If necessary, click Scan to browse and locate the address of controllers that are available on the
network.
5. Click Connect to complete connection to the required Controller.
If another computer is already connected to this controller you will be prompted to choose
between continuing or cancelling the connection request.
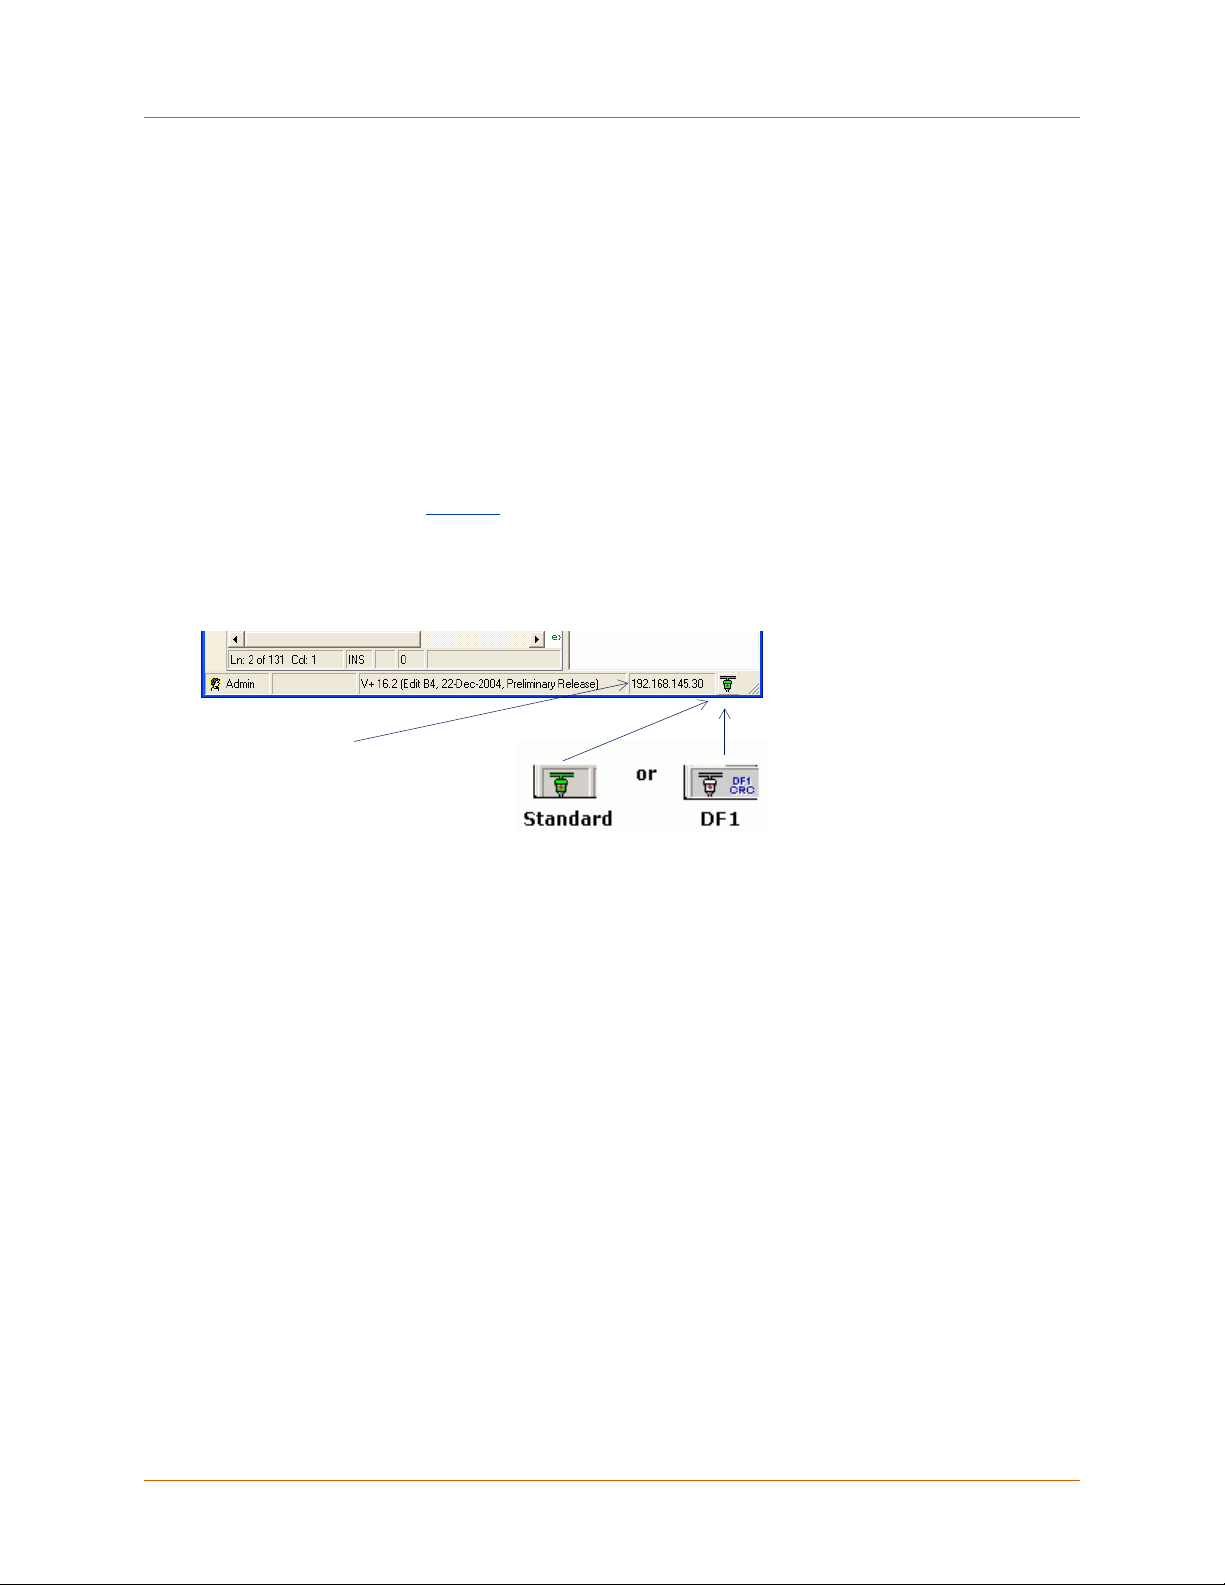
6. The connection status is displayed in the Adept DeskTop status bar. See Figure 5
Select Controller type
Enter or select Address/COM port
List of the available addresses or
COM ports for the selected controller
.
Scan to locate addresses of controllers
currently on the network
Figure 4 Connect to Controller Form
System Type
Select the type of controller to which you want to connect.
Adept DeskTop 4.3 - Online Help 17
Page 20
Address
Enter, or select from the list at right, the Ethernet address of the controller to which you want to
connect. This appears only if the selected System Type is SmartController.
COM
Enter, or select from the list at right, the COM port of the controller to which you want to connect. This
appears if the selected System Type is Cobra iSeries or Smart Axis.
Scan
Scans the network to find the ethernet address of available controller. Addresses found by the Scan
procedure are displayed in the list box.
Connect
Initiates the connection to the controller and closes the form. The status connection icon appears in the
Adept DeskTop status bar. See Figure 5
.
Cancel
Cancels changes and closes the form.
Address or Port of
the controller
Figure 5 Connection Status Icon in the Status Bar
Connection status icon:
Double-click to connect/
disconnect
Adept DeskTop 4.3 - Online Help 18
Page 21
Adept DeskTop Layouts
Windows and tools can be positioned in different manners in the Adept DeskTop user interface, due to a
multiple document interface (MDI), much like Visual Studio.
This allows you to position child windows in the main Adept DeskTop window (docked) or in separate
windows (floating). Docked windows can be displayed at all times (standard tabs) or auto-hidden (side
tabs).
The layout of the user interface refers to position and state of windows in the Adept DeskTop user
interface. You can configure layouts to suit different needs. For example, the system programmer can
create a custom user interface layout for programming tasks, and create a different desktop for the
workcell operator.
Toggle pushpin icon
to auto-hide a
docked window
Move (hover) cursor over tab to
display windows that are 'hidden'
(Auto-Hide)
Docked windows can
be repositioned by
dragging with the
cursor
Status bar
Figure 10 Adept DeskTop - Docked Windows
Default Layouts
There are three default layouts installed with Adept DeskTop. These layouts cannot be deleted nor
modified.
• Adept DeskTop Default: Shows the controls and windows most commonly used to create
and edit programs and tasks.
• Empty: Useful for creating a completely new layout. See Creating a Custom DeskTop
Layout.
• Operator: Useful for configuring a layout that corresponds to an Operator access Level. See
Operator Layout
.
Adept DeskTop 4.3 - Online Help 26
Page 22
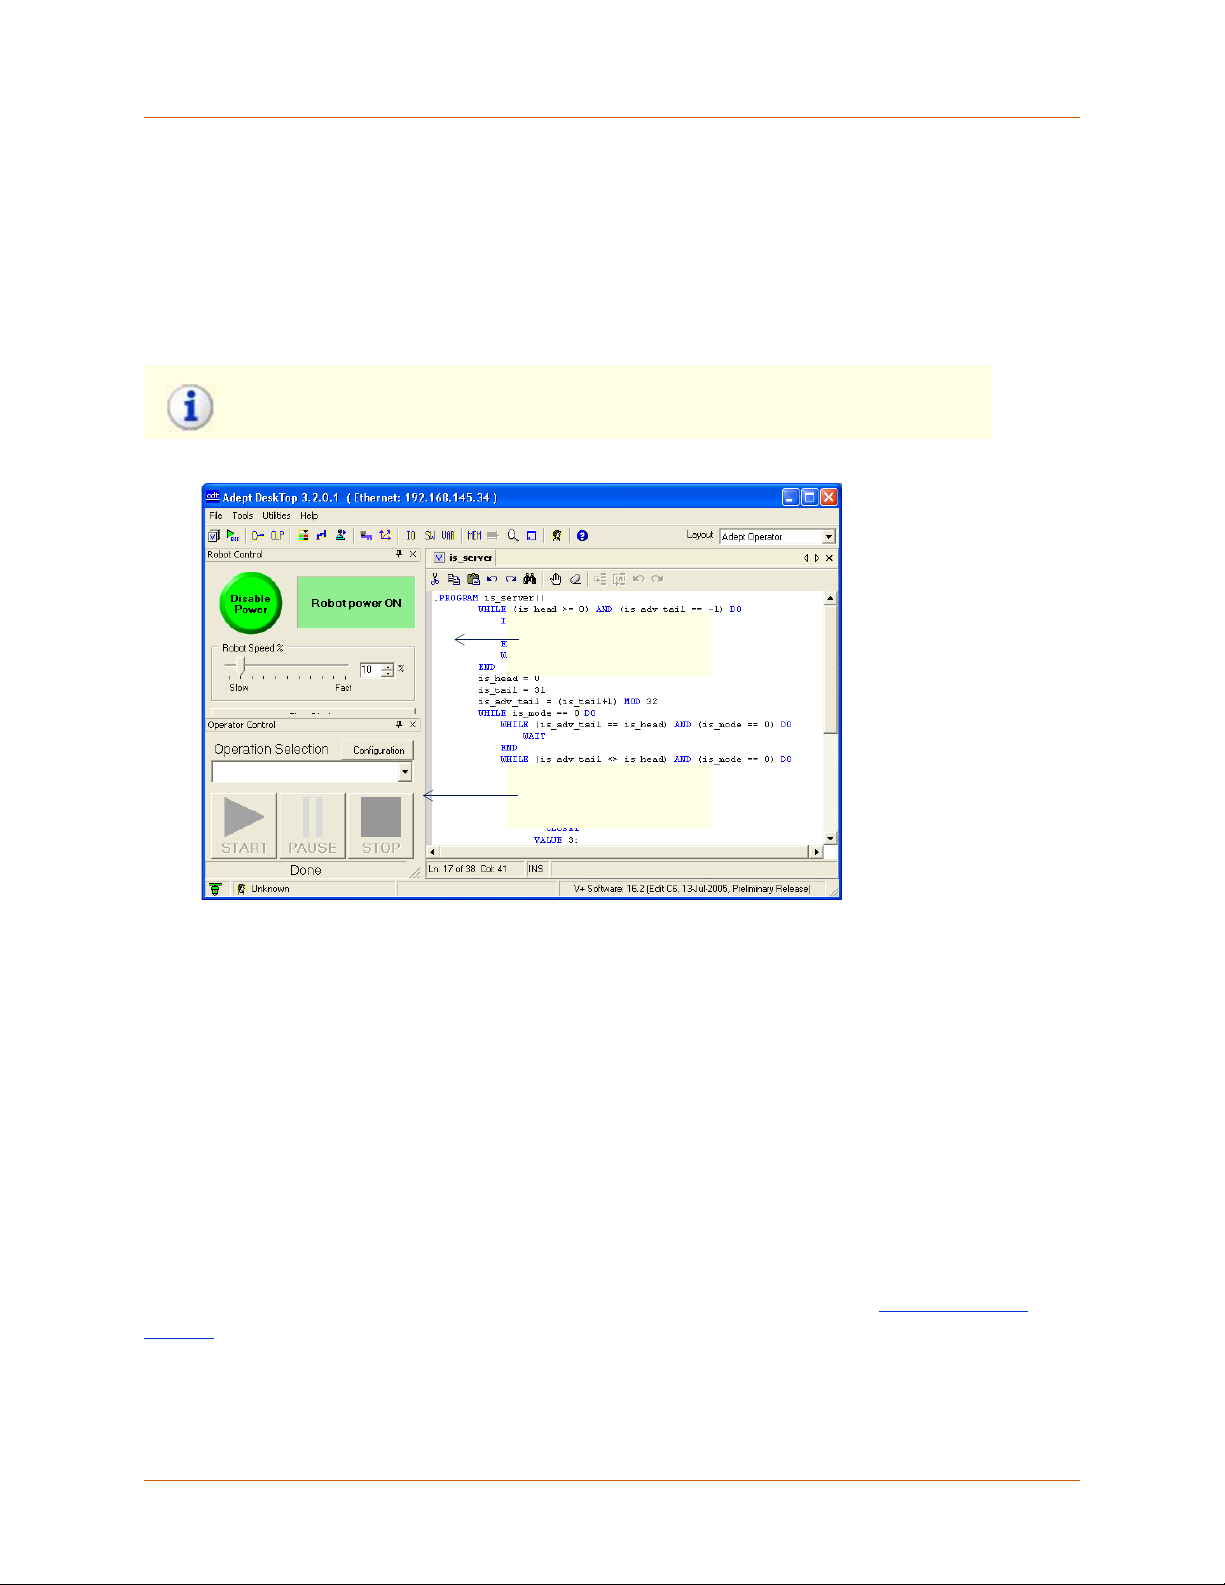
Operator Layout
The default Operator Layout contains only the windows that are enabled when the default Operator
Level user access is enabled. These controls are those typically required for basic operation-level tasks
in a workcell:
• The Robot Control
• The Operator Control
Note:Selecting the Operator Layout will NOT log the user into the Operator
Access Level.
Figure 11 Default Operator Layout
Robot Control
Operator Control
Changing Layouts
To change layouts:
1. From the Adept DeskTop menu select File >Layout >Select > layout name
2. Select a layout from the list of available layouts. Available layouts are the default Adept DeskTop
layouts and any layouts you have saved.
Any layouts saved in previous Adept DeskTop versions are displayed in Adept DeskTop 4.1. Note that
layouts are no longer stored as *.lyt files as in previous versions; layouts are now stored as part of your
Adept DeskTop preferences, on your computer.
Saving Layouts
At any given moment, you can save the layout information as a new layout. See Saving DeskTop
Layouts for more details.
Adept DeskTop 4.3 - Online Help 27
Page 23

Deleting Layouts
To delete a layout:
1. Choose File > Layout > Delete > layout name.
2. Choose the layout you want to delete. Default layouts do not appear in the list because the
cannot be deleted. See Default Layouts
.
Adept DeskTop 4.3 - Online Help 28
Page 24

Creating a Custom DeskTop Layout
Adept DeskTop allows you to create and save custom desktop layouts. After a desktop layout is created
and saved, it can be loaded through the Adept DeskTop menu bar.
This allows you to create layout that is tailored for your application, or for a specific type of user. For
example, a system designer may create a custom desktop for programming tasks, and create a
different desktop for the workcell operator.
To create a new layout, you can start from the default "Empty" layout.
To create a new custom layout:
1. From the Adept DeskTop menu, select File > Layout > Select > Empty.
2. Begin placing items on the blank desktop. For example, if you would like your desktop to contain
a Robot Control window, from the Adept DeskTop menu bar, select View > Robot Control.
Robot Control window is displayed on the desktop.
3. Continue placing items on the desktop until it contains everything required for your application.
4. Position each item on the desktop by clicking the title bar of the item and dragging the item to
the desired position. The position of windows and items will be saved in the layout.
5. To remove an item from the desktop, simply click on the item to select it. Then, click the Close
icon (located in the upper right corner of the item window) to remove the item.
After you have arranged items on the desktop; save your layout so that you can reload the layout at a
later time. For more details on saving the current desktop, see Saving Layouts.
Related Topics
Saving DeskTop Layouts
Adept DeskTop 4.3 - Online Help 29
Page 25
Saving DeskTop Layouts
A configuration of windows and controls in the Adept DeskTop interface is called a 'layout'. Layouts can
be saved to memory and recalled when needed.
There are three default layouts provided in Adept DeskTop:
• Adept DeskTop Default
•Operator Layout
•Empty
You cannot delete default layouts but you can use default layouts as a basis for creating custom
layouts.
To save the current Adept DeskTop layout:
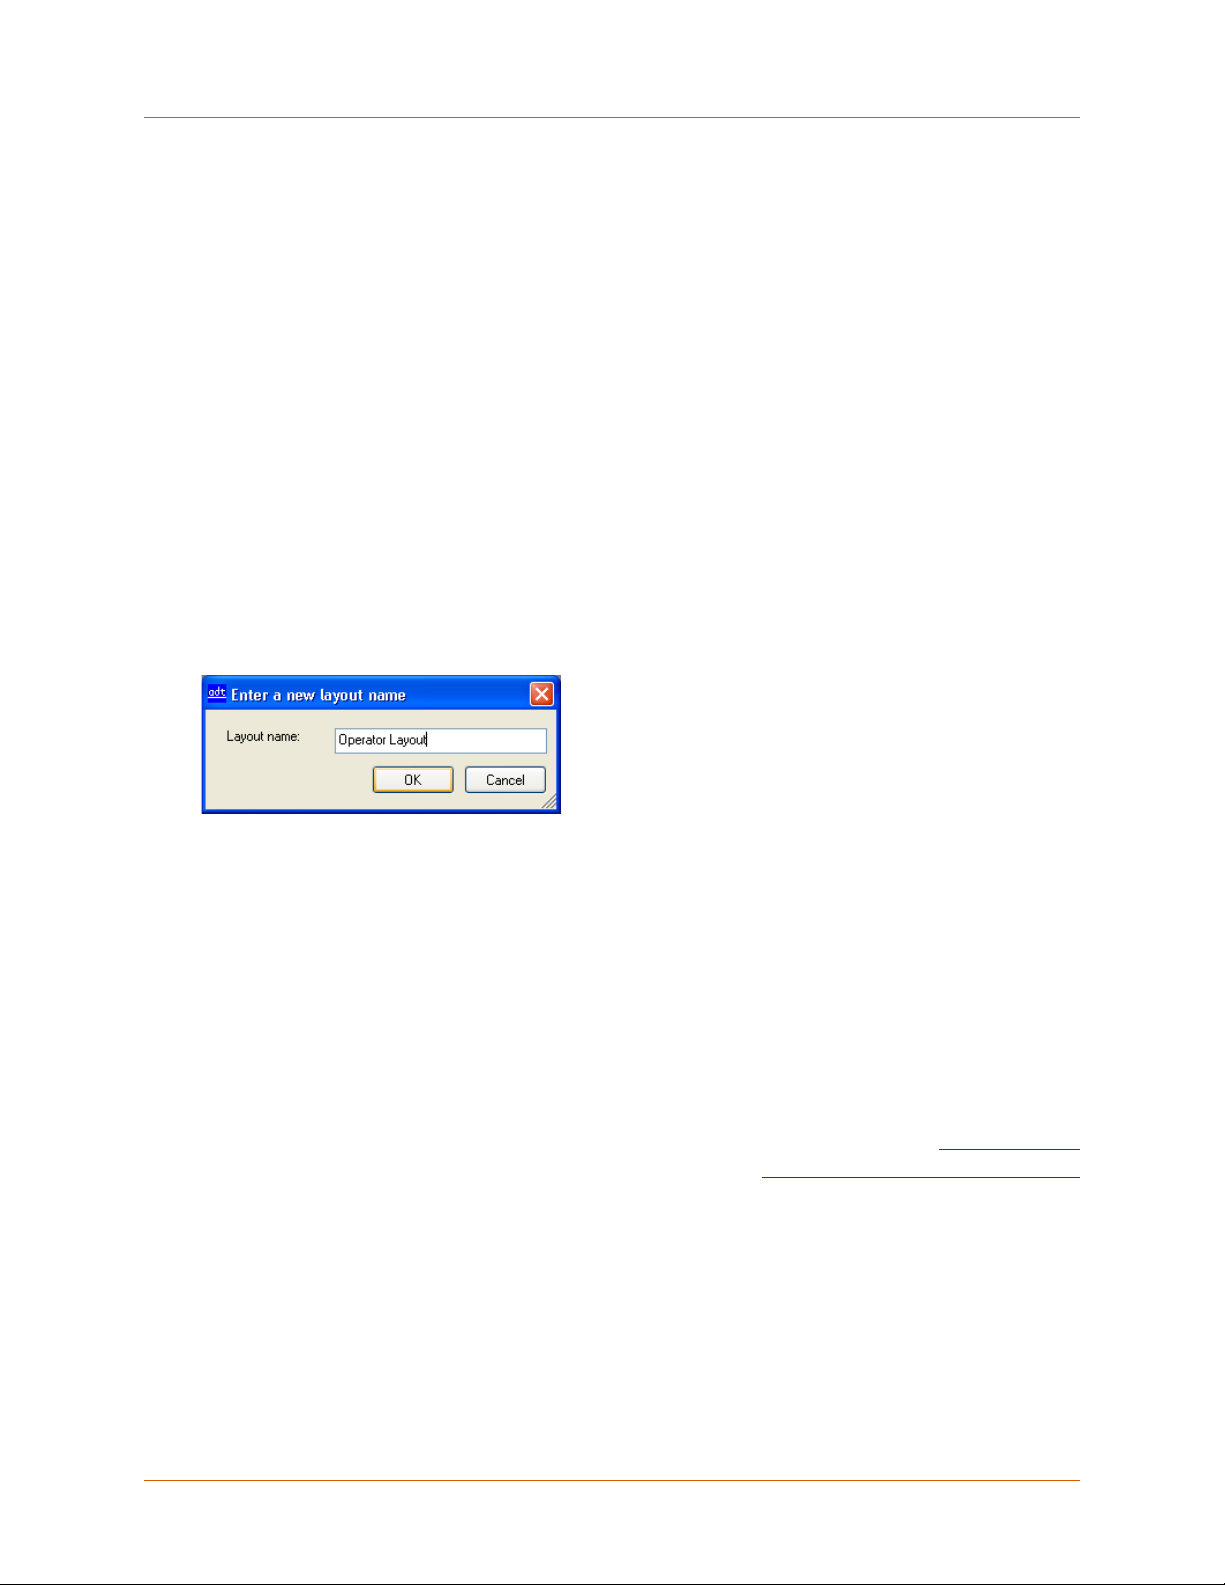
1. From the Adept DeskTop menu, select: File > Layout > Save (or Save As...).
2. Enter information in the Enter new layout name form.
3. Once the layout is saved you can reload it from the menu selecting File > Layout > Select >
layoutname.
Figure 12 Adept DeskTop - Saving a New Layout
Layout name
Enter the name of the layout.
OK
Saves the current layout with the new name and close the form.
Cancel
Cancels changes and closes the form.
Related Topics
Default Layouts
Creating a Custom DeskTop Layout
Adept DeskTop 4.3 - Online Help 30
Page 26
Setting Adept DeskTop Options
The Options form allows you to customize the appearance of Adept DeskTop. For example, from this
form, you can:
• Set the text size and colors for the Program Editor.
• Set the text size and colors for the Monitor Terminal.
• Set startup options and other program preferences.
To open the Options tool:
1. Select: Tools > Options.
2. Select a folder icon to access options and preferences for various items.
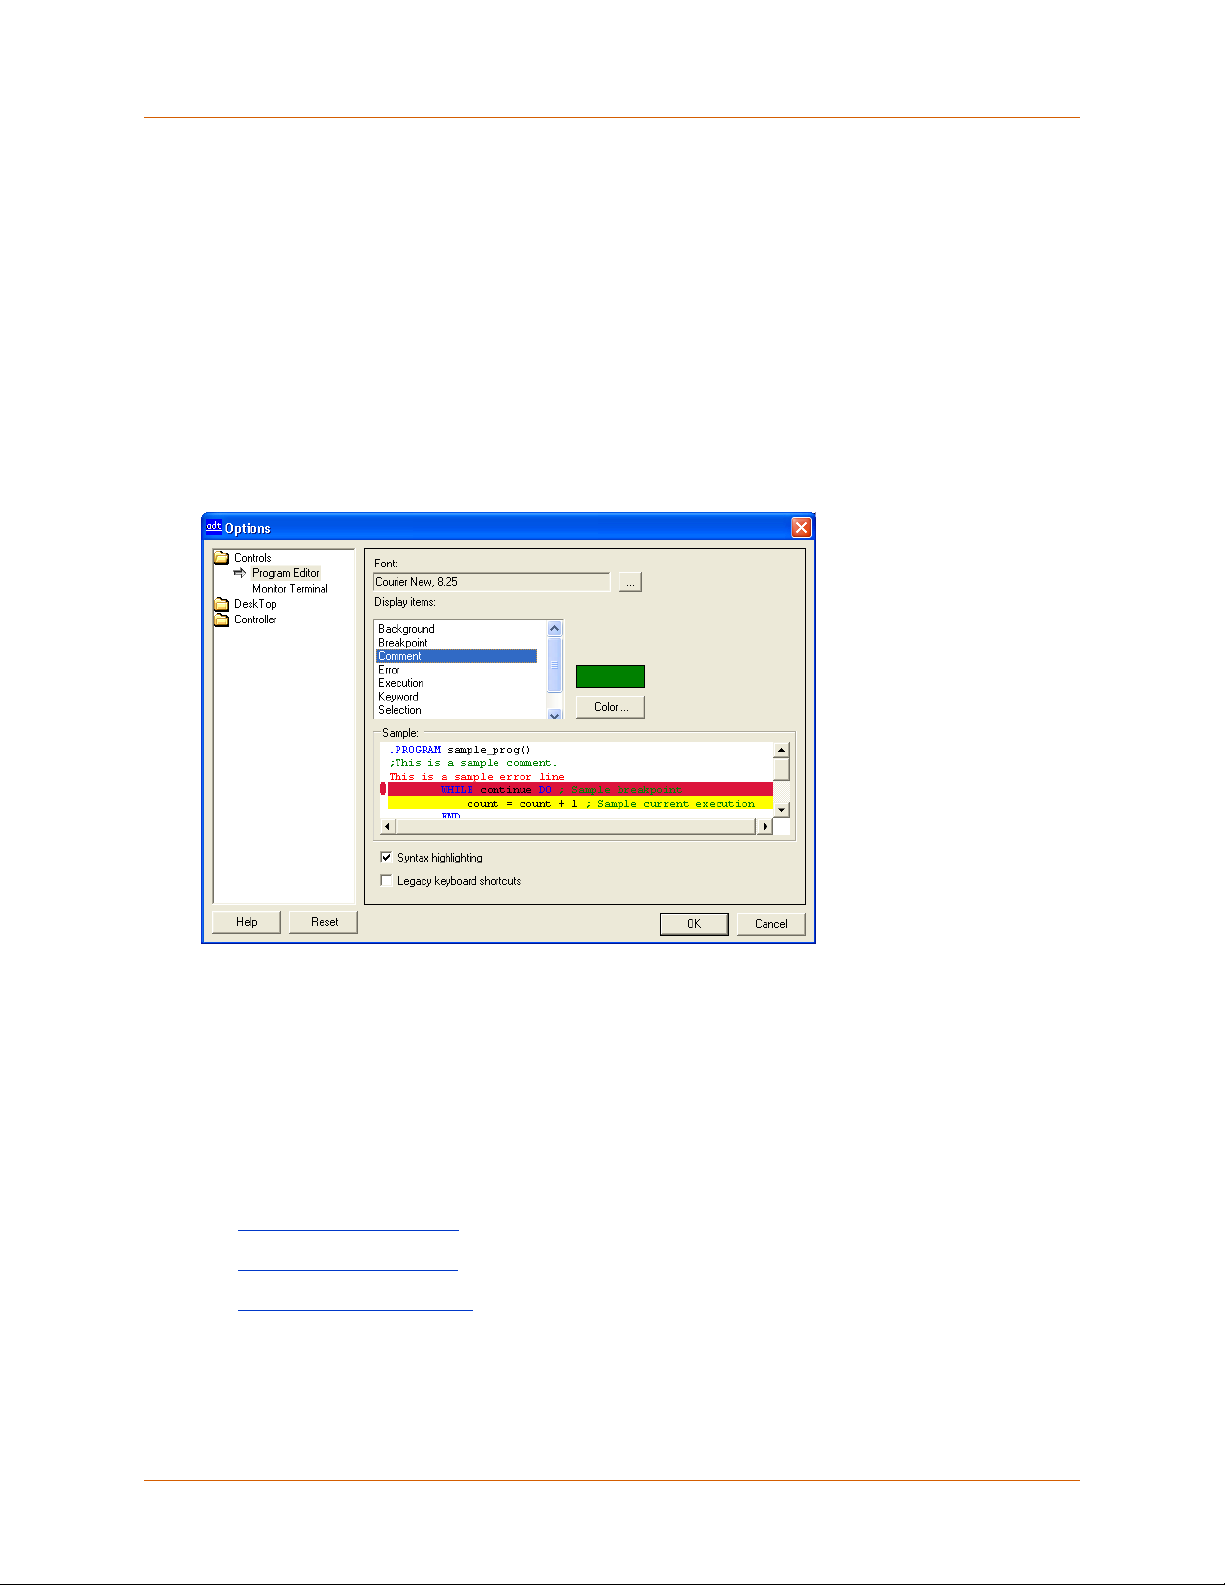
Figure 3 Adept DeskTop Options Form
To modify options:
1. In the list at left of the Options form, select an option.
Options are classed into three categories: Controls, Desktop, or Controller.
2. Settings and parameters for the selected option are displayed on the right side of the Options
form.
3. For more details on configuring options, refer to the following topics:
• Setting Controls Options
• Setting Desktop Options
• Setting Controller Options
Adept DeskTop 4.3 - Online Help 12
Page 27

Setting Controls Options
Use options in the tab to set the colors, fonts and other appearance properties of the Program Editor
and the Monitor Terminal. The Sample display shows the effect of the selected settings.
Font
Opens a Font properties form in which you can select font type, color, and size.
Display items
This lists allows you to select an item and view or select the color that is used to display the item in the
Program Editor or the Monitor Terminal.
Color
Click this button to select and change the color that will be used to display a selected item in the
Program Editor or the Monitor Terminal.
Syntax Highlighting
Syntax highlighting is a feature of the Program Editor that assign different colors to V+ and MicroV+
code, according to the category of elements in a program. This enables you to easily identify elements
in a program and helps debug and identify syntax errors. By default, syntax highlighting is enabled.
To modify syntax highlighting colors:
1. Select a category in the Display items list.
2. Click the Color button.
3. Select or create a color in the Color picker dialog, then click OK.
Legacy keyboard shortcuts
Enabling this check box applies the legacy shortcut keys used with the Adept Windows SEE editor. By
default Adept DeskTop 4.3 applies standard Windows shortcut keys. Long-time users of Adept DeskTop
may prefer to use the legacy shortcuts. To do so enable this check box.
Table 1:
Table 1: Example of standard Window (R) keyboard shortcuts used by Adept DeskTop
and Table 2: illustrate some standard keyboard shortcuts and legacy keyboard shortcuts.
Keys Action
Ctrl+A Select All
Ctrl+C Copy
Ctrl+F Find
Ctrl+V Paste
Ctrl+X Cut
Ctrl+Z Undo
F1 Display contextual Help window
F5 Execute (run) a program
LEFT ARROW Left one unit
RIGHT ARROW Right one unit
UP ARROW Up one unit or line
Adept DeskTop 4.3 - Online Help 13
Page 28

Keys Action
DOWN ARROW Down one unit or line
HOME To the beginning of the line /To the beginning of the data
(topmost position)
END To the end of the line /To the end of the data (bottommost
position)
TAB Next field / To next tab position
Table 2: Example of Legacy Keyboard Shortcuts
Keys Action
Ctrl+B Add or remove breakpoints to a program.
Ctrl+S or
Single step operation that skips stepping through a subroutine call.
Shift+F5
Ctrl+X or F5 Single step operation that will enter a subroutine call.
Ctrl+G The current position of the cursor becomes the next point the program starts
from.
Pause Pause the program task execution.
Ctrl+R Retries the current line.
Ctrl+P Proceeds the task until the next break point or program terminates.
Adept DeskTop 4.3 - Online Help 14
Page 29

Setting Desktop Options
Open "Terminal Monitor" control on program output
When this option is enabled, the Monitor Terminal control automatically opens on program output, if the
program uses a TYPE instruction.
• If the Monitor Terminal window is already open, there is no effect.
• If this option is selected and there is active output from a program, you will not be able to
close the monitor window.
Load Utilities
When this option is enabled, Adept DeskTop loads external utilities. Disable this option to speed up
loading of Adept DeskTop or when debugging the system.
Show Version in title bar
When this option is enabled, the Adept DeskTop software version is displayed in the title bar of the
Adept DeskTop window.
Maximize DeskTop on startup
When this option is enabled, the Adept DeskTop interface window is maximized in your monitor when
you open an Adept DeskTop session.
Help Location
Adept DeskTop has integrated online help that you can access at anytime by clicking F1. However, to
access additional Adept documentation that is not included in the integrated online help, you can use
this option to set the location of documentation that is located elsewhere, such as on the Adept Online
Manuals CD.
Open Connect dialog on startup
When this option is enabled, the Connect to Controller dialog automatically opens when you open an
Adept DeskTop session.
Adept DeskTop 4.3 - Online Help 15
Page 30

Setting Controller Options
Automatically connect using the last connection
When this option is enabled, Adept DeskTop will automatically connect to the controller through the last
used connection method.
Check for DDT prompt for V+ Systems
When this option is enabled, Adept DeskTop detects and displays the DDT window. This option is
enabled by default.
• If DDT is not detected, Adept DeskTop attempts to connect to the control during system
startup.
• Disabling DDT detection can speed up connection time.
On Error
These options affect the actions performed by Adept DeskTop when the controller encounters an error.
By default, Ask user for directives is enabled.
Close the connection
When this option is enabled, Adept DeskTop automatically closes if there is a communication error. The
error is logged to the file before exiting Adept DeskTop.
Ask user for directives
When this option is enabled and an error occurs Adept DeskTop will ask the user what action to take. All
communication errors are logged to a file even if they are ignored.
Adept DeskTop 4.3 - Online Help 16
Page 31

Program Manager Control
The Program Manager control allows you to create, load, store and delete programs. Also, from the
Program Manager you assign programs to specific tasks by dragging programs to tasks in the Task
Manager.
To open the Program Manager
1. From the Adept DeskTop menu, select View > Program Manager.
2. Alternatively, select the Program Manager icon from the toolbar.
3. Dock the window if needed. Typically, it is docked above the Task Manager window to facilitate
dragging programs to the task list.
Program Manager toolbar
Modules and programs currently on the
controller.
Bold letters indicate that one or more programs
To ass i g n a
program to a task,
drag program onto
a task in the Task
have been modified
Figure 13 Program Manager Control in V+
The appearance of the Program Manager differs depending on whether you are in V+ or MicroV+.
The Program Manager in V+
• In V+, program files are 'contained' in one or more modules as illustrated in Figure 13
.
•See Using the Program Manager Control and Saving Programs in V+ for more information.
The Program Manager in MicroV+
In Micro V+, Programs are not 'contained' in modules; all programs are listed in a 'flat' hierarchy as
shown in Figure 14
.
• Programs are not stored as files, instead they are saved as a block, on the controller, in
NVRAM.
• You cannot drag and drop programs from the PC into the task manager
• You cannot copy/paste programs.
Adept DeskTop 4.3 - Online Help 31
Page 32

Program Manager toolbar
Programs currently on the controller.
Bold letters indicate that one or more programs
have been modified
To assign a program to
a task, drag program
onto a task in the Task
Manager
Figure 14 Program Manager Control in MicroV+
Protected Programs and Modules
Protected programs are displayed in the program manager but these programs cannot be renamed,
modified, moved or deleted. The module that contains one or more protected programs is a protected
module that shares the same restrictions as a protected program.
• Cut and Copy functions are not active on protected items.
• Programs cannot be added to a protected module.
• A protected program in a module cannot be deleted. This preserves the integrity of the
module.
• You cannot create a code clip from protected elements nor copy the element to a clipboard.
•You can drop a protected item to a task in the Task Manager.
Program Manager Toolbar and Context Menu
The actions or tasks described below launched from the toolbar or the context menu.
Adept DeskTop 4.3 - Online Help 32
Page 33

Toolbar
Context menu
Figure 15 Program Manager Toolbar and Context menu
Edit selected program
Opens a selected program in the Program Editor. If the program is already open, it becomes the active
program in the Program Editor. If there is an error in the program code, the icon changes to a question
mark to indicate this condition.
Create New Program
Opens the New Program dialog that asks for the new program name and module name. See Creating a
New Program.
Open Program
Opens a existing program file and adds it tho the Program Manager. See Opening Programs in the
Program Editor.
Save As...
Saves files to PC or Controller. See Saving Programs and Modules
for details and differences between
V+ and MicroV+ systems.
Save Module
Saves the module with the last filename used to load or save the module. If this file has been
previously saved, a dialog opens showed to ask for a filename. Unsaved modules appear in bold type in
Program Manager list. Does not apply to MicroV+ systems.
Save All Modules
Saves all modules currently in the Program Manager to the controller, with the last used filename. A
dialog opens for each filename that is not yet defined. Does not apply to MicroV+ systems.
Save All Reals
Saves to file all real values currently in the selected program. The values are stored to the specified
destination, with the file extension 'rv'.
Adept DeskTop 4.3 - Online Help 33
Page 34

Save All Locations
Saves to file all location values currently in the selected program. The values are stored to the specified
destination, with the file extension 'lc.
Save All Strings
Saves to file all string values currently in the selected program. The values are stored to the specified
destination with the file extension 'st'.
Cut Program
Removes a selected program so it can be pasted to another module. If the program is not pasted
elsewhere, it is permanently deleted. Does not apply to MicroV+ systems.
Copy Program
Copies a program so it can be pasted to another module. Does not apply to MicroV+ systems.
Paste
Pastes (adds) the program to a selected module after a Cut Program or Copy Program operation. Does
not apply to MicroV+ systems.
Search and Replace
Opens a Search and Replace dialog that allows you to find and replace text in program files.
Delete
Permanently deletes the selected program so it can be pasted to another module.
Zero contents of controller memory
Clears from memory all programs and variables that have not been saved as well as any changes made
to programs and modules since the last 'Save'.
Rename
Enables you to rename a selected program. This function is not active on protected items.
Refresh
Refreshes the list of programs in the Program Manager.
Help
Opens Adept Online Help to the Program Manager section.
Refresh list of programs
Updates the list of modules and programs.
Note:There is no 'undo' for the Zero Memory operation. A warning prompt is
displayed, with an option to cancel the operation, before this command is
executed.
Related Topics
Creating a New Program
Using the Program Manager Control
Saving Programs and Modules
Adept DeskTop 4.3 - Online Help 34
Page 35

Using the Program Manager Control
From the Program Manager control you can manage programs, create new programs, and assign
programs to tasks.
The use of the Program Manager control differs between V+ and MicroV+ systems. Refer to the section
below that applies to your system.
Modules and programs
indicated by yellow icon
are protected and cannot
be modified
Modules and
programs in bold
letters indicate
unsaved
modifications
Figure 16 Program Manager Interface
Managing Programs in V+
The Program Manager displays the list of all programs in a hierarchical view, organized by modules.
From this list you can carry our various operations on programs through the toolbar, the context menu,
or by dragging elements in the interface.
Programs in the Program Manager are physically on the controller. Until a program is saved, it exists in
volatile memory (RAM) only. See Saving Programs in V+
Opening Programs
To open a program and add it to the program list:
• Drag any program file (*.V2) from the Microsoft Windows Explorer or the Adept File Manager
Utility and drop it onto this area. The file will automatically be loaded into the memory of the
connected Adept controller.
• From the toolbar, select Open Program. In the Open form, browse to find a file on the
controller or on the computer.
Creating New Programs
See the section Creating a New Program.
for details on saving files and modules.
Saving Programs
See the section Saving Programs in V+.
Adept DeskTop 4.3 - Online Help 35
Page 36

Deleting Programs
Programs that are assigned to a task cannot be deleted from the Program Manager. For this reason you
cannot delete a module that contains a program that is in a task execution stack. You must first clear
the task execution task, then delete the program or module. See Using the Task Manager Control.
You can delete either a selected program or module from the task, with the Delete Program/Module
icon in the toolbar or the Delete instruction.
Opening Programs in the Program Editor
To open and edit a program in the Program Editor:
• Select a program in the list, then click the Edit Program toolbar or context menu.
• You can also double-click on a program in the list to open it in the Program Editor.
Assigning a Program to a Task
• To assign a program to a task, select a program and drag it onto a task in the Task Manager.
From there you can use the Task Manager operations to modify or manage the task.
Renaming a Program
• To rename a program, select a program and then select Rename from the context menu or
click F2. Alternatively, you can click on the program name in the list.
• When the name of the program is edited, the arguments and the parentheses are removed
and only the name can be modified. The arguments and the parentheses are added back
after editing.
• If you want to modify or remove arguments that appear after the program name, you must
open the program in the Program Editor and modify or remove the arguments in the code.
Moving Programs Between Modules
A program can be moved or copied to other modules. Note that there cannot at any time be two or
more programs with the same name. Therefore any program that is copied to another module must be
renamed.
To remove a program from a module and place it in another module:
• Select a program the use Cut Program operation followed by a Paste operation on a
selected module.
• Alternatively, you can drag the selected program to a new module.
• If you drag a program to an empty area in the Program Manager, a dialog opens to ask you
for a new module name; your program will be copied or moved to the new module.
• You cannot move a program that is currently assigned to a task.
To copy a program from a module to another module:
• Select a program the use Copy Program operation followed by a Paste operation on a
selected module.
• Drag the selected program, while holding the CTRL key, to a new module.
Adept DeskTop 4.3 - Online Help 36
Page 37

Managing Programs in MicroV+
The Program Manager displays the list of all programs currently in memory. From this list you can carry
our various operations on programs through the toolbar, the context menu, or by dragging elements in
the interface.
Programs in the Program Manager are physically on the controller. Until a program is saved, it exists in
volatile memory (RAM) only. See Saving Programs in MicroV+
Opening Programs
To open a program from the PC:
1. From the toolbar, select Open Program > from PC.
2. In the Open form, browse to find a file on the controller or on the computer.
To open a program in NVRAM:
1. From the toolbar, select Open Program > from NVRAM.
Creating New Programs
See the section Creating a New Program.
for details on saving files and modules.
Deleting Programs
Programs that are assigned to a task cannot be deleted from the Program Manager. You must first clear
the task’s execution stack, then delete the program. See Using the Task Manager Control.
You can delete either a selected program or module from the task, with the Delete Program/Module
icon in the toolbar or the Delete instruction.
Saving Programs
See the section Saving Programs in MicroV+.
Bold letters indicate
unsaved changes
Right-click here to
display context menu
Figure 17 Program Manager Context Menu in MicroV+
Opening Programs in the Program Editor
To open and edit a program in the Program Editor
Adept DeskTop 4.3 - Online Help 37
Page 38

• Select a program in the list, then click the Edit Program toolbar or context menu.
• You can also double-click on a program in the list to open it in the Program Editor.
Assigning a Program to a Task
• To assign a program to a task, select a program and drag it onto a task in the Task Manager.
From there you can use the Task Manager operations to modify or manage the task.
Renaming a Program
• To rename a program, select a program and then select Rename from the context menu or
click F2. Alternatively, you can click on the program name in the list.
• When the name of the program is edited, the arguments and the parentheses are removed
and only the name can be modified. The arguments and the parentheses are added back
after editing.
• If you want to modify or remove arguments that appear after the program name, you must
open the program in the Program Editor and modify or remove the arguments in the code.
Related Topics
Creating a New Program
Saving Programs and Modules
Using the Task Manager Control
Adept DeskTop 4.3 - Online Help 38
Page 39

Creating a New Program
To create a new program:
1. From the Adept DeskTop menu, select File > New Program.
2. Alternatively, from the Program Manager toolbar select Create New Program.
3. In the New Program form, enter the name for the new program and enter or select a module
name.
4. The program is added to the Program Manager list, in the designated module and the new
program is opened in the Program Editor. See Program Editor
editing programs.
for information on writing and
'Create New Program' icon
opens New Program form
Type module name
or select it from list
(V+ systems)
Figure 18 New Program Form
Program Name
Enter the name of the new program of the program that will be created.
• If you want to create a program with arguments, you can specify the argument(s) in the
program name, in parentheses. Figure 18 illustrates an example where the program
'prgrm_test' will be created containing the argument 'er'.
• Empty spaces are not allowed in program names. A name cannot exceed 15 characters.
Module name
Enter the name of the module to which the new program will be assigned or select a module name from
the drop-down list.
• Empty spaces are not allowed in module names. A name cannot exceed 15 characters.
• Modules only apply to V+. There are no modules in a MicroV+ system.
Create
Creates the new program, adds it to the program Manager list, and opens the program in the Program
Editor.
Cancel
Cancels any changes and closes the form.
Help
Opens the Adept DeskTop online help to the related help topic.
Adept DeskTop 4.3 - Online Help 39
Page 40

Related Topics
Saving Programs and Modules
Program Manager Control
Adept DeskTop 4.3 - Online Help 40
Page 41

Saving Programs and Modules
The saving and storing of files on the controller differs between MicroV+ and V+ systems. This section
describes the effect of the different actions that you can use to save program data in each of these
systems.
Saving Programs in V+
In V+, programs and modules can be save to the controller or the PC.
• You have the option of saving all modules, all programs, or only selected modules or
programs.
• Optionally, you can save data in the files.
•See Ta bl e 3 :
Figure 19 Save As dialog for Saving V+ Files
for details on the correspondence between file saving options and V+ keywords.
Options for Saving
As illustrated in Figure 19, there are three options that can modify the content of saved files.
All
When All is enabled, all modules and programs are saved.
Selection Only
When Selection Only is enabled, only the selected module or program is saved. All dependencies are
also saved.
with Data
When with Data is enabled, all variable data used by the saved modules and programs is saved to file.
Save As
This operation allows you to saves the current selection under another filename.
• The Save dialog that opens allows you to save only the Selection (selected program or
module) or All programs or modules that are in memory.
Adept DeskTop 4.3 - Online Help 41
Page 42

• To save all variables that are in the saved module(s) or file(s) enable the with Data check
box.
Table 3: Relation between Save Options in Adept DeskTop and V+ Keywords
Selected item Corresponding Keyword and effect
Independent of the selection before select-
Save As:
ing
•All
• All + with Data
STORE, program name is empty
STOREP and program name is empty
When a module is selected:
•Selection Only
STOREM with the Module name selected but
without any data
• Selection Only + with Data
STOREM with the Module name selected and
with all the data
When a program is selected
•Selection Only
• Selection Only + with Data
STORE with the program name selected
STOREP with the program name selected
Save Module
This operation saves the selected module to the controller, with the last filename used to load or save
the module.
• This function is only available from the context menu when there are unsaved changes to the
selected module.
• Module names are temporary and are not saved to memory. When you save a module, the
programs it contains are saved with their respective names; the Module name is not saved.
When you reopen the file to which the module programs were saved, Adept DeskTop opens a
module that has the same name as the first file in the module.
Save All Modules
This operation saves all the modules to the controller, with the last filename used to load or save each
module.
Saving Programs in MicroV+
In MicroV+ programs are not saved to individual files. You cannot save only selected programs to the
controller: all programs and data are saved to the contents of the NVRAM, overwriting existing data.
• MicroV+ programs are loaded from NVRAM into RAM, and saved from RAM into NVRAM.
• When the programs are saved into NVRAM, any existing programs are overwritten by the
programs being saved.
• To avoid overwriting existing programs, you must first load all programs from NVRAM to
RAM, create your new programs, and then save all programs back into NVRAM.
Adept DeskTop 4.3 - Online Help 42
Page 43

Figure 20 Saving Micro V+ Files
Saving programs to NVRAM
Saving programs to NVRAM saves all data that is in RAM and saves it to the NVRAM memory on the
controller. Saved data includes:
• All programs
• All variables
The related MicroV+ keyword for this action is STORE. See the MicroV+ Language Reference for details
on storing files to NVRAM.
To save a program to NVRAM:
• In the toolbar, select the Save As icon, and select to NVRAM. See Figure 20.
• Alternatively, right-click in the program list and select Save As > to NVRAM from the
context menu.
Saving Programs to the PC
Saving programs to a PC provides an alternative to saving and overwriting NVRAM memory.
• Programs are saved to a single file that can then be opened from Adept DeskTop.
• If needed, program files saved on the PC can later be saved to the controller NVRAM
memory
• When you store to PC you can optionally choose to save only programs, or all data, which
includes programs and variables.
To save a program to the PC:
• In the toolbar or context menu, select Save As > to PC
•In the Open dialog that opens create the filename an select the path for the file in which
programs will be saved.
Adept DeskTop 4.3 - Online Help 43
Page 44

Task Manager Control
The Task Manager control allows you to assign programs to tasks, visualize, and manage tasks that are
running on the controller.
• From the Task Manager you can start or stop tasks as well as launch debugging of programs
in the task.
• You assign programs to a tasks by dragging the programs from the Program Manager into the
Tas k Man a g er.
To open the Task Manager control:
1. From the menu, select View > Task Manager.
2. Alternatively, click the Open Task Manager icon in the Adept DeskTop toolbar.
3. The control window opens, similar to Figure 21
Task Manager toolbar
Color of flag icons
indicate the status of a
task
Right-click here
to display the
context menu
Information on
selected task
Figure 21 Task Manager Control
.
What is a Task?
A task is a sequence of instructions that are defined by one or more programs. This sequence is also
referred to as the execution stack of the task.
Tasks can be executed and stopped either manually or programatically. Errors and system failures can
also halt or stop the execution of a task.
Task Status
Task status is indicated by a colored flag:
• Red indicates that the task was stopped due to an error or was manually stopped.
• Yellow indicates that task execution is paused or at breakpoint.
• Green indicates that the task is running.
• Black and white checker pattern indicates that the task execution has completed.
• White indicates that the task is idle or primed.
Adept DeskTop 4.3 - Online Help 44
Page 45

The display box displays information on the status of a selected task.
Number of Tasks
The number of tasks is limited as follows:
• Micro V+: 4 tasks. Task 0 is the only task that can send instructions to a robot.
• V+: 7 tasks.
• V+ with Extensions: 28 tasks
Numbering of task is 0-based, that is the numbering of tasks starts at Task 0.
Assigning Programs to a Task Execution Stack
The programs and instructions that are in a task are referred to as the execution stack, or simply the
stack, of the task.
From Adept DeskTop you can only assign a single program to a task. However, if the program added to
the task calls one or more programs, these programs will be added to the execution stack when they
are called. Figure 22
illustrates a 'called' program that was added to a stack after execution.
A single program can be assigned to more than one task.
this program
calls program
'pallet_loc'
Before execution of Task 1 only
program 'pckplc_3' is in stack
Figure 22 Program Added to an Execution task by the CALL Instruction
Task Handling
After executing Task 1,
program 'pallet_loc' is added
to the stack
• In MicroV+, Task0 is the only task that can be assigned to a robot.
• You cannot delete a task that is running, or delete or edit programs that are in a currently
executing task.
•You can Zero the memory when a task is running.
• In the Program Editor, attempting to edit a program that is executing will generate an error,
or will be ignored.
Adept DeskTop 4.3 - Online Help 45
Page 46

Task Manager Toolbar and Context Menu Options
The following actions or tasks can be launched from the task bar or the context menu.
Execute Task
Executes the selected task. In the toolbar, this icon toggles to Select Program when no programs have
been assigned to the selected task.
Select Program
When an empty task is selected, prompts for a program to assign to the task and launches execution of
the selected task. In the toolbar, this icon toggles to Execute Task when a selected task contains
programs in its stack.
Execute Using
Prompts for the name of a program and launches execution of the selected program, on the selected
task.
Debug Task
Launches debugging of a selected task.
Debug Using
Prompts for the name of a program and launches debugging of the selected program, on the selected
task.
Reset and Debug
Stops the executing of a task and restarts debugging from the first line of the first program in the stack.
Pause Task
Pauses the execution of the selected task at the next instruction.
Stop all tasks
Stops (pauses) the execution of all running tasks.
Retry Step
Retries the failed step and continues executing the task. If the selected task was paused or stopped due
to an error, attempts to re-execute the current step and continue execution.
Proceed Task
Continue executions of a task. If the selected task was paused or stopped due to an error, this button
attempts to continue the execution of the task.
Kill Task
Clear the selected task of any programs. A program must be cleared from the stack before it can be
fully edited. Note that AUTO variables or calling arguments cannot be changed while a program is in a
task stack.
Display only tasks used
When enabled, only the tasks that currently contain a stack (assigned programs) are displayed in the
Task Manager list.
Adept DeskTop 4.3 - Online Help 46
Page 47

Copy Stack to Clipboard
Records the contents of the selected task stack to the Windows clipboard. If a program terminates with
an error, this allows you to copy and paste the stack contents and send it to the proper support person.
Note that the robot ID is also recorded in this operation. Figure 23
a stack.
Figure 23 Text Content of a Task Stack Copied to the Clipboard
shows an example of the contents of
Refresh task list
Refreshes the status of the task list.
Adept DeskTop 4.3 - Online Help 47
Page 48

Using the Task Manager Control
The Task Manager control allows you to assign programs to tasks, and visualize and manage tasks that
are running on the controller.
• Programs added to the execution stack of a task are provided by the Program Manager
control.
• Use the tool bar or context menu to modify tasks, debug tasks or run/stop tasks.
• The Task Manager monitors controller events and will refresh the task status list when
needed.
Task Manager toolbar
Color of flag indicates the status
of a task
Right-click to display the
context menu
Displays status of selected task
Figure 24 Task Manager Control
Assigning Program to Tasks
Programs that open in the Program manager can be assigned (added) to tasks in the Task Manager.
The programs and instructions that are contained in a task are referred to as the execution stack.
To assign a program to a task stack:
1. Drag a program from the Program Manager list on a task in the Task Manager list.
2. Alternatively, select a task, then in the toolbar click the Select Program icon.
To remove programs from a task stack
1. Select a task.
1. If the task containing the program is running, you must stop the execution of the task.
2. From the toolbar or context menu, select the Kill Task.
Executing Tasks
You can execute, pause and debug programs from the Task Manager.
If a program in the task calls one or more programs that have not been opened, executing the task will
generate the error: Undefined program or variable name. Refer to V+ System Messages in the
V+ Reference Guide for more details.
Adept DeskTop 4.3 - Online Help 48
Page 49

To execute a task:
1. Select a task in the Task Manager.
2. If the task already contains instructions (one or more programs) select Execute Task from the
toolbar or context menu
3. If the task is empty, select Select Program, and enter the name of the program that you want
to execute in this task.
4. The flag beside the task will change color to indicate the progress/status of the program.
To pause a task:
• Select the task in the list, then select Pause Task from the toolbar or context menu. This
stops the task at the next execution in the running program.
• To pause all tasks that are running, select Stop All Tasks. This pauses all tasks that are
currently executing.
• To resume execution of a task that has been paused, select Retry Failed Step or Proceed
Task.
To debug a program:
You can launch debugging of programs from the Task Manager. For more details on debugging
programs see Debugging Programs.
1. Right-click on a task in the Task Manager to display the context menu as shown in Figure 25.
2. If the task is empty (no programs), select Debug Using. You will be prompted to provide the
name of the program you want to debug. The program will open in the Program Editor window.
3. If the task contains programs, select Debug Task. The task programs will open in the Program
Editor window. Reset and Debug will reset variable values and restart the debugging of a
program from the beginning.
4. Debugging messages and status appear in the bottom pane of the Task Manager window.
If the task stack is empty, you can
add a program to the task list and
launch debugging from the Task
Figure 25 Debug Using command adds program and launches debugging
Adept DeskTop 4.3 - Online Help 49
Page 50

Program Editor
The Adept DeskTop Program Editor is an online, interactive editor that includes program debugging
functionality.
• The editor performs syntax checking and formatting while you are programming.
• You can open up as many programs as needed.
• Program pages can be displayed as a group of tabs, or 'tiled' and displayed in horizontal or
vertical windows, which allows you to compare two or more routines. An example is shown in
Figure 26
Tabs show programs
currently open in the
Program Editor
Program Editor toolbar
Keyword tooltip displays
keyword syntax and
description when you move
(hover) over with mouse
Status bar indicates: line and
column number of the cursor
position, error message, and
keyword help
Figure 26 Program Editor
Context Sensitive Help on Keywords
You can obtain help on a V+ or MicroV+ keyword directly from the Program Editor.
To obtain Keyword help:
1. Click on a keyword and right click to obtain the context menu
2. Select the keyword help item, as illustrated in Figure 27
Click here
to open online help page
for selected keyword
.
Figure 27 Obtaining Keyword Help in the Program Editor
Adept DeskTop 4.3 - Online Help 50
Page 51

Viewing Programs in The Program Editor
Tabs group at right has
two open programs
Two vertical tab groups
each with its own toolbar
and status bar
Figure 28 Displaying programs in Vertical or Horizontal groups
You can split (tile) the display in the Program Editor into vertical or horizontal groups. Figure 28
illustrates two vertical groups, one containing two tabbed program windows.
To split the Program Editor Window into groups:
1. In the Program Editor click on a tab and drag it elsewhere in the Program Editor window
2. Release the mouse to open a context menu.
3. Select an option from the context menu.
Drag tab onto Program Editor
Select tab group option
from context menu
Figure 29 Creating Tab groups in the Program Editor
Program Editor Toolbar
The following list gives a quick description and keyboard shortcut of tasks you can carry out in the
Program Editor.
• Cut (Ctrl+X): Cut the selected text.
Adept DeskTop 4.3 - Online Help 51
Page 52

• Copy: Copy the selected text.
• Paste: Paste the text in the clipboard to the selected position.
• Undo last change: Erases last text change made to current file, returning it back to
previous state.
• Redo last undo: Reverses the previous Undo command; returning text back to state before
the Undo.
• Find/Replace: Opens the Search and Replace form, as illustrated in figure
• Toggle breakpoint at current line: Add or remove breakpoints to a program. Breakpoints
provide a way to set a point in the program where the program will automatically pause
when it reaches that point. This optimizes debugging so you don't have to single step
through the entire program.
• Clear all breakpoints: Removes all break points in the active program.
• Step into: Single step operation that will enter a subroutine call.
• Step over: Single step operation that skips stepping through a subroutine call. The
subroutine is executed in it entirety.
• Jump to current line and step: Starts the execution of the program, in step mode, starting
with at the current line (where the cursor is positioned).
• Retry line: Retries the current line.
• Proceed execution: Continues program execution.
Figure 30 Search and Replace Form used by the Program Editor
Printing Programs from the Program Editor
Print options are available from the Adept DeskTop menu. This allows you to print contents of the
Program Editor. To access print options, from the Adept DeskTop menu select
• File > Page Setup...: Opens the Page Setup dialog in which you can set paper orientation,
paper size, and margins.
• File > Page Preview...: Opens the Print Preview dialog in which you can visualize the
print output before launching the print job.
• File > Print: Opens the Print dialog in which you can select the printer, print range and
number of copies.
Adept DeskTop 4.3 - Online Help 52
Page 53

Syntax Highlighting
The default syntax highlighting colors can be modified in the Options window. See Setting Controls
Options.
Adept DeskTop 4.3 - Online Help 53
Page 54

Using the Program Editor
Program Editor
toolbar
Tooltip appears
when you hover
over with mouse
Breakpoint
Figure 31 Using the Program Editor
Opening the Program Editor
The Program Editor opens when you open a V+ or MicroV+ program.
To open the Program Editor
Do any of the following actions:
• From menu select File > New Program.
• In the Program Manager control toolbar select the Create New Program icon.
• In the program Program Manager control toolbar select the Open Program icon.
• Double-clack on a program in the Program Manager or Task Manager.
Formatting and Syntax Checking
As each line of program is entered, it is sent down to the controller dynamically. The controller
performs the formatting and checking, reports back the resulting format and the PC editor is updated to
reflect this.
In most cases, recognized keywords are properly indented in the code.
Elements in the program code are automatically displayed according to syntax hig lighting preferences
set in the Options form. For example, by default, keywords display in blue text, comments display in
green.
Adept DeskTop 4.3 - Online Help 54
Page 55

New line is typed, starting
at left margin
After 'Enter/Return' key is clicked, the
new line is automatically indented
Figure 32 Automatic Formatting of Code in Program Editor
Detecting Errors
There are many aids in the Program Manager to assist you in finding errors in programs.
• Syntax highlighting: Some errors are detected by the syntax checker. These errors are
highlighted in different color (red, by default) from the rest of the code.
• Status bar: The status bar displays the last error message reported by V+ or MicroV+ on
the controller, as illustrated in Figure 33
. It also shows the line (Ln:) and column (Col:)
position of the cursor.
• Program Manager Icons: In the Program Manager, the program containing an error is
indicated by an icon with a red "?" character.
• Tooltips: Tooltips appear at various places in the Program Editor when you hover and pause
over items with the mouse.
Text highlighting colors
can be modified in the
Options form
Error tooltip
Error message in status
bar provides description
and message number
Figure 33 Display of Errors in the Program Editor
Debugging Programs
Program debugging integrated into the Program Editor. Debugging allows you to interactively step
through a program execution while simultaneously displaying variables and states.
Adept DeskTop 4.3 - Online Help 55
Page 56

• You can have as many active debugging sessions as there are tasks. This feature allows you
to debug multiple tasks.
• The Watch Variable control assists in debugging programs. You can observe changes in the
values of variable as you step through the program. See the Watch Variable Control
section
for more details.
Breakpoints
• Set breakpoints at a point of interest in a program where you want to pause the execution of
the program and observe the value of variables.
• An executing program will stop at a breakpoint and then wait for a command to step through
the code or resume execution.
• The corresponding keyword for a breakpoint is BPT.
To add and remove breakpoints in a program:
Breakpoints must be set after the first executable statement in a program. You cannot set a breakpoint
before the .PROGRAM statement, any AUTO and LOCAL statements, and all comments and blank lines
at the start of the program.
• In the Program Editor, click to the left of a code line, in the left margin of the editor window.
• The breakpoint is indicated by a dot and a highlighted line; similar to Figure 34
. The color
may vary depending on personal preferences set in the Options form. See Setting Controls
Options.
• To remove a breakpoint, click on the breakpoint dot, at the left side of the line.
• You cannot add breakpoints before the first executable statement in the program.
• You cannot add or remove breakpoints in a program that is actively executing.
Click at left of line to set/remove a breakpoint
Figure 34 Breakpoints in a program
To step through a program using breakpoints:
1. When a execution of a program stops at a breakpoint the line is highlighted in yellow (default
color). The Program editor is in 'step' mode.
2. To continue the execution and debugging of the program in step mode, you must use one of the
following actions:
• Step into: Single steps into program lines. If it encounters a subroutine, it steps through the
subroutine, then continues stepping through the program.
Adept DeskTop 4.3 - Online Help 56
Page 57

• Step over: Single steps into program lines. If it encounters a subroutine, it executes the
subroutine the continues in step mode at the first line after the subroutine call.
• Jump into Current Line and Step: Starts single step mode, starting at the current line,
where the cursor is positioned.
• Retry: Retries the current line
• Proceed: Exits step mode and continues program execution.
Adept DeskTop 4.3 - Online Help 57
Page 58

Code Library Control
The Code Library tool is used to store code samples, also called clips, that can reused.
• Adept DeskTop also provides some predefined code clips that you can use as a starting point.
• Code clips added by the user are stored to the preferences folder in Windows on the
computer. This ensures that when you reinstall or upgrade Adept DeskTop, your code clips
are reloaded into the Code Library.
• Code clips provided with Adept DeskTop are protected files. They cannot be modified or
deleted.
To open the Code Library
1. From the Adept DeskTop menu, select View > Code Library.
2. Alternatively, from the Adept DeskTop toolbar, select the Code Library control icon.
Code Library toolbar
Code clip created by user
Yellow icons indicate
protected code clips
Group of code clips
Description of selected code
clip, if exists
Figure 35 Code Library Control
Using the Code Library
From the code library you can create new programs, insert code clips into open programs, or open the
Clip Editor to edit existing clips.
To create an new program from a code clip:
1. Select a code clip.
2. From the toolbar select the Create new program from clip icon.
3. This opens the New Program form in which you must provide the program name.
4. A new program page opens page in the Program Editor, containing the code from the selected
code clip. See Creating and Editing Code Clips
Adept DeskTop 4.3 - Online Help 58
for more details.
Page 59

To create a new code clip:
New clips are created and define in Clip Editor. To open the Clip Editor do one of the following:
• From the toolbar, click the Create a new library entry icon, or select a New from the
context menu. This opens a blank Clip Editor session.
• Select a code clip from which you want to reuse the code. Click Copy, then, Paste. This
opens the Clip Editor, containing the code copied from the selected clip.
• Select a code clip and click Edit. You can then rename and edit this code clip in the Clip
Editor. See Creating and Editing Code Clips
To insert a code clip into an open program:
• Select a code clip and drag it onto an open program in the Program Editor.
• This adds the code contained in the clip, starting at the line where you drop the clip.
• Adept DeskTop will not allow you to drop the code clip into certain incorrect positions in a
program. For example after the.END statement.
To delete a code clip:
for more details.
Note that you cannot delete the protected code clips that are installed with Adept DeskTop. Protected
code clips are indicated by a yellow icon.
1. Select the clip you want to delete.
2. From the toolbar click the Remove clip from system icon.
Related Topics
Creating and Editing Code Clips
Adept DeskTop 4.3 - Online Help 59
Page 60

Creating and Editing Code Clips
Use the Clip Editor to create new clips or edit existing code clips.
Figure 36 Clip File Editor
Note:A clip does not require a '.PROGRAM' and '.END'. However, if either is used
in the clip, then both are required.
To open a create an new code clip:
1. From the Code Library toolbar, select Create a new library entry.
2. Fill in the fields described below and type or paste code into the Data field.
3. Click Ok to save this clip and add it to the Library.
To edit an existing code clip:
1. Select the code clip to edit in the Code Library list.
2. From the Code Library toolbar, select Edit Clip.
3. Alternatively, you can double-click on the Clip name to open the Clip Editor.
4. Enter the required modifications to the text fields in the Clip Editor and Ok to save the
modifications.
Adept DeskTop 4.3 - Online Help 60
Page 61

Clip Editor Text and Data Fields
Name
You m ust e nter a n Name. This name is the node name that is displayed in the Code Library list view
display. The name must be unique in its Group.
Group
You must provide a Group name. Select a existing group from the drop-down list, or create a new
group by typing the name in the field. The clip will be displayed under this group name in the Code
Library.
Description
Descriptions are optional but recommended. Enter a description that describes the purpose or use of
the code in the clip.
Data
Use this area to type or paste contents of the clip file.
A clip does not require a '.PROGRAM' and '.END'. However, if either is used in the clip, then both are
required.
Supported Controllers
Select the controller types that this code clip is compatible with. This enables the Code Library control
to determine the display setting for this clip.
Related Topics
Code Library Control
Adept DeskTop 4.3 - Online Help 61
Page 62

Keyword Browser Control
The Keyword Browser control displays and manages all the keywords available for the type of system
connected; either V+ or MicroV+.
Keywords from can be dragged into open programs in the Program Editor.
To open the Keyword Browser:
The keyword browser is typically open in the default desktop layout and is tabbed in auto hide mode to
the left of Adept DeskTop window.
1. From the Adept DeskTop menu, select View > Keyword Browser.
2. Alternatively from the toolbar, click the Open Keyword Browser icon.
To drag keywords to the Program Editor:
• Select a keyword and drag the keyword required position in a program in the Program Editor.
• To drag the keywords with their arguments, enable the toolbar icon: Drag keyword and
arguments.
• Adept DeskTop will not allow you to drag keywords to certain positions in a program. For
example, you cannot drag a keyword before .PROGRAM or after .END.
Figure 37 Keyword Browser Control
Toolbar provides
display options
Icons indicate type of
keyword:
I - Instruction
F - Function
M - Monitor Command
Yellow icons indicate
advanced keywords
Description of
selected keyword
Keyword Browser Toolbar
The toolbar provides the following options for the Keyword Browser control.
Adept DeskTop 4.3 - Online Help 62
Page 63

Grouped
Enabling Grouped displays all the keywords grouped by similarity in function, as illustrated in Figure
37.
Alphabetic
Enabling Alphabetic the keywords in three groups: Functions, Instructions and Monitor Commands.
The keywords are displayed alphabetically within each group.
Drag Keyword
When Drag Keyword button is enabled, only the keyword can be dragged to the Program Editor, the
default arguments are not.
Drag Keyword and Instructions
When this button is enabled both the keyword and the default arguments can be dragged to the
Program Editor.
All
By default, the Keyword Browser tool displays only the commonly used keywords.
• When All is enabled, this button is selected, advanced keywords are also displayed are
displayed in the selected display mode.
• Advanced keywords are indicated by yellow icons.
Help
Displays online help for the selected keyword.
Adept DeskTop 4.3 - Online Help 63
Page 64

Variable Manager Control
The Variable Manager control allows you to view, search, and modify variables that are in memory. By
default, the Variable Manager monitors and displays GLOBAL variables, however you can add
monitoring of AUTO and Local variable for specific tasks and programs.
From the Variable Manager you can:
• Drag a variable into a program in the Program Editor.
• Select any variable and modify its value.
• For location type variables, you can either manually enter a new value or record the current
position of the robot.
• Create and remove variables.
• Monitor variables in tasks.
To open the Variable Manager control:
1. From the menu, select View > System Resources > Variable Manager.
2. Alternatively, click the Variable Manager icon in the Adept DeskTop toolbar.
3. The control window opens, similar to Figure 38
.
Variable Manager toolbar
Use text filter to search for
variables
String variables are supported
only in V+ systems
Tooltip displays variable
contents
Figure 38 Variable Manager Control
Variables are arranged by type in a tree view control. Each variable is represented by a node item in the
display with the variable name followed by its last value.
Adept DeskTop 4.3 - Online Help 64
Page 65

Variable Manager Toolbar and Context Menu
You can carry out the following operations with the task bar and context menu.
Continuous Scanning
Updates all displayed variables continuously. The scan rate varies depending on controller type and
number of variables displayed. To dynamically scan a large number of variable, it is preferable to use
the Watch Variable Control.
Stop Scanning
Terminates the Continuous Scanning process.
Create New Variable
Opens the Create Variable dialog for creating a new variable. See Creating a Variable
Copy
Copies a variable and saves it to the clipboard. It can then be pasted into a program in the Program
Editor.
Paste
Pastes a copied a variable.
Edit Selected Variable
Opens the Edit Variable dialog in which you can view and modify the current value of a selected
variable.
Delete Selected Variable
Removes the currently-selected variable. A confirmation is displayed and must be acknowledged,
before the variable is deleted.
Add @task: Program monitoring node
Adds monitoring of AUTO variables for a specified task and program. You can also monitor of LOCAL
variables for a selected program.
• AUTO and LOCAL task monitoring is not supported for MicroV+ systems.
• Figure 39
• Corresponding V+ keywords for displaying variables are LISTL, LISTR, and LISTS.
Add to Watch Variable
Opens the Watch Variable control to add the selected variable to the list of watched variables. See
Adding a Watched Variable
Refresh
Refresh the contents of the window.
shows a AUTO variables added to the Variable Manager list.
.
Record
Records the current position of the robot in the selected Location or Precision Point variable.
Jog To
Opens the Jog Pendant control to set the selected variable as a Jog To location.
Adept DeskTop 4.3 - Online Help 65
Page 66

Filter
The Filter facilitates finding one or more variables.
• Enter characters in the Filter field and click OK to display variables that begin with the
entered characters.
Add Task Monitoring
AUTO variables of task
'Jog To' opens the
Jog Pendant Control
Figure 39 Variable Manager with AUTO Variable Node Added
Adept DeskTop 4.3 - Online Help 66
Page 67

Using the Variable Manager Control
Creating a Variable
To create a new variable:
• In the Variable Manager toolbar, click the Create a variable icon, or select Create from the
context menu. This opens the Create Variable form.
• The fields in this form depend on the type of variable selected as shown in Figure 40
Form for creating a
Location variable
Form for creating a
Real variable
Figure 40 Create New Variable Form
To create a Location variable:
1. In the Type field, select: Location
2. In the Name field, type a unique name that will identify the variable. The name cannot exceed
15 characters and empty spaces are not allowed.
.
3. Type in or select a Value for the components of the Location variable for: X, Y, Z, Yaw, Pitch,
Roll.
4. To create the Location variable from the current position of a connected robot, select the
appropriate Robot, then click the Record button
5. Click OK to save the variable and exit the form.
To create a Precision Point variable:
To create a Precision Point variable you must be connected to a controller on which a robot is
configured.
1. In the Type field, select: Precision Point.
2. In the Name field, type a unique name that will identify the variable. The name cannot exceed
15 characters and empty spaces are not allowed.
3. Type in or select a Value for the components of the Location variable for: X, Y, Z, Yaw, Pitch,
Roll.
4. To create the Precision Point variable from the current position of a connected robot, select the
appropriate Robot, then click the Record button.
Adept DeskTop 4.3 - Online Help 67
Page 68

5. Click OK to save the variable and exit the form.
To create a Real variable:
1. In the Type field, select: Real.
2. In the Name field, type a unique name that will identify the variable. The name cannot exceed
15 characters and empty spaces are not allowed.
3. In the Value field, enter the text string for the variable.
4. Click OK to save the variable and exit the form.
To create a String variable (in V+ only):
String variables are currently supported only in V+ systems.
1. In the Type field, select: String.
2. In the Name field, type a unique name that will identify the variable. String variable names
MUST start with a '$' symbol to be correctly recognized and interpreted as a string. The name
cannot exceed 15 characters and empty spaces are not allowed.
3. In the Value field, enter the text string for the variable.
4. Click OK to save the variable and exit the form.
Editing a Variable
To directly edit the value of a variable, select a variable in the Variable Manager and click the Edit
selected variable icon in the toolbar.
• You can the directly view the current value and edit the value in the Edit Variable form, as
shown in Figure 41.
•The Edit Variable form differs depending on the type of variable selected.
Name of variable appears
in title bar
Figure 41 Edit Variable Form
Monitoring Variables in a Program
By default, the Variable Manager monitors and displays only Global variables. You can add monitoring
of:
• AUTO variables for a specified task and program.
• LOCAL variables for a specified program.
To add monitoring of AUTO or LOCAL variables:
1. Select the Add @task icon in the toolbar of the Variable Manager.
2. This opens the Add Program Monitoring form, as shown in Figure 42.
Adept DeskTop 4.3 - Online Help 68
Page 69

3. Select a Task number. If you leave the Name field blank, program monitoring will be added for
AUTO variables.
4. To add task monitoring for LOCAL variables, specify a program name in the Program field.
Name of variable appears
in title bar
Figure 42 Add Program Monitoring Form
Task
Number of the task to which is assigned the program you want to monitor.
Program
Name of the program in which you want to monitor variable values.
Adding a Watched Variable
From the Variable Manager, you can add a variable to the Watch Variable control.
To add a watched variable:
1. Select a variable.
2. From the toolbar select the Add to Variable Watch icon, or from the context menu, select Add
to Watch Variable.
3. The Watch Variable control opens, with the selected variable added to the list of watched
variables. See Watch Variable Control
for more details.
Related Topics
Variable Manager Control
Watch Variable Control
Adept DeskTop 4.3 - Online Help 69
Page 70

Operator Control
The Operator Control provides an interface for the basic operations required to run a robotic application
in a workcell.
• The operations that can be run from the Operator Control must be created by a system
administrator, through the Operation Manager control.
• The control buttons available in the Operator Control window execute one of the four
following commands: Start, Proceed, Pause, Stop.
Opening the Operator Control
The Operator Control Tool is automatically opened when you select the Operator Layout.
To open the Operator Control:
1. From the menu, select View > Operator Control.
2. Alternatively, from the toolbar, select the Operator Control icon.
Selects the active operation
Operation buttons. Pause and
Stop buttons may be disabled
for some operations
Displays the status of the
current task
Figure 43 Operator Control
Using the Operator Control
Operation Selection
To start an operation, select the operation from the dropdown list. Only operations created through the
Operations Manager are available in the dropdown list.
START
Click START to launch the execution of the selected operation.
Proceed
Click Proceed to continue the execution of a program that has stopped. A message appears in the
Task Status display to explain the reason why the program has halted. Proceed resumes the
execution of the program at the point where the program has stopped.
Proceed replaces the START button when the current operation is halted from outside the Operator
Control. For example, when an error occurs, or when a program encounters a breakpoint. See Figure
44.
Adept DeskTop 4.3 - Online Help 70
Page 71

PAUSE
PAUSE halts the selected operation. After a PAUSE, the operation can be restarted at the point where
it was halted by the PAUSE.
The PAUSE button may be disabled for some operations. See Operation Editor
.
STOP
Clicking STOP completely stops the selected operation.
The STOP button may be disabled for some operations. See Operation Editor
.
Task Status
The Task Status display provides information on the execution of the current operation.
Selects the active operation
Proceed restarts an operation that
has been halted by an external
cause
Message reporting why the
current operation is been
stopped
Figure 44 Operator Control Waiting for a Proceed instruction
Related Topics
Operator Layout
Operations Manager
Adept DeskTop 4.3 - Online Help 71
Page 72

Operations Manager
The Operations Manager tool allows an administrator-level user to configure operations that can later
be run from the Operator Control.
Note:The Operation Manager is only available if you are logged into Adept
DeskTop with the administrator (top-level) Access Level.
• The operations configured and managed through the Operation Manager are operations that
are typically executed by an operator in a workcell. The only possible actions that can be
carried out on these operations from the Operator Control are START, Proceed, PAUSE and
STOP. See Operator Control
• The STOP and PAUSE buttons for a defined operation can be optionally enabled or disabled in
the Operation Editor.
• The grid in the Operation window displays all the currently available operations, as illustrated
in Figure 45
To open the Operations Manager:
.
.
1. From the Adept DeskTop menu, select Tools > Operations Manager.
2. The Operation Manager window opens, as illustrated in Figure 45
cannot return to the main interface while it is open.
Figure 45 Operations Manager Window
Add
Opens a blank Operation Editor form in which you can configure a new operation to add to the current
list. See Operation Editor
Remove
Removes the a selected operation from the list of operations.
.
. This is a modal window: you
Edit
Opens the Operation Editor, containing the current settings of the selected operation. See Operation
Editor.
Adept DeskTop 4.3 - Online Help 72
Page 73

Related Topics
Operator Control
Operation Editor
Adept DeskTop 4.3 - Online Help 73
Page 74

Operation Editor
The Operation Editor allows you to configure and define an operation that will be added to the
Operations Manager. All operations defined in the Operations Manager can be run from the Operator
Control.
Name that will be displayed in
the Operator Control
Enables buttons that will appear in
the Operator Control
Figure 46 Operations Editor Window in V+
Operation Name
In the Operation Name field, enter a unique, common name that will identify the operation.
Program Name
In the Operation Name field, enter the name of a program, currently in memory (in the Program
Manager), that defines the operation.
If this program may not be in memory when an operator launches it from the Operator Control, you can
define a program in the Source parameters, as explained below.
Source
Use Source parameters to set the location of a program that can be run from the Operations Manager,
when the required program is NOT in memory (not in the Program Manager).
To set Source parameters in V+
1. Click the browse button (...) to find the required program.
2. In the Open file dialog, browse and select the required program.
3. Enable the check box Also load data from file if you want to load the data associated to the
source program when the operation is executed.
To set Source parameters in MicroV+
1. Click the browse button (...) to find the required program.
2. In the Open file dialog, Browse and select the required program.
3. Enable the check box Also load data from file if you want to load the data associated to the
source program when the operation is executed.
4. Enabling Auto Load NVRAM will allow Adept DeskTop to load NVRAM to find the required
program if is not in memory.
Adept DeskTop 4.3 - Online Help 74
Page 75

Name that will be displayed
in the Operator Control
Source file used if the
program is not found in
memory when the operation
is run
Figure 47 The Operation Editor in MicroV+
Task Number
In the Task Number drop-down list, select the task to which the defined operation will be assigned.
Buttons Enabled
Enable the buttons that will be enabled in the Operator Control to run this task.
• Stop: Enables the use of the Stop button in the Operator Control, to stop the selected task.
• Pause: Enables the use of the Pause button in the Operator Control, to pause the selected
task. Paused task can be resumed by the operator by a Start or Proceed command.
Related Topics
Operator Control
Operations Manager
Adept DeskTop 4.3 - Online Help 75
Page 76

Robot Control
The Robot Control tool is used to enable power, calibrate, and change the speed of the robot. This
control also provides the status of power, calibration, and e-stop state of the connected controller.
To display the Robot Control tool:
1. From the menu select: View > Robot Control.
2. The Robot Control tool opens, the E-Stop Button and Robot Status indicate the current status of
the robot connection.
Robot Status indicator
E-Stop button
Set/Modify robot speed
Error message display
Figure 48 Robot Control
E-Stop Button Status and Messages
The E-Stop button in the Robot Control carries out the same function as the physical E-Stop button on
the Front Panel or T1 Pendant. Table 4: provides information on the significance of the E-Stop button
color and text.
Adept DeskTop 4.3 - Online Help 76
Page 77

Table 4: E-Stop Button appearance in the Robot Control
Color Text Description
Gray (no text) Adept DeskTop has not connected to a controller
Green Disable Power The robot power is ON and the robot is calibrated.
Click to disable power to the robot.
Yellow Enable Power The robot power is off and the E-stop state is off.
Click the button to enable power to the robot.
Yellow Calibrate The robot power is ON but the robot is not calibrated. The
robot cannot operate until it is calibrated.
Click the button to attempt a calibration sequence.
Yellow Stand By... The system is waiting for High Power to be enabled by
pressing the High Power button on the Front Panel.
Red E-Stop E-stop is pushed. There is no power to the robot.
You cannot operate the robot until E-stop state is cleared
on the controller.
Robot Status Display and Messages
The Robot Status field displays status messages about the current status of the robot. Table 4:
provides information on the significance of the color and text messages in the status display.
Table 5: Status Display of the Robot Control
Color Text Description
Gray Not connected Adept DeskTop has not connected to a controller
Green Robot power ON Robot power is on.
Yellow Turning Power OFF The system is disabling power to the robot.
Yellow Dry Run Mode DRY.RUN is enabled and it overrides all other display
states except for E-Stop Pushed.
Red E-Stop Pushed An E-stop is pushed.
Red Fatal Error A fatal hardware error has occurred. Robot power is off
and cannot be turned on.
The robot is not configured correctly and High Power cannot be enabled.
White Robot Power OFF Robot power is off.
White Press HIGH
POWER button on
Front Panel
The system is waiting for the High Power button on the
Front Panel to be pressed.
If the button is not pressed, the message returns to Robot
Power Off.
White Not calibrated Robot is not calibrated.
Robot Speed
Use the Robot Speed% items to set to set the monitor speed of the controller. You can enter the
speed numerically into the field, or use the slider to adjust the speed. The results of any slider
adjustments are displayed numerically in the % field.
Clear Display
Click Clear Display to clear the error messages displayed in the Robot Control.
Adept DeskTop 4.3 - Online Help 77
Page 78

Jog Pendant Control
The Jog Pendant control, also called the virtual jog pendant, performs functions similar to the T1
Pendant, from the Adept DeskTop interface. The Jog Pendant Control offers additional features for
increased control and functionality, especially useful for developing, setting up and troubleshooting.
• The robot can be moved in distance increments; this facilitates the moving of the robot to
very precise positions or small increments.
• The Jog To mode allow quick positioning of the robot to defined positions. These positions
can be provided by predefined transformation parameter, stored in a variable, or entered
manually.
Note:To control the robot from the Jog Pendant Control the physical T1 pendant
MUST be set to Comp mode. If the Pendant is not in comp mode the status
message in the Jog Pendant control window reads: 'Pendant Not In Comp'
To open the Jog Pendant control:
1. From the menu, select View > Jog Pendant
2. Alternatively, from the toolbar, select the Jog Pendant icon.
Robot Status
message
Movement command
buttons
Robots currently
available
Figure 49 Jog Pendant Tool
Current Position
The Current Position frame displays the current position of the robot tool. This display is dynamically
refreshed as the robot moves.
• Use the World and Joint radio buttons to show the robot position expressed in either
Cartesian units or joint angles.
•In the World frame of reference, position is expressed as x, y, z, yaw, pitch, roll
•In the Joint frame of reference, position is expressed as joint angles, in degrees.
Adept DeskTop 4.3 - Online Help 78
Page 79

Jog Control
The Jog Control frame provides controls and parameters to physically move the robot and to control
speed and distance of robot movements.
• Use the slider to set a value, or type a value directly in the text box.
• When setting up, slow speed or small increments are recommended.
Movement Commands
Movement command buttons display arrows representing the relative direction in which the robot will
be moved.
For example in Figure 50
, pressing movement buttons will move the Robot along the Y-axis of the
Robot tool (end-effector) frame of reference.
• The behavior of the movement buttons is determined by the Speed and Increment options.
• The arrow labels vary depending on the selected Mode and Axis. In Figure 50, movement
buttons represent robot movement along the Y axis.
•In Figure 51
, movement buttons represent robot movement as a rotation about the Z axis.
Figure 50 Jog Pendant in Tool Mode
Robot position expressed
precision-point values when
'Joint' mode is selected
Movement buttons express
direction and axis of robot
movement
Speed
The Speed option enables you to set the speed at which the robot moves, as a percentage of the
maximum robot speed.
• In this mode, the robot moves with the set speed, in the selected direction, for as long as a
movement button (arrow) is maintained
• When the robot attains its limit (out of range), the movement stops.
• If you need to refine the movement to reach a precise point, the Increment mode may
provide more control.
Increment
The Increment option enables you to set a distance increment for robot movement. This is useful for
precise positioning; for example, when the slowest Speed mode overshoots the precise location to
which you are attempting to position the robot.
Adept DeskTop 4.3 - Online Help 79
Page 80

Increments are expressed in World coordinates; the Increment option sets the Jog Pendant to World
mode.
• In this mode the robot moves by the define Increment distance, in the selected direction,
regardless of the time the movement button (arrow) is maintained, except if released before
completed.
• Each time the movement button is pressed, the robot moves again, to the Increment
distance.
Incremental
movement can be
used only in 'World'
mode
Increments can be
millimeters or degrees,
depending on axis
Precision Point values
described robot position
in Joint-based values
Figure 51 Jog Pendant set to move the robot in Increment Mode
Mode
Jog Mode sets the Mode that will be used to move the robot. These modes are described below.
Comp Mode
Comp mode is also called Computer mode. In this mode, the Jog Control commands and settings are
disabled. When Comp mode is enabled, the robot can be controlled by an executing program or the
system terminal, the operator cannot move the robot.
Joint Mode
Joint mode enables the Jog Control to move the robot about the axis of the joint selected in the Axis
group.
Adept DeskTop 4.3 - Online Help 80
Page 81

Buttons move selected
joint in + or - direction
Number of joints depends
on the type of the
selected robot
Location Management allows
you set location manually or
get location from robot
Figure 52 Jog Pendant in Joint Mode
World Mode
World mode enables the Jog Control to move the robot in the selected direction: X, Y, or Z axes, of the
World frame of reference, or rotated around these axes: RX, RY, or RZ, in the world coordinate system.
Tool Mode
Tool mode enables the Jog Control to move the robot in the selected direction X, Y, or Z axes of the
Tool coordinate system, or rotated around these axes: RX, RY, or RZ, in the tool coordinate system.
Jog To Mode
The Jog To mode allows you to move the robot to a defined location. You must first set the Jog To
location before you enable the Jog To button.
•The Jog To location is defined under Location Management if the current robot position is
expressed in World coordinates.
• Jog To locations can only be expressed in Cartesian units.
• Jog To mode is not available in MicroV+ systems.
To set the Jog To location:
1. Set the Jog To location by doing one of the following:
• Enter or select known values in the required fields
• Acquire the location from a variable: click Browse and select a location array variable from
the Variabl e Browse r
• Click Record to set the Jog To location.
.
2. Set a distance value under Jog to - distance. This enables the Jog Control buttons shown in
Figure 52
to move to the robot either directly to the Jog To position, or above the Jog To
position, at the defined distance.
Adept DeskTop 4.3 - Online Help 81
Page 82

Moves robot to Jog To location
Moves robot above Jog To location
by distance set by Jog to...dist
Precision Point Management allows
you set precision points or get
points from robot
Figure 53 Setting a Robot Location for Jog to Mode
Location Management vs. Precision Point Management
The Location Management frame displays when the robot position is expressed in World
coordinates. A Location must be set in this frame before you enable the Jog To mode.
The Precision Point Management frame displays when the robot position is expressed in Joint
mode.
Location Management
The Location Management frame allows you to either manually set the values of a transform, or get
a transform from the current position of the robot. You can then save this location to variable.
The first three components of a transform variable are the values for the points on the X, Y, and Z axes.
The three other components are the yaw, pitch, and roll.
Figure 54 Selecting a variable in the Location Management Frame
To set a transform from the current robot position:
1. Select the Robot that will provide the transform.
2. Click the Record button. The Location Management values are updated with the values of the
current robot position.
To get a transform from a variable:
1. If you know the name of the required variable, enter or select the name of the variable, as shown
in Figure 54
.
Adept DeskTop 4.3 - Online Help 82
Page 83

2. To search for a variable, click Browse, to open the Variable Browser.
3. In the Variable Browser find and select a location variable. Click OK.
4. The name of the variable and its value are added to the Location Management fields.
To save the transform to a variable:
1. You cannot create a new variable in the Location Management frame. To save values in the
location management frame you must select an exiting variable.
2. Any changes that you make to transform parameters, either manually, or recorded from a robot
position, will be saved to the variable, overriding the current value of the variable.
3. Click 'Enter' to save transform parameters to the variable.
Precision Point Management
The Precision Point Management frame allows you to either manually set the joint angles of a robot
position, or get these points from the current position of the robot. You can then save this location to
variable
• Precision points express a robot location as the joint angles of each joint of the robot.
• Precision points may be more accurate, and they are the only way of extracting joint
information that will allow you to move an individual joint.
To set precision points from the current robot position:
1. Select the Robot that will provide the precision points.
2. Click the Record button. The Precision Point Management values are updated with the values of
the current robot position.
To get a precision points from a variable:
1. If you know the name of the required variable, enter or select the name of the variable, as shown
in Figure 54
2. To search for a variable, click Browse, to open the Variable Browser.
3. In the Variable Browser.r find and select a location variable. Click OK.
4. The name of the variable and its value are added to the Precision Point Management fields.
To save the transform to a variable:
1. You cannot create a new variable in the Precision Point Management frame. To save values in the
location management frame you must select an exiting variable.
2. Any changes that you make to transform parameters, either manually, or recorded from a robot
position, will be saved to the variable, overriding the current value of the variable.
.
3. Click 'Enter' to save transform parameters to the variable.
Adept DeskTop 4.3 - Online Help 83
Page 84

Tool Transformation Control
This control gives users access to the currently defined tool transformation. It also allows the user to
select or enter a tool transformation and activate it for a specified robot.
To open the Tool Transform Control:
1. From the menu, select View > Tool Transformation Control.
2. Alternatively, from the toolbar, select the Tool Transformation Control icon.
Figure 55 Too l Tr a n sf orm C o n t r ol
Source Transform
Source transform parameters provide a set of parameters that will be applied to the current tool
transformation.
Browse
Opens the Variables Browser from which you can search and select a variable that will provide the
values for the source transform.
Current Tool Transform
Current tool transform parameters provide information on the current tool transform of a selected
robot.
Robot
Allows you to select the robot to which the tool transformation will be applied.
Null
Sets the current tool for the selected robot to the NULL transform: (0,0,0,0,0,0).
Set from Source
Sets the current tool transform to the values shown in the Source Transform frame.
Adept DeskTop 4.3 - Online Help 84
Page 85

Frame Manager Control
The Compute Frame control is used to define and store multiple frames of reference.
• The Compute Frame control computes a transformation for the frame of reference from three
points.
•The Tea c h F ra me Wiz a r d
required to compute the required frame of reference.
• The data for associating computed frames are stored on the connected controller. This allows
any Adept DeskTop session to connect to the controller and provide a list of available defined
frames.
To open the Compute Frame Control:
1. From the menu, select View > Compute Frame Control.
2. Alternatively, from the toolbar, select the Compute Frame Control icon.
available from this control, can assist you in defining the points
Opens the Teach Frame
wizard
Opens the Variables Browser
form
Read-only values of the
computed frame transform
Figure 56 Compute Frame Control
Why Create a Frame?
When using a very simple workcell layout, it is easy to teach every point in the cell using the default
(World) reference, which is located at the base of the robot.
However, when you start adding tooling to your layout, such as a pallet, you should consider using a
reference frame for the pallet. The reference frame allows you to specify a local coordinate system for
that pallet and then teach positions on the pallet, based on that reference. If you need to adjust the
position of the pallet in the workcell, you simply reteach the frame location and all the pallet locations
will adjust automatically. This saves you the trouble of having to reteach all the individual pallet
locations.
Adept DeskTop 4.3 - Online Help 85
Page 86

World Frame of Reference Pallet Frame of Reference
Figure 57 Illustration of a Simple Pallet Frame of Reference
Creating a Frame of Reference
You can create a frame of reference by following the procedure below. Note that you can also create a
frame using the Teach Frame Wizard.
To create a frame of reference:
1. Enter a common name for the new frame in the Frame Name field. This name should allow you
to easily identify the purpose/use of the frame. You can also select an existing name and edit the
selected frame. This is optional, but useful if you intend to use this frame for further reference.
2. Provide the location of three points in the Frame, described by the Base Points
3. You can also provide the Base Points from existing variables or from the current robot position:
• To define a base point from a variable, click Browse and select an appropriate transform
variable from the Variable Browser.
• To define a base point from the current position of a robot, select the robot (number), and
click Record.
4. Enter a variable name, under Store Frame in Variable, in which the new frame transform will
be saved, or click Browse to save the to (and overwrite) an existing variable. This is optional,
but necessary if you want to save the computed transform.
5. Click Compute. The control will compute the transformation that defines the new Frame of
Reference and store it in a variable, if you set a variable name in step 4.
section below.
Base Points
You must provide three location from which the control will compute the transform for a Frame. These
locations are labeled: Origin, Point on X, Point on Y
• For each location, you must provide the x, y, z coordinates of the new frame expressed by
their position in the World Frame of Reference. The Teach Frame Wizard can facilitate this
process by allowing you to move the robot to these points instead of calculating their value in
World coordinates.
Adept DeskTop 4.3 - Online Help 86
Page 87

• The yaw, pitch, and roll are optional. They do not affect the computation of the frame of
reference.
Origin
Origin is the origin (0,0) of the new frame of reference.
Point on X
Point on X must be ON the x axis of the new Frame. It should be as far as possible on the X axis: a
longer distance provides greater accuracy in the computation of the Frame of reference.
Point on Y
Point on Y does not have to be ON the Y axis of the new frame, but it must be ON the X-Y plane, on
the positive side.
Z axis
Origin
Y axis
Point on Y
X,Y plane
Point on X
Figure 58 Base Points to Required to Compute a Reference Frame
Note:The direction of the Z-Axis is computed from the above points, using the
right-hand rule.
See also: FRAME transformation Function in V+ Reference
Related Topics
Teach Frame Wizard
Adept DeskTop 4.3 - Online Help 87
Page 88

Teach Frame Wizard
The Teach Frame Wizard guides you through the creation of a frame of reference for the current
system.
During this wizard you will need to move the robot to teach the origin of the new frame of reference.
To open the Teach Frame Wizard:
In the toolbar of the Compute Frame control, click the Wizard icon.
Figure 59 Teach Frame Wizard - Welcome
Using the Teach Frame Wizard
The Wizard takes you through the necessary steps to create a new Frame of reference.
You will need to enable power to the robot and use the Jog Pendant control to complete the steps of
this wizard application.
Follow the instructions in the Wizard. You will be asked to move the robot to the points that will define
the new Frame of reference.
Do not close the Wizard to operate the robot. Instead, open robot power and move the robot from the
Wizard, using Use the Show/Hide Pendant button and the Show/Hide Power Control button,
shown in Figure 60
.
Adept DeskTop 4.3 - Online Help 88
Page 89

Figure 60 Operating the Robot from the Teach Frame Window
Adept DeskTop 4.3 - Online Help 89
Page 90

Adept Graphics Window Control
The Adept Graphics Window control allows you to access the Adept Windows terminal.
To open the Adept Graphics Window control:
From the Adept DeskTop menu select View > Adept Graphics Window.
Figure 61 Adept Graphics Window
For more information on the Adept Graphics window, refer to the AdeptWindows User’s Guide.
Related Topics
AdeptWindows User’s Guide (on Adept Website)
Adept DeskTop 4.3 - Online Help 90
Page 91

V+ Utilities Control
The V+ Utilities control simplifies access to the V+ based utilities on the connected controller. This
control enables you to execute utility programs from the PC instead of running them in text mode, from
the Monitor Terminal window.
The utilities are typically installed on the CompactFlash directory: Disk>D:\UTIL\
• You can browse the system (including NFS-mounted drives) for utilities that are located in a
different folder on the controller.
• You can assign a V+ utility to a task.
• You can execute and pause a V+ utility.
Note:The V+ Utilities control in not available on MicroV+ systems.
To open the V+ Utilities Tool:
1. From the Menu, select View > Controller Configuration > V+ Utilities
2. The V+ Utilities window opens, similar to Figure 62 opens and displays several categories of
available utilities. Click the + sign next to the folders to display utilities.
V+ Utilities toolbar
Double-click on utility name to
execute the utility program
Description of the selected
Utility
Opens a browser form to
find a Utility
Assign selected utility to
task list
Figure 62 V+ Utilities Control
Using the V+ Utilities
Use the toolbar to carry out the following actions or tasks.
• Execute Selected Utility: Launch the selected utility and automatically display the needed
resources (V+ Monitor Window, Vision Window, or V+ Graphics Window). You can also
execute a utility by double-clicking on it in the file list.
Adept DeskTop 4.3 - Online Help 91
Page 92

• Pause Application: Pauses the utility and unloads the last launched utility. If a utility does
not complete, clicking on this button will force the Terminal Window to close.
• Displays All Items: Displays all utility programs (all *.V2 files) by group. Any unknown
utilities are placed in the 'Others' folder. Advanced and unknown utilities are indicted by
yellow icons.
• Refresh Display: Refresh the contents of the window.
To execute a utility:
1. Select a utility from the list, then click the Execute Selected Utility icon, or double-click on a
selected utility in the list.
2. The utility opens in a Monitor Terminal Window.
3. To pause the execution, click the Pause Application icon.
Note:The V+ Control will attempt to attempt to launch any V+ program that
follows the standard Adept naming conventions 'FileName.V2' = EXE tsk
'A.FileName'
However this control DOES NOT KNOW what requirements may be needed on a
controller in order to use a selected utility.
To add a utility:
1. Click the 'Browse' button (...) to open the Browse For Folder window, to search for, or add,
folders to the V+ Utilities, as shown in Figure 63
2. Click the Display All Utilities icon to show all existing V+ commands on the controller.
Figure 63 Browse for Folder Form
.
Adept DeskTop 4.3 - Online Help 92
Page 93

Watch Variable Control
The Watch Variable control is used to monitor specified variables and expressions while debugging a
program. The values of watched variables can dynamically updated as tasks and programs are
executed.
To open the Watch Variable control:
Do one of the following:
• From the Adept DeskTop menu select View > Debug Tools > Watch Variable.
• In the Variable Manager control, select a variable, then in the toolbar select the Add to
Watch Variable icon. The Watch Variable control opens with the selected variable appended
to the list of watched variables.
Watch Variable toolbar
Click 'Browse' to open
Variable Browser
Watch list
Figure 64 Watch Variable Control
To enable dynamic updating of variables and expressions:
1. In the toolbar, Watch Variable toolbar select the Start continuous refresh icon.
2. As programs execute and variables change, the new values will be displayed in the watch list.
3. To stop the continuous updating, click the Stop continuous refresh icon.
To add an existing variable:
1. Click the Browse button to open the Variable Browser and choose a variable.
2. Alternatively, if you know the name of the variable or expression, and its location, enter the
appropriate values in the Task, Program and New expression fields. See below for more
details.
To add an undefined variable to the list:
It is possible to add an undefined (non-existent) variable or expression to the watch list.
1. Set/enter the appropriate values for the new variable in the Task, Program and New
expression fields.
2. Click Enter.
3. This only adds the variable name to the watch list, it does not create the variable. Therefore, the
variable appears as undefined, with an invalid type, as shown in Figure 65
4. You can then create a new variable with the same name, from the Variable Manager.
Adept DeskTop 4.3 - Online Help 93
.
Page 94

5. Once the variable is created, reopen or refresh the Watch Variable control: the correct variable
value and variable type will be displayed. See Figure 65
.
Undefined variable
added to watch list.
Once defined, the
variable value and
type are updated.
Figure 65 Adding an undefined variable to the Watch Variable
To modify the value of a variable:
1. Click once in the Value field of a selected variable
2. A text cursor appears next to the value of the variable
3. Type in the desired value, then press Enter.
To remove variables from the watch list:
1. To remove a single variable, select the variable, then select the Delete the currently selected
item... icon from the Watch Variable toolbar.
2. To remove all variables from the list, select the Delete all items... icon from the toolbar,.
The above actions only remove variables from the Watch Variable control, they do not delete the
variables.
Task
Selects the task in which the watched variable is situated. Global variables apply to all tasks.
Program
Enter a program name for an AUTO or Local variable. No program name is required for a Global
variable.
New Expression
Enter the name of the variable.
Browse
Opens the Variable Browser in which you can search for existing variables. See Variable Browser
for
more details.
Adept DeskTop 4.3 - Online Help 94
Page 95

Variable Browser
The Variable Browser allows you to find and select an existing variable and insert this variable to an
Adept DeskTop control.
The Variable Browser form opens from Adept DeskTop controls in which you have the option to insert
an existing variable.
To open the Variable Browser
Do one of the following:
• Click Browse... in the Tool Transform control.
• Click Browse... in the Digital IO control.
• Click Browse... in the Watch Variable control.
The Variable Browser displays all existing variables that meet the specified Type, Scope and Filter
criteria.
Variables that meet the selected
criteria.
In this example: 'Location' and
'Global'
Select variable type
Figure 66 Variable Browser Form
List of Variables
Displays Name and current Value of variable that meet the selection criteria in this form.
Filter
Enter characters in the Filter to search for variables by their names.
Task
Use the drop-down list to select the task in which you want to search for a LOCAL or AUTO variable.
This is not required for Global variables.
Program
The program in which you want to search for a LOCAL variable.
Type
The browser shows only variables of the selected Type: Real, Location, String or Precision Point.
Adept DeskTop 4.3 - Online Help 95
Page 96

Note:The String type is not available only in V+ systems.
Scope
The browser shows only variables of the selected Scope: Global (by default) or LOCAL/AUTO.
• To browse for LOCAL and AUTO variables, select a Task number and enter a Program
name.
•Only Global variables are available in MicroV+.
Related Topics
Variable Manager Control
Creating a Variable
Watch Variable Control
Adept DeskTop 4.3 - Online Help 96
Page 97

Monitor Terminal Control
The Monitor Terminal Window control is a test terminal that emulates AdeptWindows. This allows you to
enter monitor commands directly from the Adept DeskTop interface.
All the commands available for the monitor terminal are listed in the Keyword Browser under the
Monitor Command type.
• You can dock the Monitor Terminal in the main window of the Adept DeskTop interface
• You can go into the 'common line buffer', using the Up/Down Arrow keys.
• You can copy/paste text using CTR+C/Ctrl+V.
• You can set modify the Terminal Window display properties, such as background color and
font, in the Options Control. See Setting Adept DeskTop Options
• User program output from the 'TYPE' keyword is displayed within this window.
To open the Monitor Terminal Emulator tool
1. Select: View > Debug Tools> Monitor Terminal
2. Alternatively, from the Adept DeskTop toolbar select the Open Monitor Terminal icon.
.
Figure 67 Monitor Terminal Window
Executing Commands from the Monitor Terminal
To execute a command:
1. Type the command at the dot prompt.
2. The results of the command are displayed in the same window.
Related Topics
Monitor Terminal Control
AdeptWindows User’s Guide (on Adept Website)
Adept DeskTop 4.3 - Online Help 97
Page 98

Digital I/O Control
The Digital IO tool is provides a virtual display of the current status of the available digital I/O (DIO).
You can also use this control to enable or disable DIO signals from the Adept DeskTop interface. This
can be useful when setting up or debugging system setups.
You can set or modify the status of the inputs and outputs directly in the Digital I/O interface.
• The state of an Input is represented by green icon when the input is ON, gray when the
input is OFF.
• The state of an Output can be modified by clicking the button representing the output.
Green indicates that the Output is ON, gray indicates that it is OFF.
• The type and number of inputs and outputs displayed in Digital IO control depend on the
current controller and system configuration.
• For easy monitoring, selected signals, inputs, and outputs can be added to a custom list and
even saved to file.
To open the Digital I/O control:
1. From the Adept DeskTop menu, select View > System Resources > Digital IO.
2. Alternatively, from the Adept DeskTop tool bar, click the IO icon.
Select the elements to show
in the VirtuaDisplay area
VirtuaDisplay area
Hover over buttons to see
id/number
Enter custom I/O values
here
Custom IO Display area
Figure 68 Digital IO Control
Viewing Inputs, Outputs, and Signals
Enable check boxes in the Show frame to display, in the virtual display area, the current system inputs
and outputs.
Adept DeskTop 4.3 - Online Help 98
Page 99

Custom IO Signals
The Custom Display allows you to assemble a list of signals, inputs, and outputs. This list can be saved
to file. The saved file includes the status of item. Saved items can be imported as needed into the
Digital IO settings of the current application.
To assemble a custom list of signals:
1. Enter the signal address in the Signal field or click Browse to search for a value in the Variable
Browser.
2. Click Add to add the to the list.
3. Type a description of the signal in the Description field
4. To edit an item on the list, click the desired item on the list. The item's signal and description are
inserted into the corresponding fields for editing.
5. Use toolbar icons to remove items from the custom display.
To save a custom list of signals:
1. In the Digital IO toolbar, select the 'Export Custom list to file' icon
2. Provide the path and filename for the file. The file is saved with a 'cio' extension.
Digital IO Toolbar
Use the toolbar to refresh the display of IO, change refresh options, save a custom list of items, or
import items into the Custom Display list.
Continuous Refresh
Automatically refresh the selected I/O. On Ethernet-based systems, the update rate is once per 100
msec. On Adept Cobra i600/i800 and SmartAmp systems, the rate is once per second.
Stop Continuous Refresh
Stops the Continuous Refresh process.
Refresh Once
Refreshes the status of IO signal one time only.
Delete current line in the custom display
Deletes the contents of a selected line in the Custom Display.
Erase all lines in the custom display
Deletes the contents of all items that are in the Custom Display list. line in the custom display.
Import Custom List from file
Allows you to import a saved list of items. If there are items in the Custom Display list, the imported
items are appended to the list.
Import Custom List from file
Allows you to import a saved list of items. If there are items in the Custom Display list, the imported
items are appended to the list.
Adept DeskTop 4.3 - Online Help 99
Page 100

Export Custom List from file
Allows you to saved the items that are in the Custom Display, and the status of the items. The file is
saved with a 'cio' extension.
Adept DeskTop 4.3 - Online Help 100
 Loading...