

Page 1
15825 Industrial Parkway
Cleveland, Ohio 44135
www.autoxray.com
Toll Free 800.228.7667
Ph. 216.898.9200
Fx. 216.898.1636
Part# 0002-00 0-2926
CodeScout
2500
™
Users Manual
CodeScout™ 2500 Users Manual ver 1.0
Page 2

SAFETY PREC AUTIONS
SAFETY PREC AUTIONS
WARNING: Read and understand all instructions in this manual. Use appropriate
personal safety equipment including hearing and eye protections when using the
scanner in or near the vehicle engine compartment. Failure to comply can result in
accidents involving re, electrical shock, or serious personal injury.
Electrical
• Do not allow anything to rest on the cable assembly. Do not allow the cable
assembly to be pinched. Keep the cable assembly away from contact with heat,
oil, sharp edges, or moving parts. Replace damaged cables immediately. Damaged
cables increase the risk of electrical shock.
• To reduce the risk of electrical shock do not disassemble the CodeScout. There are
no user repairable components inside the unit.
• Please dispose of used batteries properly. Do not incinerate batteries. Consult your
local waste authority for information regarding available recycling and/or disposal
options.
Use and Care
• Stay alert, pay attention to what you are doing, and use common sense when
operating the CodeScout. Several operational tests require the engine in the vehicle
to be running during testing. Keep all children and visitors a safe distance from the
work area.
• Keep the CodeScout dry, clean, and free from oil and grease. Use a mild detergent
on a clean cloth to wipe the outside off, when necessary.
• Only use accessories that are recommended by AutoXray.
Service
Service must only be performed by AutoXray repair personnel. Service or repair by
unqualied personnel may result in injury, damage to the unit, and may void your
warranty. Refer to the Product warranty Policy section of this manual.
Safety Precautions & Warnings
For safety, read, understand and follow all safety messages and instructions in
manual before operating the CodeScout™ 2500 Code Reader. Always refer to and
follow safety messages and test procedures provided by manufacturer of vehicle and
CodeScout Code Reader.
Important Safety Messages
• Always wear ANSI approved eye protection.
• Always operate the vehicle in a well-ventilated area.
• Always keep people, tools and test equipment away from all moving or hot engine
parts.
• Always make sure vehicle is in PARK (automatic transmission) or Neutral (manual
transmission) with the parking brake set.
• Always block drive wheels and never leave vehicle unattended while testing.
• Always keep a re extinguisher suitable for gasoline/electrical/chemical res readily
available.
• Never lay tools on vehicle battery.
• Always use caution when working around ignition coil, distributor cap, ignition wires,
and spark plugs. Components can produce a High Voltage while engine is running.
• Battery acid is caustic. If contacted, rinse with water or neutralize with a mild base
(i.e. baking soda). If in eyes, ush with water and call a physician immediately.
• Never smoke or have open ames near vehicle. Vapors from gasoline and battery
during charge are explosive.
• Never use the CodeScout Code Reader if internal circuitry has been exposed to
moisture. Internal shorts could cause a re and damage.
• Always turn ignition key OFF when connecting or disconnecting electrical
components, unless otherwise instructed.
• Some vehicles are equipped with safety air bags. Follow vehicle service manual
cautions when working around air bag components or wiring. Note, air bag can still
open several minutes after ignition key is off.
• Always follow vehicle manufacturer’s warnings, cautions and service procedures.
• Please dispose of used batteries properly. Do not incinerate batteries. Consult your
local waste authority for information regarding available recycling and/or disposal
options.
• Keep the CodeScout dry, clean, and free from oil and grease. Use a mild detergent
on a clean cloth to wipe the outside of the CodeScout, when necessary.
2
3
Page 3

TABLE OF CONTENTS
QUICK START GUIDE
Quick Start Guide ........................................................................................................................ 5
Introduction .................................................................................................................................. 5
What is OBD-I and OBD-II? ............................................................................................................... 5
Tool diagram ...................................................................................................................................... 7
Setup and Operation ................................................................................................................... 7
General Information ........................................................................................................................... 7
Menu Navigation ................................................................................................................................ 9
Batteries ............................................................................................................................................. 9
Adjust Display Contrast ...................................................................................................................... 9
Selecting Your Interface Language .................................................................................................. 10
Conguring the Tool for Your Vehicle ..................................................................................... 10
OBD-II .............................................................................................................................................. 10
OBD-I (GM, Chrysler, Ford) ............................................................................................................. 10
Using the Correct Cable ................................................................................................................... 10
Cables and Descriptions ...................................................................................................................11
OBD-II Vehicles .......................................................................................................................... 12
Reading Your OBD-II Vehicle ........................................................................................................... 12
About Scan History Function ........................................................................................................... 13
Viewing the OBD-II Data .................................................................................................................. 13
What is a Diagnostic Trouble Code? ................................................................................................ 14
Manufacturer Specic Codes ........................................................................................................... 14
What is Emissions Readiness? ........................................................................................................ 15
Clearing the OBD-II Codes .............................................................................................................. 15
OBD-II Code Library ........................................................................................................................ 16
OBD-I Vehicles (GM, Chrysler) ................................................................................................. 17
Reading Your OBD-I (GM, Chrysler) Vehicle ................................................................................... 17
About Scan History Function ........................................................................................................... 17
Viewing the OBD-I Data ................................................................................................................... 18
What is a Diagnostic Trouble Code? ................................................................................................ 18
Clearing the OBD-I (GM, Chrysler) Codes ....................................................................................... 19
OBD-I Vehicles (Ford) ................................................................................................................ 20
Reading Your OBD-I (Ford) Vehicle ................................................................................................. 20
Key On, Engine Off (KOEO) ............................................................................................................ 20
Key On, Engine Running (KOER) .................................................................................................... 20
About Scan History Function ........................................................................................................... 21
Viewing the OBD-I (Ford) Vehicle .................................................................................................... 21
What is a Diagnostic Trouble Code? ................................................................................................ 22
Clearing the OBD-I (Ford) Codes .................................................................................................... 22
Troubleshooting ........................................................................................................................ 23
What to Do if the CodeScout is Unable to Read or Clear ................................................................ 23
Resetting the CodeScout .......................................................................................................... 23
How to Reset the CodeScout ........................................................................................................... 23
Warranty ..................................................................................................................................... 24
Additional Information .............................................................................................................. 25
CodeScout manual in Espanol ................................................................................................. 26
4
Quickstart guide
Follow the below steps for reading data on your vehicle:
1. Congure the tool for the vehicle.
Power on the tool, press MENU, select SELECT VEHICLE TYPE, press
ENTER. Follow the on screen conguration questions.
2. Locate the correct cable for your vehicle.
Once congured the tool displays a screen with an image of the cable head
compatible with your vehicle. Use the image as a guide to locate the correct cable.
3. Connect the cable to the vehicle.
Most OBD-II and GM OBD-I vehicles have the connector under the dashboard on
the driver’s side. Ford and Chrysler OBD-I vehicles have the connector in the
engine compartment. See the vehicle user manual for exact location.
4. Gather the vehicle data by pressing the READ button.
Make sure the key is in the ON position. Once the read is complete, the vehicle’s
conguration and scan data can optionally be saved for later viewing.
5. View the data.
At any time after a successful scan, press MENU and select VIEW CODES to see
the code numbers and text descriptions. For OBD-II vehicles, emissions readiness
monitor status can also be viewed.
INTRODUCTION
What is OBD-I and OBD-II?
Description of OBD-I
Original Equipment Manufacturers (OEM) developed on board diagnostics (OBD)
in response to increased emissions standards being regulated by the California Air
Resource Board (CARB) and the Environmental Protection Agency (EPA).
5
Page 4

INTRODUCTION
INTRODUCTION
The diagnostics were all proprietary to each vehicle manufacturer and were used for
diagnosing and repairing their own systems. OBD-I requires a malfunction indicator
lamp (MIL) or check engine light that relates to faulty electronic systems within the
engine control system. The MIL/Dash Indicator is usually amber or red in color.
OBD-I systems have to be able to store diagnostic trouble codes (DTCs) when a fault
has occurred and set the MIL on. Once the fault code disappears the code can be
lost and the MIL turned off. Different manufacturers were able to implement different
techniques as this was not in the legislation.
Description of OBD-II
CARB found that by the time an emission system component fails and causes the MIL
to illuminate, the vehicle may have been emitting excess emissions for some time.
The manufacturers had to develop new powertrain control module (PCM) selfdiagnostic strategies in response to increased diagnostic requirements from CARB.
The latest regulations developed by CARB and accepted by the EPA are designated
OBD-II.
The Federal Clean Air Act Amendments of 1990 requires that all vehicles sold in the
United States meet OBD-II requirements by the 1996 model year. The rst OBD-II
systems appeared on selected vehicle types in 1994.
Some important OBD-II requirements are:
• Vehicle service information available to all technicians.
• Standardization of Terms (use of SAE J-1930 recommended terms).
• OBD-II requires a common diagnostic link connector (DLC) and species its
location in the vehicle.
• Generic scan tool.
• Generic emission-related diagnostic trouble codes (DTCs).
• Very specic malfunction indicator light (MIL) illumination protocol.
One very important part of the OBD-II requirements is that technical service
information for emissions related components and systems, which could affect the
vehicle’s emission levels, will be available to all technicians; not just OEM dealership
technicians.
This allows all technicians to better understand how the systems recognize faults and
set the DTCs. The technician can now make a repair and verify the repair by exactly
duplicating the criteria that is required for the DTC to be set.
6
Tool Diagram
Menu Button
Read Button
Power Button
Navigate Left Button
Navigate Down Button
Cable connection
Clear Button
Navigate Up Button
Enter Button
Navigate Right Button
SET-UP & OPERATION
General Information
Your CodeScout will:
• Read the OBD-I and OBD-II codes off of your engine’s computer .
• Provide on-screen denitions of generic and manufacturer specic diagnostic trouble
codes (DTCs).
• Provide readiness test status for emissions testing on OBD-II vehicles.
• Reset the check engine light on supported vehicles.
7
Page 5
SET-UP & OPERATION
SET-UP & OPERATION
General Information
The purpose of this manual is to guide you in successfully using the AutoXray
CodeScout. This is not a repair manual for your vehicle. For specic information
on troubleshooting issues with your vehicle, please refer to the owner’s manual or
various other repair manuals, including the AutoXray CodeTrack at
www.codetrack.spx.com.
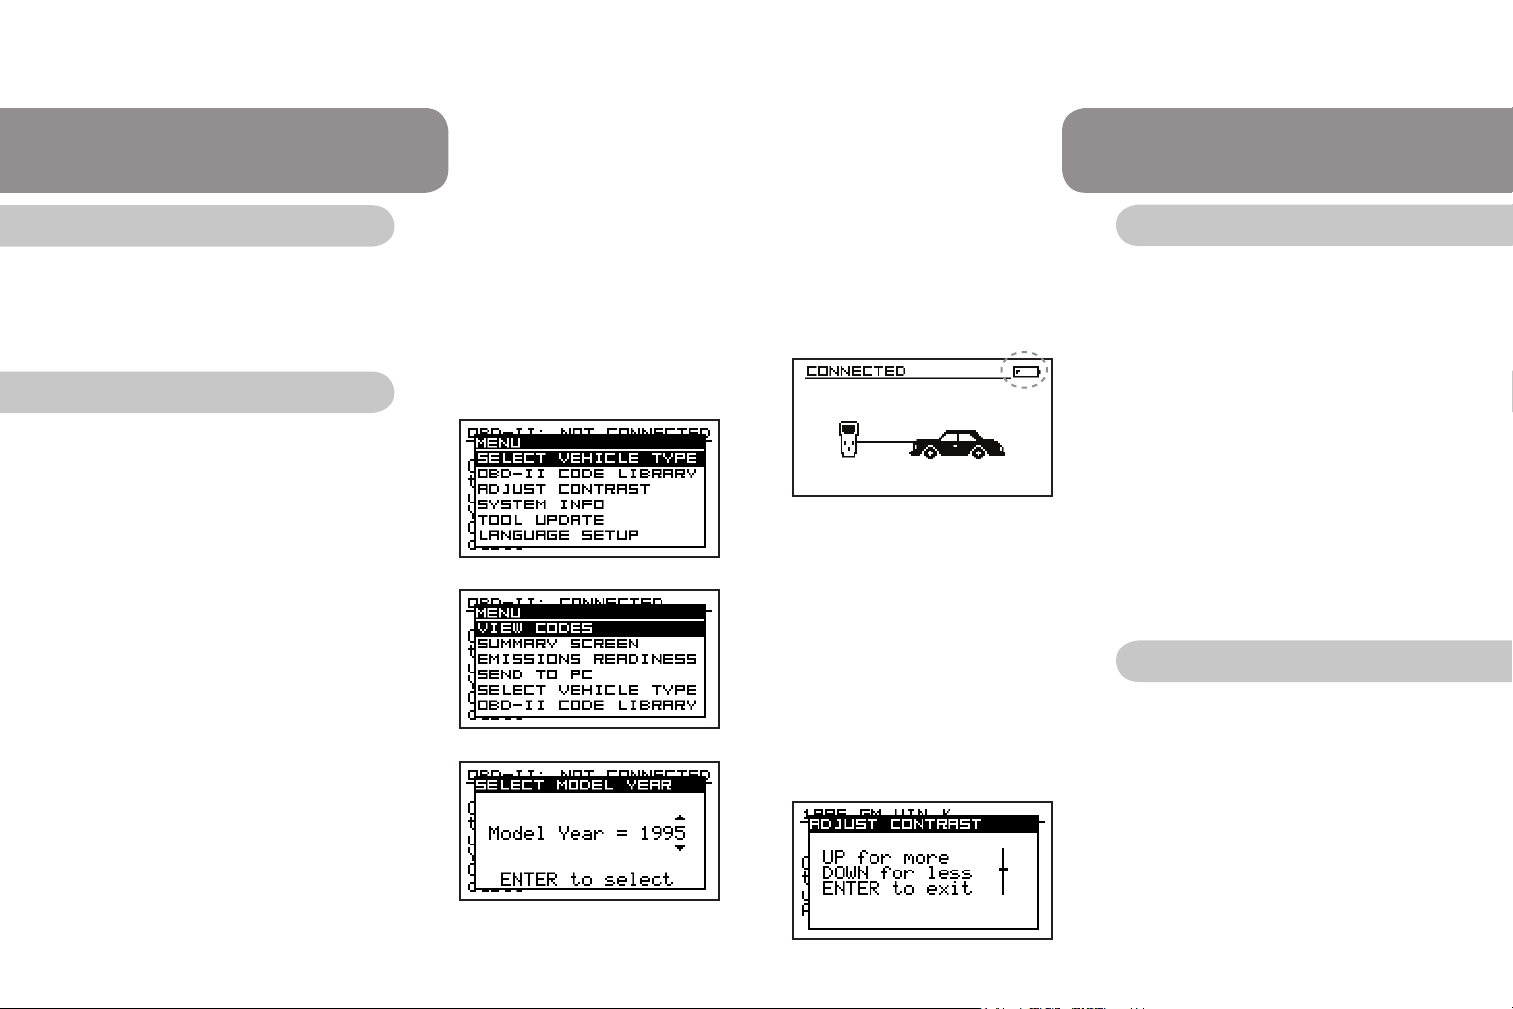
Menu Navigation
1. Understanding the dynamic menu system.
There are two versions of every menu on the
tool, a short menu (Fig.1) and a long menu
(Fig.2). The short menu is displayed before a
successful scan, and the long menu is
displayed after a successful scan. The long
menu contains the short menu’s items as well
as additional data-related items at the top.
2. Selecting on screen options and entering data.
Certain screens (Fig.3) on the tool allow
information to be entered using the navigation
buttons. Typically when the up and down arrow
characters are displayed on the screen, the up
and down navigation buttons scroll through
the available selections. In cases where
multiple characters can be entered, the left and
right navigation buttons change the edit
position. ENTER commits the selection/data
and MENU reverts to the previous screen,
when applicable.
Fig.1
Fig.2
Fig.3
Batteries
Install new batteries: The CodeScout is powered by 4 AAA batteries. Before the
CodeScout is used the rst time, you need to install batteries in the unit. Make
sure the batteries are put in according to the diagram on the back of the battery
compartment.
If the low battery icon becomes visible (Fig.4), the
batteries need to be replaced. Replace all four
batteries to avoid unit malfunction. When it is time
to change the batteries, the Data Holder feature
saves all of the data if fresh batteries are installed
immediately after removing the old ones.
Fig.4
CAUTION: Leaving used or dead batteries in the CodeScout beyond the battery date
may result in damage to the unit.
As long as good batteries are in the scanner, the vehicle engine conguration and
data will remain in the CodeScout’s memory, even after the unit is powered off.
Adjust Display Contrast
If desired, the contrast on your CodeScout can be adjusted for easier viewing under
different lighting conditions. If the code reader is left in direct sunlight the display can
turn completely black. Should this happen, put the CodeScout in a cool dark place for
approximately 10 to 15 minutes. The display should return to normal.
1. To adjust the contrast of the screens, power
the unit on.
2. Press the MENU button, arrow down to
ADJUST CONTRAST, press ENTER.
3. Arrow up or down for more or less contrast,
(Fig.5) press ENTER when nished.
Fig.5
8
9
Page 6

SET-UP & OPERATION
Selecting Your Interface Language
The user-interface language can be changed between English and Spanish at any
time. Press MENU, locate the LAST item (SELECT LANGUAGE), then use the up
and down navigation buttons to select the language of choice. Press ENTER to
activate the new selection. The language change occurs after the ENTER button is
pressed.
CONFIGURING THE TOOL FOR YOUR VEHICLE
OBD-II
The tool initially congures for OBD-II vehicles. At any time, the tool can be
recongured for OBD-II vehicles by pressing MENU, selecting the SELECT VEHICLE
TYPE option, and selecting OBD-II 1996-CURRENT.
GM, Ford, and Chrysler OBD-I
At any time, press MENU, select the SELECT VEHICLE TYPE option, and select the
appropriate option. Specify the model year of the vehicle, then specify the 8th VIN
digit. Answer any other on screen conguration questions. Conguration is complete
when a screen appears displaying an image of a vehicle cable.
Using the correct cable
Locate the cable that matches the on screen cable image. Refer to Cables &
Descriptions in this manual for specic information.
NOTE: A select few vehicles have diagnostic connector arrangements that are not
supported by the CodeScout tool. These include Chrysler LH-series vehicles, and
some pre-1996 Ford vehicles that have the OBD-II connector under the dashboard.
CABLES & DESCRIPTIONS
Cable description On-screen appearance Actual appearance
Chrysler Connector
Works with OBD-I
1983-1995 Chrysler vehicles
with SCI connectors.
Ford Connector
Works with OBD-I
1983-1995 Ford vehicles
with EEC-IV computers.
GM Connector
Works with OBD-I 19821995 vehicles with 12 pin
ALDL connectors.
OBD-II Generic Connector
(yellow)
This standardized cable
is used to scan 1996 and
newer Domestic, Asian, and
European vehicles.
OBD-II Manufacturer
Specic Connector (blue)
For 1994-1995 GM
OBD-I vehicles with a
16 pin connector
10
11
Page 7
OBD-II VEHICLES
OBD-II VEHICLES
Reading Your OBD-II vehicle
Connect the CodeScout to your vehicle. The CodeScout communicates with the
computer in your vehicle through a special connection cable.
The cable is plugged into a connector on the bottom of the CodeScout and into a
computer interface port on your vehicle.
a. Each vehicle manufacturer has its own specic computer connection
location. However, on all OBD-II vehicles, the port is usually located
under the drivers side of the dashboard and within two feet of the
steering column.
b.Make sure that all pins are straight and the connecting surfaces
are free of oils, grease and moisture.
c. Push the CodeScout cable into the vehicle port rmly.
d.Insert the CodeScout cable into the bottom of the code reader.
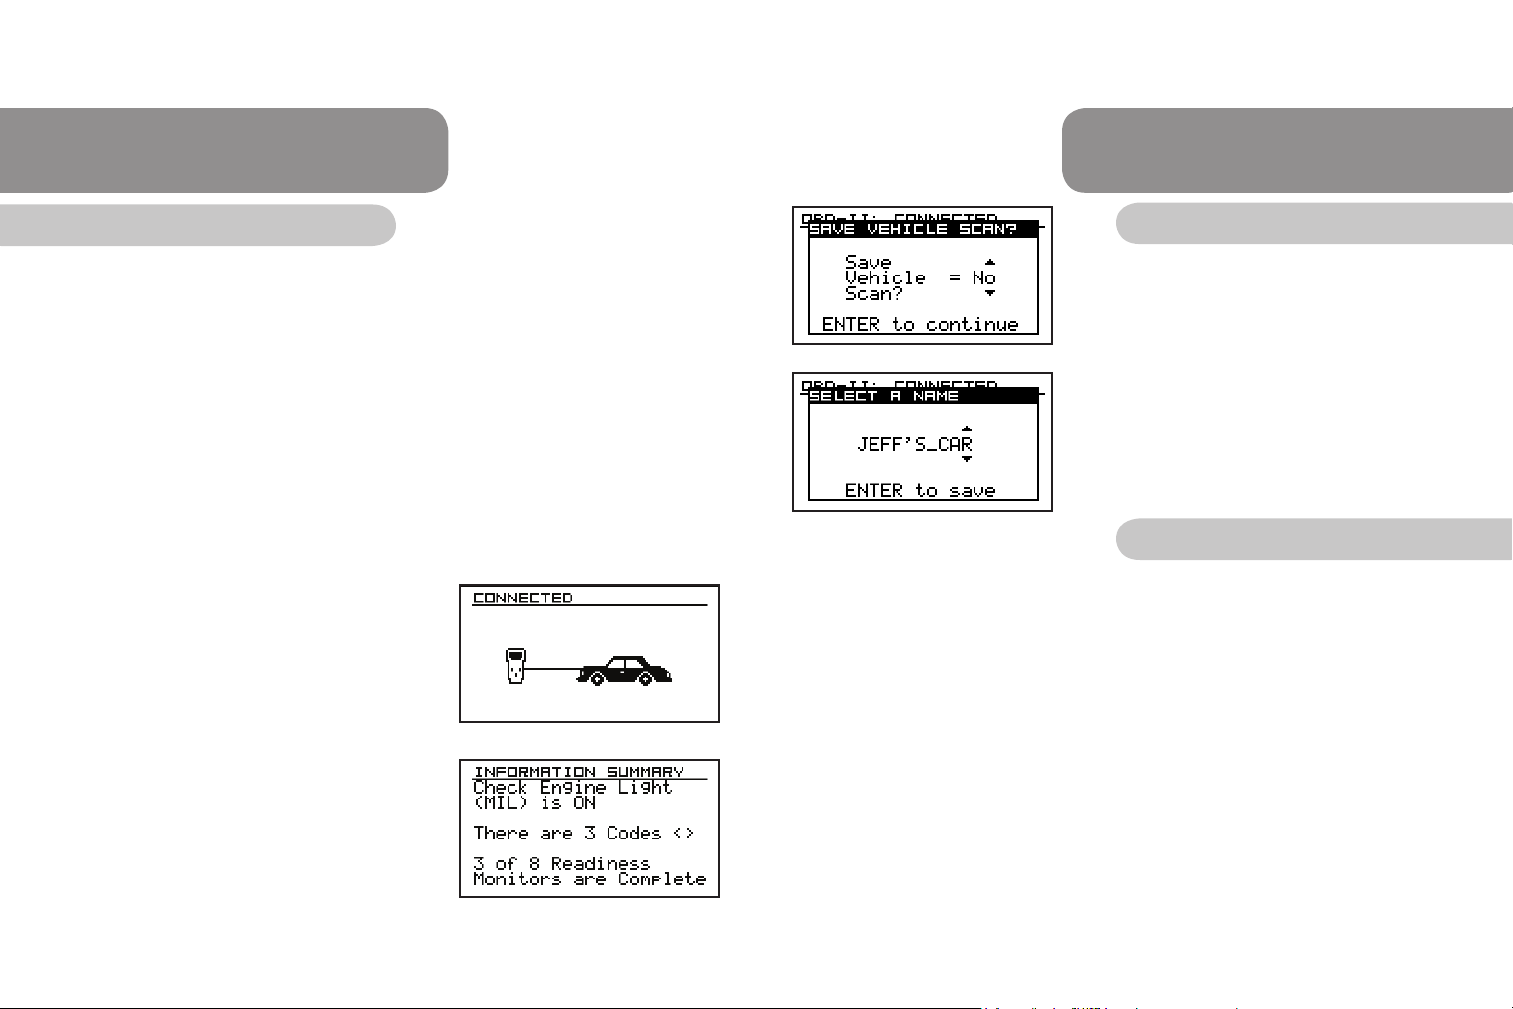
1. Power the CodeScout on. Make sure the
vehicle is connected (Fig.6).
2. Turn the vehicle ignition key to ON or start
the engine. Congure for OBD-II if necessary.
3. Press the READ button.
4. The Save Vehicle Scan question (Fig.8)
displays followed by the Information Summary
(Fig.7) if the scan was successful.
5. The Read Error screen displays if the scan
was not successful. If this happens, refer to the
Troubleshooting section of this manual.
12
Fig.6
Fig.7
About Scan History Function:
At the conclusion of a successful vehicle scan,
the vehicle conguration and scanned data
information can optionally be saved for later
reference (Fig.8). A tag name is entered that is
Fig.8
used to identify the scan at a later time (Fig.9).
Up to 10 characters can be used for the name. To
recall a saved scan refer to “Viewing the OBD-II
Data” in this manual.
Fig.9
Viewing the OBD-II Data
Before you start, your vehicle must have been read before viewing the data.
The CodeScout does not need to be connected to the vehicle to view the data. The
vehicle data remains in the memory until a vehicle is read again. This allows you to
review the data at a later time, or to use EZ-PC to load the data into a computer.
When viewing the OBD-II vehicle data, pressing the left and right arrow buttons
navigate forward and backward through the list of stored codes. The code number is
displayed at the top of the screen, and supporting text is displayed at the bottom of
the screen. If the entire supporting text does not t on the screen, pressing the UP
and DOWN arrow buttons scrolls through the text.
To view the data that was previously saved using the Scan History function, simply
recall the saved vehicle information as follows:
• Press MENU
• Press arrow down to SELECT VEHICLE TYPE
• Press ENTER
• Press arrow down to PREVIOUSLY SAVED
• Press ENTER
• Arrow down to the saved scan and press ENTER.
All scanned data for that vehicle is loaded into the tool.
13
Page 8
OBD-II VEHICLES
OBD-II VEHICLES
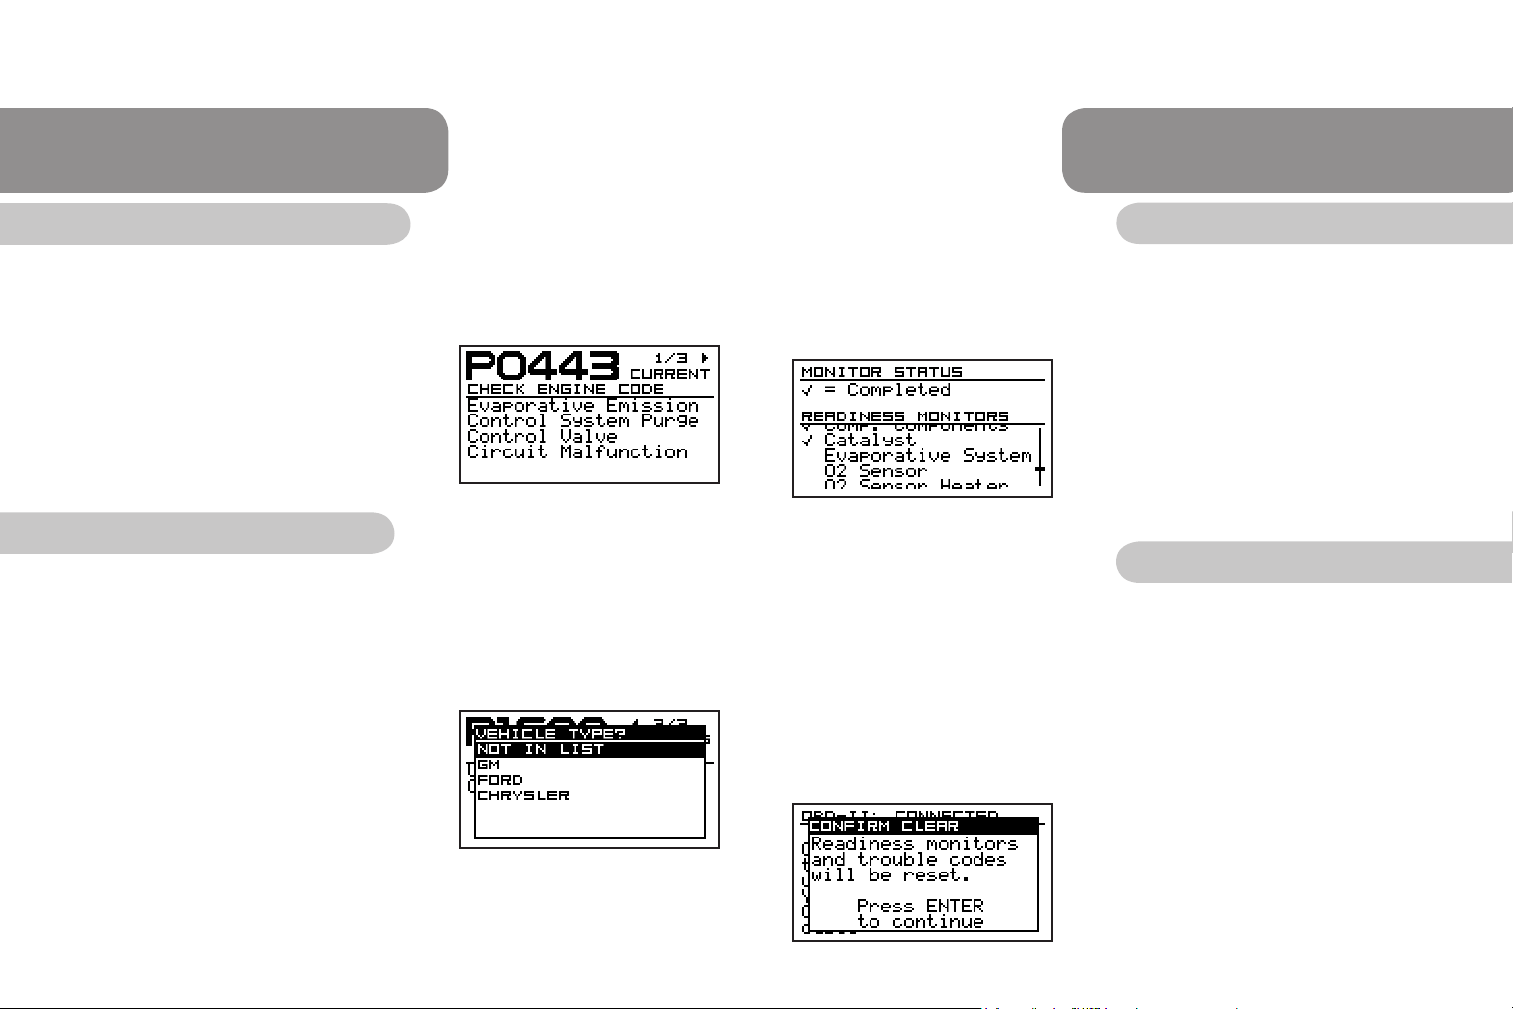
What is a Diagnostic Trouble Code (DTC)?
When the OBD system determines that a problem exists, a corresponding trouble
code is stored in the computer’s memory and triggers the MIL. These codes help to
identify the problem with the vehicle.
1. The Information Summary screen (Fig.7) tells
you if the check engine light is on, the
number of DTCs and how many
readiness tests are completed.
2. Arrow to the right to view the DTCs (Fig.10).
Manufacturer Specic Codes
NOTE: The list of vehicle types in the vehicle menu is dynamic, based on the text
available for the codes seen on the vehicle.
If the DTC says “The vehicle type is required to display the code description. ENTER
selects vehicle”, there is a manufacturer specic DTC present and some conguration
is necessary.
1. Press ENTER to continue.
2. Arrow down through the list and select the
appropriate vehicle type. Selecting a vehicle
type that does not match the connected vehicle
results in the tool displaying incorrect text. If
the connected vehicle name is not listed, select
NOT IN LIST (Fig.11).
3. Continue viewing codes by pressing the right
or left arrows.
14
Fig.10
Fig.11
What is Emissions Readiness?
Readiness monitors are indicators used to nd out if emissions components have
been evaluated. In other words, if all monitors are set to ready, the emissions
components have been tested. In some cases, complex driving patterns need to be
followed to complete these monitors.
1. To view the emissions readiness test data
press the MENU button.
2. Arrow down to Emissions Readiness and
press ENTER.
3. Use the up and down arrows to scroll through
the list of supported readiness monitors (Fig.12).
Fig.12
4. There will be a checkmark next to the readiness
monitors that have been completed.
Clearing the OBD-II codes
NOTE: Clearing the DTCs will remove any DTCs from the vehicle computer and reset
readiness monitors. You can use this feature to make sure vehicle repairs were done
correctly by doing a new read after clearing the codes.
WARNING: Once you reset the readiness test monitors, it may take several days of
driving for those to complete again.
1. Power the CodeScout on. Make sure the
vehicle is connected.
2. Turn the vehicle ignition key to ON or start
the engine.
3. Press CLEAR.
4. Read the conrm screen (Fig.13) and press
ENTER to clear the codes.
5. Once the codes are clear, you will be taken
back to the Vehicle Connected screen. The
Fig.13
Clear Error screen displays if it was unable to
clear the codes.
15
Page 9

OBD-II VEHICLES
OBD-I VEHICLES (GM, Chrysler)
OBD-II Code Library
The text description for an OBD-II generic DTC
can be found by using the CodeScout OBD-II
Code Library feature. Congure the tool for
OBD-II vehicles as follows:
• Press MENU
• Select SELECT VEHICLE TYPE
• Select OBD-II 1996-CURRENT
• Press MENU
• Select OBD-II CODE LIBRARY
• Use the navigation buttons to enter the DTC
number (Fig.14)
• Press ENTER to see the text (Fig.15)
Fig.14
Fig.15
Reading Your OBD-I (GM, Chrysler) Vehicle
Refer to “Conguring the tool for your Vehicle - GM, Ford, and Chrysler OBD-I” in this
manual for specic instructions on conguring the tool and connecting the appropriate
cable.
1. Turn the vehicle ignition key ON or start the
engine.
2. Congure the tool for the vehicle and connect
the appropriate cable. Refer to “Conguring
the tool for your Vehicle - GM, Ford, and
Chrysler OBD-I” in this manual for specic
Fig.16
information.
3. Press the READ button.
4a. If the read was successful, the Save Vehicle
Scan question is displayed (Fig.16).
4b. If the read was not successful, the Reading
Failed screen is displayed (Fig.17). If this
happens, refer to the Troubleshooting
section of this manual.
Fig.17
About Scan History Function:
At the conclusion of a successful vehicle scan,
the vehicle conguration and scanned data
information can be saved for later reference
(Fig.16). A tag name is entered that is used to
identify the scan at a later time (Fig.18). Up to 10
characters can be used for the name. To recall
a saved scan refer to “Viewing the OBD-I (GM,
Fig.18
Chrysler) Vehicle Data” in this manual.
16
17
Page 10

OBD-I VEHICLES (GM, Chrysler)
OBD-I VEHICLES (GM, Chrysler)
Viewing the OBD-I (GM, Chrysler) Vehicle Data
Before you start, you must complete Reading your OBD-I (GM, Chrysler) Vehicle.
To view codes at anytime, press MENU, select VIEW CODES and press ENTER.
The CodeScout does not need to be connected to the vehicle to view the data. The
vehicle data remains in the memory until a vehicle is read again. This allows you to
review the data at a later time or to use EZ-PC to load the data into a computer.
When viewing the OBD-I GM and Chrysler vehicle data, pressing the left and right
arrow buttons navigate forward and backward through the list of stored codes. The
code number is displayed at the top of the screen, and supporting text is displayed
at the bottom of the screen. If the entire supporting text does not t on the screen,
pressing the up and down arrow buttons scrolls through the text.
To view the data that was previously saved using the Scan History function, simply
recall the saved vehicle information as follows:
• Press MENU
• Select SELECT VEHICLE TYPE
• Select PREVIOUSLY SAVED
• Select the desired scan
All scanned data for that vehicle is loaded into the tool.
What is a Diagnostic Trouble Code (DTC)?
When the OBD system determines that a problem exists, a corresponding trouble
code is stored in the computer’s memory and triggers the MIL. These codes help to
identify the problem with the vehicle (Fig.19).
Clearing your OBD-I (GM, Chrysler) Vehicle
Once repairs have been done on a vehicle, clearing DTCs helps to make sure the
repairs were done correctly.
1. Power the CodeScout on. Make sure the tool is congured correctly for the vehicle.
Also make sure the vehicle is connected using the appropriate cable.
2. Turn the vehicle ignition key to ON or start the engine.
3. Press CLEAR.
NOTE: On many OBD-I GM and Chrysler vehicles, the codes cannot be cleared
using a tool, but instead the vehicle battery must be disconnected. The tool
will notify you if any specic procedure needs to be done to clear the codes.
4. Once the codes are cleared, you will be taken
back to the initial screen with the cable image.
The Clear Failed screen (Fig.20) is displayed if
the tool was unable to clear the codes.
Fig.20
Reading your OBD-I (Ford) Vehicle
Refer to Conguring the tool for your vehicle - GM, Ford, and Chrysler OBD-I in this
manual for specic instructions on conguring the tool and connecting the appropriate
cables.
1. Arrow to the left and right to view the codes.
18
The CodeScout tool reads three different types of trouble codes from Ford OBD-I
vehicles: key on, engine off (KOEO) codes, key on, engine running (KOER) codes,
and memory codes. KOEO codes are read during a scan when the ignition key is in
the ON position and the engine is not running. KOER codes are read during a scan
when the ignition key is in the ON position and the engine is running.
Fig.19
19
Page 11

OBD-I VEHICLES (Ford)
OBD-I VEHICLES (Ford)
Key On, Engine Off (KOEO)
Press the READ button to display the read menu. Select KOEO self-test, press
ENTER and follow the on screen instructions. Once the test starts, the screen
displays the current status (number of codes found, etc). A typical KOEO self test may
take several minutes to complete.
If the KOEO self-test is successful, the Save
Vehicle Scan question is displayed (Fig.21),
followed by a summary screen containing the
results of the scan.
If the KOEO self-test was not successful, the
Reading Failed screen is displayed (Fig.22). If
this happens, refer to the Troubleshooting section
Fig.21
of this manual.
Key On, Engine Running (KOER)
NOTE: The KOEO self-test must be completed
before the KOER self-test can be started.
Fig.22
Press the READ button to display the read menu. Select KOER self-test, press
ENTER and follow the on screen instructions. Once the test starts, the screen
displays the current status and any conditions that the test requires. A typical KOER
self-test may take several minutes to complete.
About Scan History Function:
At the conclusion of a successful vehicle scan, the vehicle conguration and scanned
data information can be saved for later reference (Fig.21). A tag name is entered that
is used to identify the scan at a later time (Fig.23).
Up to 10 characters can be used for the name. To
recall a saved scan refer to “Viewing the OBD-I
(Ford) Vehicle” in this manual.
Fig.23
Viewing the OBD-I (Ford) Vehicle
Before you start, you must complete Reading your OBD-I (Ford) Vehicle. To view
codes at any time, press MENU, select VIEW CODES and press ENTER. The
CodeScout does not need to be connected to the vehicle to view the data. The
vehicle data remains in the memory until a vehicle is read again. This allows you to
review the data at a later time or to use EZ-PC to load the data into a computer.
When viewing the OBD-I Ford vehicle data, press the left and right arrow buttons to
navigate forward and backward through the list of stored codes. The code number is
displayed at the top of the screen, and supporting text is displayed at the bottom of
the screen. If the entire supporting text does not t on the screen, pressing the UP
and DOWN arrow buttons scrolls through the text.
If the KOER self-test is successful, the Save Vehicle Scan question is displayed
(Fig.21), followed by a summary screen containing the results of the scan.
If the KOEO self-test is not successful, the Reading Failed screen is displayed
(Fig.22). If this happens, refer to the Troubleshooting section of this manual.
20
21
Page 12

OBD-I VEHICLES (Ford)
TROUBLESHOOTING
Viewing the OBD-I (Ford) Vehicle
To view the data that was previously saved using the Scan History function, recall the
saved vehicle information as follows:
• Press MENU
• Select SELECT VEHICLE TYPE
• Select PREVIOUSLY SAVED
• Select the desired scan
All scanned data for that vehicle is loaded into the tool.
What is a Diagnostic Trouble Code (DTC)?
When the OBD system determines that a problem exists, a corresponding diagnostic
trouble code is stored in the computer’s memory and triggers the MIL. These codes
help to identify the problem with the vehicle (Fig.24).
1. Arrow to the left and right to view the codes.
Clearing the OBD-I (Ford) Codes
Fig.24
Once repairs have been done on a vehicle, clearing the DTCs will help to make sure
the repairs were done correctly.
1. Power the CodeScout on. Make sure the tool is congured correctly for the
vehicle. Also make sure the vehicle is connected using the appropriate cable.
2. Press CLEAR and follow the on screen instructions. Ford vehicles require that the
ignition key be cycled into the OFF position for at least 5 seconds, then back into
the ON position prior to the tool clearing the codes.
3. Once the codes have been cleared, you will be taken back to the initial screen with
the cable image.
What to do if the CodeScout is unable to read or clear:
1. Make sure the vehicle ignition key is in the full ON position.
2. Make sure the diagnostic connector is clean.
3. Make sure the cable connectors are pushed in rmly.
4. Make sure the pins in the connectors are not bent and are making contact.
5. Try wiggling the connector during the attempted read.
6. Make sure the tool is congured correctly for the vehicle under test.
RESET TING THE CODESCOUT
How to reset the CodeScout:
NOTE: These steps will reset the CodeScout. If your problem persists please contact
AutoXray technical support
1. Power the CodeScout on.
2. Open the battery compartment and remove one battery.
3. Hold down the POWER button for 30 seconds, then release.
4. Put the battery back in, and power on.
22
23
Page 13

WARRANT Y INFORMATION
ADDITIONAL INFORMATION
FULL ONE (1) YEAR LIMITED WARRANTY
SPX warrants to the original purchaser that this product will be free from defects in materials and workmanship
for a period of one (1) year from the date of original purchase. Any unit that fails within this period will be
replaced or repaired at SPX discretion without charge. If you need to return product, please follow the
instructions below. This warranty does not apply to damages (intentional or accidental), alterations or improper
or unreasonable use.
DISCLAIMER OF WARRANTY
SPX DISCLAIMS ALL EXPRESS WARRANTIES EXCEPT THOSE THAT APPEAR ABOVE. FURTHER,
SPX DISCLAIMS ANY IMPLIED WARRANTY OF MERCHANTABILITY OF THE GOODS OR FITNESS OF
THE GOODS FOR ANY PURPOSE. (TO THE EXTENT ALLOWED BY LAW, ANY IMPLIED WARRANTY OF
MERCHANTABILITY OR OF FITNESS APPLICABLE TO ANY PRODUCT IS SUBJECT TO ALL THE TERMS
AND CONDITIONS OF THIS LIMITED WARRANTY. SOME STATES DO NOT ALLOW LIMITATIONS ON
HOW LONG AN IMPLIED WARRANTY LASTS, SO THIS LIMITATION MAY NOT APPLY TO A SPECIFIC
BUYER.)
LIMITATION OF REMEDIES
IN NO CASE SHALL SPX BE LIABLE FOR ANY SPECIAL, INCIDENTAL OR CONSEQUENTIAL DAMAGES
BASED UPON ANY LEGAL THEORY INCLUDING, BUT NOT LIMITED TO, DAMAGES FOR LOST PROFITS
AND/OR INJURY TO PROPERTY. SOME STATES DO NOT ALLOW THE EXCLUSION OR LIMITATION OF
INCIDENTAL OR CONSEQUENTIAL DAMAGES, SO THIS LIMITATION OR EXCLUSION MAY NOT APPLY
TO A SPECIFIC BUYER. THIS WARRANTY GIVES YOU SPECIFIC LEGAL RIGHTS, AND YOU MAY ALSO
HAVE OTHER RIGHTS WHICH VARY FROM STATE TO STATE.
All information, illustrations and specications contained in this manual are based on the latest information
available from industry sources at the time of publication. No warranty (expressed or implied) can be made for
its accuracy or completeness, nor is any responsibility assumed by SPX or anyone connected with it for loss
or damages suffered through reliance on any information contained in this manual or misuse of accompanying
product. SPX reserves the right to make changes at any time to this manual or accompanying product without
obligation to notify any person or organization of such changes.
TO USE YOUR WARRANTY
If you need to return the unit, please follow this procedure:
1. Call SPX Corporation Tech Support at 1-800-228-7667 or 216-898-9200, or visit www.AutoXray.com.
Our Technical Service Representatives are trained to assist you.
2. Proof of purchase is required for all warranty claims. For this reason we ask that you retain your
sales receipt.
3. In the event that product needs to be returned, you will be given a Return Material Authorization number.
4. If possible, return the product in its original package with cables and accessories.
5. Print the RMA number and your return address on the outside of the package and send to the address
provided by your Customer Service representative.
6. You will be responsible for shipping charges in the event that your repair is not covered by warranty.
OUT OF WARRANTY REPAIR
If you need product repaired after your warranty has expired, please call Tech Support at 1-800-228-7667 or
216-898-9200. You will be advised of the cost of repair and any freight charges.
SPECIAL OFFER for WARRANTY EXTENTION
Register on-line at www.AutoXray.com and receive an additional 6 months of warranty coverage for your tool.
Total tool warranty will be 18 months if you register your tool on-line.
Additional Autoxray Products
SCAN TOOLS
EZ-Scan AX6000
OBD-I & OBD-II Scan Tool with Enhanced vehicle data coverage for
OBD-II GM, Ford, Chrysler and Toyota vehicles
EZ-Scan AX6100
Spanish OBD-I & OBD-II Scan Tool with Enhanced vehicle data
coverage for OBD-II GM, Ford, Chrysler and Toyota vehicles
EZ-Scan AX4000
OBD-II Scan Tool (For use on all OBD-II vehicles 1996 & newer)
CODE READERS
CodeScout AX700
OBD-II Code Reader (For use on all OBD-II vehicles 1996 & newer)
CodeScout AX1500
OBD-II Code Reader (For use on all OBD-II vehicles 1996 & newer)
CodeScout AX2500
OBD I & OBD-II Code Reader (For use on 1982-95 GM, Ford, and
Chrysler vehicles and all OBD-II vehicles 1996 and newer)
ACCESSORIES
EZ-Update AX400-USB
Use to receive product updates and upgrades.
EZ-PC AX500
EZ-PC converts data into easy to read graphs and charts, prints reports,
archives data and allows you access to product updates via the Internet.
CABLES, MISC.
Yellow OBD-II CAN Cable AX20250
USB Cable and CD Driver AX301
Replacement GM OBD-I Cable AX20110
Replacement Ford OBD-I Cable AX20120
Replacement Chrysler OBD-I Cable AX20130
Chrysler OBD-II Enhanced Cable AX20271
GM OBD-I Blue Cable AX20211
Hard Carrying Case AX60000
Visit our Internet web site at www.autoxray.com for the latest products, accessories and available updates.
24
25
Page 14

PRECAUCIONES DE SEGURIDAD
ADVERTENCIA: Asegúrese de leer y entender todas las instrucciones contenidas
en este manual. Utilice equipo de seguridad apropiado, incluyendo protección para
ojos y oídos, cuando trabaje el producto cerca o en el compartimiento de motor
de cualquier vehículo. No cumplir con estas recomendaciones puede provocar
accidentes tales como incendios, descargas eléctricas o serios daños personales.
Eléctricos
• No coloque ningún objeto en o sobre los contactos del cable. No deje que los
contactos del cable se dañen. Mantenga el cable lejos de calor, aceite, objetos
cortantes o partes en movimiento. Reemplace los cables dañados Inmediatamente.
El uso de cables dañados Incrementa el riesgo de sufrir una descarga eléctrica.
• Para reducir el riesgo de descarga eléctrica no desarme su CodeScout. Este
producto no contiene componentes reparables en su interior.
• Por favor deseche sus baterías usadas de manera apropiada. No Incinere las
baterías. Consulte con su autoridad local para recibir información referente al
reciclaje y/o desecho de las baterías.
Uso y cuidados
• Manténgase alerta y preste atención a lo que esté haciendo; aplique su sentido
común cuando opere este producto. Muchas de las pruebas operacionales
requieren que el motor del vehículo esté en marcha. Mantenga a los niños y
visitantes fuera del área de trabajo.
• Mantenga su CodeScout limpio, seco y libre de grasa y combustible. Use un
detergente suave y un paño suave para limpiar el exterior de su CodeScout,
cuando sea necesario.
• Solamente use accesorios recomendados por AutoXray para su producto.
CodeScout
Manual de Usuario
26
2500
™
Servicio
Solamente el personal calicado de AutoXray está autorizado para proveer servicio
a su producto. Personal no calicado en reparaciones puede sufrir daños, o dañar la
unidad si intentan repararlo, revocando consecuentemente la garantía. Consulte la
sección de Términos de Aplicación de Garantía del Producto en este manual.
Advertencias y Precauciones de Seguridad
Por seguridad, lea, entienda, y siga todas las instrucciones de seguridad del manual
antes de empezar a operar el CodeScout™ 2500. En todos los casos, consulte y
sigua los mensajes de seguridad y procedimientos provistos por el presente manual y
por el fabricante del vehículo.
27
Page 15

PRECAUCIONES DE SEGURIDAD
TABLA DE CONTENIDOS
Mensajes Importantes de Seguridad
• Siempre use protección para los ojos.
• Siempre analice el vehículo en un área ventilada.
• Mantenga a personas, herramientas y equipos de prueba lejos de partes en
movimiento o expuestas al calor del motor.
• Ponga transmisión en PARK (automático) o NEUTRAL (manual), y accione el freno
de mano.
• Bloquee el volante y nunca deje el vehículo desatendido al realizar pruebas.
• Tenga a la mano un extintor de incendios para apagar fuegos.
• Nunca deje el equipo junto o sobre la batería del vehículo.
• Sea precavido ante el voltaje del Sistema de Encendido. Producen alto
• El ácido de la batería es cáustico. Si hace contacto con la piel, lávese con agua o
con una sustancia suave (por ejemplo bicarbonato). Si el contacto es en los ojos,
lávese con abundante agua y llame a un médico.
• Nunca fume o encienda fuego cerca de un vehículo. Las evaporaciones de la
gasolina y la batería durante la carga pueden resultar explosivas.
• Nunca use el CodeScout si sus circuitos internos han sido expuestos a la humedad.
Cortos circuitos internos pueden iniciar un incendio.
• Coloque la llave del vehículo en posición de apagado cuando conecte o desconecte
componentes eléctricos, a menos que se indique lo contrario.
• En vehículos equipados con bolsas de aire. Siga las indicaciones del manual de
servicio. Nota: Cualquier error puede activar las bolsas de aire.
• Siempre siga las advertencias, precauciones y procedimientos de servicio del
fabricante del vehículo.
• Maneje sus baterías usadas apropiadamente. No las incinere. Consulte a su
autoridad local acerca de desecho o reciclado de baterías usadas.
• Mantenga su CodeScout seco, limpio y libre de grasa y suciedad. Límpielo con un
paño húmedo en detergente suave cuando sea necesario.
Servicio Técnico
El Servicio debe ser efectuado solo por personal de reparaciones de AutoXray.
Servicios o reparaciones efectuados por personal no calicado puede ocasionar
riesgo de daño personal, daños al producto y anulará su garantía. Consulte la
sección Términos de Aplicación de Garantía del manual.
Guía de Inicio Rápido…….......................……………………………………………………………30
Introducción……………………………………………......................……………………….………30
¿Qué es OBD-I y OBD-II? ……………………………...........................................…………………....30
Diagrama del producto…………………………….........................................………………….………32
Conguración y Operación………………………………….......................……..…………………32
Información General……………………………………….........................................……..……………32
Menú de Navegación……………………………………...........................................…….……….……33
Baterías……………………………………………….…..........................................……………………34
Ajuste de Contraste de Pantalla………………………...........................................….……………..…34
Selección de Idioma…………………………………..........................................………………………35
Congurando el CodeScout para su vehículo………………......................……………………35
OBD-II……………………………………………………………..........................................……………35
OBD-I (GM, Chrysler, Ford)…………………………………….........................................…………… 35
Usando el cable correcto……………………………………………..........................................………35
Cables y descripciones…………………………………..........................................………….………. 36
Vehículos OBD-II……………………………………………….…….…….......................…………. 37
Analizando su vehículo OBD-II…………………………….………….........................................……. 37
Acerca de la función Reporte de Escaneo………………………….......................................………. 38
Ver información OBD-II………………………………………..……….........................................…..... 38
¿Qué es un Códigos de Falla?…………………………..…………......................................…….….. 39
Códigos Especícos del Fabricante………………..……………….........................................……... 39
¿Que es la Prueba de Monitores?………….………………………..........................................…….. 40
Borrar códigos OBD-II ……………………..……………………….........................................…...….. 40
Librería de códigos OBD-II………………………………………….......................................….…….. 41
Vehículos OBD-I (GM, Chrysler)……………………………………......................………………. 42
Prueba para vehículos OBD-I (GM, Chrysler)…………................................................………….… 42
Acerca de la función Reporte de Escaneo………………........................................……..…………. 42
Ver información OBD-I (GM, Chrysler)......................…….........................................…....…........... 43
¿Qué es un Códigos de Falla?………………………….…........................................……………..… 43
Borrar códigos OBD-I (GM, Chrysler)…………..……………........................................…………..… 44
Vehículos Ford OBD-I……………………………………….....................……………………….… 44
Prueba para vehículos OBD-I (Ford)……………….........................................…….……..............… 45
Prueba KOEO (llave en ignición, motor apagado)………….........................................….………… 45
Prueba KOER (llave en ignición, motor encendido)……………........................................………… 45
Acerca de la función Reporte de Escaneo……………………….........................................…….…. 46
Ver información OBD-I para vehículos Ford……………………….........................................……… 46
¿Qué es un Código de Falla?……………………………….………........................................…….…47
Borrar códigos OBD-I en vehículos Ford..……..………………….…….........................................… 47
Solución de Problemas…………………………………………..………....................…………… 48
¿Qué hacer si el CodeScout presenta problemas de comunicación?........................................…. 48
Reseteando el CodeScout……………………………………………………….......................….. 48
Cómo resetear el CodeScout…………………………………………….......................................…... 48
Términos de Aplicación de Garantía………………………………………….....................……. 49
Información Adicional………………………………………………………….....................……… 50
28
29
Page 16

GUIA DE INICIO RÁPIDO
INTRODUCCIÓN
Guía de Inicio Rápido
Siga las siguientes instrucciones para obtener Información de su vehículo:
1. Conguración del CodeScout con los datos de su vehículo. Encienda el
CodeScout, presione MENU, seleccione TIPO DE VEHÍCULO, presione ENTER.
Responda las preguntas adicionales de conguración que aparezcan en la pantalla.
2. Selección del cable adecuado para su vehículo. Una vez congurado, el
CodeScout mostrará en la pantalla una imagen del cable adecuado para conexión a
su vehículo. Use esta imagen como referencia para ubicar el cable correcto.
3. Conexión del cable al vehículo. La mayoría de los vehículos OBD-II y GM OBD-I
tienen el conector ubicado debajo del tablero, del lado del conductor. Los vehículos
Ford y Chrysler OBD-I tienen el conector en el compartimiento del motor. Consulte el
manual del vehículo para determinar la ubicación exacta.
4. Obteniendo información de su vehículo, mediante la tecla READ. Asegúrese
que la llave esté en posición de encendido, y presione la tecla READ. Una vez que
el CodeScout termine de revisar su vehículo, tendrá usted la opción de guardar la
conguración y la Información obtenida del vehículo, para posterior análisis.
5. Analizando la Información. En cualquier momento, tras el mensaje de Escaneo
Exitoso, presione la tecla MENU y seleccione la opción VER CÓDIGOS mostrar el
código de falla y su respectiva descripción. En vehículos OBD-II, es posible consultar
también el estado de Resultados a pruebas de Disponibilidad o Monitores.
INTRODUCCIÓN
¿Qué es OBD-I y OBD-II?
Descripción de OBD-I
Los fabricantes de vehículos desarrollaron Sistemas de Diagnóstico a Bordo en
respuesta a las regulaciones que estipulaban los niveles de emisiones permitidos
por el Buró de Calidad del Aire de California (CARB) y la Agencia de Protección
Ambiental (EPA).
Al principio, cada fabricante desarrolló sus propios sistemas para cumplir con
las regulaciones. OBD-I exige un indicador en el panel de instrumentos, que se
enciende cada vez que se detecta una falla por computadora de a bordo. El indicador
es usualmente de color ámbar o rojo. Los sistemas OBD-I tienen capacidad de
almacenar Códigos y encender el indicador de fallas cuando éstas ocurren. Si
el código de falla desaparece o es borrado, el indicador se apaga. Como esta
regulación no estableció mayores detalles para su cumplimiento, cada fabricante la
implementó de maneras diferentes según sus propias técnicas.
Descripción de OBD-II
Debido a que el tiempo transcurrido desde que se presenta una falla hasta que el
indicador se enciende, conlleva un aumento en los niveles de emisiones, la CARB
desarrolló la norma OBD-II. Según esta norma, se requiere que los automóviles
incluyan un sistema de autodiagnóstico en el Módulo de control de tren motriz
(PCM) en respuesta a los requerimientos de control de emisiones exigidos por la
CARB. Las regulaciones más recientes de OBD-II, emitidas por la CARB, han sido
aceptadas por la EPA. Los cambios al Acta Federal del Medio Ambiente emitida en
1990, obliga a los fabricantes de vehículos vendidos en Estados Unidos a cumplir los
requerimientos de la norma OBD-II a partir de 1996. Los primeros vehículos OBD-II
aparecieron en 1994, en California, por requerimientos de CARB.
Algunas características de la norma OBD-II son:
• La información de Servicio Mecánico debe estar disponible para todos los
técnicos automotrices.
• Estandarización de Términos (uso de términos recomendados por la SAE,
J-1930).
• Uso de un conector de diagnóstico único, con ubicación preestablecida en
los vehículos.
• Herramientas de diagnóstico genéricas
• Códigos de falla genéricos relacionados a emisiones.
• Especicación única referente al comportamiento del la luz indicador de fallas.
Un aspecto muy importante de la norma OBD-II es que la información técnica
necesaria para proveer reparaciones relacionadas al sistema antiemisiones debe
estar disponible para todos los técnicos automotrices, incluyendo a los técnicos
independientes. Esto permite un mayor conocimiento de cómo los sistemas de los
vehículos reconocen sus fallas y generan un código acorde. Con ello, los técnicos
tienen la capacidad de realizar reparaciones más ecientes y comprobar simulando
las condiciones en las cuales un código de falla pudiese presentarse.
30
31
Page 17

INTRODUCCIÓN
CONFIGURACIÓN Y OPERACIÓN
Diagrama CodeScout
Botón Menú
Botón Read
Botón Power
Botón Navegación Izq.
Botón Navegación Abajo
Botón Clear
Botón Navegación Arriba
Botón Enter
Botón Navegación Der.
Conexión a Cable
CONFIGURACIÓN Y OPERACIÓN
Información General
Su CodeScout puede:
• Extraer los códigos OBD-I y OBD-II almacenados en la computadora de su
vehículo.
• Proveer deniciones en pantalla de códigos de falla genéricos y especícos de
fabricante.
• Apagar el indicador luminoso de fallas (Check Engine Light), en los vehículos
que soporten esta función.
Información General
El propósito de este manual es guiarlo de manera exitosa en el uso de su
CodeScout. Este no es un manual de reparaciones para su vehículo. Si requiere
información especíca sobre cómo resolver los problemas de su vehículo, consulte el
manual del propietario o algún otro manual de servicio. Si lo desea, AutoXray provee
información de reparación mediante CodeTrack.
Menú de Navegación
1. Entendiendo el Menú tipo Sistema Dinámico.
Hay dos versiones de cada menú en su
CodeScout, un menú abreviado (Fig.25) y un
menú expandido (Fig.26). El menú abreviado se
muestra antes de analizar el vehículo, y el
menú expandido tras un escaneo exitoso.
Fig.25
El menú expandido adiciona opciones al menú
abreviado.
2. Seleccionando opciones en pantalla e
ingresando datos.
En algunos casos deberá ingresar información
utilizando las teclas de navegación (Fig.27).
Cuando las echas Arriba/Abajo aparecen en
Fig.26
la pantalla, sus respectivos botones en el teclado
le desplazarán entre las opciones disponibles.
En algunos casos, para ingresar caracteres
múltiples, los botones de Izquierda/Derecha
se utilizarán para buscar la letra o número
correspondiente. El botón ENTER permite activar
la selección en pantalla, y el botón MENU
Fig.27
permite regresar a la pantalla anterior (cuando
aplique).
32
33
Page 18

CONFIGURACIÓN Y OPERACIÓN
CONFIGURACIÓN Y OPERACIÓN
Baterías
Instalando nuevas baterías: El CodeScout se alimenta de 4 baterías AAA. Antes de
usarlo por primera vez, instale las baterías y asegúrese de colocarlas en la posición
correcta, de acuerdo al diagrama que aparece dentro del compartimiento de las
baterías.
Si se muestra un icono que indica reemplazo de
baterías (Fig.28), reemplace las cuatro baterías
para evitar problemas de funcionamiento.
Cuando realice el reemplazo de las baterías,
la función de protección guardará toda
su información, siempre y cuando instale
inmediatamente las baterías nuevas tras remover
las viejas baterías.
Fig.28
CUIDADO: Mantener baterías usadas o totalmente gastadas dentro del equipo, por
periodos prolongados de tiempo, puede ocasionar daños a su CodeScout.
Mientras las baterías se encuentren en buenas condiciones y se mantengan
instaladas en el CodeScout, la conguración del vehículo y la información
almacenada permanecerán en memoria, incluso cuando la unidad sea apagada.
Ajuste de Contraste
Si lo desea, puede ajustar el contraste de pantalla de su CodeScout para una mejor
visualización según las condiciones de iluminación. Si el CodeScout es expuesto
a la luz solar, la pantalla tomará un color negro. Simplemente coloque el equipo en
un ambiente fresco y oscuro por unos 10 a 15 minutos. Con esta acción la pantalla
volverá a su estado normal.
1. Para ajustar el contraste de pantalla encienda su CodeScout.
2. Presione el botón MENU. Con la tecla de navegación Abajo descienda hasta
AJUSTE DE CONTRASTE, y presione ENTER.
3. Realice los ajustes de contraste, usando las echas hacia Abajo/Arriba, presione
ENTER cuando haya terminado.
Selección de Idioma
El idioma de su CodeScout puede alternarse en cualquier momento entre Inglés y
Español. Presione MENU, localice la opción CONFIG. DE IDIOMA, y con los botones
hacia Arriba/Abajo seleccione el idioma de su preferencia. Presione ENTER para
activar la selección. El cambio de idioma se ejecuta inmediatamente tras haber
presionado ENTER.
CONFIGURACIÓN DEL VEHÍCULO
OBD-II
Para seleccionar OBD-II en el CodeScout, presione MENU, luego SELECCIONE
VEHÍCULO y nalmente seleccione OBD2 1996-PRESENTE.
GM, Ford y Chrysler OBD-I
Presione MENU, luego busque la opción SELECCIONE VEHÍCULO, y nalmente
elija la marca apropiada. Especique Marca y Año de su vehículo, luego seleccione el
8vo. VIN. Responda las preguntas en pantalla. El proceso naliza cuando la pantalla
le muestre la imagen del cable a usar.
Usando el Cable Correcto
Localice el cable que corresponda al de la imagen en la pantalla. Para más detalles,
consulte la sección de Descripción de Cables.
NOTA: Existen algunos vehículos con conectores de diagnóstico cuyos cables no
se incluyen en el CodeScout. Entre ellos se encuentran la serie LH de Chrysler y
algunos Ford fabricados antes de 1996 equipados con conector OBD-II debajo del
tablero.
34
35
Page 19

CABLES Y DESCRIPCIONES
Descripción Apariencia Pantalla Apariencia Física
Cable Chrysler
Para uso en vehículos
Chrysler OBD-I 1983-1995
con conector SCI.
Cable Ford
Para uso en vehículos
Ford OBD-I 1983-1995 con
controlador EEC-IV.
VEHÍCULOS OBD-II
Analizando Vehículos OBD-II
Conecte el CodeScout al vehículo. El CodeScout se comunicará con la computadora
de abordo del vehículo a través del cable.
Este cable se conecta en un extremo al vehículo y en el otro extremo al conector
ubicado en la parte inferior del CodeScout.
a. La ubicación del conector depende de cada fabricante. Sin embargo, en
vehículos con sistemas OBD-II, el conector usualmente se ubica debajo del
tablero, del lado del conductor, entre un radio de dos pies (60.96 cm.) alrededor
de la columna del volante.
b. Asegúrese que todas las terminales estén derechas y que los contactos de los
cables no estén cubiertos de grasa, suciedad o humedad.
c. Inserte el cable del CodeScout rmemente en el puerto de enlace del vehículo.
d. Inserte el otro extremo del cable en la parte inferior del CodeScout.
Cable GM
Para uso en vehículos
OBD-I 1982-1995 con
conector ALDL de 12
terminales.
Cable OBD-II
Genérico (amarillo)
Para vehículos 1996 y
posteriores: Americanos,
Europeos y Asiáticos.
Cable OBD-II
Especíco (azul)
Para uso en vehículos
GM OBD-I 1994-1995
conector tipo Genérico
36
Fig.29
Fig.30
1. Encienda el CodeScout. Asegúrese que el
vehículo esté conectado (Fig.29).
2. Coloque la llave del vehículo en posición
de encendido o encienda el motor. Realice la
conguración necesaria al CodeScout.
3. Presione el botón READ.
4. Tras un análisis exitoso, le preguntará si desea
guardar la información obtenida (Fig.31),
seguido de un resumen (Fig.30).
5. Si no se pudo analizar el vehículo, la pantalla
indicará ERROR DE LECTURA. Lea el
capítulo Solución de Problemas, en este
manual.
37
Page 20

VEHÍCULOS OBD-II
VEHÍCULOS OBD-II
Acerca de la función Reporte de Escaneo:
Después de un análisis completo de su vehículo,
la información obtenida y la conguración del
vehículo pueden ser guardadas para su uso
posterior (Fig.31). Asígnele un nombre que le
permita identicar esta información cuando
la necesite en el futuro (Fig.32). Usted podrá
Fig.31
escoger un nombre que tenga un máximo de
10 caracteres. Para acceder a la información
guardada consulte la sección “Ver información
OBD-II” en este manual.
Viendo Información OBD-II
Fig.32
Antes de iniciar, diagnostique su vehículo. El CodeScout no necesita estar
conectado al vehículo para mostrar la información. La información permanece en la
memoria hasta que se analice otro vehículo. Esto le permite revisar la información o
descargarla a una PC mediante la aplicación EZ-PC.
Para ver información OBD-II use los botones izquierdo/Derecho para mostrar la
lista de códigos almacenados. El número del código de falla aparecerá en la parte
superior de la pantalla y la denición en la parte inferior. Si la denición es extensa,
use los botones Arriba/Abajo para visualizar la denición completa.
Para ver la información antes guardada con Reporte de Escaneo, proceda de la
siguiente manera:
• Presione MENU
• Elija SELECCIONE VEHÍCULO
• Presione ENTER
• Elija ESCANEOS GUARDADOS
• Presione ENTER
• Seleccione el archivo deseado y presione ENTER.
La información correspondiente al vehículo se cargará en el CodeScout
¿Qué es Código de Falla?
Cuando un sistema OBD determina la presencia de un problema, el correspondiente
código de falla se almacenará en la memoria de la computadora del vehículo y el
indicador luminoso del panel de instrumentos se iluminará. Estos códigos ayudan a
identicar el problema del vehículo.
1. La pantalla de Resumen de Información
(Fig.31) muestra si el indicador luminoso
está encendido, el número de códigos de falla
detectados y el estado de pruebas de
monitores.
2. Con el botón hacia la derecha podrá ver las
Fig.33
deniciones de los códigos de falla (Fig.33).
Códigos Especicos de Fabricante
NOTE: El listado de las marcas de vehículos es dinámica, y aparece cuando de
requieren deniciones de códigos especícos disponibles en su vehículo.
Si el código de falla dice “Seleccione Marca de Vehículo, ENTER para escoger”
signica que hay un código especíco del fabricante almacenado y que requerirá
especicar una conguración adicional en su CodeScout.
1. Presione ENTER para continuar.
2. Con el botón Abajo, seleccione de la lista la
marca del vehículo. El seleccionar una marca
que no corresponda provocará que obtenga
deniciones incorrectas. Si no encuentra la
marca del vehículo en la lista, seleccione la
Fig.34
opción OTRO (Fig.34).
3. Continúe consultando los demás códigos,
presionando los botones de desplazamiento
hacia Izquierda/Derecha.
38
39
Page 21

VEHÍCULOS OBD-II
VEHÍCULOS OBD-II
¿Qué es Pruebas de Monitores?
Las Pruebas de Monitores son indicadores que ayudan a determinar si los
componentes anti-emisiones han sido evaluados. En otras palabras, si todos los
monitores están activos, los componentes anti-emisiones han sido evaluados. En
algunos casos se requerirá conducir el vehículo para generar las condiciones de
prueba y ejecución de dichos monitores.
1. Para ver la información de pruebas a
monitores presione MENU.
2. Con el botón hacia Abajo, seleccione Prueba
de Emisiones y presione ENTER.
3. Con los botones de desplazamiento hacia
Arriba/Abajo podrá ver la lista de monitores
disponibles en su vehículo (Fig.35).
4. Una “Palomilla” al costado izquierdo de cada
Fig.35
monitor disponible indicará que las pruebas
correspondientes han sido completadas.
Borrando Códigos OBD-II
NOTA: Al ejecutar la función de borrado, removerá los códigos de falla y los
resultados de pruebas a monitores almacenados en la computadora del vehículo.
Esta función puede ser utilizada para comprobar si las reparacionrealizadas en el
vehículo fueron apropiadas tras evaluar nuevamente su vehículo con el CodeScout,
tras haber borrado los ciclos de códigos.
ADVERTENCIA: Una vez borrados los resultados de las pruebas de monitores,
puede tomar varios días de manejo volver a completar los prueba.
Fig.36
Fig.37
Borrando Códigos OBD-II
1. Encienda su CodeScout. Asegúrese que esté
conectado al vehículo.
2. Coloque la llave del vehículo en posición de
encendido, o encienda el motor.
3. Presione CLEAR.
4. Aparecerá un texto para conrmar el proceso
de borrado (Fig.36). ENTER para proceder.
5. Una vez borrados los códigos aparecerá en
la pantalla “Vehículo Conectado”. Si hubiese
problemas al borrar los códigos, se mostrará
un mensaje de error.
Libreria de Códigos OBD-II
Las deniciones a los códigos de falla genéricos
pueden encontrarse usando la función LISTA
CÓDIGOS OBD-II de su CodeScout. Congure
su CodeScout de la siguiente manera:
• Presione MENU NE VEHÍCULO
• Elija SELECCIO
• Seleccione OBD2 1996-PRESENTE
• Presione MENU A CÓDIGOS OBDII
• Seleccione LIST
• Use los botones de navegación para
ingresar el número del código de falla
(Fig.37).
• Presione ENTER para ver el texto (Fig.38).
40
Fig.38
41
Page 22

VEHÍCULOS OBD-I (GM, Chrysler)
VEHÍCULOS OBD-I (GM, Chrysler)
Analizando Vehículo OBD-I (GM, Chrysler)
Consulte la sección “Congurando CodeScout para su vehículo - GM, Ford, y
Chrysler OBD-I” en este manual, para encontrar instrucciones de conguración y
ayuda para seleccionar el cable apropiado.
1. Coloque la llave del vehículo en posición de
encendido, o encienda el motor.
2. Congure su CodeScout y conecte el cable
apropiado. Para más información consulte
“Congurando el CodeScout para su vehículo
-GM, Ford, y Chrysler OBD-I” en este manual.
3. Presione READ.
4a. Si el análisis fue exitoso, se le preguntará si
desea guardar la información (Fig.39).
4b. Si no se pudo completar el análisis, se
mostrará un mensaje de error en pantalla
(Fig.40). Si éste es su caso, consulte la
sección Solución de Problemas en este
manual.
Función Reporte de Escaneo
Cuando se complete exitosamente el análisis de
un vehículo, la información obtenida puede ser
almacenada para una posterior revisión (Fig.39).
Escoja un nombre (máximo 10 caracteres)
para cada análisis (Fig.41). Para consultar la
información valla a Ver Información OBD-I (GM,
Chrysler) en este manual.
Fig.39
Fig.40
Fig.41
Viendo Información OBD-I (GM, Chrysler)
Para ver información OBD-I (GM, Chrysler), primero obténgala de su vehículo. El
CodeScout no necesita estar conectado al vehículo para mostrar la información. La
información permanece en la memoria hasta que se congura otro vehículo. Esta
característica le permite consultar la información posteriormente o descargarla a una
PC, mediante la aplicación EZ-PC.
Para ver información OBD-I para GM y Chrysler, presione los botones Izquierdo y
Derecho para mostrar la lista de códigos almacenados. El número del código de falla
aparecerá en la parte superior de la pantalla y la denición del mismo en la parte
inferior. Si la denición de un código de falla es extensa, presiones los botones hacia
Arriba y hacia Abajo para visualizar la denición completa.
Para visualizar la información previamente guardada usando la función Reporte de
Escaneo, simplemente proceda de la siguiente manera:
• Presione MENU
• Elija SELECCIONE VEHÍCULO
• Elija ESCANEOS PREVIOS
• Seleccione el archivo deseado y presione ENTER.
La información correspondiente a ese vehículo especíco se cargará en el
CodeScout.
¿Qué es Código de Falla?
Cuando un sistema OBD determina la presencia de un problema, el correspondiente
código de falla se almacenará en la memoria de la computadora del vehículo y el
indicador luminoso del panel de instrumentos se iluminará. Estos códigos ayudan a
identicar el problema del vehículo (Fig.42).
1. Use los botones Izquierdo y Derecho para ver
la lista de códigos.
42
Fig.42
43
Page 23

VEHÍCULOS OBD-I (GM, Chrysler)
VEHÍCULOS OBD-I (Ford)
Borrando Códigos OBD-I (GM, Chrysler)
Una vez realizadas las reparaciones en el vehículo, el borrado de códigos ayuda a
vericar si las reparaciones fueron hechas correctamente.
1. Encienda su CodeScout. Asegúrese que esté conectado al vehículo con el cable
apropiado y que esté correctamente congurado.
2. Coloque la llave del vehículo en posición de encendido, o encienda el motor.
3. Presione CLEAR.
NOTA: En muchos vehículos OBD-I GM y Chrysler, los códigos no podrán se
borrados mediante el CodeScout. En este caso se deberá desconectar la
batería. El CodeScout le noticará si será necesario algún procedimiento
especíco adicional para borrar los códigos.
4. Una vez borrados los códigos, aparecerá la
pantalla inicial con la imagen del cable. Si
no fue posible borrar los códigos, aparecerá
un mensaje de error (Fig.43).
Analizando Vehículo OBD-I (Ford)
Reérase a la sección “Congurando el CodeScout para su vehículo - GM, Ford,
y Chrysler OBD-I” en este manual para encontrar instrucciones de conguración y
ayuda para seleccionar el cable apropiado.
El CodeScout detecta tres tipos diferentes de códigos de falla en vehículos Ford
OBD-I: Llave abierta, motor apagado (key on, engine off - KOEO), llave abierta, motor
encendido (key on, engine on - KOER), y códigos de Memoria. Los códigos KOEO
se presentan durante el análisis del vehículo con la llave en posición de encendido y
el motor apagado. Los códigos KOER se presentan durante un análisis con llave en
posición de encendido y motor encendido.
44
Fig.43
Prueba Motor Apagado (KOEO)
Presione el botón READ para entrar al menú correspondiente. Seleccione Prueba
KOEO, presione ENTER y siga las instrucciones que aparecen en la pantalla. Una
vez empezada la prueba, se mostrará en pantalla detalles de la misma, por ejemplo
el número de códigos hallados, etc. Normalmente este tipo de pruebas toma varios
minutos en ser completada.
Si la prueba termina de manera exitosa, se le
preguntará si desea guardar la información
(Fig.44), seguida de otra pantalla donde se
mostrará un resumen de la prueba.
Si la prueba no fue exitosa, se mostrará el
Fig.44
mensaje “Falla de Comunicación” en pantalla
(Fig.45). Si este es el caso, consulte la sección
Solución de Problemas en este manual.
Prueba Motor Encendido (KOER)
NOTA: La prueba KOEO debe ejecutarse antes
de realizar la prueba KOER.
Fig.45
Presione el botón READ para entrar al menú correspondiente. Seleccione Prueba
KOER, presione ENTER y siga las instrucciones que aparecen en la pantalla. Una
vez empezada la prueba, se mostrará en pantalla detalles de la misma. Normalmente
este tipo de pruebas toma varios minutos en ser completada.
Si la prueba termina de manera exitosa, se preguntará si se desea guardar la
información (Fig.44), seguida de otra pantalla donde se mostrará un resumen de la
prueba.
Si la prueba no fue exitosa se mostrará, se mostrará el mensaje “ Falla de
Comunicación” en pantalla (Fig.45). Si este es el caso, consulte la sección Solución
de Problemas en este manual.
45
Page 24

VEHÍCULOS OBD-I (Ford)
VEHÍCULOS OBD-I (Ford)
Función Reporte de Escaneo
Cuando se complete exitosamente el análisis de un vehículo, la información obtenida
puede ser almacenada para una posterior revisión (Fig.44).
Escoja un nombre (máximo 10 caracteres)
para este análisis (Fig.46). Para recuperar la
información valla a Ver Información OBD-I (Ford)
en este manual.
Fig.46
Viendo Información OBD-I (Ford)
Para ver información OBD-I (Ford), primero escanee su vehículo. Para ver los
códigos en cualquier momento, presione MENU, seleccione VER CÓDIGOS y
presione ENTER. El CodeScout no necesita estar conectado al vehículo para mostrar
la información. La información permanece en la memoria hasta que se analiza otro
vehículo. Esta característica le permite revisar la información posteriormente o
descargarla a una PC, mediante la aplicación EZ-PC.
Para ver información en Ford OBD-I use los botones Izquierdo y Derecho para
mostrar la lista de códigos almacenados. El número del código de falla aparecerá
en la parte superior de la pantalla y la denición del mismo en la parte inferior. Si la
denición de un código de falla es extensa, presione los botones hacia Arriba y hacia
Abajo para visualizar la denición completa.
Viendo Información OBD-I (Ford)
Para visualizar la información previamente guardada usando la función Reporte de
Escaneo, simplemente proceda de la siguiente manera:
• Presione MENU
• Elija SELECCIONE VEHÍCULO
• Elija ESCANEOS PREVIOS
• Seleccione el archivo deseado y presione ENTER
Toda la información correspondiente a ese vehículo especíco se cargará en el
CodeScout.
¿Qué es Código de Falla?
Cuando un sistema OBD determina la presencia de un problema, el correspondiente
código de falla se almacenará en la memoria de la computadora del vehículo y el
indicador luminoso del panel de instrumentos se iluminará. Estos códigos ayudan a
identicar el problema del vehículo (Fig.47).
1. Use los botones Izquierdo y Derecho para ver
la lista de códigos.
Fig.47
Borrando Códigos OBD-I (Ford)
Una vez realizadas las reparaciones en el vehículo, el borrado de códigos ayuda a
vericar si las reparaciones fueron hechas correctamente.
1. Encienda su CodeScout. Asegúrese que el CodeScout esté correctamente
congurado y conectado con el cable apropiado al vehículo.
2. Presione CLEAR y siga las instrucciones en pantalla. Los vehículos Ford requieren
que la llave de encendido sea girada a posición de apagado, al menos cinco
segundos, antes de colocarla en posición de encendido para borrar los códigos.
3. Una vez borrados los códigos, aparecerá la pantalla inicial con la imagen del cable.
46
47
Page 25

SOLUCIÓN DE PROBLEMAS
TÉRMINOS DE APLICACIÓN DE GARANTÍA
¿Qué hacer si el CodeScout no Escanea/Borra Códigos?
1. Asegúrese que la llave esté en posición de encendido.
2. Verique que los contactos del cable se encuentren limpios.
3. Verique que el cable se encuentre rmemente conectado.
4. Asegúrese que las terminales del cable no estén torcidas y que hagan contacto
con el conector del vehículo.
5. Intente mover el cable de un lado a otro, suavemente, mientras trata de conectarse
al vehículo.
6. Asegúrese que la conguración de su CodeScout sea la correcta para el tipo de
vehículo que desea analizar.
REINICIANDO EL CODESCOUT
¿Cómo Reiniciar el CodeScout?
NOTA: Estas instrucciones reiniciarán su CodeScout. Si su problema persiste, por
favor contacte al área de Soporte Técnico de AutoXray.
1. Encienda su CodeScout.
2. Abra el compartimiento de las baterías y remueva una de las baterías.
3. Mantenga presionado el botón POWER por 30 segundos.
4. Coloque las baterías y encienda su CodeScout.
INFORMACIÓN ADICIONAL
OFERTA ESPECIAL
Registre su producto en línea en www.autoxray.com y reciba 6 meses adicionales de
garantía, (para un total de 18 meses) en su producto.
UN (1) AÑO DE GARANTÍA LIMITADA
SPX garantiza que este producto está libre de defectos de materiales y mano de obra. Extiende la garantía
por un periodo de un (1) año a partir de la fecha de compra. Cualquier unidad que presente falla dentro de
este periodo será reparada o reemplazada sin cargo alguno, a discreción de SPX. Para enviar el producto,
siga las instrucciones en este texto. Esta garantía no cubre daños (accidentales o intencionales), por
alteraciones o uso inapropiado del producto.
DENEGACIÓN DE GARANTÍA
SPX DENEGARÁ TODO RECLAMO DE GARANTÍA NO AVALADO EN EL PÁRRAFO ANTERIOR. SPX
NEGARÁ CUALQUIER GARANTÍA IMPLÍCITA, INCLUYENDO LAS DE COMERCIABILIDAD O APTITUD
PARA CUALQUIER PROPÓSITO (HASTA DONDE LO PERMITA LA LEY, APLICABLE A CUALQUIER
PRODUCTO. ESTÁ SUJETA A TODOS LOS TÉRMINOS Y CONDICIONES DE ESTA GARANTÍA. ALGUNOS
ESTADOS NO PERMITEN LIMITACIONES CON RESPECTO A LA DURACION DE UNA GARANTÍA
IMPLÍCITA, ASI QUE ESTA LIMITACIÓN NO APLICARÁ A COMPRADORES ESPECÍFICOS).
LIMITACIÓN DE SOLUCIONES
SPX NO SERÁ RESPONSABLE DE DAÑO INCIDENTAL O CONSECUENCIAL, BASADO EN CUALQUIER
TEORÍA LEGAL, INCLUYENDO, PERO NO LIMITADO A, PÉRDIDA DE BENEFICIOS Y/O DAÑOS A LA
PROPIEDAD. (Algunos estados no permiten excluir o limitar la Responsabilidad sobre daños incidentales
o sus consecuencias, en tanto, esta limitación puede no aplicar a compradores de tales estados). ESTA
GARANTÍA PROVEE DERECHOS LEGALES ESPECÍFICOS, ADICIONALES A LOS QUE USTED PUEDA
TENER, VARIABLES DE UN ESTADO A OTRO.
La información, ilustraciones y especicaciones contenidas en este manual se basan en la información
disponible en la industria al momento de la publicación. Ninguna garantía (expresa o implícita) puede ser
hecha basándose en su exactitud o contenido. Ni SPX, ni entidades relacionadas asumen la responsabilidad
por pérdidas o daños sufridos en el mal uso del producto o por no seguir las instrucciones de este manual.
SPX se reserva el derecho a cambiar este manual o sus especicaciones en cualquier momento sin la
obligación de noticar los cambios a persona u organización alguna.
PARA RECLAMOS DE GARANTÍA
Si necesita enviar el producto a servicio, por favor siga este procedimiento:
1. Llame a SPX Corporation - Soporte Técnico al 1-800-228-7667 o 216-898-9200,
o visite www.autoxray.com. Los agentes de Soporte Técnico pueden asistirlo.
2. Deberá presentar un comprobante de compra para reclamar la garantía.
3. Para enviar su producto, se le proveerá un número de autorización de retorno de mercancía (Return
Material Authorization Number, o RMA por sus siglas en inglés)
4. De ser posible, devuelva su equipo, cables y accesorios en el empaque original.
5. Imprima el número RMA y su dirección de retorno al exterior de su empaque, y envíelo a la dirección que
nuestro Representante de Soporte Técnico le proveerá.
6. Usted será responsable por cargos de envío cuando no aplique la garantía
REPARACIONES FUERA DE GARANTÍA
Si su producto necesita ser reparado y ya no cuenta con garantía, llame a Soporte Técnico al 1-800-228-7667
o 216-898-9200. Se le proporcionará información de los costos de reparación y envíos.
48
49
Page 26

OTROS PRODUCTOS
Otros Productos Autoxray
ESCÁNERS
EZ-Scan AX6000
Escáner OBD-I y OBD-II con información expandida para vehículos Toyota, GM,
Ford, y Chrysler OBD-II.
EZ-Scan AX6100
Escáner OBD-I y OBD-II con información expandida para vehículos Toyota, GM,
Ford, y Chrysler OBD-II, 100% en español.
EZ-Scan AX4000
Escáner OBD-II para uso en todos los vehículos OBD-II fabricados a partir de 1996.
LECTORES DE CÓDIGOS
CodeScout AX700
Lector de códigos OBD-II para uso en todos los vehículos OBD-II fabricados a partir
de 1996.
CodeScout AX1500
Lector de códigos OBD-II para uso en todos los vehículos OBD-II fabricados a partir
de 1996.
CodeScout AX2500
Lector de códigos OBD-I y OBD-II para uso en vehículos GM, Ford y Chrysler
desde 982 hasta 1995, y todos los vehículos OBD-II fabricados a partir de 1996.
ACCESORIOS
EZ-Update AX400-USB
Para actualizar y añadir nuevas funciones a su escáner.
EZ-PC AX500
EZ-PC convierte la información de su escáner en reportes y grácos fáciles de leer,
y le permite acceder a actualizacioes vía Internet.
CABLES Y MISCELÁNEOS
Cable Amarillo OBD-II/CANAX 20250
Cable USB y CD con sotware AX301
Cable GM OBD-I para recambio AX20110
Cable Ford OBD-I para recambio AX20120
Cable Chrysler OBD-I para recambio AX20130
Cable Chrysler OBD-II expandido AX20271
Cable GM OBD-I azul AX20211
Maletín de plástico reforzadoAX60000
Visite nuestro sitio en Internet www.autoxray.com para informarse sobre nuestros
nuevos productos, accesorios y actualizaciones disponibles.
50
 Loading...