


NVR 3.0
System Administrator’s Manual
For Version 3.0.09
2014/10/23

NVR 3.0 System Administrator’s Manual
About This Manual
Target Audience
This manual is intended for System Administrators who are responsible for installing and setting up ACTi NVR 3.0 surveillance system. The reader is expected to know the fundamentals of IP surveillance system integration and to own the administrative privileges to achieve all the tasks.
You may also check http://www.acti.com/downloadcenter for updates or release information about this software and document.
Content Overview
This manual provides information needed for planning the installation, installing, setting up the system and configuring the video streaming devices. Its main content consists of the following three sections:
Getting Started provides the preparatory knowledge you should study before starting installation, such as system requirements, license registration and backup/restore procedures.
Log in to the System explains how to log in to the system right after a successful installation.
System Setup gives instructions on the tasks such as adding devices to the system, configuring the device settings, scheduling the recordings, managing events, managing storage, managing groups/users and setting up Live View. For each major task, you will be given a brief introduction of operation principles, step-by-step instructions, and a simple method to check if you have done it correctly.
2 |
www.acti.com |
|
|

NVR 3.0 System Administrator’s Manual
Related Documentation
Since this manual focuses on how to accomplish the tasks for system installation and configurations, there is very limited information about operation-wise directions for End Users who will be operating NVR server system. To obtain the instructions on use of NVR applications such as monitoring and playback, please download the latest ACTi NVR 3.0 User’s Manual from ACTi Corporation website via http://www.acti.com/downloadcenter
Technical Support
If you have any questions during system installation, please feel free to contact our engineers via our Customer Help Desk platform http://www.acti.com/CHD.
System Integration
NVR 3.0 is supported by other products via integration tools. Please follow the instructions in the installation guide to complete the installation and system configuration.
|
|
Tool |
Installation Documentation |
|
|
Plug-in for Lenel OnGuard |
Plug-in for Lenel OnGuard Installation Guide |
|
|
You can find both the tool and its installation documentation on
http://www.acti.com/downloadcenter
3 |
www.acti.com |
|
|

NVR 3.0 System Administrator’s Manual
Conventions Used in This Manual
The following are typographic conventions used in this manual:
Bold: Bold typeface is used for a keyword, major functions of NVR, or a title of a section/column.
Italic: Italic typeface is used for a filename or location path.
Underlined: Underlined typeface is used for a document name or hyperlink.
“Bold”: Bold interface enclosed in double quotation marks indicates the name of a button, a menu or a choice item.
Some notices are placed within the following boxes; each type of the box indicates different purposes or levels of importance for system:
Important Notice
The content within this box is an important notice. This notice is important for you to get certain functions to work properly, or to prevent from certain potential problems that may damage your system. Make sure you read this notice and follow the instructions.
Note
The content within this box is a note. A note is some necessary information you need to know about the action you are currently taking, like what will happen after you follow or don’t follow certain procedure.
Tip
The content within this box is a tip. A tip gives you an alternative method to easily or quickly achieve an objective, usually for specific conditions.
4 |
www.acti.com |
|
|

NVR 3.0 System Administrator’s Manual
Legal Notice
Disclaimer
The information contained in this document is intended for general information purposes. ACTi Corporation shall not be liable for errors contained herein or for incidental or consequential damages arising from the furnishing, performance, or use of this manual.
The information contained herein is subject to change without notice.
The English version of this document is the official one for all purposes. All the translated versions are provided as a convenience. Any discrepancies or differences created in the translations of any other languages are not legally binding.
Copyright
Copyright © 2003-2014 ACTi Corporation All Rights Reserved.
Trademarks
ACTi Connecting Vision and its logo 


 are registered trademarks of ACTi Corporation.
Microsoft® and Windows® are registered trademarks of Microsoft Corporation.
All other product or company names mentioned in this document may be trademarks or
registered trademarks of their respective owners.
5 |
www.acti.com |
|
|

NVR 3.0 System Administrator’s Manual
Table of Contents
1 About This Manual |
2 |
|
|
Target Audience ..................................................................................... |
2 |
Content Overview .................................................................................. |
2 |
Related Documentation ......................................................................... |
3 |
Technical Support................................................................................... |
3 |
System Integration ................................................................................. |
3 |
Conventions Used in This Manual .......................................................... |
4 |
2 |
Legal Notice |
5 |
|
||
|
|
|
|
||
|
Disclaimer............................................................................................... |
5 |
|
||
|
Copyright ............................................................................................... |
5 |
|
||
|
Trademarks............................................................................................. |
5 |
|
||
3 |
Table of Contents |
6 |
|
||
4 |
Overview |
12 |
|
||
|
|
|
|
||
|
ACTi NVR Server / Client Architecture .................................................. |
12 |
|
||
5 |
System Installation Check List |
13 |
|
||
6 |
Getting Started |
15 |
|
||
|
|
|
|
||
|
System Requirements ........................................................................... |
15 |
|
||
|
Pre-requisites........................................................................................ |
17 |
|
||
|
|
1. |
Suitable System Specifications............................................... |
17 |
|
|
|
2. |
Uninstall Previous ACTi NVR 2.x Server ................................ |
17 |
|
|
|
3. |
More than 40 GB Space on Storage Drive ............................. |
17 |
|
|
|
4. |
Turn Off Windows UAC Function ............................................ |
17 |
|
|
|
|
Disable UAC in Windows 7 |
17 |
|
|
|
|
|
|
|
|
|
|
6 |
www.acti.com |
|
|
|
|
|
|
|

NVR 3.0 System Administrator’s Manual
Server Installation ................................................................................ |
19 |
Install the Software....................................................................... |
19 |
Workstation Installation ...................................................................... |
22 |
Install the Software....................................................................... |
22 |
License and Activation ......................................................................... |
24 |
Online Activation .......................................................................... |
25 |
Offline Activation .......................................................................... |
25 |
Step-by-step Activation Process .................................................. |
26 |
Online Activation SOP |
26 |
Offline Activation SOP |
27 |
Verify Your License ....................................................................... |
28 |
|
7 Log In to the System |
29 |
|
|
|
|
|
|
Access NVR Server via Internet Explorer .............................................. |
29 |
|
|
From Server Computer Using Local Client................................... |
29 |
|
|
From Remote Client Computer .................................................... |
29 |
|
|
Accept ActiveX Controls Installation Requests ............................ |
29 |
|
|
Login Failure Troubleshooting ...................................................... |
30 |
|
|
Condition 1: Why can’t I access NVR server via browser? |
30 |
|
|
Condition 2: Why can’t I install Active X controls after logging in? |
31 |
|
|
Login ............................................................................................ |
33 |
|
|
A. Enter Account & Password |
33 |
|
|
B. Change UI language |
33 |
|
|
C. Remember Account/Password |
33 |
|
|
D. Retrieve the Forgotten Password |
33 |
|
|
Access NVR Server via NVR3 Workstation ............................................ |
34 |
|
|
Local Workstation Client Login..................................................... |
35 |
|
|
A. Enter Account & Password |
35 |
|
|
B. Choose the Initial Page |
35 |
|
|
C. Language |
35 |
|
|
D. Remember Login Information and Auto Login |
35 |
|
|
E. Retrieve the Forgotten Password |
36 |
|
|
Remote Workstation Client Login................................................. |
36 |
|
|
A. Server IP & Server Port |
36 |
|
|
B. Enter Account & Password |
36 |
|
|
C. Choose the Initial Page |
36 |
|
|
D. Language |
37 |
|
|
|
|
|
7 |
www.acti.com |
||
|
|
|
|

NVR 3.0 System Administrator’s Manual
E. Remember Login Information and Auto Login |
37 |
F. Retrieve the Forgotten Password |
37 |
G. Server Name/Server Sites List |
37 |
|
8 Set up the System |
39 |
|
|
|
|
|
|
|
|
Setup Wizard........................................................................................ |
39 |
|
|
|
System Settings ........................................................................... |
40 |
|
|
|
Storage ........................................................................................ |
40 |
|
|
|
NVR Main Screen.................................................................................. |
42 |
|
|
|
Live View ...................................................................................... |
42 |
|
|
|
Playback....................................................................................... |
42 |
|
|
|
Setup............................................................................................ |
42 |
|
|
|
Add Devices.......................................................................................... |
43 |
|
|
|
Search Devices Within Local Area Network ................................. |
44 |
|
|
|
Search Devices Within Local Area Network with ONVIF.............. |
45 |
|
|
|
Add Devices on WAN or Other Local Area Networks ................... |
46 |
|
|
|
Basic Settings Attributes |
47 |
|
|
|
Device Status ............................................................................... |
49 |
|
|
|
Status Icon Description |
49 |
|
|
|
Add Non-ACTi Cameras .............................................................. |
50 |
|
|
|
Manage Multiple Devices..................................................................... |
52 |
|
|
|
Modify Basic Connection Settings................................................ |
52 |
|
|
|
Delete Devices ............................................................................. |
52 |
|
|
|
Copy Settings Across Devices ..................................................... |
53 |
|
|
|
Add Video Streams from a Multi-channel Device ......................... |
54 |
|
|
|
Configure Device Settings .................................................................... |
55 |
|
|
|
Configure Video Format ............................................................... |
55 |
|
|
|
Video Settings Attributes |
55 |
|
|
|
Save Storage by Setting Event Recording Frame Rate................ |
56 |
|
|
|
Schedule Recording |
56 |
|
|
|
Event Recording |
56 |
|
|
|
Event Recording with Frame Rate Adjustment |
57 |
|
|
|
How to Make Use of Event Recording with Frame Rate Adjustment |
57 |
|
|
|
Fine-tune the Image ..................................................................... |
58 |
|
|
|
Video Adjustment Attributes |
59 |
|
|
|
Configure Motion Settings............................................................ |
61 |
|
|
|
Adjustment Attributes |
62 |
|
|
|
|
|
|
|
8 |
|
www.acti.com |
||
|
|
|
|
|

NVR 3.0 System Administrator’s Manual |
|
Configure Storage Card Settings ................................................. |
63 |
Configure PTZ Device.................................................................. |
64 |
Adjustment Attributes |
65 |
How to Do Live PTZ Operation |
66 |
Set PTZ Preset Points.................................................................. |
68 |
Set PTZ Preset Tour..................................................................... |
69 |
Configure Fisheye Cameras......................................................... |
70 |
Schedule Recordings ............................................................................ |
74 |
Configure the Recording File Properties ...................................... |
74 |
Attributes Explanation |
74 |
Set the Schedule.......................................................................... |
76 |
Use Time Setting Quick Buttons to Set the Time in One Click |
77 |
Lock Specific Days |
78 |
Copy an Existing Schedule to Others........................................... |
79 |
View the Entire Recording Schedule............................................ |
80 |
Event Management.............................................................................. |
81 |
How Does NVR Handle Events.................................................... |
81 |
How to Edit an Event Rule ........................................................... |
82 |
Manage the Event Rules.............................................................. |
85 |
Delete the Event Rules |
86 |
How to Setup SMTP Settings for Event Rules ............................. |
86 |
How to Setup FTP Settings for Event Rules................................. |
87 |
System Log ........................................................................................... |
89 |
Define Search Time ..................................................................... |
89 |
Choose Log Type ......................................................................... |
90 |
Read the Log ............................................................................... |
90 |
Export the Log ............................................................................. |
91 |
Storage Management .......................................................................... |
92 |
Change Recordings Folder Name................................................ |
92 |
Set System Log Lifecycle............................................................. |
92 |
Set Hard Drives for the Recorded Files Deletion Rule ................. |
92 |
Manage User Groups/ Users ................................................................. |
94 |
Overview ...................................................................................... |
94 |
User Groups................................................................................. |
95 |
Add Users .................................................................................... |
97 |
Domain Users Management ........................................................ |
99 |
Customize Views ................................................................................ |
100 |
Step 1: Create a New View ........................................................ |
101 |
9 |
www.acti.com |
|
|

NVR 3.0 System Administrator’s Manual |
|
Step 2: Enter Edit Mode ............................................................. |
101 |
Step 3: Select a Layout .............................................................. |
101 |
Step 4: Add Video Source .......................................................... |
102 |
Step 5: Add a Map ..................................................................... |
102 |
Step 6: Add Devices to the Map ................................................. |
104 |
Step 7: Adjust the Channel Size & Layout.................................. |
105 |
Step 8: Save the View ................................................................ |
105 |
Step 9: Set Default View............................................................. |
105 |
Step 10: Set Default Hotspot Channel (Optional) ....................... |
106 |
Step 11: Set Fisheye Camera Mode .......................................... |
106 |
Manage the Views...................................................................... |
107 |
Set View Link ............................................................................. |
108 |
Set View Patrol........................................................................... |
108 |
Tips to Enhance Live View Performance .................................... |
110 |
Let Windows Automatically Start with NVR Live View ................ |
111 |
Customize System Language.............................................................. |
112 |
System Languages List.............................................................. |
112 |
Display Configurations....................................................................... |
115 |
Video & Snapshot Export Configurations .......................................... |
116 |
Joystick ............................................................................................... |
117 |
Joystick Configurations .............................................................. |
117 |
Un-install Server Software ................................................................. |
118 |
Step 1: Remove NVR 3.0 Server Program ................................. |
118 |
Step 2: Remove NVR 3.0 Server Program Folder (Optional) ..... |
119 |
Step 3: Remove the Recordings Folder (Optional) ..................... |
119 |
Back Up System Data.......................................................................... |
120 |
Step 1: Back up System Settings ............................................... |
120 |
Step 2: Back up Recording Files Folder (Optional) .................... |
121 |
Step 3: Back up Recording Files Index Folder (Optional)........... |
121 |
Step 4: System Log (Optional) ................................................... |
121 |
Restore System Data .......................................................................... |
122 |
System Migration ............................................................................... |
123 |
Migrate from NVR 2.3 to NVR 3.0 .............................................. |
123 |
NVR 2.3 to NVR 3.0 Server Data Compatibilities |
123 |
Migrate NVR 3.0 Server to Another Computer ........................... |
124 |
Advanced Administrative Tasks.......................................................... |
125 |
NVR Server Status..................................................................... |
125 |
Change Server Port ................................................................... |
125 |
Change Authentication Method .................................................. |
126 |
10 |
www.acti.com |
|
|
NVR 3.0 System Administrator’s Manual |
|
Switch to Redundancy Server............................................................. |
127 |
License Registration................................................................... |
127 |
Set up Redundancy Server ........................................................ |
130 |
11 |
www.acti.com |
|
|

NVR 3.0 System Administrator’s Manual
Overview
ACTi NVR 3.0 (hereafter referred to as NVR 3.0) is a Windows-based software that provides distributed network video surveillance solution with full functionality. This software supports centralized management, scheduled recording, real-time monitoring and recording of up to 100
ACTi video streaming devices from local or remote network, with rule-based services to trigger multiple schedules and events.
ACTi NVR Server / Client Architecture
NVR 3.0 is a typical web-based server/client system. In a video surveillance system architecture, the Server serves as a video management service provider, aimed to run 24/7 offering non-stop services for clients. A Client makes requests of monitoring video streams or playback recordings to Server, which can reside on the same computer with server program (as from local) or on another computer (as from remote). Server starts automatically as soon as the Server computer (where it is installed) boots up, and operates in the background without requiring login by administrator. It would provide services over the TCP/IP network to multiple Clients upon request through HTTP Protocol.
There are two types of Clients in NVR 3.0 system: Web Client and Workstation Client. A user, connecting from whether web browser or workstation, will enjoy the same user interface and NVR functions.
Web Client: the web version of interface to access NVR server without need of installing any client program to become a client. Logging in the NVR server is as simple as visiting a website through IE browser.
Workstation Client: the client application making accessing NVR server free from the use of browser .The workstation includes a set of programs that provide interface between users and the NVR server.
12 |
www.acti.com |
|
|

NVR 3.0 System Administrator’s Manual
System Installation Check List
Pre-installation
|
Item |
|
|
Task |
|
|
Description |
|
Reference |
|
|
|||
|
1 |
|
|
|
|
Prepare software |
|
|
NVR 3.0 comes with 16-channel free license. |
|
License and |
|
||
|
|
|
|
|
|
|
||||||||
|
|
|
|
|
|
license |
|
|
For additional channels, please purchase the |
|
Activation on page |
|||
|
|
|
|
|
|
|
|
|
license from your system supplier and get the |
24 |
|
|
||
|
|
|
|
|
|
|
|
|
license information ready before activation. |
|
|
|
|
|
2 |
|
|
|
|
Prepare the server |
|
|
Make sure the computer’s hardware spec, |
|
System |
||||
|
|
|
|
|
|
|
||||||||
|
|
|
|
|
|
computer |
|
|
operating system and IE browser version are |
|
Requirements on |
|||
|
|
|
|
|
|
|
|
|
compatible with software requirements. |
|
page 15 |
|||
|
|
|
|
|
|
|
|
|
|
|
|
|
|
|
3 |
|
|
|
|
Assign a fixed IP for |
|
|
The server computer should have a fixed IP to |
|
|
|
|
||
|
|
|
|
|
|
|
|
|
|
|||||
|
|
|
|
|
|
server computer |
|
|
be used by NVR 3.0 server. |
|
|
|
|
|
|
|
|
|
|
|
|
|
|
|
|
|
|
|
|
4 |
|
|
|
|
Set up Active Directory |
|
|
To add users through the Active Directory |
|
|
|
|
||
|
|
|
|
|
|
|
|
|
|
|||||
|
|
|
|
|
|
(Optional) |
|
|
service, please make sure an Active Directory |
|
|
|
|
|
|
|
|
|
|
|
|
|
|
server is available on your domain. |
|
|
|
|
|
|
|
|
|
|
|
|
|
|
Installation |
|
|
|
|
|
|
Item |
|
|
Task |
|
|
Description |
|
Reference |
|
|
|||
|
5 |
|
|
|
|
Install NVR 3.0 server |
|
|
Follow the instructions to install the software |
|
Server Installation |
|
||
|
|
|
|
|
|
|
||||||||
|
|
|
|
|
|
software |
|
|
on server computer. |
|
|
on page 19 |
||
|
|
|
|
|
|
|
|
|
|
|
|
|
||
6 |
|
|
|
|
Check if the installation |
|
|
Log in to NVR to check if you can see the |
|
Log In to the System |
||||
|
|
|
|
|
|
|
||||||||
|
|
|
|
|
|
is successful |
|
|
login page. (On server computer, type |
|
on page 30 |
|||
|
|
|
|
|
|
|
|
|
http://localhost in browser’s URL bar). |
|
|
|
|
|
7 |
|
|
|
|
Activate the license |
|
|
Activate your license key to get your required |
|
|
|
|
||
|
|
|
|
|
|
|
|
|
|
|||||
|
|
|
|
|
|
(When required number |
|
|
number of channels ready for adding devices. |
|
|
|
|
|
|
|
|
|
|
|
of channels exceeds |
|
|
|
|
|
|
|
|
|
|
|
|
|
16) |
|
|
|
|
|
|
|
|
|
|
|
|
|
|
|
|
|
|
|
|
|
|
||
|
|
|
|
|
|
|
|
Configuring the Devices |
|
|
|
|
||
|
Item |
|
|
Task |
|
|
Description |
|
Reference |
|
|
|||
|
8 |
|
|
|
|
Get the devices |
|
|
Finish the installation and basic settings of all |
|
|
|
|
|
|
|
|
|
|
|
|
|
|
|
|||||
|
|
|
|
|
|
connected and ready |
|
|
devices (IP address, usernames, passwords), |
|
|
|
|
|
|
|
|
|
|
|
for use |
|
|
and attach all external hardware devices |
|
|
|
|
|
|
|
|
|
|
|
|
|
|
(alarms or sensors) if necessary. |
|
|
|
|
|
9 |
|
|
|
|
Connect external |
|
|
Attach necessary |
external hardware |
|
Joystick on page |
|||
|
|
|
|
|
|
|
||||||||
|
|
|
|
|
|
devices with the NVR |
|
|
peripherals such as |
a joystick or a |
117 |
|
|
|
|
|
|
|
|
|
Client PC |
|
|
microphone to the client computer. |
|
|
|||
|
|
|
|
|
|
|
|
|
|
|
|
|||
|
|
|
|
|
|
|
|
|
System Setup |
|
|
|
|
|
|
Item |
|
|
Task |
|
|
Description |
|
Reference |
|
|
|||
|
10 |
|
|
|
|
Configure the Storage |
|
|
Activate the disks for recordings and make |
|
Storage |
|
||
|
|
|
|
|
|
|
||||||||
|
|
|
|
|
|
Settings |
|
|
sure the total size is sufficient, and how many |
|
Management on |
|||
|
|
|
|
|
|
|
|
|
days the recordings are kept on disk. |
|
page 92 |
|||
|
|
|
|
|
|
|
|
|
|
|
|
|
||
11 |
|
|
|
|
Add devices to NVR |
|
|
Add devices and configure camera settings: |
|
Add Devices on |
||||
|
|
|
|
|
|
|
||||||||
|
|
|
|
|
|
server |
|
|
camera name, video/motion/PTZ settings. |
|
page 43; |
|||
|
|
|
|
|
|
|
|
|
|
|
|
Configure Device |
||
|
|
|
|
|
|
|
|
|
|
|
|
Settings on page 54 |
||
|
|
|
|
|
|
|
|
|
|
|
|
|
|
|
|
|
|
|
|
|
|
13 |
|
|
www.acti.com |
||||
|
|
|
|
|
|
|
|
|
|
|
|
|
|
|

NVR 3.0 System Administrator’s Manual
12 |
|
|
|
|
Configure Recording |
|
|
By default, each device will start 7/24 |
|
|
|
|
|||
|
|
|
|
|
|
|
|
|
|
||||||
|
|
|
|
|
|
Schedule |
|
|
schedule recording as soon as it is added. |
|
Schedule |
||||
|
|
|
|
|
|
|
|
|
|
Set recording schedule for each device. |
|
Recordings on page |
|||
|
|
|
|
|
|
|
|
|
|
|
|
70 |
|
|
|
13 |
|
|
|
|
Configure E-mail & FTP |
|
|
Complete the E-mail or FTP settings and test |
|
How to Setup SMTP |
|||||
|
|
|
|
|
|
|
|||||||||
|
|
|
|
|
|
settings |
|
|
if NVR server succeeds in sending e-mails |
|
Settings for Event |
||||
|
|
|
|
|
|
|
|
|
|
and uploading files. This step is necessary if |
|
Rules on page 86 ; |
|||
|
|
|
|
|
|
|
|
|
|
you will use these functions for Event |
|
How to Setup FTP |
|||
|
|
|
|
|
|
|
|
|
|
Handling. |
|
Settings for Event |
|||
|
|
|
|
|
|
|
|
|
|
|
|
|
Rules on page 87 |
||
14 |
|
|
|
|
Configure Event rules |
|
|
Set the event rules. |
|
How to Edit an |
|||||
|
|
|
|
|
|
|
|||||||||
|
|
|
|
|
|
|
|
|
|
|
|
|
Event Rule on page |
||
|
|
|
|
|
|
|
|
|
|
|
|
82 |
|
|
|
15 |
|
|
|
|
Create Users Accounts |
|
|
Configure User Group permissions and |
|
Manage User |
|||||
|
|
|
|
|
|
|
|||||||||
|
|
|
|
|
|
& Groups |
|
|
create required User Accounts. |
|
Groups/ Users on |
||||
|
|
|
|
|
|
|
|
|
|||||||
|
|
|
|
|
|
|
|
|
|
|
|
|
page 94 |
||
|
|
|
|
|
|
|
|
|
|
|
|
|
|
|
|
|
|
|
|
|
|
|
|
|
|
Live View Setup |
|
|
|
|
|
|
Item |
|
|
Task |
|
|
|
Description |
|
|
Reference |
|
|
||
16 |
|
|
|
|
Create Views for Users |
|
|
Customize and save views for Live View |
|
Customize Views on |
|||||
|
|
|
|
|
|
|
|||||||||
|
|
|
|
|
|
|
|
|
|
screen. |
|
page 100 |
|||
|
|
|
|
|
|
|
|
|
|
|
|
|
|||
|
|
|
|
|
|
|
|
|
|
|
|
|
|
||
|
|
|
|
|
|
|
|
|
Back up System Settings |
|
|
|
|
||
|
Item |
|
|
Task |
|
|
|
Description |
|
|
Reference |
|
|
||
17 |
|
|
|
|
Create backup of |
|
|
Create a backup file of current system |
|
Back Up System |
|||||
|
|
|
|
|
|
|
|||||||||
|
|
|
|
|
|
system settings |
|
|
settings for future re-installation or in case of |
|
Data on page 120 |
||||
|
|
|
|
|
|
|
|
|
|
critical system failure. |
|
||||
|
|
|
|
|
|
|
|
|
|
|
|
|
|
||
|
|
|
|
|
|
|
|
Post-installation Validation |
|
|
|
|
|||
|
Item |
|
|
Item |
|
|
|
Description |
|
|
Reference |
|
|
||
18 |
|
|
|
|
Live Preview basic |
|
|
Make sure if user is able to see the live view |
|
|
|
|
|||
|
|
|
|
|
|
|
|
|
|
||||||
|
|
|
|
|
|
operations |
|
|
with saved layouts and perform basic |
|
|
|
|
||
|
|
|
|
|
|
|
|
|
|
operations (e.g. PTZ controls or instant |
|
|
|
|
|
|
|
|
|
|
|
|
|
|
|
playback). |
|
|
|
|
|
19 |
|
|
|
|
Schedule Recording |
|
|
Make sure the disk is recording normally |
|
|
|
|
|||
|
|
|
|
|
|
|
|
|
|
||||||
|
|
|
|
|
|
|
|
|
|
according to the schedule. |
|
User’s Manual |
|||
|
|
|
|
|
|
|
|
|
|
|
|
|
|||
20 |
|
|
|
|
Event Handling |
|
|
Check if the expected actions (e.g. recording, |
|
||||||
|
|
|
|
|
|
|
|
|
|
||||||
|
|
|
|
|
|
|
|
|
|
alarms or e-mail notification, etc) are correctly |
|
|
|
|
|
|
|
|
|
|
|
|
|
|
|
triggered by events. |
|
|
|
|
|
21 |
|
|
|
|
User Access |
|
|
Make sure User can access NVR with right |
|
|
|
|
|||
|
|
|
|
|
|
|
|
|
|
||||||
|
|
|
|
|
|
|
|
|
|
account/password, and perform operations |
|
|
|
|
|
|
|
|
|
|
|
|
|
|
|
based on given user rights. |
|
|
|
|
|
22 |
|
|
|
|
Playback |
|
|
Make sure user can perform playback and |
|
|
|
|
|||
|
|
|
|
|
|
|
|
|
|
||||||
|
|
|
|
|
|
|
|
|
|
video search, and the export function can |
|
|
|
|
|
|
|
|
|
|
|
|
|
|
|
generate viewable files to designated folder. |
|
|
|
|
|
14 |
www.acti.com |
|
|

NVR 3.0 System Administrator’s Manual
Getting Started
System Requirements
The Minimum CPU Processor spec will provide acceptable performance for systems that use mostly MPEG4 streams. Surveillance systems that use 4 or more H.264 streams should satisfy Minimum CPU Processor spec for good performance. To quickly validate the PC spec you need, you may check with PC Selector - http://www.acti.com/pcselector
|
|
|
|
|
|
|
|
|
|
|
|
|
|
|
|
|
|
PC Spec |
|
Server + Local Client PC |
|
|
Server PC Only |
|
|
Remote Client PC |
|
|
|||
|
Number of Live |
1-16 |
17-64 |
|
0 |
|
|
1-16 |
17-64 |
|
|
||||
|
|
Channels (*2) |
|
|
|
|
|
||||||||
|
|
|
|
|
|
|
|
|
|
|
|
|
|
||
|
|
|
Minimum |
|
Intel Core 2 |
Intel i5 |
|
Intel Core 2 |
|
Intel Core 2 |
Intel i5 |
|
|||
|
CPU |
|
|
Quad 2.4GHz |
2.4 GHz |
|
Quad 2.4GHz |
|
Quad 2.4GHz |
2.4 GHz |
|
||||
|
|
|
|
|
|
|
|||||||||
|
Processor |
Recommended |
|
Intel i5 |
Intel Core i7-920 |
|
Intel i5 |
|
Intel i5 |
Intel Core i7-920 |
|
||||
|
|
|
|
|
2.4 GHz |
2.67 GHz |
|
2.4 GHz |
|
2.4 GHz |
2.67 GHz |
|
|||
|
|
RAM |
|
|
|
|
|
4GB (*3) |
|
|
|
|
|||
|
|
|
|
|
|
|
|
|
|||||||
|
|
Network |
|
|
Ethernet (1000 Base-T recommended) |
|
|
|
|||||||
|
|
|
|
|
|
|
|
|
|||||||
|
Hard Disk (*4) Space |
|
|
Minimum 40 GB (*5) |
|
|
|
|
|||||||
|
|
|
|
|
|||||||||||
|
Operating System (*6) |
|
Windows 8, Windows 7, Windows Server 2012, Windows Server 2008 |
|
|||||||||||
|
|
Display Resolution |
|
|
Minimum: 1024 X 768 |
|
|
|
|||||||
|
|
|
|
|
|
|
|
|
|||||||
|
|
Browser |
|
|
Internet Explorer 8, 9 ,10 and 11 |
|
|
|
|||||||
|
|
|
|
|
|
|
|
|
|
|
|
|
|
|
|
*1 These specifications are based on following camera settings:
Single stream mode 1280x1024, 3Mbps, 18fps, MPEG-4
Dual stream mode1280x1024, 3Mbps, 18fps, H.264 (recording); 640x480, Quality: 100, 18fps, MJPEG (live view).
*2 Live view for multiple channels requires good hardware for smooth performance. For more channels or heavy use of high resolution streaming, it is good to adopt computers with more advanced specifications than the requirements we suggest.
*3 Please use 64-bit system if your computer has more than 4GB RAM. Windows operating system has limits on memory and address space regardless of the real or virtual memory available on a particular computer. Take Windows 7 Professional for example, the maximum physical memory for a 32-bit(X86) system can address is 3.5 GB even though 16 GB of RAM has been installed on this computer. Therefore, if you consider increasing the
15 |
www.acti.com |
|
|

NVR 3.0 System Administrator’s Manual
computer’s multi-tasking capability by adding more RAM, you will need a 64-bit version of Windows to take advantage of it all.
Please visit the link below for more memory limitations on various Windows platforms. http://msdn.microsoft.com/en-us/library/aa366778%28VS.85%29.aspx#physical_memory_l imits_windows_7
Besides the limitation mentioned above, you may find the usable memory of your computer displayed here:  Computer Properties is still less than actual installed memory.
This is a common symptoms of all Windows platforms, please find explanations and solutions in this Windows official support document http://support.microsoft.com/kb/978610/en-us and http://windows.microsoft.com/en-us/windows7/taking-the-mystery-out-of-64-bit-windows
*4 Supports local hard drives and iSCSI NAS. For detailed information on how to use iSCSI NAS with NVR3, please refer to our article on Using iSCSI NAS with NVR.
*5 The required free space of the disk drive where NVR is installed should be at least 40 GB at all times; however, the actual necessary space depends on number of devices, recording and event rules settings. To get an approximate value, you may use the software tool
Bandwidth & Storage Calculator - http://www.acti.com/storagecalculator. It is also recommended to use a separate disk for video recordings.
*6 Please make sure your operating system is fully patched with the latest service packs.
16 |
www.acti.com |
|
|
NVR 3.0 System Administrator’s Manual
Pre-requisites
These prerequisites below are necessary before installation:
1. Suitable System Specifications
Ensure that the server computer meets the minimum system requirements, and that the server computer has C Drive.
2. Uninstall Previous ACTi NVR 2.x Server
NVR 3.0 server and NVR 2.x server cannot co-exist on the same server computer. You can find instructions on System Migration on page 123 for how to perform a NVR system migration.
3. More than 40 GB Space on Storage Drive
Please make at least 20 GB memory space on the storage disk drive. You may choose different disk drive on Setup pageStorage tab.
4. Turn Off Windows UAC Function
UAC (User Access Control) is a security setting that restricts access in Microsoft Windows. You must disable UAC before installing NVR in Windows Vista and Windows 7, for the installation of application components and certain program features would be interrupted by this security rule. You may disable UAC through Windows control panel.
If you are using Windows 8, please enable the built-in Administrator account and log in with this identity, or add this NVR site to IE browser’s trusted sites ( please follow the solution provided for Condition 2: Why can’t I install Active X controls after logging in? on page 30 to do so).
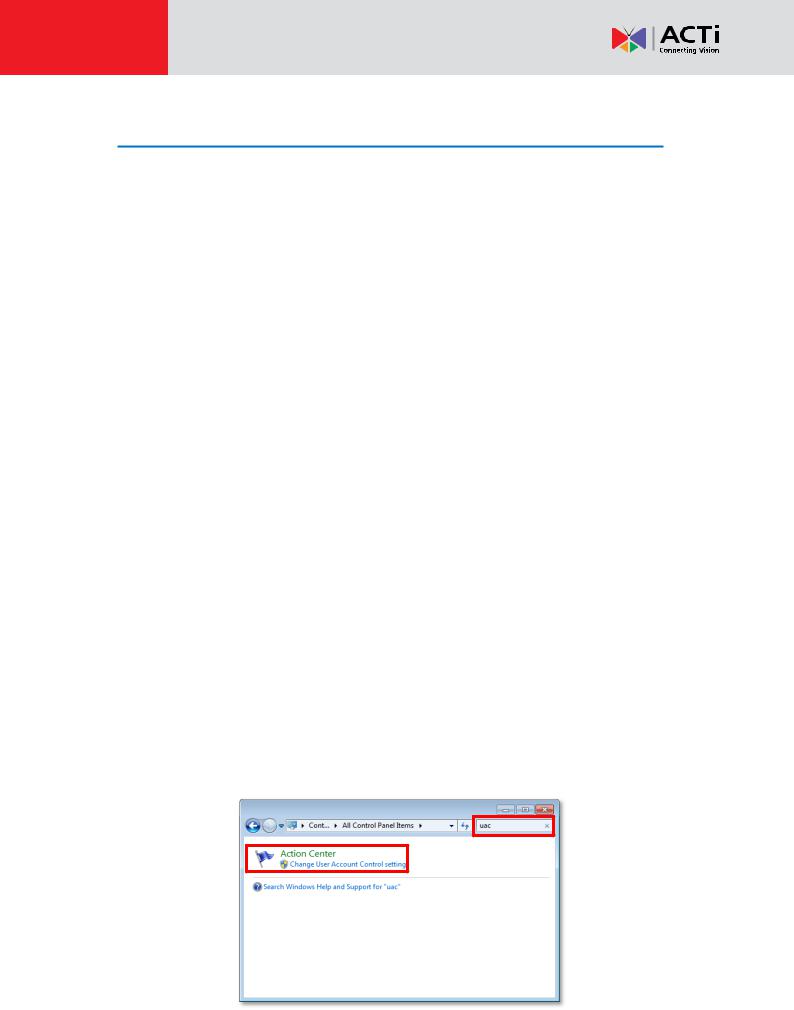
Disable UAC in Windows 7
1.Go to Windows Control Panel, type “UAC” in search box.
2.Click “Change User Account Control settings”
17 |
www.acti.com |
|
|

NVR 3.0 System Administrator’s Manual
3.Move the slider to “Never notify position”, and then click “OK”. You will have to restart the computer for this change to take place.
18 |
www.acti.com |
|
|

NVR 3.0 System Administrator’s Manual
Server Installation
The server program installation is as easy as 1-2-3 by following the installation wizard’s instructions. The server would start its service right after installation completes, without the need to restart the server computer.
Install the Software
1. Execute the install shield application .
2.Follow the onscreen instructions of Install Shield Wizard, accept the license agreement and proceed.
19 |
www.acti.com |
|
|

NVR 3.0 System Administrator’s Manual
When selecting Setup Type, the default “Complete” will have the program installed on default C drive, you may select “Custom” to choose another program location.
3.The IP Port Checker will pop up to confirm the NVR port number with you. The installation program will use 80 as default. You may enter another available port number in “Listen Port” field and click “Apply”.
You may just click “Apply” if you are not sure whether this port has been taken or not.
If the port is being used by another service, you will be asked to input another available port number.
20 |
www.acti.com |
|
|
NVR 3.0 System Administrator’s Manual
4. As the server port is confirmed, the installation process is done, click “Finish”.
5.After the installation completes, connect to http://localhost:port number with Internet Explorer browser, you will see NVR Login page.
Note
If IIS Web Server has been installed on the computer and you are asked to restart the computer during installation process, please
1. Choose to restart right away.
2.After the computer reboots, this install shield will continue to complete the installation.
Important Notice
If the server computer has already installed previous ACTi NVR server 2.x versions, please remove the main program and patches from Windows Control Panel before installing ACTi NVR 3.0; or you should choose another computer as ACTI NVR 3.0 server computer.
21 |
www.acti.com |
|
|

NVR 3.0 System Administrator’s Manual
Workstation Installation
NVR Workstation includes a set of programs that provide interface between users and the NVR server. It may be installed on the same PC as the NVR server, or they may be installed separately and connect to NVR Server via network.
Install the Software
1.Execute the install shield application  .
.
2.Follow the onscreen instructions of Install Shield Wizard, accept the license agreement and proceed.
22 |
www.acti.com |
|
|

NVR 3.0 System Administrator’s Manual
3. Double-click the shortcut |
on desktop to execute the application. |
23 |
www.acti.com |
|
|

NVR 3.0 System Administrator’s Manual
License and Activation
In NVR3 system, your required number of channels should be licensed and activated before connecting the devices. The License Key, provided by ACTi sales representative once your purchase of license is carried out, will be used to activate the license. After the license activation, the channels on NVR server will automatically become available.
Aside from ACTi brand devices, NVR 3.0 system is also able to support other vendors’ devices as well as all devices that support ONVIF. All ACTi brand devices and non-ACTi brand devices are licensed by different license types:
-Standard License: ACTi brand devices
-CDP License: Other vendors’ devices
(For more information about non-ACTi cameras supported by NVR3, please refer to http://www.acti.com/3rdpartycamera)
Please note:
The license is cumulative and perpetual.
The license is not version-specific, upgrading software version will not influence the existing license you have CDP-licensed channels (for non-ACTi brand cameras) and standard-licensed channels (for ACTi devices) are counted separately.
Any device added through ONVIF (either ACTi or non-ACTi devices) will also need to
be licensed. The license type used will solely be based on the brand of the device.
The maximum number of devices (ACTi brand + non-ACTi brands) that can be managed by NVR 3.0 server is 100.
After activating CDP license, please follow the instructions in Add Non-ACTi Cameras on page 50 to manually add those non-ACTi cameras to NVR system.
License activation is the process of unlocking the channels on NVR product with the received
License Key. License Key is a serial number delivered as a printed card or an E-mail after the purchase is carried out.
During license activation, your License Key is matched against the MAC address of the Network Interface Card (NIC) on NVR server computer. Once this license key is used by the computer with given MAC, it cannot be activated with another MAC. This matching record will be stored on the ACTi license data server. If your computer has more than one network cards, NVR server will detect them and provide you a dropdown list to select from.
24 |
www.acti.com |
|
|
NVR 3.0 System Administrator’s Manual
Note
Although certain fisheye camera view modes (e.g. Quad mode) display multiple regions in a view, they are still counted as one single channel in terms of licensing.
There are two ways to activate the licenses depending on your NVR server network condition:
Online Activation and Offline Activation.
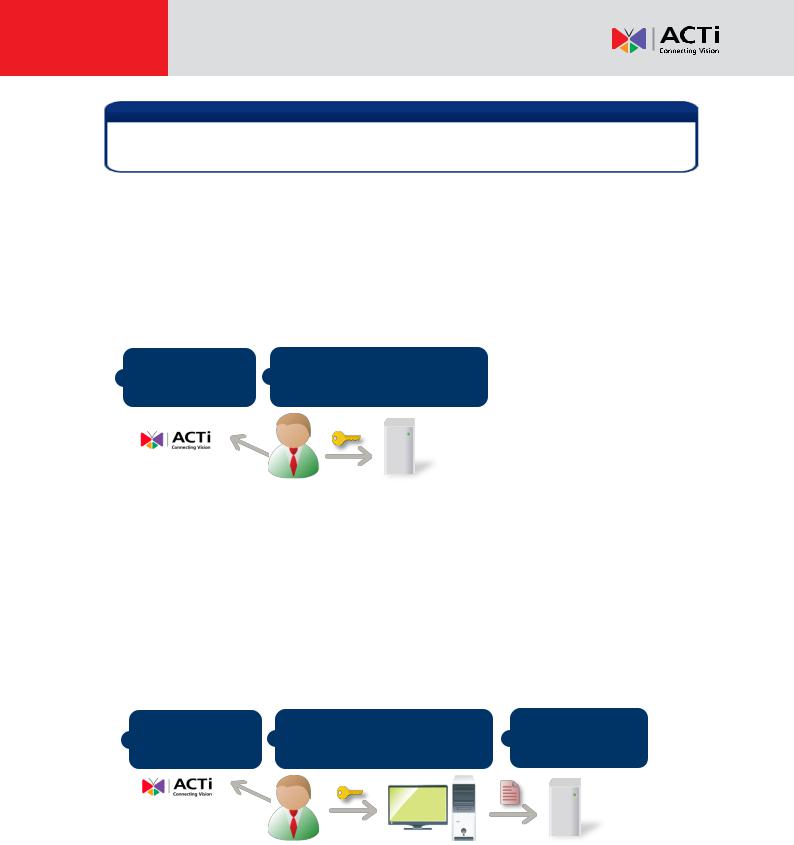
Online Activation
If your NVR server computer has Internet access, choose online activation.
Purchase licenses
1from ACTi, get the
LICENSE KEY
On NVR server, input the
2LICENSE KEY to activate the license directly.
NVR server
(Internet access)
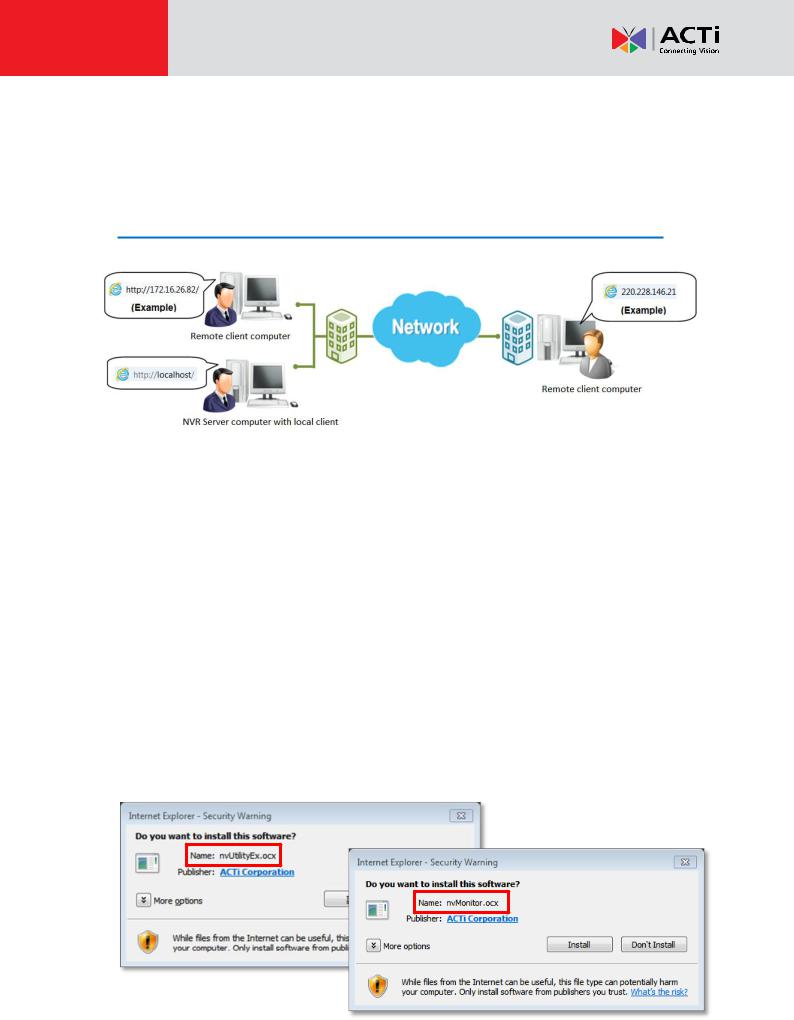
Offline Activation
Offline activation does not require Internet access for NVR server. It is used when NVR is
located in network not connected to public Internet (e.g. in a military base). You will need to get
an activation file from another computer and transfer it to NVR server computer.
Purchase licenses |
On another computer, access |
Load the |
1 from ACTi, get the |
2 ACTi website to activate the |
3 ACTIVATION FILE |
LICENSE KEY |
licenses using the LICENSE KEY |
into NVR server |
Computer |
NVR server |
(Internet access)
25 |
www.acti.com |
|
|

NVR 3.0 System Administrator’s Manual
Step-by-step Activation Process
Based on the network conditions of your site, follow Online Activation SOP or Offline Activation
SOP to activate your license.
Online Activation SOP
Step 1: Membership ID in ACTi Member Center is required for activation. Register one for free at http://member.acti.com/
Step 2: Log in NVR server, go to Setup pageSystem tabLicense“Online Registration”. Select the MAC Address, enter your License Key, ACTi member Account and Password, and then click “Apply”. NVR server will connect to the license data server via Internet to register the license key, and unlock the channels.
26 |
www.acti.com |
|
|

NVR 3.0 System Administrator’s Manual
Offline Activation SOP
Step 1: Membership ID in ACTi Member Center is required for activation. Register one for free at http://member.acti.com/
Step 2: Access http://www.acti.com/support/LicenseMgt/NVR3_registration.asp, enter the
License Key and the MAC address of NVR server computer, click “Submit”. An E-mail with activation code file (.lic) will be sent to your registered E-mail account.
Step 3: Log in NVR server from local or via web client. Go to Setup page System tab
License “Offline Registration” click “Import” and upload the license file(.lic). Click
“Apply” to activate this license.
27 |
www.acti.com |
|
|

NVR 3.0 System Administrator’s Manual
Verify Your License
Once your license is successfully activated, the license information will be shown on License
page.
Activated Standard License
Activated CDP License
Important
The license data will be erased once NVRImportant3.0 serverNoticeis uninstalled. Be sure to retain your license key information in a safe place because you may need to reinstall the software. After the software is
uninstalled, you should contact ACTi Customer Help Desk http://www.acti.com/CHD to clear the original registration data in our data server, and then you may activate the license again.
Tip
How to find MAC Address
1.Click Windows Start, in the run box on Start menu, input “cmd”.
2.Execute the cmd program, and input the command “ipconfig /all” or “getmac”
3.The MAC address will be referred to as the Physical Address, made up of 12 characters e.g. 00-1E-65-FE-8E-98
28 |
www.acti.com |
|
|
NVR 3.0 System Administrator’s Manual
Log In to the System
Access NVR Server via Internet Explorer
From Server Computer Using Local Client
Open Internet Expolrer. If your computer is where NVR 3.0 is installed, type http://localhost/ or the computer’s ip address in URL box.
From Remote Client Computer
A remote client refers to any client using a computer over WAN or LAN other than server computer. If you are connecting to a NVR 3.0 server as a remote client, please type server computer’s ip (e.g. local network ip: http://172.16.26.217 within LAN ;public IP http://220.228.146.21 or domain name http://nvr.acti.com over WAN ) in URL box. Remember to append a colon and the port number after the hostname or IP address.
Accept ActiveX Controls Installation Requests
NVR3.0 interface requires the add-on ActiveX Control components, please make sure browser’s security settings allow ActiveX controls to be downloaded and installed. When your browser asks if you allow ACTi Corporation’s add-on components to run, please allow them.
29 |
www.acti.com |
|
|
NVR 3.0 System Administrator’s Manual
Login Failure Troubleshooting
Once you confront with problems accessing NVR server, refer to the possible conditions below and follow the instruction to solve your issues.
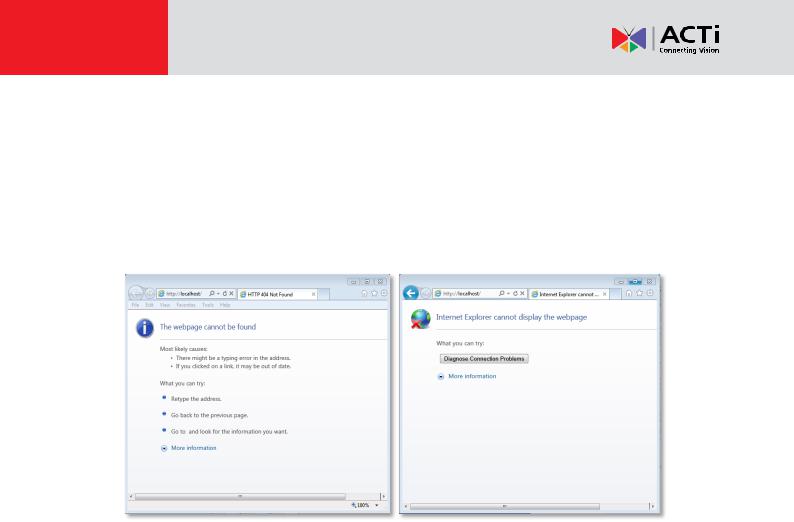
Condition 1: Why can’t I access NVR server via browser?
After typing in the correct NVR server IP, if you cannot access NVR Login page, you may get the below browser screens:
Cause 1: Server is not ready
Solution: It may happen when you just started the server computer or the server installation has just finished, please wait a few seconds and connect again.
Cause 2: Server is not able to respond to your request because the NVR port you set (default is 80) has been seized by another service running on the server computer. This may happen when that service is executed right before NVR server starts its services.
Solution: Please check if there is another service using the same port with NVR server right now, and release this port for NVR 3.0 server. The steps below are how to find the service:
1.Please click on "Windows Start" (Windows-Logo)  , then enter "cmd.exe" in the run box and execute it.
2.Input the command “netstat -a -o -b”. You will be provided with the ports in use and the services using them. Find the Local Address that has taken port 80, and the PID number.
30 |
www.acti.com |
|
|
 Loading...