

Page 1

Table of Contents
IT Equipment Recycling Information ……………………………………………………… 1
S afety ……………………………………………………… 1
E l e c t r i c a l sa f e t y ……………………………………………………… 1
In st a l l a t i o n sa f e t y ……………………………………………………… 1
C l e a n i n g sa f e t y ……………………………………………………… 1
S pecial notes on L C D monitors
………………………………………………………
2
P ack age contents ……………………………………………………… 2
Installation instructions ……………………………………………………… 3
P l a c e me n t ……………………………………………………… 3
In st a l l a t i o n ……………………………………………………… 3
E x t e r n a l c o n t r o l s ……………………………………………………… 4
Ima g e a d j u st me n t ………………………………………………………
5
S c r e e n a d j u st me n t ……………………………………………………… 7
A ttach ments ……………………………………………………… 8
P l u g a n d pl a y ……………………………………………………… 8
P o w e r sa v e r ……………………………………………………… 8
T r o u b l e sh o o t i n g ……………………………………………………… 8
T e c h n i c a l spe c i f i c a t i o n s ……………………………………………………… 9
D i spl a y mo d e s ……………………………………………………… 10
Page 2

IT Equipment Recycling Information
Ace r is stron g ly committe d to e n v iron me n tal prote ction an d v ie ws re cyclin g , in th e form of
salv ag in g an d disposal, of u se d e q u ipme n t as on e of th e compan ys top prioritie s in min imiz in g
th e bu rde n place d on th e e n v iron me n t.
We at Ace r are v e ry con sciou s of th e e n v iron me n tal force s th at impose on ou r bu sin e ss
an d striv e to ide n tify an d prov ide th e be st work in g produ cts to re du ce th e e n v iron me n tal impact
of ou r produ cts.
F o r mo r e in f o r mat io n an d h e l p in r e c y c l in g , pl e ase v isit t h e f o l l o w in g w e b sit e s :
W o r l dw ide : h t t p:/ / g l o b al . ac e r . c o m/ ab o u t / su st ain ab il it y . h t m
S afety
E l e c t r ic al saf e t y N o t e : To e n su re you r safe ty an d prolon g th e life of th e produ ct, re ad th e followin g
safe ty re comme n dation s care fu lly be fore u sin g th e produ ct for th e first time .
Do n ot tou ch th e in side of th e mon itor. O n ly au th oriz e d an d q u alifie d
te ch n ician s sh ou ld ope n th e L CD mon itor case .
H old th e plu g (n ot th e powe r cable ) wh e n you con n e ct th e plu g to th e sock e t.
M ak e su re you r h an ds are dry.
Th is produ ct sh ou ld on ly be ope rate d with th e type of powe r in dicate d on th e
mark in g labe l. I f you are n ot su re of th e type of powe r av ailable , con su lt you r
de ale r or local powe r compan y.
I n st al l at io n saf e t y
Th is produ ct is e q u ippe d with a 3-pron g plu g , (a plu g h av in g a th ird g rou n din g
pin ). Th is plu g will on ly fit in to a g rou n de d powe r ou tle t. I f you are u n able to
in se rt th e g rou n de d plu g in to th e ou tle t, con tact you r e le ctrician to re place
you r obsole te ou tle t. Do n ot u se a two-pron g adapte r in ste ad of th e g rou n de d
plu g .
Don ’ t e xpose you r L CD mon itor to wate r, or an y e n v iron me n t with a h ig h
te mpe ratu re or h u midity, su ch as k itch e n s or swimmin g pools. F lowe r v ase s
fille d with wate r are also dan g e rou s.
I f you r L CD mon itor ope rate s abn ormally (i.e ., re le ase s smok e , n oise or a sme ll),
re mov e th e plu g imme diate ly an d con tact you r au th oriz e d de ale r or se rv ice
ce n te r.
Don ' t tou ch you r L CD mon itor with you r fin g e rs or an y h ard obj e ct. Av oid
scratch in g or le av in g an y oil slu dg e on th e su rface of th e display.
Prote ct you r L CD mon itor by in stallin g it in a place th at is we ll-v e n tilate d,
moistu re proof, an d du st-fre e .
Don ’ t in stall you r L CD mon itor n e ar a h e at sou rce , (i.e ., ov e n s, space h e ate rs,
fire place s, fu rn ace s or in th e su n ).
To av oid e le ctric sh ock , or droppin g , in stall you r L CD mon itor in a place wh e re
ch ildre n will n ot tou ch it. Se cu re you r L CD mon itor firmly an d e xplain th e safe ty
ru le s to ch ildre n , if re q u ire d.
Wh e n in stallin g you r L CD mon itor or adj u stin g its an g le , atte n tion sh ou ld be
paid to th e loadin g capability an d le v e lin g of th e stru ctu re su pportin g th e L CD
mon itor.
C l e an in g saf e t y Don ’ t spray cle an se r or wate r on to you r L CD mon itor or its case .
Wh e n cle an in g you r L CD mon itor, mak e su re th at n o liq u id pe rme ate s in to th e
in side of th e L CD mon itor or an y acce ssory.
M oiste n a cle an , soft, lin t-fre e cloth with wate r or g lass cle an e r with ou t alcoh ol.
Sq u e e z e it so it' s j u st a little damp an d wipe th e su rface of you r L CD mon itor
g e n tly. I t is re comme n de d to u se a silk cloth th at is e xclu siv e ly u se d to cle an th e
display.
1
Page 3
S pecial notes on L C D monitors
Th e followin g symptoms are n ormal for L CD mon itors an d do n ot in dicate a proble m with th e de v ice :
Du e to th e n atu re of th e flu ore sce n t lig h t, th e scre e n may flick e r du rin g in itial u se . Tu rn off th e
powe r switch an d th e n tu rn it on ag ain to mak e th e flick e r disappe ar.
Y ou may fin d slig h tly u n e v e n brig h tn e ss on th e scre e n de pe n din g on th e de sk top patte rn you u se .
Th e L CD scre e n h as e ffe ctiv e pixe ls of 99.99% or more . I t may in clu de ble mish e s of 0.01% or le ss
(cau se d by a missin g pixe l or a pixe l th at is always lit).
Wh e n th e same imag e is displaye d for h ou rs on e n d, its afte rimag e may re main afte r switch in g to a
n e w imag e . Wh e n th is h appe n s, th e scre e n will re cov e r slowly by ch an g in g th e imag e . Tu rn in g th e
L CD mon itor off for se v e ral h ou rs will also corre ct th is proble m.
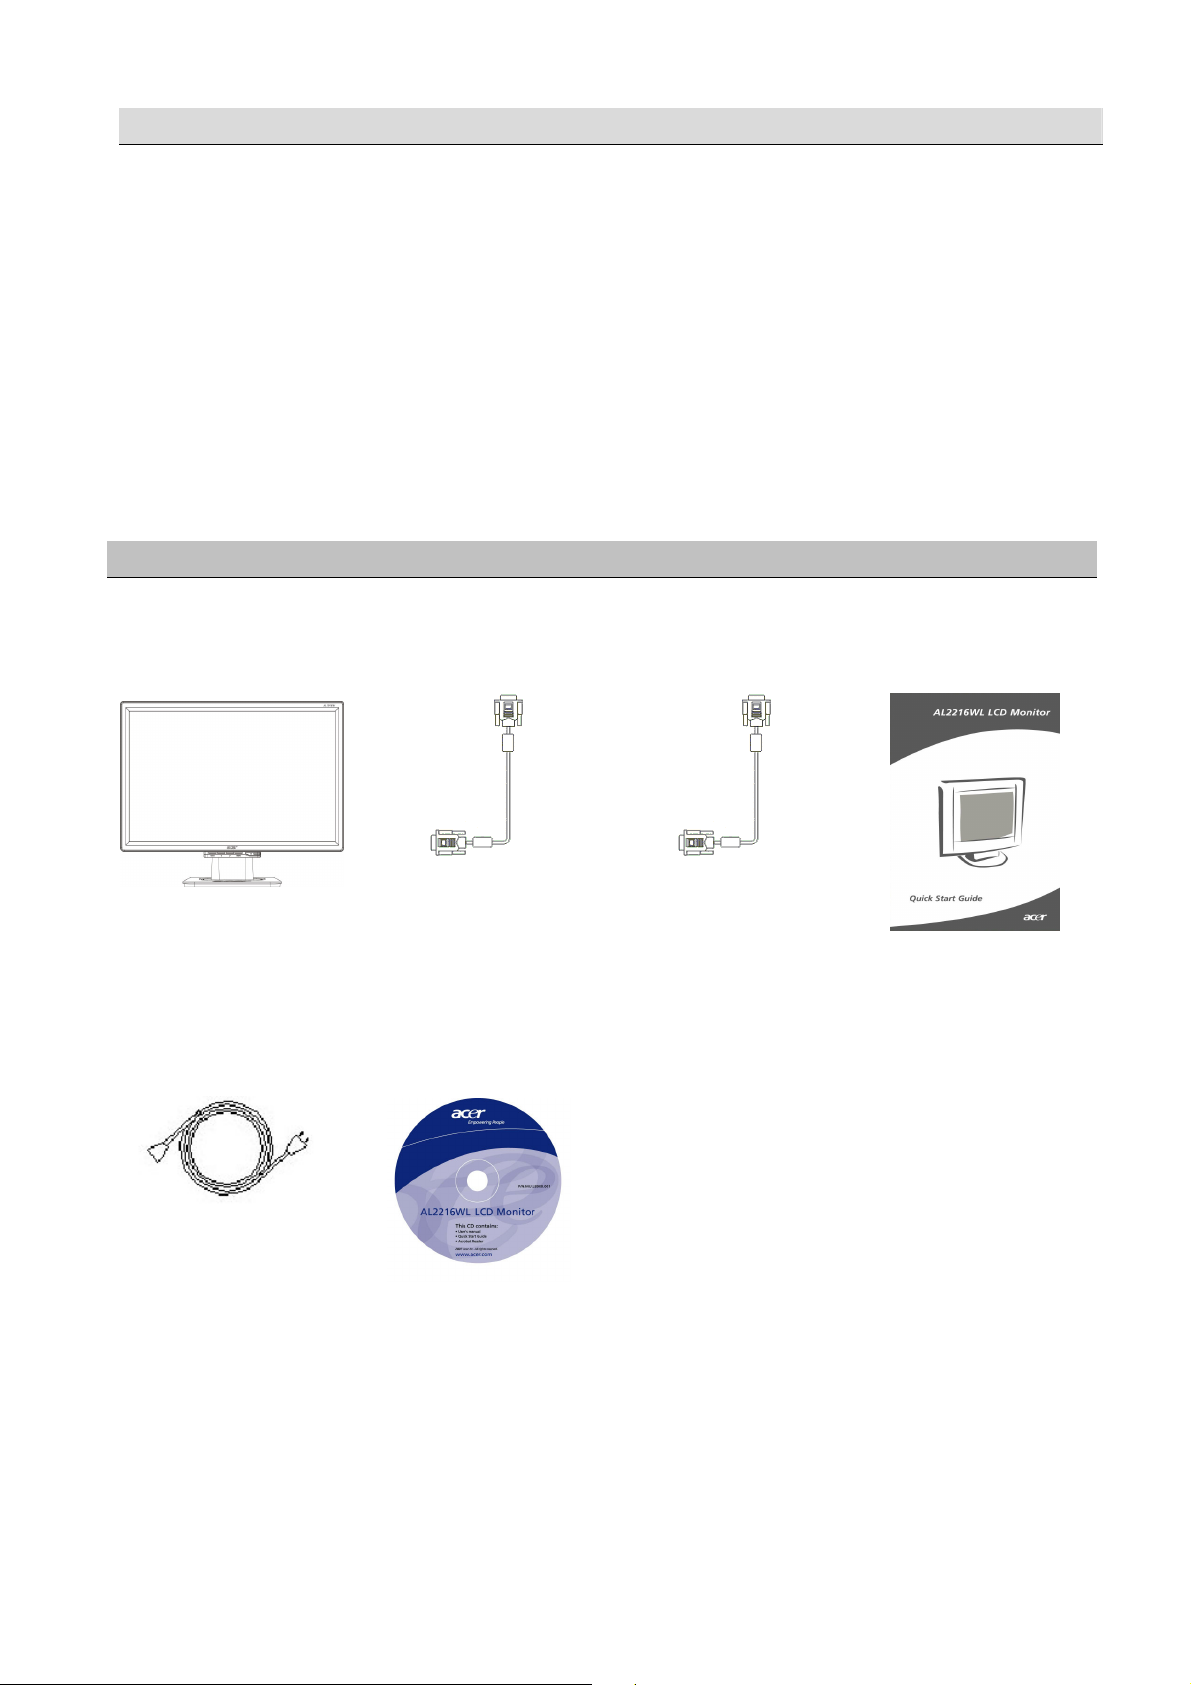
P ack age contents
L CD display
Powe r cable
D-Su b sig n al cable
U se r' s G u ide (CD)
DV I sig n al cable
(option al)
Q u ick Start G u ide
2
Page 4
Installation instructions
Pl ac e me n t N o t e : R e ad th e Safe ty se ction care fu lly be fore startin g th e in stallation .
Wh e n in stallin g you r L CD mon itor, con side r th e place me n t of th e mon itor:
To min imiz e th e re fle ction of th e mon itor, prote ct you r e ye s, an d e n su re pre miu m
q u ality, don ’ t in stall you r L CD mon itor n e ar win dows or wh e re th e re is back lig h t.
K e e p th e mon itor at le ast 30 cm away from you r e ye s.
Th e u ppe r e dg e of th e mon itor sh ou ld be j u st a little h ig h e r th an you r lin e of sig h t.
Adj u st th e fron t an d back dip an g le s of th e mon itor, so th at you can v ie w th e display
comfortably.
I n st al l at io n
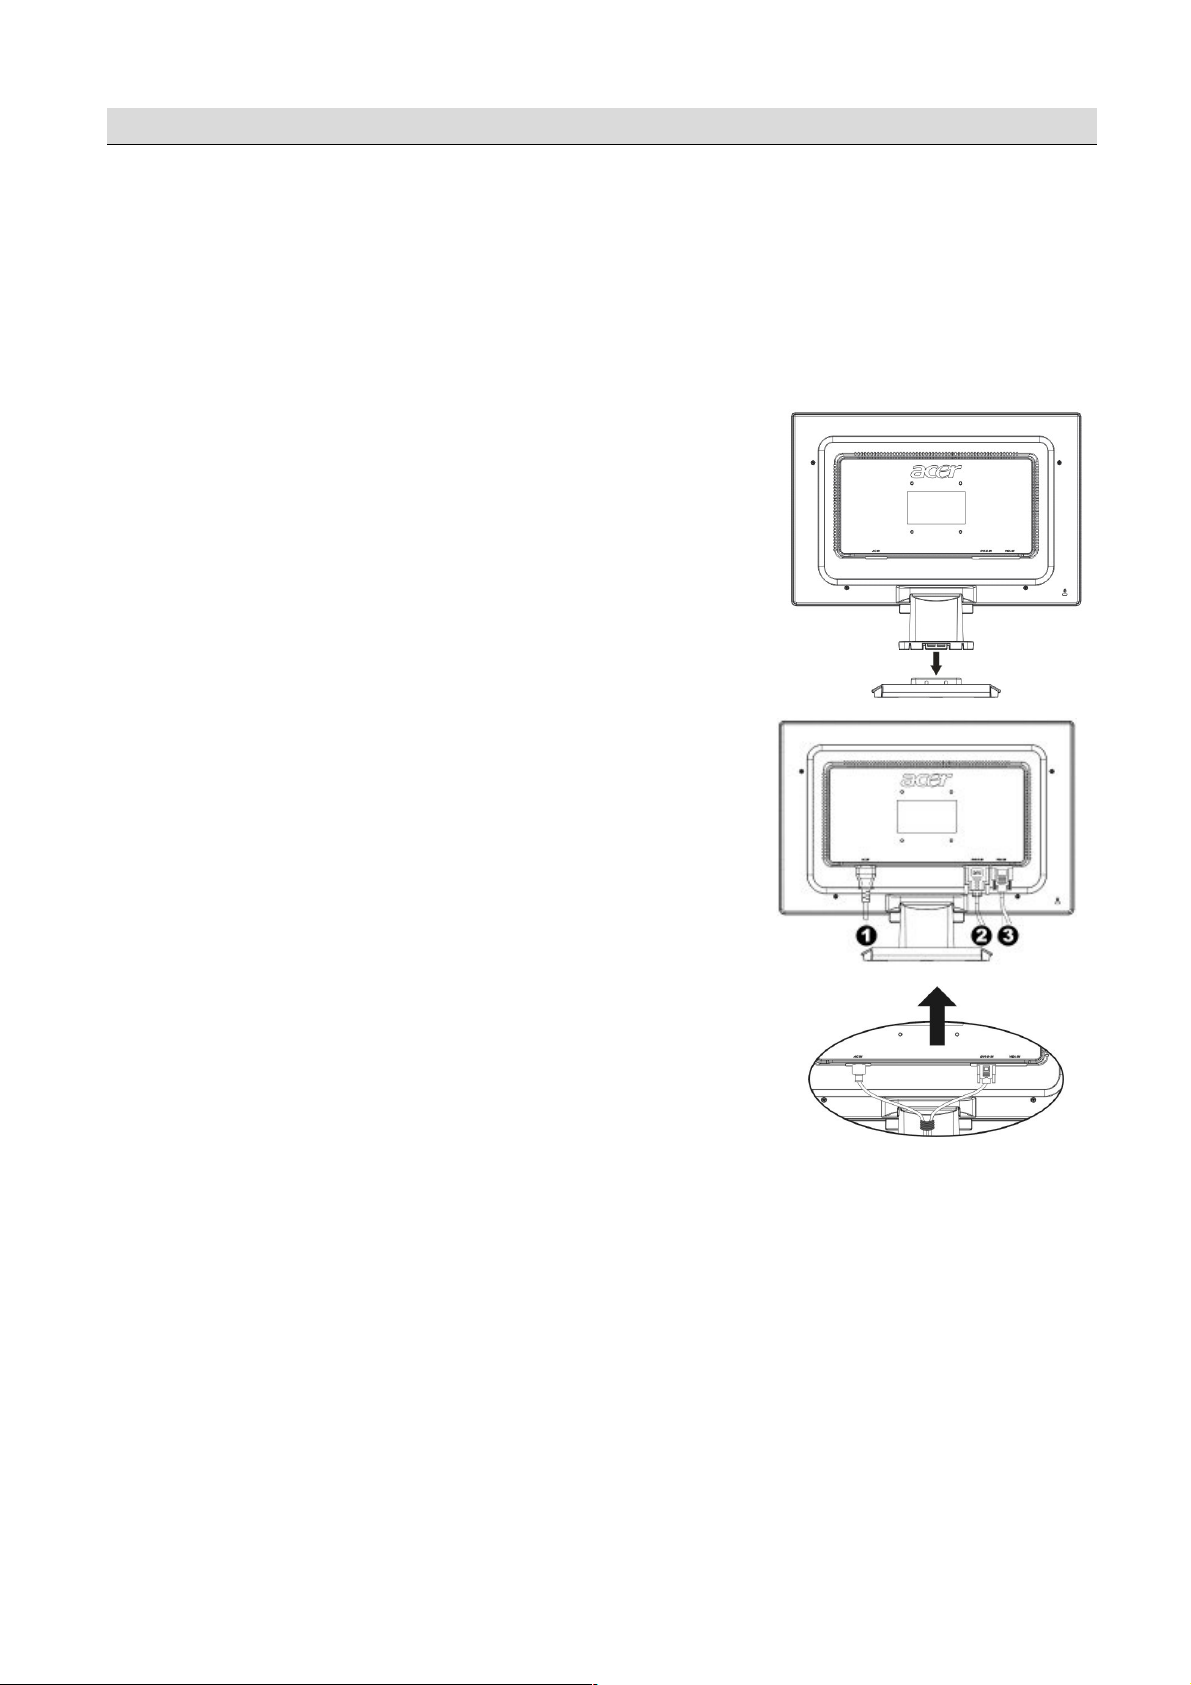
C o n n e c t in g t h e b ase t o t h e mo n it o r
Tak e th e base ou t of th e box an d place it on a flat
table .
Position th e mon itor on top of th e base .
Con n e ct th e base in to th e n e ck of th e mon itor
alon g th e track .
Y ou will h e ar a click sou n d wh e n th e base an d th e
mon itor are prope rly con n e cte d.
C o n n e c t in g t h e L C D mo n it o r t o a PC
M ak e su re th at th e powe r su pply of you r PC is
tu rn e d off an d th e powe r plu g is re mov e d.
Con n e ct an d faste n both e n ds of th e sig n al cable
to you r PC h ost an d L CD mon itor, re spe ctiv e ly.
Con n e ct th e attach e d powe r cable to you r L CD
mon itor.
Plu g th e powe r cable in to th e re ce ptacle .
U se th e cable tie to bin d u p th e powe r cord an d
th e D-su b sig n al cable / DV I -D cable .
Tu rn on th e powe r su pplie s of you r PC an d L CD
mon itor.
Powe r cable
DV I sig n al cable (option al)
D-Su b sig n al cable
3
Page 5

E x t e r n al
c o n t r o l s
Po w er O n / O f f
1
2 Men u O S D Men u Pr ess t h i s b u t t o n t o en t er O S D . Pr ess i t ag ai n t o ex i t O S D .
3
> Pl u s
Po w er so u r c e
G r een i n d i c at i o n : Po w er i s o n an d n o r m al .
O r an g e i n d i c at i o n : S l eep st at u s i n t h e en er g y -sav i n g m o d e.
C o l o r l ess i n d i c at i o n : Po w er o f f .
Pr ess t h i s b u t t o n f o r sel ec t i o n o r ad j u st m en t w h en O S D i s
st ar t ed .
4
5 A u t o
< Mi n u s
A u t o m at i c
ad j u st m en t
Pr ess t h i s b u t t o n an d c l i c k < an d > t o ad j u st v o l u m e w h en O S D
i s n o t st ar t ed ( f o r t h e m o d el w i t h sp eak er s o n l y ) .
Pr ess t h i s b u t t o n t o ex i t t h e m an u al w h en O S D i s st ar t ed .
Pr ess t h i s b u t t o n f o r t h e d i sp l ay t o o p t i m i z e t h e p o si t i o n , p h ase
an d c l o c k p u l se au t o m at i c al l y w h en O S D i s n o t st ar t ed .
4
Page 6

I mag e
O S D S et t i n g
adj u st me n t
f o r an al o g
Th e imag e se ttin g s of you r L CD mon itor we re adj u ste d to th e ir optimal statu s for an alog
TV be fore sh ipme n t. (Se e Pag e 9). I f you wan t to adj u st th e imag e se ttin g s to su it you r
pe rson al pre fe re n ce , follow th e ste ps be low:
1. Click M e n u to display th e O SD win dow as sh own in th e followin g fig u re .
2. Click Plu s or M in u s to se le ct th e fu n ction to be adj u ste d as sh own in th e followin g
fig u re .
3. Click th e M e n u ag ain to se le ct th e fu n ction to be adj u ste d.
4. Click Plu s or M in u s to ch an g e cu rre n t se ttin g s.
5. To e xit th e O SD win dow, se le ct "
se ttin g s, re pe at ste ps 2-4.
" to close an d sav e ch an g e s. To ch an g e oth e r
B r i g h t / C o n t r ac t A d j u st m en t
Ph ase/ C l o c k p u l se A d j u st m en t
H o r i z o n t al / V er t i c al A d j u st m en t
C o l o r T em p . A d j u st m en t
L an g u ag e S el ec t i o n
D D C / C I S w i t c h
Messag e
R est o r e
E x i t
( A n al o g )
5
Page 7

I mag e
R est o r e
D C / C I S w i t c h
Messag e
( D i g i t al )
adj u st me n t
f o r dig it al
Th e imag e se ttin g s of you r L CD mon itor we re adj u ste d to th e ir optimal statu s for dig ital
TV be fore sh ipme n t. (Se e Pag e 9). I f you wan t to adj u st th e imag e se ttin g s to su it you r
pe rson al pre fe re n ce , follow th e ste ps be low:
1. Click M e n u to display th e O SD win dow as sh own in th e followin g fig u re .
2. Click Plu s or M in u s to se le ct th e fu n ction to be adj u ste d as sh own in th e followin g
fig u re .
3. Click th e M e n u ag ain to se le ct th e fu n ction to be adj u ste d.
4. Click Plu s or M in u s to ch an g e cu rre n t se ttin g s.
5. To e xit th e O SD win dow, se le ct “
se ttin g s, re pe at ste ps 2-4.
” to close an d sav e ch an g e s. To ch an g e oth e r
B r i g h t / C o n t r ast A d j u st m en t
Ph ase/ C l o c k Pu l se A d j u st m en t
H o r i z o n t al / V er t i c al A d j u st m en t
C o l o r T em p . A d j u st m en t
L an g u ag e S el ec t i o n
I n p u t S el ec t i o n / D
O S D S et t i n g
E x i t
6
Page 8

an d th e in pu t
adj u st me n t
F u n c t io n D e f in it io n S c r e e n
Pr imar y
dir e c t o r y
sy mb o l
S e c o n dar y
dir e c t o r y
sy mb o l
N /A Warm color
N /A Cold color
N /A E n g l ish
S e c o n dar y
dir e c t o r y it e ms
Con trast Adj u sts th e con trast be twe e n th e fore g rou n d
B rig h tn e ss Adj u sts th e back g rou n d brig h tn e ss of th e
Ph ase Adj u sts th e focu s of th e imag e
Clock pu lse Adj u sts th e clock pu lse of th e imag e
H oriz on tal M ov e s th e imag e le ft an d rig h t on th e scre e n
V e rtical M ov e s th e imag e u p an d down on th e scre e n
te mpe ratu re
te mpe ratu re
U se r
De fin ition /R e d
U se r
De fin ition /G re e n
U se r
De fin ition /B lu e
D e sc r ipt io n
an d back g rou n d of an imag e on th e scre e n .
scre e n .
(for an alog in pu t adj u stme n t on ly).
(for an alog in pu t adj u stme n ts on ly).
(for an alog in pu t adj u stme n ts on ly).
(for an alog in pu t adj u stme n ts on ly).
Se ts th e color te mpe ratu re to warm wh ite .
Se ts th e color te mp to cold wh ite .
Adj u sts re d/g re e n /blu e g ain .
U se d to se le ct th e lan g u ag e you wan t.
N /A
N /A D e u t sc h
N /A F r an ç ais
N /A E spañ o l
N /A I t al ian o
N /A
N /A
N /A H o l l an ds
N /A S u o mal ain e n
N /A
N /A DDC/CI DDC/CI switch (for an alog in pu t on ly).
N /A An alog dig ital
N /A M e ssag e Display re solu tion , H /V fre q u e n cy
N /A R e store R e store s syste m to de fau lt se ttin g s.
N /A E xit Close s th e O SD win dow an d sav e s ch an g e s.
Русский
H oriz on tal M ov e s O SD le ft an d rig h t.
V e rtical M ov e s O SD u p an d down .
O SD time display Adj u sts O SD time display se ttin g s.
U se d to se le ct th e in pu t sou rce you wan t,
DDC/CI
DDC/CI switch (for DV I in pu t on ly).
port u se d for cu rre n t in pu t timin g fu n ction .
7
Page 9

A ttach ments
Pl u g an d pl ay Th e produ ct prov ide s th e late st V E SA plug and play fe atu re to pre v e n t
Po w e r sav e r Th e L CD mon itor h as a bu ilt-in Powe r Con trol Syste m (Powe r Sav e r).
T r o u b l e sh o o t in g
Powe r L E D doe s
n ot lig h t
complicate d an d time -con su min g in stallation proce du re s. Th e plug and play
fe atu re allows you r compu te r syste m to ide n tify th e L CD mon itor e asily an d se t
u p its fu n ction s au tomatically.
Th e L CD mon itor tran sfe rs th e Ex t e nde d Di s play Ide nt i f i c at i o n Dat a (E DI D) to
you r compu te r syste m v ia th e Di s play Dat a Ch anne l (DDC), so th at you r compu te r
can u se th e se lf-se ttin g fu n ction of th e L CD mon itor.
Wh e n th e L CD mon itor is n ot ope rate d for a pe riod of time , th e Powe r Con trol
Syste m au tomatically se ts th e syste m at low v oltag e statu s to sav e powe r. M ov e
th e mou se slig h tly or pre ss an y k e y to re tu rn to n ormal ope ration .
Th e Powe r Sav e r fu n ction can on ly be ope rate d by th e display card of th e
compu te r syste m. Y ou can se t u p th is fu n ction from you r compu te r.
Th e L CD mon itor is compatible with E PAE N E R G Y STAR N ÜTE K wh e n u se d with
V E SA DPM S.
To sav e powe r an d e xte n d th e life of th e produ ct, tu rn off th e L CD mon itor
powe r su pply wh e n it is idle for a lon g time or n ot be in g u se d.
Ch e ck th at th e powe r switch is tu rn e d on .
M ak e su re th e powe r cable is con n e cte d.
I con off Ch e ck th at th e powe r switch is tu rn e d on .
M ak e su re th e powe r cable is con n e cte d.
E n su re th at th e sig n al cable is in se rte d in th e re ce ptacle appropriate ly.
Th e Powe r Sav e r may tu rn off th e mon itor au tomatically du rin g th e ope ration .
M ak e su re th e mon itor is re store d wh e n you pre ss an y k e y from th e k e yboard.
Color de fau lt R e fe r to "Color Te mp. Adj u stme n t" to adj u st R G B color or se le ct color
te mpe ratu re s.
I n stability or
ripple
I mag e offse t or
wron g siz e
R e mov e an y e le ctron ic e q u ipme n t in th e v icin ity th at may cau se E M I in te rfe re n ce .
Ch e ck th e sig n al cable of th e mon itor to e n su re th at n on e of th e pin s are be n t.
Pre ss th e au to adj u stme n t bu tton to au tomatically optimiz e th e scre e n .
Se t u p th e re fe re n ce position .
8
Page 10

con dition s: (1) th is de v ice may n ot cau se h armfu l in te rfe re n ce , an d (2) th is de v ice mu st acce pt an y
Tech nical specifications
Pan e l dime n sion Diag on al 559 mm (22 in ch ) L CD mon itor
M ax. re solu tion 1,680 x 1,050 / WX G A+
M ax. pixe l U p to 16.7 M tru e color
Pixe l span H oriz on tal 0.282mm x V e rtical 0.282mm
L CD pan e l
(back lig h t sou rce )
B rig h tn e ss 250 cd/m2
Con trast 900 : 1
L C re spon se time 5 ms
V isu al an g le
E ffe ctiv e display H oriz on tal 473.8 mm x V e rtical 296.1 mm
Sig n al mode
I n pu t sig n al
I n pu t te rmin al I mag e D-Su b 15 PI N (V E SA) / DV I -D(H DCP)(O ption al)
Powe r tran sforme r AC100 – 240 V olts, 50 – 60 H z
Powe r
con su mption
E n v iron me n tal
con dition s
Actu al dime n sion s (W x D x H ) 513.5 x 198.2 x 405.2 mm
SY N C fre q u e n cy H oriz on tal 30 k H z – 82 k H z x V e rtical 56 H z – 76 H z
M ax. pixe l clock 135M H z
O pe ration mode 48W
Powe r sav in g sle e p
mode
Powe r sav in g off mode 1W @ 230V AC 50H z
Te mpe ratu re
H u midity 20% – 80% (ope ration ) / 20% – 85% (storag e )
H oriz on tal 170° / V e rtical 160°
Simu late d v ide o fre q u e n cy: 0.7 V pp, 75Ω
(se parate SY N C an d composite SY N C)
2W @ 230V AC 50H z
C – 35C (ope ration ) / -20C – 55C (storag e )
5
N e t we ig h t 4.9 k g
Safe ty stan dard
L amp dispo sal
L amp(s) in side th is produ ct con tain me rcu ry an d mu st be re cycle d or dispose d of accordin g to
local, state or fe de ral laws. F or more in formation , con tact th e E le ctron ic I n du strie s Allian ce at
w w w . e iae . o r g . F or lamp-spe cific disposal in formation , ch e ck w w w . l ampr e c y c l e . o r g .
Th is de v ice complie s with Part 15 of th e F CC ru le s. O pe ration is su bj e ct to th e followin g two
in te rfe re n ce re ce iv e d, in clu din g in te rfe re n ce th at may cau se u n de sire d ope ration .
Th is Class B dig ital apparatu s me e ts all re q u ire me n ts of th e Can adian I n te rfe re n ce - Cau sin g
E q u ipme n t R e g u lation s.
Ce t appare il n u mé riq u e de la class B re spe cte tou re s le s e xig e n cie s du R é g le me n t su r le mate rie l
brou ilie u r du Can ada.
TCO03;UL/CUL;TÜV-G S ;CE /LVD ;TÜV-E R G O;CB ;CCC;F CC-B ;VCCI -B ;
CE /E M C;C-Ti c k ; B S M I ; I S O 1 34 06 -2 ;E P A ;P CT;N OM ;W E E E ;P S B ;H G
9
Page 11

D ispl ay mo de s I f th e sig n al of you r PC syste m is th e
same as on e of th e followin g re fe re n ce sig n al mode s,
th e scre e n will be adj u ste d au tomatically. I f n ot, th e scre e n will n ot display or on ly th e L E D
V e rt. F re q u e n cy
lig h ts will display. F or more in formation abou t th e adj u stme n t mode , re fe r to th e
in stru ction s of you r display card.
Display M ode H or. F re q u e n cy
Pixe l F re q u e n cy
SY N C Polarity
V E SA
(k H z )
V G A 640x480
SV G A 800x600
X G A 1024x768
SX G A 1152x864 67.500 75.000 108.000 +/+
WX G A+ 1440x900
WX G A+ 1680x1050
31.469 59.940 25.175 -/-
37.861 72.809 31.500 -/-
37.500 75.000 31.500 -/-
35.156 56.250 36.000 +/+
37.879 60.317 40.000 +/+
48.077 72.188 50.000 +/+
46.875 75.000 49.500 +/+
48.363 60.004 65.000 -/-
56.476 70.069 75.000 -/-
60.023 75.029 78.750 +/+
63.981 60.020 108.000 +/+ SX G A 1280x1024
79.976 75.025 135.000 +/+
55.935 55.887 106.5 -/+
65.29 59.954 146.25 -/+
(H z )
(M H z )
(H /V )
V G A TE X T 720x400 31.469 70.087 28.322 -/+
M acin tosh
640x480 35.000 66.667 30.240 -/-
832x624 49.725 74.500 57.283 -/-
1024x768 60.150 74.720 80.000 -/-
10
 Loading...