

Accurist IA05 User Manual
Instruction Guide
and
2 year Guarantee
IA05
Your ACCURIST watch is guaranteed against defects in materials and
Service and Repairs
workmanship for a period of 2 years from the date of purchase. During
this period, we will exchange or repair, at our discretion, any defective
components free of charge.
IMPORTANT - Not covered by Guarantee
1. Batteries, straps and bracelets.
2. Damage caused by accident, misuse or lack of care.
3. Water penetrations except in watches marked as “Water Resistant”.
SERVICING AND REPAIRS UNDER GUARANTEE
Please post your watch, together with the Retailer’s Sales Receipt
or proof of purchase, the completed Guarantee slip, and a brief note
to explain the nature of the fault, by Registered Post or Recorded
Delivery to the address shown. Do not send the presentation box as
this will NOT be returned.
SERVICING AND REPAIRS OUTSIDE OF GUARANTEE
Available at a reasonable charge after an estimate has been sent by
T.P. (UK) Ltd. Send your watch to us by Registered Post or Recorded
Delivery to the address shown.
Important Note
It is important to identify your watch correctly. If, after reading
this Instruction Guide, you have any further questions regarding
the use, operation or adjustment of your watch, please call us
during ofce hours on 0116 288 2500.
T.P. (UK) Ltd, Alexander House, Chartwell Drive, Wigston, Leicester
LE18 2EZ
United Kingdom.
Water Resistance
If your watch is water resistant, it will clearly state “Water Resistant” or
have a static water pressure indication (e.g. “30/50/100/200 metres”)
on the dial and/or case back.
If it is not marked as water resistant, it should not be allowed to come
into contact with water or be worn in conditions that could expose
it to moisture (e.g. washing, heavy rain etc.). Certain chemicals in
water may damage the watch seals. To maintain water resistance, we
recommend that your watch is serviced and re-sealed at least every
12 months by T.P. (UK) Ltd.
IMPORTANT
Buttons must not be operated while in contact with water.
WATER RESISTANT or RESISTANT TO 30 METRES
Suitable for normal everyday use and will resist exposure to splashes
and rain; it is NOT designed to be used whilst bathing or swimming.
WATER RESISTANT TO 50 METRES
As 30 metres plus bathing or swimming.
WATER RESISTANT TO 100 METRES
As 50 metres plus pool side diving and snorkelling, but not high board
or scuba diving.
WATER RESISTANT TO 200 METRES
As 100 metres plus scuba diving, but not high board diving.
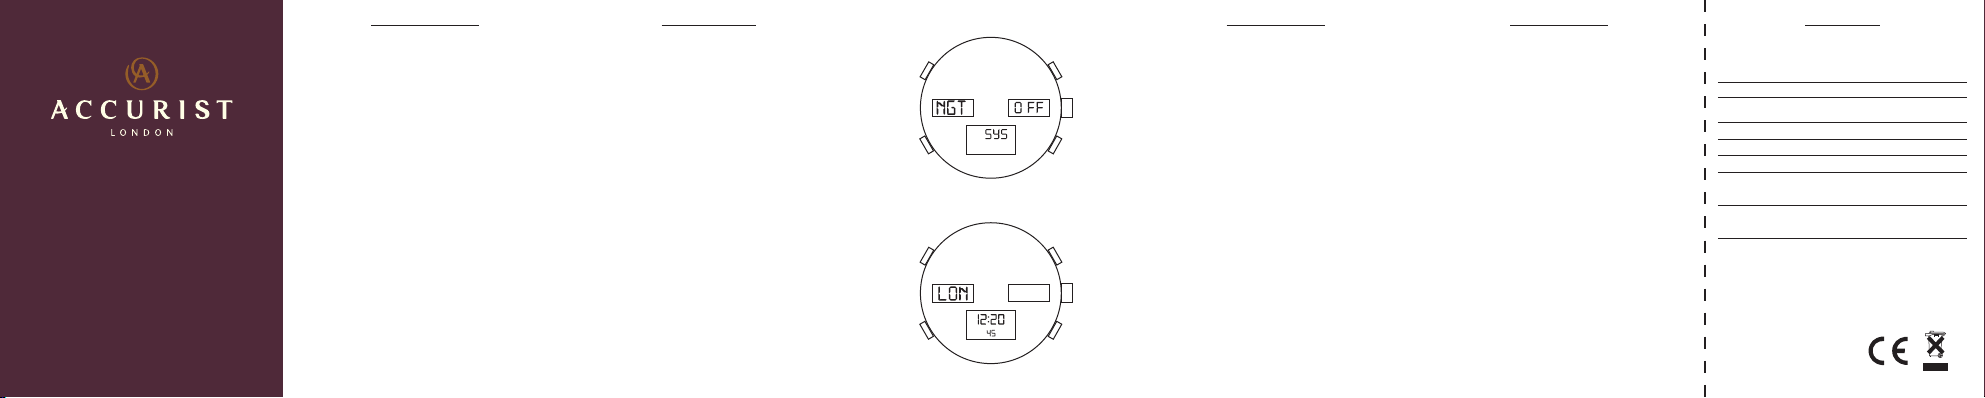
System Settings
A
B C
Time/Date Settings
A
B C
Digital Instructions
D
Using the backlight feature
1. Press ‘A’ button to activate the backlight for 3
seconds.
System Settings:
Using the night feature
1. Hold down ‘C’ and press ‘B’ to enter system settings
mode.
2. Press ‘D’ to select “NGT” on/off.
• When “NGT” is on the backlight will activate when any
button is pressed.
Setting the time schedule
• Before setting the time please check correct time
schedule is selected.
D
• To select the time schedule press the buttons in the
following sequence.
1. Hold down ‘C’ button and press ‘B’ to enter system
settings mode
2. Press ‘C’ to cycle through time zones and press ‘D’
to select either “STD” standard time or “DST” daylight
saving time.
3. Press ‘B’ to set selection and return to real time mode.
Setting the time
Setting the date
• Continuing on from setting the time, press the buttons
Selecting 12/24h format
• Continuing on from setting the date, when the display
Digital Instructions
1. Hold down ‘B’ to enter time setting mode.
2. When whole display is ashing press ‘D’ to select the
chime hourly function on/off, then press ‘C’.
3. When the time zone display is ashing press ‘D’ to
cycle through time zones, then press ‘C’.
4. When the seconds display is ashing press ‘D’ to
reset to zero, then press ‘C’.
5. When the minute display is ashing press ‘D’ to
increase the value or hold ‘D’ to increase quickly,
then press ‘C’.
6. When the hour display is ashing repeat step 5.
in the following sequence to set the date.
1. When the month display is ashing press ‘D’ to cycle
through the values, then press ‘C’.
2. When the day display is ashing press ‘D’ to cycle
through the values, then press ‘C’.
3. Repeat step 2 to set the year.
is ashing press ‘D’ to select either 12h or 24h format.
Press ‘B’ to return to real time mode.
* Instructions continued overleaf.
GUARANTEE
PLEASE USE BLOCK CAPITALS
NAME
ADDRESS
POST CODE
DAYTIME TELEPHONE NUMBER
IMPORTANT
This guarantee slip should be retained by the owner of
the product and should be sent to Timeproducts (UK) Ltd.
together with the product and £12 to cover the handling
and postage when service under Guarantee is required.
GUARANTEE
DATE OF PURCHASE:
Retailers stamp if required or full name and address:
Please attach the receipt or proof of purchase; failure to attach
these may invalidate this Guarantee.
This Guarantee does not affect your statutory rights.
IA05/05-2015
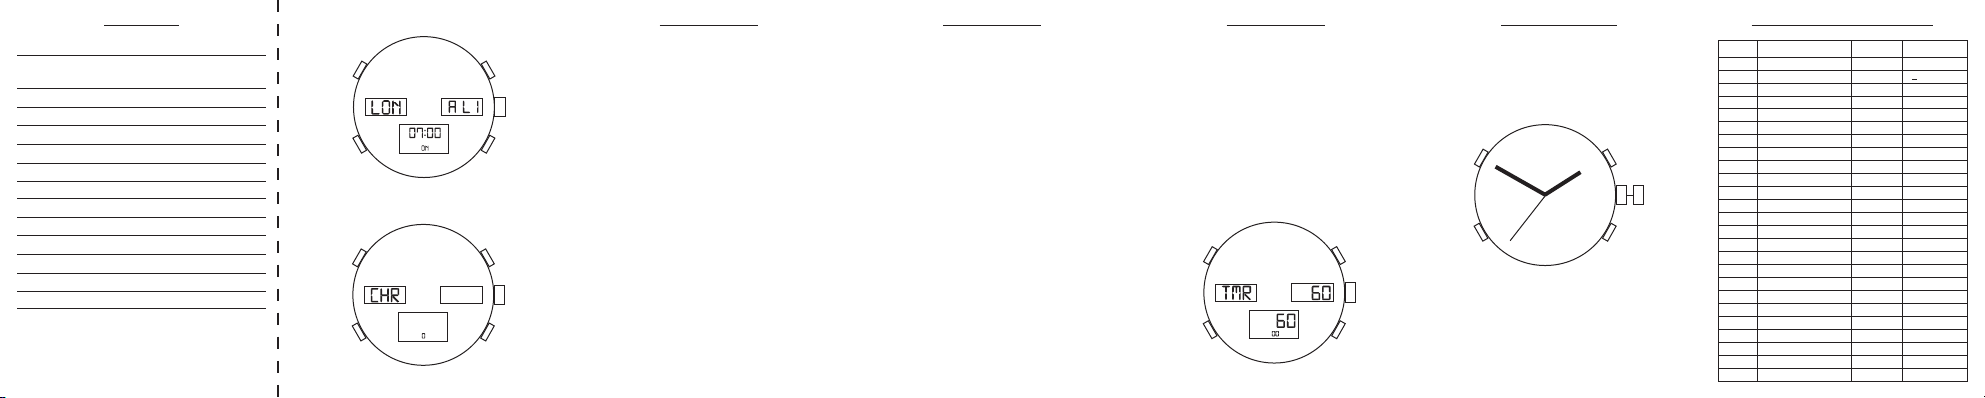
A
B C
Stopwatch mode
A
B C
Digital Instructions
D
Setting the alarm feature
1. Press ‘B’ to enter settings mode and press ‘C’ to
cycle through and select the time zone.
2. Hold down ‘B’ for 2 seconds to enter the alarm
settings mode.
3. Press ‘D’ to select alarm on/off, then press ‘C’.
4. Press or hold ‘D’ to set the hour value, then press ‘C’.
5. Repeat step 4 to set the minute value, then press ‘B’
to set the alarm and return to settings mode.
• There are 3 alarms, each can be set for different
times in different time zones independantly. Press ‘B’
to cycle between the alarms and follow the sequence
above to set the alarms.
Using the stopwatch feature
1. Press ‘B’ until display shows “CHR” mode.
D
*Stopwatch measurement can time up to 10 hours.
• Standard measurement:
1. Press ‘D’ to start the counter, then press ‘D’ again
to stop.
2. Press ‘C’ and ‘D’ together to reset the counter.
• Accumulated elapsed time measurement:
1. Press ‘D’ to start the counter, then press ‘D’ again
to stop.
2. Restart the counter by pressing ‘D’ as many times
as required.
3. Press ‘D’ to stop the counter, then press ‘C’ and ‘D’
together to reset.
Using the stopwatch feature continued
• Split time measurement:
*The stopwatch can record up to 10 LAPS. If the counter
is still running after the 10 LAPS have been recorded, any
additional elapsed time will be added to the nal LAP time.
*Once the counter has been stopped and no further timing
is required, press ‘C’ to cycle through and view the recorded
LAP times.
*If the mode is changed by pressing ‘B’, whilst the counter
is running, timing will continue in the background until the
counter is stopped.
Using the countdown feature
*Maximum duration is 180 minutes. The repeat countdown
function will automatically restart the same countdown once
the timer reaches zero.
*The countdown timer will automatically set if no button is
pressed after 1 minute.
Digital Instructions
1. Press ‘D’ to start the counter, then press ‘C’ to split
the timing.
2. Press ‘D’ to stop and restart the counter.
1. Press ‘B’ until display shows “TMR” then press ‘C’ to
enter the countdown timer settings mode.
2. Press or hold ‘D’ to increase the timer duration. Press
‘C’ to turn on/off the repeat countdown function.
3. Press ‘B’ to set the countdown time, then press ‘D’ to
start and stop the timer.
Digital Instructions
Using the countdown feature continued
4. To restart the timer press ‘C’ to enter the countdown
timer settings mode, then press ‘B’ to return to
the start.
*Before restarting, the countdown timer must be stopped.
• During the countdown a tone will sound for every
10 seconds elapsed. During the last 10 seconds of
the countdown a tone will sound for every second
elapsed. Once the countdown is complete an alarm
tone will sound until any button is pressed.
Countdown timer settings mode
A
D
B C
Analogue Instructions
Setting the time
1. Pull the crown out to position 2.
2. Turn the crown until the hands show the correct time.
3. Return the crown to position 1.
1 2
World Time Zone Reference TableAlarm settings mode
City Code City
Coordinated Universal Time
UTC
LON London
Paris
PAR
Rome
ROM
Cairo
CAI
Moscow
MOW
Dubai
DXB
Karachi
KHI
New Delhi
DEL
Dhaka
DAC
Bangkok
BKK
Singapore
SIN
Hong Kong
HKG
Tokyo
TYO
Sydney
SYD
Noumea
NOU
Auckland
AKL
Honolulu
HNL
Anchorage
ANC
Los Angeles
LAX
Denver
DEN
Chicago
CHI
New York
NYC
Caracas
CCS
Rio de Janeiro
RIO
Country Time Difference
N/A N/A
UK
France
Italy
Egypt
Russia
UAE
Pakistan
India
Bangladesh
Thailand
Singapore
China
Japan
Australia
New Caledonia
New Zealand
USA
USA
USA
USA
USA
USA
Venezuela
Brazil
+
00:00 UTC
+01:00 UTC
+01:00 UTC
+02:00 UTC
+03:00 UTC
+04:00 UTC
+05:00 UTC
+05:30 UTC
+06:00 UTC
+07:00 UTC
+08:00 UTC
+08:00 UTC
+09:00 UTC
+10:00 UTC
+11:00 UTC
+12:00 UTC
-10:00 UTC
-09:00 UTC
-08:00 UTC
-07:00 UTC
-06:00 UTC
-05:00 UTC
-04:00 UTC
-03:00 UTC
 Loading...