


Accurist 8N24, GP00, GP01, YM22A, 6P23 Instruction manual
...
PURCHASED FROM
DATE OF PURCHASE |
MODEL NO |
OWNERS NAME
ADDRESS
Perforation
Accurist Helpline
020 7447 3945
Further information or instructions can be obtained from the Accurist Helpline during office hours Monday to Friday.
Folding
Automatic / Quartz Analogue
Watch Setting Instructions
Including 8N24,YM22A, GP00 / GP01,
6P23 / 6P20 / 6P21 / JR00

Contents |
2 |
|
|
How to use these instructions |
3 |
Quartz Analogue Operating Instructions |
5 |
8N24 - Automatic Skeleton Movement Operating Instructions |
11 |
GP00 / GP01 Retrograde Operating Instructions |
13 |
YM22A Operating Instructions |
15 |
6P23 Operating Instructions |
17 |
6P29 / 6P20 / 6P21 Operating Instructions |
19 |
JR00 Operating Instructions |
24 |
Care of your watch |
28 |
WEEE Directive |
32 |
Bracelet Adjustment |
34 |
International Service Agents |
36 |
Resistance to water |
39 |
Accurist Quartz Guarantee |
42 |
After Sales Service |
44 |
Payment & Postage Instructions |
45 |

3
Caseback markings
4
How to use these instructions
This booklet contains setting instructions for the Accurist Quartz Analogue series of watches. Each section describes a particular calibre (also called watch movement) which offers a unique set of functions and features. As such, it is necessary to identify the correct calibre of your watch before proceeding to the appropriate section (see diagram opposite).
Further information
The latest setting instructions, technical manuals and interactive instructions
are available from our web site at www.accurist.co.uk and www.britishrealtime.com
When on the web site please refer to ‘After sales service/download manuals’
The Accurist technical helpline is also available during office hours: +44 (0)20 7447 3941 or email service@accurist.co.uk

5
Quartz Analogue Operating Instructions
Position A Position B
6
Please note: The second hand will not start moving until the crown has been returned to Position A.
To set the time:
1.Gently pull out crown to Position B.
2.Turn crown either way to correct time.
3.Push in crown to Position A.
7
Quartz Analogue Operating Instructions continued...
For Calendar Models
FRI 12
Position A Position B Position C
8
To set the calendar/date:
1.Gently pull out crown to Position B.
2.Turn crown anti-clockwise to adjust date, clockwise to adjust the day.
3.Push in crown to Position A.
Note: The Day will start to change at 11.25 p.m. and complete its change by 12 0’ clock midnight. The Date will start to change at 12 0’ clock midnight and complete its change by 4 a.m. Day/Date models have Bi-Lingual day settings; if you select English, the watch will continue to display in English.
9
Quartz Analogue Operating Instructions continued...
For Alarm Models
Alarm on / off button
Position A Position B Position C Alarm indicator hand
10
To set the alarm:
1.Gently pull out crown to Position B.
2.Turn crown clockwise to adjust the alarm indicator hand.
3.Push in crown to Position A.
To switch alarm on, gently pull out Alarm On/Off Button.
To switch alarm off, depress the Alarm On/Off Button.
Note: The alarm will sound for 15 seconds, before automatically switching itself off. After 2 minutes, the alarm will automatically repeat for a further 15 seconds before switching itself off.
11
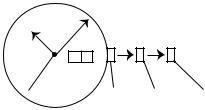
8N24 - Automatic Skeleton Movement Operating Instructions
Automatic Watches, otherwise known as self-winding watches, should be worn for at least 6-8 hours a day this is because they rely on the oscillating weight inside of the watch to wind the mainspring from the movement of your wrist.
To initially start your watch in motion turn the winder 6 – 8 times in a clockwise direction and then set the time.
When the watch is worn, the oscillating weight sways back and forth causing
the watch to wind itself. Wearing the watch on your wrist for a further 6 hours will fully wind the mainspring and will create a reserve power between 30 – 40 hours.
If the watch is not worn for a period of time or only worn occasionally, the watch will run down. If this is the case, the watch can be wound manually by turning the winder approximately 20 times in a clockwise direction.

position A position B
12
To wind the mainspring:
1.Ensure crown is in Position A (Normal time mode)
2.Turn crown clockwise approximately
15– 20 times.
To set the time:
1.Gently pull out crown to Position B.
2.Turn crown either way to correct time.
3.Push in crown to Position A.

13
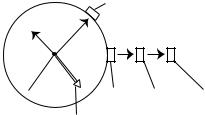
GP00 / GP01 Retrograde Operating Instructions
Date window (GP00)
Date window (GP01)
Position C
Position A Position B
To set the time:
1.Gently pull out crown to Position C.
2.Turn crown either way to correct time.
3.Push in crown to Position A.
Date window at 12-hour position on Calibre GP00.
Date window at 3-hour position on Calibre GP01.
Retrograde (Dual Time)
14
To set the calendar/date:
1.Gently pull out crown to Position B.
2.Turn crown clockwise to adjust date.
3.Push in crown to Position A.
24 Hour / Dual Time hand at 6-hour position.
To set 24 HR Hand / Dual Time (Retrograde):
1.Gently pull out crown to Position B.
2.Turn crown anti-clockwise to adjust dual time.
3.Push in crown to Position A.
Note: When setting the time, please be sure to adjust the retrograde 24-hour hand to am or pm.
 Loading...