

Page 1

IP
Telephone System
USER GUIDE
Page 2

Table of Contents
Introduction..................................1
About this Guide .........................1
Requirements..............................1
Phone Parts ................................1
Installation....................................2
Overview ....................................2
Direct Network Connection ............. 3
Connect to the Network and to a
Power Source .............................3
Connecting When Inline Power is
Provided .........................................3
Connecting When Inline Power is
Not Provided
...................................4
Connecting the Handset .............4
Table of Contents
Shared Network Connection ...........5
Installing on a Desk ........................5
Inserting the Number Card .............6
Getting to Know Your VentureIP
480i Telephone .............................7
Key Description........................7-8
Set Overview ................................9
Display Screen .......................... 9
Softkeys .......................................... 9
Navigating........................................9
Editing text .................................... 10
Entering Letters and
Characters ................................10
Display Icons ............................11
Status Lights ............................11
Handset, Headset, and
Handsfree Operation.................12
User Options ............................12
Services ................................... 13
Administrating Services .................14
Stored Number Lists ..................... 14
Changing Your Personal
Information ................................ 15
Changing Your Last Name........15
Passwords ............................... 15
Changing Your Password............. 15
Enabling and Disabling Your
Password ...................................... 15
Customizing Your Phone ...........16
Language Selection ..................16
Adjusting the Volume ................16
Select Audio Path .....................16
Self Test and Diagnostics .........17
Making and Receiving Calls..... 18
Handsfree Calling..................... 18
Make Calls Using a Stored
Number List.............................. 18
Redialing a Recently Called
Number .........................................18
Making a Call Using an
Incoming Call, Directory, or
Speed Dial List ........................ 19
Receive Calls ........................... 19
Receiving A Call....................... 19
Receiving Multiple Calls.................19
Call Duration ............................ 20
End a Call................................. 20
Call Handling ............................. 21
Hold.......................................... 21
Conference Calls...................... 21
Adding Parties to a
Conference Call ............................21
Putting Conference Callers On
Hold and Off Hold ......................... 22
Dropping Parties from a
Conference Call............................ 22
Mute ......................................... 22
Transfer.................................... 23
Transferring a Call ........................ 23
Call Forwarding........................ 24
Options for Forwarding Calls.... 24
Using Voicemail ....................... 25
View, Play, and Monitor Incoming
Voicemail Messages ............... 25
Logging In and Viewing
Messages ..................................... 26
Playing a Message ....................... 26
Monitoring Incoming Voicemail
Message ....................................... 26
Manage Voicemail Messages .. 26
Copying the Caller Information to your
Directory or Speed Dial List ............ 27
Zero Redirect .......................... 27
Language Selection ................ 27
Change Voicemail Options ...... 28
Recording Your Name and
Greeting ........................................28
Retrieving Voicemail..................... 28
Message Review Options............. 28
Callers ...................................... 29
Page 3

Table of Contents
Using Directories ...................... 30
About Directory Lists ................30
Access and View a
Directory List ............................ 30
Accessing a Directory List and
Viewing the Entries ....................... 30
Change Directory Displays .......30
Add, Delete, and Edit Entries ...31
Adding an Entry From the Caller
List or a Voicemail Message........ 31
Using a Call List........................ 32
About Call Lists ........................ 32
Access and View a Call List..... 32
Edit Entries............................... 32
Temporarily Editing a Call List...... 32
Add a Call List Entry to a Personal
Directory or Speed Dial List ..... 33
Copying an Entry from a Call List ..33
Delete Call List Entries .............33
Using Speed Dial........................34
About Speed Dial ......................34
Access and View the Speed
Dial List .................................... 34
Table of Contents
Special Features ....................... 36
Do Not Disturb.......................... 36
Enabling and Disabling the Do Not
Disturb Feature............................. 36
Intercom ................................... 36
Computer Access to Telephone
Features................................... 36
Troubleshooting.........................38
Limited Warranty....................... 40
Page 4

Introduction
About this Guide
This user guide provides basic installation instructions and
describes all user-enabled features for the VentureIP 480i telephone.
The
VentureIP 480i System Guide
instructions regarding network installation, configuration, downloads
and set management. The
VentureIP Gateway Installation Guide
specifically addresses the installation and technical specifications of
the VentureIP Gateway.
Requirements
Introduction
You require the following to install your VentureIP 480i Telephone:
• 802.3 Ethernet/Fast Ethernet LAN (please note that this document
does not provide any instructions regarding the installation of a
LAN or router).
• Category 5/5e straight through cabling
• A PoE (Power over Ethernet) inline power supply, necessary only
if your network does not provide 802.3af compliant in-line power
(optional accessory)
Phone Parts
When you unpack your phone, ensure that you have all of the following
items. If any part is missing, contact your supplier.
offers more detailed technical
handset
1 Model VentureIP 480i User Guide
IP
ABC DEF
14362
GHI JKL MNO
5
PQRS
TUV
WXYZ
798
0
#
*
telephone
number card
and lens
Xfer Icom
Conf Services
L1
L3
L2
480
i
L4
handset cord
Ethernet Cable
Page 5

Optional Accessories (Not Included)
Installation
PoE (Power over
Ethernet) Inline
Power Supply
Additional Ethernet
Cable (category 5/5e
straight through cable)
A PoE (Power over Ethernet) inline power adapter supplies 48v power
to the 480i through the Ethernet Cable on pins 1 & 2 and 3 & 6.
Do not use this power supply to power other devices.
•
Voltage:
Safety and emissions:
110/120 V AC in; 48 V DC out
Canada: ICES-003 Class A; Japan: VCCI Class A;
U.S.: FCC Class A, CSA, C-Tick, NOM
Installation
Overview
The VentureIP 480i Telephone can be set up to share a network connection
with another network device. Power can be provided by an 802.3af compliant
network power source, or a PoE inline power supply (optional accessory).
The phone can be set up either:
• with a direct network connection to the Ethernet wall jack, or
• as a shared network connection with pass-through if connecting the
phone to a computer or other network device.
4
8
0
4
8
0
4
8
0
4
8
0
PSTN
Model VentureIP 480i User Guide
2
Page 6
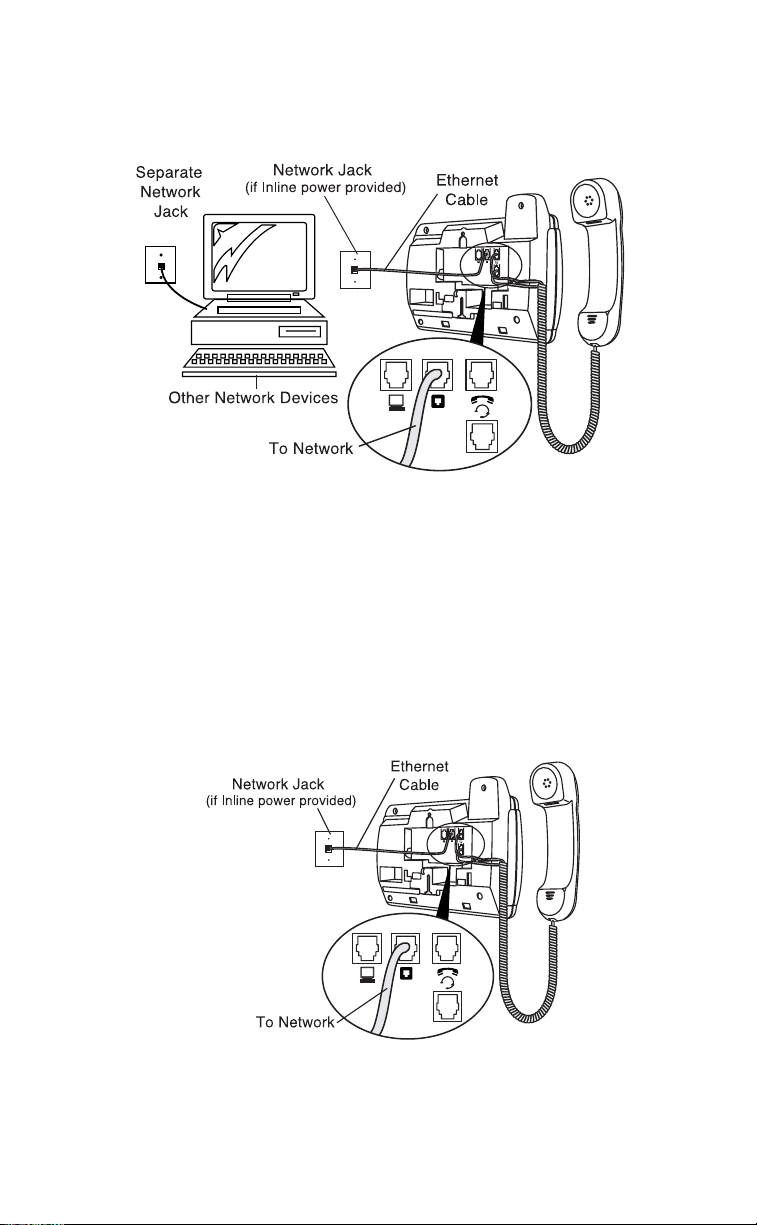
Direct Network Connection
Located at the back of the phone are two fully switched 10/100 Mbps
Ethernet cable ports. Use the port marked with l to connect the phone to the
network, and to provide power to your phone. See “
and to a Power Source”
for more information.
Connect to the Network
Installation
Connect to the Network and to a Power Source
If your network provides 802.3af compliant in-line power, the phone will be
provided with power through the network.
If your network does not provide 802.3af compliant in-line power, you will
need to install the PoE inline power supply (optional accessory).
Connecting When Inline Power is Provided
1.
On the back of your phone, connect the Ethernet cable (provided with your
phone) into the network port marked with l.
2.
Plug the other end of the Ethernet cable into the network jack on the wall.
3 Model VentureIP 480i User Guide
Page 7
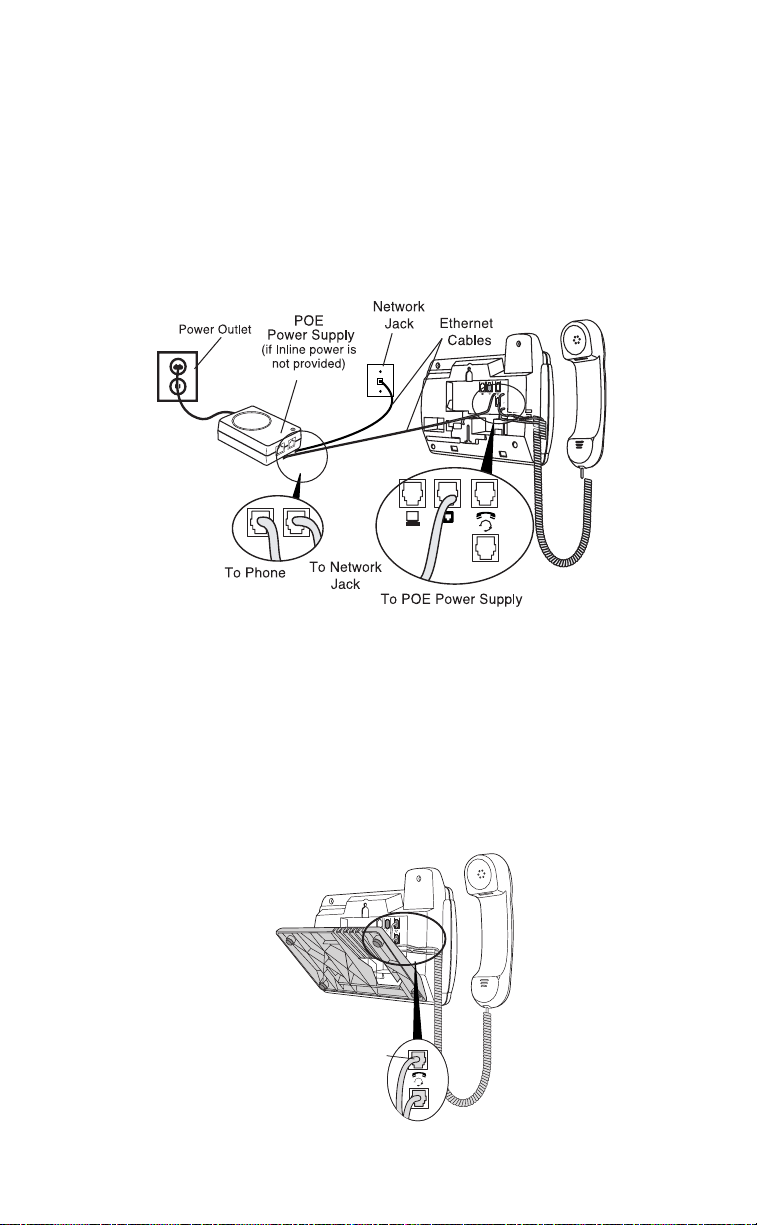
Connecting When Inline Power is Not Provided
1
. On the back of your phone, connect the Ethernet cable (provided with your
phone) into the network port marked with l.
2
. On the PoE power supply, plug the other end of the Ethernet cable into
the network jack marked as shown in the following diagram.
3
. On the PoE power supply, connect an additional Ethernet cable into the
network port as shown in the following diagram.
4
. Plug the other end of the Ethernet cable into the network jack on the wall.
5
. Plug the PoE power supply into a power outlet. You should connect
the power supply to a surge protector or power bar.
Installation
Note:
All Ethernet cables must be category 5/5e straight-through cables, such as
the cable provided with your phone.
Connecting the Handset
1.
Turn the phone over and locate the handset jack marked j.
2.
Insert one end of handset cord into the jack until it clicks into place.
3.
Route the handset cord through the upper groove as shown in
the diagram below.
4.
Attach the handset to the other end of the handset cord.
To Handset
Model VentureIP 480i User Guide
4
Page 8
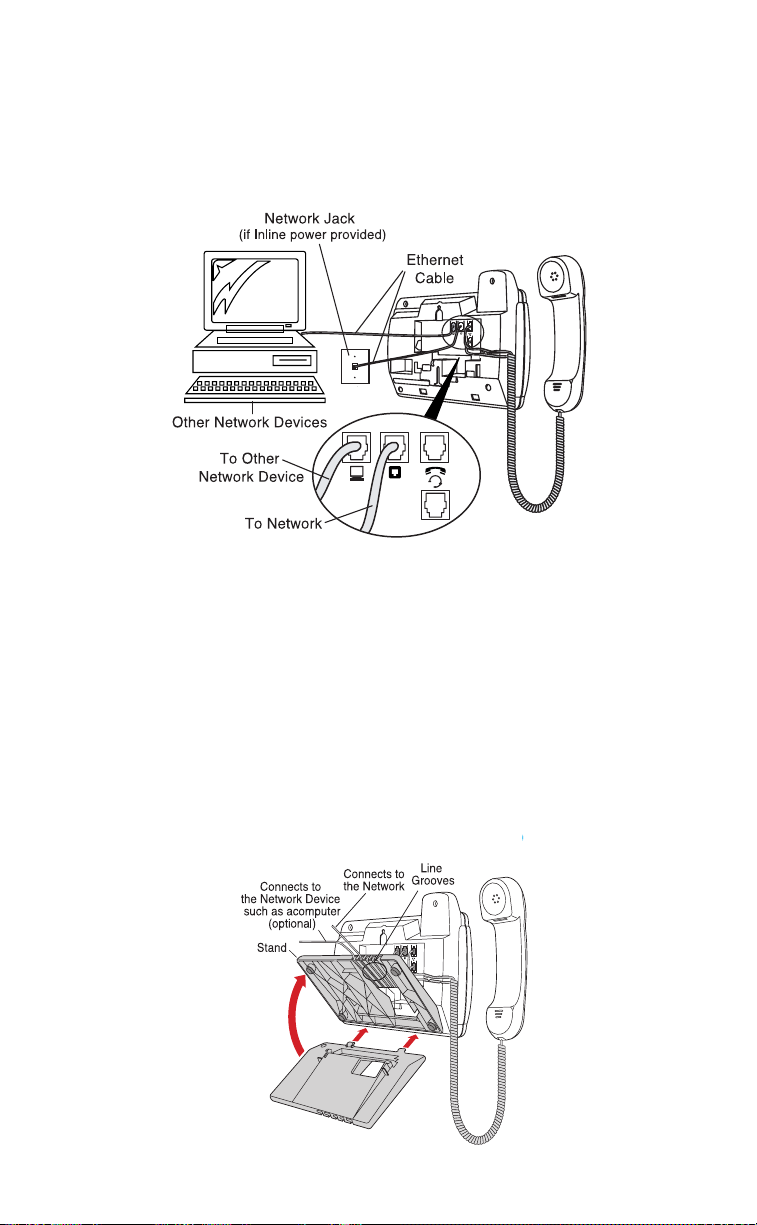
Shared Network Connection
To connect a network device (such as a computer) to the phone, connect
an Ethernet Cable into the network port on the back of the phone marked
with `. Plug the other end of the Ethernet Cable into the network jack
on the network device that you are sharing the network connection with.
Note:
The ` jack on the 480IP does not supply inline power onto
other network devices.
Installation
Note:
All Ethernet cables must be category 5/5e straight-through cables, such as the
cable provided with your phone.
Installing on a Desk
1.
Route the cables through the opening in the stand.
2.
Attach the stand by inserting the tabs on the stand (marked with o) into
the slots on the bottom of the phone. For a higher viewing angle, use the
slots marked n. For a lower viewing angle, use the slots marked m.
3.
Push the stand towards the phone until it snaps into place.
4.
Press the cords into the grooves provided on the bottom of the stand.
This will allow the stand to sit flat on a desk surface.
5 Model VentureIP 480i User Guide
Page 9

Inserting the Number Card
1. Write your phone number on the number card, and place it into the card
slot on the phone, located under the mouthpiece in the handset cradle.
2. Gently bend the clear plastic lens into the slot, over the number card.
Installation
Model VentureIP 480i User Guide
6
Page 10

Getting to Know Your VentureIP 480i Telephone
Key Description
Large Backlit Display
Navigational Keys
Status Light
Line or Call Appearance
Buttons and Lights
Handset
Key Description
Xfer
C
onf
Speaker Status Light
Headset/Handsfree Button
Mute button
Volume Bar
Dial Pad
Softkeys
Services
480
Icom
Display Screen
Extension
Number
204
— SpeedDial
— CallFwd
— DND
7 Model VentureIP 480i User Guide
Ann Jenson
CallList —
Voicemail —
Directory —
User
Name
Page 11

Key Description
Keys Key Description
1
2
3
4
u
d
Places an active call on hold. For more information,
see “Hold”.
Redials previously dialed numbers. For more information,
see “Redialing a Recently Called Number”.
Ends an active call, or exits an open list (for example,
a directory list), without saving changes.
Accesses options for administering services and customizing
your phone. For more information, see “Change Voicemail
Options”, “Changing Your Personal Information”, or
“Customizing Your Phone”.
Adjusts the volume for the handset, ringer, or handsfree
speaker. For more information, see “Customizing
Your Phone”.
Activates handsfree phone operation.
f
Prevents a caller from hearing you through the handset
a
7
:
i
8
9
=
>
<
?
or handsfree microphone. For more information, see
“Call Handling”.
Transfers the active call to another number. For more
information, “Call Handling”.
Begins a conference call with an active call. For more
information, see “Call Handling”.
Navigates between display screens, onscreen text, and
menu selections. For more information, see “Display
Screen”.
Accesses the Intercom feature. For more information, see
“Special Features”.
Accesses the available features on your phone. For more
information, see “Services”.
Connects you to a line or an incoming call. For more
information, see “Making Calls” and “Receiving Calls”.
Key Description
Model VentureIP 480i User Guide 8
Page 12

Set Overview
Display Screen
The display screen provides an interactive interface that shows information
about calls and features.
The upper portion of the screen displays information, and the lower portion
displays options that correspond to six “softkeys” on either side of the screen.
The contents of the display screen change, depending on the status of the
phone (such as any active calls in progress, or any features in use).
Softkeys
There are six softkeys on either side of the lower portion of the display
screen. The functions of the softkeys change, depending on the current status
Set Overview
of the phone. For example, if you are customizing your phone, the softkeys
will reflect the customization options available to you. If you are listening to
a voicemail message, the softkeys will reflect the options available to you
for processing that voicemail message. The softkey label is displayed directly
beside the softkey, and indicates the current function of that softkey.
Navigating
You use the display screen to perform many functions on the phone.
Use the softkeys to navigate into and out of a display screen, as follows:
Softkey Key Description
Exit
Back
Cancel
Select
Done
Next
leave the currently displayed feature or list.
move back one level in a menu hierarchy.
cancel the current process. No changes are saved.
select the current list item.
end the current process and save any changes.
go to the next step in a multi-step process.
Use the navigation keys (located beneath the display screen) to navigate,
as follows:
Navigation Key Key Description
s move to the next screen or list item.
r move to the previous screen or list item.
3 move back one level in a menu hierarchy.
4 select the current list item.
9 Model VentureIP 480i User Guide
Page 13

Editing text
When you need to edit onscreen display text, (for example, to enter
a directory list name), use the following guidelines:
To Do this
enter text at the current
cursor position.
move the cursor to the left
without deleting.
move the cursor to the right
without deleting.
add a space at the
end of a line.
Press the dialpad key with the corresponding
letter on it. Press once for the first letter, twice
for the second, and three times for the third.
For example, to type “
key three times.
Press the 3 key.
Press the 4 key.
Press the 4 key.
R”, press the dialpad
Set Overview
move the cursor to the left
and delete.
change the case of a character.
Press the
Press the
Note: The first character in a line, and the first
backspace softkey.
ChangeCase softkey.
character after a space are automatically
capitalized.
Entering Letters and Characters
You can enter characters using the telephone’s dial pad. To enter a letter,
press the key with that letter on it. If the letter is the second one on that key,
press the key twice. For example, to enter ‘R’, press 7 three times. The cursor
will advance to the next space after a delay of 2 seconds or if you press a
different key.
To change the case of a letter, press the ChangeCase softkey, and then enter
the letter. By default the first letter of a word or name will be capitalized, and
the letters following will be lower case.
Special characters are entered by pressing the 1 and the # keys.
Characters will appear in this order:
1: & , ( ) ` . _ - 1. #: # / \ @.
Model VentureIP 480i User Guide 10
Page 14

Display Icons
Icon Description
s r Use the up and down navigation keys to view
more information.
When shown beside the first or last item in a
list, indicates that there are additional list items
not shown on the screen. Use the navigation
keys to scroll through all list items.
3 4 Use the left and right navigation keys to view
more information.
Set Overview
The call associated with this Incoming Call List
entry was not answered.
The call associated with this Incoming Call
List entry was answered.
You have returned the missed call associated
with this Incoming Call List entry.
Status Lights
There are three sets of status lights:
• Status Light – located above the 2 key
• speaker light – located beside the
• call appearance lights – located beside each 6 key
d/f key
Light Status Indicates
Status Light
Speaker Light solid
Call Appearance
Lights
11 Model VentureIP 480i User Guide
fast blink incoming call
slow blink message waiting
blink microphone is muted in
solid an active call is on the line
slow blink
fast blink
solidphone is in handsfree
operation
Handsfree mode
a held call is on the line
incoming call is on the line
Page 15
Handset, Headset, and Handsfree Operation
You can use your phone in handset, headset, or handsfree operation. Handset
is the default operation. To switch to headset operation, plug in the headset.
To switch to handsfree operation, use the
d/f key.
User Options
Set Overview
Main Menu
Password
Call Forward
Voicemail
Directory
Call List
Language Selection
Last Name
Set Audio
Diagnostics
Secondary Menus
Change Password
Turn Password On/Off
All Calls
After X Rings
Reset Counter
Clear Incoming
Clear Dialed
Clear All
Record Greeting
Record Name
Default Dir
Order: Corp
Order: Personal
User Options Menu
— SysOptions
— Logout
User Options Menu
O
1. Password
2. Call ForwardŁ
3. Voicemail
4. Directory
Select —
Model VentureIP 480i User Guide 12
Page 16

Services
Menu
Speed Dial
Redial List
Services
Services Menu
— Shortcut
— Exit
Call List
Corp. Directory
My Directory
Voicemail
Paging Zones
DND
Services Menu
S
1. Call List
2. Corp. DirŁ
3. My Dir
4. Voicemail
Select —
13 Model VentureIP 480i User Guide
Page 17

Services
The 9 key provides access to all available services. Use the display
screen to view and access available services.
Administering Services
Most services have customizable options to allow you to personalize
your phone to best meet your needs. The
all customizable options. You can choose to protect your options with a
password, if desired. Use the display screen to view and access the options.
See the specific procedures in this guide for detailed information about
how to customize each option.
4 key provides access to
Stored Number Lists
There are two temporary stored lists of caller information available on the
VentureIP 480i telephone. The callers list contains a listing of up to 100 names
and numbers of your most recent incoming callers.* The redial list contains
a listing of up to 100 of your most recent outgoing caller records. Both lists
are automatically updated with each incoming or outgoing call.
You can use the entries in these lists to quickly dial outgoing calls.
Because these lists are temporary, you cannot modify the entries in these
lists. You can, however, copy the information contained in these lists to one
of the permanent lists for permanent storage.
The permanent stored number lists (Directories and Speed Dial Lists) contain
permanent records of contacts or phone numbers. You can use the entries in
these lists to quickly dial outgoing calls, or to view detailed contact
information.
There are two Directories: Corporate and Personal.
The Corporate Directory is automatically maintained by the phone system
and contains up-to-date contact information about every person connected to
your phone system. You can only modify your own information in the
Corporate Directory.
Your Personal Directory is populated and maintained by you. Use the
Personal Directory to maintain up-to-date information about phone
contacts that are not within your company.
The Speed Dial List is populated and maintained by you. Use the Speed
Dial List to store frequently dialed numbers.
Services
*Availability of feature dependant upon subscription to services offered by your
phone system or service provider
Model VentureIP 480i User Guide 14
Page 18

Changing Your Personal Information
Last Name
You can set the name that is associated with your telephone. Your name is
automatically entered in the Corporate Directory. Your name is also used by
the Auto Attendant’s dial-by-name feature when callers enter your last
name to reach you.
Changing Your Last Name
1. Press the 4 key.
2. If your user options password is enabled, enter your password
and press Done.
3. Navigate to the Last Name list item and press Select.
4. Press Change and enter the new name. See “Entering Letters and
Characters” for more information.
5. Press Done.
Passwords
You can change, enable, and disable the password for your user options.
Enabling your password prevents anyone else from viewing or altering your
personal options.
Changing Your Password
1. Press the 4 key.
2. If your user options password is enabled, enter your password
and press Done.
3. Navigate to the Password list item and press Select.
4. With the cursor on the Change Pswd list item, press Select.
5. Enter the new password and press Next.
6. Re-enter the password and press Done.
Enabling and Disabling Your Password
1. Press the Options key.
2. If your user options password is enabled, enter your password
and press Done.
Changing Your Personal Information
3. Navigate to the Password list item and press Select.
4. Navigate to the Turn Pswd ON/OFF list item and press Select.
5. Press Yes to confirm.
15 Model VentureIP 480i User Guide
Page 19

Customizing Your Phone
Language Selection
You can use the Language selection feature to set you preferred language on
the display screen. Currently English and French languages are provided.
1. Press the
2. If your user options password is enabled, enter your password
and press Done.
3. Navigate to the Language list item and press Select.
4. With the cursor on English or Français, press Select.
5. Press Ok then Exit.
Note: See “Using Voicemail” to set the language for the voicemail instructions
Adjusting the Volume
Pressing the volume button adjusts the receiver, headset, speaker, and
ringer volume.
• To adjust the ringer volume, leave the handset in the cradle and press
• To adjust the handset volume, lift the handset and press the volume
• To adjust the headset volume, press the volume button while on a call.
Note: The default handset and headset volume is always set at medium.
• To adjust the speaker volume, press the volume button while the
4 key.
callers will hear.
the volume bar uwhile there is no active call.
button while you are on a call. The handset will return to the default
volume after you hang up from your call(s).
The headset will return to the default volume after you hang up from
your call(s).
speaker is activated (activate the speaker by pressing d).
Customizing Your Phone
Select Audio Path
You can use the Set Audio feature to indicate your preference on the audio
path when you answer an incoming call by pressing a line key or the speaker
d/f button. The options are Handsfree, Handset and Headset.
1. Press the 4 key.
2. If your user options password is enabled, enter your password
and press Done.
3. Navigate to the Set Audio list item and press Select.
4. Press Headset, Hset/Spkr, Spkr/Hset or Handsfree. When you select
Hset/Spkr or Spkr/Hset, you can toggle between handset and speaker by
pressing the speaker button d/f.
5. Press Exit.
Model VentureIP 480i User Guide 16
Page 20

Self Test and Diagnostics
You can perform various hardware and software tests on the telephone set.
1. Press the
2. If your user options password is enabled, enter your password
and press Done.
3. Navigate to the Diagnostic list item and press Select.
4. With the cursor on Basic Test or Advanced Test, press Select. Follow the
instructions on the screen if you select Advanced Test.
4 key.
Customizing Your Phone
17 Model VentureIP 480i User Guide
Page 21

Making and Receiving Calls
Handsfree Calling
The Handsfree feature allows you to speak to someone without using
the handset. To dial using Handsfree, press
To answer using Handsfree, press
To switch between Handsfree and the handset when the handset is off
hook, press
a Handsfree call. When Handsfree is on, the speaker light turns on. When
the speaker light is on, press
light will flash and you will hear the caller, but they will not hear you.
To switch between Handsfree and mute press
Note: Handsfree operation as described above will be affected and may
d/f. When the handset is on hook, press d/f to disconnect
be disabled if the set audio option has been activated. See the section
“Customizing your phone” for more information.
d/f when a call is ringing.
a at any time to mute Handsfree. The speaker
Make Calls Using a Stored Number List
You can use entries in any of the stored number lists to make a call.
Redialing a Recently Called Number
1. Press the 2 key. The Outgoing Call List is shown on the display screen.
2. Use the
3. If the number must be edited before using (for example, if a local call
includes an area code), press Edit# and edit the number.
4. With the desired entry shown on the display screen:
• For handset operation, lift the handset.
• For Handsfree operation, press the
The selected number is dialed.
s r keys to move from one entry to the next.
d/f and then enter a number.
a.
d/f key.
Making and Receiving Calls
Model VentureIP 480i User Guide 18
Page 22

Making a Call Using an Incoming Call, Directory,
or Speed Dial List
1. Press the 9 key. The list of services is shown on the display screen.
2. Using the
• View the list of incoming (received) calls, navigate to the
Call List item.
• View entries in the Corporate Directory or your Personal
Directory, navigate to the appropriate list item.
• To view your Speed Dial list, navigate to the Speed Dial list item.
3. Press Select.
You can also access the Speed Dial list by pressing the Speed Dial softkey.
The list (Call List or Speed Dial) or the first entry (Corporate and
Personal Directory) is shown on the display screen.
4. Use the
5. When the cursor is beside the desired list number, or the desired Directory
entry is shown on the display screen, press Dial.
The call is dialed using the selected number.
Note: You may have to edit the number in order to dial successfully.
s r keys:
OR
OR
s r keys to navigate to the desired number or entry.
(i.e. Add “9” or an area code prefix)
Receive Calls
The display screen shows information about incoming calls, including
the name and number of the calling party. *
Making and Receiving Calls
There are two options for handling incoming calls. You can answer
the call or ignore the call.
Receiving A Call
1. To answer an incoming call:
• For handset operation, pick up the handset.
• For handsfree operation, press Answer, the
the 6 key indicated by the flashing status light.
2. Alternatively, to ignore the call, press Ignore.
The phone immediately stops ringing and the call is treated as an unanswered call.
d/f key, or
Receiving Multiple Calls
If you receive another call while on an active call, the Call Appearance
status light for the new call changes from unlit to a fast blink. For more
information, see the procedures in the “Call Handling.”
*Availability of feature dependant upon subscription to services offered by your
phone system or service provider
19 Model VentureIP 480i User Guide
Page 23

Call Duration
You can view the elapsed time of an active call at any time by viewing
the timer on the display screen.
End a Call
The method for ending a call depends on whether the phone is in handset
or handsfree operation.
• For handset operation, hang up the handset.
• For handsfree operation, press 3 or press the
d/f key.
Making and Receiving Calls
Model VentureIP 480i User Guide 20
Page 24

Call Handling
Hold
You can put a call on hold to receive additional incoming calls, to add
callers to a conference call, or to temporarily remove yourself from the call.
1. To put a call on hold:
• If you are handling one active call, press the
<
The
of the call. You can replace the handset without losing the call.
• If you have an active call and want to dial another call, press a
6key for an unoccupied line (status light unlit).
The first active call is automatically put on hold.
Call Handling
• If you have an active call and want to receive another call, press the
6 key for the incoming line (status light blinking).
The first active call is automatically put on hold.
2. To retrieve a held call:
• If in handset operation, pick up the handset or press the 6
key that corresponds to the held line (status light blinking).
• If in handsfree operation, press the Hold key, the OffHold softkey, or the
6 key that corresponds to the held line (status light blinking).
Any other active calls are automatically put on hold.
light blinks and the display screen shows the held status
Conference Calls
You can manage conference calls with three participants.
There are two approaches to setting up a conference call:
• you can make a private call with each party, put the caller on hold,
and then add them to the conference call, or
• you can add each party directly to the conference call.
You can drop one or both parties from the conference call. You can also
put individual or both parties on hold during a conference call.
Each one of your conference participants can in turn add another
participant to the conference call. However, we recommend that the total
number of participants in a conference call not to exceed 5.
Adding Parties to a Conference Call
1. To make private calls with each party before adding them to the
conference call, make the private calls and put the callers on hold.
OR
• To add a caller directly to the conference call, go to Step 2.
2. Press the : key or the Conference softkey.
1 key.
21 Model VentureIP 480i User Guide
Page 25

3. To add held callers, navigate to the desired caller in the list and
press Select. Go to Step 4.
• To dial a call to be added directly to the conference call, press Enter#.
• To dial a call to be added directly to the conference call using
a number stored in a directory, press FromDir.
4. To dial a number, enter the number and press Dial.
• To dial a number stored in a directory, use the
one entry to the next. With the desired entry displayed, press Dial.
5. Once the private call is established, press AddToConf to add the
caller to the conference call.
OR
OR
OR
3 4 keys to move from
Putting Conference Callers On Hold and Off Hold
1. To put parties on hold during a conference call:
• To put all parties on hold, from the main conference call status
screen, press Hold.
• To put individual parties on hold, from the main conference call
status screen, press ViewParties. Navigate to the desired party
and press Hold.
2. To take parties off hold:
• To take all parties off hold, from the main conference call status
screen, press OffHold.
• To take individual parties off hold, from the main conference
call status screen, press Parties. Navigate to the desired party and
press OffHold.
OR
OR
Dropping Parties from a Conference Call
1. To drop parties from a conference call:
• To drop all parties, from the main conference call status screen,
press Goodbye.
• To drop individual parties, from the main conference call status screen,
press ViewParties. Navigate to the desired party and press Drop.
OR
Call Handling
Mute
You can prevent a caller from hearing you through the handset or
handsfree microphone.
1. To activate mute while on a call, press the a key.
The display screen indicates your muted status.
2. Press the a key again to turn mute off.
Model VentureIP 480i User Guide 22
Page 26

Transfer
You can transfer an active call to any of the following:
• another dialed number
• another number contained in a Directory
• a Voicemail system
If you transfer a call to another number, you can choose to transfer
the call directly, or you can consult with the party receiving the call before
the transfer takes place.
Transferring a Call
1. Press the 7 key.
• To transfer the call to a dialed number, enter the number.
Call Handling
• To transfer the call to a number stored in a Directory, press FromDir.
The default Directory is displayed.
• To transfer the call to a Voicemail system, press VMail.
2. To transfer the call to a number stored in a Directory, navigate to
the desired entry. If necessary, press MyDir to switch from the Corporate
Directory to your Personal Directory.
3. To consult with the party receiving the transferred call prior to
the transfer, press Consult.
• To transfer the call directly with no consultation, press Complete.
OR
OR
OR
23 Model VentureIP 480i User Guide
Page 27

Call Forwarding
Options for Forwarding Calls
You can forward all calls automatically, or you can forward all unanswered
calls after a specified number of rings. You can forward calls to:
• a Voicemail system
• an internal (company) number
• an external number
Setting Up Call Forwarding
1. Press the 4 key.
2. If your user options password is enabled, enter your password
and press Done.
3. Navigate to the Call Forwarding option and select it.
You can also access the Call Forward Option list by pressing the
CallFwd softkey.
4. To forward all calls automatically, select the All Calls option.
Go to Step 6.
• To forward unanswered calls after a specified number of rings, select
the After X Rings option.
5. Use the
press Done.
6. Choose one of the following:
• 1. Voicemail
• 2. Directory #
• 3. External #
7. If you chose 2. Directory #:
• Scroll to the extension you want to forward your calls to.
• Select MyDir and scroll to the number you want to.
8. If you chose 3. External #, use the keypad to enter the number you want to
forward your calls to.
3 4 keys to increase or decrease the desired number of rings and
OR
OR
Call Forwarding
Model VentureIP 480i User Guide 24
Page 28

Using Voicemail
Menu
Using Voicemail
Voicemail Menu
— Back
Zero Redirect
Record Name
Greeting
Language Selection
Voicemail Options
1. Zero Redirect
2. Record Name
3. GreetingŁ
4. Language Selection
Select —
About Voicemail
Each VentureIP 480i stores up to twenty minutes of Voicemail messages.
It is recommended that you delete messages (using the Delete softkey
button) regularly to ensure that callers can leave you a message. Callers will
hear a busy tone if your Voicemail is full.
View, Play, and Monitor Incoming Voicemail Messages
You must log into your Voicemail system in order to perform any
Voicemail functions. When a call is unanswered and the caller starts
recording a Voicemail message, the display screen shows the number
of the caller*, and indicates that they are recording their message.
You can use this information to monitor incoming Voicemail messages.
*Availability of feature dependant upon subscription to services offered by your
phone system or service provider
25 Model VentureIP 480i User Guide
Page 29

Logging In and Viewing Messages
1. Press the 9 key.
2. Navigate to the Voicemail list item, and then press Select.
You can also access your Voicemail list by pressing the Voicemail softkey.
3. Using the dialpad, enter your password.
4. Press Done.
5. Use the
s r keys to move from one message to the next.
Playing a Message
1. With the desired Voicemail message entry shown on the display screen,
press Play.
2. To pause the playback, press Pause. Press Resume to resume playback.
3. To skip forward or backward by three seconds, press the appropriate
Skip softkey.
Monitoring Incoming Voicemail Message
1. When the display screen is showing that a caller is recording
a voicemail message:
• To listen to the message as it is being recorded, press Listen.
You can hear the caller’s message as it is being recorded without
the caller’s knowledge.
• To ignore the Voicemail message and return to an idle display screen,
press Ignore.
• To retrieve the caller from Voicemail, press Pickup.
You are connected to the caller.
Using Voicemail
Manage Voicemail Messages
Once you have viewed and played your Voicemail messages, you have
several options.* You can copy the contact information from the message into
your Personal Directory or Speed Dial list. You can return the message,
provided that you have entered your email address into your Voicemail
options (see “Change Voicemail Options”).
You must log into your Voicemail system in order to perform any Voicemail
functions. See “Logging In and Viewing Messages” above to log in.
*Availability of feature dependant upon subscription to services offered by your
phone system or service provider
Model VentureIP 480i User Guide 26
Page 30

Copying the Caller Information to your Directory
or Speed Dial List
1. With the desired Voicemail entry shown on the display screen, press Copy.
2. Navigate to the desired copying location and press Select.
3. To add the contact information to your Personal Directory, if necessary,
enter the contact name (see “Entering Letters and Characters”) and press
Done. (This step is necessary only if the entry did not contain a name.)
Press OK.
• To add the contact to your Speed Dial list, navigate to an empty
Speed Dial list item, or to an occupied list item that you want to replace
with the new entry. Press Assign (for an empty list item) or Replace
(for an occupied list item).
The name (if available) or number (if no name is available) is assigned
to the selected list item.
Using Voicemail
OR
Zero Redirect
This allows the caller to press 0 (zero) to be transferred to another extension
or to an external telephone number (for instance your mobile phone). Please
note that the caller will have to press 0 during your greeting.
1. Press the 4 key.
2. If your user options password is enabled, enter your password
and press Done.
3. Navigate to Voicemail.
4. Navigate to the Zero Redirect and press Select.
5. Press Change.
6. Enter an extension number or an external telephone number
(including the prefix 9) that you wish callers to be transferred to.
7. Press Done.
8. You can active or deactivate Zero Redirect by pressing TurnOff or TurnOn.
Language Selection
Following the voice mail greeting, the callers will hear short prompts
guiding them to use the system. You can set the language for these prompts
to English or French. English language is used by default. To change
the language:
1. Follow the steps to login to voice mail
2. Press Language
Navigate to the desired language and press Select
27 Model VentureIP 480i User Guide
Page 31

Change Voicemail Options
You can record and change your name and greeting.
Recording Your Name and Greeting
1. Press the 4 key.
2. If your user options password is enabled, enter your password
and press Done.
3. Navigate to Voicemail.
4. Navigate to the Record Name list item and press Select.
5. Press Record and record your name. Press Stop when finished.
6. To listen to your recording, press Playback. If necessary, press
ReRecord and record your name again.
7. Once you have successfully recorded your name, press Done.
8. Navigate to the Greeting list item and press Select.
9. Press Record and record your greeting. Press Stop when finished.
10. To listen to your recording, press Playback. If necessary, press ReRecord
and record your greeting again.
11. Once you have successfully recorded your greeting, press Done.
Retrieving Voicemail
Voicemail messages can be retrieved from any telephone set.
To access messages:
1. Dial the extension of the mailbox you want to access.
2. Press the * to enter Voicemail. Please note that * must be entered
while the greeting is being played.
3. Enter the User Password followed by #
(the default user password is 1-2-3-4-5)
4. Follow the prompts to listen and delete messages.
5. To exit, hang up or press *.
Message Review Options
The following keys can be used when reviewing messages:
Using Voicemail
1 rewind 3 seconds
2 toggle between Pause and Play
3 fast forward 3 seconds
4 return to the beginning of the message
5 envelope information
7 erase message
8 reply to message
9 save message
# skip message
Model VentureIP 480i User Guide 28
Page 32

Callers
When callers reach a mailbox they can review or delete their message before
they commit it to the mailbox. The following keys can be used:
# break from recording
1 store message
2 review message
3 erase and re-record
4 append more information to message
* exit without leaving message
Using Voicemail
29 Model VentureIP 480i User Guide
Page 33

Using Directories
About Directory Lists
Directory lists contain stored contact information. You can quickly dial calls
using directory entries. For information about making calls using a directory
listing, see “Making a Call Using an Incoming Call, Directory, or Speed
Dial List.”
There are two types of Directory lists:
Corporate Directory — this directory is automatically populated and
updated, and contains all of the contact information for each person in your
company. You cannot add to, edit, or delete entries in this directory.
Personal Directory — this directory is populated and maintained by you.
You can add, edit, and delete entries in this directory.
Access and View a Directory List
You can quickly access and view directory entries using various methods.
Accessing a Directory List and Viewing the Entries
1. Press the 9 key.
2. To access the Corporate Directory, navigate to the Corp. Directory list item
and press Select.
• To access your Personal Directory, navigate to the My Directory list item
and press Select.
You can also access the Directories by pressing the Directory softkey.
The directory main page shows the directory name and number of entries.
3. To navigate the entries:
• Use the
• Using the dialpad, spell the name associated with the desired entry.
The entry is displayed when a unique match is found.
4. To switch directories, press MyDir (from the Corporate Directory), or
CorpDir (from your Personal Directory).
s r keys to move from one entry to the next.
OR
OR
Using Directories
Change Directory Displays
You can change your default directory (initially the Corporate Directory),
and you can change the way that directory entries are sorted.
Changing the Default Directory
1. Press the 4 key.
2. If your user options password is enabled, enter your password
and press Done.
3. Navigate to Directory and press Select.
4. With the cursor on the Default Dir list item, press Select.
5. Navigate to the desired directory and press Select.
Model VentureIP 480i User Guide 30
Page 34

Add, Delete, and Edit Entries
You can add, delete, and edit entries in your Personal Directory only.
Adding Entries Manually
1. Access your Personal Directory.
2. From the main directory page, press AddNew.
3. Using the dialpad, enter the name for the new entry
(see “Entering Letters and Characters”) and press Next.
4. Enter the number for the new entry.
5. Press Done.
Adding an Entry From the Caller List or a Voicemail Message
You can copy entries from the Incoming Call List *, or you can copy
the contact information associated with a Voicemail message in order to
permanently store the information in your Personal Directory.
To copy a call list entry into your Personal Directory, see “Copying an Entry
from a Call List.”
Using Directories
To copy the contact information from a Voicemail message into your Personal
Directory, see “Copying Caller Information to your Directory or
Speed Dial Lis
t.”
Deleting One Entry
1. Access your Personal Directory and navigate to the entry to be deleted.
2. Press Delete.
3. Press Yes to confirm the deletion.
Editing an Entry
4. Access your Personal Directory and navigate to the desired entry.
5. Press Edit.
6. If desired, edit the name, and then press Next.
7. If desired, edit the number, and then press Done.
*Availability of feature dependant upon subscription to services offered by your
phone system or service provider
31 Model VentureIP 480i User Guide
Page 35

Using a Call List
About Call Lists
There are two call lists:
• Redial Call List — contains a record of dialed numbers.
• Incoming Call List — contains a record of received calls, regardless
of whether the calls were answered.*
The call lists contain temporary entries. When the lists are full, the most
recent call is added and the oldest call is deleted.
You can use call list entries to quickly dial out calls. See “Redialing
a Recently Called Number, or Making a Call Using an Incoming Call List,
a Directory List, or a Speed Dial List.” You cannot save any changes
to call list entries.
Access and View a Call List
You can quickly access and view call list entries using various methods.
Accessing a Call List and Viewing the Entries
1. Press the 9 key.
2. To access the incoming call list, navigate to the CallList item
and press Select.
You can also access the Call list be pressing the CallList soft key.
The main call list page shows the number of missed calls.
OR
• To access the outgoing call list, navigate to the Redial List item
and press Select.
The first entry in the list is shown.
3. To set the missed call counter back to “0”, press ClearList.
4. Use the
The outgoing call list entries show the date and time the call was made.
The incoming call list entries show the date the time the call was made,
regardless of whether the call was answered, and whether or not the entry has
been previously viewed.
s r keys to move from one entry to the next.
Using a Call List
Edit Entries
You can temporarily edit an entry for immediate use, but you cannot
save the changes. If you want a permanent record of the entry (which can
be edited and saved), see “Add a Call List Entry to a Personal Directory or
Speed Dial List below.”
Temporarily Editing a Call List
1. Access the call list and navigate to the desired entry.
2. Press Edit#.
3. Edit the number, and then press Done.
*Availability of feature dependant upon subscription to services offered by your
phone system or service provider
Model VentureIP 480i User Guide 32
Page 36

Add a Call List Entry to a Personal Directory or Speed Dial List
If you want a permanent record of a call list entry, you must copy the entry
to either your Personal Directory, or your Speed Dial list.
Copying an Entry from a Call List
1. Access the call list and navigate to the desired entry.
2. Press Copy.
3. Navigate to the desired copying location and press Select.
4. To add the entry to your Personal Directory, if necessary, enter the
contact name, (see “Entering Letters and Characters”) and press Done.
(This step is necessary only if the entry did not contain a name.)
Press OK.
OR
• To add the entry to your Speed Dial list, navigate to an empty Speed
Using a Call List
Dial list item, or to an occupied list item that you want to replace with
the new entry. Press Assign (for an empty list item) or Replace
(for an occupied list item).
The name (if available) or number (if no name is available) is assigned
to the selected list item.
Delete Call List Entries
You can delete individual call list entries, or you clear a list of all entries.
Deleting an Entry
1. Access the call list and navigate to the desired entry.
2. Press Delete.
Deleting All Entries
1. Press the 4 key.
2. If your user options password is enabled, enter your password
and press Done.
3. Navigate to the Call List item and press Select.
4. To clear the incoming call list, navigate to the Clear Incoming list item and
press Select.
• To clear the outgoing call list, navigate to the Clear Dialed list item and
press Select.
• To clear both lists, navigate to the Clear All list item and press Select.
5. Press Yes to confirm.
OR
33 Model VentureIP 480i User Guide
Page 37

Using Speed Dial
About Speed Dial
The Speed Dial list allows you to store frequently called numbers for instant
dialing. For information about making calls using Speed Dial, see “Making a
Call Using a Speed Dial Number or Making a Call Using an Incoming Call,
Directory, or Speed Dial List.”
Access and View the Speed Dial List
If you cannot remember a Speed Dial number assignment, or if you want to
administer your Speed Dial list, you can quickly access and view your Speed
Dial list entries.
Accessing the Speed Dial List and Viewing the Entries
1. Press the 9 key.
2. Navigate to the SpeedDial list item and press Select.
You can also access the Speed Dial list be pressing the SpeedDial soft key.
3. Use the
Add and Edit Entries
You can add new entries to your Speed Dial list manually, or by copying
a Call List or Voicemail entry. You can also edit existing entries.
Adding Entries Manually
1. Access the Speed Dial list and press AddNew.
2. If desired, use the dialpad to enter the name for the new entry
and press Next.
3. Enter the number for the entry.
4. Press Done.
5. Navigate to an empty Speed Dial list item, or to an occupied list item that
you want to replace with the new entry. Press Assign (for an empty list
item) or Replace (for an occupied list item).
Adding Entries From a Caller List or Voicemail Message
You can copy entries from the Incoming Call List, or you can copy the contact
information associated with a Voicemail message to your Speed Dial list.
To copy a call list entry into your Speed Dial list, see “Copying an Entry
from a Call List.”
To copy the contact information from a Voicemail message into your Speed
Dial list, see “Copying the Copying the Caller Information to your
Directory or Speed Dial List.”
s r keys to move from one entry to the next.
Using Speed Dial
Model VentureIP 480i User Guide 34
Page 38

Editing Entries
1. Access your Speed Dial list and navigate to the desired entry.
2. Press Edit.
3. If desired, edit the name, and then press Next.
4. If desired, edit the number, and then press Done.
5. If you want to change the key assignment, press Yes in answer to
the prompt and go to step 6.
• If you don’t want to change the key assignment, press No in answer
to the prompt. You have completed this procedure.
6. Navigate to an empty Speed Dial list item, or to an occupied list item
that you want to replace with the new entry. Press Assign (for an empty list
item) or Replace (for an occupied list item).
OR
Using Speed Dial
35 Model VentureIP 480i User Guide
Page 39

Special Features
Do Not Disturb
You can use the Do Not Disturb feature to prevent your phone from ringing
for incoming calls, and to prevent your phone from broadcasting pages.
Note: Incoming calls will be sent directly to voicemail.
Enabling and Disabling the Do Not Disturb Feature
1. Press the 9 key.
2. Navigate to the DND list item and press Select.
You can also access the DND list item be pressing the DND soft key.
3. To enable the feature, press TurnON.
4. To disable the feature, press TurnOFF.
Intercom
You can use the paging feature to broadcast a message to a pre-defined set
of phones. All persons in the paging zone hear the broadcast, unless they are
on an active call.
Your telephone administrator must have set up paging zones in order for
you to use this feature.
Using the Intercom Feature
1. Press the 8 key.
2. Navigate to the desired paging zone and press Select.
3. Speak into the handset or handsfree speaker.
4. When finished, press Done.
Special Features
Computer Access to Telephone Features
You can use Microsoft Internet Explorer browser to access some features
within your telephone. These features include:
• Within Home Page
• Set your call forwarding options. See the section “Call Forwarding”
for more information
• Enable or disable Do Not Disturb. See the section on
“Special Features” for more information
• Enter numbers for speed dial keys. See the section
on “Using Speed Dial” for more information
• Within Caller’s Log Page
• View a list of your incoming calls
• View a list of your outgoing calls
• Within Directory Settings Page
• Change your default directory to Corporate or Personal directory
• Within Terminal Settings Page
• Change the last name associated with your telephone
Model VentureIP 480i User Guide 36
Page 40

To use the browser to connect to your phone:
1. Determine the IP address for your telephone:
• Press the
• If your user options password is enabled, enter your password
and press Done.
• Navigate to the Diagnostics list item and press Select.
• With the cursor on Advanced Test, press Select. Follow the
instructions on the screen to step 7
• Note the IP address as displayed on the screen
2. Run Microsoft Internet Explorer.
3. On the address field enter http://your-IP-address
4. Enter your extension number and password
4 key.
Special Features
37 Model VentureIP 480i User Guide
Page 41

Troubleshooting
Why can’t I add, edit or delete directory entries?
You cannot edit the Corporate Directory, which is automatically maintained
by the 480IP system. If you are attempting to edit your Personal Directory,
ensure that the directory is not locked.
Why aren’t all the phones in a paging zone receiving pages?
Ensure that all phones are on-hook, and that the Do Not Disturb feature
is disabled.
Why can’t I edit my directory name?
Ensure that your telephone system administrator has allowed this option.
Why can’t I forward Voicemail messages to my email?
You must define your email address using the Options key before you can
forward messages to your email.
Why does my telephone wobble?
Ensure that the cords are routed properly through the stand. Check that
the stand has been properly snapped into place.
Why is my display screen blank?
Ensure that power is being provided to your phone. If your Network does
not provide Inline power over Ethernet, you can obtain an additional
accessory (PoE inline power supply), to provide power over Ethernet locally
to your phone. See “Connect to the Network and to a Power Source”
for details.
Why is my handset not working?
Check to ensure that the handset cord is fully connected to both the phone
and handset.
Why is my speakerphone not working?
If you press d/f and the speaker light flashes and you do not hear
dialtone, the Set Audio option has been used to set up the phone for headset
use. Press d
to be used only with a headset or handset. If the light stays on steady
and you hear dialtone, you can alternate between the speakerphone and
the headset by pressing d
for instructions on how to change the
How do I remove the stand from the phone?
Place one hand on top of the phone, and place the other hand on the top
of the stand. Pull the stand away from the telephone. You will have to pull
quite forcefully, but this will not break the stand.
See the section “Installation” for information.
/f a second time. If the light goes out, the phone is set up
/f.
See the section “Customizing your phone”
Set Audio
feature.
Troubleshooting
Model VentureIP 480i User Guide 38
Page 42

Why are Callers not identified on the display?
Caller ID† information usually arrives between the first and second ring.
Let the telephone ring at least once before answering. Make sure you
subscribe to Caller ID
†
services from your local telephone company.
Why can’t I dial a number in the Callers List?
You must subscribe to a Caller ID† service for names and/or numbers
to be recorded in the Callers List. If the number of the caller is unknown or
private, you cannot return the call. Or, the number may require an area code.
Press the EditNum softkey to edit the number, then press the Dial softkey.
Troubleshooting
†
These services may have different names in your area, contact your local
telephone company for details.
39 Model VentureIP 480i User Guide
Page 43

Limited Warranty
Aastra Telecom warrants this product against defects and malfunctions during a one
(1) year period from the date of original purchase. If there is a defect or malfunction,
Aastra Telecom shall, at its option, and as the exclusive remedy, either repair or
replace the telephone set at no charge, if returned within the warranty period.
If replacement parts are used in making repairs, these parts may be refurbished, or
may contain refurbished materials.
If it is necessary to replace the telephone set, it may be replaced with a refurbished
telephone of the same design and color. If it should become necessary to repair or
replace a defective or malfunctioning telephone set under this warranty, the
provisions of this warranty shall apply to the repaired or replaced telephone set until
the expiration of ninety (90) days from the date of pick up, or the date of shipment to
you, of the repaired or replacement set, or until the end of the original warranty
period, whichever is later. Proof of the original purchase date is to be provided with all
telephone sets returned for warranty repairs.
Exclusions
Aastra Telecom does not warrant its telephone sets to be compatible with the
equipment of any particular telephone company. This warranty does not extend to
damage to products resulting from improper installation or operation, alteration,
accident, neglect, abuse, misuse, fire or natural causes such as storms or floods, after
the telephone is in your possession.
Aastra Telecom shall not be liable for any incidental or consequential damages,
including, but not limited to, loss, damage or expense directly or indirectly arising
from the customers use of or inability to use this telephone, either separately or in
combination with other equipment. This paragraph, however, shall not apply to
consequential damages for injury to the person in the case of telephones used or
bought for use primarily for personal, family or household purposes.
This warranty sets forth the entire liability and obligations of Aastra Telecom with
respect to breach of warranty, and the warranties set forth or limited herein are the
sole warranties and are in lieu of all other warranties, expressed or implied, including
warranties or fitness for particular purpose and merchantability.
Warranty Repair Services
Should the set fail during the warranty period;
In North America, please call 978-436-4111 for further information.
Outside North America, contact your sales representative for return instructions.
You will be responsible for shipping charges, if any. When you return this telephone
for warranty service, you must present proof of purchase.
After Warranty Service
Aastra Telecom offers ongoing repair and support for this product. This service
provides repair or replacement of your Aastra Telecom product, at Aastra Telecom's
option, for a fixed charge. You are responsible for all shipping charges. For further
information and shipping instructions;
In North America, contact our service information number: 978-436-4111.
Outside North America, contact your sales representative.
Note:
Repairs to this product may be made only by the manufacturer and its authorized
agents, or by others who are legally authorized. This restriction applies during and after
the warranty period. Unauthorized repair will void the warranty.
Limited Warranty
Model VentureIP 480i User Guide 40
Page 44

Index
A
Access and View
Index
a Call List 32
a Directory List 30
the Speed Dial List 34
Accessing a
Call List and Viewing
the Entries 32
Directory List and
Viewing the Entries 30
Accessing the
Speed Dial List and
Viewing the Entries 34
Adding
an Entry From the
a Caller List Entry or
Voicemail Message 31
Entries From a Caller List or
Voicemail Message 34
Entries Manually 31, 34
Parties to a Conference
Call 21
B
Backlit Display 7
C
Call
Duration 20
Forwarding 24
Handling 21
Hold 21
Callers 29
Changing
the Default Directory 30
Your Last Name 15
Your Password 15
Your Personal
Information 15
Computer Access to
Telephone Features 36
Conference Calls 21
Connecting
the Handset 4
When Inline Power
is Not Provided 4
When Inline Power
is Provided 3
Conf key 8, 21
Copying
an Entry from
a Call List 33
the Call ID 26,34
Copying the Caller Information
to your Directory or Speed
Dial List 27
Customizing Your Phone 16
D
Deleting
All Entries 33
an Entry 33
Call List Entries 33
One Entry 31
Direct Network Connection 3
Display
Icons 11
Screen 7, 9
Do Not Disturb 36
Dropping Parties from a
Conference Call 22
E
Editing
an Entry 31
text 10
Your Password 15
End a Call 20
Entering Letters and
Characters 10
H
Handset, Headset, and
Handsfree Operation 12
Handsfree calling 18
Hold 21
Page 45

Index
Index
I
Inserting the Number Card 6
Installation 2
Installing
on a Desk 5
Intercom 36
K
Key Description 7, 8
L
Language Selection 16, 27
Last Name 15
Logging In and Viewing
Messages 26
M
Making a Call
Using an Incoming Call List,
a Directory List, or
a Speed Dial List 19
Making and Receiving Calls 18
Manage Voicemail
Messages 26
Mute 22
O
Optional Accessories
(Not Included) 2
Options for Forwarding
Calls 24
Options key
8, 14-17, 24, 27-28, 30, 33, 37
Overview 2
P
Passwords 15
Phone Parts 1
Playing a Message 26
R
Receive Calls 19
Receiving
A Call 19
Multiple Calls 19
Recording Your Name
and Greeting 28
Redial key 8, 11, 18
Redialing a Recently
Called Number 18
S
Select Audio Path 16
Self Test and Diagnostics 17
Services 13,14
key
8,14,19, 26, 30, 32, 34, 36
Menu 13
Set Overview 9
Shared Network Connection 5
Softkeys 9
Special Features 36
Status Light 11
Stored Number Lists 14
T
Temporarily Editing a Call List 32
Terminal Name 15
Transfer 23
Transferring a Call 23
Troubleshooting 38
U
User
Options 12
Options Menu 12
Using
a Call List 32
Directories 30
Speed Dial 34
the Intercom Feature 36
Voicemail 25
Model 1 User Guide 42
Page 46

V
View, Play, and Monitor
Index
Incoming Voicemail
Messages 25
Voicemail
Menu 25
Monitoring Incoming 26
Retrieving 28
Options 28
Volume 16
Handset 16
Key 8, 16
Z
Zero Redirect 27
Index
Page 47

Page 48

If you’ve read this owner’s manual and consulted the Troubleshooting section and
still have problems, please visit our website at www.aastra.com or call 978-436-4111 for
technical assistance.
© Aastra Telecom Inc. 2005 41-0095-00 Rev 00
 Loading...