

Page 1

IP
Telephone System
SYSTEM GUIDE
Page 2

Table of Contents
Introduction..................................1
Installation and Configuration .....1
Network Guidelines.....................2
System Options Menu .................2
Login ...........................................3
Change Password.......................3
Entering Letters and Characters .3
Web Administration.....................4
Set Management ..........................5
Set Extension/Directory
Number (DN)...............................5
Paging Zone Setup.......................... 5
Select Paging Zone .........................5
Table of Contents
Upgrade ......................................6
Load.................................................6
Prompts ........................................... 7
Load and Prompts ...........................7
Fresh Start ..................................8
Reset Password..........................8
Remove Extension......................9
Group Options............................10
Add New Group.........................10
Edit Group Name........................... 10
Delete Group .................................10
Add a Set....................................... 11
View Sets.......................................11
Remove Set................................... 11
Remove All Sets ...........................11
Date and Time...........................11
Date ...............................................11
Time...............................................12
Network Options ........................13
IP Address ................................13
Gateways ................................... 14
Auto Attendant ......................... 14
Direct Inward Dialing
(for Incoming Calls) .................. 15
Private Line
(for Outgoing Calls) .................. 16
Audio-on-Hold
(Music on Hold) ........................ 16
Dialing Rules / Restrictions...... 17
Step 1 - To define dialing patterns
to be used as restrictions: ........ 17
Step 2 - To define dialing patterns
to be used as overrides:........... 17
Step 3 - To apply restrictions
and overrides to groups of
extensions: .............................. 18
Troubleshooting ........................ 19
Acknowledgements .................. 19
Limited Warranty ....................... 20
Page 3
Introduction
This guide provides instructions for administering all VentureIP
480i telephones operating on the same network.
While administering the VentureIP telephone system does not require the
technical expertise of a traditional “system administrator” or IT professional,
it is recommended that one person controls the advanced feature settings
contained in this guide.
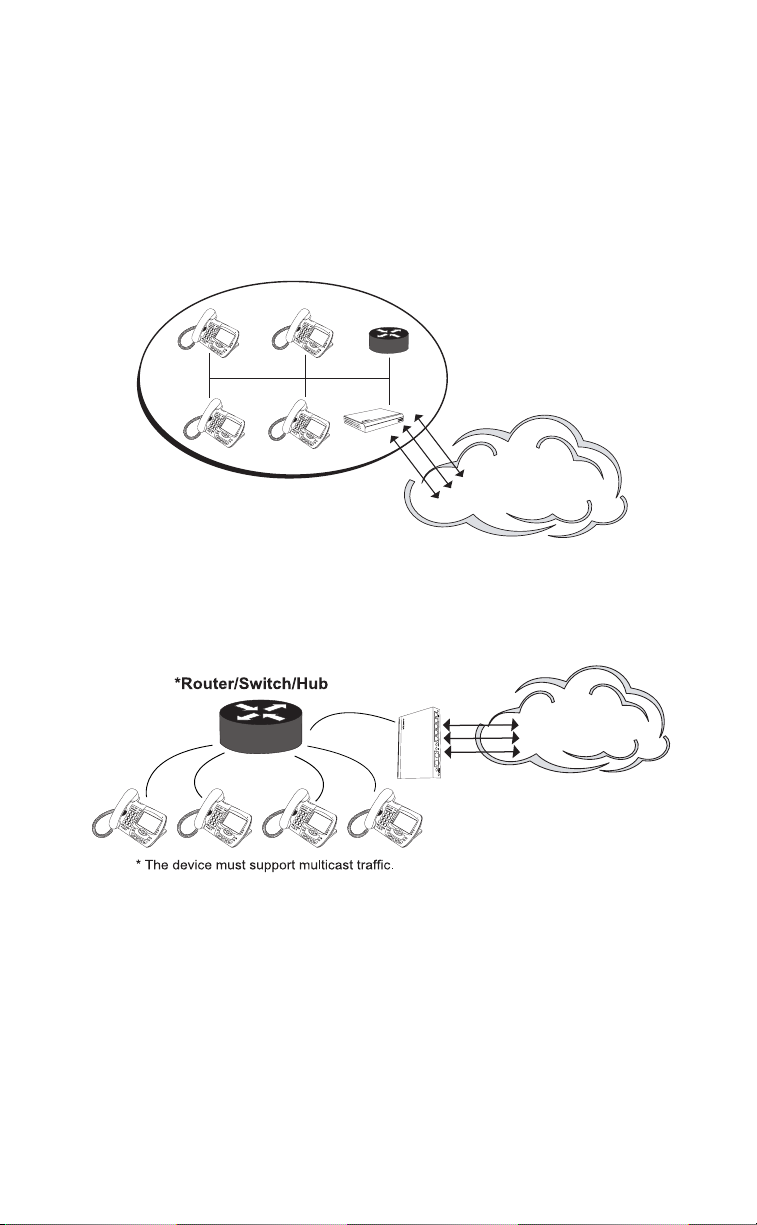
Installation and Configuration
A typical Venture IP system configuration is as follows:
Introduction
48
0
480
48
0
480
PSTN
A typical configuration consists of a standard IP Router or Switch (not
included), Cat5 cabling to each phone, and a Venture IP Gateway for access
to standard analog phone lines provided by a Public Network Service
Provider. No Central Server is required. All the features are in the Phone.
VentureIP Gatway
PSTN
4
8
0
4
8
0
4
8
0
4
8
0
System hookup is easy with the Venture IP System. Simply plug each phone
and the Venture IP Gateway into an unused port of a Fast Ethernet 100Mbps
Router or Switch, connect the Venture IP Gateway (provided separately) to
the analog phone lines provided by your service provider, apply power, and
the system auto configures itself. Note that the example above assumes a
Router or Switch equipped with POE (Power Over Ethernet) to supply
power to the Venture IP Gateway and phones. Mid-span POE injectors are
also an option and can be ordered separately from Aastra.
Model Venture IP 480i System Guide
1
Page 4

Network Guidelines
• Multicast IP traffic must be permitted on the network (default multicast
address is 239.192.228.123)
• Ensure CAT5 or better cabling is installed to get best performance
• Place all sets & gateways in the same subnet
• Do not place servers or printers behind the dual port phone.
Provide a dedicated port on the switch for these devices
• Do not leave an un-powered device connected to the network
If a DHCP (Dynamic Host Configuration Protocol) server is available on
the network, the Venture IP telephone sets and Gateways will obtain
their IP Addresses and Netmask through communication with the server.
On networks without a DHCP server, the sets and the Gateways will
automatically obtain a unique address in the Zeroconf range (169.254/16),
and set their Netmask to 255.255.255.0.
The system administrator may choose to apply fixed IP addresses and
Netmasks using the Network Options settings. Once applied, these settings
will be persisted in the set unless (a) changed manually or (b) another
device is detected at boot time using the same IP address.
To enable a set with manually configured IP settings to resume automatic
operation (DHCP/Zeroconf), reset its IP Address to 0.0.0.0.
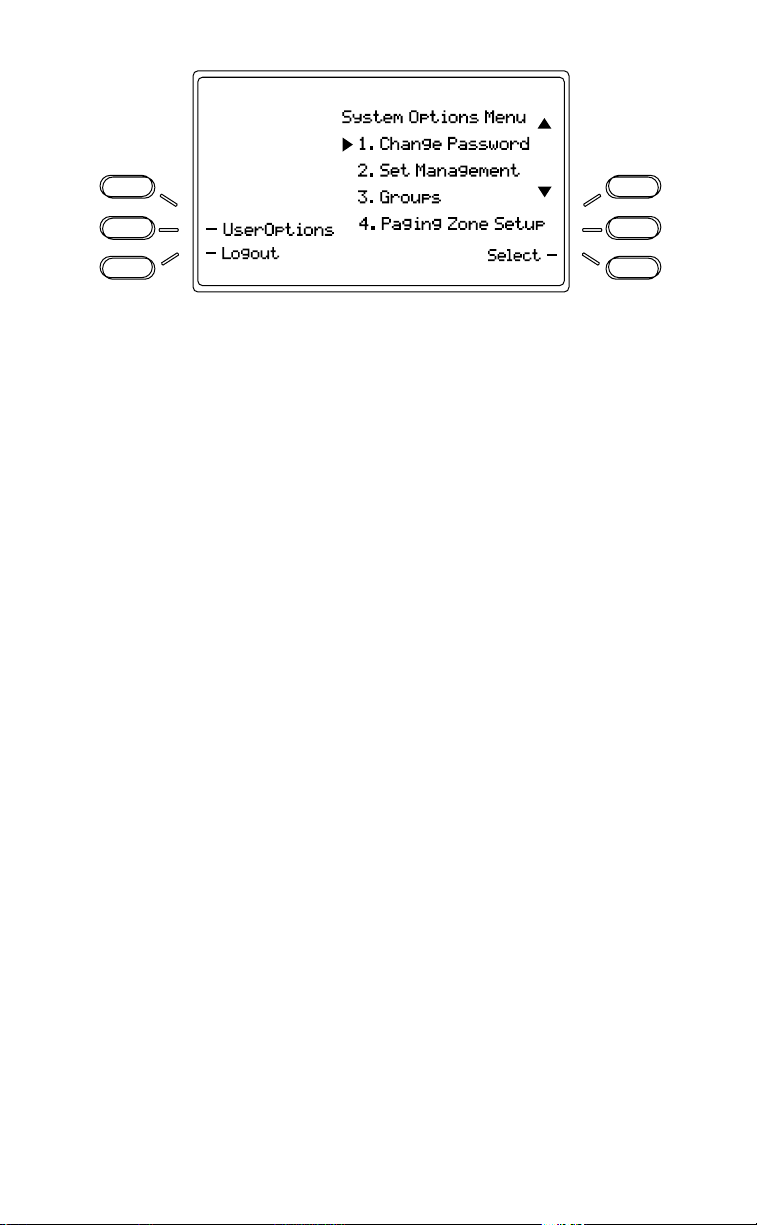
Systems Options Menu
Systems Options Menu
The System Options menu lets you set the System Options from any
telephone set. The available functions are:
•
Change Password
•
Set Management
including:
•
Set Extension
•
Paging Zone Setup
•
Upgrade
•
Fresh Start
•
Reset Password
•
Remove Extension
network, for example in the event that the device is broken.
•
Groups
– lets you create groups for simultaneous ringing, to apply
dialing restrictions to, or to set up direct inward dialing
•
Date and Time
•
Network Options
•
Gateways
– lets you manage:
•
Auto Attendant
•
Lines
for outgoing calls
•
Audio-on-Hold
•
Dialing Rules
– lets you change the administrator’s password;
– lets you manage all the sets in your network
– lets you change the extension number of a set
– lets you setup various paging zones
– lets you upgrade the software load in the telephone sets
– lets you return a telephone set to factory settings
– lets you reset a user’s password
–remove data for a set or gateway from the
– lets you set system date and time
– lets you change the IP address of a telephone set
– lets you customize the Auto Attendant
– lets you set up direct inward dialing and authorize access
– lets you configure music-on-hold in your system
– lets you apply dialing restrictions for outgoing calls
2 Model Venture IP 480i System Guide
Page 5
Login
You need to login to access System Options.
To login:
1.
Press
Options
2.
Press
SystemOptions
3.
Enter the
4.
Press
Done
The System Options Menu appears.
.
.
Admin
Password. The default is
.
5-4-3-2-1
.
Change Password
Once you have logged into System Options, you can change the default
system password.
To change the System Password:
1.
Navigate to
2.
Press
3.
Enter the new password.
4.
Press
5.
Confirm the new password.
6.
Press
The display indicates “
Change Password.
Select.
Next
.
Done
.
Password Changed.
”
Systems Options Menu
Entering Letters and Characters
Certain system operations require the entry of text characters. You can enter
characters using the telephone’s dial pad. To enter a letter, press the key with
that letter on it. If the letter is the second one on that key, press the key twice.
For example, to enter ‘R’, press 7 three times. The cursor will advance to the
next space after a delay of 2 seconds or if you press a different key.
To change the case of a letter, press the
the letter. By default the first letter of a word or name will be capitalized, and
the letters following will be lower case.
Special characters are entered by pressing the 1
Characters will appear in this order:
1: & , ( ) ` . _ - 1.
#: # / \ @.
ChangeCase
Model Venture IP 480i System Guide
softkey, and then enter
and the # keys.
3
Page 6
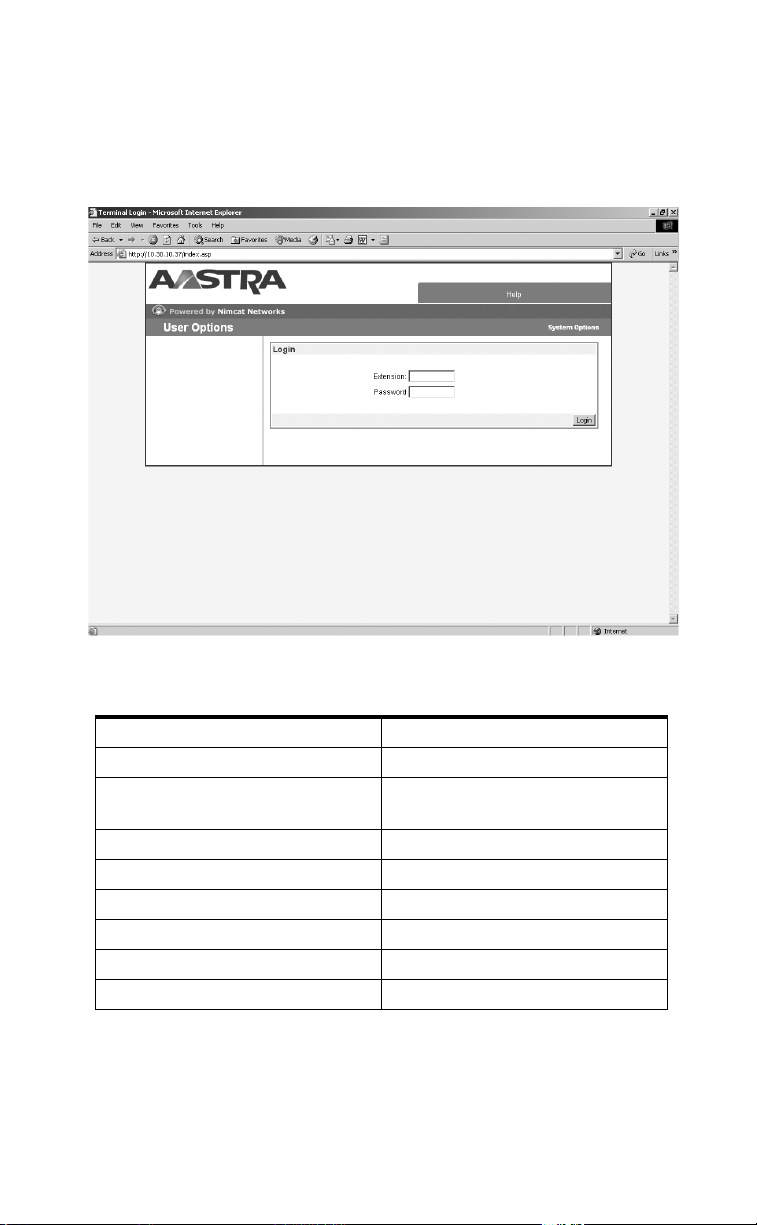
Web Administration
The VentureIP Telephone System provides users and administrators with
the ability to manage the VentureIP 480i Telephones via the web using
the Web Administration tool. Simply, point your web browser to one of
the VentureIP 480i Telephone's IP address, you will be able to log in to
the individual telephone by entering the extension number and the user
password of that extension (Figure 1).
Web Administration
Functions available from the Web Administration are:
User Options Functions
Home Configure call forwarding
Home Enabling/disabling do not dis-
turb (DND)
Home Set speed dial list
Caller’s Log View incoming calls
Caller’s Log View dialed calls
Directory Settings Set default directory
Directory Settings Set directory list sort order
Terminal Settings Change terminal/user name
4 Model Venture IP 480i System Guide
Page 7

Set Management
Set Management lets you manage all the sets in your network, including
• Set Extension/Directory Number (DN)
• Paging Zone Setup
• Upgrade
• FreshStart
Set Extension/Directory Number (DN)
Set Extension lets you change the extension of your telephone.
To change the DN
1.
Navigate to
2.
Press
3.
Press
4.
Enter the new set DN.
5.
Press
The system confirms the change.
Paging Zone Setup
You can change the paging zones that individual sets belong to.
General Zone includes all sets on the network as well as any external paging
device connected to the Gateway(s). Please see section on External Paging
in
VentureIP Gateway Installation Guide
be changed.
By default, Zone 2 includes all the sets on the network and Zones 3 to 9
have none.
Telephone sets can be placed in any one zone from Zone 2 to Zone 9.
Placing sets in any of these zones does not remove them from the General
Zone. External paging devices are only activated when the General
Zone is paged.
Select Paging Zone
To select a Paging Zone
1.
Navigate to
2.
Press
3.
Use the
4.
Press
The system confirms the paging zone of the set.
Set DN
Select
.
Change
.
Done
.
Paging Zone Setup
Select.
s r
Select
.
.
. Members of General Zone cannot
.
keys to select the Paging Zone.
Set Management
Model Venture IP 480i System Guide
5
Page 8

Upgrade
You can upgrade the set software load, the gateway software load, voicemail
system prompts and AutoAttendant system prompts. When you upgrade the
software load and system voicemail prompts, you upgrade the
• Software load for a set
• Software load for a Venture IP Gateway
• Voicemail system prompts for a set (not individual greetings)
• AutoAttendant prompts
When you upgrade the system voice prompts only, you upgrade the
• Voicemail system prompts for a set (not individual greetings)
• AutoAttendant prompts
For more information on obtaining a software load, please contact
Aastra support at
Load
Set Management
To upgrade the software load
1. Navigate to Upgrade.
2. Press Select.
The display indicates “Item to upgrade.”
3. Press Load.
The display indicates the Load Name.
4. Press Change to edit the Load Name; otherwise, proceed to Step 7.
5. Edit the Load Name
6. Press Done.
7. Press Next.
The display indicates the Server Address.
8. Press Change to edit the Server Address; otherwise, proceed to Step 11.
9. Edit the Server Address.
10. Press Done.
11. Press Next.
The display indicates “Clean Database?” By default, it is disabled.
Caution: Cleaning the database removes ALL user data.
12. Press Change to enable Clean Database.
13. Press Next.
The display indicates “Test Load First?” By default, it is enabled
(recommended).
14. Press Change to disable Test Load First.
15. Press Next.
The display indicates “Upgrade All?” By default, it is disabled.
Caution: Upgrade All upgrades ALL the sets and gateways in your network.
978-436-4111 or www.aastra.com/support
6 Model Venture IP 480i System Guide
Page 9

16. Press Change to enable Upgrade All.
17. Press Next.
The display indicates “Start Upgrade?”
18. Press Yes.
The display indicates “Upgrade In Progress…”
The phone restarts. The process takes a few minutes.
Prompts
To upgrade the voicemail system and AutoAttendant prompts
1. Navigate to Upgrade.
2. Press Select.
The display indicates “Item to upgrade.”
3. Press Prompts.
The display indicates the Server Address.
4. Press Change to edit the Server Address; otherwise, proceed to Step 7.
5. Edit the Server Address.
6. Press Done.
7. Press Next.
The display indicates “Upgrade All?” By default, it is disabled.
Caution: Upgrade All upgrades ALL the voicemail system and
AutoAttendant prompts in your network.
8. Press Change to enable Upgrade All.
9. Press Next.
The display indicates “Start Upgrade?”
10. Press Yes.
The display indicates “Upgrade In Progress…”
The phone FreshStarts.
Load and Prompts
To upgrade the software load and prompts
1. Navigate to Upgrade.
2. Press Select.
The display indicates “Item to upgrade.”
3. Press Load.
The display indicates the Load Name.
4. Press Change to edit the Load Name; otherwise, proceed to Step 7.
5. Edit the Load Name
6. Press Done.
7. Press Next.
Set Management
Model Venture IP 480i System Guide 7
Page 10

The display indicates the Server Address.
8. Press Change to edit the Server Address; otherwise, proceed to Step 11.
9. Edit the Server Address.
10. Press Done.
11. Press Next.
The display indicates “Clean Database?” By default, it is disabled.
Caution: Cleaning the database removes ALL user data.
12. Press Change to enable Clean Database.
13. Press Next.
The display indicates “Test Load First?” By default, it is enabled
(recommended).
14. Press Change to disable Test Load First.
15. Press Next.
The display indicates “Upgrade All?” By default, it is disabled.
Set Management
Caution: Upgrade All upgrades ALL the sets in your network.
16. Press Change to enable Upgrade All.
17. Press Next.
The display indicates “Start Upgrade?”
18. Press Yes.
The display indicates “Upgrade In Progress…”
The phone restarts. The process takes a few minutes.
Fresh Start
FreshStart returns a set to its factory settings. This option should be used
with caution. It deletes user data, including directory information, voicemail
settings and messages, and the DN.
To FreshStart a phone
1. Navigate to FreshStart.
The display indicates “Extension:<xxx> Remove & Refresh?”
2. Press Yes.
Reset Password
Reset Password allows the administrator to reset a user’s password
to the default value “12345”. To reset a password, this must be done at
the user’s telephone.
1. In System Options, navigate to Set Management and press Select.
2. Navigate to Reset Password and press Select.
3. Press Yes to reset the user’s password to “12345”.
8 Model Venture IP 480i System Guide
Page 11

Remove Extension
Remove Extension allows the administrator to remove all information
about a set or gateway from the network. For example, this operation would
be done to remove all references to a broken device prior to replacing it.
To remove information about a set or gateway by extension number:
1. In System Options, navigate to Set Management and press Select.
2. Navigate to Remove Extension and press Select.
3. Enter the extension number to be removed, and press Next.
Note: The extension number of a Gateway may be found through the Gateway
option under the System Options menu.
4. Review the information presented on the confirmation screen, and press
Yes to complete the operation.
To remove information about a set using the Corporate Directory:
1. In System Options, navigate to Set Management and press Select.
2. Navigate to Remove Extension and press Select.
3. Press the FromDir key to open the Corporate Directory.
4. Navigate to the set to be removed, and press Select.
Note: Gateways do not appear in the Corporate Directory.
5. Review the information presented on the confirmation screen, and press
Yes to complete the operation.
Caution: Prior to performing this procedure, please ensure that all other
sets and gateways are active and connected to the network (with the
exception of the set or gateway that is being removed). Subsequent to this
operation, other sets and gateways getting connected to the network
must be in factory setting, i.e. the sets or gateways must either be brand
new, or Fresh Started as described on page 6.
Set Management
Model Venture IP 480i System Guide 9
Page 12

Group Options
A Group lets you ring a select group of phones. It supports applications
such as customer service, support groups, help desks, and such. It allows all
sets in a group ring on an incoming call. Calls can be answered by any of the
phones in the group. In the event that the call is not answered, the specific
group settings take effect, forwarding the call to a specific phone where it can
be answered or handled by that phone’s specific settings.
The System Administrator can
• Establish groups
• Assign the DN for the group
• Assign sets to a group
• Assign Call Forward or No Answer destination point
Add New Group
Group Options
To add new groups
1. Navigate to Groups and press AddNew.
2. Enter the name of the new group.
3. Press Next.
4. Enter the Primary DN. The Primary DN is a virtual number that
must be the number 300 or higher.
5. Press Done.
The display indicates “Create Group” with the data you entered.
6. Press Yes.
Edit Group Name
To edit a group name
1. Navigate to the group name you want to edit.
2. Press Edit.
3. Edit the name.
4. Press Done.
Delete Group
To delete a group
1. Navigate to the group you want to delete.
2. Press Delete.
The group is deleted.
1
1A Group DN is a virtual number that MUST be 300 or higher.
10 Model Venture IP 480i System Guide
Page 13

Add a Set
To add sets to a group
1. Navigate to the group you want to add a set to.
2. Press ViewSets.
3. Press AddNew
4. The display indicates “Add DN to Group.”
5. Enter the DN.
6. Press Done.
The system confirms the set addition.
View Sets
To view sets in a group
1. Navigate to the group you want to view.
2. Press ViewSets.
3. Use the
3 4 keys to move between sets.
Remove Set
To remove a single set
1. Navigate to the group you want to remove a set from.
2. Press ViewSets.
3. Navigate to the set you want to delete.
4. Press Remove.
The set is removed from the group.
Remove All Sets
To remove all sets
1. Navigate to the group you want to remove all sets from.
2. Press ViewSets.
3. Press RemoveAll.
All sets are removed from the group.
Group Options
Date and Time
You can set the date and time on your network from a single phone.
Date
To change the date
1. Navigate to Date and Time.
2. Press Select.
3. Navigate to Date.
4. Press Select.
5. Enter the date in the following format: DD/MM/YYYY. The top-right softkey
changes to a slash [/] to facilitate formatting.
6. Press Done.
Model Venture IP 480i System Guide 11
Page 14

Time
To change the time
1. Navigate to Date and Time.
2. Press Select.
3. Navigate to Time.
4. Press Select.
5. Enter the time in the following format: HH:MM. It is a 24 hour
format, for example, 15:36. The top-right softkey changes to a colon [:]
to facilitate formatting.
6. Press Done.
Group Options
12 Model Venture IP 480i System Guide
Page 15

Network Options
You may have to change the following for network configuration reasons:
• IP Address
• SMTP Settings
IP Address
To change the IP Address
1. Navigate to Network Options.
2. Press Select.
3. Navigate to IP Address.
4. Press Select.
5. The display indicates the IP Address.
6. Press Change to change the IP Address.
7. Edit the IP Address. The top-right softkey changes to a dot [.] to facilitate
formatting.
8. Press Next.
9. Enter the Netmask address. The top-right softkey changes to a dot [.] to
facilitate formatting.
10. Press Next.
11. Enter the Gateway address. The top-right softkey changes to a dot [.] to
facilitate formatting.
12. Press Next.
13. The display indicates “Reprogram i/f?”
14. Press Yes.
Network Options
Model Venture IP 480i System Guide 13
Page 16

Gateways
Within Gateways you can manage:
• Auto Attendant – lets you customize the Auto Attendant which acts
as a system receptionist
• Lines – lets you set up direct inward dialing and authorize access for
outgoing calls
• Audio-on-Hold – lets you configure music-on-hold in your system
Auto Attendant
Gateways
The Auto Attendant feature acts as a system receptionist. It answers
an incoming call and invites the caller to dial an extension number, enter
the name of the person they are trying to reach, or be transferred to the
receptionist. The Auto Attendant supports up to three greetings: System
Default, Day greeting and Night greeting. You can record Day and
Night greetings of the Auto Attendant. Only one greeting can be enabled
at any time.
To record Day and Night greetings, and enable a greeting:
1. In System Options, navigate to Gateways and press Select
2. Navigate to Auto Attendant and press Select.
3. Use the
4. Press Select.
5. Use the
6. Press Record to record a greeting. This option is applicable to Day and
Night greetings.
7. Press Enable to select the desired greeting. Please note that switching
between Day and Night greetings is not performed automatically.
Following the greeting, the callers will receive short prompts guiding them
to use the system. You can set the language for these prompts to English or
French. English language is used by default. To change the language:
1. Follow the above steps to step 4
2. Press Language
3. Navigate to the desired language and press Select
3 4 keys to select the desired Venture IP Gateway.
3 4 keys to select Day, Night or Default greeting.
14 Model Venture IP 480i System Guide
Page 17

Direct Inward Dialing (for Incoming Calls)
You can assign a physical PSTN line to a telephone or a group of telephones.
Incoming calls on this line will bypass Auto Attendant and will be forwarded
to the specified telephone(s) immediately. If a line is assigned to a group of
telephones, all telephones will ring until one of them answers the call.
If you are assigning a line to a group of telephones, please note that you have
to have the group already defined before proceeding. Please refer to Group
Options on page 8 for further information.
To assign a PSTN line or a telephone or a group:
1. In System Options, navigate to Gateways and press Select.
2. Navigate to the desired Gateway to which the PSTN line is connected
(please note its MAC address).
3. Press Select.
4. Navigate to Lines and press Select.
5. Navigate to the desired line. Line number is indicated on the back of the
Gateway to which you have connected that PSTN line.
6. Navigate to Incoming and press Select.
7. Press Change.
8. The Corporate Directory is displayed. Navigate to the desired telephone
number or the group name.
9. Press Assign.
10. Confirm the assignment by pressing Yes.
Gateways
Model Venture IP 480i System Guide 15
Page 18

Private Line (for Outgoing Calls)
You can select the individuals who can access a certain PSTN line for
outgoing calls. The individuals can be selected based on their telephone
number or the group they belong to. All others will be prevented from
using that line for making outgoing calls.
If you are selecting a group of telephones, please note that you
have to have the group already defined before proceeding. Please refer
to “Group Options” on page 8 for further information.
By default all individuals can access all PSTN lines for outgoing calls.
To restrict access to a line to an individual or a group:
1. In System Options, navigate to Gateways and press Select.
2. Navigate to the desired Gateway to which the PSTN line is connected
(please note its MAC address).
3. Press Select.
4. Navigate to Lines and press Select.
5. Navigate to the desired line. Line number is indicated on the back
of the Gateway to which you have connected that PSTN line.
6. Navigate to Outgoing and press Select.
7. Press Change.
8. The Corporate Directory is displayed. Navigate to the desired telephone
number or the group name.
9. Press Assign.
10. Confirm the assignment by pressing Yes.
Audio-on-Hold (Music on Hold)
The Venture IP Gateway has a Music Input jack for Music on Hold (MOH).
Before proceeding to enable music on hold for your system, please ensure
that the music source volume is set to 50%.
1. In System Options, navigate to Gateways and press Select.
2. Navigate to the desired Gateway to which the music source is connected
(please note its MAC address).
3. Press Select.
4. Navigate to Audio On Hold and press Select.
5. Press Enable.
16 Model Venture IP 480i System Guide
Page 19

Dialing Rules / Restrictions
Dialing Restrictions can prevent users from making certain external calls
from their telephones. These restrictions are specified as prefix patterns or
complete dialing numbers. Dialing Restrictions can be applied to groups
of extensions (see “Group Options” on page 8).
Applying dialing restrictions is a two or three step activity as follows:
1. Define dialing patterns to be used as restrictions - these are prefixes for
certain external calls. For instance “91” is the prefix for long distance calls.
Prefixes can follow by “?” indicating a single digit, or “*” indicating all
subsequent digits. The use of these special characters is optional.
2. Define dialing patterns to be used as overrides - these are potential
exceptions to the restrictions. For instance “918” is the prefix for toll free
1-800 calls. Or “912146850000” may be the telephone number of the
office in Dallas.
3. Apply restrictions and overrides to groups of extensions. You may need to
define specific groups for this purpose (see “Group Options” on page 8).
Step 1 - To define dialing patterns to be used as restrictions:
1. In System Options, navigate to Dialing Rules and press Select.
2. Press AddNew.
3. Enter a name for the pattern you are specifying, such as Long Distance.
4. Press Next.
5. Enter the dialing pattern, such as 91.
6. Press Done.
7. Press Yes when “Add This Rule?” is displayed.
Dialing Rules / Restrictions
Step 2 - To define dialing patterns to be used as overrides:
1. Follow step 1 above if required.
2. Press AddNew.
3. Enter a name for the pattern you are specifying, such as 800 Calls.
4. Press Next.
5. Enter the dialing pattern, such as 918.
6. Press Done.
7. Press Yes when “Add This Rule?” is displayed.
Model Venture IP 480i System Guide 17
Page 20

Step 3 - To apply restrictions and overrides to groups of extensions:
Please note that you have to have a group already defined before proceeding
to this step. Please refer to Group Options on page 8 for further information.
1. In System Options, navigate to Groups and press Select.
2. Navigate to the group to which you are applying dialing restrictions and
press Settings.
3. Navigate to AssignRules and press Select.
4. Press Add.
To apply a restriction:
5. Navigate to a dialing pattern, for example Long Distance, and press
Disallow.
To apply an override:
6. Navigate to a dialing pattern, for example 800 Calls, and press Allow.
To review the settings:
7. Press Back. Restrictions are indicated by an “X” and overrides
by the “√ ” symbol.
Dialing Rules / Restrictions
18 Model Venture IP 480i System Guide
Page 21

Troubleshooting
Music on hold is not working
Ensure that a music source is plugged into the MOH port and that the
volume is set to 50%. Verify that the source is working by connecting a
headset to the source's output. Check the Venture IP Gateway configuration
menu to ensure that this feature is enabled.
The external page attached to Venture IP Gateway is not working
Check the Venture IP Gateway configuration menu to ensure that this
feature is enabled.
AutoAttendant doesn’t answer incoming calls
Check the Venture IP Gateway configuration menu to ensure that the correct
calling parameters are configured.
There’s a fast busy signal when trying to make external calls
A fast busy indicates that all lines of the Venture IP Gateway are currently in
use. Wait and try your call later.
All the phones in a paging zone are not receiving pages
Ensure that all phones are on-hook and that the Do Not Disturb feature is
disabled.
Groups are defined, but they weren’t added
Ensure the Primary DN is 300 or higher.
There's no dial tone on the phone when plugged into the Bypass port
An analog telephone connected to the Bypass port works only when power
is removed from the Venture IP Gateway. Ensure that power is removed from
Venture IP Gateway. Also ensure that a phone line is connected to LINE 4 of
the Venture IP Gateway.
Voicemail messages don’t forward to email
Ensure that the SMTP IP Address is setup.
Troubleshooting
Acknowledgements
• This product includes software developed by the OpenSSL Project
for use in the OpenSSL Toolkit (http://www.openssl.org/).
• This product includes cryptographic software written by Eric Young
(eay@cryptosoft.com).
Model Venture IP 480i System Guide 19
Page 22

Limited Warranty
Aastra Telecom warrants this product against defects and malfunctions during a one
(1) year period from the date of original purchase. If there is a defect or malfunction,
Aastra Telecom shall, at its option, and as the exclusive remedy, either repair or
replace the telephone set at no charge, if returned within the warranty period.
If replacement parts are used in making repairs, these parts may be refurbished, or
may contain refurbished materials.
If it is necessary to replace the telephone set, it may be replaced with a refurbished
telephone of the same design and color. If it should become necessary to repair or
replace a defective or malfunctioning telephone set under this warranty, the
provisions of this warranty shall apply to the repaired or replaced telephone set until
the expiration of ninety (90) days from the date of pick up, or the date of shipment to
you, of the repaired or replacement set, or until the end of the original warranty
period, whichever is later. Proof of the original purchase date is to be provided with all
telephone sets returned for warranty repairs.
Exclusions
Aastra Telecom does not warrant its telephone sets to be compatible with the
Limited Warranty
equipment of any particular telephone company. This warranty does not extend to
damage to products resulting from improper installation or operation, alteration,
accident, neglect, abuse, misuse, fire or natural causes such as storms or floods, after
the telephone is in your possession.
Aastra Telecom shall not be liable for any incidental or consequential damages,
including, but not limited to, loss, damage or expense directly or indirectly arising
from the customers use of or inability to use this telephone, either separately or in
combination with other equipment. This paragraph, however, shall not apply to
consequential damages for injury to the person in the case of telephones used or
bought for use primarily for personal, family or household purposes.
This warranty sets forth the entire liability and obligations of Aastra Telecom with
respect to breach of warranty, and the warranties set forth or limited herein are the
sole warranties and are in lieu of all other warranties, expressed or implied, including
warranties or fitness for particular purpose and merchantability.
Warranty Repair Services
Should the set fail during the warranty period;
In North America, please call 978-436-4111 for further information.
Outside North America, contact your sales representative for return instructions.
You will be responsible for shipping charges, if any. When you return this telephone
for warranty service, you must present proof of purchase.
After Warranty Service
Aastra Telecom offers ongoing repair and support for this product. This service
provides repair or replacement of your Aastra Telecom product, at Aastra Telecom's
option, for a fixed charge. You are responsible for all shipping charges. For further
information and shipping instructions;
In North America, contact our service information number: 978-436-4111.
Outside North America, contact your sales representative.
Note:
Repairs to this product may be made only by the manufacturer and its authorized
agents, or by others who are legally authorized. This restriction applies during and after
the warranty period. Unauthorized repair will void the warranty.
20 Model Venture IP 480i System Guide
Page 23

Index
A
Add
Index
a Set 11
New Group 10
Audio-on-Hold
(Music on Hold) 16
Auto Attendant 14
C
Change Password 3
D
Date and Time 11
Delete Group 10
Dialing Rules / Restrictions 17
Direct Inward Dialing
(for Incoming Calls) 15
E
Edit Group Name 10
Entering letters/characters 3
F
Fresh Start 8
G
Gateways 14
Group Options 10
I
IP Address 13
L
Load 6
Load and Prompts 7
N
Network
Guidelines 2
Options 13
P
Paging Zone Setup 5
Phone Parts 3
Private Line
(for Outgoing Calls) 16
R
Remove
All Sets 11
Extension 9
Set 11
Reset Password 8
S
Select Paging Zone 5
Set Extension/Directory
Number (DN) 5
Set Management 5
Step 1 - To define dialing
patterns to be used as
restrictions 17
Step 2 - To define dialing
patterns to be used as
overrides 17
Step 3 - To apply restrictions
and overrides to groups
of extensions 18
Systems Options Menu 2
T
Time 12
Troubleshooting 19
U
Upgrade 6
V
View Sets 11
W
Warranty 20
Web Administration 4
Page 24

If you’ve read this owner’s manual and consulted the Troubleshooting section and
still have problems, please visit our website at www.aastra.com or call 978-436-4111 for
technical assistance.
© Aastra Telecom Inc. 2005 41-0087-00 Rev 00
 Loading...