

Page 1
User’s Guide
UniData IPW2000 Office IP Phone
For ERICSSON WebSwitch 2000 , version 3.0 and later
Page 2

Copyright Notice
EN/LZT 108 6348
Copyright UniData Communication Systems, Inc 2002.
All rights reserved
No part of this publication may be reproduced, transmitted, transcribed, stored in a
retrieval system, or translated into any language in any form by any means without
prior written permission of the UniData Communication Systems, Inc.
UniData Communication Systems reserves the right to revise this documentation and
to make changes in content from time to time without obligation on the part of
UniData Communication Systems to provide notification of such revision or change.
UniData Communication Systems provides this documentation without warranty,
term, or condition of any kind, either implied or expressed, including, but not limited
to, the implied warranties, terms, or conditions of merchantability, satisfactory quality,
and fitness for a particular purpose. UniData Communication Systems may make
improvements or changes in the product(s) and/or the program(s) described in this
documentation at any time.
Declaration of conformity
Hereby, Ericsson Enterprise AB, declares that this telephone, is in conformity with
the essential requirements and other relevant provisions of the European R&TTE
directive 1999/5/EC.
Details to be found at: http://www.ericsson.com/sdoc.
Page 3

Table of Contents
Safety Information………………………………………………….
Introduction to IPW2000…………………………………………...
Description…………………………………………………………..
Display Information………………………………………………...
Menu Structure……………………………………………………..
Log On / Off………………………………………………………...
Outgoing Calls……………………………………………………...
Make a call from the Dial Pad………………………………….
Make a Call from the Phone Book…….…………………….
Make a Call from the Call History……………………………..
Make a Call from the Programmable Key…………………….
Make a Call from the REDIAL Key…………………………...
Make a second call during an ongoing call…………………..
Incoming Calls……………………………………………………...
Answer a Call………………………………………………….
Answer a second call during an ongoing call……………....
Answer another extension call (Call Pickup)………………...
Disconnecting Calls………………………………………………..
End a Call………………………………………………………..
End a second call during an ongoing call…………………….
Call Back………………………………………………………...
During Calls………………………………………………………...
Mute a Call……………………………………………………..
Hold a Call……………………………………………………...
Inquiry…………………………………………………………..
Transfer a Call………………………………………………….
Conference a Call……………………………………………..
Forward Calls……………………………………………………….
Forwarding all Calls……………………………………………..
Forwarding Calls on busy……………………………………...
Forwarding Calls on no answer………………………………..
Page
1
2
3
6
8
9
12
12
13
14
15
15
15
16
16
16
17
18
18
18
19
20
20
20
21
22
23
24
24
25
26
i IPW2000
Page 4

Table of Contents
Page
Voice Mail…………………………………………………………...
Access your voice mailbox from your extension…………….
Access your voice mailbox from another extension………...
Access your voice mailbox from an external number……….
Voice mail flow chart…………………………………………...
Paging……………………………………………………………….
Call History………………………………………………………….
View Outgoing, Missed and Received Calls………………...
Programmable Functions………………………………………….
Program a function……………………………………………...
Enter the name………………………………………………….
Add a number from the Call History…………………………..
Phone Book………………………………………………………...
Add an entry……………………………………………………..
Edit an entry……………………………………………………..
Add a number from the Call History………………………….
Phone Settings……………………………………………………..
27
27
28
28
29
30
31
31
32
32
33
34
35
35
36
38
39
Set the GK Address…………………………………………….
Set the Time……………………………………………………..
Chang the Display Formats…………………………………...
Set the Menu Protect…………………………………………...
Change User Password………………………………………..
Adjust the ringer volume………………………………………..
Adjust the handset, headset, and speakerphone volume…..
Information…………………………………………………………..
View the Information…………………………………………...
Audible Signals………………………………………………….
Visible Signals…………………………………………………...
39
40
41
43
44
45
45
46
46
47
47
iiIPW2000
Page 5

Safety Information
The Utmost care and attention has been devoted to quality standards in the
manufacture of your new IPW-2000. Safety is a major factor in the design of
every set. But, safety is your responsibility too.
Use Power over LAN IEEE 802.3af compliant.
Use the adaptor .
(Output: DC 18V 600mA ~ 48V 225mA, (-)---(o---(+))
For your safety
To reduce the risk of an electrical shock, do not disassemble this phone.
There are no user serviceable parts. Opening or removing covers may expose you
to hazardous voltages. Incorrect reassembly may cause an electrical shock.
Never push objects of any kind into this phone’s housing slots since such objects
may touch hazardous voltage points or short out parts that may cause electrical
shock.
Adjust only those controls covered in this Administrator’s Guide. Improper
adjustment of other controls may result in damage and could require extensive
repair by a qualified service personnel to restore this phone
Protection of the Telephone
Only use an Unshielded Twisted Pair (UTP) Category 5 Ethernet cable when
connecting to this phone’s RJ-45 ports (Uplink and Downlink).
Always use this phone with the required power source. The proper power source
required for this phone is written on the document (administrator’s guide ). If you are
unsure of the type of power supplied to your premises, consult your local power
company before installing this phone.
Disconnect the power to this phone and have it checked by a qualified service
personnel if any of the following occurs:
the power supply cord or plug is damaged or frayed
the phone was exposed to water or had liquid spilled on it
the phone was dropped or the casing is damaged
after following the Administrator’s Guide, the phone does not operate properly
Location of the Telephone
The telephone should be operated in a conteolled environment with an ambient
temperature 0°C and 50 °C (32F and 122F)
Do not install the telephone in a room where large quantities of dust accumulate;
this can considerably reduce the service life of the telephone
Do not expose the telephone to direct sunlight or any other source of heat, as this is
liable to damage the electronic equipment and the plastic casing
Do not operate the telephone in damp environments such as bathrooms
1 IPW2000
Page 6

Introduction to IPW2000
The UniData IPW2000 OIP is now introduced with the WebSwitch 2000 V3.0 and later
versions, as a system IP Phone, providing access to all advanced features and services of
the WebSwitch 2000 communication system in a user-friendly and convenient way. The
IPW2000 features a big LCD screen accompanied with a set of navigation keys, a number
of programmable feature keys, convenient and robust dial keypad, as well as, a few
special function buttons like “FLASH”, “MUTE”, “VOLUME” and “REDIAL”.
An integrated 2-port LAN Switch, combined with support for in-line power allows the
optimization of the total cost per user.
Furthermore, to provide consistent business class voice quality over varying and
congested IP network conditions, the IPW2000 is equipped with advanced Quality of
Service (QoS) technologies such as CODEC negotiation, enhanced jittering technology,
lost packet recovery, echo cancellation, and packet delay compensation.
The phone is TIA-810 compliant.
2IPW2000
Page 7
Description
2
16
1
15
14
3
E
M
U
+
L
4
O
V
-
FLASH
REDIAL
13
12
11
10
9
5
6
8
7
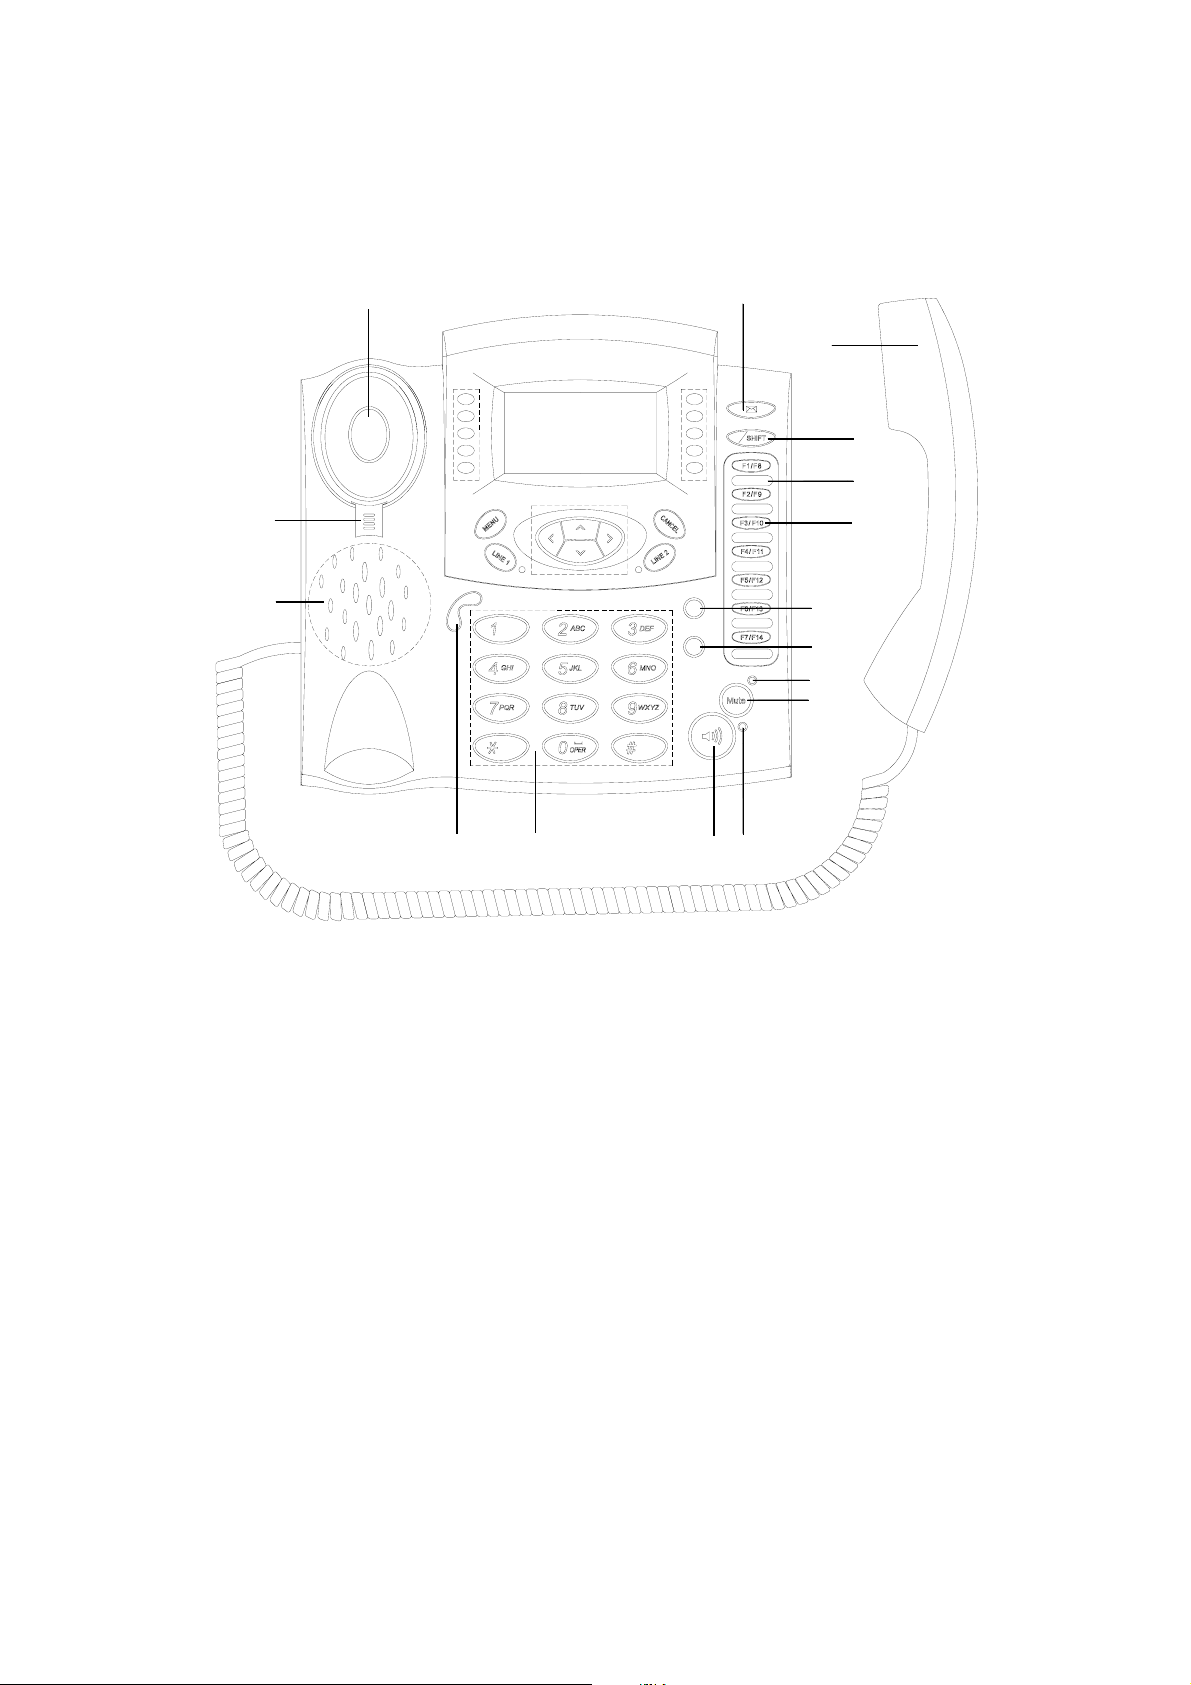
1 Handset
2 Hook Switch
3 Conversion knob
4 Speaker
5 Volume Button
Increases or decreases volume for the handset, headset, or speakerphone
(depending upon which is currently active).
Also controls the ringer volume (if the handset is in its cradle)
6 Dial Pad
Works exactly like the dial pad on a traditional telephone.
3 IPW2000
Page 8

7 Speakerphone Button
Toggles the speakerphone on or off.
8 Speakerphone indication LED
9 Mute Button
Toggles the microphone on or off during a call.
10 Mute indication LED
11 Redial Button
Redials one of the outgoing calls
12 Flash Button
Holds the current call and makes a call to another party
Description
13 Programmable keys
Store numbers and program functions (e.g. speed dial keys,function keys, etc.).
14 Label / Label Cover
Enables you to label your function keys. Remove the transparent cover, write the
names under the keys and snap the protective cover back into place.
15 Shift button
Selects between F1~F7 and F8~F14
16 Message lamp / Message Button
Provides access to a message system
A lit key indicates you have an unanswered message in your voice mailbox.
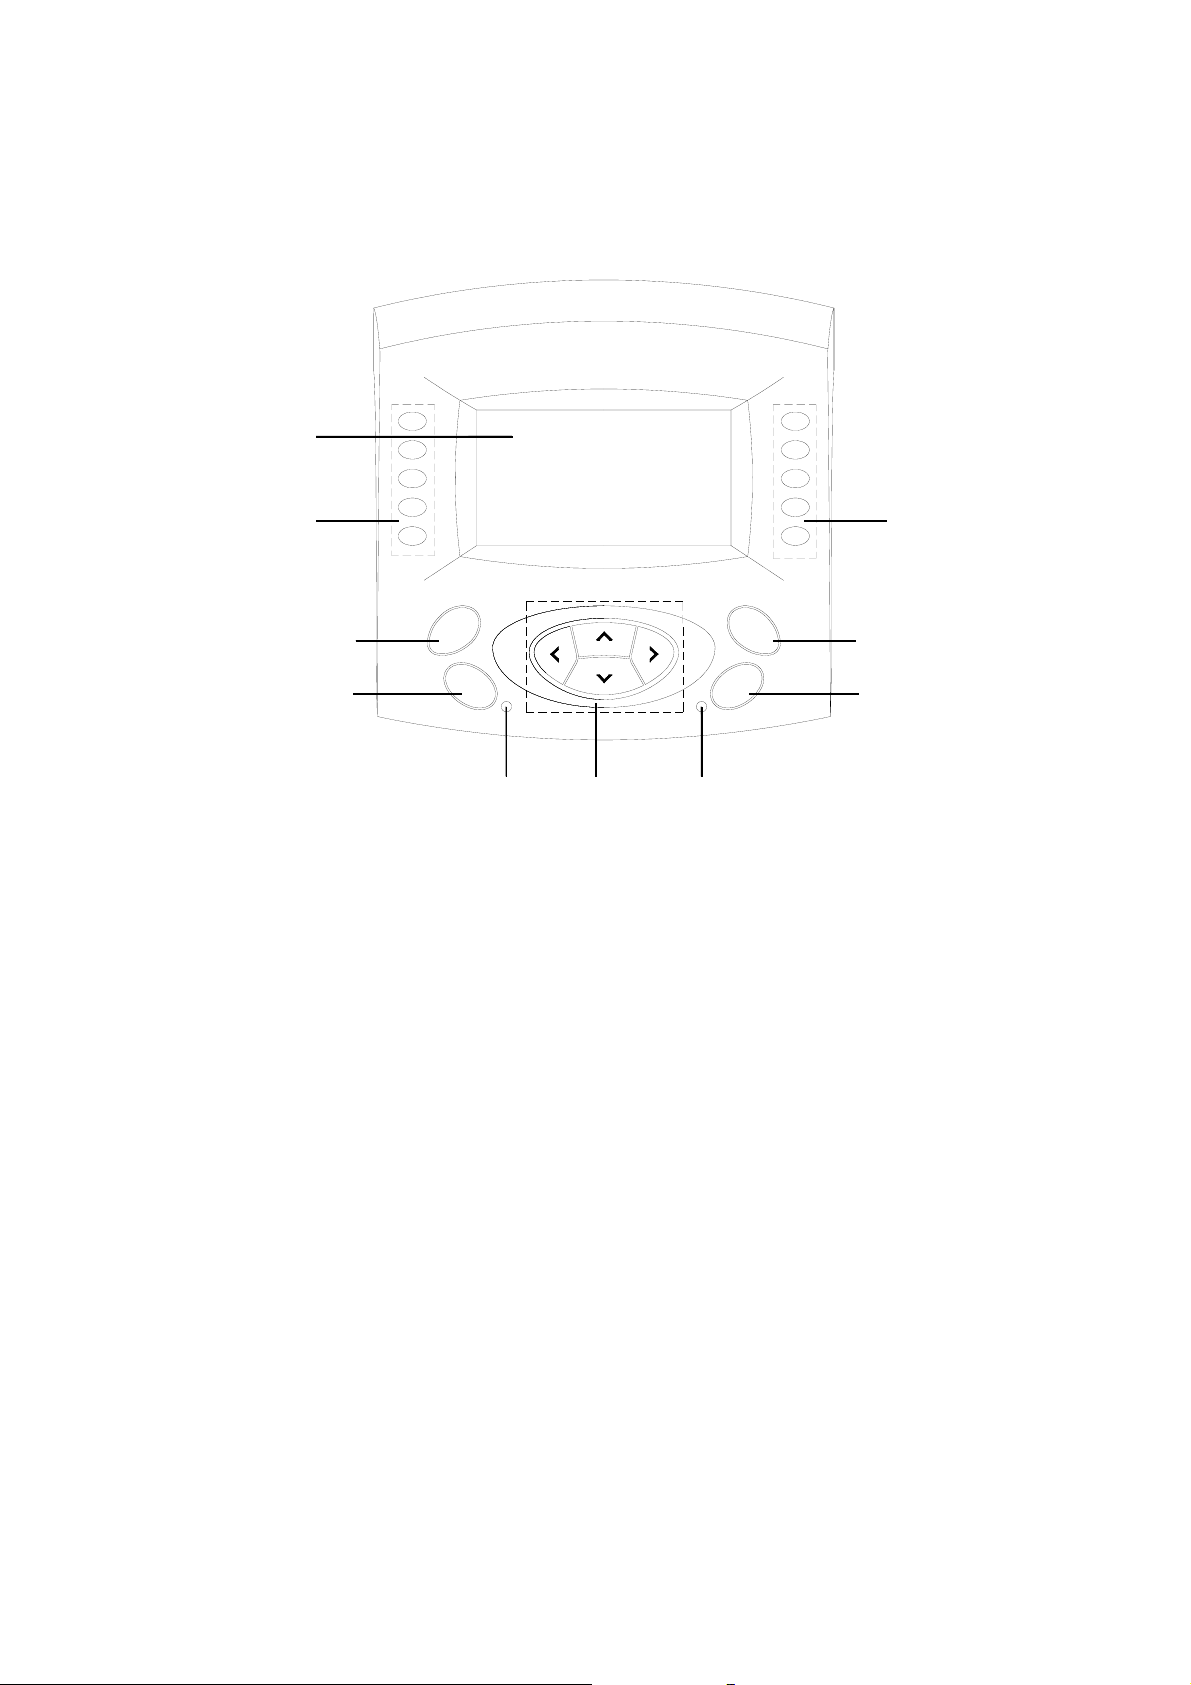
17 LCD Screen
Displays features such as the time, date, your phone number, caller ID, line/call
status and soft key tabs.
18 Soft-keys –L / 19 Soft-keys-R
Enable you to engage any of the functions displayed on the corresponding LCD
tabs. Soft keys point to feature options displayed along the bottom of your LCD
screen. Soft keys change depending on the status of your phone.
Hidden Key : Soft-key L1 Page up / Soft-key R1 Page down
4IPW2000
Page 9
Description
17
18
20
22
20 MENU button
Moves to the MENU
L1 R1
U
N
E
M
L
IN
E
1
23
CA
N
C
E
L
2
E
N
I
L
2526
19
21
24
21 CANCEL button
Cancels or escapes a selected item
22 LINE 1 buttons
23 LINE 1 indication LED
24 LINE 2
25 LINE 2 indication LED
26 Navigation buttons
g Moves Previous menu h Moves next menu
i Moves up j Moves down
5 IPW2000
Page 10
Display Information
The IPW2000 is a feature-rich capable IP phone that has a built-in display screen
for ease of use.
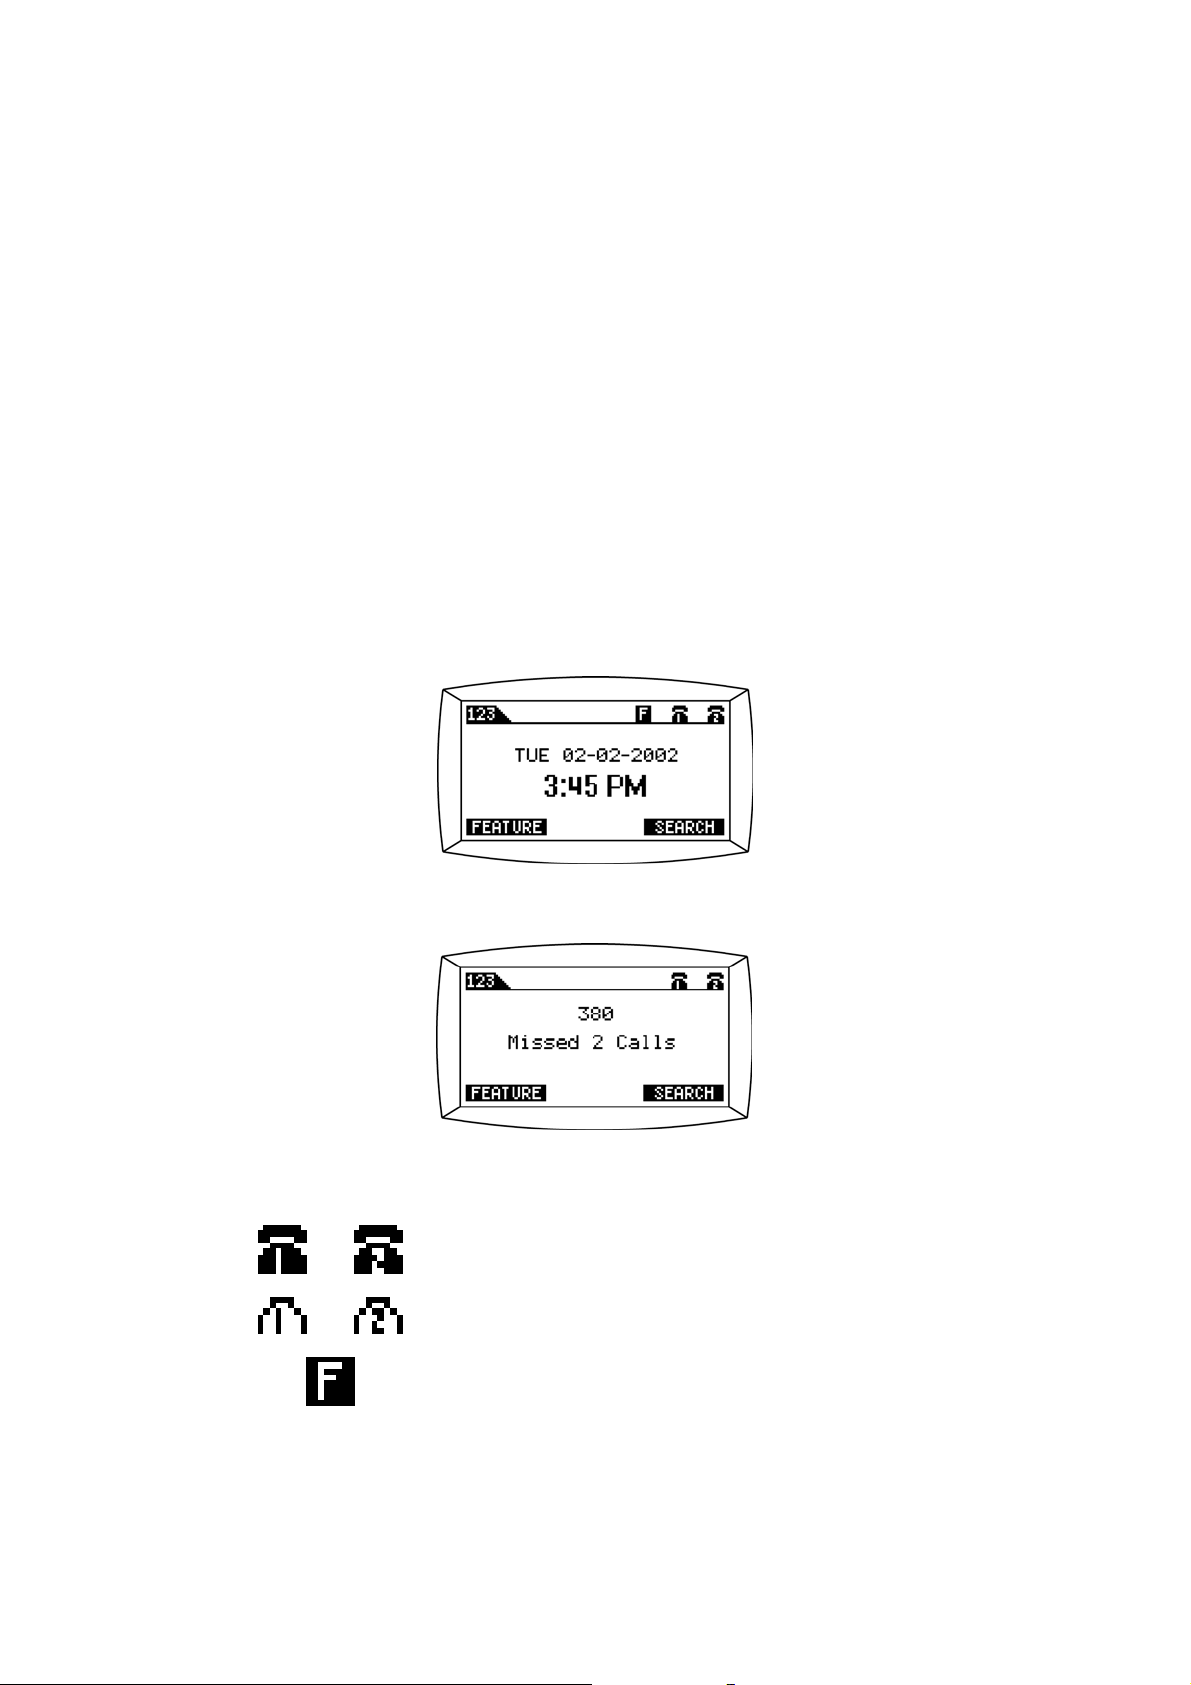
The display screen has three areas to show different types of information
(see Figure 1). The top of the display screen shows the available telephone lines
associated with your IP phone.
The middle portion of the display screen is the main information area and identifies
incoming callers by name and number and provides status messages. When the IP
phone is idle, this display area identifies the current date and time and reminds you
if your phone is forwarded from receiving incoming calls.
The lower portion of the display screen provides "on screen" information about the
available features programmed for each soft-key on your IP phone. These features
are easily accessed by pressing the corresponding keys. If you missed calls, your
phone display indicates calls that you missed (See Figure 2)
Figure 1
Icons Information
Figure 2
This icon indicates the IP phone Line 1 or Line 2 log on
This icon indicates the IP phone Line 1 or Line 2 log off
This icon indicates the IP phone Line is forwarding all
calls
6IPW2000
Page 11

Display Information
Soft-Keys Information
ADD
CALL
CLEAR
DELETE
EDIT
ENTER
ERASE
LOG-OFF
LOG-ON
NEXT
REMOVE
SAVE
SEARCH
Add to the phone book and the programmable keys
Call the name or the number displayed
Uncheck an item
Erase all characters in a line
Change property of item
Enter the data into the Phone
Erase one character in a line
Log-off from the system
Log-on to the system
Show next page
Remove item in a list
Save settings
Search phone book
SELECT
FEATURE
Select item in a list
Call features
[These features are changed by a administrator]
FWB ON
FWB OFF
FWNA ON
FWNA OFF
DND ON
DND OFF
PICKUP
CALLBACK
Initiate Forwarding calls on busy
Cancel Forwarding calls on busy
Initiate Forwarding calls on no answer
Cancel Forwarding calls on no answer
Initiate Do Not Disturb
Cancel Do Not Disturb
Call pick-up
Call back
7 IPW2000
Page 12

Menu Structure
Menu structure for each of the menus that can be selected from the idle menu.
MENU
Call History Outgoing Calls
Missed Calls
Received Calls
Programmable Keys
Phone Book
Phone Settings
[F1]
[F14]
Register
Search
Address Settings
Time
Menu Protect
G.K.
Alias1
PIN1
Alias2
PIN2
AUTO
FORMAT
Call History
Programmable Keys
Phone Book
Phone Settings
Information
Password
Version
Network
IP Config
DNS
MAC Address
8IPW2000
Page 13

Log On / Off
All the parameters for your IP phone must be set by the system administrator before
you can use the IPW2000. When this is done, and the IP phone is connected to the
local network(LAN), your IP phone initiates the start-up procedure automatically
when you connect it to the mains.
Log on
When your phone is properly installed and connected to a power source
the LOG-ON soft-key on screen is displayed. (See Figure 3)
Figure 3
LOG-ON
Press the LOG-ON soft-key. Verify that the Phone
displays your alias number.
If the displayed Alias number is not yours,
delete the displayed number by using the following
procedure
Figure 4
On the Address settings menu screen (See Figure 4),
Select Alias 1 (Press ‘i’, ‘j’ button )
Key in your Alias 1 (and optionally your pin1 code)
9 IPW2000
Page 14
Log On / Off
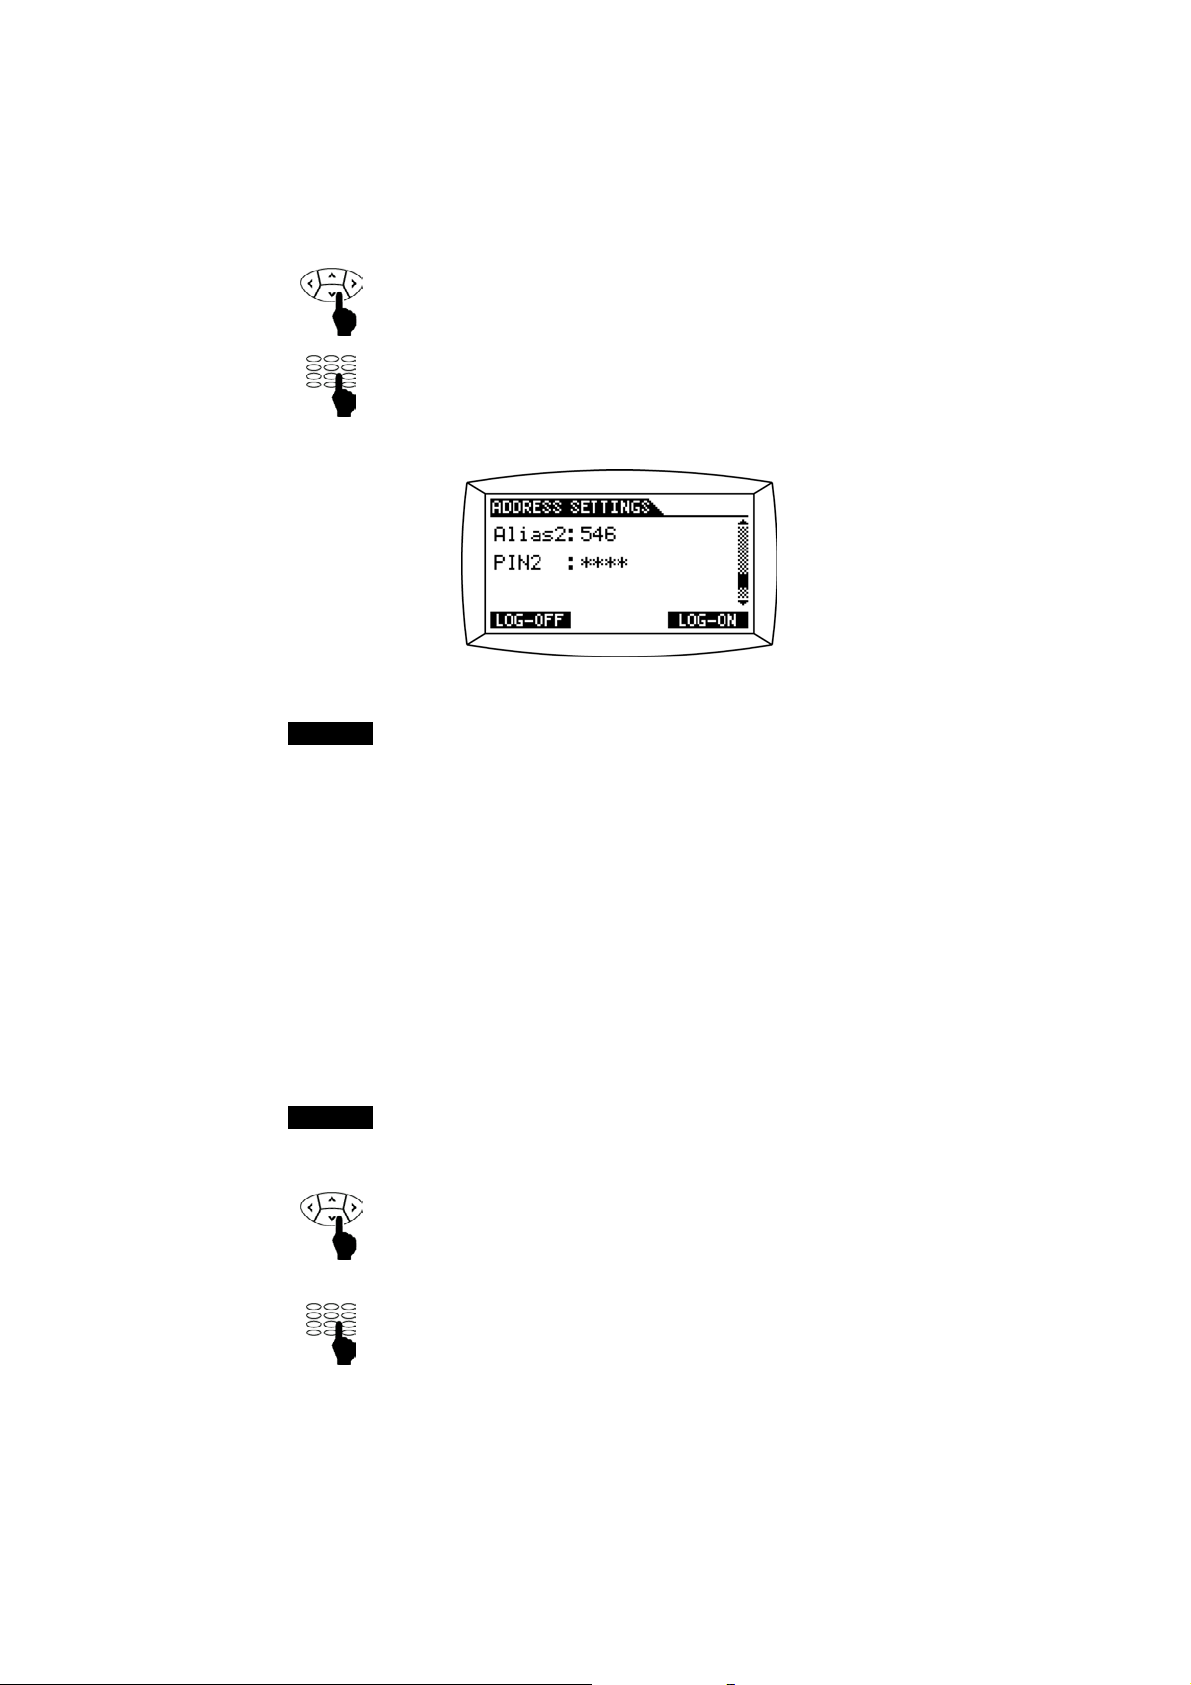
On the Address settings menu screen (See Figure 5),
Select Alias 2 (Press ‘i’, ‘j’ button )
Key in your Alias 2 (and optionally your pin2 code)
Figure 5
LOG-ON
LOG-ON
Press the LOG-ON soft-key
If you logged on successfully, the display will display
your extension number and SEARCH soft-key, and the
phone is ready for use (idle state - See Figure1).
If only the Alias 1 is registered , the display shows your
extension number, LOG-ON soft-key, and the IP phone
is ready for use (idle state).
If ” NOT REG. “ is displayed on the screen after you
make an attempt to log on, enter a PIN number using
the following procedure
Press the LOG-ON soft-key again
On the Address settings menu screen,
Select PIN 1 or PIN 2 (Press ‘i’, ‘j’button)
Note: the same PIN is used for both Line1 and Line2
Enter your PIN number
10IPW2000
Page 15

Log On / Off
LOG-ON
Press the LOG-ON soft-key
The display shows your extension number, and the
telephone is ready for use.
Note :The PIN number is initially given to the user by the system administrator. The
user can change the default PIN number by accessing VM and changing the
VM password. Once done this, the user have to make sure to change the PIN
setting in the phone accordingly.
If your display will show “WARNING ! “, contact your system administrator
for assistance.
Log off
Press the MENU button MENU
On the MENU screen,
ePhone Settingsf
Select Phone Settings (Press ‘h’ button)
If you set up the password,
Enter the password ( Default =
0 0 0 0 )
eAddress Settingsf
LOG-OFF
On the phone settings menu screen,
Select Address Settings (Press ‘h’ button)
On the Address settings menu screen(See Figure 4),
Press to log off
” NOT REG. “ in the title in the screen is shown
(See Figure 3)
11 IPW2000
Page 16

Outgoing calls
The IPW2000 gives you multiple options to make a call. You can make a call either
in the off-hook mode or in the on-hook mode by using your handset, headset, or
hands-free speakerphone.
Make a call from the dial pad
Lift the handset and dial
If using the speakerphone or the headset, press the
SPEAKERPHONE button or press the LINE button to
make a call. The phone will automatically default to LINE
1 when it is idle.
Internal
Dial the extension number
External
Dial the “dial out digit”. ( Default digit =
Dial the external number
9 )
12IPW2000
Page 17

Outgoing calls
Make a Call from the Phone Book
With this function you can make a call from the Phone Book.
MENU
ePhone Bookf
eSearchf
ENTER
Press the MENU button
On the menu screen,
Select Phone Book (Press ‘h’ button)
If you set up the password,
Enter the password ( Default =
0 0 0 0 )
On the phone book screen,
Select Search (Press ‘h’ button)
On the search screen ,
Enter the name or the number or the index
Press the ENTER soft-key
Figure 6
On the result screen (See Figure 6) ,
Press ‘i’, ‘j’ button to move up and down until you
find the name
CALL
Press the CALL soft-key to call the selected name
13 IPW2000
Page 18

Outgoing calls
Make a Call from the Call History
You can use the Call History on the menu to call back the person whose call you
missed, received, and placed
.
MENU
eCall Historyf
Outgoing Calls
eMissed Callsf
Received Calls
Press the MENU button
On the menu screen,
Select Call History (Press ‘h’ button)
If you set up the password,
Enter the password ( Default =
On the call history screen,
Select Outgoing Calls or Missed Calls or
Received Calls (Press ‘h’ button)
On the each list screen (See Figure 7) ,
Press ‘i’, ‘j’ button to move up and down until you find
the number
Figure 7
0 0 0 0 )
CALL
Press the CALL soft-key to call the selected number
14IPW2000
Page 19

Outgoing calls
Make a Call from the Programmable Key
F1/F8 ~ F7/F14
Press the Programmable key.
Note : Including the SHIFT key, there are 8 Programmable keys.
To access Programmable keys F8 through F14, first press the SHIFT key and
then press the desired Programmable key.
Make a Call from the REDIAL Key
REDIAL
Press the REDIAL button
On the outgoing calls of Call History screen,
move up and down until you find the number.
Press ‘i’, ‘j’ button to move up and down until you find
the number.
CALL
Press the CALL soft-key to call the selected number
Make a second call during an ongoing call
To make a second call while you are on a call,
LINE 1 or LINE 2
Press the idle LINE button
The primary call will automatically be put on hold when
you select the other line
Dial the number
The phone will indicate which line is active by lighting
the LED of the selected line.
15 IPW2000
Page 20

Incoming calls
When there is an incoming call (See Figure 8), the phone will display Caller ID and
the message waiting lamp will flash. In addition, the LED of the LINE 1 or LINE 2
receiving the call will be turned on. In some instances, only the number will be
displayed.
Answer a Call
You can answer a call using the handset, headset, or speakerphone.
Lift the handset
If using the speakerphone or the headset, press the
SPEAKERPHONE button or press the LINE button of
incoming a call. This phone will automatically default to
LINE 1 when it is idle.
Figure 8
Answer a second call during an ongoing call
If you are on another incoming call while you are on a call , the new Caller ID will
display after the first ring, and the message waiting lamp and the LED of the other
LINE will flash
If you choose to answer a second call,
LINE 1 or LINE 2
Press the other LINE button
The primary call will automatically be put on hold.
16IPW2000
Page 21

Incoming Calls
Answer another extension call ( Call Pick-up )
This feature allows you to retrieve incoming calls from any extension. This capability
enables you to provide a back-up support to colleagues or answer your telephone
from a colleague’s phone.
Lift the handset
If using the speakerphone or the headset, press the
SPEAKERPHONE button
Dial the number
; 1
17 IPW2000
Page 22

Disconnecting Calls
End a Call
Replace the handset to end a call
If using the speakerphone or the headset, press the
SPEAKERPHONE button again
End a second call during an ongoing call
To return to the primary call,
Press the hook switch or replace the handset
If you disconnect the second call by pressing the hook
switch, you will automatically be re-connected to the
primary call.
If you disconnected the second call by replacing the
handset, you will be re-connected to the primary call
when you lift the handset.
The phone will indicate which line is active by lighting
the LED of the selected line.
If the second caller disconnects the call before you do,
you will be re-connected to the primary call by pressing
the hook switch.
If you are on speakerphone and disconnect a second
call , push the speakerphone button.
To reconnect to the primary , push the speakerphone
button again or pick up the handset.
18IPW2000
Page 23

Disconnecting Calls
Call Back
Call-back can be enabled when you call an internal extension and receive a busy
tone. Your phone will ring as soon as the other extension becomes available.
To activate
If a called extension is busy
Dial the number ;
Replace the handset to finish procedure
You are called back (recall ringing signal) when the
ongoing call is finished or the next time a new call is
finished.
Lift the handset when you are called back
You have to answer within ten seconds, otherwise the
Call-back service is cancelled.
5
To cancel
Dial the number ; # 3 7 #
Note: Call-backs can be activated on several extensions at the same time.
19 IPW2000
Page 24

During Calls
While on a call , you can mute the handset, headset, or speakerphone during a call
and place the call on hold. When you place one caller on hold and call another party,
you can toggle between the calls (refer back), transfer the call, create a conference
call and end one of the calls.
Mute a Call
While on a call , you can mute the handset, headset, or speakerphone during a call.
The mute feature temporarily disables your phone’s microphone. Mute prevents the
party or parties on the other end of the line from hearing you, but does not interfere
with your ability to hear them.
MUTE
MUTE
Note: Pressing the mute key will mute both LINE 1 and LINE 2 when both are
active.
Hold a Call
While on a call, you can place the call on hold, so that the caller cannot hear you
and you cannot hear the caller. You can answer other calls while a call is on hold.
The caller will hear music (customer-provided equipment) while on hold, if available.
FLASH
FLASH
Press the MUTE button to mute a call
Press the MUTE button again to disengage mute
Press the FLASH button.
The connected party is automatically placed on hold.
Press the FLASH button again to retrieve the call on
hold
Note: If you place a caller on hold and hang up, your phone will ring. When you
answer you will automatically be connected back to the party that was on hold.
20IPW2000
Page 25

During Calls
Inquiry
While on a call, you can place the call on hold and call another party. You may
toggle between both parties as desired. Inquiry provides you with greater handling
flexibility. You want to make an inquiry to an internal or external party:
FLASH
FLASH
FLASH FLASH
Press the FLASH button and wait for dial tone
The connected party is automatically placed on hold.
Dial the extension number to call the third party
If the number is external, remember to dial the “dial out
digit” before the number ( default =
Press once the FLASH button to return to first party
Press twice the FLASH button to toggle between the
two parties
Replace the handset to end the ongoing call
9 ).
21 IPW2000
Page 26

Transfer a call
While on a call, you can transfer the call.
During Calls
FLASH
Note :.If you have put more than one call on hold, the last call that was put on hold
will be transferred. If the dialed extension is busy or transfer is not allowed,
your phone will ring again.
Press the FLASH button and wait for dial tone
The connected party is automatically placed on hold.
Dial the number to call the third party
If the number is external, remember to dial the “dial out
digit” before the number ( default =
Before wait for the first ring or after answer,
Replace the handset to transfer the call.
The ongoing call is transferred
9 ).
22IPW2000
Page 27

During Calls
Conference a call
The IPW2000 supports conference calls, enabling you to talk with multiple parties at
the same time. With this procedure you can include up to seven parties in a
conference. Only the conference originator can admit participants.
FLASH
FLASH
Note : If the originator leaves the conference call(hangs up), the other members
remain connected to continue the conference.
Press the FLASH key and wait for dial tone
The connected party is automatically placed on hold.
Dial the number to call the third party
If the number is external, remember to dial the “dial out
digit” before the number ( default =
Wait for answer.
Press the flash key again
Dial the number ;
Repeat the procedure to add more conference members.
(max. 8 members)
Replace the handset to exit the conference
8
9 ).
23 IPW2000
Page 28

Forwarding Calls
If you will be out of the office, you can have calls forwarded to another extension or
external number (e.g. cellular / mobile telephone, home telephone etc). In addition
to the unconditional forwarding, you may also forward call on busy and no answer.
This feature allows you to be accessible wherever you work
Forwarding all Calls
To turn on
Lift the handset
To turn off
Dial the number :
Dial the number of the answering position
To forward on all your calls to your mobile phone or
home , dial the “dial out digit” before the external
number ( default =
To forward on all your calls to your voice mail (DND),
dial the voice mail access number (default =
Press the symbol :
Replace the handset
Your incoming calls are forwarded to the call forwarding
phone number that you selected.
Lift the handset
9 ).
7 1
7 7 7).
#
Dial the number :
Replace the handset
7 0
24IPW2000
Page 29

Forwarding Calls
Forwarding Calls on busy
To turn on
Lift the handset
To turn off
Dial the number :
Dial the number of the answering position
To forward on all your calls to your mobile phone or
home , dial the “dial out digit” before the external
number ( default =
To forward on all your calls to your voice mail, dial the
voice mail access number ( default =
Press the symbol :
Replace the handset
If your phone is busy, incoming calls are forwarded to
the call forwarding number that you selected.
Lift the handset
9 ).
7 2
7 7 7 ).
#
Dial the number :
Replace the handset
25 IPW2000
# 7 2
Page 30

Forwarding Calls on no answer
To turn on
Lift the handset
Forwarding Calls
To turn off
Dial the number :
Dial the number of the answering position
To forward on all your calls to your mobile phone or
home , dial the “dial out digit” before the external
number ( default =
To forward on all your calls to your voice mail, dial the
voice mail access number ( default =
Press the symbol :
Replace the handset
After a certain number of rings, incoming calls are
forwarded to the call forwarding number that you
selected. The number of rings is set by your system
administrator
Lift the handset
9 ).
7 3
7 7 7 ).
#
Dial the number :
Replace the handset
# 7 3
26IPW2000
Page 31

Integrated Voice Mail
This function allows an incoming caller to leave a private voice message of up to five
minutes in length in your voice mailbox. Up to 100 messages may be stored in your
mailbox. You may access your password-protected voice mailbox locally or remotely.
If your voice mailbox contains a message, the message lamp will flash.
Note:. You may record two greetings and toggle between the greetings as desired.
Access your voice mailbox from your extension
Lift the handset
Dial the number :
Enter your password ( default = 5 5 5 )
And press the symbol :
Further procedure, see section “Voice mail flow chart”
Note : Pressing the message lamp indicator button will always connect you to voice mail.
0
#
27 IPW2000
Page 32

Access your voice mailbox from another extension
Lift the handset
Integrated Voice Mail
Dial the voice mail access number ( default =
Dial your extension number
And press the symbol :
Dial the number during message : 1
Enter your password ( default = 5 5 5 )
And press the symbol : #
Further procedure, see section “Voice mail flow chart”
Access your voice mailbox from an external number
Lift the handset and call your office
When the Auto Attendant answers:
Dial the voice mail access number ( default =
#
7 7 7 )
7 7 7 )
Dial your extension number
And press the symbol :
Dial the number during message : 1
Enter your password ( default = 5 5 5 )
And press the symbol : #
Further procedure, see section “Voice mail flow chart”
#
28IPW2000
Page 33

Integrated Voice Mail
Voice mail flow chart
Use the following diagram to navigate through your voice mail system
29 IPW2000
Page 34

Paging
If your business is equipped with a paging amplifier and speaker system
connected to the system, you can broadcast a message over the speakers.
Initiate external paging
Lift the handset
Wait for dial tone
Dial the paging extension number
(Default =
and start speaking
Replace the handset to finish the broadcast
7 0 0 or 7 0 1)
30IPW2000
Page 35

Call History
The IPW2000 maintains histories of calls that you miss, receive, and place.
You can use the Call History on the menu to view your call history and to call back
the person whose call you missed, received, and placed.
View Outgoing, Missed and Received Calls
The IPW2000 keeps a history of all calls you make, miss and receive, including the
caller ID, time, and date of the call. You can use this information to redial a party.
MENU
eCall Historyf
eOutgoing Callsf
Missed Calls
Received Calls
Press the MENU button
Figure 9
On the menu screen (See Figure 9),
Select Call History (Press ‘h’ button)
If you set up the password,
Enter the password ( Default =
On the call history screen,
Select Outgoing Calls or Missed Calls or
Received Calls (Press ‘h’ button)
0 0 0 0 )
On the each list screen,
Press ‘i’, ‘j’ button to move up and down until you find
the number
SELECT
Note: The IPW2000 automatically stores the names and numbers of the last 20
outgoing, the last 20 missed, and the last 10 received calls in the Call History.
31 IPW2000
On the each list screen
Press the SELECT soft-key to view call information
Page 36

Programmable Functions
Any frequently used function, such as call forwarding or frequently dialed
internal/external telephone numbers may be stored on any available Programmable
Key for single key access to that function or number. There are two ways you can
store function or number to your Programmable Keys. Program a function or store
the telephone number by using the keypad and Add telephone number from the Call
History to the Programmable Keys. The IPW2000 allows you to customize 14
programmable keys LINE 1 and LINE 2 share the programmable keys so that you
may use the programmable keys with either line.
Program a function
MENU
eProgrammable Keysf
Press the MENU button
On the menu screen,
Select Programmable Keys (Press ‘h’ button)
The stored name and number is shown on the display.
Figure 10
On the programmable keys screen (See Figure 10),
Press ‘i’, ‘j’ button to move up and down until you
select the programmable key that you want to program.
SELECT
SAVE
Press the SELECT soft-key to program
The the programmable keys edit menu is displayed.
Enter the name the the number using the dial pad
Dial the “dial out digit” before the external number
( default =
Press the SAVE soft-key to store the name and number
9 ).
32IPW2000
Page 37

Programmable Functions
Enter the name
When entering the name by using the dial pad, the most common letters are
written each dial pad on the IP phone. To get the letter A press dial pad 2 once, for
B press dial pad 2 twice, to get C press dial pad 2 three times, etc.
All of the letters you enter in an alpha entry field are lowercase by default. To enter
uppercase letters, press MENU button. To enter a symbol mark in an alpha enter
field you press the MENU button multiple times. If you make a mistake while
entering the name or telephone number, use the navigation keys to move forward or
backward and the ERASE soft-key to delete character to edit the existing entry.
MENU
Example : To enter the name Scott
Press to switch of upper case, lower case, symbol, and
number
If enter uppercase letters, press MENU button
multiple times until the ENG displayed on the screen
Press for S :
If enter lowercase letters, press MENU button
multiple times until the eng displayed on the screen
Press for c :
Press for o :
Press for t : 8
Press for t : 8
7 7 7 7
2 2 2
6 6 6
Dial Pad
#*0987654321
F
1
O
2
N
T
3
4
33 IPW2000
SPACE
WTPMJGDA.
#*
XUQNKHEB
YVROLIFC
ZS
Page 38

Add a number from the Call History
Programmable Functions
You can add numbers saved in the Call History to your Programmable Keys
MENU
eCall Historyf
eOutgoing Callsf
Missed Calls
Received Calls
SELECT
Press the MENU button
On the menu screen,
Select Call History (Press ‘h’ button)
If you set up the password,
Enter the password ( Default =
On the call history screen,
Select Outgoing Calls or Missed Calls or
Received Calls (Press ‘h’ button)
On the each list screen,
Press ‘i’, ‘j’ button to move up and down until you find
the number
On the each list screen
Press the SELECT soft-key to view call information
0 0 0 0 )
.
ADD
yAdd Programmable Key
SELECT
Press the ADD soft-key to add the selected number
On the add screen,
Select Add Programmable Key (Press ‘i’, ‘j’ button)
Press the SELECT soft-key
The programmable keys menu screen is displayed
And follow the same procedure “Program a function”
34IPW2000
Page 39

Phone Book
The IPW2000 contains an internal phone book.
There are two ways you can add names and numbers to your phone book.
Add an entry
MENU
ePhone Bookf
eRegisterf
SAVE
Press the MENU button
On the menu screen (See Figure 10),
Select phone Book (Press ‘h’ button)
If you set up the password,
Enter the password ( Default =
On the phone book menu screen,
Select Register (Press ‘h’ button)
On the register screen,
Enter the name, the number and the index
Follow the same procedure “Enter the name”
Press the SAVE soft-key
0 0 0 0 )
35 IPW2000
Page 40

Phone Book
Edit an entry
This function allows you to make changes to a name or a numberin an entry.
MENU
ePhone Bookf
eSearchf
ENTER
Press the MENU button
On the MENU screen,
Select Phone Book (Press ‘h’ button)
If you set up the password,
Enter the password ( Default =
On the phone book menu screen,
Select Search (Press ‘h’ button)
On the search menu screen (See Figure 11),
Enter the name or the number or the index
Follow the same procedure “Enter the name”
Press the ENTER soft-key
If you view all entry, press the ENTER soft-key without
entering the name or the number or the index
0 0 0 0 )
Figure 11
On the result menu screen (See Figure 12),
Press ‘i’, ‘j’ button to move up and down until you
find the name
36IPW2000
Page 41

Phone Book
SELECT
EDIT
Press the SELECT soft-key to view contents of the
selected name
Figure 12
On the index menu screen (See Figure 13),
Press the EDIT soft-key to edit contents
If you delete the selected item,
Press the REMOVE soft-key
Figure 13
On the edit menu screen,
Enter the name or the number or the index
SAVE
Press the SAVE soft-key
37 IPW2000
Page 42

Phone Book
Add a number from the Call History
You can add numbers saved in the Call History to your internal phone book.
MENU
eCall Historyf
eOutgoing Callsf
Missed Calls
Received Calls
SELECT
ADD
Press the MENU button
On the menu screen,
Select Call History (Press ‘h’ button)
On the call history screen,
Select Outgoing Calls or Missed Calls or
Received Calls (Press ‘h’ button)
On the each list screen,
Press ‘i’, ‘j’ button to move up and down until you find
the number
On the each list screen,
Press the SELECT soft-key to view call information
On the each list screen (See Figure 14),
Press the ADD soft-key to add the selected number
yAdd Phone Book
SELECT
Figure 14
On the add screen,
Select Add Phone book (Press ‘i’, ‘j’ button)
Press the SELECT soft-key
The programmable keys menu screen is displayed
And follow the same procedure “Program a function”
38IPW2000
Page 43

Phone Settings
Set the GK Address
Press the MENU button MENU
ePhone Settingsf
eAddress Settingsf On the phone settings menu screen (See Figure 15),
On the MENU screen,
Select Phone Settings (Press ‘h’ button)
If you set up the password,
Enter the password ( Default =
If you set up the password, Enter the password
Select Address Settings (Press ‘h’ button)
Figure 15
0 0 0 0 )
G.K. : 0.0.0.0
39 IPW2000
On the address settings menu screen(See Figure 16),
Select G.K.
Enter the gate keeper address
Figure 16
Page 44

Phone Settings
Set the Time
The time and date are automatically updated from the network.
Press the MENU button MENU
On the MENU screen,
ePhone Settingsf
Select Phone Settings (Press ‘h’ button)
If you set up the password, Enter the password
eTimef
e [AUTO] f
SELECT
On the phone settings menu screen,
Select Time (Press ‘h’ button)
On the set date/time menu screen (See Figure 17),
Select AUTO ( Press the navigation button (g, h ) to
choose time setting )
Figure 17
Press the SELECT soft-key to set up IP & offset
SAVE
Enter the time server’s IP address
Always consult your administrator before changing the
time server’s IP address.
Press ‘g’, ’h’ button to move until you find the time
offset.
Press the SAVE soft-key to store
40IPW2000
Page 45

Phone Settings
Chang the Display Formats
You can change the way the time (format) and the date (format) is presented in the
display. The time can be shown in 24 or 12 hour clock mode. The date can be
shown in eight ways
Press the MENU button MENU
ePhone Settingsf
eTimef
e[FORMAT]f
On the MENU screen,
Select Phone Settings (Press ‘h’ button)
If you set up the password,
Enter the password ( Default =
On the phone settings menu screen,
Select Time (Press ‘h’ button)
On the set date/timemenu screen (See Figure 18),
Select FORMAT ( Press the navigation button (g, h )
to choose time setting )
Figure 18
0 0 0 0 )
SELECT
41 IPW2000
Press the SELECT soft-key to set up time & date
Press ‘g’, ’h’ button to select your preferred time format
• 12 hours / 24 hours
Page 46

Phone Settings
Press ‘g’, ’h’ button to select your preferred date format
SAVE
• DD-MM-YYYY
• DD-MM-YYYY
• DD-MM-YYYY
• DD-MM-YYYY
• DD-MM-YYYY
• YYMMDD
• YYYY-MM-DD
• MM/DD/YYYY
22-02-2001
Th 22-02-2001
22 02 2001
22 Feb 2001
Th 22 Feb 2001
010222
2001-02-22
02/22/2001
Press the SAVE soft-key to store
IPW2000
42
Page 47

Phone Settings
Set the Menu Protect
To prevent anyone else from viewing to your information, you must set a menu
protect. The MENU is protected by the user password
Press the MENU button MENU
ePhone Settingsf
eMenu Protectf
e5f
5
On the MENU screen,
Select Phone Settings (Press ‘h’ button)
If you set up the password,
Enter the password ( Default =
On the phone settings menu screen,
Select Menu Protect (Press ‘h’ button)
Figure 19
On the protect menu screen(See Figure 19),
Select what you want to protect out of Menu, Call
History/Programmable keys/Phone Book/ Phone
Settings pressing the ‘h’ button to check a item
0 0 0 0 )
SAVE
43 IPW2000
Press the SAVE soft-key to store
Page 48

Phone Settings
Change user Password
Your password will protect all your user-specific settings.You can change your
password from your IP phone. You cannot modify your password without first
entering your current password. If you forget your current password, the
administrator must reset it to your extension.
Press the MENU button MENU
ePhone Settingsf
ePasswordf
ENTER
On the MENU screen,
Select Phone Settings (Press ‘h’ button)
On the phone settings menu screen,
Select Password (Press ‘h’ button)
Figure 20
Enter your old password using the dial pad,
then Press the ENTER soft-key. ( Default =
0 0 0 0 )
Enter your new password (Maximum 6-digit )
ENTER
using the dial pad, then
Press the ENTER soft-key.
ENTER
Retype your password using the dial pad,
then Press the ENTER soft-key.
Note : Use only numeric characters so that you can enter the password from the
dial pad on the IP phone
44IPW2000
Page 49

Phone Settings
Adjust the ringer volume
Use the volume keys to adjust the ringing signal volume when the telephone is idle
or ringing. Adjusted volume is stored.
VOLUME
Adjust the handset, headset, and speakerphone volume
Use the volume keys to change the volume of the handset or headset or
speakerphone during a call.
VOLUME
Press the up(+) or down(-) VOLUME button to adjust the
volume to the desired level.
Lift the handset
If using the speakerphone or the headset,
press the speakerphone button
Press the up(+) or down(-) VOLUME button to adjust the
volume to the desired level.
45 IPW2000
Page 50

Information
View the Information
The Information menu provides you with specific information about the IPW2000,
including the network information, and phone version.
View the Version
The phone version information contains the bootrom version, software version, and
hardware version.
MENU
eInformationf
eVersionf
View the Network
The network information contains the IP configuration, DNS, and MAC address
MENU
eInformationf
Press the MENU button
On the menu screen,
Select Information (Press ‘h’ button)
On the Information screen,
Select Version (Press ‘h’ button)
Your Phone’s bootrom, software, hardware version is
displayed
Press the MENU button
On the menu screen,
Select Information (Press ‘h’ button)
eNetworkf
eIP Configf
On the Information screen,
Select Network (Press ‘h’ button)
On the network screen,
Select IP Config (Press ‘h’ button)
Your Phone’s IP address, Net Mask, Gateway
is displayed
Follow the same procedure to view information about
your phone’s DNS and MAC Address.
46IPW2000
Page 51

Information
Audible Signals
The Distinctive Ringing feature enables you to differentiate between internal and
external call ring tones. The following are representations of the internal and
external call ring cadences:
Internal ringing signal
External ringing signal
Visible signals
The LEDs on your telephone use a variety of signals to indicate the traffic state of
an ongoing call or a function.
Message LED and Line
indication LED
Slowly flashing
Message LED
Steady lighting Line
indication LED
Slowly flashing Line
indication LED
Steady lighting
Speakerphone
indication LED
Steady lighting Mute
indication LED
Incoming callsRapidly flashing
Receiving voice mails
Line in use
Line is on hold
Speakerphone or headset in use
Mute in use
47 IPW2000
Page 52

Asia Pacific
Ericsson Enterprise
Jalan SS7/19, Kelana Jaya
47301 Petaling Jaya
Selangor
MALAYSIA
Phone: +60 3 7808 7000
enterprise.asiapacific@ebc.ericsson.se
Nordic
Ericsson Enterprise
LM Ericssons vag 8
126 25 Stockholm
SWEDEN
Phone: +46 8 579 18 000
enterprise.nordic@ebc.ericsson.se
Produced in November 2002
EN/LZT 108 6348
Ericsson Enterprise AB 2002
Americas
Ericsson Enterprise
6300 Legacy Drive
Plano, TX-75024-3607
USA
Phone: +1 972-583-5000
enterprise.latinamerica@ebc.ericsson.se
Western Europe
Ericsson Enterprise
Avenue du Bourget 44
Bourgetlaan
1130 Brussels
BELGIUM
Phone: +32 2 745 12 11
enterprise.westerneurope@ebc.ericsson.se
Central and Eastern Europe
Middle East, Africa
Ericsson Enterprise
Pottendorferstr. 25-27
A-1121 Vienna
AUSTRIA
Phone: +43 1 81 10 00
enterprise.centraleurope@ebc.ericsson.se
 Loading...