

Page 1

M320
Téléphone analogique
avec écoute amplifiée
Analog telephone
with group listening
© AASTRA MATRA Telecom
Guide utilisateur i780
Guide d’utilisation
User Guide
Page 2

> 2 <
Présentation du M320 3
Touches de fonctions 3
Bloc haut-parleur 3
Installer le téléphone 4
Raccorder le téléphone 4
Téléphoner 5
Numéroter avec le clavier 5
Numéroter sans décrocher 5
Répétition du dernier numéro composé 5
Appeler à partir des touches mémoire 6
Ecoute amplifiée 6
Fonction Secret 6
Réglages 7
Régler la sonnerie 7
Programmer les touches mémoire 7
Réinitialiser les mémoires 7
Utilisation derrière un PABX 8
Insérer une pause manuelle 8
Programmer la durée du flashing (R) 8
Rétablir la configuration standard 8
Informations générales 9
En cas de problèmes 9
Données techniques 9
Entretien 9
Garantie 10
Marquage CE 10
Certificat de conformité 10
Manuel abrégé 11
Etiquettes mémoire 11
Aide-mémoire système EADS 13
Presentation of the M320 3
Keys of functions 3
Loudspeaker unit 3
Installing the telephone 4
Connecting the telephone 4
Making a call 5
Dialling via the keyboard 5
Dialling without picking up the handset 5
Dialling the last number called 5
Using the memory keys to dial a call 6
Group listening 6
Privacy function 6
Settings 7
Adjusting the ringing tone 7
Programming the memory keys 7
Resetting the memory locations 7
Use with a PABX 8
Inserting a manual pause 8
Programming the flashing frequency (R) 8
Resetting the standard configuration 8
General information 9
Troubleshooting 9
Technical dıata 9
Cleaning 9
Guarantee 10
EC markings 10
Certificate of conformity 10
Summary of the manual 11
Reminder labels 11
Quick reference guide 13
EnglishFrançais
>>
Sommaire
>>
>>
Contents
>>
Page 3
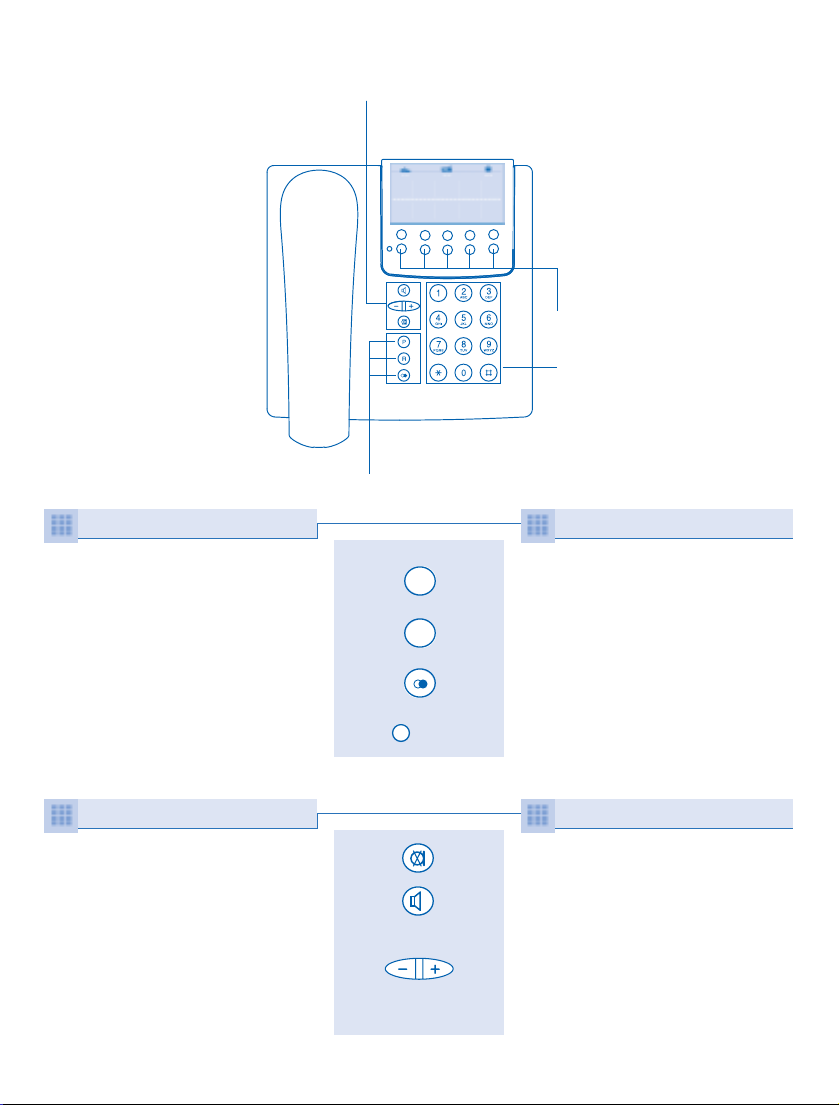
Le téléphone
EADS TELECOM M320
peut être connecté
sur le réseau analogique
public ou derrière
un autocommutateur (Pbx)
avec numérotation
multifréquences (DTMF).
•Touche de programmation :
débuter et terminer
une programmation.
•Touche R :
fonction flash.
•Touche répétition : recompose
le dernier numéro appelé
ou insère une pause.
•Touche de mémoire : compose
le numéro en mémoire.
•Touche secret : activer
et désactiver le micro.
•Touche haut-parleur pour activer
et désactiver le haut-parleur.
•Touche plus/moins pour régler
le niveau sonore du haut-parleur
(5 niveaux)
ou du combiné lorsque
le haut-parleur n’est pas activé
(2 niveaux).
The EADS TELECOM M320
telephone can be connected
to the public analog
network or to
a private branch
exchange (Pbx) with
multi-frequency
dialling (DTMF).
• Programming key:
starting and finishing
a programming sequence.
•R Key:
Flashing function.
• Repeat key: redials
the last number called
or inserts a pause.
• Memory key: dials
the number stored in the memory.
• Privacy key: switches
the microphone on and off.
• Loudspeaker key to switch
the loudspeaker on and off.
• Plus/minus key to adjust the
loudspeaker volume
(5 levels) or that of the handset
when the loudspeaker is switched
off (2 levels).
> 3 <
Touches de fonctions
>
Functions keys
>
Bloc haut-parleur
>
Loudspeaker unit
>
>>
Présentation
du M320
>>
>>
Presentation
of the M320
>>
Bloc haut-parleur/PLSD
Loudspeaker/
On Hook Dialling unit
Touches de mémoire
Memory key
Clavier numérique
Digital keyboard
Touches de fonction/Function key
P
R
x10
Page 4

L'emballage contient : téléphone,
combiné, cordon de combiné, cordon
de ligne, pièce pour montage mural
et notice d'utilisation.
Placez le téléphone dans un endroit
sec et sur un support stable.
Protégez-le du rayonnement direct
du soleil, des sources de chaleur,
de l'humidité, de la poussière,
des liquides agressifs, de la vapeur
et de l'influence d'autres appareils
électriques.
Placez les cordons de raccordement
de manière à éviter les accidents
et branchez-les uniquement
aux prises prévues à cet effet.
Ne jamais ouvrir soi-même
le téléphone ou toucher les contacts
avec des objets pointus ou métalliques.
Ne déplacez pas votre téléphone
ou son combiné par
les cordons de raccordement !
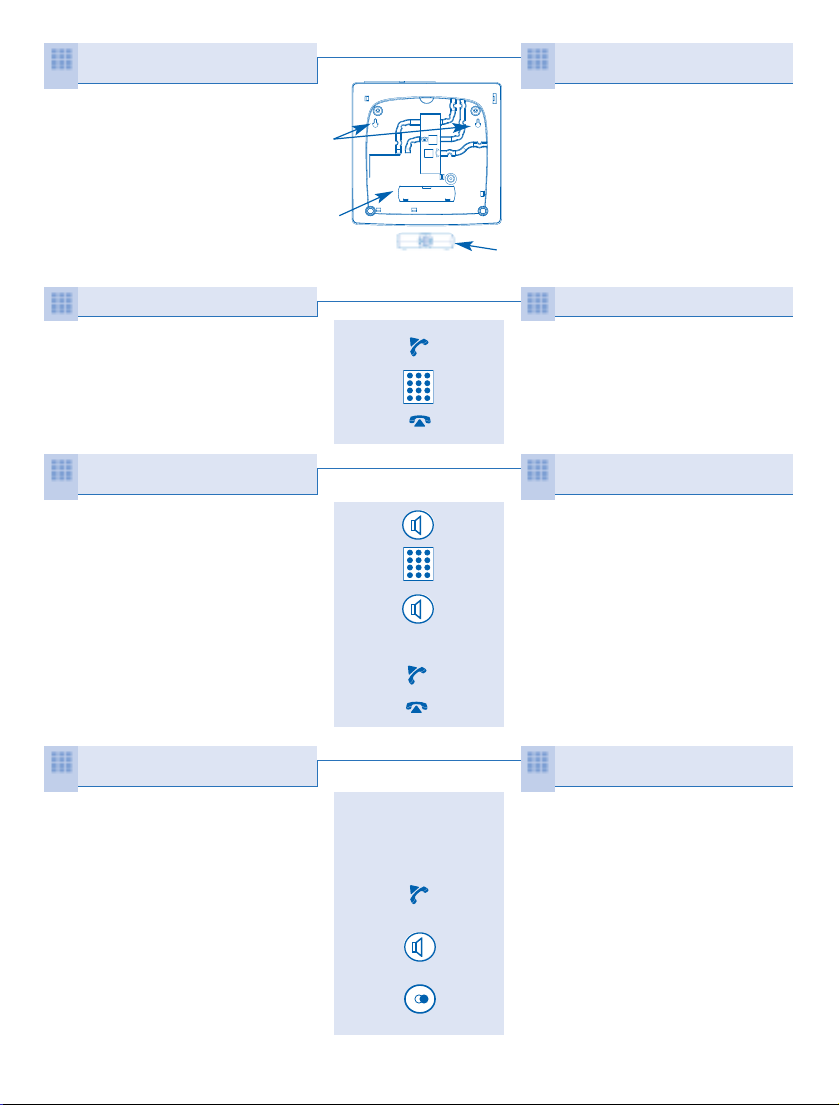
Introduisez la partie la plus longue
(non-spiralée) du cordon à spirales
dans la prise sous le téléphone portant
le symbole du combiné.
Placez le cordon dans le canal
de câble puis branchez l'autre fiche
dans le combiné.
Introduisez la plus petite des deux
fiches du cordon de ligne dans
la prise située sous le téléphone
portant le symbole téléphone et placez
le cordon dans le canal de câble.
Branchez l'autre extrémité dans
la prise téléphonique murale.
Pour retirer les cordons, appuyez
sur la languette de la fiche
(par ex. à l'aide d'un stylo bille)
en la poussant en direction de la fiche
et retirez en même temps la fiche avec
son cordon.
The package contains: the telephone,
the handset, the handset cord,
the line, a wall-mounting bracket
and the user manual.
Put the telephone in a dry place and
on a stable support. Protect it from
direct sunlight and from sources of
heat, damp, dust, aggressive liquids,
steam and the influence of other
items of electrical equipment.
Place the connecting lines in such a
way as to avoid accidents and only
connect them to the sockets provided
for the purpose.
Never take the telephone apart
yourself, or touch the contacts with
sharp or metal objects. Never pull on
the connecting cords to move your
telephone or its handset!
Put the longer section (without
spirals) of the spiral cord into the
socket underneath the telephone with
a handset symbol. Put the cord into
the cable groove and then connect
the other plug to the handset.
Put the smaller of the two plugs
on the connecting line into the socket
underneath the telephone with a
telephone symbol and place
the line in the cable groove.
Connect the other end to
the telephone socket on the wall.
To remove the cords,
press on the tongue of the plug
(e.g. with the point of a pen)
to push it towards the plug,
and pull on the plug
and its cord at the same time.
> 4 <
Installer le téléphone
>
Installing the telephone
>
Raccorder le téléphone
>
Connecting the telephone
>
Page 5
• Clipez la cale (1) dans le logement
(2) équipé de 3 encoches sous
le poste.
• Utilisez 2 vis espacées de 134 mm
situées au niveau des crochets
muraux (3), sur une surface plane.
• Décrochez le combiné et attendez
la tonalité.
• Composez le numéro
et conversez.
• Raccrochez le combiné pour terminer
la communication.
• Appuyez sur la touche haut-parleur
(PLSD) et attendez la tonalité.
• Composer le numéro de votre
correspondant.
• Appuyer à nouveau sur la touche
haut-parleur (PLSD) pour terminer
la communication
Ou
• Décrochez le combiné pour
converser.
• Raccrochez le combiné pour terminer
la communication.
• Le dernier numéro composé est
automatiquement mémorisé.
Vous souhaitez rappeler votre
correspondant :
• Décrochez le combiné et attendez
la tonalité.
Ou
• Appuyez sur la touche haut-parleur
(PLSD) et attendez la tonalité.
• Appuyez sur la touche répétition.
Votre téléphone compose
automatiquement le numéro.
Conversez.
• Clip the spacer (1) into the housing
(2) with 3 grooves underneath the
telephone.
• Use 2 screws 134 mm apart
located at the level of the wall
hooks (3), on a flat surface.
• Pick up the handset and wait
for the dialling tone.
• Dial the number
and make your call.
• Put the handset back in place to
end the call.
• Press the loudspeaker key
and wait for the dialling tone.
• Dial the number that you
want to call.
• Press the loudspeaker
key again to end
the call
Or
• Pick up the handset
to speak.
• Put the handset back in place
to end the call.
• The last number dialled is
automatically stored.
If you want to call the same
number again:
• Pick up the handset and wait
for the dialling tone.
Or
• Press the loudspeaker key
and wait for the dialling tone.
• Press the repeat key.
Your telephone dials the number
automatically.
Make your call.
> 5 <
3
2
>>
Téléphoner
>>
>> Making a call
>>
Numéroter avec le clavier
>
Dialling via the keyboard
>
Répétition du dernier
numéro composé
>
Dialling the last
number called
>
Numéroter sans décrocher
(PLSD)
>
Dialling without picking up
the handset on hook dialling
>
Fixer le téléphone au mur
>
Fixing the telephone
to the wall
>
1
Page 6

Chacune des 10 touches mémoire
permet de mémoriser un numéro
ou une fonction (voir mémorisation
page 7).
• Décrochez le combiné ou activer
le haut-parleur (PLSD)
• Appuyez sur la touche de mémoire.
Votre téléphone compose le numéro.
Conversez.
Exemple numéro : 055 254 68 22
Exemple fonction : *26# ou #26#
Votre poste permet le chaînage des
mémoires pour composer à la suite
plusieurs séries de numéros, codes
secrets, etc…
Vous souhaitez faire profiter d'autres
personnes présentes dans la pièce
de votre conversation téléphonique.
• Activer le haut-parleur
:
Appuyez sur la touche haut-parleur
pour activer la fonction.
La touche plus/moins permet de
régler le volume sonore du hautparleur. Le volume sonore réglé est
mémorisé pour les appels ultérieurs.
• Désactiver le haut-parleur
:
Appuyez à nouveau sur la touche
haut-parleur.
Le haut-parleur est désactivé.
En cours de communication,
vous avez la possibilité de parler
à votre entourage sans être entendu
de votre correspondant. Pendant que
la fonction Secret est activée, un signal
sonore est émis toutes les dix
secondes.
• Appuyez sur la touche Secret.
Le micro est désactivé.
Vous entendez toujours votre
interlocuteur.
• Appuyez à nouveau sur la touche
Secret. Le micro est réactivé.
Each of the 10 memory keys
enables you to store a number
or a function (see storing
on page 7).
• Pick up the handset or switch on the
amplifier (On hook dialling)
• Press the memory key.
Your telephone dials the number.
Make your call.
Example of a number: 055 254 68 22
Example of a function: *26# or #26#
Your telephone enables you to enter
a sequence of stored numbers to be
dialled one after the other (sets of
numbers, code numbers, etc.).
If you want to enable other people
in the room to listen to your
telephone conversation:
•T
o switch the loudspeaker on:
Press the loudspeaker key
to activate the function.
The plus/minus key enables you
to adjust the loudspeaker volume.
The volume as adjusted is stored
for future calls.
•T
o switch the loudspeaker off:
Press the loudspeaker key again.
The loudspeaker is switched
off.
During a call, you have the possibility
of talking to those around you
without being heard by the person
on the line. While the Privacy function
is activated, an audible signal
is made every ten seconds.
• Press the Privacy key.
The microphone is switched off.
You can still hear the other
person on the line.
• Press the Privacy key again.
The microphone is switched
on again.
> 6 <
Appeler à partir
des touches mémoire
>
Using the memory keys to
dial a call
>
Ecoute amplifiée
>
Group listening
>
Fonction secret
>
Privacy function
>
x10
Bip Bip
Beep Beep
/
Page 7

Chaque réglage est confirmé
par un bref signal sonore.
Vous pouvez modifier le volume
et la mélodie de la sonnerie.
• Décrochez le combiné ou haut-parleur.
• Appuyez sur la touche programmation
et ensuite sur la touche 1.
Vous entendez la mélodie actuelle.
Réglez le volume sonore (faible à fort).
Réglez la mélodie (1 à 5).
Les mélodies 4 et 5 sont
particulièrement bien adaptées
à l'utilisation professionnelle.
• Appuyez à nouveau sur la touche
de programmation pour valider.
Vous pouvez également régler
la sonnerie pendant que le téléphone
sonne. Sans décrocher le combiné,
réglez le volume de la sonnerie à l'aide
de la touche plus/moins et
la mélodie à l'aide des touches 1 à 5.
• Décrochez le combiné ou haut-parleur.
• Appuyez sur la touche
de programmation.
• Appuyez sur la touche de mémoire.
• Composez le numéro
du correspondant ou de la fonction
à mémoriser.
• Appuyez à nouveau sur la touche
de programmation pour valider.
Le numéro précédemment mis
en mémoire est effacé.
Vous pouvez effacer le contenu
de toutes les mémoires.
• Décrochez le combiné ou haut-parleur.
• Appuyez sur la touche
programmation et ensuite
sur la touche « 0 »
Puis « M » « E » « M » soit 6-3-6.
• Appuyez à nouveau sur la touche
de programmation pour valider.
Each setting is confirmed
by a short audible signal.
You can modify the volume
and the melody of the ringing tone.
• Pick up the handset.
• Press the programming key
and then press key 1.
You can hear the current melody.
Adjust the volume (low to high).
Select the melody (1 to 5).
Melodies 4 and 5 are particularly
well suited to professional use.
• Press the programming key again
to validate.
You can also adjust the ringing
tone while the phone is ringing.
Without picking up the handset,
adjust the volume of the ringing
tone using the plus/minus key
and select the melody using
keys 1 to 5.
• Pick up the handset.
• Press the programming
key.
• Press the memory key.
• Dial the phone number
or function number to be stored.
• Press the programming key
again to validate.
The number previously stored is
deleted.
You can delete the contents
of all the memory locations.
• Pick up the handset.
• Press the programming key
and then press the “0” key.
Then press “M” “E” “M”, i.e. 6-3-6.
• Press the programming key
again to validate.
> 7 <
Programmer les touches
mémoire
>
Programming the
memory keys
>
Réinitialiser les mémoires
>
Resetting the memory
locations
>
>>
Réglages
>>
>>
Settings
>>
Régler la sonnerie
>
Adjusting the ringing tone
>
P 1
1 5
P
P
P
x10
P 0
6P3 6
/
/
/
Page 8

Il est possible de raccorder
le téléphone à un réseau téléphonique
privé (PABX). Selon le type de PABX,
il faut saisir une pause manuelle après
le préfixe de sortie réseau lors de la
numérotation ou de la programmation
des touches mémoire.
• Décrochez le combiné ou haut-parleur.
• Composez le préfixe de sortie réseau.
• Appuyez sur la touche répétition.
Une pause est insérée.
• Composez le numéro de votre
correspondant.
• Décrochez le combiné ou haut-parleur.
• Appuyez sur la touche
programmation et ensuite sur
la touche 6.
• Entrez la valeur de flashing comprise
entre 080 et 600.
Exemple : « 0 » « 8 » « 5 » indique
une valeur de 85ms.
• Appuyez à nouveau sur la touche
de programmation pour valider.
Cette procédure remet les fonctions
suivantes aux valeurs standard :
• Sonnerie : volume 3, mélodie 3
• flashing : 270ms
• numéro composé : vide
• Décrochez le combiné ou haut-parleur.
• Appuyez sur la touche
programmation et ensuite sur
la touche 0.
• Composer « S » « T » « D » soit
7-8-3.
• Appuyez à nouveau sur la touche
de programmation pour valider.
Le réglage est confirmé par
un bref signal sonore.
It is possible to connect the telephone
to a private telephone network
(PABX). Depending on the type of
PABX, it is necessary to enter a
manual pause after the network out
number when dialling or programming
the memory keys.
• Pick up the handset.
• Dial the network out number.
• Press the repeat key.
A pause is inserted.
• Dial the number that you want
to store.
• Pick up the handset.
• Press the programming
key and then press
key 6.
• Enter the flashing value,
between 080 and 600.
E.g.: “0” “8” “5” sets a value
of 85 ms.
• Press the programming key
again to validate.
This procedure resets the following
functions to their standard values:
• Ringing tone: volume 3, melody 3
• Flashing: 270 ms
• Number dialled: empty
• Pick up the handset.
• Press the programming key
P and then press
the key 0.
• Enter “S” “T” “D” i.e. 7-8-3.
• Press the programming key
again to validate.
The setting is confirmed by
a brief audible signal.
> 8 <
>>
Utilisation derrière
un PABX
>>
>>
Use with
a PABX
>>
>>
Rétablir la configuration
standard
>>
>> Resetting the standard
configuration
>>
Insérer une pause manuelle
>
Inserting a manual pause
>
Programmer la durée
du flashing (R)
>
Programming the
flashing frequency (R)
>
P 6
xPx x
P 0
7P8 3
/
/
/
Page 9

En cas de dysfonctionnement de
votre téléphone, veuillez effectuer
les vérifications suivantes avant
de le retourner à votre vendeur :
Symptôme
Pas de tonalité
d'invitation à
numéroter
après
décrochage
Le téléphone
ne sonne pas
Uniquement
derrière PABX
l'appel n'aboutit
pas en cas de
numérotation à
partir d'une
mémoire
Cause
possible
Le cordon de
ligne n'est pas
connecté
correctement
ou défectueux
La sonnerie
est trop faible
Absence de
Pause
manuelle
Remède
Débranchez-le
et branchez-le
à nouveau
Réglez le
volume sonore
de la sonnerie
(voir page [7])
Composez une
Pause
manuelle (voir
page [8])
Conditions d'exploitation admises :
+5°C à +45°C ; 5 % à 85 % d'humidité
d'air relative
Température de stockage admise :
-25°C à +55°C.
Nettoyez votre téléphone à l'aide
d'un chiffon légèrement humide
ou avec un chiffon antistatique.
N'utilisez jamais un chiffon sec.
Evitez l'application de tout autre produit
de nettoyage ou de serviettes
de nettoyage mouillées.
> 9 <
>>
Informations
générales
>>
>> General
information
>>
In the event of a malfunction
concerning your telephone, please
carry out the following checks before
returning it to your supplier:
Symptoms
No dialling
tone on
picking up
the handset
The telephone
does not ring
Only with a
PABX the call
is not put
through in the
event of
dialling from
a memory
location
Possible
cause
The line
is not
connected
correctly
or defective
The ringing
tone is not
loud enough
Absence
of manual
pause
Cure
Unplug it
and plug
it in again
Adjust the
volume of the
ringing tone
(see page [7])
Enter a
manual
pause (see
page [8])
Acceptable operating conditions:
+5°C to +45°C ; 5% to 85% relative
humidity of the air
Acceptable storage temperatures:
-25°C to +55°C.
Use a slightly damp cloth or an
antistatic cloth to clean your
telephone.
Never use a dry cloth.
Avoid applying any other cleaning
product or damp cleaning tissues.
Données techniques
>
Technical data
>
Entretien
>
Cleaning
>
En cas de problèmes
>
Troubleshooting
>
Page 10

La garantie n'est pas applicable
si l'acheteur modifie ou répare
le téléphone lui-même ou avec
les services de personnes non
habilitées. Les dommages causés
par une manipulation, utilisation,
stockage non appropriés ainsi que
résultant de cas de force majeure
ou d'autres facteurs externes ne sont
pas couverts par la présente garantie.
La conformité à la directive
sus-mentionnée est confirmée par
le sigle CE apposé sur l'appareil.
Certificat de conformité
EADS TELECOM EADS Defence
and Security Networks SAS
Rue JP Timbaud Montigny Le Bretonneux
78063 SAINT-QUENTIN YVELINES
CEDEX - France,
déclarons que le produit M320
est en conformité avec les exigences
essentielles applicables et en particulier
celle de la directive 1999/5/CE
suivantes :
• Article 3.1a : (protection de la santé
et de la sécurité des utilisateurs)
NF EN 60950 (édition2 +
amendements A1/A2/A3/A4/A11)
• Article 3.1b : (exigences de protection
en ce qui concerne la compatibilité
électromagnétique)
NF EN 55022 (classe B édition 1998)
NF EN 55024 (1998)
Le certificat de conformité
est disponible sur le site internet :
www.eads-telecom.com
The guarantee is not applicable
if the purchaser modifies or repairs
the telephone himself or via
the services of persons not
approved. Damage caused
by inappropriate handling, use,
or storage, together with that
resulting from cases of force majeure
or other external factors, are not
covered by the present guarantee.
Conformity with the aforementioned
directive is confirmed by the initials
CE marked on the equipment.
Certificate of conformity
EADS TELECOM EADS Defence
and Security Networks SAS
Rue JP Timbaud Montigny Le Bretonneux
78063 SAINT-QUENTIN YVELINES
CEDEX - France,
hereby declares that the M320
product is in conformity with the
essential requirements applicable
and in particular those of the following
articles of directive 1999/5/CE:
• Article 3.1a: (protection of the
health and safety of the users)
NF IN 60950 (edition 2 +
amendments A1/A2/A3/A4/A11)
• Article 3.1b: (protection
requirements concerning
electromagnetic compatibility)
NF IN 55022 (class B edition 1998)
NF IN 55024 (1998)
The certificate of conformity
is available on the internet site:
www.eads-telecom.com
> 10 <
Garantie
>
Guarantee
>
Marquage CE
>
EC markings
>
Certificat de conformité
>
Certificate of conformity
>
Page 11

Répétition du dernier numéro composé
Programmer les touches de mémoire
Appeler à partir des touches mémoire
> 11 <
>>
Manuel abrégé
>>
>> Summary of the manual
>>
>>
Etiquettes mémoire
>>
>> Reminder labels
>>
P P
x10
x10
OU
OU
OU
Redialling the last number called
Programming the memory keys
Using the memory keys to dial a
number
P P
x10
x10
OR
OR
OR
Page 12

Page 13

> 13 <
Ce document vous présente les fonctions
accessibles depuis votre poste, installé
avec un système des gammes
M6500 IP PBX et Succession 6500.
This document shows the available
functions from your phone associated with a
system of M6500 IP PBX
and Succession 6500 ranges.
Appels Calls
Appel d’un numéro externe 0 + N° Calling an external number
Appel d’un numéro interne N° Calling an internal extension
Appel du standard 9 Calling an attendant
Rappel automatique d’un numéro interne R + 5 Automatic redialling of internal extension
(en cas d’occupation ou de non-réponse) (if the number is busy or does not answer)
Votre poste sonnera au prochain When the called extension hangs up,
raccrochage de votre correspondant interne. your extension rings.
En cas d’occupation ou de non-réponse,
✳79 If the number is busy or does not answer,
enregistrement du numéro pour le ré-émettre storing the number for redial (after hangup).
(après raccrochage).
Rappel du numéro ✳99 To redial this number
Annulation de l’enregistrement #79 To cancel the storing
Transfert d’une communication R + N° Transferring a communication
vers un poste interne. to an internal extension.
Appels simultanés Simultaneous calls
En cours de communication, R + ✳10 In communication, when an external party is
si un appel externe arrive, émission d'un bip. trying to reach you, you hear a beep.
Consultation de l’appel Answerring the call
Le premier correspondant est mis en attente. The first party is placed on hold.
Vous êtes en ligne avec un 1
er
correspondant. R + N° You are in communication with the first party.
Appel d’un deuxième correspondant Calling a second party
Le premier correspondant est mis en attente. The first party is placed on hold.
Passage d’un correspondant à l’autre R + 2 Switching from one party to the other
Pendant la conversation avec During the conversation with one party,
l’un des correspondants, the other is placed on hold.
l’autre est mis en attente.
Libération d’un correspondant R + 1 Releasing one party.
Vous restez en communication avec You are connected with the other party.
l’autre correspondant.
>>
Aide-mémoire
système EADS
>>
>>
Quick reference
guide
>>
Page 14

> 14 <
Conférence à 3 Three-way calling
Vous êtes en communication avec un R + 3 You are in communication with one party and
correspondant et un second est en attente. the other is placed on hold.
Etablissement d’une conférence à trois. Establishing a three-way call.
Fin avec transfert de la communication Leaving and transferring the call
Raccrochez Hang up
Les deux correspondants restent The two parties are connected (except if the
en communication (sauf si les deux two parties are external numbers).
correspondants sont externes).
Renvoi d'appels Call forwarding
Ver s un autre N° interne To another extension
Si le poste en a le droit.
✳21 + N° According to user’s class of service.
Renvoi d’appel immédiat. Setting up immediate call forwarding.
(annulation par #21) (to cancel #21)
Renvoi d’appel sur non-réponse
✳22 + N° Setting up delayed call forwarding
(annulation par #22) (to cancel #22)
Renvoi d’appel sur occupation
✳23 + N° Setting up call forwarding on busy
(annulation par #23) (to cancel #23)
Vers la messagerie vocale To voice mail
Si la boîte vocale existe
✳25 If you have a voice mailbox
Renvoi d’appel immédiat. Setting up immediate call forwarding.
(annulation par #21) (to cancel #21)
Renvoi d’appel sur non-réponse
✳26 Setting up delayed call forwarding
(annulation par #22) (to cancel #22)
Renvoi d’appel sur occupation
✳27 Setting up call forwarding on busy
(annulation par #23) (to cancel #23)
Annulation de tous les renvois d'appels #20 Cancelling all call forwarding
Interception d'appels Call pick up
Interception d’un appel destiné à un poste ✳01 Picking up a call meant for a
de votre groupe hunt group
Interception d’un appel destiné à un poste
✳02 + N° Picking up a call meant for an extension of
d’un autre groupe another group
Interception d’un appel sur sonnerie générale ✳00 Picking up a call on common ringing
Page 15

> 15 <
Rappel de rendez-vous Appointment reminder
Programmation d’un rendez-vous ✳
55 + hhmm
Programming an appointment
Entrez l’heure et les minutes (hhmm) Enter the hour and minutes (hhmm) in 24-hour
(par exemple,1830 correspond à 18H30) format (for example 6.30 pm is 1830)
Annulation d’un rendez-vous
#55 + hhmm
Cancelling an appointment
Numéros abrégés Abbreviated numbers
Il s’agit des répertoires enregistrés Those are the system directories,
dans le système, indépendants du répertoire independent of personal numbers
qui peut exister par ailleurs sur votre poste. you can store in your phone.
Répertoire personnel Personal directory
Vous disposez de 10 numéros abrégés (0 à 9) You can store in 10 abbreviated numbers
pour enregistrer les numéros (N°) (0 to 9) the phone numbers (N°)
des correspondants que vous appelez of your favorite correspondents.
le plus souvent.
Enregistrement d’un numéro abrégé
✳51+ Storing an abbreviated number
(0-9)+N°
Appel d’un numéro abrégé ✳✳ +(0-9) Making a call using abbreviated numbers
Annulation d’un numéro abrégé
#51 + (0-9)
Cancelling an abbreviated number
Répertoire collectif General directory
Consultez l’exploitant de votre installation Contact your administrator to have the list
pour avoir la liste des numéros abrégés of abbreviated numbers memorized
(3xxx) du répertoire collectif. (3xxx) in the general directory.
Appel d’un numéro abrégé ✳+3xxx Making a call using abbreviated numbers
Verrouillage poste Set locking
Programmation d’un code personnel ✳06+xxxx+ Programming a personal password
Entrez votre ancien code (xxxx) qui par défaut
nnnn+nnnn
Enter the old password (xxxx) which is 0000
est 0000, puis entrez deux fois votre nouveau by default and then enter twice your new
code à 4 chiffres (nnnn). password (nnnn)in four digits format.
Verrouillage de votre poste ✳05 Locking your set
Déverrouillage de votre poste
#05+nnnn
Unlocking your set
Vous devez entrer votre code personnel. Enter your password.
Page 16

APS0022ABLAA01
© AASTRA MATRA Telecom
Ce document ne peut être considéré comme contractuel.
Les renseignements y figurant sont donnés à titre indicatif
et peuvent être modifiés sans avis préalable.
Reproduction interdite.
AASTRA MATRA Telecom - SAS au capital de 25 031 712 Euros
- 398 414 425 RCS Versailles
All rights reserved. Information subject to change without
notice. AASTRA MATRA Telecom reserves the right to
make changes without notice, in equipment design as
engineering or manufacturing consideration may warrant.
AASTRA MATRA Telecom - SAS with a registered capital of
25 031 712 Euros - 398 414 425 RCS Versailles
L'élimination de ce produit est soumise aux
réglementations nationales applicables à
l'élimination des déchets d'équipements
électriques et électroniques.
This product's elimination is subjected to
national regulations on elimination of both
electric and
electronic equipments' wastes.
AASTRA MATRA Telecom
1 rue Arnold Schoenberg
Rond-point des Saules
78286 Guyancourt Cedex - France
Tél. : + 33 (0)1 30 96 42 00
Fax : + 33 (0)1 30 96 43 00
www.aastra-matra.com
 Loading...