

Page 1

3M™ Multi-TouchDesktop Display User Guide
3M™ Multi-Touch Desktop Display User Guide ............................................................................................................................... 1
3M™ Multi-Touch Desktop дисплеи Ръководство за потребителя ............................................................................................. 21
Stolni zaslon 3M™ Multi-Touch Korisnički priručnik ....................................................................................................................... 41
3M™ Vícedotykový stolní displej - Uživatelská příručka ................................................................................................................. 61
3M™ Multiberøringsskærm Brugervejledning ................................................................................................................................ 80
3M™ Multi-Touch Desktop Display Gebruikershandleiding.......................................................................................................... 100
3M™ Multi-Touch lauaekraan Kasutusjuhised ............................................................................................................................. 120
3M™ Multi-Touch -työpöytänäytön käyttöohje .............................................................................................................................. 139
Guide de l’utilisateur de l’écran Multi-Touch Desktop 3M™ ......................................................................................................... 158
Bedienungsanleitung 3M™ Multi-Touch Desktop Display ............................................................................................................ 178
3M™ Επιτραπέζια Πολυσημειακή Οθόνη Αφής Οδηγός χρήστη ................................................................................................. 198
3M™ többérintéses asztali kijelző felhasználói útmutatója ........................................................................................................... 218
Guida rapida all’uso del Display Multi-touch 3M™ ....................................................................................................................... 238
3M™ Multi-Touch darbvirsmas displeja lietotāja rokasgrāmata ................................................................................................... 258
„3M™ Multi-Touch“ stalinio ekrano naudojimo vadovas ............................................................................................................. 278
Gwida għall-Utent għal 3M™ Multi-Touch Desktop Display ......................................................................................................... 298
Monitor wielodotykowy 3M™ podręcznik użytkownika ................................................................................................................. 318
Guia do Utilizador do Ecrã Multi-toque de Secretária da 3M™ .................................................................................................... 338
Ghid de utilizare a afişajului multi-tactil pentru desktop 3M™ ...................................................................................................... 358
3M™ Multidotykový stolný displej - Príručka používateľa ............................................................................................................. 378
Priročnik za uporabo večdotičnega namiznega zaslona 3M™ ..................................................................................................... 397
3M™ Pantalla multitáctil de sobremesa - Guía del usuario .......................................................................................................... 417
3M™ Bruksanvisning för bordsdisplay med flertryck .................................................................................................................... 437
3M Touch Systems, Inc. Proprietary Information
Page 2

Page 3

3M™ Multi-Touch
Desktop Display
User Guide
For the Multi-Touch Desktop Product Line:
M1866PW, M2167PW, M2467PW, and M2767PW
Please read, understand and follow all safety information contained in
the Quick Start Guide found at www.3M.co.uk/TouchUserGuides prior to
the use of this device. Retain the Quick Start Guide for future reference.
3M Touch Systems, Inc. Proprietary Information
Page 4

2 3M™ Multi-Touch Desktop Display User Guide
Contents
Important Notes .......................................................................................................... 3
Maintaining Your Touch Display............................................................................... 3
Touch Sensor Care and Cleaning ............................................................................... 3
3M Touch Systems Support Services ......................................................................... 4
Contact 3M Touch Systems ....................................................................................... 4
Chapter 1
Setting up Your Multi-Touch Desktop Display
System Requirements ................................................................................................. 5
Unpacking Your Touch Display................................................................................. 6
Connecting the Touch Display ................................................................................... 7
Testing the Multi-Touch Desktop Display ................................................................. 7
VESA Mounting Option ............................................................................................. 7
Video Card Requirements .......................................................................................... 8
Supported Video Display Modes and Refresh Rates ................................................. 8
Configuring the Display Settings ............................................................................... 8
Multimedia Features ................................................................................................... 8
Access to the Video Controls ..................................................................................... 9
Adjusting the Desktop Video Display ........................................................................ 9
Chapter 2
Enabling Your Multi-Touch Desktop Display
Windows® 7 USB Compatibility ............................................................................. 13
All Other Platforms .................................................................................................. 13
Multi-Touch Application Support ............................................................................ 13
Installing 3M™ MicroTouch™ Software ................................................................ 14
Chapter 3
Troubleshooting & Maintenance
Display Installation Problems .................................................................................. 15
Troubleshooting the Touch Sensor........................................................................... 16
Chapter 4
Regulatory Information
Regulatory Agency Approvals ................................................................................. 18
FCC Warning ........................................................................................................... 19
CE Conformity for Europe ....................................................................................... 19
3M Touch Systems, Inc. Proprietary Information
Page 5

3 3M™ Multi-Touch Desktop Display User Guide
Intended Use
The 3M™ Touch Systems Touch Displays are designed for touch input and tested to
replace an existing display. These displays are intended for professional installation and
use in an indoor environment. They are not designed or tested for use in hazardous
locations. Use in any other application has not been evaluated by 3M and may lead to
an unsafe condition.
Important Notes
In extreme temperature and humidity situations, you may observe condensation
between the touch screen and the display. To minimize this condition, place the unit
where it will be used and allow a 24-hour environmental stabilization period prior to
powering on the display. Any noticeable condensation is temporary and will have no
long term affect on the operation of the display.
When unplugging power supply cord, hold the plug, do not pull by the cord.
Do not connect or disconnect this product during an electrical storm.
Install the display in a well-ventilated area. Always maintain adequate ventilation to
protect the display from overheating and to ensure reliable and continued operation.
Do not expose this display to direct sunlight or heat. Passive heat may cause damage
to the housing and other parts.
An inherent characteristic of the PCT sensor is a fine grid pattern that may be visible
under certain lighting conditions.
Do not install this display in areas where extreme vibrations may be generated. For
example, nearby manufacturing equipment may produce strong vibrations. The
vibrations may cause the display to exhibit picture discoloration or poor video quality.
The 3M touch controllers mentioned in this document are USB compatible full speed
devices.
3M does not warrant that we are USB compliant pursuant to USB specifications.
Maintaining Your Touch Display
To maintain your display and keep your display operating at peak performance:
Keep your display and touch sensor clean.
Adjust the display video controls.
Do not install the display in a place where ventilation may be hindered. Always
maintain adequate ventilation to protect the display from overheating and to promote
reliable and continued operation.
Touch Sensor Care and Cleaning
Periodically clean the glass touch sensor surface, turn off your display before cleaning.
3M Touch Systems, Inc. Proprietary Information
Page 6

4 3M™ Multi-Touch Desktop Display User Guide
Isopropyl alcohol and water solution ratio of 50:50 is the best cleaning agent for your
touch sensor.
Apply the cleaner with a soft, lint-free cloth. Avoid using gritty cloths.
Dampen the cloth and then clean the sensor. Spray the cleaner onto the cloth, not the
sensor, so that drips do not seep inside the display or stain the bezel.
3M Touch Systems Support Services
Visit the 3M Touch Systems website at http://www.3m.com/touch/ to download MT 7
software, drivers and obtain technical documentation.
Hot Line: 978-659-9200
Fax: 978-659-9400
Toll Free: 1-866-407-6666 (Option 3)
Email: US-TS-techsupport@mmm.com
Contact 3M Touch Systems
Contact information for all offices can be found at: http://www.3m.com/touch/
3M Touch Systems, Inc. Proprietary Information
Page 7

5 3M™ Multi-Touch Desktop Display User Guide
Chapter 1
Setting up Your Multi-Touch Desktop Display
System Requirements
The Multi-Touch Desktop Display requires a personal computer (PC).
Your PC must have an available USB port to connect the touch sensor cable.
Your PC must have a video card and video driver already installed for the display.
When choosing your workspace, select a sturdy, level surface. Also, make sure you can
easily access the back of the touch display and the computer. Easy access helps ensure a
smooth setup of the touch display.
Note: Before setting up your Multi-Touch Display, follow all safety information
contained in the quick start guide found on www.3M.co.uk/TouchUserGuides.
3M Touch Systems, Inc. Proprietary Information
Page 8

6 3M™ Multi-Touch Desktop Display User Guide
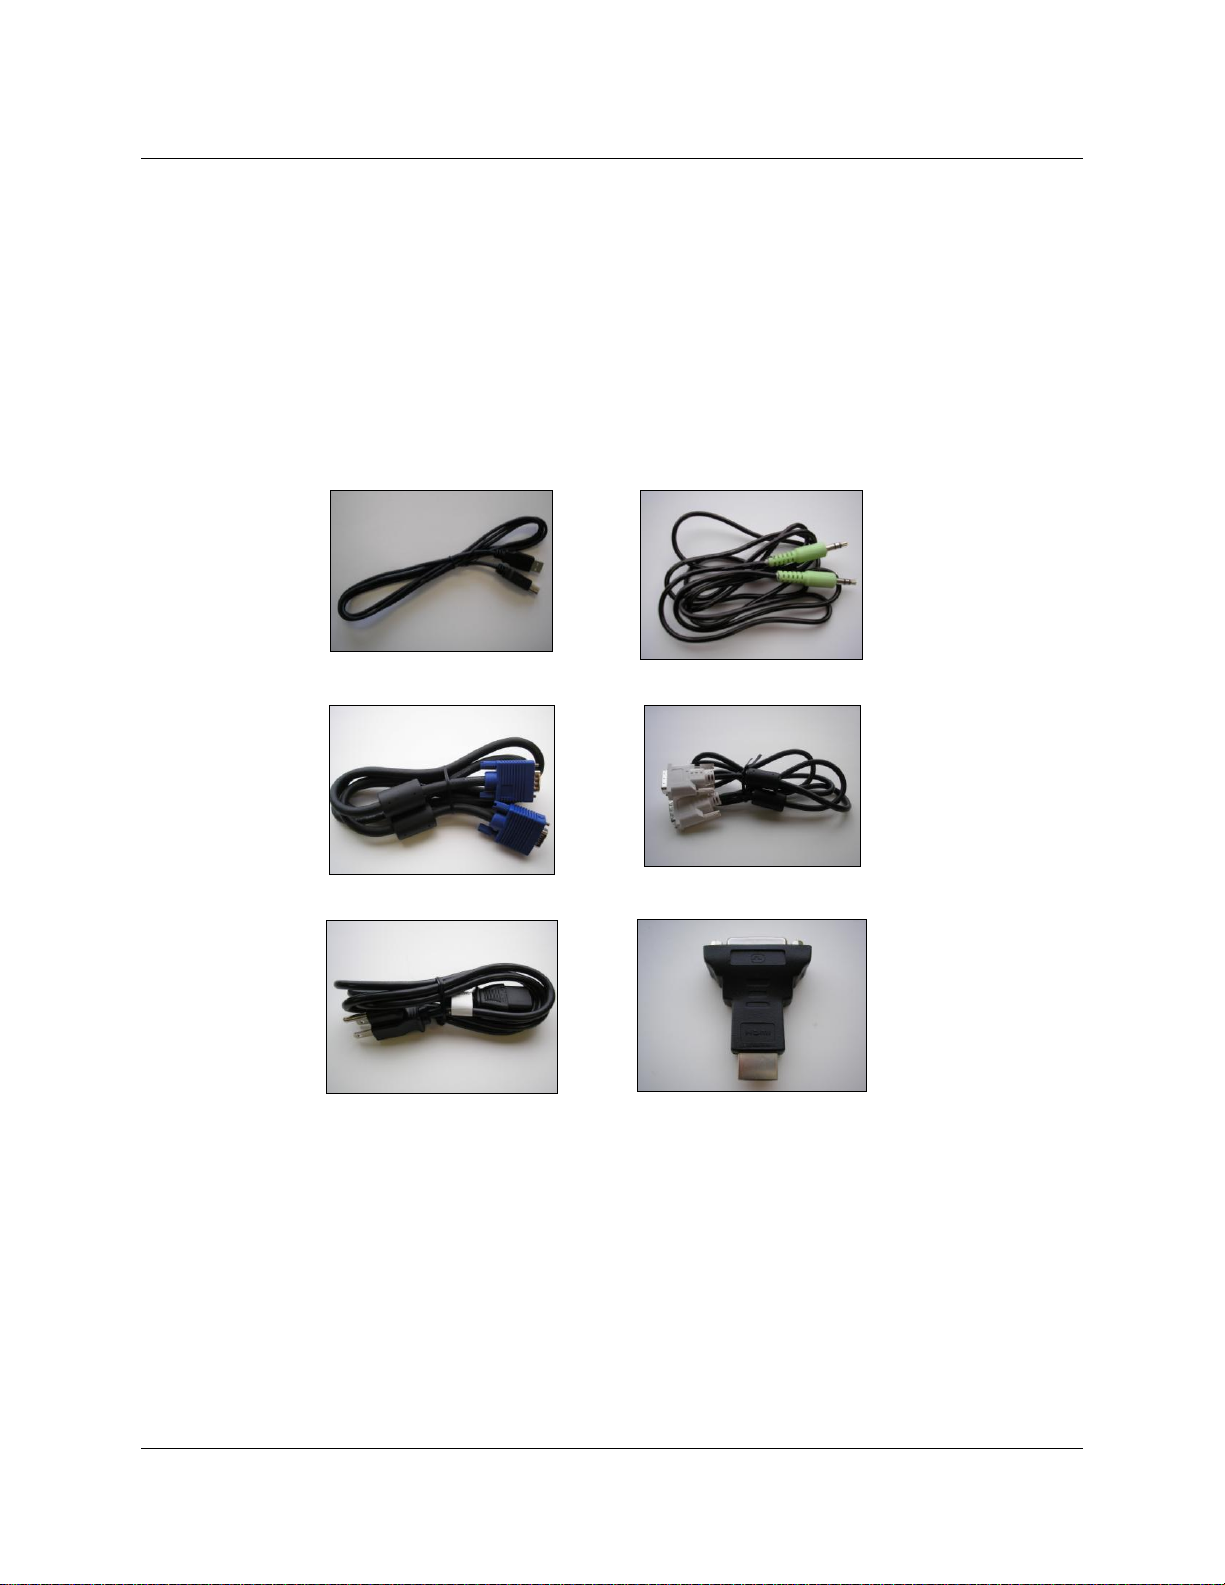
USB cable
Audio cable
VGA cable
DVI cable
US Power cable
DVI to HDMI converter
Unpacking Your Touch Display
Your Multi-Touch Desktop Display includes:
USB communication cable
DVI and VGA video cables and an HDMI to DVI converter.
Audio cable
US power cable and brick
Software CD and documentation
Cables Included with Your Multi-Touch Desktop Display
3M Touch Systems, Inc. Proprietary Information
Page 9
7 3M™ Multi-Touch Desktop Display User Guide
Model
VESA Pattern
M1866PW
100 x 100
M2167PW
100 x 100
M2467PW
200 x 100
M2767PW
200 x 100
Connecting the Touch Display
To connect the Multi-Touch Desktop Display:
1. Turn off the computer before connecting or disconnecting the touch display.
2. Select either the DVI/HDMI or VGA cable. Connect one end of the video cable to
the video connector on the display. Connect the other end to the video card in your
computer.
3. Connect one end of the touch sensor USB cable to the LCD and the other end to an
available port on your computer.
4. Plug the AC power cord into the display.
5. Connect the power cable to an appropriate power source.
Testing the Multi-Touch Desktop Display
Note: The Desktop Display has a power status light located on the front of the bezel.
After connection, turn on the power switch located at the bottom of the front bezel.
Make sure all cables are connected properly. Be sure to tighten all cable screws.
To test display:
1. Turn on your computer. Do not touch the screen during the startup sequence so you
do not interrupt the initialization sequence which affects touch positioning.
2. Make sure the video image is displayed. Check the LED to ensure that the display is
not in power save mode (orange).
3. Confirm the video image is centered within the viewing area. Use the display
controls to adjust, if necessary.
You can adjust the video controls to better suit your personal preference.
VESA Mounting Option
If you do not want to utilize the stand, you may remove it and use an alternative VESA
mount. The unit has a VESA mounting pattern on the back to allow for arm mount
capability. Refer to the table below for specifics on your display.
Use M4 x 8 mm screws to secure the VESA mount stand. Follow the manufacturer's
instructions included with the mounting device to properly attach your display.
Note: Do not use longer screws as they could potentially damage electronics inside the
display.
3M Touch Systems, Inc. Proprietary Information
Page 10
8 3M™ Multi-Touch Desktop Display User Guide
Display Mode
Refresh Rate (Hz)
640 x 350
70
640 x 480
60, 72, and 75
720 x 400
70
800 x 600
56, 60, 72, and 75
1024 x 768
60, 70, and 75
1280 x 1024
60 and 75
1360 x 768
60
1680 x 1050
60
1920 x 1080
60
Video Card Requirements
Confirm your computer has a video card installed that supports the native video
resolution of your Multi-Touch Desktop Display. The native resolution for the 18.5 is
1366 x 768 and for the 21.5, 24, and 27 is 1920 x 1080.
Supported Video Display Modes and Refresh Rates
Your video card should support one of the display modes specified in Table 1.
Table 1. Applicable Display Modes and Refresh Rates
Configuring the Display Settings
After you connect your Multi-Touch Desktop Display and turn on your computer, you
may need to configure the display settings. The ideal setting for the Multi-Touch Desktop
Display is as follows:
Display mode (Video resolution) 1366 x 768 or 1920 x 1080
Refresh rate (Vertical sync) 60 Hz
Color depth (Number of colors) at least 16-bit (high color)
Multimedia Features
The Multi-Touch Desktop Display comes with speakers built into the back of the display
housing and includes audio cables. These cables can be connected underneath the
display.
3M Touch Systems, Inc. Proprietary Information
Page 11
9 3M™ Multi-Touch Desktop Display User Guide
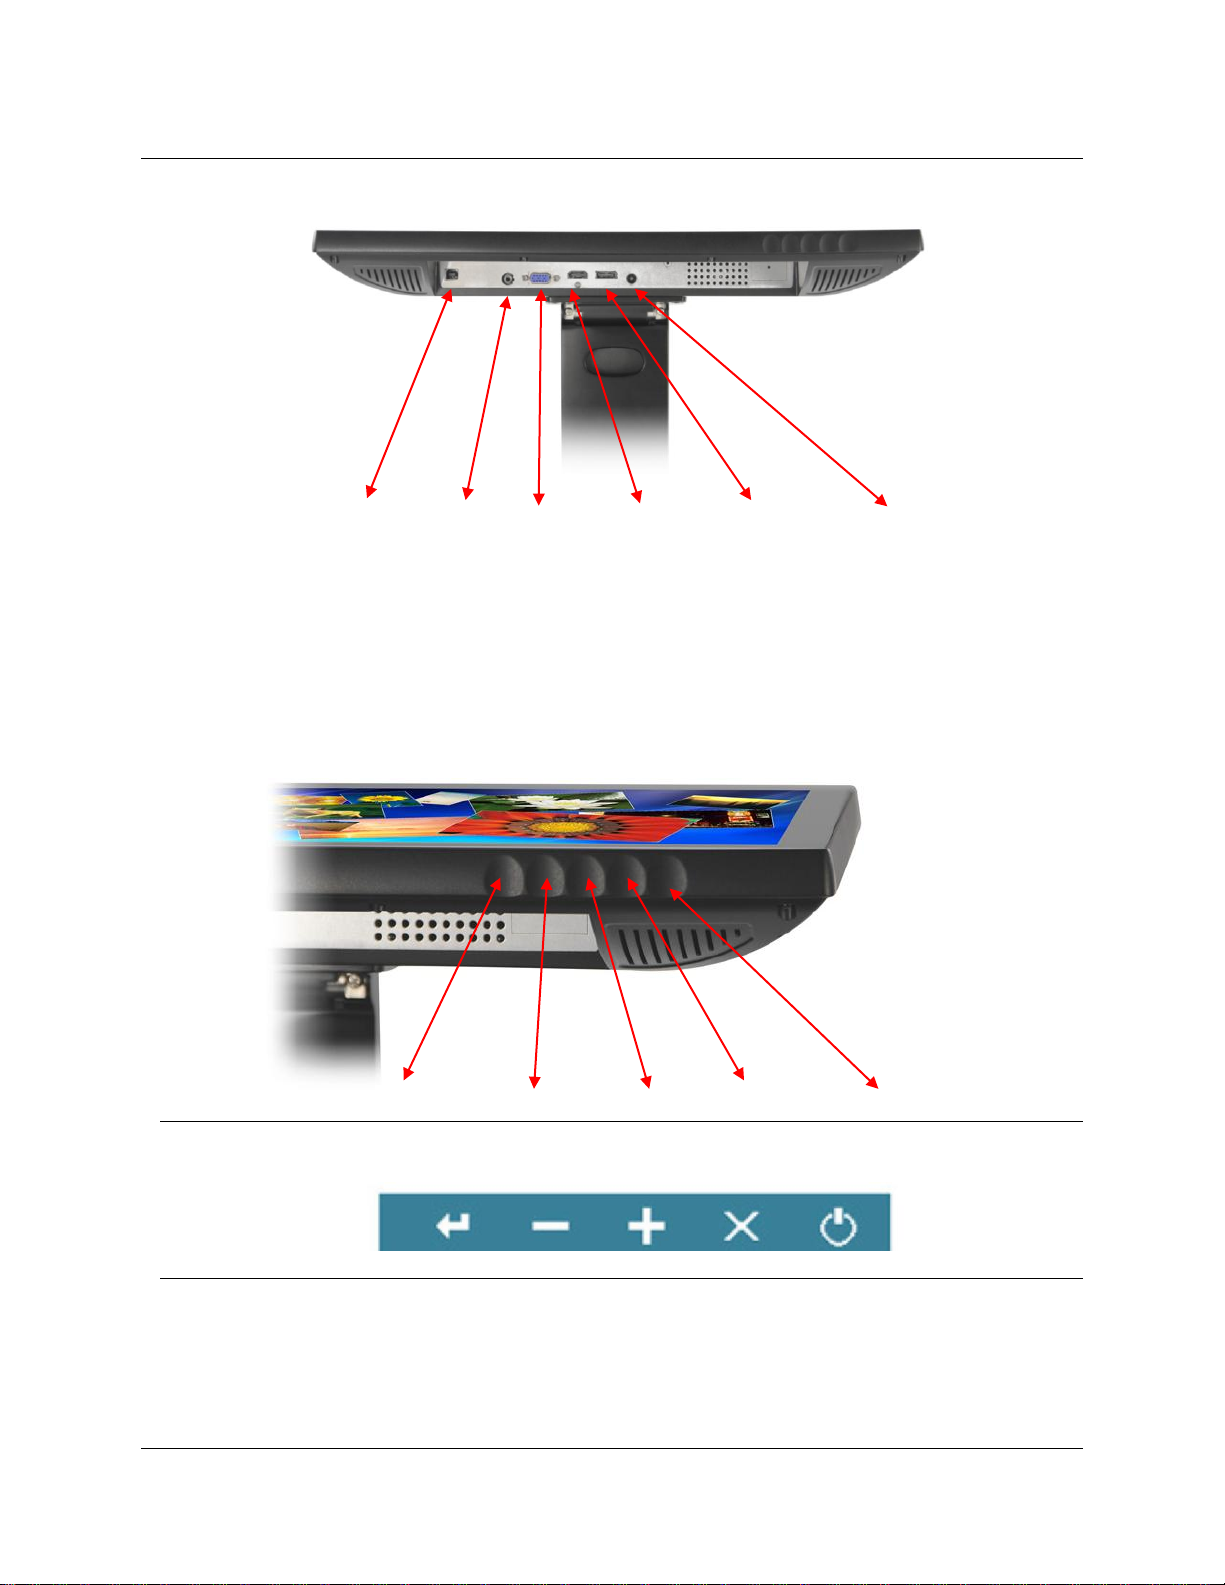
USB port Audio VGA port HDMI port DisplayPort Power
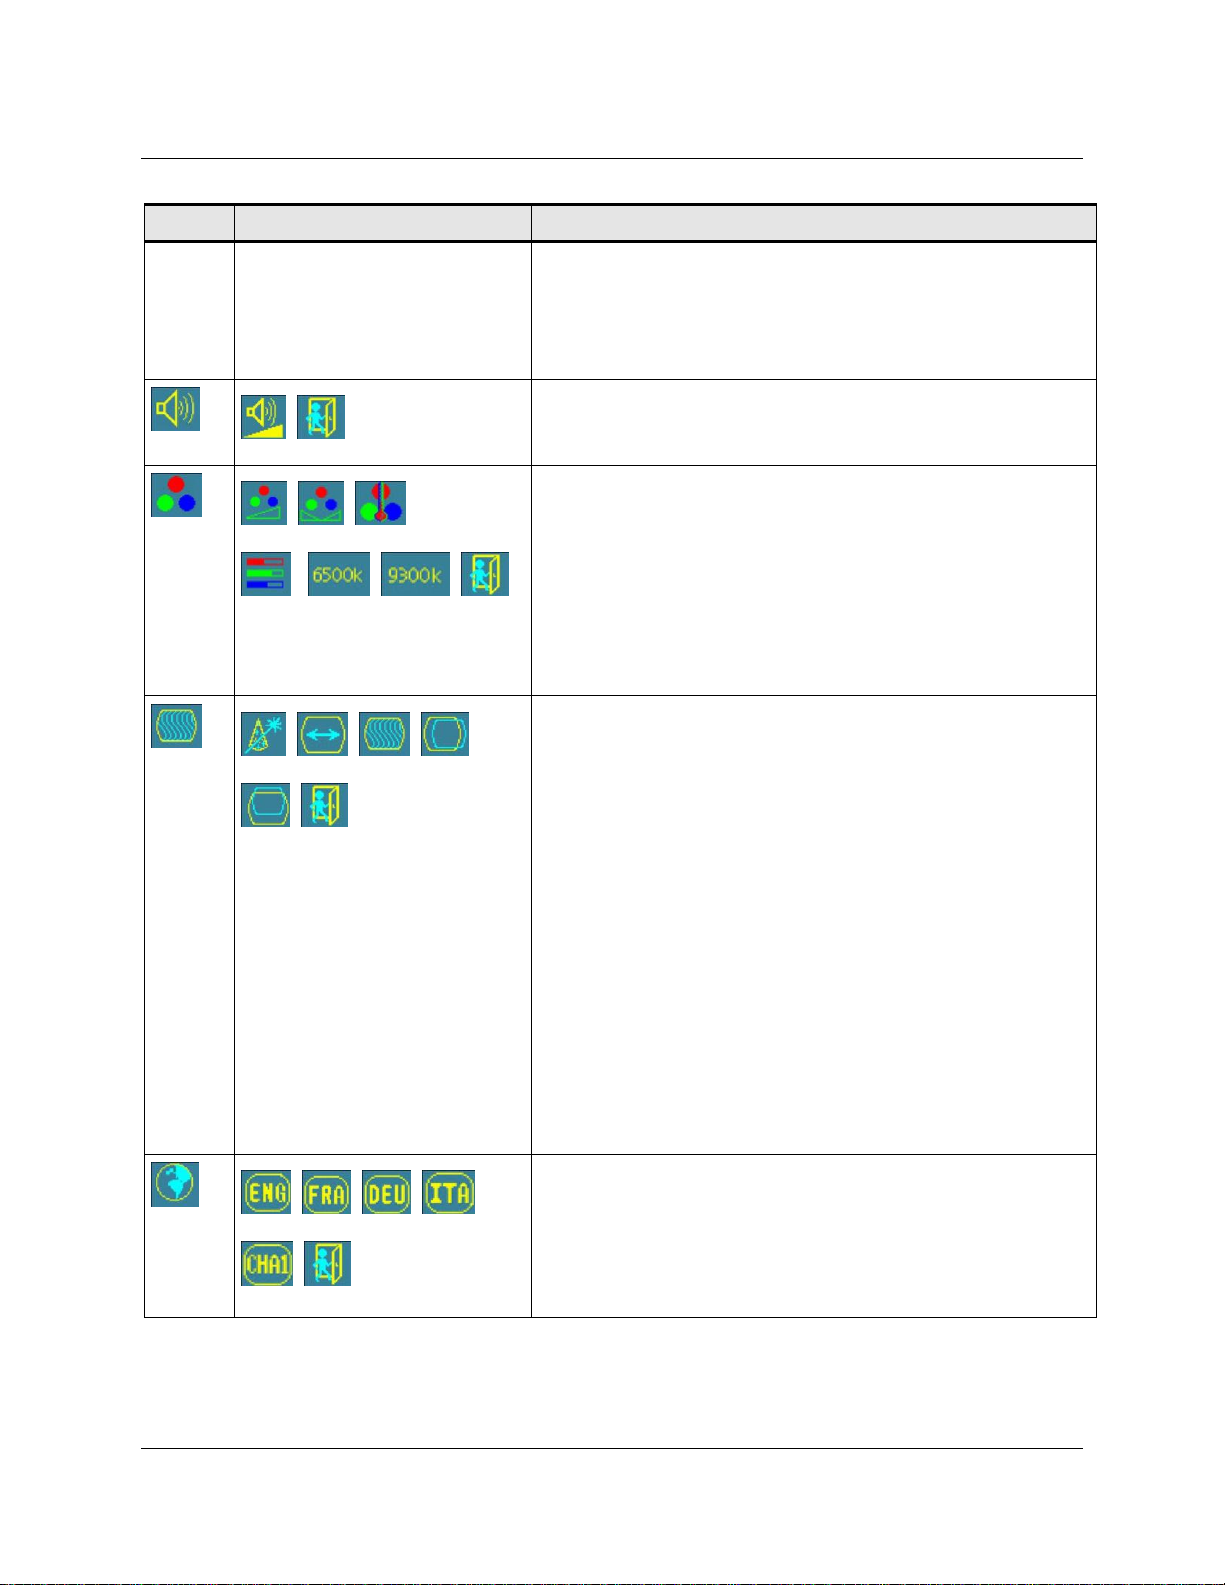
Access to the Video Controls
The controls for adjusting the video display are located on the bottom right of the MultiTouch Desktop Display. These capacitive touch buttons let you display the on-screen
menu to adjust the video image.
Adjust the controls in your normal lighting conditions.
Display a test image or pattern whenever you adjust the video.
Menu/Select —/Decrease +/Increase Cycle/Exit Power
Note: The OSD provides a quick guide to these buttons as shown below. When the OSD is activated,
the image will appear over the buttons for easy reference.
Adjusting the Desktop Video Display
Your Multi-Touch Desktop Display has four controls to adjust the video display.
3M Touch Systems, Inc. Proprietary Information
Page 12
10 3M™ Multi-Touch Desktop Display User Guide
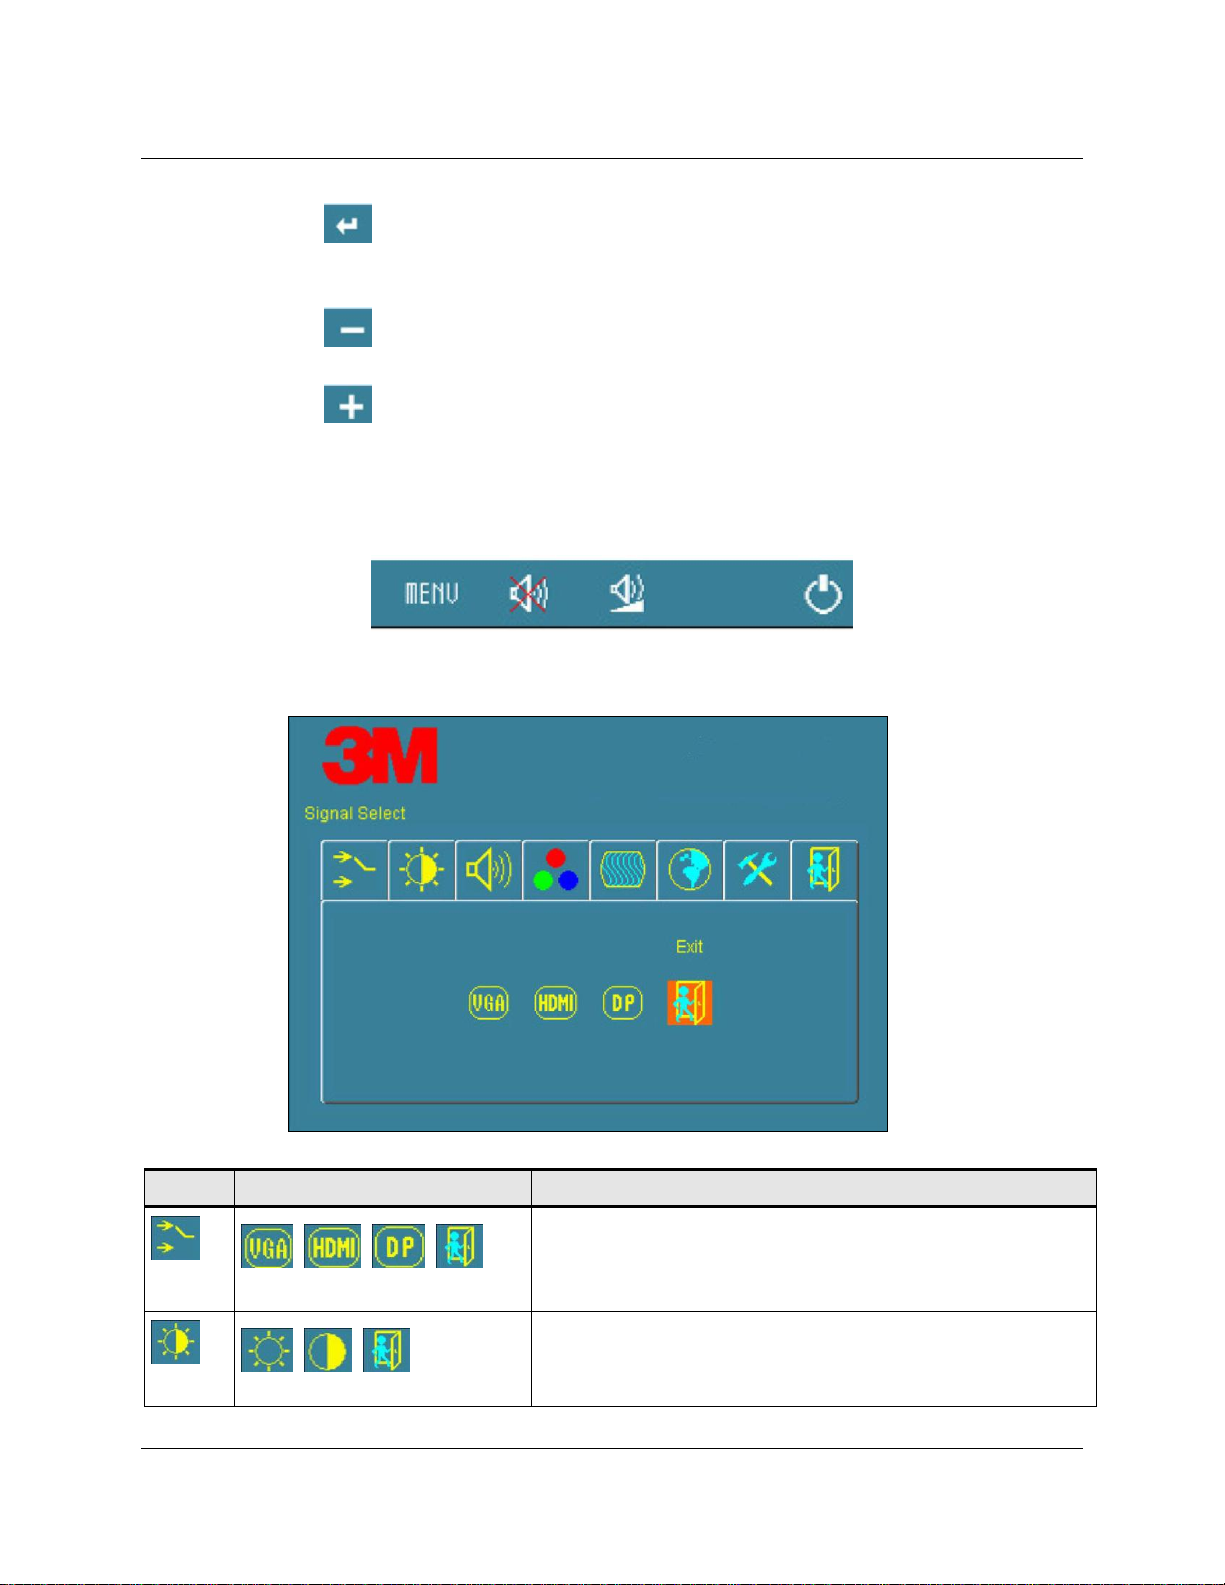
OSD
Choices
Description
SIGNAL SELECT
Choices are VGA, HDMI, DP, or Exit
Selects the applicable input source
VIDEO
Choices are Brightness, Contrast, or Exit
BRIGHTNESS
AUTO
Menu/Select – Shows or hides the on screen display menu. Select highlights
the current menu option or saves the current setting. Press — (Decrease) or
+ (Increase) to change the value.
— (Decrease) -- Scroll backward through items on the menu -- decrease the
value of selected option or move to the previous menu item.
+ (Increase) -- Scroll forward through items on the menu -- increase the value
of selected option or move to the next menu item.
If you do not press the Menu/ Select, or — (Decrease) or + (Increase) buttons within
30 seconds, the display adjustment program times out and hides the menu options.
Press the Menu button once to display the menu below for quick adjustments.
Pressing Menu button again will pull up the On Screen Display (OSD) menu, as shown
below.
3M Touch Systems, Inc. Proprietary Information
Page 13
11 3M™ Multi-Touch Desktop Display User Guide
OSD
Choices
Description
Adjust the brightness using the + or - buttons and press
SELECT to confirm the new setting.
CONTRAST
Adjust the contrast using the + or - buttons and press
SELECT to confirm the new setting.
AUDIO
Adjust the volume of the speakers using the + or – buttons
COLOR
Choices are User Defined Color, Preset Color
Temperature, or Exit
USER DEFINED COLOR
Adjust the Red, Green and Blue channels to your preference.
COLOR TEMPERATURE
Adjusts color temperature to PRESET 1 (6500 color
temperature) or PRESET 2 (9300 color temperature).
IMAGE
Choices are Auto Tune, Clock, Phase, H. Position, V.
Position, or Exit
AUTO TUNE
Performs automatic configuration of the Clock, Phase,
Vertical and Horizontal positions.
CLOCK and PHASE
If bars or noise are present, this setting can be adjusted
manually.
Adjust this setting so that either the vertical bars of noise are
replaced by an even amount of noise across the whole screen,
or the noise disappears completely.
H POSITION (Horizontal Position)
Moves image horizontally on screen either left or right.
V POSITION (Vertical position)
Moves images vertically on screen either up or down
LANGUAGE
Sets the language for the OSD -- the choices are English,
French, German, Italian, and Chinese
3M Touch Systems, Inc. Proprietary Information
Page 14
12 3M™ Multi-Touch Desktop Display User Guide
OSD
Choices
Description
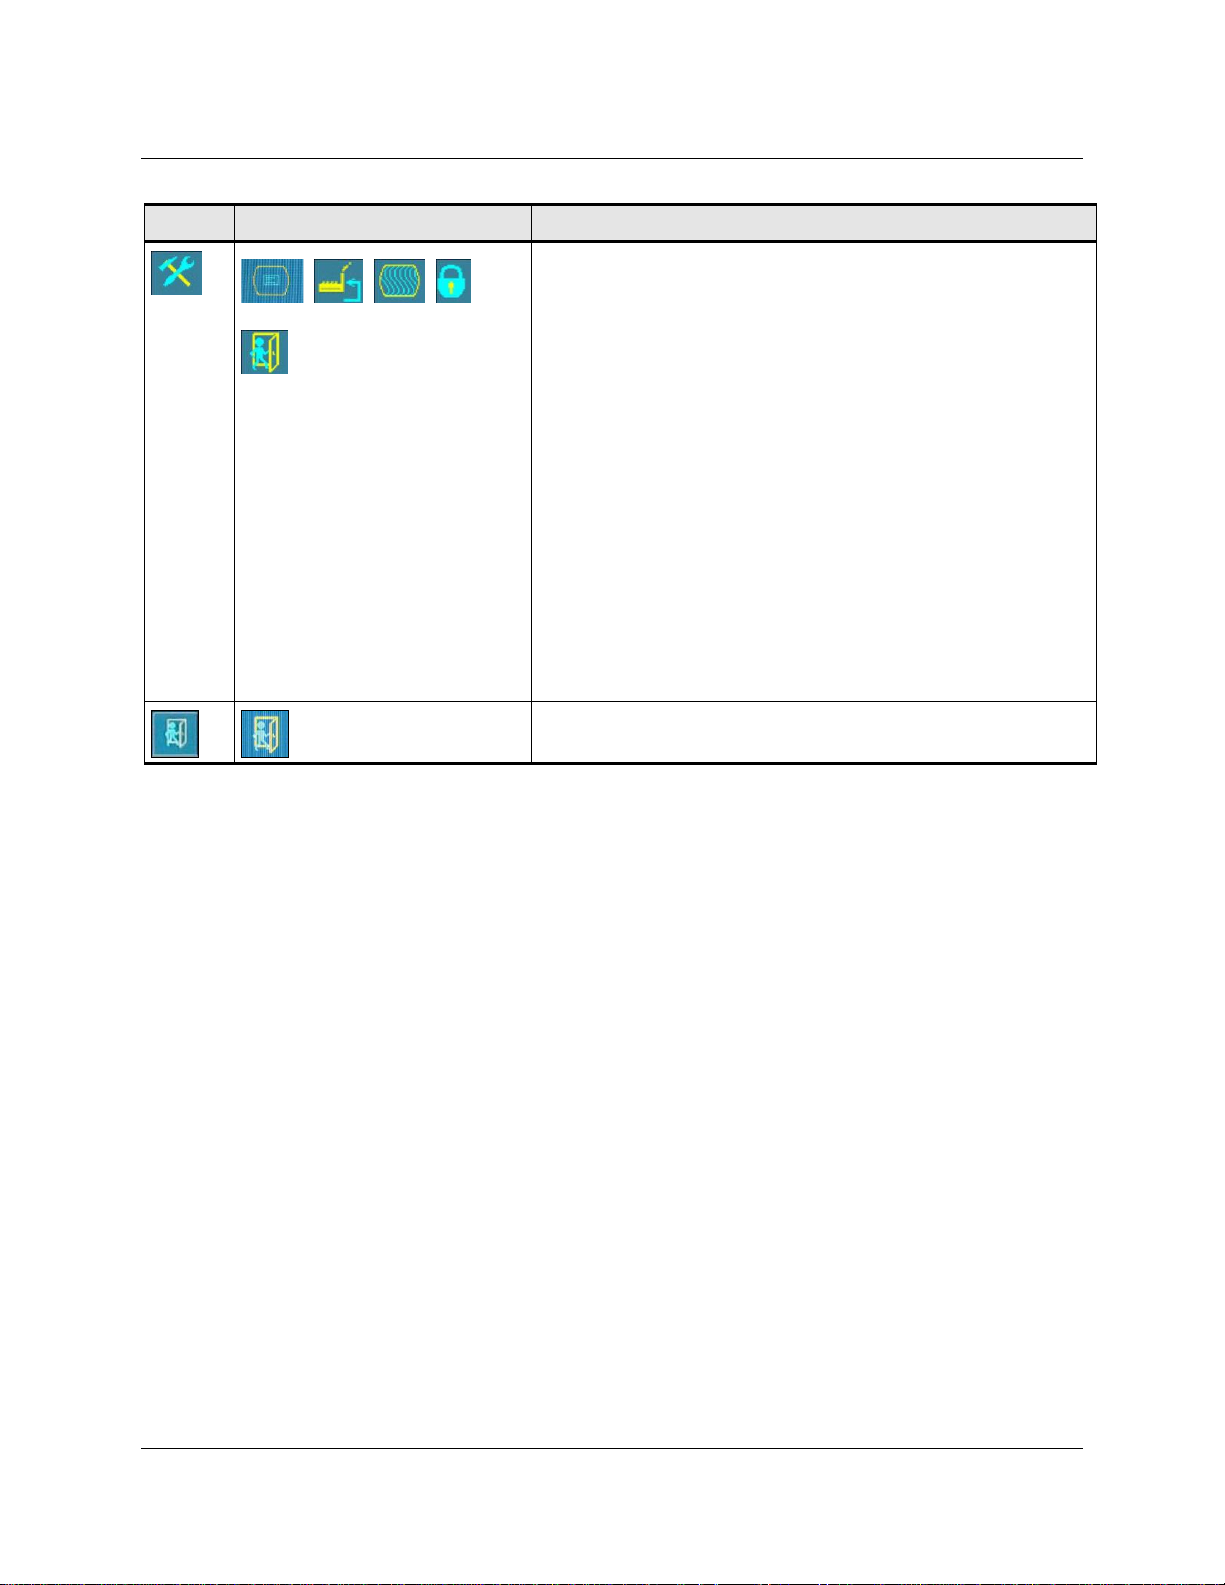
TOOLS
Choices are OSD Timing, OSD Horizontal, OSD Vertical
OSD TIMING
Adjust how long the menu remains on the screen. Submenu
choices are: Recall, Sharpness, or Exit
OSD HORIZONTAL and VERTICAL
Adjusts the position of the OSD on your screen
RECALL
Resets the control functions back to the original factory
values.
SHARPNESS
Adjusts the video quality to be sharp or blurry (useful for text
mode).
KEY LOCK
Use this to lock the display – the key to unlocking the display
is Menu>up>down>up>down>menu sequence.
EXIT
Exits the OSD menu.
3M Touch Systems, Inc. Proprietary Information
Page 15

13 3M™ Multi-Touch Desktop Display User Guide
Chapter 2
Enabling Your Multi-Touch Desktop Display
Windows® 7 USB Compatibility
The Multi-Touch Desktop Display is compatible with Windows 7 with no additional
software. Refer to Microsoft's Windows 7 documentation for additional information.
All Other Platforms
When using Windows XP, Vista or Linux operating systems, 3M provides MicroTouch
MT 7 Software for multi-touch drivers. For information on writing your own drivers to
interface with the 3M Multi-Touch Technology, refer to PCT Controller Reference Guide
(TSD-40847).
For non-Windows 7 operating system users this document provides the communication
protocol necessary to talk directly with the electronics. This enables software developers
using other operating systems such as Microsoft Windows® Vista or Linux® to write
their own drivers and achieve the same multi-touch results.
Multi-Touch Application Support
Remember not all applications are multi-touch ready -- Multi-touch behavior is a function
of YOUR application. Check with your application vendor to determine if your software
has multi-touch capability.
For additional information on 3M Micro Touch Software refer to: MT7 Users Guide
(25695).
3M Touch Systems, Inc. Proprietary Information
Page 16

14 3M™ Multi-Touch Desktop Display User Guide
Installing 3M™ MicroTouch™ Software
Remember that Windows® 7 does not require any additional software to enable multitouch functionality.
However, for Windows® XP, Vista or Linux® operating systems, 3M™ MicroTouch™
Software enables your Multi-Touch Desktop Display to work with your computer. 3M™
MicroTouch™ Software includes a control panel for setting your touch sensor
preferences and a diagnostic utility. If you are experiencing problems with the touch
sensor, you can use the diagnostic utilities provided to test the system.
For more information on installing this software and using the control panel, refer to the
3M™ MicroTouch™ Software User Guide on the accompanying CD or on the corporate
website at www.3m.com/touch.
3M Touch Systems, Inc. Proprietary Information
Page 17
15 3M™ Multi-Touch Desktop Display User Guide
Issue
Solution
No image displayed (blank
screen)
Is the display receiving power?
Check that the display’s power cable is connected properly and securely
into a grounded electrical outlet.
Check that the AC input jack is firmly plugged into the display.
Check that the display’s power cable is connected properly and securely
to an electrical outlet.
Try a different power cable.
Try a different electrical outlet.
No image displayed (blank
screen)
Is the display receiving a valid video signal from the PC?
Check that the computer is powered on.
Check that the video cable is connected properly and securely to the
display and the computer.
Check that the LED on the rear of the display is green.
Check that no pins are bent in the video cable connector (both ends).
Check that the video card is firmly seated in the card slot in your
computer.
Check that the video input from the video card falls within the refresh
rate of the display. Refer to Supported Video Display Modes and
Refresh Rates in Chapter 1.
Check that your computer is using a supported display mode. Refer to
Supported Video Display Modes and Refresh Rates in Chapter 1.
Chapter 3
Troubleshooting & Maintenance
Display Installation Problems
Table 21. Common Display Installation Issues
3M Touch Systems, Inc. Proprietary Information
Page 18
16 3M™ Multi-Touch Desktop Display User Guide
Issue
Solution
No image displayed (blank
screen)
Is the display in Power Management mode?
If the LED on the rear of the display is flashing amber, touch the screen,
press any key on the keyboard, or move the mouse to restore operation.
Verify video selection is correct (OSD).
No image displayed (blank
screen)
Are the brightness and contrast settings too low?
Use the display controls to adjust these values.
Abnormal image
Check that the video input from the video card falls within the refresh
rate of the display. Refer to Supported Video Display Modes and
Refresh Rates in Chapter 1.
Check that the video cable is connected properly and securely to the
display and the computer.
Colors of image are
abnormal
Check that the video cable is connected properly and securely to the
display and the computer.
Check that no pins are bent in the video cable connector (both ends).
Disturbances on the screen
The video display adjustments are incorrect. Refer to Chapter 1 for
adjusting procedures.
Common Installation
Issues
Possible Solutions
Touch sensor does not respond
to touch
Review the installation procedures. Are all cables connected properly?
After you installed Touch Software, did you restart your PC to activate
the touch sensor driver?
Remove the sensor communications cable and plug it back in.
Disconnect the power cable and plug it back in.
Touch sensor is not accurate
Calibrate the touch sensor for the current video resolution and
operating system. Refer to Chapter 2 in document 25695 for additional
information.
Cursor does not follow finger
movement or does not reach the
edges of the sensor
Calibrate the touch sensor for the current video resolution and
operating system. Refer to Chapter 2 in document 25695 for additional
information.
Troubleshooting the Touch Sensor
If you are experiencing problems with the touch sensor, check the following list of
common installation errors.
Table 22. Common Touch Sensor Installation Issues
3M Touch Systems, Inc. Proprietary Information
Page 19

17 3M™ Multi-Touch Desktop Display User Guide
Common Installation
Issues
Possible Solutions
Cursor is not located directly
underneath your finger
Open the touch sensor control panel and make sure all cursor offsets
(vertical, edge/horizontal) are turned off.
Calibrate the touch sensor for the current video resolution and
operating system.
3M Touch Systems, Inc. Proprietary Information
Page 20

18 3M™ Multi-Touch Desktop Display User Guide
Chapter 4
Regulatory Information
Regulatory Agency Approvals
Your product complies with the following regulatory standards:
FCC-B
CE
TUV
This equipment has been tested and found to comply within limits for a Class B digital
device, pursuant to Part 15 of the FCC rules. These limits are designed to provide
reasonable protection against harmful interference in residential installations. This
equipment generates, uses, and can radiate radio frequency energy, and if not installed
and used in accordance with the instructions, may cause harmful interference to radio
communications. However, there is no guarantee that interference will not occur in a
particular installation. If this equipment does cause interference to radio or television
equipment reception, which can be determined by turning the equipment off and on, the
user is encouraged to try to correct the interference by one or more of the following
measures:
Reorient or relocate the receiving antenna.
Move the equipment away from the receiver.
Consult the dealer or an experienced radio/television technician for additional
suggestions.
This Class B digital apparatus meets all requirements of the Canadian InterferenceCausing Equipment Regulations.
This device complies with Part 15 of the FCC rules: Operation is subject to the following
two conditions: (1) This device may not cause harmful interference, and (2) this device
must accept any interference received, including interference that may cause undesired
operation.
3M Touch Systems, Inc. Proprietary Information
Page 21

19 3M™ Multi-Touch Desktop Display User Guide
FCC Warning
To assure continued FCC compliance, the user must use grounded power supply cord and
the provided shielded video interface cable with bonded ferrite cores. If a BNC cable is
going to be used, use only a shielded BNC(5) cable. Also, any unauthorized changes or
modifications not expressly approved by the party responsible for compliance could void
the user’s authority to operate this device.
3M Touch Systems is not responsible for any radio or television interference caused by
using other than recommended cables and connectors or by unauthorized changes or
modifications to this equipment.
CE Conformity for Europe
The device complies with the requirements of the EU RoHS Directive 2011/65/EU", the
ECC directive 2004/108/EC with regard to “Electromagnetic compatibility” and
2006/95/EC with regard to "Safety".
3M Touch Systems, Inc. Proprietary Information
Page 22

20 3M™ Multi-Touch Desktop Display User Guide
The information in this document is subject to change without notice. No part of this document may be reproduced or transmitted
in any form or by any means, electronic or mechanical, for any purpose, without the express written permission of 3M Touch
Systems, Inc. 3M may have patents or pending patent applications, trademarks, copyrights, or other intellectual property rights
covering subject matter in this document. The furnishing of this document does not give you license to these patents, trademarks,
copyrights, or other intellectual property except as expressly provided in any written license agreement from 3M Touch Systems,
Inc.
The information provided in this document is intended as a guide only. For the latest detailed engineering specifications, please
contact your 3M Touch Systems, Inc. Application Engineer. 3M Touch Systems, Inc. is committed to continually improving
product designs, as a result, product specifications may be subject to change without notification.
Dispose of display and components in accordance with all applicable local and governmental regulations.
"RoHS 2011/65/EU Compliant" means that the product or part does not contain any of the substances in excess of the maximum
concentration values (“MCVs”) in EU RoHS Directive 2011/65/EU, unless the substance is in an application that is exempt
under EU RoHS. The MCVs are by weight in homogeneous materials. This information represents 3M's knowledge and belief,
which may be based in whole or in part on information provided by third party suppliers to 3M.
NOTICE: Given the variety of factors that can affect the use and performance of a 3M Touch Systems, Inc. Product (the
“Product”), including that solid state equipment has operation characteristics different from electromechanical equipment, some
of which factors are uniquely within User’s knowledge and control, it is essential that User evaluate the 3M Touch Systems, Inc.
Product and software to determine whether it is suitable for User’s particular purpose and suitable for User’s method of
application. 3M Touch Systems, Inc. statements, engineering/technical information, and recommendations are provided for
User’s convenience, but their accuracy or completeness is not warranted. 3M Touch Systems, Inc. products and software are not
specifically designed for use in medical devices as defined by United States federal law. 3M Touch Systems, Inc. products and
software should not be used in such applications without 3M Touch Systems, Inc. express written consent. User should contact
its sales representative if User’s opportunity involves a medical device application.
IMPORTANT NOTICE TO PURCHASER: Specifications are subject to change without notice. These 3M Touch Systems,
Inc. Products and software are warranted to meet their published specifications from the date of shipment and for the period
stated in the specification. 3M Touch Systems, Inc. makes no additional warranties, express or implied, including but not
limited to any implied warranties of merchantability or fitness for a particular purpose. User is responsible for determining
whether the 3M Touch Systems, Inc. Products and software are fit for User’s particular purpose and suitable for its method of
production, including intellectual property liability for User's application. If the Product, software or software media is proven
not to have met 3M Touch Systems, Inc. warranty, then 3M Touch Systems, Inc. sole obligation and User’s and Purchaser’s
exclusive remedy, will be, at 3M Touch Systems, Inc. option, to repair or replace that Product quantity or software media or to
refund its purchase price. 3M Touch Systems, Inc. has no obligation under 3M Touch Systems, Inc. warranty for any Product,
software or software media that has been modified or damaged through misuse, accident, neglect, or subsequent manufacturing
operations or assemblies by anyone other than 3M Touch Systems, Inc. 3M Touch Systems, Inc. shall not be liable in any
action against it in any way related to the Products or software for any loss or damages, whether non-specified direct,
indirect, special, incidental or consequential (including downtime, loss of profits or goodwill) regardless of the legal
theory asserted.
Copyright © 2015 3M All rights reserved.
Document Title: 3M™ Multi-Touch Desktop Display User Guide
Document Number: TSD-40532, Revision F
3M, the 3M logo, MicroTouch, and the MicroTouch logo are either registered trademarks or trademarks of 3M in the United
States and/or other countries.
Windows and/or other Microsoft products referenced herein are either registered trademarks or trademarks of Microsoft
Corporation in the U.S. and/or other countries.
Linux is a registered trademark of Linus Torvalds in the U.S. and/or other countries
All other trademarks are the property of their respective owners.
3M Touch Systems, Inc. Proprietary Information
Page 23

3M™ Multi-Touch
Desktop дисплеи
Ръководство за
потребителя
За продуктовата линия Multi-Touch Desktop:
M1866PW, M2167PW, M2467PW, и M2767PW
Моля, прочетете, разберете и следвайте цялата информация за
безопасност, съдържаща се в ръководството за бързо стартиране,
намиращо се на www.3M.co.uk/TouchUserGuides преди да
използвате уреда. Запазете ръководството за бързо стартиране за
бъдещи справки.
Информация, собственост на 3M Touch Systems
Page 24

22 3M™ Multi-Touch Desktop дисплеи Ръководство за потребителя
Съдържание
Важни бележки ....................................................................................................... 23
Поддръжка на сензорния дисплей ........................................................................ 23
Грижи и почистване на сензора за докосване ...................................................... 24
Поддържащи услуги на 3M Touch Systems .......................................................... 24
Контакти с 3M Touch Systems ............................................................................... 24
Глава 1
Включване на Вашия Multi-Touch Desktop дисплей
Системни изисквания ............................................................................................. 25
Разопаковане на сензорния дисплей ..................................................................... 26
Свързване на сензорния дисплей .......................................................................... 27
Тестване на Multi-Touch дисплея .......................................................................... 27
Опция за монтаж VESA ......................................................................................... 27
Изисквания към видео картата .............................................................................. 28
Поддържани режими на изобразяване и честоти на обновяване ....................... 28
Конфигуриране настройките на дисплея ............................................................. 28
Мултимедийни свойства ........................................................................................ 28
Достъп до видео контролите ................................................................................. 29
Настройка на видео изображението на дисплея .................................................. 29
Глава 2
Софтуер за Вашия Multi-Touch Desktop дисплей
Windows® 7 USB съвместимост ........................................................................... 33
Всички други платформи ....................................................................................... 33
Помощ за прилагането на въвеждане с докосване .............................................. 33
Инсталиране на 3M™ MicroTouch™ софтуера ................................................... 34
Глава 3
Отстраняване на неизправности и поддръжка
Проблеми при инсталирането на дисплея ............................................................ 35
Отстраняване на неизправности по сензора за докосване .................................. 36
Глава 4
Регулаторна информация
Одобрения от регулаторна агенция ...................................................................... 38
Предупреждение на FCC ....................................................................................... 39
CE съвместимост за Европа ................................................................................... 39
Информация, собственост на 3M Touch Systems
Page 25
23 3M™ Multi-Touch Desktop дисплеи Ръководство за потребителя
Предназначение
Сензорните дисплеи на 3M™ Touch Systems са разработени за въвеждане с
докосване и са тествани като заменят съществуващ дисплей. Тези дисплеи са
предназначени за професионален монтаж и употреба в затворени помещения. Те
не са разработени или тествани за употреба в опасни условия. Употребата за
всякакво друго приложение не е оценявана от 3М и може да доведе до
небезопасни условия.
Важни бележки
При условия на екстремна температура и влажност, трябва да вземете предвид
възможно образуване на кондензат между сензора за докосване и дисплея. За да
избегнете това, поставете дисплея където ще бъде използван и го оставете в
продължение на 24 часа да се стабилизира, преди да го включите към
захранването. Евентуалното образуване на кондензат е временно и няма да има
дълготраен ефект върху работата на дисплея.
Когато откачате мрежовия кабел, дръжте щепсела, а не дърпайте кабела.
Не свързвайте и не откачайте продукта по време на гръмотевична буря.
Монтирайте дисплея в добре проветрено помещение. Винаги поддържайте
достатъчна вентилация за предпазване на дисплея от прегряване, за да осигурите
надеждна и продължителна работа.
Не излагайте дисплея на пряка слънчева светлина или източници на топлина.
Пасивното нагряване може да повреди корпуса и други части.
Фината мрежа, която може да се види при известни условия на осветлението е
присъща характеристика на PCT сензора.
Не монтирайте дисплея на места, където могат да се появят екстремни
вибрации. Например, разположено наблизо производствено оборудване може да
предизвика силни вибрации. Вибрациите могат да предизвикат обезцветяване на
картината или влошено качество на видео изображението.
Сензорните контролери на 3M, споменати в този документ са USB съвместими
високоскоростни прибори.
3M не гарантира, че ние сме съвместими с USB според всички спецификации на
USB.
Поддръжка на сензорния дисплей
За да поддържате Вашия дисплей и да осигурите оптималната му работа:
Пазете дисплея и сензора за докосване чисти.
Настройте видео контролите на дисплея.
Информация, собственост на 3M Touch Systems
Page 26

24 3M™ Multi-Touch Desktop дисплеи Ръководство за потребителя
Не монтирайте дисплея на места, където вентилацията може да бъде затруднена.
Винаги поддържайте достатъчна вентилация за предпазване на дисплея от
прегряване, за да осигурите надеждна и продължителна работа.
Грижи и почистване на сензора за докосване
Периодично почиствайте стъклената повърхност на сензора за докосване,
изключвайте дисплея преди почистване.
Най-доброто почистващо средство за сензора е изопропилов алкохол, в
съотношение 50:50 с вода.
Нанасяйте почистващото средство с мека кърпа без власинки. Избягвайте
използването на твърди кърпи.
Навлажнете кърпата и почистете сензора. Нанасяйте почистващото средство на
кърпата, а не на сензора, за да не се просмукват капки или да се замърсява
жлеба.
Поддържащи услуги на 3M Touch Systems
Посетете уебстраницата на 3M Touch Systems на http://www.3m.com/touch/ за да
свалите софтуера за MT 7, драйвери и техническа документация.
Гореща линия: 978-659-9200
Факс: 978-659-9400
Безплатен телефон: 1-866-407-6666 (опция 3)
E- мейл: US-TS-techsupport@mmm.com
Контакти с 3M Touch Systems
Контактната информация за всички офиси може да се намери на:
http://www.3m.com/touch/.
Информация, собственост на 3M Touch Systems
Page 27

25 3M™ Multi-Touch Desktop дисплеи Ръководство за потребителя
Глава 1
Включване на Вашия Multi-Touch Desktop
дисплей
Системни изисквания
Този дисплей изисква персонален компютър (PC).
Компютърът трябва да има USB порт за свързване на кабела на сензора за
докосване.
Компютърът трябва да има видео карта и предварително инсталиран видео
драйвер за дисплея.
Избирайте твърда, гладка повърхност за разполагане на дисплея. Също така, си
осигурете лесен достъп до задната част на дисплея и на компютъра. Лесният достъп
осигурява гладък процес на включване на сензорния дисплей.
Забележка: Преди да включите Вашия Multi-Touch Display, прочетете цялата
информация за безопасност, съдържаща се в Ръководството за бързо стартиране на
www.3M.co.uk/TouchUserGuides.
Информация, собственост на 3M Touch Systems
Page 28
26 3M™ Multi-Touch Desktop дисплеи Ръководство за потребителя
USB кабел
Аудио кабел
VGA кабел
DVI кабел
US мрежов кабел
DVI към HDMI адаптор
Разопаковане на сензорния дисплей
Вашият Multi-Touch дисплей включва:
USB комуникационен кабел
DVI и VGA видео кабели и HDMI към DVI адаптор.
Аудио кабел
US мрежов кабел
CD със софтуер и документация
Кабели, включени към Вашия Multi-Touch Desktop дисплей
Информация, собственост на 3M Touch Systems
Page 29
27 3M™ Multi-Touch Desktop дисплеи Ръководство за потребителя
Модел
VESA рамка
M1866PW
100 X 100
M2167PW
100 X 100
M2467PW
200 X 100
M2767PW
200 X 100
Свързване на сензорния дисплей
За да свържете Multi-Touch Desktop дисплея:
1. Изключете компютъра преди да свързвате или откачате сензорния дисплей.
2. Изберете DVI/HDMI или VGA кабела. Свържете единия край на видео кабела
към конектора на дисплея. Свържете другия край към видео картата на
компютъра.
3. Свържете единия край на USB кабела на сензора за докосване към LCD и
другия край към свободен порт на компютъра.
4. Свържете мрежовия кабел към дисплея.
5. Свържете мрежовия кабел към правилно заземен контакт.
Тестване на Multi-Touch дисплея
Забележка: Desktop дисплеят има индикатор за включено състояние, разположен
на рамката отпред.
След свързването, включете мрежовия ключ, разположен отдолу на предната
рамка,
Уверете се, че всички кабели са свързани правилно. Затегнете всички винтове на
кабелите.
За да тествате дисплея:
1. Включете компютъра. Не докосвайте дисплея по време на процеса на
стартиране, за да не прекъснете последователността на инициализиране, което
ще повлияе на позиционирането на докосването.
2. Проверете дали се появява видео изображение. Проверете дали дисплеят не е в
режим за спестяване на енергия (индикаторът свети оранжево).
3. Уверете се, че видео изображението е в центъра на видимата зона. Ако е
необходимо, настройте чрез видео контролите.
Можете да настроите видео контролите така, че изображението да съответства на
личните Ви предпочитания.
Опция за монтаж VESA
Ако не искате да използвате стойката, можете да я демонтирате и да приложите
алтернативния VESA монтаж. Дисплеят има VESA монтажна рамка отзад, за да
може да се монтира върху подвижно рамо. Вижте долната таблица за
специфичните характеристики на Вашия дисплей:
Информация, собственост на 3M Touch Systems
Page 30
28 3M™ Multi-Touch Desktop дисплеи Ръководство за потребителя
Режим на изображение
Честота на обновяване (Hz)
640 X 350
70
640 X 480
60, 72, и 75
720 X 400
70
800 X 600
56, 60, 72, и 75
1024 X 768
60, 70, и 75
1280 X 1024
60 и 75
1360 X 768
60
1680 X 1050
60
1920 X 1080
60
Използвайте M4 x 8 мм винтове за закрепване на VESA стойката. Следвайте
инструкциите на производителя, включени към монтажното съоръжение, за да
монтирате правилно Вашия дисплей.
Забележка: Не използвайте по-дълги винтове, тъй като те могат да увредят
електрониката на дисплея.
Изисквания към видео картата
Уверете се, че Вашият компютър има инсталирана видео карта, която поддържа
естествената разделителна способност на Вашия Multi-Touch Desktop дисплей.
Естествената разделителна способност за 18.5 е 1366 x 768, а за 21.5, 24, и 27 е 1920
x 1080.
Поддържани режими на изобразяване и честоти на обновяване
Вашата видео карта трябва да поддържа един от режимите на изобразяване,
изброени в Таблица 1.
Tаблица 2. Поддържани режими на изобразяване и честоти на обновяване
Конфигуриране настройките на дисплея
След като сте свързали Multi-Touch дисплея и сте включили компютъра, трябва да
конфигурирате настройките на дисплея. Идеалните настройки за Multi-Touch
дисплея са както следва:
Режим на изображение (разделителна способност) 1366 х 768 или 1920 x 1080
Честота на обновяване (вертикална синхронизация) 60 Hz
Цветна дълбочина (брой цветове) поне 16 бита (high color)
Мултимедийни свойства
Multi-Touch Desktop дисплеят се доставя с високоговорители, вградени на гърба на
корпуса и в обхвата на доставката са включени аудио кабели. Тези кабели могат да
се включат от долната страна на дисплея.
Информация, собственост на 3M Touch Systems
Page 31

29 3M™ Multi-Touch Desktop дисплеи Ръководство за потребителя
USB порт Аудио VGA порт HDMI порт Дисплей порт Захранване
Достъп до видео контролите
Контролите за настройка на видео изображението са разположени отдолу вдясно на
Multi-Touch дисплея. Тези капацитивни бутони с докосване Ви позволяват да
покажете екранно меню, с което да настроите видео изображението.
Настройвайте изображението при нормални условия на осветление.
Покажете тестово изображение или мрежа.
Меню/избор —/намаляване +/увеличаване Цикъл/излизане Захранване
Забележка: В екранното меню също има указания за използването на бутоните, както е
показано по-долу. Когато екранното меню е активирано, изображението ще се появи над
бутоните, за по-лесно ориентиране.
Настройка на видео изображението на дисплея
Вашият Multi-Touch Desktop дисплей има четири контрола за настройка на видео
изображението.
Информация, собственост на 3M Touch Systems
Page 32

30 3M™ Multi-Touch Desktop дисплеи Ръководство за потребителя
Екранно
меню
Избор
Описание
ИЗБОР НА СИГНАЛ
Възможностите са VGA, HDMI, DP, или излизане
Избира източника на входен сигнал
ВИДЕО
Възможностите са яркост, контраст или излизане
AUTO
Меню/избор - показва или скрива екранното меню. Избира опции от
настоящото меню или запомня настоящите настройки. Докоснете
— (намаляване) или + (увеличаване), за да промените стойността.
— (намаляване) -- прелиства назад през точките на менюто -- намалява
стойността на избраната опция или се връща към предишната точка на менюто.
+ (увеличаване) -- прелиства напред през точките на менюто -- увеличава
стойността на избраната опция или се придвижва към следващата точка на
менюто.
Ако не натискате бутоните Меню/избор, — (намаляване) или + (увеличаване)
за 30 секунди, програмата за настройка на изображението спира автоматично и
менюто се скрива. Натиснете бутона "Меню" веднъж, за да покажете долното
меню за бърза настройка.
Ако натиснете бутона "Меню" втори път, се показва екранното меню, както е
показано по-долу.
Информация, собственост на 3M Touch Systems
Page 33

31 3M™ Multi-Touch Desktop дисплеи Ръководство за потребителя
Екранно
меню
Избор
Описание
ЯРКОСТ
Настройте яркостта с бутоните + или - и докоснете
ИЗБОР, за да потвърдите настройката.
КОНТРАСТ
Настройте контраста с бутоните + или - и докоснете
ИЗБОР, за да потвърдите настройката.
АУДИО
Регулирайте силата на звука на високоговорителите с
бутоните + или –
ЦВЯТ
Възможностите са Избран от потребителя цвят,
Предварително настроена цветна температура или
Излизане
ИЗБРАН ОТ ПОТРЕБИТЕЛЯ ЦВЯТ
Настройва червения, зеления и синия канал според
Вашите предпочитания.
ЦВЕТНА ТЕМПЕРАТУРА
Настройва цветната температура на предварително
зададените стойности 1 (6500 К) или 2 (9300 К).
ИЗОБРАЖЕНИЕ
Възможностите са Автоматично конфигуриране,
Часовник, Фаза, Х. позиция, В. позиция или Излизане
AВТОМАТИЧНО КОНФИГУРИРАНЕ
Извършва автоматично конфигуриране на часовника,
фазата, хоризонталното и вертикалното позициониране.
ЧАСОВНИК и ФАЗА
Ако се виждат вертикални линии поради шум,
параметрите могат да се настроят ръчно. Настройте този
параметър така, че или вертикалните линии от шум да се
заменят с равномерен шум по целия екран, или шумът да
изчезне напълно.
Х. ПОЗИЦИЯ (хоризонтална позиция)
Движи изображението хоризонтално по екрана наляво
или надясно.
В. ПОЗИЦИЯ (вертикална позиция)
Движи изображението вертикално по екрана нагоре или
надолу.
ЕЗИК
Избира езика на екранното меню - изборът е между
английски, френски, немски, италиански и китайски
Информация, собственост на 3M Touch Systems
Page 34

32 3M™ Multi-Touch Desktop дисплеи Ръководство за потребителя
Екранно
меню
Избор
Описание
ИНСТРУМЕНТИ
Възможностите са таймер, хоризонтално и
вертикалното положение на екранното меню.
ТАЙМЕР НА ЕКРАННОТО МЕНЮ
Настройва колко време екранното меню да остава на
екрана. Възможностите в подменюто са: Фабрични
настройки, острота или излизане
ХОРИЗОНТАЛНО И ВЕРТИКАЛНО ПОЛОЖЕНИЕ
НА ЕКРАННОТО МЕНЮ
Настройва позицията на екранното меню в екрана.
ФАБРИЧНИ НАСТРОЙКИ
Възстановява контролните функции до оригиналните,
фабрично настроени стойности.
ОСТРОТА
Настройва изображението да бъде по-остро или по-
неясно (полезно за текстов режим).
ЗАКЛЮЧВАНЕ
Използва се за заключване на дисплея – за отключване се
използва последователността
Mеню>нагоре>надолу>нагоре>надолу>меню.
ИЗЛИЗАНЕ
Излиза от екранното меню.
Информация, собственост на 3M Touch Systems
Page 35

33 3M™ Multi-Touch Desktop дисплеи Ръководство за потребителя
Глава 2
Софтуер за Вашия Multi-Touch Desktop
дисплей
Windows® 7 USB съвместимост
Multi-Touch Desktop дисплеят е съвместим с Windows® 7 без допълнителен
софтуер. Вижте документацията на Windows 7 за допълнителна информация.
Всички други платформи
Когато използвате операционните системи Windows® XP, Vista или Linux, 3M
предлага софтуера MicroTouch™ MT 7 за сензорните драйвери. Информация за
това, как да напишете собствени драйвери за комуникация с 3M Multi-Touch
технологията, вижте указанията за работа с PCT контролера (TSD-40847).
За потребителите, използващи операционна система, различна от Windows 7, този
документ дава протокола за комуникация, необходим за директно управление на
електрониката. Това позволява на разработчиците на софтуер, който използва
други операционни системи като Microsoft Windows® Vista или Linux® да напишат
собствени драйвери и да постигнат същите резултати.
Помощ за прилагането на въвеждане с докосване
Имайте предвид, че не всички приложения са готови за въвеждане с докосване въвеждането с докосване е функция на ВАШЕТО приложение. Проверете при
производителя на вашето приложение дали софтуерът поддържа въвеждане с
докосване.
За допълнителна информация относно софтуера 3M Micro Тouch, вижте:
Ръководство за потребителя на MT7 (25695).
Информация, собственост на 3M Touch Systems
Page 36

34 3M™ Multi-Touch Desktop дисплеи Ръководство за потребителя
Инсталиране на 3M™ MicroTouch™ софтуера
Помнете, че Windows® 7 не изисква допълнителен софтуер за поддържането на
въвеждане с докосване.
Обаче за операционните системи Windows® XP, Vista или Linux®, софтуерът 3M™
MicroTouch™ Ви позволява Multi-Touch Desktop дисплеят да работи с Вашия
компютър. Софтуерът 3M™ MicroTouch™ включва контролен панел за настройка
на Вашите предпочитания за сензора за докосване, както и програма за
диагностика. Ако имате проблеми със сензора за докосване, можете да използвате
програмата за диагностика за да тествате системата.
За повече информация относно инсталирането на софтуера и използването на
контролния панел, вижте ръководството за потребителя на софтуера 3M™
MicroTouch™ на съпровождащото CD или на фирмения уебсайт на
www.3m.com/touch.
Информация, собственост на 3M Touch Systems
Page 37

35 3M™ Multi-Touch Desktop дисплеи Ръководство за потребителя
Въпрос
Решение
Няма изображение
(тъмен екран)
Има ли захранване дисплея?
Проверете дали захранващият кабел е свързан правилно и стабилно
в заземен електрически контакт.
Проверете дали AC конектора е вкаран добре в дисплея.
Проверете дали захранващият кабел е свързан правилно и стабилно
в контакта.
Опитайте с друг мрежов кабел.
Опитайте да включите към друг контакт.
Няма изображение
(тъмен екран)
Получава ли дисплеят видео сигнал от компютъра?
Проверете дали компютърът е включен.
Проверете дали видео кабелът е свързан правилно и стабилно към
дисплея и към компютъра.
Проверете дали светодиодът отзад на дисплея свети зелено.
Проверете да няма прегънати пинове в конекторите на видео
кабела (и от двете страни).
Проверете дали видео картата е плътно вкарана в слота на
компютъра.
Глава 3
Отстраняване на неизправности и
поддръжка
Проблеми при инсталирането на дисплея
Таблица 21. Чести въпроси при инсталирането на дисплея
Информация, собственост на 3M Touch Systems
Page 38

36 3M™ Multi-Touch Desktop дисплеи Ръководство за потребителя
Въпрос
Решение
Проверете дали видео изхода от картата отговаря на честотата на
обновяване на дисплея. Виж "Поддържани режими на видео
изображение и честоти на обновяване" в глава 1.
Проверете дали компютърът използва поддържан режим на
изображение. Виж "Поддържани режими на видео изображение и
честоти на обновяване" в глава 1.
Няма изображение
(тъмен екран)
Дисплеят не е ли в режим на пестене на енергия?
Ако светодиодът отзад на дисплея мига в оранжево, докоснете
екрана, натиснете някой клавиш на клавиатурата или мръднете
мишката, за да възстановите работния режим.
Проверете дали изборът на видео е правилен (OSD)
Няма изображение
(тъмен екран)
Не са ли стойностите на яркостта и контраста твърде ниски?
Настройте стойностите чрез видео контролите.
Ненормално изображение
Проверете дали видео изхода от картата отговаря на честотата на
обновяване на дисплея. Виж "Поддържани режими на видео
изображение и честоти на обновяване" в глава 1.
Проверете дали видео кабелът е свързан правилно и стабилно към
дисплея и към компютъра.
Цветовете на
изображението не са
нормални
Проверете дали видео кабелът е свързан правилно и стабилно към
дисплея и към компютъра.
Проверете да няма прегънати пинове в конекторите на видео
кабела (и от двете страни).
Смущения по екрана
Настройките на видео изображението не са правилни. Виж глава 1
за процедурата за настройка.
Чести въпроси при
инсталирането
Възможни решения
Сензорът за докосване не
реагира
Проверете процедурите по инсталиране. Свързани ли са правилно
всички кабели?
След като инсталирахте сензорния софтуер, рестартирахте ли
компютъра, за да активирате драйвера на сензора за докосване?
Откачете комуникационния кабел на сензора за докосване и го
закачете отново.
Отстраняване на неизправности по сензора за докосване
Ако имате проблеми със сензора за докосване, проверете за следните обикновени
грешки при инсталирането.
Таблица 22. Чести въпроси при инсталирането на сензора за докосване
Информация, собственост на 3M Touch Systems
Page 39

37 3M™ Multi-Touch Desktop дисплеи Ръководство за потребителя
Чести въпроси при
инсталирането
Възможни решения
Откачете захранващия кабел и го закачете отново.
Сензорът за докосване не е
точен
Калибрирайте сензора за докосване за настоящата видео
разделителна способност и операционна система. Вижте глава 2
на документа 25695 за допълнителна информация.
Курсорът не следва
движението на пръста или не
достига до края на сензора
Калибрирайте сензора за докосване за настоящата видео
разделителна способност и операционна система. Вижте глава 2
на документа 25695 за допълнителна информация.
Курсорът не се появява точно
под пръста Ви
Отворете контролния панел на сензора за докосване и проверете
дали всички отмествания на курсора (вертикални, хоризонтални,
от ръба) са изключени.
Калибрирайте сензора за докосване за настоящата видео
разделителна способност и операционна система.
Информация, собственост на 3M Touch Systems
Page 40

38 3M™ Multi-Touch Desktop дисплеи Ръководство за потребителя
Глава 4
Регулаторна информация
Одобрения от регулаторна агенция
Вашият продукт отговаря на следните регулаторни стандарти:
FCC-B
CE
TUV
Това оборудване е тествано и е намерено, че влиза в границите за клас В цифров
прибор, според чл. 15 от правилата на FCC. Тези граници са определени за да
осигурят разумна защита срещу вредно въздействие в жилищни помещения. Това
оборудване генерира, използва и може да изпуска енергия в радио честоти, и ако не
е инсталирано и използвано според инструкциите, може да окаже вредно
въздействие върху радио комуникациите. Няма гаранция, че въздействие няма да се
получи и при някои конкретни инсталации. Ако това оборудване оказва влияние
върху приемането на радио или телевизионен сигнал, което може да се установи
чрез включване и изключване на оборудването, потребителят може да коригира
това влияние чрез една или повече от следните мерки:
Преместете или преориентирайте приемащата антена.
Преместете оборудването по-далеч от приемника.
Консултирайте се с търговеца или с компетентен радио/телевизионен техник за
други предложения.
Този цифров прибор от клас B удовлетворява всички изисквания на канадската
регулация за предизвикващо интерференция оборудване.
Този прибор удовлетворява правилата на чл. 15 от FCC: Работата с прибора се
разрешава при изпълнението на две условия: (1) Приборът не оказва вредно
въздействие, и (2) приборът трябва да допуска получаване на въздействие,
включително въздействие, което може да предизвика нежелателно функциониране.
Информация, собственост на 3M Touch Systems
Page 41

39 3M™ Multi-Touch Desktop дисплеи Ръководство за потребителя
Предупреждение на FCC
За да осигури съвместимост с FCC, потребителят трябва да използва заземен
мрежов кабел и екраниран видео кабел с вградени феритни сърцевини. Ако ще се
използва BNC кабел, той трябва да е екраниран. Също така, всякакви
неоторизирани изменения или модификации, не одобрени изрично от отговорната
инстанция, могат да доведат до лишаване на потребителя от правото да работи с
този прибор.
3M Touch Systems не отговаря за радио или телевизионни смущения, предизвикани
от използване на други кабели и конектори, освен препоръчаните, или от
неоторизирани изменения или модификации по оборудването.
CE съвместимост за Европа
Приборът отговаря на изискванията на директива RoHS 2011/65/EU, ECC
директива 2004/108/EC по отношение на "Електромагнитна съвместимост" и на
2006/95/EC по отношение на "Безопасност".
Информация, собственост на 3M Touch Systems
Page 42

40 3M™ Multi-Touch Desktop дисплеи Ръководство за потребителя
Информацията в този документ подлежи на промяна без предупреждение. Никаква част от този документ не може да бъде
възпроизвеждана или предавана в никаква форма и по никакъв начин, електронен или механичен, за никаква цел, без изрично
писмено разрешение от 3M Touch Systems, Inc. 3M може да притежава патенти или заявки за патент, търговски марки, авторски
права или други права за интелектуална собственост, покриващи теми в този документ. Прилагането на този документ не Ви
дава лиценз за използването на тези патенти, търговски марки, авторски права или други права за интелектуална собственост,
освен ако това е изрично предвидено в писмено лицензионно споразумение с 3M Touch Systems, Inc.
Информацията в този документ е само указателна. За подробни инженерни спецификации, моля влезте във връзка с Вашия
местен инженер на 3M Touch Systems, Inc. 3M Touch Systems, Inc. се ангажира с непрекъснатото подобряване на конструкцията
на продуктите си. Поради това, спецификациите на продукта подлежат на промяна без предупреждение.
Изхвърляйте дисплея и негови компоненти в съответствие с всички приложими местни и правителствени
регулации.
"RoHS 2011/65/EU съвместим" означава, че продуктът или негови части не съдържат никакви вещества над максималната
допустима концентрация в EU RoHS директива 2011/65/EU, освен ако веществото е изключено от EU RoHS. Максималната
допустима концентрация се изразява тегловно в хомогенен материал. Тази информация представлява познанията и
убежденията на 3M, които може да се основават изцяло или частично на информация, предоставена от трети лица, доставчици
на 3M.
ЗАБЕЛЕЖКА: Поради многообразието на факторите, които влияят върху използването и характеристиките на продуктите на
3M Touch Systems, Inc. („продукти“”), включително това, че механичното оборудване има различни операционни
характеристики от електромеханичното оборудване, някои от които фактори са под контрол изключително от потребителя, е
съществено потребителят да оцени продукта и софтуера на 3M Touch Systems, Inc., за да определи дали той е подходящ за
конкретната цел на потребителя и за метода на приложение от потребителя. Определенията, инженерно-техническата
документация и препоръките на 3M Touch Systems, Inc. се предоставят за удобство на потребителя, но тяхната точност и
пълнота не е гарантирана. Продуктите и софтуерът на 3M Touch Systems, Inc. не са специално предназначени за използване в
медицински прибори по дефиницията на федералния закон на САЩ. Продуктите и софтуерът на 3M Touch Systems, Inc. не
трябва да се използват в такива предназначения без изрично писмено съгласие от 3M Touch Systems, Inc. Ако приложението на
потребителя включва използване в медицински прибори, потребителят трябва да се свърже със съответния търговски
представител.
ВАЖНА БЕЛЕЖКА ЗА КУПУВАЧА: Спецификациите подлежат на промяна без предупреждение. Тези продукти и софтуер
на 3M Touch Systems, Inc. гарантирано покриват публикуваните спецификации към датата на доставка и за периода, отбелязан
в спецификацията. 3M Touch Systems, Inc. не дава допълнителни гаранции, изрични или косвени, включително, но без да
се ограничава с косвени гаранции за продаваемост или пригодност за определена цел. Потребителят трябва да определи
дали продуктите и софтуерът на 3M Touch Systems, Inc. са пригодни за конкретната цел на потребителя и подходящи за
неговите методи на производство, включително отговорностите по интелектуалната собственост на приложението на
потребителя. Ако се докаже, че продуктът, софтуерът или носителят на софтуера не покриват гаранцията на 3M Touch Systems,
Inc. единственото задължение на 3M Touch Systems, Inc. и единственото обезщетение за потребителя или купувача ще бъде да
бъде ремонтиран или заменен продуктът или софтуерният носител или да се върне продажната цена, по усмотрение на 3M
Touch Systems, Inc. Гаранцията не задължава 3M Touch Systems, Inc. за продукт, софтуер или софтуерен носител, който е бил
модифициран, или повреден поради неправилна употреба, злополука или небрежност или ако е правен опит за ремонтиране от
каквито и да било лица, освен от 3M Touch Systems, Inc. 3M Touch Systems, Inc. няма да отговаря по никакви оплаквания,
свързани с продукта или софтуера за щети и загуби, преки, косвени, специални, случайни или резултиращи
(включително престои, пропуснати ползи и добра воля), независимо от отстояваната юридическа теза.
Авторско право © 2015 3M Всички права запазени.
Заглавие на документа: 3M™ Multi-Touch Desktop дисплеи Ръководство за потребителя
Номер на документа: TSD-40532, ревизия F
3M, логото на 3M, MicroTouch и логото на MicroTouch са регистрирани търговски марки или търговски марки на 3M в САЩ
и/или други страни.
Windows и/или други продукти на Microsoft са регистрирани търговски марки или търговски марки на Microsoft Corporation в
САЩ и/или други страни.
Linux е регистрирана търговска марка на Linus Torvalds в САЩ и/или други страни
Всички други търговски марки са собственост на съответните си притежатели.
Информация, собственост на 3M Touch Systems
Page 43

Stolni zaslon
3M™ Multi-Touch
Korisnički priručnik
Za proizvodnu liniju stolnog zaslona Multi-Touch:
M1866PW, M2167PW, M2467PW i M2767PW
Prije uporabe uređaja dobro proučite i slijedite sve sigurnosne
informacije navedene u Kratkim uputama za uporabu koje se nalaze na
stranici www.3M.co.uk/TouchUserGuides. Sačuvajte Kratke upute za
buduću uporabu.
3M Touch Systems Vlasničke informacije
Page 44

42 Stolni zaslon 3M™ Multi-Touch Korisnički priručnik
Sadržaj
Važne napomene ...................................................................................................... 43
Održavanje zaslona osjetljivog na dodir .................................................................. 43
Čišćenje i održavanje senzora osjetljivog na dodir .................................................. 44
Usluge podrške 3M Touch Systems ......................................................................... 44
Obratite se tvrtki 3M Touch Systems ....................................................................... 44
Poglavlje 1
Postavljanje stolnog zaslona Multi-Touch
Preduvjeti sustava ..................................................................................................... 45
Vađenje zaslona osjetljivog na dodir iz ambalaže .................................................... 46
Povezivanje zaslona osjetljivog na dodir ................................................................. 47
Testiranje stolnog zaslona Multi-Touch ................................................................... 47
Mogućnost postavljanja VESA-e ............................................................................. 47
Preduvjeti grafičke kartice ........................................................................................ 48
Podržani načini prikaza videozapisa i frekvencija osvježavanja .............................. 48
Konfiguracija postavki zaslona ................................................................................ 48
Multimedijske značajke ............................................................................................ 48
Pristup tipkama za upravljanje videozapisom .......................................................... 49
Podešavanje stolnog videozaslona ........................................................................... 49
Poglavlje 2
Uključivanje stolnog zaslona Multi-Touch
USB kompatibilnost sa sustavom Windows® 7 ....................................................... 53
Sve ostale platforme ................................................................................................. 53
Podrška za aplikaciju Multi-Touch .......................................................................... 53
Instaliranje softvera 3M™ MicroTouch™ ............................................................... 54
Poglavlje 3
Rješavanje problema i održavanje
Problemi s postavljanjem zaslona ............................................................................ 55
Rješavanje problema senzora osjetljivog na dodir ................................................... 56
Poglavlje 4
Informacije o propisima
Odobrenja regulatornih agencija .............................................................................. 58
Upozorenje FCC-a .................................................................................................... 59
CE usklađenost za Europu ........................................................................................ 59
3M Touch Systems, Inc. Vlasničke informacije
Page 45

43 Stolni zaslon 3M™ Multi-Touch Korisnički priručnik
Namjena
Zasloni na dodir tvrtke 3M™ Touch Systems osmišljeni su za unos dodirom i testirani
kako bi zamijenili postojeći zaslon. Ti su zasloni namijenjeni profesionalnom
postavljanju i uporabi u zatvorenim prostorima. Nisu osmišljeni ili testirani za uporabu
na opasnim mjestima. Tvrtka 3M nije procijenila upotrebu u bilo koje druge svrhe te
ona može dovesti do nesigurnih uvjeta.
Važne napomene
U uvjetima ekstremnih temperatura i vlage primjetna je kondenzacija između zaslona
osjetljivog na dodir i zaslona. Da biste ublažili te uvjete, postavite uređaj na mjesto na
kojem će se upotrebljavati i pričekajte 24 sata da se uvjeti stabiliziraju prije nego što
uključite zaslon. Vidljiva je kondenzacija privremena i neće imati dugoročan učinak
na rad zaslona.
Prilikom isključivanja kabela držite utikač, ne povlačite kabel.
Nemojte povezivati ili odspajati ovaj proizvod tijekom električne oluje.
Zaslon postavite u dobro prozračen prostor. Omogućite dovoljno prozračivanje kako
biste zaštitili zaslon od pregrijavanja i osigurali pouzdan i neprekidan rad.
Nemojte izlagati zaslon izravnom sunčevu svjetlu ili toplini. Pasivno zagrijavanje
može uzrokovati oštećenje kućišta i drugih dijelova.
Slab uzorak mreže značajka je PCT senzora vidljiva u određenim uvjetima
osvjetljenja.
Ne postavljajte zaslon u prostorima u kojima može doći do snažnih vibracija.
Primjerice, oprema za proizvodnju u blizini može stvarati snažne vibracije. Vibracije
mogu uzrokovati gubitak boje na zaslonu ili smanjenje kvalitete videoprikaza.
Dodirni kontroleri 3M navedeni u ovom dokumentu uređaji su velike brzine
kompatibilni s USB-om.
3M ne jamči usklađenost s USB-uređajima prema tehničkim značajkama USB-a.
Održavanje zaslona osjetljivog na dodir
Za održavanje zaslona i njegovog rada u punoj funkciji:
Održavajte zaslon i senzor osjetljiv na dodir čistima.
Podesite kontrole videozapisa zaslona.
Zaslon nemojte postavljati na mjesto na kojem ventilacija može biti spriječena.
Omogućite dovoljno prozračivanje kako biste zaštitili zaslon od pregrijavanja i
osigurali pouzdan i neprekidan rad.
3M Touch Systems, Inc. Vlasničke informacije
Page 46

44 Stolni zaslon 3M™ Multi-Touch Korisnički priručnik
Čišćenje i održavanje senzora osjetljivog na dodir
Periodički čistite stakleni senzor osjetljiv na dodir, isključite zaslon prije čišćenja.
Otopina izopropilnog alkohola i vode u omjeru 50:50 najbolje je sredstvo za čišćenje
senzora osjetljivog na dodir.
Sredstvo za čišćenje nanesite mekom krpom koja ne otpušta dlačice. Izbjegavajte
uporabu prljavih krpa.
Navlažite krpu i zatim očistite senzor. Raspršite sredstvo na krpu, a ne na senzor, tako
da kapljice ne uđu u zaslon ili zamrljaju okvir.
Usluge podrške 3M Touch Systems
Posjetite web-mjesto tvrtke 3M Touch Systems http://www.3m.com/touch/ i preuzmite
softver MT 7, upravljačke programe i tehničku dokumentaciju.
Otvorena telefonska linija: 978-659-9200
Faks: 978-659-9400
Besplatna linija: 1-866-407-6666 (opcija 3)
E-pošta: US-TS-techsupport@mmm.com
Obratite se tvrtki 3M Touch Systems
Kontaktni podaci za sve urede mogu se pronaći na: http://www.3m.com/touch/
3M Touch Systems, Inc. Vlasničke informacije
Page 47

45 Stolni zaslon 3M™ Multi-Touch Korisnički priručnik
Poglavlje 1
Postavljanje stolnog zaslona Multi-Touch
Preduvjeti sustava
Stolni zaslon Multi-Touch zahtijeva računalo (PC).
Vaše računalo mora imati USB priključak na koji se može priključiti kabel senzora
osjetljivog na dodir.
Vaše računalo za zaslon mora imati grafičku karticu i instaliran upravljački program
za video.
Pri odabiru radnog prostora odlučite se za čvrstu, ravnu površinu. Također provjerite
možete li jednostavno pristupiti stražnjem dijelu zaslona osjetljivog na dodir i računala.
Jednostavni pristup omogućuje jednostavno postavljanje zaslona osjetljivog na dodir.
Napomena: Prije postavljanja zaslona Multi-Touch, slijedite sve sigurnosne informacije
navedene u kratkim uputama za uporabu koje se nalaze na stranici
www.3M.co.uk/TouchUserGuides.
3M Touch Systems, Inc. Vlasničke informacije
Page 48

46 Stolni zaslon 3M™ Multi-Touch Korisnički priručnik
USB kabel
Audiokabel
VGA kabel
DVI kabel
Kabel za napajanje za SAD
Konverter iz DVI u HDMI
Vađenje zaslona osjetljivog na dodir iz ambalaže
Stolni zaslon Multi-Touch sadrži:
USB komunikacijski kabel
DVI i VGA videokabele i konverter iz HDMI u DVI
Audiokabel
Kabel za napajanje i pretvarač za SAD
CD sa softverom i dokumentaciju
Kabeli isporučeni sa stolnim zaslonom Multi-Touch
3M Touch Systems, Inc. Vlasničke informacije
Page 49

47 Stolni zaslon 3M™ Multi-Touch Korisnički priručnik
Model
Obrazac VESA
M1866PW
100 x 100
M2167PW
100 x 100
M2467PW
200 x 100
M2767PW
200 x 100
Povezivanje zaslona osjetljivog na dodir
Za povezivanje stolnog zaslona Multi-Touch:
1. Isključite računalo prije povezivanja ili odspajanja zaslona osjetljivog na dodir.
2. Odaberite ili DVI/HDMI ili VGA kabel. Povežite jedan kraj videokabela s
videopriključkom na zaslonu. Povežite drugi kraj s grafičkom karticom u računalu.
3. Povežite jedan kraj kabela USB senzora osjetljivog na dodir s LCD-om, a drugi kraj
na slobodan priključak na računalu.
4. Uključite kabel za napajanje izmjeničnom strujom na zaslon.
5. Povežite kabel za napajanje s odgovarajućim izvorom napajanja.
Testiranje stolnog zaslona Multi-Touch
Napomena: Lampica statusa napajanja stolnog zaslona nalazi se ispred okvira.
Nakon povezivanja uključite prekidač koji se nalazi na dnu prednjeg okvira.
Provjerite jesu li svi kabeli pravilno povezani. Obavezno zategnite sve vijke kabela.
Za testiranje zaslona:
1. uključite računalo. Nemojte dodirivati zaslon tijekom pokretanja kako ne biste
prekinuli slijed pokretanja koji utječe na položaj dodira.
2. Provjerite prikazuje li se slika videozapisa. Provjerite LED kako biste osigurali da
zaslon nije u načinu rada uštede energije (narančasta).
3. Provjerite je li slika videozapisa centrirana unutar područja za prikaz. Upotrijebite
tipke za upravljanje zaslonom da biste podesili sliku ako je potrebno.
Tipke za upravljanje videozapisom možete podesiti kako bi odgovarale vašim željama.
Mogućnost postavljanja VESA-e
Ako ne želite upotrebljavati stalak, možete ga ukloniti i upotrijebiti drugi stalak VESA.
Jedinica ima obrazac montiranja VESA na stražnjoj strani kako bi se omogućila
mogućnost montiranja kraka. Za detalje o vašem zaslonu pogledajte tablicu u nastavku.
Za pričvršćivanje stalka VESA koristite se vijcima M4 x 8 mm. Slijedite upute
proizvođača isporučene s uređajem za montiranje kako biste ispravno pričvrstili zaslon.
Napomena: Nemojte se koristiti dužim vijcima jer bi mogli potencijalno oštetiti
elektroniku u zaslonu.
3M Touch Systems, Inc. Vlasničke informacije
Page 50

48 Stolni zaslon 3M™ Multi-Touch Korisnički priručnik
Način prikaza
Frekvencija osvježavanja (Hz)
640 x 350
70
640 x 480
60, 72 i 75
720 x 400
70
800 x 600
56, 60, 72 i 75
1024 x 768
60, 70 i 75
1280 x 1024
60 i 75
1360 x 768
60
1680 x 1050
60
1920 x 1080
60
Preduvjeti grafičke kartice
Provjerite ima li vaše računalo instaliranu grafičku karticu koja podržava nativnu
razlučivost videozapisa stolnog zaslona Multi-Touch. Nativna je razlučivost za 18,5 1366
x 768, a za 21,5, 24 i 27 1920 x 1080.
Podržani načini prikaza videozapisa i frekvencija osvježavanja
Vaša grafička kartica trebala bi podržavati jedan od načina prikaza navedenih u tablici 1.
Tablica 3. Primjenjivi načini prikaza i frekvencija osvježavanja
Konfiguracija postavki zaslona
Nakon što povežete stolni zaslon Multi-Touch i uključite računalo, možda ćete morati
konfigurirati postavke zaslona. Idealne postavke za stolni zaslon Multi-Touch jesu
sljedeće:
Način prikaza (razlučivost videozapisa) 1366 x 768 ili 1920 x 1080
Frekvencija osvježavanja (okomita sinkronizacija) 60 Hz
Dubina boja (broj boja) barem 16-bitne (boje visoke razlučivosti)
Multimedijske značajke
Uz stolni zaslon Multi-Touch isporučeni su i zvučnici ugrađeni u stražnji dio kućišta
zaslona te audiokabeli. Ti se kabeli mogu povezati ispod zaslona.
3M Touch Systems, Inc. Vlasničke informacije
Page 51

49 Stolni zaslon 3M™ Multi-Touch Korisnički priručnik
USB priključak Audio VGA priključak HDMI priključak Priključak zaslona Uklj./isklj.
Pristup tipkama za upravljanje videozapisom
Tipke za podešavanje videoprikaza nalaze se na donjoj desnoj strani stolnog zaslona
Multi-Touch. Te vam tipke osjetljive na dodir omogućuju prikaz izbornika na zaslonu
kojim se podešava slika videozapisa.
Tipke za upravljanje podesite u uobičajenim uvjetima osvjetljenja.
Prikažite testnu sliku ili uzorak kad god podešavate videozapis.
Izbornik/odabir —/Smanji +/Povećaj Ciklus/izlaz Uklj./isklj.
Napomena: Prikaz na zaslonu (OSD) omogućuje brzi vodič za ove tipke, kao što je prikazano u
nastavku. Kada je OSD aktiviran, preko ovih će se tipki prikazati slika za lakše snalaženje.
Podešavanje stolnog videozaslona
Stolni zaslon Multi-Touch ima četiri kontrole za podešavanje prikaza videozapisa.
3M Touch Systems, Inc. Vlasničke informacije
Page 52

50 Stolni zaslon 3M™ Multi-Touch Korisnički priručnik
OSD
Izbori
Opis
SIGNAL SELECT (Odabir signala)
Postoji izbor između VGA, HDMI, DP ili Exit (Izlaz)
Odabire primjenjiv izvor unosa
VIDEO
Postoji izbor između Brightness (Svjetlina), Contrast
AUTO
Menu/Select (Izbornik/odabir) - prikazuje ili skriva izbornik na zaslonu. Select
(Odabir) označava trenutačnu opciju izbornika ili sprema trenutačnu postavku.
Pritisnite — (Decrease) (Smanji) ili + (Increase) (Povećaj) da biste promijenili
vrijednost.
— (Decrease) (Smanji) -- Pomicanje unatrag po stavkama u izborniku --
smanjivanje vrijednosti odabrane opcije ili pomicanje na prethodnu stavku izbornika.
+ (Increase) (Povećaj) -- Pomicanje prema naprijed po stavkama izbornika --
povećanje vrijednosti odabrane opcije ili pomicanje na sljedeću stavku izbornika.
Ako ne pritisnete Menu/ Select (Izbornik/odabir) ili tipke — (Decrease) (Smanji) ili
+ (Increase) (Povećaj) unutar 30 sekundi, vrijeme prilagodbe prikaza programa isteći
će i opcije izbornika sakrit će se. Jednom pritisnite tipku Menu (Izbornik) za prikaz
izbornika u nastavku za brza podešavanja.
Ako ponovno pritisnete tipku Menu (Izbornik), prikazat će se prikaz izbornika na zaslonu
(OSD), kao što je prikazano u nastavku.
3M Touch Systems, Inc. Vlasničke informacije
Page 53

51 Stolni zaslon 3M™ Multi-Touch Korisnički priručnik
OSD
Izbori
Opis
(Kontrast) ili Exit (Izlaz)
BRIGHTNESS (Svjetlina)
Podešava svjetlinu s pomoću tipki + ili -, a pritiskom na
SELECT (Odabir) potvrđuje novu postavku.
CONTRAST (Kontrast)
Podešava kontrast s pomoću tipki + ili -, a pritiskom na
SELECT (Odabir) potvrđuje novu postavku.
AUDIO (Zvuk)
Podešava glasnoću zvučnika s pomoću tipki + ili –
COLOR (Boja)
Postoji izbor između User Defined Color (Boja prema želji
korisnika), Preset Color Temperature (Prethodno
postavljena temperatura boje) ili Exit (Izlaz)
USER DEFINED COLOR (Boja prema želji korisnika)
Podešava crveni, zeleni i plavi kanal prema vašim željama.
COLOR TEMPERATURE (Temperatura boje)
Podešava temperaturu boje na PRESET 1 (6500 temperatura
boje) ili PRESET 2 (9300 temperatura boje).
IMAGE (Slika)
Postoji izbor između Auto Tune (Automatsko
podešavanje), Clock (Sat), Phase (Faza), H. Position
(Vodoravan položaj), V. Position (Okomiti položaj) ili Exit
(Izlaz)
AUTO TUNE (Automatsko podešavanje)
Služi za automatsku konfiguraciju značajki Clock (Sat), Phase
(Faza), Vertical and Horizontal positions (Okomiti i
vodoravni položaj).
CLOCK (Sat) i PHASE (Faza)
Ako postoje trake ili smetnje, ova se postavka može podesiti ručno.
Podesite ovu postavku tako da okomite trake smetnji zamijeni
jednaka količina smetnji preko cijelog zaslona ili tako da
smetnje potpuno nestanu.
H POSITION (Vodoravan položaj)
Sliku pomiče vodoravno na zaslonu, ulijevo ili udesno.
V POSITION (Okomiti položaj)
Sliku pomiče okomito na zaslonu, prema gore ili dolje
3M Touch Systems, Inc. Vlasničke informacije
Page 54

52 Stolni zaslon 3M™ Multi-Touch Korisnički priručnik
OSD
Izbori
Opis
LANGUAGE (Jezik)
Postavlja jezik OSD-a -- ponuđeni su engleski, francuski,
njemački, talijanski i kineski
TOOLS (Alati)
Postoji izbor između OSD Timing (Vrijeme OSD-a), OSD
Horizontal (Vodoravni OSD), OSD Vertical (Okomiti
OSD)
OSD TIMING (Vrijeme OSD-a)
Podešava koliko dugo izbornik ostaje na zaslonu. Izbori
podizbornika sljedeći su: Recall (Opoziv), Sharpness
(Oštrina) ili Exit (Izlaz)
OSD HORIZONTAL and VERTICAL (Vodoravni i
okomiti OSD)
Podešava položaj OSD-a na zaslonu
RECALL (Opoziv)
Vraća upravljačke funkcije natrag na izvorne tvorničke
vrijednosti.
SHARPNESS (Oštrina)
Podešava kvalitetu videozapisa između oštre ili
zamućene (korisno za način teksta).
KEY LOCK (Zaključavanje tipki)
Služi za zaključavanje zaslona – za otključavanje zaslona
koristi se slijed Izbornik>gore>dolje>gore>dolje>izbornik.
EXIT (Izlaz)
Izlaz iz OSD izbornika.
3M Touch Systems, Inc. Vlasničke informacije
Page 55

53 Stolni zaslon 3M™ Multi-Touch Korisnički priručnik
Poglavlje 2
Uključivanje stolnog zaslona Multi-Touch
USB kompatibilnost sa sustavom Windows® 7
Stolni zaslon Multi-Touch kompatibilan je sa sustavom Windows 7 bez dodatnog
softvera. Dodatne informacije potražite u dokumentaciji za Windows 7 tvrtke Microsoft.
Sve ostale platforme
Kada upotrebljavate operacijske sustave Windows XP, Vista ili Linux, 3M pruža softver
MicroTouch MT 7 za upravljačke programe višestrukog dodira. Informacije o pisanju
vlastitih upravljačkih programa za ostvarivanje sučelja s tehnologijom 3M Multi-Touch,
pročitajte Vodič za PCT kontroler (TSD-40847).
Za korisnike koji koriste operacijske sustave osim Windowsa 7 ovaj dokument nudi
komunikacijski protokol koji je potreban za izravan razgovor s elektronikom. Ovo
omogućuje razvojnim inženjerima upotrebu drugih operacijskih sustava poput Microsoft
Windows® Vista ili Linux® za pisanje vlastitih upravljačkih programa i postizanje istih
rezultata višestrukog dodira.
Podrška za aplikaciju Multi-Touch
Upamtite da ne podržavaju sve aplikacije višestruki dodir -- takvo je ponašanje funkcija
VAŠE aplikacije. Upitajte prodavača aplikacije podržava li vaš softver višestruki dodir.
Za dodatne informacije o softveru 3M Micro Touch pogledajte: Korisnički priručnik
MT7 (25695).
3M Touch Systems, Inc. Vlasničke informacije
Page 56

54 Stolni zaslon 3M™ Multi-Touch Korisnički priručnik
Instaliranje softvera 3M™ MicroTouch™
Upamtite da za sustav Windows® 7 nije potreban dodatni softver kako bi se omogućila
funkcija višestrukog dodira.
Međutim, softver 3M™ MicroTouch™ omogućuje stolnom zaslonu Multi-Touch da radi
s vašim računalom za operacijske sustave Windows® XP, Vista ili Linux®. Softver
3M™ MicroTouch™ uključuje upravljačku ploču za postavljanje željenih opcija senzora
osjetljivog na dodir i dijagnostičkog uslužnog programa. Ako imate poteškoća sa
senzorom osjetljivim na dodir, možete upotrijebiti dijagnostičke uslužne programe koji su
isporučeni za testiranje sustava.
Za više informacija o instalaciji ovog softvera i upotrebi upravljačke ploče pogledajte
korisnički priručnik softvera 3M™ MicroTouch™ na priloženom CD-u ili na web-mjestu
tvrtke www.3m.com/touch.
3M Touch Systems, Inc. Vlasničke informacije
Page 57

55 Stolni zaslon 3M™ Multi-Touch Korisnički priručnik
Problem
Rješenje
Ne prikazuje se slika
(prazan zaslon)
Je li zaslon uključen u napajanje?
Provjerite je li kabel za napajanje zaslona ispravno i sigurno povezan s
uzemljenom električnom utičnicom.
Provjerite je li utikač za ulaz izmjenične struje čvrsto uključen u zaslon.
Provjerite je li kabel za napajanje zaslona ispravno i sigurno povezan s
električnom utičnicom.
Pokušajte s drugim kabelom za napajanje.
Pokušajte s drugom električnom utičnicom.
Ne prikazuje se slika
(prazan zaslon)
Prima li zaslon ispravan videosignal od računala?
Provjerite je li računalo uključeno.
Provjerite je li videokabel ispravno i sigurno povezan sa zaslonom i
računalom.
Provjerite je li LED-žaruljica na stražnjoj strani zaslona zelena.
Provjerite jesu li zatici priključka videokabela savinuti (oba kraja).
Provjerite je li grafička kartica čvrsto postavljena u utor za karticu u
računalu.
Provjerite odgovara li videoulaz grafičke kartice frekvenciji
osvježavanja zaslona. Pogledajte Podržani načini prikaza videozapisa i
frekvencija osvježavanja u Poglavlju 1.
Provjerite upotrebljava li vaše računalo podržani način prikaza.
Pogledajte Podržani načini prikaza videozapisa i frekvencija
osvježavanja u Poglavlju 1.
Poglavlje 3
Rješavanje problema i održavanje
Problemi s postavljanjem zaslona
Tablica 21. Česti problemi s postavljanjem zaslona
3M Touch Systems, Inc. Vlasničke informacije
Page 58

56 Stolni zaslon 3M™ Multi-Touch Korisnički priručnik
Problem
Rješenje
Ne prikazuje se slika
(prazan zaslon)
Je li zaslon u načinu upravljanja potrošnjom?
Ako LED-žaruljica na stražnjoj strani treperi jantarnom bojom,
dodirnite zaslon, pritisnite bilo koju tipku na tipkovnici ili pomaknite
miš da biste nastavili s radom.
Provjerite je li odabir videozapisa ispravan (OSD).
Ne prikazuje se slika
(prazan zaslon)
Jesu li postavke svjetline i kontrasta preniske?
Upotrijebite tipke za upravljanje zaslonom da biste podesili ove
vrijednosti.
Neuobičajena slika
Provjerite odgovara li videoulaz grafičke kartice frekvenciji
osvježavanja zaslona. Pogledajte Podržani načini prikaza videozapisa i
frekvencija osvježavanja u Poglavlju 1.
Provjerite je li videokabel ispravno i sigurno povezan sa zaslonom i
računalom.
Boje na slici nisu uobičajene
Provjerite je li videokabel ispravno i sigurno povezan sa zaslonom i
računalom.
Provjerite jesu li zatici priključka videokabela savinuti (oba kraja).
Smetnje na zaslonu
Prilagodbe videoprikaza nisu točne. Postupke podešavanja potražite u
Poglavlju 1.
Česti problemi s
postavljanjem
Moguća rješenja
Senzor osjetljiv na dodir ne
reagira na dodir
Pregledajte postupke postavljanja. Jesu li kabeli ispravno povezani?
Nakon što ste instalirali softver Touch, jeste li ponovno pokrenuli
računalo da biste aktivirali upravljački program senzora?
Isključite komunikacijski kabel senzora i ponovno ga priključite.
Isključite kabel za napajanje i ponovno ga priključite.
Senzor osjetljiv na dodir nije
precizan
Kalibrirajte senzor osjetljiv na dodir za trenutačnu razlučivost
videozapisa i operacijski sustav. Dodatne informacije potražite u
Poglavlju 2 dokumenta 25695.
Pokazivač ne slijedi pokrete
prsta ili ne doseže rubove
senzora
Kalibrirajte senzor osjetljiv na dodir za trenutačnu razlučivost
videozapisa i operacijski sustav. Dodatne informacije potražite u
Poglavlju 2 dokumenta 25695.
Rješavanje problema senzora osjetljivog na dodir
Ako imate problema sa senzorom osjetljivim na dodir, pročitajte sljedeći popis
uobičajenih pogrešaka pri postavljanju.
Tablica 22. Česti problemi s postavljanjem senzora osjetljivog na dodir
3M Touch Systems, Inc. Vlasničke informacije
Page 59

57 Stolni zaslon 3M™ Multi-Touch Korisnički priručnik
Česti problemi s
postavljanjem
Moguća rješenja
Pokazivač se ne nalazi izravno
ispod vašeg prsta
Otvorite upravljačku ploču senzora osjetljivog na dodir i provjerite
jesu li svi pomaci pokazivača (okomiti, rubni/vodoravni) isključeni.
Kalibrirajte senzor osjetljiv na dodir za trenutačnu razlučivost
videozapisa i operacijski sustav.
3M Touch Systems, Inc. Vlasničke informacije
Page 60

58 Stolni zaslon 3M™ Multi-Touch Korisnički priručnik
Poglavlje 4
Informacije o propisima
Odobrenja regulatornih agencija
Vaš je proizvod usklađen sa sljedećim regulatornim standardima:
FCC-B
CE
TUV
Ova je oprema testirana i utvrđeno je da je usklađena s ograničenjima digitalnog uređaja
Razreda B u skladu s dijelom 15. pravila FCC-a. Ova ograničenja namijenjena su
pružanju zaštite od štetnih interferencija u razumnim granicama u stambenim prostorima.
Oprema stvara, upotrebljava i može zračiti energijom radijske frekvencije te, ako nije
postavljena i ne upotrebljava se u skladu s uputama, može izazvati štetne interferencije
radijske komunikacije. Međutim, ne jamči se da neće doći do interferencija u određenim
slučajevima. Ako ova oprema uzrokuje interferencije prijemu radijske ili televizijske
opreme, što se može utvrditi isključivanjem i uključivanjem opreme, korisnik bi trebao
pokušati ispraviti interferenciju na jedan od sljedećih načina:
Okrenite ili premjestite prijamnu antenu.
Odmaknite opremu dalje od prijamnika.
Obratite se dobavljaču ili iskusnom tehničaru za radijske/televizijske prijamnike za
dodatne savjete.
Ovaj digitalni uređaj Razreda B ispunjava sve uvjete kanadskih propisa o opremi koja
uzrokuje interferenciju.
Ovaj je uređaj usklađen s dijelom 15. pravila FCC-a: Rad uređaja podložan je sljedećim
dvama uvjetima: (1) ovaj uređaj ne smije uzrokovati štetne interferencije i (2) ovaj uređaj
mora prihvatiti svaku primljenu interferenciju, uključujući i interferenciju koja može
uzrokovati neželjen način rada.
3M Touch Systems, Inc. Vlasničke informacije
Page 61

59 Stolni zaslon 3M™ Multi-Touch Korisnički priručnik
Upozorenje FCC-a
Kako bi se osigurala usklađenost s FCC-om, korisnik mora upotrebljavati uzemljeni
kabel za napajanje i isporučeni oklopljeni kabel za videosučelje sa zalijepljenom feritnom
jezgrom. Ako se koristi BNC kabel, koristite samo oklopljeni BNC(5) kabel. Osim toga,
neovlaštene promjene ili izmjene koje nije izričito odobrila strana odgovorna za
usklađenost može pravo korisnika na rukovanje uređajem učiniti nevažećim.
Tvrtka 3M Touch Systems nije odgovorna za radijske ili televizijske interferencije
uzrokovane uporabom kabela i priključaka koji nisu preporučeni ili neovlaštenim
promjenama ili izmjenama ove opreme.
CE usklađenost za Europu
Uređaj ispunjava uvjete navedene u Direktivi RoHS Europske unije 2011/65/EU, ECC
Direktivi 2004/108/EZ s obzirom na „Elektromagnetsku kompatibilnost” i 2006/95/EZ s
obzirom na „Sigurnost”.
3M Touch Systems, Inc. Vlasničke informacije
Page 62

60 Stolni zaslon 3M™ Multi-Touch Korisnički priručnik
Informacije u ovom dokumentu podložne su promjeni bez prethodne najave. Nijedan dio ovog dokumenta ne smije se
reproducirati ili prenijeti u bilo kojem obliku ili bilo kojim sredstvom, elektroničkim ili mehaničkim, za bilo koju svrhu, bez
izričitog pisanog dopuštenja tvrtke 3M Touch Systems, Inc. 3M može imati patente ili zahtjeve koji čekaju na patent, zaštitne
znakove, autorska prava ili druga prava intelektualnog vlasništva koja pokrivaju predmet u ovom dokumentu. Posjedovanje ovog
dokumenta ne daje vam licencu za te patente, zaštitne znakove, autorska prava ili druga prava intelektualnog vlasništva, osim
ako to nije izričito navedeno u pisanom licencnom ugovoru s poduzećem 3M Touch Systems, Inc.
Informacije navedene u ovom dokumentu namijenjene su samo kao smjernice. Za najnovije detaljne inženjerske tehničke
značajke obratite se inženjeru za aplikacije tvrtke 3M Touch Systems, Inc. Tvrtka 3M Touch Systems, Inc. predana je
neprekidnom poboljšanju dizajna proizvoda te su stoga tehničke značajke proizvoda podložne promjenama bez prethodne najave.
Zaslon i njegove dijelove odložite u skladu s primjenjivim lokalnim i državnim propisima.
„Sukladno s Direktivom RoHS 2011/65/EU” znači da proizvod ili dio ne sadrži bilo koju od tvari u više od maksimalne
vrijednosti koncentracije („MCV”) u EU-ovoj Direktivi RoHS 2011/65/EU, osim ako je tvar dio primjene koja je izuzeta prema
Direktivi EU RoHS. MCV-ovi su po težini homogeni materijali. Ove informacije predstavljaju znanja i uvjerenja tvrtke 3M, koja
se u cijelosti ili djelomično mogu temeljiti na informacijama koje dobavljači treće strane pruže tvrtki 3M.
NAPOMENA: S obzirom na niz čimbenika koji mogu utjecati na upotrebu i učinkovitost proizvoda („Proizvod”) tvrtke 3M
Touch Systems, Inc., uključujući i to da se radne značajke opreme čvrstog stanja razlikuju od onih elektromehaničke opreme, od
kojih su neki čimbenici jedinstveni dio znanja korisnika i pod njegovom kontrolom, neophodno je da korisnik procijeni proizvod
i softver poduzeća 3M Touch Systems, Inc kako bi se utvrdilo jesu li oni prikladni za korisnikovu određenu svrhu i prikladni za
korisnikov način primjene. Izjave, inženjerski/tehnički podaci i preporuke tvrtke 3M Touch Systems, Inc. pruženi su za
korisnikovu praktičnost, ali njihova točnost ili potpunost nije zajamčena. Proizvodi i softver tvrtke 3M Touch Systems, Inc. nisu
posebno dizajnirani za uporabu u medicinskim uređajima kako je utvrđeno u saveznom zakonu SAD-a. Proizvodi i softver tvrtke
3M Touch Systems, Inc. ne bi se trebali upotrebljavati u takvim primjenama bez izričitog pisanog pristanka tvrtke 3M Touch
Systems, Inc. Korisnik bi se trebao obratiti prodajnom predstavniku ako korisnikova mogućnost uključuje primjenu u
medicinskom uređaju.
VAŽNA NAPOMENA ZA KUPCA: Tehničke značajke podložne su promjeni bez prethodne najave. Ovi proizvodi i softver
tvrtke 3M Touch Systems, Inc. pod jamstvom su da zadovoljavaju objavljene tehničke značajke od datuma isporuke i za
razdoblje navedeno u tehničkim značajkama. Tvrtka 3M Touch Systems, Inc. ne daje dodatna jamstva, izričita ili
podrazumijevana, uključujući, ali ne ograničavajući se na, podrazumijevana jamstva o mogućnosti prodaje ili
prikladnosti za određenu svrhu. Korisnik je odgovoran za utvrđivanje jesu li proizvodi i softver poduzeća 3M Touch Systems,
Inc. prikladni za korisnikovu određenu svrhu i pogodni za način proizvodnje, uključujući odgovornost za zaštitu prava
intelektualnog vlasništva za korisnikovu namjenu. Ako je za proizvod, softver ili medije softvera dokazano da nisu ispunili
jamstvo tvrtke 3M Touch Systems, Inc., tada će jedina obaveza tvrtke 3M Touch Systems, Inc. i isključivi pravni lijek korisnika
i kupca biti, prema mogućnosti tvrtke 3M Touch Systems, Inc., da popravi ili zamijeni tu količinu proizvoda ili medija softvera
ili vrati nabavnu cijenu. Tvrtka 3M Touch Systems, Inc. nije odgovorna prema jamstvu tvrtke 3M Touch Systems, Inc. za bilo
koji proizvod, softver ili medije softvera koji su izmijenjeni ili oštećeni zbog zloupotrebe, nesreće, nemara ili naknadnih
proizvodnih postupaka ili sastavljanja koje je napravio bilo tko osim tvrtke 3M Touch Systems, Inc. 3M Touch Systems, Inc. ne
snosi odgovornost u bilo kakvoj tužbi protiv njega koja je na bilo koji način povezana s proizvodima ili softverom za bilo
kakav gubitak ili štetu, bilo neodređenu izravnu, neizravnu, posebnu, slučajnu ili posljedičnu (uključujući prekid rada,
gubitak profita ili dobru volju), bez obzira na iznesenu pravnu teoriju.
Autorsko pravo © 2015 3M Sva prava pridržana.
Naslov dokumenta: Stolni zaslon 3M™ Multi-Touch Korisnički priručnik
Broj dokumenta: TSD-40532, Revizija F
3M, logotip 3M, MicroTouch i logotip MicroTouch registrirani su zaštitni znakovi ili zaštitni znakovi tvrtke 3M u Sjedinjenim
Američkim Državama i/ili drugim državama.
Windows i/ili drugi proizvodi tvrtke Microsoft koji se ovdje navode registrirani su zaštitni znakovi ili zaštitni znakovi tvrtke
Microsoft Corporation u SAD-u i/ili drugim državama.
Linux je registrirani zaštitni znak tvrtke Linus Torvalds u SAD-u i/ili drugim državama
Svi drugi zaštitni znakovi vlasništvo su njihovih određenih vlasnika.
3M Touch Systems, Inc. Vlasničke informacije
Page 63

3M™ Vícedotykový
stolní displej -
Uživatelská příručka
Pro výrobní řadu vícedotykového stolního displeje:
M1866PW, M2167PW, M2467PW, a M2767PW
Dříve než toto zařízení použijete, seznamte se s bezpečnostními
informacemi, uvedenými v Úvodní příručce na webu
www.3M.co.uk/TouchUserGuides. Úvodní příručku si uchovejte pro
budoucí potřebu.
3M Touch Systems chráněné informace
Page 64

62 3M™ Vícedotykový stolní displej - Uživatelská příručka
Obsah
Důležité poznámky ................................................................................................... 63
Údržba dotykového displeje ..................................................................................... 63
Ošetřování a čištění dotekového senzoru ................................................................. 64
Podpůrné služby společnosti 3M Touch Systems .................................................... 64
Obraťte se na 3M Touch Systems ............................................................................ 64
Kapitola 1
Nastavení vícedotykového stolního displeje
Systémové požadavky .............................................................................................. 65
Vybalení dotykového displeje .................................................................................. 66
Připojení dotykového displeje .................................................................................. 67
Testování vícedotykového stolního displeje ............................................................ 67
Možnost montáže VESA .......................................................................................... 67
Požadavky na grafickou kartu .................................................................................. 68
Podporované režimy zobrazení a obnovovací frekvence ......................................... 68
Konfigurace nastavení displeje ................................................................................ 68
Multimediální funkce ............................................................................................... 68
Přístup k ovládacím prvkům obrazu ......................................................................... 69
Úprava obrazu displeje ............................................................................................. 69
Kapitola 2
Aktivace vícedotykového stolního displeje
Kompatibilita USB se systémem Windows® 7 ....................................................... 73
Všechny ostatní platformy........................................................................................ 73
Podpora vícedotykových aplikací ............................................................................ 73
Instalace softwaru 3M™ MicroTouch™ .................................................................. 74
Kapitola 3
Odstraňování závad a údržba
Potíže při instalaci displeje ....................................................................................... 75
Odstraňování potíží s dotykovým senzorem ............................................................ 76
Kapitola 4
Regulační informace
Schválení regulačních agentur .................................................................................. 77
FCC varování ........................................................................................................... 78
Prohlášení o shodě CE v Evropě .............................................................................. 78
3M Touch Systems, Inc. chráněné informace
Page 65

63 3M™ Vícedotykový stolní displej - Uživatelská příručka
Účel použití
Dotykové displeje společnosti 3M™ Touch Systems jsou navrženy pro zadávání vstupu
dotykem a testovány jako náhrada stávajícího displeje. Tyto displeje jsou určeny pro
profesionální instalaci a použití v interiérech. Nejsou navrženy ani testovány pro použití
v nebezpečných prostorech. Použití v jiných aplikacích nebylo společností 3M
testováno a může vést k nebezpečným situacím.
Důležité poznámky
V případě vysokých teplot a vlhkosti je možné mezi dotykovou obrazovkou a
displejem pozorovat kondenzaci. Kvůli minimalizaci této kondenzace jednotku před
zapnutím umístěte do prostoru, kde bude používána a nechte ji 24 hodin stabilizovat.
Pozorovaná kondenzace je pouze přechodná a nemá žádný dlouhodobý účinek na
provoz displeje.
Při odpojování napájecí šňůry od sítě uchopte zástrčku, ale netahejte za šňůru.
Během bouřky tento produkt nepřipojujte ani neodpojujte.
Displej instalujte do dobře větraného prostoru. Postarejte se vždy o dobré větrání
displeje, abyste zabránili jeho přehřátí a zaručili tak trvalý a spolehlivý provoz.
Displej nevystavujte přímému slunečnímu světlu nebo teplu. Teplo může poškodit
kryt displeje a jiné části.
Základní charakteristikou PCT senzoru je obrazec jemné mřížky, viditelný za jistých
světelných podmínek.
Tento displej neinstalujte do prostor, kde mohou vznikat silné vibrace. Silné vibrace
může například produkovat blízké výrobní zařízení. Silné vibrace mohou způsobit
ztrátu barvy obrazu nebo špatnou kvalitu obrazu.
Dotekové kontroléry 3M uváděné v tomto dokumentu jsou zařízení s plnou rychlostí
kompatibilní s USB.
3M nezaručuje USB kompatibilitu podle USB specifikací.
Údržba dotykového displeje
Údržba displeje pro zachování jeho maximálního výkonu:
Displej a dotykový senzor udržujte v čistotě.
Upravte ovládací prvky obrazu displeje.
Neinstalujte displej na místo, kde může být zabráněno ventilaci. Vždy udržujte
dostatečnou ventilaci displeje, abyste zabránili jeho přehřátí a zaručili tak jeho trvalý a
spolehlivý provoz.
3M Touch Systems, Inc. chráněné informace
Page 66

64 3M™ Vícedotykový stolní displej - Uživatelská příručka
Ošetřování a čištění dotekového senzoru
Pravidelně čistěte skleněný povrch dotykového senzoru. Před čištěním displej vypněte.
Nejlepším čisticím prostředkem pro čištění dotekového senzoru je směs vody a
isopropylalkoholu v poměru 1:1.
Čisticí prostředek nanášejte měkkým hadrem, který nepouští vlákna. Nepoužívejte
drsné tkaniny.
Tkaninu navlhčete a očistěte senzor. Prostředek nastříkejte na hadr, nikoliv na senzor,
aby kapky nevnikly do displeje nebo neposkvrnily přední rámeček.
Podpůrné služby společnosti 3M Touch Systems
Navštivte webovou stránku 3M Touch Systems na http://www.3m.com/touch/, kde si
můžete stáhnout software MT 7, ovladače a technickou dokumentaci.
Horká linka: 978-659-9200
Fax: 978-659-9400
Bez poplatku: 1-866-407-6666 (volba 3)
E-mail: US-TS-techsupport@mmm.com
Obraťte se na 3M Touch Systems
Kontaktní informace všech zastoupení najdete na: http://www.3m.com/touch/
3M Touch Systems, Inc. chráněné informace
Page 67

65 3M™ Vícedotykový stolní displej - Uživatelská příručka
Kapitola 1
Nastavení vícedotykového stolního displeje
Systémové požadavky
Vícedotykový stolní displej vyžaduje připojení osobního počítače (PC).
Počítač musí mít k dispozici USB port pro připojení kabelu dotykového senzoru.
Počítač musí mít již nainstalovanou grafickou kartu a grafický ovladač pro displej.
Při výběru pracovního prostoru pro displej vyberte pevnou rovnou plochu. Také se
ujistěte, že můžete snadno přistupovat k zadní straně dotykového displeje a počítače.
Snadný přístup pomáhá zajistit jednoduché nastavení dotykového displeje.
Poznámka: Před zahájením nastavování vícedotykového displeje si přečtěte veškeré
bezpečnostní informace obsažené v úvodní příručce na adrese
www.3M.co.uk/TouchUserGuides.
3M Touch Systems, Inc. chráněné informace
Page 68

66 3M™ Vícedotykový stolní displej - Uživatelská příručka
USB kabel
Zvukový kabel
VGA kabel
DVI kabel
Napájecí kabel pro USA
Převodník DVI/HDMI
Vybalení dotykového displeje
Příslušenství vícedotykového stolního displeje:
Komunikační USB kabel
Videokabel DVI a VGA a převodník HDMI/DVI
Zvukový kabel
Napájecí kabel a zdroj pro USA
CD se softwarem a dokumentace
Kabely dodávané k vícedotykovému stolnímu displeji
3M Touch Systems, Inc. chráněné informace
Page 69

67 3M™ Vícedotykový stolní displej - Uživatelská příručka
Model
Montážní otvory VESA
M1866PW
100 x 100
M2167PW
100 x 100
M2467PW
200 x 100
M2767PW
200 x 100
Připojení dotykového displeje
Připojení vícedotykového stolního displeje:
1. Před připojením/odpojením dotykového displeje vypněte počítač.
2. Zvolte DVI/HDMI nebo VGA kabel. Jeden konec videokabelu zapojte do video
konektoru na displeji. Druhý konec zapojte do grafické karty počítače.
3. Připojte jeden konec USB kabelu dotekového senzoru k displeji LCD a druhý konec
připojte do volného portu počítače.
4. Připojte napájecí kabel k displeji.
5. Připojte napájecí kabel ke vhodnému zdroji napájení.
Testování vícedotykového stolního displeje
Poznámka: Stolní displej má na přední straně rámečku umístěnou kontrolku stavu
napájení.
Po připojení displeje zapněte hlavní vypínač napájení na spodní straně předního rámečku.
Zkontrolujte správné připojení všech kabelů. Dotáhněte na nich všechny šrouby.
Postup testování displeje:
1. Zapněte počítač. Během spouštěcí sekvence se nedotýkejte obrazovky, abyste
nepřerušili postup inicializace, který ovlivňuje polohování dotyku.
2. Displej musí zobrazovat obraz. Pokud tomu tak není, zkontrolujte, zda displej není v
úsporném režimu (oranžová kontrolka).
3. Ověřte, zda je obraz ve středu zobrazovací plochy. Pomocí ovládací prvků displeje
nastavení případně upravte.
Ovládací prvky obrazu si upravte tak, aby lépe vyhovovaly vašim preferencím.
Možnost montáže VESA
Pokud nechcete používat stojan, můžete jej demontovat a použít alternativní držák
VESA. Každá jednotka má na zadní straně montážní otvory VESA kvůli možnosti
montáže na rameno. Bližší podrobnosti o displeji naleznete v níže uvedené tabulce.
K upevnění montážního stojanu VESA použijte šrouby M4 x 8 mm. Pro správné
připojení displeje postupujte podle pokynů výrobce montážního zařízení.
Poznámka: Nepoužívejte delší šrouby, protože by mohlo dojít k poškození elektroniky
uvnitř displeje.
3M Touch Systems, Inc. chráněné informace
Page 70

68 3M™ Vícedotykový stolní displej - Uživatelská příručka
Režim zobrazení
Obnovovací frekvence (Hz)
640 x 350
70
640 x 480
60, 72 a 75
720 x 400
70
800 x 600
56, 60, 72 a 75
1024 x 768
60, 70 a 75
1280 x 1024
60 a 75
1360 x 768
60
1680 x 1050
60
1920 x 1080
60
Požadavky na grafickou kartu
Potvrďte, že je počítač vybaven nainstalovanou grafickou kartou, která podporuje nativní
grafické rozlišení vícedotykového stolního displeje. Nativní rozlišení pro 18,5" je 1366 x
768 a pro 21,5", 24" a 27" je 1920 x 1080.
Podporované režimy zobrazení a obnovovací frekvence
Grafická karta by měla podporovat režimy zobrazení uvedené v Tabulce 1.
Tabulka 4. Použitelné režimy zobrazení a obnovovací frekvence
Konfigurace nastavení displeje
Po připojení vícedotykového stolního displeje a zapnutí počítače budete pravděpodobně
muset nakonfigurovat nastavení displeje. Optimální nastavení vícedotykového stolního
displeje:
Režim zobrazení (rozlišení obrazu) 1366 x 768 nebo 1920 x 1080
Obnovovací frekvence (vertikální synchronizace) 60 Hz
Barevná hloubka (počet barev) nejméně 16bitová (high color)
Multimediální funkce
Vícedotykový stolní displej je dodáván s reproduktory, vestavěnými do zadní části krytu
displeje, včetně zvukových kabelů. Tyto kabely mohou být připojeny pod displejem.
3M Touch Systems, Inc. chráněné informace
Page 71

69 3M™ Vícedotykový stolní displej - Uživatelská příručka
USB port Audio VGA port HDMI port Port displeje Napájení
Přístup k ovládacím prvkům obrazu
Ovládací prvky pro úpravu obrazu displeje se nacházejí na pravé spodní straně
vícedotykového stolního displeje. Tato kapacitní tlačítka umožní zobrazit nabídku na
obrazovce pro úpravu obrazu displeje.
Ovládací prvky upravte za normálního osvětlení.
Při nastavování obrazu zobrazte testovací obrazec nebo vzor.
Menu/Zvolit –/Snížit +/Zvýšit Smyčka/Konec Napájení
Poznámka: Jak je zobrazeno níže, nabídka OSD poskytuje k těmto tlačítkům stručné pokyny. Jakmile
je nabídka OSD aktivována, nad tlačítky se pro snadnou orientaci objeví obrázek.
Úprava obrazu displeje
Vícedotykový stolní displej má čtyři ovládací prvky pro úpravu obrazu.
3M Touch Systems, Inc. chráněné informace
Page 72

70 3M™ Vícedotykový stolní displej - Uživatelská příručka
OSD
Volby
Popis
VOLBA SIGNÁLU
Volby jsou VGA, HDMI, DP nebo Exit (Konec)
Volba příslušného zdroje vstupního signálu
VIDEO
Volby jsou Brightness (Jas), Contrast (Kontrast) nebo
Exit (Konec)
AUTO
Menu/Select (Menu/Zvolit) – Slouží k zobrazení nebo skrytí obrazovkové
nabídky. Select (zvolit) zvýrazní aktuální volbu menu nebo uloží aktuální nastavení.
Hodnotu změníte stisknutím tlačítka – (Snížení) nebo + (Zvýšení).
– (Snížení) -- Prochází dozadu položkami nabídky - slouží ke snížení hodnoty
vybrané volby nebo přesunu na předchozí položku nabídky.
+ (Zvýšení) -- Prochází dopředu položkami menu - slouží ke zvýšení hodnoty
vybrané volby nebo přesunu na následující položku nabídky.
Pokud nestisknete tlačítko Menu/Zvolit nebo tlačítka – (Snížení) nebo + (Zvýšení)
během 30 sekund, program pro úpravu displeje se ukončí a skryje možnosti nabídky.
Chcete-li zobrazit níže uvedenou nabídku pro rychlé úpravy, stiskněte jedenkrát
tlačítko Menu.
Po dalším stisknutí tlačítka Menu se zobrazí nabídka na obrazovce (OSD), jak je uvedeno
níže.
3M Touch Systems, Inc. chráněné informace
Page 73

71 3M™ Vícedotykový stolní displej - Uživatelská příručka
OSD
Volby
Popis
BRIGHTNESS (Jas)
Upravte jas pomocí tlačítek + nebo – a stiskněte tlačítko
SELECT (Zvolit) pro potvrzení nového nastavení.
CONTRAST (Kontrast)
Upravte kontrast pomocí tlačítek + nebo – a stiskněte tlačítko
SELECT (Zvolit) pro potvrzení nového nastavení.
AUDIO
Upravte hlasitost reproduktorů pomocí tlačítek + nebo –
COLOR (Barva)
Volby jsou User Defined Color (Uživatelem definovaná
barva), Preset Color Temperature (Přednastavená teplota
barvy) nebo Exit (Konec)
USER DEFINED COLOR (Uživatelem definovaná barva)
Upravuje Red (červený), Green (zelený) a Blue (modrý) kanál
podle vašich preferencí.
COLOR TEMPERATURE (Teplota barvy)
Upravuje teplotu barvy na PRESET 1 (Předvolbu 1) (teplota
barvy 6500) nebo PRESET 2 (Předvolbu 2) (teplota barvy
9300).
IMAGE (Obraz)
Volby jsou Auto Tune (Auto ladění), Clock (Hodiny),
Phase (Fáze), H. Position (H. pozice), V. Position (V.
pozice) nebo Exit (Konec)
AUTO TUNE (Automatické ladění)
Provádí automatickou konfiguraci hodin (Clock), fáze
(Phase), vertikální (Vertical) a horizontální (Horizontal)
polohy obrazu.
CLOCK a PHASE (HODINY a FÁZE)
Objevují-li se pruhy nebo šum, lze nastavení ručně upravit.
Upravte toto nastavení tak, aby vertikální pruhy šumu byly
nahrazeny sudým počtem pruhů šumu přes celou obrazovku
nebo aby šum zmizel úplně.
H POSITION (Horizontální pozice)
Posune obraz na obrazovce vodorovně doleva nebo doprava.
V POSITION (Vertikální pozice)
Posune obraz na obrazovce svisle nahoru nebo dolů
3M Touch Systems, Inc. chráněné informace
Page 74

72 3M™ Vícedotykový stolní displej - Uživatelská příručka
OSD
Volby
Popis
LANGUAGE (Jazyk)
Nastavuje jazyk pro nabídku OSD - volby jsou angličtina,
francouzština, němčina, italština a čínština
TOOLS (Nástroje)
Volby jsou OSD Timing (OSD časovač), OSD Horizontal
(OSD horizontální), OSD Vertical (OSD vertikální)
OSD TIMING (OSD ČASOVAČ)
Nastavuje jak dlouho zůstane nabídka zobrazena na obrazovce
Volby podnabídky jsou: Recall (Vyvolat), Sharpness
(Ostrost) nebo Exit (Konec)
OSD HORIZONTAL a VERTICAL (OSD HORIZONTÁLNÍ
a VERTIKÁLNÍ)
Upravuje polohu nabídky OSD na obrazovce
RECALL (Obnovit)
Nastaví řídící funkce zpět na původní tovární hodnoty.
SHARPNESS (Ostrost)
Upravuje kvalitu obrazu na ostrý nebo rozmazaný (vhodné
pro textový režim).
KEY LOCK (Blokovací klávesa)
Slouží k uzamčení displeje - sekvence k odemknutí displeje je
Menu > nahoru > dolů > nahoru > dolů >menu.
EXIT (Konec)
Slouží k opuštění nabídky OSD.
3M Touch Systems, Inc. chráněné informace
Page 75

73 3M™ Vícedotykový stolní displej - Uživatelská příručka
Kapitola 2
Aktivace vícedotykového stolního displeje
Kompatibilita USB se systémem Windows® 7
Vícedotykový stolní displej je kompatibilní se systémem Windows 7 bez dalšího
softwaru. Další informace naleznete v dokumentaci systému Microsoft Windows 7.
Všechny ostatní platformy
Při použití operačních systémů Windows XP, Vista nebo Linux poskytuje společnost 3M
software MicroTouch MT 7 s ovladači pro vícedotykový displej. Informace pro psaní
vlastních ovladačů pro propojení s 3M vícedotykovou technologií naleznete v referenční
příručce řídícího obvodu PCT (TSD-40847).
Pro uživatele jiného operačního systému než Windows 7 poskytuje tento dokument
komunikační protokol pro přímou komunikaci s elektronikou. To umožňuje vývojářům
softwaru, kteří používají jiné operační systémy, jako jsou Microsoft Windows® Vista
nebo Linux®, napsat své vlastní ovladače a dosáhnout stejných výsledků s
vícedotykovou technologií.
Podpora vícedotykových aplikací
Nezapomeňte, že ne všechny aplikace jsou připraveny pro vícedotykovou technologii –
vícedotykové chování je funkcí aplikace. Informujte se u prodejce aplikace, zda software
podporuje vícedotykové ovládání.
Další informace o softwaru 3M Micro Touch naleznete v: Uživatelské příručce MT7
(25695).
3M Touch Systems, Inc. chráněné informace
Page 76

74 3M™ Vícedotykový stolní displej - Uživatelská příručka
Instalace softwaru 3M™ MicroTouch™
Nezapomeňte, že systém Windows® 7 nevyžaduje žádný další software pro aktivaci
vícedotykové funkce.
Nicméně, v operačních systémech Windows XP, Vista nebo Linux® aktivuje
vícedotykový stolní displej pro práci s počítačem software 3M™ MicroTouch™.
Software 3M™ MicroTouch™ má ovládací panel pro nastavení preferencí dotykového
senzoru a diagnostickou pomůcku. Jsou-li s dotykovým senzorem problémy, použijte
diagnostickou pomůcku k testování systému.
Další informace o instalaci tohoto softwaru a použití ovládacího panelu naleznete v
uživatelské příručce softwaru 3M™ MicroTouch™ na přiloženém CD nebo na webových
stránkách na adrese www.3m.com/touch.
3M Touch Systems, Inc. chráněné informace
Page 77

75 3M™ Vícedotykový stolní displej - Uživatelská příručka
Problém
Řešení
Nic se nezobrazuje (prázdná
obrazovka)
Je displej napájen?
Zkontrolujte správné a pevné připojení napájecího kabelu displeje do
zemněné síťové zásuvky.
Zkontrolujte řádné zastrčení napájecí zástrčky do displeje.
Zkontrolujte správné připojení napájecího kabelu displeje do napájecí
zásuvky.
Vyzkoušejte jiný napájecí kabel.
Vyzkoušejte jinou zásuvku.
Nic se nezobrazuje (prázdná
obrazovka)
Dostává obrazovka platný videosignál z počítače?
Zkontrolujte, zda je počítač zapnutý.
Zkontrolujte správné připojení videokabelu k počítači a displeji.
Ověřte, zda stavová kontrolka na zadní straně displeje svítí zeleně.
Ověřte, zda nejsou ohnuty kolíky na konektorech videokabelu.
Zkontrolujte řádné usazení grafické karty ve slotu pro videokartu v
počítači.
Zkontrolujte, zda má vstupní video signál obnovovací frekvenci v rámci
možností displeje. Viz Podporované režimy zobrazení a obnovovací
frekvence v kapitole 1.
Ověřte, zda počítač používá podporovaný režim zobrazení. Viz
Podporované režimy zobrazení a obnovovací frekvence v kapitole 1.
Kapitola 3
Odstraňování závad a údržba
Potíže při instalaci displeje
Tabulka 21. Běžné problémy při instalaci displeje
3M Touch Systems, Inc. chráněné informace
Page 78

76 3M™ Vícedotykový stolní displej - Uživatelská příručka
Problém
Řešení
Nic se nezobrazuje (prázdná
obrazovka)
Není displej v úsporném režimu?
Pokud kontrolka na zadní straně displeje bliká oranžově, dotkněte se
obrazovky, stiskněte jakoukoli klávesu nebo pohněte myší a obnovte
činnost počítače.
Ověřte správnou volbu obrazu (OSD).
Nic se nezobrazuje (prázdná
obrazovka)
Nejsou jas nebo kontrast nastaveny na příliš nízkou hodnotu?
Pomocí ovládací prvků displeje hodnoty případně upravte.
Abnormální obraz
Zkontrolujte, zda má vstupní video signál obnovovací frekvenci v rámci
možností displeje. Viz Podporované režimy zobrazení a obnovovací
frekvence v kapitole 1.
Zkontrolujte správné připojení videokabelu k počítači a displeji.
Obraz má abnormální barvy
Zkontrolujte správné připojení videokabelu k počítači a displeji.
Ověřte, zda nejsou ohnuty kolíky na konektorech videokabelu.
Poruchy na obrazovce
Nesprávné nastavení obrazu. Postup nastavení najdete v Kapitole 1.
Běžné chyby při instalaci
Možná řešení
Dotykový senzor nereaguje na
dotyk
Projděte postupy instalace. Jsou všechny kabely správně připojené?
Byl po instalaci Touch Software restartován počítač, aby došlo k
aktivaci ovladače senzoru?
Odpojte a opět připojte komunikační kabel senzoru.
Odpojte a opět připojte napájecí kabel.
Dotykový senzor je nepřesný
Nakalibrujte dotykový senzor pro stávající rozlišení obrazu a operační
systém. Více informací najdete v kapitole 2 dokumentu 25695.
Kurzor nesleduje pohyb prstu
nebo nedosahuje k okraji
dotykového senzoru.
Nakalibrujte dotykový senzor pro stávající rozlišení obrazu a operační
systém. Více informací najdete v kapitole 2 dokumentu 25695.
Kurzor není umístěn přímo pod
vaším prstem.
Otevřete ovládací panel dotykového senzoru a ujistěte se, zda jsou
všechny offsety kurzoru (vertikální, hranový/horizontální) vypnuty.
Nakalibrujte dotykový senzor pro stávající rozlišení obrazu a operační
systém.
Odstraňování potíží s dotykovým senzorem
Pokud máte potíže s dotykovým senzorem, projděte následující seznam běžných chyb
instalace.
Tabulka 22. Běžné chyby instalace dotykového senzoru
3M Touch Systems, Inc. chráněné informace
Page 79

77 3M™ Vícedotykový stolní displej - Uživatelská příručka
Kapitola 4
Regulační informace
Schválení regulačních agentur
Produkt splňuje následující regulační normy:
FCC-B
CE
TUV
Toto zařízení bylo testováno shledáno vyhovujícím pro Třídu B digitálních zařízení,
podle Části 15 pravidel FCC. Tyto limity byly navrženy, aby poskytovaly rozumnou
ochranu vůči škodlivým interferencím při rezidenčních instalacích. Toto zařízení
generuje, používá a může vyzařovat radiofrekvenční energii, a pokud se neinstaluje a
nepoužívá podle instrukcí, může rušit rádiovou komunikaci. Neexistuje však záruka, že v
konkrétní situaci nedojde ke vzniku rušení. Jestliže toto zařízení skutečně ruší příjem
rádia nebo televize, což se zjistí jeho vypnutím a zapnutím, doporučujeme rušení
odstranit jedním z následujících opatření:
Přemístěte přijímací anténu nebo změňte její nasměrování.
Zařízení posuňte dále od přijímače.
Více informací získáte u prodejce nebo od zkušeného technika radiových/televizních
přijímačů.
Toto zařízení Třídy B splňuje všechny požadavky kanadských předpisů pro zařízení s
rušivou interferencí.
Toto zařízení splňuje část 15 pravidel FCC: Provoz je vázán na dvě podmínky: (1) Toto
zařízení nesmí způsobovat škodlivou interferenci a (2) toto zařízení musí zachytit
všechny interference, včetně interferencí potenciálně způsobujících nežádoucí provoz.
3M Touch Systems, Inc. chráněné informace
Page 80

78 3M™ Vícedotykový stolní displej - Uživatelská příručka
FCC varování
Aby bylo zaručeno dodržení norem FCC, uživatel musí používat uzemněný napájecí
kabel a stíněný videokabel s dělenými lepenými feritovými jádry. Chcete-li použít BNC
kabel, použijte pouze stíněný kabel BNC(5). Právo uživatele provozovat zařízení může
být též zrušeno i změnami či modifikacemi výslovně nepovolenými institucí dozorující
dodržování norem.
Společnost 3M Touch Systems neodpovídá za rušení radiového či televizního příjmu,
pokud se používají jiné než doporučené kabely a konektory, nebo pokud byly na zařízení
provedeny neschválené změny a modifikace.
Prohlášení o shodě CE v Evropě
Toto zařízení splňuje požadavky EU RoHS Směrnice 2011/65/EU, ECC směrnice
2004/108/ES s ohledem na „Elektromagnetickou kompatibilitou“ a 2006/95/ES ohledně
„Bezpečnosti“.
3M Touch Systems, Inc. chráněné informace
Page 81

79 3M™ Vícedotykový stolní displej - Uživatelská příručka
Informace v tomto dokumentu podléhají změnám bez upozornění. Žádná část tohoto dokumentu nesmí být reprodukována ani
přenášena jakoukoli formou či prostředkem, elektronickým nebo mechanickým, za jakýmkoli účelem, bez výslovného
písemného svolení společnosti 3M Touch Systems, Inc. 3M může vlastnit nebo mít přihlášené patenty, obchodní známky,
autorská práva nebo jiná práva duševního vlastnictví pokrývající předmětnou věc v tomto dokumentu. Poskytnutí tohoto
dokumentu vám nedává licenci k těmto patentům, obchodním značkám, autorským právům, nebo jiným formám ochranu
duševního vlastnictví, pokud tato nebyla výslovně poskytnuta písemnou smlouvou se společností 3M Touch Systems, Inc.
Informace uvedené v tomto dokumentu jsou pouze orientační. Nejnovější inženýrské specifikace vám poskytne Aplikační
inženýr společnosti 3M Touch Systems, Inc. 3M Touch Systems, Inc. se snaží svoje produkty neustále zlepšovat. V důsledku
toho se specifikace mohou bez upozornění kdykoli změnit.
Displej a jeho komponenty zlikvidujte podle platných vládních a místních předpisů.
„RoHS 2011/65/EU Compliant“ znamená, že produkt nebo jeho část neobsahuje látky v množství překračujícím maximální
hodnoty koncentrace („MCV“) uvedené ve Směrnici RoHS 2011/65/EU, kromě případů, kdy látka je součástí aplikace s
výjimkou pro RoHS EU. MCV jsou uváděny jako hmotnost v homogenních materiálech. Tato informace představuje znalosti a
přesvědčení společnosti 3M, jako celek nebo zčásti, založené na informacích poskytnutých dodavateli (třetí strany) společnosti
3M.
UPOZORNĚNÍ: Protože používání a výkon produktu 3M Touch Systems, Inc. („Produkt“) závisí na různých faktorech, včetně
toho, že polovodičová zařízení mají jiné charakteristiky než elektromechanická zařízení, z nichž jsou některé zcela pod kontrolou
uživatele, je zásadní, aby uživatel vyhodnotil produkt a software společnosti 3M Touch Systems, Inc. a zjistil, zda je vhodný pro
jeho specifický účel a jeho způsob použití. Prohlášení, inženýrsko/technické informace a doporučení společnosti 3M Touch
Systems, Inc. slouží uživateli, ovšem bez nároku na přesnost či úplnost. Produkty a software 3M Touch Systems, Inc. nejsou
speciálně navrženy pro medicínská zařízení, jak je definuje federální zákon USA. Produkty a software 3M Touch Systems, Inc.
používejte v takových aplikacích pouze s výslovným svolením společnosti 3M Touch Systems, Inc. Pokud uživatel zamýšlí
použití tohoto produktu v medicínském zařízení, měl by se obrátit na obchodního zástupce.
DŮLEŽITÁ POZNÁMKA PRO KUPUJÍCÍHO: Specifikace podléhají změnám bez upozornění. Tyto produkty a software
3M Touch Systems, Inc. zaručeně splňují zveřejněné specifikace v době expedice a po dobu uvedenou v jejich specifikacích. 3M
Touch Systems, Inc. neposkytuje žádné další záruky, přímé nebo odvozené, včetně, kromě jiného, všech nepřímých záruk
obchodovatelnosti, či vhodnosti pro konkrétní účel. Je na odpovědnosti uživatele aby rozhodl, zda jsou produkty a software
společnosti 3M Touch Systems, Inc. vhodné pro daný účel nebo výrobní metody, včetně oprávnění využívat duševní vlastnictví
aplikace uživatele. Pokud by se dokázalo, že produkt, software nebo softwarová media nesplňují podmínky záruky společnosti
3M Touch Systems, Inc., pak jen jediným závazkem společnosti 3M Touch Systems, Inc. a jediným opravným prostředkem
kupujícího a uživatele je možnost opravit nebo nahradit produkt(y) nebo softwarová media, nebo refundace nákupní ceny.
Společnost 3M Touch Systems, Inc. nemá žádné závazky podle záruky 3M Touch Systems, Inc. v případě, že produkt, software
nebo softwarová media byly upraveny nebo poškozeny nesprávným použitím, nehodou, nedbalostí nebo následnými výrobními
operacemi nebo montážemi někým jiným, než společností 3M Touch Systems, Inc. Společnost 3M Touch Systems, Inc.
nepřebírá žádnou odpovědnost za ztráty či škody, a to nespecifikované přímé, nepřímé, speciální, náhodné nebo následné
(včetně s prostoji, ztráty zisku nebo dobré vůle) související s produktem, softwarem nebo softwarovými medii, a to v
každém aplikovaném právním systému.
Autorská práva © 2015 3M všechna práva vyhrazena.
Název dokumentu: 3M™ Vícedotykový stolní displej - Uživatelská příručka
Číslo dokumentu: TSD-40532, Revize F
Značka 3M, logo 3M, značka MicroTouch a logo MicroTouch jsou registrované ochranné známky nebo ochranné známky
společnosti 3M ve Spojených státech a/anebo jiných zemích.
Zde uváděné produkty Windows a/anebo Microsoft jsou registrované obchodní známky nebo obchodní známky společnosti
Microsoft Corporation v USA a/anebo jiných zemích.
Linux je registrovaná ochranná známka Linuse Torvaldse v USA a/anebo jiných zemích.
Všechny další ochranné známky jsou majetkem jejich příslušných vlastníků.
3M Touch Systems, Inc. chráněné informace
Page 82

3M™
Multiberøringsskærm
Brugervejledning
For multiberøringsskærme af følgende produktserie:
M1866PW, M2167PW, M2467PW og M2767PW
Før denne enhed tages i brug skal man læse, forstå og følge alle
sikkerhedsanvisninger i Lynvejledningen, som findes på
www.3M.co.uk/TouchUserGuides før enheden tages i brug. Gem
Lynvejledningen for fremtidig reference.
3M Touch Systems, Inc. proprietære oplysninger
Page 83

81 3M™ Multiberøringsskærm Brugervejledning
Indhold
Vigtige bemærkninger .............................................................................................. 82
Vedligeholdelse af din touch-skærm ........................................................................ 82
Pasning og rengøring af berøringssensor ................................................................. 83
3M Touch Systems supporttjeneste .......................................................................... 83
Kontakt 3M Touch Systems ..................................................................................... 83
Kapitel 1
Opsætning af din multiberøringsskærm
Systemkrav ............................................................................................................... 84
Udpakning af din touch-skærm ................................................................................ 85
Tilslutning af berøringsskærmen .............................................................................. 86
Test af multiberøringsskærmen ................................................................................ 86
VESA-installationsmuligheder ................................................................................. 86
Krav til skærmkort.................................................................................................... 87
Understøttede skærmtilstande og opdateringshastigheder ....................................... 87
Konfiguration af skærmindstillinger ........................................................................ 87
Multimediefunktioner ............................................................................................... 87
Adgang til videoknapperne ...................................................................................... 88
Justering af skærmen ................................................................................................ 88
Kapitel 2
Aktivering af din multiberøringsskærm
Windows® 7 USB-kompatibilitet ............................................................................ 92
Alle andre platforme ................................................................................................. 92
Multiberøring programsupport ................................................................................. 92
Installering af 3M™ MicroTouch™ software .......................................................... 93
Kapitel 3
Fejlfinding og vedligeholdelse
Installationsproblemer for skærm ............................................................................. 94
Fejlfinding af Touch-sensoren .................................................................................. 95
Kapitel 4
Myndighedsmæssige oplysninger
Myndighedsmæssige godkendelser .......................................................................... 97
FCC-advarsel ............................................................................................................ 98
CE-overensstemmelse for Europa ............................................................................ 98
3M Touch Systems, Inc. proprietære oplysninger
Page 84

82 3M™ Multiberøringsskærm Brugervejledning
Tiltænkt brug
3M™ Touch Systems berøringsfølsomme skærme blev udviklet til berøringsinput og
testet til at erstatte en eksisterende skærm. Tanken er at disse skærme skal installeres af
fagfolk og bruges i et indendørs miljø. De er ikke designet til eller testet for brug i
farlige områder. Enhver anden anvendelse er ikke blevet evalueret af 3M og kan føre til
en farlig situation.
Vigtige bemærkninger
Ved situationer med ekstreme temperaturer og luftfugtighed, kan der forekomme
kondens mellem berøringssensoren og skærmen. For at minimere denne tilstand, skal
enheden placeres der hvor den skal anvendes og gives en miljømæssig
stabiliseringsperiode på et døgn, før der tændes for skærmen. Enhver nævneværdig
kondens er midlertidig og vil ikke have nogen langsigtet effekt på brugen af skærmen.
Når strømkabler trækkes ud skal man holde på stikket, ikke trække i ledningen.
Tilslut eller frakobl aldrig dette produkt i tordenvejr.
Montér skærmen på et velventileret sted. Oprethold altid tilstrækkelig ventilation til at
beskytte skærmen mod overophedning, samt sikre pålidelig og fortsat drift.
Udsæt ikke denne skærm for direkte sollys eller varme. Passiv varme kan forårsage
skader på kabinettet og andre dele.
En grundlæggende del af PCT-sensoren er et fint gittermønster, der kan ses under
visse lysforhold.
Installer ikke denne skærm i områder hvor ekstreme vibrationer kan opstå. F.eks. nær
produktionsudstyr, der kan forårsage stærke vibrationer. Vibrationerne kan få
skærmen til at vise misfarvning af billeder eller dårlig videokvalitet.
De 3M touch-controllere, der er nævnt i dette dokument er USB-kompatible
fuldhastighedsenheder.
3M garanterer ikke at vi er USB-kompatible i henhold til USB-specifikationerne.
Vedligeholdelse af din touch-skærm
Sådan vedligeholder du din skærm og sørger for at den fungerer optimalt.
Hold din skærm og berøringssensor ren.
Juster skærmens videoknapper.
Installér ikke skærmen på steder, hvor ventilation kan hindres. Oprethold altid
tilstrækkelig ventilation til at beskytte skærmen mod overophedning, samt fremme
pålidelig og fortsat drift.
3M Touch Systems, Inc. proprietære oplysninger
Page 85

83 3M™ Multiberøringsskærm Brugervejledning
Pasning og rengøring af berøringssensor
Berøringssensorens glasoverflade skal rengøres jævnligt. Sluk skærmen inden rengøring.
En opløsning af isopropylalkohol og vand i forholdet 50:50 er det bedste
rengøringsmiddel til din berøringssensor.
Påfør rengøringsmidlet med en blød, fnugfri klud. Undgå at bruge klude der ikke er
bløde.
Fugt kluden og rengør derefter sensoren. Kom rengøringsmidlet på kluden, ikke
sensoren, så dråber ikke siver ind i skærmen eller pletter kanten.
3M Touch Systems supporttjeneste
Besøg 3M Touch Systems hjemmeside på http://www.3m.com/touch/ for at downloade
MT 7-softwaren, drivere og finde teknisk dokumentation.
Hot-line: 978-659-9200
Fax: 978-659-9400
Gratisnummer: 1-866-407-6666 (mulighed 3)
E-mail: US-TS-techsupport@mmm.com
Kontakt 3M Touch Systems
Kontaktinformationer til alle kontorer kan findes på: http://www.3m.com/touch/
3M Touch Systems, Inc. proprietære oplysninger
Page 86

84 3M™ Multiberøringsskærm Brugervejledning
Kapitel 1
Opsætning af din multiberøringsskærm
Systemkrav
Multiberøringsskærmen kræver en personlig computer (PC).
Din pc skal have en tilgængelig USB-port for tilslutning af berøringssensorens kabel.
Din pc skal allerede have lydkort og videodriver installeret for skærmen.
Når du skal vælge din arbejdsplads, skal du vælge en solid, plan overflade. Sørg også for,
at du kan nemt kan få adgang til bagsiden af berøringsskærmen og computeren. Nem
adgang sikrer en let opsætning af berøringsskærmen.
Bemærk: Før opsætningen af din multiberøringsskærm, skal du følge alle
sikkerhedsanvisningerne, der er indeholdt i lynvejledningen, der findes på
www.3M.co.uk/TouchUserGuides.
3M Touch Systems, Inc. proprietære oplysninger
Page 87

85 3M™ Multiberøringsskærm Brugervejledning
USB-kabel
Lydkabel
VGA-kabel
DVI-kabel
Strømkabel for USA
DVI til HDMI-konverter
Udpakning af din touch-skærm
Din Multiberøringsskærm indeholder følgende:
USB-kommunikationskabel
DVI- og VGA-kabler og en HDMI til DVI-konverter
Lydkabel
Strømkabel og mursten
Software CD og dokumentation
Kabler inkluderet med din multiberøringsskærm
3M Touch Systems, Inc. proprietære oplysninger
Page 88

86 3M™ Multiberøringsskærm Brugervejledning
Model
VESA-mønster
M1866PW
100 x 100
M2167PW
100 x 100
M2467PW
200 x 100
M2767PW
200 x 100
Tilslutning af berøringsskærmen
Sådan forbindes multiberøringsskærmen:
1. Sluk for computeren, før du tilslutter eller frakobler touch-skærmen.
2. Vælg enten DVI/HDMI eller VGA-kablet. Tilslut den ene ende af videokablet til
videostikket på skærmen. Tilslut den anden ende til skærmkortet på din computer.
3. Tilslut den ene ende af berøringsskærmens USB-kabel til LCD'en og den anden ende
til en ledig port på din computer.
4. Sæt netledningen i displayet.
5. Tilslut netledningen til en passende strømkilde.
Test af multiberøringsskærmen
Bemærk: Den stationære skærm har en strømstatusindikator, der findes på forsiden af
rammen.
Efter tilslutning, tænd på kontakten nederst på forkanten.
Sørg for at alle kabler er forbundet korrekt. Sørg for at tilspænde alle kabelskruer.
Sådan testes skærmen:
1. Tænd computeren. Rør ikke ved skærmen under startsekvensen, så du ikke forstyrrer
initialiseringen, som påvirker berøringspositioneringen.
2. Sørg for, at videobillederne vises. Kontrollere lysdioden for at sikre at skærmen ikke
er i strømsparetilstand (orange).
3. Sørg for at videobilledet er centreret på skærmområdet. Brug knapperne på skærmen
til at justere billedet, om nødvendigt.
Du kan justere videokontrollen, så de passer bedre til dine personlige præferencer.
VESA-installationsmuligheder
Hvis du ikke ønsker at bruge stativetet, kan du fjerne det og bruger en alternativ VESAinstallation. Enheden har et VESA-monteringsmønster på bagsiden, til montering af en
bom. Se tabellen nedenfor for oplysninger om skærmen.
Brug M4 x 8 mm skruer til at fastgøre VESA-monteringsstativet. Følg instruktionerne fra
producentens der fulgte med vægbeslaget, for, på korrekt vis, at montere din skærm.
Bemærk: Brug ikke længere skruer eftersom de potentielt kan skade elektronikken i
skærmen.
3M Touch Systems, Inc. proprietære oplysninger
Page 89

87 3M™ Multiberøringsskærm Brugervejledning
Visningstilstand
Opdateringshastighed (Hz)
640 x 350
70
640 x 480
60, 72, og 75
720 x 400
70
800 x 600
56, 60, 72, og 75
1024 x 768
60, 70, og 75
1280 x 1024
60 og 75
1360 x 768
60
1680 x 1050
60
1920 x 1080
60
Krav til skærmkort
Bekræft at din computer har et skærmkort installeret, der understøtter ukomprimeret
videoopløsning på din multiberøringsskærm. Den ukomprimerede opløsning for 18.5 er
1366 x 768 og for 21.5, 24 og 27 er den 1920 x 1080.
Understøttede skærmtilstande og opdateringshastigheder
Dit skærmkort skal understøtte en af skærmtilstandene angivet i Tabel 1.
Tabel 5. Relevante skærmtilstande og opdateringshastigheder
Konfiguration af skærmindstillinger
Når du tilslutter din multiberøringsskærmen og tænder din computer, skal du muligvis
konfigurere skærmindstillingerne. De ideelle indstillinger for multiberøringsskærmen er
som følger:
Skærmtilstand (videoopløsning) 1366 x 768 eller 1920 x 1080
Opdateringshastighed (lodret synkronisering) 60 Hz
Farvedybde (antallet af farver) mindst 16-bit (mange farver)
Multimediefunktioner
Multiberøringsskærmen har indbyggede højttalere bagerst i skærmkabinettet og kommer
med lydkabler. Disse kabler kan tilsluttes under skærmen.
3M Touch Systems, Inc. proprietære oplysninger
Page 90

88 3M™ Multiberøringsskærm Brugervejledning
USB-port Lyd VGA-port HDMI-port DisplayPort Strøm
Adgang til videoknapperne
Knapperne til justering af skærmen er placeret nederst til højre på
multiberøringsskærmen. Med disse kapacitive knapper kan du få vist skærmmenuen for
at justere videobilledet.
Juster knapperne ved normale lysforhold.
Vis et testbillede eller mønster når du justerer video.
Menu/valg —/Ned +/Op Bladre/afslut Strøm
Bemærk: OSD har en lynvejledning til disse knapper, som vist nedenfor. Når OSD er aktiveret, vises
billedet over knapperne, så det er nemt at se.
Justering af skærmen
Din multiberøringsskærm har fire knapper til justering af skærmvisningen.
3M Touch Systems, Inc. proprietære oplysninger
Page 91

89 3M™ Multiberøringsskærm Brugervejledning
OSD
Valg
Beskrivelse
SIGNALVALG
Valg er VGA, HDMI, DP eller Afslut
Vælger den relevante indgangskilde
VIDEO
Valg af Lysstyrke, Kontrast, eller Afslut
LYSSTYRKE
AUTO
Menu/vælg - Viser eller skjuler menuen skærmvisning. Valget vil fremhæve
det aktuelle menupunkt eller gemmer den aktuelle indstilling. Tryk på - (Ned) eller +
(Op) for at ændre værdien.
- (Ned) -- Rul tilbage gennem punkterne på menuen - reducer værdien af den
valgte indstilling eller går til det forrige menupunkt.
+ (Op) -- Rul fremad gennem punkterne på menuen - øger værdien af den
valgte indstilling eller går til det næste menupunkt.
Hvis du ikke trykker på Menu/ valg, eller - (Ned) eller + (Op) knapperne i 30
sekunder, vil programmet til justering af skærmen lukke og gemme menupunkterne.
Tryk på knappen Menu for at vise menuen nedenfor for hurtige justeringer.
Tryk på Menu-knappen igen for at vise OSD-menuen (OSD - On Screen Display eller
skærmvisning), som vist nedenfor.
3M Touch Systems, Inc. proprietære oplysninger
Page 92

90 3M™ Multiberøringsskærm Brugervejledning
OSD
Valg
Beskrivelse
Juster lysstyrken ved at trykke på + eller - tasterne, og tryk på
VÆLG for at bekræfte den nye indstilling.
KONTRAST
Juster kontrasten ved at trykke på + eller - tasterne, og tryk på
VÆLG for at bekræfte den nye indstilling.
LYD
Juster lydstyrken på højttalerne ved hjælp af knapperne + eller
-
FARVEVALG
Valg er brugerdefineret farve, Forudindstillet
farvetemperatur, eller Afslut
BRUGERDEFINERET FARVE
Juster de røde, grønne og blå kanaler til din præference.
FARVETEMPERATUR
Justerer farvetemperaturen til PRESET 1 (6500
farvetemperatur) eller PRESET 2 (9300 farvetemperatur).
BILLEDE
Valg er Automatisk justering, Ur, Fase, H-Position, VPosition, eller Afslut
AUTOMATISK JUSTERING
Udfører automatisk konfiguration af Uret, Fase, Lodrette og
Vandrette positioner.
UR og FASE
Hvis streger eller støj er til stede, kan denne indstilling
justeres manuelt.
Juster denne indstilling så lodrette streger af støj enten
erstattes af en ensartet støj på hele skærmen, eller støjen
forsvinder helt.
H-POSITION (Vandret position)
Flytter billedet vandret på skærmen enten til venstre eller
højre.
V-POSITION (Lodret position)
Flytter billeder lodret på skærmen enten op eller ned.
SPROG
Angiver sproget for OSD - valgmulighederne er engelsk,
fransk, tysk, italiensk og kinesisk
3M Touch Systems, Inc. proprietære oplysninger
Page 93

91 3M™ Multiberøringsskærm Brugervejledning
OSD
Valg
Beskrivelse
VÆRKTØJER
Valg er OSD-timing, OSD-vandret, OSD-lodret
OSD-TIMING
Indstil hvor længe menuen forbliver på skærmen.
Undermenuens valg er: Genkald, skarphed eller afslut
OSD-VANDRET og LODRET
Justerer positionen af OSD'en på skærmen
GENKALD
Nulstiller kontrolfunktionerne tilbage til de oprindelige
fabriksindstillede værdier.
SKARPHED
Justerer videokvaliteten til skarp eller sløret (brugbar for
teksttilstand).
TASTLÅS
Brug dette til at låse skærmen - nøglen til at låse skærmen op
er Menu>op>ned>op>ned>menusekvens.
AFSLUT
Afslutter OSD-menuen.
3M Touch Systems, Inc. proprietære oplysninger
Page 94

92 3M™ Multiberøringsskærm Brugervejledning
Kapitel 2
Aktivering af din multiberøringsskærm
Windows® 7 USB-kompatibilitet
Multiberøringsskærm er kompatibel med Windows 7 uden ekstra programmer. Se
Microsofts Windows 7 dokumentationen for yderligere oplysninger.
Alle andre platforme
Når du bruger Windows XP, Vista eller Linux operativsystemer, leverer 3M MicroTouch
MT 7 softwaren for multiberøringsdrivere. For information om at skrive dine egne
drivere til interface med 3M Multiberøringsteknologi, se PCT-Controllerens
oversigtsvejledning (TSD-40847).
For brugere af operativsystemer der ikke er Windows 7 indeholder dette dokument
kommunikationsprotokollen for at tale direkte med elektronikken. Dette gør det muligt
for softwareudviklere at bruge andre operativsystemer såsom Microsoft Windows® Vista
eller Linux® til at skrive deres egne drivere og opnå samme multiberøringsresultater.
Multiberøring programsupport
Husk at ikke alle programmer er klar til multiberøring - Multiberøringsopførsel er en
funktion i DIT program. Check med din programleverandør for at finde ud af, om din
software har multiberøringsfunktioner.
For yderligere information om 3M Micro Touch-software henvises til: MT7
Brugervejledning (25695).
3M Touch Systems, Inc. proprietære oplysninger
Page 95

93 3M™ Multiberøringsskærm Brugervejledning
Installering af 3M
Husk at Windows® 7 ikke kræver yderligere software for at aktivere
multiberøringsfunktionalitet.
Men, Windows® XP, Vista eller Linux® -operativsystemer, 3M™ MicroTouch™software gør det muligt for din multiberøringsskærm at virke med din computer. 3M™
MicroTouch™ software indeholder et kontrolpanel til indstilling af præferencerne for din
touch-sensor og et diagnosticeringsværktøj. Hvis du oplever problemer med touchsensoren kan du bruge diagnosticeringsprogrammerne, til at teste systemet.
For yderligere oplysninger om installation af denne software og brug af kontrolpanelet, se
Brugervejledning for 3M™ MicroTouch™-softwaren på den medfølgende CD eller på
www.3m.com/touch.
™
MicroTouch™ software
3M Touch Systems, Inc. proprietære oplysninger
Page 96

94 3M™ Multiberøringsskærm Brugervejledning
Problem
Løsning
Det vises intet billede (tom
skærm)
Modtager skærmen strøm?
Kontroller, at skærmens strømkabel er tilsluttet og sidder korrekt i en
jordet stikkontakt.
Kontroller, at strømstikket er forbundet til skærmen på forsvarlig vis.
Kontroller, at skærmens strømkabel er tilsluttet og sidder korrekt i en
jordet stikkontakt.
Prøv et andet strømkabel.
Prøv en anden stikkontakt.
Det vises intet billede (tom
skærm)
Modtager skærmen et gyldigt videosignal fra PC'en?
Kontroller, at computeren er tændt.
Kontroller, at videokablet er tilsluttet korrekt og sikkert til skærmen og
computeren.
Kontroller, at lysdioden på bagsiden af skærmen lyser grønt.
Kontroller, at der ikke er nogen bøjede ben i videokablets stik, (begge
ender).
Kontroller, at grafikkortet sidder korrekt i kortåbningen på din
computer.
Kontroller, at videoindgangen fra skærmkortet er indenfor
opdateringshastigheden for skærmen. Se Understøttede skærmtilstande
og opdateringshastigheder i kapitel 1.
Kontroller, at din computer bruger en understøttet skærmtilstand. Se
Understøttede skærmtilstande og opdateringshastigheder i kapitel 1.
Kapitel 3
Fejlfinding og vedligeholdelse
Installationsproblemer for skærm
Tabel 21. Almindelige installationsproblemer for skærmen
3M Touch Systems, Inc. proprietære oplysninger
Page 97

95 3M™ Multiberøringsskærm Brugervejledning
Problem
Løsning
Det vises intet billede (tom
skærm)
Er skærmen i strømstyringstilstand?
Hvis lysdioden på bagsiden af displayet blinker gult, skal du trykke på
skærmen, trykke på en tast på tastaturet eller bevæge musen for at vende
tilbage til normal driftstilstand.
Kontroller at videovalget er korrekte (OSD).
Det vises intet billede (tom
skærm)
Er indstillingerne for lysstyrke og kontrast for lave?
Brug knapperne på skærmen til at justere disse værdier.
Unormal billede
Kontroller, at videoindgangen fra skærmkortet er indenfor
opdateringshastigheden for skærmen. Se Understøttede skærmtilstande
og opdateringshastigheder i kapitel 1.
Kontroller, at videokablet er tilsluttet korrekt og sikkert til skærmen og
computeren.
Billedfarverne er unormale
Kontroller, at videokablet er tilsluttet korrekt og sikkert til skærmen og
computeren.
Kontroller, at der ikke er nogen bøjede ben i videokablets stik, (begge
ender).
Forstyrrelser på skærmen
Skærmjusteringerne er forkerte. Se kapitel 1 for justeringsprocedurer.
Almindelige
installationsproblemer
Mulige løsninger
Touch-sensoren reagerer ikke
på tryk
Gennemgå installationsprocedurerne. Er alle kabler forbundet korrekt?
Genstartede du din PC, efter at du installerede Touch-softwaren, for at
aktivere touch-sensorens driver?
Fjern sensorens kommunikationskabel og sæt det i igen.
Frakobl strømkablet og sæt det i igen.
Touch-sensoren er ikke
nøjagtig.
Kalibrer touch-sensoren for den aktuelle skærmopløsning og
operativsystem. Der henvises til kapitel 2 i dokument 25695 for
yderligere oplysninger.
Markøren følger ikke eller ikke
når kanterne af sensoren
Kalibrer touch-sensoren for den aktuelle skærmopløsning og
operativsystem. Der henvises til kapitel 2 i dokument 25695 for
yderligere oplysninger.
Fejlfinding af Touch-sensoren
Hvis du har problemer med den touch-sensoren, skal du tjekke følgende liste over
almindelige installationsfejl.
Tabel 22. Almindelige installationsproblemer med Touch-sensor
3M Touch Systems, Inc. proprietære oplysninger
Page 98

96 3M™ Multiberøringsskærm Brugervejledning
Almindelige
installationsproblemer
Mulige løsninger
Markøren ikke er placeret
direkte under din finger
Åbn touch-sensorens kontrolpanel og kontroller, at alle markørens
forskydninger (lodret, kant/vandret) er slået fra.
Kalibrer touch-sensoren for den aktuelle skærmopløsning og
operativsystem.
3M Touch Systems, Inc. proprietære oplysninger
Page 99

97 3M™ Multiberøringsskærm Brugervejledning
Kapitel 4
Myndighedsmæssige oplysninger
Myndighedsmæssige godkendelser
Dit produkt opfylder følgende regulatoriske standarder:
FCC-B
CE
TUV
Dette udstyr er blevet testet og overholder grænserne for digitale enheder i klasse B i
overensstemmelse med kapitel 15 i FCC-reglerne. Disse grænser er udviklet til at give
rimelig beskyttelse mod skadelig interferens i beboelsesinstallationer. Dette udstyr
genererer, bruger og kan udstråle radiofrekvensenergi og, hvis det ikke er installeret og
benyttes i overholdelse med instruktionerne, kan det forårsage skadelig interferens i
radiokommunikation. Der er dog ingen garanti for, at der ikke vil opstå interferens i en
bestemt installation. Hvis dette udstyr forårsager interferens i radio- eller tv-modtagelse,
hvilket kan konstateres ved at tænde og slukke for udstyret, opfordres brugeren til at
forsøge at afhjælpe interferensen på en eller flere af følgende måder:
Drej eller flyt modtagerantennen.
Flyt udstyret længere væk fra modtageren.
Kontakt forhandleren eller en erfaren radio/tv-tekniker for yderligere forslag.
Dette digitale klasse B-apparat opfylder alle kravene i de canadiske regulativer
vedrørende interferensskabende udstyr.
Denne enhed overholder afsnit 15 af FCC-reglerne: Betjening er underlagt følgende to
vilkår: (1) Denne enhed må ikke forårsage skadelig interferens, og (2) denne enhed skal
acceptere enhver modtaget interferens, inklusive interferens, der kan forårsage uønsket
drift.
3M Touch Systems, Inc. proprietære oplysninger
Page 100

98 3M™ Multiberøringsskærm Brugervejledning
FCC-advarsel
For at sikre fortsat overholdelse af FCC-reglerne, skal brugeren bruge den jordede
netledning og afskærmede videointerfacekabel med ferritkerner. Hvis et BNC-kabel skal
bruges, kan kun et afskærmet BNC(5) kabel benyttes. Alle uautoriserede ændringer eller
modifikationer, der ikke er udtrykkeligt godkendt af den part, der er ansvarlig for
overensstemmelse, kan annullere brugerens ret til at betjene dette udstyr.
3M Touch Systems er ikke ansvarlig for nogen radio- eller tv-forstyrrelser forårsaget af
brug af andre kabler og stik end de anbefalede eller af uautoriserede ændringer eller
modifikationer af dette udstyr.
CE-overensstemmelse for Europa
Denne enhed overholder kravene i EU's RoHS direktiv 2011/65/EF, EØF direktiv
2004/108/EF for så vidt angår "Elektromagnetisk kompatibilitet" og 2006/95/EF for så
vidt angår "Sikkerhed".
3M Touch Systems, Inc. proprietære oplysninger
 Loading...