


PrintConversionSystemModel813
Owner’sManual

Copyright©2009,3M.Allrightsreserved.
PrintConversionSystemModel813Owner’sManual78-8129-3227-1,RevB
3Misatrademarkof3M.SanDiskandImageMateareregisteredtrademarksofSanDiskCorp.CompactFlashisa
registeredtrademarkoftheCompactFlashAssociation.Zebraisaregisteredtrademark,and110XiIIIPlusandTLP
2844–ZaretrademarksofZIHCorp.WindowsXPandWindowsVistaareregisteredtrademarksofMicrosoftCorp.
TheoriginalinstructionsinthisdocumentwerewritteninU.S.English.Allotherlanguagesarea
translationoftheoriginalinstructions.

Contents
Safetyinformation..........................................................................................................................1
Intendeduse.................................................................................................................................1
Explanationofsignalwordconsequences.......................................................................................1
Explanationofproductsafetylabelsymbols....................................................................................1
Warnings......................................................................................................................................2
Safetylabels.................................................................................................................................2
Printersafety.................................................................................................................................2
Regulatorycompliance...................................................................................................................5
FCCcompliancestatement—regularvolumeprinter......................................................................5
FCCcompliancestatement—highvolumeprinter..........................................................................5
Introduction....................................................................................................................................7
Aboutyour3M
TM
PrintConversionSystemModel813.....................................................................7
Trainingyourstaff..........................................................................................................................8
Systemdocumentation..................................................................................................................8
Operatingprocedures.....................................................................................................................9
Startingthesystem........................................................................................................................9
PrintingRFIDtags.........................................................................................................................10
ProgrammingandapplyingRFIDtags............................................................................................15
Loadingatagrollintheprinter.......................................................................................................15
Loadingaribbonintheprinter........................................................................................................18
Reference—Equipmentspecifications..........................................................................................21
Customer-suppliedcomputerandmonitor.......................................................................................21
Customer-suppliedbarcodescanner..............................................................................................21
TM
3M
RFIDpad(antenna)..............................................................................................................22
TM
3M
RFIDreader.........................................................................................................................22
3M-suppliedCFcardreader/writer..................................................................................................23
3M-suppliedhighvolumeprinter.....................................................................................................23
3M-suppliedregularvolumeprinter.................................................................................................24
TM
3M
tagrollholder.......................................................................................................................24
Reference—Hardwareinstallation................................................................................................25
Model813hardwareinstallationsequence......................................................................................25
Install3M
TM
RFIDreaderandRFIDpad..........................................................................................26
InstallRFIDpadbeneathcountertop(optional)................................................................................26
ConnectRFIDreadercommunicationandpowercables..................................................................27
Reference—Printerdriverandprinterinstallation........................................................................29
Reference—ConversionStationsoftwareinstallation..................................................................33
GatherConversionStationsoftwareconfigurationinformation..........................................................33
InstallConversionStationsoftware.................................................................................................33
ConfigureConversionStationsoftware...........................................................................................33
Maintenance...................................................................................................................................35
Troubleshooting.............................................................................................................................37
Warranty.........................................................................................................................................43
Obtaining3Mprintersupplies........................................................................................................45
Copyright©2009,3M.Allrightsreserved.
i

C o n t e n t s
3MService......................................................................................................................................47
Informationtogather.....................................................................................................................47
3MServicephonenumbers...........................................................................................................47
3MLibrarySystemsWebSite........................................................................................................47
ii
Copyright©2009,3M.Allrightsreserved.
Safetyinformation
Pleasereadandunderstandallsafetyinformationcontainedintheseinstructionspriortousingyour3M
SystemModel813.Retaintheseinstructionsforfuturereference.
TM
PrintConversion
Intendeduse
Thesystemisintendedforusebylibrarystaffinconvertingexistingitemidentificationtechnology(suchasbarcodes)to
RadioFrequencyIdentification(RFID)technology.Barcodes,ifcurrentlyused,arescannedandthen3MRFIDtagsare
programmedandprintedwithinformationsuchasitembarcodes,itemdescriptionsandlibraryinformation.Ifabarcode
scannerisnotused,itemIDinformationcanbeinputmanuallyviakeyboardorkeypad,orinlistformusingaCFcardreader.
Thesystemmustbeinstalledandoperatedasspecifiedinthismanualandrelateddocuments,includingthe3MRFID
ReaderPadModelsP08–P12Owner’ sManual,3MRFIDReaderModel810Owner’sManualand3MPrintConversion
SystemModel813SitePlanningGuide.AdminHelpandStaffHelpareaccessiblefromthe3MConversionStationsoftware
application(clicktheHelpor“?”button).Thesystemisintendedforuseinanindoorlibraryenvironment,andhasnotbeen
evaluatedforotherusesorlocations.
Explanationofsignalwordconsequences
WARNING
Indicatesapotentiallyhazardoussituation,which,ifnotavoided,couldresultindeath
orseriousinjuryand/orpropertydamage.
CAUTION
Indicatesapotentiallyhazardoussituationwhich,ifnotavoided,couldresultinminoror
moderateinjuryand/orpropertydamage.
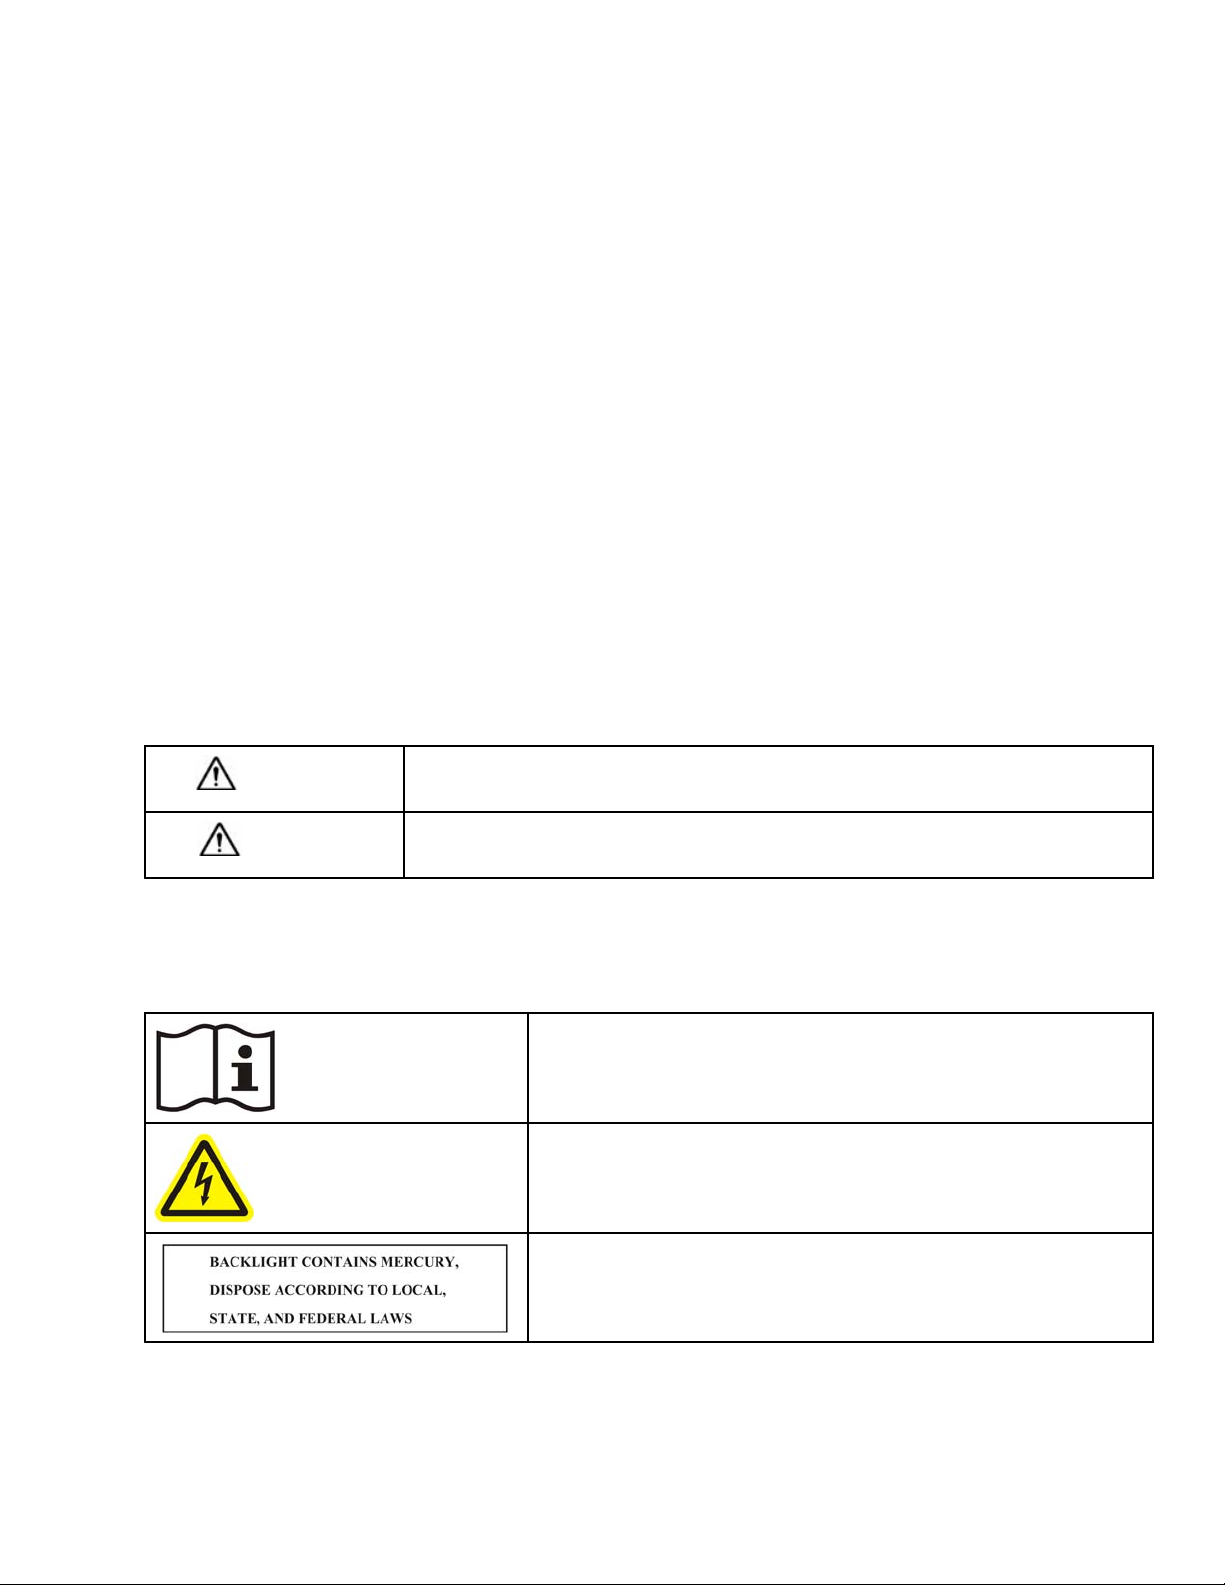
Explanationofproductsafetylabelsymbols
Attention:Readaccompanyingdocumentation
Riskofelectricshock
DisplayUnit:Mercurydisposalhazard
Copyright©2009,3M.Allrightsreserved.
1

S a f e t y i n f o r m a t i o n
Warnings
ToreducetheriskassociatedwithtippingoverModel813componentsduetoplacementonanunsuitabledeskorcountertop:
•Ensurethatthefurnitureontowhichsystemcomponentsareplacedisstrongenoughandprovidesalowslipsurfaceto
safelyholdtheequipmenttopreventtippingorfalling.
•Ensurethatsysteminstallationandoperationareperformedinaccordancewithinstructionsandspecificationsinthis
manualandotherdocumentationincludedwiththesystem.
Toreduceriskassociatedwithfireduetoincorrectinstallationofsystemcomponents:Ensurethatsysteminstallation
andoperationareperformedinaccordancewithinstructionsandspecificationsinthismanualandotherdocumentation
includedwiththesystem.
Toreducetheriskassociatedwithfireduetoauserorinstallerattemptingtoservicesystemcomponents:
•Donotattempttomodifyorrepair—nouserserviceableparts—contact3MServiceforrepair.
•Useapprovedreplacementcomponents,installedby3MServicepersonnelonly.
•DoNOTaltersystempowercords,e.g.,byreplacingpowercordplugstoworkwithlocalelectricaloutlets.Purchase
powercordslocallywhenfactorycordsdonotworkinaparticularlocation.
Toreducetheriskassociatedwithhazardousvoltageduetoauserorinstallerattemptingtoservicesystem
components:
•Donotattempttomodifyorrepair—nouserserviceableparts—contact3MServiceforrepair.
•Useapprovedreplacementcomponents,installedby3MServicepersonnelonly.
•DoNOTaltersystempowercords,e.g.,byreplacingpowercordplugstoworkwithlocalelectricaloutlets.Purchase
powercordslocallywhenfactorycordsdonotworkinaparticularlocation.
Safetylabels
SeedocumentationincludedwithModel813components.
Printersafety
Printerbattery
Themainprintedcircuitboardassemblyincludesathree-voltlithiumbattery.
WARNINGRiskofexplosionifbatteryisreplacedwithanincorrecttype.
Note:Recyclebatteriesaccordingtoyourlocalguidelinesandregulations.
Shockhazard
WARNINGTheprinterandpowersupplyshouldneverbeoperatedinalocationwhereeitheronecangetwet.
Personalinjurycouldresult.
2
Copyright©2009,3M.Allrightsreserved.

S a f e t y i n f o r m a t i o n
Printermediaandribbon
CAUTIONAlwaysusehigh-quality,approvedtagsandribbons.IfadhesivebackedtagsareusedthatDONOTlay
flatonthebackingstrip,theexposededgesmaysticktothetagrollguidesandrollersinsidetheprinter,causingthetagtopeel
offfromthestripandjamtheprinter .Permanentdamagetotheprintheadmayresultifanon-approvedribbonisused,asit
maybewoundincorrectlyfortheprinterorcontainchemicalscorrosivetotheprinthead.Approvedsuppliescanbeordered
orverifiedthroughyour3Mrepresentative.Iftagsorribbonrunoutwhileprinting,youDONOThavetoturnthepower
switchOFFwhilereloading—datalossmayresult.Theprinterautomaticallyrestartsafteryouloadanewtagorribbonroll.
Staticdischarge
CAUTIONThedischargeofelectrostaticenergythataccumulatesonthesurfaceofthehumanbodyorother
surfacescandamageordestroytheprintheadorelectroniccomponentsusedintheprinter .DONOTTOUCHtheprint
headortheelectroniccomponentsunderthetopcover.
Printheadtemperature
CAUTIONTheprintheadbecomeshotwhileprinting.T oprotectfromdamagingtheprintheadandriskofpersonal
injury,avoidtouchingtheprinthead.Useonlymanufacturer-approvedtoolsandmaterialstoperformmaintenance.
Copyright©2009,3M.Allrightsreserved.
3

S a f e t y i n f o r m a t i o n
4
Copyright©2009,3M.Allrightsreserved.

Regulatorycompliance
FCCcompliancestatement—regularvolumeprinter
Note:ThisequipmenthasbeentestedandfoundtocomplywiththelimitsforaClassBdigitaldevice,pursuanttoPart
15oftheFCCRules.Theselimitsaredesignedtoprovidereasonableprotectionagainstharmfulinterferencein
aresidentialinstallation.
Thisequipmentgenerates,uses,andcanradiateradiofrequencyenergyand,ifnotinstalledandusedinaccordancewiththe
instructions,maycauseharmfulinterferencetoradiocommunications.However,thereisnoguaranteethattheinterference
willnotoccurinaparticularinstallation.Ifthisequipmentdoescauseharmfulinterferencetoradioortelevisionreception,
whichcanbedeterminedbyturningtheequipmentoffandon,theuserisencouragedtotrytocorrecttheinterference
byoneormoreofthefollowingmeasures:
•Reorientorrelocatethereceivingantenna.
•Increasetheseparationbetweentheequipmentandthereceiver.
•Connecttheequipmentintoanoutletonacircuitdifferentthanthattowhichthereceiverisconnected.
•ConsultthedealeroranexperiencedRadio/TVtechnicianforhelp.
Note:Thisunitwastestedwithshieldedcommunicationcablesontheperipheraldevices.Shieldedcommunicationcables
mustbeusedwiththeunittoensurecompliance.
FCCcompliancestatement—highvolumeprinter
ThisdevicecomplieswithPart15rules.Operationissubjecttothefollowingtwoconditions:
1.Thisdevicemaynotcauseharmfulinterference,and
2.Thisdevicemustacceptanyinterferencereceived,includinginterferencethatmaycauseundesiredoperation.
Theuseriscautionedthatanychangesormodificationsnotexpresslyapprovedbythemanufacturercouldvoidtheuser’s
authoritytooperatetheequipment.Toensurecompliance,thisprintermustbeusedwithshieldedcommunicationcables.
FCCradiationexposurestatement(forprinterswithRFIDencoders)
ThisequipmentcomplieswithFCCradiationexposurelimitssetforthforanuncontrolledenvironment.Thisequipment
shouldbeinstalledandoperatedwithminimumdistance20cmbetweentheradiatorandyourbody.
Thistransmittermustnotbeco-locatedoroperatinginconjunctionwithanyotherantennaortransmitter.
CanadianDOCcompliancestatement
ThisClassBdigitalapparatuscomplieswithCanadianICES-003.
CetappareilnumeriquedelaclasseBestconformealanormeNMB-003duCanada.
Copyright©2009,3M.Allrightsreserved.
5

R e g u l a t o r y c o m p l i a n c e
6
Copyright©2009,3M.Allrightsreserved.
Introduction
Aboutyour3M
TheModel813hasbeendesignedtoreliably,accuratelyandeconomicallyprogramandprinthigh-quality3MRFIDtags
usedtoidentifytheitemsinyourcollection,frombooksandmagazinestofilmsandCDs/DVDs.Whilea100%electronic
securitynetdoesnotexist,3MRFIDtagsanddetectionsystemsprovideeffectiveprotectionandsignificantreductionin
thelossoflibrarymaterials.Withalittleattentionandcare,yoursystemshouldprovidemanyyearsofserviceandhelpto
protectyourlibraryagainstthousandsofdollarsinlosses.
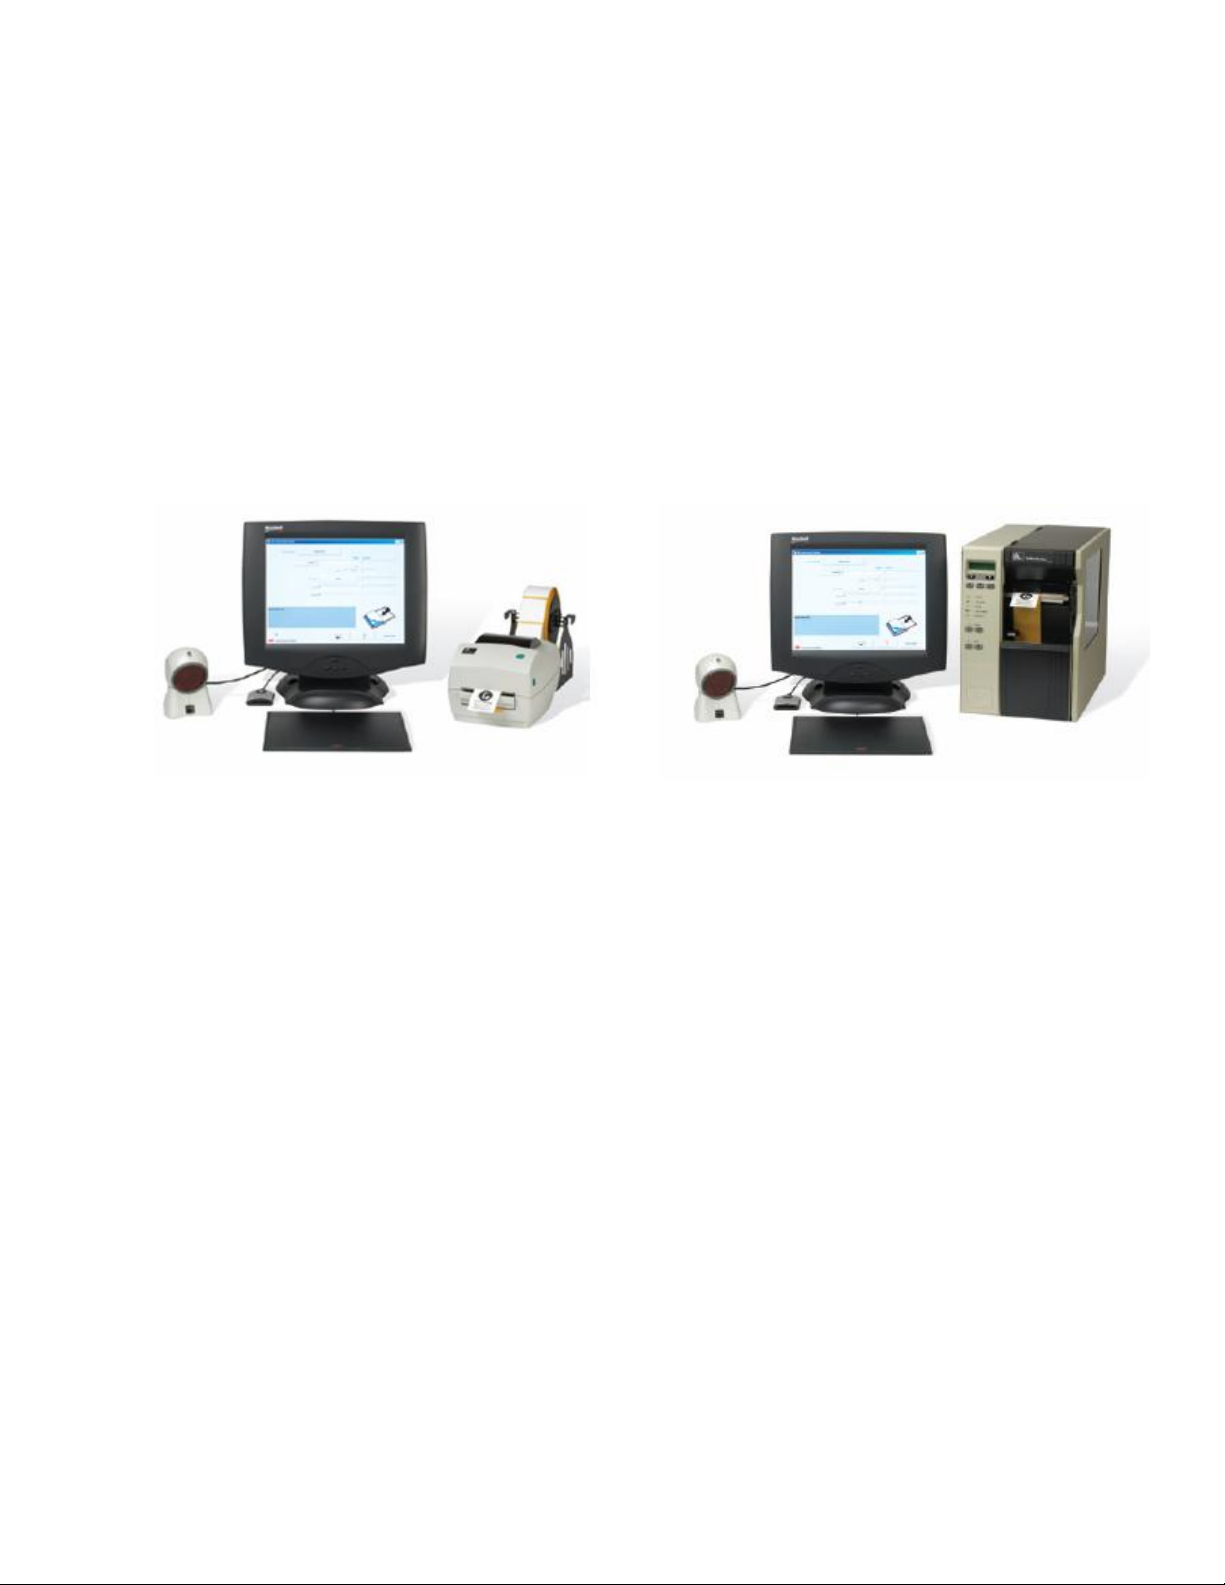
Figure1Model813Rwithregularvolumeprinter Figure2Model813Hwithhighvolumeprinter
Model813hardwareandsoftwareisusedasfollowsinalibraryenvironment:
TM
PrintConversionSystemModel813
1.Ifthelibraryiscurrentlyusingbarcodes,theModel813operatorfirstscansthebarcodeonalibrarycollectionitem.Ifa
barcodescannerisnotused,informationcanbeinputviakeyboardorkeypad,oritemIDlistscanbetransferredtothe
Model813usingtheCFcardreaderincludedwiththesystem.
2.3MConversionStationsoftwarethenassignsanRFIDidentitytothebarcodeorlistitem,andtheoperatorinitiatesa
printoutofitemIDandlibraryinformationonablank3MRFIDtag.
3.TheoperatorretrievestheprintedRFIDtagfromtheprinterandbrieflyholdsthetagoverthe3MRFIDpad,which
assignsanRFidentitytotheRFIDtag.
4.Theoperatorthenappliestheprinted/programmedRFIDtagtothecollectionitem(book,magazine,CD,DVD,etc.).
TwoRFIDtagprintersavailablefrom3Mareshownabove:regularvolumeandhighvolume.Eachsystemincludes3M
ConversionStationsoftware,anRFIDreaderandRFIDpad,andaCF(CompactFlash®)cardreader.Thecomputer,monitor
andbarcodescanner(ifused)arecustomer-supplied.
TheModel813isdesignedforinstallationoncustomer-suppliedfurniture,andmustbeinstalledasspecifiedinthismanual
andotherdocumentationincludedwiththesystem.Thesystemisintendedforinstallationonadeskorcountertop,awayfrom
librarypatrontraffic.Theworksurfacemustbestableandsturdyenoughtosupportsystemcomponents.TheModel813is
intendedforuseinanindoorlibraryenvironmentandhasnotbeenevaluatedforotherusesorlocations.
Copyright©2009,3M.Allrightsreserved.
7

I n t r o d u c t i o n
Trainingyourstaff
Akeyelementofanylosspreventioneffortisasuccessfulstafftrainingprogram.Y oursystemwillbemuchmoreeffective
withtheactiveparticipationofselectedstaffatyourlibrary,andwerecommendthatyouperiodicallyconducttrainingsessions
includingthefollowingelements:
•ReviewthismanualandtheonlineStaffHelpavailablefromthe3MConversionStationsoftwareapplicationincludedwith
yoursystem(clickthe“?”button).
•Reviewyourlibrary’ssecuritypolicies.
•Practiceprogramming,printing,andtagginglibrarymaterialswith3MRFIDtags.
Systemdocumentation
TheModel813consistsofcomponentssuppliedbyboth3Mandthelibrary,includingdocumentationforinstallation,
configuration,operationandmaintenance.Librarypersonnelassignedtothesetasksshouldknowwheretolocatespecific
documentsforreferencewhennecessary.Systemdocumentationincludes:
•3MPrintConversionSystemModel813SitePlanningGuide
•3MPrintConversionSystemModel813Owner’sManual
•3MConversionStationonlineAdminHelp(clicktheHelpbutton)
•3MConversionStationonlineStaffHelp(clickthe“?”button)
•3MRFIDReaderModel810Owner’sManual
•3MRFIDReaderPadModelsP08–P12Owner’sManual
•Zebra®printeruserguides(PDFformat,locatedonthe3MRFTagPrinterDriversCD-ROM)
•Library-suppliedcomputer,monitor,andbarcodescannerdocumentation
•3M-suppliedCFcardreaderdocumentation
8
Copyright©2009,3M.Allrightsreserved.

Operatingprocedures
Beforeyouperformanyoftheseprocedures,makesurethatthesystemhasbeeninstalledandconfiguredasdescribedinthe
Referencesectionsofthismanualandrelateddocumentation.
Theconversionprocessincludes:
•enteringthecurrentlyuseditemIDbyscanningaprintedbarcodeorusingakeyboard,keypad,orlist;
•printingablankRFIDtagwithitemID(barcode)andlibraryIDinformation;
•programmingtheprintedRFIDtagwithanewlyassignedRFidentifier;
•applyingtheprinted/programmedRFIDtagtoitscorrespondingcollectionitem,whichthencanbedetectedandprocessed
byvarioustypesof3MRFIDequipment.
CAUTION
Toreducetherisksassociatedwithrepeatedbodymovement,which,ifnotavoided,mayresultinminoror
moderateinjury:
OperationoftheModel813mayinvolverepeatedbodymovements.T ominimizepossibilityofRepetitiveStressInjury ,
avoidprolongedrepetitivemovements,restwhenbecomingfatiguedand,whenpossible,alternatejobfunctionswithother
people.Avoidawkwardreachingforitems.
Startingthesystem
1.Checktheprintertomakesurethatatagrollandribbonareproperlyinstalledandaligned.
2.Checktheconnectionsofallcommunicationcablesbetweenthecomputerandsystemcomponents:monitor,keyboard,
mouse,barcodescanner(ifused),CFcardreader(ifused),printer,and3MRFIDreader.Alsocheckthecable
connectionbetweentheRFIDreaderandRFIDpad.
3.Connectorcheckpowercordconnectionsforthecomputer,monitor,RFIDreader,andprinter.
4.Turnallpowerswitcheson.
5.Whenthecomputerhasfinishedthebootprocess,checkindicatorsoneachcomponenttoensurethattheyareall
poweredonwithnoerrorconditions.
6.Ifnecessary ,double-clickorselectthe3MConversionStationicontostartthe3MConversionStationsoftware.(The
softwaremaybeconfiguredtoloadwhenthecomputerispoweredon.)
Copyright©2009,3M.Allrightsreserved.
9
O p e r a t i n g p r o c e d u r e s
PrintingRFIDtags
PrintRFIDtagsusingoneofthetwofollowingprocedures(regularvolumeprinter,highvolumeprinter).
Printing—regularvolumeprinter
Thisproceduredescribestheregularvolumeprinter’sdefault“peel-off”mode,wherethetagrollbackingstripfollowsa
“discard”pathandRFIDtagsarepresentedoneatatimeforremovalandplacementonlibrarycollectionitems.
Note:TheprinterFeedbuttonislocatedontheupperrightfrontcoveroftheunit.VisualindicatorsontheFeedbuttonare
describedinthetablefollowingthisprocedure.
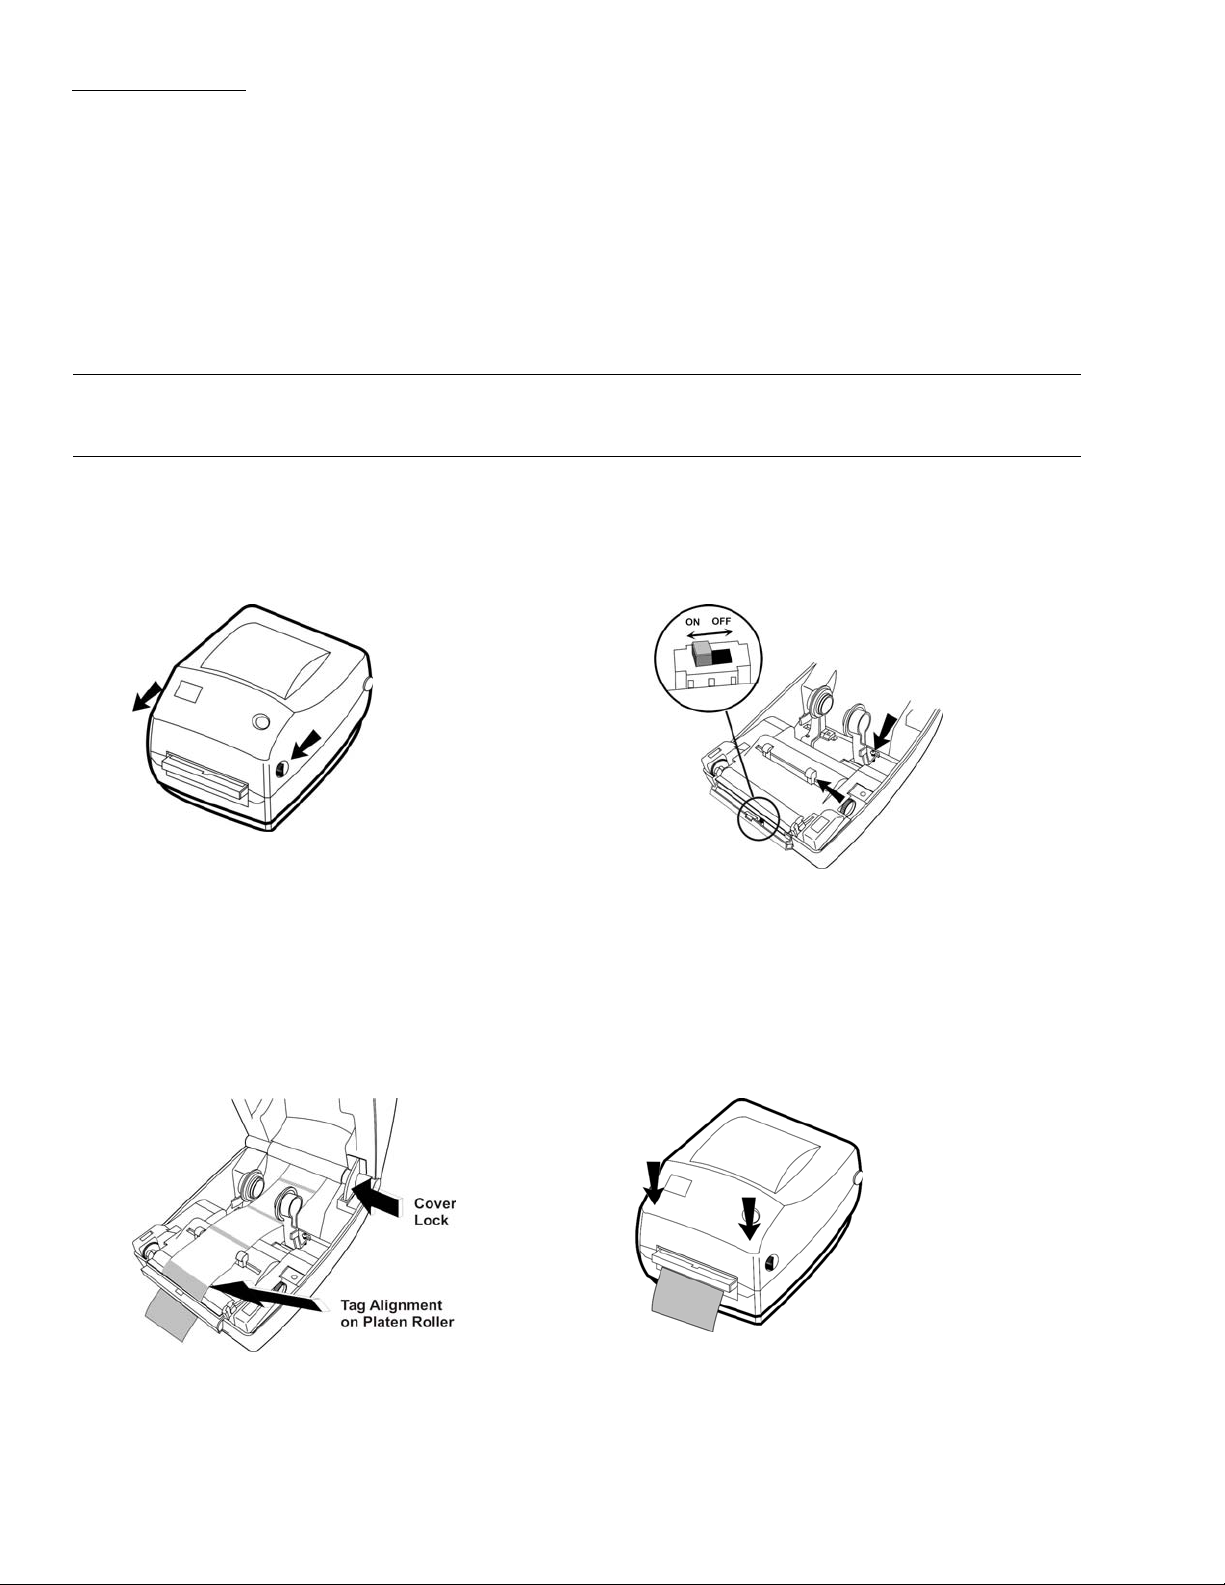
1.Opentheprinterbypullingthereleaselevers(belowleft)towardyou,thenliftthecoverupuntilitlocksintheopen
position.V erifythataribbonisinstalledinthecovercompartment.
2.Lowerthedispenserdoor(lowerfrontofprinter)and,ifnecessary ,switchonthepeel-offmode“label-taken”sensor
(belowright).
3.Verifythatatagstripissetupinsidetheprinterasshown(belowleft),withthetagstripthreadedoverthepeelbar
andplatenroller,thendownbetweentherollersbehindthedispenserdoor.
4.Asshown(belowleft),theleadingedgeofthefirsttagonthestripshouldbepositionedhalfwayacrossthetopofthe
platenrollertoprovidecorrectprintingalignment.Ifnecessary ,movethetagrollforwardorbackforproperalignment.
5.Toclosethetopcover,pressthecoverlock(belowleft).
6.Carefullylowerthetopcover,thenpressdownuntilthelatchessnapintoplace(belowright).
7.Ifnecessary ,presstheFeedbuttononcetoputtheprinterintheREADYstate(solidgreenFeedbuttonLED).Ifthe
LEDisnotsolidgreen,refertothefollowingtableandtheTroubleshootingsectioninthismanualtocorrectany
errorsbeforeproceeding.
10
Copyright©2009,3M.Allrightsreserved.
O p e r a t i n g p r o c e d u r e s
CAUTIONIfyouenteroneormoreitemIDswhentheprinterisnotintheREADYstate,tagswillimmediately
begintoprint,withoutstopping,whentheprinterisputbackintotheREADYstate.
8.ScanorotherwiseenterbarcodeinformationasdescribedintheonlineStaffHelp(clickthe“?”button).Theprinterwill
printitemIDandlibraryinformationonablankRFIDtag.
9.Whenprintingisfinished,theprinterwillseparatethetagfromthebackingstripandpresentthetagabovethedispenser
door.Whenyouremovethetag,theprinterisreadytoprintthenexttag.
FeedbuttonLEDindicators—regularvolumeprinter
LEDStatusPrinterStatus
Off
SolidGreen
FlashingAmber
FlashingGreen
FlashingRed
DoubleFlashingGreen
SolidAmber
AlternatelyFlashingGreenandRed
PowerOff
On(idle)
Stopped(seeTroubleshooting)
NormalOperation
Stopped(outofmediaorribbon,ortopcoveropen)
Paused
Off-temperature(seeTroubleshooting)
NeedsService(seeTroubleshooting)
Printing—highvolumeprinter
Thisproceduredescribesthehighvolumeprinter’sdefault“peel-off”mode,wherethetagrollbackingstripfollowsa“rewind”
pathtoaninternalspindleandRFIDtagsarepresentedoneatatimeforremovalandplacementonlibrarycollectionitems.
Note:Printercontrolsandindicatorsaredescribedinthetablesfollowingthisprocedure.
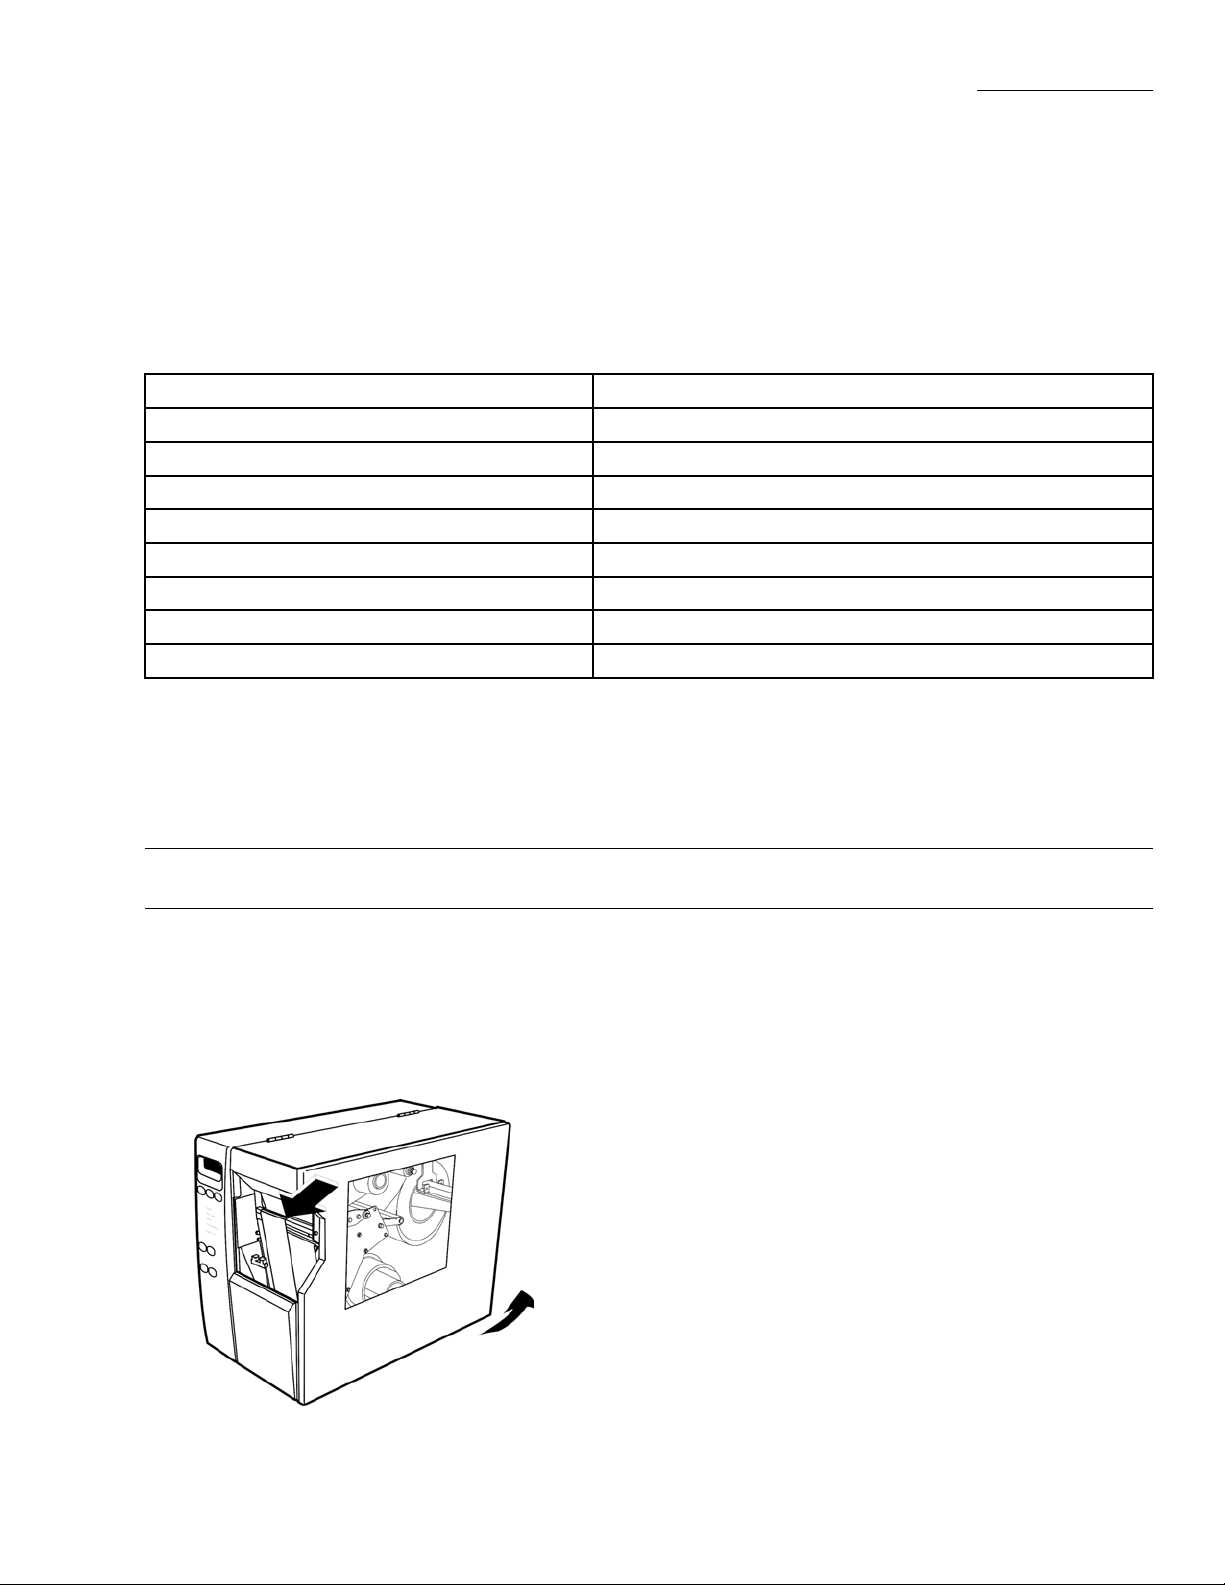
1.Opentheprinterbycarefullyliftingtherightcoverpaneluponitshinges,exposingtheinsideoftheprinter.
2.Verifythatatagrollandribbonareproperlyinstalled,andthatenoughtagsandribbonareavailabletoperformthe
requiredprintjob.
3.Verifythattheleadingedgeofthefirstblanktagontherollisbarelyvisiblefromthefrontoftheprinter(seebelow).
Thefirsttagshouldbeinthispositiontoprovidecorrectprintingalignment.Ifnecessary,movethetagrollforwardor
backforproperalignment.
4.Carefullylowertherightcoverpanelintotheclosedposition.
Copyright©2009,3M.Allrightsreserved.
11

O p e r a t i n g p r o c e d u r e s
5.Ifnecessary ,pressthePausebuttononcetoputtheprinterintheREADYstate(PauseindicatorOFF).IfPauseremains
ONorothererrorsaredisplayed,refertothefollowingtablesandtheTroubleshootingsectioninthismanualto
correctanyerrorsbeforeproceeding.
CAUTIONIfyouenteroneormoreitemIDswhentheprinterisnotintheREADYstate,tagswillimmediately
begintoprint,withoutstopping,whentheprinterisputbackintotheREADYstate.
6.ScanorotherwiseenterbarcodeinformationasdescribedintheonlineStaffHelp(clickthe“?”button).Theprinterwill
printitemIDandlibraryinformationonablankRFIDtag.
7.Whenprintingisfinished,theprinterwillseparatethetagfromthebackingstripandpresentthetagattheprinterfront
opening.Whenyouremovethetag,theprinterisreadytoprintthenexttag.
Controlpanelindicators—highvolumeprinter
ControlPanelIndicatorsStatus
POWER
TAKELABEL
ERROR
CHECKRIBBON
PAPEROUT
PAUSE
Indication
OffTheprinterisofforpowerisnotapplied.
On
OffNormaloperation.
Flashing(Peel-offmodeonly)Thetagisavailable.
OffNormaloperation—noprintererrors.
On
OffNormaloperation—ribbonisproperly
On
OffNormaloperation—tagrollisproperly
On
OffNormaloperation.
On
Theprinterison.
Printingpausesuntilthetagisremoved.
Aprintererrorexists.ChecktheLCDfor
moreinformation.
loaded.
Printingispaused,theLCDdisplaysa
warningmessage,andthePAUSElightis
on.Noribbonisloaded.
loaded.
Notagunderthemediasensor.Printingis
paused,theLCDshowsanerrormessage,
andthePAUSElightison.
Theprinterstoppedallprintingoperations.
Causesinclude:
•PAUSEwaspressed.
•Atagformatincludedapause
command.
•Theonlineverifierdetectedanerror.
•Aprintererrorwasdetected.
TheLCDgivesadditionalinformation.
12
Copyright©2009,3M.Allrightsreserved.

O p e r a t i n g p r o c e d u r e s
DATA
OffNormaloperation.Nodatabeingreceived
On
FlashingTheprinterisreceivingdatafromor
Controlpanelbuttons—highvolumeprinter
ButtonFunction
PAUSE
FEED
CANCEL
orprocessed.
Theprinterisprocessingdataoris
printing.Nodataisbeingreceived.
sendingstatusinformationtothehost
computer.
Stopsandrestartstheprintingprocessorremoveserror
messagesandclearstheLCD.
•Iftheprinterisidle,entersPausemodeimmediately.
•Iftheprinterisprinting,thetagiscompletedbeforethe
printerpauses.
Advancesablanktag.
•Iftheprinterisidleorpaused,thetagisfedimmediately .
•Iftheprinterisprinting,thetagisfedafterprintingfinishes.
CANCELfunctionsonlyinPausemode.PressingCANCEL
oncehastheseeffects:
•Cancelsthetagformatthatiscurrentlyprinting.
•Ifnotagformatisprinting,thenextonetobeprintedis
canceled.
•Ifnotagformatsarewaitingtobeprinted,CANCELis
ignored.
Tocleartheprinter’sentiretagformatmemory,pressandhold
CANCEL.Whentheformatsarecleared,theDA TAlightturns
off.
CALIBRATE
Manualcalibrationisnotrequiredsincethe3Mprinterdriver
providescalibrationparametersfortheModel813.Formore
informationonmanualprintercalibration,seetheZebrauser
guide(PDFformat,locatedonthe3MRFTagPrinterDrivers
CD-ROM).
SETUP/EXIT
PREVIOUS
EntersandexitsSetupmode.
WheninSetupmode,scrollstheLCDtothepreviousparameter .
Pressandholdtoscrollquickly.
NEXT/SAVE
•WheninSetupmode,scrollstheLCDtothenextparameter.
Pressandholdtoscrollquickly .
•WhenexitingSetupmode,savesanychangesyouhave
madeintheconfigurationandcalibrationsequence.
Copyright©2009,3M.Allrightsreserved.
13

O p e r a t i n g p r o c e d u r e s
LEFTARROW
Changestheparametervalues.Commonusesaretodecreasea
value,toanswer“no,”toscrollthroughchoices,ortochange
thecursorpositionwhileenteringthepassword.
RIGHTARROW
Changestheparametervalues.Commonusesaretoincreasea
value,toanswer“yes,”toscrollthroughchoices,ortochange
valueswhileenteringthepassword.
14
Copyright©2009,3M.Allrightsreserved.

O p e r a t i n g p r o c e d u r e s
ProgrammingandapplyingRFIDtags
Note:RefertotheonlineStaffHelp(clickthe“?”button)forcompleteRFIDtagprogrammingandapplicationinstructions.
ProgrammingandapplyingRFIDtagswiththeModel813followsthisgeneralsequence:
1.RemovetheprintedRFIDtagfromtheprinter.
2.WhenpromptedbyConversionStationsoftware,holdtheRFIDtagslightlyabovethesurfaceoftheRFIDpadto
programthetag.HoldthetagupsidedowntoavoidstickingthetagtotheRFIDpadsurface.
3.Followtheprompts.OncetheRFIDtagisprogrammed,attachittothelibrarycollectionitem.
Loadingatagrollintheprinter
Loadatagrollintheprinterusingoneofthetwofollowingprocedures(regularvolumeprinter,highvolumeprinter).
Regularvolumeprinter—loadingatagroll
CAUTIONWhileperformingtasksnearanopenprinthead,removerings,watches,necklaces,identificationbadges,
orothermetallicobjectsthatcouldtouchtheprinthead.Iftagsorribbonrunoutwhileprintingyoudonothavetoturnoff
printerpowerduringtagrollorribbonreplacement,butitisrecommendedasasafetyprecaution.
1.Makesurethatthetagrollholder(belowleft)issecurelypositionedbehindtheprinterasshown.
2.Toavoidpullingadhesiveordirtytags(possiblysoiledduringshipmentorstorage)betweentheprintheadandplaten,
removeanyaffectedtagsatthebeginningoftheroll.
3.Mountthetagrollontheholderasshown,sotheholderwillfeedtherolltag-sideupintotheprinter.
4.Toopentheprinter,pullthereleaselevers(belowright)towardyouandliftthecoverupuntilitlocksintheopenposition.
Copyright©2009,3M.Allrightsreserved.
15

O p e r a t i n g p r o c e d u r e s
5.Lowerthedispenserdoor(belowleft)and,ifnecessary ,switchonthepeel-offmode“label-taken”sensor(belowleft).
6.Ifnecessary ,adjustthewidthoftheinternaltagrollholders(belowleft)sothetagrolleasilypassesbetweenthem.Use
theadjustmentscrewatthebaseoftheright-mostholder.
7.Ifnecessary,turntheguideadjusterknob(belowleft)sothetagstripguideswilljusttouchbutnotrestrictthetagstrip.
8.Removethefirsttwotagsontheroll,theninsertthetagstripintotheprinterthroughtherearopening.Threadthetag
stripbetweentheinternaltagrollholdersandguidesasshown(belowright).
9.Threadthetagstripovertheplatenrollerandmetalpeelbar,thendownbetweentherollersbehindthedispenser
doorandoutthedispenserslotasshown(belowright).
10.Withthetagstripproperlythreaded,closethedispenserdoorasshown(belowleft).
11.Theleadingedgeofthefirsttagonthestrip(belowright)shouldbepositionedhalfwayacrossthetopofthepeelroller
toprovidecorrectprintingalignment.Ifnecessary,movethetagrollforwardorbackforproperalignment.
12.Toclosethetopcover,firstpressthecoverlock(belowright).Carefullylowerthetopcover,thenpressdownuntil
thelatchessnapintoplace.
16
Copyright©2009,3M.Allrightsreserved.

O p e r a t i n g p r o c e d u r e s
Highvolumeprinter—loadingatagroll
CAUTIONWhileperformingtasksnearanopenprinthead,removerings,watches,necklaces,identificationbadges,
orothermetallicobjectsthatcouldtouchtheprinthead.Iftagsorribbonrunoutwhileprintingyoudonothavetoturnoff
printerpowerduringtagrollorribbonreplacement,butitisrecommendedasasafetyprecaution.
1.Asshownbelow,opentheprinterbycarefullyliftingtherightcoverpaneluponitshinges,exposingtheinsideof
theprinter.
2.Slideoutandflipdownthetagrollguideonthetagrollholder(seebelow).
3.Placethetagrollontheholdersothetagrollandleaderwillunwindcounterclockwiseasshown.Pushtherollback
asfarasitwillgoontheholder .
4.Flipupthetagrollguide,thenslideitinuntilittouchestheedgeofthetagroll.
5.Iftherewindplate(notshownabove)isattachedtothefrontsurfaceoftheprintheadassembly ,removeandstoreit.
Therewindplateisnotusedwhenprintinginthe“peel-off”mode.
6.Opentheprintheadassemblybyrotatingtheprintheadopen/closelevercounterclockwise.
7.Loosenthethumbscrew(notshown)locatedonthebottomoftheoutertagstripguide.
8.Slidetheoutertagstripguideallthewayout.
9.Threadthetagrollleaderundertheroller,tagstripsensor,printhead,andsnapplate,thenovertheplatenrollerand
peel-offbar.
Note:Ifyouthreadthetagrollleaderovertheroller,tagstripsensor,printhead,orsnapplate,thetagstripwillobstruct
theribbonsensorandcauseafalseRIBBONOUTerror.
Copyright©2009,3M.Allrightsreserved.
17

O p e r a t i n g p r o c e d u r e s
10.Extendthetagrollleaderoutfromtheprintheadandthreadtheleaderasshownonthepreviouspage,fromthe
platenrollerdowntotherewindspindle.
11.Removethehookfromtherewindspindleasshownbelow.
12.Ifyouareusingacore(notrequired),slideitontotherewindspindleuntilitisflushagainsttheguideplate.
13.Windtheendoftheleadercounterclockwisearoundthespindle,thenreinstallthehookasshownabove.Insertthe
longendofthehookintothesmallholeontheguideplate,andtheshortendofthehookintotheholeinthecenterof
theadjustmentnut.
14.Turnthespindlecounterclockwiseseveralturnstowindtheleaderoverthehookandremovetheslack.
15.Alignthetagstripwiththeinnertagstripguide(seepreviouspage),thenslideintheoutertagstripguideuntilitjust
touchestheedgeofthetagstrip.
16.Retightenthethumbscrewlocatedonthebottomoftheoutertagstripguide.
17.Carefullypushdowntheprintheadassembly,thenrotatetheprintheadopen/closeleverclockwiseuntilitlocksinplace.
Loadingaribbonintheprinter
Loadaribbonintheprinterusingoneofthetwofollowingprocedures(regularvolumeprinter,highvolumeprinter).
Regularvolumeprinter—loadingaribbon
CAUTIONWhileperformingtasksnearanopenprinthead,removerings,watches,necklaces,identificationbadges,
orothermetallicobjectsthatcouldtouchtheprinthead.Iftagsorribbonrunoutwhileprintingyoudonothavetoturnoff
printerpowerduringtagrollorribbonreplacement,butitisrecommendedasasafetyprecaution.
1.Preparetheribbonformountingbyremovingitswrappingandpullingitsadhesivestripfree.
2.Opentheprintercover,thenthreadtheribbonthroughthecarriageasshown(belowleft).
3.Presstherightendoftheribbonspoolontothesupplyhubasshown.
4.Alignthenotchesontheleftsideofthespoolandthehub,thenmounttheribbonspoolontothespokesofthelefthub.
18
Copyright©2009,3M.Allrightsreserved.

O p e r a t i n g p r o c e d u r e s
5.Presstherightsideofthetake-upspoolontothetake-uphub(seepreviouspage).
Note:Y ourfirstribbontake-upspoolisintheshippingbox.Eachtimeyouloadanewribbon,usetheemptysupply
ribbonspoolasthetake-upspoolforthenextrollofribbon.
6.Alignthenotchesontheleftsideofthetake-upspoolandhub,thenmountthetake-upspoolontothespokesof
thelefthub.
7.Aligntheribbonsothatitwillbetakenstraightontothetake-upspool(belowleft).
8.Attachtheribbontothetakeupcorebyusingtheadhesivestriponnewrolls,orusetapeasshown.
9.Turntheribbontake-upgeartoremoveslackfromtheribbon(belowright).
10.Toclosethetopcover,firstpressthecoverlock(ontheinsiderightcoverhinge).Thencarefullylowerthetopcoverand
pressdownuntilthelatchessnapintoplace.
Highvolumeprinter—loadingaribbon
CAUTIONWhileperformingtasksnearanopenprinthead,removerings,watches,necklaces,identificationbadges,
orothermetallicobjectsthatcouldtouchtheprinthead.Iftagsorribbonrunoutwhileprintingyoudonothavetoturnoff
printerpowerduringtagrollorribbonreplacement,butitisrecommendedasasafetyprecaution.
1.Alignthearrowandnotchontheribbontake-upspindleasshown(aboveright).
2.Alignthethreesegmentsoftheribbonholder(nextpage,left).
Copyright©2009,3M.Allrightsreserved.
19

O p e r a t i n g p r o c e d u r e s
3.Placetheribbonrollontheholder(belowright)soitwillunrollclockwise.Pushtherollasfarasitwillgoontothe
holder.
4.Beforeyouthreadtheribbon,itisrecommendedthatyoutapealeadertotheendoftheribbontofacilitatethreading.
5.Opentheprintheadassemblybyrotatingtheprintheadopen/closelevercounterclockwise.
6.Threadtheribbonundertheribbonguideroller.
7.Pushtheribbonleaderforwarduntilitpassesundertheprintheadassembly,overthesnapplate,andthenabovethe
platenroller.
8.Pulltheribbonleaderupovertheupperribbonrollerandthentowardtheribbontake-upspindle(belowleft).
9.Windtheribbonleaderandattachedribboncounterclockwisearoundtheribbontake-upspindle(belowright).
10.Rotatethespindlecounterclockwiseseveralturnstowindtheribbonandremovetheslack.
11.Carefullypushdowntheprintheadassembly,thenrotatetheprintheadopen/closeleverclockwiseuntilitlocksinplace.
20
Copyright©2009,3M.Allrightsreserved.

Reference—Equipmentspecifications
Customer-suppliedcomputerandmonitor
OperatingSystem
Processor
RAM
Harddrive
Monitor
Media
Soundcardandspeakers
Network
Securitypolicy
Serialport
USBports
WindowsXP®Professional,SP2orSP3WindowsVista®Businessorhigher,SP1
800MHzminimum1GHzminimum,32–bit(x86)
128MB(minimum)
512MB(recommended)
Minimum40GBharddiskwithupto100
MBspacereservedforlogandstatisticsfiles
Minimum:SVGA800x600(256color)
Recommended:VGA1024x768(32–bit
color)
CDorDVDdriveDVDdrive
Line-outsoundcardrecommendedbutnot
required
NotapplicableNotapplicable
Localadministratorprivilegestoinstall
software
Requiredonlyifcustomer-suppliedserial
barcodescannerused
RequiredforUSB-connectedcomponents
suchas3MRFIDreaders,printers,CFcard
readers,barcodereaders,etc.Ifnecessary,
useaUSBhub.
1GBminimum
Minimum40GBharddiskwithupto100
MBspacereservedforlogandstatisticsfiles
DirectX®9supportwithWDDMdriver,
128MBgraphicsmemory(minimum),Pixel
Shader2.0inhardware,32bitsperpixel
Line-outsoundcardrecommendedbutnot
required
Localadministratorprivilegestoinstall
software
Requiredonlyifcustomer-suppliedserial
barcodescannerused
RequiredforUSB-connectedcomponents
suchas3MRFIDreaders,printers,CFcard
readers,barcodereaders,etc.Ifnecessary,
useaUSBhub.
Customer-suppliedbarcodescanner
Acustomer-suppliedkeyboard-wedgebarcodescannerisrequiredinordertoscanlibraryIDtagbarcodesduringthe
conversionprocess.(Seecomputerserial/USBportrequirementsabove.)
Copyright©2009,3M.Allrightsreserved.
21

R e f e r e n c e — E q u i p m e n t s p e c i f i c a t i o n s
TM
3M
RFIDPadModelP12
DimensionsLength:11.4in.(28.9cm)
ReadrangeAtleast8in.(20.3cm)witha3MRFIDtaginthecenteroftheRFIDpad
Weight16oz.(454g)
EnvironmentalOperatingtemperaturerange:50°Fto104°F(10°Cto40°C)
Mountingoptions•TheRFIDpadcanbeplacedonadesktoporcountertopnearothersystemequipment.
RFIDpad(antenna)
Width:11.4in.(28.9cm)
Height:0.6in.(1.5cm)
Note:Metalsurfaceswithin2in.(5cm)oftheRFIDpadwillreducethepad’sread
range.SincetheRFIDreaderisenclosedinametalcase,alsomakesurethatthe
readerislocatedatleast2in.fromthepad.
Storagetemperaturerange:-40°Fto131°F(-40°Cto55°C)
Humidity:0%to85%RH,non-condensing
•TheRFIDpadcanbeinstalledoutofsight,attachedtotheundersideofadesktopor
countertop.Akitforthisoptionisincludedwiththesystem.
TM
3M
RFIDReaderModel810
DimensionsLength:5.125in.(13cm)
Weight6.46oz.(183.2g)
EnvironmentalOperatingtemperaturerange:50°Fto104°F(10°Cto40°C)
ConnectionUSB2.0portforhigh-speeddatatransfer.USBcableincluded.
Powersupply
RFIDreader
Width:3.0in.(7.62cm)
Height:1.0in.(2.54cm)
Storagetemperaturerange:-40°Fto131°F(-40°Cto55°C)
Humidity:0%to85%RH,non-condensing
Input:100–240V AC,47–63Hz,0.6A
Output:12VDC,0.3A(1.7Amax.)
22
Copyright©2009,3M.Allrightsreserved.

R e f e r e n c e — E q u i p m e n t s p e c i f i c a t i o n s
3M-suppliedCFcardreader/writer
SanDisk®ImageMate®CompactFlash®CardReader/Writer
DimensionsLength:3.13in.(7.95cm)
Width:2.38in.(6.05cm)
Height:0.75in.(1.90cm)
Weight1.62oz.(45.92g)
EnvironmentalOperatingtemperaturerange:50°Fto104°F(10°Cto40°C)
Storagetemperaturerange:-40°Fto131°F(-40°Cto55°C)
Humidity:0%to85%RH,non-condensing
ControlsButtonapplicationinstalledfromCD-ROMinitiatesdatatransfer.Windows
copy-and-pasteordrag-and-droptransferalsocanbeused.
ConnectionUSB2.0portforhigh-speeddatatransfer.USBcable(included)providesbothdata
transferandpower.
MediaSDT ypeIorIIcompactflashmemorycard(TypeIIrecommended)
3M-suppliedhighvolumeprinter
Zebra®Model110XiIIIPlus™ ™
DimensionsLength:19.5in.(49.53cm)
Weight(withoutoptions)51lb.(23.13kg)
EnvironmentalOperatingtemperaturerange:41°Fto104°F(5°Cto40°C)
Power
™
Width:10.37in.(26.34cm)
Height:15.5in.(39.37cm)
Storagetemperaturerange:-40°Fto140°F(-40°Cto60°C)
Humidity:5%to85%RH,non-condensing
90-264V ac,47to63Hz;180Wpowerconsumptionatslowspeed;20Wpower
consumptionatidle
Copyright©2009,3M.Allrightsreserved.
23

R e f e r e n c e — E q u i p m e n t s p e c i f i c a t i o n s
3M-suppliedregularvolumeprinter
Zebra®ModelTLP2844–Z™ ™
DimensionsLength:9.75in.(24.77cm)
Weight3.2lbs.(1.5kg)
Environmental—thermal
transferordirectthermal
Power
TM
3M
Thiscomponentisusedonlywiththeregularvolumeprinter.
Dimensions
tagrollholder
™
Width:7.9in.(20.1cm)
Height:6.8in.(17.3cm)
Operatingtemperaturerange:40°Fto105°F(5°Cto41°C)
Storagetemperaturerange:-40°Fto140°F(-40°Cto60°C)
Humidity:10%to90%RH,non-condensing
Auto–detectable(PFCcompliant)100-240V ac,50–60Hz
Length:12.75in.(32.4cm)
Width:6.25in.(15.9cm)
Height:8.75in.(22.2cm)
Weight
3.5lbs.(1.6kg)
24
Copyright©2009,3M.Allrightsreserved.

Reference—Hardwareinstallation
WhenyoufirstreceivedyourModel813,itmostlikelywasinstalledandconfiguredby3Mpersonnel.Thefollowing
instructionsandreferencesareprovidedincaseyouneedtomoveorreplacesystemcomponents.
WARNINGDoNOTaltersystempowercords,e.g.,byreplacingpowercordplugstoworkwithlocalelectrical
outlets.Purchasepowercordslocallywhenfactorycordsdonotworkinaparticularlocation.
Model813hardwareinstallationsequence
AlwaysusethefollowingsequenceifyouneedtorelocateorreplaceModel813components:
1.BeforeyourelocateorreplaceModel813components,reviewandimplementtheguidelinespresentedintheSystem
placementguidelinessectionofthe3MPrintConversionSystemModel813SitePlanningGuide.
2.ChecktheReference–Equipmentspecificationssectioninthismanualforspecifichardwarerequirements.
3.Installthecomputer(plusmonitor,keyboardandmouse)asdescribedinthemanufacturer’sdocumentation.
4.Ifused,installthecustomer-suppliedbarcodescannerandkeyboardwedgesoftwareasdescribedinthemanufacturer’s
documentation.
5.Installthe3M-suppliedCFcardreaderusingtheUSBcommunicationcableasdescribedinthemanufacturer’s
documentation.
6.Installthe3MModel810RFIDreaderandModelP12RFIDpadusingtheUSBcommunicationcableasdescribedin
thefollowingtopic.
7.Installthe3Mprinterdriverand3M-suppliedprinterasdescribedunderReference–Printerdriverandprinter
installationinthismanual.
Note:The3MprinterdriverandprintermustbeinstalledBEFOREthe3MConversionStationsoftware
isinstalled.
8.Installandconfigure3MConversionStationsoftwareasdescribedunderReference–ConversionStationsoftware
installationinthismanual.
Copyright©2009,3M.Allrightsreserved.
25

R e f e r e n c e — H a r d w a r e i n s t a l l a t i o n
Install3M
TM
RFIDreaderandRFIDpad
RFIDpadplacement
TheRFIDpadistypicallyplacedonaflat,non-metallicsurfaceinaconvenientlocationnearthecomputerandmonitor.
Thepadalsocanbemountedbeneathadesktoporcountertopwiththekitprovidedforthatpurpose.SeeInstallRFID
padbeneathcountertop(optional)followingthistopic.
•Forbestperformance,makesurethattheRFIDpadisatleast2inches(5cm)awayfromanymetalsurface.Sincethe
RFIDreaderisenclosedinametalcase,alsomakesurethatthereaderislocatedatleast2inchesfromthepad.
•Somedesksorcountertopsmayhavemetalpartsbeneaththesurface.Ifnecessary,theRFIDpadcanbeascloseas1inch
(2.5cm)fromametalsurface,butthiswillreducetheRFIDpad’sreadrange.
•PlacetheRFIDpadcloseenoughtothesystemcomputerandmonitorsouserscanhearandseecomputer-generated
audibleandvisualcues.
RFIDreadermounting
TheRFIDreadercanbeplacedinanylocationthatmeetstheenvironmentalrequirementslistedintheequipment
specifications.
InstallRFIDpadbeneathcountertop(optional)
PerformthissteponlyifthelibrarywantstheRFIDpadinstalledbeneathacountertopordesktopandhaspreparedawork
surfaceforthistypeofinstallation.Surfacepreparationinstructionsarelocatedinthe3MPrintConversionSystemModel
813SitePlanningGuide.
1.Locatethefourpre-drilledmountingholesontheundersideofthecountertop.
2.Usingthescrewsfromthemountingkit,fastenthreemountingclips,leavingonesideopentoprovideapathtoslide
theRFIDpadintoplace.
26
Copyright©2009,3M.Allrightsreserved.

3.SlidetheRFIDpadintotheclipsasshown.
4.Fastenthefourthclipwiththeincludedscrew.
ConnectRFIDreadercommunicationandpower cables
R e f e r e n c e — H a r d w a r e i n s t a l l a t i o n
WARNING
Toreducetherisksassociatedwithhazardousvoltagecontainedwithinthepowersupply,which,ifnotavoided,could
resultindeathorseriousinjury:
•Donotusethepowersupplyifthecaseorcordaredamaged.
•Donotusethepowersupplyinoutdoororwetenvironments.
•DonotattempttoserviceorrepairtheRFIDcircuitryorpowersupply—nouserserviceablepartsinside.
•DoNOTaltersystempowercords,e.g.,byreplacingpowercordplugstoworkwithlocalelectricaloutlets.Purchase
powercordslocallywhenfactorycordsdonotworkinaparticularlocation.
Note:TheRFIDpadmustbeconnectedtotheRFIDreaderbeforeapplyingpowertothesystem.
Note:Wheneverythingishookedupandthepowerison,theRFIDreaderPowerlightshouldbeflashingGreenandthe
CommunicationlightshouldbeflashingRed.Ifthelightsareoff,seeTroubleshootinginthismanual.
Cablelengths—RFIDreaderandRFIDpad
•Coaxialcable—RFIDpadtoRFIDreader,6.67ft.(2m)
•USBcable—RFIDreadertocomputer,6.67ft.(2m)
•Powersupplycable—RFIDreadertopowertransformer,6.67ft.(2m)
•ACpowercord—PowertransformertoACpower,9.8ft.(3m)
Copyright©2009,3M.Allrightsreserved.
27

R e f e r e n c e — H a r d w a r e i n s t a l l a t i o n
28
Copyright©2009,3M.Allrightsreserved.

Reference—Printerdriverandprinter installation
BesuretoreadALLofthefollowingnotesandproceduresBEFOREyouinstalloruninstallthe3Mprinterdriver.
Administratorrights
Important:DonotattempttheseproceduresifyoudonothaveadministratorrightsineitherWindowsXPorWindowsVista.
Youmustbeloggedinasanadministrator.
Printerdriveruninstallation
Important:WitheitherWindowsXPorWindowsVista,DONOTusethe“uninstall”utilityontheprinterdriverCD.
IfyouneedtouninstalltheprinterdriverinWindowsXP:
1.GotoStart>Settings>ControlPanel>PrintersandFaxes.
2.Right-clickthe3MprinterdriverinthelistandselectDelete.
3.Rebootthecomputer.
IfyouneedtouninstalltheprinterdriverinWindowsVista:
1.GotoStart>Settings>ControlPanel>Printers.
2.Right-clickthe3MprinterdriverinthelistandselectDelete.
3.Rebootthecomputer.
Printerdriverinstallationprocedure
Important:ThefollowingstepsmustbeperformedBEFOREyouinstall3MConversionStationsoftwareonthe
computer.Y oumustbeloggedontothecomputerwithAdministratorrights.DONOTattachtheUSBcablefrom
theprintertothecomputeruntilinstructedtodoso.
1.Insertthe3MRFT agPrinterDrivers(Zebra)CD-ROMintotheCD-ROMdrive.
2.TurntheprinteronandattachtheUSBcabletothecomputer.
3.WhentheFoundNewHardwarewizardappears,
selectNo,notthistime(forwindowsupdate).
Copyright©2009,3M.Allrightsreserved.
29

R e f e r e n c e — P r i n t e r d r i v e r a n d p r i n t e r i n s t a l l a t i o n
4.SelectInstallfromalistorspecifiedlocation
(Advanced),thenselectonlythecheckboxforInclude
thislocationinthesearchandbrowsetotheCD
Driverdirectory.
5.ClicktheNextbutton.Ifyouarepromptedaboutcompatibility ,clickContinueAnyway.
6.Whenthedriversareinstalled,clicktheFinishbutton.
7.Uponcompletionofthedriverinstallation,startthe
PrinterCloningapplicationlocatedintheDriver
directoryontheCD.
Note:InWindowsVista,right-clickonthePrinter
Cloning.exeapplicationandselectRunas
administratorinthemenu.
8.SelectImportinthePrinterCloningWizard,then
selecttheprinterandbrowsetotheappropriatecloning
file(.zsd)intheSettingsdirectoryontheCD.Use
D4_110XiIIIPlus_PeelOffforthehighvolume(Zebra
110XiIIIPlus)printerorD4_TLP2844-Z_PeelOff
fortheregularvolume(ZebraTLP2844-Z)printer.
9.Whenyouhaveselectedyourprinterandcloningfile,
clickNexttoimportthesettingsintotheprinterdriver.
Theremaybeaslightpausebeforetheprogressbar
beginstoupdate.ClickFinishwhenprompted.
30
Copyright©2009,3M.Allrightsreserved.
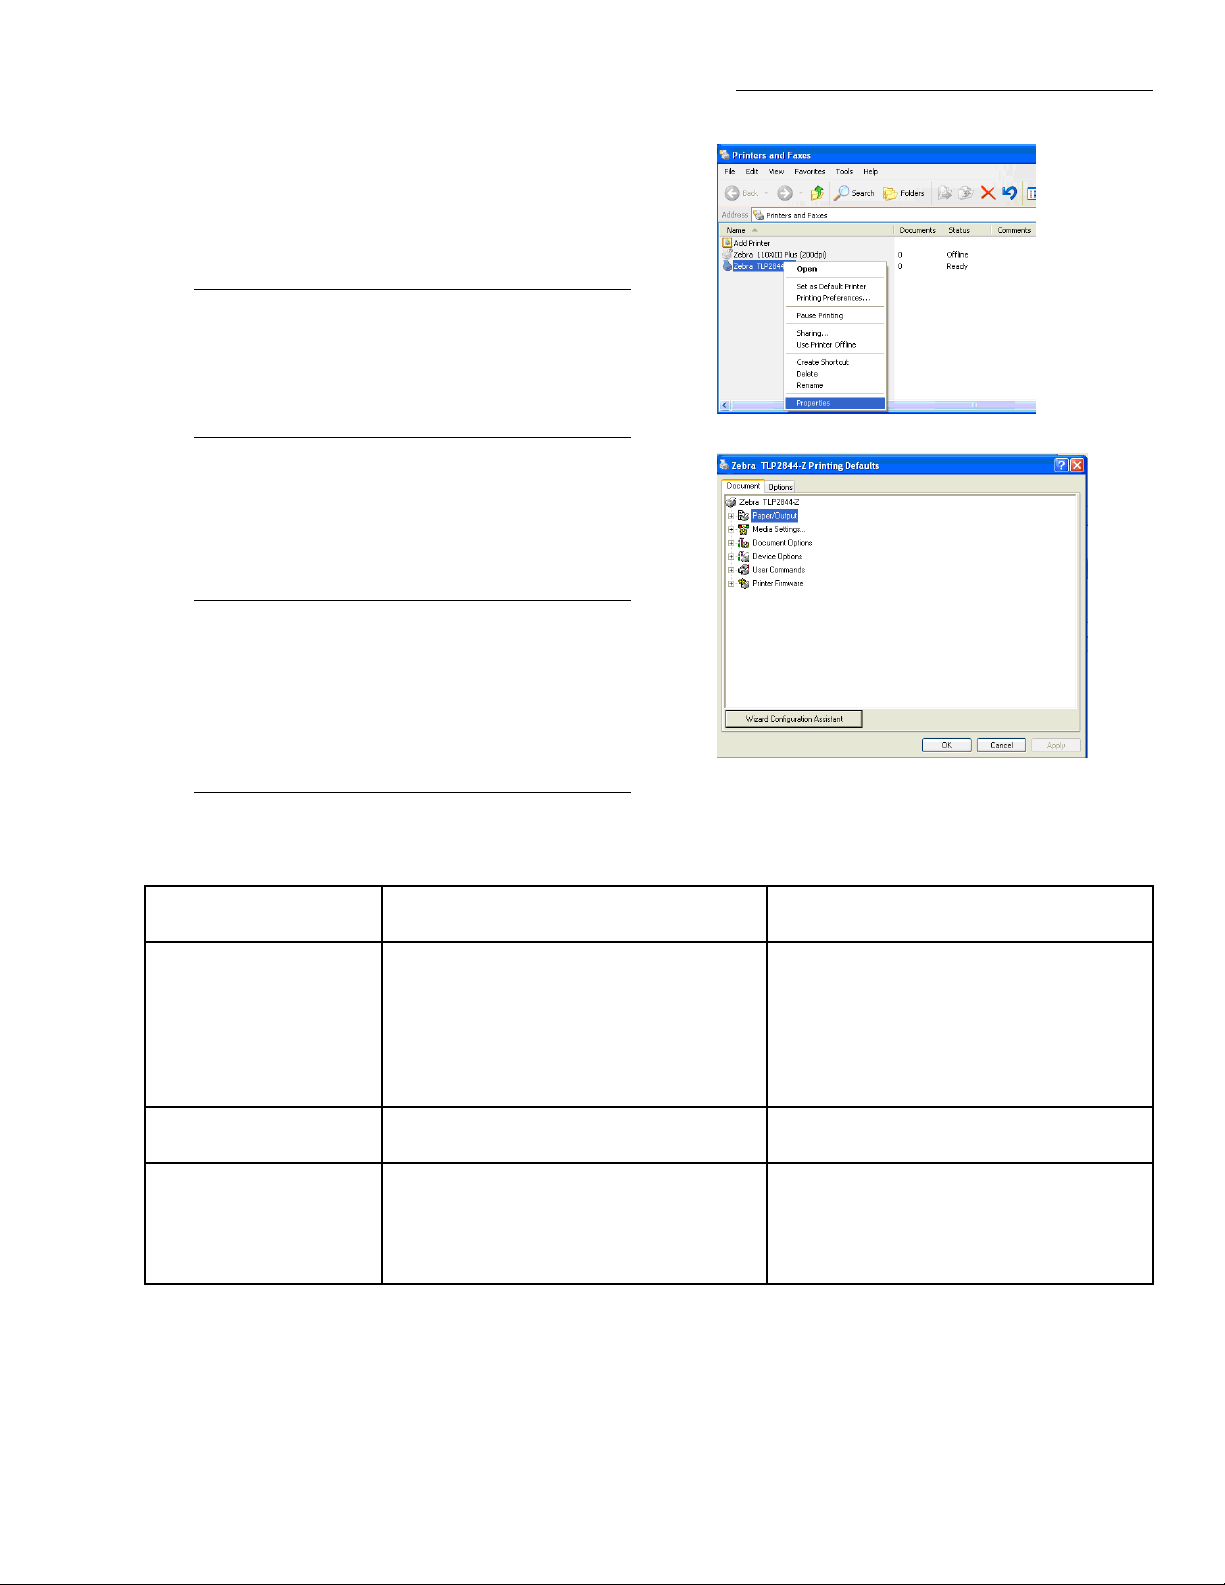
10.Right-clickontheprinterthatwasinstalled,select
Properties>Advanced,clickPrintingDefaults
andselectorenterthedefaultsettingslistedinthe
followingtable.Thedefaultsettingsyouselector
enterwillbedisplayedontheDocumenttab.
Note:InWindowsVistawithUserAccountControl
enabled,right-clickontheprinterthatwas
installedandselectRunasadministratorin
themenu.ThenselectProperties>Advanced
andclickPrintingDefaults.
11.ClickOK.Printerdriverinstallationanddefault
settingsselectioniscomplete.Y oushouldnowbe
abletoviewyourdefaultprinterdriversettingslisted
inthefollowingtableonthePrinterProperties>
Advanced>PrintingDefaults>Documenttab.
Note:DuringConversionStationsoftwareinstallation,
aDefault.xmlfileisinstalledunderC:\Program
Files\3MLibrarySystems\ConvS\Printing.
Inordertousethesameprintingformaton
multiplecomputers,thisfilemaybecopied
betweensystems.Alsocopythebitmapfilefor
thegraphicthatwillbeprintedontags.
R e f e r e n c e — P r i n t e r d r i v e r a n d p r i n t e r i n s t a l l a t i o n
PrinterDefaultSettings—PrinterProperties>Advanced>PrintingDefaults>Document
PrinterSettings
RegularVolumePrinter
(Zebra®ModelTLP2844–Z™) ™)
Paper/Output
PaperLayout:Portrait
PaperSize:D4RFIDTag
Copies:1
Rotate180:Off
Mirror:Off
Negative:Off
TopAdjustment:20
MediaSettings
MediaType:ThermalTransfer
MediaTracking:NonContinuous
DocumentOptions
DispenseMode:PeelOff(Options:No
Pause,BackfeedDefault,V erticalOffset:
0.00in)
SmartDownload:Off
Configuration:UseDriverSettings
HighVolumePrinter
™)
(Zebra®Model110XiIIIPlus™) ™)
™)
PaperLayout:Portrait
PaperSize:D4RFIDTag
Copies:1
Rotate180:Off
Mirror:Off
Negative:Off
TopAdjustment:38
MediaType:ThermalTransfer
MediaTracking:NonContinuous
DispenseMode:PeelOff(Options:No
Pause,BackfeedDefault,V erticalOffset:
-0.14in)
SmartDownload:Off
Configuration:UseDriverSettings
Copyright©2009,3M.Allrightsreserved.
31

R e f e r e n c e — P r i n t e r d r i v e r a n d p r i n t e r i n s t a l l a t i o n
DeviceOptions
SpeedSettings…
—PrintSpeed:2.00in/Sec
—SlewSpeed:2.00in/Sec
—BackFeedSpeed:2.00in/Sec
HeadSettings…
—PrintDarkness:28
PrinterActions
—OnPowerup:DoNothing
—OnHeadClose:DoNothing
UserCommands
StartofJob:DoNothing
EndofJob:DoNothing
StartofPage:DoNothing
EndofPage:DoNothing
PrinterFirmware
Firmware:X.10orLaterFirmware:X.10orLater
SpeedSettings…
—PrintSpeed:2.00in/Sec
—SlewSpeed:2.00in/Sec
—BackFeedSpeed:2.00in/Sec
HeadSettings…
—PrintDarkness:28
PrinterActions
—OnPowerup:DoNothing
—OnHeadClose:DoNothing
StartofJob:DoNothing
EndofJob:DoNothing
StartofPage:DoNothing
EndofPage:DoNothing
32
Copyright©2009,3M.Allrightsreserved.

Reference—ConversionStationsoftware installation
Performthefollowingproceduresintheorderpresentedtoinstall3MConversionStationsoftware.
Note:ThefollowingproceduresmustbeperformedAFTERyouinstalltheModel813printerdriverandprinter(see
previoustopic).Y oumustbeloggedontothecomputerwithAdministratorprivileges.(Alsoseethenote
belowonstatisticsreportingbeforeyouproceed.)
GatherConversionStationsoftwareconfiguration information
Beforeyoubeginsoftwareinstallation,obtaincompleted3MConversionStationsoftwareconfigurationformsfrom
thelibrary.Thecompletedformsshouldbelocatedonthelastfewpagesofthe3MPrintConversionSystemModel813
SitePlanningGuide.
InstallConversionStationsoftware
ThissectiondescribeshowtoinstalltheConversionStationsoftware.
1.Inserttheinstallationdisklabeled3MConversionStationintoyourcomputer’sCD-ROMdrive.
2.Theinstallationprocesswillbeginautomatically.Followtheinstructions.
Note:Whenprompted,selectDocumentationandelecttoinstallthe3MStatisticsReporterONL Yifthesystemmeets
thefollowingcriteria:1)WindowsVistadoesnotsupportthisfunction;donotelecttoinstallthe3MStatistics
Reporter.2)WindowsXPsupportsthisfunctiononlyifyouhavemanuallyinstalledDAOsoftwareonthis
computer;donotelecttoinstall3MStatisticsReporterunlessthesystemisrunningWindowsXPandyou
havepreviouslyinstalledDAOsoftware.
Note:DuringConversionStationsoftwareinstallation,aDefault.xmlfileisinstalledunderC:\ProgramFiles\3M
LibrarySystems\ConvS\Printing.Inordertousethesameprintingformatonmultiplecomputers,thisfilemaybe
copiedbetweensystems.Alsocopythebitmapfileforthegraphicthatwillbeprintedontags.
ConfigureConversionStationsoftware
YoumustbeloggedonwithAdministratorprivilegestoconfigure3MConversionStationsoftware.RefertotheonlineAdmin
Help(clicktheHelpbutton)includedwithyoursystemforcompletesystemconfigurationinstructions.
Copyright©2009,3M.Allrightsreserved.
33

R e f e r e n c e — C o n v e r s i o n S t a t i o n s o f t w a r e i n s t a l l a t i o n
34
Copyright©2009,3M.Allrightsreserved.

Maintenance
Cleaning—general
PeriodicallycleantheexposedsurfacesofModel813componentsasfollows:
Note:AlwaysTURNOFFsystemcomponentsbeforecleaning.
•DONOTuseanyabrasivecleanersontheRFIDpad.Gentlyrubthepadwithasoftclothdampenedwithamild
cleaningsolution.
•DONOTuseanyliquidcleaningsolutionsontheRFIDreader.
•Usecarewhencleaningthemonitor.Usepre-moistenedtowelettesthataresoldspecificallyformonitorcleaning.Ifthese
arenotavailable,useanon-solventbasedcleanertodampenasoftclothanduseitverysparingly.
•Cleanthebarcodescannerwindowregularlytominimizescanningproblems.Wipethescannerwindowwithaclean,
dry,cotton-tipswaborcottoncloth.
Note:PerCodeofFederalRegulations(CFR)21CFR1040.10forproductscontaininglasers:CAUTION!Useof
controlsoradjustmentsorperformanceofproceduresotherthanthosespecifiedhereinmayresultinhazardous
laserlightexposure.
•Tocleancomponentexteriors,dampenasoftclothwithwateroramildcleaningsolutionandgentlywipeawaydirt.
Cleaning—printmechanism
Bothprintersofferedby3MforusewiththeModel813require“asneeded”and“periodic”cleaningofprintmechanism
components.3Mrecommendsthatthelibraryappointsoneortwoindividualstoberesponsibleforprintercleaningschedules
andprocedures.Thoseindividualsshouldbecomefamiliarwithapplicableinformationinthemanufacturer’suserguidethat
appliestotheprinterincludedwithyoursystem.BothuserguidescanbefoundinPDFformatonthe3MRFTagPrinter
DriversCD-ROM.
•Model813Hhighvolumeprinter—Zebra110XiIIIPlusUserGuide
•Model813Rregularvolumeprinter—ZebraTLP2844-ZUserGuide
Lubrication
NoModel813components,includingthe3M-suppliedprinter,requirelubrication.
Copyright©2009,3M.Allrightsreserved.
35

M a i n t e n a n c e
36
Copyright©2009,3M.Allrightsreserved.

Troubleshooting
RFIDpaddoesnotreadtags
•Makesurethattheitemsthatyouaretryingtoreadareequippedwith3MRFIDtags.
•MakesurethattheRFIDreader’sGreenpowerlightisflashing,indicatingthatthereaderhaspower.Ifthepowerlightis
NOTflashing:
–CheckthepowerconnectiontotheRFIDreaderandthepowertransformer.Makesurethatthethreadedportionofthe
reader’spowerconnectionistightened“fingertight.”
–MakesurethatthepoweroutletthatthepowertransformerispluggedintoisON.
•MakesurethattheRFIDreader’sCommunicationslight(red)isflashingtoindicatethatitiscommunicatingwiththe
software.IfthecommunicationslightisnotON,makesurethattheConversionStationsoftware(deliveredwithyour
system)isinstalledandrunningonyourcomputer.
RFIDpadreadrangeisreduced(lessthan6in.)
•ChecktomakesurethattheRFIDpadisatleasttwoinches(5cm)fromanymetalsurfaces.Somelocationsmayhave
hiddenmetalsurfacesandcomponents.Trymovingthepadtoadifferentlocationtoseeifthereadrangeimproves.
•Makesurethattheitem’sRFIDtagisplacedinthecenteroftheRFIDpad.
RFIDpaddoesnotalwaysreadalltagsplacedonit
•Makesurethatyouarenottryingtoreadblank,invalid,ordisabledRFIDtags.
•MakesurethattheRFIDtagsarewithintheRFIDpad’sreadrange.
•Makesurethateachitem’sRFIDtagisplacednearthecenteroftheRFIDpad(nothangingoffthesideofthepad).
Barcodescannerproblems/solutions
•Ifthescannerwon’tstart,checkcableconnections.
•Ifthescannerhasapoorreadrate,checkfordustandfingerprintsonthescannerwindowandwipeitwithaclean,dry
cotton-tipswaborcottonclothifrequired.
•Ifyouhaveotherscannerproblems,checkthemanufacturer’sdocumentationforpossiblesolutions.
RunscannerorRFIDreaderdiagnostics
1.LoginastheAdministrator.
2.ClicktheSetuptab.
3.ClicktheDiagnosticsbuttonforthescannerorRFIDreader.
4.Usetheonlinehelpforinformationondiagnosticfields.
Copyright©2009,3M.Allrightsreserved.
37

T r o u b l e s h o o t i n g
Printerproblems/solutions
Regularvolumeprinter—LEDstatusindicators
LEDStatusPrinterStatus
Off
SolidGreenOn
FlashingAmber
FlashingGreen
FlashingRed
DoubleFlashingGreen
SolidAmber
AlternatelyFlashingGreenandRed
Resolution
OffPrinterisnotreceivingpower.Have
youturnedonprinterpower?Check
powerconnectionsfromthewalloutlet
tothepowersupply,andfromthe
powersupplytotheprinter.
Printerisonandinidlestate.Noaction
necessary.
StoppedPrinterhasfaileditspoweronselftest.
Ifthiserroroccursrightafteryouturn
ontheprinter,contact3MService.OR:
Memoryshortage.Ifthiserroroccurs
afteryouhavebeenprinting,turnthe
printerpoweroffandon,thenresume
printing.
NormalOperationPrinterisreceivingdata.Assoonasall
thedatahasbeenreceived,thestatus
LEDwillturngreen.Theprinterthen
willautomaticallyresumeoperation.
StoppedLoadarollofmedia,thenpressthe
feedbuttontoresumeprinting.OR:
Loadarollofribbon,thenpressthe
feedbuttontoresumeprinting.OR:
Closethetopcover,thenpressthefeed
buttontoresumeprinting.
PausedTheprinterispaused.Pressthefeed
buttontoresumeprinting.
Off-temperatureTheprintheadisundertemperature.
Continueprintingwhiletheprint
headreachesthecorrectoperating
temperature.OR:Theprintheadisover
temperature.Printingwillstopuntil
theprintheadcoolstoanacceptable
printingtemperature.Whenitdoes,
theprinterwillautomaticallyresume
operation.
NeedsServiceFlashmemoryisnotprogrammed.
Contact3MService.
38
Copyright©2009,3M.Allrightsreserved.

Highvolumeprinter—LCDdisplaymessages
LCDDisplay—PrinterConditionPossibleCauseRecommendedSolutions
ERRORCONDITION—RIBBON
OUT
(Printerstops,RIBBONlighton,
ERRORlightflashes.)
Inthermaltransfermode,ribbonisnot
loadedorisincorrectlyloaded.
Inthermaltransfermode,ribbonsensor
isnotdetectingribbonthatisloaded
incorrectly.
Inthermaltransfermode,mediais
blockingtheribbonsensor.
Inthermaltransfermode,printerdid
Loadribboncorrectly.
1.Loadribboncorrectly.
2.Calibratesensors.SeeZebra
1.Loadmediacorrectly.
2.Calibratesensors.SeeZebra
1.Printasensorprofile.Theribbon
notdetecttheribboneventhoughitis
loadedcorrectly.
2.Calibratesensorsorloadprinter
WARNING—RIBBONIN
(RIBBONlighton,ERRORlight
flashes.)
Ribbonisloadedbutprinterissetfor
directthermalmode.
Ifyouareusingthermaltransfermedia,
whichrequiresribbon,settheprinter
forThermalTransfermode.SeeZebra
XiIIIPlusUserGuide(PDFondrivers
CD).
ERRORCONDITION—PAPER
OUT
(Printerstops,MEDIAlighton,
ERRORlightflashes.)
Themediaisnotloadedorisloaded
Loadmediacorrectly.
incorrectly.
Misalignedmediasensor.Checkpositionofthemediasensor.
Theprinterissetfornon-continuous
media,butcontinuousmediaisloaded.
Installpropermediatype,orreset
printerforcurrentmediatypeand
performcalibration.SeeZebra
XiIIIPlusUserGuide(PDFondrivers
CD).
ERRORCONDITION—HEAD
OPEN
(Printerstops,ERRORlightflashes.)
THERMISTORFAULT
Theprintheadisnotfullyclosed.Closeprintheadcompletely.
Theheadopensensorisnotworking
Call3MService.
properly.
Theprintheadhasafaultythermistor.Call3MService.
(ERRORlightflashes.)
T r o u b l e s h o o t i n g
XiIIIPlusUserGuide(PDFon
driversCD).
XiIIIPlusUserGuide(PDFon
driversCD).
outthresholdismostlikelytoo
high.SeeZebraXiIIIPlusUser
Guide(PDFondriversCD).
defaults.SeeZebraXiIIIPlus
UserGuide(PDFondriversCD).
Copyright©2009,3M.Allrightsreserved.
39

T r o u b l e s h o o t i n g
WARNING—HEADCOLD
THERMISTORFAULT
ERRORCONDITION—HEAD
ELEMENTBAD
(Printerstops,ERRORlighton,printer
cyclesthroughthesethreemessages.)
WARNING—HEADCOLD
(PrinterprintswhileERRORlight
flashes.)
CAUTIONAnimproperlyconnectedprintheaddatacableorpowercable
cancausetheseerrormessages.Theprintheadmaybehotenoughtocause
severeburns.Allowtheprintheadtocool.
Theprintheaddatacableisnotproperly
connected.
Theprintheadhasafaultythermistor.Call3MService.
CAUTIONTurnOFFprinterpower
beforeperformingthisprocedure.
Failuretodosocandamagetheprint
head.
1.TurnOFFprinterpower.
2.Disconnectandreconnectthe
datacabletotheprinthead.
3.Ensurethatthecableconnectoris
fullyinsertedintotheprinthead
connector.
4.TurnONtheprinter.
CAUTIONAnimproperlyconnectedprintheaddatacableorpowercable
cancausethiserrormessage.Theprintheadmaybehotenoughtocausesevere
burns.Allowtheprintheadtocool.
Theprintheadtemperatureis
approachingitsloweroperatinglimit.
Theprintheaddatacableisnotproperly
connected.
Continueprintingwhiletheprint
headreachesthecorrectoperating
temperature.Iftheerrorremains,
theenvironmentmaybetoocoldfor
properprinting.Relocatetheprinterto
awarmerarea.
CAUTIONTurnOFFprinterpower
beforeperformingthisprocedure.
Failuretodosocandamagetheprint
head.
WARNING—HEADTOOHOT
(Printerstops,ERRORlightflashes.)
40
1.TurnOFFprinterpower.
2.Disconnectandreconnectthe
datacabletotheprinthead.
3.Ensurethatthecableconnectoris
fullyinsertedintotheprinthead
connector.
4.TurnONtheprinter.
Theprintheadhasafaultythermistor.Call3MService.
CAUTIONTheprintheadmaybehotenoughtocausesevereburns.Allow
theprintheadtocool.
Theprintheadisovertemperature.Allowtheprintheadtocool.Printing
automaticallyresumeswhentheprint
headelementscooltoanacceptable
operatingtemperature.
Copyright©2009,3M.Allrightsreserved.

T r o u b l e s h o o t i n g
DEFRAGMENTING
(Printerstops.)
OUTOFMEMORY
(function)
Theprinterisdefragmentingmemory.
Thereisnotenoughmemorytoperform
thefunctionspecifiedonthesecond
lineoftheerrormessage.
CAUTIONDoNOTturnoffthe
printerpowerduringdefragmenting.
Doingsocandamagetheprinter .
Allowtheprintertofinish
defragmenting.Ifyougetthis
errormessagefrequently,checkyour
labelformats.Formatsthatwritetoand
erasememoryfrequentlymaycause
theprintertodefragmentoften.Using
properlycodedlabelformatsusually
minimizestheneedfordefragmenting.
Ifthiserrormessagedoesnotgo
away,contact3MService.Theprinter
requiresservice.
Freeupsomeoftheprinter’smemory
byadjustingthelabelformatorprinter
parameters.Onewaytofreeup
memoryistoadjusttheprintwidthto
theactualwidthofthelabelinstead
ofleavingtheprintwidthsettothe
default.SeeZebraXiIIIPlusUser
Guide(PDFondriversCD).
Ensurethatthedevice,suchasflash
memoryorPCMCIAcard,isinstalled
andnotwrite-protectedorfull.
Ensurethatthedataisnotdirected
toadevicethatisnotinstalledoris
unavailable.
SeeZebraXiIIIPlusUserGuide(PDF
ondriversCD)formoreinformation
aboutthespecifiedfunction.
Copyright©2009,3M.Allrightsreserved.
41

T r o u b l e s h o o t i n g
42
Copyright©2009,3M.Allrightsreserved.

Warranty
Effective12-12-05
OneY earLibrarySystemsProductPerformanceGuarantee:SubjecttotheLimitationofLiabilitybelow,3Mguaranteesyour
satisfactionwiththeperformanceofany3MLibrarySystemProductfor12monthsfromthedateofinstallationprovidedthat
a)youaretheoriginalpurchaser:b)youhaveexecutedaone(1)year3MServiceAgreementformaintenanceoftheLibrary
Systemproduct;andc)theproducthasnotbeensubjectedtoabuse,misuse,accidentorneglect.Performancemeansthe
productmeets3Mpublishedproductspecifications.IfyouarenotcompletelysatisfiedwiththeperformanceofyourLibrary
SystemProduct,youmayreturntheLibrarySystemproductforapromptrefund.3Mwillpayallreasonablede-installation
andshippingchargestoreturntheproductto3M.Notethatallclaimsunderthisguaranteemustbesubmittedto3Mwithin12
monthsfromthedateofinstallationofthe3MLibrarySystemsProduct.Failuretosubmitaclaimwithinthistimeframewill
invalidatethisguarantee.IMPORTANT:Consumablesandnon-3MbrandedproductsareexcludedfromthisGuarantee.
WarrantyandLimitedRemedyforNon-SoftwareLibrarySystemsProductsNotCoveredbyPerformanceGuarantee:
Unlessstatedotherwisein3Mproductliteratureorpackaging,3Mwarrantsthateach3MLibrarySystemsProductmeetsthe
applicablespecificationsforaperiodofninety(90)daysfromthedateofshipment(or,inthecaseofhardwareinstalledby
3M,fromthedateofinstallation).Anywarrantiesrelatedto3Msoftwarearecontainedinseparate3Msoftwarelicenses.
Consumablesandnon-3MbrandedproductsareexcludedfromthisWarrantyandLimitedRemedy.
3MMAKESNOOTHERGUARANTEES,W ARRANTIESORCONDITIONS,EXPRESSORIMPLIED,
INCLUDING,BUTNOTLIMITEDTO,ANYIMPLIEDW ARRANTYORCONDITIONOFMERCHANTABILITY
ORFITNESSFORAPARTICULARPURPOSEORANYIMPLIEDW ARRANTYORCONDITIONARISINGOUT
OFACOURSEOFDEALING,CUSTOMORUSAGEOFTRADE.Y ouareresponsiblefordeterminingwhetherthe3M
productisfitforaparticularpurposeandsuitableforyourapplication.Ifthe3Mproductisdefectivewithinthewarranty
periodandprovidedthata)theproducthasnotbeensubjectedtoabuse,misuse,accidentorneglectandb)youhavenotified
3Mwithinthirty(30)daysafterthedefectwasdiscovered,yourexclusiveremedyand3M’sandseller’ssoleobligationwill
be,at3M’soption,toreplaceorrepairthedefective3Mproduct.
LimitationofLiability:EXCEPTWHEREPROHIBITEDBYLA W,3MANDSELLERWILLNOTBELIABLE
FORANYLOSSORDAMAGEARISINGFROM3MLIBRARYSYSTEMs,WHETHERDIRECT,INDIRECT,
SPECIAL,INCIDENTALORCONSEQUENTIAL,REGARDLESSOFTHELEGALTHEORYASSERTED,
INCLUDINGW ARRANTY,CONTRACT ,NEGLIGENCEORSTRICTLIABILITY.
GuaranteeandWarrantyClaims:Forguaranteeandwarrantyclaims,andforservice,contactourservicerepresentatives
at1-800-328-0067
TrackandTraceSolutions
3MCenterBuilding225-4N-14
St.Paul,MN55144-1000
Ver121205
Copyright©2009,3M.Allrightsreserved.
43

W a r r a n t y
44
Copyright©2009,3M.Allrightsreserved.

Obtaining3Mprintersupplies
Toorder3MRFIDtags,printerribbonandothersuppliesintheU.S.,call1–800–328–0067,option2.OutsidetheU.S.,
callyourlocal3Moffice.
ProductPartNumber—HighV olume
Printer
3MRFIDT ags,D4,3000/CTN
PrinterRibbon
75–4700–2227–075–4700–2227–0
78–8129–3206–578–8129–3205–7
PartNumber—RegularVolume
Printer
Copyright©2009,3M.Allrightsreserved.
45

O b t a i n i n g 3 M p r i n t e r s u p p l i e s
46
Copyright©2009,3M.Allrightsreserved.

3MService
Informationtogather
Beforeyoucallforservice,pleasehavefollowinginformationavailable:
•Thename,address,andtelephonenumberofyourfacility
•Adescriptionoftheproblemortheissueyouwantaddressed
•Themodelnumberandserialnumberoftheequipment(locatedontheseriallabel),ifthecallisinregardtoasystem
problem
ModelNumber_________________________
SerialNumber_________________________
3MServicephonenumbers
Forquestionsregardingyoursystem,calloneofthefollowingnumbers.
IntheUnitedStatesInCanadaInothercountries
1-800-328-0067
English1-800-268-6235
Français1-800-567-3193
Callyourlocal3Moffice.
3MLibrarySystemsWebSite
The3MLibrarySystemsWebsitecanbelocatedath
ForadditionalinformationintheUnitedStatesabout3MLibrarySystems,gotoh
t t p : / / w w w . 3 M . c o m / l i b r a r y .
t t p : / / w w w . 3 M . c o m / u s / l i b r a r y .
Copyright©2009,3M.Allrightsreserved.
47

3MLibrarySystems
3MCenter,Building225-4N-14
St.Paul,MN55144-1000
www.3M.com/library
 Loading...