

ADDING MORE MEMORY TO
THE
3COM SUPERSTACK 3
NBX CALL PROCESSOR
3C10233 — Upgrade/Replacement Kit for 256 MB Memory Module
Do I Need to Add
More Memory?
Tab l e 1 Memory Needs on SuperStack 3 NBX Call Processor
If you are running this version of NBX software —>
And you want your SuperStack 3 NBX system to
support:
Up to 250 devices, you must have —> at least 128 MB of memory at least 128 MB of memory
Between 251 and 750 devices, you must have —> at least 256 MB of memory at least 256 MB of memory
*Between 751 and 1500 devices, you must have —> This level of device count is
In Table 1, verify the amount of total memory that you need, based on:
■ The version of NBX system software that your system is running
■ The total number of devices that you want your SuperStack 3 NBX
Networked Telephony system to support
Release
3.0.x or 4.0.x
not supported on these
NBX system software
releases.
384 MB of memory (up to a
maximum of 512 MB)*
Release 4.1
or Later
■ Also be sure that your device limit license supports your required level
of total system devices. See your 3Com NBX Voice Authorized Partner.
■ *If you want your SuperStack 3 NBX system to support between 751
and 1500 devices, you upgrade the NBX system software to Release
4.1 before you add additional memory. See “Prepare to Add the
Memory” on page 2.
Replacing a Faulty
Memory Module
Part Number: 900-0113-01 Rev AB Published December 2002
If you want to replace a faulty memory module in your SuperStack 3 NBX
Call Processor chassis, follow the instructions in this guide.
2 ADDING MORE MEMORY TO THE 3COM SUPERSTACK 3 NBX CALL PROCESSOR
Prepare to
Add the Memory
Record the amount of free memory in your existing system; remove all
power and shut the system down to install the memory; and then open
the chassis box, as described in these steps:
1 So that you can verify that you have more free memory after you add the
new memory card, in NBX NetSet > System Configuration > System
Settings, record the number that you see in the Free Memory field.
2 To support between 751 and 1500 devices, upgrade the NBX software to
Release 4.1 now, before you add additional memory.
3 Shut the system down: In NBX NetSet > Operations > Reboot/Shutdown,
click Shutdown, and then click OK.
CAUTION: To prevent damage to the Call Processor board or memory
module, always wear and properly ground an antistatic grounding strap
before you touch the Call Processor or the memory module.
4 Remove all power from the Call Processor chassis.
WARNING: Your SuperStack 3 NBX Call Processor may have 1 or 2 power
supplies, each with a power cord. If your Call Processor has 2 cords, be
sure to remove them both from the chassis.
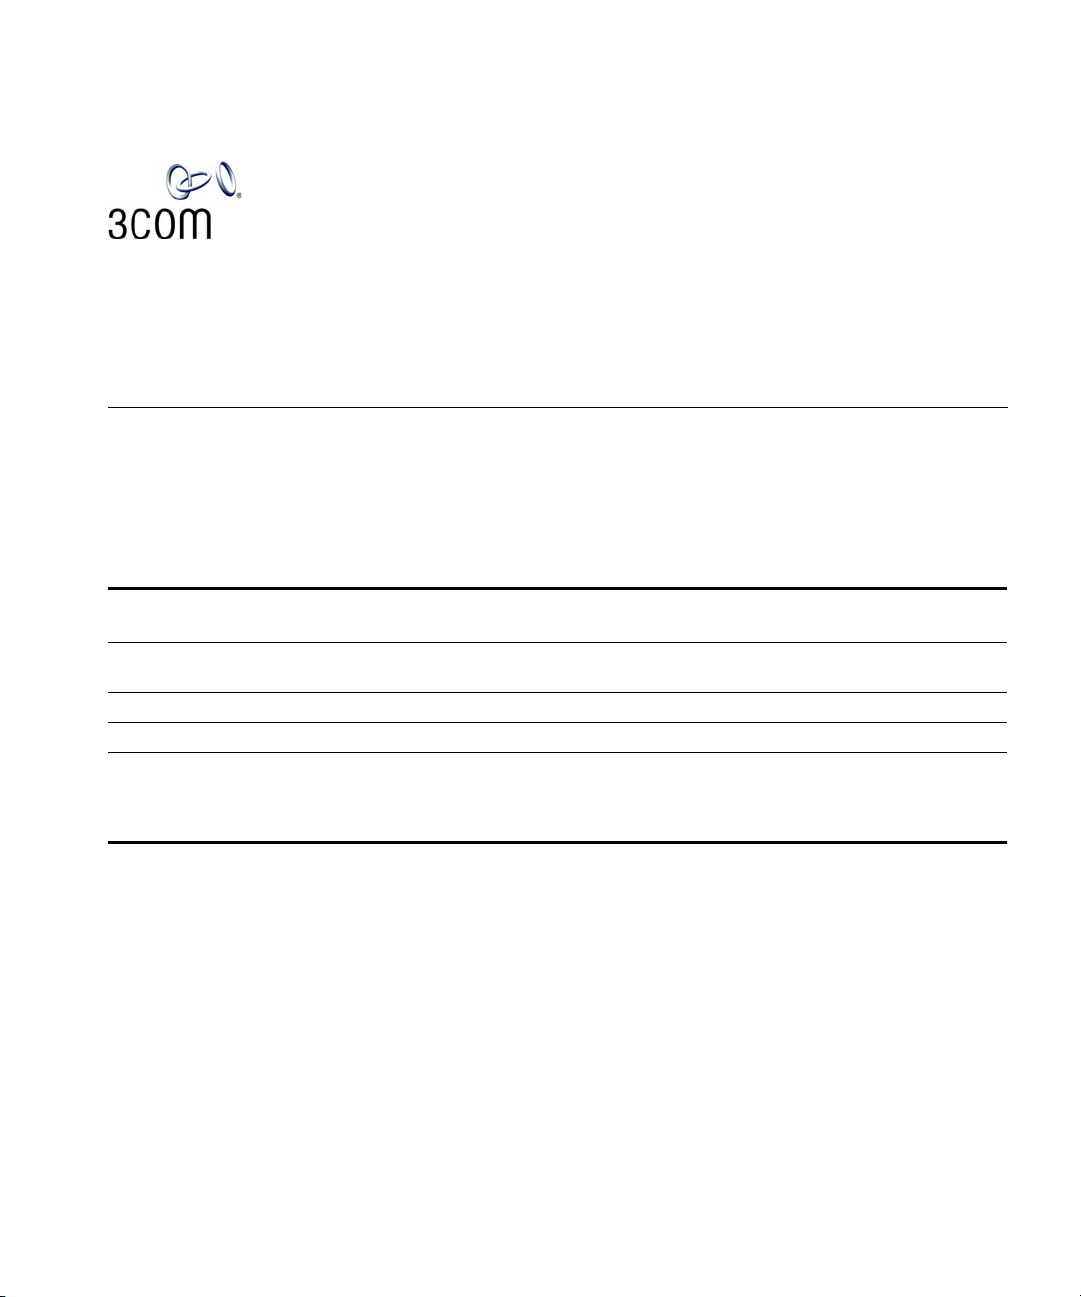
5 Use a Phillips screwdriver to remove the 8 screws that hold the cover onto
the Call Processor:
a Remove the 3 screws on the left side of the Call Processor (Figure 1).
Figure 1 Call Processor — Left Side View
1
2
3
Examine the Circuit Board 3
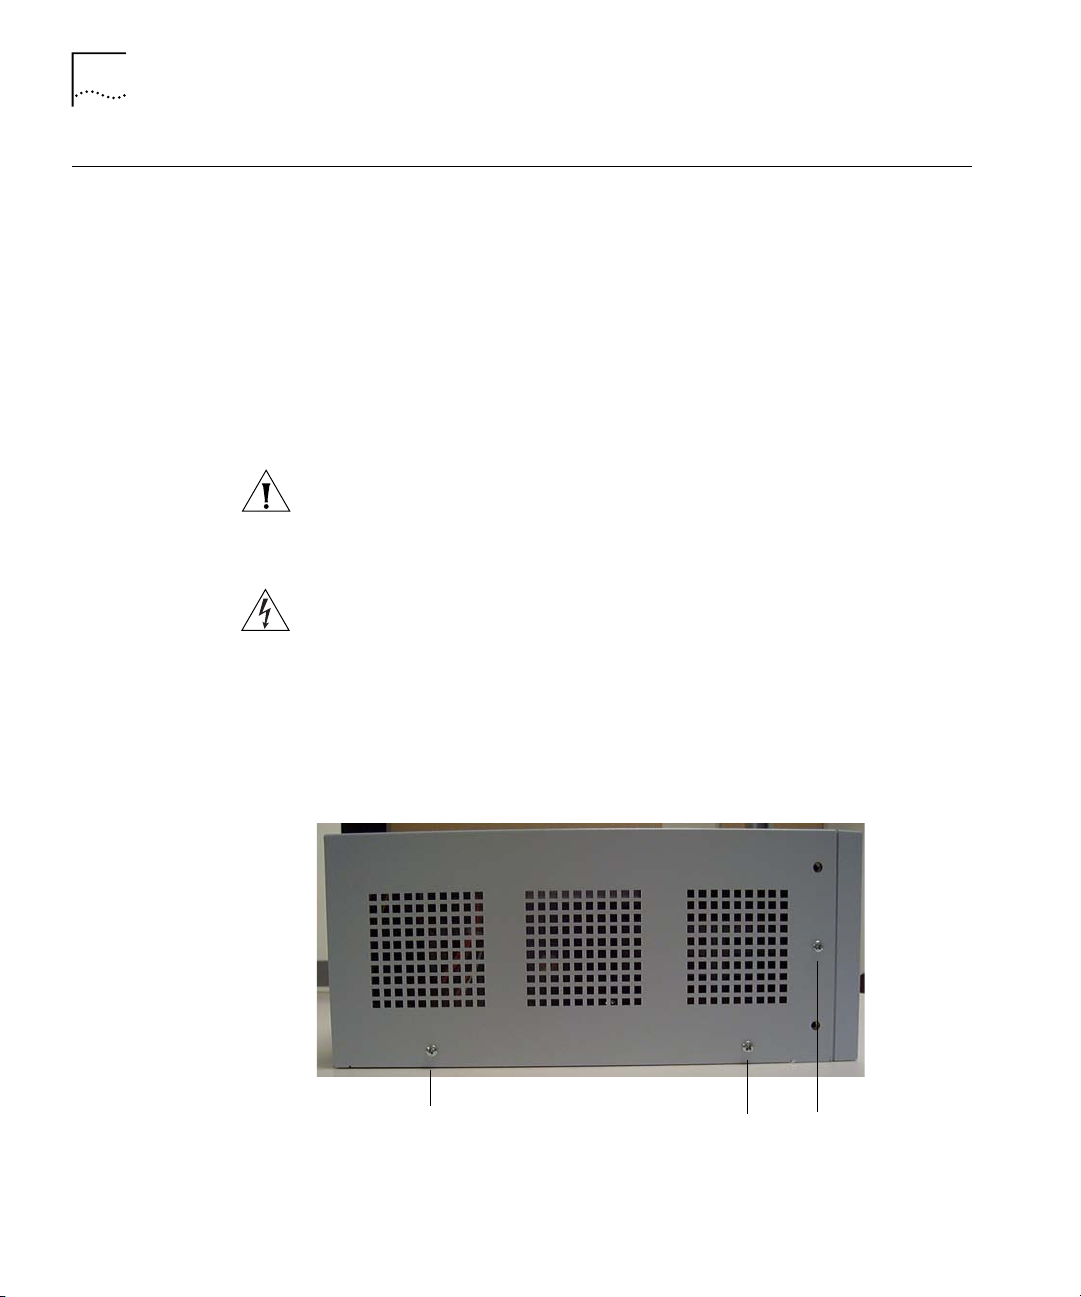
b Remove the 3 screws on the right side of the Call Processor (Figure 2).
Figure 2 Call Processor — Right Side View
Examine the
Circuit Board
1
2
3
c Remove the 2 screws along the top of the back of the Call Processor
(not illustrated).
6 After you remove all 8 screws, slide the cover toward the back of the
chassis, and then lift it off carefully.
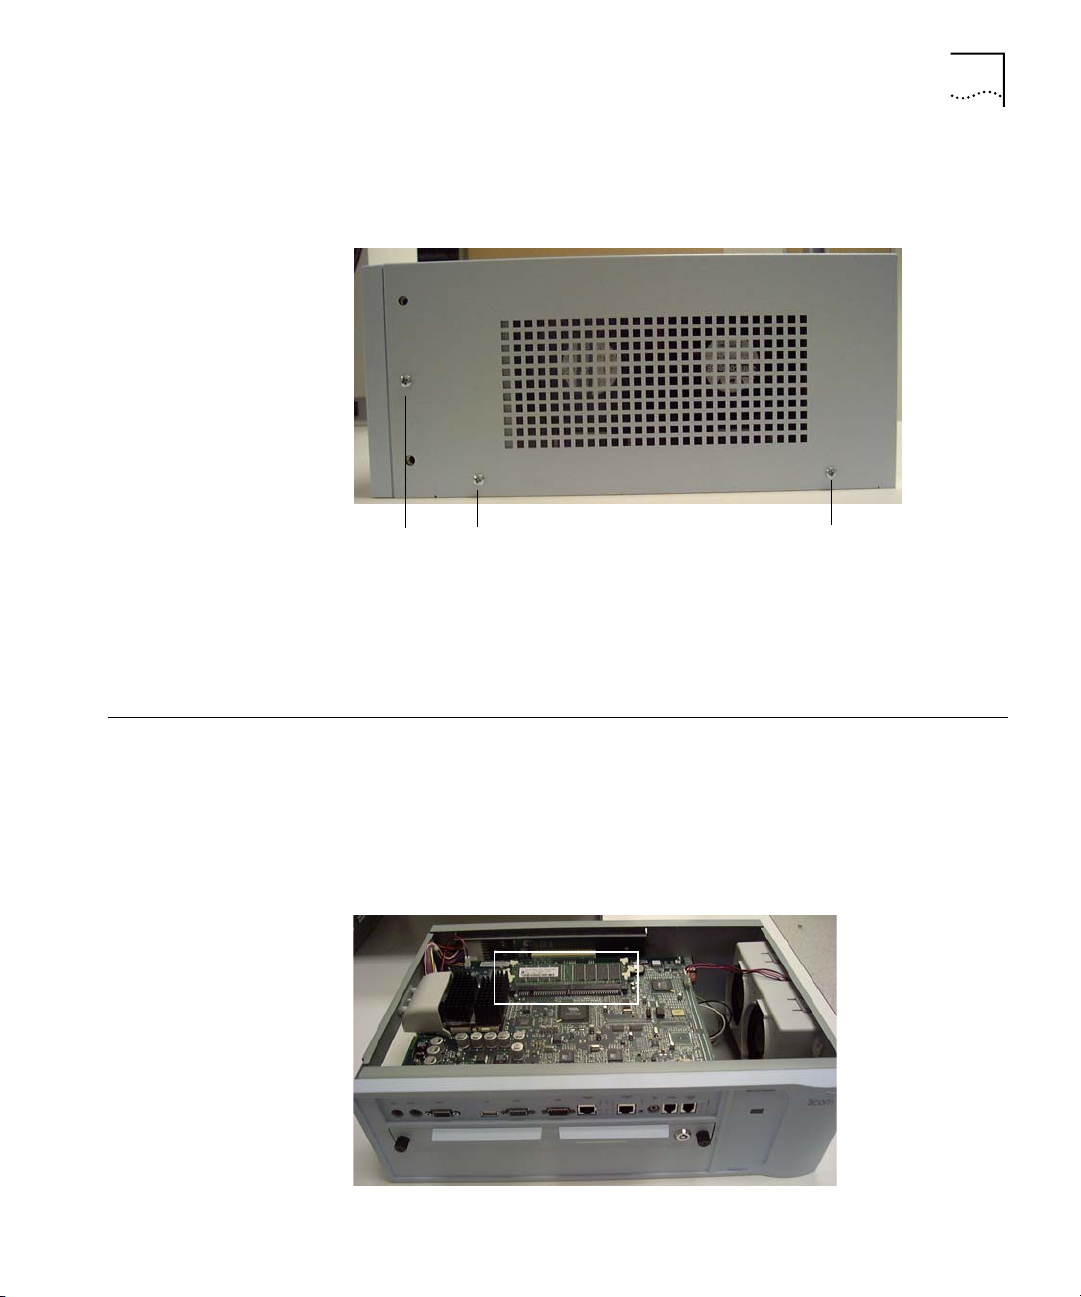
Locate the 2 memory mounting slots and note the number of memory
modules, as described in these steps:
1 Turn the Call Processor chassis so that the front side is toward you.
2 Find the memory mounting slots. See the white rectangle in Figure 3.
Figure 3 Call Processor Circuit Board Showing Memory Modules

4 ADDING MORE MEMORY TO THE 3COM SUPERSTACK 3 NBX CALL PROCESSOR
Choose the
Memory Upgrade
Procedure
for Your System
Follow the directions in Table 2 to determine the memory upgrade
procedure for your system.
Tab l e 2 Possible Memory Upgrades to the SuperStack® 3 NBX® Call Processor
Initial
Memory
Configuration
1 - 128 MB
memory
module
2 - 128 MB
memory
modules
Note: If you start with 1 - 128 MB module and 1 - 256 MB module, you can remove
the 128 MB module and add a second 256 MB module.
Final
Memory
Configuration
384 MB If you start with 1 - 128 MB memory module:
384 MB or
higher
Memory Upgrade Process
Insert the new 256 MB module into the empty
slot. See “Insert a Memory Module” later in this
guide.
Your final configuration is 384 MB, which
supports up to 1500 devices.
If you start with 2 -128 MB memory
modules:
1 Remove 1 of the 128 MB modules. See
“Remove a Memory Module” next.
2 Insert the new 256 MB module into the
empty slot. See “Insert a Memory Module”
later in this guide.
Your final configuration is 384 MB, which
supports up to 1500 devices.

Remove a Memory Module 5
Remove a Memory
Module
To remove a memory module from a slot on the SuperStack 3 NBX Call
Processor circuit board:
1 Read and follow the CAUTION and WARNING instructions in “Prepare
to Add the Memory” on page 2.
2 Wear and ground an antistatic grounding device.
3 Open the 2 locking tabs at either end of the mounting slot.
4 Gently pull the memory module from the slot.
The memory module is mounted at an angle to the Call Processor board.
If a memory module is difficult to remove:
■ Verify that the locking tabs are completely unlocked.
■ Verify that you are pulling directly in line with the module slot.

6 ADDING MORE MEMORY TO THE 3COM SUPERSTACK 3 NBX CALL PROCESSOR
Insert a
Memory Module
To insert a memory module into an empty slot on the SuperStack 3
NBX Call Processor board:
1 Wear and ground an antistatic grounding device. Read and follow the
CAUTION and WARNING instructions in “Prepare to Add the Memory”
on page 2.
2 Open the locking tabs at both ends of the empty memory mounting slot.
3 Remove the memory module from the package in which it was shipped.
4 To verify that the memory module is oriented properly, align the
indentations along the edge of the memory module (1 and 2 in Figure 4)
with the corresponding locations in the memory mounting slot on the
circuit board.
Align the memory module with the angle of the slot.
Figure 4 Slot-Alignment Indentations on the Memory Module
1
12
2
5 Insert the memory module into the memory mounting slot. The left and
right edges of the memory module must fit into the guide slots at either
end of the memory mounting slot.
6 Slide the memory module down until it touches the base of the memory
mounting slot.
7 To seat the memory module, press the its top firmly. When it is properly
seated, the two locking tabs snap into place.
CAUTION: Do not press too hard or you may damage the memory
module or the mounting hardware. If the locking tabs do not snap into
place, the memory module may not be properly aligned. Remove the
module and repeat the insertion process.
8 Replace the Call Processor cover and hand tighten the 8 screws.

Verify the Memory Configuration 7
Verify the Memory
Configuration
To verify that the NBX system can access all of the memory, compare the
free memory before and after you upgraded the memory. Follow these
steps:
1 Reinsert the power cord (or 2 cords, if you have a dual-power-supply
system) into the Call Processor chassis, and wait until the NBX system
completes the startup process.
2 Log in to the NBX NetSet utility with the administrator username and
password.
3 In NBX NetSet > System Configuration > System Settings, compare the
Free Memory value to the number that you recorded before you installed
the additional memory. The number should reflect more memory.
4 Remember, if you need to support more than 250 devices, contact your
3Com NBX Voice Authorized Partner to upgrade your device license.

8 ADDING MORE MEMORY TO THE 3COM SUPERSTACK 3 NBX CALL PROCESSOR
Copyright © 2002, 3Com Corporation. All rights reserved.
Unless otherwise indicated, 3Com registered trademarks are registered in the United States and may be registered in other countries. 3Com,
the 3Com logo, NBX, and SuperStack are registered trademarks, and NBX NetSet is a trademark of 3Com Corporation. Other brand and
product names may be registered trademarks or trademarks of their respective holders.
 Loading...