

®
NBX
Cordless Telephone
Guide
NBX Networked Telephony Solutions
System Release 6.0
Part Number 900-0340-01
Published July 2006
http://www.3com.com/

3Com Corporation
350 Campus Drive
Marlborough, MA
01752-3064
Copyright © 1998–2006, 3Com Corporation. All Rights Reserved. No part of this documentation may be
reproduced in any form or by any means or used to make any derivative work (such as translation,
transformation, or adaptation) without written permission from 3Com Corporation.
3Com Corporation reserves the right to revise this documentation and to make changes in content from
time to time without obligation on the part of 3Com Corporation to provide notification of such revision
or change.
3Com Corporation provides this documentation without warranty, term, or condition of any kind, either
implied or expressed, including, but not limited to, the implied warranties, terms, or conditions of
merchantability, satisfactory quality, and fitness for a particular purpose. 3Com may make improvements
or changes in the product(s) and/or the program(s) described in this documentation at any time.
If there is any software on removable media described in this documentation, it is furnished under a
license agreement included with the product as a separate document, in the hardcopy documentation, or
on the removable media in a directory file named LICENSE.TXT or !LICENSE.TXT. If you are unable to
locate a copy, please contact 3Com and a copy will be provided to you.
UNITED STATES GOVERNMENT LEGENDS:
If you are a United States government agency, then this documentation and the software described herein
are provided to you subject to the following:
United States Government Legend: All technical data and computer software is commercial in nature
and developed solely at private expense. Software is delivered as Commercial Computer Software as
defined in DFARS 252.227-7014 (June 1995) or as a commercial item as defined in FAR
such is provided with only such rights as are provided in 3Com’s standard commercial license for the
Software. Technical data is provided with limited rights only as provided in DFAR 252.227-7015 (Nov
1995) or FAR
portion of any legend provided on any licensed program or documentation contained in, or delivered to
you in conjunction with guide.
Unless otherwise indicated, 3Com registered trademarks are registered in the United States and may or
may not be registered in other countries.
3Com, the 3Com logo, and NBX are registered trademarks of 3Com Corporation. NetSet and pcXset are
trademarks of 3Com Corporation.
Other brand and product names may be registered trademarks or trademarks of their respective holders.
52.227-14 (June 1987), whichever is applicable. You agree not to remove or deface any
2.101(a) and as

CONTENTS
CONTENTS
ABOUT THIS GUIDE
How to Use This Guide 9
Conventions 10
Documentation 11
Comments on the Documentation 11
1 GETTING STARTED
Setting Up Your Password and Voice Mail for the First Time 13
The NBX NetSet Utility 15
Starting the NBX NetSet Utility 16
Navigating the NBX NetSet Utility 16
Setting Your Accessibility Options 16
Quick Reference Guides 17
2 3COM 3106C AND 3107C CORDLESS TELEPHONES
Telephone Buttons and Controls 20
3Com 3106C 20
3Com 3107C 23
Programmable Access Buttons 25
Status Lights for System Appearance Buttons 26
Base Unit Controls and Functions 27
Using the Handset 27
Handset Controls 28
Using the Handset 29
Using the Optional Headset 31
3 NBX MESSAGING
NBX Messaging Components 33
Important Considerations 34
Changing Your Password 34

4
Security Tips 34
Changing Your Name Announcement and Personal Greetings 35
Listening to NBX Messages 36
Message Indicators 36
Listening from Your Computer 36
Listening from Your 3Com Cordless Telephone 37
Listening from Any Internal 3Com Telephone 37
Listening from an External Location 37
Managing Your Messages 38
Information About Your Messages 38
Replying to a Message 39
Forwarding a Message 40
Creating and Sending a Message 41
Using Voice Mail Group Lists 42
Viewing System Groups 42
Creating Personal Groups 42
Modifying or Deleting Groups 43
Marking a Message as Private or Urgent 45
Other Ways to Manage Your Voice Mail Messages 45
Other Kinds of Mailboxes 46
Greeting-Only Mailbox 46
Phantom Mailbox 47
Group Mailbox 47
4 STANDARD FEATURES
Answering a Call 49
Caller ID 49
Answering a Second Call 50
Dialing a Call 51
An Internal Call 51
An External Call 51
Redialing a Call 51
Forwarding Incoming Calls 52
Call Coverage Points 52
Condition to Forward Calls 52
Setting Call Forward from the Telephone 53
Setting Call Forward from the NBX NetSet Utility 55

Call Forward Precedence 57
Putting a Call On Hold 58
Dialing Another Call 58
More Than One Call 58
Transferring a Call 59
Announced (Screened) Transfer 59
Blind Transfer 60
Direct Mail Transfer 60
Establishing a Conference Call Using Feature Codes 60
Disconnecting the Last Person That Yo u Called 61
More About Conference Calls 62
Using Camp On 62
Initiating Camp On With Call Transfer 63
Initiating Direct
Camp On 64
More About
Camp On 64
Using Automatic Callback 66
Initiating Automatic Callback 66
More About Automatic Callback 66
5
5 PERSONALIZING YOUR TELEPHONE
Guidelines About Features on 3Com Telephones 69
Ringer Tones 70
Button Mapping 70
Button Mapping Notes 74
Speed Dials 76
Personal Speed Dials 76
System-wide Speed Dials 77
Special Case: One-Touch Speed Dials 78
Printing Speed Dial Lists 78
Printing Labels 79
Off-Site Notification 80
Managing Off-site Notification Using the Telephone 84
Do Not Disturb 84
Preventing Unauthorized Use of Your Telephone 85
Telephone Locking 85
Call Permissions 86

6
Class of Service Override 86
Using a Headset 87
6 FEATURE CODES
Feature Codes with 3Com Telephones 89
3Com Cordless Telephone 89
NBX Tones 90
Using Feature Codes 91
7 GETTING MORE FROM YOUR TELEPHONE SYSTEM
Listening to Your Messages in Your E-mail 96
Account (Billing) Codes 96
Caller ID 97
Internal and External Caller ID 97
Calling Line Identity Restriction (CLIR) 98
Call Pickup 99
Directed Call Pickup on a Specific Telephone 99
Group Call Pickup 100
Automatic Call Distribution Groups, Hunt Groups, and Calling Groups 100
Automatic Call Distribution 100
Hunt Groups 103
Calling Groups 105
Group Membership 106
Supervisory Monitoring 106
Agent Role for 3Com Cordless Telephones 107
Supervisory Monitoring Terminology 107
Call Privacy 108
More About Supervisory Monitoring 109
WhisperPage 110
Starting a WhisperPage Session 111
More About WhisperPage 111
Call Park 112
Paging 113
Paging the System 114
Paging Zones 114
Configurable Operators 115
How Configurable Operators Work 115

Configuring the Operators 116
Using Message Waiting Indicator to Telephone 117
Sending an MWI Message 117
Cancelling an MWI Message 118
Dialing a Call to a Remote Office 118
Using Unique Extensions 118
Using Site Codes 119
Bridged Extensions 120
Using Pulse Dialing 121
Through a Feature Code 122
Through a Mapped Button 122
Through a Personal Speed Dial 122
Additional Applications 123
A TELEPHONE INSTALLATION AND MAINTENANCE
Selecting the Installation Location 126
Telephone Kit Contents 127
Connecting the Telephone Cords 127
Applying Power to the Base and Charging Units 128
Installing on the Wall 129
Installing the Base Unit on the Wall 130
Installing the Charging Unit on the Wall 131
Attaching the Beltclip to the Handset 134
Installing the Handset Battery Pack 135
3Com 3106C 135
3Com 3107C 136
Charging the Handset Battery Pack 137
Charging an Optional Spare Battery Pack (3Com 3107C) 138
Low Battery Indicator 138
Cleaning the Battery and Charging Unit Contacts 139
Moving Your Telephone 139
Swapping Telephones 139
Cleaning Your Telephone 139
Important Safety Instructions 140
Battery Precautions 141
Electrical and EMI Precautions 142
Troubleshooting Problems 144
7

8
Telephone Specifications 147
INDEX
FCC CLASS B VERIFICATION STATEMENT
INDUSTRY CANADA NOTICE
How to Use
This
Guide
ABOUT THIS GUIDE
This guide is intended for anyone using:
■ 3Com
■ 3Com
It includes information about using the NBX Voice Mail system and the
NBX
If the information in the release notes (readme.pdf) on the NBX Resource
Pack CD differs from the information in this guide, follow the instructions
in the release notes.
®
3106C Cordless Telephones
®
3107C Cordless Telephones
NetSet™ administration utility for personal telephone settings.
Ta bl e 1 shows where to look for specific information in this guide.
Ta bl e 1 Where to Find Information
If you are looking for information about Turn to
How to get started with your new telephone
The 3Com 3106C and 3107C Cordless Telephones
NBX Voice Messaging features
Using standard telephone features
Personalizing your telephone
Enhanced system features
Feature codes
Telephone installation, maintenance, and troubleshooting
information
References to all topics in this book
Chapter 1
Chapter 2
Chapter 3
Chapter 4
Chapter 5
Chapter 7
Chapter 6
Appendix A
Index
10 ABOUT THIS GUIDE
Conventions Ta bl e 2 defines some commonly used words and phrases in this guide.
Ta bl e 2 Common Terms
Term Definition
Auto Attendant The set of voice prompts that answers incoming calls and
Administrator The person who is responsible for maintaining your
Receptionist The person who answers the majority of incoming
User A person who has a single 3Com Telephone or an
Ta bl e 3 lists icons that are used throughout this guide.
Ta bl e 3 Icons
describes actions that a caller or user can take to access
individual services.
3Com Networked Telephony Solution.
telephone calls. In some business environments, this
person may be a switchboard operator.
analog telephone connected to the NBX system through
an ATC card or the single-port ATA device.
Icon Type Description
Information note Information that describes important features
Caution Information that alerts you to potential loss of
Warning Information that alerts you to potential
or instructions.
data or potential damage to an application,
system, device, or network.
personal injury.

Documentation 11
Documentation The documentation set for 3Com NBX Networked Telephony Solutions is
designed to help 3Com Telephone users, installers, and administrators
maximize the full potential of the system.
The NBX Resource Pack CD contains many guides to the NBX products
and their related 3Com applications.
When you log in to the NBX NetSet utility as a user, you can view the PDF
versions of the NBX
going to Resources > Phone Guide and Feature Code Reference
pages, respectively and clicking their associated links. You can similarly
view the Quick Reference Guide by clicking the Telephone Quick
Reference link. The NBX NetSet utility also includes a searchable Help
system with Help buttons on each screen.
An administrator who logs in can also see the NBX Installation Guide and
the NBX
Administrator’s Guide.
Telephone Guides and NBX Feature Codes Guide by
Comments on the
Documentation
Your suggestions are important to us. They help us to make the NBX
documentation more useful to you.
Please send your e-mail comments about this guide or any of the
3Com
NBX documentation and Help systems to:
Voice_TechComm_Comments@3com.com
Include the following information with your comments:
■ Document title
■ Document part number (found on the front or back page)
■ Page number
As always, please address all questions regarding the NBX hardware and
software to your 3Com NBX Voice-Authorized Partner.

12 ABOUT THIS GUIDE

1
GETTING STARTED
As soon as you are given a telephone and extension number, you need to
set up a password and record your name announcement and personal
greeting.
This chapter covers these topics:
■ Setting Up Your Password and Voice Mail for the First Time
■ The NBX NetSet Utility
■ Quick Reference Guides
Setting Up Your
Password and
Voice Mail
for
the First Time
The procedure by which you set up your password and voice mailbox for
the first time depends on:
■ The kind of telephone that you have
■ The kind of voice messaging system on your NBX system. Ask your
administrator what kind of voice messaging is active on your system.
For details on tones and feature codes, see Chapter 6.
To set your password for the first time if your system uses NBX
Messaging:
1 Press the Message button, which is the bottom-right button on the
3106C and the 3107C.
2 Follow the voice prompts.
The password you specify provides access to your inbox and to the NBX
NetSet utility.

14 CHAPTER 1: GETTING STARTED
*
#
To set your password for the first time If your system uses a voice
messaging application other than NBX Messaging:
1 Use this code sequence to set your password for the NBX NetSet utility:
Feature button
+ 434
+ new password
+
+ repeat your new password
+
3Com recommends that you use the same password for the NBX NetSet
utility and your messaging application.
For all voice messaging systems:
■ Use only 4- to 10-digit numbers
■ Do not use letters, , or as part of your password.
To change your password if your system uses NBX Messaging:
1 Press the Message button on your telephone and login to your mailbox.
#
#
2 Follow the NBX voice prompts to change your NBX password (which
changes your NBX NetSet utility password, because they are the same).
Message button
+ old password
#
+
+ 9
+ 2
+ follow the prompts
To change your password if your system uses a voice messaging
application other than NBX Messaging:
1 Use this code sequence to change your password for the NBX NetSet
utility.
Feature button
+ 434
+ current password
#
+
+ new password
#
+
+ repeat your new password

The NBX NetSet Utility 15
If you forget your password, the administrator can reset it to your
extension.
After you set your initial NBX password, continue to follow the voice
prompts to record your name announcement. Your name announcement
tells callers that they have reached your voice mailbox. Then follow the
voice prompts to record your personal greeting. Your personal greeting
lets callers know important information about you, for instance, that you
are on vacation, available at another number, or unavailable for a
specified amount of time.
At any time you can change these greetings or record more than one
personal greeting and choose which one is active. See
“Changing Your
Name Announcement and Personal Greetings” in Chapter 3.
The NBX NetSet Utility
The NBX NetSet administration utility has two interfaces:
■ Administrator — Your administrator logs in with a special password
and uses the NBX NetSet utility to manage and configure system-wide
telephone settings and many of the settings for your telephone.
■ User — As a telephone user, you log in to the NBX NetSet utility with
your own system ID (your extension) and password to:
■ View and change your telephone’s personal settings, such as speed
dials, ringer tone, and specify where you want your calls to go
when you cannot answer them (your call coverage point).
■ Listen to and delete your voice messages from your computer as an
alternative to managing calls on your telephone.
■ View your call permissions, certain current feature settings, and the
internal user directory to call other users on your system.
■ Log in to and out of one or all hunt groups and calling groups of
which your telephone is a member.
See Chapter 4, Chapter 5, and Chapter 7 for discussions about the
standard and enhanced features that you can monitor and change in the
NBX NetSet utility. See
Chapter 3 for voice messaging features.
If your NBX system uses a messaging application other than NBX
Messaging, voice messaging features are available through your
messaging application. See the application’s documentation rather than
using this Guide.

16 CHAPTER 1: GETTING STARTED
Starting the NBX
NetSet
Navigating the NBX
NetSet Utility
Utility
To use the NBX NetSet utility, you need a computer that is connected to
your local area network (LAN) and that has a web browser. (You do not
need Internet access.) To start the NBX NetSet utility:
1 Ask your administrator for the IP address (or DNS host name) for your
NBX system. In the web browser on your computer (Microsoft Internet
Explorer version 5.5 or later is optimal), enter the IP address (or DNS host
name) in the Address field, and then press Enter. The NBX NetSet utility
login screen appears.
You cannot log in to the NBX NetSet utility until you establish your
password through your telephone using NBX voice prompts or the
Feature Code sequence.
2 Click User to log in as a user. The password dialog box appears.
3 Type your NBX NetSet utility user identification (always your 3-digit or
4-digit telephone extension) and your
then click OK.
Once you log in to the NBX NetSet utility, you can easily locate the
information you need to use your NBX telephone features. Start by
clicking the category you want in the left-hand column. Tabs indicating
the specific topics for this category appear at the top of the NBX NetSet
window. To display a particular topic, click its associated tab.
NBX NetSet utility password, and
Setting Your Accessibility Options
You can also quickly access any of the frequently used topics from the
Favorites menu. Simply select an item from the drop-down list to go to
the selected topic. (If your browser does not support Javascript, click the
Go button after selecting an item.)
To change your telephone’s settings for accessibility and to choose the
format for your NetSet utility online Help, log in to the NetSet Utility and
go to Accessibility > Accessibility Options. After selecting your
preferences, click Apply to save your changes.

Quick Reference Guides 17
Quick Reference Guides
To open and print a copy of the Quick Reference Guides for the most
frequently used features on your telephone:
1 Log in to the NBX NetSet utility. See “Starting the NBX NetSet Utility”
earlier in this chapter.
2 Go to Resources > Telephone Quick Reference and click Telephone
Quick Reference. The quick reference guide that pertains to your
®
telephone appears. Adobe
Reader 5.0 or higher is required to view the
file. Adobe Reader is available free from the Adobe Web site:
www.adobe.com

18 CHAPTER 1: GETTING STARTED

3COM 3106C AND 3107C
2
ORDLESS TELEPHONES
C
This chapter describes the buttons, controls, and features on the
3Com
3106C and 3107C Cordless Telephones.
The chapter covers these topics:
■ Telephone Buttons and Controls
■ Programmable Access Buttons
■ Status Lights for System Appearance Buttons
■ Base Unit Controls and Functions
■ Using the Handset
■ Using the Optional Headset
The 3Com 3106C and 3107C Cordless Telephones (3C10406C and
3C10407C) do not support speaker phone operation.

20 CHAPTER 2: 3COM 3106C AND 3107C CORDLESS TELEPHONES
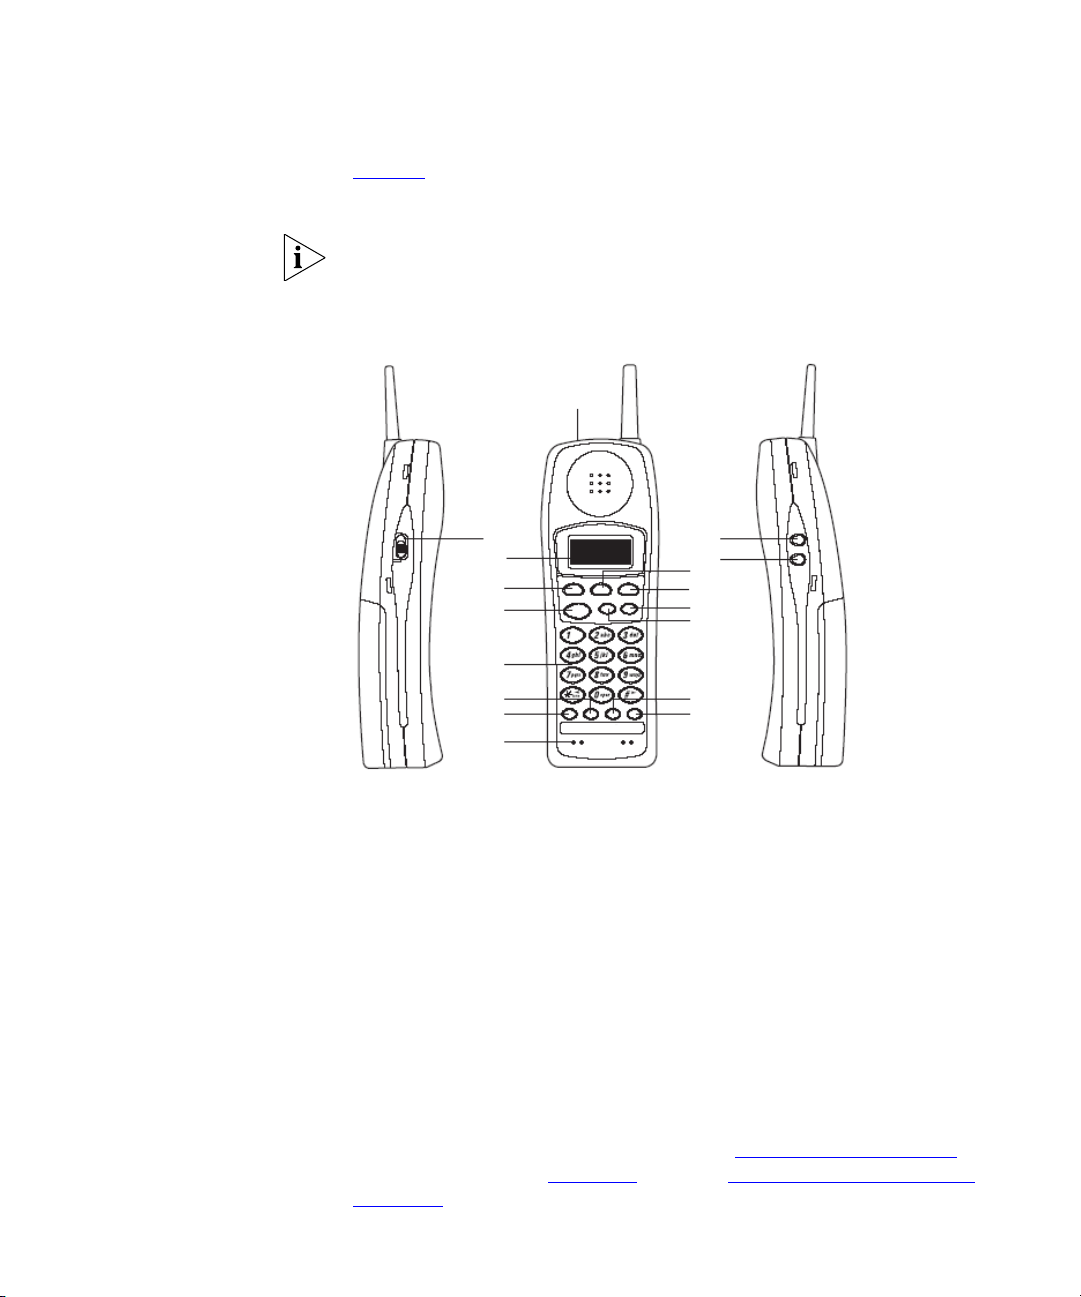
Telephone Buttons and Controls
3Com 3106C Figure 1 shows the buttons and controls on the 3Com 3106C Cordless
Telephone.
For many operations, the 3Com 3106C makes a sound when you press a
button.
Figure 1 3Com 3106C Cordless Telephone
1
2
3
4
15
16
9
10
11
12
5
6
7
8
13
14
1Headset jack — See Using the Optional Headset later in this chapter.
2 Display panel — Displays telephone status messages, Caller ID
information (if enabled), and the number of messages that you have in
your voice mail mailbox.

Telephone Buttons and Controls 21
*#*
You can also use it to view icons that indicate:
■ A message has arrived (MSG)
■ The phone is on for placing calls (Talk). This icon flashes during call
transfers.
■ The handset ringer is off (Off)
■ The handset battery needs recharging (Low)
3 Hold button — Places a call on hold. See “Putting a Call On Hold” later
in this chapter and in Chapter 4. Also see “Answering a Second Call” in
Chapter 4.
4 Talk button — Turns the phone on to place or answer calls. Also acts as
a hookswitch.
5 Telephone key pad — Lets you select menu items or enter numeric
characters. Press to save changes. Press to exit from a menu item. If
#
you have not saved menu changes by pressing , pressing exits the
menu item without saving changes.
6 System Appearance button — Indicates activity on the second calling
line. Lights steadily when an outgoing call is ringing or when you are
using the NBX Messaging system. Blinks to indicate an incoming call or
that you have placed a call on hold.
7 System Appearance button — Indicates activity on the first calling line.
Lights steadily when an outgoing call is ringing or when you are using the
NBX Messaging system. Blinks to indicate an incoming call or that you
have placed a call on hold.
8 Microphone
9 Transfer (Xfer) button — Sends the currently active call to another
telephone. See “Transferring a Call” in Chapter 4.
10 Conference (Conf) button — Establishes a single call with up to three
additional internal parties, external parties, or both. See “Establishing a
Conference Call Using Feature Codes” in Chapter 4.
11 Channel (CH) button — Changes the handset’s channel to reduce
interference during a call.
12 Feature button — Lets you access features that are not directly assigned
to another button on the telephone. See Chapter 6.

22 CHAPTER 2: 3COM 3106C AND 3107C CORDLESS TELEPHONES
13 Personal Speed Dial button — See Chapter 5.
This is a programmable access button. It can be reassigned other
functions. See
“Programmable Access Buttons” later in this chapter.
14 Message (MSG) button — Accesses your voice mail messages through
the NBX Messaging system.
This is a programmable access button. It can be reassigned other
functions. See
“Programmable Access Buttons” later in this chapter.
15 RING/VOL button — Controls the ringer alert volume when you are not
on a call. Controls the audio volume through the handset or headset
during a call. See
Handset Ringer Tone and Volume later in this chapter.
16 Ringer ON/OFF and MUTE switch — Turns the handset ringer on and
off. When the ringer is disabled, an Off icon appears on the display
panel.
Also lets you prevent a caller from hearing what you are saying during a
telephone call, although you can still hear the caller. Press the button to
turn off (Mute) the telephone’s microphone when you are using the
handset (or the headset’s microphone when using the headset). The
indicator lamp is lit when the Mute feature is enabled. Press the button a
second time to turn off the Mute feature.
Telephone Buttons and Controls 23
3Com 3107C Figure 2 shows the buttons and controls on the 3Com 3107C Cordless
Telephone.
For many operations, the 3Com 3107C makes a sound when you press a
button.
Figure 2 3Com 3107C Cordless Telephone
9
1
2
3
4
5
6
7
8
10
11
12
13
14
15
16
17
1 Ringer ON/OFF switch — Turns the handset ringer on and off. When
the ringer is disabled, an Off icon appears on the display panel.
2 Display panel — Displays telephone status messages, Caller ID
information (if enabled), and the number of messages that you have in
your voice mail mailbox.
You can also use it to view icons that indicate:
■ A message has arrived (MSG)
■ The phone is on for placing calls (Talk). This icon flashes during call
transfers.
■ The handset ringer is off (Off)
■ The handset battery needs recharging (Low)
3 Hold button — Places a call on hold. See “Putting a Call On Hold” later
in this chapter and in Chapter 4. Also see “Answering a Second Call” in
Chapter 4.

24 CHAPTER 2: 3COM 3106C AND 3107C CORDLESS TELEPHONES
*#*
4 Talk button — Turns the phone on to place or answer calls. Also acts as
a hookswitch.
5 Telephone key pad — Lets you select menu items or enter numeric
characters. Press to save changes. Press to exit from a menu item. If
#
you have not saved menu changes by pressing , pressing exits the
menu item without saving changes.
6 System appearance button — Indicates activity on the second calling
line. Lights steadily when an outgoing call is ringing or when you are
using the NBX Messaging system. Blinks to indicate an incoming call or
that you have placed a call on hold.
7 System Appearance button — Indicates activity on the first calling line.
Lights steadily when an outgoing call is ringing or when you are using the
NBX Messaging system. Blinks to indicate an incoming call or that you
have placed a call on hold.
8 Microphone
9Headset jack — See Using the Optional Headset later in this chapter.
10 R/VOL button — Controls the ringer alert volume when you are not on
a call. Controls the audio volume through the handset or headset during
a call. See
Handset Ringer Tone and Volume later in this chapter.
11 MUTE button — Lets you prevent a caller from hearing what you are
saying during a telephone call, although you can still hear the caller. Press
the button to turn off (Mute) the telephone’s microphone when you are
using the handset (or the headset’s microphone when using the headset).
The indicator lamp is lit when the Mute feature is enabled. Press the
button a second time to turn off the Mute feature.
12 Transfer (Xfer) button — Sends the currently active call to another
telephone. See “Transferring a Call” in Chapter 4.
13 Conference (Conf) button — Establishes a single call with up to three
additional internal parties, external parties, or both. See “Establishing a
Conference Call Using Feature Codes” in Chapter 4.
14 Feature button — Lets you access features that are not directly assigned
to another button on the telephone. See Chapter 6.
15 Channel button — Changes the handset’s channel to reduce
interference during a call.

Programmable Access Buttons 25
16 Personal Speed Dial button — See Chapter 5.
This is a programmable access button. It can be reassigned other
functions. See
“Programmable Access Buttons” next.
17 Message (MSG) button — Accesses your voice mail messages through
the NBX Messaging system.
This is a programmable access button. It can be reassigned other
functions. See
“Programmable Access Buttons” next.
Programmable
Access B
uttons
Figure 3 shows the Access buttons on the 3Com Cordless Telephones. By
default, the functions assigned to these buttons are set by your NBX
administrator. The administrator may also choose to assign these buttons
different functions, such as Bridged extensions. See
“Bridged Extensions”
in Chapter 7.
If your administrator has assigned you to a group that allows you to
change your button mappings, you also can assign other functions to
these buttons, such as call park extensions. See
“Button Mapping” in
Chapter 5. Otherwise, you cannot change their functions unless your
administrator defines one or more buttons as User Speed Dials. See
“Speed Dials” in Chapter 5.
Figure 3 TAccess Buttons
123 4
Access buttons have these default settings:
1 System Appearance button 1 — Indicates activity on the first calling
line. Lights steadily when you are in an active call or are using the NBX
Messaging system. Blinks to indicate an incoming call or when you have
placed a call on hold.
2 System Appearance button 2 — Indicates activity on the second calling
line. Lights steadily when you are in an active call or are using the NBX
Messaging system. Blinks to indicate an incoming call or when you have
placed a call on hold.
3 Personal Speed Dial button — See “Speed Dials” in Chapter 5.
26 CHAPTER 2: 3COM 3106C AND 3107C CORDLESS TELEPHONES
4 Message (MSG) button — Accesses your voice mail messages through
the NBX Messaging system. See
The telephone LabelMaker, which is available through the NBX NetSet
utility, enables you to define and print a new label for the label area
below these Access buttons.
Chapter 3.
Status Lights for System Appearance Buttons
An Access button that is set up for incoming and outgoing calls is called a
System Appearance button. Each System Appearance button lights as
follows to indicate a line’s status. See
Ta bl e 4 Status Indicator Lights for System Appearance Buttons
If the light is The line is
Off Available for use
Steady In use
Blinking quickly Ringing
Blinking slowly On hold
Tab le 4.
Base Unit Controls and Functions 27
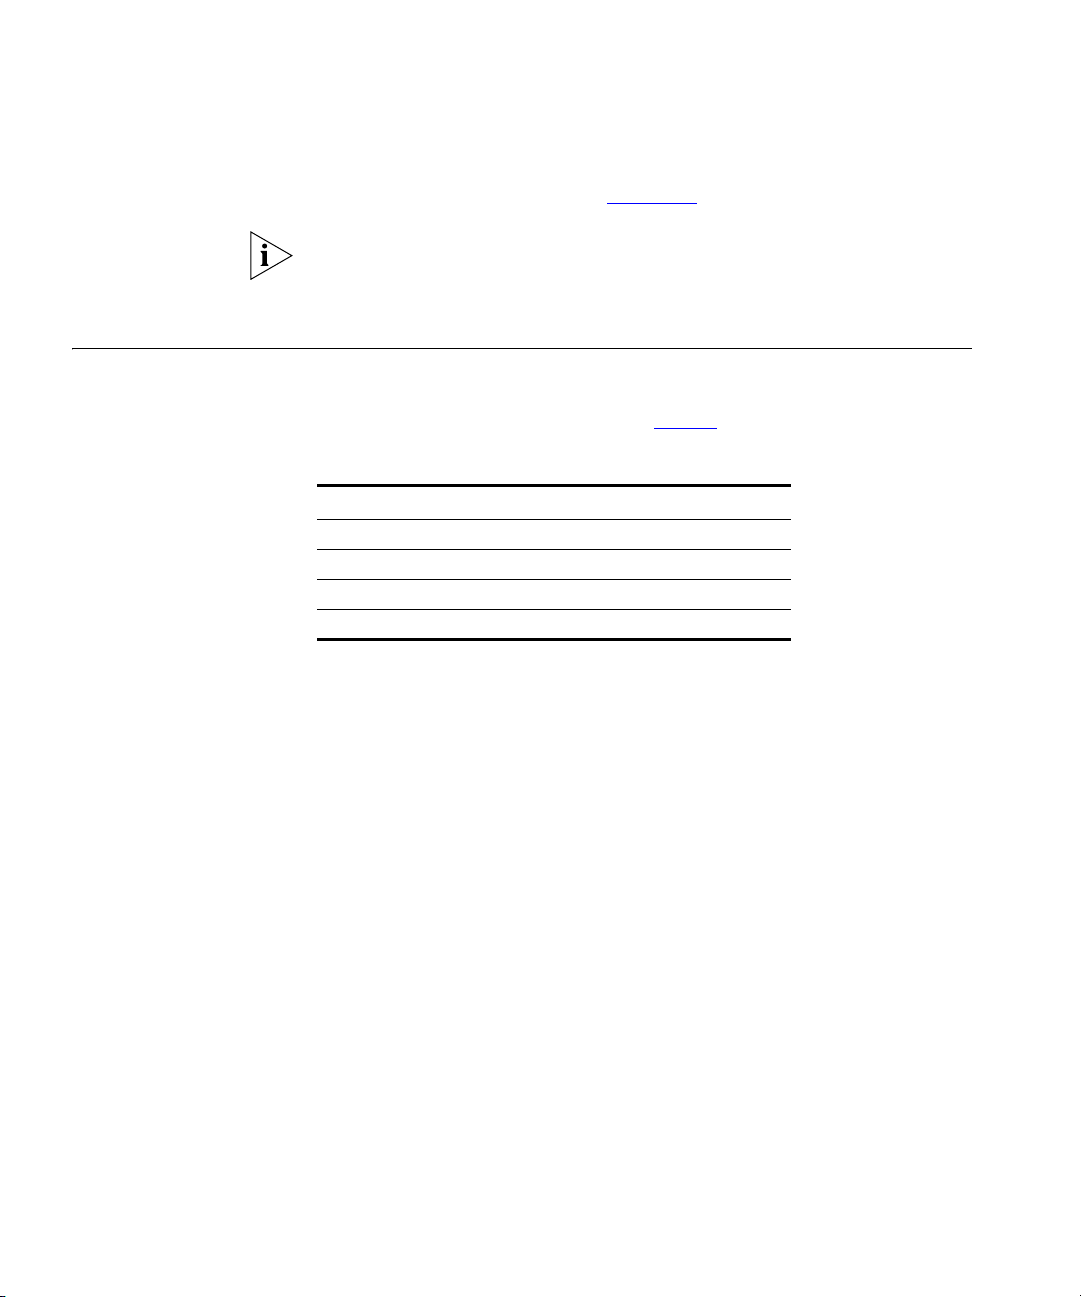
Base Unit Controls and Functions
Figure 4 shows the controls and functions of the 3Com Cordless
Telephone base unit.
Figure 4 3Com Cordless Telephone Base Unit
2
3
1
1 Power status LED
2 DC Power Jack
3 RJ45 port for connecting to the LAN
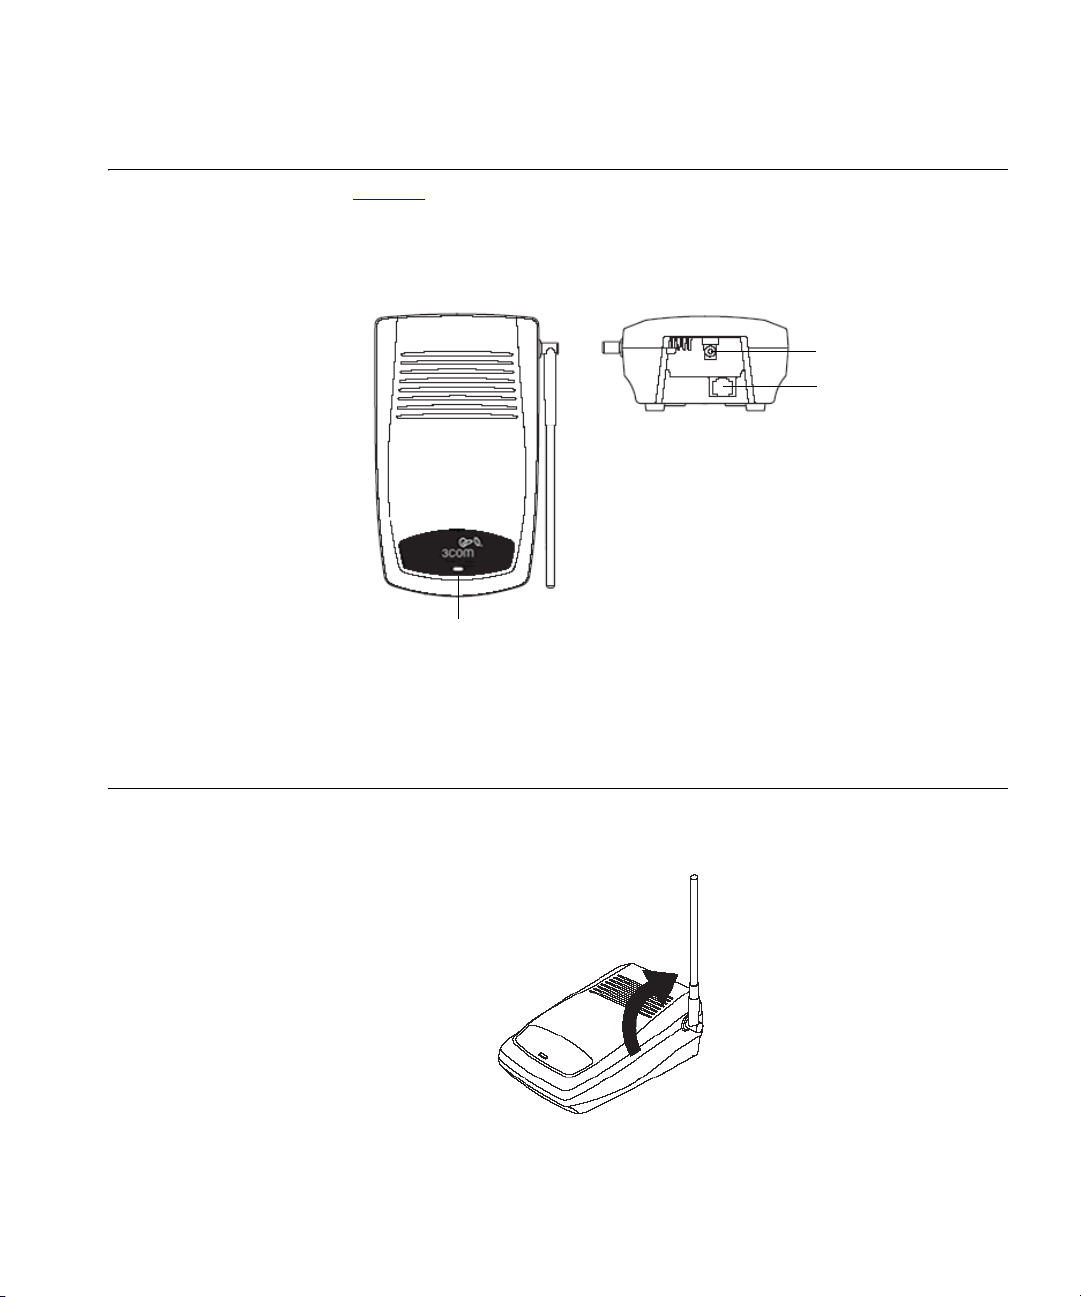
Using the Handset Before using your 3Com Cordless Telephone, raise the antenna to the
vertical position.
To use your Cordless Telephone, lift the handset out of the charging unit.
28 CHAPTER 2: 3COM 3106C AND 3107C CORDLESS TELEPHONES
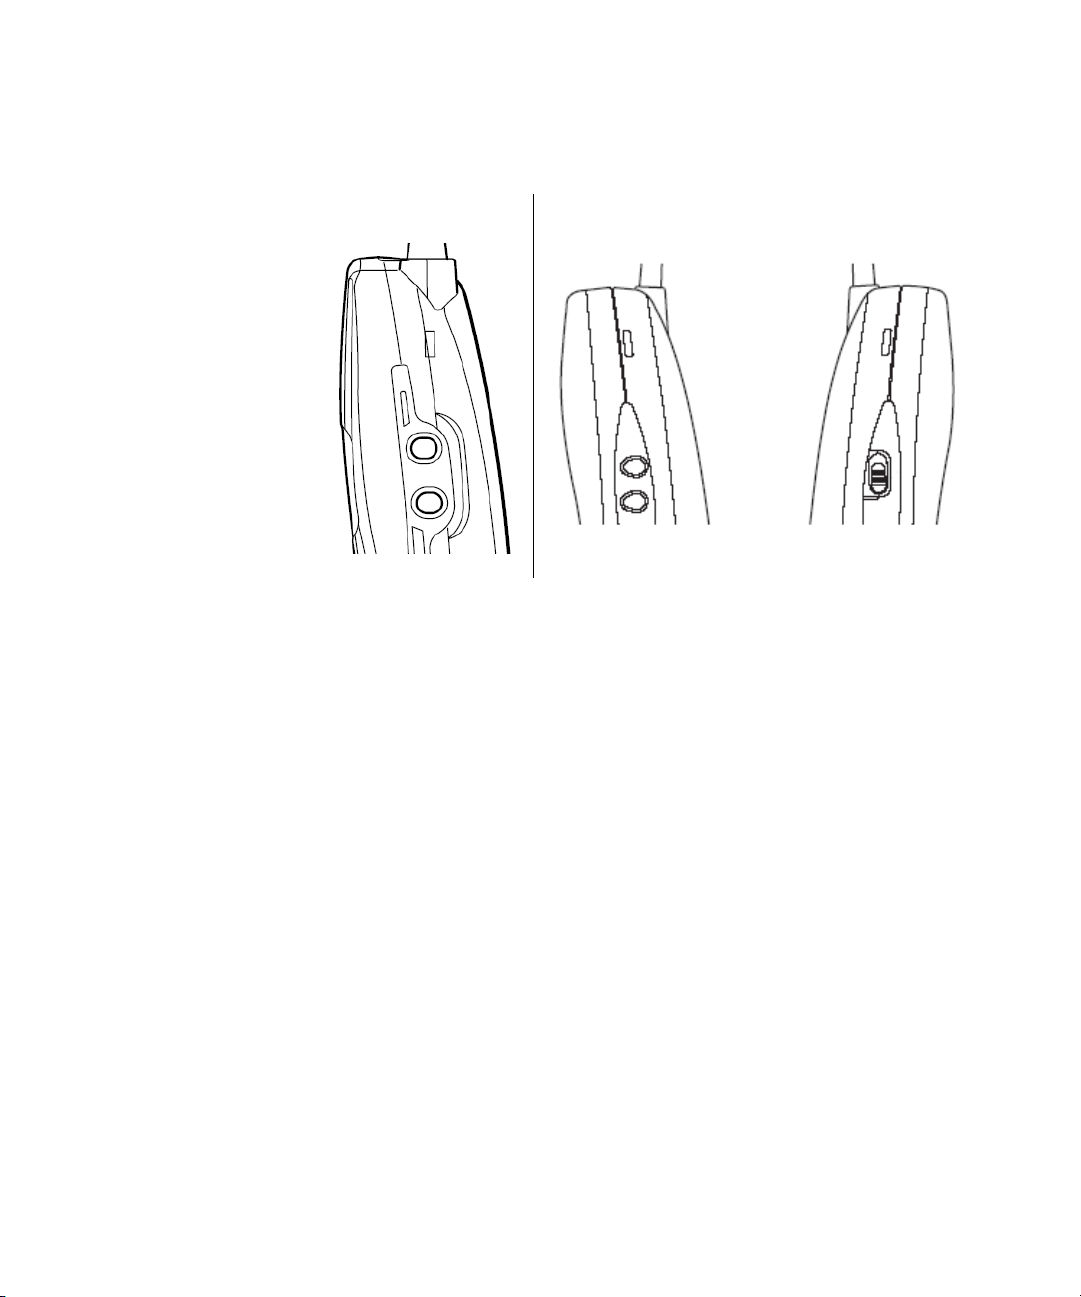
Handset Controls
3Com 3106C 3Com 3107C
RING
/VOL
ON/OFF
MUTE
R/VOL
MUTE
ON
OFF
Earpiece Volume
1 Press the RING/VOL (3106C) button or the R/VOL (3107C) button on
the side of the handset during a call to change the earpiece volume on
the handset.
The phone’s display panel cycles through these possible settings:
■ Volume Low
■ Volume Medium
■ Volume High
■ Volume Maximum
2 Stop pressing the RING/VOL (3106C) button or the R/VOL (3107C)
button when the handset reaches the desired volume.
Handset Ringer ON/OFF Switch
Use the ON/OFF MUTE (3106C) switch or the ON/OFF (3107C) switch
on the side of the handset to turn the handset ringer on or off.
■ When the ringer is off, the Off icon appears on the display panel.
■ When the ringer is on, the Off icon disappears.

Using the Handset 29
Handset Ringer Tone and Volume
1 Press the RING/VOL (3106C) button or the R/VOL (3107C) button on
the side of the handset when it is not being used for conversations (when
it is in AutoStandby mode) to change the ringer tone and volume.
The phone’s display panel cycles through these possible settings:
■ Ring Type A High
■ Ring Type A Low
■ Ring Type B High
■ Ring Type B Low
■ Ring Type C High
■ Ring Type C Low
■ Ring Off
Ring off is the handset Vibrate Mode.
■ If you set the ringer off and the handset is not on the charger, the
handset vibrates when there is an incoming call.
■ If you set the ringer off and the handset is on the charger, the handset
uses
Ring Type A Low.
2 Stop pressing the RING/VOL (3106C) button or the R/VOL (3107C)
button when the handset ringer reaches the desired volume.
You can also turn the handset’s ringer tone on and off using the NBX
NetSet utility. See “Ringer Tones” in Chapter 5.
Using the Handset When you remove the handset from the charging unit and press the Ta lk
button, you see
ACQUIRING LINK.
After the connection has been made between the handset and base unit,
you see the current volume setting. Example:
Volume Low.

30 CHAPTER 2: 3COM 3106C AND 3107C CORDLESS TELEPHONES
Or, depending on the condition, you may see one of the following display
messages:
LCD Display Condition Indicator
NO SERVICE
or
Connect to the
phone port
LINE IN USE Line in use Error Tone
NO SERVICE Handset at the phone’s range
No LAN connection or no power
to the base unit
limit
Answering a Call
When you receive a call, the handset rings and the display shows the
calling phone’s ID (if Caller ID is enabled).
Handset in the Charging Unit Handset Out of Charging Unit
Remove the handset from the charging
unit. The AutoTalk feature allows you
to answer the call immediately.
When you finish the call, place the handset back in the charging unit. AutoStandby
automatically hangs up the phone.
or
Press the Ta lk button to hang up the phone.
Error Tone
Error Tone
Press the Ta l k button.
Making a Call
1 Press the Tal k button.
The Talk icon displays after the handset and base unit are connected,
and you see the handset’s current volume setting.
Example: Volume Low.
2 When you hear a dial tone, enter the number that you want to call.
Example: 18085551840.
You see Invalid Number in the display panel if you enter a number that
the phone does not recognize or cannot process.
3 When you finish the call, press the Ta lk button again to hang up the
phone and put it in AutoStandby.
 Loading...