

Page 1

3C
OM IMPACT
®
ISDN E
M
ODEM
NSTRUCTIONS
I
Part Number 09-0700-002
The following information will help you install the 3Com
Impact ISDN External digital modem models 3C871, 3C872,
3C876, or 3C877. Refer to the
Digital Modem User Guide
Site Preparation
The Basic Rate ISDN line and computer serial port must be
properly configured.
Ordering, Installing, and Configuring the ISDN Line
3Com has determined the optimal ISDN line configurations
for the 3Com Impact digital modem and has provided that
configuration data to many telephone companies. To simplify
the ordering process for an ISDN digital line, use the following
simplified ISDN ordering code:
XTERNAL DIGITAL
Q
for additional information.
UICK START
3Com Impact ISDN External
3ComA * J6
If your digital modem has an internal analog fax modem
(Models 3C872 and 3C877), then two directory numbers
(telephone numbers) will be required to allow a voice call and
a fax modem call to occur at the same time. When you tell the
telephone company the ISDN ordering code (3ComA * J6) let
the representative know that you will need two directory
numbers.
If your telephone company does not support simplified ISDN
ordering codes, refer to Table 1 for ISDN ordering information.
An internal Network Termination Type 1 device (NT1) is built
into the 3Com Impact digital modem, so an ex ternal NT1 is
not usable. When the telephone company installs the ISDN
Page 2

2
3COM I
MPACT
ISDN E
XTERNAL DIGITAL MODEM QUICK START INSTRUCTIONS
line at your location, be sure it provides you with the
following information. For future reference, write the
information in the blank spaces.
ISDN Switch Type:
Phone #1:
SPID #1:
Phone #2:
SPID #2:
Table 1
(Local ISDN Directory Number 1)
(Service Profile Identifier Number 1)
(Local ISDN Directory Number 2)
(Service Profile Identifier Number 2) ___________________
ISDN Ordering Information by Switch Type
(See Table 1)
___________________
___________________
___________________
___________________
ISDN Switch Type
ISDN Line
Configuration
Parameter
AT&T
Custom
5ESS
Line Code 2B1Q (no NT1
required)
Directory
*
1
AT&T 5ESS
National
ISDN-1
2B1Q (no NT1 required)
*
1
Northern
Telecom
DMS100
National
ISDN-1
2B1Q (no NT1 required)
2
Siemens
EWSD
National
ISDN-1
2B1Q (no NT1 required)
*
1
Numbers
Channels
2B alternate circuit-switched data and voice
Terminal Type A with
Point-to-Point
2B alternate circuit-switched data and voice
A with Point-to-Point
2B alternate circuit-switched data and voice
2B alternate circuit-switched data and voice
Functional PVC 2 Functional
TEI Dynamic Dynamic Dynamic Dynamic Call
Idle Idle — —
Appearances
Supplemental
None None None None
Voice Features
EKTS Features No No No No
D Channel
No No No No
Packet
B Channel
No No No No
Packet
* Two directory numbers are required for Models 3C872 and 3C877. This allows a voice call and a
call using the internal analog fax modem to occur at the same time.
Page 3

Installing the 3Com Impact Digital Modem
3
The 3Com Impact digital modem has an RS-232-C
asynchronous interface port that operates at data rates of up
to 115.2 Kbps. Some computers may need additional
hardware or driver software for reliable operation.
IBM PCs and Compatible Computers
An IBM PC or compatible computer must have a buffered
UART (universal asynchronous receiver/transmitter) chip, called
msd
) at the
the 16550 UART, to operate at 115 Kbps. Under Microsoft
Windows
, run the Microsoft Diagnostic Program (
DOS prompt and select COM Ports within msd. The UARTs
present in your computer are listed under each COM port.
To operate at the maximum data rate, install an enhanced
16550 UART expansion card in your PC. If you have a
nonupgradable PC with a slower UART (16450 or 8250), the
3Com Impact digital modem can operate at lower data rates,
since it automatically adjusts to the PC serial COM port data
rate. The COMM.DRV driver for Windows 3.1 only allows data
rates of up to 38.4 Kbps. If you have a UART that supports
higher rates than this (for example, 16550), you must install the
TurboCom
enhanced driver that is provided with the digital
modem.
Apple Macintosh Computers
Motorola
68XXX-based Macintosh
systems support a
maximum asynchronous serial port data rate of 57.6 Kbps.
Power Macintosh
computers may operate at higher serial
port data rates.
Installing the 3Com Impact Digital Modem
Follow the appropriate procedure for installing the
3Com Impact digital modem in your computer. Refer to
Figure 1 during the installation procedure.
Page 4
4
3COM I
MPACT
ISDN E
XTERNAL DIGITAL MODEM QUICK START INSTRUCTIONS
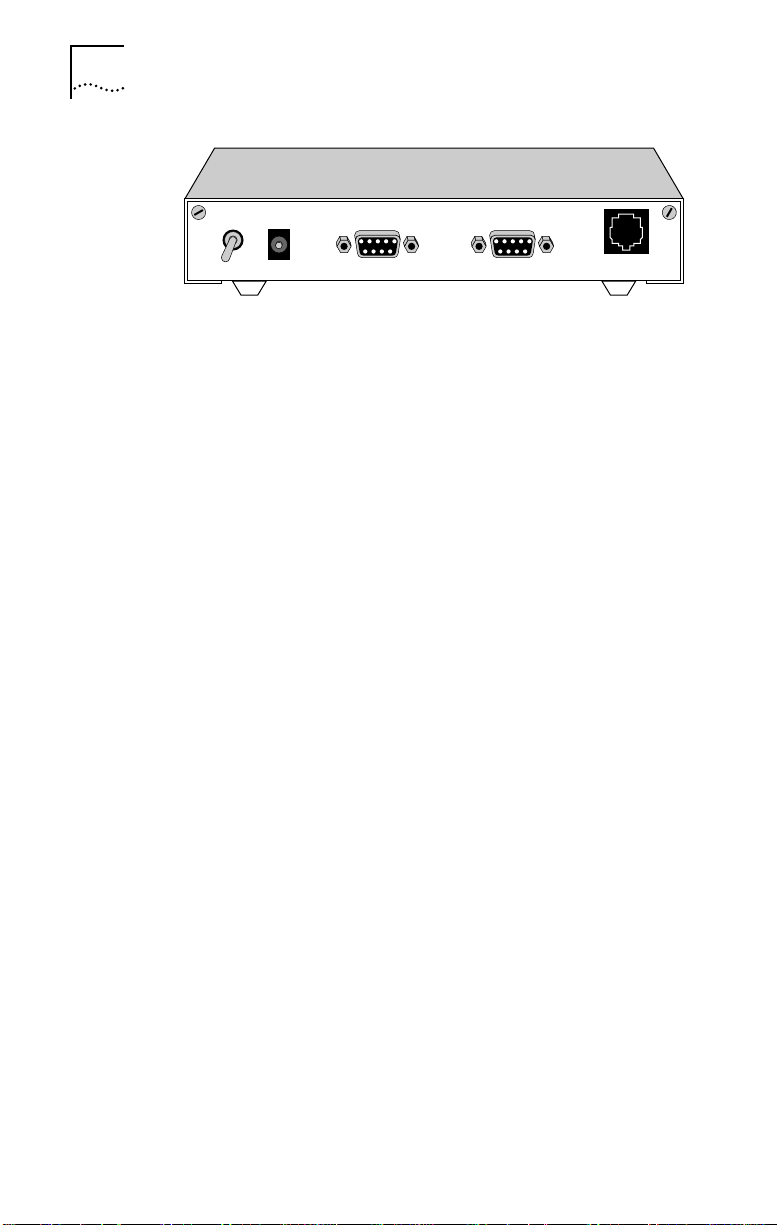
Power 12V AC RS232D
Figure 1
3Com Impact Digital Modem Rear Panel
RS232D
Wall
ISDN BRI-U ONLY
Installing the Digital Modem in an IBM-compatible PC
To install the 3Com Impact digital modem in an IBM or
compatible PC, follow these steps:
1
Turn off the computer.
2
Insert the 9-pin male end of the 3Com Impact digital
modem-to-PC serial signal cable into the connector labeled
Computer on the digital modem’s back panel and tighten the
connector screws.
3
Connect the other end of the 3Com Impact digital
modem-to-PC serial signal cable to a serial communications
(COM) port on the back of your PC and tighten the connector
screws.
4
Connect the 3Com Impact digital modem power cable to the
connector marked 12V AC on the back panel of the digital
modem.
5
Plug the transformer end of the power cable into a standard
117V ac wall outlet.
6
Connect the RJ-45 (8-pin) connector end of the RJ-45/RJ-11
ISDN cable to the RJ-45 connector labeled Wall on the
digital modem’s back panel.
7
Connect the RJ-11 (6-pin) connector end of the RJ-45/RJ-11
ISDN cable to the RJ-11 telephone ISDN jack.
Page 5

Installing the 3Com Impact Digital Modem
5
CAUTION:
The 3Com Impact digital modem is designed to
operate with Basic Rate ISDN 2B1Q U Interface network
terminations. An internal Net work Termination device (NT1) is
built into the digital modem. D o not connect the 3Com
Impact digital modem ISDN port to a standard analog
telephone jack or to an external NT1 device. Make sure that it
is connected to the ISDN jack.
8
Turn on the 3Com Impact digital modem by toggling the
power switch on the back panel to the On position.
9
Turn on the computer’s power switch.
10
Go to the section “Configuration for IBM PC or Compatible
Computer” to configure the 3Com Impact digital modem for
your computer.
Installing the Digital Modem in an Apple Macintosh
Computer
To install the 3Com Impact digital modem in an Apple
Macintosh computer, follow these steps:
1
Turn off the computer.
2
Insert the 9-pin male end of the 3Com Impact digital
modem-to-Macintosh serial signal cable into the
connector labeled Computer on the digital modem’s back
panel and tighten the connector screws.
3
Connect the other end of the 3Com Impact digital
modem-to-Macintosh serial signal cable to the serial
communications port on the back of the Macintosh.
The serial communications port is the mini-DIN, 8-pin serial
port connector, indicated on the Macintosh connector panel
by the telephone handset imprint.
4
Connect the 3Com Impact digital modem power cable to
the connector marked 12V AC on the back panel of the
digital modem.
Page 6

6
3COM I
5
Plug the transformer end of the power cable into a
MPACT
ISDN E
XTERNAL DIGITAL MODEM QUICK START INSTRUCTIONS
standard 117V ac wall outlet.
6
Connect the RJ-45 (8-pin) connector end of the RJ-45/RJ-11
ISDN cable to the RJ-45 connector labeled Wall on the
digital modem’s back panel.
7
Connect the RJ-11 (6-pin) connector end of the RJ-45/RJ-11
ISDN cable to the RJ-11 telephone ISDN jack.
CAUTION:
The 3Com Impact digital modem is designed to
operate with Basic Rate ISDN 2B1Q U Interface network
terminations. An internal Net work Termination device (NT1)
is built into the digital modem. D o not connect the 3Com
Impact digital modem ISDN port to a standard analog
telephone jack or to an external NT1 device. Make sure that it
is connected to the ISDN jack.
8
Turn on the 3Com Impact digital modem by toggling the
power switch on the back panel to the On position.
9
Turn on the computer’s power switch and restart.
10
Go to the section “Configuration for Apple Macintosh
Computer” to configure the 3Com Impact digital modem for
your computer.
Configuring the 3Com Impact Digital Modem
The 3Com Impact digital modem requires the five essential
configuration parameters below before it can operate
properly on an ISDN line. Before configuring the digital
modem, make sure you have this information readily
available. These five parameters are provided to you at the
time of installation of your ISDN line by the telephone
company installer.
■
ISDN Switch Type
■
Phone #1 (local directory telephone number)
■
SPID #1 (Service Profile Identifier)
Page 7

Configuring the 3Com Impact Digital Modem
■
Phone #2 (if required by the telephone company)
■
SPID #2 (if required by the telephone company)
Each of these items is stored in special S registers within the
digital modem. These S registers are set by issuing ATSxx=
commands to the digital modem. The 3Com Impact digital
modem software will automatically issue the AT commands
to set the S registers as part of the configuration process.
The following three sections describe how to configure the
3Com Impact digital modem using the Windows, DOS, or
Macintosh operating systems, respectively.
After you configure the digital modem and verify that it is
working properly, you should install the TurboCom software.
Refer to the installation instructions that came with the
TurboCom software. This software is required only for
IBM PC or compatible computers running Windows 3.X.
Configuration for IBM PC or Compatible Computer
7
You can configure the 3Com Impact digital modem for
an IBM PC or compatible using either the Windows-based
installation program or the MS-DOS
–based installation program.
Configuration Using Windows
To configure the digital modem for an IBM PC or compatible
computer using Windows:
1
Insert the 3Com Impact DOS & Windows Installation
Diagnostic Utilities diskette into an available diskette drive.
2
Select Run from the File menu. In the Run dialog box, type:
a:setup
The check box labeled Run Minimized should be left
unchecked.
3
Click OK.
The installation process begins copying the configuration
program to the hard disk. A message box provides the status
of the installation and indicates when it is complete.
Page 8

8
3COM I
4
Double-click the 3Com Impact icon to access the 3Com
MPACT
ISDN E
XTERNAL DIGITAL MODEM QUICK START INSTRUCTIONS
Impact Configuration dialog box.
COM1 is the default COM port.
If the digital modem is connected to COM1, the 3Com
■
Impact Configuration dialog box appears, as shown in
Figure 2. Go on to step 5.
If the digital modem is not connected to COM1, the
■
COM Port Provisioning dialog box appears. Choose the
COM port to which the digital modem is connected. Click
Connect. The 3Com Impact Configuration dialog box
appears, as shown in Figure 2.
Figure 2
Configuration Dialog Box
A status bar below the Help, Tools, Configure, and Exit
buttons provides the following ISDN status information:
■
Layer 1 status
■
Service Profile Identifier (SPID) for telephone numbers 1 and 2
■
Terminal Endpoint Identifiers (TEI) 1 and 2 (for information
purposes only)
Page 9

Configuring the 3Com Impact Digital Modem 9
A message bar at the bottom of the dialog box provides help
for completing the fields. If you click in a field, the message
bar tells you what information to enter in the field. The
message bar also provides status information about the
digital modem. If the digital modem is disconnec ted from
the ISDN telephone line, for example, a message indicates
this condition.
The right side of the dialog box shows the digital modem
software version, along with any installed options (such as
Multilink PPP or internal analog fax modem).
5 Select the type of switch, as specified by your telephone
company, from the Telephone Company Switch
drop-down list box.
6 Click in the Telephone Number field in the Number 1 area
and enter the telephone number to which your digital
modem is connected.
7 Click in the Service Profile Identifier (SPID) field and enter
the corresponding SPID for the telephone number you
entered in the previous step.
You should have received this SPID from your telephone
company.
CAUTION: If the ISDN line has been configured with only one
telephone number (Point-to-Point), do not include the SPID.
8 Specify which device should receive the calls coming to
Telephone Number 1.
You can select Phone Por t or Internal Fax/Modem. If your
model has the internal analog fax modem installed
(Models 3C872 and 3C877), you can select both.
If both boxes are checked, the internal analog fax modem and
the phone will both ring, enabling you to answer using either
device.
Page 10

10 3COM IMPACT ISDN EXTERNAL DIGITAL MODEM QUICK START INSTRUCTIONS
9 If you have a second telephone number associated with
your ISDN telephone line (some telephone companies
require two), enter the number and corresponding SPID in
the appropriate fields in the Number 2 area.
10 Specify which device should receive the calls coming to
Telephone Number 2.
11 Click the Configure button to download the parameters
listed in steps 5 through 10 to your digital modem’s
S registers.
12 If you have changed the Telephone Company Switch type,
you must reset the digital modem by turning the power
switch off and then on.
13 Verify the configuration.
Check the status bar (located beneath the Help, Tools,
Configure, and Exit buttons of the Configuration dialog box)
to verify correct configuration. If the parameters were
configured accurately and the digital modem is ready to
send and receive calls, the status bar fields will appear as
shown below. Note that the TEI number(s) are not configured
by the user. The TEI number is provided by the telephone
company for informational purposes only.
■ Layer 1: UP
■ SPID 1: Init
■ TEI 1: Number from 0 to 127
■ SPID 2: Init (if required)
■ TEI 2: Number from 0 to 127 (if required)
,
14 Click Exit to leave the utility.
This completes the configuration procedure.
15 Install the TurboCom software.
Refer to the installation instructions that came with the
TurboCom software.
Page 11

Configuring the 3Com Impact Digital Modem 11
After the TurboCom software is installed, proceed to the
“Placing and Receiving Calls” section in Chapter 2 of the
3Com Impact ISDN External Digital Modem User Guide.
Configuration Using DOS
To configure the digital modem for an IBM PC or compatible
computer using DOS:
1 Create a directory on the hard drive, insert the 3Com
Impact DOS & Windows Installation Diagnostic Utilities
diskette into the PC’s diskette drive, and copy all the files
from the utility diskette to the hard drive.
Copy the files to a new DOS directory. For example, to create a
directory dddd on your C drive at the C:\> DOS prompt, type:
md c:\dddd
To copy all files from the diskette to a directory \dddd at the
A:\> DOS prompt, type:
copy a:*.* c:\dddd
2 Execute INSTALL from the hard drive.
At the C:\> DOS prompt, type:
INSTALL
The configuration program launches and presents the
Port Settings screen. To move the cursor around the screen,
use the [Up Arrow] and [Down Arrow] keys. To select a
parameter, use the [Space Bar].
3 Use the [Space Bar] to select the digital modem’s
COM port and COM port data rate.
This sets the speed of communication between the
3Com Impact digital modem and the computer during
configuration.
When you select the port, the standard interrupt (IRQ)
associated with that port is automatically chosen. Select the
COM port data rate based on the data rate required by the
destination digital modem and the maximum data rate
supported by your computer’s COM port.
Page 12

12 3COM IMPACT ISDN EXTERNAL DIGITAL MODEM QUICK START INSTRUCTIONS
The program does not allow you to select a data rate that
exceeds the speed of your COM port.
4 Press [F10] to connect to the 3Com Impact digital modem
via the chosen COM port.
The Configuration screen will appear.
5 In the Phone #1 field, enter the telephone number to
which your digital modem is connected.
6 Enter the corresponding Service Profile Identifier (SPID) in
the SPID #1 field for the telephone number you entered in
the previous step.
You should have received this SPID from your telephone
company.
CAUTION: If the ISDN line has been configured with only one
telephone number (Point-to-Point), do not include the SPID.
7 Specify which device should receive the calls coming to
Phone #1.
You can select Phone Por t or Internal Fax/Modem. If your
model has the internal analog fax modem (Models 3C872
and 3C877), you can select both. The Phone Port and Internal
Fax/Modem check boxes associated with Phone #1 appear
to the right of Phone #1.
If both boxes are checked, the internal analog fax modem
and the phone will both ring, enabling you to answer using
either device.
8 If you have a second telephone number associated with
your ISDN telephone line (some telephone companies
require two), enter the number and corresponding SPID in
the Phone #2 and SPID #2 fields.
9 Specify which device should receive the calls coming to
Phone #2.
Page 13

Configuring the 3Com Impact Digital Modem 13
10 Confirm that the parameters listed in steps 5 through 9
are correct.
When these parameters are updated, the information is read
back to the screen. Check to see that the values have been
correctly entered.
11 Press [F10] to update the information in the 3Com Impact
digital modem.
12 Reset the digital modem by turning the power switch off
and then on again.
If the parameters match those registered at the telephone
company ISDN switch, the D channel LED lights for a few
minutes, flashes for several seconds, and then turns off. If the
LED continues to flash or remains lit, see Chapter 3,
“Troubleshooting,” in the 3Com Impact ISDN External Digital
Modem User Guide.
13 Press [Esc] to return to the main menu.
Once in the main menu, exit the program.
14 Go to the section “Placing and Receiving Calls” in
Chapter 2 of the 3Com Impact ISDN External Digital
Modem User Guide to place your first call.
Configuration for Apple Macintosh Computer
To configure the digital modem for an Apple Macintosh
computer:
1 Insert the 3Com Impact Installer Diagnostic Utilities
software utility diskette into the diskette drive and copy
the files by selecting them and dragging them to the
hard drive icon.
The Macintosh operating system automatically places the
files in the appropriate folders.
2 Open the 3Com Impact Mac folder and double-click the
3Com Impact Installer program icon to launch it.
Page 14

14 3COM IMPACT ISDN EXTERNAL DIGITAL MODEM QUICK START INSTRUCTIONS
The utility program presents the Port Settings screen. To
move the cursor around the screen, use the [ Tab] key. Select
the Modem port and click OK. The Utility dialog box appears.
3 In the Phone Number 1 field, enter the telephone number
to which your digital modem is connected.
4 Enter the corresponding Service Profile Identifier (SPID) in
the SPID field for the telephone number you entered in
the previous step.
You should have received this SPID from your telephone
company.
CAUTION: If the ISDN line has been configured with only one
telephone number (Point-to-Point), do not include the SPID.
5 Specify which device should receive the calls coming to
Phone Number 1.
You can select Phone Por t or Internal Fax/Modem. If your
model has the internal analog fax modem installed
(Models 3C872 and 3C877), you can select both.
If both boxes are checked, the internal analog fax modem
and the phone will both ring, enabling you to answer using
either device.
6 If you have a second telephone number associated with
your ISDN telephone line (some telephone companies
require two), enter the number and corresponding SPID in
the Phone Number 2 and SPID Number 2 fields.
7 Specify which device should receive the calls coming to
Phone Number 2.
8 Confirm that the parameters listed in steps 3 through 7
are correct.
9 Click the Update Configuration button to update this
information to the 3Com Impact digital modem.
Page 15

Configuring the 3Com Impact Digital Modem 15
10 Reset the digital modem by turning the power switch off
and then on again.
If the parameters match those registered at the telephone
company ISDN switch, the D channel LED lights for a few
minutes, flashes for several seconds, and then turns off. If the
LED continues to flash or remains lit, see Chapter 3,
“Troubleshooting,” in the 3Com Impact ISDN External Digital
Modem User Guide.
11 Go to the section “Placing and Receiving Calls” in
Chapter 2 of the 3Com Impact ISDN External Digital
Modem User Guide to place your first call.
 Loading...