

Page 1
3Com® IP Contact Center
Desktop User’s Guide
System Release 7
http://www.3com.com/
Part Number 900-0361-01, Rev. AA
Published May 2006
Page 2

3Com Corporation
350 Campus Drive
Marlborough, MA 01752-3064
Copyright © 2006, 3Com Corporation. All rights reserved. No part of this documentation may be
reproduced in any form or by any means or used to make any derivative work (such as translation,
transformation, or adaptation) without written permission from 3Com Corporation.
3Com Corporation reserves the right to revise this documentation and to make changes in content
from time to time without obligation on the part of 3Com Corporation to provide notification of such
revision or change.
3Com Corporation provides this documentation without warranty of any kind, either implied or
expressed, including, but not limited to, the implied warranties of merchantability and fitness for a
particular purpose. 3Com may make improvements or changes in the product(s) and/or the
program(s) described in this documentation at any time.
UNITED STATES GOVERNMENT LEGENDS:
If you are a United States government agency, then this documentation and the software described
herein are provided to you subject to the following:
United States Government Legend: All technical data and computer software is commercial in
nature and developed solely at private expense. Software is delivered as Commercial Computer
Software as def ined in DFARS 252.227-7014 ( June 1995) or as a commercial item as defined in
FAR 2.101(a) and as such is provided with only such rights as are provided in 3Com’s standard
commercial license for the Software. Technical data is provided with limited rights only as provided in
DFAR 252.227-7015 (Nov 1995) or FAR 52.227-14 (June 1987), whichever is applicable. You agree
not to remove or deface any portion of any legend provided on any licensed program or
documentation contained in, or delivered to you in conjunction with guide.
Unless otherwise indicated, 3Com registered trademarks are registered in the United States and may
or may not be registered in other countries.
3Com and the 3Com logo are registered trademarks of 3Com Corporation. VCX is a trademark of
3Com Corporation. Shutters is a registered trademark of Nuasis Corporation.
Other brand and product names may be registered trademarks or trademarks of their respective
holders.
Page 3

Contents
About This Guide . . . . . . . . . . . . . . . . . . . . . . . . . . . . . . . . . . . . . . . . . . . . . . . . . . . 11
Who Should Read This Guide . . . . . . . . . . . . . . . . . . . . . . . . . . . . . . . . . . . . . . . . . . 11
How This Guide Is Organized . . . . . . . . . . . . . . . . . . . . . . . . . . . . . . . . . . . . . . . . . . 11
Related Publications. . . . . . . . . . . . . . . . . . . . . . . . . . . . . . . . . . . . . . . . . . . . . . . . . . . 13
Books (PDF Format) . . . . . . . . . . . . . . . . . . . . . . . . . . . . . . . . . . . . . . . . . . . . . . . . 13
Quick Reference Guides (PDF format). . . . . . . . . . . . . . . . . . . . . . . . . . . . . . . . . 14
Chapter 1. Introduction to the 3Com IPCC Desktop . . . . . . . . . . . . . . . . . 15
Understanding 3Com IP Contact Center Concepts. . . . . . . . . . . . . . . . . . . . . . . . .16
Levels of Assistance . . . . . . . . . . . . . . . . . . . . . . . . . . . . . . . . . . . . . . . . . . . . . . . . 16
Users, Agents, Teams, and Supervisors. . . . . . . . . . . . . . . . . . . . . . . . . . . . . . . . 17
User Roles, Feature Sets, and Classes of Service . . . . . . . . . . . . . . . . . . . . . . . . 18
3Com IPCC Desktop Overview . . . . . . . . . . . . . . . . . . . . . . . . . . . . . . . . . . . . . . . . .21
Voice . . . . . . . . . . . . . . . . . . . . . . . . . . . . . . . . . . . . . . . . . . . . . . . . . . . . . . . . . . . . . 22
E-mail Management . . . . . . . . . . . . . . . . . . . . . . . . . . . . . . . . . . . . . . . . . . . . . . . . 22
Web Collaboration . . . . . . . . . . . . . . . . . . . . . . . . . . . . . . . . . . . . . . . . . . . . . . . . . 23
Contact History . . . . . . . . . . . . . . . . . . . . . . . . . . . . . . . . . . . . . . . . . . . . . . . . . . . . 24
Management Applications Overview . . . . . . . . . . . . . . . . . . . . . . . . . . . . . . . . . . . . 24
3Com IPCC Real-Time Status Viewer . . . . . . . . . . . . . . . . . . . . . . . . . . . . . . . . . 24
3Com IPCC Reporter . . . . . . . . . . . . . . . . . . . . . . . . . . . . . . . . . . . . . . . . . . . . . . . 25
Administrative Applications Overview . . . . . . . . . . . . . . . . . . . . . . . . . . . . . . . . . . 26
3Com IPCC Administrator . . . . . . . . . . . . . . . . . . . . . . . . . . . . . . . . . . . . . . . . . .26
3Com IPCC Workflow Builder . . . . . . . . . . . . . . . . . . . . . . . . . . . . . . . . . . . . . . .27
Media Types . . . . . . . . . . . . . . . . . . . . . . . . . . . . . . . . . . . . . . . . . . . . . . . . . . . . . . . . . 28
Chapter 2. Working in the 3Com IPCC Desktop Environment . . . . . . . . 31
Before You Start . . . . . . . . . . . . . . . . . . . . . . . . . . . . . . . . . . . . . . . . . . . . . . . . . . . . . . 32
Logging On to the 3Com IPCC Desktop. . . . . . . . . . . . . . . . . . . . . . . . . . . . . . . . . .33
3Com IPCC Desktop Components . . . . . . . . . . . . . . . . . . . . . . . . . . . . . . . . . . . . . . 37
Desktop Manager . . . . . . . . . . . . . . . . . . . . . . . . . . . . . . . . . . . . . . . . . . . . . . . . . . 38
Desktop Toolbar . . . . . . . . . . . . . . . . . . . . . . . . . . . . . . . . . . . . . . . . . . . . . . . . 38
Contact Panel Bar . . . . . . . . . . . . . . . . . . . . . . . . . . . . . . . . . . . . . . . . . . . . . . . 39
Personal Status Panel . . . . . . . . . . . . . . . . . . . . . . . . . . . . . . . . . . . . . . . . . . . .39
Alerts Panel . . . . . . . . . . . . . . . . . . . . . . . . . . . . . . . . . . . . . . . . . . . . . . . . . . . . 40
Bulletin Bar . . . . . . . . . . . . . . . . . . . . . . . . . . . . . . . . . . . . . . . . . . . . . . . . . . . . 40
3Com IP Contact Center Desktop User’s Guide 3
Page 4

Contents
Shutters . . . . . . . . . . . . . . . . . . . . . . . . . . . . . . . . . . . . . . . . . . . . . . . . . . . . . . . . . . .40
3Com IPCC Workspace. . . . . . . . . . . . . . . . . . . . . . . . . . . . . . . . . . . . . . . . . . . . . .41
User States . . . . . . . . . . . . . . . . . . . . . . . . . . . . . . . . . . . . . . . . . . . . . . . . . . . . . . . . . . .42
Contact Types and Contact Panel States . . . . . . . . . . . . . . . . . . . . . . . . . . . . . . . . . .45
Contact Types. . . . . . . . . . . . . . . . . . . . . . . . . . . . . . . . . . . . . . . . . . . . . . . . . . . . . .45
Contact Panel States . . . . . . . . . . . . . . . . . . . . . . . . . . . . . . . . . . . . . . . . . . . . . . . .47
Managing 3Com IPCC Desktop Windows . . . . . . . . . . . . . . . . . . . . . . . . . . . . . . . .47
Opening Application Windows from the Desktop Toolbar . . . . . . . . . . . . . . .48
Opening Applications from Shutters . . . . . . . . . . . . . . . . . . . . . . . . . . . . . . . . . .49
Minimizing and Maximizing Application Windows . . . . . . . . . . . . . . . . . . . . .50
Maximizing a Window in the 3Com IPCC Workspace. . . . . . . . . . . . . . . . .51
Minimizing a Window to Shutters. . . . . . . . . . . . . . . . . . . . . . . . . . . . . . . . . .52
Switching Between Two Application Windows . . . . . . . . . . . . . . . . . . . . . . . . .52
Opening Applications Outside the 3Com IPCC Workspace. . . . . . . . . . . . . . .54
Closing Applications Managed by the 3Com IPCC Desktop . . . . . . . . . . . . . .55
Viewing Your Personal Information . . . . . . . . . . . . . . . . . . . . . . . . . . . . . . . . . . . . .56
Viewing the Personal Status Panel . . . . . . . . . . . . . . . . . . . . . . . . . . . . . . . . . . . .56
Viewing the My Statistics Tab . . . . . . . . . . . . . . . . . . . . . . . . . . . . . . . . . . . . . . . .58
User State Statistics Table . . . . . . . . . . . . . . . . . . . . . . . . . . . . . . . . . . . . . . . . .59
Contact Handling Statistics Table . . . . . . . . . . . . . . . . . . . . . . . . . . . . . . . . . .60
Classification Statistics Table . . . . . . . . . . . . . . . . . . . . . . . . . . . . . . . . . . . . . .60
Viewing Bulletins . . . . . . . . . . . . . . . . . . . . . . . . . . . . . . . . . . . . . . . . . . . . . . . . . . . . .61
Resizing the Bulletin Bar . . . . . . . . . . . . . . . . . . . . . . . . . . . . . . . . . . . . . . . . . . . .63
Getting Help . . . . . . . . . . . . . . . . . . . . . . . . . . . . . . . . . . . . . . . . . . . . . . . . . . . . . . . . .63
Accessing Help for the 3Com IPCC Desktop . . . . . . . . . . . . . . . . . . . . . . . . . . .64
Using the Controls in the Help Window . . . . . . . . . . . . . . . . . . . . . . . . . . . . . . .64
Topic-Only View . . . . . . . . . . . . . . . . . . . . . . . . . . . . . . . . . . . . . . . . . . . . . . . .65
Frameset View. . . . . . . . . . . . . . . . . . . . . . . . . . . . . . . . . . . . . . . . . . . . . . . . . . 66
Finding a Help Topic. . . . . . . . . . . . . . . . . . . . . . . . . . . . . . . . . . . . . . . . . . . . . . . .67
Resizing the Help Navigation Frame . . . . . . . . . . . . . . . . . . . . . . . . . . . . . . . . . .68
Printing a Help Topic . . . . . . . . . . . . . . . . . . . . . . . . . . . . . . . . . . . . . . . . . . . . . . .69
Troubleshooting Online Help Access Problems . . . . . . . . . . . . . . . . . . . . . . . . .69
Changing Your 3Com IPCC Desktop Logon Password . . . . . . . . . . . . . . . . . . . . .70
Understanding Remote Access Codes. . . . . . . . . . . . . . . . . . . . . . . . . . . . . . . . . . . .71
Using a Phone Other Than the IPCC Soft Phone. . . . . . . . . . . . . . . . . . . . . . . . . . .72
Logging Off the 3Com IPCC Desktop . . . . . . . . . . . . . . . . . . . . . . . . . . . . . . . . . . .73
Chapter 3. Handling Immediate-Assistance Contacts . . . . . . . . . . . . . . . .75
Changing User States . . . . . . . . . . . . . . . . . . . . . . . . . . . . . . . . . . . . . . . . . . . . . . . . . .76
Notifying the System That You Are Available . . . . . . . . . . . . . . . . . . . . . . . . . .76
Entering and Leaving the Wrap-Up State . . . . . . . . . . . . . . . . . . . . . . . . . . . . . .77
4 3Com IP Contact Center Desktop User’s Guide
Page 5

Contents
Placing Yourself in the Idle State . . . . . . . . . . . . . . . . . . . . . . . . . . . . . . . . . . . . . 78
Issuing an Idle Request . . . . . . . . . . . . . . . . . . . . . . . . . . . . . . . . . . . . . . . . . . . 79
Changing an Idle Reason . . . . . . . . . . . . . . . . . . . . . . . . . . . . . . . . . . . . . . . . . 79
Receiving Immediate-Assistance Contacts. . . . . . . . . . . . . . . . . . . . . . . . . . . . . . . . 80
Contact Panel Components . . . . . . . . . . . . . . . . . . . . . . . . . . . . . . . . . . . . . . . . . . 80
When a Contact Is Routed to You . . . . . . . . . . . . . . . . . . . . . . . . . . . . . . . . . . . . .82
Manual Answer . . . . . . . . . . . . . . . . . . . . . . . . . . . . . . . . . . . . . . . . . . . . . . . . . 82
Automatic Answer . . . . . . . . . . . . . . . . . . . . . . . . . . . . . . . . . . . . . . . . . . . . . . 83
Accepting an Immediate-Assistance Contact . . . . . . . . . . . . . . . . . . . . . . . . . . .84
Handling a Redirected Contact. . . . . . . . . . . . . . . . . . . . . . . . . . . . . . . . . . . . . . . 85
Consulting a Supervisor . . . . . . . . . . . . . . . . . . . . . . . . . . . . . . . . . . . . . . . . . . . . . . . 87
Being Monitored or Coached by a Supervisor. . . . . . . . . . . . . . . . . . . . . . . . . . . . . 87
Being Monitored by a Supervisor. . . . . . . . . . . . . . . . . . . . . . . . . . . . . . . . . . . . . 88
Being Coached by a Supervisor . . . . . . . . . . . . . . . . . . . . . . . . . . . . . . . . . . . . . . 88
When a Supervisor Barges In on a Contact. . . . . . . . . . . . . . . . . . . . . . . . . . . . .89
Requesting Emergency Assistance . . . . . . . . . . . . . . . . . . . . . . . . . . . . . . . . . . . . . . 90
Entering Wrap-Up Data. . . . . . . . . . . . . . . . . . . . . . . . . . . . . . . . . . . . . . . . . . . . . . . . 91
Disconnecting a Contact . . . . . . . . . . . . . . . . . . . . . . . . . . . . . . . . . . . . . . . . . . . . . . . 92
Chapter 4. Using Voice Features . . . . . . . . . . . . . . . . . . . . . . . . . . . . . . . . . . . . 95
Answering a Call . . . . . . . . . . . . . . . . . . . . . . . . . . . . . . . . . . . . . . . . . . . . . . . . . . . . . 96
Manually Answering a Call . . . . . . . . . . . . . . . . . . . . . . . . . . . . . . . . . . . . . . . . . 97
Automatically Answering a Call . . . . . . . . . . . . . . . . . . . . . . . . . . . . . . . . . . . . . 98
Putting a Call on Hold. . . . . . . . . . . . . . . . . . . . . . . . . . . . . . . . . . . . . . . . . . . . . . . . . 99
Transferring a Call . . . . . . . . . . . . . . . . . . . . . . . . . . . . . . . . . . . . . . . . . . . . . . . . . . . 100
Transferring a Call to Another User. . . . . . . . . . . . . . . . . . . . . . . . . . . . . . . . . . 100
Transferring a Call to a Classification . . . . . . . . . . . . . . . . . . . . . . . . . . . . . . . . 102
Establishing a Conference Call. . . . . . . . . . . . . . . . . . . . . . . . . . . . . . . . . . . . . . . . . 103
Putting a Conference Call on Hold. . . . . . . . . . . . . . . . . . . . . . . . . . . . . . . . . . . 104
Disconnecting a Conference Call . . . . . . . . . . . . . . . . . . . . . . . . . . . . . . . . . . . . 105
Transferring a Conference Call . . . . . . . . . . . . . . . . . . . . . . . . . . . . . . . . . . . . . .105
Disconnecting a Call . . . . . . . . . . . . . . . . . . . . . . . . . . . . . . . . . . . . . . . . . . . . . . . . . 106
Preventing the Other Party from Hearing You . . . . . . . . . . . . . . . . . . . . . . . . . . . 106
Recording a Call . . . . . . . . . . . . . . . . . . . . . . . . . . . . . . . . . . . . . . . . . . . . . . . . . . . . . 107
Making a Call . . . . . . . . . . . . . . . . . . . . . . . . . . . . . . . . . . . . . . . . . . . . . . . . . . . . . . . 108
Making an Internal Call . . . . . . . . . . . . . . . . . . . . . . . . . . . . . . . . . . . . . . . . . . . . 109
Calling Your Supervisor . . . . . . . . . . . . . . . . . . . . . . . . . . . . . . . . . . . . . . . . . . . . 111
Making an External Call. . . . . . . . . . . . . . . . . . . . . . . . . . . . . . . . . . . . . . . . . . . . 112
Redialing a Number . . . . . . . . . . . . . . . . . . . . . . . . . . . . . . . . . . . . . . . . . . . . . . . 115
Handling a Customer Callback Request . . . . . . . . . . . . . . . . . . . . . . . . . . . . . . 116
3Com IP Contact Center Desktop User’s Guide 5
Page 6

Contents
Accessing Voice Messages . . . . . . . . . . . . . . . . . . . . . . . . . . . . . . . . . . . . . . . . . . . . .119
Listening To and Handling Voice Messages Left By Customers . . . . . . . . . .120
Listening to a Voice Message Left By a 3Com IPCC Desktop User . . . . . . . .122
Listening to Voice Messages from a Remote Location . . . . . . . . . . . . . . . . . . .123
About Remote Voice Message Access . . . . . . . . . . . . . . . . . . . . . . . . . . . . . .123
Listening to Your Voice Messages . . . . . . . . . . . . . . . . . . . . . . . . . . . . . . . . .124
Working with Phone Controls . . . . . . . . . . . . . . . . . . . . . . . . . . . . . . . . . . . . . . . . .125
Opening the Phone Controls Window . . . . . . . . . . . . . . . . . . . . . . . . . . . . . . . .125
Generating Touch Tones . . . . . . . . . . . . . . . . . . . . . . . . . . . . . . . . . . . . . . . . . . .126
Adjusting the Volume on Your Headset. . . . . . . . . . . . . . . . . . . . . . . . . . . . . . .127
Playing the Incoming Call Ring on an Alternate Speaker . . . . . . . . . . . . . . .128
Chapter 5. Using E-mail Features. . . . . . . . . . . . . . . . . . . . . . . . . . . . . . . . . . .129
About Deferred-Assistance and Immediate-Assistance Contacts . . . . . . . . . . . .129
Working with Microsoft Outlook Express. . . . . . . . . . . . . . . . . . . . . . . . . . . . . . . .131
Logging On to Your Account in Outlook Express . . . . . . . . . . . . . . . . . . . . . .132
Working in the Outlook Express Window. . . . . . . . . . . . . . . . . . . . . . . . . . . . .134
About E-mail Folders. . . . . . . . . . . . . . . . . . . . . . . . . . . . . . . . . . . . . . . . . . . .135
About the Message List . . . . . . . . . . . . . . . . . . . . . . . . . . . . . . . . . . . . . . . . . .138
About the Preview Pane . . . . . . . . . . . . . . . . . . . . . . . . . . . . . . . . . . . . . . . . .139
Getting Help for Microsoft Outlook Express. . . . . . . . . . . . . . . . . . . . . . . . . . .140
Handling Deferred-Assistance Contacts . . . . . . . . . . . . . . . . . . . . . . . . . . . . . . . .140
Browsing Classification Folders . . . . . . . . . . . . . . . . . . . . . . . . . . . . . . . . . . . . .141
Viewing a Message List. . . . . . . . . . . . . . . . . . . . . . . . . . . . . . . . . . . . . . . . . .142
Changing the Column Width in a Message List . . . . . . . . . . . . . . . . . . . . .143
Searching for Messages . . . . . . . . . . . . . . . . . . . . . . . . . . . . . . . . . . . . . . . . . .143
Sorting Messages . . . . . . . . . . . . . . . . . . . . . . . . . . . . . . . . . . . . . . . . . . . . . . .144
Working with E-mail Threads . . . . . . . . . . . . . . . . . . . . . . . . . . . . . . . . . . . . . . .145
Claiming a Message . . . . . . . . . . . . . . . . . . . . . . . . . . . . . . . . . . . . . . . . . . . . . . .145
Viewing a Message . . . . . . . . . . . . . . . . . . . . . . . . . . . . . . . . . . . . . . . . . . . . . . . .147
Responding to Deferred-Assistance Contacts. . . . . . . . . . . . . . . . . . . . . . . . . .148
Replying to Deferred-Assistance E-mail Messages. . . . . . . . . . . . . . . . . . .149
About Voice Messages . . . . . . . . . . . . . . . . . . . . . . . . . . . . . . . . . . . . . . . . . . .150
About Callback Requests . . . . . . . . . . . . . . . . . . . . . . . . . . . . . . . . . . . . . . . .151
Forwarding a Deferred-Assistance Message. . . . . . . . . . . . . . . . . . . . . . . . . . .152
Deleting a Message . . . . . . . . . . . . . . . . . . . . . . . . . . . . . . . . . . . . . . . . . . . . . . . .154
Handling Messages Escalated to Immediate Assistance . . . . . . . . . . . . . . . . . . .155
Accepting an E-mail, Voice Message, or Callback Contact . . . . . . . . . . . . . . .155
Replying to E-mail, Voice Message, and Callback Contacts . . . . . . . . . . . . . .157
Transferring an E-mail, Voice Message, or Callback Contact to
Another User . . . . . . . . . . . . . . . . . . . . . . . . . . . . . . . . . . . . . . . . . . . . . . . . . . . . .158
6 3Com IP Contact Center Desktop User’s Guide
Page 7

Contents
Transferring an E-mail, Voice Message, or Callback Contact to
a Classification. . . . . . . . . . . . . . . . . . . . . . . . . . . . . . . . . . . . . . . . . . . . . . . . . . . . 159
Sending E-mail Messages . . . . . . . . . . . . . . . . . . . . . . . . . . . . . . . . . . . . . . . . . . . . .160
Sending a New E-mail Message to Another 3Com IPCC Desktop User . . . 161
Using the 3Com IPCC Desktop to Send a New E-mail Message . . . . . . . 161
Using Outlook Express to Send a New E-mail Message . . . . . . . . . . . . . . 163
Consulting a Supervisor by E-mail . . . . . . . . . . . . . . . . . . . . . . . . . . . . . . . . 164
Sending a New E-mail Message to an External Address . . . . . . . . . . . . . . . . 165
Receiving E-mail Messages. . . . . . . . . . . . . . . . . . . . . . . . . . . . . . . . . . . . . . . . . . . . 166
Receiving E-mail Messages From Other 3Com IPCC Desktop Users . . . . . .166
Receiving E-mail Messages From External E-mail Addresses . . . . . . . . . . . . 167
Replying to an External E-mail Message . . . . . . . . . . . . . . . . . . . . . . . . . . . . . . . . 168
E-mail Templates . . . . . . . . . . . . . . . . . . . . . . . . . . . . . . . . . . . . . . . . . . . . . . . . . . . . 168
Creating E-mail Templates. . . . . . . . . . . . . . . . . . . . . . . . . . . . . . . . . . . . . . . . . . 169
Modifying an Existing E-mail Template . . . . . . . . . . . . . . . . . . . . . . . . . . . . . . 170
Using E-mail Templates . . . . . . . . . . . . . . . . . . . . . . . . . . . . . . . . . . . . . . . . . . . . 171
Deleting an E-mail Template . . . . . . . . . . . . . . . . . . . . . . . . . . . . . . . . . . . . . . . .171
Searching the Archives . . . . . . . . . . . . . . . . . . . . . . . . . . . . . . . . . . . . . . . . . . . . . . .172
Chapter 6. Using 3Com IPCC Web Collaboration Features . . . . . . . . .175
About 3Com IPCC Web Collaboration . . . . . . . . . . . . . . . . . . . . . . . . . . . . . . . . . . 175
Web Collaboration Request . . . . . . . . . . . . . . . . . . . . . . . . . . . . . . . . . . . . . . . . . 176
Meet-Me Session Request . . . . . . . . . . . . . . . . . . . . . . . . . . . . . . . . . . . . . . . . . . 177
About the 3Com IPCC Web Collaboration Window. . . . . . . . . . . . . . . . . . . . . . . 177
Agent’s View of the Web Collaboration Window . . . . . . . . . . . . . . . . . . . . . .177
Resizing Web Collaboration Window Components . . . . . . . . . . . . . . . . . . . . 180
Caller’s View of the Web Collaboration Window . . . . . . . . . . . . . . . . . . . . . . 181
Supported Web Collaboration Features. . . . . . . . . . . . . . . . . . . . . . . . . . . . . . .182
Handling Web Collaboration Requests . . . . . . . . . . . . . . . . . . . . . . . . . . . . . . . . . .183
Answering a Web Collaboration Request . . . . . . . . . . . . . . . . . . . . . . . . . . . . .184
Manually Answering a Web Contact . . . . . . . . . . . . . . . . . . . . . . . . . . . . . . 184
Automatically Answering a Web Contact . . . . . . . . . . . . . . . . . . . . . . . . . . 185
Viewing Caller Information. . . . . . . . . . . . . . . . . . . . . . . . . . . . . . . . . . . . . . . . . 185
Exchanging Text Messages with a Web Collaboration Participant . . . . . . . . 186
Sharing Web Pages . . . . . . . . . . . . . . . . . . . . . . . . . . . . . . . . . . . . . . . . . . . . . . . .187
Helping a Caller Complete an Online Web Form . . . . . . . . . . . . . . . . . . . . . . 188
Highlighting Text on a Web Page . . . . . . . . . . . . . . . . . . . . . . . . . . . . . . . . . . . . 189
Calling a Customer During a Web Collaboration Session . . . . . . . . . . . . . . .189
Handling a Meet-Me Session. . . . . . . . . . . . . . . . . . . . . . . . . . . . . . . . . . . . . . . . 191
Locating Your Meet-Me ID . . . . . . . . . . . . . . . . . . . . . . . . . . . . . . . . . . . . . . 191
Initiating a Meet-Me Session with a Caller . . . . . . . . . . . . . . . . . . . . . . . . . 192
3Com IP Contact Center Desktop User’s Guide 7
Page 8

Contents
Initiating a Web Collaboration Session . . . . . . . . . . . . . . . . . . . . . . . . . . . . . . . . . .193
Initiating a 3Com IPCC Web Collaboration Session with Another User . . .193
Consulting a Supervisor by Web Chat . . . . . . . . . . . . . . . . . . . . . . . . . . . . . . . .195
Transferring a Web Contact . . . . . . . . . . . . . . . . . . . . . . . . . . . . . . . . . . . . . . . . . . .197
Transferring a Web Contact to Another User . . . . . . . . . . . . . . . . . . . . . . . . . .197
Transferring a Web Contact to a Classification . . . . . . . . . . . . . . . . . . . . . . . . .199
Handling a Redirected Web Contact. . . . . . . . . . . . . . . . . . . . . . . . . . . . . . . . . .200
Establishing a Web Collaboration Conference . . . . . . . . . . . . . . . . . . . . . . . . . . . .200
Disconnecting a Web Collaboration Conference. . . . . . . . . . . . . . . . . . . . . . . .202
Transferring a Web Collaboration Conference . . . . . . . . . . . . . . . . . . . . . . . . .202
Disconnecting a Web Contact . . . . . . . . . . . . . . . . . . . . . . . . . . . . . . . . . . . . . . . . . .203
Chapter 7. Viewing Contact History. . . . . . . . . . . . . . . . . . . . . . . . . . . . . . . . .205
About 3Com IPCC Contact History Viewer . . . . . . . . . . . . . . . . . . . . . . . . . . . . . .206
Starting 3Com IPCC Contact History Viewer . . . . . . . . . . . . . . . . . . . . . . . . . .207
Working in the 3Com IPCC Contact History Viewer Window. . . . . . . . . . . .208
Searching for Prior Contacts . . . . . . . . . . . . . . . . . . . . . . . . . . . . . . . . . . . . . . . . . . .209
Performing a Search . . . . . . . . . . . . . . . . . . . . . . . . . . . . . . . . . . . . . . . . . . . . . . .209
Stopping a Search in Progress . . . . . . . . . . . . . . . . . . . . . . . . . . . . . . . . . . . .212
Resetting the Date Selection . . . . . . . . . . . . . . . . . . . . . . . . . . . . . . . . . . . . . .212
Resetting the Search Criteria. . . . . . . . . . . . . . . . . . . . . . . . . . . . . . . . . . . . . .212
Reviewing the Search Results . . . . . . . . . . . . . . . . . . . . . . . . . . . . . . . . . . . . . . .213
Viewing a List of Contacts. . . . . . . . . . . . . . . . . . . . . . . . . . . . . . . . . . . . . . . .214
Viewing Contact Summary. . . . . . . . . . . . . . . . . . . . . . . . . . . . . . . . . . . . . . .215
Viewing Contact Segments . . . . . . . . . . . . . . . . . . . . . . . . . . . . . . . . . . . . . . .217
Refining Your Search Criteria . . . . . . . . . . . . . . . . . . . . . . . . . . . . . . . . . . . . . . .221
Reviewing E-mail Messages, Web Collaboration Transcripts, and
Voice Recordings. . . . . . . . . . . . . . . . . . . . . . . . . . . . . . . . . . . . . . . . . . . . . . . . . . . . .222
Viewing Handled E-mail Messages . . . . . . . . . . . . . . . . . . . . . . . . . . . . . . . . . .222
Viewing Web Collaboration Transcripts. . . . . . . . . . . . . . . . . . . . . . . . . . . . . . .224
Playing Recorded Voice Contacts . . . . . . . . . . . . . . . . . . . . . . . . . . . . . . . . . . . .225
Playing Recorded Voice Messages . . . . . . . . . . . . . . . . . . . . . . . . . . . . . . . . . . .226
Playing Emergency Notification Recordings. . . . . . . . . . . . . . . . . . . . . . . . . . .227
Chapter 8. Supervising the Workforce . . . . . . . . . . . . . . . . . . . . . . . . . . . . . .229
Sending Bulletins . . . . . . . . . . . . . . . . . . . . . . . . . . . . . . . . . . . . . . . . . . . . . . . . . . . .230
Logging Off an Agent. . . . . . . . . . . . . . . . . . . . . . . . . . . . . . . . . . . . . . . . . . . . . . . . .232
Monitoring Agents and Classifications . . . . . . . . . . . . . . . . . . . . . . . . . . . . . . . . . .234
Understanding Basic and Expanded Agent Monitoring. . . . . . . . . . . . . . . . .235
About Basic Agent and Classification Monitoring . . . . . . . . . . . . . . . . . . . . .236
About Expanded Agent Monitoring. . . . . . . . . . . . . . . . . . . . . . . . . . . . . . . . . .237
8 3Com IP Contact Center Desktop User’s Guide
Page 9

Contents
Monitoring an Agent . . . . . . . . . . . . . . . . . . . . . . . . . . . . . . . . . . . . . . . . . . . . . .238
Monitoring a Classification . . . . . . . . . . . . . . . . . . . . . . . . . . . . . . . . . . . . . . . . . 240
Coaching an Agent. . . . . . . . . . . . . . . . . . . . . . . . . . . . . . . . . . . . . . . . . . . . . . . . . . . 243
Using the Barge-In Feature . . . . . . . . . . . . . . . . . . . . . . . . . . . . . . . . . . . . . . . . . . . . 245
Recording Monitored and Coached Agents and Classifications. . . . . . . . . . . . .246
Recording Guidelines. . . . . . . . . . . . . . . . . . . . . . . . . . . . . . . . . . . . . . . . . . . . . . 247
About the Recorded Files. . . . . . . . . . . . . . . . . . . . . . . . . . . . . . . . . . . . . . . . . . . 248
Recording Monitored and Coached Calls . . . . . . . . . . . . . . . . . . . . . . . . . . . . . 249
Monitoring Alerts. . . . . . . . . . . . . . . . . . . . . . . . . . . . . . . . . . . . . . . . . . . . . . . . . . . . 250
Monitoring System Alarms and Emergency Notifications . . . . . . . . . . . . . . . . .252
Viewing a System Alarm . . . . . . . . . . . . . . . . . . . . . . . . . . . . . . . . . . . . . . . . . . .253
Receiving, Viewing, and Listening to Emergency Notifications . . . . . . . . . . 253
Viewing an Emergency Notification on the Bulletin Bar . . . . . . . . . . . . . 254
Reviewing an Emergency Notification Recording or Transcript . . . . . . . 255
Chapter 9. Troubleshooting . . . . . . . . . . . . . . . . . . . . . . . . . . . . . . . . . . . . . . . . 257
Handling 3Com IPCC Desktop Problems . . . . . . . . . . . . . . . . . . . . . . . . . . . . . . . 257
Logon Node list is empty. . . . . . . . . . . . . . . . . . . . . . . . . . . . . . . . . . . . . . . . . . . 258
Cannot log on to the 3Com IPCC Desktop . . . . . . . . . . . . . . . . . . . . . . . . . . . .258
Failed to respond to a contact . . . . . . . . . . . . . . . . . . . . . . . . . . . . . . . . . . . . . . . 258
IPCC Phone Set rings whenever it is placed on-hook . . . . . . . . . . . . . . . . . . . 259
Cannot save a workflow to your local computer. . . . . . . . . . . . . . . . . . . . . . . 259
Received a second immediate-assistance contact while connected
to Web contact . . . . . . . . . . . . . . . . . . . . . . . . . . . . . . . . . . . . . . . . . . . . . . . . . . . . 260
“Play incoming call ring on an alternate speaker” setting is not
retained after logging off the 3Com IPCC Desktop . . . . . . . . . . . . . . . . . . . . . 261
Applications configured to be managed by Shutters appear as
unmanaged windows. . . . . . . . . . . . . . . . . . . . . . . . . . . . . . . . . . . . . . . . . . . . . . 261
Applications configured to open outside 3Com IPCC workspace
behave unpredictably. . . . . . . . . . . . . . . . . . . . . . . . . . . . . . . . . . . . . . . . . . . . . .261
Cannot view results of provisioning changes. . . . . . . . . . . . . . . . . . . . . . . . . . 262
Handling Voice Problems . . . . . . . . . . . . . . . . . . . . . . . . . . . . . . . . . . . . . . . . . . . . .262
Caller cannot hear the conversation. . . . . . . . . . . . . . . . . . . . . . . . . . . . . . . . . .262
You cannot hear the caller . . . . . . . . . . . . . . . . . . . . . . . . . . . . . . . . . . . . . . . . . .263
The 3Com IP Contact Center system disconnects a voice contact. . . . . . . . . 264
Handling E-mail Problems . . . . . . . . . . . . . . . . . . . . . . . . . . . . . . . . . . . . . . . . . . . . 264
Sent an e-mail message and it remained in the Outlook Express
Outbox folder. . . . . . . . . . . . . . . . . . . . . . . . . . . . . . . . . . . . . . . . . . . . . . . . . . . . . 265
Outlook Express closes unexpectedly . . . . . . . . . . . . . . . . . . . . . . . . . . . . . . . . 265
No longer receive voice message or callback contacts . . . . . . . . . . . . . . . . . . 266
Transferred e-mail, voice message, or callback contact does not escalate . . 266
Voice message link in e-mail message does not play voice message. . . . . . . 267
3Com IP Contact Center Desktop User’s Guide 9
Page 10

Contents
Handling Web Collaboration Problems. . . . . . . . . . . . . . . . . . . . . . . . . . . . . . . . . .267
Content in a 3Com IPCC Web Collaboration window is replaced
by a Web page . . . . . . . . . . . . . . . . . . . . . . . . . . . . . . . . . . . . . . . . . . . . . . . . . . . .267
Microsoft Internet Explorer closes frequently . . . . . . . . . . . . . . . . . . . . . . . . . .268
Web collaboration session is unexpectedly disconnected . . . . . . . . . . . . . . . .268
Handling internal Web collaboration transfers. . . . . . . . . . . . . . . . . . . . . . . . .269
Handling 3Com IPCC Contact History Viewer Problems . . . . . . . . . . . . . . . . . .270
Cannot see all the content in the 3Com IPCC Contact History
Viewer window . . . . . . . . . . . . . . . . . . . . . . . . . . . . . . . . . . . . . . . . . . . . . . . . . . .270
Glossary . . . . . . . . . . . . . . . . . . . . . . . . . . . . . . . . . . . . . . . . . . . . . . . . . . . . . . . . . . 273
Index . . . . . . . . . . . . . . . . . . . . . . . . . . . . . . . . . . . . . . . . . . . . . . . . . . . . . . . . . . . . . .283
10 3Com IP Contact Center Desktop User’s Guide
Page 11

PREFACE
About This Guide
This guide provides instructions for using the 3Com® IPCC Desktop to
perform tasks within the 3Com IP Contact Center system. Though this
guide is written primarily with agents and supervisors in mind, all 3Com
IPCC Desktop users can use this guide to learn about
3Com IP Contact Center components and functions, and applications
managed by the 3Com IPCC Desktop.
Who Should Read This Guide
This guide is intended for all 3Com IPCC Desktop users who use the
3Com IPCC applications to perform their jobs. No previous experience with
the 3Com IP Contact Center environment is required.
How This Guide Is Organized
The chapters in this guide provide the following information:
Chapter 1, “Introduction to the 3Com IPCC Desktop,” describes the levels
of assistance available through the 3Com IP Contact Center and common
3Com IP Contact Center concepts. It also provides a brief overview of the
3Com IPCC Desktop and applications.
Chapter 2, “Working in the 3Com IPCC Desktop Environment,” describes
what you need to do before you start working with the 3Com IPCC
Desktop, including how to log on, work with the 3Com IPCC Desktop
windows, get help, change your password, and log off the 3Com IPCC
Desktop. It also provides tips for users who use a phone other than the
IPCC Soft Phone.
3Com IP Contact Center Desktop User’s Guide 11
Page 12

About This Guide
Chapter 3, “Handling Immediate-Assistance Contacts,” explains how to
change user states, receive and disconnect immediate- assistance contacts,
request assistance, consult with a supervisor, be monitored or coached by a
supervisor, and enter wrap-up data.
Chapter 4, “Using Voice Features,” explains how to handle voice contacts,
make and transfer calls, generate touch tones, record voice calls, adjust the
volume on the your headset speaker, and use the mute function. It also
describes how to access your voice messages from the 3Com IPCC Desktop
and a remote location.
Chapter 5, “Using E-mail Features,” provides a description of
deferred-assistance and immediate-assistance e-mail contacts, and explains
how to work in Microsoft Outlook Express, use the e-mail management
system to handle deferred e-mail contacts, and handle e-mail contacts that
have been escalated to immediate assistance. It also describes how to create
an e-mail template and search the Archive folders for a specific message.
Chapter 6, “Using 3Com IPCC Web Collaboration Features,” explains how
to use 3Com IPCC Web Collaboration to accept Web contacts and meet-me
requests, initiate a Web collaboration session, exchange text messages, share
Web pages, and use other 3Com IPCC Web Collaboration features.
Chapter 7, “Viewing Contact History,” explains how to use 3Com IPCC
Contact History Viewer to research previously handled contacts, play voice
messages and voice recordings, view Web collaboration transcripts, and
search for e-mail messages.
Chapter 8, “Supervising the Workforce,” describes supervisory tasks you
can perform with the 3Com IPCC Desktop and its applications, including
monitoring and coaching agents, recording calls while monitoring or
coaching agents, sending bulletins, and monitoring alarms.
Chapter 9, “Troubleshooting,” provides advice for problems and issues
that you might encounter while working with your 3Com IPCC
applications.
A glossary and index are included at the back of this guide.
12 3Com IP Contact Center Desktop User’s Guide
Page 13
Related Publications
The following lists describe other 3Com IP Contact Center publications.
Books (PDF Format)
Title Description
Related Publications
3Com IP Contact Center
Administrator Guide
3Com IP Contact Center
Management Information
Guide
3Com IP Contact Center
Workflow Builder User’s
Guide
3Com IP Contact Center
Desktop Installation
Instructions
Detailed instructions for using 3Com IPCC Administrator
to configure and maintain the resources in your
3Com IP Contact Center.
Detailed instructions for using 3Com IPCC Real-Time
Status Viewer and 3Com IPCC Reporter to view and
monitor system and user status. Real-Time Status Viewer
is used to monitor and analyze real-time information and
Reporter is used to collect and review consolidated
historical information.
Detailed instructions for using 3Com IPCC Workflow
Builder to create and edit workflows. A workflow is a set
of instructions for processing and delivering contacts,
managing agents, and controlling system-level behaviors.
Detailed instructions for configuring user computers and
installing the 3Com IPCC Desktop software components. It
also describes how to remove the software that is
installed as part of the 3Com IPCC Desktop installation.
Quick Reference Guides (PDF format)
Title Description
3Com IP Contact Center
Desktop Quick Reference
3Com IP Contact Center
Desktop Supervisor Quick
Reference
Concise instructions for logging on to the 3Com IPCC
Desktop, accessing 3Com IPCC applications typically used
by agents to handle e-mail, voice, Web, voice message,
and callback contacts, and using 3Com IPCC
History Viewer.
Concise instructions for performing common supervisor
tasks, including monitoring and coaching agents, sending
bulletins, logging off users, and accessing real-time and
historical reports.
Contact
3Com IP Contact Center Desktop User’s Guide 13
Page 14

About This Guide
14 3Com IP Contact Center Desktop User’s Guide
Page 15

CHAPTER 1
Introduction to the 3Com IPCC
Desktop 1
The 3Com IPCC Desktop provides an integrated set of applications that
enable you to provide the appropriate level of assistance to your
customers—whether they interact with you by telephone, e-mail, or
interactive Web collaboration sessions.
This chapter briefly describes the 3Com IPCC applications and the media
types supported by the 3Com IP Contact Center system. It also introduces
important 3Com IP Contact Center concepts—including levels of assistance,
user roles, feature sets, classes of service, media types, and the agent,
supervisor, and team relationship.
Topics covered in this chapter:
■ Understanding 3Com IP Contact Center Concepts
■ 3Com IPCC Desktop Overview
■ Management Applications Overview
■ Administrative Applications Overview
■ Media Types
3Com IP Contact Center Desktop User’s Guide 15
Page 16

Chapter 1: Introduction to the 3Com IPCC Desktop
Understanding 3Com IP Contact Center Concepts
To use the 3Com IPCC Desktop effectively, you need to understand several
concepts used in the 3Com IP Contact Center environment.
Topics covered in this section:
■ Levels of Assistance
■ Users, Agents, Teams, and Supervisors
■ User Roles, Feature Sets, and Classes of Service
Levels of Assistance
The 3Com IP Contact Center system classifies and prioritizes contacts based
on levels of assistance. Each level has different resource requirements and
treatment methods.
■ Self-service is for your customers who want to get information
themselves while maintaining the option of being escalated to deferred
or immediate assistance to complete their transactions. In the
3Com IP Contact Center system, self-service contacts include contacts
handled by informational announcements, including the 3Com
interactive voice response (IVR) capability, and information posted on a
Web s ite.
■ Deferred assistance is for your customers who require assistance but
are willing to wait. Because these customers expect a response within a
finite period of time, automatic escalation to immediate assistance
ensures that their expectations are met in an effective and timely
manner. Deferred-assistance contacts typically include e-mail messages,
callback requests, and voice messages (which are delivered to 3Com
IPCC Desktop users as links in e-mail messages).
■ Immediate assistance is for your customers who require assistance as
soon as possible. Immediate-assistance contacts typically include Web
collaboration requests, phone calls, and escalated e-mail messages
(including e-mail messages with links for callback requests and voice
messages).
16 3Com IP Contact Center Desktop User’s Guide
Page 17

Understanding 3Com IP Contact Center Concepts
Users, Agents, Teams, and Supervisors
A user is any person who has access privileges to the
3Com IP Contact Center. Users can be located on-site or at a remote
location. They access the features offered by the 3Com IP Contact Center
voice functionality using the IPCC Soft Phone or an alternative phone
device such as a traditional telephone.
Note: Unless specifically noted otherwise, all instructions in this guide apply to
both users who use the IPCC Soft Phone and users who use an alternative phone
device. For more information about alternative phone devices, see “Using a Phone
Other Than the IPCC Soft Phone” on page 72.
An agent is a user whose role includes the Contact Handling feature set. An
agent handles contacts and interacts with customers, other agents, and other
people in the agent’s organization. (For information about roles and feature
sets, see “User Roles, Feature Sets, and Classes of Service” on page 18.)
A team is a group of users whose roles include the Contact Handling feature
set. All users who handle contacts must be assigned to a team. A user can be
a contact-handling member of only one team.
A supervisor is a user whose role includes the Management feature set. A
supervisor can be designated as the supervisor of one or more teams. A
supervisor can supervise and handle contacts for the team to which he or
she belongs (thus “supervising” himself or herself) or supervise a team and
not belong to any team as a contact-handling member.
Team supervisors can do the following:
■ Access real-time status views
■ View historical reports (if authorized to do so by their assigned class of
service)
■ Monitor, coach, and barge in on agents who are members of the teams
they supervise (if authorized to do so by their assigned class of service)
■ Receive notification when a user on their team clicks the Report
Emergency button on the 3Com IPCC Desktop.
3Com IP Contact Center Desktop User’s Guide 17
Page 18

Chapter 1: Introduction to the 3Com IPCC Desktop
User Roles, Feature Sets, and Classes of Service
Your user role is associated with several feature sets that each contain core
functionality and a group of class of service settings. The class of service
settings determine the 3Com IPCC Desktop functions to which you have
access. Following is a brief description of user roles, feature sets, and classes
of service:
■ User roles. When you work in the 3Com IPCC Desktop environment,
you are assigned a user role. A user role is constructed from the
functionality associated with three or more feature sets.
The 3Com IP Contact Center system includes four default user roles:
Agent, Supervisor, Administrator, and Executive.
Though 3Com IP Contact Center administrators cannot change the
default roles, they can use them as they are configured or as the basis to
create new unique roles to suit their business needs.
■ Feature sets. The 3Com IP Contact Center system includes eight feature
sets: Common, Desktop, Contact Handling, Ring-Through,
Management, Application, Strategic, and System. Each user role is
constructed from the functionality associated with three or more feature
sets: the Common and Desktop feature sets—which provide basic
contact center functionality—and one or more additional feature sets.
Each feature set consists of core functionality and, except for the System
feature set, a group of settings that are configured and saved as a class of
service. For example, the default Agent user role is associated with the
Common, Desktop, Contact Handling, and Ring-Through feature sets.
If you are assigned the default Agent user role, you are also assigned a
class of service for each of these feature sets.
The following table lists and briefly describes the feature sets included
in each default user role. The table uses the following abbreviations:
Agent (Agent), Sup (Supervisor), Admin (Administrator), and Exec
(Executive).
18 3Com IP Contact Center Desktop User’s Guide
Page 19

Understanding 3Com IP Contact Center Concepts
Feature set Description Agent Sup Admin Exec
Common Provides the basic functionality of the 3Com
IPCC Desktop, such as which trunk groups
are accessible to the user for outbound calls,
which types of routed calls the user can
receive, whether the Web application starts
automatically, and if the calls waiting
indicator is displayed.
Desktop Provides a way to specify which applications
are available to the 3Com IPCC Desktop
user, whether they are managed
applications, and their relative sizes and
positions. This feature set can be configured
only by a user with technician privileges.
Contact
Handling
Ring-Through Provides a way to specify the type of calls
Management Enables users to supervise teams, view the
Enables users to perform tasks such as
handling contacts, viewing personal
statistics, and playing back recordings. This
feature set is required for roles that include
the Ring-Through feature set.
Note: Users whose roles do not include the
Contact Handling feature set (such as the
default Executive user role) can still make
outbound calls, make and receive internal
voice calls, initiate and participate in internal
Web collaboration conferences, and send
and receive e-mail messages.
that can be delivered to an agent during
each type of immediate-assistance contact
and each user state. This feature set is
required for roles that include the Contact
Handling feature set.
Alerts panel on their 3Com IPCC Desktop,
access 3Com IPCC Real-Time Status Viewer
to view statistics for their teams and
classifications, and receive emergency
notifications from members of teams that
they supervise. When the corresponding
classes of service settings are enabled, users
can also access 3Com IPCC Reporter to view
historical reports, monitor and coach agents,
and send bulletins to supervisors and all
logged-on members of a team or teams
supervised by the user.
XX X X
XX X X
XX X
XX
XX
3Com IP Contact Center Desktop User’s Guide 19
Page 20

Chapter 1: Introduction to the 3Com IPCC Desktop
Feature set Description Agent Sup Admin Exec
Application Provides access to 3Com IPCC Administrator
and its features and capabilities, 3Com IPCC
Workflow Builder, and all information
available through 3Com IPCC Real-Time
Status Viewer. This feature set also enables
the user to send bulletins to all users, all
logged-on administrators, all logged-on
supervisors, or all logged-on members of a
team or teams supervised by the user, and to
receive emergency notifications.
Strategic Provides access to 3Com IPCC Reporter for
viewing historical reports and to all the
information available through 3Com IPCC
Real-Time Status Viewer. When the “Allow
user to send bulletins” class of service
setting is enabled, this feature set also
enables a user to send bulletins to all users,
all logged-on administrators, all logged-on
supervisors, or all logged-on members of a
team or teams supervised by the user.
System Reserved for future use.
■ Classes of service. A class of service is a collection of preconfigured
X
settings associated with a feature set. The class of service assigned to a
feature set determines which functions you can access within the
feature set. For example, a user who is assigned the default Agent role is
associated with several feature sets, including the Common feature set.
The class of service associated with the Common feature set determines,
among other things, the types of contacts the agent can handle.
X
20 3Com IP Contact Center Desktop User’s Guide
Page 21
3Com IPCC Desktop Overview
The 3Com IPCC Desktop environment, shown in the following illustration,
provides a common interface that enables agents and supervisors to focus
on handling customer, inbound, and outbound contacts, regardless of the
media type. (For information about media types, see “Media Types” on
page 28.)
Because the 3Com IPCC Desktop provides a media-independent view of all
contacts, agents and supervisors use the same controls to manage phone
calls, Web collaboration sessions, e-mail messages, voice messages, and
callback requests.
3Com IPCC Desktop Overview
The 3Com IP Contact Center system sends information about a contact to
the 3Com IPCC Desktop and the 3Com IPCC Desktop displays it in a
contact panel. The 3Com IPCC Desktop automatically opens the
applications that are needed to handle the contact, such as a third-party
customer- relationship management (CRM) application.
The 3Com IPCC Desktop offers the following functionality:
■ Vo ic e
■ E-mail Management
■ Web Collaboration
■ Contact History
The 3Com IPCC Desktop also provides a single point of entry for managed
applications, including management and administrative applications that
enable supervisors and administrators to monitor and administer the
3Com IP Contact Center system and enable managers to generate historical
reports for analyzing contact center activity. For information, see
“Management Applications Overview” on page 24 and “Administrative
Applications Overview” on page 26.
For descriptions of the 3Com IPCC Desktop components, see “Desktop
Manager” on page 38.
3Com IP Contact Center Desktop User’s Guide 21
Page 22

Chapter 1: Introduction to the 3Com IPCC Desktop
Voice
With the 3Com IP Contact Center voice functionality, you can receive
inbound calls (also known as Direct Inward Dialing, or DID calls) that are
delivered directly to your extension, make outbound calls, and make
internal calls to and receive internal calls from other 3Com IPCC Desktop
users.
Depending on your access privileges, you might also receive immediateassistance voice contacts on your 3Com IPCC Desktop. For information
about receiving voice contacts from customers, see Chapter 3, “Handling
Immediate-Assistance Contacts,” beginning on page 75.
The interface for 3Com IP Contact Center voice functionality is completely
integrated with the 3Com IPCC Desktop, enabling you to keep your focus
on your computer screen for all forms of contact. Typically, the application
that provides the voice functionality is the IPCC Soft Phone, which starts
automatically when you log on to the 3Com IPCC Desktop and displays an
icon ( ) in the Windows notification area. If your system is not configured
to use the IPCC Soft Phone, voice functionality is provided by an
application related to your type of phone and the IPCC Soft Phone icon is
not displayed. (For more information about alternative phone devices, see
“Using a Phone Other Than the IPCC Soft Phone” on page 72.)
For more information, see Chapter 4, “Using Voice Features,” beginning on
page 95.
E-mail Management
You can use the e-mail management system to do the following:
■ Send e-mail messages to and receive e-mail messages from other 3Com
IPCC Desktop users.
■ Send e-mail messages to and receive e-mail messages from external
e-mail addresses.
■ Depending on your access privileges, respond to customers who send
e-mail messages, request callbacks, and leave voice messages for your
organization.
The e-mail management system consists of two main components: Mail
User Agent Assistant (MUAA) and Microsoft Outlook Express.
■ The MUAA enables the 3Com IP Contact Center system to monitor
e-mail activities performed by agents and to coordinate the escalation of
e-mail messages from deferred to immediate assistance. It also enables
22 3Com IP Contact Center Desktop User’s Guide
Page 23

3Com IPCC Desktop Overview
agents to manage their personal folders, browse shared classification
folders and archives, and handle deferred and immediate-assistance
e-mail, callback, and voice message contacts.
■ Outlook Express provides the interface that enables 3Com IPCC
Desktop users to manage e-mail messages, including messages sent
between users and messages sent from customers and routed through
the 3Com IP Contact Center system.
The MUAA and Outlook Express typically start automatically when you log
on to the 3Com IPCC Desktop. The Outlook Express windows are displayed
in the 3Com IPCC workspace and the MUAA icon ( ) is displayed in the
Microsoft Windows taskbar.
For detailed information about using Outlook Express, refer to the Microsoft
Outlook Express publications and online Help. For information about using
Outlook Express to handle deferred-assistance contacts or e-mail, callback,
and voice message contacts that have been escalated to immediate
assistance, see Chapter 5, “Using E-mail Features,” beginning on page 129.
Web Collaboration
With 3Com IPCC Web Collaboration, you can share information over the
Web. You can also exchange text messages with other 3Com IPCC Desktop
users and, depending on your access privileges, with customers who
request a Web collaboration session through your organization’s Web site.
Here are some of the ways you can use 3Com IPCC Web Collaboration:
■ To communicate with Web collaboration session participants by
exchanging text messages.
■ To share Web pages by entering a URL in the address field of the
browser window, selecting a stored Web page from your Favorites
folder, or clicking a link on a Web page displayed in the browser
window.
■ To help customers complete Web forms interactively.
■ To highlight text on Web pages.
■ To consult with other 3Com IPCC Desktop users or transfer a Web
collaboration session to another user.
■ To view Web pages while talking simultaneously with a customer.
For information about using Web Collaboration, see Chapter 6, “Using
3Com IPCC Web Collaboration Features,” beginning on page 175.
3Com IP Contact Center Desktop User’s Guide 23
Page 24

Chapter 1: Introduction to the 3Com IPCC Desktop
Contact History
With the appropriate access privileges, you can research past voice, e-mail,
Web, voice message, and callback contacts.
3Com IPCC Contact History Viewer enables authorized agents, supervisors,
and other 3Com IPCC Desktop users to search for and review contacts that
have been handled. For example, you can use Contact History Viewer to
play voice messages from a particular case, review Web collaboration
transcripts from a completed Web collaboration session, or search an e-mail
thread to locate information provided to the caller by another agent.
For information about 3Com IPCC Contact History Viewer, see Chapter 7,
“Viewing Contact History,” beginning on page 205.
Management Applications Overview
The 3Com IP Contact Center system offers the following management
information applications:
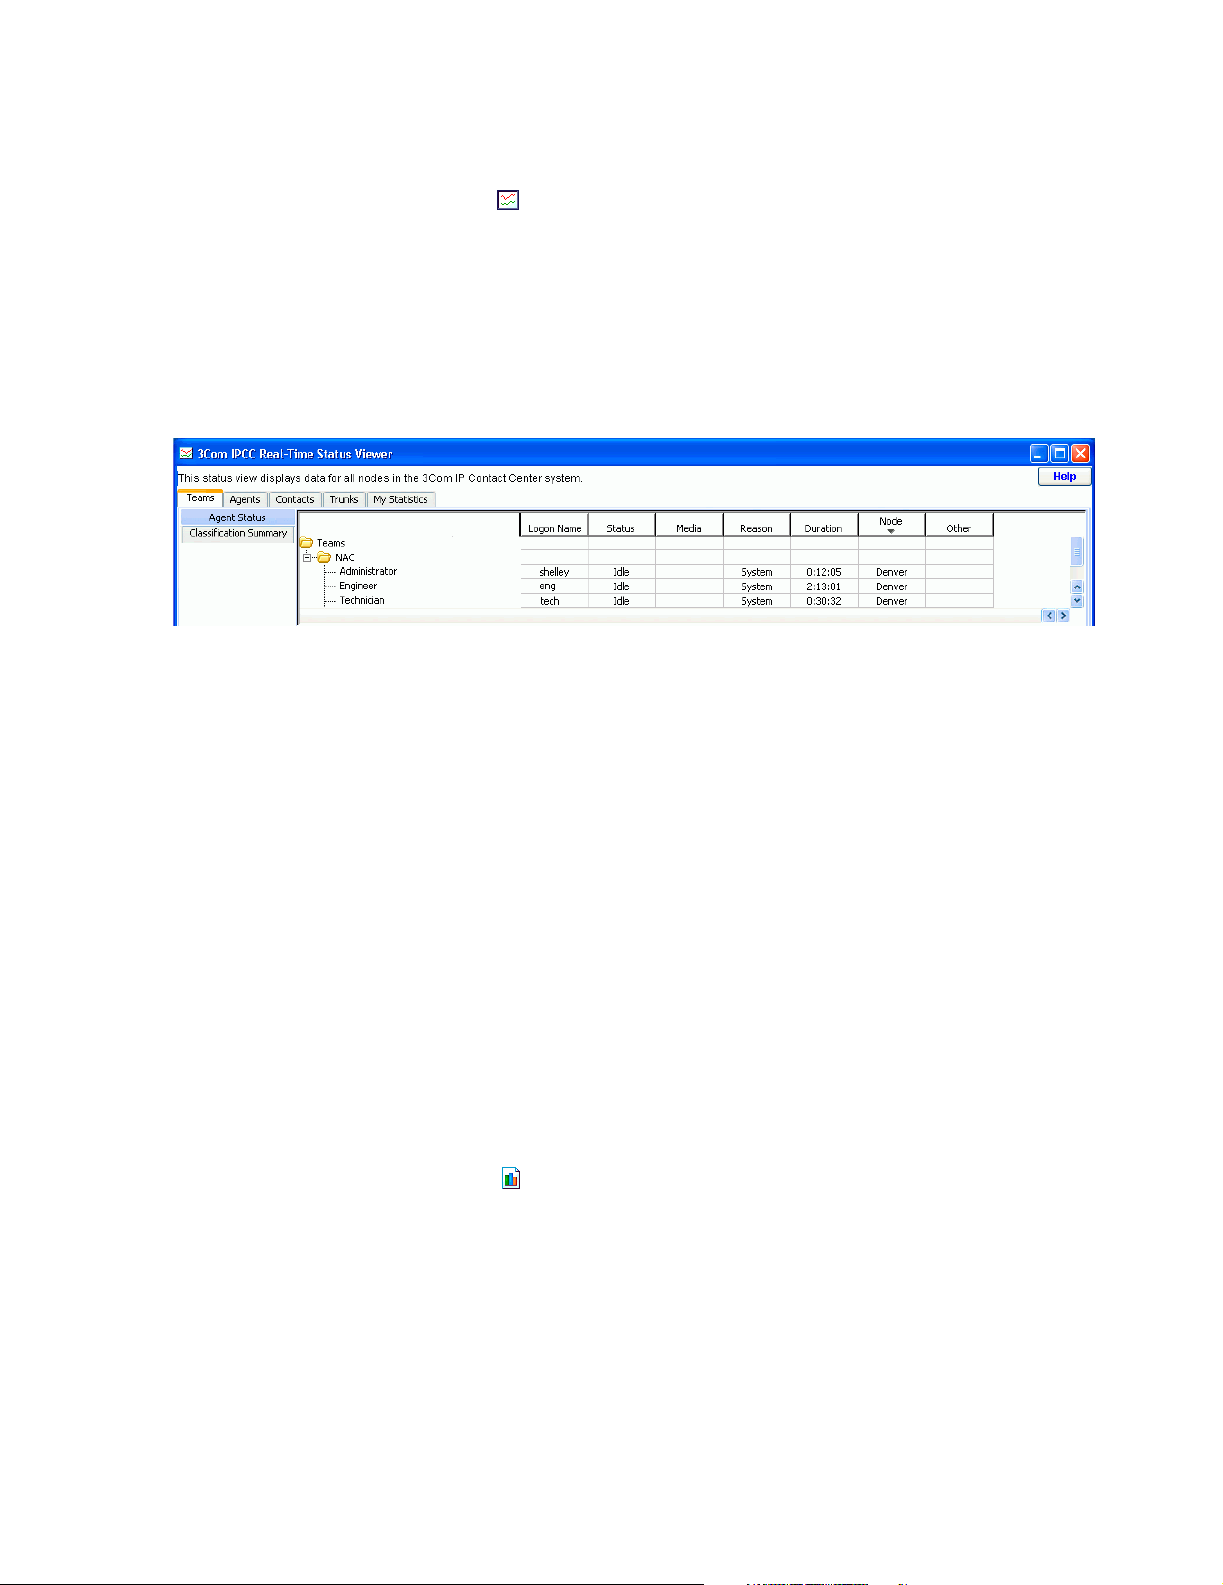
■ 3Com IPCC Real-Time Status Viewer
■ 3Com IPCC Reporter
3Com IPCC Real-Time Status Viewer
3Com IPCC Real-Time Status Viewer offers real-time information about the
operation of your contact center. Supervisors can use this application to
evaluate the current status of agents on their teams. Supervisors and
3Com IP Contact Center administrators can use it to review targeted service
level objectives and look for trouble spots in overall effectiveness.
Full access to 3Com IPCC Real-Time Status Viewer is available to users
whose role includes the Management, Application, or Strategic feature set.
3Com IPCC Desktop users whose role includes the Contact Handling
feature set with the Enable agent personal statistics class of service setting
enabled can view their contact-handling and personal user states on the My
Statistics tab of 3Com IPCC Real-Time Status Viewer. They can also view
aggregate contact-handling statistics for all agents in each of the
classifications in their classification set.
24 3Com IP Contact Center Desktop User’s Guide
Page 25
Management Applications Overview
To view the 3Com IPCC Real-Time Status Viewer:
➤ Click the button on the 3Com IPCC Desktop toolbar.
The 3Com IPCC Real-Time Status Viewer window appears in the
3Com IPCC workspace.
The following illustration shows the full-access version of 3Com IPCC RealTime Status Viewer.
Note: The Trunks tab displays only if your contact center uses an internal gateway.
For information about using 3Com IPCC Real-Time Status Viewer, refer to
the 3Com IP Contact Center Management Information Guide or click Help in
the upper right corner of the window. For information about the My
Statistics tab, click Help, or see “Viewing the My Statistics Tab” on page 58.
3Com IPCC Reporter
3Com IPCC Reporter provides both standard and analytical reporting
across several major aspects of contact center activity. The
3Com IP Contact Center system provides several preformatted reports. You
can use the preformatted reports or you can customize them to create new
reports. With Reporter, you can view, export, and print reports and, if your
access privileges permit, perform scheduled tasks.
Access to 3Com IPCC Reporter is available to users whose role includes the
Management or Strategic feature set.
To open 3Com IPCC Reporter:
➤ Click the button on the 3Com IPCC Desktop toolbar.
Note: Alternatively, you can access 3Com IPCC Reporter from a browser
window. For information, refer to the 3Com IP Contact Center Management
Information Guide or contact your 3Com IP Contact Center administrator.
3Com IP Contact Center Desktop User’s Guide 25
Page 26
Chapter 1: Introduction to the 3Com IPCC Desktop
The 3Com IPCC Reporter window appears.
For information about using 3Com IPCC Reporter to create, view, and
modify 3Com IP Contact Center reports, refer to the 3Com IP Contact Center
Management Information Guide.
Administrative Applications Overview
The 3Com IP Contact Center system offers the following administrative
applications:
■ 3Com IPCC Administrator
■ 3Com IPCC Workflow Builder
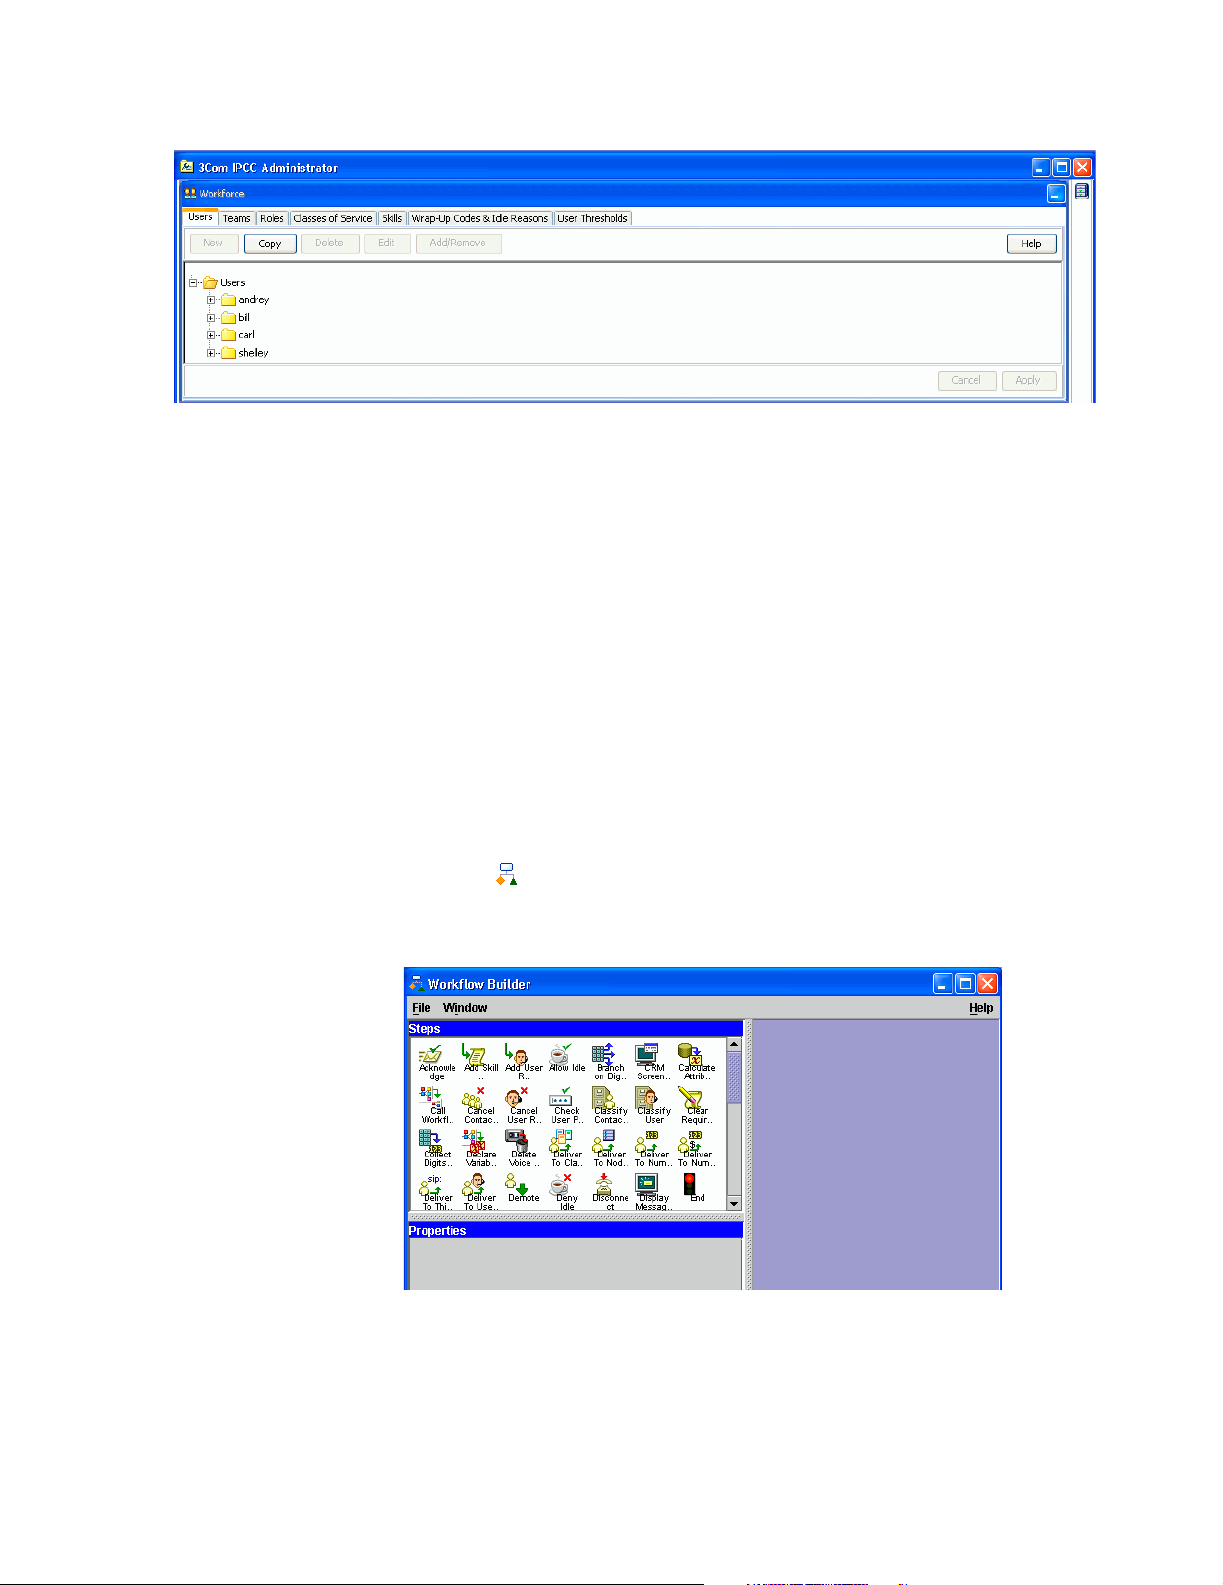
3Com IPCC Administrator
3Com IPCC Administrator enables administrators to provision,
configure, and manage the resources and business logic of your
3Com IP Contact Center.
Access to 3Com IPCC Administrator is available to users with the
default Administrator role or whose role includes the Application
feature set.
To open 3Com IPCC Administrator:
➤ Click the button on the 3Com IPCC Desktop toolbar.
The 3Com IPCC Administrator window appears.
26 3Com IP Contact Center Desktop User’s Guide
Page 27
For information about using 3Com IPCC Administrator, refer to the 3Com IP
Contact Center Administrator Guide or click Help in the upper right corner of
the window.
3Com IPCC Workflow Builder
3Com IPCC Workflow Builder enables 3Com IP Contact Center
administrators to create instructions that control system-level behaviors and
tell the system how to process and deliver contacts and how to manage
users.
Administrative Applications Overview
Access to Workflow Builder is available to users whose role includes the
Application feature set.
To open Workflow Builder:
➤ Click the button on the 3Com IPCC Desktop toolbar.
The 3Com IPCC Workflow Builder window appears.
For information about using 3Com IPCC Workflow Builder, refer to the
3Com IP Contact Center Workflow Builder User’s Guide or select Workflow
Builder Help from the Help menu in the upper right corner of the window.
3Com IP Contact Center Desktop User’s Guide 27
Page 28
Chapter 1: Introduction to the 3Com IPCC Desktop
Media Types
The 3Com IP Contact Center system provides service for five different
media types: voice, e-mail, Web, callback, and voice message. The media
types used by your 3Com IP Contact Center depend on your organization’s
business needs and your 3Com IP Contact Center system configuration.
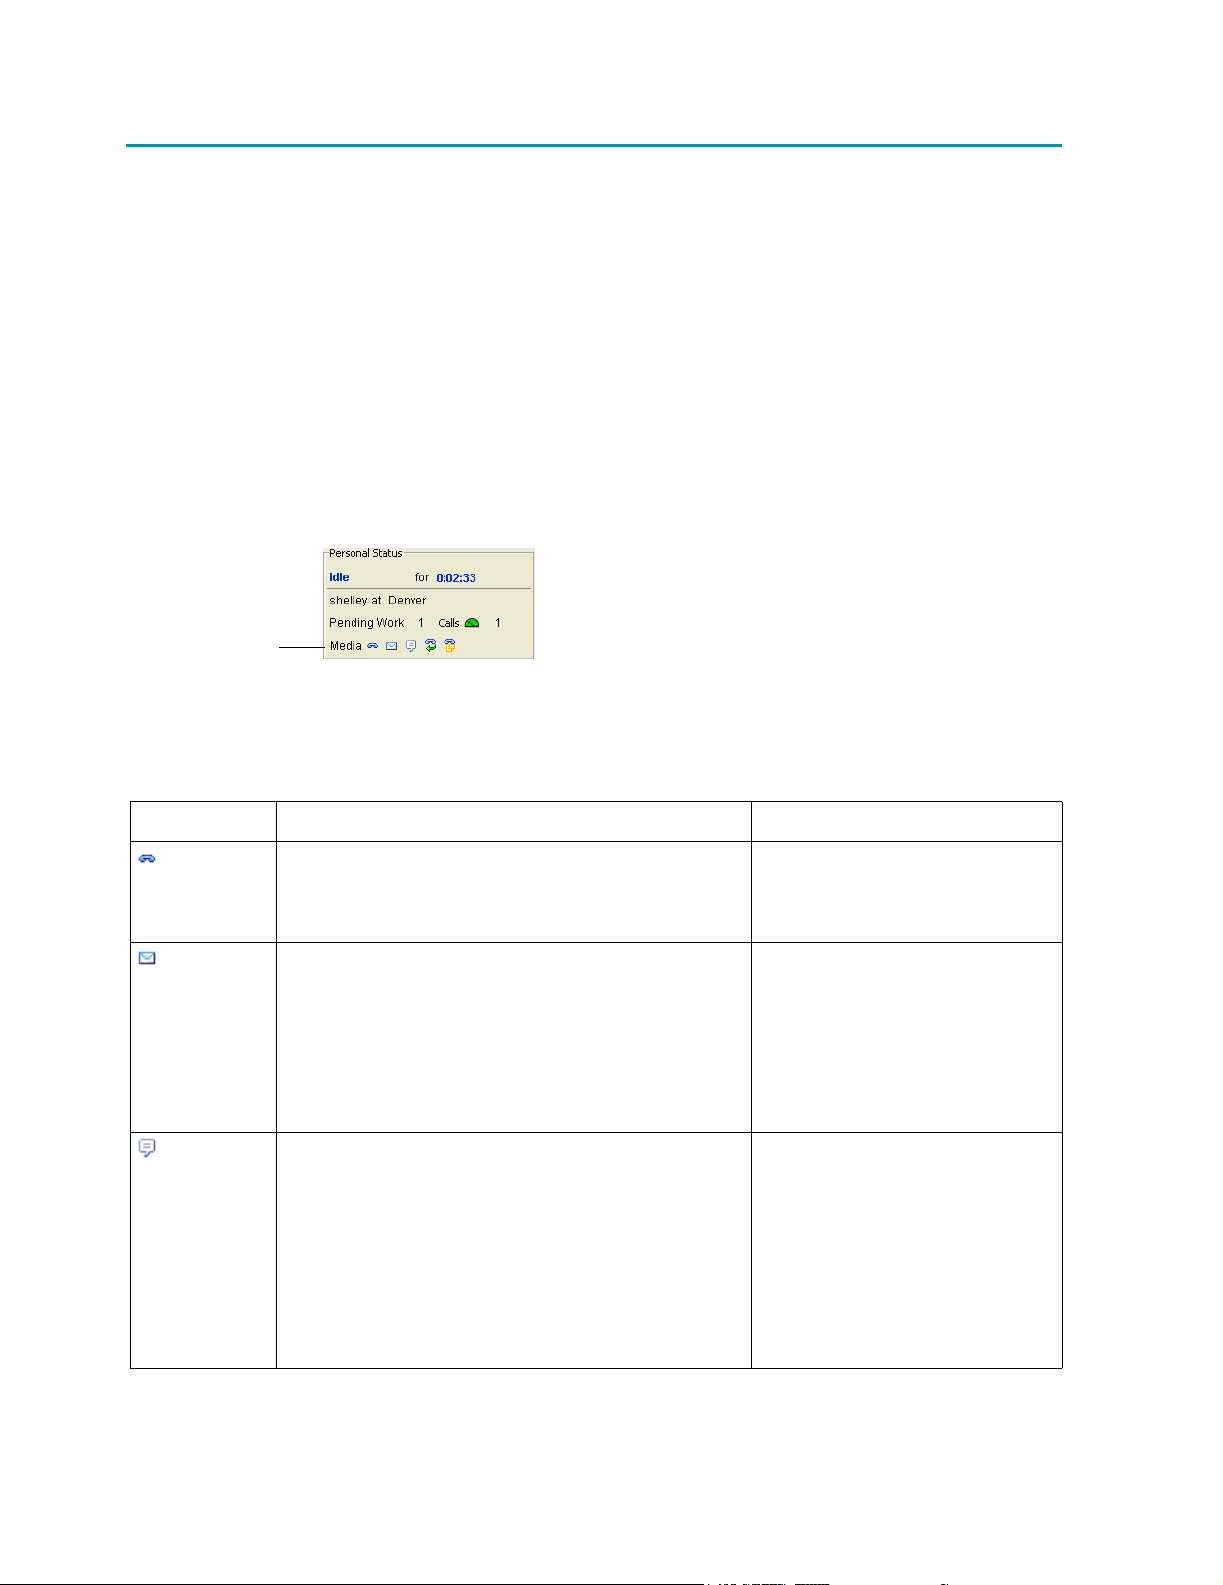
To identify the media types you are set up to handle, view the Personal
Status panel on the Contact panel bar. (To locate Personal Status panel, see
“Desktop Manager” on page 38.) The Media field displays icons that
represent the media types you are set up to handle and whether or not the
application that supports the media type is currently available.
In this example, the
Media field shows that
this 3Com IPCC Desktop
user is set up to handle all
media types: voice,
e-mail, Web, callback,
and voice message.
The following table describes the types of contacts you can receive when
you are set up to handle the different media types.
Media type Types of contacts For more information, see...
Voice Phone calls to your 3Com IP Contact Center system from
customers. The calls (or routed contacts) are routed
according to your organization’s business logic and
delivered as immediate-assistance contacts.
E-mail E-mail messages sent to your organization by customers. “About Deferred-Assistance and
Web Web collaboration requests, including:
■ Web chat and page sharing. For example, a customer
enters information in fields on a caller information
page on your organization’s Web site and the request
is routed as an immediate- assistance contact.
■ Meet-me requests—a Web collaboration session in
which a caller navigates to a specific Web page and
enters a logon name and meet-me ID to initiate a
session with a specific agent.
“Using Voice Features” on page 95
“Contact Types” on page 45
Immediate-Assistance Contacts” on
page 129
“Handling Deferred-Assistance
Contacts” on page 140
“Handling Messages Escalated to
Immediate Assistance” on page 155
“About 3Com IPCC Web
Collaboration” on page 175
28 3Com IP Contact Center Desktop User’s Guide
Page 29

Media Types
Media type Types of contacts For more information, see...
Callback Requests from customers for a return call from an agent.
A callback request is routed and delivered as a link in an
e-mail message.
Voice
Message
Voice messages left by customers in response to a voice
prompt.
For example, while waiting in queue for an agent, a
customer may choose to leave a voice message. The
voice message is routed and delivered as a link in an
e-mail message.
For information about media type icons that include a red x, see “Viewing
the Personal Status Panel” on page 56.
“About Callback Requests” on
page 151
“Handling a Customer Callback
Request” on page 116
“Listening To and Handling Voice
Messages Left By Customers” on
page 120
3Com IP Contact Center Desktop User’s Guide 29
Page 30

Chapter 1: Introduction to the 3Com IPCC Desktop
30 3Com IP Contact Center Desktop User’s Guide
Page 31

CHAPTER 2
Working in the 3Com IPCC Desktop
Environment 2
The 3Com IPCC Desktop environment provides access to the applications
that agents use to handle voice, Web, and e-mail contacts; supervisors use to
manage and monitor agents; and system administrators use to configure
and manage the 3Com IP Contact Center.
Topics covered in this chapter:
■ Before You Start
■ Logging On to the 3Com IPCC Desktop
■ 3Com IPCC Desktop Components
■ User States
■ Contact Types and Contact Panel States
■ Managing 3Com IPCC Desktop Windows
■ Viewing Your Personal Information
■ Viewing the My Statistics Tab
■ Viewing Bulletins
■ Getting Help
■ Changing Your 3Com IPCC Desktop Logon Password
■ Understanding Remote Access Codes
■ Using a Phone Other Than the IPCC Soft Phone
■ Logging Off the 3Com IPCC Desktop
3Com IP Contact Center Desktop User’s Guide 31
Page 32

Chapter 2: Working in the 3Com IPCC Desktop Environment
Before You Start
Before you log on to the 3Com IPCC Desktop:
■ Make sure your computer is configured correctly and the 3Com IPCC
Desktop is installed as described in the 3Com IP Contact Center Desktop
Installation Instructions.
Note: Before you access the 3Com IPCC Desktop for the first time, certain
settings must be configured on your computer and the 3Com IPCC Desktop
software must be installed. Typically, these tasks are performed by the 3Com IP
Contact Center administrator. If not, make sure to follow the instructions in
the 3Com IP Contact Center Desktop Installation Instructions before
continuing.
■ If you are using a phone other than the IPCC Soft Phone, be aware of
the following:
– You will need a remote access code to be able to use the voice
functionary of the system. Ask your 3Com IP Contact Center
administrator for your remote access code.
– There are several things you need to know about using the phone.
For information, see “Using a Phone Other Than the IPCC Soft
Phone” on page 72.
■ If you are using a headset, make sure of the following:
– Make sure you are using an approved headset and adaptor and that
your headset is set up correctly. For more information, contact the
3Com IP Contact Center administrator.
– To ensure reliable voice quality, make sure that the headset
connector is properly inserted in the USB port on your computer (or
USB adapter, if applicable) and that your headset microphone is
positioned for optimal clarity and volume.
■ If you use 3Com IPCC Workflow Builder to build workflows, be aware
that you might not be able to save workflows locally unless you
configure Microsoft Windows Explorer to show file extensions for
known file types. For more information, see “Cannot save a workflow
to your local computer” on page 259.
32 3Com IP Contact Center Desktop User’s Guide
Page 33

Logging On to the 3Com IPCC Desktop
Logging On to the 3Com IPCC Desktop
To log on to the 3Com IPCC Desktop:
1. On the Windows desktop, double-click the 3Com IPCC Desktop icon
to display the 3Com IP Contact Center logon page.
Note: If you do not have a 3Com IPCC Desktop icon on your Windows
desktop, refer to the “3Com IP Contact Center Desktop Installation
Instructions” document before continuing for instructions about configuring
your computer and accessing the 3Com IPCC Desktop for the first time.
If a security message, such as the one shown in the following
illustration, is displayed in the Microsoft Internet Explorer Information
Bar, click the message, and then follow the prompts to display the active
content.
Enter your logon name and
password here.
If the logon page is still not displayed, press and hold the CTRL key
while you click the message and the subsequent prompts. Release the
CTRL key when the logon page is displayed.
2. Enter your logon name and password.
When you first log on to the 3Com IPCC Desktop, you enter the
password provided by the 3Com IP Contact Center administrator. For
information about changing your password, see “Changing Your 3Com
IPCC Desktop Logon Password” on page 70.
Note: Your logon name and password are case-sensitive, so be sure to type
uppercase and lowercase letters exactly as provided by your administrator.
3Com IP Contact Center Desktop User’s Guide 33
Page 34

Chapter 2: Working in the 3Com IPCC Desktop Environment
3. From the Logon Node drop-down list, select a node, if necessary.
The Logon Node field displays the node that you logged on to during
your last 3Com IPCC Desktop session. If you need to change nodes for
this 3Com IPCC Desktop session, select a different node from the Logon
Node drop-down list.
4. If you are using a phone other than the IPCC Soft Phone, make sure your
phone is on-hook.
Note: On-hook is the state of the telephony device when the device is available
to receive incoming calls. Typically this means the phone’s receiver is placed in
its cradle.
5. Click the Log On button.
■ If you are set up to be able to change the type of phone and phone
number at which you receive voice calls, the Select Phone Settings
dialog box is displayed as shown in the following illustration. Go to
step 6.
■ If you cannot change the phone you use to access voice media, one
of the following occurs:
– If you are using an IPCC Phone Set—a phone other than the
IPCC Soft Phone—the system places a call to your default
phone to authenticate it, and the phone rings. Go to step 8.
– If you are using the IPCC Soft Phone, the 3Com IPCC Desktop
appears and automatically opens any appropriate applications.
For example, if you are an agent who handles e-mail, voice
message, or callback contacts, both Outlook Express and the
MUAA open when you log on to the 3Com IPCC Desktop. Go
to step 10.
34 3Com IP Contact Center Desktop User’s Guide
Page 35

Logging On to the 3Com IPCC Desktop
Caution: If you are an agent who handles immediate-assistance
contacts, make sure that all required applications complete their
startup processes before you place yourself in the Available state.
Making yourself available before the startup process is complete can
cause routing, desktop, and reporting problems.
6. Select one of the available phone settings described in the following
table:
Select this phone
setting... To do this...
IPCC Soft Phone Use the IPCC Soft Phone for voice functionality.
IPCC Phone Set Receive and make calls from a phone other than the
IPCC Soft Phone at the phone number and trunk group
assigned to you by the 3Com IP Contact Center administrator.
Alternate Phone Enter an alternative phone number and trunk group, as follows:
■ In the Phone Number field, enter the phone number or
extension at which you are to receive calls from the 3Com
IPCC Desktop. There are no restrictions to the numbers and
characters you enter in this field; only the numbers are used
by the system.
Note: To dial a phone number that is represented by letters,
translate the letters into number before entering. For
example, for 650-555-CALL, enter 650-555-2225.
Depending on how your contact center is configured, you
might be required to enter extra digits such as a 9 to access
an outside line. Check with your supervisor for information
about any extra digits you might need to enter.
■ From the Trunk Group drop-down list, select the trunk
group to be used for outbound calls.
Your contact center might be configured with separate
trunks for different kinds of calls. For example, you might
need to select a different trunk group for local calls than for
long distance and international calls. If you are not sure
which trunk group to select, ask your
3Com IP Contact Center administrator.
User Default To log on with your default phone setting (the setting configured
for you by the 3Com IP Contact Center administrator), click Use
Default. If this is the IPCC Soft Phone, go to step 10. If not, your
phone rings as the system authenticates your selection by
placing a call to the designated phone number. Go to step 8.
3Com IP Contact Center Desktop User’s Guide 35
Page 36

Chapter 2: Working in the 3Com IPCC Desktop Environment
7. Do one of the following:
■ If you selected IPCC Soft Phone in step 6, go to step 10.
■ If you selected IPCC Phone Set or Alternate Phone, make sure the
designated phone is on-hook, then click OK.
Your phone rings as the system authenticates your selection by
placing a call to the designated phone number. Go to the next step.
8. Answer the phone.
9. When you are asked for your remote access code, enter your remote
access code and # (the pound sign) by pressing the touch-tone keys on
the telephone keypad.
If you do not answer your phone within the amount of time configured
for your system (typically 20 seconds), or if you do not enter the correct
remote access code after two attempts, the media icon for Voice on your
Personal Status panel displays with a red x .
■ If the Select Phone Settings dialog box reappears, return to step 6.
■ If the Select Phone Settings dialog box does not reappear, log off
the 3Com IPCC Desktop and return to step 1.
When you hear that you are now logged on to the system, the 3Com
IPCC Desktop appears and automatically opens any appropriate
applications. For example, if you are an agent who handles e-mail, voice
message, or callback contacts, both Outlook Express and the MUAA
open when you log on to the 3Com IPCC Desktop.
Caution: If you are an agent who handles immediate-assistance contacts, make
sure that all required applications complete their startup processes before you
place yourself in the Available state. Making yourself available before the
startup process is complete can cause routing, desktop, and reporting problems.
Go to step 10.
10. Log on to your account in Microsoft Outlook Express, if necessary. For
instructions, see “Logging On to Your Account in Outlook Express” on
page 132.
Caution: Do not change any of the Outlook Express settings unless you are
told to do so by 3Com Support personnel. Doing so causes unpredictable
system behavior.
36 3Com IP Contact Center Desktop User’s Guide
Page 37

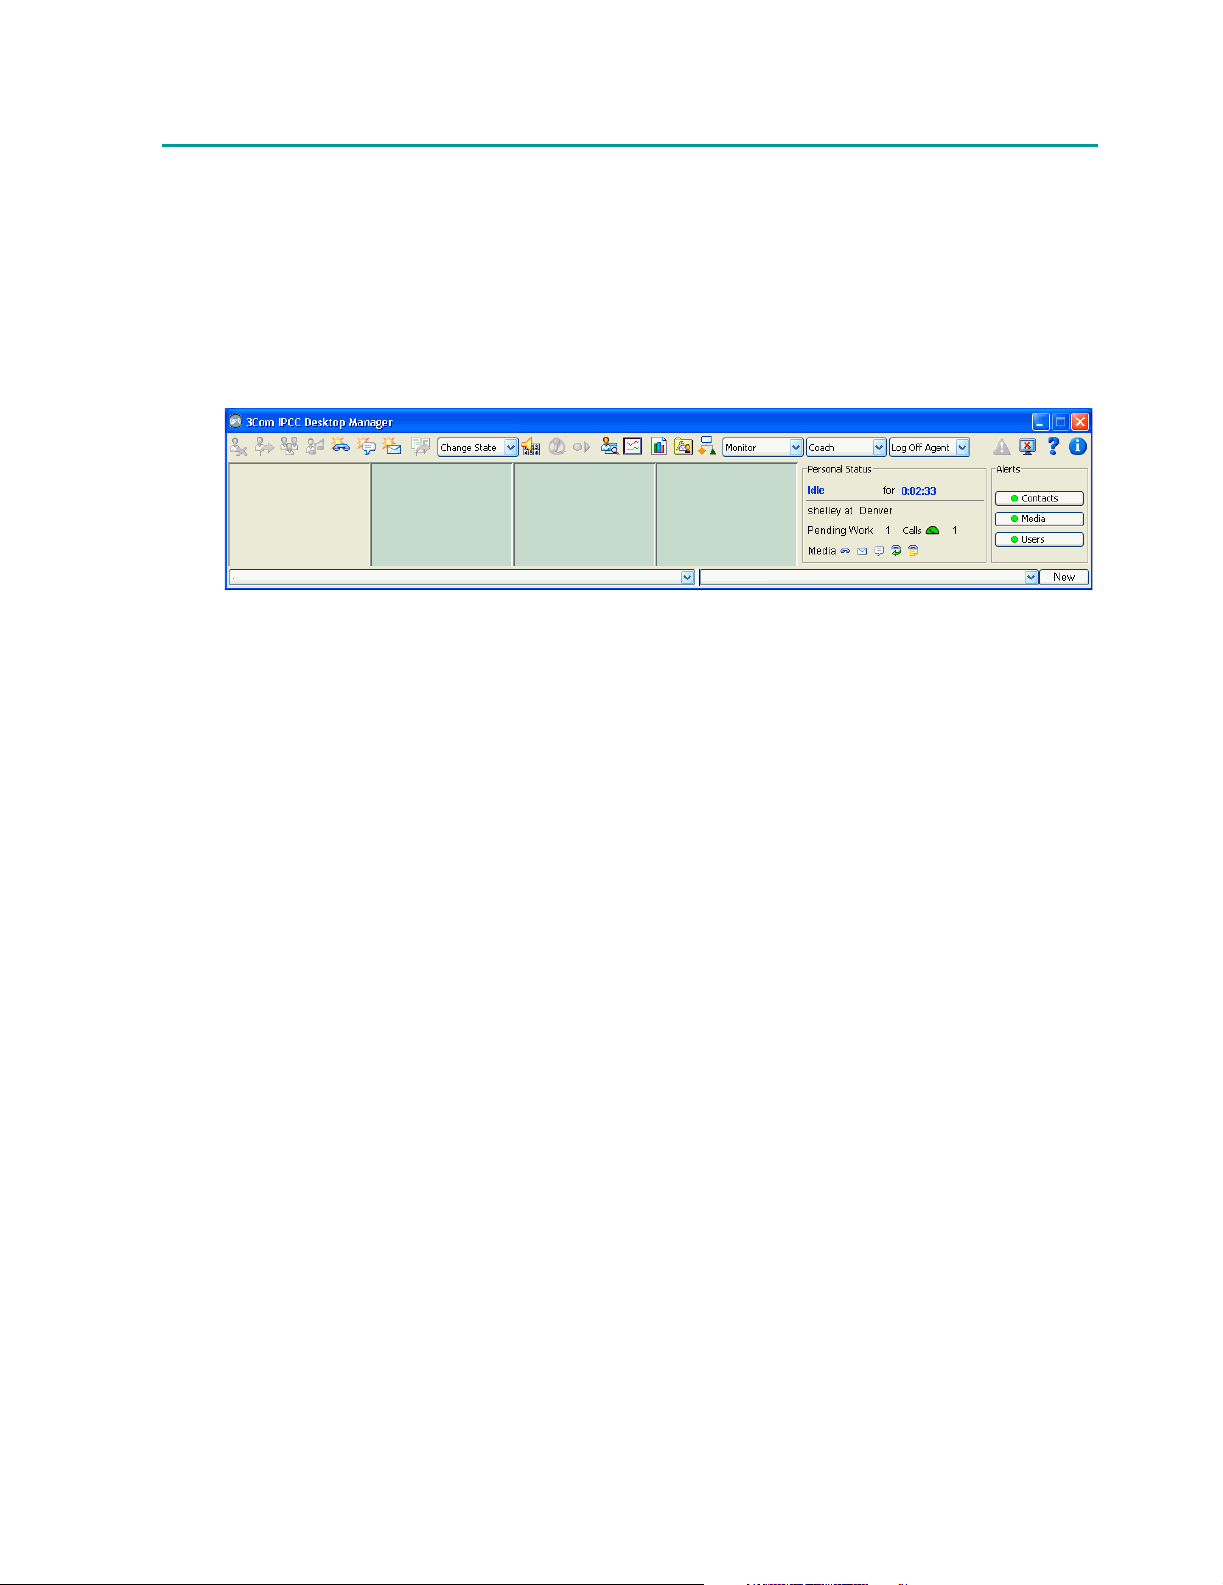
3Com IPCC Desktop Components
An example and description of the 3Com IPCC Desktop environment is
shown in the following illustration.
Use the 3Com IPCC
Desktop Manager to
handle contacts,
open 3Com IPCC
applications, view
personal status and
bulletins issued for
your contact center
or your team, and (if
you are authorized
to do so) monitor
thresholds and
system alarms.
Applications
managed by the
3Com IPCC
Desktop appear
in the
3Com IPCC
workspace.
3Com IPCC Desktop Components
Use the icons in
Shutters to open and
close applications
managed by the
3Com IPCC
Desktop.
The functions available on your 3Com IPCC Desktop are determined by
your assigned user role and associated feature sets and classes of service.
For example, if you are a supervisor, you are probably set up with access to
controls that enable you to monitor, barge in on, and coach agents who are
connected to a contact. You might also have access to applications and
features that let you view the current status of a particular classification and
the entire contact center.
Topics covered in this section:
■ Desktop Manager
■ Shutters
■ 3Com IPCC Workspace
3Com IP Contact Center Desktop User’s Guide 37
Page 38

Chapter 2: Working in the 3Com IPCC Desktop Environment
Desktop Manager
You use the 3Com IPCC Desktop Manager to handle contacts, open and
close internal applications managed by the 3Com IPCC Desktop, view your
personal status, and monitor system thresholds.
The 3Com IPCC Desktop Manager components are shown in the following
illustration.
3Com IPCC
Desktop toolbar
Alerts panel
Bulletin bar
Contact panel bar
Personal Status panel
Desktop Manager components include:
■ Desktop Toolbar
■ Contact Panel Bar
■ Personal Status Panel
■ Alerts Panel
■ Bulletin Bar
Desktop Toolbar
The 3Com IPCC Desktop toolbar displays buttons you use to control 3Com
IPCC Desktop activities, such as managing connected contacts, changing
user states, reporting an emergency, or logging off the 3Com IPCC Desktop.
The buttons that are displayed on your 3Com IPCC Desktop toolbar depend
on your user role and associated classes of service. Typically, supervisors are
set up to see buttons on the toolbar that allow them to monitor an agent or a
classification, coach an agent, and start 3Com IPCC Real-Time Status Viewer
to evaluate contact center performance.
38 3Com IP Contact Center Desktop User’s Guide
Page 39

3Com IPCC Desktop Components
The buttons that could be included on your 3Com IPCC Desktop toolbar are
identified in the following table:
Button Function Button Function
Hang Up Record
Transfer to User 3Com IPCC Contact History Viewer
Conference 3Com IPCC Real-Time Status Viewer
Hold 3Com IPCC Reporter
New Voice Call 3Com IPCC Administrator
New Web Session 3Com IPCC Workflow Builder
New E-mail Message Report Emergency
Transfer to Classification Log Off
Show Phone Controls 3Com IPCC Desktop Help
Mute About 3Com IPCC Desktop
Contact Panel Bar
When an immediate-assistance contact is routed to an agent, information
about the contact is displayed in a panel in the contact panel bar.
Immediate-assistance contacts always appear in the left-most panel.
Other contacts (callback, conference, debrief, internal, inbound, outbound,
redirected, and unrecognized) appear in the three panels to the right of the
first panel. The contact panel bar can accommodate up to four connected
contacts at a time.
For information about contact types, see “Contact Types” on page 45. For
information about the contact panel components, see “Contact Panel
Components” on page 80.
Personal Status Panel
Users can view information about their current status in the Personal Status
panel. For example, agents can be configured to view information about
their current user state, the number of immediate-assistance e-mail
messages in their Pending folder (including those with links to callbacks
and voice messages), the current level and number of calls waiting, and the
media types they are set up to handle.
For more information about using the Personal Status panel, see “Viewing
Your Personal Information” on page 56.
3Com IP Contact Center Desktop User’s Guide 39
Page 40

Chapter 2: Working in the 3Com IPCC Desktop Environment
Alerts Panel
Users whose role includes the Management feature set can use the Alerts
panel to monitor system thresholds for the classifications they supervise.
For information about using the Alerts panel, see “Monitoring Alerts” on
page 250.
Bulletin Bar
The 3Com IPCC bulletin bar displays bulletins sent by authorized users.
In addition to viewing bulletins, users configured to do so can also view
system alarms and emergency notifications on the bulletin bar.
For more information about the bulletin bar, see “Viewing Bulletins” on
page 61, “Sending Bulletins” on page 230, and “Monitoring System Alarms
and Emergency Notifications” on page 252.
Shutters
The Shutters
®
feature of the 3Com IP Contact Center system manages when
and where application windows are displayed in the 3Com IPCC
workspace. For example, each time a Web contact is routed to an agent, the
3Com IPCC Desktop automatically opens both the 3Com IPCC Web
Collaboration window and the Customer Relationship Management
application (CRM) application window to a preconfigured size and position
in the 3Com IPCC workspace.
Shutters is displayed on the right side of the 3Com IPCC Desktop and
provides a way for users to open applications managed by the 3Com IPCC
Desktop and to control multiple open windows.
To open an application from the Quick Launch
section, click its application icon.
If an internal or a third-party application
managed by the 3Com IPCC Desktop is
already open, its icon appears here in the Open
Applications section.
40 3Com IP Contact Center Desktop User’s Guide
Page 41

3Com IPCC Desktop Components
Shutters is divided into two sections: the Quick Launch section and the
Open Applications section.
■ The Quick Launch section of Shutters contains icons that represent
third-party applications managed by the 3Com IPCC Desktop; for
example, your CRM.
■ The Open Applications section of Shutters displays an icon for each
managed application (internal and third-party) that is currently
running on your computer. You can use the icons in this section to
switch between application windows displayed in the 3Com IPCC
workspace, minimize an application window to Shutters, or maximize
an application window in the 3Com IPCC workspace.
Typically, when you first log on to the 3Com IPCC Desktop or you
perform a task that requires a particular application, the 3Com IPCC
Desktop automatically opens the required applications and displays the
corresponding icons in the open applications section of Shutters.
For information about opening and closing windows from Shutters and
applications not managed by Shutters, see “Managing 3Com IPCC Desktop
Windows” on page 47.
3Com IPCC Workspace
Applications managed by the 3Com IPCC Desktop appear in the
3Com IPCC workspace, which is located directly beneath the 3Com IPCC
Desktop Manager. Managed applications can include your Customer
Relationship Management (CRM) application, 3Com IPCC Web
Collaboration, 3Com IPCC Contact History Viewer, Microsoft Outlook
Express, 3Com IPCC Administrator, 3Com IPCC Real-Time Status Viewer,
and 3Com IPCC Reporter.
Note: You can open only those applications for which you have access privileges.
For example, if you are an agent who is set up to handle immediate-assistance
e-mail contacts, you can open Outlook Express by clicking the Outlook Express icon
displayed in Shutters.
3Com IP Contact Center Desktop User’s Guide 41
Page 42

Chapter 2: Working in the 3Com IPCC Desktop Environment
The size and position of the application windows that appear within the
3Com IPCC workspace are determined by the Desktop class of service
assigned to you by your 3Com IP Contact Center administrator.
Note: Your 3Com IPCC Desktop may be set to open one or more applications
outside the 3Com IPCC workspace. For information, see “Opening Applications
Outside the 3Com IPCC Workspace” on page 54.
For information about opening and closing applications and managing the
3Com IPCC workspace, see “Managing 3Com IPCC Desktop Windows” on
page 47.
User States
Any time you are logged on to the 3Com IPCC Desktop, the system assigns
you a specific user state. The status indicator in the Personal Status panel
shows you your current state.
Your current user state is
always visible in the
Personal Status panel.
The 3Com IP Contact Center system uses your user state to determine when
you are able to handle immediate-assistance contacts, when you are busy
with a contact or performing another type of activity, or when you are
simply not responding to an immediate-assistance contact that was routed
to you.
The following table describes the user states recognized by the system.
When you are
in this state... You are...
Available Ready to receive immediate-assistance contacts.
For information about the Available state, see “Notifying the System That You Are
Available” on page 76.
Coaching Providing verbal instructions and guidance to a user who is handling a voice
contact or providing written directions to a user handling a Web contact.
For information about coaching, see “Coaching an Agent” on page 243.
42 3Com IP Contact Center Desktop User’s Guide
Page 43

When you are
in this state... You are...
Connected Handling an immediate-assistance contact.
You can only handle one immediate-assistance contact at a time. Depending on
how you are set up, however, you might also receive contacts of other types such
as redirected, inbound, or internal while you are connected to an immediateassistance contact.
For information about contact types, see “Contact Types” on page 45.
Idle Logged on to the 3Com IPCC Desktop, but not available to receive
immediate-assistance contacts.
When you first log on to the 3Com IPCC Desktop, you are typically in the Idle state
and you must put yourself in the Available state before you can receive contacts.
Your 3Com IP Contact Center administrator might define Idle reasons that identify
the reason a 3Com IPCC Desktop user is not available. For example, you could be
required to specify when you are on a break, at lunch, or in a meeting. If you are a
supervisor, you should specify a special monitoring or coaching Idle state when
you are monitoring or coaching an agent or monitoring a classification.
For more information about placing yourself in the Idle state, see “Placing Yourself
in the Idle State” on page 78. For information about monitoring and coaching, see
“Supervising the Workforce” on page 229.
Logged Off Currently logged off the 3Com IPCC Desktop.
This state is displayed when the system logs you off the 3Com IPCC Desktop.
When this state is displayed, close the 3Com IPCC Desktop.
Monitoring Listening in on a voice contact or viewing a Web collaboration session.
For information about monitoring, see “Monitoring Agents and Classifications” on
page 234.
Not
Responding
Failing to accept an immediate-assistance contact that was routed to you.
This condition could occur when you leave your computer without placing yourself
in an Idle state. When you do not respond to an immediate- assistance contact,
your state changes to Not Responding and you cannot receive another contact
until you place yourself back into the Available state.
To highlight the error condition, the Personal Status panel displays the Not
Responding status in red font.
For more information about the Not Responding state, see “Failed to respond to a
contact” on page 258.
User States
3Com IP Contact Center Desktop User’s Guide 43
Page 44

Chapter 2: Working in the 3Com IPCC Desktop Environment
When you are
in this state... You are...
Recovering Waiting for a temporary problem in the 3Com IP Contact Center system to resolve
itself.
This condition can occur in the following situations:
■ The IPCC Soft Phone, which provides voice functionality for the 3Com IPCC
Desktop, terminates unexpectedly and is in the process of restarting.
■ There is a temporary problem in the business routing logic.
■ There is a problem in the voice stream.
For information about the Recovering state, see “Handling Voice Problems” on
page 262.
Wrap Up Selecting a wrap-up code in response to a prompt after disconnecting or
transferring a contact.
Your administrator typically defines wrap-up codes to collect data that can be used
for trend analysis.
For more information about the Wrap-Up state, see “Entering and Leaving the
Wrap-Up State” on page 77. For information about entering wrap-up data, see
“Entering Wrap-Up Data” on page 91.
44 3Com IP Contact Center Desktop User’s Guide
Page 45

Contact Types and Contact Panel States
Contact Types and Contact Panel States
Any time you receive an immediate-assistance contact, make a call, initiate a
Web collaboration session, or receive a contact from or transfer a contact to
another 3Com IPCC Desktop user, the 3Com IP Contact Center system
assigns a contact type and contact panel state. This information is displayed
in the contact panel, as described in the following illustration.
This contact panel represents an e-mail contact
that was escalated to immediate assistance.
The contact type is Routed and the contact
panel state is Connected.
This contact panel represents a voice contact
between two 3Com IPCC Desktop users. The
contact is waiting to be answered by the
second party (roy). The contact type is Internal
and the contact panel state is Ringing.
Contact Types
The contact type and contact state identify the way the contact is being
routed in the 3Com IP Contact Center system and the current status of the
contact.
Topics covered in this section:
■ Contact Types
■ Contact Panel States
Each time a contact is delivered to you, the contact type is displayed in a
contact panel. The following table describes the contact types.
Note: When a routed contact is delivered to an agent, it appears in the left-most
panel of the 3Com IPCC Desktop contact panel as an immediate-assistance contact.
All other contacts appear in an available space in panels 2, 3, or 4 on the panel bar.
The panel displays the contact type.
Type Description
Callback A contact initiated by a 3Com IPCC Desktop user to a caller who
requested a return call from an agent. Also known as a callback request.
The 3Com IP Contact Center system delivers the callback request as a link
in an e-mail message. When the agent clicks the link, the customer’s
phone number is displayed in the Phone Number to Dial field in the New
Voice Call dialog box. The agent clicks the Call button and the
3Com IP Contact Center system initiates a call to the specified number.
3Com IP Contact Center Desktop User’s Guide 45
Page 46

Chapter 2: Working in the 3Com IPCC Desktop Environment
Type Description
Conference A voice or Web contact that consists of three participants. For example, a
conference can be one of the following:
■ An immediate-assistance voice contact delivered to an agent, who
conferences in a supervisor.
■ A supervisor who is monitoring an agent’s conversation with a caller
and then barges in on the call.
■ A Web collaboration session between a customer and two agents.
■ An internal call between two agents and a supervisor.
Debrief A voice conference (a caller and two 3Com IPCC Desktop users), from
which the caller disconnects. The contact converts to a Debrief contact
type during the period of time the two 3Com IPCC Desktop users remain
connected.
Inbound A voice or Web contact from an external party that is routed directly to a
3Com IPCC Desktop user. For example, a voice call from a customer to an
agent’s direct number or a Web meet-me session between a customer
and an agent.
Internal A contact between one 3Com IPCC Desktop user and another (for
example, a phone call from an agent to a supervisor) or from the
3Com IP Contact Center system to the 3Com IPCC Voice Manager to play
a voice recording or message.
Outbound A contact initiated by a 3Com IPCC Desktop user to an external party. This
is also known as an external call.
Redirected An immediate-assistance contact that is transferred from one 3Com IPCC
Desktop user to another. For example:
■ An immediate-assistance contact that is delivered to an agent, who
transfers the contact to a supervisor.
■ A voice contact that originates as a conference with three
participants—a caller and two 3Com IPCC Desktop users—from which
the primary agent disconnects.
Routed A contact that, upon arrival at the contact center, is routed based on your
organization’s business logic. For example, a routed contact can be one of
the following:
■ A contact that is handled by an announcement.
■ An immediate-assistance contact delivered to an agent.
When a routed contact is delivered to an agent, it appears in the left-most
panel of the 3Com IPCC Desktop contact panel as an immediateassistance contact.
Unrecognized A contact type assigned to a voice contact that is not recognized by the
3Com IP Contact Center system.
An unrecognized contact occurs when a caller dials a number that is
provisioned on the system but is not defined in 3Com IPCC Administrator
as either a routed contact target address or a user phone number.
46 3Com IP Contact Center Desktop User’s Guide
Page 47

Contact Panel States
Each time a contact is delivered to you, a contact panel state is displayed in
the contact panel to the right of the contact type. The following table
describes the contact panel states.
State Description
Connected A period during which a 3Com IPCC Desktop user is busy with a contact—
On Hold An interruption during a contact when one party switches to another line
Ringing A period during which a contact routed to you is waiting to be answered.
Managing 3Com IPCC Desktop Windows
except the period of time the contact is on hold.
without completely disconnecting the other party. If you click the Hold
button while you are connected to a contact or if you establish a
conference or transfer a contact, you place the contact on hold.
Note: If you are set up to automatically answer immediate-assistance
contacts, you do not see the Ringing state on a contact panel that
represents an immediate-assistance contact.
Managing 3Com IPCC Desktop Windows
Your 3Com IPCC Desktop is managed by Shutters; that is, Shutters controls
when and where certain application windows appear on your computer
screen. This window behavior enables you to focus on your current task,
rather than spending your time managing multiple windows in the
workspace. For information, see “Shutters” on page 40.
Note: Your 3Com IPCC Desktop might be set to open one or more applications
outside the 3Com IPCC workspace. For information, see “Opening Applications
Outside the 3Com IPCC Workspace” on page 54.
You can manually open and close managed windows and applications,
minimize windows to Shutters, and maximize windows to their
preconfigured size in the 3Com IPCC workspace.
Topics covered in this section:
■ Opening Application Windows from the Desktop Toolbar
■ Opening Applications from Shutters
■ Minimizing and Maximizing Application Windows
■ Opening Applications Outside the 3Com IPCC Workspace
3Com IP Contact Center Desktop User’s Guide 47
Page 48

Chapter 2: Working in the 3Com IPCC Desktop Environment
Opening Application Windows from the Desktop Toolbar
You use the 3Com IPCC Desktop toolbar to open applications managed by
the Desktop.
Note: You can open only those applications for which you have access privileges.
For example, if you are an agent who is authorized to view the history of prior
contacts, the 3Com IPCC Contact History Viewer icon is enabled on the 3Com
IPCC Desktop toolbar.
From the 3Com IPCC
Desktop toolbar, you
can open the
3Com IPCC
applications for which
you have access
privileges.
To open a 3Com IPCC application:
➤ Click the application icon on the 3Com IPCC Desktop toolbar.
Application Icon
3Com IPCC Administrator
3Com IPCC Contact History Viewer
3Com IPCC Real-Time Status Viewer
3Com IPCC Reporter
3Com IPCC Workflow Builder
The 3Com IPCC Desktop opens the application and displays the
application window in the 3Com IPCC workspace.
Note: Your 3Com IPCC Desktop may be set to open one or more applications
outside the 3Com IPCC workspace. For information, see “Opening Applications
Outside the 3Com IPCC Workspace” on page 54.
48 3Com IP Contact Center Desktop User’s Guide
Page 49

Opening Applications from Shutters
Shutters enables you to open external applications that are managed by the
Desktop, such as a third-party CRM application that is integrated with the
3Com IP Contact Center system.
From the Open
Applications section of
Shutters, you can
maximize any applications
that are already open.
Note: You can open only those applications for which you have access privileges.
For example, if you are an agent who is set up to handle immediate-assistance
e-mail, voice message, or callback contacts, the Outlook Express icon appears in
Shutters.
Managing 3Com IPCC Desktop Windows
You can open external applications
managed by the 3Com IPCC Desktop
(such as a CRM application) from the
Quick Launch section of Shutters.
To open a window for an external application managed by the 3Com IPCC
Desktop:
➤ If the application is not already open, click the application icon on the
Quick Launch section of Shutters.
or
➤ If the application is already open, but the window is minimized, click
the application icon in the Open Applications section of Shutters.
The 3Com IPCC Desktop displays the application window in the
3Com IPCC workspace.
3Com IP Contact Center Desktop User’s Guide 49
Page 50

Chapter 2: Working in the 3Com IPCC Desktop Environment
Minimizing and Maximizing Application Windows
The 3Com IPCC Desktop provides several ways to view an application
window that can vary according to your work style and preferences. For
example, you might be an agent who prefers to keep the CRM application
open to its full, preconfigured location and position in the workspace while
you are working with an immediate-assistance contact. Or, if you are a
supervisor, you might want to keep all your windows minimized to
Shutters so you can switch easily between applications.
View Description
Maximized The window height is increased to its largest possible size in the 3Com IPCC
workspace.
Note: The Maximize button on the application title bar has no effect in the
3Com IPCC workspace. For information about maximizing the window in the
3Com IPCC workspace, see “Maximizing a Window in the 3Com IPCC
Workspace” in this section.
Minimized The application is running, but the window is reduced to an icon in Shutters.
For information about minimizing the window in the 3Com IPCC workspace,
see “Minimizing a Window to Shutters” on page 52.
Topics covered in this section:
■ Maximizing a Window in the 3Com IPCC Workspace
■ Minimizing a Window to Shutters
50 3Com IP Contact Center Desktop User’s Guide
Page 51

Managing 3Com IPCC Desktop Windows
Maximizing a Window in the 3Com IPCC Workspace
You can maximize an application window so that it expands to fill the
3Com IPCC workspace as shown in the following illustration.
The 3Com IPCC
Contact History
Viewer window is
maximized in the
3Com IPCC
workspace.
To maximize an application window in the 3Com IPCC workspace:
➤ Minimize all other open application windows to Shutters. For
instructions, see “Minimizing a Window to Shutters” on page 52.
The application window expands to the largest possible size in the
3Com IPCC workspace.
Note: The application window is limited to a preconfigured size. Consequently,
you cannot make the window larger than the 3Com IPCC workspace by
minimizing the 3Com IPCC Desktop Manager.
3Com IP Contact Center Desktop User’s Guide 51
Page 52

Chapter 2: Working in the 3Com IPCC Desktop Environment
Minimizing a Window to Shutters
You can remove an application window from view but keep it running in
the background by minimizing the window to an application icon in
Shutters.
Note: If an application window is minimized, the 3Com IPCC Desktop
automatically restores the application when a task requires it. For example, if the
3Com IPCC Web Collaboration window is minimized to Shutters and an
immediate-assistance Web contact is routed to you, the window opens automatically
when the contact is connected.
To minimize an application window to Shutters:
➤ Click the Minimize button in the application title bar.
or
➤ Click the application icon in Shutters.
The application window is minimized to the lower section of Shutters and
any other application windows that shared the 3Com IPCC workspace are
maximized to the size and position preconfigured by your 3Com IP Contact
Center administrator.
Switching Between Two Application Windows
You can easily switch between two or more application windows in the
3Com IPCC workspace.
To switch between application windows:
➤ If the application window is already displayed in the 3Com IPCC
workspace, click in the window.
The focus switches to the selected application window and causes the
height of the application window to increase to a size predefined by
3Com Support personnel. This is especially useful when you need to
work in two separate application windows simultaneously; for
example, to handle a Web contact, you exchange text messages in the
3Com IPCC Web Collaboration window and enter customer
information in your CRM application window.
52 3Com IP Contact Center Desktop User’s Guide
Page 53
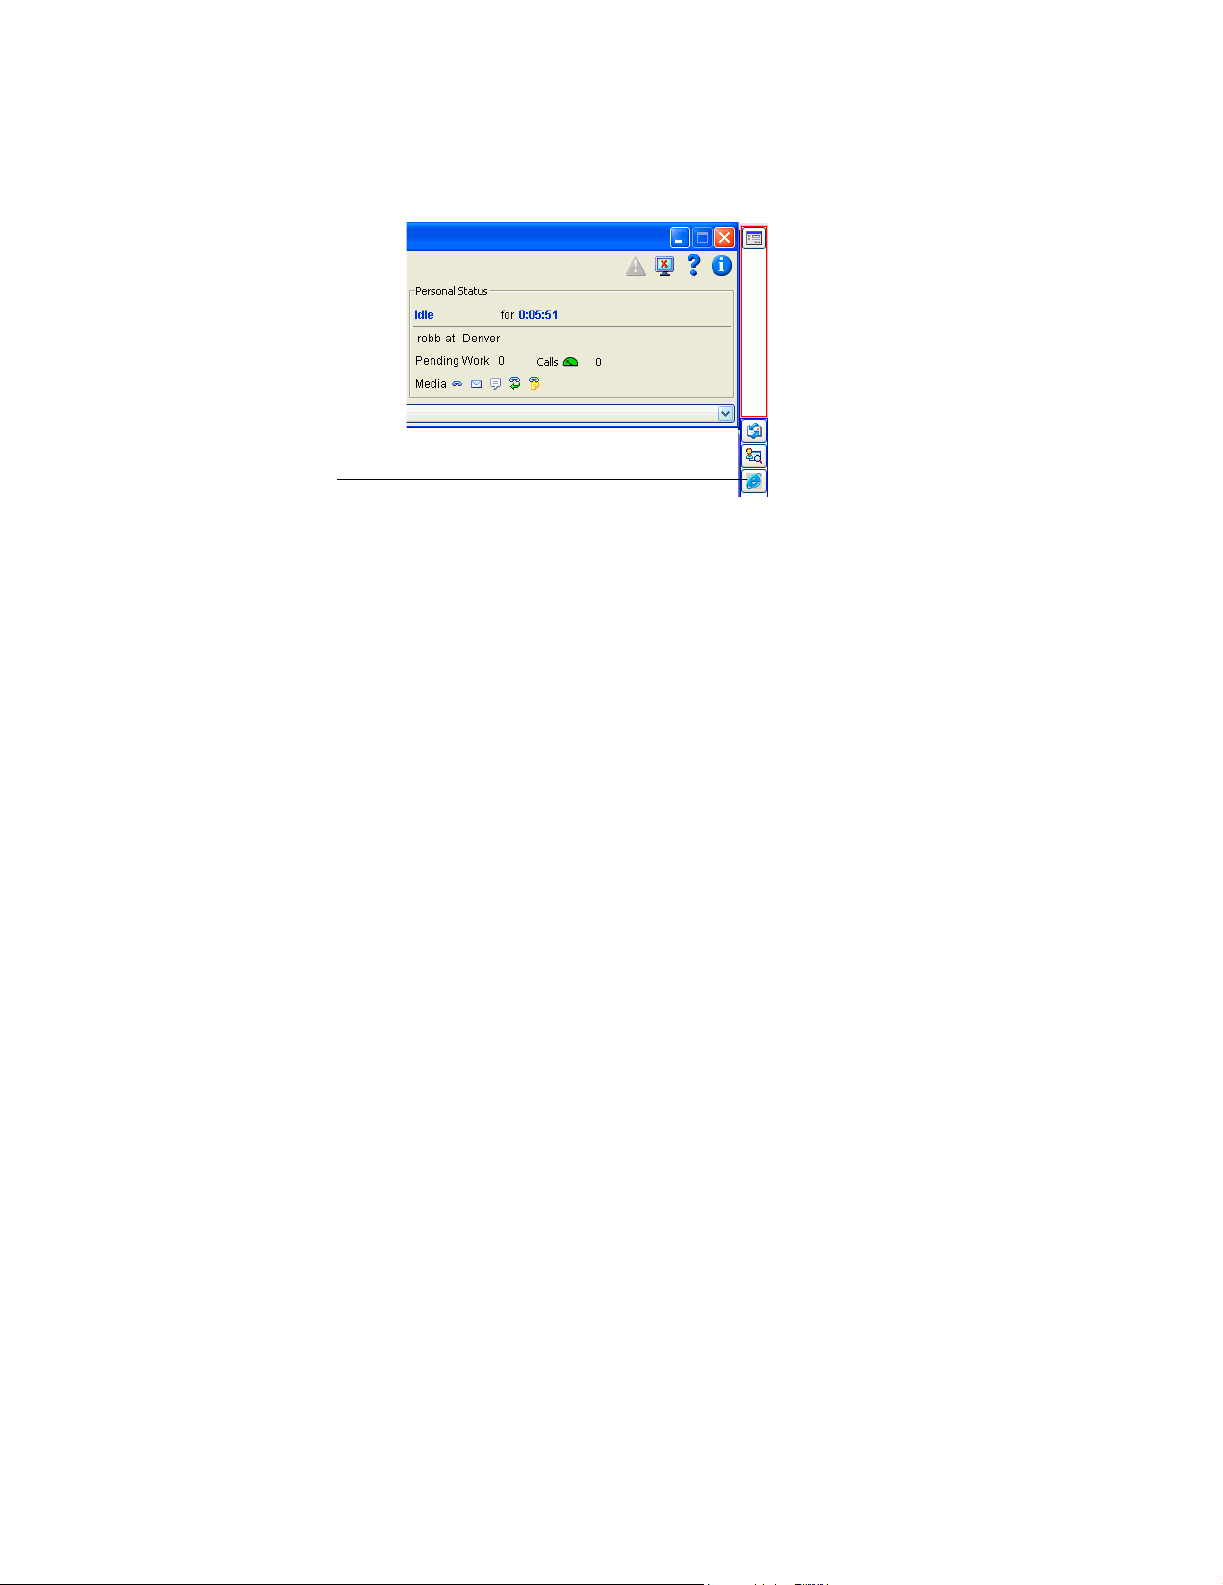
If the application icon does not
appear in the lower section of
Shutters, it is not currently
running.
In this example, Outlook
Express, 3Com IPCC
History Viewer, and
3Com IPCC Web
Collaboration are currently
running.
Contact
Managing 3Com IPCC Desktop Windows
➤
If the application is running, but the window is minimized to Shutters,
click the application icon in the lower section of Shutters.
The application window opens and the focus switches to the selected
application window.
➤ If the application is running outside the 3Com IPCC Workspace, click
the application icon in the Windows taskbar.
3Com IP Contact Center Desktop User’s Guide 53
Page 54

Chapter 2: Working in the 3Com IPCC Desktop Environment
Opening Applications Outside the 3Com IPCC Workspace
Depending on how your Desktop class of service is set up, you might be
able to open one or more application windows outside the workspace. For
example, you might be set up to open 3Com IPCC Web Collaboration
outside the 3Com IPCC workspace so that you can keep the application
window maximized on your Microsoft Windows desktop while you handle
incoming Web contacts, as shown in the following illustration.
In this example, the 3Com IPCC Web Collaboration window
is open outside the 3Com IPCC workspace...
...and the third-party CRM application window is
maximized in the 3Com IPCC workspace.
This window behavior is especially useful if the 3Com IPCC workspace
does not accommodate the content in the application window.
54 3Com IP Contact Center Desktop User’s Guide
Page 55

Managing 3Com IPCC Desktop Windows
To open an application window:
➤ Click the application icon in Shutters.
The application window appears outside the 3Com IPCC workspace on
the Windows desktop.
You manipulate the application window just as you would any other
standard window in the Windows environment. For example, you can
resize the window by dragging the borders, and you can use the Maximize
button to expand the window to fill all the space on the Windows desktop
and the Minimize button to reduce the window to an icon on the Windows
taskbar. For information about managing application windows on the
Windows desktop, refer to your Microsoft Windows documentation or
online Help.
If your Desktop class of service is set up so that none of the applications is
managed by the Desktop, Shutters is not displayed. You can move the
application windows to different positions on the Windows desktop, and
you can resize them as necessary.
To open an application window when none of the applications is managed
by the Desktop:
➤ Click the application icon on the Windows taskbar.
Closing Applications Managed by the 3Com IPCC Desktop
You can close certain applications managed by the 3Com IPCC Desktop.
Note 1: Depending on how you are set up, you may be required to keep certain
applications running during your 3Com IPCC Desktop session. For example, if you
handle Web contacts, you can minimize the 3Com IPCC Web Collaboration
window to Shutters, but you might not be able to close the application.
Note 2: Logging off the 3Com IPCC Desktop closes most open applications. For
information about logging off, see “Logging Off the 3Com IPCC Desktop” on
page 73.
To close an application:
➤ From the File menu in the application window, select Close or Exit,
(depending on the application).
or
➤ Click the Close button on the application title bar.
3Com IP Contact Center Desktop User’s Guide 55
Page 56

Chapter 2: Working in the 3Com IPCC Desktop Environment
Viewing Your Personal Information
You can view information about your personal status and statistics in two
areas of the 3Com IPCC Desktop. These areas are described in the following
sections:
■ Viewing the Personal Status Panel
■ Viewing the My Statistics Tab
Viewing the Personal Status Panel
The Personal Status panel provides real-time data about your current user
state, pending e-mail messages, contacts in queue, and your
3Com IP Contact Center setup.
User state
Logon name
Number of e-mail
messages in your
Pending Work folder
Length of time in the current state
Node you are connected to
Calls waiting indicator
Media type
Note: To view detailed information about your user state and contact handling
statistics, see “Viewing the My Statistics Tab” on page 58.
The fields in the Personal Status panel are described in the following table.
Field Description
User state and
length of time
Logon name and
node
Your current user state and how long you have been in that state. For
example, if you have been busy on a call for 22 minutes and 42 seconds,
this field displays:
State: Connected for: 22:42
For information about user states, see “User States” on page 42.
Your 3Com IPCC Desktop logon name and the node to which you are logged
on. Your logon name also appears in the recipient’s contact panel when you
make an internal call and in the address book for internal phone calls, e-mail
messages, and Web collaboration sessions.
56 3Com IP Contact Center Desktop User’s Guide
Page 57

Viewing Your Personal Information
Field Description
Pending Work The number of e-mail, voice message, and callback contacts in your Pending
folder.
The value in the Pending Work field changes when you do one of the
following:
■ Claim a message from a shared classification folder (or another e-mail
folder) to your Pending folder.
■ Receive an immediate-assistance e-mail contact that you want to
respond to later, so you click the Close button in the contact panel to
move the message to your Pending folder.
■ Respond to an immediate-assistance voice message or callback contact.
When you click the Close button in the contact panel that represents the
contact, you move the message to your Pending folder.
■ Delete one or more messages from the Pending folder.
Note: If a message in your Pending folder is part of an e-mail thread, the
Pending Work field increments by the total number of messages in the
thread. This count includes the original message and up to the maximum of
five messages in the e-mail message thread.
For information about claiming a message, see “Claiming a Message” on
page 145.
Calls The calls waiting indicator icon enables you to assess the level of voice
contacts waiting in queue. The number to the right of the icon indicates the
total number of voice contacts in your worst performing classification.
The calls waiting indicator icon is displayed in the Personal Status panel of
users whose role includes the Common feature set with the Display Calls
Waiting Indicator setting enabled.
When you log on to the 3Com IPCC Desktop, the icon is green. When the
level of calls waiting increases, the color of the icon changes from green to
yellow, then from yellow to red. If you take voice contacts from more than
one classification, the icon changes color when the calls waiting threshold
for one of the classifications is triggered.
Your 3Com IP Contact Center administrator defines the threshold levels that
determine the change in color.
3Com IP Contact Center Desktop User’s Guide 57
Page 58

Chapter 2: Working in the 3Com IPCC Desktop Environment
Field Description
Media The media types you are set up to handle: Voice , E-mail , Web ,
Callback , and Voice Message .
The icons also show whether or not the application required by the media
type is currently running. If the icon contains a red x, the application is not
running. For example, if you handle e-mail, callback, and voice message
contacts, Outlook Express must be running on your computer before you
can receive or claim an e-mail, callback or voice message contact. If Outlook
Express is not running or has not completed its startup process, the
following icons appear in the Personal Status panel: E-mail , Callback ,
and Voice Message .
The tooltips for the media-type icons display giving the status of the
applications they represent. When the voice application is connected, the
tooltip for the voice media icon also includes the phone number of the
phone you are using, if you are using an external or alternate phone. If you
are using the IPCC Soft Phone, it says “Connected to IPCC Soft Phone.”
For more information about media types, see “Media Types” on page 28. For
information about handling voice, e-mail, or Web collaboration problems,
see “Troubleshooting” on page 257.
Viewing the My Statistics Tab
You can view your personal user state and contact-handling statistics on the
My Statistics tab in 3Com IPCC Real-Time Status Viewer. You can also view
aggregate contact-handling statistics for all agents in each of the
classifications in your classification set.
Access to the My Statistics tab is available to users with the “Enable agent
personal statistics” class of service setting enabled in their Contact Handling
feature set.
To access the My Statistics tab:
➤ Click the button on the 3Com IPCC Desktop toolbar.
The 3Com IPCC Real-Time Status Viewer window appears in the
3Com IPCC workspace.
The My Statistics tab has only one view, Personal Stats, as shown in the
following illustration. This illustration shows only the My Statistics tab, the
only tab displayed to default agents in 3Com IPCC Real-Time Status Viewer.
58 3Com IP Contact Center Desktop User’s Guide
Page 59

Viewing Your Personal Information
Note the following:
■ The data displayed on the My Statistics tab is typically updated every
five seconds.
■ Tables on the My Statistics tab display statistics for the time zone of the
local node (the node onto which the user is logged).
The Personal Stats view displays summarized data in the tables that are
described in the following sections:
■ User State Statistics Table
■ Contact Handling Statistics Table
■ Classification Statistics Table
User State Statistics Table
The rows in the User State Statistics table provide user-state statistics for the
logged-on user. They are described in the following table.
Row Description
Time Idle The total amount of time (in HH:MM:SS format) the agent was in
the Idle state since the agent logged on to the 3Com IPCC
Desktop.
Time Not Responding The total amount of time (in HH:MM:SS format) the agent was in
the Not Responding state since the agent logged on to the 3Com
IPCC Desktop.
Node Logged On To The node to which the agent is logged.
Time Logged On The total amount of time (in HH:MM:SS format) the agent has
been logged on to the 3Com IPCC Desktop.
3Com IP Contact Center Desktop User’s Guide 59
Page 60

Chapter 2: Working in the 3Com IPCC Desktop Environment
Row Description
Time Connected The total amount of time (in HH:MM:SS format) the agent was in
the Connected state since the agent logged on to the 3Com IPCC
Desktop.
Time Available The total amount of time (in HH:MM:SS format) the agent was in
the Available state since the agent logged on to the 3Com IPCC
Desktop.
Contact Handling Statistics Table
The rows in the Contact Handling Statistics table provide immediateassistance and deferred-assistance contact-handling statistics for the loggedon user. They are described in the following table.
Note: In this table, “handled” means the contact was routed or transferred to the
agent and answered.
Row Description
Callback Requests
Handled
Voice Message Contacts
Handled
Web Contacts Handled The number of Web contacts handled by the agent since the
E-mail Contacts Handled The number of e-mail contacts handled by the agent since the
Voice Contacts Handled The number of voice contacts handled by the agent since the
The number of callback requests handled by the agent since
the agent logged on to the 3Com IPCC Desktop.
The number of voice message contacts handled by the agent
since the agent logged on to the 3Com IPCC Desktop.
agent logged on to the 3Com IPCC Desktop.
agent logged on to the 3Com IPCC Desktop.
agent logged on to the 3Com IPCC Desktop.
Classification Statistics Table
The Classifications table displays data from across all nodes. This data
includes the following:
■ Data for each of the classifications in the Contact classification set
defined in 3Com IPCC Administrator for the logged-on agent
■ Data for all agents for each media type (voice, Web, e-mail, voice
message, and callback) for each of the displayed classifications
■ Data for immediate-assistance contacts
60 3Com IP Contact Center Desktop User’s Guide
Page 61

Viewing Bulletins
The columns in the Classifications table are described in the following table.
Column Description
Handled The number of contacts that were handled by all agents with the
corresponding classification and media type.
This value is the total number of contacts handled since midnight
(based on the time of the node to which the agent is logged on).
Note: In this context, “handled” means the contact was routed or
transferred to the agent and answered.
Abandoned The number of voice and Web contacts that were disconnected by
callers before reaching all agents with the corresponding classification
and media type.
Note the following:
■ E-mail, callback, and voice message contacts cannot be abandoned
and, consequently, do not have any affect on the value in this view.
■ This value is based on data collected since midnight (based on the
time of the node to which the agent is logged on).
Queue The number of contacts that are currently in queue for all agents with
the corresponding classification and media type.
Longest The amount of time (in HH:MM:SS format) that the handled contact
who has waited the longest in queue has had to wait for an agent.
Note: In this context, “handled” means the contact was routed or
transferred to the agent and answered.
Viewing Bulletins
All users can receive bulletins in the bulletin bar.
The bulletin bar displays bulletins that are sent by authorized users to all
3Com IPCC Desktop users or to specific groups of users—such as all
administrators, all supervisors, or members of specific teams. It also
displays system alarms and emergency notifications to authorized users.
(For information about system alarms and emergency notifications, see
“Monitoring System Alarms and Emergency Notifications” on page 252.)
If the bulletin bar has only one section, it displays only the bulletins sent by
authorized users. These bulletins could include messages such as brief
instructions for a specific team or meeting notifications for all users. For
information about which users can send bulletins, see “Sending Bulletins”
on page 230.
Bulletins sent to all users are immediately delivered to all logged-on users.
They are delivered to logged-off users when they log on to the 3Com IPCC
3Com IP Contact Center Desktop User’s Guide 61
Page 62

Chapter 2: Working in the 3Com IPCC Desktop Environment
Desktop. Bulletins sent to specific groups of users (such as all
administrators or members of a specified team) are delivered only to
logged-on users.
The following illustration shows an example of a bulletin bar as viewed by
an agent whose role includes the Contact Handling feature set.
Bulletins from authorized users appear
on the bulletin bar.
The bulletin bar displays the most recently issued bulletin and provides
access to a list of older bulletins.
To view the list of bulletins:
➤ Click the arrow on the bulletin bar.
The 3Com IPCC Desktop saves approximately ten bulletins in the bulletin
list, with the most recent message appearing in the bar.
Bulletins that are sent to all users remain in the bulletin list until the list is
full, at which time the oldest bulletin is deleted. Bulletins sent to specific
users or groups of users remain in your bulletin list until you log off the
3Com IPCC Desktop or the list is filled, whichever comes first.
For users with the appropriate access privileges (typically administrators
and supervisors), the bulletin bar is separated into two sections—the left
section displays system alarms and emergency notifications and the right
section displays bulletins.
Click on this arrow to view the bulletin list.
System alarms and emergency
notifications appear on the left
side of the bulletin bar...
62 3Com IP Contact Center Desktop User’s Guide
...and bulletins appear on the
right side of the bulletin bar.
Page 63

For information about viewing emergency notifications and alarms, see
“Monitoring System Alarms and Emergency Notifications” on page 252. For
instructions for sending a bulletin, see “Sending Bulletins” on page 230.
Resizing the Bulletin Bar
If the entire message cannot be displayed in the available space on the
bulletin bar, the message is truncated and followed by an ellipsis (...)
indicating missing text.
If your access privileges enable you to view both alarms and bulletins, the
bulletin bar is split into two sections—one for the alarms and the other for
bulletins. If necessary, you can resize the bulletin bar to view more text.
To resize the bulletin bar:
1. Rest the cursor on the border between the alarms and the bulletins until
an arrow appears.
Getting Help
Drag the border line to the left
to display more of the text.
Getting Help
2. Drag the border to the left until the entire message is displayed or you
reach the edge of the 3Com IPCC Desktop Manager window.
When you work with the 3Com IPCC Desktop, you can access the online
Help at any time by clicking a Help button.
Topics included in this section:
■ Accessing Help for the 3Com IPCC Desktop
■ Using the Controls in the Help Window
■ Finding a Help Topic
■ Resizing the Help Navigation Frame
■ Printing a Help Topic
■ Troubleshooting Online Help Access Problems
3Com IP Contact Center Desktop User’s Guide 63
Page 64

Chapter 2: Working in the 3Com IPCC Desktop Environment
Accessing Help for the 3Com IPCC Desktop
You can easily access online Help for the 3Com IPCC Desktop by clicking
the Help button on the 3Com IPCC Desktop toolbar. You can also access
Help from all of the 3Com IPCC Desktop dialog boxes.
Note: If the online Help does not appear after you have followed the instructions in
this section, see “Troubleshooting Online Help Access Problems” on page 69.
A Help button is available on the 3Com IPCC Desktop toolbar and in
every dialog box accessible from the 3Com IPCC Desktop Manager.
Using the Controls in the Help Window
Online Help for the 3Com IPCC Desktop Manager is displayed in two ways:
■ In the frameset view, when you click the Help button on the 3Com
IPCC Desktop window.
■ In the topic-only view, when you click Help in a dialog box, context-
sensitive Help (Help specific to the dialog box you are viewing).
Topics covered in this section:
■ Topic-Only View
■ Frameset View
64 3Com IP Contact Center Desktop User’s Guide
Page 65

Getting Help
Topic-Only View
When you click Help in a dialog box or window managed by the 3Com
IPCC Desktop, a relevant Help topic is displayed in the topic-only view, as
shown in the following illustration. To switch to the frameset view, click the
Show Navigation button.
Show
Navigation
Navigation
path
Related
To pi c s
Related TopicsNextPrevious
Print
The following table describes the components of the topic-only view.
Component Description
Show Navigation button. Displays the navigation frame. This frame
provides access to the Contents, Index, and Search tabs.
Previous button. Displays the previous sequential topic in the Help system.
Note: Use your browser’s Back button, not the Previous button, to display a
topic that you previously viewed.
Next button. Displays the next sequential topic in the Help system.
Related Topics button. Displays a list of related topics. Click a topic name
on the list to display it in the Help window.
Print button. Prints the current topic.
Navigation path. Shows you the context of the current topic relative to its
parent topic. Click the underlined topic name to display it.
3Com IP Contact Center Desktop User’s Guide 65
Page 66

Chapter 2: Working in the 3Com IPCC Desktop Environment
Frameset View
When you click the Help button in the 3Com IPCC Desktop Manager
window, Help, similar to the example shown in the following illustration, is
displayed in the frameset view.
Navigation
tabs
Show in Contents button
Navigation frame Topic frame
Previous
Next
In the frameset view, the navigation frame appears on the left side of the
window and the Help topic frame appears on the right side of the window.
When you first display the Help window, the Contents tab appears; this is
analogous to the table of contents in a printed book.
The following table describes the components of the frameset view.
Component Description
Navigation tabs Click a tab to display one of three navigation aids in the Help
window’s navigation frame: the Contents, Index, or Search tab.
Show in Contents button. Highlights the entry on the Contents tab
that corresponds to the currently displayed topic.
Previous button. Displays the previous sequential topic in the Help
system.
Note: Use your browser’s Back button, not the Previous button, to
display a topic that you previously viewed.
Next button. Displays the next sequential topic in the Help system.
Navigation frame Displays the contents of the Contents, Index, or Search tab.
Topic frame Displays the current topic.
66 3Com IP Contact Center Desktop User’s Guide
Page 67

Finding a Help Topic
You can find online Help topics by using the tabs on the navigation frame:
1. If the navigation frame is not already displayed, click the
Show Navigation button.
Click here to display
the navigation frame.
2. Use the controls on the Contents, Index, and Search tabs to find a topic.
Getting Help
Navigation tabs
Click a closed book to
open it and view a list
of subtopics.
Click an open book
to close it and hide
the subtopics.
When you select a subtopic from the navigation frame on the left,
the topic is displayed in the topic pane on the right.
3Com IP Contact Center Desktop User’s Guide 67
Page 68

Chapter 2: Working in the 3Com IPCC Desktop Environment
The following table describes the navigation tabs.
Tab Action
Contents Click a closed book to display a list of subtopics. Click an open book to
hide the list of subtopics. Click the title next to a book or page icon to
display the corresponding topic.
Index Scroll the list to find an index entry or click a link at the top of the Index
tab to display a different set of index entries. For example, click B to
display the index entries that begin with the letter b. Then click an index
entry to display the corresponding topic.
If more than one topic corresponds to the index entry, a list of topics is
displayed. Click the one you want to view.
Search Type a word or phrase in the text box, and then press ENTER or click Go.
The Search tab displays a list of all topics that contain the word or phrase
you entered, along with a relevancy ranking (a number between 1 and
100). Click the name of the topic you want to view.
When you enter more than one word, the search finds topics that
contain all the words you entered.
Resizing the Help Navigation Frame
To resize the navigation frame:
➤ Drag the vertical line that separates the navigation frame from the topic
frame.
When the cursor changes to a double-headed arrow, press and hold the mouse
button, then drag the vertical line to the right or left to resize the frames.
68 3Com IP Contact Center Desktop User’s Guide
Page 69

Printing a Help Topic
To print the current online Help topic:
1. Click the Print button.
2. In the Print dialog box, select the appropriate settings, and then click
Print.
Getting Help
Click here to print the active Help topic.
Troubleshooting Online Help Access Problems
A Microsoft Internet Explorer 6.0 security feature and the Google Popup
Blocker might prevent the 3Com IP Contact Center online Help from being
displayed.
When one or both of these security features are enabled, the online Help for
the 3Com IP Contact Center applications might not appear when you click a
Help icon or button. One of the following situations might occur:
■ A security message, as shown in the following illustration, is displayed
in the Internet Explorer Information Bar.
If this occurs, click the message, and then follow the prompts to display
the active content (the online Help).
If the online Help is still not displayed, press and hold the CTRL key
while you click the message and the subsequent prompts. Release the
CTRL key when the online Help is displayed.
■ The Help window does not display at all or flashes briefly on the screen
and then disappears. This typically occurs when the Google Popup
Blocker is enabled.
3Com IP Contact Center Desktop User’s Guide 69
Page 70

Chapter 2: Working in the 3Com IPCC Desktop Environment
To display the online Help, press and hold the CTRL key while you
click the Help icon or button. Release the CTRL key when the online
Help is displayed.
If the online Help does not appear after you have followed the instructions
in this section, do the following:
1. From the Microsoft Internet Explorer Tools menu, select Internet
Options.
2. Select the Advanced tab.
3. In the Browsing directory, make sure the Reuse windows for
launching shortcuts check box is cleared.
Changing Your 3Com IPCC Desktop Logon Password
For security purposes, you should change your logon password to one that
is unique and easy to remember.
To change your password:
1. If you are logged on to the 3Com IPCC Desktop, log off. For
instructions, see “Logging Off the 3Com IPCC Desktop” on page 73.
2. Double-click the 3Com IPCC Desktop icon to display the Logon
page.
3. Click the Change Password button.
4. Type your current password in the Current Password field.
5. Type a new password in the New Password field.
The only password restriction imposed by the 3Com IP Contact Center
system is that you cannot use more than 100 characters. For security,
however, 3Com recommends that you follow these guidelines when
you choose your password:
■ Use only uppercase or lowercase letters (A-Z, a-z), numbers (0-9),
and underscores (_).
■ Use a minimum of six and a maximum of twelve characters.
■ Do not use your logon name as a password.
70 3Com IP Contact Center Desktop User’s Guide
Page 71

Understanding Remote Access Codes
6. Verify the new password by typing it in the Confirm New Password
field.
7. Click OK to save your new password.
To close the window without saving your changes, click the Cancel
button.
Understanding Remote Access Codes
You are required to have a remote access code under the following
circumstances:
■ If you are using a phone other than the IPCC Soft Phone to access the
3Com IPCC Desktop, when you log on to the system, you are asked to
enter your remote access code to authenticate the phone at which you
will receive calls.
■ If your system is configured to allow you to access your voice messages
from a remote location, you are asked to enter your remote access code
when you access the voice message system.
You use the same code for both applications.
If you do not know your remote access code, request it from your
3Com IP Contact Center system administrator.
You can change your remote access code only if your system is configured
to allow remote access to voice messages and your remote voice message
access is set up to allow a user to change the access code while accessing the
application. For more information about remote voice message access, see
“Listening to Voice Messages from a Remote Location” on page 123.
3Com IP Contact Center Desktop User’s Guide 71
Page 72

Chapter 2: Working in the 3Com IPCC Desktop Environment
Using a Phone Other Than the IPCC Soft Phone
Unless specifically noted otherwise, all instructions in this guide apply
to both users who use the IPCC Soft Phone and to users who use a phone
other than the IPCC Soft Phone (also called an alternative phone device or
IPCC Phone Set).
If you use a phone other than the IPCC Soft Phone, be aware of the
following:
■ When you log on to the 3Com IPCC Desktop, the system asks you for
your remote access code so it can authenticate the phone at which you
will receive calls.
■ When your phone rings, answer it following the instructions in
“Answering a Call” on page 96.
■ If you hang up the phone while handling a contact, the contact panel
state changes to On Hold and your phone rings. When you answer the
phone, you are immediately connected back to the contact.
■ If your system is configured to “immediately reconnect,” your phone
will ring whenever you hang up the receiver or go on-hook, even if you
are not receiving or handling a contact. With this configuration, you
should leave your phone off-hook while you are logged on to the 3Com
IPCC Desktop.
■ To disconnect a contact, follow the instructions in “Disconnecting a
Call” on page 106.
■ The Phone Controls that adjust the volume on your headset’s
microphone and speaker and set the 3Com IPCC Desktop to play an
incoming call ring on an alternate speaker work only for
IPCC Soft Phone users.
72 3Com IP Contact Center Desktop User’s Guide
Page 73

Logging Off the 3Com IPCC Desktop
Before you log off the 3Com IPCC Desktop, be sure to complete any contacts
routed to you.
To log off the 3Com IPCC Desktop:
➤ Click the Log Off button on the 3Com IPCC Desktop toolbar.
or
➤ From the Change State menu on the 3Com IPCC Desktop toolbar, select
Log Off.
Logging Off the 3Com IPCC Desktop
Click Log Off to log off the
3Com IPCC Desktop.
While the 3Com IPCC Desktop is shutting down, log files are copied to a
central location and a message is displayed that tells you to wait while the
3Com IPCC Desktop shuts down. This could take several minutes.
When shutdown is complete, the message disappears, most applications
and the 3Com IPCC Desktop are closed, and you are logged off the system.
Note: Some applications, such as 3Com IPCC Workflow Builder or 3Com IPCC
Reporter, might remain open after the 3Com IPCC Desktop is closed. To close
3Com IPCC Workflow Builder, click the Close button. To close 3Com IPCC
Reporter, first log off the application, then click the Close button.
3Com IP Contact Center Desktop User’s Guide 73
Page 74

Chapter 2: Working in the 3Com IPCC Desktop Environment
74 3Com IP Contact Center Desktop User’s Guide
Page 75

CHAPTER 3
Handling Immediate-Assistance
Contacts 3
When you are in the Available state, immediate-assistance contacts are
routed to you according to your contact center business logic. When a
phone call or a Web collaboration request arrives or a deferred-assistance
contact is escalated, the contact is routed to an available agent who has the
appropriate class of service settings in a specified classification.
This chapter describes general tasks you perform when you handle
immediate-assistance contacts. For tasks and procedures that are specific to
a particular media type—such as voice, e-mail, Web, voice message, or
callback—refer to the appropriate chapter in this guide.
Topics covered in this chapter:
■ Changing User States
■ Receiving Immediate-Assistance Contacts
■ Consulting a Supervisor
■ Being Monitored or Coached by a Supervisor
■ Requesting Emergency Assistance
■ Entering Wrap-Up Data
■ Disconnecting a Contact
3Com IP Contact Center Desktop User’s Guide 75
Page 76

Chapter 3: Handling Immediate-Assistance Contacts
Changing User States
Topics covered in this section:
■ Notifying the System That You Are Available
■ Entering and Leaving the Wrap-Up State
■ Placing Yourself in the Idle State
Notifying the System That You Are Available
Typically, when you first log on to the 3Com IPCC Desktop, you are
automatically placed in the Idle state. While in the Idle state, you cannot
receive immediate-assistance contacts such as phone calls, Web
collaboration requests, or escalated e-mail messages. To handle
immediate-assistance contacts, you must notify the system that you are
available to handle contacts each time you log on to the 3Com IPCC
Desktop or when you finish handling a contact.
Note: If you were set up to be automatically available by your system
administrator, you are placed in the Available state, ready to receive
immediate-assistance contacts, each time you finish handling a contact.
Before you notify the system that you are available, note the following:
■ Before you place yourself in the Available state, make sure that the
3Com IPCC Desktop has completed its logon process and opened all
required applications. For example, if you are an agent who is set up to
handle immediate-assistance e-mail contacts, voice messages, or
callback requests, you must make sure that both Outlook Express and
the MUAA are started before you place yourself in the Available state.
Your Personal Status panel displays icons that represent the media
types to which you are assigned. If the application required to provide
the media functionality is not currently running, the icon is displayed
with a red x; for example, .
For information about resolving problems that might occur when the
3Com IP Contact Center system routes contacts to you and the required
applications are not running, see “Troubleshooting” on page 257.
■ If you are currently in the Not Responding state—primarily caused by
failing to accept an immediate-assistance contact that was routed to
you—you must first exit the Not Responding state before you can
return to the Available state. For information, see “Failed to respond to
a contact” on page 258.
76 3Com IP Contact Center Desktop User’s Guide
Page 77

To notify the system that you are available:
➤ From the Change State menu, select Available.
Select Available to notify the
system that you are available to
accept immediate-assistance
contacts.
While you are in the Available state, the Available option on the Change
State menu appears dimmed.
Entering and Leaving the Wrap-Up State
The Wrap-Up state is a user state in which you complete tasks related to the
contact that you either transferred to another 3Com IPCC Desktop user or
disconnected. The 3Com IP Contact Center system automatically places you
in the Wrap-Up state and prompts you to select a wrap-up code if you have
not selected a code from the Wrap Up menu while connected to the contact.
Changing User States
Tip: If you are set up to be placed in the Available state after each contact
and you have additional tasks to complete before you can accept another
contact, you might not want to enter the Wrap-Up state before entering the
Available state.
To enter the Wrap-Up state:
➤ Disconnect an immediate-assistance contact before you select a
wrap-up code.
The contact panel displays a message requesting that you select a
wrap-up code.
The contact panel displays a message prompting
you to select a wrap-up code.
The Personal Status panel displays
your current user state.
3Com IP Contact Center Desktop User’s Guide 77
Page 78

Chapter 3: Handling Immediate-Assistance Contacts
To leave the Wrap-Up state:
➤ Select a wrap-up code from the Wrap Up menu.
The 3Com IP Contact Center system places you in the Idle state or in the
Available state, depending on how you are set up. For information
about entering wrap-up data, see “Entering Wrap-Up Data” on page 91.
Placing Yourself in the Idle State
The Idle state is a user state in which you are logged on but not available to
receive immediate-assistance contacts. If you are a supervisor,
administrator, or executive who does not handle contacts, you should
remain in the Idle state.
If you are set up to be placed in the Available state after you complete a
contact, you must issue a request to go into the Idle state when you want to
temporarily stop handling contacts, such as when you need to take a break
for lunch or attend a meeting. The 3Com IP Contact Center system grants or
denies your request based on certain contact center conditions, such as the
number of contacts in the queue.
Tip: If you are set up to be placed in the Available state after you complete a
contact and you need to go into the Idle state before the next contact is
delivered, issue your request to go into the Idle state before selecting a
Wrap-Up code for the current contact. This way, your request is considered
before a new contact is delivered to you.
It is important that you remain at your computer until your request is
granted because the 3Com IP Contact Center system will continue to send
you immediate-assistance contacts while you are in the Available state.
When you issue an Idle request, you must also select a reason for being in the
Idle state. These reasons are displayed on status screens and in reports and
can provide useful information for contact center supervisors,
administrators, and managers.
If you are a supervisor planning on monitoring or coaching agents, you
must specify the appropriate reason defined for monitoring or coaching
when you enter the Idle state. Check with your 3Com IP Contact Center
administrator for information about specific guidelines you should be
aware of when you monitor or coach agents.
Topics covered in this section:
■ Issuing an Idle Request
■ Changing an Idle Reason
78 3Com IP Contact Center Desktop User’s Guide
Page 79

From the Change State
menu, select Idle, and
then select a reason.
Changing User States
Issuing an Idle Request
To issue an Idle request:
➤ From the Change State menu, select Idle, and then select a reason.
If your request is granted, the reason you selected appears in the
Personal Status panel. If your request is denied, a message appears
indicating that the request was denied, and you can try again later.
The updated Idle reason
is displayed in the
Personal Status panel.
Changing an Idle Reason
When the reason you are in the Idle state changes—for example, you return
from lunch and need to attend a meeting—change the Idle reason on your
3Com IPCC Desktop to ensure that contact center reports and status views
are accurate.
To change the Idle reason on your 3Com IPCC Desktop:
➤ From the Change State menu, select Idle, and then select another
reason from the list.
The new reason is displayed in the Personal Status panel.
3Com IP Contact Center Desktop User’s Guide 79
Page 80

Chapter 3: Handling Immediate-Assistance Contacts
Receiving Immediate-Assistance Contacts
All immediate-assistance contacts routed to you appear in the left-most
position in the contact panel. To receive immediate-assistance contacts, you
must be in the Available state and not busy with another transaction that
prevents you from receiving immediate-assistance contacts.
The remaining panels of the contact panel are reserved for outbound calls,
calls and contacts routed specifically to your extension, and calls and
contacts sent to and from other agents or supervisors.
Topics covered in this section:
■ Contact Panel Components
■ When a Contact Is Routed to You
■ Accepting an Immediate-Assistance Contact
■ Handling a Redirected Contact
Contact Panel Components
The information that appears on the contact panel when a contact is
presented or connected is determined by the contact type and your
company business logic. For example,
■ If the contact is an internal voice call, the contact panel shows the media
type, the contact type, the contact panel state, the logon name of the
caller, and the timer.
■ If the contact is an immediate-assistance voice contact, the contact panel
also includes any contact data (customer-entered data and the
classification to which is was routed) and a Wrap Up menu.
The following illustration shows an immediate-assistance voice contact on
an agent’s contact panel.
Media type
Contact type
From or To
Timer
Contact panel state
Customer data (if any)
Classification
Wrap Up button
80 3Com IP Contact Center Desktop User’s Guide
Page 81

Receiving Immediate-Assistance Contacts
Each panel displays the information shown in the previous illustration and
described in the following table, if applicable to the contact type. For
example, the contact panel that represents an immediate-assistance contact
typically displays the media type, the contact type, the contact panel state,
customer data, and classification; however, a contact panel that represents
an internal contact displays only the media type, contact type, and contact
panel state.
Component Description
Media type Voice , E-mail , Web , Callback , or Voice Message .
For information about media types, see “Media Types” on page 28.
Timer The total amount of time the contact has been connected and on
hold.
Contact type Routed, Inbound, Outbound, Redirected, Callback, Internal,
Conference, Debrief, or Unrecognized.
For information about contact types, see “Contact Types” on page 45.
Contact panel state Ringing, Connected, or On Hold.
For information about contact states, see “Contact Panel States” on
page 47.
From or To The name, number, e-mail address, or Web address that identifies
the origin of the caller or the destination of the call. For example, if
you are calling another 3Com IPCC Desktop user, the following is
displayed in the contact panel: To: Logon Name
Classification The name of the classification to which the contact is routed; for
example, Sales or Customer Support.
Note: The classification is displayed only for immediate-assistance
(routed) contacts.
Customer data Data entered by the customer or the 3Com IP Contact Center
system, such as an account or membership number.
Note: Customer data is displayed only for immediate-assistance
(routed) and redirected contacts.
Wrap Up menu A button that enables you to select a wrap-up code while the contact
is connected or after the contact is disconnected and you are in the
Wrap-Up state. For information about entering wrap-up data, see
“Entering Wrap-Up Data” on page 91.
3Com IP Contact Center Desktop User’s Guide 81
Page 82

Chapter 3: Handling Immediate-Assistance Contacts
When a Contact Is Routed to You
When an immediate-assistance contact is routed to you, it appears in the
left-most contact panel on the panel bar, as shown in the following
illustration.
Contacts routed to you
appear in Panel 1 (the
left-most panel) of the
contact panel bar.
The way the contact is presented on the contact panel depends on whether
you are set up to manually answer contacts or automatically answer
contacts that are routed to you.
Media
Topics covered in this section:
■ Manual Answer
■ Automatic Answer
Manual Answer
If you are set up to manually answer contacts that are routed to you, the
3Com IPCC Desktop Manager looks similar to the following illustration.
User state (Available)
Countdown timer Contact panel state (Ringing)Contact data
The following occurs when a contact arrives:
1. If you are set up to use a phone other than the IPCC Soft Phone and
your phone is on-hook, the phone rings. When you answer the phone,
the contact is displayed in the contact panel.
2. The background of the contact panel changes color.
82 3Com IP Contact Center Desktop User’s Guide
Page 83

Receiving Immediate-Assistance Contacts
3. The contact panel displays the following:
■ An icon that represents the media type (voice , Web , e-mail ,
callback , or voice message ).
■ A countdown timer, which indicates the amount of time you have
to accept the contact before it is placed back in the queue.
■ The current contact panel state (Ringing).
■ Information about the contact, which can include its classification,
origin (caller’s phone number, sender’s e-mail address, or Web
address), and an account number or customer ID that the caller
entered in response to instructions.
4. You remain in the Available state, as indicated in the Personal Status
panel, until you take an action.
For instructions for answering a voice call when you are set to manually
answer your calls, see “Manually Answering a Call” on page 97.
Media
Automatic Answer
If you are set up to automatically answer contacts that are routed to you, the
3Com IPCC Desktop Manager looks similar to the following illustration.
User state (Connected)Timer
Wrap Up menu
The following occurs when a contact arrives:
1. If you are set up to use a phone other than the IPCC Soft Phone and
your phone is on-hook, the phone rings. When you answer the phone,
the contact is displayed in the contact panel.
2. The contact is connected immediately.
Contact panel state (Connected)Contact data
3Com IP Contact Center Desktop User’s Guide 83
Page 84

Chapter 3: Handling Immediate-Assistance Contacts
3. The contact panel displays the following:
■ An icon that represents the media type (voice , Web , e-mail ,
callback , or voice message ).
■ A timer that tracks the amount of time the contact has been
connected.
■ The current contact panel state (Connected).
■ Information about the contact, which can include its classification,
origin (caller’s phone number, sender’s e-mail address, or Web
address), and an account number or customer ID that the caller
entered in response to instructions.
■ A Wrap Up menu, which enables you to select a wrap-up code
during or after you handle the contact.
4. Your Personal Status panel displays the Connected state.
For instructions for answering a voice call when you are set to automatically
answer your calls, see “Automatically Answering a Call” on page 98.
Accepting an Immediate-Assistance Contact
Refer to the following sections for instructions for accepting an immediateassistance contact of the different media types:
■ For voice contacts, see “Answering a Call” on page 96.
■ For e-mail, voice message, and callback contacts, see “Accepting an
E-mail, Voice Message, or Callback Contact” on page 155.
■ For Web collaboration contacts, see “Handling Web Collaboration
Requests” on page 183.
When an immediate-assistance contact is connected, the following occurs:
■ The contact panel displays a different background color, a Wrap Up
menu, and a timer that tracks the amount of time this contact is
connected.
■ Command buttons located at the top of the 3Com IPCC Desktop are
activated. For example, if this is a voice or Web contact, the Hold,
Transfer, and Conference buttons are enabled.
84 3Com IP Contact Center Desktop User’s Guide
Page 85

■ You are placed in the Connected state, as indicated in the Personal
T
a
3
Status panel.
Your Personal Status panel
indicates your new state:
Connected.
Handling a Redirected Contact
A redirected contact is an immediate-assistance contact that is transferred
from one 3Com IPCC Desktop user to another. Redirected contacts can
include voice, Web, and e-mail messages (including those with links to voice
messages or callback requests) that are escalated to immediate assistance.
Receiving Immediate-Assistance Contacts
When transferring an immediate-assistance contact, a 3Com IPCC Desktop
user typically initiates an internal voice call or Web collaboration session
and announces the contact before completing the transfer.
To handle a redirected contact:
he panel indicates that this is
voice contact from another
Com IPCC Desktop user.
1. Accept the internal contact. For information about accepting a contact
from another 3Com IPCC Desktop user, see the following sections:
■ “Answering a Call” on page 96
■ “Accepting an E-mail, Voice Message, or Callback Contact” on
page 155
■ “Answering a Web Collaboration Request” on page 184
Because the initial contact is from another 3Com IPCC Desktop user, the
corresponding contact panel appears similar to the following
illustration.
3Com IP Contact Center Desktop User’s Guide 85
Page 86

Chapter 3: Handling Immediate-Assistance Contacts
2. If you do not want to receive immediate-assistance contacts while
connected to a redirected contact, place yourself in the Idle state. For
information, see “Placing Yourself in the Idle State” on page 78.
Note: If you remain in the Available state while you are connected to a
redirected, inbound, internal, or outbound voice contact, you must manually
answer any immediate-assistance voice contacts routed to you—even if you are
set up to automatically answer immediate-assistance contacts. For information,
see “Manually Answering a Call” on page 97.
After the 3Com IPCC Desktop user transfers the contact, the contact
panel indicates that this is a redirected contact.
The panel indicates that
this is a redirected voice
contact and displays
information about the
contact; for example, the
classification to which the
contact was routed and the
caller’s phone number.
Any data that originates with the contact is also transferred with the
contact. For example, the 3Com IP Contact Center system displays
contact information in the contact panel, opens and displays any
required application window (such as Web Collaboration, Outlook
Express, or a CRM application), and sends information that was entered
and saved in the CRM application before the contact was transferred.
3. When you are finished with the contact, click the Close button in the
contact panel that represents the contact.
The 3Com IPCC Desktop does not prompt you for a wrap-up code after
you disconnect a redirected contact. The user who initially transferred
the contact selects the wrap-up code for the contact.
4. Close the CRM application window when you disconnect the contact, if
necessary.
86 3Com IP Contact Center Desktop User’s Guide
Page 87

Consulting a Supervisor
At times you may need to contact a supervisor for a consultation or a
customer request. The address book provides quick access to a supervisor
by phone, e-mail, or Web collaboration. To make a call, initiate a Web
collaboration session, or send an e-mail message to a supervisor, you must
have an available panel on the panel bar.
For information about consulting a supervisor, see the following sections:
■ “Calling Your Supervisor” on page 111
■ “Consulting a Supervisor by E-mail” on page 164
■ “Consulting a Supervisor by Web Chat” on page 195
Consulting a Supervisor
Being Monitored or Coached by a Supervisor
With appropriate access privileges, 3Com IP Contact Center supervisors
assigned to supervise your team can do the following:
■ Listen in on your immediate-assistance voice contacts or monitor your
immediate-assistance Web contacts.
■ Provide instructions to you without the caller’s knowledge by coaching
you during an immediate-assistance voice or Web contact.
■ Barge in on the conversation or Web collaboration session.
Note: Depending on the configuration of your 3Com IP Contact Center and your
supervisor’s access privileges, your supervisor might be able to monitor your calls
and coach you while you are on a voice call of any kind—whether you received or
initiated the contact—and while you are listening to voice messages.
Topics included in this section:
■ Being Monitored by a Supervisor
■ Being Coached by a Supervisor
■ When a Supervisor Barges In on a Contact
3Com IP Contact Center Desktop User’s Guide 87
Page 88

Chapter 3: Handling Immediate-Assistance Contacts
Being Monitored by a Supervisor
You may be monitored by a supervisor as part of an agent training program
or if you have an issue with a particular caller or product. The following
table describes what happens when a supervisor monitors you while you
are handling an immediate-assistance voice contact or participating in a
Web collaboration session.
While you are
handling this
type of contact...
Voice Both the agent and the caller hear a tone that indicates that the call is
Web Neither the agent nor the caller has any indication that the supervisor
The following occurs while you are being monitored by a
supervisor...
being monitored.
Note: The tone may be disabled for the monitoring supervisor. If so,
you and the caller will not hear a tone or have any audible indication
that you are being monitored.
is monitoring the session.
The supervisor can view the ongoing Web collaboration session, but
cannot enter a message until he or she barges in on the session. For
more information, see “When a Supervisor Barges In on a Contact” on
page 89.
Being Coached by a Supervisor
You may be coached by a supervisor if you need extra assistance during an
immediate-assistance voice or Web contact. The following table describes
what happens when a supervisor coaches an immediate-assistance voice
contact and a Web collaboration session.
While you are
handling this
type of contact...
Voice The agent can hear both the
Web When the supervisor sends a
The following occurs when you are being coached by a supervisor...
If you are the agent... If you are the caller...
supervisor and the caller.
message, it appears in the agent’s
chat transcript panel.
The caller can hear only the
agent’s voice.
There is no audible indication that
the agent to whom the caller is
talking is being coached.
The caller does not see messages
in the chat transcript panel that
are sent by the supervisor.
88 3Com IP Contact Center Desktop User’s Guide
Page 89

Being Monitored or Coached by a Supervisor
When a Supervisor Barges In on a Contact
While monitoring or coaching your connection with an immediateassistance voice or Web contact, a supervisor can barge in on the
conversation or the session in progress. The contact then becomes a
conference between the caller, the agent, and the supervisor.
Note: A conference is limited to a maximum of three parties. If you are already
involved in a conference with two other parties, the supervisor cannot barge in on
the conversation or the session.
A supervisor could barge in when a problem occurs during the contact or if
the caller asks to speak to a supervisor. The following table describes what
happens when a supervisor barges in on an immediate-assistance voice
contact and a Web contact.
While you are
handling this
type of contact...
Voice The agent can hear both the caller
Web The agent can see text messages
The following occurs when a supervisor barge in...
If you are the agent... If you are the caller...
and the supervisor.
Even though the contact has
changed to a conference, the
contact type on the 3Com IPCC
Desktop contact panel remains
Routed-Connected.
in the chat transcript panel from
both the caller and the supervisor.
Even though the contact has
changed to a conference, the
contact type on the 3Com IPCC
Desktop contact panel remains
Routed-Connected.
The caller can hear both the agent
and the supervisor.
The caller can see text messages
in the chat transcript panel from
both the agent and the
supervisor.
3Com IP Contact Center Desktop User’s Guide 89
Page 90

Chapter 3: Handling Immediate-Assistance Contacts
Requesting Emergency Assistance
Your contact center should have guidelines that you follow when an
emergency situation such as a threatening phone call, e-mail message, or
Web chat occurs. Check with your supervisor for specific tasks you should
perform in case of an emergency.
To report an emergency while handling an e-mail contact, follow your
contact center guidelines.
To use the 3Com IPCC Desktop to report an emergency while you are
handling a voice or Web contact:
➤ While the voice or Web contact is connected, click the Report
Emergency button on the 3Com IPCC Desktop toolbar.
When you click the Report Emergency button, the 3Com IP Contact Center
system does the following:
1. Starts recording the conversation, if you are connected to a voice
contact.
Note: If you are connected to a Web contact, the transcript is automatically
saved, regardless of whether you click the Report Emergency button.
2. Broadcasts a message to all logged-on users whose role enables them to
receive emergency notifications. These users could include supervisors
of the team to which you belong and administrators of your 3Com IPCC
Contact Center. (For more information, see “Monitoring System Alarms
and Emergency Notifications” on page 252.)
3. Sends an e-mail message after the contact ends to the same users to
whom the emergency notification was displayed. The e-mail message
includes a link that allows the recipient to play back the recording (if
this was a voice contact) or to display the Web collaboration transcript
(if this was a Web contact).
90 3Com IP Contact Center Desktop User’s Guide
Page 91

Entering Wrap-Up Data
After handling an immediate-assistance contact, you might be required to
enter information about the contact—either by entering data in a CRM
application or by selecting a code defined by your 3Com IP Contact Center
administrator. This information, called wrap-up data, can be used by
supervisors, managers, and administrators to identify the types of calls that
come in to the 3Com IP Contact Center system or how contacts are resolved.
You can enter wrap-up data any time a contact is connected by selecting a
code from the Wrap Up menu in the contact panel. If you do not select a
code while the contact is connected, you are placed in the Wrap-Up state
and prompted to select a code after the contact is disconnected. The
3Com IP Contact Center system will not route any additional calls to you
until you re-enter the Available state.
Note: If your contact center does not use wrap-up codes, you could still be required
to enter wrap-up data in the CRM application. Ask your supervisor about any
wrap-up tasks unique to your contact center.
Entering Wrap-Up Data
To enter wrap-up data:
1. Do one of the following:
While connected to a contact, select
a code. When you disconnect from
the contact, the system places you in
either the Idle or Available state,
depending on your setup.
Select a code...
■ While the contact is still connected, select an appropriate code from
the Wrap Up menu at the bottom of the contact panel.
■ After you have disconnected the contact, select an appropriate code
from the Wra p Up menu, and then click Done.
...and then click Done.
3Com IP Contact Center Desktop User’s Guide 91
Page 92

Chapter 3: Handling Immediate-Assistance Contacts
If you have wrap-up tasks you need to perform after you end the
contact—for example, entering information in the CRM application—
select the wrap-up code after you have completed your tasks.
2. If you are set up to enter the Idle state after each contact, place yourself
in the Available state when you are ready to again receive contacts. For
more information, see “Notifying the System That You Are Available”
on page 76.
Disconnecting a Contact
To disconnect an immediate-assistance contact:
➤ Click the Close button in the contact panel or the Disconnect
button on the 3Com IPCC Desktop toolbar.
The contact is disconnected and removed from the contact panel.
Click one of these
buttons to disconnect
the contact.
Note: If the other party disconnects first, you do not need to do anything to
disconnect the contact.
Be aware of the following when disconnecting e-mail, voice message, or
callback contacts:
■ E-mail contacts
– When an e-mail contact is disconnected and you have not
responded, the message is moved to your Pending folder and the
Pending Work field in the Personal Status panel increments by one
or, if the e-mail contact is part of a thread, the total number of
messages in the thread. When an e-mail contact is in your Pending
folder, the message does not escalate to immediate assistance, so it
is important to handle the contact as quickly as possible.
92 3Com IP Contact Center Desktop User’s Guide
Page 93

Disconnecting a Contact
– When an e-mail contact is disconnected and you have responded to
the e-mail message, the contact is considered handled and is not
saved in your 3Com personal folders.
For detailed information about e-mail contacts, see Chapter 5, “Using
E-mail Features,” beginning on page 129.
■ Voice message or callback contacts
When a voice message or callback contact is disconnected, the e-mail
message that contains the voice message or callback link is moved to
your Pending folder, and the Pending Work field in the Personal Status
panel increments by one. When a voice message or callback contact is in
your Pending folder, the message does not escalate to immediate
assistance, so it is important to handle the contact a quickly as possible.
For detailed information about voice message and callback contacts, see
“About Voice Messages” on page 150 and “About Callback Requests”
on page 151.
■ Web contacts
When a Web contact is disconnected, the contact is removed from the
contact panel and the transcript in the chat panel is dimmed in the
3Com IPCC Web Collaboration window.
For information about Web contacts, see Chapter 6, “Using 3Com IPCC
Web Collaboration Features,” beginning on page 175.
Depending on how your 3Com IP Contact Center system is configured, you
might be required to enter wrap-up data at the end of each contact. For
instructions, see “Entering Wrap-Up Data” on page 91.
3Com IP Contact Center Desktop User’s Guide 93
Page 94

Chapter 3: Handling Immediate-Assistance Contacts
94 3Com IP Contact Center Desktop User’s Guide
Page 95

CHAPTER 4
Using Voice Features 4
This chapter describes features available for handling
3Com IP Contact Center voice functionality.
Topics covered in this chapter:
■ Answering a Call
■ Putting a Call on Hold
■ Transferring a Call
■ Establishing a Conference Call
■ Disconnecting a Call
■ Preventing the Other Party from Hearing You
■ Recording a Call
■ Making a Call
■ Accessing Voice Messages
■ Working with Phone Controls
3Com IP Contact Center Desktop User’s Guide 95
Page 96

Chapter 4: Using Voice Features
Answering a Call
How you accept or answer a contact that is routed to you depends on the
type of phone you are using and whether you have been set to
automatically or manually answer contacts. For instructions for answering a
voice contact—or call—see the following sections:
■ Manually Answering a Call
■ Automatically Answering a Call
When you accept a voice contact that is displayed in the left-most contact
panel, you see the following:
■ A telephone icon appears indicating that this is a voice call.
■ Information about the call appears in the contact panel, including the
contact type, contact panel state, and information about the caller, such
as the logon name (if the call is internal—between two 3Com IPCC
Desktop users) or a phone number (if the call is inbound—an external
call placed directly to your extension).
Routed calls always
appear in panel 1.
All other calls—including internal and inbound
calls—and contacts appear in panels 2 through 4
If the call is an immediate-assistance voice contact, additional information
appears in the contact panel. For information about immediate-assistance
contacts, see “Receiving Immediate-Assistance Contacts” on page 80.
Depending on the configuration of your 3Com IP Contact Center and your
supervisor’s access privileges, your supervisor might be able to monitor
your calls and coach you while you are on a voice call of any kind or
listening to a voice message. For more information, see “Being Monitored or
Coached by a Supervisor” on page 87.
For additional information about accepting immediate-assistance contacts,
see “Accepting an Immediate-Assistance Contact” on page 84.
96 3Com IP Contact Center Desktop User’s Guide
Page 97

Manually Answering a Call
If you are set up to manually answer an incoming call, a countdown timer
appears at the bottom of the contact panel when a contact arrives. This timer
indicates the amount of time you have to accept the contact before it is
placed back in the queue.
If you are using the IPCC Soft Phone:
➤ Click anywhere in the contact panel except the Close button.
You are connected to the caller.
The timer indicates the amount
of time you have before the
contact is placed back into the
queue and you are placed in the
Not Responding state.
Answering a Call
If you are using a phone other than the IPCC Soft Phone, do the following:
■ If your phone is on-hook:
a. When the phone rings, answer the phone.
The contact is displayed in the contact panel.
b. Click anywhere in the contact panel except the Close button.
You are connected to the caller.
■ If your phone is off-hook, click anywhere in the contact panel except the
Close button.
You are connected to the caller.
3Com IP Contact Center Desktop User’s Guide 97
Page 98

Chapter 4: Using Voice Features
Note the following:
Caution: If you click the Close button in the contact panel, you reject the
contact. Rejecting or ignoring an immediate-assistance contact that is routed to you
places you in the Not Responding state. When you are in the Not Responding state,
no additional immediate-assistance contacts are routed to you until you notify the
system that you are available. For information about returning to the Available
state, see “Failed to respond to a contact” on page 258.
■ If you click the Close button in the contact panel before you answer the
contact, you reject the contact.
■ If you reject an immediate-assistance contact or do not accept the
contact before it is returned to the queue, you are placed in the Not
Responding state. For information, see “Failed to respond to a contact”
on page 258.
Automatically Answering a Call
If you were set up to automatically answer immediate-assistance contacts
by your system administrator, one of the following occurs when a call is
routed to your contact panel:
■ If you are using the IPCC Soft Phone, the immediate-assistance contact
appears in the left-most panel of the panel bar, and you are immediately
connected to the contact.
■ If you are using a phone other than the IPCC Soft Phone:
– If phone is off-hook, the immediate-assistance contact appears in
the left-most panel of the panel bar, and you are immediately
connected to the contact.
– If your phone is on-hook, the phone rings. The contact appears in
the left-most panel of the panel bar when you answer the phone,
and you are immediately connected to the contact.
Depending on the configuration of your contact center, one or both of the
following might also occur:
■ A brief announcement tells you the type of contact that is to be
connected, such as the classification to which the contact was routed.
■ You hear one or more tones that indicate the call is connected.
When you are set up to automatically answer immediate-assistance contacts
(see “Accepting an Immediate-Assistance Contact” on page 84), you must
still manually answer all other types of calls that are delivered to your
contact panel.
98 3Com IP Contact Center Desktop User’s Guide
Page 99

Putting a Call on Hold
When you put a call on hold, you temporarily disconnect from the call to
perform other tasks, such as consulting with another agent or researching a
customer issue.
To put a call on hold, do one of the following:
➤ Click the Hold button on the 3Com IPCC Desktop toolbar.
The contact panel flashes slowly and displays On Hold instead of
Connected, and the caller hears music on hold. You can now perform
other tasks.
Click the Hold button
to put the call on hold.
Putting a Call on Hold
When you make a second
voice call, the first call is
automatically put on hold.
➤ Make a new voice call, as described in “Making a Call” on page 108.
When the second voice call is connected, the contact panel that
represents the first voice call is automatically put on hold. The contact
panel flashes slowly and displays On Hold instead of Connected, and
the caller hears music on hold.
To return to the call on hold:
➤ Click the Hold button on the 3Com IPCC Desktop toolbar or click
the contact panel that represents the call on hold.
3Com IP Contact Center Desktop User’s Guide 99
Page 100

Chapter 4: Using Voice Features
Transferring a Call
You can transfer a call to an internal extension or to a classification that
routes the contact to an agent who handles calls for that classification.
Topics covered in this section:
■ Transferring a Call to Another User
■ Transferring a Call to a Classification
Transferring a Call to Another User
When you transfer a call, you remain connected to the caller while the call is
being routed to a second party (such as another agent or supervisor or an
external party). When the second party answers, you should introduce the
first party before you complete the transfer.
To transfer a call to another user:
When you make a call to a
second party, the first party is
immediately put on hold.
In this example, the first party
is an immediate-assistance
contact and the second party is
another 3Com IPCC Desktop
user.
1. While a call is connected, make a call to a second party (see “Making a
Call” on page 108).
2. When the second party responds, introduce the first party and
announce the transfer.
100 3Com IP Contact Center Desktop User’s Guide
 Loading...