

Page 1
IP Conferencing Module
Administration Guide
3Com® Convergence Applications Suite
VCX System Release 7.2
http://www.3com.com/
Part Number 900-0409-01
Published October 2006
Page 2

3Com Corporation
350 Campus Drive
Marlborough, MA
01752-3064
Copyright © 2006, 3Com Corporation. All rights reserved. No part of this documentation may be
reproduced in any form or by any means or used to make any derivative work (such as translation,
transformation, or adaptation) without written permission from 3Com Corporation.
3Com Corporation reserves the right to revise this documentation and to make changes in content from
time to time without obligation on the part of 3Com Corporation to provide notification of such revision
or change.
3Com Corporation provides this documentation without warranty of any kind, either implied or
expressed, including, but not limited to, the implied warranties of merchantability and fitness for a
particular purpose. 3Com may make improvements or changes in the product(s) and/or the program(s)
described in this documentation at any time.
UNITED STATES GOVERNMENT LEGENDS:
If you are a United States government agency, then this documentation and the software described herein
are provided to you subject to the following:
United States Government Legend: All technical data and computer software is commercial in nature
and developed solely at private expense. Software is delivered as Commercial Computer Software as
defined in DFARS 252.227-7014 (June 1995) or as a commercial item as defined in FAR
such is provided with only such rights as are provided in 3Com’s standard commercial license for the
Software. Technical data is provided with limited rights only as provided in DFAR 252.227-7015 (Nov
1995) or FAR
portion of any legend provided on any licensed program or documentation contained in, or delivered to
you in conjunction with guide.
Unless otherwise indicated, 3Com registered trademarks are registered in the United States and may or
may not be registered in other countries.
3Com and the 3Com logo are registered trademarks of 3Com Corporation. VCX is a trademark of 3Com
Corporation.
Other brand and product names may be registered trademarks or trademarks of their respective holders.
52.227-14 (June 1987), whichever is applicable. You agree not to remove or deface any
2.101(a) and as
Page 3

CONTENTS
ABOUT THIS GUIDE
Conventions 7
Notices 7
Text 8
Related Documentation 8
Comments 9
1 3COM IP CONFERENCING MODULE OVERVIEW
Overview 11
Conference Types 12
Conference Feature Matrix 13
Conference Names (IDs) 14
Access Controls 15
Public Conferences 15
Restricted Conferences 15
Scheduled and Meet Me 15
Instant and Emergency 15
Licensing 16
Maximum Server Capacity 16
G.729 Codec Assignment 16
Media Type 16
Port Type Assignment 17
Total Number of Ports Available 18
Port Usage per Conference 18
Overbook Ports for Scheduled Conferences 18
Distributed Conferencing 18
Conference Distribution Mechanism 19
Conference Server Roles (Routing and Hosting) 19
Database Redundancy 19
High Availability 20
Hostname Usage 20
Page 4

4
System Upgrades 20
Configuration Options 20
Configuration Option 1: Single Server 20
Configuration Option 2: Dual Server 20
Configuration Option 3: Four to Twelve Servers 21
Distributed Conferencing example (multiple servers) 22
Distributed Presence 22
Mapping Table for Presence and Conference Provisioning 23
Global Directory of VCX Users 23
Audio CODECs 24
Video CODECs 24
2 ADMINISTRATIVE SETUP
Logging in through the Web Console 25
Regular User Privileges 25
Administrative Privileges 26
Logging in as an Administrator 26
Logging in as a Regular User 27
Logging out 28
Managing User Accounts 28
Assigning Administrative Privileges 28
Changing the Super User’s Password 29
Adding an E-mail Address 29
Adding Another User’s E-mail Address 29
3 SYSTEM CONFIGURATION
Configuring the Global Parameters 31
Configuring the Conference Server Parameters 32
Configuring the Conferencing Parameters 34
Configuring the Digit Map for DTMF Dialout 37
Programming the Digit Map 38
Configuring the User Database Import Parameters 39
Multi-office Configuration 40
Managing the Local Domain Configuration 40
Page 5

4 PRESENCE SERVER
What is the Presence Server? 43
Configuring the Presence Server 44
Configuring Distributed Presence 46
Conference Provisioning 47
Global Directory of Users 47
Adding Distributed Presence/Conference Provisioning Entries 48
Editing Distributed Presence/Conference Provisioning Entries 49
Starting and Stopping the Presence Server 50
5 MAINTENANCE AND TROUBLESHOOTING
Power Cycling 53
Managing the Status of Key Processes 53
Managing the Status of the Conference Servers 55
Database Backup and Restore 57
Backing up the Database 57
Restoring the Database 58
Restoring the Database on the Master (primary) Server 59
Manual Database Switchover 60
Manual Switchover to Master Database 61
Manual Switchover to Slave Database 61
Managing the Error and Debug Log Files 61
Log File Size Limits 62
Maximum Log File Size 62
Maximum Disk Space Usage 62
Viewing the Log Files 63
Changing the Log File Threshold for an Application 63
Changing or upgrading the License Key 65
5
6 OBTAINING SUPPORT FOR YOUR PRODUCT
Register Your Product 67
Purchase Value-Added Services 67
Troubleshoot Online 68
Access Software Downloads 68
Telephone Technical Support and Repair 68
Contact Us 69
Page 6

6
7 ACKNOWLEDGEMENT OF THIRD PARTY SOFTWARE
Supplementary Copyright Information 71
Net-SNMP License 71
Xerces License 72
GLOSSARY
INDEX
Page 7
ABOUT THIS GUIDE
This guide describes how to set up, maintain, and provision the 3Com® IP
Conferencing Module of the 3Com Convergence Applications Suite.
This guide is for network operations, internal support, and Voice over
Internet Protocol (VoIP) systems planning personnel. Users of this
document should have a thorough knowledge of telecommunications, IP
telephony technology, and networks.
Release Notes are issued with some products. If the information in the
release notes differs from the information in this guide, follow the
instructions in the release notes.
Conventions This section describes notice, text, and figure conventions.
Notices Tab le 1 lists notice icons.
Ta bl e 1 Notice Icon Descriptions
Icon Notice Type Description
Information note Information that describes important features or
Caution Information that alerts you to potential loss of
Warning
instructions
data or potential damage to an application,
system, or device
Information that alerts you to potential personal
injury
Page 8

8 ABOUT THIS GUIDE
Te xt Ta bl e 2 lists text conventions.
Ta bl e 2 Text Convention Descriptions
Convention Description
Screen displays This typeface represents information as it appears on the
screen.
Commands The word “command” means that you must enter the
command exactly as shown and then press Return or
Enter. Commands appear in bold. Example:
To remove the IP address, enter the following
command:
SETDefault !0 -IP NETaddr = 0.0.0.0
Words in italics Italics are used to:
n Emphasize a point.
n Denote a new term at the place where it is defined in
the text.
n Identify menu names, menu commands, and software
button names. Examples:
From the Help menu, select Contents.
Click OK.
Related Documentation
These 3Com documents contain additional information about the
products in this release that are a part of or support the 3Com
Convergence Applications Suite.
The following documents are a part of the VCX IP Telephony Module:
n VCX
n VCX Administration Guide
n VCX
n VCX Business Telephone Quick Reference Guide
n VCX Manager’s Telephone Quick Reference Guide
n VCX
n VCX Business Telephone Guide
n VCX Manager’s Telephone Guide
n VCX Security Guide
n VCX Feature Codes for Analog Telephones Quick Reference Guide
Installation and Maintenance Guide
Basic Telephone Quick Reference Guide
Basic Telephone Guide
Page 9

Comments 9
The following documents are a part of the IP Messaging Module:
n IP Messaging Module Product Overview
n IP Messaging Module Quick Reference Guide - 3Com Native Interface
n IP Messaging Module User Guide - 3Com Native Interface
n IP Messaging Module Quick Reference Guide - Traditional Interface
n IP Messaging Module User Guide - Traditional Interface
n IP Messaging Module Operations and System Administration Guide
n E-Mail Reader Application Quick Start Guide
The following documents are a part of the IP Conferencing Module:
n IP Conferencing Module Installation Guide
n IP Conferencing Module User Guide
n IP Conferencing Module Administration Guide
n Convergence Center Client User and Administration Guide
The following documents provide information on products that support
this release:
n Enterprise Management Suite User Guide
n Enterprise Management Suite Getting Started Guide
n V7111 Analog Media Gateway Fast Track Installation Guide
n V7111 Analog Media Gateway User Guide
n V6000 Analog Media Gateway Fast Track Installation Guide
n V6000 Analog Media Gateway User Guide
n V7122 Digital Media Gateway Fast Track Installation Guide
n V6100 Digital Media Gateway Fast Track Installation Guide
n V7122 and V6100 Digital Media Gateway User Guide
Comments Send e-mail comments about this guide or about any Voice product
documentation to:
VOICE_Techcomm_comments@3com.com
Include the following information with your comments:
n Document title
Page 10

10 ABOUT THIS GUIDE
n Document part number (found on the front page)
n Page number
n Your name and organization (optional)
Example:
IP Conferencing Module User Guide
System Release 7.1
Part Number 900-0350-01
Page 25
Please address all questions regarding 3Com software to your authorized
3Com representative.
Page 11

3COM IP CONFERENCING
1
MODULE OVERVIEW
This chapter provides an overview of the principal features of the 3Com IP
Conferencing Module
conferences or presence services.
This chapter includes the following topics:
n Overview
n Conference Types
n Conference Feature Matrix
n Conference Names (IDs)
n Access Controls
n Licensing
n Port Ty pe Assignment
n Distributed Conferencing
n Distributed Presence
™
. Study it before attempting to configure
n Audio CODECs
n Video CODECs
Overview The 3Com IP Conferencing Module is a multi-party conference
management program that supports a variety of communication modes
and conference types. Users can participate in conferences that include
voice, video, desktop sharing services, and instant messaging.
The 3Com IP Conferencing Module supports a variety of communication
modes:
n Voice for Session Initiation Protocol (SIP) devices and analog phones
n Video for the 3Com Convergence Center Client
Page 12

12 CHAPTER 1: 3COM IP CONFERENCING MODULE OVERVIEW
n Desktop sharing for the 3Com Convergence Center Client
n Instant messaging for the 3Com Convergence Center Client.
The 3Com Convergence Center Client includes the Presence Server,
which collects and distributes the online status information of users.
Conference Types The following conference types are supported:
Scheduled — When a user sets up a scheduled conference, the
required system resources are reserved for a defined period of time. After
the conference ends, the resources become available again. User access
can be restricted (password-protected) or public (accessible to anyone
who knows the conference name). Scheduled conferences are configured
on the web console.
Meet Me — Meet Me conferences are “always on,” without a
scheduled start and end time. They are intended for informal meetings
organized by regular users, and can be started only if sufficient resources
are available on the system. User access can be restricted or public. Meet
Me conferences are configured on the web console.
Ad Hoc — An Ad Hoc conference starts when the first user joins it. No
configuration is required on the 3Com IP Conferencing Module. To
activate the conference, the user simply dials a special prefix that has
been set up by the administrator. Other users can join the conference by
dialing the same prefix; no password is required. Ad Hoc conferences
offer the same features as Meet-Me conferences for a maximum of six
participants.
Instant — An instant conference starts as soon as the first participant
calls it and dials the Conference Start PIN. The system then calls all other
conference participants, who can join immediately or call the conference
at a later time. If calling at a later time, users will be required to enter a
password if the conference is restricted. Instant conferences can be
configured by regular users on the web console.
Emergency — Emergency conferences are the same as instant
conferences with the following exceptions:
n The system can be programmed to alert users that an emergency
conference is in progress by continuously ringing an alarm, flashing
light, or other notification device.
Page 13

Conference Feature Matrix 13
n Individual user extensions can be programmed with a line monitoring
feature that causes a lamp to flash whenever an emergency
conference is in progress. The user connects to the conference by
pressing the button located beside the lamp.
n Emergency conferences can be configured only by administrators.
Conference Feature Matrix
Ta bl e 3 lists the features that are available with each type of
conference—scheduled, Meet Me, Ad Hoc, Instant, and Emergency. For
detailed feature descriptions, refer to the conference programming
instructions in the IP Conferencing Module User Guide.
Ta bl e 3 Conference feature matrix
Conference Type
Feature
Set up on web console Yes Yes Yes Yes
Set up by dialing a special prefix Yes
Defined start and end time Yes
Recurrence option Yes
Number of ports allocated for conference users
(default)
Maximum number of participants per
conference (global limit)
Maximum duration of conference defined by
conference creator/moderator
Supported media types (subject to licensing):
Audio Yes Yes Yes Yes Yes
Instant Messaging Yes Yes Yes Yes Yes
Video Yes Yes Yes
Desktop Sharing Yes Yes Yes
Conference types:
Public - No authentication. Yes Yes
Restricted - Password authentication. Yes Yes Yes Yes
Web console controls available to moderators:
Participant access control lock Yes Yes Yes Yes
Extend conference Yes
Scheduled Meet-me Ad Hoc Instant Emergency
25 + 5
floater ports
Set by
administrator
8 hrs
shared between Meet-me/Ad hoc/Instant/Emergency
Set by
administrator
Always Public
25
6
3 to 30
Set by
administrator
Yes Yes
100
Page 14

14 CHAPTER 1: 3COM IP CONFERENCING MODULE OVERVIEW
Table 3 Conference feature matrix (continued)
Audio control: Open mode, Moderator Lecture
mode, Isolate Participant mode
Video control: Open mode, Moderator Lecture
mode, Isolate Participant mode
Disconnect participants Yes Yes Yes Yes
Touch tone controls available to moderators:
Terminate conference Yes Yes Yes Yes
Dial out and add participants to conference Yes Yes Yes Yes
Participant access control lock Yes Yes Yes Yes
Extend conference Yes
Mute and un-mute all participant voices Yes Yes Yes Yes
Mute and un-mute own voice Yes Yes Yes Yes
Hear a private roll call of all participants Yes Yes Yes Yes
Touch tone controls available to all participants:
Mute and un-mute own voice Yes Yes Yes Yes
Hear a private roll call of all participants Yes Yes Yes Yes
Automated conference announcements:
First in conference Yes Yes Yes Yes
Next in conference Yes Yes Yes Yes
Leave conference Yes Yes Yes Yes
End of conference first warning Yes
End of conference final warning Yes
Yes Yes Yes Yes
Yes Yes
Conference Names (IDs)
Every conference is identified by a unique SIP Uniform Resource Identifier
(SIP URI) that is assigned when the conference is created. The SIP URI has
a name portion and a server host portion. For example:
sip:7000@10.1.0.238
name server host
Only the name portion is required to connect the conference. Internal
callers (callers within the enterprise) can simply dial the name and be
connected directly. External callers (callers on the PSTN) must first dial the
Page 15

Access Controls 15
Conference Attendant and then dial the name when prompted.
Optionally, callers can dial the full SIP URI to reach the conference.
Conference names are always numeric (e.g. 7000). When users create a
new conference, they can select a name from a block of numbers made
available by the administrator (for example, any number between 7200
and 7299), or they can leave the conference name field blank, in which
case the system will automatically assign a name from the available block
of numbers.
In a multi-server configuration, the servers share a common range of
numeric conference names (IDs). It is not possible to assign separate
ranges to the individual servers in the pool.
Access Controls Conferences can be created with or without access controls.
Public Conferences Public conferences are unrestricted and open to anyone without the need
to authenticate or enter a passcode. The caller is only required to know
the numeric conference ID.
Restricted
Conferences
Users access a restricted conference by authenticating themselves to the
system. The authentication method varies depending on the conference
type.
Scheduled and Meet Me
To access a restricted Scheduled or Meet Me conference, users are
required to dial the numeric conference name and then enter a passcode
to authenticate themselves and be added to the Participant Control List
for the conference.
Instant and Emergency
When a restricted Instant or Emergency starts, the system calls a list of
users and invites them to participate. Users who answer this call and
press the # key are automatically authenticated and connected to the
conference. Users who call the conference after it has started will be
prompted to authenticate themselves by entering the Join PIN.
Users can call a conference after it has started by dialing the numeric
conference name, or, if their extension has been programmed to support
Page 16

16 CHAPTER 1: 3COM IP CONFERENCING MODULE OVERVIEW
Emergency Conference Notification, by pressing the appropriate line key
on their telephone.
Licensing The 3Com IP Conferencing Module is activated by a set of license keys
that you must acquire from 3Com. There is a separate license key for
each application:
n conference server
n conference attendant server
n presence server
The following feature levels are also controlled by the license keys:
Maximum Server
Capacity
G.729 Codec
Assignment
Media Type Defines which media types are supported by the conferences hosted on
For the conference server, this feature controls how many users can
participate in conferences simultaneously. For example, if you purchase a
license for 100 users, then a maximum of 100 ports are available on the
server at any one time for conference participants.
For the conference attendant, this feature controls how many users can
connect to the attendant IVR simultaneously.
For the conference server, this feature controls the number of ports that
are available for G.729 connections. For example, if you assign 30 ports
from a 100-port license to G.729, then these ports can use G.729 or any
other supported codec (G.711, etc). The remaining ports cannot use
G.729.
For the conference attendant, this feature controls how many users can
connect to the attendant IVR simultaneously with G.729.
The number of ports you make available to G.729 depends on the
processing capacity of your server. If you have a high-capacity server, you
can allocate more ports to G.729.
the server. You can purchase support for audio, video and desktop
sharing. This feature applies only to the conference server.
All licensing parameters are defined on a per-server basis.
Page 17
Port Type Assignment 17
Port Type Assignment
The 3Com IP Conferencing Module connects to the network via ports.
When you configure the ports in your system, you can subdivide them by
type in order to optimize resource usage. For example, if your users hold a
large number of impromptu meetings, then you should allocate most of
your available ports to Meet-me and Ad Hoc conferences.
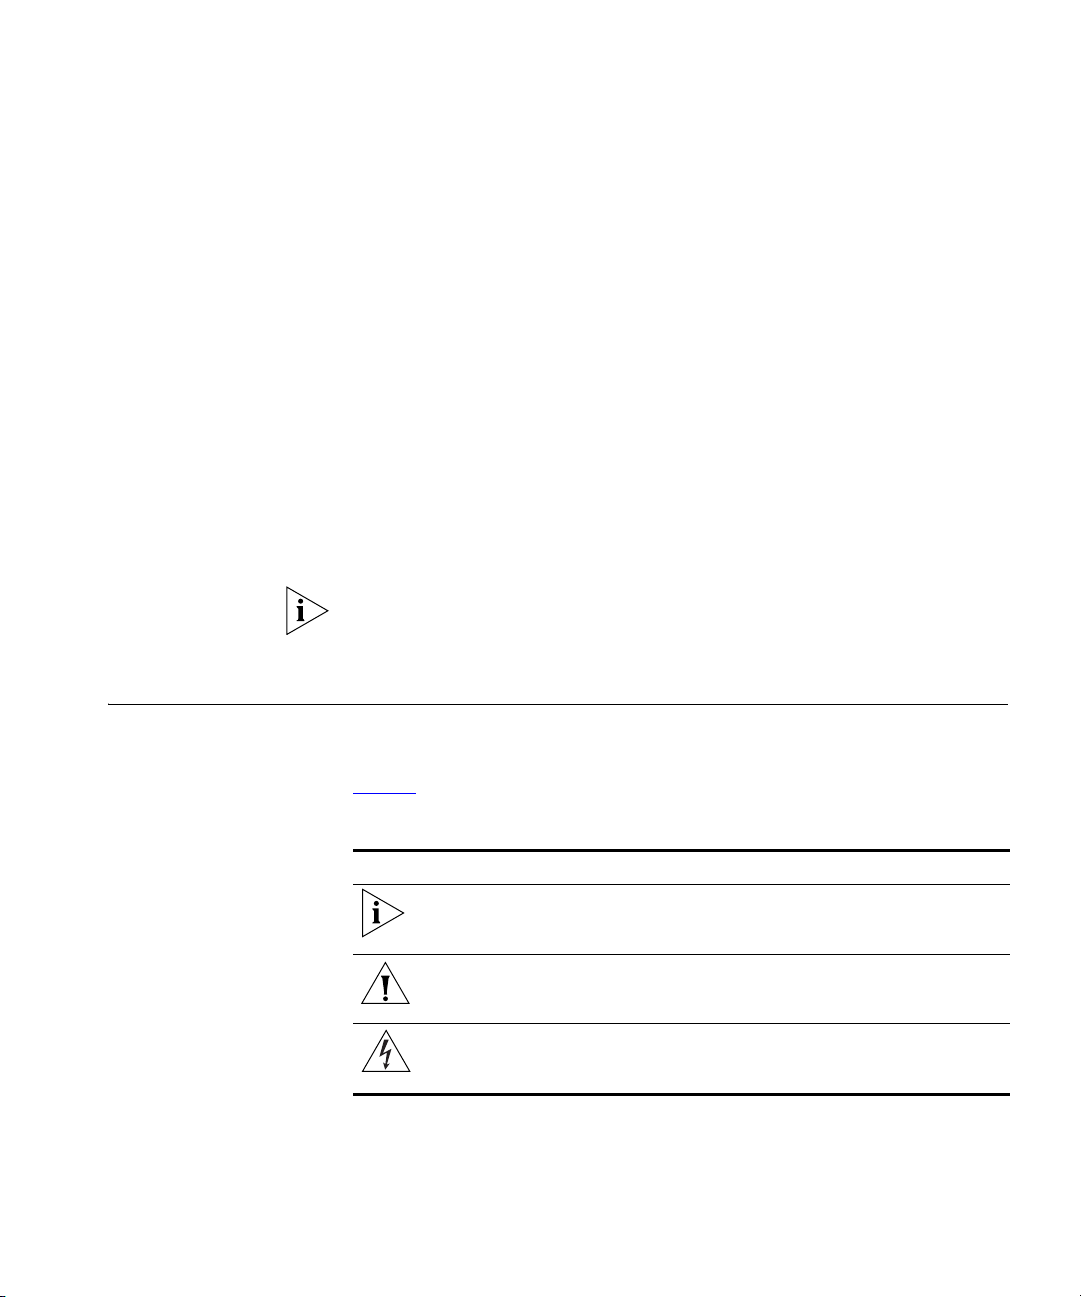
Available port types are illustrated in Figure 1.
Figure 1 Distribution of Port Types
Announcement
Floater
Conference
ports
1 Announcement ports — Used to deliver messages to users who are too
early or late to connect to a conference, or who attempt to join a
conference that is locked or full. Announcement ports are available to
deliver messages for all conference types (scheduled, meet-me, ad hoc,
instant and emergency). By default, five ports are designated as
announcement ports.
Scheduled
Non-Scheduled
1
2
3
4
2 Floater ports — Enables users to join conferences that are full, and
allows conferences to start when the system is near its maximum
capacity. In the first example, if a conference has reached its provisioned
limit of ten users and another wants to join, the extra user can be
accommodated with a floater port. In the second example, if there are
three conference servers, each of which is hosting a conference, and a
user attempts to start another conference, the extra conference can be
accommodated with floater ports. Depending on the total number of
ports available, the system may support fewer users than actually
provisioned for the extra conference.
3 Scheduled ports — Ports reserved for scheduled conference users. By
default, there are 25 scheduled ports.
Page 18

18 CHAPTER 1: 3COM IP CONFERENCING MODULE OVERVIEW
4 Non-Scheduled ports — Ports reserved for Meet-Me, Ad Hoc, Instant
and Emergency conference users. By default, 25 ports are reserved for
these types of conferences.
Total Number of Ports
Available
Port Usage per
Conference
Overbook Ports for
Scheduled
Conferences
The total number ports that you configure should equal the maximum
server capacity (total number of licensed users). This can be expressed as:
Announcement ports
Floater ports
Scheduled ports
Non-Scheduled ports
maximum server capacity
When a conference starts, three ports are automatically allocated to it.
Additional ports are allocated as more users join the conference. If any
users fail to join, their ports remain available for use. For example, if you
configure a scheduled conference for 10 users but only six participate,
four ports will remain available for use by other scheduled conferences.
Overbooking allows you to reserve more ports for conferences than are
actually available. Suppose you have 100 scheduled conference ports and
that these are entirely booked for meetings. If the “overbook” parameter
is set to 25, you can still schedule conferences for another 25 users.
Overbooking assumes that all users who are scheduled to attend often do
not attend, which usually leaves unused ports available. In the rare case
that all ports are scheduled and all people attend the meeting—including
those who are overbooked—the last people to call into any meeting
would not be able to get through.
Distributed Conferencing
In its standard configuration, the 3Com IP Conferencing Module
concentrates all applications and processes on a single server. This limits
the system to supporting a maximum of 300 conference participants at
any one time.
In a distributed configuration, the applications and processes are assigned
to multiple servers. A fully equipped system with twelve servers in a pool
(ten for conferencing; two for provisioning, presence and database
redundancy) can support up to 3,000 concurrent conference participants.
Smaller systems with fewer servers can also be implemented.
Page 19

Distributed Conferencing 19
Users employ a single web console to set up and manage their
conferences, regardless of how many servers are installed.
To achieve maximum system capacity, the IBM xSeries 346 platform is
required. Capacity is reduced with the IBM xSeries 306 platform.
Conference
Distribution
Mechanism
Conference Server
Roles (Routing and
Hosting)
When a new conference starts, the system uses the “best fit” distribution
mechanism to assign it to the server in the pool that has the least
available capacity (assuming that G.711 will be used for all connections,
and that the conference will host the maximum possible number of
users). If a server cannot be found with sufficient capacity, the conference
is refused.
Conferences in a distributed system are handled by a pool of up to ten
servers. The individual servers in the pool can host conferences, route
callers to conferences, or perform both functions. A server in the routing
role completes the following steps when a caller dials a conference:
n Receives the initial SIP INVITE message from the caller to the
conference.
n Uses the “best fit” distribution method to determine which server
should host the conference, or discovers which server is already
hosting the conference.
n Redirects the caller to the conference.
Routing can be performed by any conference server in the pool. Simply
configure the VCX dial plan so that calls are forwarded to the appropriate
destination. If you have only one conference server (an “all-in-one”
implementation), then only one route is required. If you have two or more
conference servers, then at least two routes are required to provide
redundancy. You can optimize system efficiency by assigning the routing
role to all servers in the pool, or by restricting the number of ports
available for conferencing on the “routing” conference servers.
Database
Redundancy
Database redundancy is provided to ensure that the system remains
available in the event that a server fails. A single database pair (master
and slave) is supported. The slave maintains a copy of the master using
MySQL database replication. In the event that the slave cannot
communicate with the master for ten minutes, switchover occurs.
Manual switchover is also possible. Manual switchover is required
whenever one of the application servers attempts to connect to the
Page 20

20 CHAPTER 1: 3COM IP CONFERENCING MODULE OVERVIEW
wrong database server. (Note that this set-up only provides redundancy
for server failure, not network failure.)
High Availability High availability is not provided as part of the solution. Each conference
runs on a single server, and if that server fails, then the conference
participants are required to re-dial the conference and connect to a
different server through the distribution mechanism described above.
Hostname Usage The servers in a distributed conferencing system will have distinct host
names. However, the domain name portion of conference addresses
(@domain) will be the same for all conferences.
System Upgrades Following the initial implementation, the system can be upgraded in
order to increase system capacity or provide database redundancy. For
example, adding a second server to a single-server implementation will
provide database redundancy.
Upgrades can be performed at any time on fully operational systems.
There is no need to disable any applications that are currently running
when you add a new server.
Configuration
Options
Three basic configurations are possible. The type you select depends on
the number of servers that are available, plus their processing capacity.
Configuration Option 1: Single Server
If you only have one server, then all components must be installed on it.
Distributed conferencing is not a feature of this “all-in-one” solution.
Components installed on single server:
n conference server/conference attendant server
n presence server (if purchased)
n VCX user database
n conferencing and presence database
n web console server.
Configuration Option 2: Dual Server
If you have two servers, then both can host conferences. Implement
database redundancy by installing the master database on one server and
Page 21

Distributed Conferencing 21
the slave database on the other. Implement routing redundancy by
configuring the SIP server to forward SIP INVITEs to both servers.
Components installed on the primary server:
n conference server/conference attendant server
n presence server (if purchased)
n VCX user database
n conferencing and presence database (initial master)
n web console server.
Components installed on second server:
n conference server/conference attendant server
n conferencing and presence database (initial slave).
Configuration Option 3: Four to Twelve Servers
If you have between four and twelve servers, configure the first server as
a “provisioning” server by installing the web console server, presence
server, VCX user database, and master database on it. Configure the
second server with the slave database and, optionally, the conference
server. Configure all other servers in the pool with the conference server.
To ensure routing redundancy, configure the SIP server to forward SIP
INVITEs to at least two servers in the pool.
Components installed on primary server:
n presence server (if purchased)
n VCX user database
n conferencing and presence database (initial master)
n web console server.
Components installed on secondary server:
n conferencing and presence database (initial slave).
Components installed on all other servers:
n conference server/conference attendant server.
Page 22
22 CHAPTER 1: 3COM IP CONFERENCING MODULE OVERVIEW
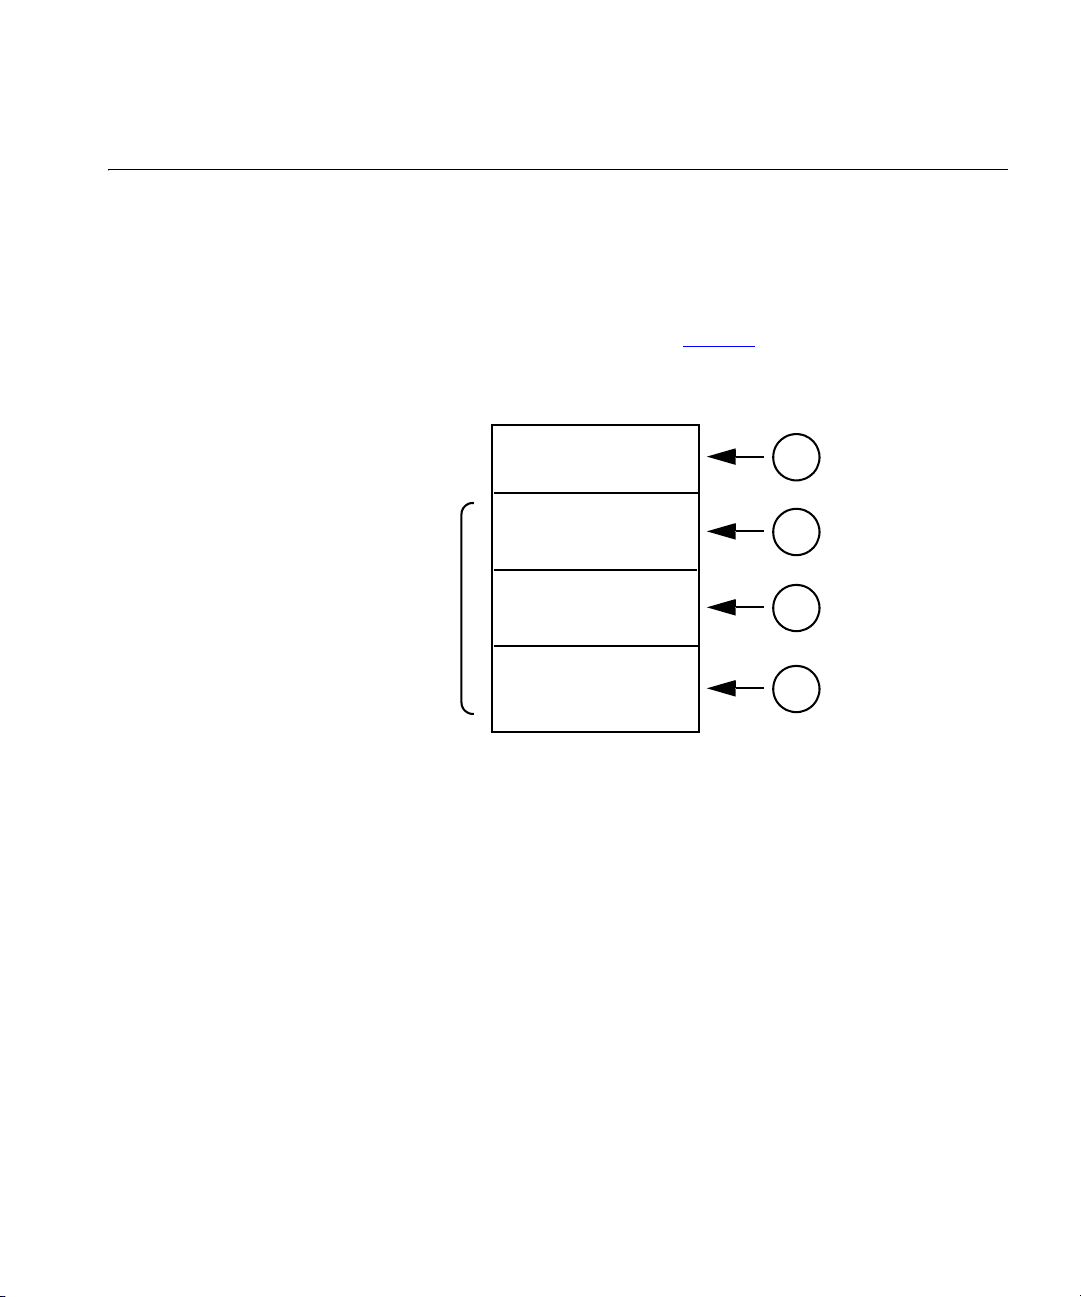
Distributed Conferencing example (multiple servers)
Figure 2 Distributed conferencing example configuration - Seven servers
Conference installation
conferencing conferencing conferencing conferencing
- master db
- user db
- web console
- presence (optional)
Primary
- slave db
- routing
SIP server
IP-PBX
- conferencing
- routing
Secondary
Distributed Presence
User 1
User 2
1 A dial plan is used to redirect the initial call to a routing conference server.
2 The routing conference server uses the “best fit” distribution mechanism
to redirect the call to the conference server with the least available
capacity (assuming that G.711 will be used for all connections, and that
the conference will host the maximum possible number of users).
3 The user device calls the conference server specified by the routing
conference server and the conference is set up.
By default, presence information is concentrated on a single server—the
primary server of the installation. However, you can distribute presence
information across the enterprise by adding more installations of the
3Com IP Conferencing Module. Each installation has a single Presence
server that is associated with one or more VCX systems.
Page 23
Distributed Presence 23
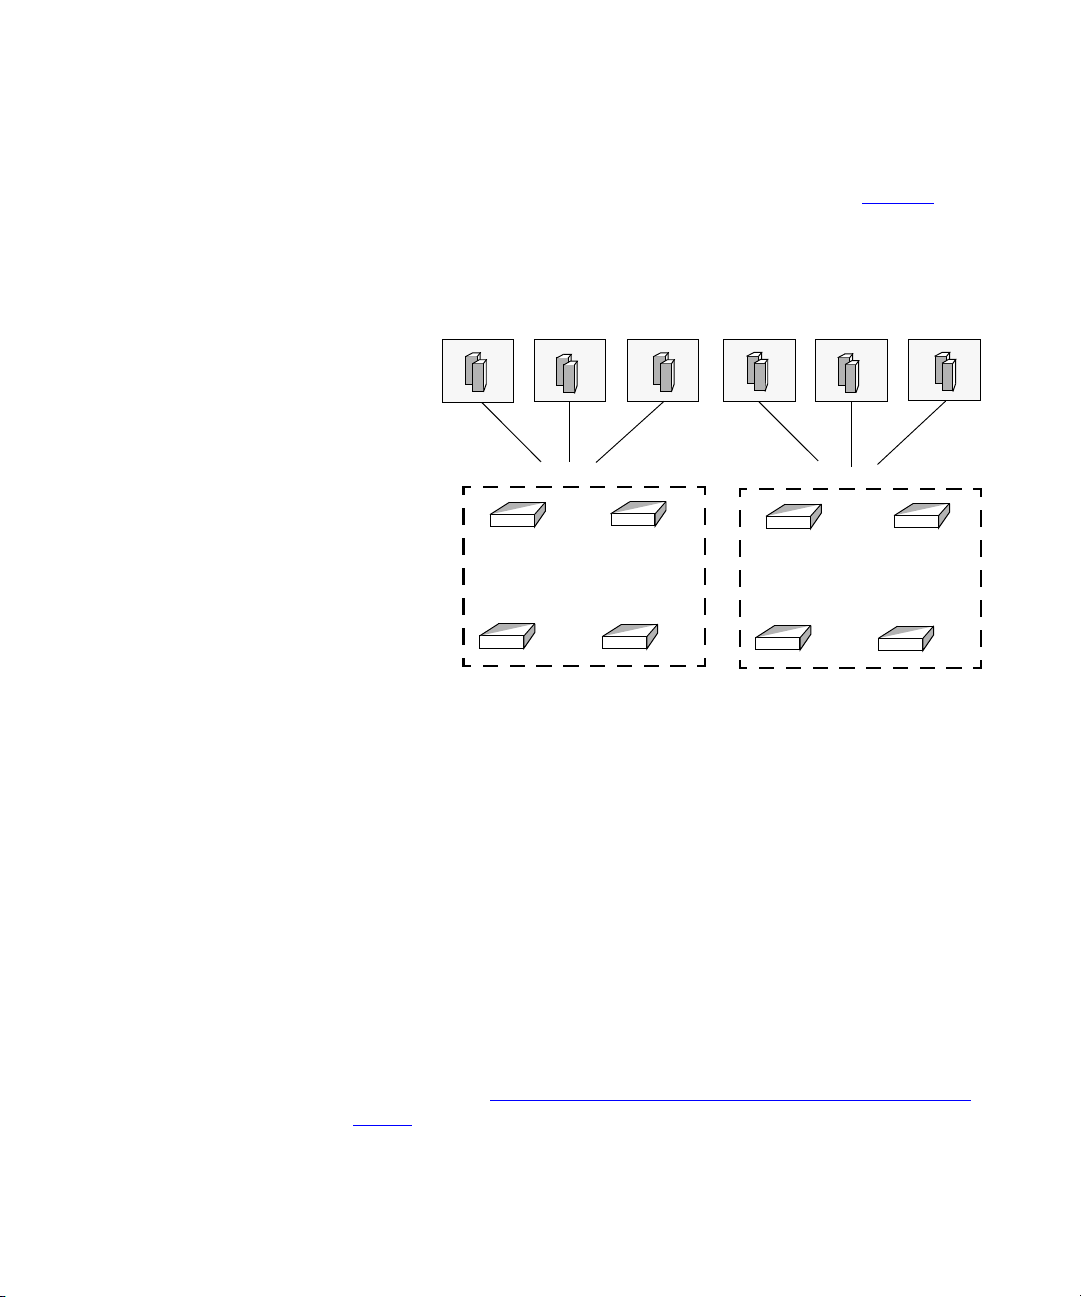
For example, if you have two Presence servers and six VCX systems, then
you can associate each Presence server with three VCXs.
illustrates this example.
Figure 3 Distributed Presence example - six VCXs and two Presence servers
Figure 3
Mapping Table for
Presence and
Conference
Provisioning
Chicago
VCX
systems
IP Conferencing
Module
installations
Detroit
Installation A
Primary server
includes presence
conferencing
server
New York
Secondary server
conferencing
server
Houston
Primary server
includes presence
conferencing
Dallas
Installation B
Secondary server
server
conferencing
Phoenix
server
The link between Presence servers and VCX systems is made with
mapping table entries. In a distributed environment with multiple
Presence servers and VCXs, identical mapping table entries must be
added to each installation of the 3Com IP Conferencing Module. In a
non-distributed environment with one Presence server and one VCX, only
one mapping table entry is required, which defaults to the values
specified during the initial software installation.
Global Directory of
VCX Users
For each entry on the mapping table, you must specify whether
Conference Provisioning is either allowed or denied. Selecting “allowed”
enables users on other installations to provision conferences on the 3Com
IP Conferencing Module that is associated with the local Presence Server.
Selecting “denied” prevents non-local users from provisioning
conferences.
For details, see Adding Distributed Presence/Conference Provisioning
Entries.
In addition to adding the mapping table entries, you must also add the
Global Directory of VCX users to each installation of the 3Com IP
Page 24

24 CHAPTER 1: 3COM IP CONFERENCING MODULE OVERVIEW
Conferencing Module. A properly configured Global Directory that
includes entries for all regional offices (Chicago, Detroit, New York,
Houston, Dallas and Phoenix in the above example) enables users to track
the presence status of their buddies located throughout the network. For
details, see
Audio CODECs The 3Com IP Conferencing Module supports conference participants using
any combination of the supported CODECs (the audio conferencing
trans-codes as required). Currently, the following CODECs are supported:
n G.711 A-law (pcma)
n G.711 Mu–law (pcmu)
n G.729
n G.721
n DVI ADPCM
n GSM.
Configuring the User Database Import Parameters.
server
Video CODECs The 3Com IP Conferencing Module distributes H.261 and H.263 video
from each conference participant to all other conference participants.
Page 25

2
ADMINISTRATIVE SETUP
This chapter describes how to log in to the 3Com IP Conferencing
Module and maintain administrative accounts.
This chapter includes the following topics:
n Logging in through the Web Console
n Managing User Accounts
Logging in through the Web Console
Regular User
Privileges
You can log in to the 3Com IP Conferencing Module web console using
Microsoft Internet Explorer or Mozilla Firefox. The 3Com IP Conferencing
Module can be used by administrators to manage the system and user
accounts.
For more information on presence, see Presence Server.
Account information for regular users is imported into the 3Com IP
Conferencing Module from the VCX system. If user information (name,
SIP address, etc.) for a regular user requires updating, this must be done
on the VCX system, not the 3Com IP Conferencing Module.
A regular user has the authority to do the following in the 3Com IP
Conferencing Module:
n Manage their Presence Access Control List
n Add their personal e-mail address
n Add Scheduled and Meet-me conferences
n View all Scheduled conferences*
n View their own Meet-me conferences*.
* For which the user is the conference owner or moderator.
Page 26

26 CHAPTER 2: ADMINISTRATIVE SETUP
Administrative
Privileges
On installation, a single super user is created. This super user cannot
create other users. Users are imported from the VCX system. The super
user is purely local to the 3Com IP Conferencing Module, cannot be
deleted, and has administrative privileges that cannot be removed. The
super user can assign administrative privileges to other users that have
been imported from the VCX system. All users with administrative
privileges can assign or remove administrative privileges from all users
except the super user.
Administrators can access the following options through the Admin
menu of the 3Com IP Conferencing Module:
n System Configuration — Contains parameters which control the
operation of the entire system. Includes global configuration,
conference server configuration, local domains, presence settings,
XML database import settings, and licensing information.
n User List — The complete list of user accounts. Administrators can
select accounts from the list and review them in detail. They can also
perform limited updates (change passwords, add e-mail addresses) to
the accounts. The addition or deletion of users must be done on the
VCX system.
n Monitor Servers — The Monitor Servers screen, where
administrators can check, start, and stop system processes.
Logging in as an
Administrator
The super user has a user name root and a default password of root. All
administrators have the same authority as the super user. They can add
and update administrative accounts, and they can change the password
or e-mail address for regular user accounts. Note, however, that
passwords will be re-set after the next VCX database import. They also
have the authority to monitor and update the system settings.
To log in to the 3Com IP Conferencing Module:
1 Enter this web address in the browser: http://hostname/presconf/
and press Enter.
Where <hostname> is your server’s domain name as configured during
the software installation process.
The Login screen appears. See Figure 4.
Page 27

Logging in through the Web Console 27
Figure 4 3Com IP Conferencing Module login screen
2 Log in as the super user:
n Enter User name root
n Enter Password root
The user name and password are case-sensitive. The first time you log in,
change the root administrator’s password (select Profile > Change
Password) to prevent unauthorized personnel from accessing critical
operating parameters.
Logging in as a
Regular User
3 Click Login.
4 The Conference List screen appears. This screen provides access to the full
functionality of the 3Com IP Conferencing Module.
Regular users log in to the 3Com IP Conferencing Module by entering the
user name and password that has been provided to them by the
administrator. Unless they have administrative privileges, regular users will
not have access to the Admin menu. As such, they cannot administer the
system, view the list of user accounts, or monitor the server processes.
To access the 3Com IP Conferencing Module and log in as a regular user:
1 Enter this web address in the browser: http://hostname/presconf/
and press Enter.
Where hostname is the domain name or IP address of the host running
the 3Com IP Conferencing Module.
The Login screen appears.
2 Enter the user name and password assigned to you by the administrator.
Page 28

28 CHAPTER 2: ADMINISTRATIVE SETUP
An example of a user name is 270
3 Click Login. The Conference List screen appears.
Logging out To sign out from the 3Com IP Conferencing Module:
From the upper right-hand corner of the screen, select LOGOUT. See
Figure 5.
Figure 5 LOGOUT button
Managing User Accounts
Assigning
Administrative
Privileges
This section includes the following topics:
n Assigning Administrative Privileges
n Changing the Super User’s Password
n Adding an E-mail Address
Administrators can assign administrative-level privileges to regular users.
Regular user accounts are added in the VCX system.
To assign administrative privileges to a user:
1 Log in to the 3Com IP Conferencing Module as an administrative user.
2 Select Admin > User List.
The User List screen appears.
3 Locate a user in the User ID column. Use the Search field if necessary.
Users are identified by the name portion of their SIP ID. For example, a
user with a SIP ID of sip:270@10.1.0.238 will display as 270 on the User
List.
4 Click the user’s ID.
The User Information screen appears.
5 Select Profile > Access Control.
The Access Control screen appears.
6 Click Yes to assign administrative privileges to the user.
7 Click Submit.
Page 29

Managing User Accounts 29
The user has been assigned administrative privileges.
Administrative users are identified in the User List by the word admin
appearing next to their name in the Groups column.
Changing the Super
User’s Password
Adding an E-mail
Address
The super user’s password should be changed immediately after logging
in for the first time.
The instructions in this section are meant for the super user only. Regular
users and administrators cannot change their passwords using the 3Com
IP Conferencing Module.
To change the super user’s password:
1 Log in to the 3Com IP Conferencing Module as the super user.
2 Select Profile > Change Password.
The Change Password screen appears.
3 Enter the new password.
4 Re-enter the password in the Re-enter password for verification field.
5 Click Submit.
If your e-mail notification preference for presence is enabled (by default it
is enabled) and your email address is set up, you will be notified by e-mail
when other users add you to their Buddy List requesting permission to
view your online status. An administrator can add an e-mail address for
any user. Regular users can add their own e-mail address.
Adding Another User’s E-mail Address
This procedure requires administrative authority.
To add an e-mail address for another user:
1 Log in to the 3Com IP Conferencing Module as an administrator.
2 Select Admin > User List.
The User List screen appears.
3 Locate a user in the User Name column. Use the Search field if necessary.
4 Click the user’s ID.
The User Information screen appears
Page 30

30 CHAPTER 2: ADMINISTRATIVE SETUP
5 Enter the Email address.
6 Click Submit.
Page 31

3
SYSTEM CONFIGURATION
This chapter describes how a system administrator configures the 3Com
IP Conferencing Module operating parameters.
This chapter includes the following topics:
n Configuring the Global Parameters
n Configuring the Conference Server Parameters
n Configuring the Conferencing Parameters
n Configuring the User Database Import Parameters
n Managing the Local Domain Configuration
Configuring the Global Parameters
You should review the default values of the tables in this chapter to
ensure that they will work with your network.
To configure the global parameters:
1 Log in to the 3Com IP Conferencing Module as an administrative user.
2 Select Admin > System Configuration.
The System Configuration screen appears.
3 From quick links, select Global Configuration.
The Global Configuration screen appears.
4 Fill out the fields according to the descriptions in Tab le 4.
Ta bl e 4 Global Configuration fields
Field Description
The HTTP server, for this
server e.g.,
www.example.com:
The HTTP (web) server address is set during installation
and should normally be left unchanged.
Page 32

32 CHAPTER 3: SYSTEM CONFIGURATION
Table 4 Global Configuration fields (continued)
Configuring the Conference Server Parameters
The realm used in SIP
prompts for authentication
requests:
The email address of the
administrator:
5 Click Submit.
To configure the parameters governing the setup and operation of the
conference server:
In a distributed environment, these settings apply only to an individual
conference server in the server pool.
1 Log in to the 3Com IP Conferencing Module as an administrative user.
2 Select Admin > System Configuration.
The System Configuration screen appears.
This parameter is set by default to match the domain
name provided during installation. It should not be
changed.
The administrator’s email address is set during
installation. Update this parameter only when the
administrator’s email address changes. Web page and
server failure information is sent to this address.
Note: Changes to the email address will not take effect
until the conferencing engine (sipconf), and the
presence server (sippeng) are restarted. For more
information, see
Managing the Status of Key Processes.
3 From quick links, select Conference Servers.
The Conference Server screen appears.
4 From the Server Host column, select a conference server.
The Conference Server Configuration screen appears.
5 Fill out the fields according to the descriptions in Tab le 5.
Ta bl e 5 Conference server configuration fields
Field Description
Host name for running SIP
conference server:
IP address for running the
SIP conference server:
The domain name for the 3Com IP Conferencing
Module. This parameter is set during installation and
should not normally need to be changed.
The IP address of the interface you want the 3Com IP
Conferencing Module to use. The IP address must be
valid and be assigned to your server. If left blank, the
first available interface will be used.
Page 33

Configuring the Conference Server Parameters 33
Table 5 Conference server configuration fields (continued)
Port number for running
SIP conference server:
Non-Scheduled Ports
Number (NSPN):
Scheduled Ports Number
(SPN):
Announcement Ports
Number (APN):
Floater Ports Number
(FPN):
Scheduled Ports
Overbooking (SPO):
Directory to store all
conference files:
The port number to be used by the 3Com IP
Conferencing Module. This parameter is set during
installation to the default port number 5060 and
should not normally need to be changed.
The NSPN is the number of ports reserved for Meet-me,
Ad Hoc, Instant, and Emergency conference users. By
default, 25 ports are reserved for NSPN.
The SPN is the number of ports reserved for scheduled
conference users. By default, 25 ports are reserved for
SPN.
The APN is the number of ports reserved for conference
announcements. By default, 5 ports are reserved for
announcements.
The FPN enables users to join conferences that are full,
and allows conferences to start when the system is near
its maximum capacity. In the first example, if a
conference has reached its provisioned limit of ten
users and another wants to join, the extra user can be
accommodated with a floater port. In the second
example, if there are three conference servers, each of
which is hosting a conference, and a user attempts to
start another conference, the extra conference can be
accommodated with floater ports. Depending on the
total number of ports available, the system may
support fewer users than actually provisioned for the
extra conference.
Note: NSPN + SPN + APN + FPN = maximum server
capacity.
The SPO is the number of ports reserved for ports to be
reserved for scheduled conferences in excess of the
SPN. For example, if the SPN is 100 and the SPO is 25,
then scheduled conferences for a maximum or 125
users can be provisioned. Bear in mind, however, that
the SPN limit is still in force, so only the first 100 callers
will be allowed to join the conferences when they take
place. The default value for the SBO is 5. Change it to a
real number only if you determine that scheduled
conferences in your network are regularly overbooked.
This is the directory used to store files uploaded for
conferences. This parameter is set during installation
and should normally be left unchanged. If this
parameter is changed, then files previously uploaded to
be shared amongst conference participants will no
longer be available.
Page 34

34 CHAPTER 3: SYSTEM CONFIGURATION
Table 5 Conference server configuration fields (continued)
Conference server
minimum audio port
number (>10000):
Conference server
maximum audio port
number (<65535):
Conference server
minimum video port
number (>10000):
Conference server
maximum video port
number (<65535):
Conference server
application sharing port
number:
IP address for running the
SIP conference attendant:
Port number for running
SIP conference attendant:
3Com recommends that this setting not be changed.
The numeric range of audio ports that the firewall
integrated with the 3Com IP Conferencing Module will
allow is between 26000 and 26999. Any value outside
this range will cause audio problems.
3Com recommends that this setting not be changed.
The numeric range of audio ports that the firewall
integrated with the 3Com IP Conferencing Module will
allow is between 26000 and 26999. Any value outside
this range will cause audio problems.
3Com recommends that this setting not be changed.
The numeric range of video ports that the firewall
integrated with the 3Com IP Conferencing Module will
allow is between 27000 and 27999. Any value outside
this range will cause video problems.
3Com recommends that this setting not be changed.
The numeric range of video ports that the firewall
integrated with the 3Com IP Conferencing Module will
allow is between 27000 and 27999. Any value outside
this range will cause video problems.
3Com recommends that this setting not be changed.
However, if the port on your firewall is changed, you
must change it in this field also.
The IP address of the server running the conference
attendant.
The IP port the conference attendant will bind to. If not
specified, port 5092 will be used. Make sure the port
you choose is not used by any other application on the
system.
Configuring the Conferencing Parameters
6 Click Submit.
Changes to these parameters will not take effect until you restart the
sipconf process using the commands in the Admin > Monitor Servers
Screen.
To configure the parameters governing the setup and operation of
conferences:
Page 35

Configuring the Conferencing Parameters 35
In a distributed environment, these settings apply to all servers in the
conference server pool.
1 Log in to the 3Com IP Conferencing Module as an administrative user.
2 Select Admin > System Configuration.
The System Configuration screen appears.
3 From quick links, select Conferencing Configuration.
The Conferencing Configuration screen appears.
4 Fill out the fields according to the descriptions in Tab le 6.
Ta bl e 6 Conferencing Configuration fields
Field Description
Maximum participants per
Scheduled/Meet-me
conference created by
non-administrative users:
Maximum duration per
Scheduled/Meet-me
conference created by
non-administrative users
(hours):
Maximum number of
participants per instant
conference:
Restrict conference names
to be within a numeric
range:
Enter the maximum number of users able to participate
in a single Scheduled or Meet-me conference at any
one time, when the conference is configured by a
regular (non-administrative) user. The actual maximum
may be less for scheduled conferences depending on
the resources available at the scheduled time. This
number is limited by the system license key and the
port type designations. For details, see
Enter the maximum time in hours for the duration of a
Scheduled/Meet-me conference. A conference cannot
be extended past this maximum time. The default
setting is 2 hours. You can chose from a range of 1 to 8
hours.
Enter the maximum number of users that can
participate in instant conferences at any one time. The
default is 10; the range is 3 to 30. This number is
limited by the system license key and the port type
designations. For details, see
Since conference names are required to be numeric,
this field is read-only and displays true.
Licensing.
Licensing.
Conference name
minimum numeric value:
Enter the lowest number available for the name of
Scheduled, Meet-me, Instant, and Emergency
conferences. This values maps to the VCX system’s dial
plan. For example, if 7500 to 7599 has been reserved
for conferences in the dial plan, enter 7500 as the
minimum numeric value.
Page 36

36 CHAPTER 3: SYSTEM CONFIGURATION
Table 6 Conferencing Configuration fields (continued)
Conference name
maximum numeric value:
Ad-hoc conference user
name prefix:
Ad-hoc conference user
name suffix:
Conference server sends
instant message to all
other participants when
users join/leave:
Conference server will
avoid g729 codec if client
proposes other codecs in
sdp:
Dtmf Roll Call messages
will have an English
participant count:
Standard users will be able
to create instant
conferences:
Scheduled Conferences:
Early Meeting Start Time
(EMST) (minutes):
Scheduled Conferences:
Meeting Extension Time
(EXMT) (minutes):
Enter the highest number available for the name of
Scheduled, Meet-me, Instant, and Emergency
conferences. This values maps to the VCX system’s dial
plan. For example, if 7500 to 7599 has been reserved
for conferences in the dial plan, enter 7599 as the
maximum numeric value.
For Ad-hoc conferences, users can enter this prefix as
the first part of the user name portion of the
conference SIP URI. For example, with the prefix 96,
users in a system with 4-digit extensions can initiate an
ad hoc conference by dialing any number between
9600 and 9699. Up to five other users can access the
conference by dialing the same number.
For Ad-hoc conferences, users can call conferences by
entering this suffix as the last part of the user name
portion of the conference SIP URI. Note that the suffix
should contain one non-numeric character. For
example, with the suffix .adhoc, users can call
conferences with names like sales.adhoc or
marketing.adhoc.
The Conferencing Server will send instant messages to
participants of a conference notifying them when users
join or leave. The default setting is disable.
The default setting is enable, which causes the
Conferencing Server and Conference Attendant to
select some other codec besides G.729, if the client
proposes them.
By default, an English voice will sound during a
conference Roll Call. For non-English speaking
environments, this setting should be set to disable.
By default, regular users can create instant conferences.
To limit the creation of instant conferences to
administrative users, this setting should be set to
disable.
Specifies the number of minutes prior to the start time
of scheduled conferences that users will be allowed to
connect if ports are available. The default is 15 minutes;
the range is 15 to 30 minutes.
Specifies the number of minutes the system will
automatically attempt to extend a scheduled
conference that is nearing completion. The default is
15 minutes; the range is 15 to 30 minutes.
Page 37

Configuring the Conferencing Parameters 37
Table 6 Conferencing Configuration fields (continued)
Primary Proxy Server for
dialing out:
Secondary Proxy Server for
dialing out:
Digit Map for DTMF dial
out:
5 Click Submit.
Changes to these parameters will not take effect until you restart the
sipconf process using the commands in the Admin > Monitor Servers
screen.
Enter the hostname (IP address or domain name) of the
primary proxy server. The system will add an @
followed by the hostname to dial-out addresses of
instant and emergency conferences. The default value
is the address of the VCX system from which the user
database is imported.
Note: This parameter must be programmed to enable
emergency and instant conferences to dial out to users.
Optionally, enter the hostname (IP address or domain
name) of the secondary proxy server. This hostname is
used for emergency and instant conferences if the
primary proxy is not available.
Enter the digit map that defines the dial plan that is
used by the DTMF dialout feature.
For example,
[2-9]11|0T|011xxx.T|91[2-9]xxxxxxxxx|[1-8]xx
For details on how to program the digit map, see
Configuring the Digit Map for DTMF Dialout.
Configuring the Digit
Map for DTMF
Dialout
The DTMF Dialout feature enables the conference administrator or
moderator to add a user to an ongoing conference by pressing *3 and
then dialing the user’s extension, PSTN or mobile phone number. After
answering this call, the user is prompted to join the conference by
pressing #.
To facilitate the operation of DTMF Dialout, it is necessary to configure a
digit map that defines the dial plan on the 3Com IP Conferencing
Module. If the dial plan is correct for your enterprise and geographical
location, the system will be able to recognize when the dialed number is
complete and then immediately initiate a call. If the dial plan is incorrect,
the system will fail to recognize the dialed number and the call will fail or
be initiated prematurely.
Page 38

38 CHAPTER 3: SYSTEM CONFIGURATION
Programming the Digit Map
The digit map is defined during the initial software installation process.
Thereafter, it can be updated on the Conferencing Configuration screen
(see above).
Default digit map:
[1-7]XX|9XXXXXXXXXX|91XXXXXXXXX|9011.XT
n [1-7]XX - Internal extension rule (8 and 9 are excluded as prefixes).
n 9XXXXXXXXXX - Local rule with prefix.
n 91XXXXXXXXX - Long distance rule with prefix.
n 9011.XT - International rule with prefix.
Example of a more complex digit map:
[2-9]XX|0T|100|101|011xxx.T|9011xxx.T|1[2-9]xxxxxxxxx|91[2-9
]xxxxxxxxx|9[2-9]xxxxxx|*xx|[8]xxx|[2-7]xx
n [2-9]XX - Emergency number rule.
n 0T - Local operator rule. After dialing zero the phone waits T seconds
and then initiates the call.
n 100 - Auto attendant default extension.
n 101 - Voicemail default extension.
n 011xxx.T - International rule without prefix.
n 9011xxx.T - International rule with prefix.
n 1[2-9]xxxxxxxxx - Long distance rule without prefix.
n 91[2-9]xxxxxxxxx - Long distance rule with prefix.
n 9[2-9]xxxxxx - Local rule with prefix.
n *xx - Two-digit star codes.
n [8]xxx - A three-digit extension prefixed with an 8 routes the call to
the voicemail of extension xxx.
n [2-7]xxx - A regular three-digit extension that does not start with 1,
8 or 9 is dialed immediately.
For a complete definition of the digit map syntax, refer to section 2.1.5 of
RFC 3435, Media Gateway Control Protocol. The document is available at
http://ietf.org/rfc/rfc3435.txt.
Page 39

Configuring the User Database Import Parameters 39
Configuring the User Database Import Parameters
The 3Com IP Conferencing Module uses the user database file located on
the VCX system to track user account information.
Depending on your system configuration, the user database file can
contain users for a single office or for multiple offices. A multi-office file
(or “Global Directory”) enables users located in different regional offices
and branches to monitor each other’s presence status and hold
inter-office multimedia conferences.
To configure the database import settings:
1 Log in to the 3Com IP Conferencing Module as an administrative user.
2 Select Admin > System Configuration.
3 From quick links, select XML User Database Import.
The XML User Database Import screen appears.
4 Fill out the fields according to the descriptions in Tab le 7.
Ta bl e 7 XML User Database Import fields
Field Description
Host name or IP address: The host name or IP address of the Primary VCX
Login user ID: The login user ID used to access the user database from
Password: The password of the Primary VCX system. This value is
Full path to XML User info
file on the call processor:
Daily user database import
time (time zone):
system.
the Primary VCX system. This value is set during IP
Conferencing Module installation. 3Com recommends
that this setting not be changed.
set during the 3Com IP Conferencing Module
installation. 3Com recommends that this setting not be
changed.
The location of the user file on the VCX system. Use the
exact path and file name used on the VCX.
For example:
/opt/3com/VCX/vcxdata/globaldir/output/masterDirectory.xml
3Com recommends that this setting not be changed.
The hour of the day that the system imports the latest
user file from the VCX system. The 3Com IP
Conferencing Module uses the file to obtain new user
account information, and to update existing user
account information. 3Com recommends that this
setting not be changed.
Page 40

40 CHAPTER 3: SYSTEM CONFIGURATION
5 Click Submit.
The Import the database now button allows you to override the
synchronization interval by immediately updating user accounts.
If a user is added to and shortly thereafter deleted from the VCX system,
the deleted user may still appear in the imported user database file. This is
because the VCX system generates an updated user database file every
10 minutes. The deleted user will be removed during the next
synchronization.
Multi-office
Configuration
Managing the Local Domain Configuration
To enable users to interact with each other regardless of their location, it
is important to program the VCX system in each regional office with
appropriate dial plan routes and trusted endpoints. On the primary VCX
system in each regional office, add routes leading to the following
servers, plus define them as trusted endpoints:
n Local conference server(s)
n Local conference attendant server(s)
n Local Presence server
n Primary VCX server in each of the other regional offices.
For information on how to program the VCX dial plan and trusted
endpoints, see the 3Com VCX Administration Guide.
The domain configuration screen lists the domain names and IP addresses
for the local domain. The local domain requires one primary domain. It
can also have one or more secondary domains that map into the primary
domain. SIP messages addressed to the primary and secondary domains
are handled locally.
Primary and secondary domains are automatically added during initial
system installation. At that time, the administrator is required to enter the
organization’s domain name — this becomes the primary domain.
Secondary domains are derived from the server’s IP address and host
name. For example, if the administrator configures a domain of
“company.com” on a system with an IP address of “10.1.0.3” and a host
name of “sipserver,” then the following local domain entries will be
created:
n 10.1.0.3
Page 41

Managing the Local Domain Configuration 41
n sipserver.company.com
n company.com.
Typically, there is no need for you to add extra domains or IP addresses.
You should simply check that the default values created during initial
system installation are correct. For installations where the host name is
different from the domain name, there will be one primary domain and
two secondary domains. For installations where the host name is the
same as the domain name, there will be one primary domain and one
secondary domain.
If the 3Com IP Conferencing Module IP address is changed, then a
corresponding change must be made to the local domain’s configuration.
The same holds true if the domain name is changed.
To add a domain or IP address:
1 Log in to the 3Com IP Conferencing Module as an administrative user.
2 Select Admin > System Configuration.
The System Configuration screen appears.
3 From quick links, select Local Domain Configuration.
The Local Domain Configuration screen appears. See Figure 6.
Figure 6 Local Domain Configuration
The Local Domain Configuration screen does not differentiate between
the primary and secondary domains. To determine your primary domain,
select Admin > System Configuration. Then select Global
Configuration under quick links. The primary domain displays in the title
of the Global Configuration screen.
4 In the text box, enter a domain name or IP address.
5 Click Add.
Page 42

42 CHAPTER 3: SYSTEM CONFIGURATION
Page 43

4
PRESENCE SERVER
This chapter introduces the Presence Server and describes how it is set
up, administered, and used.
This chapter includes the following topics:
n What is the Presence Server?
n Configuring the Presence Server
n Configuring Distributed Presence
n Starting and Stopping the Presence Server
What is the Presence Server?
The Presence Server is an application that collects and distributes the
online status information of users. Working with the 3Com Convergence
Center Client and 3Com phones, the Presence Server informs users when
their buddies are online and available, or are offline. The server
instantaneously sends update information to the 3Com Convergence
Center Client to reflect any change in user status. For example, if you are
eating lunch at your desk and want to let your buddies know that you
won’t be taking calls, you can change your online status to “meal”. A
meal icon will automatically appear next to your name in your buddies’
Buddy List. The Presence Server handles the transmission of this
information.
When using the Presence Server, administrators can:
n Configure the Presence Server
n Start, stop, and monitor the Presence Server
n Perform normal user tasks on behalf of users.
Page 44

44 CHAPTER 4: PRESENCE SERVER
Configuring the Presence Server
The Presence Server must be set up by an administrator before it can be
used.
To set up the Presence Server:
1 Log in to the 3Com IP Conferencing Module as an administrative user.
2 Select Admin > System Configuration.
The System Configuration screen appears.
3 From the quick links list, select Presence Server Configuration.
The Presence Server Configuration screen appears. See Figure 7.
Figure 7 Presence Server Configuration screen
Fill out the fields for this screen according to the descriptions in Tab le 8.
Ta bl e 8 Presence configuration fields
Field Description
Host name for running SIP
Presence Server:
Port number for running
SIP Presence Server:
The host name or IP address of the 3Com IP
Conferencing Module hosting the Presence Server. This
parameter is set during installation and should not
normally need to be changed.
The port number where the Presence Server is running.
Default is 5063. This parameter is set during installation
and should not normally need to be changed.
Page 45

Configuring the Presence Server 45
Table 8 Presence configuration fields (continued)
Registrar Address: The host name or IP address of the local SIP registrar.
Minimum accepted
presence subscription
duration (sec):
Maximum accepted
presence subscription
duration (sec):
4 When you have finished with the configuration, click Submit.
Changes to the parameters on this screen will not take effect until you
restart the sippeng process using the commands in the Servers
Monitoring screen.
This must be set to the IP address of the primary VCX
system.
The minimum amount of time, in seconds, that a user
can subscribe to presence information for another user
(that is, “watch” another user). If a shorter period of
time is specified, the Presence Server will refuse the
subscription. 3Com recommends that these settings
not be changed.
The maximum amount of time, in seconds, that a user
can subscribe to presence information for another user
(that is, “watch” another user). If a longer period of
time is specified, the Presence Server will refuse the
subscription. 3Com recommends that these settings
not be changed.
Page 46

46 CHAPTER 4: PRESENCE SERVER
Configuring Distributed Presence
Presence information can be processed by a single Presence server or, if
your system has two or more installations of the 3Com IP Conferencing
Module, across multiple Presence servers in a distributed environment.
To configure distributed presence, you must add mapping table entries
that link the VCX systems to the Presence servers in your network. For
example, if you have three VCX systems and a single Presence server,
then you will require three mapping table entries.
example.
Figure 8 Distributed Presence example - three VCX s and one Presence server
Figure 8 illustrates this
Chicago Detroit New York
VCX
systems
Installation A
Primary server
IP Conferencing Module
installation
Distributed Presence Mapping Table Entries
Primary Registrar Secondary Registrar Presence Server
Chicago 1 Chicago 2 Installation A
Detroit 1 Detroit 2 Installation A
New York 1 New York 2 Installation A
In another example, if you have six VCXs and two Presence servers, then
you will require six mapping table entries, which you must add to both
installations of the 3Com IP Conferencing Module. Note that the entries
must be identical.
Figure 9 illustrates this example.
includes presence
conferencing
server
Secondary server
conferencing
server
Page 47

Configuring Distributed Presence 47
Figure 9 Distributed Presence example - six VCXs and two Presence servers
Chicago
VCX
systems
IP Conferencing
Module
installations
Distributed Presence Mapping Table Entries (added to both installations)
Detroit
New York
Houston
Installation A
Primary server
includes presence
conferencing
server
Primary Registrar Secondary Registrar Presence Server
Chicago 1 Chicago 2 Installation A
Detroit 1 Detroit 2 Installation A
New York 1 New York 2 Installation A
Houston 1 Houston 2 Installation B
Dallas 1 Dallas 2 Installation B
Phoenix 1 Phoenix 2 Installation B
Secondary server
conferencing
server
Primary server
includes presence
conferencing
Dallas
Installation B
Secondary server
server
conferencing
server
Phoenix
Conference
Provisioning
Global Directory of
Users
For each entry on the mapping table, you must specify whether
conference provisioning is either allowed or denied. Selecting “allowed”
enables users configured on the primary registrar of the VCX system to
provision conferences on the 3Com IP Conferencing Module. Selecting
“denied” prevents these users from provisioning conferences.
In addition to adding the mapping table entries, you must also add the
Global Directory of users to each installation of the 3Com IP
Conferencing Module. This enables users to monitor the presence status
of their buddies located throughout the network. For details, see
Configuring the User Database Import Parameters.
Page 48

48 CHAPTER 4: PRESENCE SERVER
Adding Distributed
Presence/Conference
Provisioning Entries
Following the initial software installation, a single entry appears on the
mapping table. It links the local Presence server to a single VCX. Add
more entries to the mapping table if:
n the implementation includes more than one VCX system
n the implementation includes more than one Presence server
If the implementation includes more than one Presence server, then
identical mapping table entries must be added to each installation of the
3Com IP Conferencing Module.
For each entry, you must also specify whether conference provisioning is
either “allowed” or “denied” to users who are configured on the primary
registrar of the VCX system.
To add a mapping table entry for distributed presence/conference
provisioning:
1 Log in to the 3Com IP Conferencing Module as an administrative user.
2 Select Admin > System Configuration.
3 From the quick links list, select Distributed Presence and Conference
Provisioning.
The Distributed Presence and Conference Provisioning screen appears:
Figure 10 Distributed Presence and Conference Provisioning screen
The fields for this screen are described below:
Ta bl e 9 Distributed Presence and Conference Provisioning fields
Field Description
Primary Registrar The host name or IP address of the primary VCX call
processor.
Secondary Registrar The host name or IP address of the secondary VCX call
processor (if it exists).
Page 49

Configuring Distributed Presence 49
Table 9 Distributed Presence and Conference Provisioning fields (continued)
Editing Distributed
Presence/Conference
Provisioning Entries
Presence Server URI The URI address of the 3Com IP Conferencing Module
Change Conference
)Provisioning
In order to monitor presence and provision conferences, users must be
contained in the Global Directory of Users downloaded to the 3Com IP
Conferencing Module. For details, see Configuring the
Import Parameters.
4 Add an entry for each VCX server pair in your network that is served by a
3Com IP Conferencing Module.
5 When you have finished with the configuration, click Add.
Changes to the parameters on this screen will not take effect until you
restart the sippeng process using the commands in the Servers
Monitoring screen.
hosting the Presence Server.
Selecting “allowed” enables users configured on the
primary registrar of the VCX system to provision
conferences on the 3Com IP Conferencing Module.
Selecting “denied” prevents these users from
provisioning conferences.
User Database
To edit a mapping table entry for distributed presence/conference
provisioning:
1 Log in to the 3Com IP Conferencing Module as an administrative user.
2 Select Admin > System Configuration.
3 From the quick links list, select Distributed Presence and Conference
Provisioning.
The Distributed Presence and Conference Provisioning screen appears.
4 Select the Primary Registrar for the mapping table entry you want to
edit.
The Distributed Presence/Conference Provisioning screen appears.
Page 50

50 CHAPTER 4: PRESENCE SERVER
Figure 11 Distributed Presence/Conference Provisioning screen
The fields for this screen are described below:
Ta bl e 10 Distributed Presence and Conference Provisioning fields
Field Description
Primary Registrar The host name or IP address of the primary VCX call
Secondary Registrar The host name or IP address of the secondary VCX call
Presence Server URI The URI address of the 3Com IP Conferencing Module
Change Conference
)Provisioning
processor.
processor (if it exists).
hosting the Presence Server.
Selecting “allowed” enables users configured on the
primary registrar of the VCX system to provision
conferences on the 3Com IP Conferencing Module.
Selecting “denied” prevents these users from
provisioning conferences.
Starting and Stopping the Presence Server
5 When you have finished editing the entry, click Submit.
Once the Presence Server has been configured, it must be restarted
before it can be used. An administrator can start or stop the Presence
Server through the controls on the Monitor Servers screen.
To start or stop the Presence Server:
1 Log in to the 3Com IP Conferencing Module as an administrative user.
2 Select Admin > Monitor Servers.
The Monitor Servers screen appears. This screen lists the system
processes, indicating their current state. The Presence Server is identified
as sippeng in the Application column.
Page 51

Starting and Stopping the Presence Server 51
3 Depending on the process you wish to perform, click on the following
controls:
n probe — determines the current state of the server
n stop — stops the server
n start — starts the server.
Taking the Presence Server through a power cycle (turning it off and on
again), causes presence information to be unavailable for approximately
one hour.
Page 52

52 CHAPTER 4: PRESENCE SERVER
Page 53

MAINTENANCE AND
5
TROUBLESHOOTING
This chapter contains information on how the 3Com IP Conferencing
Module responds to unexpected events such as power outages, and how
to perform recommended maintenance procedures such as database
backups.
This chapter includes the following topics:
n Power Cycling
n Managing the Status of Key Processes
n Managing the Status of the Conference Servers
n Database Backup and Restore
n Manual Database Switchover
n Managing the Error and Debug Log Files
n Changing or upgrading the License Key
Power Cycling When the 3Com IP Conferencing Module is unavailable due to
power-cycling or a reboot, users will not be able to connect to
conferences. Existing calls will be affected by power cycling.
If you need to power-cycle the 3Com IP Conferencing Module, you
should try to do so in an off-peak period to minimize loss of service.
Managing the Status of Key Processes
A functioning 3Com IP Conferencing Module has a set of core processes
which must run in order for the conferencing and presence applications
to work. Other applications require additional services to function.
Page 54

54 CHAPTER 5: MAINTENANCE AND TROUBLESHOOTING
To check the status of key processes, or to start or stop the processes:
1 Log in to the 3Com IP Conferencing Module as an administrative user.
2 Select Admin > Monitor Servers.
The Monitor Servers screen appears. See Figure 12. This screen lists the
system processes, indicating their current state.
Figure 12 Monitor Servers screen
3 Check to see that the core processes and other applications are started:
Conferencing Server processes:
n confbridge — the conference attendant
n mysqld — the conference user information database
n sipconf — the conferencing server engine
n sippeng — the presence server
n vcxdb — acquires user information from the user database.
Page 55

Managing the Status of the Conference Servers 55
In a distributed environment, some processes will be hosted on multiple
3Com IP Conferencing Modules. For example, in the example above,
confbridge and sipconf are hosted on two different machines.
4 As required, enter the following process commands:
n probe — determines the current state of the process
n stop — stops a process
n start — starts a process.
When sippeng is stopped, all presence information is lost. New presence
information will be collected when the sippeng process is restarted. This
process can take up to one hour.
Managing the Status of the Conference Servers
The conference application can run on multiple 3Com IP Conferencing
Modules. For example, an “all-in-one” implementation has a single
conference server, while a fully equipped distributed implementation has
ten conference servers (with two more servers reserved for provisioning
and database redundancy).
To check the status of the conference servers:
1 Log in to the 3Com IP Conferencing Module as an administrative user.
2 Select Conferences > Conference Servers.
The Conference Servers screen appears. See Figure 13.
Figure 13 Conference Servers
3 View & edit the fields according to the descriptions in Ta bl e 11.
Ta bl e 11 Conference server configuration fields
Field Description
Page 56

56 CHAPTER 5: MAINTENANCE AND TROUBLESHOOTING
Table 11 Conference server configuration fields (continued)
Server host: The domain name for the 3Com IP Conferencing
Active? Indicates whether or not the server is running. Start,
Server state Indicates whether the server is unlocked and can host
Service control Use the Service Control list box to control the
Server capacity The maximum number of concurrent conference
Non-Scheduled conference
connected/maximum
participant counts
Total Non-Scheduled
conference
connected/maximum
participant counts
Non-Scheduled server
capacity (NSPN)
Scheduled conference
connected/maximum
participant counts
Module. Select this field to go to the Conference Server
Configuration screen for a particular server. For details,
see,
Configuring the Conference Server Parameters
stop, and probe the server on the Monitor Servers
screen. For details, see
Processes.
Note: There is a delay of approximately two minutes
before changes made on the Monitor Servers screen
are reflected on the Conference Servers screen.
new conferences, or is locked and cannot host new
conferences.
conference server’s availability:
n To take the server out of service, select lock. The
server will allow current conferences to finish, but
will not host any new conferences that are
distributed to it.
n To bring the server into service, select unlock. The
server will host new conferences that are
distributed to it.
connections that the server can support, as defined by
the license key.
The current number of participants, and the configured
maximum number of participants, for each Meet-me,
Ad hoc, Instant, and Emergency conference hosted on
the server. Click on a conference ID to go to its
associated Conference screen.
The current number of participants, and the configured
maximum number of participants, for all Meet-me, Ad
hoc, Instant, and Emergency conferences hosted on the
server.
The NSPN is the number of ports reserved for Meet-me,
Ad Hoc, Instant, and Emergency conference users.
NSPN + SPN + APN + FPN = maximum server capacity.
The current number of participants, and the configured
maximum number of participants, for each Scheduled
conference hosted on the server. Click on a conference
ID to go to its associated Conference screen.
Managing the Status of Key
Page 57

Database Backup and Restore 57
Table 11 Conference server configuration fields (continued)
Database Backup and Restore
Total scheduled
conference
connected/maximum
participant counts
Scheduled Server Capacity
(SPN + FPN)
Delete inactive server
record
3Com applications make use of the MySQL database to store
configuration and user information. It is good practice to back up this
database periodically, preferably to an off-site location or removable
media for safekeeping.
In the current release, the web interface does not have backup and
restore functions, so this task must be done using the command line
interface.
In a dual-database system, MySQL database replication is used to ensure
that the server hosting the slave database has an up-to-date copy of the
master database. Although a dual-server system reduces the need for
backups, they should still be performed to guard against the possibility of
database corruption or catastrophic site failure. If a database restore is
required, it only needs to be performed on the master server, not the
slave.
The current number of participants, and the configured
maximum number of participants, for all Scheduled
conferences hosted on the server.
The number of ports reserved for scheduled conference
users, plus the number of floater ports available for
conferences that have reached their provisioned limit.
Select in order to delete an inactive conference server
from the 3Com IP Conferencing Module. The server
must be stopped before this field can be selected. To
stop the server, see
Processes.
Managing the Status of Key
Backing up the
Database
To obtain the most accurate backup of the current state of your system,
you must shut down the 3Com IP Conferencing Module first, then
perform the database backup while it’s idle. Service disruption can be
minimized by scheduling backups or restores for off-peak hours such as
the evening.
This takes about 2 minutes, depending on the performance of your
server. It creates a backup file that you can copy to an off-site location
removable media.
Page 58

58 CHAPTER 5: MAINTENANCE AND TROUBLESHOOTING
To back up the database:
1 Log in to the 3Com IP Conferencing Module as an administrative user.
2 Select Admin > Monitor Servers.
The Monitor Servers screen appears.
3 Use the Stop command to stop all processes that are running.
When sippeng is stopped, all presence information is lost. New presence
information will be collected when the sippeng process is restarted. This
process can take up to one hour.
4 Open a Linux window.
5 Change to the backup directory. This can be any directory on the server,
such as /opt.
6 From the command line, type
mysqldump --opt --all-databases >backup.sql
7 Copy the backup file from the backup directory to an off-site location or
removable media.
8 Select Admin > Monitor Servers.
The Monitor Servers screen appears.
Restoring the
Database
9 Use the Start command to re-start all processes.
This takes about 2 minutes, depending on the performance of your
server. You will need to copy the backup file to the server before you
perform the restore.
Shared files for conferences are not backed up and restored with this
procedure.
To restore the database:
1 Log in to the 3Com IP Conferencing Module as an administrative user.
2 Select Admin > Monitor Servers.
The Monitor Servers screen appears.
3 Use the Stop command to stop all processes that are running.
When sippeng is stopped, all presence information is lost. New presence
information will be collected when the sippeng process is restarted. This
process can take up to one hour.
Page 59

Database Backup and Restore 59
4 Open a Linux window.
5 Change to the backup directory. This can be any directory on the server,
such as /opt.
6 Copy the backup file from the off-site location/removable media to the
backup directory.
7 From the command line, type
mysql <backup.sql
mysqladmin flush-privileges
8 Select Admin > Monitor Servers.
The Monitor Servers screen appears.
9 Use the Start command to re-start all processes.
Restoring the
Database on the
Master (primary)
Server
Use the following procedure to restore the database in a dual-database
environment. You will need to copy the backup file to the master
(primary) server before you perform the restore.
In a dual-database environment, perform the restore procedure only on
the master server, not the slave. The slave database is created
automatically from a “snapshot” of the master database.
To restore the database on the master (primary) server:
1 Log in to the 3Com IP Conferencing Module as an administrative user.
2 Select Admin > Monitor Servers.
The Monitor Servers screen appears.
3 Use the Stop command to stop all processes that are running.
When sippeng is stopped, all presence information is lost. New presence
information will be collected when the sippeng process is restarted. This
process can take up to one hour.
4 Open a Linux window on the master server.
5 Change to the backup file directory. This can be any directory on the
master server, such as /opt.
6 Copy the backup file from the off-site location/removable media to the
backup directory.
7 From the command line, type
Page 60

60 CHAPTER 5: MAINTENANCE AND TROUBLESHOOTING
mysql <backup.sql
mysqladmin flush-privileges
The restore MUST be made on the current MySQL master; to find out
which machine is the current master, run:
mysql -e "SELECT * FROM sip.dbservers"
The output will look like this:
+-----------------------+--------+
| server_name | role |
+-----------------------+--------+
| dbserver1.example.com | master |
| dbserver2.example.com | slave |
+-----------------------+--------+
In this example, the restore must be performed on dbserver1.
8 After completing the restore, rebuild the slave database by running
"scripts/make_slave.sh" on the slave server. See
Slave Database.
9 Select Admin > Monitor Servers.
Manual Switchover to
Manual Database Switchover
The Monitor Servers screen appears.
10 Use the Start command to re-start all processes.
For distributed systems, a single database pair (master and slave) is
provided to ensure no single point of failure. Automatic switchover
occurs if the slave cannot communicate with the master for ten minutes.
Manual switchover is also possible using an SQL command.
The administrator may be required to perform a manual switchover if one
or more of the application servers cannot access the database following a
network failure.
To perform a manual database switchover, it is necessary to manually
change the role of both servers. First change the slave to a master (both
servers will be running master databases). Then change the original
master to a slave. Stop all services prior to performing a manual database
switchover.
Page 61

Managing the Error and Debug Log Files 61
Manual Switchover
to Master Database
Manual Switchover
to Slave Database
To designate the local database as the master database:
1 Open a Linux command prompt.
2 Go to the install directory (/opt/3Com/VCX/presconf).
3 Typ e
./scripts/make_master.tcl
Make_master takes several seconds to complete for most installations.
To designate the local database as the slave database:
1 Open a Linux command prompt.
2 Go to the install directory (/opt/3Com/VCX/presconf).
3 Typ e
./scripts/make_slave.sh
For most installations, make_slave completes almost immediately. It may
take a few extra seconds if the database is large.
Never designate both databases as slaves.
Managing the Error and Debug Log Files
During operation of the 3Com IP Conferencing Module, each application
writes to two log files:
n Error log file — Contains error messages related to the application.
n Debug log file — Contains debugging information. Depending on the
application, this information can include:
n SIP activity
n SQL activity (reading and writing information to the database)
n Network activity
n Instant messaging activity (IMPP)
n Miscellaneous other activity for the application.
As soon as you start the server application processes, messages start
being written to the active error and debug log files.
Page 62

62 CHAPTER 5: MAINTENANCE AND TROUBLESHOOTING
In addition to an active file, the system retains seven backup files — one
for each day of the week — for each error and debug log. The backup
process occurs nightly at 11:58 pm when the active file overwrites the
backup file for the current day of the week. Debug log files are always
backed up. Error log files are only backed up if new error messages have
been recorded that day.
Ta bl e 12 Applications and associated log files
Application Application name Debug log file Error log file*
confbridge Conference bridge confbridge_errlog10_<day> error.txt_<day>
sipconf Conferencing server sipconf_errlog10_<day> error.txt_<day>
sippeng Presence server sippeng_errlog10_<day> error.txt_<day>
userDataImport (database import file) vcxdb_errlog10_<day> error.txt_<day>
* Where <day> is Mon, Tue, Wed, Thu, Fri, Sat, or Sun.
Log File Size Limits On a busy system, the log files may grow quite large. For this reason,
there is a limit to the maximum size of the log files and to the total space
they may use on the hard drive.
Maximum Log File Size
A single log file can cannot exceed 2 GB for an application. If a log file
exceeds this limit, the system will write a message to the error log file
(“Maximum log file size reached ...”) and stop writing debug and error
messages for the application. No new messages will be written to the
debug and error log files until the next night at 11:58 pm, when new files
are started for the application.
Maximum Disk Space Usage
By default, an application can use no more than 80 percent of the disk
partition where the 3Com IP Conferencing Module is installed (/opt). If
this limit is exceeded, the system will write a warning message to the
error log file (“Disk utilization has reached or is close to 80 percent ...”)
and stop writing debug and error messages for the application. Logging
stops for other applications with an 80 percent threshold as soon the
system checks their resource status. (The system checks each application’s
resource level every six minutes.) No new messages will be written to the
debug and error log files until you free up resources by removing some
logs from the disk.
Page 63

Managing the Error and Debug Log Files 63
You can change the default level at which the system stops writing log
files for an application. For example, you can set a low threshold of 50
percent for one application, a high threshold of 90 percent for another
application, and leave all other applications at the default threshold of 80
percent. For details, see
Application.
Viewing the Log Files You can view (and if necessary edit) the log files with any text editor.
To view the log files:
1 ssh to the 3Com IP Conferencing Module and log in.
2 CD to /opt/logs
3 Change to an application directory. Options are:
n confbridge — the conference attendant
n sipconf — the conferencing engine
n sippeng — the presence server
n userDataImport — acquires user information from the user
database.
Changing the Log File Threshold for an
4 List the log files available in the application directory.
Changing the Log File
Threshold for an
Application
5 Use the less command to view or edit a log file.
For example, to view the current debug log file for the Conference Server,
type:
less sipconf_errlog10
To view Thursday’s debug log file for the Conference Server, type:
less sipconf_errlog10_Thu
By default, all applications are configured to stop logging when the
3Com IP Conferencing Module disk partition (/opt) is 80 percent full.
Optionally, you can set different log file thresholds for the applications.
For example, you can configure one application to stop logging at 60
percent, another application to stop logging at 70 percent, and all other
applications to stop logging at 80 percent (the default).
To update the log file threshold for an application, you need to edit the
run-monitor script that manages the operation of the server applications.
Page 64

64 CHAPTER 5: MAINTENANCE AND TROUBLESHOOTING
The run-monitor contains a number other parameters in addition to the
log file threshold parameter. 3Com recommends that you do not change
the default values for these parameters.
To change the log file threshold for an application:
1 ssh to the 3Com IP Conferencing Module and log in.
2 CD to /opt/3com/VCX/presconf
3 Use vi to edit the run-monitor script:
vi run-monitor
4 Go to application configuration section of the script. Applications
available:
n confbridge — the conference attendant
n sipconf — the conferencing engine
n sippeng — the presence server
n userDataImport — acquires user information from the user
database.
5 To update the logging threshold for an application, enter a value between
0 and 100 for the -T parameter. For example, to change the threshold to
70 percent, enter -T 70. See
Figure 14.
Figure 14 Seting the Logging Threshold
6 Save the updated run-monitor script.
7 Log in to the 3Com IP Conferencing Module as an administrative user.
8 Select Admin > Monitor Servers.
The Monitor Servers screen appears.
9 For the application you have updated, click stop and start.
This causes the application to be restarted and the configuration updates
to take effect.
Page 65

Changing or upgrading the License Key 65
Changing or upgrading the License Key
If you have purchased new applications, or need to increase the number
of users on your system, then you may need to upgrade your license key.
To change or upgrade the license key:
1 Log in to the IP Conferencing Module as an administrative user.
2 Select Admin > System Administration from the menu bar.
3 From quick links, select Licensing Information.
The License Information screen appears. See Figure 15.
Figure 15 Licensing Information
1
2
3
1
300 - 200 indicates that the conference server supports 300 concurrent
connections, of which 200 are G.729-enabled.
2
1 - 1- 1 indicates that the conference server supports audio, video and
desktop sharing media types.
3
10 - 10 indicates that the conference attendant supports 10 concurrent
connections, of which all 10 are G.729-enabled.
4 You can add a new license string, or delete the old license from this
screen.
3Com creates and distributes the license keys. Each key must contain (in
addition to other elements) a host name that is resolvable and accessible
by the host that is running the web console server. Otherwise, the license
key addition will fail and the web console will display an error message.
Page 66

66 CHAPTER 5: MAINTENANCE AND TROUBLESHOOTING
Page 67

6
OBTAINING SUPPORT FOR YOUR PRODUCT
Register Your Product
Purchase Value-Added Services
Warranty and other service benefits start from the date of purchase, so it
is important to register your product quickly to ensure you get full use of
the warranty and other service benefits available to you.
Warranty and other service benefits are enabled through product
registration. Register your product at
3Com eSupport services are based on accounts that you create or have
authorization to access. First time users must apply for a user name and
password that provides access to a number of eSupport features
including Product Registration, Repair Services, and Service Request. If
you have trouble registering your product, please contact 3Com Global
Services for assistance.
To enhance response times or extend warranty benefits, contact 3Com or
your authorized 3Com reseller. Value-added services like 3Com Express
and Guardian
upgrades, onsite assistance or advance hardware replacement.
Experienced engineers are available to manage your installation with
minimal disruption to your network. Expert assessment and
implementation services are offered to fill resource gaps and ensure the
success of your networking projects. More information on 3Com
maintenance and Professional Services is available at
http://www.3com.com/
SM
can include 24x7 telephone technical support, software
http://eSupport.3com.com/.
SM
Contact your authorized 3Com reseller or 3Com for a complete list of the
value-added services available in your area.
Page 68

68 APPENDIX 6: OBTAINING SUPPORT FOR YOUR PRODUCT
Troubleshoot Online
Access Software Downloads
You will find support tools posted on the 3Com web site at
http://www.3com.com/
3Com Knowledgebase helps you troubleshoot 3Com products. This
query-based interactive tool is located at
http://knowledgebase.3com.com and contains thousands of technical
solutions written by 3Com support engineers.
Software Updates are the bug fix / maintenance releases for the version
of software initially purchased with the product. In order to access these
Software Updates you must first register your product on the 3Com web
http://eSupport.3com.com/
site at
First time users will need to apply for a user name and password. A link to
software downloads can be found at
under the Product Support heading at
http://eSupport.3com.com/, or
http://www.3com.com/
Software Upgrades are the software releases that follow the software
version included with your original product. In order to access upgrades
and related documentation you must first purchase a service contract
from 3Com or your reseller.
Telephone Technical Support and Repair
To enable telephone support and other service benefits, you must first
register your product at
http://eSupport.3com.com/
Warranty and other service benefits start from the date of purchase, so it
is important to register your product quickly to ensure you get full use of
the warranty and other service benefits available to you.
When you contact 3Com for assistance, please have the following
information ready:
n Product model name, part number, and serial number
n Proof of purchase, if you have not pre-registered your product
n A list of system hardware and software, including revision level
n Diagnostic error messages
n Details about recent configuration changes, if applicable
Page 69

Contact Us 69
To send a product directly to 3Com for repair, you must first obtain a
return authorization number (RMA). Products sent to 3Com, without
authorization numbers clearly marked on the outside of the package, will
be returned to the sender unopened, at the sender’s expense. If your
product is registered and under warranty, you can obtain an RMA
number online at
http://eSupport.3com.com/. First time users will
need to apply for a user name and password.
Contact Us 3Com offers telephone, e-mail and internet access to technical support
and repair services. To access these services for your region, use the
appropriate telephone number, URL or e-mail address from the list below.
Telephone numbers are correct at the time of publication. Find a current
directory of contact information posted on the 3Com web site at
http://csoweb4.3com.com/contactus/
Country Telephone Number Country Telephone Number
Asia, Pacific Rim Telephone Technical Support and Repair
Australia
Hong Kong
India
Indonesia
Japan
Malaysia
New Zealand
Pakistan
You can also obtain support in this region using the following e-mail: apr_technical_support@3com.com
Or request a repair authorization number (RMA) by fax using this number: + 65 543 6348
Europe, Middle East, and Africa Telephone Technical Support and Repair
From anywhere in these
regions, call:
From the following countries, you may use the numbers shown:
1 800 678 515
800 933 486
+61 2 9424 5179 or
000800 650 1111
001 803 61009
00531 616 439 or
03 3507 5984
1800 801 777
0800 446 398
+61 2 9937 5083
+44 (0)1442 435529
Philippines
P. R . o f C hi n a
Singapore
S. Korea
Ta iw a n
Thailand
1235 61 266 2602 or
1800 1 888 9469
800 810 3033
800 6161 463
080 333 3308
00801 611 261
001 800 611 2000
Page 70

70 APPENDIX 6: OBTAINING SUPPORT FOR YOUR PRODUCT
Country Telephone Number Country Telephone Number
Austria
Belgium
Denmark
Finland
France
Germany
Hungary
Ireland
Israel
Italy
You can also obtain support in this region using the following URL:
http://emea.3com.com/support/email.html
Latin America Telephone Technical Support and Repair
Antigua
Argentina
Aruba
Bahamas
Barbados
Belize
Bermuda
Bonaire
Brazil
Cayman
Chile
Colombia
Costa Rica
Curacao
Ecuador
Dominican Republic
You can also obtain support in this region using the following:
Spanish speakers, enter the URL:
http://lat.3com.com/lat/support/form.html
Portuguese speakers, enter the URL:
http://lat.3com.com/br/support/form.html
English speakers in Latin America should send e-mail to:
lat_support_anc@3com.com
01 7956 7124
070 700 770
7010 7289
01080 2783
0825 809 622
01805 404 747
06800 12813
1407 3387
1800 945 3794
199 161346
1 800 988 2112
0 810 444 3COM
1 800 998 2112
1 800 998 2112
1 800 998 2112
52 5 201 0010
1 800 998 2112
1 800 998 2112
0800 13 3COM
1 800 998 2112
AT&T +800 998 2112
AT&T +800 998 2112
AT&T +800 998 2112
1 800 998 2112
AT&T +800 998 2112
AT&T +800 998 2112
Luxembourg
Netherlands
Norway
Poland
Portugal
South Africa
Spain
Sweden
Switzerland
U.K.
Guatemala
Haiti
Honduras
Jamaica
Martinique
Mexico
Nicaragua
Panama
Paraguay
Peru
Puerto Rico
Salvador
Trinidad and Tobago
Uruguay
Venezuela
Virgin Islands
342 0808128
0900 777 7737
815 33 047
00800 441 1357
707 200 123
0800 995 014
9 021 60455
07711 14453
08488 50112
0870 909 3266
AT&T +800 998 2112
57 1 657 0888
AT&T +800 998 2112
1 800 998 2112
571 657 0888
01 800 849CARE
AT&T +800 998 2112
AT&T +800 998 2112
54 11 4894 1888
AT&T +800 998 2112
1 800 998 2112
AT&T +800 998 2112
1 800 998 2112
AT&T +800 998 2112
AT&T +800 998 2112
57 1 657 0888
US and Canada Telephone Technical Support and Repair
1 800 876 3266
Page 71

ACKNOWLEDGEMENT OF
7
Supplementary
Copyright
THIRD PARTY SOFTWARE
3Com server software applications contain integrated third–party
software. This chapter acknowledges this third–party software.
This chapter includes the following topics:
n Supplementary Copyright Information
3Com server software applications contain integrated third–party software which is covered under the
following license agreements:
Information
Net-SNMP License Part 1: CMU/UCD copyright notice:
Copyright 1989, 1991, 1992 by Carnegie Mellon University
Derivative Work - 1996, 1998-2000
Copyright 1996, 1998-2000 The Regents of the University of California
All Rights Reserved
Permission to use, copy, modify and distribute this software and its documentation for any purpose and
without fee is hereby granted, provided that the above copyright notice appears in all copies and that both
that copyright notice and this permission notice appear in supporting documentation, and that the name of
CMU and The Regents of the University of California not be used in advertising or publicity pertaining to
distribution of the software without specific written permission.
CMU AND THE REGENTS OF THE UNIVERSITY OF CALIFORNIA DISCLAIM ALL WARRANTIES WITH REGARD TO
THIS SOFTWARE, INCLUDING ALL IMPLIED WARRANTIES OF MERCHANTABILITY AND FITNESS. IN NO EVENT
SHALL CMU OR THE REGENTS OF THE UNIVERSITY OF CALIFORNIA BE LIABLE FOR ANY SPECIAL, INDIRECT OR
CONSEQUENTIAL DAMAGES OR ANY DAMAGES WHATSOEVER RESULTING FROM THE LOSS OF USE, DATA
OR PROFITS, WHETHER IN AN ACTION OF CONTRACT, NEGLIGENCE OR OTHER TORTIOUS ACTION, ARISING
OUT OF OR IN CONNECTION WITH THE USE OR PERFORMANCE OF THIS SOFTWARE.
Part 2: Networks Associates Technology, Inc. copyright notice (BSD)
Copyright © 2001-2002, Networks Associates Technology, Inc.
All rights reserved.
Redistribution and use in source and binary forms, with or without modification, are permitted provided that
the following conditions are met:
Redistributions of source code must retain the above copyright notice, this list of conditions and the following
disclaimer.
Page 72

72 CHAPTER 7: ACKNOWLEDGEMENT OF THIRD PARTY SOFTWARE
Redistributions in binary form must reproduce the above copyright notice, this list of conditions and the
following disclaimer in the documentation and/or other materials provided with the distribution.
Neither the name of the Networks Associates Technology, Inc. nor the names of its contributors may be used
to endorse or promote products derived from this software without specific prior written permission.
THIS SOFTWARE IS PROVIDED BY THE COPYRIGHT HOLDERS AND CONTRIBUTORS ``AS IS'' AND ANY EXPRESS
OR IMPLIED WARRANTIES, INCLUDING, BUT NOT LIMITED TO, THE IMPLIED WARRANTIES OF
MERCHANTABILITY AND FITNESS FOR A PARTICULAR PURPOSE ARE DISCLAIMED. IN NO EVENT SHALL THE
COPYRIGHT HOLDERS OR CONTRIBUTORS BE LIABLE FOR ANY DIRECT, INDIRECT, INCIDENTAL, SPECIAL,
EXEMPLARY, OR CONSEQUENTIAL DAMAGES (INCLUDING, BUT NOT LIMITED TO, PROCUREMENT OF
SUBSTITUTE GOODS OR SERVICES; LOSS OF USE, DATA, OR PROFITS; OR BUSINESS INTERRUPTION) HOWEVER
CAUSED AND ON ANY THEORY OF LIABILITY, WHETHER IN CONTRACT, STRICT LIABILITY, OR TORT
(INCLUDING NEGLIGENCE OR OTHERWISE) ARISING IN ANY WAY OUT OF THE USE OF THIS SOFTWARE, EVEN
IF ADVISED OF THE POSSIBILITY OF SUCH DAMAGE.
Part 3: Cambridge Broadband Ltd. copyright notice (BSD)
Portions of this code are copyright © 2001-2002, Cambridge Broadband Ltd.
All rights reserved.
Redistribution and use in source and binary forms, with or without modification, are permitted provided that
the following conditions are met:
Redistributions of source code must retain the above copyright notice, this list of conditions and the following
disclaimer.
Redistributions in binary form must reproduce the above copyright notice, this list of conditions and the
following disclaimer in the documentation and/or other materials provided with the distribution.
The name of Cambridge Broadband Ltd. may not be used to endorse or promote products derived from this
software without specific prior written permission.
THIS SOFTWARE IS PROVIDED BY THE COPYRIGHT HOLDER ``AS IS'' AND ANY EXPRESS OR IMPLIED
WARRANTIES, INCLUDING, BUT NOT LIMITED TO, THE IMPLIED WARRANTIES OF MERCHANTABILITY AND
FITNESS FOR A PARTICULAR PURPOSE ARE DISCLAIMED. IN NO EVENT SHALL THE COPYRIGHT HOLDER BE
LIABLE FOR ANY DIRECT, INDIRECT, INCIDENTAL, SPECIAL, EXEMPLARY, OR CONSEQUENTIAL DAMAGES
(INCLUDING, BUT NOT LIMITED TO, PROCUREMENT OF SUBSTITUTE GOODS OR SERVICES; LOSS OF USE,
DATA, OR PROFITS; OR BUSINESS INTERRUPTION) HOWEVER CAUSED AND ON ANY THEORY OF LIABILITY,
WHETHER IN CONTRACT, STRICT LIABILITY, OR TORT (INCLUDING NEGLIGENCE OR OTHERWISE) ARISING IN
ANY WAY OUT OF THE USE OF THIS SOFTWARE, EVEN IF ADVISED OF THE POSSIBILITY OF SUCH DAMAGE.
Xerces License The Apache Software License, Version 1.1
Copyright © 1999 The Apache Software Foundation. All rights reserved.
Redistribution and use in source and binary forms, with or without modification, are permitted provided that
the following conditions are met:
1 Redistributions of source code must retain the above copyright notice, this list of conditions and the following
disclaimer.
2 Redistributions in binary form must reproduce the above copyright notice, this list of conditions and the
following disclaimer in the documentation and/or other materials provided with the distribution.
3 The end-user documentation included with the redistribution, if any, must include the following
acknowledgment:
“This product includes software developed by the Apache Software Foundation (http://www.apache.org/).”
Alternately, this acknowledgment may appear in the software itself, if and wherever such third-party
acknowledgments normally appear.
4 The names “Xerces” and “Apache Software Foundation” must not be used to endorse or promote products
derived from this software without prior written permission. For written permission, please contact
apache@apache.org.
5 Products derived from this software may not be called “Apache,” nor may “Apache” appear in their name,
without prior written permission of the Apache Software Foundation.
Page 73

Supplementary Copyright Information 73
THIS SOFTWARE IS PROVIDED ``AS IS'' AND ANY EXPRESSED OR IMPLIED WARRANTIES, INCLUDING, BUT NOT
LIMITED TO, THE IMPLIED WARRANTIES OF MERCHANTABILITY AND FITNESS FOR A PARTICULAR PURPOSE
ARE DISCLAIMED. IN NO EVENT SHALL THE APACHE SOFTWARE FOUNDATION OR ITS CONTRIBUTORS BE
LIABLE FOR ANY DIRECT, INDIRECT, INCIDENTAL, SPECIAL, EXEMPLARY, OR CONSEQUENTIAL DAMAGES
(INCLUDING, BUT NOT LIMITED TO, PROCUREMENT OF SUBSTITUTE GOODS OR SERVICES; LOSS OF USE,
DATA, OR PROFITS; OR BUSINESS INTERRUPTION) HOWEVER CAUSED AND ON ANY THEORY OF LIABILITY,
WHETHER IN CONTRACT, STRICT LIABILITY, OR TORT (INCLUDING NEGLIGENCE OR OTHERWISE) ARISING IN
ANY WAY OUT OF THE USE OF THIS SOFTWARE, EVEN IF ADVISED OF THE POSSIBILITY OF SUCH DAMAGE.
This software consists of voluntary contributions made by many individuals on behalf of the Apache Software
Foundation and was originally based on software copyright © 1999, International Business Machines, Inc.,
http://www.ibm.com. For more information on the Apache Software Foundation, please see
<http://www.apache.org/>.
Page 74

74 CHAPTER 7: ACKNOWLEDGEMENT OF THIRD PARTY SOFTWARE
Page 75

GLOSSARY
Ad-hoc conference Preconfigured by an administrator, this conference is joined when a
user dials a special SIP URI. A maximum of 6 users can participate in an
Ad-hoc conference.
CODEC Coder-Decoder. Transforms analog voice into digital bit stream and
vice-versa.
DHCP Dynamic Host Control Protocol. Dynamically assigns IP addresses to
network devices such as workstations IP phones and gateways. DHCP
allows you to move network devices from one subnet to another
without administrative attention.
DTMF Dual Tone Multi Frequency. The paired, high- and low-frequency tones
which make up touch tone dialing.
Emergency
Conference
ENUM E.164 Number Mapping. A protocol that maps telephone numbers
Gateway The server that connects the VoIP network with analog phones, PBXs
H.323 An ITU standard for transmitting audio, video and data conferencing
HTTP Hypertext Transfer Protocol. The protocol used by Web browsers and
Emergency conferences provide methods to notify users that their
participation is required. Emergency confernces can be configured only
by administrators.
(E.164 numbers) to URLs, making it possible to converge the PSTN and
the Internet.
and PSTN trunks.
over IP-based networks. The H.323 standard recognizes the following
endpoints in the network: H.323 terminals, gatekeepers, MCUs, and
gateways.
Web servers to transfer files, such as text and graphic files.
Page 76

76 GLOSSARY
Instant Conference An instant conference starts as soon as the first participant calls it and
dials the Conference Start PIN. The system then calls all other
conference participants, who can join immediately or call the
conference at a later time.
IP Address An identifier for a computer or device on a TCP/IP network. An IP
address is a 32-bit numeric address written as four numbers separated
by periods. Each number can be zero to 255.
IVR Interactive Voice Response (IVR).
MAC address Media Access Control address. A hardware address that uniquely
identifies each node of a network.
MIB Management Information Base. A database of objects that can be
monitored by an SNMP network manager.
Meet-me conference Intended for informal meetings with no start or end time. Always
available provided that sufficient system resources are available.
MySQL Database used to store and access provisioning system and subscriber
feature data.
NAT Network Address Translation.
PBX Private Branch Exchange. Privately-owned central switching office.
Proxy Server An intermediate device that receives SIP requests from a client and then
initiates requests on the client's behalf.
PSTN Public Switched Telephone Network.
RTP/RTCP An Internet Protocol for transmitting real-time data such as audio and
video. RTP itself does not guarantee real-time delivery of data, but it
does provide mechanisms for the sending and receiving applications to
support streaming data.
Scheduled
conference
SNMP Simple Network Management Protocol. A set of protocols for managing
Intended for formal meetings with a predetermined participant list and
a scheduled start and end time.
networks. SNMP works by sending messages to different parts of a
network. SNMP-compliant devices, called agents, store data about
themselves in Management Information Bases (MIBs) and return this
data to the SNMP requesters.
Page 77

GLOSSARY 77
STUN Simple Traversal of UDP Through Network Address Translation.
TCP Transmission Control Protocol. One of the main protocols in TCP/IP
networks. TCP guarantees delivery of data and also guarantees that
packets will be delivered in the same order in which they were sent.
Page 78

78 GLOSSARY
UDP User Datagram Protocol. A connectionless protocol that, like TCP, runs
on top of IP networks. Unlike TCP, UDP provides very few error recovery
services, offering instead a direct way to send and receive datagrams
over an IP network. It is used primarily for broadcasting messages over
a network.
URI Uniform Resource Identifier. A character string used to identify a
resource (such as a file) from anywhere on the Internet by type and
location.
Page 79

INDEX
A
access controls 15
ad hoc conferences 12
administrative privileges 26
Announcement Ports Number 17, 33
audio CODECs 24
C
Conference Names (IDs) 14
conference server parameters
APN 33
application sharing port 34
audio ports 34
conference attendant 34
file storage directory 33
FPN 33
host name 32
NSPN 33
port number 33
SPN 33
SPO 33
video ports 34
conferences
ad hoc 12
emergency 12
instant 12
Meet Me 12
public 15
restricted 15
scheduled 12
conferencing parameters
ad-hoc prefix 36
ad-hoc suffix 36
avoid G.729 36
DTMF roll call 36
EMST 36
instant message 36
maximum duration 35
maximum number of participants 35
maximum participants 35
meeting extension time 36
numeric conference name 35
proxy server for dialout 37
D
database backup 57
database import parameters
host name 39
login ID 39
password 39
path to user file 39
database restore 57
database switchover 60
debug log 61
distributed conferencing
conference server roles 19
configuration options 20
database redundancy 19
distribution mechanism 19
hostname usage 20
system upgrades 20
Distributed Presence
configuring 48
editing 49
overview 46
E
e-mail addresses 29
emergency conferences 12
error log 61
F
feature matrix 13
Floater Ports Number 17, 33
G
global parameters
admin e-mail address 32
HTTP server 31
realm 32
Page 80

80 INDEX
I
instant conferences 12
L
license key
changing or upgrading 65
local domain
adding 41
managing 40
secondary domains 40
log file
changing threshold 63
maximum disk usage 62
maximum size 62
viewing 63
logging in 25
as a regular user 27
as an administrator 26
logging out 28
M
maintenance
changing log file threshold 63
checking processes 53, 55
database backup 57
database restore 57
database switchover 60
debug log 61
error log 61
log file size limits 62
power cycling 53
viewing log files 63
Meet Me conferences 12
passwords
changing 29
port type assignment 17
power cycling 53
Presence Server
configuring 44
overview 43
starting and stopping 44, 46, 50
public conferences 15
S
scheduled conferences 12
Scheduled Ports Number 17, 33
Scheduled Ports Overbooking Number 18, 33
server status 53, 55
starting processes 53, 55
stopping processes 53, 55
system administration
license key 65
system configuration
conference server parameters 32
conferencing parameters 34
database import parameters 39
global parameters 31
local domain settings 40
U
user accounts
adding e-mail addresses 29
changing passwords 29
managing 28
user privileges 25
administrative 26
regular 25
N
Net-SNMP license 71
Non-Scheduled Ports Number 18, 33
O
overview
application 11
maintenance 53
Presence Server 43
public conferences 15
restricted conferences 15
P
V
video CODECs 24
W
web console
adding e-mail addresses 29
changing passwords 29
logging in 26
logging out 28
managing accounts 28
requirements 25
X
Page 81

Xerces license 72
X 81
Page 82

82 INDEX
 Loading...