

Page 1
IP Conferencing Module
User Guide
3Com® Convergence Applications Suite
VCX System Release 7.2
http://www.3com.com/
Part Number 900-0408-01
Published October 2006
Page 2

3Com Corporation
350 Campus Drive
Marlborough, MA
01752-3064
Copyright © 2006, 3Com Corporation. All rights reserved. No part of this documentation may be
reproduced in any form or by any means or used to make any derivative work (such as translation,
transformation, or adaptation) without written permission from 3Com Corporation.
3Com Corporation reserves the right to revise this documentation and to make changes in content from
time to time without obligation on the part of 3Com Corporation to provide notification of such revision
or change.
3Com Corporation provides this documentation without warranty of any kind, either implied or
expressed, including, but not limited to, the implied warranties of merchantability and fitness for a
particular purpose. 3Com may make improvements or changes in the product(s) and/or the program(s)
described in this documentation at any time.
UNITED STATES GOVERNMENT LEGENDS:
If you are a United States government agency, then this documentation and the software described herein
are provided to you subject to the following:
United States Government Legend: All technical data and computer software is commercial in nature
and developed solely at private expense. Software is delivered as Commercial Computer Software as
defined in DFARS 252.227-7014 (June 1995) or as a commercial item as defined in FAR
such is provided with only such rights as are provided in 3Com’s standard commercial license for the
Software. Technical data is provided with limited rights only as provided in DFAR 252.227-7015 (Nov
1995) or FAR
portion of any legend provided on any licensed program or documentation contained in, or delivered to
you in conjunction with guide.
Unless otherwise indicated, 3Com registered trademarks are registered in the United States and may or
may not be registered in other countries.
3Com and the 3Com logo are registered trademarks of 3Com Corporation. VCX is a trademark of 3Com
Corporation.
Other brand and product names may be registered trademarks or trademarks of their respective holders.
52.227-14 (June 1987), whichever is applicable. You agree not to remove or deface any
2.101(a) and as
Page 3

CONTENTS
ABOUT THIS GUIDE
Conventions 5
Notices 5
Text 6
Related Documentation 6
Comments 7
1 3COM IP CONFERENCING MODULE OVERVIEW
Conference Types 9
Conference Feature Matrix 10
Conference Names (IDs) 12
Public and Restricted Access Control 12
Public Conferences 12
Restricted Conferences 12
Scheduled and Meet Me 13
Instant and Emergency 13
2 USER SETUP
Logging in through the Web Console 15
Regular User Privileges 15
Logging in 16
Logging out 16
Adding an E-mail Address 16
3 CONFERENCE CONFIGURATION
Setting up Scheduled and Meet-me Conferences 20
Setting up Instant and Emergency Conferences 25
Dial-out List for Instant and Emergency Conferences 28
Emergency Conference Notification 30
Ad Hoc Conferences 30
Page 4

4
Setting up an Ad Hoc Conference with a Prefix 31
Setting up an Ad Hoc Conference with a Suffix 31
Viewing and Editing the Conference List 31
Overview of the Conference and Participant Control Screen 33
Viewing and Editing the Conference Controls 34
Viewing and Editing the Participant Controls 36
Adding Moderators to a Conference 39
Disconnecting Participants from a Conference 40
Viewing and Editing Conference Properties 40
Viewing Conference Information 43
Sharing Files 44
Adding a Shared File 44
Viewing a Shared File 45
Deleting a Shared File 46
Replacing a Shared File 47
Using Touch Tones to Control Conferences 48
Using the In–conference Help System 48
Leaving a Conference 50
4 PRESENCE SERVER
What is the Presence Server? 51
Setting up E-mail Notification 52
Using the Access Control List 52
5 ACKNOWLEDGEMENT OF THIRD PARTY SOFTWARE
Supplementary Copyright Information 55
Net-SNMP License 55
Xerces License 56
GLOSSARY
INDEX
Page 5
ABOUT THIS GUIDE
This guide describes how to use the 3Com® IP Conferencing Module of
the 3Com Convergence Applications Suite. In addition to providing
step-by-step instructions for common conference management tasks, this
guide contains information about how to access conferences and allocate
resources to conferences.
This guide is for both system administrators and general users. Users of
this document should have some knowledge of telecommunications and
IP telephony technology.
Release Notes are issued with some products. If the information in the
release notes differs from the information in this guide, follow the
instructions in the release notes.
Conventions This section describes notice, text, and figure conventions.
Notices Tab le 1 lists notice icons.
Ta bl e 1 Notice Icon Descriptions
Icon Notice Type Description
Information note Information that describes important features or
instructions
Caution Information that alerts you to potential loss of
Warning
data or potential damage to an application,
system, or device
Information that alerts you to potential personal
injury
Page 6

6 ABOUT THIS GUIDE
Te xt Ta bl e 2 lists text conventions.
Ta bl e 2 Text Convention Descriptions
Convention Description
Screen displays This typeface represents information as it appears on the
screen.
Commands The word “command” means that you must enter the
command exactly as shown and then press Return or
Enter. Commands appear in bold. Example:
To remove the IP address, enter the following
command:
SETDefault !0 -IP NETaddr = 0.0.0.0
Words in italics Italics are used to:
n Emphasize a point.
n Denote a new term at the place where it is defined in
the text.
n Identify menu names, menu commands, and software
button names. Examples:
From the Help menu, select Contents.
Click OK.
Related Documentation
These 3Com documents contain additional information about the
products in this release that are a part of or support the 3Com
Convergence Applications Suite.
The following documents are a part of the VCX IP Telephony Module:
n VCX
n VCX Administration Guide
n VCX
n VCX Business Telephone Quick Reference Guide
n VCX Manager’s Telephone Quick Reference Guide
n VCX
n VCX Business Telephone Guide
n VCX Manager’s Telephone Guide
n VCX Security Guide
n VCX Feature Codes for Analog Telephones Quick Reference Guide
Installation and Maintenance Guide
Basic Telephone Quick Reference Guide
Basic Telephone Guide
Page 7

Comments 7
The following documents are a part of the IP Messaging Module:
n IP Messaging Module Product Overview
n IP Messaging Module Quick Reference Guide - 3Com Native Interface
n IP Messaging Module User Guide - 3Com Native Interface
n IP Messaging Module Quick Reference Guide - Traditional Interface
n IP Messaging Module User Guide - Traditional Interface
n IP Messaging Module Operations and System Administration Guide
n E-Mail Reader Application Quick Start Guide
The following documents are a part of the IP Conferencing Module:
n IP Conferencing Module Installation Guide
n IP Conferencing Module User Guide
n IP Conferencing Module Administration Guide
n Convergence Center Client User and Administration Guide
The following documents provide information on products that support
this release:
n Enterprise Management Suite User Guide
n Enterprise Management Suite Getting Started Guide
n V7111 Analog Media Gateway Fast Track Installation Guide
n V7111 Analog Media Gateway User Guide
n V6000 Analog Media Gateway Fast Track Installation Guide
n V6000 Analog Media Gateway User Guide
n V7122 Digital Media Gateway Fast Track Installation Guide
n V6100 Digital Media Gateway Fast Track Installation Guide
n V7122 and V6100 Digital Media Gateway User Guide
Comments Send e-mail comments about this guide or about any Voice product
documentation to:
VOICE_Techcomm_comments@3com.com
Include the following information with your comments:
n Document title
Page 8

8 ABOUT THIS GUIDE
n Document part number (found on the front page)
n Page number
n Your name and organization (optional)
Example:
IP Conferencing Module User Guide
System Release 7.2
Part Number 900-0350-01
Page 25
Please address all questions regarding 3Com software to your authorized
3Com representative.
Page 9

3COM IP CONFERENCING
1
MODULE OVERVIEW
This chapter provides an overview of the principal features of the 3Com IP
Conferencing Module. Study it before attempting to configure
conferences or presence services.
This chapter includes the following topics:
n Conference Types
n Conference Feature Matrix
n Conference Names (IDs)
n Public and Restricted Access Control
Conference Types The following conference types are supported:
Scheduled — When a user sets up a scheduled conference, the
required system resources are reserved for a defined period of time. After
the conference ends, the resources become available again. User access
can be restricted (password-protected) or public (accessible to anyone
who knows the conference name). Scheduled conferences are configured
on the web console.
Meet Me — Meet Me conferences are “always on,” without a
scheduled start and end time. They are intended for informal meetings
organized by regular users, and can be started only if sufficient resources
are available on the system. User access can be restricted or public. Meet
Me conferences are configured on the web console.
Ad Hoc — An Ad Hoc conference starts when the first user joins it. No
configuration is required on the 3Com IP Conferencing Module. To
activate the conference, the user simply dials a special prefix that has
been set up by the administrator. Other users can join the conference by
dialing the same prefix; no password is required. Ad Hoc conferences
Page 10

10 CHAPTER 1: 3COM IP CONFERENCING MODULE OVERVIEW
offer the same features as Meet-Me conferences for a maximum of six
participants.
Instant — An instant conference starts as soon as the first participant
calls it and dials the Conference Start PIN. The system then calls all other
conference participants, who can join immediately or call the conference
at a later time. If calling at a later time, users will be required to enter a
password if the conference is restricted. Instant conferences can be
configured by regular users.
Emergency — Emergency conferences are the same as instant
conferences with the following exceptions:
n The system can be programmed to alert users that an emergency
conference is in progress by continuously ringing an alarm, flashing
light, or other notification device.
n Individual user extensions can be programmed with a line monitoring
feature that causes a lamp to flash whenever a emergency conference
is in progress. The user connects to the conference by pressing the
button located beside the lamp.
n Emergency conferences can be configured only by administrators.
Conference Feature Matrix
Ta bl e 3 Conference feature matrix
Feature
Set up on web console Yes Yes Yes Yes
Set up by dialing a special prefix Yes
Defined start and end time Yes
Recurrence option Yes
Number of ports allocated for conference users
(default)
Maximum number of participants per
conference (global limit)
Ta bl e 3 lists the features that are available with each type of
conference—scheduled, Meet Me, Ad Hoc, Instant, and Emergency. For
detailed feature descriptions, refer to the conference programming
instructions.
Conference Type
Scheduled Meet Me Ad Hoc Instant Emergency
25 + 5
floater ports
Set by
administrator
shared between Meet-me/Ad hoc/Instant/Emergency
Set by
administrator
25
6
3 to 30
Set by
administrator
100
Page 11

Conference Feature Matrix 11
Table 3 Conference feature matrix (continued)
Maximum duration of conference defined by
conference creator/moderator
Supported media types (subject to licensing):
Audio Yes Yes Yes Yes Yes
Instant Messaging Yes Yes Yes Yes Yes
Video Yes Yes Yes
Desktop Sharing Yes Yes Yes
Conference types:
Public - No authentication. Yes Yes
Restricted - Password authentication. Yes Yes Yes Yes
Web console controls available to moderators:
Participant access control lock Yes Yes Yes Yes
Extend conference Yes
Audio control: Open mode, Moderator Lecture
mode, Isolate Participant mode
Video control: Open mode, Moderator Lecture
mode, Isolate Participant mode
Disconnect participants Yes Yes Yes Yes
Touch tone controls available to moderators:
Terminate conference Yes Yes Yes Yes
Dial out and add participants to conference Yes Yes Yes Yes
Participant access control lock Yes Yes Yes Yes
Extend conference Yes
Mute and un-mute all participant voices Yes Yes Yes Yes
Mute and un-mute own voice Yes Yes Yes Yes
Hear a private roll call of all participants Yes Yes Yes Yes
Touch tone controls available to all participants:
Mute and un-mute own voice Yes Yes Yes Yes
Hear a private roll call of all participants Yes Yes Yes Yes
Automated conference announcements:
First in conference Yes Yes Yes Yes
Next in conference Yes Yes Yes Yes
Leave conference Yes Yes Yes Yes
End of conference first warning Yes
End of conference final warning Yes
8 hrs
Always Public
Yes Yes Yes Yes
Yes Yes
Yes Yes
Page 12

12 CHAPTER 1: 3COM IP CONFERENCING MODULE OVERVIEW
Conference Names (IDs)
Every conference is identified by a unique SIP Uniform Resource Identifier
(SIP URI) that is assigned when the conference is created. The SIP URI has
a name portion and a server host portion. For example:
sip:7000@10.1.0.238
name server host
Only the name portion is required to connect the conference. Internal
callers (callers within the enterprise) can simply dial the name and be
connected directly. External callers (callers on the PSTN) must first dial the
Conference Attendant and then dial the name when prompted.
Optionally, callers can dial the full SIP URI to reach the conference.
Conference names are always numeric (e.g. 7000). When users create a
new conference, they can select a name from a block of numbers made
available by the administrator (for example, any number between 7200
and 7299), or they can leave the conference name field blank, in which
case the system will automatically assign a name from the available block
of numbers.
In a multi-server configuration, the servers share a common range of
numeric conference names (IDs). It is not possible to assign separate
ranges to the individual servers in the pool.
Public and Restricted Access Control
Public Conferences Public conferences are unrestricted and open to anyone without the need
Restricted
Conferences
Conferences can be created with or without access control.
to authenticate or enter a passcode. The caller is only required to know
the numeric conference ID.
Users access a restricted conference by authenticating themselves to the
system. The authentication method varies depending on the conference
type.
Page 13

Public and Restricted Access Control 13
Scheduled and Meet Me
To access a restricted Scheduled or Meet Me conference, users are
required to dial the numeric conference ID and then enter a passcode to
authenticate themselves and be added to the Participant Control List for
the conference.
Instant and Emergency
When a restricted Instant or Emergency starts, the system calls a list of
users and invites them to participate. Users who answer this call and
press the # key are automatically authenticated and connected to the
conference. Users who call the conference after it has started will be
prompted to authenticate themselves by entering the Join PIN.
Users can call a conference after it has started by dialing the numeric
conference name, or, if their extension has been programmed to support
Emergency Conference Notification, by pressing the appropriate line key
on their telephone.
Page 14

14 CHAPTER 1: 3COM IP CONFERENCING MODULE OVERVIEW
Page 15

2
USER SETUP
This chapter describes how to log in to the 3Com IP Conferencing
Module and maintain user accounts.
This chapter includes the following topics:
n Logging in through the Web Console
n Adding an E-mail Address
Logging in through the Web Console
Regular User
Privileges
You can log in to the 3Com IP Conferencing Module web console using
Microsoft Internet Explorer or Mozilla Firefox. The 3Com IP Conferencing
Module can be used by users to set up conferences and manage their
presence settings.
Account information for regular users is imported into the 3Com IP
Conferencing Module from the VCX system. If user information (name,
SIP address, etc.) for a regular user requires updating, this must be done
on the VCX system, not the 3Com IP Conferencing Module.
A user has the authority to do the following in the 3Com IP Conferencing
Module:
n Manage their Presence Access Control List
n Add their personal e-mail address
n Add Scheduled and Meet-me conferences
n View Scheduled conferences*
n View Meet-me conferences*.
* For which the user is the conference owner or moderator.
Page 16
16 CHAPTER 2: USER SETUP
Logging in Users log in to the 3Com IP Conferencing Module by entering the user
name and password that has been provided to them by the administrator.
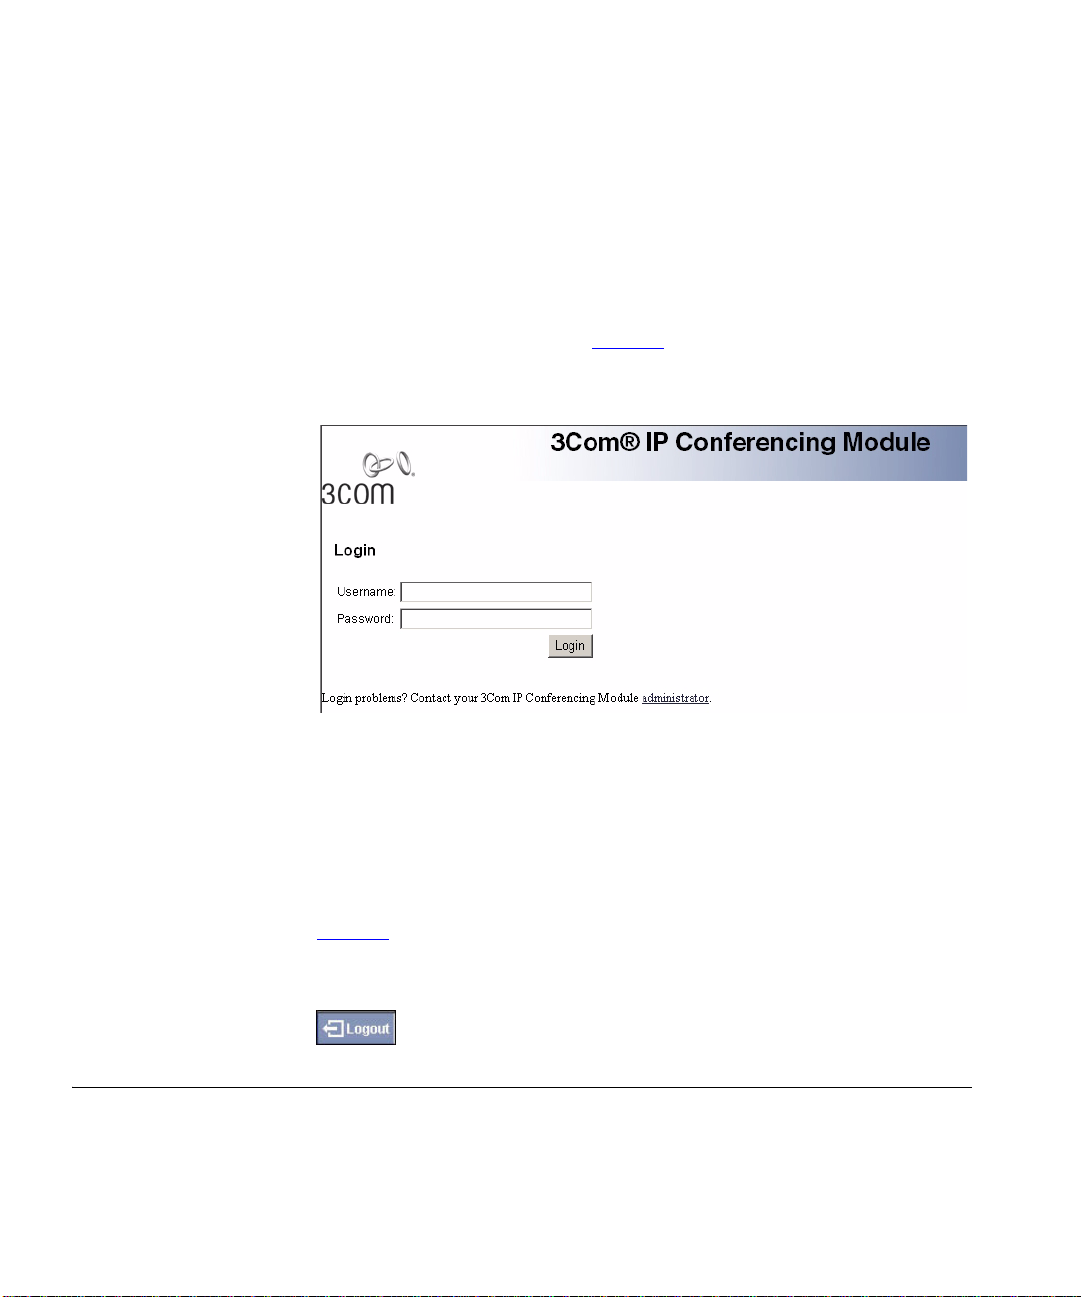
To access the 3Com IP Conferencing Module and log in as a regular user:
1 Enter this web address in the browser: http://hostname/presconf/
and press Enter. Where hostname is the fully qualified domain name or
IP address of the host running the 3Com IP Conferencing Module.
The Login screen appears. See Figure 1.
Figure 1 3Com IP Conferencing Module login screen
Logging out To sign out from the 3Com IP Conferencing Module:
Adding an E-mail Address
2 Enter the user name and password assigned to you by the administrator.
An example of a user name is 270
3 Click Login. The Conference List screen appears.
From the upper right-hand corner of the screen, select LOGOUT. See
Figure 2.
Figure 2 LOGOUT button
If your e-mail notification preference for presence is enabled (by default it
is enabled) and your e-mail address is set up, you will be notified by
e-mail when other users add you to their Buddy List requesting
permission to view your online status.
Page 17

Adding an E-mail Address 17
To add an e-mail address for yourself:
1 Log in to the 3Com IP Conferencing Module.
2 Select Profile > User Information.
The User Information screen appears.
3 Enter the Email address.
4 Click Submit.
Page 18

18 CHAPTER 2: USER SETUP
Page 19

3
CONFERENCE CONFIGURATION
This chapter describes how to set up and manage conferences using the
3Com IP Conferencing Module.
This chapter includes the following topics:
n Setting up Scheduled and Meet-me Conferences
n Setting up Instant and Emergency Conferences
n Dial-out List for Instant and Emergency Conferences
n Ad Hoc Conferences
n Viewing and Editing the Conference List
n Overview of the Conference and Participant Control Screen
n Viewing and Editing the Conference Controls
n Viewing and Editing the Participant Controls
n Adding Moderators to a Conference
n Disconnecting Participants from a Conference
n Viewing and Editing Conference Properties
n Viewing Conference Information
n Sharing Files
n Using To uch Tones to Control Conferences
n Leaving a Conference
Page 20

20 CHAPTER 3: CONFERENCE CONFIGURATION
Setting up Scheduled and Meet-me Conferences
Scheduled and Meet-me conferences are identical except for the
differences outlined in
Ta bl e 4 Scheduled and Meet-me conference feature differentiation
Feature Scheduled conferences Meet-me conferences
Setup Scheduled conferences are set
Scheduling Scheduled conferences have
Recurrence Scheduled conferences can be
Resource
Allocation
To set up a Scheduled or Meet-me conference:
1 Log in to the 3Com IP Conferencing Module.
Ta bl e 4.
up ahead of time.
defined start and end times.
programmed to recur at
predetermined intervals (daily,
weekly or monthly).
System resources are reserved
for scheduled conferences.
This ensures that once a
scheduled conference has
been set up, it will start on
time and that all participants
will be able to access it.
Meet-me conferences are
started when needed.
Meet-me conferences can start
any time and continue
indefinitely.
Meet-me conferences can
occur only once.
Meet-me conferences can be
started only if there are
sufficient system resources
available on the system.
2 Select Conference List.
3 From quick links, select Create Scheduled Conference or Create
Meet-me Conference.
The Create Conference screen appears (Scheduled or Meet-me).
Page 21

Setting up Scheduled and Meet-me Conferences 21
4 Fill out the fields according to the descriptions in Tab le 5.
Ta bl e 5 Scheduled and Meet-me Conference fields
Field Value Description
Description:
Conference Name: numeric-only Enter a number or leave the field blank
to have the 3Com IP Conferencing
Module automatically select a numeric
conference name. The system
administrator provides a block of valid
numbers for entry.
Note: In a multi-server configuration,
the servers share a common range of
numeric conference names. It is not
possible to assign separate ranges to
the individual servers in the pool.
Subject: alphanumeric Optionally, add a description of the
conference.
Max. number of
participants:
Media type: audio
1 - max This is the maximum number of
video
desktop
sharing
participants allowed in the conference.
Keep this value as low as possible as
high values may limit the server’s ability
to handle simultaneous conferences.
Once the maximum number of
participants has been reached, new
users that attempt to connect are
refused.
This value cannot exceed the global
limit configured by the administrator.
Select the media permitted in the
conference.
Page 22

22 CHAPTER 3: CONFERENCE CONFIGURATION
Table 5 Scheduled and Meet-me Conference fields (continued)
Conference schedule:
Start date and time
(time zone):
Duration in minutes
(15 - 1440):
Recurrence: Non-recurring
Recurrence pattern: Daily
Interval: Days
Day(s) of the Week: Mon - Sun Recurrent scheduled conferences only.
Day pattern: Date-based
date, time Scheduled conferences only.
Choose the date and time the
conference is scheduled to start. Use
the calendar to assist you in selecting
the date.
Note: The Time Zone is added
automatically and corresponds to the
3Com IP Conferencing Module’s time
zone.
Format: DD-MMM-YYYY
hh:mm:am/pm
Example: 12-Nov-2005 04:46 PM
minutes Scheduled conferences only.
Enter the duration of the conference in
minutes.
Note: System users can schedule
conferences of up to 8 hours (480
minutes) duration. The default is 2
Recurring
Weekly
Monthly
Weeks
Months
Day of weekbased
hours (120 minutes) duration.
Scheduled conferences only.
Specify whether the conference is
recurring or non-recurring.
Recurrent scheduled conferences only.
Program the conference to recur on a
daily, weekly, or monthly basis.
Recurrent scheduled conferences only.
Program the recurrence interval. For
example, if this field is set to “2” and
the recurrence pattern is monthly, the
conference will recur every two
months.
Program the day of the week that
weekly scheduled conferences will
recur, from Monday to Sunday.
Recurrent scheduled conferences only.
Program the day of the month or the
day and week of the month that
monthly scheduled conferences will
recur.
Page 23

Setting up Scheduled and Meet-me Conferences 23
Table 5 Scheduled and Meet-me Conference fields (continued)
Range of recurrence: 1 year
Access control:
Conference type: public,
Participant passcode for
restricted conference
(4-digit):
Moderator passcode for
restricted conference
(4-digit):
Conference announcements:
First-in-conference
announcement repeat
interval (30-300 seconds,
blank for no repeat.):
Join announcement type: tone,
end after #
end by date
restricted
#### Users who call a restricted conference
#### Moderators must enter this passcode
numeric-only A user who is the first to join a
name,
none
Recurrent scheduled conferences only.
Program the conference to end after
one year, a specific number of
occurrences, or a specific date.
To join a public conference, users must
enter a numeric conference name. No
passcode is required.
To join a restricted conference, users
must enter a numeric conference name
and passcode.
Note: Users can call a conference
directly by dialing the numeric
conference name, or indirectly by
accessing the Conference Attendant
and entering the numeric conference
name when prompted. The Conference
Attendant is typically used by external
callers (callers on the PSTN).
will be prompted to enter this passcode
before being added to the Participant
Control List and allowed to participate
in the conference.
when joining a conference in order to
access moderator controls.
conference will hear an announcement
indicating that they are the first to join.
The announcement can be set to
repeat at an interval ranging from 30
to 300 seconds. If you do not want the
announcement to repeat, leave the
field blank.
The default setting is 45 seconds.
When users other than the first user
join a conference, conference
participants will hear an
announcement. The announcement
type can be either a tone, or the name
of the individual joining the
conference. If no announcement is
required, choose “none”.
The default announcement is the
participant’s name.
Page 24

24 CHAPTER 3: CONFERENCE CONFIGURATION
Table 5 Scheduled and Meet-me Conference fields (continued)
Leave announcement type: tone,
End of conference first
warning (2-10 minutes):
End of conference last
warning (1-9 minutes):
name,
none
numeric-only Scheduled conferences only.
numeric-only Scheduled conferences only.
When participants leave a conference,
conference participants will hear an
announcement. The announcement
type can be either a tone, or the name
of the individual leaving the
conference. If no announcement is
required, choose “none”.
The default announcement is the
participant’s name.
A warning announcement will play
when the conference is nearing its
scheduled end time. The first warning
can be set to sound from 2 to 10
minutes before the conference ends.
The default setting is 5 minutes.
The first warning must be set to play
earlier than the last warning.
A warning announcement will play
when the conference is nearing its
scheduled end time. The last warning
can be set to sound from 1 to 9
minutes before the conference ends.
The default setting is 1 minute.
The last warning must be set to play
later than the first warning.
5 Click Submit to save the new conference.
Page 25

Setting up Instant and Emergency Conferences 25
Setting up Instant and Emergency Conferences
Instant and emergency conferences are identical except for the
differences outlined in
Ta bl e 6 Instant and Emergency conference feature differentiation
Feature Emergency conferences Instant conferences
Continuous Alert Users can be alerted by an
Emergency
Conference
Notification
Configuration
Authority
Source Address You can use any valid user
Maximum Number
of Users
Ta bl e 6.
alarm or flashing light (strobe
light) that an emergency
conference is taking place.
Users can be alerted by a
flashing lamp on their
telephone that an emergency
conference is taking place.
Pressing the key beside the
lamp connects the user directly
to the conference.
Only administrators have the
authority to configure
emergency conferences.
address as the source address
(“From” address) for
emergency conferences.
Emergency conferences can
support up to 100 participants.
This feature is not available
with instant conferences.
This feature is not available
with instant conferences.
Any user can configure an
instant conference.
Instant conferences always use
the conference creator’s
address as the source address.
Instant conferences can
support from 3 to 30
participants (the actual limit is
defined by the administrator).
To set up an Instant or Emergency conference:
1 Log in to the 3Com IP Conferencing Module.
2 Select Conference List.
3 From quick links, select Create Instant Conference or Create
Emergency Conference.
The Create Conference screen appears (Instant or Emergency).
Page 26

26 CHAPTER 3: CONFERENCE CONFIGURATION
4 Fill out the fields according to the descriptions in Tab le 7.
Ta bl e 7 Instant and Emergency Conference fields
Field Value Description
Description:
Conference Name: numeric-only Enter a number or leave the field blank
Subject: alphanumeric Optionally, add a description of the
Max. number of
participants:
Access Control:
to have the 3Com IP Conferencing
Module automatically select a numeric
conference name. The system
administrator provides a block of valid
numbers for entry.
Note: In a multi-server configuration,
the servers share a common range of
numeric conference names. It is not
possible to assign separate ranges to
the individual servers in the pool.
conference.
3 - max This is the maximum number of
participants allowed in the conference.
Keep this value as low as possible as
high values may limit the server’s ability
to handle simultaneous conferences.
Once the maximum number of
participants has been reached, new
users that attempt to connect are
refused.
This value cannot exceed the global
limit. The global limit for Emergency
Conferences is 100 participants. The
global limit for Instant conferences
varies from 3 to 30 participants (set by
the administrator).
Page 27

Setting up Instant and Emergency Conferences 27
Table 7 Instant and Emergency Conference fields (continued)
Conference Start PIN (4
digit):
Conference type: public,
#### After dialing the numeric conference
restricted
Conference Join PIN for
restricted
instant/emergency
conference (4 digit):
Conference announcements:
First-in-conference
announcement repeat
interval (30-300 seconds,
blank for no repeat.):
#### Users who call a restricted instant or
numeric-only A user who is the first to join a
name, the conference creator will be
prompted to enter the PIN and record a
greeting (30 seconds, maximum). The
instant or emergency conference will
start and the system will automatically
call the other users and invite them to
participate. In response, users can:
n join the conference immediately by
answering the call and pressing #
n join the conference at a later time
by dialing the numeric conference
name
n join the conference at a later time
by pressing the telephone’s
Emergency Conference Notification
key (if configured)
If the conference is restricted, users
who join late will be required to enter
the Join PIN.
Public conferences are open users who
answer the initial call to participate, or
who call the conference after it has
started. No PIN is required.
Restricted conferences are limited to
users who answer the initial call to
participate, or who call the conference
after it has started and enter the
Conference Join PIN when prompted.
emergency conference after it has
started will be prompted to enter this
4-digit numeric passcode.
conference will hear an announcement
indicating that they are the first to join.
The announcement can be set to
repeat at an interval ranging from 30
to 300 seconds. If you do not want the
announcement to repeat, leave the
field blank.
The default setting is 45 seconds.
Page 28

28 CHAPTER 3: CONFERENCE CONFIGURATION
Table 7 Instant and Emergency Conference fields (continued)
Dial-out List for Instant and Emergency Conferences
Join announcement type: tone,
name,
none
Leave announcement type: tone,
name,
none
5 Click Submit to save the new conference.
When users other than the first user
join a conference, conference
participants will hear an
announcement. The announcement
type can be either a tone, or the name
of the individual joining the
conference. If no announcement is
required, choose “none”.
The default announcement is the
participant’s name.
When participants leave a conference,
conference participants will hear an
announcement. The announcement
type can be either a tone, or the name
of the individual leaving the
conference. If no announcement is
required, choose “none”.
The default announcement is the
participant’s name.
Instant and emergency users must be added to a dial-out list. When the
conferences commences, the system automatically calls all of the users on
the list. Users who answer the call will be prompted to enter the # key to
join the conference. Users who miss the call can join the conference at a
later time by dialing the numeric conference name. If the conference is
restricted, they will be prompted to enter the Join PIN.
Only an administrator or the conference creator/moderator can create a
dial-out list for an Instant or Emergency conference.
To add users to a dial-out list:
1 Log in to the 3Com IP Conferencing Module.
2 Select Conferences > Conference List from the menu bar.
The Conference List screen appears.
3 Locate the conference you want to work with.
4 Select the Edit icon for the conference.
5 The Editing Conference screen appears.
6 Select User list for dial-out.
Page 29

Dial-out List for Instant and Emergency Conferences 29
The User List for Dial-out screen appears (Instant or Emergency).
7 Fill out the fields according to the descriptions in Tab le 8.
Ta bl e 8 User Dial-out List fields
Field Value Description
Friendly User Name Alphanumeric The participant identifier, which is the
“friendly name” in the case of 3Com
Convergence Center Client users. For
telephone users this is derived from the
caller-id if available.
User dial prefix (if any) Numeric Enter the digits that must be dialed to
reach the user. For example, if the
telephone dialing plan requires that
external calls be prefixed with a 9,
enter the number 9 in this field.
User phone #/URL Alphanumeric Enter the user’s phone number or
Dialout Call
Strobe
None
extension number.
Example (phone number): 416967111
Example (extension number): 259
Note: To enable dial-out to extensions,
the administrator must also program
the “Primary Proxy Server for dialing
out” on the Conferencing
Configuration screen. See the 3Com IP
Conferencing Module Administration
Guide for details.
Optionally, enter the user’s complete
SIP ID. Format: name@domain.com
where name is the user’s extension or
phone number.
Select a calling option:
Call is the default setting. Selecting it
will cause the system to call the
specified User phone#/URL when the
conference starts.
Strobe is applicable to emergency
conferences only. Selecting it will cause
the system to call the number of an
alert device (alarm or strobe) when the
conference starts, and then ring
continuously until the conference ends.
None means that the user will not be
called when the conference starts.
Select this parameter for users that you
do not want to invite to a particular
instance of the conference.
Page 30

30 CHAPTER 3: CONFERENCE CONFIGURATION
8 Select Add to add a new user to the list, or Change to edit an existing
user.
Emergency Conference Notification
Ad Hoc Conferences Ad-hoc conferences let you hold public-access conferences of up to six
The Emergency Conference Notification features causes a lamp to flash
on your telephone when an emergency conference is taking place. You
can join the conference by pressing the button located beside the lamp.
To configure Emergency Conference Notification:
1 Log in to the VCX as an administrator (Administrative Portal).
2 Select the user’s extension.
3 Access the Button Mappings screen.
4 Program a free button (line) as follows:
a Select Busy Lamp Field as the Feature Type.
b Enter the numeric conference name in the Number/Index field.
5 Repeat for all users that belong to the emergency conference.
If a user fails to answer the initial call to participate in the conference, a
lamp will flash on the user’s telephone. The user can join the conference
by pressing the button located beside the lamp.
participants instantly. The 3Com IP Conferencing Module automatically
starts the conference when it receives a SIP URI that includes a
configurable prefix or suffix as part of the user name that was set up by
the administrator. Other users can join the conference by calling the same
URI. For example, if the system is configured to use 4-digits extensions
and the Ad hoc prefix is “76”, then a user can start an ad hoc conference
by dialing any number between 7600 and 7699. Up to five other users
can join the conference by dialing the same number.
Once created, Ad hoc conferences function much like Meet-me
conferences. They generate instances which begin when the first person
joins and end when the last person leaves.
Page 31

Viewing and Editing the Conference List 31
Setting up an Ad Hoc
Conference with a
Prefix
Setting up an Ad Hoc
Conference with a
Suffix
Viewing and Editing the Conference List
The system is programmed with a prefix that can be used to set up Ad
Hoc conferences. Contact your administrator to determine which prefix
you should use.
To set up an Ad Hoc conference using a programmed prefix:
1 From a SIP device, dial the conference number including the ad hoc
prefix. For example, if the prefix is “76”, dial 7601.
2 Invite up to five other users to join the conference by dialing 7601.
The system is programmed with a suffix that can be used to set up Ad
Hoc conferences. Contact your administrator to determine which suffix
you should use.
To set up an Ad Hoc conference using a programmed suffix:
1 From a SIP device, enter the conference SIP URI including ad hoc suffix.
For example, if the suffix is “.adhoc”, enter conf1.adhoc@domain.com.
2 Invite up to five other users to join the conference by entering
conf1.adhoc@domain.com.
The Conference List screen can be used to view Scheduled, Meet-me,
Instant and Emergency conferences. This screen can also be used to
delete individual conferences, and to access the following conference
management screens:
n Conference screen - Use this screen to view instance information for
an ongoing conference, and to initiate file sharing.
n Editing Conference screen - Use this screen to view and edit
conference properties (supported media, schedule, access controls,
announcements, etc.).
n Conference and Participant Control screen - Use this screen to modify
settings applicable to the entire conference, and to change access
settings for individual participants of the conference.
The conferences that you can view depends on your authority level.
Administrators can view all conferences. Conference creators/moderators
can view their own conferences. Regular users cannot view any
conferences.
Page 32

32 CHAPTER 3: CONFERENCE CONFIGURATION
To view/edit the Conference List:
1 Log in to the 3Com IP Conferencing Module.
2 Select Conferences > Conference List from the menu bar.
The Conference List appears.
3 View/edit the fields according to the descriptions in Ta bl e 9.
Ta bl e 9 Conference List fields
Field Value Description
Conference ID numeric Click on the Conference ID (Conference
Edit Click the Edit icon to access the Editing
Owner ID alphanumeric Indicates the creator of the conference.
Owner first name alphanumeric The first name of the creator of the
Owner last name alphanumeric The last name of the creator of the
Control Click the Control icon to access the
Subject alphanumeric A brief description of the conference.
Conference schedule always on
Conference duration minutes The duration of the conference in
or
date/time
name) to access the Conference screen.
Note: Only an administrator or the
conference creator/moderator can
access the Conference screen.
Conferences screen.
Note: Only an administrator or the
conference creator/moderator can
access the Editing Conference screen.
conference.
conference.
Conference and Participant Control
screen.
Note: Only an administrator or the
conference creator/moderator can
access the Conference and Participant
Control screen.
Indicates the duration of the
conference. Click to edit the
conference schedule if you have the
appropriate permission.
minutes.
Page 33

Overview of the Conference and Participant Control Screen 33
Table 9 Conference List fields (continued)
Overview of the Conference and Participant Control Screen
Type public,
Maximum number of
participants
Media audio, video,
Delete Click this icon to remove the
The Conference and Participant Control screen can be used to view and
edit conference and participant settings for a specific conference.
Only an administrator or the conference creator/moderator can view and
use the controls on this screen. Access by regular users is prohibited.
restricted,
scheduled,
meet-me,
instant,
emergency
numeric Indicates the maximum participant
desktop
sharing
Indicates the type of conference. For
example, “public–scheduled” or
“restricted–meet-me”.
count for this conference.
Indicates the media supported by the
conference.
conference from the server. You cannot
delete a conference while it is in
progress.
Note: Only an administrator or the
conference creator/moderator can
delete the conference.
To view the Conference and Participant Control screen:
1 Log in to the 3Com IP Conferencing Module.
2 Select Conferences > Conference List from the menu bar.
The Conference List screen appears.
3 Click Show Advanced.
4 Locate the conference you want to work with.
5 Click the Control icon.
The Conference and Participant Control screen appears. This screen is
divided into two sections:
n The Conference Control section allows a conference
creator/moderator to modify settings applicable to the entire
Page 34

34 CHAPTER 3: CONFERENCE CONFIGURATION
conference. For more information, see Viewing and Editing the
Conference Controls.
n The Participant Control section allows a conference creator/moderator
to change access settings for individual participants of the conference.
For more information, see
Controls.
Viewing and Editing the Participant
Viewing and Editing
the Conference
Controls
The following conference controls are available on the Conference and
Participant Control screen:
n access (locked or unlocked)
n end time (time and date for scheduled conferences)
n end time extension (15 minute increments for scheduled conferences)
n audio status (open, lecture mode, and isolate all participants)
n video status (open, lecture mode, and isolate all participants)
n maximum conference capacity
n disconnect conference
Only an administrator or the conference creator/moderator can view and
use the controls on this screen. Access by regular users is prohibited.
To view / edit the conference controls:
1 Log in to the 3Com IP Conferencing Module.
2 Select Conferences > Conference List from the menu bar.
The Conference List screen appears.
3 Locate the conference you want to work with.
4 Click the Control icon for the conference.
The Conference and Participant Control screen appears.
5 Fill out the fields according to the descriptions in Tab le 10.
Ta bl e 10 Conference control fields
Field Value Description
Access Status Displays the setting selected in the Access
Control field.
Page 35

Overview of the Conference and Participant Control Screen 35
Table 10 Conference control fields (continued)
Access Control unlock,
End Time
(time zone)
Extend By 15 minutes,
lock
time, date Scheduled conferences only.
30 minutes,
45 minutes,
60 minutes,
120 minutes
Audio Status Open
Conference,
Lecture Mode,
Isolate
Participants
Audio Control Open
Conference,
Lecture Mode,
Isolate
Participants
The conference moderator can choose to
lock access to the conference. Once locked,
no additional participants are allowed to
join the conference, but active participants
are free to leave.
Note: The value in this field can be changed
prior to the start of a conference or during a
conference.
The time that the conference is scheduled
to end.
Scheduled conferences only.
The conference creator/moderator can
choose to extend the length of the
conference past its scheduled end time by
selecting a value from this field. An active
conference can be extended numerous
times. Note, however, that a conference
cannot be extended beyond its maximum
duration. The ability to extend a conference
is also determined by the resources
available.
Note: The value in this field can be changed
prior to the start of a conference or during a
conference.
Displays the setting selected in the Audio
Control field.
The conference moderator can change the
audio setting for the conference.
Open Conference is the default setting
and means that all participants can both
speak and be heard.
Lecture Mode means that only conference
moderators can be heard. The voices of all
other participants are muted.
Isolate Participants means that the audio
access for all conference participants is
turned off. The participants remain
connected to the conference.
Page 36

36 CHAPTER 3: CONFERENCE CONFIGURATION
Table 10 Conference control fields (continued)
Video Status Open
Conference,
Lecture Mode,
Isolate
Participants
Video Control Open
Conference,
Lecture Mode,
Isolate
Participants
Max Capacity 1 - max The maximum number of participants
Update Click this button to save changes to
Disconnect All Click this button to end the conference. All
Displays the setting selected in the Video
Control field.
The conference moderator can change the
video setting for the conference.
Open Conference is the default setting
and means that all participants have full
video access. They can see and be seen.
Lecture Mode means that only the
conference moderator who activated this
setting can be seen. The video streams for
all other participants is turned off.
Isolate Participants means that the video
access for all conference participants is
turned off. The participants remain
connected to the conference.
allowed to join the conference is
determined when the conference is created.
The conference moderator can override that
setting in this field.
Note: The value in this field can be changed
prior to the start of a conference or during a
conference.
conference settings.
users will be disconnected and the
conference will end.
Viewing and Editing
the Participant
Controls
6 Click Update to save your changes.
The following participant controls are available on the Conference and
Participant Control screen:
n audio status (listen and speak, listen only, and isolate all participants)
n video status (listen and speak, listen only, and isolate all participants)
n participant name
n moderator privileges
Page 37

Overview of the Conference and Participant Control Screen 37
n disconnect participant
In addition, each participants’ call status appears on this screen. The
status indicates whether the participant is connected or disconnected to
the conference.
Only an administrator or the conference creator/moderator can view and
use the controls on this screen. Access by regular users is prohibited.
To view / edit the participant controls:
1 Log in to the 3Com IP Conferencing Module.
2 Select Conferences > Conference List from the menu bar.
The Conference List screen appears.
3 Locate the conference you want to work with.
4 Click the Control icon for the conference.
The Conference and Participant Control screen appears.
5 Fill out the fields according to the descriptions in Tab le 11.
Ta bl e 11 Participant control fields
Field Value Description
Participant alphanumeric The participant identifier. For
telephone users this is derived from
the caller-id if available. Only active
participants and moderators (active
or not) are displayed.
Call Status
Audio Status Listen and Speak,
Listen Only,
Isolate Participant
The indicates that the participant
is connected to the conference. The
indicates that the conference
creator/moderator is not currently
connected to the conference.
Displays the setting selected in the
Audio Control field.
Page 38

38 CHAPTER 3: CONFERENCE CONFIGURATION
Table 11 Participant control fields (continued)
Audio Control Listen and Speak,
Listen Only,
Isolate Participant
Video Status Two Way Video,
View Only,
Isolate Participant
Video Control Two Way Video,
View Only,
Isolate Participant
Name Alphanumeric The participant identifier, which is
Moderator yes The conference creator is
Update N/A Click this button to save changes to
Disconnect Click this button to disconnect the
The conference creator/moderator
can change the audio setting for
individual participants of the
conference.
Listen and Speak is the default
setting and means that the
participant can both listen and speak
in the conference.
Listen Only means that the
participant can only listen and not
speak in the conference.
Isolate Participant means that the
audio for the participant is turned
off. The participant remains
connected to the conference.
Displays the setting selected in the
Video Control field.
The conference creator/moderator
can change the video settings for
individual participants of the
conference.
Two Way Video is the default
setting and means that the
participant can both see and be seen.
View Only means that the
participant can only view video, but
cannot be seen.
Isolate Participant means that the
video access for the participant is
turned off. The participant remains
connected to the conference.
the “friendly name” in the case of
3Com Convergence Center Client
users. For telephone users this is
derived from the caller-id if available.
automatically assigned moderator
status and can assign moderator
status to any participant.
participant privileges.
participant from the conference.
Page 39

Overview of the Conference and Participant Control Screen 39
Table 11 Participant control fields (continued)
Adding Moderators
to a Conference
Call ID Alphanumeric A unique ID assigned by the system
6 Click Update to save your changes.
The conference creator, or “owner,” has the authority to assign
conference moderator privileges to other users registered in the system.
With conference moderator privileges, users have the same authority as
the conference creator. They can add and delete shared files, access the
Conference and Participant Control lists, edit conference properties, and
share files. Regular participants cannot change conference properties or
share files.
Only the conference creator or an administrator can assign moderator
privileges to a user.
To add a moderator:
1 Log in to the 3Com IP Conferencing Module.
2 Select Conferences > Conference List from the menu bar.
The Conference List screen appears.
3 Locate the conference you want to work with.
to each call.
4 Click the Control icon for the conference.
The Conference and Participant Control screen appears.
5 Enter the user’s SIP address in the Participant text box (located at the
bottom of the screen).
Format: <name>@<hostname>
Example: 270@10.1.0.238
Where hostname is the fully qualified name or IP address of the host
running the VCX system.
When adding users to a Participant List, do not enter the prefix sip:
6 Click Add Moderator.
The user is added to the Participant Control List and has moderator
privileges.
Page 40

40 CHAPTER 3: CONFERENCE CONFIGURATION
No check is done to ensure that the SIP address entered matches a user
currently in the local database.
Disconnecting
Participants from a
Conference
Viewing and Editing Conference Properties
An administrator or the conference creator/moderator can delete
participants from an active conference.
To disconnect a participant from a conference:
1 Log in to the 3Com IP Conferencing Module.
2 Select Conferences > Conference List from the menu bar.
The Conference List screen appears.
3 Locate the conference you want to work with.
4 Click the Control icon for the conference.
The Conference and Participant Control screen appears.
5 Locate the user you want to disconnect and click the Disconnect icon.
6 When asked if you want to proceed with the disconnect, click Yes .
Use the Editing Conference screen to view and edit the following
conference properties:
n conference subject (ID)
n maximum numbers of participants
n supported media types
n schedule (if applicable)
n access controls
n announcements
Only an administrator or the conference creator/moderator can view and
use the controls on this screen. Access by regular users is prohibited.
To view and edit conference properties:
1 Log in to the 3Com IP Conferencing Module.
2 Select Conferences > Conference List from the menu bar.
The Conference List screen appears.
3 Locate the conference you want to work with.
Page 41

Viewing and Editing Conference Properties 41
4 Select the Edit icon for the conference.
The Editing Conference screen appears.
5 View/edit the fields according to the descriptions in Ta bl e 12.
Ta bl e 12 Editing Conference fields
Field Value Description
Description:
Subject: numeric Optionally, edit the description of the
conference.
Max. number of
participants:
Media type: audio, video,
Conference schedule:
Start date and time (time
zone:
Duration in minutes (15 -
1440):
1 - max This is the maximum number of
desktop
sharing
date, time Edit the date and time the conference
minutes Enter the duration of the conference in
participants allowed in the conference.
The media permitted in the conference.
is scheduled to start. Use the calendar
to assist you in selecting the date.
Note: The Time Zone is added
automatically.
Format: DD-MMM-YYYY
hh:mm:am/pm
Example: 26-Feb-2005 04:46 PM
Note: This field appears for scheduled
conferences only.
minutes.
Note: System administrators can
schedule conferences of up to 24 hours
(1440 minutes) duration. System users
can schedule conferences of up to 8
hours (480 minutes) duration. The
default is 2 hours (120 minutes)
duration.
Note: This field appears for scheduled
conferences only.
Page 42

42 CHAPTER 3: CONFERENCE CONFIGURATION
Table 12 Editing Conference fields (continued)
Access control:
Conference type: public
Participant passcode for
restricted conference
(4-digit):
Moderator passcode for
restricted conference
(4-digit):
Conference announcements:
First-in-conference
announcement repeat
interval (30-300 seconds,
blank for no repeat.):
Join announcement type: tone,
To join a public conference, users must
restricted
#### Users who call a restricted conference
#### Moderators will be prompted to enter
numeric-only A user who is the first to join a
name,
none
enter a numeric conference name. No
password is required.
To join a restricted conference, users
must enter a numeric conference name
and password.
Note: Users can call a conference
directly by dialing the numeric
conference name, or indirectly by
accessing the Conference Attendant
and entering the numeric conference
name when prompted. The Conference
Attendant is typically used by external
callers (callers on the PSTN).
will be prompted to enter this passcode
before being allowed to participate in
the conference.
this passcode when joining a
conference.
conference will hear an announcement
indicating that they are the first to join.
The announcement can be set to
repeat at an interval ranging from 30
to 300 seconds. If you do not want the
announcement to repeat, leave the
field blank.
The default setting is 45 seconds.
When users other than the first user
joins a conference, conference
participants will hear an
announcement. The announcement
type can be either a tone, or the name
of the individual joining the
conference. If no announcement is
required, choose “none”.
The default announcement is the
participant’s name.
Page 43

Viewing Conference Information 43
Table 12 Editing Conference fields (continued)
Leave announcement type: tone,
End of conference first
warning (2-10 minutes,
blank for no warning):
End of conference last
warning (1-9 minutes,
blank for no warning):
name,
none
numeric-only A warning announcement will play
numeric-only A warning announcement will play
When participants leave a conference,
conference participants will hear an
announcement. The announcement
type can be either a tone, or the name
of the individual leaving the
conference. If no announcement is
required, choose “none”.
The default announcement is the
participant’s name.
when the conference is nearing its
scheduled end time. The first warning
can be set to sound from 2 to 10
minutes before the conference ends.
The default setting is 5 minutes.
The first warning must be set to play
earlier than the last warning.
Note: This field appears for scheduled
conferences only.
when the conference is nearing its
scheduled end time. The last warning
can be set to sound from 1 to 9
minutes before the conference ends.
The default setting is 1 minute.
The last warning must be set to play
later than the first warning.
Note: This field appears for scheduled
conferences only.
Viewing Conference Information
6 Click Submit to save your changes.
Use the Conference screen to view the following the information for an
ongoing instance of the conference:
n current participant count for the conference
n the conference session log
n the IP address of the server hosting the conference
A conference instance is created when the first person joins a conference
making it active. When the last person leaves the conference, the
instance is ended. Any user can view the instance for an active
Page 44

44 CHAPTER 3: CONFERENCE CONFIGURATION
conference. Instance information is automatically deleted once a
conference ends. No historical conference information is maintained.
Only an administrator or the conference creator/moderator can view the
Conference screen. Access by regular users is prohibited.
To view the instance of a currently active conference:
1 Select Conferences > Conference List from the menu bar.
The Conference List screen appears.
2 Locate the conference you want to work with.
3 Select Conference ID for the conference.
The Conference screen appears.
4 Use Tab le 13 to interpret the conference instance fields.
Ta bl e 13 Conference instance fields
Field Value Description
Session log alphanumeric Indicates the time the conference
Server alphanumeric The Conferencing Server used by this
started.
instance.
Sharing Files Use this feature to share files during public and restricted conferences.
Only an administrator or the conference creator/moderator can share
files. This feature is not available to regular conference participants.
Adding a Shared File To add a shared file to a conference:
1 Select Conferences > Conference List from the menu bar.
The Conference List screen appears.
2 Locate the conference you want to work with.
3 Select Conference ID for the conference.
The Conference screen appears.
4 Select Share files with others. See Figure 3.
Page 45

Sharing Files 45
Figure 3 Share files with others
The Shared files for screen appears.
5 Select Share a new file.
The Share a file for screen appears.
6 Click Browse, then locate the file and add it to the conference.
7 Fill out the fields according to the descriptions in Tab le 14.
Ta bl e 14 Shared file fields
Field Value Description
Choose file: Choose a file to share with the
Description: alphanumeric A brief description of the file you are
Access privilege: participant
Overwrite privilege: creator
Delete privilege: creator
Send email notification: N/A Select Yes to send an e-mail to the
public
participant
participant
conference participants.
adding to this conference.
Select either participant or public to
enable the conference creator and
moderator(s) to access the file.
Select creator to restrict overwrite
authority to the user who added the
file. Select participant to enable the
conference moderators to overwrite
the file.
Select creator to restrict delete
authority to the user who added the
file. Select participant to enable the
conference moderators to delete the
file.
conference participants whenever the
file is overwritten or deleted.
8 Click Submit to save your changes.
Viewing a Shared File Your capacity to view a shared file is determined when the file is originally
added to the conference. For details, see
Sharing Files.
Page 46

46 CHAPTER 3: CONFERENCE CONFIGURATION
To view a shared file:
1 Select Conferences > Conference List from the menu bar.
The Conference List screen appears.
2 Locate the conference you want to work with.
3 Select Conference ID for the conference.
The Conference screen appears.
4 Select Share files with others. See Figure 4.
Figure 4 Share files with others
The Shared files for screen appears.
5 Locate the file you want to view.
6 Select File name or Typ e.
The file will display.
7 Optionally, save the file to your computer.
Deleting a Shared File Your capacity to delete a shared file is determined when the file is
originally added to the conference. For details, see
To delete a shared file:
1 Select Conferences > Conference List from the menu bar.
The Conference List screen appears.
2 Locate the conference you want to work with.
3 Select Conference ID for the conference.
The Conference screen appears.
4 Select Share files with others. See Figure 5.
Sharing Files.
Page 47

Sharing Files 47
Figure 5 Share files with others
The Shared files for screen appears.
5 Locate the file you want to delete and click the delete icon.
The file is deleted from the conference server.
Replacing a Shared
File
Your capacity to replace a shared file is determined when the file is
originally added to the conference. For details, see
To replace a shared file:
1 View and save the file to your computer. See Viewing a Shared File.
2 Update the file on your computer.
3 Select Conferences > Conference List from the menu bar.
The Conference List screen appears.
4 Locate the conference you want to work with.
5 Select Conference ID for the conference.
The Conference screen appears.
6 Select Share files with others. See Figure 6.
Figure 6 Share files with others
Sharing Files.
The Shared files for screen appears.
7 Locate the file you want to replace and click the delete icon.
8 Add the updated file to replace the file you deleted. See Sharing Files.
Page 48

48 CHAPTER 3: CONFERENCE CONFIGURATION
Using Touch Tones to Control Conferences
Using the
In–conference Help
System
Conference participants can control active conferences using the dial pad
on a phone, or on the 3Com Convergence Center Client.
A conference creator or moderator can:
n terminate a conference
n dial out to users and add them to an ongoing conference (DTMF
dialout)
n extend conferences (scheduled conferences only)
n mute and un–mute the voices of all participants in a conference
(excluding all moderators)
n mute and un–mute their own voice
n lock and un–lock a conference
n hear a private roll call of all the participants in a conference.
A regular conference participant can:
n mute and un–mute their own voice
n hear a private roll call of all the participants in a conference.
The In–conference Help system guides the user through the process of
controlling an active conference using a dial pad. The system prompts the
user to press the appropriate key. For example, “Please press 6 to mute or
un–mute yourself”.
To start the In–conference Help system:
n Using the dial pad, press **
The help system starts and presents you with a list of options. The
functions you can perform using a dial pad depend on your status and
the type of conference you have joined.
Alternatively, you can control a conference from outside the help
system by pressing * before the appropriate key. For example, to mute
or un–mute yourself, press *6.
Refer to Tab le 15 for a list of in-conference help system controls.
Page 49

Using Touch Tones to Control Conferences 49
Ta bl e 15 In–conference Help system controls
Dial pad control Function Comments
** Starts the help.
*1 Terminates the
conference.
*3 Enables user numbers to
*4 Extends the conference
*5 Lecture Mode - mutes
*6 Mutes and un-mutes
*7 Locks and unlocks a
be dialed mid-call.
by 15 minutes.
and un-mutes the voices
of all participants except
conference moderators.
your own voice.
conference.
The conference creator/moderator
can terminate the conference at any
time by pressing *1, and then
confirming the selection by pressing
1 a second time.
The conference creator/moderator
can add a user to an ongoing
conference by pressing *3 and then
dialing the user’s
extension/PSTN/mobile phone
number. After answering the call,
the user will be prompted to press #
in order to join the conference.
Note: Before this feature can be
used, the administrator must
program the “Digit Map for DTMF
Dialout” on the Conferencing
Configuration screen. See the 3Com
IP Conferencing Module
Administration Guide for details.
For scheduled conferences only. The
conference creator/moderator can
choose to extend the length of the
conference past its scheduled end
time. An active conference can be
extended numerous times. Note,
however, that a conference cannot
be extended beyond its maximum
duration.
The conference creator/moderator
can mute the voices of all
participants in the conference. This
is equivalent to a “lecture mode” as
the moderator’s voice is the only
voice that can be heard.
All conference participants can mute
or un-mute their own voices.
The conference creator/moderator
can choose to lock access to the
conference. Once locked, no
additional participants are allowed
to join the conference, but active
participants are free to leave.
Page 50

50 CHAPTER 3: CONFERENCE CONFIGURATION
Table 15 In–conference Help system controls
Dial pad control Function Comments
*8 A roll call will sound
*9 Exits the help.
listing all of the
participants in a
conference.
All conference participants can use
this feature to find out who is in the
conference. When a roll call is in
progress you will not be able to hear
participants talking in a conference.
Leaving a Conference
To leave a conference with an analog phone or a SIP phone:
n Hang up the handset.
To leave a conference with a SIP user agent:
n End the call.
When all participants have left a conference, that instance ends. The next
time a participant joins the conference, a new instance will be created.
Page 51

4
PRESENCE SERVER
This chapter introduces the Presence Server and describes how users can
use its settings.
This chapter includes the following topics:
n What is the Presence Server?
n Setting up E-mail Notification
n Using the Access Control List
What is the Presence Server?
The Presence Server is an application that collects and distributes the
online status information of users. Working with the 3Com Convergence
Center Client and 3Com phones, the Presence Server informs users when
their buddies are online and available, or are offline. The server
instantaneously sends update information to the 3Com Convergence
Center Client to reflect any change in user status. For example, if you are
eating lunch at your desk and want to let your buddies know that you
won’t be taking calls, you can change your online status to “meal”. A
meal icon will automatically appear next to your name in your buddies’
Buddy List. The Presence Server handles the transmission of this
information.
You manage who is able to monitor your status through the Access
Control List. Users have full control over who is granted permission to
monitor them, and the permissions can be changed at any time.
Users can use the presence settings to:
n Maintain their user preferences (e-mail notification)
n Maintain their Access Control List.
Page 52

52 CHAPTER 4: PRESENCE SERVER
Setting up E-mail Notification
Using the Access Control List
Users should configure the Presence Server to send them an e-mail
message when a colleague requests permission to view their online status
for the first time.
E-mail notification is enabled by default for all users.
To configure e-mail notification:
1 Log in to the 3Com IP Conferencing Module.
2 Select Presence > User Preferences for Presence.
The User Presence Preferences screen appears.
3 Select a radio button:
n yes — you will receive e-mail notification when a colleague requests
permission to view your online status
n no — you will not receive e-mail notification.
For e-mail notification to work, the user account must be configured with
an e-mail address. For details, see
Adding an E-mail Address.
The Presence Access Control List is where you manage who is able to
monitor your online status. From the list you can:
n View the current status of the users (either allowed, denied, or
pending). A status of pending means that a user has added you to
their Buddy List and is waiting for you to grant them “allow” status.
n Change the status of the users. For example, from allowed to
denied.
To change a users’s status:
1 Log in to the 3Com IP Conferencing Module.
2 Select Presence > Presence Access Control List.
The Presence Access Control List appears. See Figure 7.
Page 53

Using the Access Control List 53
Figure 7 Presence Access Control List
3 Identify the user whose status you want to change, and make a selection
from the New Status list box.
4 Click Update to register your change.
You can click on the Address, Lastname, and Current Status headers
to sort the items in the list.
Page 54

54 CHAPTER 4: PRESENCE SERVER
Page 55

ACKNOWLEDGEMENT OF
5
Supplementary
Copyright
THIRD PARTY SOFTWARE
3Com server software applications contain integrated third–party
software. This chapter acknowledges this third–party software.
This chapter includes the following topics:
n Supplementary Copyright Information
3Com server software applications contain integrated third–party software which is covered under the
following license agreements:
Information
Net-SNMP License Part 1: CMU/UCD copyright notice:
Copyright 1989, 1991, 1992 by Carnegie Mellon University
Derivative Work - 1996, 1998-2000
Copyright 1996, 1998-2000 The Regents of the University of California
All Rights Reserved
Permission to use, copy, modify and distribute this software and its documentation for any purpose and
without fee is hereby granted, provided that the above copyright notice appears in all copies and that both
that copyright notice and this permission notice appear in supporting documentation, and that the name of
CMU and The Regents of the University of California not be used in advertising or publicity pertaining to
distribution of the software without specific written permission.
CMU AND THE REGENTS OF THE UNIVERSITY OF CALIFORNIA DISCLAIM ALL WARRANTIES WITH REGARD TO
THIS SOFTWARE, INCLUDING ALL IMPLIED WARRANTIES OF MERCHANTABILITY AND FITNESS. IN NO EVENT
SHALL CMU OR THE REGENTS OF THE UNIVERSITY OF CALIFORNIA BE LIABLE FOR ANY SPECIAL, INDIRECT OR
CONSEQUENTIAL DAMAGES OR ANY DAMAGES WHATSOEVER RESULTING FROM THE LOSS OF USE, DATA
OR PROFITS, WHETHER IN AN ACTION OF CONTRACT, NEGLIGENCE OR OTHER TORTIOUS ACTION, ARISING
OUT OF OR IN CONNECTION WITH THE USE OR PERFORMANCE OF THIS SOFTWARE.
Part 2: Networks Associates Technology, Inc. copyright notice (BSD)
Copyright © 2001-2002, Networks Associates Technology, Inc.
All rights reserved.
Redistribution and use in source and binary forms, with or without modification, are permitted provided that
the following conditions are met:
Redistributions of source code must retain the above copyright notice, this list of conditions and the following
disclaimer.
Page 56

56 CHAPTER 5: ACKNOWLEDGEMENT OF THIRD PARTY SOFTWARE
Redistributions in binary form must reproduce the above copyright notice, this list of conditions and the
following disclaimer in the documentation and/or other materials provided with the distribution.
Neither the name of the Networks Associates Technology, Inc. nor the names of its contributors may be used
to endorse or promote products derived from this software without specific prior written permission.
THIS SOFTWARE IS PROVIDED BY THE COPYRIGHT HOLDERS AND CONTRIBUTORS ``AS IS'' AND ANY EXPRESS
OR IMPLIED WARRANTIES, INCLUDING, BUT NOT LIMITED TO, THE IMPLIED WARRANTIES OF
MERCHANTABILITY AND FITNESS FOR A PARTICULAR PURPOSE ARE DISCLAIMED. IN NO EVENT SHALL THE
COPYRIGHT HOLDERS OR CONTRIBUTORS BE LIABLE FOR ANY DIRECT, INDIRECT, INCIDENTAL, SPECIAL,
EXEMPLARY, OR CONSEQUENTIAL DAMAGES (INCLUDING, BUT NOT LIMITED TO, PROCUREMENT OF
SUBSTITUTE GOODS OR SERVICES; LOSS OF USE, DATA, OR PROFITS; OR BUSINESS INTERRUPTION) HOWEVER
CAUSED AND ON ANY THEORY OF LIABILITY, WHETHER IN CONTRACT, STRICT LIABILITY, OR TORT
(INCLUDING NEGLIGENCE OR OTHERWISE) ARISING IN ANY WAY OUT OF THE USE OF THIS SOFTWARE, EVEN
IF ADVISED OF THE POSSIBILITY OF SUCH DAMAGE.
Part 3: Cambridge Broadband Ltd. copyright notice (BSD)
Portions of this code are copyright © 2001-2002, Cambridge Broadband Ltd.
All rights reserved.
Redistribution and use in source and binary forms, with or without modification, are permitted provided that
the following conditions are met:
Redistributions of source code must retain the above copyright notice, this list of conditions and the following
disclaimer.
Redistributions in binary form must reproduce the above copyright notice, this list of conditions and the
following disclaimer in the documentation and/or other materials provided with the distribution.
The name of Cambridge Broadband Ltd. may not be used to endorse or promote products derived from this
software without specific prior written permission.
THIS SOFTWARE IS PROVIDED BY THE COPYRIGHT HOLDER ``AS IS'' AND ANY EXPRESS OR IMPLIED
WARRANTIES, INCLUDING, BUT NOT LIMITED TO, THE IMPLIED WARRANTIES OF MERCHANTABILITY AND
FITNESS FOR A PARTICULAR PURPOSE ARE DISCLAIMED. IN NO EVENT SHALL THE COPYRIGHT HOLDER BE
LIABLE FOR ANY DIRECT, INDIRECT, INCIDENTAL, SPECIAL, EXEMPLARY, OR CONSEQUENTIAL DAMAGES
(INCLUDING, BUT NOT LIMITED TO, PROCUREMENT OF SUBSTITUTE GOODS OR SERVICES; LOSS OF USE,
DATA, OR PROFITS; OR BUSINESS INTERRUPTION) HOWEVER CAUSED AND ON ANY THEORY OF LIABILITY,
WHETHER IN CONTRACT, STRICT LIABILITY, OR TORT (INCLUDING NEGLIGENCE OR OTHERWISE) ARISING IN
ANY WAY OUT OF THE USE OF THIS SOFTWARE, EVEN IF ADVISED OF THE POSSIBILITY OF SUCH DAMAGE.
Xerces License The Apache Software License, Version 1.1
Copyright © 1999 The Apache Software Foundation. All rights reserved.
Redistribution and use in source and binary forms, with or without modification, are permitted provided that
the following conditions are met:
1 Redistributions of source code must retain the above copyright notice, this list of conditions and the following
disclaimer.
2 Redistributions in binary form must reproduce the above copyright notice, this list of conditions and the
following disclaimer in the documentation and/or other materials provided with the distribution.
3 The end-user documentation included with the redistribution, if any, must include the following
acknowledgment:
4 “This product includes software developed by the Apache Software Foundation (http://www.apache.org/).”
5 Alternately, this acknowledgment may appear in the software itself, if and wherever such third-party
acknowledgments normally appear.
6 The names “Xerces” and “Apache Software Foundation” must not be used to endorse or promote products
derived from this software without prior written permission. For written permission, please contact
apache@apache.org.
7 Products derived from this software may not be called “Apache,” nor may “Apache” appear in their name,
without prior written permission of the Apache Software Foundation.
Page 57

Supplementary Copyright Information 57
8 THIS SOFTWARE IS PROVIDED ``AS IS'' AND ANY EXPRESSED OR IMPLIED WARRANTIES, INCLUDING, BUT NOT
LIMITED TO, THE IMPLIED WARRANTIES OF MERCHANTABILITY AND FITNESS FOR A PARTICULAR PURPOSE
ARE DISCLAIMED. IN NO EVENT SHALL THE APACHE SOFTWARE FOUNDATION OR ITS CONTRIBUTORS BE
LIABLE FOR ANY DIRECT, INDIRECT, INCIDENTAL, SPECIAL, EXEMPLARY, OR CONSEQUENTIAL DAMAGES
(INCLUDING, BUT NOT LIMITED TO, PROCUREMENT OF SUBSTITUTE GOODS OR SERVICES; LOSS OF USE,
DATA, OR PROFITS; OR BUSINESS INTERRUPTION) HOWEVER CAUSED AND ON ANY THEORY OF LIABILITY,
WHETHER IN CONTRACT, STRICT LIABILITY, OR TORT (INCLUDING NEGLIGENCE OR OTHERWISE) ARISING IN
ANY WAY OUT OF THE USE OF THIS SOFTWARE, EVEN IF ADVISED OF THE POSSIBILITY OF SUCH DAMAGE.
This software consists of voluntary contributions made by many individuals on behalf of the Apache Software
Foundation and was originally based on software copyright © 1999, International Business Machines, Inc.,
http://www.ibm.com. For more information on the Apache Software Foundation, please see
<http://www.apache.org/>.
Page 58

58 CHAPTER 5: ACKNOWLEDGEMENT OF THIRD PARTY SOFTWARE
Page 59

GLOSSARY
Ad hoc conference Preconfigured by an administrator, this conference is joined when a
user dials a special SIP URI. A maximum of 6 users can participate in an
Ad-hoc conference.
CODEC Coder-Decoder. Transforms analog voice into digital bit stream and
vice-versa.
DHCP Dynamic Host Control Protocol. Dynamically assigns IP addresses to
network devices such as workstations IP phones and gateways. DHCP
allows you to move network devices from one subnet to another
without administrative attention.
DTMF Dual Tone Multi Frequency. The paired, high- and low-frequency tones
which make up touch tone dialing.
Emergency
Conference
ENUM E.164 Number Mapping. A protocol that maps telephone numbers
Gateway The server that connects the VoIP network with analog phones, PBXs
H.323 An ITU standard for transmitting audio, video and data conferencing
HTTP Hypertext Transfer Protocol. The protocol used by Web browsers and
Emergency conferences provide methods to notify users that their
participation is required. Emergency confernces can be configured only
by administrators.
(E.164 numbers) to URLs, making it possible to converge the PSTN and
the Internet.
and PSTN trunks.
over IP-based networks. The H.323 standard recognizes the following
endpoints in the network: H.323 terminals, gatekeepers, MCUs, and
gateways.
Web servers to transfer files, such as text and graphic files.
Page 60

60 GLOSSARY
Instant Conference An instant conference starts as soon as the first participant calls it and
dials the Conference Start PIN. The system then calls all other
conference participants, who can join immediately or call the
conference at a later time.
IP Address An identifier for a computer or device on a TCP/IP network. An IP
address is a 32-bit numeric address written as four numbers separated
by periods. Each number can be zero to 255.
IVR Interactive Voice Response (IVR).
MAC address Media Access Control address. A hardware address that uniquely
identifies each node of a network.
MIB Management Information Base. A database of objects that can be
monitored by an SNMP network manager.
Meet me conference Intended for informal meetings with no start or end time. Always
available provided that sufficient system resources are available.
MySQL Database used to store and access provisioning system and subscriber
feature data.
NAT Network Address Translation.
PBX Private Branch Exchange. Privately-owned central switching office.
Proxy Server An intermediate device that receives SIP requests from a client and then
initiates requests on the client's behalf.
PSTN Public Switched Telephone Network.
RTP/RTCP An Internet Protocol for transmitting real-time data such as audio and
video. RTP itself does not guarantee real-time delivery of data, but it
does provide mechanisms for the sending and receiving applications to
support streaming data.
Scheduled
conference
SNMP Simple Network Management Protocol. A set of protocols for managing
Intended for formal meetings with a predetermined participant list and
a scheduled start and end time.
networks. SNMP works by sending messages to different parts of a
network. SNMP-compliant devices, called agents, store data about
themselves in Management Information Bases (MIBs) and return this
data to the SNMP requesters.
Page 61

GLOSSARY 61
STUN Simple Traversal of UDP Through Network Address Translation.
TCP Transmission Control Protocol. One of the main protocols in TCP/IP
networks. TCP guarantees delivery of data and also guarantees that
packets will be delivered in the same order in which they were sent.
Page 62

62 GLOSSARY
UDP User Datagram Protocol. A connectionless protocol that, like TCP, runs
on top of IP networks. Unlike TCP, UDP provides very few error recovery
services, offering instead a direct way to send and receive datagrams
over an IP network. It is used primarily for broadcasting messages over
a network.
URI Uniform Resource Identifier. A character string used to identify a
resource (such as a file) from anywhere on the Internet by type and
location.
Page 63

INDEX
A
Access Control List 52
access controls 12
ad hoc conferences
overview 9
setup 30
with a prefix 31
with a suffix 31
C
conference announcements 42
conference control screen 33
conference list 31
conference names (IDs) 12
conference properties 40
conferences
ad hoc 9, 30
emergency 10, 25
instant 10, 25
leaving 50
meet me 9, 20
public 12
restricted 12
scheduled 9, 20
shared files 44, 45
viewing conference list 31
viewing conference properties 40
parameters 26
setup 25
extending conferences 35
F
feature matrix 10
I
instant conferences
access control 26
conference announcements 27
dial-out list 28
overview 10
parameters 26
setup 25
isolate participant 38
isolate participants 36
L
leaving a conference 50
lecture mode 36
listen and speak 38
listen only 38
logging in 15
logging out 16
D
dial-out list 28
disconnect all 36
disconnect participant 38, 40
E
e-mail addresses 16
emergency conferences
access control 26
conference announcements 27
dial-out list 28
overview 10
M
meet me conferences
access control 23
conference announcements 23
overview 9
parameters 21
setup 20
muting voices 48
N
Net-SNMP license 55
Page 64

64 INDEX
O
overview
application 9
Presence Server 51
public conferences 12
restricted conferences 12
P
participant control list
viewing users 36
Presence Server
Access Control List 52
overview 51
public conferences 12
R
roll call 49
S
scheduled conferences
access control 23
conference announcements 23
overview 9
parameters 21
schedule 22
setup 20
shared files 44, 45
adding 44
managing 45
X
Xerces license 56
T
touch tones 48
U
user accounts
adding e-mail addresses 16
user privileges 15
regular 15
W
web console
adding e-mail addresses 16
logging out 16
requirements 15
 Loading...