

Page 1

E
THERLINK
®
10/100 PCI
FOR
OMPLETE
C
ETWORK INTERFACE CARDS
N
UICK GUIDE
Q
3C905C-TX and 3C905C-TX-M
EtherLink 10/100 PCI NICs for
Complete PC Management
PC M
ANAGEMENT
http://www.3com.com/
http://www.3com.com/productreg
Part No. 09-1487-000 OEM
Published March 1999
Page 2

3Com Corporation ■ 5400 Bayfront Plaza ■ Santa Clara, California ■ 95052-8145
Copyright © 1999, 3Com Corporation. All rights reserved. No part of this documentation may be
reproduced in any form or by any means or used to make any derivative work (such as translation,
transformation, or adaptation) without written permission from 3Com Corporation.
3Com Corporation reserves the right to revise this documentation and to make changes in content
from time to time without obligation on the part of 3Com Corporation to provide notification of such
revision or change.
3Com Corporation provides this documentation without warranty, term, or condition of any kind,
either implied or expressed, including, but not limited to, the implied warranties, terms or conditions of
merchantability, satisfactory quality, and fitness for a particular purpose. 3Com may make improvements
or changes in the product(s) and/or the program(s) described in this documentation at any time.
If there is any software on removable media described in this documentation, it is furnished under a
license agreement included with the product as a separate document, in the hard copy documentation,
or on the removable media in a directory file named LICENSE.TXT or !LICENSE.TXT. If you are unable to
locate a copy, please contact 3Com and a copy will be provided to you.
UNITED STATES GOVERNMENT LEGEND
If you are a United States government agency, then this documentation and the software described
herein are provided to you subject to the following:
All technical data and computer software are commercial in nature and developed solely at private
expense. Software is delivered as “Commercial Computer Software” as defined in DFARS 252.227-7014
(June 1995) or as a “commercial item” as defined in FAR 2.101(a) and as such is provided with only such
rights as are provided in 3Com’s standard commercial license for the Software. Technical data is provided
with limited rights only as provided in DFAR 252.227-7015 (Nov 1995) or FAR 52.227-14 (June 1987),
whichever is applicable. You agree not to remove or deface any portion of any legend provided on any
licensed program or documentation contained in, or delivered to you in conjunction with, this guide.
Unless otherwise indicated, 3Com registered trademarks are registered in the United States and may or
may not be registered in other countries.
3Com, the 3Com logo, EtherDisk, and EtherLink are registered trademarks of 3Com Corporation.
Microsoft and Windows are trademarks of Microsoft Corporation.
All other company and product names may be trademarks of the respective companies with which
they are associated.
Page 3

Introduction
This quick guide explains how to install a 3Com®
EtherLink® 10/100 PCI for Complete PC Management
(3C905C) network interface card (NIC) in a PC running
Microsoft Windows 95 or Windows 98.
For all other operating systems, or for more detailed
information on the 3C905C NIC, see the
for Complete PC Management Network Interface Card
User Guide
.
Installation Overview
Before you physically install the NIC in a PC, you
must run the NIC preinstallation program, located on
EtherDisk® diskette 1, to prevent conflicts with the NIC.
CAUTION:
the NIC driver and software will not be installed correctly.
See “Running the Preinstallation Program” later in this
quick guide for instructions.
Make sure that you have the following items:
■
3C905C NIC
3Com
■
■
Remote Wake-Up cable (This cable is optional. Install
it only if you want to use Remote Wake-Up and your
PC is not compliant with PCI 2.2. Contact your PC
manufacturer for the Remote Wake-Up cable.)
■
SOS or SMBus cable (This cable is optional. Install it only if
you want to use remote system alerts and your PC has a
matching connector on its motherboard. Contact your PC
manufacturer for cabling and installation instructions.)
If you do not run the preinstallation program,
EtherDisk
diskettes 1, 2, and 3
Introduction
3
EtherLink 10/100 PCI
Page 4

4
E
THERLINK
10/100 PCI
FOR COMPLETE
PC M
Installing Multiple NICs
If you are installing multiple 3C905C NICs in a PC or server,
follow the instructions in “Installing Multiple NICs” in
Chapter 3 of the user guide. Do
in this quick guide.
Upgrading Windows 95 to Windows 98
If you are upgrading a PC from Windows 95 to
Windows 98 that already has a 3C90x NIC installed,
follow the instructions in the WIN98.TXT file located
in the HELP directory on
EtherDisk
ANAGEMENT
not
NICS Q
UICK GUIDE
follow the instructions
diskette 3.
Updating
EtherDisk
Software
If you want to update your current version of
software to
EtherDisk
5.x software, follow the instructions
in the text file appropriate for your operating system in the
HELP directory on
EtherDisk
diskette 3.
Running the Preinstallation Program
Before you physically install the NIC in a PC, you must run
the following preinstallation program to properly set up
your system environment.
CAUTION:
driver and software will not be installed correctly.
To run the NIC preinstallation program:
1 Do not install the NIC in the PC.
2 Turn on the power to the PC and start Windows.
3 Insert
4 From the Windows
5 Run the preinstallation program. Enter:
a:\preinstl
6 After the preinstallation program finishes, turn off
the power to the PC.
The next step is to install the NIC in the PC.
If you do not perform this procedure, the NIC
EtherDisk
diskette 1 in drive A.
Start
menu, select
EtherDisk
Run
.
Page 5

Installing the NIC
To install the NIC in the PC:
1 Make sure that you have run the preinstallation
program, as described in the previous section.
CAUTION:
case of your PC to discharge static electricity from your
body. While you are handling the NIC, wear a wrist strap
grounded to the PC chassis.
2 Remove all jewelry from your hands and wrists. Use
only insulated or nonconducting tools.
3 Make sure that the power to the PC is turned off and
that the power cord is unplugged.
4 Remove the cover from the PC.
5 Locate an empty, nonshared bus mastering PCI slot
and remove the corresponding slot cover. Save
the screw.
Do not install the NIC in a
PCI slot next to an ISA slot. This is often a shared slot
and does not support bus mastering.
If you do not know how to identify a PCI slot, check your
PC documentation or ask your system administrator.
If you are planning to install the Remote Wake-Up cable or
a cable for the SOS or SMBus connector, choose an empty
PCI slot that is close to the matching connector on the
PC motherboard.
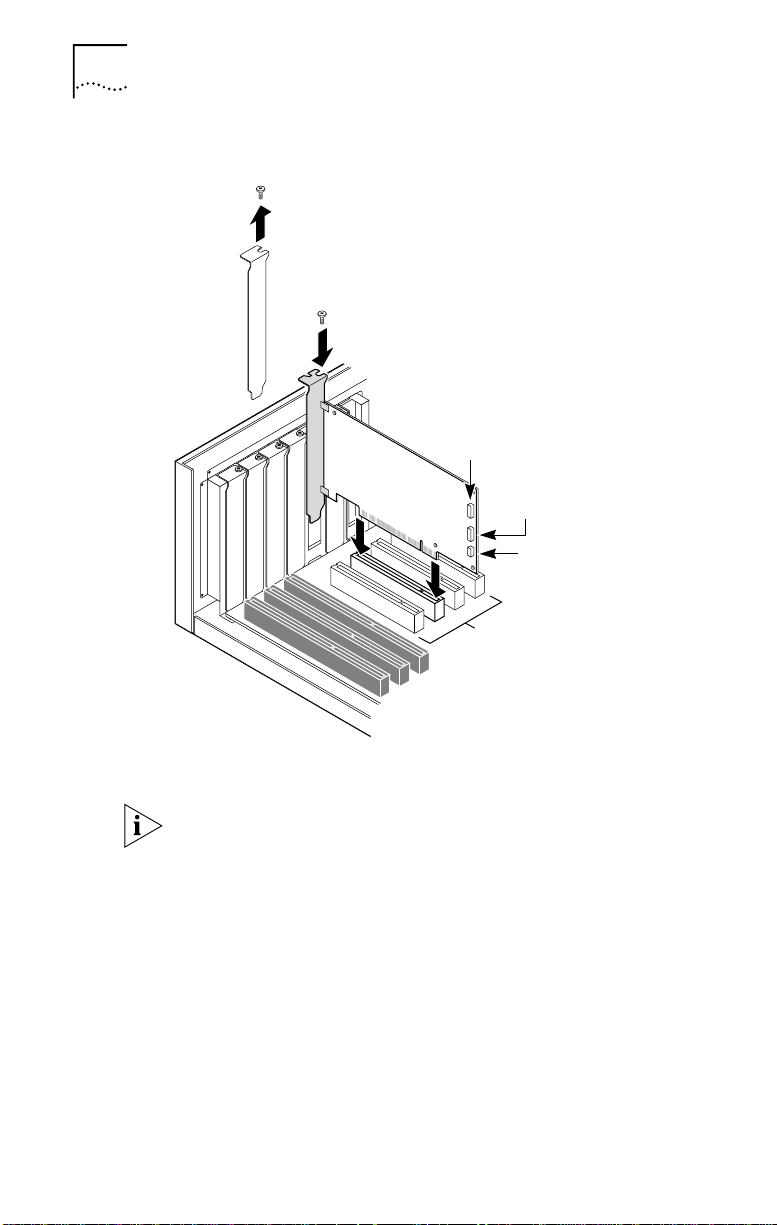
6 Carefully insert the NIC into the empty PCI slot (see
Figure 1). Press firmly to ensure that the NIC is fully
seated in the slot.
Installing the NIC
5
Before handling the NIC, touch the bare metal
shared
PCI slot. Avoid any
Page 6
6
E
THERLINK
10/100 PCI
FOR COMPLETE
PC M
ANAGEMENT
NICS Q
UICK GUIDE
Figure 1
Installing the NIC
1 Remove slot cover
2 Insert NIC
SOS pin connector
System Management
Bus (SMB) connector
Remote Wake-Up
(RWU) connector
PCI slots
7 Secure the NIC with the screw you removed in step 5.
If you want to connect the Remote Wake-Up cable, see
“Connecting the Remote Wake-Up Cable” in Chapter 2
of the user guide to continue the installation.
If you want to connect a cable from the SOS or
SMBus connector, see your PC documentation
or contact your PC manufacturer for instructions.
If you do not want to connect a cable, continue
with step 8.
8 Replace the PC cover and plug in the power cord.
Do not turn on the power to the PC.
Page 7

Installing the Driver and Software
7
9 Connect the appropriate network cable to the RJ-45
port on the NIC, following the specifications in the
table below.
Network
Environment
10 Mbps
(10BASE-T)
100 Mbps
(100BASE-TX)
Cable Required
Category 3, 4, or 5
unshielded twisted-pair
Category 5 unshielded
twisted-pair
The next step is to install the NIC driver and software.
Installing the Driver and Software
This section describes how to install the NIC driver and
software on a PC running Windows 95 or Windows 98.
For other operating systems, see the user guide.
Windows 95
To install the NIC driver and software under Windows 95,
you need the Windows 95 installation files. These files
may be on a CD or diskettes, or they may have been copied
to your hard drive when Windows 95 was installed on
your PC.
If you encounter problems during the installation, see
the W95NDIS.TXT file located in the HELP directory on
EtherDisk
Before installing the NIC driver and software:
■
■
To install the NIC driver and software on a PC running
Windows 95:
1 Turn on the power to the PC.
Windows 95 detects the NIC. Depending on the version of
Windows 95 that you have installed, the New Hardware
Found dialog box appears or the Update Device Driver
Wizard starts.
diskette 3 for troubleshooting tips.
Make sure that you have run the preinstallation
program, as described earlier in this guide.
Make sure that the NIC is installed in the PC and
that it is connected to the network.
Maximum
Cable Length
100 m (328 ft)
100 m (328 ft)
Page 8

8
E
THERLINK
10/100 PCI
FOR COMPLETE
PC M
ANAGEMENT
NICS Q
If the New Hardware Found dialog box appears:
a
Select
Driver from disk provided by hardware
manufacture
r, and then click OK.
b Insert EtherDisk diskette 1 in drive A, make sure that
A:\ appears in the entry box, and then click OK.
c Go to step 2 when prompted for EtherDisk diskette 2.
If the Update Device Driver Wizard starts:
a Insert EtherDisk diskette 1 in drive A, and then
click Next.
Windows finds the driver and asks if you want to
use this driver.
b Click Finish, and then click OK when prompted for
EtherDisk diskette 1.
c Go to step 2 when prompted for EtherDisk diskette 2.
2 Remove EtherDisk diskette 1 from drive A, insert
EtherDisk diskette 2, and then click OK.
Files are copied.
■ If this is the first time that networking is being installed
on your PC, the Identification tab of the Network screen
appears. Go to step 3.
■ If networking has already been installed, you are
prompted for the Windows 95 CD. Go to step 4.
3 In the specified fields of the Identification tab screen,
enter the following information, and then click OK:
■ Computer Name — Identifies the PC on the network
for other users. This entry must be a unique name of
15 characters or fewer, containing no spaces.
■ Workgroup — Identifies the group (for example, your
department name) to which your PC belongs. If you
belong to a peer-to-peer network, this entry must be
exactly the same for all the PCs in your network.
■ Computer Description — Displays additional details to
other users on the network about this PC. For example,
you could specify that the PC has a printer attached.
Filling in this field is optional.
UICK GUIDE
Page 9

Installing the Driver and Software 9
4 Insert the Windows 95 CD or diskette, and then click OK.
If you do not have the Windows 95 CD or diskette, but the
Windows 95 installation files are on your hard drive, click
OK. Enter the directory in the Copy Files From entry box
(usually C:\WINDOWS\OPTIONS\CABS), and then click OK.
Files are copied. You are prompted for EtherDisk diskette 2.
5 Make sure that EtherDisk diskette 2 is in drive A, and
then click OK.
Files are copied. You are prompted to restart the PC.
6 Remove EtherDisk diskette 2 from drive A, and then
click Yes to restart the PC.
You must restart the PC to complete the installation.
The installation is complete. Go to “Verifying Successful
Installation” later in this guide to confirm that the NIC is
properly installed.
After Windows restarts, double-click the Network icon
in the Windows Control Panel and make sure that the
configuration settings are properly configured for your
network environment. Contact your system administrator
for assistance.
Windows 98
To install the NIC driver and software under Windows 98,
you need the Windows 98 installation files. These files
may be on a CD or diskettes, or they may have been copied
to your hard drive when Windows 98 was installed on
your PC.
If you encounter problems during the installation, see
the WIN98.TXT file located in the HELP directory on
EtherDisk diskette 3 for troubleshooting tips.
Before installing the NIC driver and software:
■ Make sure that you have run the preinstallation
program, as described earlier in this guide.
■ Make sure that the NIC is installed in the PC and
that it is connected to the network.
Page 10

10 ETHERLINK 10/100 PCI FOR COMPLETE PC MANAGEMENT NICS QUICK GUIDE
To install the NIC driver and software on a PC running
Windows 98:
1 Turn on the power to the PC.
Windows 98 detects the NIC. The Add New Hardware
Wizard starts.
2 Insert EtherDisk diskette 1 in drive A, and then
click Next.
3 Select Search for the best driver for your device
(Recommended), and then click Next.
4 Select Floppy disk drives, and then click Next.
Windows finds the driver file for the device.
5 Click Next.
If the Insert Disk dialog box appears, prompting you to
insert EtherDisk diskette 1, click OK.
Files are copied. You are prompted for EtherDisk diskette 2.
6 Remove EtherDisk diskette 1 from drive A, insert
EtherDisk diskette 2, and then click OK.
Files are copied. You are prompted for the Windows 98 CD.
7 Insert the Windows 98 CD or diskette, and then
click OK.
If you do not have the Windows 98 CD or diskette, but the
Windows 98 installation files are on your hard drive, click
OK. Enter the directory in the Copy Files From entry box
(usually C:\WINDOWS\OPTIONS\CABS), and then click OK.
Files are copied. You are prompted for EtherDisk diskette 2.
8 Make sure that EtherDisk diskette 2 is in drive A, and
then click OK.
Files are copied.
9 Click Finish.
You are prompted to restart the PC.
Page 11

Verifying Successful Installation 11
10 Remove EtherDisk diskette 2 from drive A, and then
click Yes to restart the PC.
You must restart the PC to complete the installation.
The installation is complete. Go to the next section,
“Verifying Successful Installation,” to confirm that the
NIC is properly installed.
After Windows restarts, double-click the Network icon
in the Windows Control Panel and make sure that the
configuration settings are properly configured for your
network environment. Contact your system administrator
for assistance.
Verifying Successful Installation
To verify that the NIC and its software are properly installed
on a PC running Windows 95 or Windows 98:
1 Open the Windows Start menu, select Settings, and
then select Control Panel.
2 Double-click the System icon.
3 Select the Device Manager tab.
4 Double-click Network adapters and make sure that
the name of the NIC appears.
If a red X or a yellow exclamation point (!) appears next to
the name of the NIC, the installation was not successful.
See “Troubleshooting the Installation” and “Frequently
Asked Questions” in Chapter 5 of the user guide for
troubleshooting help.
Page 12

 Loading...