

Page 1
INKBUILDER
L
MSH
HASSIS
C
SER
U
G
UIDE
Part No. DUA1800-0AAA04
Published September 1994
Page 2

3Com Corporation ■ 5400 Bayfront Plaza ■ Santa Clara, California ■ 95052-8154
© 3Com Ireland, 1994. All rights reserved. No part of this documentation may be reproduced in any
form or by any means or used to make any derivative work (such as translation, transformation, or
adaptation) without permission from 3Com Ireland.
3Com Ireland reserves the right to revise this documentation and to make changes in content from
time to time without obligation on the part of 3Com Ireland to provide notification of such revision or
change.
3Com Ireland provides this documentation without warranty of any kind, either implied or expressed,
including, but not limited to, the implied warranties of merchantability and fitness for a particular
purpose. 3Com may make improvements or changes in the product(s) and/or the program(s) described
in this documentation at any time.
UNITED STATES GOVERNMENT LEGENDS:
If you are a United States government agency, then this documentation and the software described
herein are provided to you subject to the following restricted rights:
For units of the Department of Defense:
Restricted Rights Legend: Use, duplication or disclosure by the Government is subject to restrictions as
set forth in subparagraph (c) (1) (ii) for restricted Rights in Technical Data and Computer Software
clause at 48 C.F.R. 52.227-7013. 3Com Ireland, c/o 3Com Limited, Isolan House, Brindley Way, Hemel
Hempstead, Hertfordshire, HP3 9XJ, UK.
For civilian agencies:
Restricted Rights Legend: Use, reproduction or disclosure is subject to restrictions set forth in
subparagraph (a) through (d) of the Commercial Computer Software - Restricted Rights Clause at 48
C.F.R. 52.227-19 and the limitations set forth in 3Com’s standard commercial agreement for the
software. Unpublished rights reserved under the copyright laws of the United States.
3Com, CardFacts, LinkBuilder and RingBuilder are registered trademarks of 3Com Corporation.
Registered trademarks are registered in the United States, and may or may not be registered in other
countries.
LinkSwitch, FMS, MSH, and Transcend are trademarks of 3Com Corporation.
3ComFacts, Ask 3Com, NetFacts, and CardBoard are service marks of 3Com Corporation.
CompuServe is a registered trademark of CompuServe, Inc.
Other brand and product names may be registered trademarks or trademarks of their respective
holders.
Page 3

C
ONTENTS
A
BOUT THIS GUIDE
About This Guide ix
A Word About Safety ix
Special Messages x
How to Use This Guide x
W
HAT IS THE LINKBUILDER
1
The LinkBuilder MSH 1-1
The Chassis 1-4
The Backplane 1-5
The Modules 1-8
Power Supply Units (PSU) 1-8
The Display Panel 1-9
The Thermal Management Unit (TMU) 1-10
The Cable Support Tray 1-10
Management Of The LinkBuilder MSH 1-11
I
NSTALLING THE LINKBUILDER
2
Introduction 2-1
A Suitable Site For Installation 2-2
Installing The Chassis 2-2
Installation Into A 19 Inch Rack 2-4
The Locking Bar 2-5
Assembling The LinkBuilder MSH 2-6
Safety Information 2-6
The Power Supply Unit And Power Inlet Panel 2-8
Installing The Power Supply Unit 2-9
Removing The Power Supply Unit 2-12
The Display Panel 2-15
Removing The Display Panel 2-15
The Thermal Management Unit 2-17
MSH?
MSH
Page 4

The Cable Support Tray 2-20
Completing The Installation 2-23
Network Cabling 2-23
Power-up The LinkBuilder MSH 2-23
Storing The User Guides 2-24
I
3
NSTALLING MODULES INTO THE
Introduction 3-1
Ethernet Modules 3-2
Token Ring Modules 3-10
FDDI Modules 3-13
Handling Modules 3-15
Before You Begin 3-16
Blanking Plates 3-16
Choosing Slots For Modules 3-17
LinkBuilder MSH Modules 3-17
Installing/Removing A Module 3-18
Removing A Module 3-20
LinkBuilder ECS Modules 3-21
Installing/Removing LinkBuilder ECS Modules 3-21
U
4
SING THE DISPLAY PANEL
The Display Panel 4-1
The LEDs 4-4
Tes ti ng LE Ds 4- 5
Resetting The LinkBuilder MSH 4-6
Management 4-6
The Four-button Keypad 4-6
The RS232 Serial Port 4-7
The Network Manager 4-7
MSH C
HASSIS
P
5
ROBLEM SOLVING
Introduction 5-1
Spares 5-2
Spot Checks 5-2
Cleaning 5-3
Removing And Replacing Equipment 5-3
Page 5

Fault Diagnosis Using The LEDs 5-4
Obtaining Help 5-5
S
A
TANDARDS USED IN THE DESIGN
Standards and Approvals A-1
Safety A-1
Environmental A-1
Electromagnetic Compatability A-1
Functional A-2
BABT Approval A-2
T
B
ECHNICAL SPECIFICATION
MSH Chassis - 3C18000 and 3C18001 B-1
Display Panel - 3C18006 B-2
375W Power Supply Unit - 3C18011 B-2
525W Power Supply Unit - 3C18012 B-3
Thermal Management Unit - 3C18005 B-3
ECS - MSH Module Converter - 3C18082 B-4
Miscellaneous B-4
Weight of blanking panels B-4
MSH P
C
Calculating Power Consumption C-1
OWER CONSUMPTION LIMITS
PIN AND C
D
Ethernet RJ45 - Pin Assignments D-1
Ethernet Telco - Pin Assignments D-2
Token Ring RJ45 - Pin Assignments D-4
Ring-In and Ring-Out Pin Assignments D-4
RS232 Serial Port - Pin Assignments D-5
Status Input Connector D-5
O
E
RDERING INFORMATION
Product Numbers E-1
Chassis Components E-1
IRCUIT ASSIGNMENTS
Page 6

Ethernet Products E-2
Token Ring Products E-3
FDDI Products E-3
Suppliers E-4
T
F
ECHNICAL SUPPORT
On-line Technical Services F-1
3Com Bulletin Board Service (3ComBBS) F-1
Ask3Com on CompuServe F-2
3ComFacts Automated Fax Service F-2
3Com Documentation on CD-ROM F-3
Support from Your Network Supplier F-4
Support from 3Com F-4
Returning Products for Repair F-5
I
NDEX
R
ADIO FREQUENCY INTERFERENCE STATEMENTS
FCC Statement 1
CSA Statement 1
Information To The User 1
L
IMITED WARRANTY
Page 7

A
BOUT THIS
About This Guide
This guide is intended for use only by the following:
■ the Network Administrator responsible for the management and
maintenance of the network.
■ the installation engineer responsible for installing hardware.
This guide contains all the information you need to set up the
LinkBuilder MSH (Multi-Services Hub) and describes how:
■ the MSH works
■ to install the chassis, its ancillary components and modules
■ to identify problems and possible solutions to these problems.
G
UIDE
A Word About Safety
Please pay careful attention to the Warning and Safety
Information panels that appear throughout this user guide. These
panels give information that will protect you and the MSH
equipment.
They are always accompanied by this symbol:
Page 8
x A
BOUT THIS GUIDE
Special Messages
A special format indicates notes, cautions, and warnings. These
messages are defined as follows.
Notes call attention to important features or instructions.
CAUTION:
Cautions contain directions that you must follow to
avoid immediate system damage or loss of data.
WARNING:
Warnings contain directions that you must follow for
your personal safety. Follow all instructions carefully.
Throughout this guide,
are used to denote new terms or
italics
emphasis.
How to Use This Guide
The following list shows where to find specific information. Refer
to the documentation roadmap in the front of this guide for
information on related guides.
If you are looking for: Turn to:
Details of Multi-Services Hub functions and features, and add-on products Chapter One
How to install the chassis and the ancillary items Chapter Two
How to install and remove LinkBuilder MSH and ECS modules Chapter Three
How to use the display panel and what you can do with it Chapter Four
How to identify and resolve any problems Chapter Five
Standards used in the development of the MSH Appendix A
Technical specifications for LinkBuilder MSH products Appendix B
MSH power consumption limits Appendix C
Connector pin assignments Appendix D
Ordering information for products mentioned in this user guide. Appendix E
How you can contact 3Com Appendix F
DUA1800-0AAA04
Page 9
W
HAT IS THE LINKBUILDER
1
■ The LinkBuilder MSH and the services it provides
■
■ A brief explanation of the display panel, power supply units and
MSH?
This chapter introduces:
The modules
thermal management unit.
WARNING:
i.e., removal and replacement of modules, power supply units
and other ancillary components must only be carried out by
qualified personnel
AVERTISSEMENT:
MSH, comme par exemple, l'enlèvement et le remplacement des
modules, des fournitures électriques et des autres composants,
doivent être effectués uniquement par un personnel qualifié.
Installation and configuration of the MSH chassis,
L'installation et la configuration du châssis
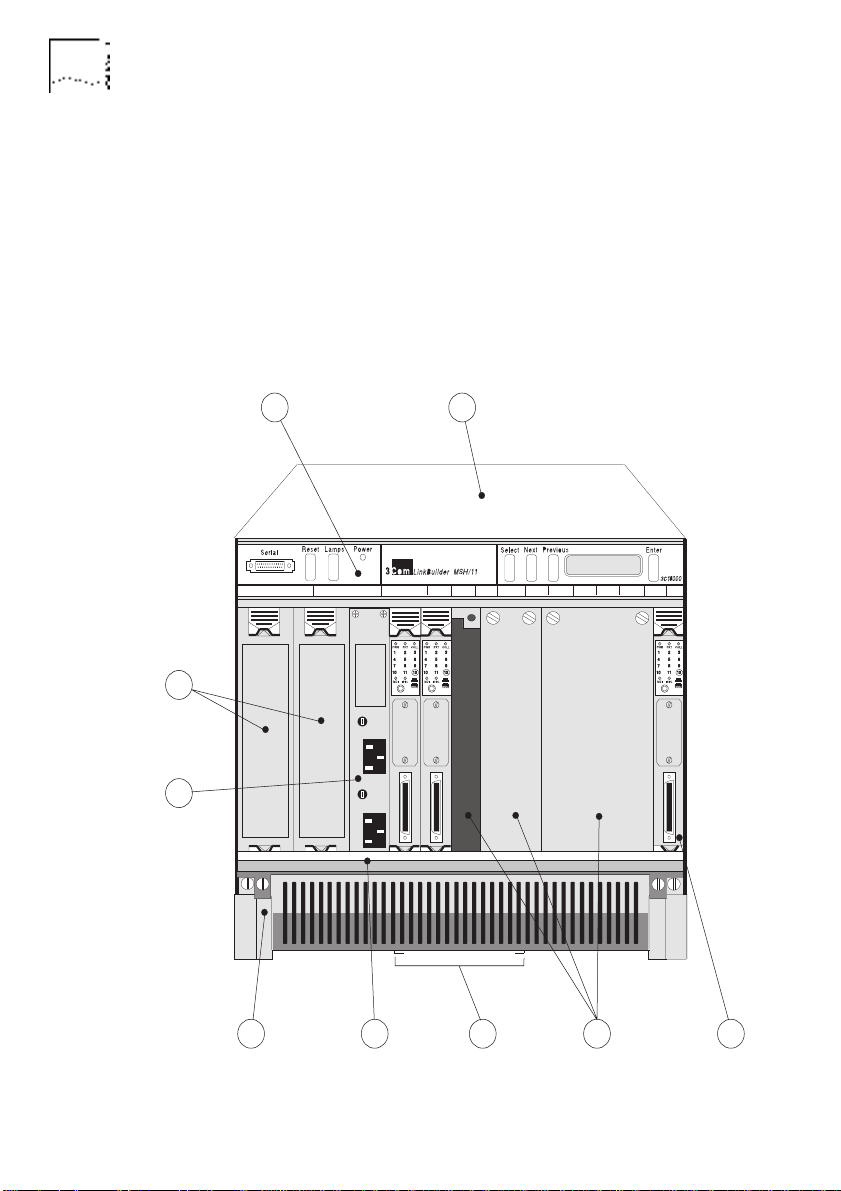
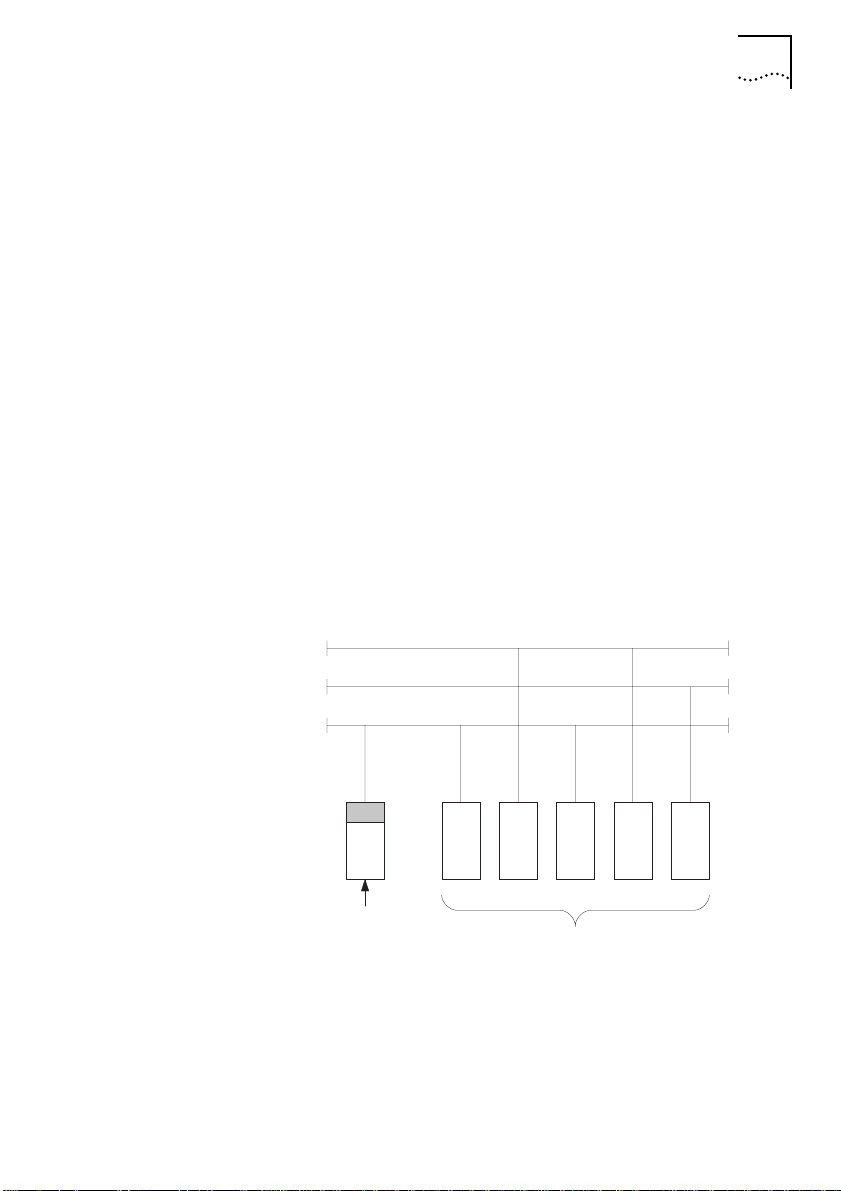
The LinkBuilder MSH
The LinkBuilder MSH provides a central hub for network
interconnection and management.
There is a diagram of an MSH and key to the compnents overleaf.
The basis of the MSH is the chassis, into which can be installed a
series of media specific modules. At the heart of the chassis is the
backplane onto which all modules connect. It is the backplane
which allows communication between the network segments
using the MSH. A locking bar fitted across the front of the MSH
chassis prevents removal of modules and power supply units by
unqualified personnel.
Page 10
1-2 C
HAPTER
HAT IS THE LINKBUILDER
1: W
MSH?
Power is supplied to the chassis via one or two
and the chassis is kept cool with a
Your local interface with the MSH is via a
convenience may be installed at the front or rear of the chassis.
This display panel provides simple local fault finding and
management status information and an RS232 port for
out-of-band management. Detailed management of the system is
available via a remote management tool such as the ISOVIEW
Network Manager.
2
thermal management unit
1
power supply units
display panel
.
which for
3
4
5
Figure 1-1 The LinkBuilder MSH
6
7
8
DUA1800-0AAA04
9
Page 11

The LinkBuilder MSH 1-3
MSH Chassis
1
which all components are installed. See
Display Panel
2
- The 11-slot chassis that holds the backplane into
The Chassis
on page 1-4
- Can be fitted front or back. Provides your local
interface to the control and management of the MSH. See
Display Panel
Power Supply Units
3
on page 1-9
.
- Distributes power to the other modules.
One unit is essential for operation, two are recommended for
resilience. See
Power Inlet Panel
4
sockets. See
page 2-8
Thermal Management Unit
5
air to the modules. See
page 1-10
Locking Bar
6
Power Supply Units (PSU)
on page 1-8
- Provides the power connection via two IEC
The Power Supply Unit And Power Inlet Panel
.
- A fan unit that supplies cooling
The Thermal Management Unit (TMU)
.
- This must be fitted to prevent removal of modules
and power supply units by unqualified personnel. See
Bar
on page 2-5
.
.
The Locking
The
on
on
7
8
9
DUA1800-0AAA04
Documentation Holder
guides. See
Storing The User Guides
Module Slot and Blanking Plate
- A useful place to store module user
on page 2-24
.
- There are eleven identical
slots that can take one of a range of modules. Blanking plates
that cover 1, 3 and 5 vacant slots are supplied.
For Modules
Module
Modules
- One of a wide range available from 3Com. See
on page 1-8.
on page 3-17
and Blanking Plates
See Choosing Slots
on page 3-16
The
Packaged with the MSH chassis, but not shown on Figure 1-1:
The Rack Mounting Kit
allow the MSH to be mounted into a 19 inch rack. See
Into A 19 Inch Rack
- Consists of a pair of brackets that
on page 2-4
.
Installation
.
Page 12

1-4 C
HAPTER
HAT IS THE LINKBUILDER
1: W
MSH?
Available to order, but not shown on Figure 1-1:
The Cable Support Kit
prevents strain on the connections.
on page 1-10
The MSH components are explained more fully in the sections
which follow.
The Chassis
The chassis has two versions. 3C18000 supports Ethernet and
Token Ring: 3C18001 supports FDDI as well. Upgrade from
3C18000 to 3C18001 is available. Ask your supplier for details.
Either chassis has eleven slots offering identical functionality to a
maximum of eleven modules if the unit is fully populated. Two
identical slots on the left-hand side of the chassis can each hold a
power supply unit (PSU). A power inlet panel located between the
right-hand PSU slot (PSU 2) and the module slots provides two IEC
sockets, one for each PSU. It is worth noting at this point that
connectivity modules
cannot
cannot
- Takes the weight of network cables and
See The Cable Support Tray
and Appendix E for ordering information.
cannot
be fitted into PSU slots, the PSU
be fitted into module slots and the power inlet panel
be moved from its position.
The chassis is suitable for installation into a standard 19 inch rack
system or stand-alone desk or shelf mounting and has been
designed so that you may decide which face of the unit is the
front. Blanking plates of various sizes are supplied to cover any
unused slots whilst the unit is in operation.
Underneath the chassis there is a storage position for holding up
to four module user guides. We suggest that you use this as a
way of keeping the useful information contained in the guides at
your finger-tips.
Fitted in the chassis and central to the operation of the MSH is the
backplane.
DUA1800-0AAA04
Page 13
The Backplane
p
The backplane provides the following services to the MSH:
■
Ethernet support via a medium speed CSMA/CD bus
■
Token ring support via a flexible high speed bus
■
FDDI support via a flexible high-speed bus (3C18001 or converted
3C18000)
■
Management via a separate management bus
■
Power
■
System control
Ethernet Support
The Ethernet bus has been designed to conform to the IEEE 802.3
standard for Local Area Networks. It supports three individual
paths which are tracked to all module slots. You can decide to
which Ethernet bus a module connects thus allowing multiple
segments within the one chassis..
The Chassis 1-5
DUA1800-0AAA04
Bus 3
Bus 2
Bus 1
ECS module
Figure 1-2
with adap
Ethernet backplane operation
ter
MSH modules
Figure 1-2 shows an ECS module fitted with a converter
connecting into Bus E1 on the MSH Backplane, and MSH modules
connecting to any of the three ethernet buses.
Page 14

1-6 C
HAPTER
HAT IS THE LINKBUILDER
1: W
MSH?
ECS modules can connect to any of the three buses, however, you
should note that an ECS module attached to Buses E2 or E3 will
not have full statistics gathering facilities. Note also that an ECS
module should only be installed in slots 1 to 10 in the MSH
chassis.
Bus selection on MSH modules is controlled via link settings on
the board or through a remote management tool such as
Transcend software or using the front panel RS232 port.
You will find further information about this subject in Chapter 3,
The Modules
on page 1-8 in this user guide and in the user guide
that accompanies each module.
Token Ring Support
The MSH supports up to five individually managed token rings
using a bus tracked to all slots in the chassis. Token rings are
created using RingBuilder and MAU modules. Each RingBuilder
has a local ring section number associated with it, set by switches
on the RingBuilder or by the Management Module. Similarly all
MAU modules have local ring section numbers. A RingBuilder
combines all MAUs with local ring section numbers that match
the RingBuilder's local ring section number into one logical token
ring. Any MAUs with a local ring section number of zero, or one
that does not match the local ring section numbers of any
RingBuilder are left isolated as single, stand-alone token rings.
The MSH supports tokens rings at both 4Mbps and 16Mbps but
all modules in a local ring section must operate at the same
speed.
DUA1800-0AAA04
Page 15

The Chassis 1-7
.
DUA1800-0AAA04
Figure 1-3
Token ring backplane operation
You will find further information about this subject in Chapter 3,
The Modules
on page 1-8 in this user guide and in the user guide
that accompanies each module.
FDDI Support
The MSH chassis (3C18001) which is fitted with a FDDI
backplane, supports three managed 100Mbs FDDI rings.
Rings are created with an FDDI RingBuilder Module and one or
more port cards (fiber, UTP or any combination of these up to ten
modules). RingBuilder Modules may contain up to two FDDI
Media Modules, which connect to external FDDI devices. Port
cards associated with a RingBuilder Module must be to the left of
that RingBuilder Module. A special FDDI interface on the
backplane allows a LinkSwitch FDDI Module to communicate with
the associated RingBuilder Module on its left. The user guide
which accompanies your RingBuilder Module gives you a full
description of how to deploy the FDDI modules in an MSH
chassis. Management is through the MSH display panel RS232
Page 16
1-8 C
HAPTER
1: W
management port, a remote manager using Telnet or an SNMP
management application such as one of the 3Com Transcend
range.
The Modules
The range of modules available for installation into the
LinkBuilder MSH is constantly being extended. Please contact your
local supplier for further information.
If you already have a LinkBuilder ECS10 or ECS4, the modules
that you use for this system can be easily adapted for installation
into the MSH chassis. This is achieved by attaching a converter to
the ECS module which will allow it to connect to the MSH
backplane.
ECS modules are also known as line cards.
You will find further information about module functionality in
Chapter 3,
guide.
HAT IS THE LINKBUILDER
MSH?
LinkBuilder MSH Modules
on page 3-17 in this user
Power Supply Units (PSU)
Two slots are provided within the MSH chassis for power supply
units. The MSH can be configured with one PSU installed into
the chassis. However with two PSUs installed, each contributes
approximately half of the power requirement, enabling the load
to be shared. This increases the reliability of the power supply
units. Failure of one of the power supply units would result in the
other unit taking over the full load, without any interruption to
the operation of the MSH.
See Appendix C for details of the use of the two different capacity
PSUs and how to calculate power requirements for a particular
MSH configuration.
DUA1800-0AAA04
Page 17

Power is supplied to the chassis via two IEC sockets (the top
socket serves the left-hand PSU) on a fixed power inlet panel
fitted in the chassis between the right-hand PSU slot (PSU 2), and
the module slots. The two sockets provide resilience against
power supply cable or fuse faults.
The Display Panel
The display panel provides the following features:
■
Lamps Button
The Lamps button allows you to carry out an LED test which
shows you that all the LEDs on the display panel and on modules
installed into the chassis, are working. If an LED on the display
panel does not light, refer to Chapter 5 of this user guide; if it is a
problem with a module LED, refer to the user guide that
accompanies the product.
■
Reset Button
The Display Panel 1-9
■
DUA1800-0AAA04
Pressing the Reset button restarts the MSH. To prevent an
accidental reset of the modules, the Enter button on the
four-button keypad must be pressed at the same time as the
Reset button
.You should only need to reset the MSH immediately after
installation. It is advisable not to use the Reset button during
normal operation, as this could cause loss of data.
RS232 Port
This is a 25-way D-Type connector to which you may connect a
local management terminal directly or via a modem. Note that, in
order to use this port, a LinkBuilder MSH Management Module
must be installed into the chassis.
The display panel also gives you simple fault finding with a line of
comprehensive LEDs, which are explained in Chapters 4 and 5.
Page 18

1-10 C
HAPTER
HAT IS THE LINKBUILDER
1: W
MSH?
If you have a Management Module installed, you can access
read-only information telling you how the chassis is set up. More
details can be found in the user guide that accompanies the
Management Module.
For convenience, the display panel may be installed into the front
of the MSH chassis (the face of the chassis with cable connections
and module LEDs) or it may be fitted to the back of the chassis if
you wish to have network connections and cables kept behind
the MSH.
The Thermal Management Unit (TMU)
This is a fan unit which slides into the bottom of the MSH chassis
and supplies cooling air to the modules by forced circulation. Each
fan has its own failure detector. In the unlikely event of one of the
fans in the unit failing, a Fan Fail LED located on the display panel
at the top of the MSH chassis will light and a message will be sent
to network management stations. If a fan does fail, you should
contact your supplier immediately as the failure may lead to
overheating and subsequent damage to the modules.
Filters fitted over each fan, prevent dust and debris from entering
the chassis. These should be cleaned at regular intervals.
The Cable Support Tray
We recommend that all external cables from the LinkBuilder MSH
are provided with some form of strain relief. The
has been specifically designed for use with the MSH chassis.
tray
When fitted, the cable support tray also provides the correct
clearance underneath the unit so that cooling air can freely
circulate.
cable support
DUA1800-0AAA04
Page 19

Management Of The LinkBuilder MSH 1-11
Management Of The LinkBuilder MSH
You are advised to install a LinkBuilder Management Module into
the MSH. This will enable you to more effectively manage the
multiservice facilities of the MSH.
There are four possible methods of management.
■
If the MSH does not contain a Management Module:
■
you have access to simple monitoring, using the LED indicators
located on the display panel and on modules, and by manually
setting links on the modules.
■
If there is a Management Module installed in the MSH Chassis:
■
Remote Network Management, for instance ISOVIEW Network
Manager or Transcend applications for SunNet and HP
OpenView Managers, is the most powerful method of
management. It allows access to and control of a range of
features, including error and traffic rate triggers.
DUA1800-0AAA04
■
Using a local management terminal connected to the RS232
port on the display panel provides a method of accessing a
comprehensive set of management tools for out-of-band
management.
■
The 2-line x 24-character LCD panel displays read-only
information detailing statistics, port traffic, version numbers
etc. Refer to the user guides that accompany the Management
Module.
You will find further information in
Management
on page 4-6.
Page 20

1-12 C
HAPTER
HAT IS THE LINKBUILDER
1: W
MSH?
DUA1800-0AAA04
Page 21
I
NSTALLING THE LINKBUILDER
2
■
■
■ Details of how to install:
MSH
This chapter provides:
An overview of the steps needed to install the MSH
Details of how to install the chassis
■
a power supply unit
■
the display panel
■
the thermal management unit
■
the rack/cable mounting kit
WARNING:
must be carried out by qualified personnel only.
AVERTISSEMENT:
ce chapitre doivent être effectuées uniquement par un personnel
qualifié.
Maintenance operations described in this chapter
Les opérations de maintenance décrites dans
Introduction
We suggest that you carry out the following sequence of steps to
install and set up the LinkBuilder MSH:
If the MSH is to be installed on a new or extended network,
1
ensure that all the network cabling has been set up and tested
before starting the installation.
Install the chassis, and at least one power supply unit and check
2
that they are operating correctly.
Page 22
2-2 C
HAPTER
3
NSTALLING THE LINKBUILDER
2: I
Install modules and a Management Module if you are using one,
into the chassis, and check their operation
Attach your network cabling to the modules you have installed.
4
A Suitable Site For Installation
Before you install the MSH, make sure that the location you have
chosen is suitable. There should be:
Adequate ventilation. The chassis has three sets of ventilation
■
holes - one on the top of the chassis, one at the back and one
underneath. Ventilation panels and the air-intake at the front of
the fan tray must be free of obstructions at all times to allow
adequate circulation of cooling air.
Adequate clearance to allow for cable connections, viewing and
■
use of display panel and LEDs, and installation and removal of
modules.
Access to a power supply with two sockets.
■
MSH
No direct sources of electrical interference in the immediate area,
■
for example, machinery, power lines, transmitters.
No danger of condensation, liquids or excessive amounts of dust
■
entering the chassis.
Remember also that the MSH operates correctly in temperatures
between 0°C and 40°C (32°F and 104°F).
Installing The Chassis
A pair of brackets for mounting the MSH are supplied with the
chassis. The MSH can be:
Fitted into a standard 19 inch rack system.
■
Left as a stand-alone piece of equipment, for example, on a desk
■
or shelf.
DUA1800-0AAA04
Page 23

Introduction 2-3
If MSH chassis are mounted one above the other, there must be
adequate space between them for cooling air to pass. When
fitted, the cable support tray, which can be ordered from your
local LinkBuilder supplier, provides the correct spacing between
units. If you do not fit a cable support tray you should leave 1U
between units. (The height of standard 19 inch rack mountings
are measured in `U's. 1U is approximately 45 millimeters (1
3
/4”).)
If you decide to install the chassis into a 19 inch rack, you can also
determine which face of the chassis is the front. Throughout this
user guide, we assume that the front of the chassis is that face
which has the network connections and module LEDs. However,
you may find that, for your set-up, it is more convenient to have
all cable connections at the back of the unit.
Fitting The Mounting Brackets
Refer to Figure 2-1.
Figure 2-1
DUA1800-0AAA04
Position of the Mounting Brackets (lefthand side view)
Page 24
2-4 C
HAPTER
NSTALLING THE LINKBUILDER
2: I
MSH
There are two sets of holes on each side of the MSH chassis.
These allow for fitting the mounting brackets to two different
positions:
If you decide to have the face of the chassis that takes the cable
■
connections and shows module LEDs as the
, fit the brackets
front
to the holes near this face.
If you decide to have the face of the chassis that is clear of
■
connections as the front, fit the brackets using the set of holes
towards the rear face.
If you decide on this configuration, the display panel above the
module slots must be moved. Refer to The Display Panel on page
2-15.
Match the appropriate bracket with the holes on the side face of
1
the MSH chassis.
Locate the four slotted screws into the holes and tighten using a
2
flat-tipped screwdriver.
To remove the bracket, loosen the four screws, and lift it away.
Store both brackets and screws safely for future use.
Installation Into A 19 Inch Rack
Fit the mounting brackets that are supplied with the chassis to the
1
face which you have decided is the front of the chassis.
Refer to the manufacturer's documentation that accompanies the
2
19 inch rack for details of installation. If there is a door fitted to
the rack, it is essential that there is adequate clearance between
the door and the front of the MSH chassis to prevent damage to
cables and connectors.
DUA1800-0AAA04
Page 25
The Locking Bar
The MSH chassis is delivered with a locking bar fitted. Once the
MSH is fully assembled and installed, you must refit this locking
bar. This will prevent the removal and replacement of power
supplies, modules etc. by unqualified personnel.
Fitting The Locking Bar
1
Position the locking bar so that its two captive, fixing screws
align with holes in the thermal management unit. Note that for
clarity, the captive screws are shown removed from the bar in
Figure 2-2.
2
Locate two small screws into the appropriate holes and tighten
fully with a flat bladed screwdriver.
To remove the locking bar, loosen two screws and remove bar.
Introduction 2-5
DUA1800-0AAA04
Figure 2-2
Installing the Locking Bar
Page 26

2-6 C
HAPTER
NSTALLING THE LINKBUILDER
2: I
MSH
Assembling The LinkBuilder MSH
WARNING:
powered-up MSH must not be left unattended
Safety Information
WARNING:
power leads before servicing.
ATTENTION
The MSH cannot be powered from IT
are of the IT type, then the unit should be powered with 230V (2P
+ T) via an isolation transformer ratio 1:1, with the secondary
connection point labelled neutral, connected directly to earth.
‡
Impedance à la tierre
The MSH operates under SELV conditions (Safety Extra Low
Voltage) according to IEC 950, the conditions of which are
maintained only if the equipment to which it is connected is also
operating under SELV.
The power inlet panel is an integral part of the MSH chassis. Do
not make any attempt to remove it. If you suspect a problem is
related to the panel, please contact your supplier.
During installation and maintenance operations, the
This equipment must be earthed. Disconnect both
- Débrancher les 2 cordons avant entretien.
‡
supplies. If your supplies
The Power Lead - General1
The power lead must be approved for the country where it will be
■
used.
The appliance coupler (that is the connector to the device itself -
■
not the wall plug), must have a configuration for mating with a
EN 60320/IEC320 appliance inlet (Standard Sheet C14).
The Power Lead - USA and Canada
The power lead must be UL-listed and CSA-certified.
■
DUA1800-0AAA04
Page 27

Safety Information 2-7
■
The minimum specifications for the flexible lead are:
■
- No. 18 AWG
■
- Type SV or SJ
■
- 3-conductor
■
The power lead must have a rated current capacity of at least
10A.
■
The attachment plug must be an earth-grounding type with a
NEMA 5-15P (15A, 125V) or NEMA 6-15P (15A, 250V)
configuration.
The Power Supply Plug
If the power supply plug is unsuitable and you have to replace it,
you may find that the color coding for the replacement power
connector differs from the scheme used on the original
connector. Connect the power supply wire from the MSH
according to the following scheme:
DUA1800-0AAA04
■
Brown wire to the Live (Line) plug terminal which may be
marked with the letter L or colored red.
■
Blue wire to the neutral plug terminal which may be marked
with the letter N or colored black.
■
Yellow/Green wire to the Earth (Ground) plug terminal which
may be marked with the letter E or the earth symbol or
colored green/yellow.
WARNING:
It is essential that the power plugs of the final
installation remain nearby and easily accessible.
ATTENTION
- Il est essentiel que la prise principale de
l'installation finale soit située à proximité et facilement accessible.
The MSH is delivered with one power supply unit (PSU). It will
operate with one unit installed, but two units will provide a
resilient power supply in the unlikely event of a failure of one unit.
Page 28
2-8 C
HAPTER
NSTALLING THE LINKBUILDER
2: I
MSH
The Power Supply Unit And Power Inlet Panel
We recommend that you install two units. Further power supply
units are available from your LinkBuilder supplier: see Appendix E
Ordering Information
resilient supplies and calculating supply requirements.
One PSU installed into the MSH chassis can provide up to 375W
or 525W of power (maximum- depending on which PSU was
purchased), allowing the use of various types and numbers of
modules.
With two Units installed, each contributes approximately half of
the power requirement of the chassis. This enables the load to be
shared, increasing the reliability of the PSUs. Failure of one of the
PSUs would result in the other unit taking over the full load,
without any interruption to the operation of the MSH.
To ensure the operation of a resilient power supply in the MSH
chassis, you are advised to follow the instructions in Appendix C
and calculate total power and current consumptions before
installing the modules.
. See Appendix C for details of configuring
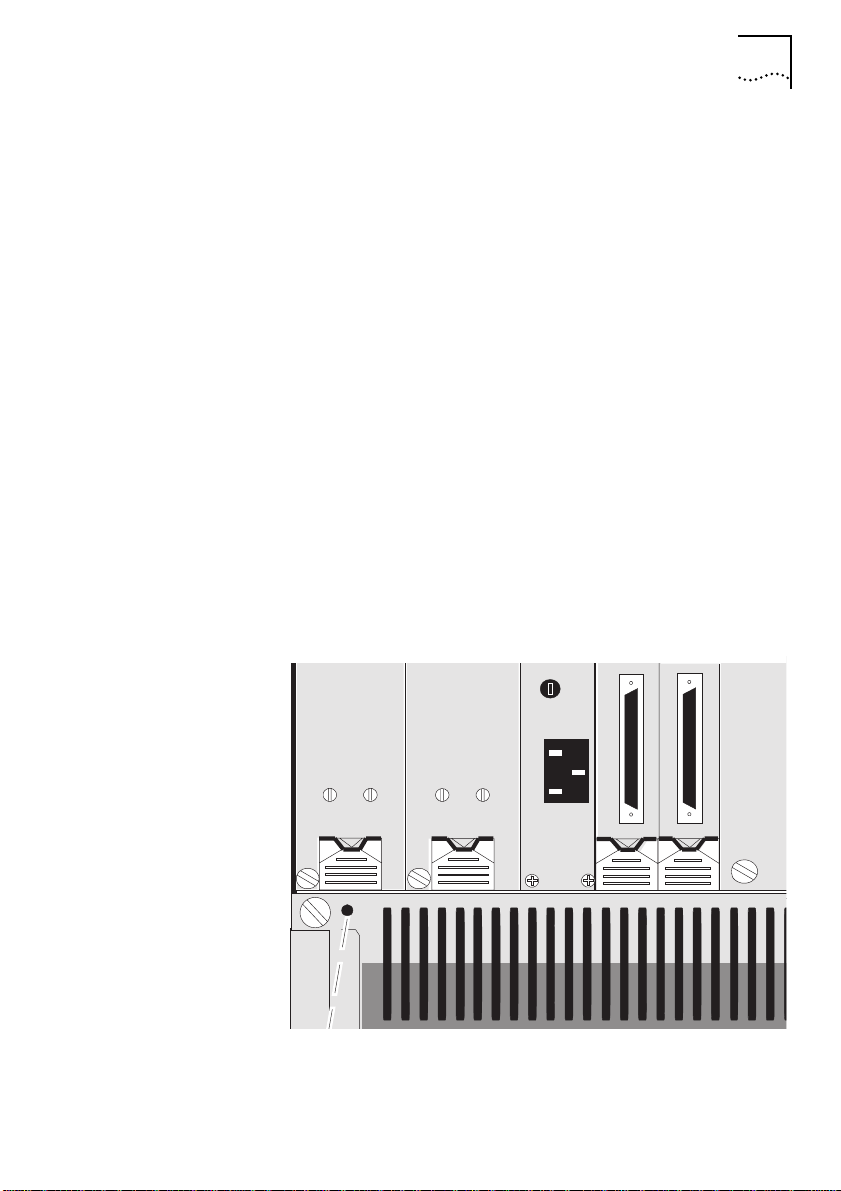
Power is supplied to the chassis via two IEC sockets on the power
inlet panel which is located between the right-hand PSU slot (PSU
2) and the first module slot. The top IEC socket supplies power to
the left-hand PSU (PSU 1), the lower socket supplies to the
right-hand PSU (PSU 2). The unit does not have an ON/OFF
switch, so it is isolated from power by disconnecting the
appropriate power supply cable. The power inlet panel also
contains two replaceable fuses: see the section entitled
The Power Supply Fuses
.
Replacing
The MSH PSU features automatic voltage selection according to
the supply that you are using.
A power lead terminated at both ends is supplied with the
chassis. Refer to the
Safety Information
on the previous pages.
DUA1800-0AAA04
Page 29
The Power Supply Unit And Power Inlet Panel 2-9
Installing The Power Supply Unit
We recommend that, if a single power supply unit is to be used
to power the MSH, the power supply unit should be installed into
the slot at the far left of the chassis. This position optimizes
ventilation within the chassis. MSH chassis are shipped without a
blanking plate covering this slot.
If you are installing a second power supply unit, it can be inserted
without powering down the MSH (this is known as
This will not cause any damage to your equipment, but packets of
data passing through the unit at the time of insertion could be
corrupted.
hot insertion
).
WARNING:
One PSU blanking plate is supplied. If you only have
one PSU installed, the adjacent vacant slot must be covered with
the blanking plate to allow cooling air to be directed onto the
installed PSU.
Hot insertion or removal of modules and/or PSUs may result in
code corruption in modules which contain microprocessors (e.g.
management or bridge modules). In the unlikely event that this
occurs, carry out a reset operation by depressing the `Enter' and
`Reset' buttons on the display panel simultaneously. The affected
modules will then resume their operational state.
We recommend that you use the following steps to install the
power supply unit. If you are hot inserting a second power supply
unit, ignore the first step.
1
Disconnect the power supply cable(s) from the IEC socket(s) on
the power inlet panel to ensure the MSH is powered down.
2
Undo two screws securing the locking bar and lift it away from
chassis.
3
The chassis offers two possible positions for power supply units;
the two left-most slots in the chassis. When a second power
DUA1800-0AAA04
Page 30

2-10 C
HAPTER
NSTALLING THE LINKBUILDER
2: I
MSH
supply unit is to be installed into the chassis, the blanking plate
covering the remaining power supply unit slot must be removed.
See
Blanking Plates
Orientate the power supply unit so that the ejector showing the
4
on page 3-16.
part number is at the top and the 11 way DIN connectors are
nearest to the unit. See Figure 2-3.
Figure 2-3
Raise the ejectors at the top and bottom of the PSU to the open
5
Inserting the PSU (3C18011 shown)
position. See Figure 2-4. With the unit located in the slot runners,
guide the power supply unit into the chassis until the hook on the
top of the ejector locates under the edge of the chassis. See
Figure 2-4. Ensure that the ejector at the bottom of the PSU is in a
similar position.
DUA1800-0AAA04
Page 31

The Power Supply Unit And Power Inlet Panel 2-11
DUA1800-0AAA04
Figure 2-4
Locking the PSU in position
Page 32

2-12 C
HAPTER
6
NSTALLING THE LINKBUILDER
2: I
Simultaneously, press the ejector flaps firmly down into the closed
position. See Figure 2-4. Check that the module has been
properly seated by placing both your thumbs on the front panel
and firmly pushing the module home. Check that the module
front panel is flush with the chassis and surrounding modules.
Using a suitable screwdriver, tighten the single security screw that
7
is at the foot of each PSU, adjacent to the ejector. This captive
screw is shown removed from the unit in Figure 2-3 for clarity.
Reposition locking bar and fully tighten the two screws to secure
8
it in place.
Once you have completed the installation of all components into
9
the chassis, you can power the MSH up and verify that it is
operating correctly. See
Completing The Installation
2-23.
Removing The Power Supply Unit
MSH
on page
Remove the power cord corresponding to the PSU you intend to
remove. The top socket feeds the left-hand PSU; the bottom one
the right-hand PSU. Remove the locking bar from the front of the
chassis. Loosen the security screw at the foot of the PSU. To
unlock the PSU ejector, press on the sprung catch and move the
flaps to the open position. This operation must be applied
simultaneously to both ejectors on the PSU
Removing one of the two power supply units from an operational
MSH will not cause any damage to your equipment. However,
packets of data passing through the unit at the time of removal
can be corrupted. Most network protocols will transparently
recover if this happens.
Before you power down the chassis make sure you inform
affected users or the Network Manager. The effect on end users
of powering down the MSH is varied. It is up to the Network
Manager to decide how best to deal with the situation.
DUA1800-0AAA04
Page 33

The Power Supply Unit And Power Inlet Panel 2-13
.
DUA1800-0AAA04
Figure 2-5
Removing the PSU
Replacing The Power Supply Fuses
Two fuses are fitted in removable cartridges located on the power
inlet panel.
WARNINGS:
The power inlet panel must not be removed from
the chassis; therefore fuse replacement must be carried out with
the panel in position.
Before replacing the fuse make sure you remove the power lead
immediately below the fuse to be replaced.
A defective fuse must be replaced with one of the same
manufacturer and type. The LinkBuilder MSH uses the following
fuses:
Manufacturer: LITTLEFUSE
Type: 314010, F10A H 250V
Page 34

2-14 C
HAPTER
NSTALLING THE LINKBUILDER
2: I
MSH
6.3 x 32mm, ceramic
Replace fuse ONCE only.
If the unit consistently blows fuses, there may be a problem.
Contact your supplier for advice.
Figure 2-6
Replacing Fuses - removing the cartridge
To replace one of these fuses proceed as follows:
Using a suitably sized screwdriver, unscrew the officeholder
1
cartridge from the power inlet panel (refer to Figure 2-6). Slide
the cartridge out of its position.
Pull the spent fuse from the cartridge and fit a new one of the
2
correct type as specified above.
DUA1800-0AAA04
Page 35

3
Replace the cartridge into the power inlet panel and secure using
the screwdriver.
The Display Panel
The display panel provides your local interface to the control of
the MSH. For a description of its functionality and instructions on
how to use it, please refer to Chapter 4.
The MSH is delivered with the display panel installed into the
chassis. However, if the panel fails for any reason or you want to
move the panel so that it is positioned on the other side of the
chassis, you will need to carry out the following procedures.
The Display Panel 2-15
Figure 2-7
WARNING:
Installing / removing the display panel
Installation or removal of the Display Panel must be
performed with the MSH powered down.
Removing The Display Panel
Refer to Figure 2-7.
You will need a small, cross-head screwdriver.
DUA1800-0AAA04
Page 36

2-16 C
HAPTER
1
NSTALLING THE LINKBUILDER
2: I
MSH
Remove the three screws that secure the display panel to the MSH
chassis.
Carefully disengage the flexi-ribbon connector taking care not to
2
bend the pins on the connector, and move the panel away from
the chassis.
Installing The Display Panel
Refer to Figure 2-7.
Before carrying out this procedure, you will need to decide which
installation position for the display panel best suits your set-up.
The display panel can be fitted to the front face (the face with the
network and power supply connections) or the rear face of the
MSH if you need to keep the front of the chassis free from cables.
However, remember that when the chassis is viewed from the
rear, module LEDs will not be visible, the only indication to the
user will be the single LED per slot on the display panel.
Fitting the display panel to the rear of the MSH. When fitting the
display panel to the rear of the unit, the ventilation panel must
first be removed and should be refitted into the position left by
the display panel at the front of the unit. The procedure for fitting
the ventilation panel is similar to that for the display panel.
To install the display panel, you will need a small, cross-head
screwdriver.
The procedure for installing the display panel is identical whether
you are installing it into the front or rear of the chassis.
Lift the display panel into position with the buttons and LCD
1
character display facing towards you.
Fit the flexi-ribbon connector, that emerges from the chassis to
2
the socket on the rear of the display panel and press firmly to
DUA1800-0AAA04
Page 37

ensure that the connection is good. The connector is keyed, so if
necessary turn it around to make it fit the socket.
3
Locate the display panel into position at the top of the chassis.
Secure using the three screws provided.
The Thermal Management Unit
The thermal management unit fits into the bottom of the MSH
chassis, underneath the module slots. It consists of an open-top
tray containing axial fans that draw in cooling air through a grill at
the front of the tray. The air circulates through the chassis and is
expelled through ventilation holes which must be kept free of
obstruction at all times.
The thermal management unit can be installed or replaced whilst
the MSH is powered up without any detrimental effect to its
operation. You should install or replace the TMU with minimal
delay when the MSH is powered up: serious damage can be
caused through overheating if the MSH is allowed to operate
without a TMU installed.
The Thermal Management Unit 2-17
DUA1800-0AAA04
On the underside of the unit, each fan is covered with a filter to
prevent dust from entering into the chassis. These filters should
be removed and inspected regularly and cleaned when necessary.
Cleaning The Filters
See
on page 2-19
.
The MSH is delivered with the thermal management unit
installed. However, in the unlikely event of a fan failure, you will
need to remove the unit and return it to your supplier. The
thermal management unit takes power from the MSH backplane.
This backplane connection also provides a detection service; an
LED located on the display panel will notify you immediately if a
fan has failed. If a Management Module has been fitted, a signal
will be sent to the module, which will in turn send an event to the
remote Network Manager.
Page 38

2-18 C
HAPTER
NSTALLING THE LINKBUILDER
2: I
MSH
WARNING:
You cannot replace individual fans in the thermal
management unit. If failure of a fan occurs, the entire unit must
be replaced as soon as possible.
Installing The Thermal Management Unit
You will need a flat-tipped screwdriver to install the thermal
management unit into the MSH chassis.
The unit can be hot-inserted; you do not have to power the MSH
down before installation. You should not run the MSH for more
than a short while without a working TMU installed.
With the grill at the front of the fan tray towards you and the
1
cut-outs in the top of the tray facing upwards, guide the unit into
the MSH chassis until it is fully home. See Figure 2-8.
With a screwdriver tighten the two captive screws. The captive
2
screws are shown removed from the unit in Figure 2-8 for clarity.
Fit the locking bar and tighten two screws fully.
3
Figure 2-8
Installing / removing the thermal management unit
DUA1800-0AAA04
Page 39

The Thermal Management Unit 2-19
Removing The Thermal Management Unit
Refer to Figure 2-8.
The MSH does not have to be powered down before carrying out
the procedure.
1
Loosen two screws to remove the locking bar.
2
Using a screwdriver loosen the two captive screws that secure the
thermal management unit in the MSH chassis.
3
Slowly withdraw the unit from the chassis.
WARNING:
A replacement thermal management unit must be
fitted immediately. If this is not possible, you must power down
the MSH to prevent damage from overheating.
Cleaning The Filters
WARNING:
It is important that the filters are kept clean. If dust is
allowed to build up, the air flow through the fans and the effect
of cooling of the MSH chassis will be reduced. This could cause
the MSH to overheat.
DUA1800-0AAA04
Page 40

2-20 C
a
a
a
a
a
a
a
a
a
a
a
a
a
a
a
a
a
a
a
a
a
a
a
a
a
a
a
a
a
a
a
a
a
a
a
a
a
a
a
a
a
a
a
a
a
a
a
a
a
a
a
a
a
a
a
a
a
a
a
a
a
a
a
a
a
a
a
a
a
a
a
a
a
a
a
a
a
a
a
a
a
a
a
a
a
a
a
a
a
a
a
a
a
a
a
a
a
a
a
a
a
a
a
a
a
a
a
a
a
a
a
a
a
a
a
a
a
a
a
a
a
a
a
a
a
a
a
a
a
a
a
a
a
a
a
a
a
a
a
a
a
a
a
a
a
a
a
a
a
a
a
a
a
a
a
a
a
a
a
a
a
a
a
a
a
a
a
a
a
a
a
a
a
a
a
a
a
a
a
a
a
a
a
a
a
a
a
a
a
a
a
a
a
a
a
a
a
a
a
a
a
a
a
a
a
a
a
a
a
a
a
a
a
a
a
a
a
a
a
a
a
a
a
a
a
a
a
a
a
a
a
a
a
a
a
a
a
a
a
a
a
a
a
a
a
a
a
a
a
a
a
a
a
a
a
a
a
a
a
a
a
a
a
a
a
a
a
a
a
a
a
a
a
a
a
a
a
a
a
a
a
a
a
a
a
a
a
a
a
a
a
a
a
a
a
a
a
a
a
a
a
a
a
a
a
a
a
a
a
a
a
a
a
a
a
a
a
a
a
a
a
a
a
a
a
a
a
a
a
a
a
a
a
a
a
a
a
a
a
a
a
a
a
a
a
a
a
a
a
a
a
a
a
a
a
a
a
a
a
a
a
a
a
a
a
a
a
a
a
a
a
a
a
a
a
a
a
a
a
a
a
a
a
a
a
a
a
a
a
a
a
a
a
a
a
a
a
a
a
a
a
a
a
a
a
a
a
a
a
a
a
a
a
a
a
a
a
a
a
a
a
a
a
a
a
a
a
a
a
a
a
a
a
a
a
a
a
a
a
a
a
a
a
a
a
a
a
a
a
a
a
a
a
a
a
a
a
a
a
a
a
a
a
a
a
a
a
a
a
a
a
a
a
a
a
a
a
a
a
a
a
a
a
a
a
a
a
a
a
a
a
a
a
a
a
a
a
a
a
a
a
a
a
a
a
a
a
a
a
a
a
a
a
a
a
a
a
a
a
a
a
a
a
a
a
a
a
a
a
a
a
a
a
a
a
a
a
a
a
a
a
aaa
a
a
a
a
a
a
a
a
a
a
a
a
a
a
a
a
a
a
a
a
a
a
a
a
a
a
a
a
a
a
a
a
a
a
a
a
a
a
a
a
a
a
a
a
a
a
a
a
a
a
a
a
a
a
a
a
a
a
a
a
a
a
a
a
a
a
a
a
a
a
a
a
a
a
a
a
a
a
a
a
a
a
a
a
a
a
a
a
a
a
a
a
a
a
a
a
a
a
a
a
a
a
a
a
a
a
a
a
a
a
a
a
a
a
a
a
a
a
a
a
a
a
a
a
a
a
a
a
a
a
a
a
a
a
a
a
a
a
a
a
a
a
a
a
a
a
a
a
a
a
a
a
a
a
a
a
a
a
a
a
a
a
a
a
a
a
a
a
a
a
a
a
a
a
a
a
a
a
a
a
a
a
a
a
a
a
a
a
a
a
a
a
a
a
a
a
a
a
a
a
a
a
a
a
a
a
a
a
a
a
a
a
a
a
a
a
a
a
a
a
a
a
a
a
a
a
a
a
a
a
a
a
a
a
a
a
a
a
a
a
a
a
a
a
a
a
a
a
a
a
a
a
a
a
a
a
a
a
a
a
a
a
a
a
a
a
a
a
a
a
a
a
a
a
a
a
a
a
a
a
a
a
a
a
a
a
a
a
a
a
a
a
a
a
a
a
a
a
a
a
a
a
a
a
a
a
a
a
a
a
a
a
a
a
a
a
a
a
a
a
a
a
a
a
a
a
a
a
a
a
a
a
a
a
a
a
a
a
a
a
a
a
a
a
a
a
a
a
a
a
a
a
a
a
a
a
a
a
a
a
a
a
a
a
a
a
a
a
a
a
a
a
a
a
a
a
a
a
a
a
a
a
a
a
a
a
a
a
a
a
a
a
a
a
a
a
a
a
a
a
a
a
a
a
a
a
a
a
a
a
a
a
a
a
a
a
a
a
a
a
a
a
a
a
a
a
a
a
a
a
a
a
a
a
a
a
a
a
a
a
a
a
a
a
a
a
a
a
a
a
a
a
a
a
a
a
a
a
a
a
a
a
a
a
a
a
a
a
a
a
a
a
a
a
a
a
a
a
a
a
a
a
a
a
a
a
a
a
a
a
a
a
a
a
a
a
a
a
a
a
a
a
a
a
a
a
a
a
a
a
a
a
a
a
a
a
a
a
a
a
a
a
a
a
a
a
a
a
a
a
a
a
a
a
a
a
a
a
a
a
a
a
a
a
a
a
a
a
a
a
a
aa
a
a
a
a
a
a
a
a
a
a
a
a
a
a
a
a
a
a
a
a
a
a
a
a
a
a
a
a
a
a
a
a
a
a
a
a
a
a
a
a
a
a
a
a
a
a
a
a
a
a
a
a
a
a
a
a
a
a
a
a
a
a
a
a
a
a
a
a
a
a
a
a
a
a
a
a
a
a
a
a
a
a
a
a
a
a
a
a
a
a
a
a
a
a
a
a
a
a
a
a
a
a
a
a
a
a
a
a
a
a
a
a
a
a
HAPTER
NSTALLING THE LINKBUILDER
2: I
MSH
Figure 2-9
Remove the thermal management unit from the MSH chassis as
1
Removing/fitting filters
instructed previously and turn it upside down on a flat surface.
The filters are located in holders, one protecting each fan. Refer
2
to Figure 2-9. Unclip the cover of the filter holder and remove the
sponge filter.
The filter can be cleaned using clean water and, if required, a mild
3
detergent. When it is dry, fit it back into the holder and clip the
holder back into place. Repeat the procedure for each of the fans
within the unit.
Reinstall the thermal management unit as instructed previously.
4
The Cable Support Tray
Refer to Figures 2-10 and 2-11.
A cable support tray can be ordered from your LinkBuilder
product supplier. 3Com recommends its use, as it relieves any
strain on cables and therefore maintains good network
DUA1800-0AAA04
Page 41

The Thermal Management Unit 2-21
connections. When fitted, the cable support tray also provides the
correct clearance between chassis mounted one above the other.
If you decide to use the tray, the user guide holder that is located
underneath the chassis (see
Storing The User Guides
on page
2-24) must be moved as in this position the user guides will be
inaccessible.
To move the user guide holder:
1
Remove the user guide holder by loosening the four screws that
secure it in position underneath the chassis.
2
With the cable support tray upside down, slide the user guide
holder through the slot at the front of the tray until the four
screw holes align. Locate the four screws and tighten.
To fit the cable support tray:
1
Place the cable support tray onto a flat surface. Sit the MSH
chassis on the tray so that two screw holes on either side of the
tray match up with those on the chassis body.
2
1
2
DUA1800-0AAA04
Insert the four screws and tighten.
Fixing the cables:
The cable support tray can contain up to twelve adjustable cable
clips. Once you have fitted the tray, module cables can be secured
in two ways:
Figure 2-10: Let cables drop down the front of the chassis, insert
them through the front of the cable clip and route them out
through the back of the cable support tray. Tighten the cable clip.
Figure 2-11: The bracket that holds the cable clips can slide away
from the MSH chassis; undo the two thumb-screws, slide the
bracket out and retighten the thumb-screws. Let cables drop
down the front of the chassis, insert them through the back of
Page 42

2-22 C
HAPTER
NSTALLING THE LINKBUILDER
2: I
MSH
the cable clip, so leaving them at the front of the chassis. Tighten
the cable clip.
Multiple cables from an individual module can be secured into
one cable clip
Figure 2-10
Cables through the back of the MSH
DUA1800-0AAA04
Page 43

Completing The Installation 2-23
Figure 2-11
Cables at the front of the MSH
Completing The Installation
Complete the installation by fittiing the modules you require.
Refer to Chapter 3 of this user guide, and to the user guides
accompanying the individual modules and Management Module.
Network Cabling
Once you have installed the required modules in your chassis, you
can attach your network cable segments to the modules as
described in the user guide that accompanies each module.
You should ensure that all cables attached to the MSH are
correctly terminated, according to 802.3, 802.5 or ANSIX3T9.5
PMD requirements.
DUA1800-0AAA04
Page 44

2-24 C
HAPTER
NSTALLING THE LINKBUILDER
2: I
Power-up The LinkBuilder MSH
When you have completed all stages of installing the MSH as
outlined in this chapter, and have connected all the cable
segments to your modules, the MSH is ready for operation.
Check that all connections are secure and that all cables are
1
terminated correctly.
To power-up the unit connect the power lead to the IEC socket on
2
the power inlet panel and plug in to the wall socket. The upper
IEC socket supplies power to the left-hand PSU (PSU 1), the lower
IEC socket supplies to the right-hand PSU (PSU 2). Therefore if you
want to use two PSUs, you must have a power supply to both
sockets.
When the unit is powered up, the PWR indicator on each module
3
should light. If they do not, refer to the problem-solving section of
the appropriate user guide.
MSH
Storing The User Guides
On the underside of the MSH chassis, there is a storage position
for module user guides (if the cable support tray is fitted, this
holder should be moved. See
2-20). You can slide up to four guides into the holder, so that they
are readily available for fault diagnosis and LED interpretation.
The Cable Support Tray
DUA1800-0AAA04
on page
Page 45

Storing The User Guides 2-25
DUA1800-0AAA04
Figure 2-12
Putting the user guides into the holder
Page 46

I
NSTALLING
M
ODULES INTO THE
3
■
■
■ Instructions for fitting LinkBuilder ECS modules into the MSH
■ Instructions for fitting blanking plates
MSH C
This chapter provides:
An introduction to Ethernet, token ring and FDDI modules
A general overview for installing modules into the MSH chassis
chassis
WARNING:
out by qualified personnel only.
AVERTISSEMENT:
doivent être effectuées uniquement par un personnel qualifié.
Operations described in this chapter must be carried
HASSIS
Les opérations décrites dans ce chapitre
Introduction
The LinkBuilder range of MSH modules are specifically designed
to fit into your MSH chassis. However, if you currently have a
LinkBuilder ECS, you can also adapt modules that were designed
to fit into the ECS chassis, so that they are fully functional in the
MSH chassis. This does not apply to the Management Module;
ECS Management Modules cannot be used in the MSH.
ECS modules are also known as line cards.
Page 47

3-2 C
HAPTER
NSTALLING MODULES INTO THE
3: I
A Quick Check Before You Install Modules
As mentioned before you can insert up to eleven modules of
mixed media into the LinkBuilder MSH. The range of modules
that are available from 3Com allows many combinations and
permutations for a mixed media network.
However, you should check before installing the modules that the
total power and current consumptions required by the
combination of modules does not exceed the limits given in
Appendix C. These limits have been set to support a fault tolerant
power supply in the MSH chassis.
Ethernet Modules
Repeater Modules
Repeater modules provide all the standard functions within an
802.3 Repeater including the following:
MSH C
HASSIS
Frames are regenerated and retimed, allowing them to be
■
transmitted further than the maximum length of a single cable
segment.
Fragment extension extends undersized collision fragments so
■
that they can be detected by devices throughout the network.
Jabber lock-up protection prevents transceivers attached to the
■
MSH from locking up in the case of devices jabbering (jabbering is
the uncontrolled transmission of oversized frames to the
network).
The diagram opposite shows the functional blocks that make up
an Ethernet module
.
DUA1800-0AAA04
Page 48

Introduction 3-3
S
E
G
M
E
N
T
S
B
A
C
K
P
L
A
N
E
S
E
LED
display
G
M
E
N
T
S
Figure 3-1
Repeater Interface.
network
connections
Ethernet module functions
repeater
functions
isolation
This interface allows the transfer of
management
interface
repeater
interface
C
H
A
S
S
I
S
Ethernet packets, via the backplane, between the different
modules and the management module. Isolation logic allows a
module to act as a sub-network. See
Repeater Functions
on page
3-4.
Network Connection.
The network interface gives the module
a direct connection to the appropriate networking media.
Management Interface.
The management interface is available
if a management module is fitted. It allows modules to be
managed in any of the following ways (dependent on type):
B
A
C
K
P
L
A
N
E
■
Statistics relating to traffic status can be taken from each module
by the management module.
■
The management module can alter the status of any port on a
module. Ports can be enabled or disabled. The management
module can also test individual ports on a module.
■
Local working can be enabled by isolating network traffic over
cable segments from the backplane. Isolation logic allows the
module to act as a sub-network. See
3-4.
DUA1800-0AAA04
Repeater Functions
on page
Page 49

3-4 C
LinkBuilder MSH No. 1
LinkBuilder MSH No. 2
HAPTER
■
NSTALLING MODULES INTO THE
3: I
MSH C
HASSIS
Resilient links can be set up. See Figure 3-2 below. A resilient link
consists of a
main port
and a
stand-by port
which are both set up
locally via the display panel or remotely via a Network Manager.
The main port is the normally operational port; however, if a fault
occurs on the link and data cannot be passed over it, the stand-by
port will automatically take over. .
main port enabled
stand-by port disabled
Figure 3-2 Resilient links
Security features can be configured locally from the display panel
■
inter-repeater link
standby link
port enabled
port enabled
and monitored remotely by a network management tool such as
ISOVIEW Network Manager.
Limited management can be carried out locally at the MSH, by
means of the display or via the RS232 port. Implementation of the
full set of management functions available from the Management
Module require the use of a Network Manager. In both cases the
Management Module must be fitted to the MSH.
LED Display.
The LEDs provide visual information on the data
integrity and port status of each segment attached to a module.
The function of module LEDs is described in the user guide that
accompanies each module.
Repeater Functions.
Depending on type, MSH modules provide
the following features:
■
Auto Partition/Reconnection:
from faults such as cable breaks and faulty connectors which
would halt all network communication. In these circumstances,
the segment in which the fault occurs is isolated by partitioning it
from the rest of the network after 32 collisions.
The module provides protection
DUA1800-0AAA04
Page 50

Introduction 3-5
Partitioning of a segment from the rest of the network will occur
if the module detects thirty-two consecutive collisions on a
segment or if it detects a single collision of between 1,000 and
30,000 bit times.
Once a segment has been partitioned, the module will pass
network traffic onto the segment; but will not accept anything
from the segment for transmission to the rest of the network.
When a good packet is detected on the partitioned port, it will
automatically reconnect the port.
■
Isolation:
Modules can be isolated from the backplane and
therefore all other modules in the MSH chassis via a configurable
jumper. In Isolation mode, a module acts as a repeater for only
the segments attached to that module and data is not repeated
over the backplane. A module operating in Isolation mode does
not affect data travelling between the other slots in the MSH
chassis. Isolated modules can still be managed by the
management module.
■
Port Disable On Power-up:
This feature can be used as a
first-line security feature. Configurable jumpers mounted on the
module allow you to set ports to power-up in a disabled state.
This prevents unauthorized users from accessing your network via
unused ports.
■
DUA1800-0AAA04
If necessary, you can then enable these ports individually using a
management facility.
LAN Security Architecture (LSA):
A specific non-smart secure
module is supplied to support LSA. This provides twelve 10Base-T
ports over a 50-way telco connector. If LSA is needed over Optical
Fiber or AUI, the relevant secure ECS module fitted with a
converter can be used. Alternatively, you may fit a transceiver
module of the required connectivity to a secure MSH module.
LSA may be enabled or disabled using hardware links or Network
Manager.
When enabled, LSA operates in two ways to give you assurance
that your network is not being accessed by unauthorized users.
Page 51

3-6 C
HAPTER
NSTALLING MODULES INTO THE
3: I
Firstly, each frame is examined for the destination address, and
■
MSH C
HASSIS
passed intact to the port associated with that address. For
10Base-T, fiber or AUI, this is equivalent to passing direct to the
addressed device. Every other port transmits a frame of the
same length and network timing but with randomized bits:
this is undecipherable. No extra delays are introduced. The
frames are therefore sent securely on a need-to-know basis.
Secondly, if an unauthorized station appears on a segment
■
attached to a port, the Network Manager will be informed.
You may choose what action is taken by the Network
Manager. It may just note the fact, or it may automatically
disconnect the unauthorized device by disabling the port to
which that device is attached.
Resilience:
■
This feature is available for use on point-to-point
media, for example twisted pair and optical fiber. You specify
resilient pairs of ports, each pair consisting of a main port and a
stand-by port. If the management module detects a signal loss in
data transmitting over the segment attached to a main port, this
port will be automatically disabled and the data re-routed over
the segment attached to the stand-by port.
Ethernet Bus Selection:
■
The MSH Ethernet backplane contains
three separate buses, E1, E2 and E3. A configurable jumper on
the module (or converter if you are using ECS modules) allows
you to determine to which bus that module is routed. This allows
you to set up separate networks within the one MSH chassis.
When using this feature you should be aware that:
You will not be able to collect all statistics from LinkBuilder ECS
■
modules that are routed to Bus E2 or E3. If you require full
statistics gathering, you must connect ECS modules to Bus E1.
To ensure that the remote Network Manager has initial access
■
to the MSH management module and to ensure full statistics
gathering for ECS modules, you are advised to also attach the
management module to bus E1.
Internal Crossover:
■
Configured via a jumper located on a 10
Base-T Repeater module, this feature allows you to determine
DUA1800-0AAA04
Page 52

Introduction 3-7
whether a specified port on a module is connected to another
MSH (Inter-repeater Link) or to an end-station.
You will find further information in the user guides that
accompany Repeater Modules.
4 Port Ethernet Bridge
The 4 port bridge module connects the three Ethernet busses of
the MSH backplane and an external port which is provided
through a transceiver module. Various transceiver modules are
available, giving you a choice from the media on your network.
The 4 port bridge module offers, in addition to transparent
bridging according to IEEE 802.1 Part D, custom filtering and
spanning tree algorithm and protocol (STAP).
LEDs indicate bridge activity and give diagnostic information.
Ethernet Transceiver Modules
A number of plug-in Ethernet transceiver modules are available
for some Ethernet modules. These transceivers provide network
connections to different media and are the same as those
available for the ECS and other 3Com products.
DUA1800-0AAA04
For example, fiber optic transceiver modules can be installed on a
variant of the MSH 10Base-T module, allowing an optical fiber
backbone to be established.
Page 53

3-8 C
G
t
t
c
t
c
t
c
HAPTER
NSTALLING MODULES INTO THE
3: I
FLOOR 3
Module fitted with
ransceiver module
installed in MSH
hassis
MSH C
HASSIS
fiber optic backbone
FLOOR 2
Module fitted with
ransceiver module
installed in MSH
hassis
FLOOR 1
Module fitted with
ransceiver module
installed in MSH
hassis
ROUND FLOOR
MSH with three
modules fitted with
ransceiver modules
fiber optic backbone
fiber optic backbone
Figure 3-3 Using transceiver modules
Modules for the ECS Chassis
Although you may use any ECS Module in the MSH chassis by
attaching the special converter (3C18082), the following modules
may be of particular interest.
DUA1800-0AAA04
Page 54

Introduction 3-9
Local Bridge Modules.
local bridge module
A
allows you to
connect two Local Area Networks together to form an Extended
Local Area Network. It allows you to extend beyond the physical
limitations of a single network and provides sophisticated filtering
between the networks.
Contact your local supplier for further information.
The Terminal Server Module.
terminal server module
The
provides sixteen asynchronous ports to connect to terminals,
personal computers, printers and modems. Connection to these
ports is provided by two 50-way telco connectors, providing
maximum flexibility and good cable management. Port speeds
operate at up to 57.6 Kbps with both TCP/IP and DEC LAT
protocols. The module provides TCP/IP users with a complete
implementation of Telnet and full compliance with all Internet
protocols.
Contact your local supplier for further information.
The Remote Bridge Module And The Remote Control
Module.
remote bridge module
The
enables you to link
networks located at different sites, and provides sophisticated
filtering between those networks. It has an Ethernet port and one
or two WAN ports. The Ethernet port is the connection to the
LAN segment through the backplane of the MSH chassis. Each
WAN port requires a daughter board interface card which may be
one of seven types (X.21 (barriered and unbarriered), V.24, V.35,
V.36, G.703 or T1) allowing connection to all major network
termination unit interface standards.
DUA1800-0AAA04
In addition to the above, the
remote control module
offers
Bridge/Routing is a the Boundary Routing System Architecture
and PPP bridging.
Contact your local supplier for further information.
Page 55

3-10 C
HAPTER
NSTALLING MODULES INTO THE
3: I
Token Ring Modules
The operation of 3Com token rings is described in Volume 3 of
the user guide that accompanies the MSH management module.
Token rings in the MSH chassis are built from two types of
module:
Media Access Unit (MAU)
■
RingBuilder module
■
Normally an internal token ring will have one RingBuilder and
several MAUs linked into it. These modules provide all the
standard functions within an 802.5 Token Ring network.
The MAU Module
The MAU module (available with UTP or STP connections)
provides connectivity for a number of ring-stations into an
internal token ring section. It provides the following functions:
MSH C
HASSIS
A physical and electrical connection of a token ring-station to a
■
local ring section of a token ring network.
Data rates of either 4 or 16 Mbps. It is possible to operate
■
separate 4 and 16 Mbps rings simultaneously in the same MSH
chassis.
Basic insert and bypass functions, together with signal retiming
■
for the module.
Port level insertion control capability when a management
■
module and an associated RingBuilder module are installed in the
MSH chassis. This incorporates the ability to enable or disable a
port, and provides an asynchronous method of notifying the
management software of any port status change.
Supported lobe lengths of 100 meters at 4 Mbps, 100 meters at
■
16 Mbps assuming the use of high quality data grade cable.
DUA1800-0AAA04
Page 56

Introduction 3-11
A block of LEDs shows the status of each of the twelve lobes
attached to the module. Another five LEDs provide information
on the state of the module.
The MAU module can operate in two modes:
■
Enabled Mode - the MAU is connected to a local ring section. All
of the ring-stations connected to the MAU are connected to a
ring comprising a RingBuilder module and any other MAUs
similarly configured to the RingBuilder.
■
Isolated Mode - the MAU is isolated from the local ring section
and its associated RingBuilder module in stand-alone mode to
form its own ring. Ring-stations can only communicate to other
ring-stations connected to the same MAU module.
The RingBuilder Module
The RingBuilder Module provides the following features:
■
An interface to an external token ring for its backplane ring via
Ring-In (RI) and Ring-Out (RO) ports.
■
■
■
■
DUA1800-0AAA04
The interconnection of individual MAU modules into a local ring
section utilizing one of the five token ring buses.
The management interface for all token ring modules located in a
local ring section.
RingBuilder modules can only be connected together by token
ring trunk cables external to the MSH chassis. In addition the
RingBuilder provides the following features:
The speed of the RingBuilder module can be set to operate at 4 or
16 Mbps.
A RingBuilder module is used to create a local ring utilizing one of
the token ring buses. One RingBuilder is required per backplane
ring. Ring selection can be determined either by setting a DIP
switch located on the modules themselves or by management.
Page 57

3-12 C
HAPTER
■
NSTALLING MODULES INTO THE
3: I
MSH C
HASSIS
The ability to allow any MAU or Bridge to be assembled into a
ring, independent of its physical location.
Signals are retimed when they enter or leave the RingBuilder
■
module at RI (Ring-In) and RO (Ring-Out). This increases the
distances supported on the trunk cables to the next repeater or
station and simplifies the overall network design.
Isolation logic allows the RingBuilder module, with attached
■
MAUs, to act as a stand-alone sub-network. This mode can be
controlled through management and is helpful for diagnostics
and fault analysis.
A Fail-Safe mode on RI and RO ports provides highly reliable ring
■
operation. If the equipment at the other end of the trunk cable
(e.g. a RingBuilder in another MSH chassis) provides a compatible
phantom signal, then the RI and RO ports can be commanded to
wrap if the phantom signal disappears, protecting the rest of the
ring from the faulty trunk segment.
The RingBuilder provides the management module with
■
information on the network status including alarms and statistics
traffic.
LEDs provide visual information about ring speed, presence of
data and the status of the Ring-In and Ring-Out ports.
The MAC Module
A Media Access Control (MAC) module installed on the
RingBuilder module provides the following:
Monitoring of the health of the main ring
■
An access point for network management
■
An optional second MAC module can be fitted to a second
■
location to monitor the health of the backup ring.
The user guide that accompanies the optional MAC module will
give further information.
DUA1800-0AAA04
Page 58

Token Ring Bridge
The 2 port token ring bridge connects between two rings and
controls the traffic between the rings. The management interface
is menu driven.
FDDI Modules
To use FDDI Modules, you must have the special MSH model
(3C18001) or have the special backplane (3C18015) fitted to the
basic model (3C18000).
FDDI rings are built from three types of module:
■
an FDDI RingBuilder Module
■
Port Modules
■
Media Modules (optional)
FDDI rings normally contain one RingBuilder Module and several
Port Modules. Up to two Media Modules can be fitted into the
RingBuilder to provide connections to external FDDI devices.
Introduction 3-13
DUA1800-0AAA04
Standard FDDI functions are supported by these modules in all
valid combinations.
FDDI RingBuilder Module
An FDDI concentrator normally contains one RingBuilder and
several Port Modules. Up to two Media Modules can be fitted to
the RingBuilder to provide connections to external FDDI devices.
Up to three RingBuilder Modules may be used in one MSH
chassis, providing up to three FDDI rings. See the RingBuilder User
Guide for the detailed rules governing the positioning of port
modules relative to RingBuilder modules.
Page 59

3-14 C
HAPTER
NSTALLING MODULES INTO THE
3: I
MSH C
HASSIS
Port Modules
Two Port Modules are available:
4 port FDDI Fiber (MIC) Module
■
6 port FDDI UTP (RJ45) Module
■
These units provide connections to the FDDI concentator.
FDDI Media Modules
Small modules, similar to the Ethernet transceiver modules, are
available to provide extra connection to a RingBuilder ring. They
fit into the RingBuilder Module.
LinkSwitch Module
LinkSwitch is an FDDI to Ethernet switch module. The module can
be installed in an MSH chassis with or without the FDDI
backplane. When configured as part of a suitable network, the
LinkSwitch can significantly increase LAN workgroup
performance. In particular, LinkSwitch can provide increased
client/server performance in both small and large LAN
applications. LinkSwitch switches traffic from Ethernet segments
to FDDI, or between Ethernet segments, and filters FDDI traffic so
that only frames destined for a particular Ethernet segment are
forwarded to that segment.
LinkSwitch provides full wire rate connectivity between multiple
Ethernet segments and an FDDI network. With low latency and
high performance, LinkSwitch is able to support the busiest
networks.The LinkSwitch module has 4 built-in switch ports: 3
switched connections to the three Ethernet backplanes and a
high-speed fiber FDDI port. Up to two MIC Media Modules can be
connected to a LinkSwitch module to provide single-attached
(SAS), dual-attached DAS) or dual-homed FDDI connections.
Alternatively, the FDDI connection can be across the internal FDDI
bus to an FDDI RingBuilder and its associated ring. This
configuration supports connection to, for example, a local file
server or an FDDI backbone downlink to a server farm. See the
DUA1800-0AAA04
Page 60

user guide which came with your FDDI RingBuilder module for
more details.
LinkSwitch Expansion Module
The LinkSwitch Expansion Module must be installed next to a
LinkSwitch module. It provides six RJ45 Ethernet ports connected
to the rest of the network through the main LinkSwitch module.
Each port can support its own dedicated 10Mbps Ethernet device
or network switching directly to FDDI, so reducing contention for
the network.
Handling Modules
Safety Information
■
This equipment must be earthed.
■
Modules operate under SELV conditions (Safety Extra Low Voltage
according to IEC 950), the conditions of which are maintained
only if the equipment to which they are connected is also
operating under SELV.
Handling Modules 3-15
■
■
■
■
■
DUA1800-0AAA04
Modules can be easily damaged by static:
Do not remove the module from its anti-static packaging until you
are ready to install it into the MSH chassis.
Do not touch the pins, leads, connections or any components on
the module.
Handle modules only by their edges.
Always wear an anti-static wristband if you have one.
Always store or transport modules in anti-static packaging.
Page 61

3-16 C
HAPTER
NSTALLING MODULES INTO THE
3: I
Before You Begin
Blanking Plates
The MSH chassis is supplied with blanking plates to cover single
or multiple module slots. The blanking plate sizes are:
1 slot
■
3 slots
■
5 slots
■
It is essential that unpopulated slots are fitted with blanking
plates to allow the controlled circulation of cooling air and to
prevent the ingress of dust.
Fitting Blanking Plates
Choose a plate that is the correct size for the slot(s) that you need
1
to cover.
MSH C
HASSIS
Remove the locking bar from the front of the chassis.
2
Align the plate over the slot and tighten the captive, knurled
3
thumb-screws at the top and bottom.
Reposition the locking bar and fully tighten the two screws to
4
secure it in place.
Removing Blanking Plates
Remove the locking bar from the front of the chassis.
1
Loosen all captive, knurled, thumb-screws at the top and bottom
2
of the blanking plate and lift it clear of the MSH chassis.
Reposition the locking bar and fully tighten the two screws to
3
secure it in place.
Store the plates in a safe place until they are needed again.
4
DUA1800-0AAA04
Page 62

Choosing Slots For Modules
All slots in the MSH chassis have the same functionality and
therefore you are not restricted as to where in the chassis you
place Ethernet and Token Ring modules. However, we make the
following recommendations for practicality and easy
management of the chassis:
■
Group all Ethernet modules together and all token ring modules
together.
■
Group any ECS modules together and connect to Bus E1(Buses E2
and E3 can be used but will not provide full statistics gathering).
■
Insert the management module into slot 11 of the chassis.
This configuration facilitates administration and network
monitoring.
ECS modules must be installed in slots 1 to 10 only.
There are constraints to the positions of FDDI modules relative to
one other. These are detailed in the user guide which
accompanies the RingBuilder module. There are no constraints on
the position of FDDI modules or groups relative to Ethernet and
Token Ring modules
LinkBuilder MSH Modules 3-17
LinkBuilder MSH Modules
Please note that this section covers the common installation and
removal instructions for MSH modules. For installation and
removal details specific to each module, please refer to the User
Guide that accompanies the product.
The modules are designed to be hot inserted into the MSH
chassis; you do not need to power down the unit before installing
or replacing them.
DUA1800-0AAA04
Page 63

3-18 C
HAPTER
NSTALLING MODULES INTO THE
3: I
Installing/Removing A Module
Remove the locking bar from the front of the MSH chassis.
1
Ensure that the chassis is installed correctly and all
2
necessary cables are present. Prepare a slot to receive the module,
removing blanking plates if necessary.
Configure the module as necessary, referring to the relevant User
3
Guide.
Hold the module in the correct position; front panel facing
4
towards you.
Raise the ejectors at the top and bottom of the module to the
5
open position (see Figure 3-4). Engage the module into the
runners at the top and bottom of the chassis and gently push it
into the chassis until the hook at the top of the ejector locates
under the edge of the chassis (see Figure 3-4). Ensure that the
ejector at the bottom of the module is in a similar position.
MSH C
HASSIS
Simultaneously, press the ejector flaps at the top and foot of the
6
module firmly down into the closed position (Figure 3-4). Check
that the module has been fully pushed home by placing both your
thumbs on the module front panel and firmly pressing the
module home. Check that the module front panel is flush with
the chassis and other modules.
Reposition the locking bar and fully tighten the two screws to
7
secure it in place.
Connect network cables as necessary and check the operation of
8
the module.
If the module does not operate correctly or you need information
about connecting the network, please refer to the user guide that
accompanies the module
.
DUA1800-0AAA04
Page 64

LinkBuilder MSH Modules 3-19
DUA1800-0AAA04
Figure 3-4
Locking the module into position
Page 65

3-20 C
HAPTER
NSTALLING MODULES INTO THE
3: I
Removing A Module
Warn all users who are likely to be affected. Remove all network
1
connections from the module that you wish to remove.
Remove the locking bar from the front of the chassis.
2
To unlock the module ejector, press the sprung catch and move
3
the flap to the open position. See Figure 3-5. This operation must
be applied simultaneously to both ejectors on the module
.
MSH C
HASSIS
Figure 3-5 Ejecting the module
If a replacement module is not to be fitted immediately, the
4
vacant slot must be covered with a blanking plate.
Reposition the locking bar and tighten the two screws to secure it
5
in place.
DUA1800-0AAA04
Page 66

LinkBuilder ECS Modules
With the exception of the LinkBuilder ECS management modules
(types 3C12030 and 3C12031) all other LinkBuilder ECS modules
can be installed into the MSH chassis by using a module
converter. See
page 3-21. These LinkBuilder ECS modules will provide the same
functionality as they provided in the LinkBuilder ECS chassis.
ECS modules are also known as line cards.
To install ECS modules into the MSH chassis, you will need a
converter. There is a universal converter suitable for all modules
(you will need one converter for each module). The converter
allows the ECS modules to connect to the MSH backplane. Links
mounted onto the module converter allow you to implement the
bus selection feature found on an MSH module and to configure
the converter to operate with a local bridge module or any other
type of ECS module.
Installing/Removing LinkBuilder ECS Modules
LinkBuilder ECS Modules 3-21
on
For details on the ECS modules you will need to refer to the user
guide that originally accompanied the module.
Installing/Removing LinkBuilder ECS Modules
Due to the construction of ECS modules types 3C12012,
3C12013 and 3C12080, the module guides within the MSH
chassis must be adjusted before these modules can be installed.
Instructions for carrying out the modification can be found in the
information sheet that accompanies the module converter.
To install ECS modules, you will need a small, flat-tipped
screwdriver.
.
DUA1800-0AAA04
Page 67

3-22 C
HAPTER
NSTALLING MODULES INTO THE
3: I
MSH C
HASSIS
Figure 3-6 Setting the switch position on the converter
Fitting The ECS Module Converter
Locate the block of three link positions LK1, LK2 and LK3 on the
1
converter: see Figure 3-6. The position of the link itself determines
DUA1800-0AAA04
Page 68

LinkBuilder ECS Modules 3-23
to which Bus the module is routed:
Link set to LK1 - Module routed to Bus E1
Link set to LK2 - Module routed to Bus E2
Link set to LK3 - Module routed to Bus E3
Note that the Bus can also be set via management.
2
Set link LK4 as follows:
■
If you are fitting the converter to any ECS module
except
local bridge module (3C1205x), leave LK4 at its default
position NORMAL.
■
If you are fitting the converter to the ECS local bridge module
(3C1205x), move LK4 to the alternative position BRIDGE
3
With the module and the converter oriented as shown in Figure
3-7 opposite, press the 96-way connector on the module firmly
into the socket on the converter.
The converter comes with both plates already attached to the
converter. The two screws fixing the plates to the converter
should not be removed, and are covered by labels to prevent this.
4
Secure the module to the converter by locating the two screws on
the module side of the converter and tightening fully.
.
the
DUA1800-0AAA04
Page 69

3-24 C
HAPTER
NSTALLING MODULES INTO THE
3: I
MSH C
HASSIS
Figure 3-7 Fitting the converter
Installing The ECS Module Into The Chassis
Remove the locking bar from the front of the chassis.
1
Ensure that the MSH chassis is installed correctly and all necessary
2
cables are present. Prepare a slot to receive the module, removing
blanking plates if necessary.
Configure the module as necessary, referring to the relevant user
3
guide.
Hold the module in the correct position with the panel of network
4
connectors facing towards you.
DUA1800-0AAA04
Page 70

LinkBuilder ECS Modules 3-25
5
Make sure that the converter is securely fitted to the module.
Engage the module into the slot, using just sufficient force to
ensure that the connector on the edge of the converter mates
with the socket on the MSH backplane.
6
Locate the two round-headed screws supplied as part of the
module assembly, in the tapped holes at the top and bottom of
the module. Tighten the screws.
7
Reposition the locking bar and tighten the two screws to secure it
in place.
Removing An ECS Module From The MSH Chassis
1
Remove all network connections from the module that will be
removed.
2
Remove the locking bar from the front of the chassis.
3
4
5
6
DUA1800-0AAA04
Remove the round-headed screws from the top and bottom of
the module. Carefully withdraw the module from the chassis. The
converter should come out with it; if it does not, contact your
supplier for advice.
If you do not intend to fit a replacement module immediately, you
must cover the vacant slot with a blanking plate. This prevents
dust from entering the chassis and helps the circulation of cooling
air. See
Blanking Plates
on page 3-16
Reposition the locking bar and tighten the two screws to secure it
in place.
If necessary remove the converter from the module.
Page 71

3-26 C
HAPTER
NSTALLING MODULES INTO THE
3: I
MSH C
HASSIS
DUA1800-0AAA04
Page 72

4
■
■
■ Steps for resetting the MSH
■ An overview of managing the MSH
U
SING THE
This chapter provides:
An introduction to the display panel
An interpretation of the LEDs and instructions for testing them
D
ISPLAY PANEL
WARNING:
must be carried out by qualified personnel only.
AVERTISSEMENT:
ce chapitre doivent être effectuées uniquement par un personnel
qualifié.
The Display Panel
The display panel provides the following:
■ simple fault diagnosis via LEDs
■ a facility to reset modules to default configuration
■ a facility for testing the operation of LEDs
■ access to information telling you about the way in which the MSH
is set up
■ an RS232 port
Full display panel facilities require a management module to be
fitted in the chassis. Only the first three facilities are available if
you do not have a management module
Maintenance operations described in this chapter
Les opérations de maintenance décrites dans
Page 73

4-2 C
HAPTER
SING THE DISPLAY PANEL
4: U
9
8
7
12
65
4
3
2
1
Figure 4-1 The display panel
11
10
DUA1800-0AAA04
Page 74

The Display Panel 4-3
1 RS232 Port
Serial Port
2 Reset Button
chassis to default configuration. See
MSH
on page 4-6
3 Lamps Button
.
4-5
4Power LED -
page 4-4
5 Select Button
The Four-button Keypad
6 Next Button
Four-button Keypad
7 Previous Button
The Four-button Keypad
8 LCD Display
- Used for out-of-band management. See
on page 4-7
.
- Used with the Enter button, resets the MSH
Resetting The LinkBuilder
.
- Tests LED operation. See
Test ing LEDs
Signifies state of power to chassis. See
.
- Used in conjunction with the LCD display. See
on page 4-6
.
- Used in conjunction with the LCD display. See
on page 4-6
.
- Used in conjunction with the LCD display. See
on page 4-6
.
- Used in conjunction with 5, 6, 7 and 9 for
displaying information about your MSH setup. See
Four-button Keypad
on page 4-6
.
The RS232
on page
The LEDs
The
on
The
9 Enter Button
10 Power Fail LED
11 Fan Fail LED
12 Module LEDs
DUA1800-0AAA04
- Used in conjunction with the LCD display, and
with the Reset button to reset the MSH chassis to default
configuration. See
The Four-button Keypad
on page 4-6
- Indicates power supply unit failure. See
LEDs
on page 4-4
.
- Indicates failure of one or more fans in the thermal
management unit. See
The LEDs
on page 4-4
.
- Indicate state of modules installed in the chassis.
The LEDs
See
on page 4-4
.
.
The
Page 75

4-4 C
HAPTER
The LEDs
■
■
SING THE DISPLAY PANEL
4: U
The LEDs located on the display panel are provided for two
reasons:
to assure you that the MSH is operating normally
to give you immediate notice should a fault occur
Table 4-1 shows the possible states of the LEDs and how to
interpret them. If an LED indicates a fault, you should take
immediate action as the performance of your network may be
seriously impaired; refer to Chapter 5,
Problem Solving
for advice
and possible actions to take.
.
Table 4-1 Status LEDs
LED Color Status Meaning
Power Green ON The supply voltage is operating
normally and the MSH is receiving
power.
OFF A fault has occurred at the power
supply or within the PSU.
Power Fail
(1 & 2 - for
each PSU)
Fan Fail Red OFF The thermal management unit (TMU) is
Module
(1 to 11 - for
each module)
Red OFF The supply voltage is reaching the PSU
and it is operating normally.
ON The supply voltage on the input to the
PSU associated with the LED has failed.
installed and is operating normally.
ON One or more of the fans in the fan tray
has failed or the TMU is not installed.
Green ON The module associated with this LED is
installed and is operating correctly.
OFF There is no module installed in this slot.
Red ON There is a fault condition associated
with this module. This LED can only be
driven Red if there is an MSH
management module installed in the
chassis.
DUA1800-0AAA04
Page 76

refer to the module user guide
operational Management Module installed in the chassis.
If an LED indicates a fault, Chapter 5 gives you advice and steps to
take to rectify the problem.
Testing LEDs
The button labelled Lamps on the display panel allows you to
check that all LEDs are operating correctly and none have failed. It
is important to carry out this check regularly; if an LED has failed,
you may not realize that there is a problem with the MSH. In the
case of the thermal management unit, a failure overlooked here
could cause serious damage.
The Lamps button tests all LEDs including module LEDs. For
diagnosing problems associated with modules, you will need to
refer to the relevant User Guide for each module.
The LEDs 4-5
To diagnose problems related to module LEDs, you will need to
Unless otherwise stated, the LEDs will function without an
DUA1800-0AAA04
If multicolor LEDs are functional, they will flash cyclically through
the colors when the lamp test is carried out.
Press and hold the Lamps button. LEDs will remain illuminated for
as long as the button is depressed. Any LEDs that do not light
have failed. Refer to Chapter 5.
When you have finished the inspection, release the Lamps button.
Page 77

4-6 C
HAPTER
SING THE DISPLAY PANEL
4: U
Resetting The LinkBuilder MSH
The display panel carries a facility for resetting the LinkBuilder
MSH. This operation restarts the entire MSH chassis, including the
display panel and installed modules.
Press and hold down the Reset button and Enter button at the
1
same time. The Reset operation will only be performed if these
two buttons are pressed simultaneously; this protects against
accidental system resets.
Release the two buttons; the MSH will reset and then continue to
2
operate normally in its current configuration.
Token rings and secure Ethernet modules will be taken out of
operation for a several seconds after which they will reconfigure
and operate normally.
Management
In order to carry out management of the LinkBuilder MSH, you
must install a LinkBuilder Management Module into the chassis.
Management is applied in one of the three ways quoted below.
The LinkBuilder MSH Management Module can be installed into
any slot within the MSH chassis. We recommend that you use slot
11 for the Management Module leaving the maximum number of
slots free for ECS modules. ECS modules must not be installed in
this position.
The Four-button Keypad
The LCD panel and the adjacent four-button keypad located on
the display panel, allow you access to read-only information
which tells you about the current setup of the chassis. For full
instructions on using the keypad, you will need to refer to the
user guides that accompany the Management Module.
DUA1800-0AAA04
Page 78

The RS232 Serial Port
Out-of-band management can be implemented via the 25-way
D-type RS232 port located on the left-hand side of the display
panel. This facility is provided for the initial setup of the MSH
IP address and if the primary network link to management fails,
management is still possible.
A management terminal can be connected directly to the port, or
you can connect to the telephone voice network via an external
modem.
For further information, refer to the user guides that accompany
the LinkBuilder MSH Management Module.
The Network Manager
A Network Manager is the most powerful tool available for
management of the MSH. It uses the Management Module
through the network connections to the modules in the chassis. It
provides facilities for:
Management 4-7
■
■
■
■
■
■
DUA1800-0AAA04
SNMP management support
Traffic monitoring
Statistics collection
Chassis configuration display
Immediate fault notification
Chassis and module set-up
3Com has a range of network management software available
that can manage the MSH, including Transcend applications for
Windows and UNIX workstations.
For more information, refer to the user guides that accompany
your Network Manager.
Page 79

4-8 C
HAPTER
SING THE DISPLAY PANEL
4: U
DUA1800-0AAA04
Page 80

5
■
■
■ How to obtain advice if a problem persists
P
ROBLEM SOLVING
This chapter explains:
How to maintain the MSH in operation
How to spot problems and solve them
must be carried out by qualified personnel only.
ce chapitre doivent être effectuées uniquement par un personnel
qualifié.
Introduction
This chapter deals specifically with the maintenance of the
LinkBuilder MSH. It covers the checks you should make at
frequent intervals which may identify the potential failure of
equipment. These checks are highlighted in Spot Checks on page
5-2. It also describes what you should do in the unlikely event of
an MSH developing a fault. Fault Diagnosis Using The LEDs on
page 5-4 gives you guidance on how to identify the fault using
the LEDs and the corrective actions you can take.
For problems relating to the modules or the Management
Module refer to the user guide that accompanies each product.
Maintenance operations described in this chapter
Les opérations de maintenance décrites dans
Page 81

5-2 C
HAPTER
Spares
The LinkBuilder MSH has been designed to provide resilience and
reliability. It is good practice that you hold spares. We recommend
that you have 1 spare module or power supply unit for every 10 in
use. In the unlikely event that you have problems with the MSH,
you should swap the faulty module, thermal management unit or
power supply unit with a spare.
In addition to the above, it is advisable to carry spare replaceable
components, such as fuses. A list of recommended component
spares, if any, is given in the corresponding module or
Management Module User Guide.
Spot Checks
We recommend that you check the MSH visually at frequent
intervals. Regular checks can give you an early warning of a
possible failure.
ROBLEM SOLVING
5: P
Check the following:
All LEDs.
Check that
Press the Lamps button located on the display panel.
LEDs light. If they do not, an LED has probably
all
failed.
POWER FAIL LEDs.
LEDs are
Fans.
lit.
not
If a fan in the thermal management unit (TMU) has failed
Check that, during normal operation, these
the FAIL LED on the display panel of the MSH will light up.
Cabling.
Check that all external cabling connections are secure
and that no cables are pulled taut. Also check that any AUI cables
used are secured using the slide locks fitted.
Modules.
Check that all modules are secured in position and
flush with each other.
DUA1800-0AAA04
Page 82

Spot Checks 5-3
Management Module.
Check that the Management Module is
secure in position.
If you discover a problem, refer to
on page 5-4 and
Obtaining Help
Cleaning
It is important that the MSH, and the environment in which the
MSH is sited, is kept clean. This will prevent the accumulation of
dust around components, drawn in by the cooling fans.
Make sure that you keep the filter in the thermal management
unit free from blockage by cleaning it regularly; refer to
The Thermal Management Unit
information.
When cleaning the acrylic screen covering the diagnostic LEDs use
an anti-static cleaning agent.
Removing And Replacing Equipment
Inserting additional modules or a second power supply unit into
an
active
MSH (known as
hot insertion
damage to your equipment. However, it should be noted that
there is a small possibility that data passing through the unit at
the time of insertion can be corrupted. Most network protocols
will transparently recover from any errors if this happens.
Fault Diagnosis Using The LEDs
on page 5-5.
Installing
on page 2-18 for further
) will not cause any
DUA1800-0AAA04
Hot insertion or removal of modules and/or PSUs may result in
code corruption in modules which contain microprocessors (e.g.
management/bridge modules). In the unlikely event that this
occurs, reset the chassis by simultaneously pressing the Reset and
Enter buttons located on the front panel. All modules in the
chassis will be resume normal operation using the stored MSH
configuration settings.
Page 83

5-4 C
HAPTER
ROBLEM SOLVING
5: P
Fault Diagnosis Using The LEDs
Table 5-1 Fault diagnosis using the LEDs and corrective actions
LED Status Actions to take
Power OFF Carry out a lamp test to make sure that the LED has not
failed.
Make sure that the power cables are plugged in at the
wall and at the MSH power inlet sockets.
Check fuses are not blown.
If you suspect that the problem is at the MSH power
inlet panel, contact your supplier.
Power
fail
Fan fail Red ONEnsure that the fan tray is correctly installed.
Module
(1 - 11)
Red ONCheck that the power supply unit associated with the
LED is secure in the rack and is flush with the other
modules installed.
Check that the thermal management unit has not failed
causing the PSU to overheat and switch off.
Check the thermal management unit for failure. You
cannot replace individual fans that have failed within the
unit: contact your supplier immediately. If you do not
have a spare unit to fit, you should power down the
MSH to prevent further damage due to overheating.
OFF This LED will not be lit if a module is not installed into
the associated slot. However, if this LED is not lit and
there is a module installed:
- carry out a lamp test
- check that the module is secure in the chassis and
flush with other modules installed.
Red ONRefer to the user guide that accompanies the module.
DUA1800-0AAA04
Page 84

Obtaining Help
If any of the MSH equipment fails to operate correctly and you
cannot solve the problem yourself after following advice in this
chapter, contact your supplier with the following information
before returning the item(s).
■
Serial number
■
Revision number
■
A brief description of the fault.
The serial number for modules is shown on the ejector at the
bottom of each module; the revision level is printed on the circuit
board. Serial numbers and revision levels for the MSH chassis are
shown on a label on one of the outer surfaces.
If you are returning the MSH chassis to your supplier, remove all
ancillary components first - modules, Management Modules,
power supply units, thermal management unit, rack mounting
kit, cable support kit.
Obtaining Help 5-5
DUA1800-0AAA04
When returning equipment to your supplier make sure that it is
suitably packed for transit.
Page 85

5-6 C
HAPTER
ROBLEM SOLVING
5: P
DUA1800-0AAA04
Page 86

S
TANDARDS USED IN THE DESIGN
A
Standards and Approvals
The MSH chassis and its associated accessories have been
designed to conform to the following standards:
Safety
UL 1950
CSA 22.2 #950
EN 60950
BS 6301
Environmental
IEC 68
Electromagnetic Compatability
EN 55022 Level A
FCC Part 15 Level A
VFG 243 Level B
CSA C108.8 - M1983 Level A
IEC 801-2
IEC 801-3
IEC 801-4
IEC 801-5
IEC 801-6
Page 87

A-2 A
PPENDIX
A: S
Functional
ISO 8802/3
IEEE 802.3
IEEE 802.5
The standards applicable to the modules and the management
modules installed in the chassis are listed in the corresponding
user guides.
BABT Approval
For UK users only
The LinkBuilder MSH chassis is covered by General Approval,
NS/G/12345/J/100003, for indirect connection to British
Telecommunications plc equipment. This can only be achieved
using 3C12090 or 3C12091 motherboards fitted with BABT
approved interfaces. Refer to ‘How to Install and Use the
LinkBuilder 3C1219 Series WAN Interfaces’ for more details
concerning this approval.
TANDARDS USED IN THE DESIGN
DUA1800-0AAA04
Page 88

B
T
ECHNICAL SPECIFICATION
MSH Chassis - 3C18000 and 3C18001
Dimensions
Height 400.5mm (15.8in)
Width 436mm (17.2in)
Depth 335mm (13.2in)
Weight
3C18000 Chassis - empty* 16.2Kg (35.7lb)
3C18001 Chassis - empty* 16.6Kg (35.4lb)
* without modules, display panel or power supply units fitted, but
including the backplane(s) and power inlet panel.
Electrical
A.C. power supply 90-132V, 176-264V, 45-66Hz
Consumption 3C18000
(including TMU and 5.7A @ 5V 9.5A @ 5V
display panel) 3.2A @ 12V 3.2A @ 12V
Environmental
Maximum Operating Range 0°C to 40°C (32°F to 104°F)
Relative Humidity 10% to 95% non-condensing
3C18001
Page 89

B-2 A
PPENDIX
ECHNICAL SPECIFICATION
B: T
Display Panel - 3C18006
Weight
Display Panel 190g (0.4lb)
Electrical
Consumption 700mA (max) at +5V
375W Power Supply Unit - 3C18011
Weight
PSU 2290g (5lb)
Electrical
Maximum Output Power 375W
Output Voltages +5V*, -9V (isolated) and +12V
* Minimum 1A load
A.C. power supply 90 - 132V, 176 - 264V, 45 - 66Hz
Environmental
Maximum Operating Range 0°C to 40°C (32°F to 104°F)
Relative Humidity 10% to 95% non-condensing
DUA1800-0AAA04
Page 90

525W Power Supply Unit - 3C18012 B-3
525W Power Supply Unit - 3C18012
Weight
PSU 3300g (7.3lb)
Electrical
Maximum Output Power 525W
Output Voltages +5V* and +12V
* Minimum 1A load
A.C. power supply 90 - 132V, 176 - 264V, 45 - 66Hz
Environment
Maximum Operating Range 0°C to 40°C (32°F to 104°F)
Relative Humidity 10% to 95% non-condensing
Thermal Management Unit - 3C18005
Weight
TMU (five fans fitted) 2280g (5lb)
Electrical
Consumption
(five fans operational) 100mA at +5V
3.1A at +12V
Environmental
Maximum Operating Range 0°C to 40°C (32°F to 104°F)
Relative Humidity 10% to 95% non-condensing
DUA1800-0AAA04
Page 91

B-4 A
PPENDIX
ECHNICAL SPECIFICATION
B: T
ECS - MSH Module Converter - 3C18082
Dimensions
Height 137.0mm (5.4in)
Depth 64.0mm (2.5in)
Weight
Converter 100g (0.2lb)
Electrical
Consumption 550mA at +5V
Environmental
Maximum Operating Range 0°C to 40°C (32°F to 104°F)
Relative Humidity 10% to 95%
Miscellaneous
Weight of blanking panels
1-slot width 180g (0.4lb)
3-slot width 320g (0.7lb)
5-slot width 460g (1lb)
DUA1800-0AAA04
Page 92

MSH P
OWER CONSUMPTION
C
Calculating Power Consumption
L
IMITS
It is important that you calculate the total power consumption
and total current consumption required by the LinkBuilder MSH
chassis and the modules that you intend to install in the MSH
chassis. Only by calculating these values can you be sure that your
selected combination will not exceed the power available for
modules.
Two Power Supply Units are available:
■ a 375 Watt PSU (3C18011)
■ a 525 Watt PSU (3C18012)
Chassis with a serial number less than 03110 do not support the
525W PSU.
You should select the PSU(s) to suit the power consumption you
calculate bearing in mind resilience considerations. If you use two
different PSUs in a redundant configuration, the redundant
capacity of the pair is that of the lower capacity PSU. It is possible
to configure an MSH with higher power requirements but
without redundancy using two PSUs. If you have a chassis with a
serial number greater than 03109, you may mix types of PSU.
Contact your local supplier for advice on configuring for higher
power requirements.
Page 93

C-2 A
PPENDIX
C: MSH P
OWER CONSUMPTION LIMITS
Power consumption calculations must include the power used by
the chassis and its components.
The basic chassis (3C18000), fitted with display panel, thermal
■
management unit and backplane, consumes 67 watts (5.7 A @
+5V and 3.2A @ +12V).
A chassis fitted with an FDDI backplane (3C18001 or converted
■
3C18000) consumes an additional 19 watt (an additional 3.8A @
+5V).
These figures must be included in the calculation of the total
power consumption. If you are using ECS modules with
converters, remember to include the power and current
consumed by the converter. The maximum allowable power
consumption will vary with the choice of PSUs you have made.
The individual limits listed in the table below must not be
exceeded.
Table C-1 Power consumption limits
PSU
configuration
single 375W PSU No 45 15 375
single 525W PSU No 90 15 525
two 375W PSUs
two 525WPSUs
one 375W PSU &
one 525W PSU
†You will have resilience provided these limits are not exceeded.
‡These figures are the maximum current and power you may take from the combined
power supply.
Resilient
Yes† 45 15 375
No 90 30 750‡
Yes† 90 15 525
No 90 30 750‡
Yes† 45 15 375
No 90 30 750‡
5V supply
(A
1 amps
12V supply
)
(A
2 amps
DUA1800-0AAA04
Total power
)
(watts)
Page 94

Calculating Power Consumption C-3
If you have a 3C12010 ECS Coaxial module with a 3C18082
ECS-MSH converter installed in your MSH chassis, you must have
at least one 375W PSU present, or two if you want resilience. The
3C18012 525W PSU does not provide the -9V supply required by
the ECS Coaxial module.
To calculate actual total current requirements, use the following
equations.
A
= (+5V current for chassis) +
1
(+5V current for module 1) +
(+5V current for module 2) +
(+5V current for module 3) +
.....................
(+5V current for module n)
DUA1800-0AAA04
A
= (+12V current for chassis) +
2
(+12V current for module 1) +
(+12V current for module 2) +
(+12V current for module 3) +
.....................
(+12V current for module n)
Consumption figures for modules can be found either in
Appendix B, or in the user guide for individual modules.
To calculate power and current consumptions for ECS modules,
remember to include the power and current consumed by the
ECS - MSH module converter.
Page 95

C-4 A
PPENDIX
C: MSH P
OWER CONSUMPTION LIMITS
To calculate the actual total power consumption, W, use the total
current values calculated above in the equation:
W = 5xA
+ 12xA
1
2
DUA1800-0AAA04
Page 96

D
Ethernet RJ45 - Pin Assignments
Pin Number Signal Function
1 TxData+ Transmit Data
2 TxData- Transmit Data
3 RxData+ Receive Data
4 Not Assigned
5 Not Assigned
6 RxData- Receive Data
7 Not Assigned
8 Not Assigned
PIN A
ND CIRCUIT
A
SSIGNMENTS
Page 97

D-2 A
PPENDIX
D: PIN AND C
IRCUIT ASSIGNMENTS
Ethernet Telco - Pin Assignments
Port
Number
1 1
2 3
3 5
4 7
5 9
6 11
7 13
8 14
9 17
10 19
11 21
12 23
Telco
Connector
Pin Number
26
2
27
28
4
29
30
6
31
32
8
33
34
10
35
36
12
37
38
14
39
40
16
41
42
18
43
44
20
45
46
22
47
48
24
49
Telco
Signal
Name
Tx Data Tx Data +
Rx Data Rx Data +
Tx Data Tx Data +
Rx Data Rx Data +
Tx Data Tx Data +
Rx Data Rx Data +
Tx Data Tx Data +
Rx Data Rx Data +
Tx Data Tx Data +
Rx Data Rx Data +
Tx Data Tx Data +
Rx Data Rx Data +
Tx Data Tx Data +
Rx Data Rx Data +
Tx Data Tx Data +
Rx Data Rx Data +
Tx Data Tx Data +
Rx Data Rx Data +
Tx Data Tx Data +
Rx Data Rx Data +
Tx Data Tx Data +
Rx Data Rx Data +
Tx Data Tx Data +
Rx Data Rx Data +
To
RJ45
Pin
Number
2
1
6
3
2
1
6
3
2
1
6
3
2
1
6
3
2
1
6
3
2
1
6
3
2
1
6
3
2
1
6
3
2
1
6
3
2
1
6
3
2
1
6
3
2
1
6
3
RJ45
Signal
Name
Tx Data Tx Data +
Rx Data Rx Data +
Tx Data Tx Data +
Rx Data Rx Data +
Tx Data Tx Data +
Rx Data Rx Data +
Tx Data Tx Data +
Rx Data Rx Data +
Tx Data Tx Data +
Rx Data Rx Data +
Tx Data Tx Data +
Rx Data Rx Data +
Tx Data Tx Data +
Rx Data Rx Data +
Tx Data Tx Data +
Rx Data Rx Data +
Tx Data Tx Data +
Rx Data Rx Data +
Tx Data Tx Data +
Rx Data Rx Data +
Tx Data Tx Data +
Rx Data Rx Data +
Tx Data Tx Data +
Rx Data Rx Data +
DUA1800-0AAA04
Page 98

Ethernet Telco - Pin Assignments D-3
MODULAR JACK
CHANNEL NUMBER
Tx DATA Rx DATA Tx DATA Rx DATA Tx DATA Rx DATA Tx DATA Rx DATA Tx DATA Rx DATA Tx DATA Rx DATA Tx DATA Rx DATA Tx DATA Rx DATA Tx DATA Rx DATA Tx DATA Rx DATA Tx DATA Rx DATA Tx DATA Rx DATA -
10
11
12
13
14
15
16
17
18
19
20
21
22
23
24
25
1
2
3
4
5
6
7
8
9
26
27
28
29
30
31
32
33
34
35
36
37
38
39
40
41
42
43
44
45
46
47
48
49
Tx DATA +
Rx DATA +
Tx DATA +
Rx DATA +
Tx DATA +
Rx DATA +
Tx DATA +
Rx DATA +
Tx DATA +
Rx DATA +
Tx DATA +
Rx DATA +
Tx DATA +
Rx DATA +
Tx DATA +
Rx DATA +
Tx DATA +
Rx DATA +
Tx DATA +
Rx DATA +
Tx DATA +
Rx DATA +
Tx DATA +
Rx DATA +
1
2
3
4
5
6
7
8
9
10
11
12
50
Note
The TELCO used is
a female connector
DUA1800-0AAA04
Page 99

D-4 A
RED (RX)
GREEN (RX)
Front View
PPENDIX
D: PIN AND C
IRCUIT ASSIGNMENTS
Token Ring RJ45 - Pin Assignments
BLACK (TX)
12345678
ORANGE (TX)
Ring-In and Ring-Out Pin Assignments
Signal Purpose R/I Pins R/O Pins
Tx+ Transmit Data 5 1
Tx- Transmit Data Inverted 9 6
Rx+ Receive Data 1 5
Rx- Receive Data Inverted 6 9
+5V Phantom Power 3 3
gnd Ground 2,4,7,8 2,4,7,8
DUA1800-0AAA04
Page 100

RS232 Serial Port - Pin Assignments D-5
RS232 Serial Port - Pin Assignments
Pin Number Signal Function
1 Ground Protective Ground
2 TxData Transmit Data
3 RxData, Receive Data
4 RTS Request To Send
5 CTS Clear To Send
6 DSR Data Set Ready
7 Ground Signal Ground
8 DCD Data Carrier Detect
20 DTR Data Terminal Ready
22 RI Ring In
Status Input Connector
DUA1800-0AAA04
 Loading...