

Page 1

3Com Network Access Manager
User Guide
Version 1.1
http://www.3com.com/
Part No. DUA1550-0AAA02
Published December 2005
Page 2

3Com Corporation
350 Campus Drive
Marlborough, MA USA
01752-3064
Copyright © 2005, 3Com Corporation. All rights reserved. No part of this documentation may be reproduced
in any form or by any means or used to make any derivative work (such as translation, transformation, or
adaptation) without written permission from 3Com Corporation.
3Com Corporation reserves the right to revise this documentation and to make changes in content from time
to time without obligation on the part of 3Com Corporation to provide notification of such revision or change.
3Com Corporation provides this documentation without warranty, term, or condition of any kind, either
implied or expressed, including, but not limited to, the implied warranties, terms or conditions of
merchantability, satisfactory quality, and fitness for a particular purpose. 3Com may make improvements or
changes in the product(s) and/or the program(s) described in this documentation at any time.
If there is any software on removable media described in this documentation, it is furnished under a license
agreement included with the product as a separate document, in the hard copy documentation, or on the
removable media in a directory file named LICENSE.TXT or !LICENSE.TXT. If you are unable to locate a copy,
please contact 3Com and a copy will be provided to you.
UNITED STATES GOVERNMENT LEGEND
If you are a United States government agency, then this documentation and the software described herein are
provided to you subject to the following:
All technical data and computer software are commercial in nature and developed solely at private expense.
Software is delivered as “Commercial Computer Software” as defined in DFARS 252.227-7014 (June 1995) or
as a “commercial item” as defined in FAR 2.101(a) and as such is provided with only such rights as are
provided in 3Com’s standard commercial license for the Software. Technical data is provided with limited rights
only as provided in DFAR 252.227-7015 (Nov 1995) or FAR 52.227-14 (June 1987), whichever is applicable.
You agree not to remove or deface any portion of any legend provided on any licensed program or
documentation contained in, or delivered to you in conjunction with, this User Guide.
Unless otherwise indicated, 3Com registered trademarks are registered in the United States and may or may not
be registered in other countries.
3Com, the 3Com logo and SuperStack are registered trademarks of 3Com Corporation.
Microsoft, and Windows are registered trademarks of Microsoft Corporation.
IEEE and 802 are registered trademarks of the Institute of Electrical and Electronics Engineers, Inc.
All other company and product names may be trademarks of the respective companies with which they are
associated.
ENVIRONMENTAL STATEMENT
It is the policy of 3Com Corporation to be environmentally-friendly in all operations. To uphold our policy, we
are committed to:
Establishing environmental performance standards that comply with national legislation and regulations.
Conserving energy, materials and natural resources in all operations.
Reducing the waste generated by all operations. Ensuring that all waste conforms to recognized environmental
standards. Maximizing the recyclable and reusable content of all products.
Ensuring that all products can be recycled, reused and disposed of safely.
Ensuring that all products are labelled according to recognized environmental standards.
Improving our environmental record on a continual basis.
End of Life Statement
3Com processes allow for the recovery, reclamation and safe disposal of all end-of-life electronic components.
Regulated Materials Statement
3Com products do not contain any hazardous or ozone-depleting material.
Page 3

CONTENTS
ABOUT THIS GUIDE
Naming Conventions 7
Screen Shots 7
Conventions 8
Related Documentation 8
1 INTRODUCTION
3Com Network Access Manager Overview 9
3Com Network Access Manager User Interfaces 11
Users of 3Com Network Access Manager 11
Network Administrators 11
Network Operators 12
3Com EFW Policy Support 13
Backing up 3Com Network Access Manager Data 14
Concepts and Terminology 14
Active Directory 14
Users/Groups/Computers 14
Internet Authentication Service (IAS) 14
Remote Access Policy 15
Rules 15
Rule Priority 16
Network Access Setting 16
RADIUS Authentication and Authorization 16
MAC-address based Authentication 17
IEEE 802.1X Authentication 17
Authorization 18
Devices Supported 18
Configuring Edge Port Security 18
Page 4

4
2 INSTALLING 3COM NETWORK ACCESS MANAGER
System Requirements 21
Before Installation 23
Installing 3Com Network Access Manager 24
Overview 24
New Installation 24
Modifying and Repairing An Installation 30
Uninstalling 3Com Network Access Manager 32
3 GETTING STARTED
Using The Network Administrator User Interface 35
User Interface 35
Setting Up 3Com Network Access Manager 37
VLANs View 37
Creating A New VLAN 38
Deleting An Existing VLAN 39
Renaming A VLAN And Changing The VLAN ID 39
Displaying Rules Associated With A VLAN 40
QoS Profiles View 40
Creating A New QoS Profile 41
Deleting An Existing QoS Profile 42
Renaming A QoS Profile And Changing The QoS Profile ID 42
Displaying Rules Associated With A QoS Profile 43
EFW Policies View 43
Creating A New EFW Policy 44
Deleting An Existing EFW Policy 45
Renaming An EFW Policy 45
Displaying Rules Associated With An EFW Policy 45
Rules View 46
Creating A New Rule 47
Deleting An Existing Rule 50
Controlling Permission To Apply A Rule 51
Changing Rule Priorities 51
Changing Rule Properties 52
Displaying Members Of A Rule 52
Changing Members Of A Rule 52
Users View 53
Page 5

Associating Rules With A User 54
Displaying And Changing Rules Associated With A User 56
Creating A New User 56
Groups View 57
Associating Rules With A Group 58
Displaying And Changing Rules Associated With A Group 59
Creating A New Group 60
Computers View 60
Entering MAC Addresses For A Computer 61
Associating Rules With A Computer 62
Displaying And Changing The Rules And MAC Address Associated
With A Computer 64
Creating A New Computer 65
Selecting Appropriate Permissions For An Operator 65
Using The Operator User Interface 66
Operator Tasks 66
Displaying And Changing Rules Associated With A User 66
Displaying And Changing Rules Associated With A Group 68
Displaying And Changing The Rule Associated With A Computer 69
Using The Online Help 70
5
4 USING 3COM NETWORK ACCESS MANAGER WITHIN A
N
ETWORK
Case Study Assumptions 71
Case Study 1 - Controlling User Access To The Network 72
Network Administrator Tasks 72
Network Operator Tasks 73
What Happens When A User Logs In 74
Case Study 2 - Restricting Network Access To Known Computers 75
Network Administrator Tasks 75
Network Operator Tasks 76
What Happens 77
Case Study 3 - Blocking A Specific PC From The Network 78
Network Administrator Tasks 78
When a PC needs to be blacklisted: 79
Network Operator Tasks 79
What Happens 80
Page 6

6
Case Study 4 - Hot Desking 81
Network Administrator Tasks 81
Network Operator Tasks 82
What Happens When A User Logs In 82
Case Study 5 - Removing Infected Devices From The Network 84
Network Administrator Tasks 84
When a PC needs to be isolated for the first time: 85
Network Operator Tasks 85
What Happens 86
Case Study 6 - Combining Hot Desking With Host Filtering 87
Network Administrator Tasks 87
When a PC needs to be isolated for the first time: 88
Network Operator Tasks 88
What Happens When A User Logs In 89
5 PROBLEM SOLVING
Checking the Event Viewer 91
Identifying Where The Problem Lies 93
Problems Related to Setting Up 94
A CREATING A REMOTE ACCESS POLICY
Using Microsoft Windows 2000 Server Operating System 101
Using Microsoft Windows Server 2003 Operating System 114
B OBTAINING SUPPORT FOR YOUR 3COM PRODUCTS
Register Your Product to Gain Service Benefits 129
Solve Problems Online 129
Purchase Extended Warranty and Professional Services 130
Access Software Downloads 130
Contact Us 130
Telephone Technical Support and Repair 131
INDEX
Page 7
ABOUT THIS GUIDE
This guide describes how to install and configure the 3Com Network
Access Manager.
This guide is intended for use by network administrators who are
responsible for installing and setting up network equipment, and who are
already familiar with configuring Microsoft’s Active Directory and IAS
RADIUS servers. Certain sections of the guide may also be useful to
non-IT staff responsible for the day-to-day routine of administering
network access.
If a release note is shipped with the 3Com Network Access Manager and
contains information that differs from the information in this guide,
follow the information in the release note.
Most 3Com user guides and release notes are available in Adobe Acrobat
Reader Portable Document Format (PDF) on the 3Com World Wide Web
site:
http://www.3com.com
Naming Conventions
Screen Shots With the exception of Appendix A, all screen shots in this User Guide are
This guide refers to Microsoft Active Directory domain controllers as
Active Directory servers.
for Windows Server 2003. However, Appendix A shows screen shots for
both Windows 2000 Server and Windows Server 2003 in their respective
sections.
Page 8
8 ABOUT THIS GUIDE
Conventions Table 1 and Table 2 list conventions that are used throughout this guide.
Tab le 1 Notice Icons
Icon Notice Type Description
Information note Information that describes important features or
instructions
Caution Information that alerts you to potential loss of data or
Warning Information that alerts you to potential personal injury
Tab le 2 Text Conventions
Convention Description
Screen displays This typeface represents information as it appears on the
Words in italics Italics are used to:
User entry This typeface represents information that you must enter
The words “enter”
and “type”
potential damage to an application, system, or device
screen.
■ Emphasize a point.
■ Denote a new term at the place where it is defined in the
text.
■ Identify menu names, menu commands, and software
button names. Examples:
From the Help menu, select Contents.
Click OK.
When you see the word “enter” in this guide, you must type
something, and then press Return or Enter. Do not press
Return or Enter when an instruction simply says “type.”
Related Documentation
In addition to this guide, each 3Com Network Access Manager provides
on-line help which can be accessed through the application. This guide
contains the instructions you need to install and configure your 3Com
Network Access Manager.
Page 9

1
INTRODUCTION
This chapter provides:
■ an overview of how 3Com Network Access Manager integrates with
Microsoft’s IAS and Active Directory,
■ an explanation of Rules, Rule Priority and RADIUS response,
■ an explanation of 3Com Network Access Manager’s role in
authentication and authorization,
■ a list of 3Com devices supported by 3Com Network Access Manager,
■ advice on configuring edge port security.
3Com Network Access Manager Overview
3Com Network Access Manager is designed for network administrators
responsible for networks using Microsoft Active Directory and Microsoft's
Internet Authentication Service (IAS). 3Com Network Access Manager
simplifies the task of controlling who connects to the network using
either IEEE 802.1X (also known as Network Login ) or MAC-address
based authentication (for example RADA). Today this task can be very
complex to install and configure, particularly if using some of the more
advanced security features.
In summary, 3Com Network Access Manager simplifies the administration
of:
■ Network access for users via IEEE 802.1X.
■ Network access for computers via MAC-address based authentication.
■ Automatic VLAN assignment when a user or computer connects.
■ Automatic QoS configuration when a user or computer connects.
■ Automatic EFW policy configuration when an EFW user connects.
■ Preventing specific users or computers from connecting to the
network.
Page 10
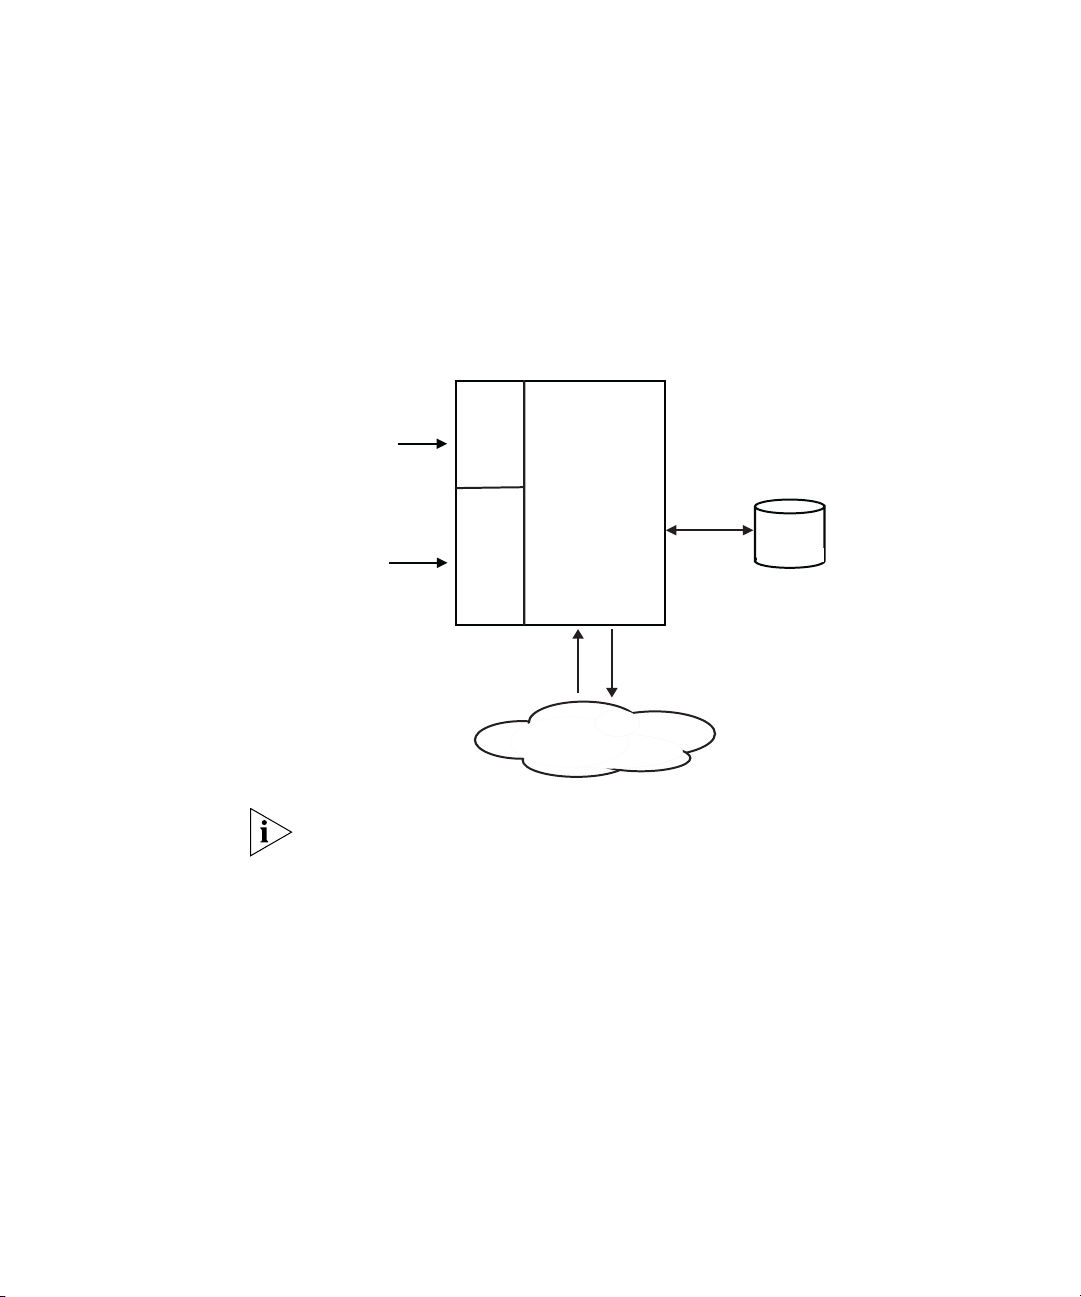
10 CHAPTER 1: INTRODUCTION
Microsoft
Active Directory
RADIUS Server
Microsoft
Internet
Authentication
Service
3Com Network
Access Manager
User Interface
Active Directory
Users and Computers
Network
Administrator
Network
Operator
RADIUS requests
RADIUS responses
RADIUS clients
■ Moving specific users or computers (e.g. a PC infected with a virus)
into an isolated network.
Figure 1 illustrates the integration of 3Com Network Access Manager
with Microsoft's Internet Authentication Service (IAS) and Microsoft's
Active Directory.
Figure 1 3Com Network Access Manager Integrated with IAS and Active
Directory
3Com Network
Access Manager
User Interface
Network
Administrator
Network
Operator
Users and Computers
Internet
Authentication
Service
Microsoft
Active Directory
Microsoft
Active Directory
3Com Network Access Manager is not a standalone RADIUS server.
3Com Network Access Manager is a rule based application that extends
the RADIUS response from the IAS RADIUS server to include the VLAN
and QoS profile associated with the rule, if the rule is obeyed. Network
administrators create rules through the 3Com Network Access Manager
Network Administration interface, and apply them to the users, groups
and computers configured within the domain. Network operators, if
assigned permission by the network administrator, can apply rules to
users, groups and computers, see “Selecting Appropriate Permissions For
An Operator” in Chapter 3.
3Com Network Access Manager can be used to extend the security on a
network by setting up a self-protecting network. Creating a “Restricted
Access” user group and corresponding “Isolation” VLAN and QoS
settings will enable the network administrator to keep separate otherwise
Page 11

3Com Network Access Manager Overview 11
authorized computers or users that represent a security threat to the
network. For example, a PC infected with a virus or a worm, or a user
launching a DoS attack on the network. Further examples of how 3Com
Network Access Manager can be used to improve the security on a
network are given in chapter 4.
In addition, 3Com Network Access Manager provides facilities for the
configuration of Active Directory based information for use by a 3Com
EFW Policy Server, see “3Com EFW Policy Support”.
3Com Network
Access Manager User
Interfaces
Users of 3Com
Network Access
Manager
3Com Network Access Manager provides two interfaces: an
Administration interface and an Operator interface, see Figure 1.
The Administration interface is a Microsoft Management Console (MMC)
snap-in that enables the user to quickly configure Active Directory/IAS to
provide user and device authentication, with VLAN and QoS
configuration. It is an extension of the existing Active Directory database
so the list of users, groups and computers already set up in Active
Directory are used to authenticate users. The administrator can also
configure a safe network, to isolate PCs identified as being infected with
a virus or worm.
The Operator interface is a simple extension to the current Active
Directory Users and Computers interface, through the addition of an
extra tab added to the Properties pages for users and computers. This
allows non IT staff, granted with appropriate permissions, to apply rules
that have already been setup by the network administrator.
The 3Com Network Access Manager interfaces enables two different
types of users to control and apply rules on a network: Network
Administrators and Network Operators. This enables network
administrators to delegate much of the day-to-day routine of
administering network access to non technical staff.
Network Administrators
3Com Network Access Manager assumes network administrators are
responsible for:
■ setting up the RADIUS server and edge-port security, including the
VLAN, QoS profiles and EFW policies across the network,
■ creating the user group structure within Active Directory,
Page 12

12 CHAPTER 1: INTRODUCTION
and are familiar with MAC addresses and IEEE 802.1X authentication.
Typical tasks for a network administrator using 3Com Network Access
Manager include:
■ editing security profiles for users, groups and computers to include
VLAN, QoS profile and EFW policy information,
■ adding computer MAC addresses,
■ setting up appropriate rules to control access to the network, to
ensure an appropriate level of security and protection for the network,
■ setting appropriate administration privileges for network operators.
Network Operators
Network operators are allocated some limited administration privileges by
network administrators, the extent of the privileges being specific to the
individual and their role. For example, one operator may be limited to
blocking access for specific users, whereas another operator may be
allowed to move users between arbitrary groups.
Typical tasks for a network operator include specifying:
■ if a user is allowed access to the network,
■ if a computer (defined by the MAC address) is allowed access to the
network,
■ if allowed access, which VLAN should the user or computer connect
to, and using which QoS configuration,
■ if a computer should be isolated from the main network,
■ if a user should be isolated from the main network,
■ the EFW Policy for each user when they log into a PC with an EFW NIC
installed.
Network operators using 3Com Network Access Manager, do not need to
understand the complexities of the network or the technicalities of
VLANs, QoS, EFW or RADIUS.
Page 13

3Com Network Access Manager Overview 13
3Com EFW Policy
Support
3Com Network Access Manager provides support for 3Com EFW Policy
Server v2.5, which adds the concept of user-based Embedded Firewall
(EFW) policies rather than just NIC-based EFW policies. For example, the
policy which is downloaded to the EFW can be specific to the user logged
into the PC and not just the PC itself. 3Com Network Access Manager
enables the network administrator to define an EFW Policy for each user
in Active Directory. The EFW Policy Server then queries Active Directory to
determine the profile for each user and replies to the EFW with the
relevant configuration.
Through 3Com Network Access Manager, the network administrator can
change an EFW policy at the same time as the port security settings,
speeding up the configuration of the network. The EFW policy is not
returned in any RADIUS response.
To ensure that 3Com Network Access Manager and the 3Com EFW Policy
Server operate together, the following steps must be followed using
3Com Network Access Manager:
■ Define each EFW policy in 3Com Network Access Manager, see
“Creating A New EFW Policy” in Chapter 3. 3Com Network Access
Manager creates the EFW policy as an Active Directory object.
■ Associate the EFW policy with rules created in 3Com Network Access
Manager. This can be done during the creation of a new rule, or after
a rule has been created, see “Creating A New Rule” and “Changing
Rule Properties”in Chapter 3.
■ Make sure that appropriate users and groups have been associated
with each rule associated with the EFW policy, see “Displaying
Members Of A Rule” in Chapter 3.
Any changes to EFW policy associations must be made through the 3Com
Network Access Manager user interface. 3Com Network Access Manager
will not recognize any externally made changes.
After making any change that might affect the EFW policy of a user, the
EFW group associations must be recalculated for the user, this is done by
clicking the Recalculate EFW membership button on the Tool bar at the
top of the Administration Interface window, see Figure 14 in Chapter 3.
Examples of changes that might affect the EFW policy of a user are:
■ if a user’s properties are changed, the correct rule association has to
be re-established. Clicking on the Recalculate EFW membership
button will cause 3Com Network Access Manager to find the highest
Page 14

14 CHAPTER 1: INTRODUCTION
priority rule associated with the user, the EFW Policy from that rule is
then associated with the user, all other associations are removed.
■ if a rule priority or group is changed, the correct associations have to
be re-established. Clicking on the Recalculate EFW membership
button will cause 3Com Network Access Manager to find all users that
are members of that rule or group, and then finding the authorization
rules applied for each. In a large network this can take a considerable
time.
Backing up 3Com
Network Access
Manager Data
Data from 3Com Network Access Manager is stored in Active Directory,
via an LDAP interface. Your normal methods for backing up/restoring of
data from Active Directory will also cover 3Com Network Access Manager
data. No special backup/restore is required for 3Com Network Access
Manager data.
Concepts and Terminology
This section provides descriptions of concepts and terminology that you
will need to be familiar with in order to use 3Com Network Access
Manager.
Active Directory Active Directory is the distributed directory service included with
Microsoft Windows Server 2003 and Microsoft Windows 2000 Server
operating systems. Active Directory enables centralized, secure
management of an entire network, which might span a building, a city, or
multiple locations throughout the world. Active Directory stores
information about objects on the computer network and makes this
information easy for administrators and users to find and apply. With
Active Directory, users can access resources anywhere in the network with
a single logon, and administrators have a single point of administration
for all objects in the network. When interfaced to IAS, Active Directory
provides secure single login for users, and administrators.
Internet
Authentication
Service (IAS)
Users/Groups/Computers
Users, groups and computers are standard Active Directory objects,
membership of a group is managed using normal Active Directory
management tools.
IAS is Microsoft’s implementation of a RADIUS server, providing
authentication and authorization of users. IAS is included with Microsoft
Windows Server 2003 and Microsoft Windows 2000 Server operating
Page 15
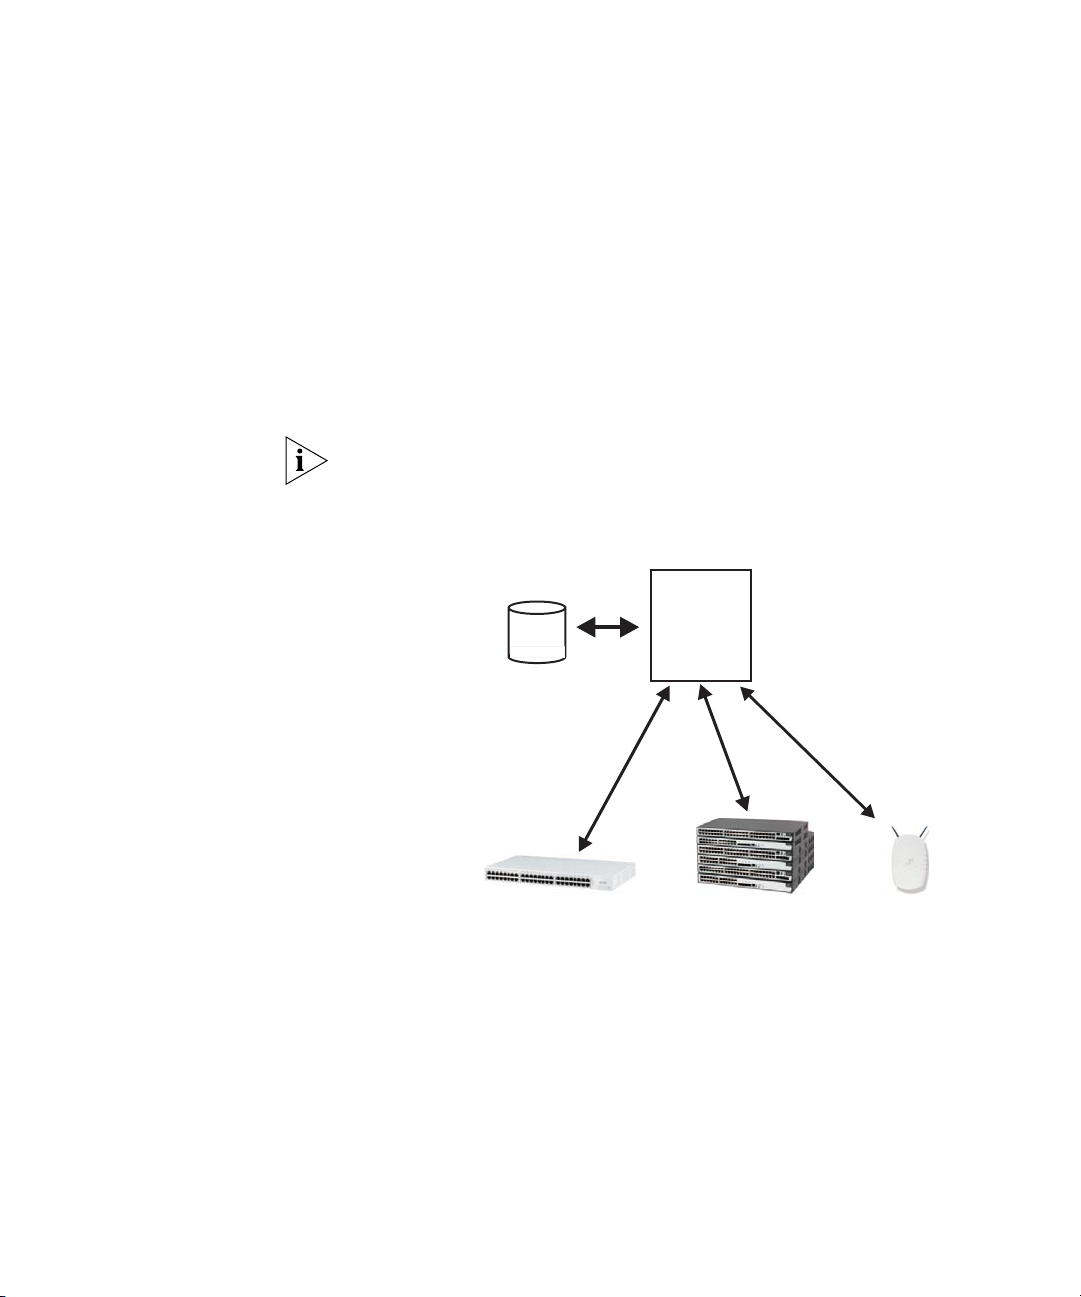
Concepts and Terminology 15
Microsoft
Active Directory
Microsoft
Internet
Authentication
Service with
3Com Network
Access Manager
SuperStack3 Switch 4400
SuperStack4 Switch 5500
Wireless LAN Access Points
RADIUS protocol
with VLAN and
QoS associations
systems. As a RADIUS server, IAS performs centralized connection
authentication, authorization, and accounting for network access servers
(desktop switches and wireless access points acting as radius clients), see
Figure 2.
Remote Access Policy
For 3Com Network Access Manager to authenticate users and computers
accessing the network, an IAS Remote Access Policy must be created.
Appendix A provides step by step instructions on how to create a Remote
Access Policy.
In a mixed-vendor network where only 3Com switches are to be
authenticated through 3Com Network Access Manager, the Remote
Access Policy needs to be adjusted to only match 3Com devices.
Figure 2 Network Access Servers within a Domain
Microsoft
Active Directory
Microsoft
Internet
Authentication
Service with
3Com Network
Access Manager
RADIUS protocol
with VLAN and
QoS associations
Network Access
Servers
Rules 3Com Network Access Manager provides its functionality through a set
of rules implemented in Active Directory. Each rule comprises a priority, a
Network Access setting (allow/deny), an optional authorization response
(VLAN and QoS), and an optional EFW policy name.
Users, groups and computers (through the MAC address of the PC) are
associated with rules. When multiple rules are associated with a user,
group or computer then the rule with the highest priority takes
precedence.
Page 16

16 CHAPTER 1: INTRODUCTION
Only one pre-defined rule, the Default Rule, is supplied as standard. The
Default Rule is used whenever an authentication finds that a user, group
or computer is not a member of any other rule. Further rules are added
by the Network Administrator to implement the required network
security policies, see “Creating A New Rule” in Chapter 3.
Rule Priority
Each rule has a priority associated with it. The rule with priority 1 has the
highest priority, and will take precedence over all other rules. Whenever a
RADIUS request is authenticated, all associated rules will be found, but
only the rule with the highest priority will be used. No two rules can have
the same priority. It is the network administrator's responsibility to ensure
that each rule has a unique priority.
The Default Rule always has the lowest priority.
Network Access Setting
A rule defines the Network Access as either:
Allow - The authentication is valid, or
RADIUS
Authentication and
Authorization
Deny - The authentication is refused
If the Network Access for a rule is set to Allow, and the rule is selected,
then the RADIUS response will be Accept and will contain the VLAN and
QoS profile associated with the rule. If the Network Access for a rule is set
to Deny, and the rule is selected, then the RADIUS response will be Reject.
To understand the effect that the Network Access setting has in a
network, the Network Administrator needs to be aware of how the edge
port security has been set up. In some port modes, the setting may
appear counter-intuitive, for example Allow can be used to implement a
blacklist. For more information on edge port security modes, see
“Configuring Edge Port Security”.
Authentication/ authorization DLLs for IAS are provided as part of the
3Com Network Access Manager installation. The Authentication DLL is
used to verify the identity of the user or computer being authenticated
through 3Com Network Access Manager. The Authorization DLL is
responsible for sending the RADIUS response for a user or computer that
is recognized by 3Com Network Access Manager.
Page 17

Concepts and Terminology 17
The two forms of RADIUS authentication supported by 3Com Network
Access Manager are:
■ MAC-address based authentication, for example RADA (RADIUS
Authenticated Device Access).
■ IEEE 802.1X authentication, also known as dot1X, 802.1X and
Network Login.
MAC-address based Authentication
3Com Network Access Manager relies on the RADIUS server to perform
MAC-address based authentication through a single authentication user
name (as opposed to the MAC address as a user name).
When 3Com Network Access Manager receives an authentication request
to the MAC authentication user name, it also authenticates the MAC
address of the computer against the 3Com Network Access Manager
rules to determine the authentication outcome, as follows:
1 Look up the MAC address against all Computers configured, to find all
associated rules.
2 If rules are found, select the highest priority rule.
3 If no rules are found, select the Default Rule.
4 Return the authentication result from the selected rule.
IEEE 802.1X Authentication
When a switch performs IEEE 802.1X authentication, the process is
similar to the MAC-address based authentication, but 3Com Network
Access Manager also checks the user requested, as follows:
1 Look up the IEEE 802.1X username against all Users configured, to find
all associated rules.
2 Look up the MAC address against all Computers configured, to find all
associated rules.
3 If rules are found, select the highest priority rule.
4 If no rules are found, select the Default Rule.
5 Return the authentication result from the selected rule.
Checking the MAC address ensures that network policies such as blocked
hosts can be maintained, regardless of edge port security mode.
Page 18

18 CHAPTER 1: INTRODUCTION
Authorization
Once a user has successfully authenticated, the authorization process
determines which VLANs and QoS to return to the switch, as follows:
1 From the authentication rule selected, if any VLAN has been specified,
return the VLAN ID in the RADIUS response.
2 From the authentication rule selected, if a QoS profile has been specified,
return the QoS Profile ID in the RADIUS response.
Devices Supported The following 3Com devices are supported by 3Com Network Access
Manager v1.1:
Tab le 3 3Com Devices Supported By 3Com Network Access Manager
Configuring Edge
Port Security
Device Type
SuperStack3 Switch 4400 v5.0
SuperStack3 Switch 4400 SE v5.0
SuperStack4 Switch 5500 v1.0
Wireless LAN Access Point 8250 v3.2 supporting RADIUS and VSA
Wireless LAN Access Point 8750 v3.2 supporting RADIUS and VSA
Wireless LAN Access Point 7250 v3.2 supporting RADIUS and VSA
Minimum Agent Version or
other requirement
Ensure that the configurations of the devices on your network are
consistent with the security policy to be set up using 3Com Network
Access Manager.
If VLANs are to be configured in 3Com Network Access Manager then
edge ports on switches across the network need to be set to a security
mode that supports auto-VLANS. If VLANs are not to be set up in 3Com
Network Access Manager, then the devices do not need to support
auto-VLANs.
In addition, the edge ports on switches must be set to consistent modes,
otherwise the same RADIUS response will yield different actions on
different ports. For example, RADA And Network Login only allows user
login if the RADIUS server returns Accept. RADA-Else-Network Login only
allows user login if the RADIUS server returns Reject.
Page 19

Devices Supported 19
Table 4 lists suitable edge port security modes and their typical use within
a network.The case studies in Chapter 4 explain how these port security
modes operate to control network access.
Tab le 4 Edge Port Security Modes Compatible With 3Com Network Access Manager
Port Security Mode Typical Use Supported By
RADA-Else-Network Login Primarily used for blocking unwanted hosts, as the
RADA authorization overrides the ability for the user
to log-in.
This is the recommended edge port security mode,
if the devices on your network support it. All users
have to be authorised before being allowed access.
Any computer or device can access the network as
long as that they have not been identified as
infected. This allows a network administrator to
easily add host filtering to an existing IEEE 802.1X
network.
RADA And Network Login Both the computer and the user need to be
authorized to gain access to the network.
It is primarily used for “White-list” style of security,
where all known computers have to be first
configured before a user can log-in from one of
these computers.
RADA Or Network Login Access to the network is granted if either the
RADA (MAC-address based
Authentication)
Network Login (IEEE 802.1X) Use to control user access and manage QoS and
computer or the user is authorised. This mode is
flexible for environments where not every device
has a IEEE 802.1X client
Use to control computer access to the network. SuperStack3 Switch4400 v5.0
VLAN configuration.
SuperStack3 Switch4400 v5.0
SuperStack3 Switch4400SE
v5.0 (does not support QoS
profiles)
SuperStack3 Switch4400 v6.0
SuperStack3 Switch4400SE
v6.0 (does not support QoS
profiles)
SuperStack3 Switch4400 v5.0
SuperStack3 Switch4400SE
v5.0 (does not support QoS
profiles)
SuperStack3 Switch4400SE
v5.0 (does not support QoS
profiles)
SuperStack4 Switch 5500 v1.0
SuperStack3 Switch4400 v4.0
SuperStack3 Switch4400SE
v5.0 (does not support QoS
profiles)
SuperStack4 Switch 5500 v1.0
Wireless LAN Access Point
8250 v3.2
Wireless LAN Access Point
8750 v3.2
Wireless LAN Access Point
7250 v3.2
Page 20

20 CHAPTER 1: INTRODUCTION
Page 21

2
INSTALLING 3COM NETWORK ACCESS MANAGER
This chapter covers:
■ the operating systems and required PC configurations that are
compatible with the 3Com Network Access Manager components,
■ the tasks that need to be performed before installing and running
3Com Network Access Manager,
■ how to install 3Com Network Access Manager,
■ how to modify and repair an existing 3Com Network Access Manager
installation,
■ how to uninstall 3Com Network Access Manager.
System Requirements
Tab le 5 Microsoft Windows Operating Systems Supported By 3Com Network Access Manager
3Com Network
Access Manager
Component
IAS component yes yes no no
Active Directory
component
Network Administrator
User Interface
Network Operator User
Interface
User Guide yes yes yes yes
Table 5 lists the Microsoft Windows operating systems compatible with
installing and running the 3Com Network Access Manager components.
For more information about the different 3Com Network Access
Manager components see “Installing 3Com Network Access Manager”.
Windows 2000
Server SP4
yes yes no no
yes yes yes yes
yes yes yes yes
Windows Server 2003 SP1,
standard and enterprise
editions
Windows 2000
client
Windows XP
Professional
Page 22

22 CHAPTER 2: INSTALLING 3COM NETWORK ACCESS MANAGER
Table 6 lists the configuration requirements of PCs that will have 3Com
Network Access Manager components installed.
Tab le 6 PC Configuration Requirements
3Com Network
Access Manager
Component
IAS component Ensure IAS is installed on PC.
Active Directory
component
Network Administrator
User Interface
Network Operator User
Interface
User Guide Adobe Acrobat Reader is required on each PC used to view
For each PC that will have 3Com Network Access
Manager component installed:
Ensure the PC is a member of the required domain.
Ensure .NET Framework version 1.1 or later, is installed on
the PC.
Only install on one domain controller. This must become
the schema master (schema FSMO) to perform the install.
You will need to have Schema Administrator privileges to
install the Active Directory component.
Ensure the PC is a member of the required domain.
Ensure .NET Framework version 1.1 or later, is installed on
the PC.
Install Active Directory Users and Computers, if not already
installed.
Ensure the PC is a member of the required domain.
Ensure .NET Framework version 1.1 or later, is installed on
the PC.
Install Active Directory Users and Computers, if not already
installed.
the 3Com Network Access Manager user guide (this
guide). Obtain a free download of Adobe Acrobat Reader
from http://www.adobe.com/
.NET Framework v1.1 is included as part of Windows Server 2003. For
Windows 2000 and Windows XP Professional, you can check if .NET
Framework v1.1 is installed using the Add/Remove Programs utility on the
Control Panel. Download the .NET Framework version 1.1 files from
www.microsoft.com/download
Page 23
Before Installation 23
Before Installation You must perform the following tasks on your network before installing
and setting up 3Com Network Access Manager:
1 Install and configure Microsoft Internet Authentication Service (IAS),
a Install IAS on one or more Windows 2000 servers or Windows 2003
servers in the network. IAS is included as part of the operating system.
For information on setting up IAS, refer to the Microsoft
documentation supplied with IAS.
b Ensure all 3Com devices in the network that will use IAS are
configured in IAS as RADIUS clients with client-vendor set to ‘3Com’.
c Setup an IAS Remote Access Policy that 3Com Network Access
Manager will be required to use to authenticate users and computers.
Refer to Appendix A for details on how to create an IAS Remote
Access Policy.
For 3Com Network Access Manager to operate correctly with IAS, do not
specify a VLAN list or QoS profile as part of the Remote Access Policy.
2 Ensure all Users, Groups and Computers have been added to Microsoft
Active Directory for your network domain, refer to the user
documentation supplied with Active Directory for details.
3 Configure the 3Com switches and wireless access points on your network
a Configure the 3Com switches with consistent VLAN and QoS settings
throughout the network.
b Configure all edge ports on 3Com switches with a suitable and
consistent edge port security mode and Intrusion Action setting. For
information on edge port security modes suitable for use with 3Com
Network Access Manager, see “Configuring Edge Port Security” in
Chapter 1.
CAUTION: Using different security modes on switch edge ports on
your network, will result in different meanings for RADIUS
responses across the network.
Use 3Com Network Director or 3Com Enterprise Management Suite to
make the VLAN, QoS and port security mode settings, or else configure
each switch through its web or command line interface. Refer to the user
documentation accompanying the management application or switch for
details.
Page 24
24 CHAPTER 2: INSTALLING 3COM NETWORK ACCESS MANAGER
Installing 3Com
Network Access
Follow the instructions in this section to install 3Com Network Access
Manager.
Manager
Overview 3Com Network Access Manager comprises five components:
■ Internet Authentication Server component consisting of
authorization/authentication DLLs,
■ Active Directory Server component, this component will make
changes to your Active Directory schema configuration which cannot
be deleted from AD,
■ Network Administrator User Interface,
■ Network Operator User Interface,
■ this user guide.
Each component is installed through the 3Com Network Access Manager
installer.
You will need to have Schema Administrator privileges to install the
Active Directory component.
New Installation The Internet Authentication Server component needs to be installed on
each IAS in the network. However, the Active Directory Server component
should only be installed on one Active Directory server (also known as a
domain controller) which should be the schema master on your network.
The changes that the Active Directory Server component makes to the
Active Directory server will be replicated across all of the Active Directory
servers on your network.
CAUTION: The changes that the Active Directory Server component
makes to the Active Directory schema configuration cannot be deleted.
The 3Com Network Access Manager uninstaller will not affect or remove
these Active Directory changes.
Install the Network Administrator User Interface and Network Operator
User Interface on the PCs that will be used by the network administrators
and operators using 3Com Network Access Manager. Before installing,
check that the operating system and configuration of the PC complies
with Table 5 and Table 6.
Page 25

Installing 3Com Network Access Manager 25
Follow these steps to install the 3Com Network Access Manager
components:
1 Insert the 3Com Network Access Manager CD in the PC’s CDROM drive.
If Autorun is enabled on the PC, the installation starts automatically and
you can skip steps 2 and 3.
2 From the Start menu, select Run.
3 Typ e
D:\setup (substitute the appropriate letter of your CD-ROM drive
for D), and click OK.
4 A splash screen will display and the installer will check that:
■ .NET Framework version 1.1 or later is installed on the PC,
■ a supported version of Windows is installed on the PC, as shown in
Ta bl e 5 ,
■ the PC is a member of a domain,
if any of the checks fail, an error message will display indicating the
problem and the installer will abort. You need to correct the problem
before restarting the installer.
If the checks are successful, the Welcome dialog is displayed, Figure 3.
Figure 3 InstallShield Wizard
Page 26

26 CHAPTER 2: INSTALLING 3COM NETWORK ACCESS MANAGER
5 Select Next, the End User License Agreement will display, Figure 4.
Figure 4 End User Licence Agreement dialog
To continue the installation select I accept the terms of the license
agreement, and press the Next button. Otherwise, select Back to move to
the previous dialog or Cancel to end the installation.
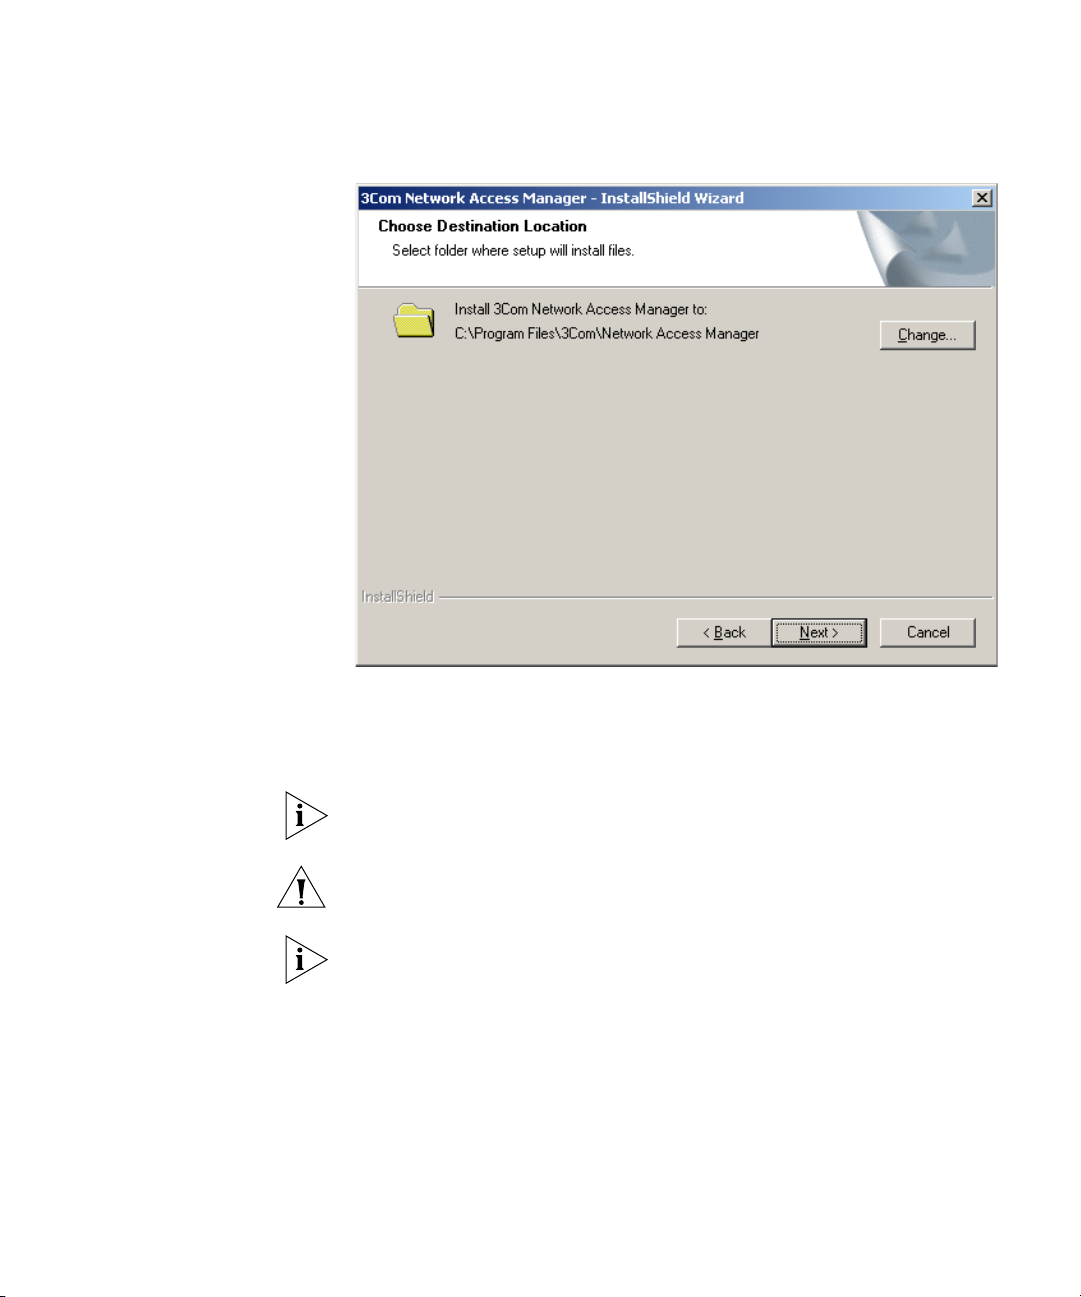
6 On the next dialog, Figure 5, either select the destination location for the
3Com Network Access Manager files using the Change button or else use
the default location Program Files\3Com\Network Access Manager. Press
Next.
Page 27
Installing 3Com Network Access Manager 27
Figure 5 Choose Destination Location
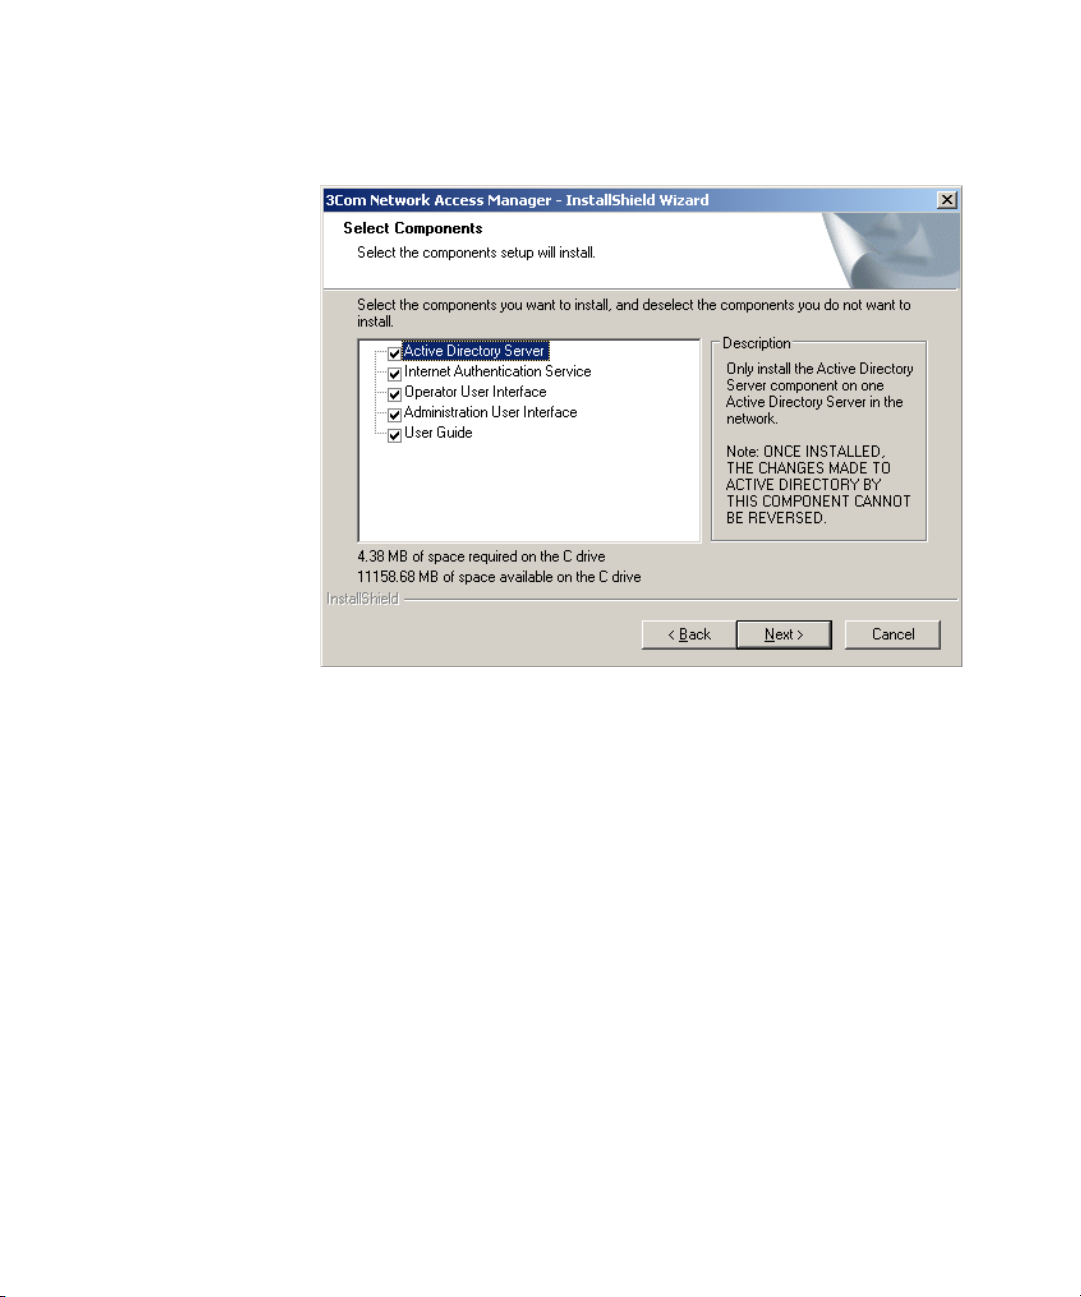
7 On the next dialog, Figure 6, select the 3Com Network Access Manager
components to install on the PC. Ticked components will be installed.
Un-ticked components will not be installed. The Next button will be
grayed out until a component has been ticked.
Any combination of components is permitted on a PC providing they are
supported by the PC’s operating system, see Table 5.
CAUTION: The changes that the Active Directory Server component
makes to the Active Directory schema configuration cannot be deleted.
You will need to have Schema Administrator privileges to install the
Active Directory component.
Page 28
28 CHAPTER 2: INSTALLING 3COM NETWORK ACCESS MANAGER
Figure 6 Component Selection
8 On the next dialog, Figure 7, select Install to start the installation, or Back
to return to the previous dialog.
Page 29
Installing 3Com Network Access Manager 29
Figure 7 Confirmation of Installation
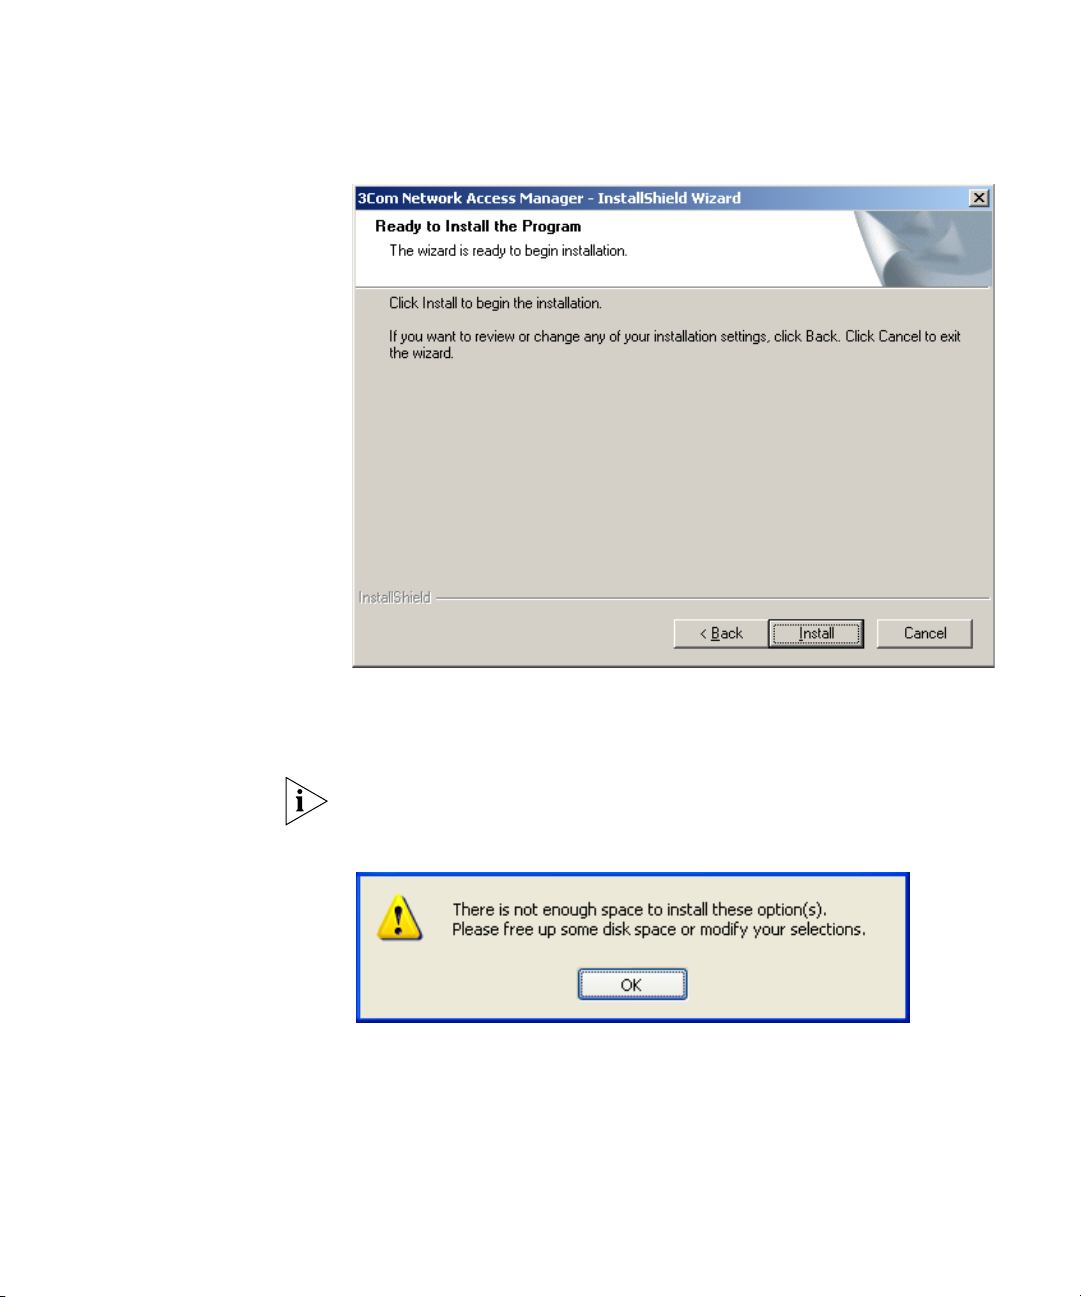
9 The Installer will check the hard disk space available on the PC. If
sufficient disk space is available, the installer will install the components
selected.
If insufficient disk space is available, an error message is displayed, see
Figure 8, the installation will stop until sufficient space is made available.
Figure 8 Insufficient Disk Space Error Message
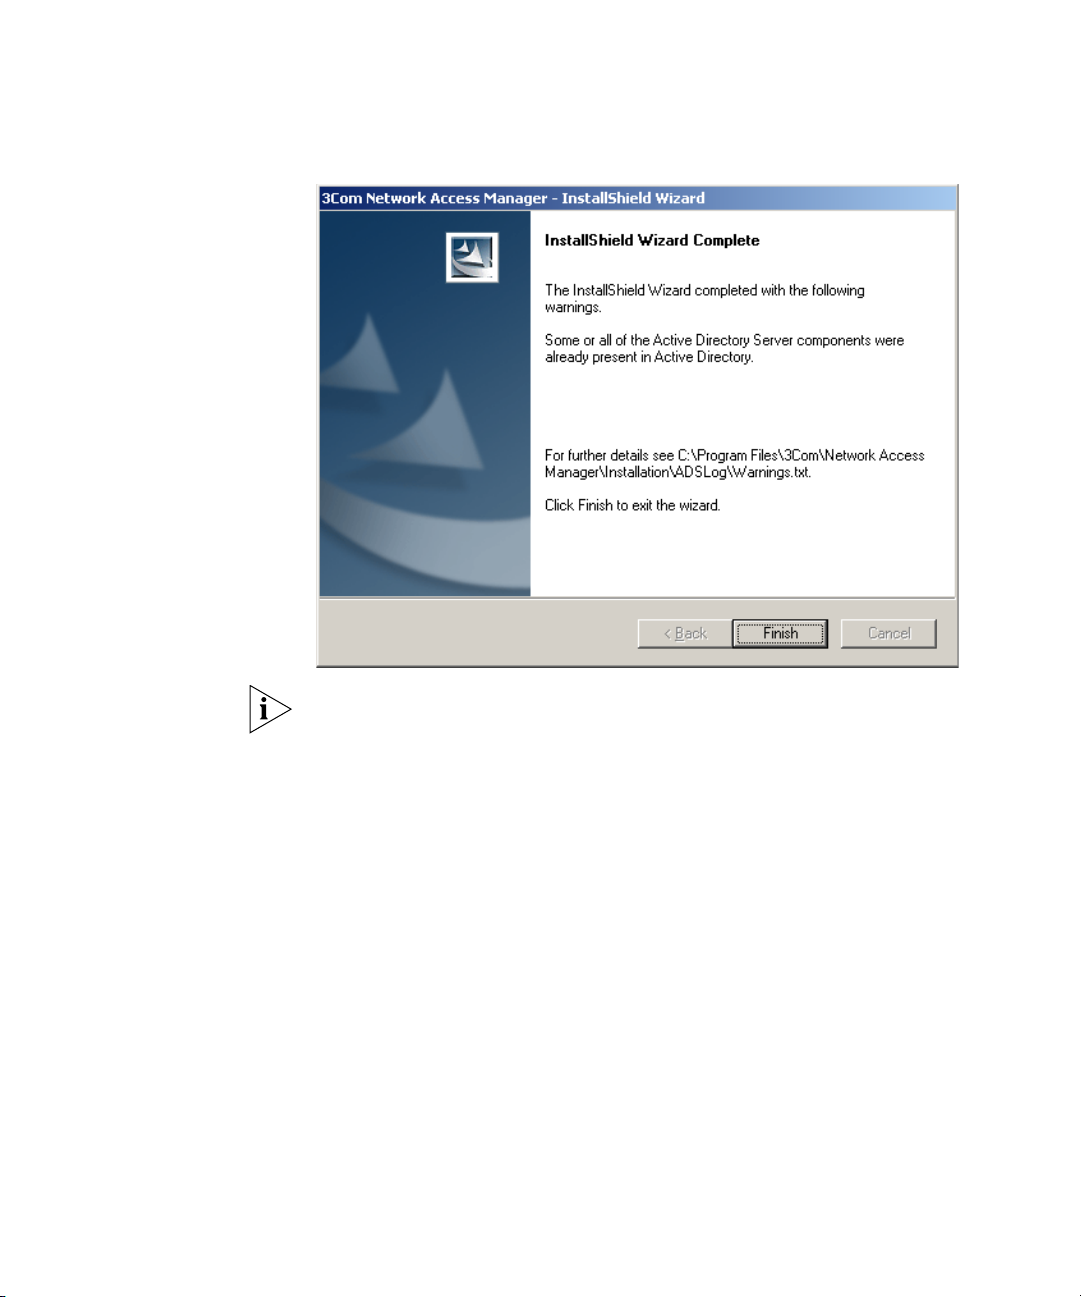
10 Once each of the selected components have been successfully installed,
the Installer displays a Wizard Complete dialog, see Figure 9. If the
Internet Authentication Server component was installed, then the IAS
server will need to be restarted.
Page 30
30 CHAPTER 2: INSTALLING 3COM NETWORK ACCESS MANAGER
Figure 9 Installation Complete
Modifying and
Repairing An
Installation
With the exception of installing the Active Directory component, any
problems encountered during installation will result in an error message
being displayed and the installation aborted. You will need to manually
fix the problem before restarting the installation.
If the installer encounters problems during installation of the Active
Directory component, a
warnings.txt file will be created and the Wizard
Complete dialog will shows its location.
11 Repeat steps 1 to 8 for any other PC being used for RADIUS,
Administrator or Operator users.
To change the 3Com Network Access Manager components installed on
a PC or repair an existing installation, follow these steps:
1 Insert the 3Com Network Access Manager CD in the PC’s CDROM drive.
If Autorun is enabled on the PC, the installation starts automatically and
you can skip steps 2 and 3.
2 From the Start menu, select Run.
3 Typ e
D:\setup (substitute the appropriate letter of your CD-ROM drive
for D), and click OK.
Page 31

Installing 3Com Network Access Manager 31
4 The splash screen will display followed by the Maintenance dialog, see
Figure 10.
Figure 10 Maintenance dialog
5 Click on the Modify button to change the components installed on the
PC.
a The Select Components dialog will display.
b Tick the components to be installed.
c Any unticked components will be removed if already installed on the
PC.
d Click Next. The Installer will check the hard disk space available on the
PC. If sufficient disk space is available, the installer will install the
components selected.
If insufficient disk space is available, an error message is displayed, and
the installation will stop until sufficient space is made available.
6 Click on the Repair button to repair an existing 3Com Network Access
Manager installation on a PC. All of the currently installed 3Com Network
Access Manager components will be reinstalled on the PC.
If the original installation included the Active Directory Server
component, then repairing the installation will give a warning message
Page 32

32 CHAPTER 2: INSTALLING 3COM NETWORK ACCESS MANAGER
on the Maintenance Complete dialog that the Active Directory
components are already present in Active Directory. This will not affect
Active Directory.
Figure 11 Maintenance Complete dialog
Uninstalling 3Com
Network Access
Manager
7 Click Finish to exit the Maintenance program. If the Internet
Authentication Server component was installed, then the IAS server will
need to be restarted.
To uninstall the 3Com Network Access Manager components from a PC,
follow these steps:
CAUTION: The configuration changes made by the Active Directory
Server component to the Active Directory schema cannot be deleted.
1 Insert the 3Com Network Access Manager CD in the PC’s CDROM drive.
If Autorun is enabled on the PC, the installation starts automatically and
you can skip steps 2 and 3.
2 From the Start menu, select Run.
3 Typ e
D:\setup (substitute the appropriate letter of your CD-ROM drive
for D), and click OK.
Page 33

Installing 3Com Network Access Manager 33
4 The splash screen will display followed by the Maintenance dialog, see
Figure 12.
Figure 12 Maintenance dialog
5 Click on the Remove button. On the next dialog, click Yes to remove the
3Com Network Access Manager components installed on the PC, click
No to stop the uninstall and return to the Maintenance dialog.
The changes made to Active Directory by the Active Directory Server
component cannot be removed.
6 After the 3Com Network Access Manager components have been
removed from the PC, the Maintenance Complete dialog will display, see
Figure 13. Click on the Finish button.
Page 34

34 CHAPTER 2: INSTALLING 3COM NETWORK ACCESS MANAGER
Figure 13 Maintenance Complete dialog
Page 35

3
GETTING STARTED
This chapter describes:
■ how to configure 3Com Network Access Manager after installation,
using the Network Administrator User Interface,
■ how to configure the User Interface for Network Operators.
Before configuring 3Com Network Access Manager, make sure you have
created a Remote Access Policy in IAS that 3Com Network Access
Manager will use to authenticate users and computers accessing the
network, see Appendix A.
Using The Network Administrator User Interface
User Interface To display the Network Administrator's User Interface, select
As a Network Administrator on a network that already employs
Microsoft’s Active Directory and Internet Authentication Service (IAS) you
will be familiar with managing Users, Groups and Computers through the
Active Directory MMC console. 3Com Network Access Manager extends
these capabilities by providing facilities to:
■ set up rules on how VLANs, QoS profiles and EFW policies are applied,
■ edit security profiles for users, groups and computers to include VLAN,
QoS profile and EFW policy information.
Start>Control Panel> Administrative Tools >3Com Network Access
Manager Admin
The User Interface is a Microsoft Management Console (MMC) console
consisting of a window divided into two panes, see Figure 14. The left
pane, called the Tree pane in this guide, displays the console tree and the
items that can be configured within the console. The right pane, called
the Details pane, shows information about the item selected in the Tree
pane.
Page 36

36 CHAPTER 3: GETTING STARTED
Figure 14 Network Administrator User Interface
Active Directory
Domain
New Rule
New VLAN
New QoS Profile
New EFW Policy
Increase Rule Priority
Recalculate EFW Membership
Decrease Rule Priority
The Tree pane.
Click on an object in the
tree to display a list of
items known to the system
in the Details pane
The Details pane.
Lists the items known to the
system for the object selected
in the Tree pane
Page 37

Using The Network Administrator User Interface 37
Setting Up 3Com
Network Access
Manager
To configure 3Com Network Access Manager after installation, follow
these steps:
Before adding entries for VLANs, QoS profiles and EFW policies in 3Com
Network Access Manager make sure that the VLANs, QoS profiles and
EFW policies have already been set up in the network access devices in
the network. These settings must be consistent throughout the entire
network.
1 Create VLANs, see“Creating A New VLAN”.
2 Create QoS profiles, see “Creating A New QoS Profile”.
3 Create EFW policies, see “Creating A New EFW Policy”.
4 Specify the MAC address(es) for the computers in the domain, see
“Entering MAC Addresses For A Computer”
5 Create rules and assign attributes to the rules, see “Creating A New
Rule”.
6 Ensure the appropriate permissions for each network operator who will
use 3Com Network Access Manager have been set, see “Selecting
Appropriate Permissions For An Operator”.
7 Associate the rules with the users, groups, and computers in the network
domain.
VLANs View Clicking on VLANs in the Tree pane displays in the Detail pane a list of
VLANs already entered into 3Com Network Access Manager. Initially the
Detail pane will be empty, until one or more VLAN entries have been
created, see “Creating A New VLAN”. After a VLAN entry has been
created in 3Com Network Access Manager, the Detail pane will show the
VLAN Name and ID, see Figure 15.
Page 38

38 CHAPTER 3: GETTING STARTED
Figure 15 VLANs View Detail Pane.
New VLAN button
Creating A New VLAN
To create a new VLAN entry in 3Com Network Access Manager, follow
these steps:
1 Either click VLANs in the Tree pane and click the New VLAN button on the
Tool bar, or right-click VLANs in the Tree pane and select New> VLAN
2 In the dialog box enter the name of the new VLAN and the VLAN ID.
The VLAN ID should be a string of characters that match the ID assigned
to the VLAN in the network access device (switch or wireless access
point). For maximum compatibility with supported devices use numeric
IDs.
3 Click OK to create the VLAN.
The VLAN name will be checked to ensure it is valid and unique, and the
new VLAN name and ID will be added to the list of VLANs shown in the
Detail pane of the VLAN view.
This completes creating a new VLAN entry in 3Com Network Access
Manager.
Page 39

Using The Network Administrator User Interface 39
You can now:
■ associate rules with this VLAN if the rules have already been created,
see “Changing Rule Properties”.
Deleting An Existing VLAN
To delete an existing VLAN entry in 3Com Network Access Manager,
follow these steps:
1 Click on VLANs in the Tree pane. The Details pane on the right will list all
of the VLANs in 3Com Network Access Manager.
2 Select the VLAN to delete and right-click. Select Delete.
3 Click Yes to confirm deleting the VLAN from 3Com Network Access
Manager.
If you delete a VLAN which is associated with one or more rules, then the
rules are updated to have a VLAN assignment of 'Unspecified'.
Renaming A VLAN And Changing The VLAN ID
To rename an existing VLAN entry in 3Com Network Access Manager,
follow these steps:
1 Click on VLANs in the Tree pane. The Details pane on the right will list all
of the VLANs in 3Com Network Access Manager.
2 Select the VLAN to rename and right-click. Select Rename.
3 Enter the new name for the VLAN and press Return.
This completes renaming the VLAN entry in 3Com Network Access
Manager.
To change the VLAN ID of an existing VLAN entry in 3Com Network
Access Manager, follow these steps:
1 Click on VLANs in the Tree pane. The Details pane on the right will list all
of the VLANs in 3Com Network Access Manager.
2 Select the VLAN to change and right-click. Select Properties.
The Properties dialog window will appear.
3 Select the VLAN tab and change the ID for the VLAN.
The ID should be a string of characters, for example a number, that
matches the ID assigned to the VLAN during configuration of the
network access device (switch or wireless access point)
Page 40

40 CHAPTER 3: GETTING STARTED
4 Click OK
This completes changing the ID for an existing VLAN entry in 3Com
Network Access Manager.
Displaying Rules Associated With A VLAN
To display the rules associated with a VLAN, follow these steps:
1 Click on VLANs in the Tree pane. The Details pane on the right will list all
of the VLANs in 3Com Network Access Manager.
2 Select the VLAN to view and right-click. Select Properties.
The Properties dialog window will appear.
3 Select the Members tab, a list of rules associated with the VLAN will be
displayed in the window.
4 Click OK or Cancel.
This completes displaying the rules associated with a VLAN.
QoS Profiles View Clicking on QoS Profiles in the Tree pane displays in the Detail pane a list
of QoS profiles already entered into 3Com Network Access Manager.
Initially the Detail pane will be empty, until one or more QoS profile
entries have been created, see “Creating A New QoS Profile”. After a
QoS profile entry has been created in 3Com Network Access Manager,
the Detail pane will show the QoS Profile Name and Profile ID, see
Figure 16.
Page 41

Using The Network Administrator User Interface 41
Figure 16 QoS Profiles View Detail Pane
New QoS Profile button
Creating A New QoS Profile
To create a new QoS profile entry in 3Com Network Access Manager,
follow these steps:
1 Either click QoS Profiles in the Tree pane and click the New QoS Profile
button on the Tool bar, or right-click QoS Profiles in the Tree pane and
select New>QoS Profile
2 In the dialog box enter the name of the new QoS profile and the QoS
profile ID.
The QoS profile ID should be a string of characters (with no spaces) that
match the ID assigned to the QoS profile in the network access device
(switch or wireless access point), otherwise the device may not accept the
RADIUS response.
3 Click OK to create the QoS profile. The new QoS profile name and ID will
be added to the list of QoS profiles displayed in the Detail pane of the
QoS Profile View.
Page 42

42 CHAPTER 3: GETTING STARTED
This completes creating a new QoS profile entry in 3Com Network Access
Manager.
You can now:
■ associate rules with this QoS profile if the rules have already been
Deleting An Existing QoS Profile
To delete an existing QoS profile in 3Com Network Access Manager,
follow these steps:
1 Click on QoS Profiles in the Tree pane. The Details pane on the right will
list all of the QoS profiles in 3Com Network Access Manager.
2 Select the QoS profile to delete and right-click. Select Delete.
3 Click Yes to confirm deleting the QoS profile from 3Com Network Access
Manager.
If you delete a QoS profile which is associated with one or more rules,
then the rules are updated to have a QoS profile assignment of
'Unspecified'.
created, see “Changing Rule Properties”.
Renaming A QoS Profile And Changing The QoS Profile ID
To rename an existing QoS profile entry in 3Com Network Access
Manager, follow these steps:
1 Click on QoS Profiles in the Tree pane. The Details pane on the right will
list all of the QoS profiles in 3Com Network Access Manager.
2 Select the QoS profile to rename and right-click. Select Rename.
3 Enter the new name for the QoS profile and press Return.
This completes renaming the QoS profile entry in 3Com Network Access
Manager.
To change the ID of an existing QoS profile entry in 3Com Network
Access Manager, follow these steps:
1 Click on QoS Profiles in the Tree pane. The Details pane on the right will
list all of the QoS profiles in 3Com Network Access Manager.
2 Select the QoS profile to change and right-click. Select Properties.
The Properties dialog window will appear.
3 Select the Profile tab and change the ID for the QoS profile.
Page 43

Using The Network Administrator User Interface 43
The ID should be a string of characters that match the ID assigned to the
QoS profile in the network access device (switch or wireless access point).
4 Click OK or Cancel.
This completes changing the ID for an existing QoS profile entry in 3Com
Network Access Manager.
Displaying Rules Associated With A QoS Profile
To display the rules associated with a QoS profile, follow these steps:
1 Click on QoS Profiles in the Tree pane. The Details pane on the right will
list all of the QoS profiles in 3Com Network Access Manager.
2 Select the QoS profile to view and right-click. Select Properties.
The Properties dialog window will appear.
3 Select the Members tab, a list of rules associated with the QoS profile will
be displayed in the window.
4 Click OK or Cancel.
This completes displaying the rules associated with a QoS profile.
EFW Policies View Clicking on EFW Policies in the Tree pane displays in the Detail pane a list
of EFW policies already entered into 3Com Network Access Manager.
Initially the Detail pane will be empty, until one or more EFW policy
entries have been created, see “Creating A New EFW Policy”. After an
EFW policy entry has been created in 3Com Network Access Manager,
the Detail pane will show the EFW policy name, see Figure 17.
EFW policies are only required if your network includes a 3Com EFW
Policy Server.
Page 44

44 CHAPTER 3: GETTING STARTED
Figure 17 EFW Policies View Detail Pane
New EFW Policy Recalculate EFW membership
button
Click on this after changing the association
between a rule and an EFW policy
Creating A New EFW Policy
Before creating an EFW policy in 3Com Network Access Manager make
sure that the EFW policy has already been created in the EFW Policy
Server.
To create a new EFW policy entry in 3Com Network Access Manager,
follow these steps:
1 Either click EFW Policies in the Tree pane and click the New EFW Policy
button on the Tool bar, or right-click EFW Policies in the Tree pane and
select New> EFW Policy.
2 In the dialog box enter the name of the new EFW policy. The name must
be the same as the name assigned to the policy in the EFW Policy Server.
3 Click OK to create the EFW policy. The new EFW policy name will be
added to the list of EFW policies shown in the Detail pane of the EFW
Policy view.
Page 45

Using The Network Administrator User Interface 45
This completes creating a new EFW policy entry in 3Com Network Access
Manager.
You can now:
■ associate rules with this EFW policy if the rules have already been
created, see “Changing Rule Properties”.
Deleting An Existing EFW Policy
To delete an existing EFW policy in 3Com Network Access Manager,
follow these steps:
1 Click on EFW Policies in the Tree pane. The Details pane on the right will
list all of the EFW policies in 3Com Network Access Manager.
2 Select the EFW policy to delete and right-click. Select Delete.
3 Click on Yes to confirm deleting the EFW policy from 3Com Network
Access Manager.
If you delete an EFW policy which is associated with one or more rules,
then the rules are updated to have an EFW policy assignment of
'Unspecified'.
Renaming An EFW Policy
To rename an existing EFW policy entry in 3Com Network Access
Manager, follow these steps:
1 Click on EFW Policies in the Tree pane. The Details pane on the right will
list all of the EFW policies in 3Com Network Access Manager.
2 Select the EFW policy to rename and right-click. Select Rename.
3 Enter the new name for the EFW policy and press Return.
This completes renaming the EFW policy entry in 3Com Network Access
Manager.
Displaying Rules Associated With An EFW Policy
To display the rules associated with an EFW policy, follow these steps:
1 Click on EFW Policies in the Tree pane. The Details pane on the right will
list all of the EFW policies in 3Com Network Access Manager.
2 Select the EFW policy to view and right-click. Select Properties.
The Properties dialog window will appear.
Page 46

46 CHAPTER 3: GETTING STARTED
3 Select the Members tab, a list of rules associated with the EFW policy will
be displayed in the window.
4 Click OK or Cancel.
This completes displaying the rules associated with an EFW policy.
Rules View Clicking on Rules in the Tree pane displays in the Detail pane a list of rules
already entered into 3Com Network Access Manager. Initially the Detail
pane will be empty, until one or more rules have been created, see
“Creating A New Rule”. After a rule has been created in 3Com Network
Access Manager, the Detail pane will show the Priority of the rule, the
Rule Name and Description, its Action and the VLANs, QoS Profile and
EFW Policy applied to the rule, see Figure 18.
Figure 18 Rules View Detail Pane.
New Rule
Increase Rule
Priority
Decrease Rule
Priority
Recalculate EFW membership
If EFW policies are used, click on
this button after changing the
priority of a rule
Page 47

Using The Network Administrator User Interface 47
Creating A New Rule
To create a new rule, assign a priority and network access response to the
rule, follow these steps:
1 Either click Rules in the Tree pane and click the New Rule button on the
Tool bar, or right-click Rules in the Tree pane and select New>Rule
2 In the dialog box enter the name of the new rule.
3 Click OK to create the rule.
You now need to set the priority for the rule, which must be unique. The
priority determines the order in which rules are examined when a RADIUS
request is received. The rule with priority 1 has the highest priority, and
will take precedence over all other rules. The new rule will have been
assigned the current lowest priority, for example if the lowest priority was
10 before creating the rule, then the new rule will have priority 11.
4 Click Rules in the Tree pane. The Details pane on the right will list all of
the rules.
5 Select the newly created rule and use the ( buttons on the Tool bar to
increase or decrease the priority of the rule to match your network
security requirements. Ensure the rule has a unique priority.
Now set the other attributes for the rule.
6 Select the new rule from the list of rules shown in the Detail pane, and
right-click, select Properties.
The Properties dialog window will appear.
7 Select the Security tab to assign security permissions to network
administrators and operators who are permitted to apply the rule to
users, groups and computers, see Figure 19.
a Select a group or user from the list of names in the window and click
Add.
b Select the appropriate security permission to match the role of the
group or user, see Table 7.
All Network Administrators must have Read permission for ALL rules to
ensure that they can see how rules have been applied, and enable them
to troubleshoot access difficulties in the network.
Page 48

48 CHAPTER 3: GETTING STARTED
Figure 19 Security Tab For A Rule
Tab le 7 Selecting Appropriate Rule Permissions
Role Rule Permissions
Network Administrator(s) or Network Operator(s)
allowed to associate the rule with a user, group,
or computer
Network Administrator(s) not allowed to associate
the rule with a user, group, or computer
Network Operator not allowed to associate the
rule with a user, group, or computer
Tick Allow for Read and Write
permissions.
Tick Allow for Read permission.
Do not tick any boxes.
c Repeat steps 7a and 7b for each group and user permitted to assign
the rule.
Page 49

Using The Network Administrator User Interface 49
8 Select the Action tab and configure the action attributes for the rule,
Figure 20.
Figure 20 Action Tab For A Rule
a You changed the Priority setting for the rule in step 5. There is no
need to change it again unless you need to assign a different unique
priority.
b Select the Network Access setting that the RADIUS server will return in
the RADIUS response, on the rule being obeyed. Allow indicates
authentication is valid. Deny indicates authentication is refused. If you
select Deny all attributes below Network Access will be grayed out, go
to step 9.
Page 50

50 CHAPTER 3: GETTING STARTED
To understand the effect of this action, you need to be aware of how the
edge port security is set up on the network. In some port modes, the
response may appear illogical, for instance, Allow can be used to
implement a blacklist.
c If Network Access is set to Allow, select the VLAN from the drop down
The network access device may interpret the VLAN as a tagged or
untagged VLAN depending upon the switch or wireless access point type
and configuration.
d Select the QoS profile (if any) associated with the rule. The QoS profile
e Select the EFW policy (if any) associated with the rule. If you do not
list, this VLAN will be included in the RADIUS response if the rule is
obeyed. Select the (Unspecified) option to prevent a VLAN from being
included in the RADIUS response.
will be included in the RADIUS response if the rule is obeyed. If you do
not wish to associate a QoS profile with the rule, select the
(Unspecified) setting.
wish to associate an EFW policy with the rule, select the (Unspecified)
setting.
EFW policy information is NOT returned in a RADIUS response
9 Select the Members tab to display a list of members (users, groups or
computers) associated with the rule. At this stage the list will be empty.
10 Click OK
This completes creating a new rule in 3Com Network Access Manager,
you now need to associate users, groups and computers with the rule.
Follow the steps in “Associating Rules With A User”, “Associating Rules
With A Group”, “Associating Rules With A Computer”as appropriate.
Deleting An Existing Rule
To delete an existing rule in 3Com Network Access Manager, follow these
steps:
1 Click on Rules in the Tree pane. The Details pane on the right will list all of
the rules in 3Com Network Access Manager.
2 Select the rule to delete and right-click. Select Delete.
3 Click Yes to confirm deleting the rule from 3Com Network Access
Manager.
Page 51

Using The Network Administrator User Interface 51
Controlling Permission To Apply A Rule
Selecting who has permission to apply a rule, is performed when the rule
is created. Permissions can be changed after a rule is created, providing
the user or group making the change has write permission for the rule.
To change permissions on a rule, follow these steps:
1 Click on Rules in the Tree pane. The Details pane on the right will list all of
the rules in 3Com Network Access Manager.
2 Select the rule to change and right-click. Select Properties.
The Properties dialog window will appear.
3 Select the Security tab. Follow the instructions in step 7 of “Creating A
New Rule” to re-assign permissions for the rule.
Changing Rule Priorities
Setting the priority of a rule, is performed when the rule is created. The
rule priority can be changed after a rule is created, providing the user or
group making the change has write permission for the rule. Priority 1 is
the highest priority, a rule assigned priority 1 will take precedence over all
other rules. A rule assigned priority 2 will take precedence over rules
assigned a priority of 3, 4...The Default Rule has the lowest priority.
To change the priority of a rule, follow these steps:
Either:
1 Click on Rules in the Tree pane. The Details pane on the right will list all of
the rules in 3Com Network Access Manager.
2 Select the rule to change and use the ( buttons on the Tool bar to
increase or decrease the priority of the rule to match your network
security requirements. Ensure the rule has a unique priority.
3 If EFW policies are used, click on the Recalculate EFW Membership button
in the Tool bar after changing the rule priorities.
Or:
1 Click Rules in the Tree pane. The Details pane on the right will list all of
the rules in 3Com Network Access Manager.
2 Select the rule to change and right-click. Select Properties.
The Properties dialog window will appear.
3 Select the Action tab and select the Priority for the rule. Ensure the
priority for the rule is unique.
Page 52

52 CHAPTER 3: GETTING STARTED
4 Click OK.
5 If EFW policies are used, click on the Recalculate EFW Membership button
in the Tool bar after changing the rule priorities.
Changing Rule Properties
Selecting the properties for a rule is performed when the rule is created.
Rule properties can be changed after a rule is created, providing the user
or group making the change has write permission for the rule.
To change properties for a rule, follow these steps:
1 Click on Rules in the Tree pane. The Details pane on the right will list all of
the rules in 3Com Network Access Manager.
2 Select the rule to change and right-click. Select Properties.
The Properties dialog window will appear.
3 Select the Action tab. Follow the instructions in step 8 of “Creating A
New Rule” to select different properties for the rule.
If EFW policies are used, click on the Recalculate EFW Membership button
in the Tool bar after changing the rule properties.
Displaying Members Of A Rule
To display all of the members (users, groups and computers) associated
with a rule, follow these steps:
1 Click on Rules in the Tree pane. The Details pane on the right will list all of
the rules in 3Com Network Access Manager.
2 Select the rule to view and right-click. Select Properties.
The Properties dialog window will appear.
3 Select the Members tab.The members associated with the rules will be
listed in the window.
4 Click OK
Changing Members Of A Rule
To add or remove users associated with a rule, refer to “Displaying And
Changing Rules Associated With A User”.
To add or remove groups associated with a rule, refer to“Displaying And
Changing Rules Associated With A Group”.
Page 53

Using The Network Administrator User Interface 53
To add or remove computers associated with a rule, refer to “Displaying
And Changing The Rules And MAC Address Associated With A
Computer”.
Users View Clicking on Users in the Tree pane displays in the Detail pane a list of
Users which already exist in the domain, see Figure 21. Alternatively if
you have created Organizational Units to structure your users, click on the
organizational units subfolders until you reach the desired unit holding
the user.
In the Detail pane, the Current Rule column indicates the rule with the
highest priority that is associated with a user, and which is used for
authorization of the user. A new user without specific rules applied, will
have the Default Rule in the Current Rule column.
The current rule for a user may be overridden by MAC address related
settings, for example, if the MAC address of a user's PC was blocked
because the PC was infected, it would usually be set to override the user's
own allocations.
Figure 21 Users View Detail Pane.
Page 54

54 CHAPTER 3: GETTING STARTED
Associating Rules With A User
All users in the domain will have the Default Rule applied until they are
associated with other rules created with 3Com Network Access Manager.
To associate a rule(s) with a user, follow these steps:
1 Either click on Users in the Tree pane or if you have created
Organizational Units to structure your users, click on the organizational
units subfolders until you reach the desired unit holding the user.
2 Select the user in the Details pane and right-click. Select Properties.
The Properties dialog window will appear.
3 Select the Network Access tab, a list of rules created with 3Com Network
Access Manager and for which you have read permission will be
displayed in the window, see Figure 22.
Page 55

Using The Network Administrator User Interface 55
Figure 22 Network Access Tab
4 Tick the box beside each rule that is to be associated with the user. If the
rule is grayed out then the user is a member of a group which is already
associated with the rule.
A user can be associated with multiple rules, however only the highest
priority rule associated with the user will be used for the RADIUS
authorization.
5 Click OK
This completes associating rules with a user.
Page 56

56 CHAPTER 3: GETTING STARTED
Displaying And Changing Rules Associated With A User
To display and change the rules associated with a user, follow these steps:
1 Either click on Users in the Tree pane or if you have created
Organizational Units to structure your users, click on the organizational
units subfolders until you reach the desired unit holding the user.
2 Select the user in the Details pane and right-click. Select Properties.
The Properties dialog window will appear.
3 Select the Network Access tab, a list of rules created with 3Com Network
Access Manager and for which you have read permission will be
displayed in the window, see Figure 22. The tick box indicates how the
rule is to be applied to the user, see Table 8.
Tab le 8 Rules Tick Box For A User
Tick Box Setting Meaning
Black, not ticked The rule does not apply to this user
Black, ticked The rule is applied to this user
Grey, ticked The rule is applied to this user indirectly through the user’s
membership of one or more groups that have the rule
specifically applied
4 You can change which of these rules are applied to a user by either
ticking or removing the tick from rules that are black. To change a rule
that is applied indirectly through a group, see “Displaying And Changing
Rules Associated With A Group”.
A user can be associated with multiple rules, however only the highest
priority rule associated with the user will be used for the RADIUS
authorization.
5 Click OK
This completes displaying and changing the rules associated with a user.
DO NOT change rule membership using the Members Of tab.
Creating A New User
To create a new user in the system, you will need to use a tool such as the
“Active Directory Users and Computers” administration tool. You cannot
create users through 3Com Network Access Manager. Follow the
instructions given in the user documentation shipped with Microsoft
Active Directory.
Page 57

Groups View Clicking on Groups in the Tree pane displays in the Detail pane a list of
Groups which already exist in the domain, see Figure 23. Alternatively if
you have created Organizational Units to structure your groups, click on
the organizational units subfolders until you reach the desired unit
holding the group.
The Current Rule column indicates the rule with the highest priority that
is associated with a group, and which is used for authorization of the
group. A new group without specific rules applied, will have the Default
Rule in the Current Rule column.
Figure 23 Groups View Detail Pane
Using The Network Administrator User Interface 57
Page 58

58 CHAPTER 3: GETTING STARTED
Associating Rules With A Group
All groups in the domain will have the Default Rule applied until they are
associated with other rules created with 3Com Network Access Manager.
To associate a rule(s) with a group, follow these steps:
1 Either click on Groups in the Tree pane or if you have created
Organizational Units to structure your groups, click on the organizational
units subfolders until you reach the desired unit holding the group.
2 Select the group in the Details pane and right-click. Select Properties.
The Properties dialog window will appear.
3 Select the Network Access tab, a list of rules created with 3Com Network
Access Manager and for which you have read permission will be
displayed in the window, see Figure 24.
Figure 24 Network Access Tab
4 Tick the box beside each rule that is to be associated with the group. If
the rule is grayed out then the group is a member of a group which is
already associated with the rule.
A group can be associated with multiple rules, however only the highest
priority rule associated with the group will be used for the RADIUS
authorization.
Page 59

Using The Network Administrator User Interface 59
5 Click OK
This completes associating rules with a group.
Displaying And Changing Rules Associated With A Group
To display and change the rules associated with a group, follow these
steps:
1 Either click on Groups in the Tree pane or if you have created
Organizational Units to structure your groups, click on the organizational
units subfolders until you reach the desired unit holding the group.
2 Select the group in the Details pane and right-click. Select Properties.
The Properties dialog window will appear.
3 Select the Network Access tab, a list of rules created with 3Com Network
Access Manager and for which you have read permission will be
displayed in the window, see Figure 24. The tick box indicates how the
rule is to be applied to the group, see Table 9.
Tab le 9 Rules Tick Box for A Group
Tick Box Setting Meaning
Black, not ticked The rule does not apply to this group
Black, ticked The rule is applied to this group
Grey, ticked The rule is applied to this group indirectly through the
group’s membership of one or more groups that have the
rule specifically applied
4 You can change which of these rules are applied to a group by either
ticking or removing the tick from rules that are black.
To change the rules applied indirectly through being a member of
another group, select the other group from the Detail pane and apply
steps 1 to 4 above on the other group.
A group can be associated with multiple rules, however only the highest
priority rule associated with the group will be used for the RADIUS
authorization.
5 Click OK
6 If EFW policies are used, click on the Recalculate EFW Membership
button.
This completes displaying and changing the rules associated with a
group.
Page 60

60 CHAPTER 3: GETTING STARTED
DO NOT change rule membership using the Members Of tab.
Creating A New Group
To create a new group in the system, you will need to use a tool such as
the “Active Directory Users and Computers” administration tool. You
cannot create groups through 3Com Network Access Manager. Follow
the instructions given in the user documentation shipped with Microsoft
Active Directory.
Computers View Clicking on Computers in the Tree pane displays in the Detail pane a list
of Computers known to the domain, see Figure 25. Alternatively if you
have created Organizational Units to structure your computers, click on
the organizational units subfolders until you reach the desired unit
holding the computer.
The Current Rule column indicates the rule with the highest priority that
is associated with a computer, and which is used for authorization of the
computer. A computer without specific rules applied, will have the
Default Rule in the Current Rule column.
The current rule for a computer may be overridden by user related
settings on an IEEE 802.1X request.
Page 61

Figure 25 Computers View Detail Pane
Using The Network Administrator User Interface 61
Entering MAC Addresses For A Computer
To use MAC-address based authentication, the computers in the domain
need to have their MAC addresses entered into 3Com Network Access
Manager. To enter the MAC address(es) for a computer follow these
steps:
1 Either click on Computers in the Tree pane or if you have created
Organizational Units to structure your computers, click on the
organizational units subfolders until you reach the desired unit holding
the computer.
2 Select the computer in the Details pane and right-click. Select Properties.
The Properties dialog window will appear.
3 Select the MAC Address tab. Enter the MAC address of the computer, if
the computer has two MAC addresses enter the second MAC address in
the field provided.
4 Click OK
This completes entering a MAC address for a computer.
Page 62

62 CHAPTER 3: GETTING STARTED
Associating Rules With A Computer
Ensure you have entered the MAC address of the computer in your
network, before associating rules with the computer. 3Com Network
Access Manager will only apply a rule to the computer if the RADIUS
request includes the MAC address as the Calling-Station-Id.
All computers in the domain will have the Default Rule applied until they
are associated with other rules created with 3Com Network Access
Manager. To associate a rule(s) with a computer, follow these steps:
1 Either click on Computers in the Tree pane or if you have created
Organizational Units to structure your computers, click on the
organizational units subfolders until you reach the desired unit holding
the computer.
2 Select the computer in the Details pane and right-click. Select Properties.
The Properties dialog window will appear.
3 Select the Network Access tab, a list of rules created with 3Com Network
Access Manager and for which you have read permission will be
displayed in the window, see Figure 26.
Page 63

Using The Network Administrator User Interface 63
Figure 26 Network Access Tab
4 Tick the box beside each rule that is to be associated with the computer.
If the rule is grayed out then the computer is a member of a group which
is already associated with the rule.
A computer can be associated with multiple rules, however only the
highest priority rule associated with the computer will be used for the
RADIUS authorization.
5 Click OK
This completes associating rules with a computer.
Page 64

64 CHAPTER 3: GETTING STARTED
Displaying And Changing The Rules And MAC Address Associated With A Computer
To display and change the rules and MAC addresses associated with a
computer, follow these steps:
1 Either click on Computers in the Tree pane or if you have created
Organizational Units to structure your computers, click on the
organizational units subfolders until you reach the desired unit holding
the computer.
2 Select the computer in the Details pane and right-click. Select Properties.
The Properties dialog window will appear.
3 Select the Network Access tab, a list of rules created with 3Com Network
Access Manager and for which you have read permission will be
displayed in the window, see Figure 26. The tick box indicates how the
rule is to be applied to the computer, see Table 10.
Table 10 Rules Tick Box for A Computer
Tick Box Setting Meaning
Black, not ticked The rule does not apply to this computer
Black, ticked The rule is applied to this computer
Grey, ticked The rule is applied to this computer indirectly through the
computer’s membership of one or more groups that have
the rule specifically applied
4 You can change which of these rules are applied to a computer by either
ticking or removing the tick from rules that are black. To change a rule
that is applied indirectly through a group, see “Displaying And Changing
Rules Associated With A Group”.
A computer can be associated with multiple rules, however only the
highest priority rule associated with the computer will be used for the
RADIUS authorization.
5 Click Apply to apply the changes.
6 Select the MAC Address tab. Enter the 12 digit MAC address of the
computer in the format XX-XX-XX-XX-XX-XX. You can enter up to two
MAC addresses in the fields provided.
To find the MAC address of a PC running Windows, open a command
prompt window (for example click Start>Run then type
ipconfig /all at the prompt. The MAC address is shown as the 12-digit
cmd) and enter
Physical Address.
Page 65

Using The Network Administrator User Interface 65
7 Click OK.
This completes displaying and changing the rules and MAC addresses
associated with a computer.
Creating A New Computer
To add a computer to the system, you will need to use a tool such as the
“Active Directory Users and Computers” administration tool. You cannot
add computers through 3Com Network Access Manager. Follow the
instructions given in the user documentation shipped with Microsoft
Active Directory.
Selecting Appropriate
Permissions For An
Operator
The rules that a Network Operator can apply, can be individually selected
for the operator. For example, one operator may be restricted to blocking
access for specific users, whereas another operator may be allowed to
move users between arbitrary groups.
Selecting the rules that an operator can apply, is achieved through the
securities permission of the rule, see step 7 of “Creating A New Rule”on
page 47. By selecting the name of the operator from the Group or User
name list and ticking the Allow box for both read and write, enables the
network operator to apply the rule. Not ticking the Allow box for read
and write permission will prevent the network operator from applying the
rule.
By using the permissions model, network administrators can decide who
is permitted to apply rules to users, groups and computers to control
network access. In some organizations it may not be appropriate to let
operators have this responsibility.
Security permissions on a rule do not affect the security permissions on
individual users. If a network operator does not have security permission
for particular individuals or groups, for example directors of a company,
then the operator will not be able to apply a rule to that user or group.
Page 66

66 CHAPTER 3: GETTING STARTED
Using The Operator User Interface
Operator Tasks Providing a network operator has been granted appropriate permissions
Network Operators use the standard Active Directory Users and
Computers interface, accessed from Programs>Administrative
Tools>Active Directory Users and Computers. 3Com Network Access
Manager adds a new tab, named Network Access, to the Properties
pages for Users, Groups and Computers. The Network Access tab shows
the network operator each rule that they can apply, if the network
operator does not have permission to apply a rule then it is not displayed.
by the network administrator setting up 3Com Network Access Manager,
a network operator can specify:
■ if a user is allowed access to the network,
■ if a group is allowed access to the network,
■ if a computer (defined by its MAC address) is allowed access to the
network,
■ if a user and/or group and/or computer are allowed access, which
VLAN should they connect to, and what QoS configuration should
they have,
■ if a computer should be isolated from the main network,
■ if a user should be isolated from the main network,
■ if a group should be isolated from the main network,
■ the EFW profile for each user logging into a PC with an EFW installed.
Displaying And Changing Rules Associated With A User
To display and change the rules associated with a user, follow these steps:
1 Click on Users in the Tree pane. The Details pane on the right will list the
users that the Network Operator can manage.
2 Select a user to view and right-click. Select Properties.
The Properties dialog window will appear.
3 Select the Network Access tab, a list of rules associated with the user will
be displayed in the window, see Figure 27. The tick box indicates how the
rule is to be applied to the user, see Table 11.
Page 67

Using The Operator User Interface 67
Figure 27 Changing Rules Associated With A User
Table 11 Rules Tick Box For A User
Tick Box Setting Meaning
Black, not ticked The rule does not apply to this user
Black, ticked The rule is applied to this user
Grey, ticked The rule is applied to this user indirectly through the user’s
membership of one or more groups that have the rule
specifically applied
Page 68

68 CHAPTER 3: GETTING STARTED
4 Change the rules applied to a user by either ticking or removing the tick
from rules that are black. To change a rule that is applied indirectly
through a group, see “Displaying And Changing Rules Associated With A
Group”.
5 Click OK
This completes displaying and changing the rules associated with a user.
Displaying And Changing Rules Associated With A Group
To display and change the rules associated with a group, follow these
steps:
1 Click on Groups in the Tree pane. The Details pane on the right will list all
of the groups that the Network Operator can manage.
2 Select a group to view and right-click. Select Properties.
The Properties dialog window will appear.
3 Select the Network Access tab, a list of rules associated with the group
will be displayed in the window similar to Figure 27. The tick box
indicates how the rule is to be applied to the group, see Table 12.
Table 12 Rules Tick Box for A Group
Tick Box Setting Meaning
Black, not ticked The rule does not apply to this group
Black, ticked The rule is applied to this group
Grey, ticked The rule is applied to this group indirectly through the
group’s membership of one or more groups that have the
rule specifically applied
4 Change the rules applied to a group by either ticking or removing the tick
from rules that are black.
To change the rules applied indirectly through being a member of
another group, select the other group from the Detail pane and apply
steps 1 to 4 above on the other group.
5 Click OK
This completes displaying and changing the rules associated with a
group.
Page 69

Using The Operator User Interface 69
Displaying And Changing The Rule Associated With A Computer
To display and change the rules associated with a computer, follow these
steps:
1 Click on Computers in the Tree pane. The Details pane on the right will
list all of the computers that the Network Operator can manage.
2 Select a computer to view and right-click. Select Properties.
The Properties dialog window will appear.
3 Select the Network Access tab, a list of rules associated with the
computer will be displayed in the window, see Figure 28. The tick box
indicates how the rule is to be applied to the group, see Table 13.
Figure 28 Network Access Tab
Page 70

70 CHAPTER 3: GETTING STARTED
Table 13 Rules Tick Box for A Computer
Tick Box Setting Meaning
Black, not ticked The rule does not apply to this computer
Black, ticked The rule is applied to this computer
Grey, ticked The rule is applied to this computer indirectly through the
4 You can change which of these rules are applied to a computer by either
ticking or removing the tick from rules that are black. To change a rule
that is applied indirectly through a group, see “Displaying And Changing
Rules Associated With A Group”.
5 Click OK
This completes displaying and changing the rules associated with a
computer.
computer’s membership of one or more groups that have
the rule specifically applied
Using The Online Help
Press the F1 key to display the 3Com Network Access Manager online
help from the network administrator interface.
Page 71

4
USING 3COM NETWORK ACCESS MANAGER WITHIN A NETWORK
This chapter provides:
■ six case studies on how 3Com Network Access Manager can be setup
to provide different levels of security on a network.
Case Study Assumptions
All of the case studies described in this chapter assume the following:
■ Microsoft’s Active Directory working with Microsoft's Internet
Authentication Service (IAS) and 3Com Network Access Manager to
provide RADIUS authentication of users and computers in the
network.
■ All authorized users are listed in Active Directory.
■ All users and computers are allocated into their relevant organizational
group, for example Marketing, or Students.
■ The network operator has access to a PC with Windows 2000
Professional or Windows XP Professional installed, and the PC has
Active Directory Users and Computers installed (from the Windows
Server Admin Pack).
Page 72

72 CHAPTER 4: USING 3COM NETWORK ACCESS MANAGER WITHIN A NETWORK
Case Study 1 Controlling User
Access To The
Network
Network
Administrator Tasks
This case study describes the tasks that need to be performed in order to
control user access to the network using IEEE 802.1X. This method of
authentication is based on the user, and does not perform authentication
of the PC (or other client device) being used.
The following provides an overview of the tasks for a network
administrator responsible for the domain on the network.
1 Ensure edge port security is set to IEEE 802.1X on edge ports in the
domain.
Edge ports are called ‘access ports’ on the Switch 5500.
Using 3Com Network Access Manager:
2 Select the Default Rule and set the Network Access to Deny, see
“Changing Rule Properties” in Chapter 3.
3 Create an Authorized Users rule which will allow network access, see
“Creating A New Rule”in Chapter 3.
a Set security permissions for the rule. Grant READ and WRITE access to
the users/groups permitted to apply the rule, grant READ access to all
Network Administrators in the domain to ensure they can see that the
rule exists even if they are not permitted to apply the rule.
b Set the Actions for the rule: select the rule priority, and set Network
Access to Allow, if appropriate select the VLAN, QoS profile and EFW
policy for the rule.
4 Associate the Authorized Users rule with users and groups already listed
in Active Directory
5 Ensure the network operators or those individuals responsible for
applying the Authorized Users rule have the Network Operator
component of 3Com Network Access Manager installed on their PC.
Page 73

Case Study 1 - Controlling User Access To The Network 73
Network Operator
Ta sk s
The following provides an overview of the tasks for a network operator
responsible for controlling user access to the network domain.
On being informed that a specific user or group needs to be granted
access to the network, use the Active Directory Users and Computers
interface to perform the following:
1 Either:
click on Users in the Tree pane, or
if Organizational Units have been created, click on the organizational
units subfolders until you reach the desired unit holding the user or
group.
2 Highlight the specific user or group in the Details pane, and right-click.
Select Properties.
3 Select the Network Access tab from the Properties dialog window.
A list of rules that the operator has permission to apply will be displayed
4 Tick the Authorized Users rule to apply it to the user.
5 Click OK and exit the Active Directory Users and Computers interface.
On being informed that a specific user or group needs to be denied
access to the network, use the Active Directory Users and Computers
interface to perform the following:
1 Either:
click on Users in the Tree pane, or
if Organizational Units have been created, click on the organizational
units subfolders until you reach the desired unit holding the user or
group.
2 Highlight the specific user or group in the Details pane, and right-click.
Select Properties.
3 Select the Network Access tab from the Properties dialog window.
A list of rules that the operator has permission to apply will be displayed
4 Untick the Authorized Users rule.
5 Click OK and exit the Active Directory Users and Computers interface.
Page 74

74 CHAPTER 4: USING 3COM NETWORK ACCESS MANAGER WITHIN A NETWORK
What Happens When
A User Logs In
The following takes place when a user connects and logs into the
network domain.
1 The user’s PC connects to the network and the user logs in with a
username.
2 The IEEE 802.1X client on the PC sends the user’s ID and credentials to
the switch. At this stage, the port on the switch is blocked and the PC
cannot connect to the rest of the network.
3 The switch sends the user's details via RADIUS to IAS.
a If the user is listed in Active Directory, and the Authorized Users rule
has been applied to the user (or a group that the user is a member of),
IAS replies Accept and the switch enables the port.
b If the user is listed in Active Directory, but the Authorized Users rule
has not been applied to the user (or a group that the user is a member
of), then the Default Rule will be applied, IAS replies Reject and the
switch disables the port.
c If the user is not listed in Active Directory, IAS replies Reject and the
switch disables the port.
Page 75

Case Study 2 - Restricting Network Access To Known Computers 75
Case Study 2 Restricting Network
Access To Known
Computers
Network
Administrator Tasks
This case study describes the tasks that need to be performed in order to
restrict network access to known computers, using MAC-address based
authentication.
It is an example of “block-by-default” or a white-list mode, where the
device needs to be listed in the RADIUS server before it is allowed access
to the network. This mode relies solely on authenticating the MAC
address of each attached device. Non-user devices (for example printers
and servers) can still connect to the network, while the network blocks
rogue devices, such as unknown wireless access devices. This mode does
not require user authentication and hence does not provide any network
protection against unauthorized user login.
The following provides an overview of the tasks for a network
administrator responsible for the domain on the network.
1 Ensure edge port security is set to MAC-address based authentication (or
RADA) on edge ports in the domain.
Edge ports are called ‘access ports’ on the Switch 5500.
Using 3Com Network Access Manager:
2 Select the Default Rule and set the Network Access to Deny, see
“Changing Rule Properties” in Chapter 3.
3 Create an Authorized Computers rule which will allow network access,
see “Creating A New Rule”in Chapter 3.
a Set security permissions for the rule. Grant READ and WRITE access to
the users/groups permitted to apply the rule, grant READ access to all
Network Administrators in the domain to ensure they can see that the
rule exists even if they are not permitted to apply the rule.
b Set the Actions for the rule: select the rule priority, and set Network
Access to Allow, if appropriate select the VLAN, QoS profile and EFW
policy for the rule.
4 Enter the MAC addresses for all devices in the domain. For information
on entering MAC addresses, see “Entering MAC Addresses For A
Computer”.
5 Create a new group which will hold the computers that are allowed
access, see “Creating A New Group” in Chapter 3.
Page 76

76 CHAPTER 4: USING 3COM NETWORK ACCESS MANAGER WITHIN A NETWORK
6 Associate the Authorized Computers rule created in step 3 with the
group created in step 5.
a Highlight the specific group in the Details pane, and right-click. Select
Properties.
b Select the Network Access tab from the Properties dialog window.
c Tick the Authorized Computers rule. Click OK.
7 Associate the computers that are permitted network access with the
group created in step 5.
8 If required, create an Unauthorized Computers rule to deny network
access, which a network operator can apply to specific computers when
necessary. Ensure the network operator responsible for applying this rule
has the Network Operator component of 3Com Network Access
Manager installed on their PC.
An Unauthorized Computers rule must have a higher priority than the
Authorized Computers rule in order to override the Authorized
Computers rule.
9 Maintain the list of computers in Active Directory, ensuring all known
computers are listed in Active Directory with their MAC addresses
specified.
Network Operator
Ta sk s
The network operator cannot enter the MAC address for a computer.
However, once the computer’s MAC address has been entered, the
operator can apply any rules to the computer or change the rules applied
to the computer if they have been given write permission for the rule.
On being informed that a specific PC can be granted network access, use
the Active Directory Users and Computers interface to perform the
following:
1 Either:
click on Computers in the Tree pane, or
if Organizational Units have been created, click on the organizational
units subfolders until you reach the desired unit holding the PC.
2 Highlight the specific PC, and right-click. Select Properties.
3 Select the Network Access tab from the Properties dialog window.
A list of rules that the operator has permission to apply will be displayed
4 Tick the Authorized Computers rule to apply it to the PC.
Page 77

Case Study 2 - Restricting Network Access To Known Computers 77
5 Click OK and exit the Active Directory Users and Computers interface.
On being informed that a specific PC needs to be denied access to the
network, use the Active Directory Users and Computers interface to
perform the following:
1 Either:
click on Computers in the Tree pane, or
if Organizational Units have been created, click on the organizational
units subfolders until you reach the desired unit holding the PC.
2 Highlight the specific PC in the Details pane, and right-click. Select
Properties.
3 Select the Network Access tab from the Properties dialog window.
A list of rules that the operator has permission to apply will be displayed
4 Tick the Unauthorized Computers rule.
5 Click OK and exit the Active Directory Users and Computers interface.
What Happens The following takes place when a device connects to the network.
1 The PC connects to the network
2 The switch sends the MAC address of the PC via RADIUS to IAS
a If the PC is listed in Active Directory, and the Authorized Computers
rule has been applied to the PC, IAS replies Accept and the switch
enables the port.
b If the PC is listed in Active Directory, but either the Default Rule or the
Unauthorized Computers rule is applied to the PC, IAS replies Reject
and the switch disables the port.
c If the PC is not listed in Active Directory, IAS replies Reject and the
switch disables the port.
Page 78

78 CHAPTER 4: USING 3COM NETWORK ACCESS MANAGER WITHIN A NETWORK
Case Study 3 Blocking A Specific
PC From The
Network
Network
Administrator Tasks
This case study describes the tasks that need to be performed in order to
block a specific PC from the network, using MAC-address based
authentication. It is an example of a Blacklist mode in which all devices
are allowed network access unless the device is on the blacklist. This is
useful in very large networks where you just want to block access to
specific PCs.
The following provides an overview of the tasks for a network
administrator responsible for the domain on the network.
1 Ensure edge port security is set to MAC-address based authentication on
edge ports in the domain.
Edge ports are called ‘access ports’ on the Switch 5500.
Using 3Com Network Access Manager:
2 Select the Default Rule and set the Network Access to Allow, see
“Changing Rule Properties” in Chapter 3.
3 Create a Blacklist rule which can be used to deny network access to
specific computers.
a Set security permissions for the Blacklist rule. Grant READ and WRITE
access to the users/groups permitted to apply the rule, grant READ
access to all Network Administrators in the domain to ensure they can
see that the rule exists even if they are not permitted to apply the rule.
b Set the Actions for the rule:
select the rule priority, a Blacklist rule should be assigned a high
priority to ensure it takes precedence over other rules
set Network Access for the Blacklist rule to Deny to block network
access,
4 Ensure the network operators or those individuals responsible for
applying the Blacklist rule have the Network Operator component of
3Com Network Access Manager installed on their PC.
Page 79

Case Study 3 - Blocking A Specific PC From The Network 79
When a PC needs to be blacklisted:
1 Enter the MAC address for the computer that needs to be blacklisted. For
information on entering MAC addresses, see “Entering MAC Addresses
For A Computer”in Chapter 3.
2 Associate the Blacklist rule with the computer, see “Associating Rules
With A Computer” in Chapter 3.
Network Operator
Ta sk s
The network operator cannot enter the MAC address for a computer.
However, the operator can apply the Blacklist rule to a specific computer
once the computer’s MAC address has been entered. The operator can
also remove the computer from the blacklist if circumstances require it.
On being informed that a specific PC needs to be denied access to the
network, use the Active Directory Users and Computers interface to
perform the following:
1 Either:
click on Computers in the Tree pane, or
if Organizational Units have been created, click on the organizational
units subfolders until you reach the desired unit holding the computer.
2 Highlight the specific device in the Details pane, and right-click. Select
Properties.
3 Select the Network Access tab from the Properties dialog window.
A list of rules that the operator has permission to apply will be displayed.
4 Tick the Blacklist rule to apply it to the PC.
5 Click OK and exit the Active Directory Users and Computers interface
On being informed that a specific PC can be removed from the Blacklist,
use the Active Directory Users and Computers interface to perform the
following:
1 Either:
click on Computers in the Tree pane, or
if Organizational Units have been created, click on the organizational
units subfolders until you reach the desired unit holding the computer.
2 Highlight the specific device, and right-click. Select Properties.
3 Select the Network Access tab from the Properties dialog window.
Page 80

80 CHAPTER 4: USING 3COM NETWORK ACCESS MANAGER WITHIN A NETWORK
A list of rules that the operator has permission to apply will be displayed.
4 Untick the Blacklist rule applied to the PC.
5 Click OK and exit the Active Directory Users and Computers interface.
What Happens The following takes place when a PC connects to the network.
1 The PC connects to the network.
2 The switch sends the MAC address of the PC via RADIUS to IAS,
a If the PC is on the Blacklist, IAS replies Reject and the switch disables
the port,
b If the PC is not on the Blacklist and the Default Rule was set to Allow
network access, IAS replies Accept and the switch enables the port.
Page 81

Case Study 4 - Hot Desking 81
Case Study 4 - Hot Desking
Network
Administrator Tasks
Combining Auto VLAN with IEEE 802.1X enables users to login anywhere
on the network, and always have access to their network (for example,
the Engineering VLAN, or Marketing VLAN). This makes hot-desking
viable, as users can change desks and still gain access to their network.
The following provides an overview of the tasks for a network
administrator responsible for the domain on the network.
1 Ensure edge port security is set to IEEE 802.1X and Auto VLAN is enabled,
on edge ports in the domain.
Edge ports are called ‘access ports’ on the Switch 5500.
Using 3Com Network Access Manager:
2 Decide how you want to apply the Default Rule. You can use the Default
Rule to either:
deny access to unspecified users, or
allow access to users who are not hot desking and who do not require
VLAN and QoS assignments.
3 Select the Default Rule and set the Network Access to either Deny or
Allow, according to your decision in step 2
4 Create VLANs and QoS profiles. Use the same VLAN IDs and QoS profile
IDs as set up in the network access device (switch or wireless access
point), otherwise the network access device may not accept the RADIUS
response.
5 Create rules to support the assignment of a VLAN and QoS profile to
those users and groups permitted to log in. For example, in a school the
following rules could be created: Staff, Student, SysAdmin.
a Set security permissions for each rule. Grant READ and WRITE access
to the users/groups permitted to apply the rule, grant READ access to
all Network Administrators in the domain to ensure they can see that
the rule exists even if they are not permitted to apply the rule.
b Set the Actions for each rule:
select the rule priority,
set Network Access for the rule, to Allow to permit access to the
network,
Page 82

82 CHAPTER 4: USING 3COM NETWORK ACCESS MANAGER WITHIN A NETWORK
select the VLAN ID, QoS profile and EFW policy (if appropriate) for
each rule.
6 Associate the new rules with users and groups already listed in Active
Directory.
7 Ensure the network operators or those individuals responsible for
applying the rules have the Network Operator component of 3Com
Network Access Manager installed on their PC.
Network Operator
Ta sk s
What Happens When
A User Logs In
The following provides an overview of the tasks for a network operator
responsible for controlling user access to the network domain.
On being informed that a user or group needs to be granted access to a
particular VLAN on the network, use the Active Directory Users and
Computers interface to perform the following:
1 Either:
click on Users in the Tree pane, or
if Organizational Units have been created, click on the organizational
units subfolders until you reach the desired unit holding the user or
group.
2 Highlight the user or group, and right-click. Select Properties.
3 Select the Network Access tab from the Properties dialog window.
A list of rules that the operator has permission to apply will be displayed.
4 Identify the rule that will enable the user to access the particular VLAN,
and tick the rule to apply it to the user.
5 Click OK and exit the Active Directory Users and Computers interface.
The following takes place when a user connects and logs into the
network domain.
1 The user’s PC connects to the network and the user logs in with a
username.
2 The IEEE 802.1X client on the PC sends the user’s ID and credentials to
the switch. At this stage, the port on the switch is blocked and the PC
cannot connect to the rest of the network.
3 The switch sends the user's details via RADIUS to IAS.
Page 83

Case Study 4 - Hot Desking 83
a If the user is listed in Active Directory, and the new rule allowing
access and assigning VLAN and QoS profile has been applied to the
user (or a group that the user is a member of), IAS replies Accept with
the VLAN ID and QoS profile for that user. The switch enables the port
and configures the VLAN and QoS profile of the port as specified.
b If the user is listed in Active Directory, but the new rule was not
applied, then if the Default Rule was set to Allow, IAS replies Accept
and the switch enables the port, otherwise if the Default Rule was set
to Deny, IAS replies Reject and the switch disables the port.
c If the user is not listed in Active Directory, IAS replies Reject and the
switch disables the port.
Page 84

84 CHAPTER 4: USING 3COM NETWORK ACCESS MANAGER WITHIN A NETWORK
Case Study 5 Removing Infected
Devices From The
Network
Network
Administrator Tasks
Combining Auto VLAN with MAC-address based authentication enables
infected PCs to be moved to a separate network, until the network
administrator has removed any viruses or worms.
The following provides an overview of the tasks for a network
administrator responsible for the domain on the network.
1 Ensure edge port security is set to MAC-address based authentication (for
example RADA-Else-Network Login) and Auto VLAN is enabled, on edge
ports in the domain.
Edge ports are called ‘access ports’ on the Switch 5500.
Using 3Com Network Access Manager:
2 Select the Default Rule and set the Network Access to Allow, see
“Changing Rule Properties” in Chapter 3.
3 Create VLANs and QoS profiles. Use the same VLAN IDs and QoS profile
IDs as set up in the network access device (switch or wireless access
point), otherwise the network access device may not accept the RADIUS
response.
4 Decide which VLAN will be the Isolation VLAN.
5 Create an Isolation rule.
a Set security permissions for the Isolation rule. Grant READ and WRITE
access to the users/groups permitted to apply the rule, grant READ
access to all Network Administrators in the domain to ensure they can
see that the rule exists even if they are not permitted to apply the rule.
b Set the Actions for the Isolation rule:
■ select the rule priority, an Isolation rule should have a high priority
to ensure it takes precedence over other rules,
■ set Network Access to Allow,
■ select the VLAN ID of the Isolation VLAN.
6 Ensure the network operators or those individuals responsible for
applying the rule have the Network Operator component of 3Com
Network Access Manager installed on their PC.
Page 85

Case Study 5 - Removing Infected Devices From The Network 85
When a PC needs to be isolated for the first time:
1 Enter the MAC address for the computer that needs to be removed from
the network. For information on entering MAC addresses, see “Entering
MAC Addresses For A Computer”in Chapter 3.
2 Associate the Isolation rule with the computer, see “Associating Rules
With A Computer” in Chapter 3.
Network Operator
Ta sk s
The network operator cannot enter the MAC address for a computer.
However, once the computer’s MAC address has been entered, the
operator can apply the Isolation rule to the computer if they have been
given write permission for the rule. The operator can also reconnect the
computer to the main network once the network administrator has
removed any viruses or worms.
On being informed that a specific PC needs to be isolated again, use the
Active Directory Users and Computers interface to perform the following:
1 Click on Computers in the Tree pane,
2 Highlight the specific PC, and right-click. Select Properties.
3 Select the Network Access tab from the Properties dialog window.
A list of rules that the operator has permission to apply will be displayed.
4 Tick the Isolation rule to apply it to the PC.
5 Click OK and exit the Active Directory Users and Computers interface.
On being informed that a specific PC can be returned to the normal
network, use the Active Directory Users and Computers interface to
perform the following:
1 Click on Computers in the Tree pane,
2 Highlight the specific PC, and right-click. Select Properties.
3 Select the Network Access tab from the Properties dialog window.
A list of rules that the operator has permission to apply will be displayed
4 Untick the Isolation rule applied to the PC.
5 Click OK and exit the Active Directory Users and Computers interface.
Page 86

86 CHAPTER 4: USING 3COM NETWORK ACCESS MANAGER WITHIN A NETWORK
What Happens The following takes place when a PC connects to the network.
1 The switch checks the MAC address of the PC with Active Directory.
a If the PC is on the Isolation list, IAS replies Accept with the VLAN ID of
the Isolation Network. The switch enables the port and configures the
VLAN of the port to be in the Isolation Network.
b If the PC is unknown the Default Rule is applied, IAS replies Accept
and the switch enables the port.
Page 87

Case Study 6 - Combining Hot Desking With Host Filtering 87
Case Study 6 Combining Hot
Desking With Host
Filtering
Network
Administrator Tasks
This case study describes the tasks that need to be performed in order to
set up hot desking with the ability to filter out specific hosts. This
configuration allows infected PCs to be isolated regardless of where the
user has connected to the network in a hot desking office environment.
The method combines MAC-address based authentication with IEEE
802.1X authentication and Auto VLAN.
The following provides an overview of the tasks for a network
administrator responsible for the domain on the network.
1 Ensure edge port security is set to MAC-address based authentication (or
RADA) And IEEE 802.1X, and Auto VLAN is enabled.
Edge ports are called ‘access ports’ on the Switch 5500.
Using 3Com Network Access Manager:
2 Create VLANs and QoS profiles. Use the same VLAN IDs and QoS profile
IDs as set up in the network access device (switch or wireless access
point), otherwise the network access device may not accept the RADIUS
response.
3 Decide which VLAN will be the Isolation VLAN.
4 Create an Isolation rule.
a Set security permissions for the Isolation rule. Grant READ and WRITE
access to the users/groups permitted to apply the rule, grant READ
access to all Network Administrators in the domain to ensure they can
see that the rule exists even if they are not permitted to apply the rule.
b Set the Actions for the Isolation rule:
■ select the rule priority, an Isolation rule should have a high priority
to ensure it takes precedence over other rules,
■ set Network Access to Allow,
select the VLAN ID of the Isolation VLAN.
5 Ensure the network operators or those individuals responsible for
applying the rules have the Network Operator component of 3Com
Network Access Manager installed on their PC.
Page 88

88 CHAPTER 4: USING 3COM NETWORK ACCESS MANAGER WITHIN A NETWORK
When a PC needs to be isolated for the first time:
1 Enter the MAC address for the computer that needs to be removed from
the network. For information on entering MAC addresses, see “Entering
MAC Addresses For A Computer”in Chapter 3.
2 Associate the Isolation rule with the computer, see “Associating Rules
With A Computer” in Chapter 3.
Network Operator
Ta sk s
The network operator cannot enter the MAC address for a computer.
However, once the computer’s MAC address has been entered, the
operator can apply the Isolation rule to the computer if they have been
given write permission for the rule. The operator can also reconnect the
computer to the main network once the network administrator has
removed any viruses or worms.
On being informed that a specific PC needs to be isolated again, use the
Active Directory Users and Computers interface to perform the following:
1 Click on Computers in the Tree pane,
2 Highlight the specific PC, and right-click. Select Properties.
3 Select the Network Access tab from the Properties dialog window.
A list of rules that the operator has permission to apply will be displayed.
4 Tick the Isolation rule to apply it to the PC.
5 Click OK and exit the Active Directory Users and Computers interface.
On being informed that a specific PC can be returned to the normal
network, use the Active Directory Users and Computers interface to
perform the following:
1 Click on Computers in the Tree pane,
2 Highlight the specific PC, and right-click. Select Properties.
3 Select the Network Access tab from the Properties dialog window.
A list of rules that the operator has permission to apply will be displayed.
4 Untick the Isolation rule applied to the PC.
5 Click OK and exit the Active Directory Users and Computers interface.
Page 89

Case Study 6 - Combining Hot Desking With Host Filtering 89
What Happens When
A User Logs In
The following takes place when a user connects and logs into the
network domain.
1 The switch checks both the PC and the user with Active Directory.
2 If the Isolation rule has been applied to the PC, IAS replies Accept with
the VLAN ID of the Isolation Network. The switch enables the port and
configures the VLAN of the port as specified.
3 Otherwise, if the user is listed, IAS replies Accept with the VLAN ID for
that user (determined by the current rule applied to the user, or if the user
is assigned to a group then the current rule applied to the group). The
switch enables the port and configures the VLAN of the port as specified.
4 Else, if the user is not listed, IAS replies Reject and the switch disables the
port.
Page 90

90 CHAPTER 4: USING 3COM NETWORK ACCESS MANAGER WITHIN A NETWORK
Page 91

5
PROBLEM SOLVING
This chapter covers:
■ checking the Windows Event Viewer for obvious problems,
■ resolving problems related to setting up 3Com Network Access
Manager.
Checking the Event Viewer
If you experience network access or RADIUS authentication problems on
your network, first check the Windows Event Viewer to see whether the
problem can be readily identified and corrected.
Follow these steps:
1 Select Control Panel>Administrative Tools>Event Viewer.
2 Select System from the Tree pane, and review the events in the log in the
right hand pane, see Figure 29. IAS in the Source column indicates an
event was generated by IAS. Use the information in the log to determine
the reason an IAS connection attempt was either rejected or discarded.
Click on any event to display more information about the event.
3 Select 3Com Network Access Manager from the Tree pane, see Figure 30.
Review the events in the 3Com Network Access Manager log to
determine whether 3Com Network Access Manager has been set up
correctly. Click on any event to display more information about that
event, Figure 31 shows computer ‘S4400-45080’ granted network access
to VLAN 2 with QoS Profile ID q2.
Page 92

92 CHAPTER 5: PROBLEM SOLVING
Figure 29 System Event Log
Figure 30 3Com Network Access Manager Authorization Log
Page 93

Figure 31 Event detail
Checking the Event Viewer 93
Identifying Where
The Problem Lies
3Com Network Access Manager is dependent on IAS. A problem with
3Com Network Access Manager may be caused by an underlying issue
with IAS. If that is the case then it will be IAS that logs an event and not
3Com Network Access Manager. In these instances you should view the
event detail in the system event log, determine the cause of the problem
and then resolve the issue.
Page 94

94 CHAPTER 5: PROBLEM SOLVING
Problems Related to Setting Up
This section details possible problems that you might experience when
setting up and using 3Com Network Access Manager. Each problem is
described by a symptom, an explanation of the cause of the problem and
a suggestion on what to do to remedy the problem.
The problems are listed in two tables: Table 14 covers problems that you
may experience when initially setting up 3Com Network Access Manager,
Table 15 lists possible problems related to network access.
Table 14 Problems That May Be Encountered When Setting Up
Symptom Cause Remedy
Cannot find 3Com
Network Access
Manager Admin on the
PC used by a Network
Administrator.
3Com Network Access
Manager does not
allow you to create
rules/ VLANs/QoS
Profiles/ EFW Policies.
When trying to create a
rule/ VLAN/ QoS Profile/
EFW Policy the
following message is
displayed: “Unable to
create item. This may
be because an item
with this name already
exists or because of
security permission”.
The Administration User Interface
component has not been installed on the
Network Administrator’s PC.
Either:
You do not have Administrator privileges or
are not using the 3Com Network Access
Manager Admin tool.
Or:
The Active Directory component for 3Com
Network Access Manager has not been
installed on an Active Directory server in
the network domain.
Or:
Changes to the Active Directory schema
have not replicated to all Active Directory
servers in the domain.
Check that the Network Administrator’s
PC meets the specifications in Table 5 and
Table 6, in Chapter 2, install the
Administration User Interface component
on the PC.
Use the 3Com Network Access Manager
Admin tool to access the Network
Administrator User Interface.
Ensure you have appropriate
Administrator permissions.
Ensure the Active Directory component is
installed on one Active Directory server in
the domain.
If you have already installed the Active
directory component on an Active
Directory server in the domain, then you
may need to wait for the schema changes
to replicate to the other Active Directory
servers in the domain.
The Network Access
tab, accessible by
right-clicking Users or
Groups or Computers
in the Tree pane and
selecting Properties,
does not display all
rules created in 3Com
Network Access
Manager
You have not been granted read
permission for the rules which are not
displayed.
Ask the network administrator who
created the rules in 3Com Network Access
Manager to grant you read permission for
the specific rules.
Page 95

Problems Related to Setting Up 95
Table 14 Problems That May Be Encountered When Setting Up (continued)
Symptom Cause Remedy
Clicking on Rules in the
Tree pane displays an
empty Display pane.
Note: After correct
installation the Default
Rule will always be
shown in the Display
pane
Using the Network
Administrator user
interface, right-clicking
Users or Groups or
Computers in the Tree
pane and selecting
Properties does not
display a Network
Access tab.
The Current Rule
column in the Details
pane for Users, Group
or Computers, shows
“Not specified” for all
entries
Either:
The Active Directory component for 3Com
Network Access Manager has not been
installed on an Active Directory server in
the network domain.
Or:
Changes to the Active Directory schema
have not replicated to all Active Directory
servers in the domain.
The Active Directory component for 3Com
Network Access Manager has either not
been installed on an Active Directory server
in the network domain, or else has not yet
replicated to all of the Active Directory
servers in the domain
Ensure the Active Directory component for
3Com Network Access Manager is
installed on one Active Directory server in
the domain.
If you have already installed the Active
directory component on an Active
Directory server in the domain, then you
may need to wait for the schema changes
to replicate to the other Active Directory
servers in the domain, this may take some
time. Alternatively, you can ‘force’
replication between Active Directory
servers, consult the Microsoft
documentation for further information.
If you have not installed the Active
Directory component for 3Com Network
Access Manager, then install the
component on one Active Directory server
in the domain. The schema changes made
by the component will be replicated to all
of the Active Directory servers in the
domain.
If you have already installed the Active
directory component on an Active
Directory server in the domain, then you
may need to wait for the schema changes
to replicate to the other Active Directory
servers in the domain. Alternatively, you
can ‘force’ replication between Active
Directory servers, consult the Microsoft
documentation for further information.
"Computer-name =
<unknown>” is logged
in the 3Com Network
Access Manager event
log following an
authentication attempt
from this computer.
This is probably due to the computer’s
MAC address not having been entered into
3Com Network Access Manager.
Follow the steps in “Entering MAC
Addresses For A Computer” in Chapter 3.
Page 96

96 CHAPTER 5: PROBLEM SOLVING
Table 14 Problems That May Be Encountered When Setting Up (continued)
Symptom Cause Remedy
On a PC used by a
Network Operator,
selecting Active
Directory Users and
The Operator User Interface component
has not been installed on the Network
Operator’s PC.
Check that the Network Operator’s PC
meets the specifications in Table 5 and
Table 6 in Chapter 2, install the Operator
User Interface component on the PC
Computers, then
right-clicking Users or
Computers in the Tree
pane and selecting
Properties does not
display a Network
Access tab
Table 15 Possible Problems With Network Access
.
Symptom Cause Remedy
Incorrect RADIUS
authorizations within
the network domain
Either:
You have not installed the IAS component
for 3Com Network Access Manager on all
of the IAS servers in the domain, or else
you have not restarted the servers after
installation of the component.
Or:
You have not correctly set up a Remote
Access Policy.
Identify the IAS server(s) issuing the
incorrect RADIUS authorizations.
For each IAS server suspected of issuing
incorrect RADIUS authorizations use the
Event Viewer to check for correct
functionality of the server.
From the Tree pane of Event Viewer, select
System Log and look at the IAS responses
in the Display pane, this will show the
Policy that was used for each
authorization from the server.
From the Tree pane, select 3Com Network
Access Manager Log.
If 3Com Network Access Manager Log is
not displayed in the Tree pane, then 3Com
Network Access Manager has not been
installed on the specific IAS server, or the
IAS server has not been restarted after
installation. Rectify as appropriate.
If clicking on 3Com Network Access
Manager Log shows an empty Display
pane, then 3Com Network Access
Manager is installed on the server but the
Remote Access Policy is not configured
correctly. Refer to Appendix A for step by
step instructions on correctly setting up a
Remote Access policy.
Page 97

Problems Related to Setting Up 97
Table 15 Possible Problems With Network Access (continued)
Symptom Cause Remedy
The expected rules for
a computer are not
applied.
An event shown in the
System event log
displays the message:
“Computer-Name =
<unknown>”
Unpredictable RADIUS
authentication of a
user, group or
computer.
A user, group or
computer associated
with a specific rule
cannot gain network
access.
The computer’s MAC address has not been
entered correctly into 3Com Network
Access Manager.
The computer’s MAC address has not been
entered correctly into 3Com Network
Access Manager
The authentication mode enabled on the
network access device may be incompatible
with the settings on the Action tab for the
rule associated with the user, group or
computer
Either:
The rule may be set to Deny network
access.
Or:
The VLAN ID applied to the rule may not
match the VLAN ID in the network access
device (switch or wireless access point).
Or:
The user or computer does not have
remote access permission enabled.
Or:
The user’s password is not stored using
reversible encryption.
Follow the steps in “Entering MAC
Addresses For A Computer” in Chapter 3.
Follow the steps in “Entering MAC
Addresses For A Computer” in Chapter 3.
Ensure the authentication mode selected
on the network access device matches
how the rule has been setup. Either
change the rule setting or else select a
different authentication mode on the
network access device
Select the Action tab for the rule and
check the network access setting.
The network access setting may be set to
Deny for a purpose, for example to
blacklist a user or group and prevent
network access.
Ensure the VLAN ID set for the rule,
matches the ID assigned to the VLAN in
the network access device. Refer to the
user documentation shipped with the
network access device for information on
determining the VLAN ID assigned in the
network access device.
From the Dial-in tab (accessible by
right-clicking Users or Groups or
Computers in the Tree pane and selecting
Properties) under Remote Access
Permission, select "Allow access".
From the Account tab (accessible by
right-clicking Users or Groups or
Computers in the Tree pane and selecting
Account) under Account options, enable
"Store password using reversible
encryption".
Page 98

98 CHAPTER 5: PROBLEM SOLVING
Table 15 Possible Problems With Network Access (continued)
Symptom Cause Remedy
The Network Access
tab, accessible by
right-clicking Users or
Groups or Computers
in the Tree pane and
selecting Properties
does not show the
actual rule being
applied to the user,
group or computer.
The Current Rule
column for User View,
and Computer View
does not show the
actual rule being
applied to the user or
computer.
The 3Com Network
Access Manager Log
shows a request as
being accepted
(displays
3ComAuthorization in
the Source column),
but user cannot gain
network access.
You may not have been granted read
permission for the rule which is actually
being applied to the user, group or
computer. In which case the rule will not be
listed for you.
It is important that network administrators
responsible for resolving network access
problems are given read access on all rules
created in 3Com Network Access Manager.
You may not have been granted read
permission for the rule which is actually
being applied to the user, group or
computer. In which case the rule will not be
listed for you.
It is important that network administrators
responsible for resolving network access
problems are given read access on all rules
created in 3Com Network Access Manager
Either:
The VLAN ID applied to the rule associated
with the user may not match the VLAN ID
in the network access device that the user
connects to.
Or:
The authentication mode enabled on the
network access device may be incompatible
with the settings on the Action tab for the
rule associated with the user, group or
computer.
Ask the network administrator who
created the rules in 3Com Network Access
Manager to grant you read permission for
all rules.
Ask the network administrator who
created the rules in 3Com Network Access
Manager to grant you read permission for
all rules.
Ensure the VLAN ID set for the rule,
matches the ID assigned to the VLAN in
the network access device. Refer to the
user documentation shipped with the
network access device for information on
determining the VLAN ID assigned in the
network access device.
Ensure the authentication mode selected
on the network access device matches
how the rule has been setup. Either
change the rule setting or else select a
different authentication mode on the
network access device.
Entry in system event
log displays message:
“A RADIUS message
was received from
invalid RADIUS client IP
address xx.xx.xx.xx”,
and no response is
returned to the device.
There may be a delay
before the user is
informed of a log-in
failure.
A network access device (switch or wireless
access point) has not been added to IAS.
Add the network access device to IAS as a
radius client with the client-vendor
parameter set to ‘3Com’.
Page 99

Problems Related to Setting Up 99
Table 15 Possible Problems With Network Access (continued)
Symptom Cause Remedy
Incorrect EFW Policy is
used for an EFW user
Either:
Active Directory has not been updated with
changes which affect the EFW Policy
applied to the user.
Or:
There is a mismatch in configuration
between Active Directory and the EFW
Policy Server,
Or:
The EFW Policy has not been entered into
3Com Network Access Manager, or the
EFW policy is not being used by a rule.
Press Recalculate EFW Membership
button.
Verify that the EFW Policy entered into
3Com Network Access Manager exists on
the EFW Policy Server.
Enter the EFW Policy information and
assign to appropriate rule(s).
Page 100

100 CHAPTER 5: PROBLEM SOLVING
 Loading...