

Page 1

ONcore 12-Port 25 Mbps ATM I/O Module
Installation and User's Guide
Document Number: 17-00899-1
August 1996
Model Number: 6412M-25-TP
3Com Corporation
118 Turnpike Road
Southborough, MA 01772-1886
U.S.A.
(508) 460-8900
FAX: (508) 460-8950
Page 2

Federal Communications Commission Notice
This equipment was tested and found to comply with the limits for a Class
A digital device, pursuant to Part 15 of the FCC Rules. These limits are
designed to provide reasonable protection against harmful interference
when the equipment is operated in a commercial environment. This
equipment generates, uses, and can radiate radio frequency energy and, if
not installed and used in accordance with the instruction manual, may
cause harmful interference to radio communications. Operation of this
equipment in a residential area is likely to cause harmful interference, in
which case you must correct the interference at your own expense.
Canadian Emissions Requirements
This Class A digital apparatus meets all requirements of the Canadian
Interference-Causing Equipment Regulations.
Cet appareil numérique de la classe A respecte toutes les exigences du
Règlement sur le matériel brouilleur du Canada.
EMC Directive Compliance
This equipment was tested and conforms to the Council Directive
89/336/EEC for electromagnetic compatibility. Conformity with this directive
is based upon compliance with the following harmonized standards:
EN 55022 – Limits and Methods of Measurement of Radio Interference
EN 50082-1 – Electromagnetic Compatibility Generic Immunity
Standard: Residential, Commercial, and Light Industry
Warning:
a domestic environment, this product may cause radio interference, in
which case you may be required to take adequate measures.
When used with shielded cables, this product complies with Class B
emissions levels.
ii 25 Mbps ATM Module - Installation and User's Guide
When used with unshielded cables, this is a Class A product. In
Page 3

VCCI Class 1 Compliance
This equipment is in the 1st Class category (information equipment to be
used in commercial or industrial areas) and conforms to the standards set
by the Voluntary Control Council for Interference by Information Technology
Equipment aimed at preventing radio interference in commercial or
industrial areas.
Consequently, when the equipment is used in a residential area or in an
adjacent area, radio interference may be caused to radio and TV receivers,
and so on.
Read the instructions for correct handling.
Disclaimer
The information in this document is subject to change without notice and
should not be construed as a commitment by 3Com Corporation. 3Com
Corporation assumes no responsibility for any errors that may appear in
this document.
Copyright Statement
1996 by 3Com Corporation. All rights reserved. The information
contained herein is the exclusive and confidential property of 3Com
Corporation. No part of this manual may be disclosed or reproduced in
whole or in part without permission from 3Com Corporation.
iii
Page 4

Trademarks
Because of the nature of this material, numerous hardware and software
products are mentioned by name. In most, if not all cases, these product
names are claimed as trademarks by the companies that manufacture the
products. It is not our intent to claim these names or trademarks as our
own.
CELLplex is a trademark, and 3Com and ONcore registered trademarks of
3Com Corporation.
IBM and Nways are trademarks or service marks of the IBM Corporation in
the United States or other countries.
iv 25 Mbps ATM Module - Installation and User's Guide
Page 5

Contents
Chapter 1. Overview . . . . . . . . . . . . . . . . . . . . . . . . . . . . 1-1
6412M-25-TP Module Features ....................... 1-1
Module Functions . . . . . . . . . . . . . . . . . . . . . . . . . . . . . 1-3
Interfaces Supported . . . . . . . . . . . . . . . . . . . . . . . . . . . 1-3
Using the 6412M-25-TP Module for ATM Campus Networking .... 1-4
Chapter 2. Installation . . . . . . . . . . . . . . . . . . . . . . . . . . . 2-1
Before You Unpack the Module ...................... 2-1
Unpacking the Module ............................ 2-2
Installation Summary . . . . . . . . . . . . . . . . . . . . . . . . . . . . . 2-3
Installation . . . . . . . . . . . . . . . . . . . . . . . . . . . . . . . . . . . 2-4
Installing the Module in an ONcore Hub ................ 2-4
Installing the Module in a CELLplex 4000 Expansion Unit ...... 2-7
Connecting ATM Devices ......................... 2-10
Cabling Up . . . . . . . . . . . . . . . . . . . . . . . . . . . . . . . . 2-10
Connecting Devices to the ATM Ports ................ 2-13
Cables, Pins and Connectors ..................... 2-15
Chapter 3. Configuration . . . . . . . . . . . . . . . . . . . . . . . . . 3-1
Configuring Port Parameters ....................... 3-1
Displaying Configuration Settings ..................... 3-3
Module Information . . . . . . . . . . . . . . . . . . . . . . . . . . . . 3-3
Port Information . . . . . . . . . . . . . . . . . . . . . . . . . . . . . . 3-5
Saving Configuration Settings ....................... 3-5
Connecting the Module to the Network ................. 3-6
Verifying Module Operation ......................... 3-7
Front Panel . . . . . . . . . . . . . . . . . . . . . . . . . . . . . . . . . . 3-8
Chapter 4. Troubleshooting . . . . . . . . . . . . . . . . . . . . . . . 4-1
Verifying LED Operation ........................... 4-1
Port Status LED Does Not Light Green or Is Blinking When Idle ... 4-2
Port Status LED Does Not Light Yellow During Traffic ......... 4-5
When the Reset LED Is ON or Starts Blinking .............. 4-7
Contents v
Page 6

When the Wrong Slot LED Is ON (ONcore only) ............. 4-8
Determining the Failing Component Using a Wrap Test ........ 4-9
Replacing 6412M-25-TP Modules .................... 4-10
Appendix A. Technical Specifications . . . . . . . . . . . . . . . . . A-1
General Specifications . . . . . . . . . . . . . . . . . . . . . . . . . . . . A-1
Electrical Specifications . . . . . . . . . . . . . . . . . . . . . . . . . . . A-1
Environmental Specifications . . . . . . . . . . . . . . . . . . . . . . . . A-1
Mechanical Specifications . . . . . . . . . . . . . . . . . . . . . . . . . . A-2
Appendix B. ATM Components . . . . . . . . . . . . . . . . . . . . . B-1
Appendix C. Technical Support . . . . . . . . . . . . . . . . . . . . . C-1
Online Technical Services .......................... C-1
3Com Bulletin Board Service ...................... C-1
World Wide Web Site ........................... C-3
3ComForum on CompuServe ...................... C-3
3ComFacts Automated Fax Service .................. C-3
Support From Your Network Supplier ................... C-5
Support From 3Com Corporation ...................... C-5
Returning Products for Repair ....................... C-7
Accessing the 3Com ISD MIB ....................... C-8
Contacting 3Com ISD Technical Publications .............. C-8
Index . . . . . . . . . . . . . . . . . . . . . . . . . . . . . . . . . . . . . . X-1
Limited Warranty . . . . . . . . . . . . . . . . . . . . . . . . . . . . . . X-3
vi 25 Mbps ATM Module - Installation and User's Guide
Page 7

Figures
1-1. ATM Campus Networking ..................... 1-4
2-1. Installing the Module in an ONcore Hub ............ 2-5
2-2. ONcore Module Ejectors ..................... 2-6
2-3. Removing a Blank Panel ..................... 2-7
2-4. CELLplex 4000 Module Ejectors ................. 2-8
2-5. Installing the Module in a CELLplex 4000 Expansion Unit .. 2-9
2-6. RJ-45 Connector . . . . . . . . . . . . . . . . . . . . . . . . . 2-15
2-7. Straight-Through UTP Cable .................. 2-16
2-8. Attaching ATM Devices ..................... 2-17
3-1. Front Panel . . . . . . . . . . . . . . . . . . . . . . . . . . . . 3-10
Figures vii
Page 8

viii 25 Mbps ATM Module - Installation and User's Guide
Page 9

Tables
2-1. Installation Steps . . . . . . . . . . . . . . . . . . . . . . . . . . 2-3
2-2. UTP/FTP/STP Cabling Details ................. 2-11
2-3. ATM Device Cabling Distances ................ 2-12
2-4. RJ-45 Connector-Pin Signal Assignments .......... 2-15
2-5. Pin Assignments for Cabling Non-ATM Forum Compliant
Devices . . . . . . . . . . . . . . . . . . . . . . . . . . . . . . 2-17
3-1. Meaning of the Front Panel LEDs ................ 3-8
4-1. Problem Determination Using Port Status LEDs ........ 4-3
4-2. Problem Determination Using Port Status LEDs during Traffic 4-6
4-3. Problem Determination Using the Module Reset LED .... 4-7
B-1. Part Numbers of ATM Components ............... B-1
Tables ix
Page 10

x 25 Mbps ATM Module - Installation and User's Guide
Page 11

How to Use This Guide
This guide presents information on how to install and configure the 3Com
ONcore ATM I/O Module (6412M-25-TP) in the ONcore Integrated
System Hub or CELLplex 4000 expansion unit. It describes how to:
Plan and set up valid links in an ONcore hub or CELLplex 4000 based
ATM subnetwork using the 6412M-25-TP module
Install the 6412M-25-TP module
Configure the 6412M-25-TP module
Diagnose and solve problems associated with the operation of the
6412M-25-TP module.
Who Should Use This Guide
This guide is intended for the following people at your site:
ATM network administrator
ATM network operator
Hardware installer
The installation activities described in this book should be undertaken by
Trained Service Personnel ONLY.
How to Use This Guide xi
Page 12

Contents of This Guide
This guide contains four chapters and three appendixes:
Chapter 1, Overview gives an overview of the main functions of the
6412M-25-TP module and the ATM interface used by ONcore 12-Port 25
Mbps ATM I/O Module ports to interconnect user devices to an ATM
campus network.
Chapter 2, Installation describes how to install the 6412M-25-TP module
in an ONcore hub and CELLplex 4000 expansion unit.
Chapter 3, Configuration describes how to configure the 6412M-25-TP
module.
Chapter 4, Troubleshooting describes how to diagnose and solve
problems associated with the operation of the 6412M-25-TP module.
Appendix A, Technical Specifications describes the specifications for the
6412M-25-TP module.
Appendix B, ATM Components lists the part numbers for the ATM
components that you can order for use with the 6412M-25-TP module.
Appendix C, Technical Support provides information on technical support
services available from 3Com.
The Index lists the concepts, terms, and tasks described in this guide and
the page numbers on which you can find the information.
xii 25 Mbps ATM Module - Installation and User's Guide
Page 13

Terms Used in This Guide
The term
Point located in either the ONcore ATM Switch/Control module or CELLplex
4000 base unit.
The term
ONcore ATM Switch and CELLplex 4000 Command Reference Guide
17-00866.
Prerequisite Knowledge
To understand the information presented in this guide, refer to:
ATM Control Point
Command Reference Guide
Features and Characteristics of the ONcore Integrated System Hub, as
described in the
Guide
, Document Number: 17-00362.
Features and Characteristics of the CELLplex 4000, as described in
CELLplex 4000 Installation and User's Guide
17-00865.
Publications listed in the section “Related Documents” on page xv.
ATM Forum UNI Specification V3.0 and V3.1.
3Com ONcore Integrated System Hub Installation
used in this guide refers to the ATM Control
used in this guide refers to the
,
, Document Number:
How to Use This Guide xiii
Page 14

Conventions Used in This Guide
The following text conventions are used in this guide:
Text
Convention
Bold Text emphasis Selective backpressure temporarily
Italics
Meaning Example
stops one virtual connection.
Global backpressure temporarily
stops an ATM link.
Special term This is known as a
Document titles Refer to the
ATM User-Network
hot swap
.
Interface Specification - Version 3.0
for more information.
Monospace Command syntax
(parameters and
variables)
User input
(including
carriage return)
System
messages and
screen displays
SET PORT slot.port ENABLE
To display detailed information,
enter the following command:
show port 4.2 verbose [ENTER]
Port Type Mode Status
---------------------------------------------
4. 2 NNI enabled UP-OKAY
xiv 25 Mbps ATM Module - Installation and User's Guide
Page 15

Related Documents
This section provides information on supporting documentation, including:
3Com Documents
Reference Documents
3Com Documents
The following documents provide additional information on 3Com products:
ONcore Integrated System Hub Installation and Operation Guide
information on the installation, operation, and configuration of the ONcore
hub. This guide also describes the principal features of the ONcore
Fault-Tolerant Controller Module.
CELLplex 4000 Installation and User's Guide
installation, operation, and configuration of the CELLplex 4000.
ONcore Distributed Management Module User's Guide
information on the ONcore Distributed Management Module's operation,
installation, and configuration. This guide also describes the software
commands associated with the Distributed Management Module.
Distributed Management Module Commands Guide
management command by providing detailed information on the
command's format, use, and description.
ONcore ATM Switch and CELLplex 4000 Command Reference Guide
Describes each ATM command by providing detailed information on the
command's format, use, and description.
- Provides information on the
- Provides
- Describes each
- Provides
-
For a complete list of 3Com documents, contact your 3Com representative.
How to Use This Guide xv
Page 16

Reference Documents
The following documents supply related background information:
Case, J., Fedor, M., Scoffstall, M., and Davin, J.,
Management Protocol,
Performance Systems International and the MIT Laboratory for Computer
Science, May 1990.
Rose, M., and K. McCloghrie,
Information for TCP/IP-based internets,
International and Hughes LAN Systems, May 1990.
RFC 1157, University of Tennessee at Knoxville,
Structure and Identification of Management
RFC 1155, Performance Systems
The Simple Network
xvi 25 Mbps ATM Module - Installation and User's Guide
Page 17

Chapter 1. Overview
This chapter presents an overview of the ONcore 12-Port 25 Mbps ATM I/O Module
(6412M-25-TP). It describes the main functions of the module, and how the module
operates as part of the ATM subsystem when installed in the ONcore Integrated System
Hub or CELLplex 4000 Expansion Unit.
6412M-25-TP Module Features
The 6412M-25-TP module is a single-slot module that functions as part of the ONcore
ATM or CELLplex 4000 Expansion Unit.
Chapter 1. Overview 1-1
Page 18

6412M-25-TP modules can be used in any of the following ways:
To send and receive data from an ATM subsystem in another ONcore ATM
switching hub or CELLplex 4000.
To attach high capacity workstations and servers (with 25.6Mbps adapter cards)
that function in ATM mode.
6412M-25-TP modules interface to the ONcore hub or CELLplex 4000 by means of the
Control Point located in either the ONcore ATM Switch/Control module or CELLplex
4000 base unit. 6412M-25-TP modules process ATM cells of data by:
Checking their validity
Accessing the switching tables to locate the destination module
Preparing the internal ATM format required by the Control Point
Sending the cells to the Control Point
6412M-25-TP modules can be used in any vacant slot in the CELLplex 4000 expansion
unit, or any vacant slot in the ONcore hub except for slots 9, 10, and (for 17-slot
models) 11 and 12. These slots are reserved for ONcore ATM Switch/Control modules.
In 17-slot ONcore models, although slot 12 is also reserved, you can insert an
6412M-25-TP module in slot 12 if no ONcore ATM Switch/Control module is installed in
slot 11.
Like other ATM media modules, the 6412M-25-TP module can be inserted while the
hub or CELLplex 4000 is operating without disturbing data traffic on other modules.
Before removing the module however, you must first isolate it by using the SET
MODULE command.
For more information on how to install and change modules, see the
System Hub Installation Guide
Installation and User's Guide
, Document Number 17-000362 or
Document Number 17-000865, as appropriate.
ONcore Integrated
CELLplex 4000
1-2 25 Mbps ATM Module - Installation and User's Guide
Page 19

Module Functions
The 6412M-25-TP module has the following characteristics:
Twelve ports operating at up to 25 Mbps to connect stations or servers to the hub
or CELLplex 4000. Each port may connect to:
– An ATM or multimedia workstation that requires a high bit rate (UNI connection)
– A UNI device using a supported interface
Physical interface: copper cable with RJ45 connector.
ONcore 12-Port 25 Mbps ATM I/O Module connections: port-to-port, hub-to-server,
and hub-to-workstation.
Up to three 6412M-25-TP modules can be used in the CELLplex 4000 expansion
unit, thereby providing up to 48 ATM ports.
Up to fourteen 6412M-25-TP modules can be used in the 17-slot ONcore hub at the
same time (8 in the 10-slot ONcore hub).
Interfaces Supported
The 6412M-25-TP module supports the following interfaces:
User-to-network (UNI)
Network-to-network (NNI)
Switch-to-switch (SSI)
The UNI interface is defined in the following documents:
ATM Forum UNI Specification V3.0 and V3.1
ITU (ex-CCITT) SG13 as defined in the following standards:
– I.413 (B_ISDN User-Network Interface)
– I.432 (Physical Layer)
– Q.2931 (Signaling)
Chapter 1. Overview 1-3
Page 20
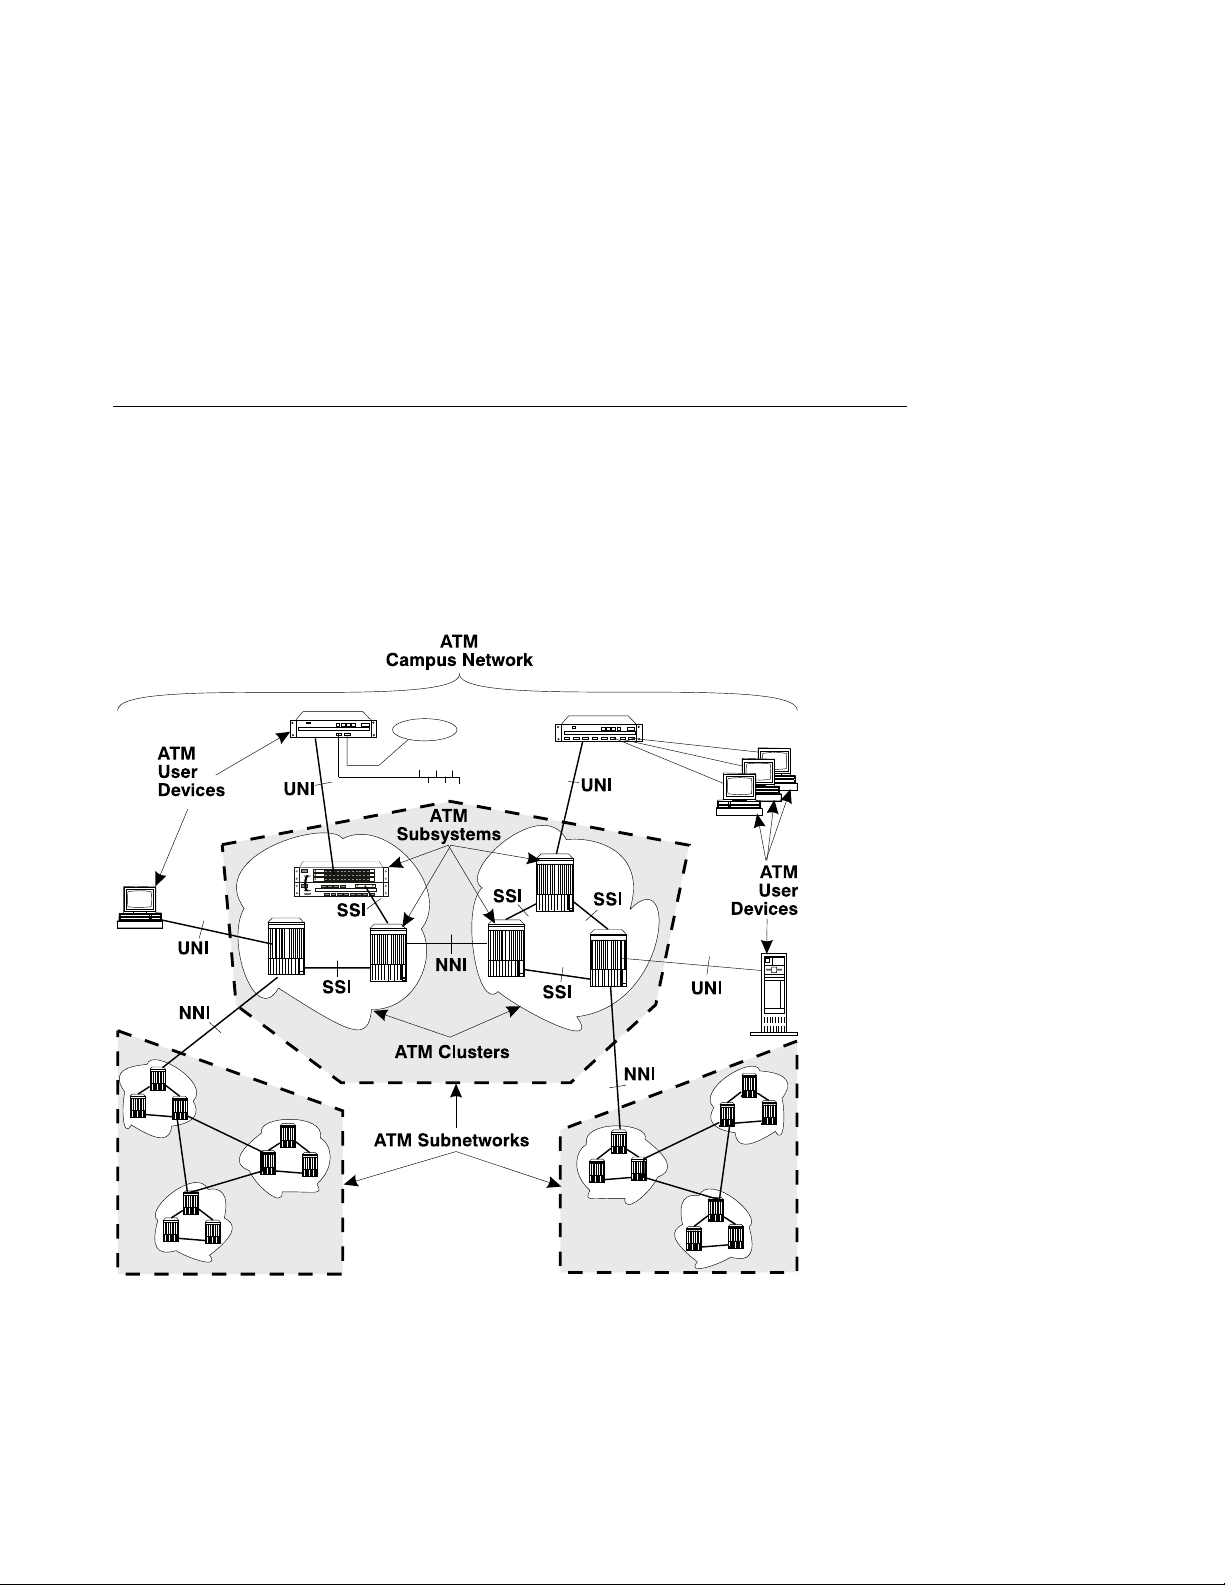
Using the 6412M-25-TP Module for ATM Campus
Networking
The 6412M-25-TP module can be used as a link to an ATM campus network by
allowing workstations, servers, and other ATM devices to communicate with the
network.
Figure 1-1. ATM Campus Networking
1-4 25 Mbps ATM Module - Installation and User's Guide
Page 21

Chapter 2. Installation
This chapter describes how to unpack, install, and connect ATM devices to the
6412M-25-TP module.
Before You Unpack the Module
Take the following precautions before unpacking the 6412M-25-TP module:
Do not remove the 6412M-25-TP module from its anti-static shielding bag until you
are ready to install it. This avoids the possibility of having electrostatic discharge
damage static-sensitive devices on the module.
Always handle the module by the edges.
Always use a foot strap and grounded mat or wear a grounded static discharge
wrist strap whenever you inspect or install or remove the module. Or else, be sure
to touch a grounded rack or another source of ground before handling it.
Chapter 2. Installation 2-1
Page 22

Unpacking the Module
To unpack the 6412M-25-TP module, follow these steps:
1. Verify that the 6412M-25-TP module is the correct model by matching the model
number listed on the side of the shipping carton to the model number you ordered.
Note: The product model number printed on the shipping box differs from the
model number on the product. The model number on the shipping box bears the
prefix 3C9.
2. Remove the module from its shipping carton.
3. Remove the 6412M-25-TP module from its anti-static bags and inspect it for
damage. Always handle it by the edges, being careful not to touch the internal
components.
If the module appears to be damaged, put it back in the anti-static bag, put the bag
back into the shipping carton, then contact your local 3Com dealer.
It is recommended that you retain the shipping carton and the anti-static shielding bag
in which the module was delivered. These can be reused later if you want to repackage
the components for storage or shipment.
2-2 25 Mbps ATM Module - Installation and User's Guide
Page 23

Installation Summary
Note: The installation activities described in the following sections should be
undertaken by TRAINED SERVICE PERSONNEL ONLY.
Table 2-1 lists the steps to follow to install the 6412M-25-TP module. Each step is
described in detail in this chapter.
Note: Before installing an 6412M-25-TP module in an ONcore switching hub, make
sure that an ONcore ATM Switch/Control module is installed in slots 9 and 10 (or 11
and 12 in a 17 slot model), and that an ONcore ATM Switch/Control console has
already been configured. If an ONcore ATM Switch/Control module is not installed, the
Reset LED on the 6412M-25-TP module will start blinking when you insert the module.
Table 2-1. Installation Steps
Step Refer to
1. Insert the 6412M-25-TP module into a vacant slot:
ONcore: 1 to 8 on 10-slot models (or 1 to 8, 12 to
17 on 17-slot models).
CELLplex 4000: Any vacant slot in the expansion unit.
2. Set up connections between the ONcore 12-Port 25
Mbps ATM I/O Module ports and other ATM devices using
the appropriate Twisted Pair (TP) cables and connectors.
“Installing the Module in
an ONcore Hub” on
page 2-4 (ONcore)
“Installing the Module in a
CELLplex 4000
Expansion Unit” on
page 2-7 (CELLplex
4000)
“Connecting ATM
Devices” on page 2-10
Chapter 2. Installation 2-3
Page 24

Installation
You can install the 6412M-25-TP module while the ONcore hub or CELLplex 4000
expansion unit are powered on.
Installing the Module in an ONcore Hub
To install a 6412M-25-TP module in an ONcore hub, follow these steps:
1. Locate a vacant slot in positions 1 to 8 (or 12 to 17 in 17 slot models). (Slots 9 and
10 are reserved for the ONcore ATM Switch/Control module. You cannot install the
6412M-25-TP module in slot 11.) If necessary, remove a panel on the hub to
expose a blank slot.
2. Make sure that the slot to be used is in Isolated mode by entering the following
command from the ONcore ATM Switch/Control console:
SET MODULE slot ISOLATED
where slot specifies the number of the slot to be used. For more information, see
the
ONcore Integrated System Hub Installation Guide
17-000362.
3. Insert the 6412M-25-TP module into one of the free slots in the hub as shown in
Figure 2-1 on page 2-5, matching the top and bottom board guides as you slide the
module cleanly into place (by pressing evenly on the top and bottom of the
faceplate). Do not attempt to push the module all the way into the hub until you
have verified that the top and bottom module ejectors are OPEN (see Figure 2-2 on
page 2-6.)
, Document Number
2-4 25 Mbps ATM Module - Installation and User's Guide
Page 25

Slots
1234567
8910
11121314
1516
17
Figure 2-1. Installing the Module in an ONcore Hub
Chapter 2. Installation 2-5
Page 26

4. Close the top and bottom ejectors simultaneously.
Figure 2-2. ONcore Module Ejectors
5. The Reset LED should light ON briefly, and then turn OFF.
6. Fasten the spring-loaded screws on the front panel of the module to the hub using
your fingers. Do not overtighten.
2-6 25 Mbps ATM Module - Installation and User's Guide
Page 27

Installing the Module in a CELLplex 4000 Expansion Unit
To install a 6412M-25-TP module in a CELLplex 4000 expansion unit, follow these
steps:
1. Locate a vacant slot in the expansion unit. If the slot is filled with a blank panel,
loosen the knurled screws on both sides of the cover and remove it from the front
panel of the expansion unit.
Figure 2-3. Removing a Blank Panel
Store the blank panel in a safe place in case the ATM media module needs to be
removed in the future.
Chapter 2. Installation 2-7
Page 28

2. Make sure that the slot to be used is in Isolated mode by entering the following
command from the ATM console:
SET MODULE slot ISOLATED
where slot specifies the number of the slot to be used. For more information, see
the
CELLplex 4000 Installation and User's Guide
3. Make sure that the two module ejectors (left and right) are OPEN (see Figure 2-4.)
.
Figure 2-4. CELLplex 4000 Module Ejectors
2-8 25 Mbps ATM Module - Installation and User's Guide
Page 29

4. Insert the 6412M-25-TP module into one of the free slots in the expansion unit as
shown in Figure 2-5, matching the left and right board guides as you slide the
module cleanly into place (by pressing evenly on the top and bottom of the
faceplate).
Figure 2-5. Installing the Module in a CELLplex 4000 Expansion Unit
5. Close the left and right ejectors simultaneously. This secures the module.
6. The Reset LED should light ON briefly, and then turn OFF.
7. Fasten the spring-loaded screws on the front panel of the module to the expansion
unit using your fingers. Do not overtighten.
Chapter 2. Installation 2-9
Page 30

Connecting ATM Devices
After inserting the module, attach the cables to the ATM ports that will connect to ATM
devices.
Cabling Up
The following sections provide instructions and guidelines for connecting ATM devices
(such as switches, servers, personal computers, and workstations). Remember these
tips when connecting cables:
Avoid stretching and bending the cables too much.
Avoid routing the cables near potential sources of electromagnetic interference,
such as motorized devices and fluorescent lights.
Avoid trip hazards by routing the cables away from aisles and other areas where
people walk. If such routes cannot be avoided, use floor cable covers or similar
material to secure and protect the cables.
Be sure that the cables connected to the 6412M-25-TP module are supported so
that the cable connectors are not excessively strained. The cable management
bracket shipped with the ONcore hub or CELLplex 4000 expansion unit helps
prevent strain on the cables.
Use a Category 3 or better UTP cable or a 150-ohm STP cable for each of the ATM
ports.
2-10 25 Mbps ATM Module - Installation and User's Guide
Page 31

UTP/FTP/STP Cabling Information
Table 2-2 details the accepted UTP/FTP/STP cables for the 25.6 Mbps ATM ports.
Table 2-2. UTP/FTP/STP Cabling Details
Cable
Type
UTP-5 100 ohm 5 / Class D 22db MAX /
FTP/SFTP 100 ohm 5 / Class D 22db MAX /
FTP/SFTP 120 ohm 5 / Class D 17db MAX /
STP 150 ohm IBM
Legend:
UTP-5 Unshielded Twisted Pair (Category 5)
FTP Foiled Twisted Pair
SFTP Screened and Foiled Twisted Pair
STP Shielded Twisted Pair
TRUNK rigid cable
PATCH flexible cable
Impedance Category Trunk
Attenuation
@ 100 MHz
100m
100m
100m
IBM type
Cabling
1/1A
12.3db MAX
/ 130m
Patch
Attenuation
@ 100 MHz
33db MAX /
100m
33db MAX /
100m
25db MAX /
100m
IBM type
6/6A
18.4db MAX
/ 130m
RFI
Class
A
B
B
B
Chapter 2. Installation 2-11
Page 32

Cabling Distances
Table 2-3 lists the maximum cabling distances for devices attached to the 25.6-Mbps
ATM ports.
Table 2-3. ATM Device Cabling Distances
Cable Type Maximum Allowable Distance (meters)
UTP Category 3 100 (330 ft)
UTP Category 4 150 (495 ft)
UTP Category 5 160 (528 ft)
STP 300 (990 ft)
Note: The minimum UTP cable quality must meet EIA/TIA-568 specification for
Category 3 or equivalent UTP wiring.
2-12 25 Mbps ATM Module - Installation and User's Guide
Page 33

Connecting Devices to the ATM Ports
You can connect devices to the ATM ports either through the building wiring or by a
direct connection.
Via Building Wiring
To connect an ATM device via building wiring, follow the steps listed below.
Note: This procedure begins with the cabling of the ATM device (such as a 25.6-Mbps
ATM adapter installed in a workstation) to the building faceplate; then it describes
connecting the ONcore switching hub or CELLplex 4000 to the patch panel in the wiring
closet.
1 Look at the cabling chart, which your network planner provided, to determine
how the ONcore switching hub or CELLplex 4000 should be connected to the
network.
2 In the work area, connect one end of a straight-through cable (with
ATM-compliant pin assigments) to the ATM connector on the device and the
other end to the ATM connector on the faceplate where the building wiring
terminates.
3 Label the faceplate if it does not already have a cable label. Follow your
enterprise’s procedures for cable labeling. If there is more than one wiring
closet on a floor, record on the same line, the wiring closet identifier or
location and the cable identifier.
4 In the wiring closet, connect the cable that originated at the ATM device to
the appropriate connector on the patch panel or other equipment where the
building wiring terminates. Connect the other end of the cable to an ATM
port on the 6412M-25-TP module.
5 Label the connector on the patch panel (or other equipment used to
terminate the building wiring).
Chapter 2. Installation 2-13
Page 34

Direct Cabling
To cable an ATM device directly to the 6412M-25-TP module:
1 Look at the cabling chart, which your network planner provided, to determine
how the ONcore hub or CELLplex 4000 should be connected to the network.
2 Connect the cables between the 6412M-25-TP module and other devices as
indicated by the connections in the cabling chart.
3 Label the cables, following your enterprise’s procedures for cable labeling.
2-14 25 Mbps ATM Module - Installation and User's Guide
Page 35

Cables, Pins and Connectors
Each of the ATM ports on the 6412M-25-TP module connects to other ATM devices
using an 8-pin female RJ-45 connector. The sections below describe the male RJ-45
plug and the twisted-pair cables that attach to this connector.
RJ-45 Connector
The RJ-45 connector is the 8-pin female connector on the CELLplex 4000 that attaches
to UTP Category 3, 4, or 5 cable or STP category 1, 1A, 9, or 9A cable. Table 2-4 lists
the signal name associated with each pin on this connector, and Figure 2-6 shows how
the pins are numbered.
Table 2-4. RJ-45 Connector-Pin Signal Assignments
Pin Number Signal Name
1 RD+
2 RD-
3-4-5-6 Frame Ground
7 TD+
8 TD-
Figure 2-6. RJ-45 Connector
Chapter 2. Installation 2-15
Page 36

Twisted-Pair Cable
Figure 2-7 on page 2-16 below shows the pin-outs for the straight-through cable
required for connecting ATM Forum compliant devices via UNI interface to the ports on
the 6412M-25-TP module.
Note: Pins 3, 4, 5, and 6 are
RJ-45 RJ-45
12345678 12345678
Figure 2-7. Straight-Through UTP Cable.
2 and the other cable connects pins 7 and 8. You will cause an error if you
cable any other active pins together, such as 1 and 7, 1 and 8, 7 and 2, or 8
and 2.
not used
and are grounded on the chassis.
Note that one cable connects pins 1 and
Non-ATM Forum Compliant (UNI) Devices: To connect non-ATM Forum compliant
devices to the 6412M-25-TP module you must build a twisted-pair cable that connects
the pins as listed in Table 2-5 on page 2-17.
2-16 25 Mbps ATM Module - Installation and User's Guide
Page 37

Table 2-5. Pin Assignments for Cabling Non-ATM Forum Compliant
Devices
6412M-25-TP Module Port Non-Compliant 25.6-Mbps Device
1 RD+ 3 TD+
2 RD- 6 TD7 TD+ 4 RD+
8 TD- 5 RD-
MODULE
STAT
1
2
ERR
ACTIVITY
STAT
RESET
MODULE
RESET
WRONG
SLOT
A2-MB155
Figure 2-8. Attaching ATM Devices
Chapter 2. Installation 2-17
Page 38

2-18 25 Mbps ATM Module - Installation and User's Guide
Page 39

Chapter 3. Configuration
After installing the 6412M-25-TP module and attaching media cables to ATM devices,
you must enter configuration commands from the ATM console to:
Configure the ports parameters.
Connect the module to the network.
Enable the ports.
This section describes the ATM commands you need to enter to configure each
6412M-25-TP module in the ways described above. For a complete description of all
ATM commands, see the
Reference Guide
(hereafter referred to simply as the Command Reference Guide).
Configuring Port Parameters
ONcore ATM Switch and CELLplex 4000 ATM Command
The 6412M-25-TP module uses the user-to-network (UNI) interface. A UNI interface
defines the interface between an ATM user device (such as a router, bridge, server,
workstation, or concentrator equipped with an ATM adapter) and the ATM network.
Before you connect a 6412M-25-TP module to the ATM network (as described in
“Connecting the Module to the Network” on page 3-6) and enable its ports, you must
first set the type of ATM interface used on each port (UNI).
In addition, you can switch ILMI flow control on or off, and specify the ILMI
characteristics.
When a port is enabled, it can transmit and receive cells in the ATM network. The port's
parameters should be configured before the port is enabled.
Chapter 3. Configuration 3-1
Page 40

To set individual port parameters, enter the following command at the ATM console
prompt. The parameters may be entered in any order.
SET PORT slot.port mode type flow_control ilmi
slot Slot number of the 6412M-25-TP module.
port ATM port number.
mode enable or disable. Enter disable until the port has been configured.
type Type of interface used: UNI (user-to-network), NNI (network-to-network),
or SSI (switch-to-switch). Default: Last value entered.
flow_control Used to activate or deactivate the ILMI flow control for this port:
FLOW_CONTROL:ON activates ILMI flow control (GFC field of the cell
header)
FLOW_CONTROL:OFF deactivates ILMI flow control.
Default: Last value entered.
ilmi Specifies the ILMI characteristics for this port:
ILMI:NORMAL ILMI active with automatic detection of the
signalling protocol version (UNI 3.0 or UNI 3.1).
ILMI address registration is normally performed.
ILMI:FORCED_SIG_3. UNI 3.0 signalling is forced, and ILMI address
registration active.
ILMI:FORCED_SIG_3.1 UNI 3.1 signalling is forced, and ILMI address
registration active.
ILMI:OFF_SIG_3. UNI 3.0 signalling is forced, and ILMI address
registration inactive.
ILMI:OFF_SIG_3.1 UNI 3.1 signalling is forced, and ILMI address
registration inactive.
Default: Last value entered.
3-2 25 Mbps ATM Module - Installation and User's Guide
Page 41

Example
The following example configures port 2 of the 6412M-25-TP module installed in slot 1.
ONcoreATM> set port 1.2 uni [ENTER]
ONcoreATM> Port set.
ONcoreATM> show port 1.2 verbose [ENTER]
Type Mode Status
-------------------------------------------------------------------------------
1. 2:UNI enabled UP-OKAY
Signalling Version : with ILMI
Flow Control : Off
Connector : RJ-45
Media : copper twisted pair
Remote device is active
IX status : IX OK
Port speed : 256 Kbps
ONcoreATM>
Displaying Configuration Settings
The following sections describes how to display information about the module and its
port configurations. By displaying this information, you can check that the module is
properly configured before connecting it to the network.
Module Information
To display status information about a 6412M-25-TP module, use the SHOW MODULE
command.
Chapter 3. Configuration 3-3
Page 42

For example, to display configuration information about the 6412M-25-TP module in slot
2, you would enter the following command:
ONcoreATM> show module 2 verbose
Slot Install Connect Operation General Information
------------------------------------------------------------------ 2 Y Y Y ONcore 12-Port 25 Mbps ATM I/O Module
status: connected / hardware okay
enable / normal
P/N:xxxxxxx EC level:xxxxxx Manufacturer:xxxx
Operational FPGA version : 1
Backup FPGA version : 1
Type Mode Status
-------------------------------------------------------------------
2. 1:UNI enabled UP-OKAY
2. 2:UNI enabled UP-NO ACTIVITY
2. 3:UNI enabled UP-NO ACTIVITY
2. 4:UNI enabled UP-OKAY
2. 5:UNI enabled UP-OKAY
2. 6:UNI enabled UP-OKAY
2. 7:UNI enabled UP-NO ACTIVITY
2. 8:UNI enabled UP-NO ACTIVITY
2. 9:UNI enabled UP-NO ACTIVITY
2.1 :UNI enabled UP-NO ACTIVITY
2.11:UNI enabled UP-NO ACTIVITY
2.12:UNI enabled UP-NO ACTIVITY
2.13:NOT INSTALLED
ONcoreATM>
If the value for port status indicates that the port is inoperational or not functioning
properly (for example, NOT IN SERVICE or NO ACTIVITY), refer to the chapter called
"Troubleshooting", in the
Guide
, Document Number 17-00616.
ONcore ATM Switch/Control Module Installation and User's
For more information on the SHOW MODULE command, see the Command Reference
Guide.
3-4 25 Mbps ATM Module - Installation and User's Guide
Page 43

Port Information
To display status information about the ports of an 6412M-25-TP module, use the
SHOW PORT command.
The following example shows how to display detailed information about port 1 of the
6412M-25-TP module in slot 1:
ONcoreATM> show port 1.1 verbose
Port display for ONcore 12-Port 25 Mbps ATM I/O Module
Type Mode Status
------------------------------------------------------------------------------
1. 1:UNI enabled UP-NO ACTIVITY
Signalling Version : with ILMI
Flow Control : Off
Connector : RJ45
Media : copper twisted pair
Remote device is active
IX status : IX OK
Port speed : 256 Kbps
ONcoreATM>
For more information on the SHOW PORT command, see the Command Reference
Guide.
Saving Configuration Settings
After configuring the 6412M-25-TP module and port settings, save the settings by
entering the SAVE MODULE_PORT command.
Chapter 3. Configuration 3-5
Page 44

Connecting the Module to the Network
When you install an 6412M-25-TP module, it is by default set to Isolated mode and all
of its ports are disabled. When a module is isolated, no network activity takes place on
it and it cannot be accessed by the network. This is a security measure that protects
your ATM network from unauthorized access and module dysfunction.
To establish the module's connection to the network, enter the following command at
the ATM console prompt:
SET MODULE slot CONNECTED
where slot specifies the slot number of the ONcore 12-Port 25 Mbps ATM I/O module.
The module's ports will not be enabled. This allows you to configure individual ports
before enabling them. If you wish to enable all ports using the current values (either
the default values if the module has not been used, or the previous values entered),
enter the following command:
SET MODULE slot CONNECTED ENABLE
If you wish to enable individual ports using the current values (either the default values
if the module has not been used, or the previous values entered), enter the following
command:
SET PORT slot.port ENABLE
3-6 25 Mbps ATM Module - Installation and User's Guide
Page 45

Verifying Module Operation
After configuring and saving 6412M-25-TP module and port settings, you can verify that
the module is operating correctly by viewing the LEDs on the front panel:
The Port Status light should be lit (Green if no traffic, Yellow when traffic is present)
The Module Reset LED should be off.
The Wrong Slot LED should be off.
Table 3-1 on page 3-8 provides a full description of the front panel LEDs.
Note: The 155M LEDs are reserved for future use.
Chapter 3. Configuration 3-7
Page 46

Front Panel
ATM connections are made through the 6412M-25-TP module by means of the ports on
its front panel and its backplane interfaces. The front panel is shown in Figure 3-1 on
page 3-10. The meaning of each LED is shown in Table 3-1.
By pressing the Module Reset button, you interrupt and reset the operation of the
6412M-25-TP module. All ATM data traffic and connections that are being transmitted
are stopped, and the Reset LED lights while the reset is performed. The change in
status of the 6412M-25-TP module (from normal operation to reset status) is reported to
the ATM Control Point.
Table 3-1 (Page 1 of 2). Meaning of the Front Panel LEDs
LED Name Color State Meaning
Port Status None OFF Port is disabled or there is no
traffic.
Green ON Port is enabled and there is a
connection.
Blinking Port is enabled, but either no
cable is connected or the cable
is damaged, or there is no
station at the other end of the
connection.
Yellow ON
(or blinking)
Module Reset Yellow OFF Normal operation. Module is
ON Module is being reset; data
Blinking No 6416SW installed or module
3-8 25 Mbps ATM Module - Installation and User's Guide
Normal operation (traffic
detected).
not being reset.
traffic is interrupted.
faulty.
Page 47

Table 3-1 (Page 2 of 2). Meaning of the Front Panel LEDs
LED Name Color State Meaning
Wrong Slot Yellow OFF Normal operation.
ON
(ONcore
only)
See Chapter 4, “Troubleshooting” on page 4-1 if:
A Port Status LED does not light or is blinking.
The Reset LED is ON or is blinking.
The Wrong Slot LED is ON.
Module is installed in an
incorrect slot and no power is
reaching the module. Check
that the module is installed in
the correct slot slot (1 to 8 on
10-slot models, 1 to 8 and 12 to
17 on 17-slot models).
Chapter 3. Configuration 3-9
Page 48

Port Status LEDs
Module Reset LED
Module Reset Button
ATM Ports
Wrong Slot LED
6412M-25-TP
Figure 3-1. Front Panel
3-10 25 Mbps ATM Module - Installation and User's Guide
Page 49

Chapter 4.
Troubleshooting
This chapter describes how to diagnose and solve problems that may arise with the
operation of an 6412M-25-TP module. These problems are signaled by the following
conditions:
The Port Status LED of a port does not light green, or is blinking, when idle
(connected and enabled but no traffic).
The Port Status LED of a port does not light yellow during data transmission.
The Reset LED is either ON or blinking.
The Wrong Slot LED is ON.
Before you start troubleshooting, be sure to carry out the procedure described in
“Verifying LED Operation.”
When instructed to replace an 6412M-25-TP module, proceed as described in
“Replacing 6412M-25-TP Modules” on page 4-10.
Verifying LED Operation
Before troubleshooting an 6412M-25-TP module, verify that all LEDs on the module are
functioning properly:
ONcore Press the LED Test button on the Fault-Tolerant Controller module in
the ONcore hub.
CELLplex 4000 Press the RESET button on the base unit. Note that this action will
interrupt all traffic and reset the CELLplex 4000.
All LEDs on the module should light ON. If not, replace the module (see page 4-10).
Note: The 155M LEDs will not light. These LEDs are reserved for future use.
Chapter 4. Troubleshooting 4-1
Page 50

Port Status LED Does Not Light Green or Is
Blinking When Idle
During normal operation, the Port Status LED of an 6412M-25-TP module should light
GREEN if the port is enabled and a connection present. (The LED will light YELLOW
during traffic.)
If the Port Status LED does not light GREEN or is blinking when there is no traffic, refer
to Table 4-1 on page 4-3 to diagnose and solve the problem.
4-2 25 Mbps ATM Module - Installation and User's Guide
Page 51

Table 4-1 (Page 1 of 2). Problem Determination Using Port Status LEDs
Status LED Port Status Possible
Cause
OFF Disabled Port is
disabled.
Enabled 6412M-25-TP
module is not
powered ON.
Status LED is
burned out.
Corrective Action
Enable port.
1) Check that the ONcore or
CELLplex 4000 is connected to
a power supply.
2) Check the power supply LED
by following the instructions in
“Verifying LED Operation” on
page 4-1.
3) Re-insert the 6412M-25-TP
module in the hub.
1) Check the Status LED by
following the instructions in
“Verifying LED Operation” on
page 4-1.
2) If the Port Status does not
light, replace the module.
6412M-25-TP
module is
faulty.
Perform the wrap tests
described in “Determining the
Failing Component Using a
Wrap Test” on page 4-9.
Chapter 4. Troubleshooting 4-3
Page 52

Table 4-1 (Page 2 of 2). Problem Determination Using Port Status LEDs
Status LED Port Status Possible
Cause
Blinking Enabled No connector is
attached to the
port, or there is
no device at
the end of the
connection.
Cable attached
to the port is
faulty.
Remote station
attached to the
port is either
turned OFF or
inoperational.
Corrective Action
Attach a connector to the port,
or ensure that there is a device
at the end of the connection.
1) Change the cable.
2) Perform wrap tests to
determine the failing
component.
3) Check the cable type.
Check the remote station.
If the station is turned OFF, turn
ON the station. If the station is
inoperational, restart the
application that is running on it.
Maximum link
distance
exceeded.
See Table 2-3 on page 2-12 for
the maximum distances for valid
connections.
4-4 25 Mbps ATM Module - Installation and User's Guide
Page 53

Port Status LED Does Not Light Yellow During
Traffic
If during continous traffic the Status LED of a port does not light YELLOW, refer to
Table 4-2 on page 4-6 to diagnose and solve the problem.
Chapter 4. Troubleshooting 4-5
Page 54

Table 4-2. Problem Determination Using Port Status LEDs during Traffic
Status
LED
OFF Port is disabled. Enter the SHOW PORT command at
Possible Cause Corrective Action
the ATM console to see if port is
enabled.
6412M-25-TP module is not
powered ON.
Status LED is burned out. 1) Check the Status LED by
6412M-25-TP module port is
faulty.
1) Check the Port Status LED and
the power supply LEDs by following
the instructions in “Verifying LED
Operation” on page 4-1.
2) Re-insert the 6412M-25-TP
module in the hub.
following the instructions in
“Verifying LED Operation” on
page 4-1.
2) If necessary, replace the module.
Perform the wrap tests described in
“Determining the Failing Component
Using a Wrap Test” on page 4-9.
There is a bad connection on the
ATM backplane.
UNI port is enabled but not in
service.
1) Remove the 6412M-25-TP
module and re-insert it in the same
slot.
2) If the problem persists, insert the
module in another slot.
From the ATM host, make sure that
the station attached to the port has
been assigned an ATM address and
that the address is unique within the
network.
4-6 25 Mbps ATM Module - Installation and User's Guide
Page 55

When the Reset LED Is ON or Starts Blinking
When the Reset LED of an 6412M-25-TP module is ON or starts blinking, the module
has entered into an error condition. Table 4-3 describes the possible problems that
may occur and the corrective action to take for each problem.
Table 4-3. Problem Determination Using the Module Reset LED
Reset LED Meaning Possible
Cause
ON 6412M-25-TP
module error
condition
Blinking 6412M-25-TP
module error
condition
Module is
faulty.
There is a bad
connection on
the ATM
backplane.
(ONcore only)
ONcore ATM
Switch/Control
module is not
installed.
Module is either
faulty or not
securely
plugged into
the ATM
backplane.
Corrective Action
Perform the wrap tests
described in “Determining the
Failing Component Using a
Wrap Test” on page 4-9.
1) Remove the module and
re-insert it in the same slot.
2) If the problem persists, insert
the module in another slot.
Install an ONcore ATM
Switch/Control module in slots 9
to 10 (or 11 to 12 in 17-slot
model).
1) Remove the module and
re-insert it.
2) If the problem persists,
replace the module.
There is a bad
connection on
the ATM
backplane.
1) Remove the module and
re-insert it in the same slot.
2) If the problem persists, insert
the module in another slot.
Chapter 4. Troubleshooting 4-7
Page 56

When the Wrong Slot LED Is ON (ONcore only)
When the Wrong Slot LED of an 6412M-25-TP module is ON, the module is not
installed in the correct slot. Remove the module from the hub and re-insert it into any
vacant slot in positions 1 to 8 (or 12 to 17 in 6017C-AC model). (Slots 9 to 10, and 11
in a 17-slot model are reserved for the ONcore ATM Switch/Control module.) Slot 12 in
17-slot models cannot be used if an ONcore ATM Switch/Control module is installed in
slot 11.
4-8 25 Mbps ATM Module - Installation and User's Guide
Page 57

Determining the Failing Component Using a Wrap
Test
In the troubleshooting procedures in this chapter, you are sometimes instructed to
perform a wrap test in order to determine the failing component that caused the
problem.
To run a wrap test:
1. Enter the SET PORT slot.port DISABLE command, where slot is the slot number of
the 6412M-25-TP module and port is the number of the port (1 through 12). Then
press Enter.
2. Insert a wrap plug in the port.
3. Enter WRAP slot.port EXTERNAL where slot is the slot number of the module and
port is the number of the port. Then press Enter.
If you receive a return code of KO Test Failed, the port is faulty and the module
motherboard should be replaced. Contact your 3Com Service Representative.
If you receive a return code of OK Test Successful, test the line connected to the
port.
Chapter 4. Troubleshooting 4-9
Page 58

Replacing 6412M-25-TP Modules
The troubleshooting procedures in this chapter sometimes instruct you to replace a
failing 6412M-25-TP module. To do so, follow these steps:
1. Enter SET MODULE slot ISOLATED where slot is the slot number of the failed
module. Then press Enter.
2. Remove the failed module and insert another 6412M-25-TP module in its slot.
3. Enter SET MODULE slot CONNECTED where slot is the slot number of the new
module. Then press Enter.
The new module is automatically configured with the last settings configured for the slot
number you entered.
4-10 25 Mbps ATM Module - Installation and User's Guide
Page 59

Appendix A. Technical
Specifications
General Specifications
Face Plate Marking 6412M-25-TP
Number of Ports 12
Connectors RJ-45 copper
Electrical Specifications
Power Requirement 25 Watts
1.2 Watts for +12V
Power Consumption 6 Amps for +5V
0.10 Amps for +12V
Fuses 7 Amps for +5V
1 Amp for +12V
Environmental Specifications
Operating Temperature 0°C to 50°C (32°F to 122°F)
Storage Temperature −10°C to +60°C (14°F to 140°F)
Humidity 0 to 95 % RH
Appendix A. Technical Specifications A-1
Page 60

Mechanical Specifications
Dimensions 2.5 cm. (1.0 in) Width
27 cm. (10.7 in) Length
38.5 cm. (15.25 in) Height
Weight 3.3 lbs (1.5 kg)
A-2 25 Mbps ATM Module - Installation and User's Guide
Page 61

Appendix B. ATM
Components
Table B-1 lists the part numbers of ATM components that can be ordered for use with
the 6412M-25-TP module.
Table B-1. Part Numbers of ATM Components
ATM Component 3Com Part
Number
RJ-45 wrap plug 42H0540
Appendix B. ATM Components B-1
Page 62

B-2 25 Mbps ATM Module - Installation and User's Guide
Page 63

Appendix C. Technical
Support
3Com provides easy access to technical support information through a variety of
services. This appendix contains the following sections:
Online Technical Services
Support From Your Network Supplier
Support From 3Com Corporation
Returning Products for Repair
Accessing the 3Com ISD MIB
Contacting 3Com ISD Technical Publications
Online Technical Services
3Com offers worldwide product support 7 days a week, 24 hours a day, through the
following online systems:
3Com Bulletin Board Service (3ComBBS)
World Wide Web site
3ComForum on CompuServe
3ComFactsSM automated fax service
3Com Bulletin Board Service
3ComBBS contains patches, software, and drivers for all 3Com products, as well as
technical articles. This service is available through a modem or ISDN 7 days a week, 24
hours a day.
Appendix C. Technical Support C-1
Page 64

Access by Analog Modem
To reach the service by modem, set your modem to 8 data bits, no parity, and 1 stop
bit. Call the telephone number nearest you:
Country Data Rate Telephone Number
Australia up to 14400 bps Sydney (61) (2) 9937 5000
Melbourne (61) (3) 9653 9515
France up to 14400 bps (33) (1) 69 86 69 54
Germany up to 9600 bps (49) (89) 627 32 188 or
(49) (89) 627 32 189
Hong Kong up to 14400 bps (852) 2501 1111
Italy (fee required) up to 14400 bps (39) (2) 273 00680
Japan up to 14400 bps (81) (3) 3345 7266
Singapore up to 14400 bps (65) 534 5693
Taiwan up to 14400 bps (886) (2) 377 5840
U.K. up to 28800 bps (44) (1442) 278278
U.S. up to 28800 bps (1) (408) 980 8204
Access by Digital Modem
ISDN users can call in to 3ComBBS using a digital modem for fast access up to 56
Kbps. To access 3ComBBS using ISDN, call the following number:
(408) 654-2703
C-2 25 Mbps ATM Module - Installation and User's Guide
Page 65

World Wide Web Site
Access the latest networking information on the 3Com World Wide Web site by entering
our URL into your Internet browser:
http://www.3Com.com/
This service features news and information about 3Com products, customer service and
support, 3Com Corporation's latest news releases, selected articles from 3TECH
(3Com Corporation's award-winning technical journal), and more.
3ComForum on CompuServe
3ComForum is a CompuServe-based service containing patches, software, drivers, and
technical articles about all 3Com products, as well as a messaging section for peer
support. To use 3ComForum, you need a CompuServe account.
To use 3ComForum:
1. Log in to CompuServe.
2. Enter go threecom.
3. Press Return to view the 3ComForum main menu.
3ComFacts Automated Fax Service
3Com Corporation's interactive fax service, 3ComFacts, provides data sheets, technical
articles, diagrams, and troubleshooting instructions on 3Com products 7 days a week,
24 hours a day.
Call 3ComFacts using your touch-tone telephone. International access numbers are:
Country Telephone Number
Hong Kong (852) 2537 5610
U.K. (44) (1442) 278279
U.S. (1) (408) 727 7021
Appendix C. Technical Support C-3
Page 66

Local access numbers are available within the following countries:
Country Telephone Number
Australia 800 123853
Belgium 0800 71279
Denmark 800 17319
Finland 98 001 4444
France 05 90 81 58
Germany 0130 8180 63
Italy 1678 99085
Netherlands 06 0228049
Norway 800 11062
Portugal 0505 442607
Russia (Moscow only) 956 0815
Spain 900 964445
Sweden 020 792954
U.K. 0800 626403
C-4 25 Mbps ATM Module - Installation and User's Guide
Page 67

Support From Your Network Supplier
If additional assistance is required, contact your network supplier. Many suppliers are
authorized 3Com service partners who are qualified to provide a variety of services,
including network planning, installation, hardware maintenance, application training, and
support services.
When you contact your network supplier for assistance, have the following information
ready:
Diagnostic error messages
A list of system hardware and software, including revision levels
Details about recent configuration changes, if applicable.
If you are unable to contact your network supplier, refer to the following section on
contacting 3Com.
Support From 3Com Corporation
If you are unable to receive support from your network supplier, technical support
contracts are available from 3Com.
In the U.S. and Canada, call (800) 876-3266 for customer service.
If you are outside the U.S. and Canada, contact your local 3Com sales office to find
your authorized service provider:
Country Telephone Number
Australia (61) (2) 9937 5000 (Sydney)
(61) (3) 9653 9515 (Melbourne)
Belgium* 0800 71429
Brazil (55) (11) 546 0869
Appendix C. Technical Support C-5
Page 68

Country Telephone Number
Canada (416) 498 3266
Denmark* 800 17309
Finland* 0800 113153
France* 05 917959
Germany* 0130 821502
Hong Kong (852) 2501 1111
Ireland* 1 800 553117
Italy* 1678 79489
Japan (81) (3) 3345 7251
Mexico (525) 531 0591
Netherlands* 06 0227788
Norway* 800 13376
Singapore (65) 538 9368
South Africa (27) (11) 803 7404
Spain* 900 983125
Sweden* 120 795482
Taiwan (886) (2) 577 4352
United Arab Emirates (971) (4) 349049
U.K.* 0800 966197
U.S. (1) (408) 492 1790
*
These numbers are toll-free.
C-6 25 Mbps ATM Module - Installation and User's Guide
Page 69

Returning Products for Repair
A product sent directly to 3Com for repair must first be assigned a Return Materials
Authorization (RMA) number. A product sent to 3Com without an RMA number will be
returned to the sender unopened, at the sender's expense.
To obtain an RMA number, call or fax:
Country Telephone Number Fax Number
U.S. and Canada (800) 876 3266, option 2 (408) 764 7120
Europe 31 30 60 29900, option 5 (44) (1442) 275822
Outside Europe, U.S., and
Canada
(1) (408) 492 1790 (1) (408) 764 7290
Appendix C. Technical Support C-7
Page 70

Accessing the 3Com ISD MIB
The 3Com Management Information Base (MIB) for the Integrated Systems Division
(ISD) describes commands that enable you to manage 3Com SNMP-based products.
The MIB is available over the Internet on an anonymous FTP server. Updates to these
MIBs are released as new 3Com products are introduced.
To access Internet versions:
1. FTP to ftp.3com.com (192.156.136.12).
2. Enter the login name anonymous.
3. Enter your full Internet e-mail address as the password (for example,
jdoe@company.com).
4. Change to the mib or schema directory using the cd /pub/mibs or
cd /pub/mibs/all-mibs command.
5. To view the 3Com MIB, OID, or schema entries, enter the ls command.
To pause the display, press [Ctrl+S].
To continue the display, press [Ctrl+Q].
6. Copy the MIB, OID, or schema files to your current directory using the appropriate
command (for example, get atswitch.mib).
7. To exit the FTP session, invoke the quit command.
Contacting 3Com ISD Technical Publications
If you have comments or questions on 3Com Integrated Systems Division Technical
Publications documents, contact the Technical Publications group by fax at (508)
229-1551.
C-8 25 Mbps ATM Module - Installation and User's Guide
Page 71

Index
A
activity LEDs 1-4, 3-7, 3-9
adapters B-1
ATM
attaching ATM devices 2-10
campus networking 1-4
cell switching 1-1
components B-1
interfaces 1-3, 3-1
multiplexed traffic 1-3
ATM data transmission 1-1
ATM Forum specifications 1-3
ATM interfaces 1-3, 3-1
ATM ports
building wiring 2-13
cabling 2-13, 2-14
connecting devices to 2-13
attaching ATM devices 2-10
attaching devices to ONcore 12-Port 25
Mbps ATM I/O Module ports 2-10
campus networking 1-4
campus networks 1-4
CELLplex 4000
cabling instructions 2-10
pin-out information 2-15
commands
SET MODULE 3-6, 4-10
SET PORT 3-6, 4-9
SHOW PORT 4-5
WRAP 4-9
configuration 3-1
connecting devices to the ATM ports 2-13
connecting to end-node devices 2-14
connecting to network 3-6
connections 1-3, 1-4
to ONcore 12-Port 25 Mbps ATM I/O
Module ports 1-3
connectors
on front panel 3-8
pin numbers 2-15
pin signal names 2-15
B
blinking LEDs 4-7
C
cables
labeling 2-14
cabling
ATM connections 2-13, 2-14
CELLplex 4000 2-10
instructions 2-10
labeling cables 2-13, 2-14
types 2-14
D
devices, connecting 1-3
port 1-3
dimensions A-2
direct cabling 2-14
disabling ONcore 12-Port 25 Mbps ATM I/O
Module ports 4-9
displaying configuration 3-3
displaying ONcore 12-Port 25 Mbps ATM
I/O Module configuration 3-3
Index X-1
Page 72

E
electrical specifications A-1
electronic emission notices ii
enabling ONcore 12-Port 25 Mbps ATM I/O
Module ports 3-6, 4-9
enabling ports 3-6
environmental specifications A-1
F
Fault-Tolerant Controller module 4-1, 4-2
FCC statement ii
feature codes A-1
front panel 3-9
front panel LEDs 3-7
fuses A-1
I
installation 2-4
interfaces used on ONcore 12-Port 25 Mbps
ATM I/O Module ports 1-3, 3-1, 3-3
isolated mode 3-6
isolating module 4-10
isolating ONcore 12-Port 25 Mbps ATM I/O
modules 4-10
L
LEDs
normal operation 4-1
on front panel 3-7, 3-9
troubleshooting 4-1
logical links, configuring 3-1
M
module reset button 3-8
multiplexed ATM traffic 1-3
N
notices, electronic emission ii
O
operating temperature A-1
P
part numbers for ATM components B-1
physical interface 1-3
pin-outs for twisted-pair cable 2-16
power requirements A-1
problem determination
See
troubleshooting
R
reconnecting module 4-10
replacing module 4-10
replacing ONcore 12-Port 25 Mbps ATM I/O
modules 4-10
reset LED 1-4, 2-6, 2-9, 3-7, 3-9, 4-7
resetting 3-8
resetting ONcore 12-Port 25 Mbps ATM I/O
modules 3-8
RJ-45 connector
connector pin numbers 2-15
connector pin signal names 2-15
S
saving configuration 3-5
saving ONcore 12-Port 25 Mbps ATM I/O
Module configuration 3-5
Index X-2
Page 73

SET MODULE command 3-6, 4-10
SET PORT command 3-1, 3-6, 4-9
SHOW MODULE command 3-3
SHOW PORT command 3-5, 4-5
slot positions 1-2
slot positions in expansion unit 2-7
slot positions in hub 2-4
specifications
dimensions A-2
electrical A-1
feature codes A-1
temperature A-1
weight A-2
status LEDs 1-4, 3-6, 3-7, 3-9, 4-2, 4-5
T
temperature, operating and storage A-1
troubleshooting 4-1
replacing modules 4-10
using reset LED 4-7
using status LEDs 4-2, 4-5
using wrong slot LED 4-8
wrap test 4-9
twisted-pair cable
pin-outs 2-16
W
WRAP commands 4-9
wrap plugs B-1
wrap tests 4-9
wrong slot LED 1-4, 3-9, 4-8
U
unpacking 2-2
user-to-network interface (UNI) 1-3, 3-1
V
verifying ONcore 12-Port 25 Mbps ATM I/O
Module operation 3-7
verifying operation 3-7
Index X-3
Page 74

Index X-4
Page 75

Limited Warranty
HARDWARE: 3Com warrants its hardware products to be free from defects in workmanship and materials, under normal use
and service, for the following lengths of time from the date of purchase from 3Com or its Authorized Reseller:
Internetworking products 1 year
Network adapters Lifetime
Ethernet stackable hubs and Unmanaged Ethernet fixed port repeaters Lifetime* (1 year if not registered).
*
Power supply and fans in these stackable hubs and unmanaged repeaters 1 year
Other hardware products 1 year
Spare parts and spares kits 90 days
If a product does not operate as warranted above during the applicable warranty period, 3Com shall, at its option and
expense, repair the defective product or part, deliver to Customer an equivalent product or part to replace the defective item,
or refund to Customer the purchase price paid for the defective product. All products that are replaced will become the
property of 3Com. Replacement products may be new or reconditioned. Any replaced or repaired product or part has a ninety
(90) day warranty or the remainder of the initial warranty period, whichever is longer.
3Com shall not be responsible for any software, firmware, information, or memory data of Customer contained in, stored on,
or integrated with any products returned to 3Com for repair, whether under warranty or not.
SOFTWARE: 3Com warrants that the software programs licensed from it will perform in substantial conformance to the
program specifications thereof for a period of ninety (90) days from the date of purchase from 3Com or its Authorized
Reseller. 3Com warrants the media containing software against failure during the warranty period. No updates are provided.
3Com's sole obligation with respect to this express warranty shall be (at 3Com's discretion) to refund the purchase price paid
by Customer for any defective software products, or to replace any defective media with software which substantially
conforms to 3Com's applicable published specifications. Customer assumes responsibility for the selection of the appropriate
applications program and associated reference materials. 3Com makes no warranty or representation that its software
products will work in combination with any hardware or applications software products provided by third parties, that the
operation of the software products will be uninterrupted or error-free, or that all defects in the software products will be
corrected. For any third-party products listed in the 3Com software product documentation or specifications as being
compatible, 3Com will make reasonable efforts to provide compatibility, except where the non-compatibility is caused by a
"bug" or defect in the third party's product.
STANDARD WARRANTY SERVICE: Standard warranty service for hardware products may be obtained by delivering the
defective product, accompanied by a copy of the dated proof of purchase, to 3Com's Corporate Service Center or to an
Authorized 3Com Service Center during the applicable warranty period. Standard warranty service for software products may
be obtained by telephoning 3Com's Corporate Service Center or an Authorized 3Com Service Center, within the warranty
period. Products returned to 3Com's Corporate Service Center must be pre-authorized by 3Com with a Return Material
Authorization (RMA) number marked on the outside of the package, and sent prepaid, insured, and packaged appropriately
for safe shipment. The repaired or replaced item will be shipped to Customer, at 3Com's expense, not later than thirty (30)
days after receipt of the defective product by 3Com.
Limited Warranty X-5
Page 76

WARRANTIES EXCLUSIVE: If a 3Com product does not operate as warranted above, Customer's sole remedy FOR
BREACH OF THAT WARRANTY shall be repair, replacement, or refund of the purchase price paid, at 3Com's option. TO
THE FULL EXTENT ALLOWED BY LAW, THE FOREGOING WARRANTIES AND REMEDIES ARE EXCLUSIVE AND ARE
IN LIEU OF ALL OTHER WARRANTIES, terms, or conditions, EXPRESS OR IMPLIED, EITHER IN FACT OR BY
OPERATION OF LAW, STATUTORY OR OTHERWISE, INCLUDING WARRANTIES, terms, or conditions OF
MERCHANTABILITY, FITNESS FOR A PARTICULAR PURPOSE, and satisfactory quality. 3COM NEITHER ASSUMES NOR
AUTHORIZES ANY OTHER PERSON TO ASSUME FOR IT ANY OTHER LIABILITY IN CONNECTION WITH THE SALE,
INSTALLATION, MAINTENANCE, OR USE OF ITS PRODUCTS.
3COM SHALL NOT BE LIABLE UNDER THIS WARRANTY IF ITS TESTING AND EXAMINATION DISCLOSE THAT THE
ALLEGED DEFECT IN THE PRODUCT DOES NOT EXIST OR WAS CAUSED BY CUSTOMER'S OR ANY THIRD
PERSON'S MISUSE, NEGLECT, IMPROPER INSTALLATION OR TESTING, UNAUTHORIZED ATTEMPTS TO REPAIR OR
MODIFY, OR ANY OTHER CAUSE BEYOND THE RANGE OF THE INTENDED USE, OR BY ACCIDENT, FIRE,
LIGHTNING, OR OTHER HAZARD.
LIMITATION OF LIABILITY: TO THE FULL EXTENT ALLOWED BY LAW, 3COM ALSO EXCLUDES FOR ITSELF AND ITS
SUPPLIERS ANY LIABILITY, WHETHER BASED IN CONTRACT OR TORT (INCLUDING NEGLIGENCE), FOR
INCIDENTAL, CONSEQUENTIAL, INDIRECT, SPECIAL, OR PUNITIVE DAMAGES OF ANY KIND, OR FOR LOSS OF
REVENUE OR PROFITS, LOSS OF BUSINESS, LOSS OF INFORMATION OR DATA, OR OTHER FINANCIAL LOSS
ARISING OUT OF OR IN CONNECTION WITH THE SALE, INSTALLATION, MAINTENANCE, USE, PERFORMANCE,
FAILURE, OR INTERRUPTION OF ITS PRODUCTS, EVEN IF 3COM OR ITS AUTHORIZED RESELLER HAS BEEN
ADVISED OF THE POSSIIBILITY OF SUCH DAMAGES, AND LIMITS ITS LIABILITY TO REPAIR, REPLACEMENT, OR
REFUND OF THE PURCHASE PRICE PAID, AT 3COM'S OPTION. THIS DISCLAIMER OF LIABILITY FOR DAMAGES
WILL NOT BE AFFECTED IF ANY REMEDY PROVIDED HEREIN SHALL FAIL OF ITS ESSENTIAL PURPOSE.
Some countries, states, or provinces do not allow the exclusion or limitation of implied warranties or the limitation of incidental
or consequential damages for certain products supplied to consumers, so the above limitations and exclusions may be limited
in their application to you. This warranty gives you specific legal rights which may vary depending on local law.
GOVERNING LAW: This Limited Warranty shall be governed by the laws of the state of California.
3Com Corporation
5400 Bayfront Plaza
Santa Clara, CA 95052-8145
(408) 764-5000
3/18/96
Limited Warranty X-6
 Loading...