


Vision Fitness T9450, T9300, T9500, T9700, T9350 User Manual
...

TABLE OF CONTENTS
SECTION 1: MAINTENANCE PROCEDURE
MAINTENANCE CHECK LIST
TENSIONING THE BELT PROCEDURE
DECK RE-WAXING PROCEDURE
CLEAN THE GROOVES PROCEDURE
LUBRICATING THE AIR SHOCK PROCEDURE
SECTION 2: WIRING DIAGRAM
T9700 MCB NAME : MEB1J (WIRING DIAGRAM)
T9600/T9500 MCB NAME : MEA9J (WIRING DIAGRAM)
T9450/T9350/T9300/T9200/T9250 MCB NAME : JHT2.0(WIRING DIAGRAM)
SECTION 3: CONSOLE ENGINEERING MODE GUIDE
T9700 UCB NAME : DGB1J
T9600/T9500/T9450/T9350/T9300/T UCB NAME : DGA3J
T9200/T9250 UCB NAME : JHT
SECTION 4: MCB LED INSTRUCTIONS
MCB LED LAYOUT
MCB LED INDICATION
PWM MCB LED CHART
MCB LED TROUBLESHOOTING CHART
SECTION 5: TROUBLESHOOTING
NO DISPLAY ON CONSOLE
RUNNING SPEED IS NOT STABLE
TREADMILL STARTS TO RUN BY ITSELF
ALL OR SOME OF KEYS ON CONSOLE DO NOT WORK
NOISE GENERATED UNDER MOTOR COVER
TREADMILL WILL NOT START
INCLINE FUNCTION DOES NOT WORK
HEART-RATE-CONTROL FUNCTION DOES NOT WORK
Error Messages on the Console
SECTION 6 : SOFTWARE UPGRADE PROCEDURE
VISION SERIES TREADMILL SOFTWARE UPGRADE SOP

SECTION 1
MAINTENANCE PROCEDURE

PREVENTIVE MAINTENANCE SCHEDULE
|
|
|
|
|
|
|
|
|
|
|
|
VISION TREADMILL |
|
|
|
||
|
|
|
|
|
|
|
|
|
|
|
|
|
|
|
|
|
|
|
Item |
Daily |
Weekly |
Monthly |
Quarterly |
Biannual |
Annual |
|
|
|
|
|
|
|
|
|
|
|
|
|
|
|
|
|
|
|
|
Console Mounting |
|
|
|
|
Inspect |
|
|
|
Bolts |
|
|
|
|
|
|
|
|
|
|
|
|
|
|
|
|
|
|
|
|
|
|
|
|
|
|
Frame |
Clean |
|
|
|
Inspect |
|
|
|
|
|
|
|
|
|
|
|
|
Running Belt Top |
|
Clean |
|
|
Inspect |
|
|
|
|
(Vacuum) |
|
|
|
|
||
|
|
|
|
|
|
|
|
|
|
|
|
|
|
|
|
|
|
|
#3 Carbon Brush |
|
|
|
Inspect |
|
Replace |
|
|
|
|
|
|
|
|
|
|
|
Power Cord |
|
|
Inspect |
|
|
|
|
|
|
|
|
|
|
|
|
|
|
Display Console |
Clean |
|
Inspect |
|
|
|
|
|
|
|
|
|
|
|
|
|
|
Handlebar |
Clean |
|
|
|
Inspect |
|
|
|
|
|
|
|
|
|
|
|
|
Handrail & |
|
|
|
Inspect |
|
|
|
|
Handlebar |
|
|
|
|
|
|
|
|
|
|
|
|
|
|
|
|
|
|
|
|
|
|
|
|
|
|
Front Roller |
|
|
|
Clean |
Inspect |
|
|
|
|
|
|
|
|
|
|
|
|
Rear Roller |
|
|
|
|
Inspect |
|
|
|
|
|
|
|
|
|
|
|
|
Emergency Button |
Test |
|
|
|
|
|
|
|
|
|
|
|
|
|
|
|
|
Tension Wheel |
|
|
Inspect |
|
|
|
|
|
|
|
|
|
|
|
|
|
|
V Belt |
|
|
|
Clean |
Inspect |
|
|
|
|
|
|
|
|
|
|
|
|
Deck Re-waxing |
|
|
Inspect & |
|
|
|
|
|
|
|
Re-waxing |
|
|
|
|
|
|
|
|
|
|
|
|
|
|
|
|
|
|
|
|
|
|
|
|
Running Belt |
|
|
|
|
Inspect |
|
|
|
|
|
|
|
|
|
|
|
|
Control Box |
|
|
|
|
Clean |
|
|
|
|
|
|
|
(Vacuum) |
|
|
|
|
|
|
|
|
|
|
|
|
|
Motor |
|
|
|
Clean |
|
|
|
|
|
|
|
|
|
|
|
|
|
Air Shock |
|
|
|
|
Lubricate |
|
|
|
|
|
|
|
|
|
|
|
|
|
|
1-1 |
|
|
|
|
|
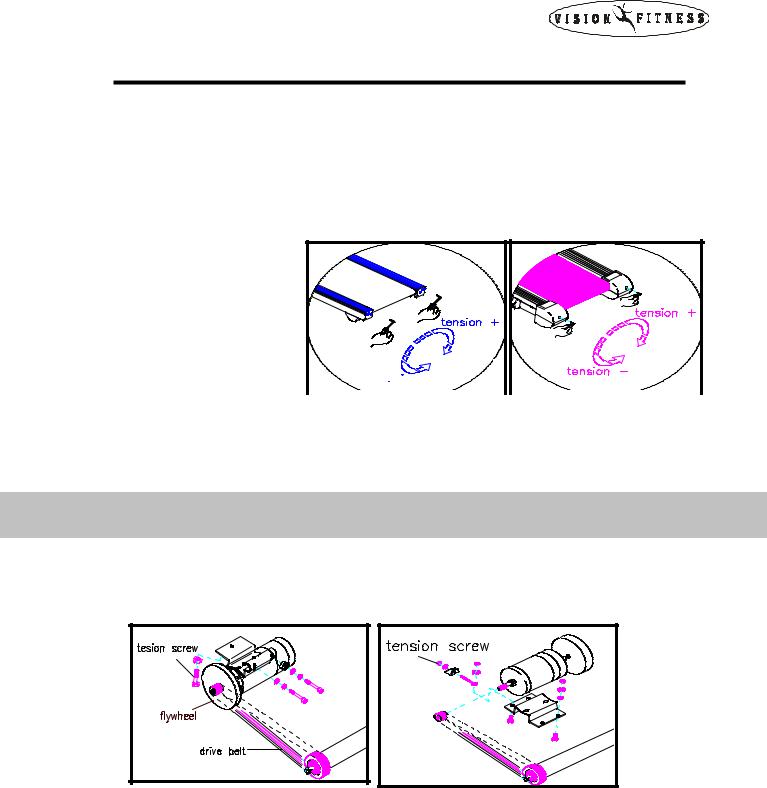
TENSIONING THE BELT
Caution:
Over-tightening of the roller will severely shorten the life of the belt and may cause further damage to other components.
Running Belt:
If when you plant
your foot on the belt, you can feel a slipping
sensation then the belt has stretched and is slipping across the
rollers. This is a 
 normal and common adjustment on a new treadmill. To eliminate this slipping, tension both the rear rollers Allen bolts 1/4 TURN as shown above. Try the treadmill again to check for slipping. Repeat if necessary, but
NEVER TURN the roller bolts more than 1/4 turn at a time.
Perfect Tension o f Running Belt: 0.9~1.1 lbs
Drive Belt:
If you have tensioned the running belt and are still experiencing a slipping, adjust the tension screw. Then try the treadmill again to check for slipping.
Perfect Tension of Drive Belt: |
70~90 lbs |
|
|
1-2 |
|

DECK RE-WAXING PROCEDURE
Frequency: Every 1 month.
LUBE
Name: DOW CORNING 350 SILICON
Procedure:
1.Loosen the tension bolts at both ends.
2.Pull the belt with your left hand and apply the silicon in the deck with your right hand. (The volume of silicon applied is about 25CC.)
3.Tighten the tension bolts.
4.Start the treadmill. Step on the treadmill belt to walk the silicon in. Adjust the belt tension if necessary.
5.With the clamp-on meter, measure the current draw of the motor. (Clamp
on either the red or the black wire.) The current should be less than 15Amps for 110V model. (less than 7.5Amps for 220V model.)
1-3
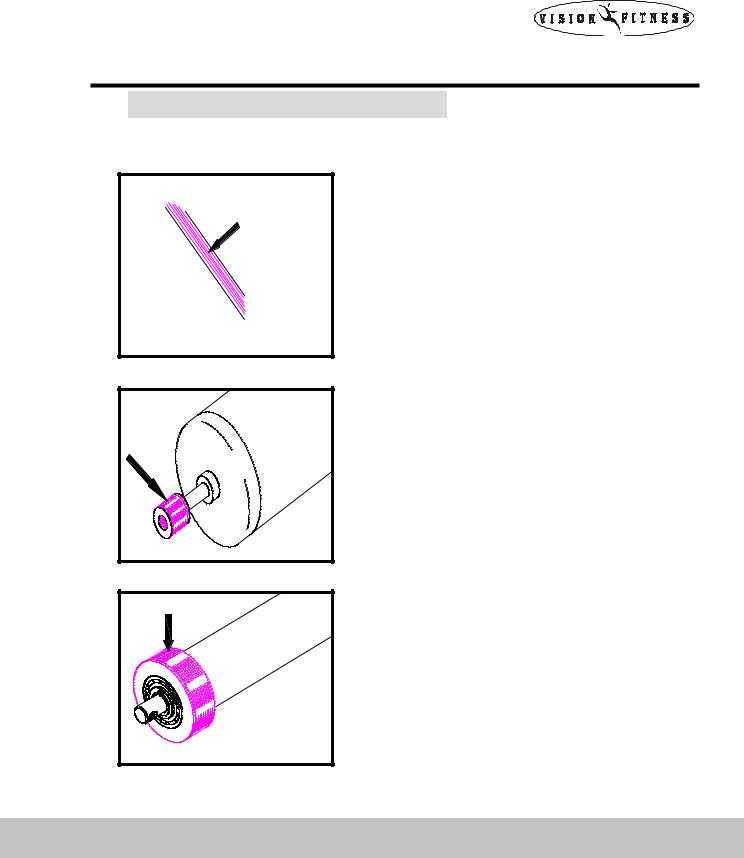
CLEAN THE GROOVES PROCEDURE
Frequency: Every 3 months.
Procedure:
1.Remove the drive belt and check the grooves in belt for dirt or dust and clean it.
2.Check the grooves in motor pulley for dirt or dust and clean it.
3Check the grooves in roller pulley for dirt or dust and clean it.
If dirty grooves in the drive belt, motor and roller pulley, there will be noises while running.
1-4
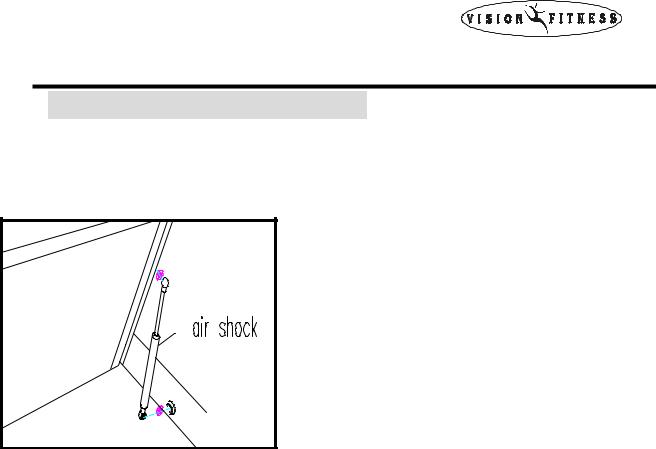
LUBRICATING THE AIR SHOCK
Frequency: Every 6 months.
Procedure:
1.Fold up the frame by using the deck-locking lever.
2.Add the lubricating oil on the shaft of the air shock.
3.Lift the frame up and down, repeating this several times to allow the lubricating oil blend into air shock.
1-5
SECTION 2
WIRING DIAGRAM INSTRUCTION
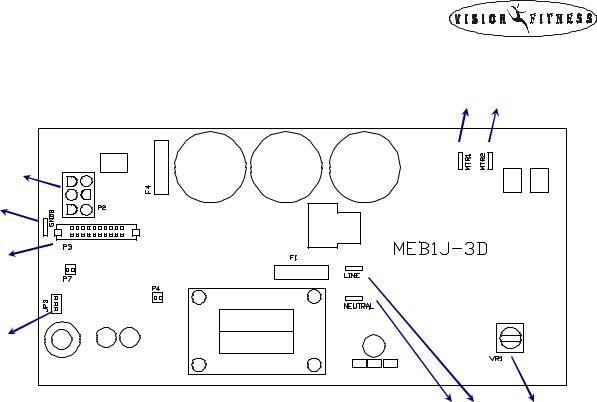
T9700(TM51D/E) MCB WIRING(FOR 110V / 220V) |
||
T2 |
T1 |
|
T6 |
|
|
T8 |
|
|
T5 |
|
|
T7 |
|
|
T3 |
T4 |
VR1 |
T1-----Motor wire (black)
T2-----Motor wire (red)
T3-----D1 of on/off switch
T4-----D3 of on/off switch
T5-----20-pin console cable
T6-----Elevation cable
T7-----Speed sensor line
T8----- Ground wire
2-1
T9600HRT(COMFORT)/T9600HRT/T9500HRT/T9450HRT/T935 |
|||||
|
0/T9300 MCB WIRING(FOR 110V / 220V) |
|
|
||
|
|
|
T2 |
T1 |
|
T6 |
|
|
|
|
|
T9 |
|
|
|
|
|
T7 |
T8 |
T5 |
T3 |
T4 |
VR1 |
|
|
|
|||
T1-----Motor wire (black)
T2-----Motor wire (red)
T3-----D1 of on/off switch
T4-----D3 of on/off switch
T5-----8-pin console cable
T6-----Elevation cable
T7-----6-pin console cable
T8----- Speed sensor line
T9----- Ground wire
2-2
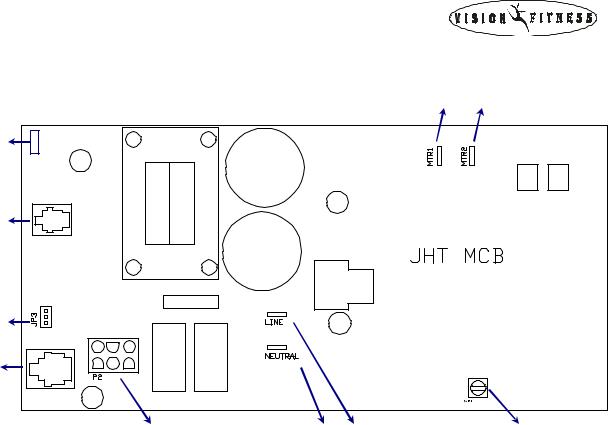
T9200/T9250 MCB WIRING(FOR 110V / 220V) |
|||
|
|
T2 |
T1 |
T9 |
|
|
|
T7 |
|
|
|
T8 |
|
|
|
T5 |
|
|
|
T6 |
T3 |
T4 |
VR1 |
|
|||
T1-----Motor wire (black)
T2-----Motor wire (red)
T3-----D1 of on/off switch
T4-----D3 of on/off switch
T5-----8-pin console cable
T6-----Elevation cable
T7-----6-pin console cable
T8----- Speed sensor line
T9----- Ground wire
2-3

SECTION 3
CONSOLE ENGINEERING MODE GUIDE
 Loading...