


E T
Congratulations on choosing a VISION FITNESS Bike. You’ve taken an important step in developing and sustaining an exercise program! Your Bike is a tremendously effective tool for achieving your personal fitness goals. Regular use of your Bike can improve the quality of your life in so many ways…
Here are just a few of the health benefits of aerobic exercise:
•Weight Loss
•A Healthier Heart
•Improved Muscle Tone
•Increased Daily Energy Levels
•Reduced Stress
•Help In Countering Anxiety and Depression
•An Improved Self Image
The key to reaping these benefits is to develop the exercise habit. Your new Bike will help you eliminate the obstacles that prevent you from getting in your exercise time. Snow and rain and darkness won't interfere with your workout when you have your Bike in the comfort of your home. This Owner’s Guide provides you with basic information on starting an exercise program. A more complete knowledge of your new Bike will assist you in realizing your goal of a healthy lifestyle.
Some kinds of service to your Bike should only be performed by your VISION FITNESS retailer. Please contact your authorized VISION FITNESS retailer should service be required. If a question or problem arises which cannot be handled by your VISION FITNESS retailer, please contact us:
VISION FITNESS P.O. Box 280 621-D East Lake St.
Lake Mills, WI 53551 Ph: 1.800.335.4348 Fax: 1.920.648.3373 www.visionfitness.com
E L S
. . . . . . . . . . 4
. . . 6
. . . . . . . . . . . 7
E 3 0 0 0
E 4 0 0 0
BATTERIES, TURNING ON . . . . . . . . . 8 COUNTDOWN, COUNTUP, OFF . . . . . 9 RESISTANCE, RESETTING . . . . . . . . 10 FEEDBACK DISPLAY . . . . . . . . . . . 11 DUAL-ACTION BENEFITS . . . . . . . . 11
E 3 1 0 0
BATTERIES, TURNING ON . . . . . . . . 12 SETTING MPH/KPH . . . . . . . . . . . 13 COUNTDOWN, COUNTUP, START . . . 14 CHOOSING WEIGHT, RESISTANCE . . 15 PAUSE, RESET . . . . . . . . . . . . . . . 16 FEEDBACK DISPLAY . . . . . . . . . . . 17
E 3 2 0 0
SETTING MPH/KPH . . . . . . . . . . . 18 STARTING IN MANUAL MODE . . . . . 19 PROGRAM DETAILS . . . . . . . . . . . . 20 FEEDBACK DISPLAY . . . . . . . . . . . 21 SETTING WEIGHT DEFAULT . . . . . . . 22 PROGRAM, LEVEL, TIME . . . . . . . . 23 RACE PROGRAM . . . . . . . . . . . . . 24
Table of Contents
E 3 2 0 0 H R T
SETTING MPH/KPH . . . . . . . . . . . 26
STARTING IN MANUAL MODE . . . . . 27
PROGRAM DETAILS . . . . . . . . . . . . 28
FEEDBACK DISPLAY . . . . . . . . . . . 29
SETTING WEIGHT DEFAULT . . . . . . . 30
USING HRT PROGRAM . . . . . . . . . 32
USING HEART RATE STRAP . . . . . . . 33
G E N E R A L
. . . . . . . . . . . . . . 34 MONITOR . . . . . . . . . 35
. . . . . . . . . 36
. . . . . . . . . . . . 38 WARRANTY . . . 40
E3200 & E3200HRT)
. . . . . . . . . . 42 RATE . . . . . . . . . . . 46 RATE OF PERCEIVED EXERTION . . . . 47
WEEKLY WORKOUT LOGS . . . . . . . 50 MONTHLY WORKOUT LOGS . . . . . . 52
1
L A R E N E G TR H 0 0 2 3 E 0 0 2 3 E 0 0 1 3 E 0 0 0 4 E 0 0 0 3 E S L E D O M L L A
CONSOLE
TENSION
KNOB
E 4 0 0 0
SEAT |
DUAL-ACTION |
|
HANDLEBARS |
FRONT FOOT &
TRANSPORT WHEELS
REAR FOOT
2
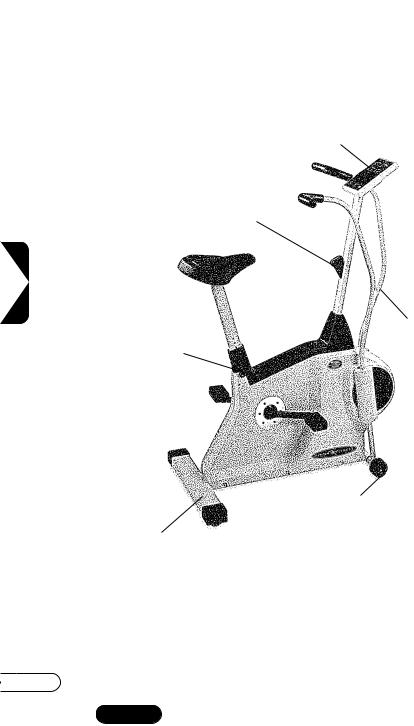
E 4 0 0 0
D U A L - A C T I O N U P R I G H T F I T N E S S C Y C L E

CONSOLE
TENSION KNOB |
SEAT |
||
ADJUSTMENT |
|||
(MODELS |
E3000 & |
||
|
|||
E3100 |
ONLY) |
|
|
REAR FOOT
0 0 0 3 E
TR H 0 0 2 3 E 0 0 2 3 E 0 0 1 3 E
3
E 3 0 0 0 |
E 3 2 0 0 |
E 3 2 0 0 H R T |
U P R I G H T F I T N E S S C Y C L E S

A L L M O D E L S
IMPORTANT SAFETY INSTRUCTIONS SAVE THESE INSTRUCTIONS
When using an electrical product, basic precautions should always be followed, including the following:
Read all instructions before using this exercise product.
WARNING! To reduce the risk of burns, fire, electrical shock or injury to persons:
•Use this exercise product for its intended use as described in this Owner’s Guide. Do not use attachments not recommended by the manufacturer.
•Never drop or insert any object into any opening.
•Do not remove the Bike sidecovers. Service should be performed only by an authorized VISION FITNESS retailer.
Models E3200 & E3200HRT only:
•Never operate this Bike if it has a damaged cord or plug, if it is not working properly, if it has been damaged, or immersed in water.
Return the Bike to a retailer for examination and repair.
•Keep the cord away from heated surfaces.
•Do not use outdoors.
•To disconnect, turn the switch to the OFF position, then remove plug from outlet.
•Only use the power cord provided with your VISION FITNESS Bike.
•Never place the power cord under carpeting or place any object on top of the power cord, which may pinch and damage it.
•Unplug your Bike before moving it.
CHILDREN
•Keep children off your Bike at all times.
•When the Bike is in use, young children and pets should be kept at least 10 feet away.
4

OTHER SAFETY TIPS FOR YOUR VISION FITNESS BIKE
CAUTION! If you experience chest pains, nausea, dizziness or shortness of breath, stop exercising immediately and consult your physician before continuing.
•Do not wear loose clothing that might catch on any part of the Bike.
•Read this Owner’s Guide before operating this Bike.
CLEANING
•Clean with soap and slightly damp cloth only; never use solvents.
S L E D O M L L A
5
A L L M O D E L S
ASSEMBLY
If you have elected to assemble this product yourself, for your safety please read and follow each of the steps in the enclosed assembly instructions. It is recommended, when possible, that assembly be performed by an authorized VISION FITNESS retailer. If you have any questions regarding any part or function of your Bike, contact your retailer.
MOVING
Your VISION FITNESS Bike has a pair of transport wheels built into the front legs. To move your upright Bike, firmly grasp the handlebars, carefully tip toward you and roll on the transport wheels.
CAUTION: Our Bikes are well-built and heavy, weighing up to 140 lbs.! Use care and additional help if necessary.
PLACEMENT IN YOUR HOME
It is important that you place your Bike in a comfortable and inviting room. Your Bike is designed to use minimal floor space. Many people will place their Bike facing the TV or a picture window. If at all possible, avoid putting your Bike in an unfinished basement. To make exercise a desirable daily activity for you, the Bike should be in an attractive setting.
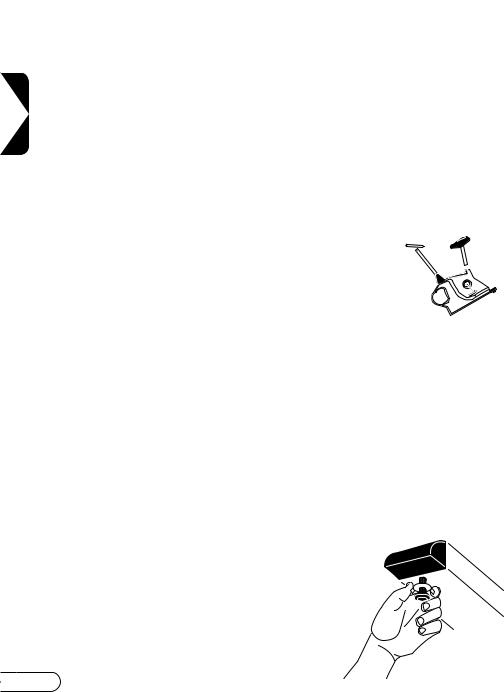
LEVELING
The Bike should be level for optimum use. If your Bike wobbles when you have placed it where you intend to use it, raise or lower one or both of the adjustable levelers located on the bottom of the rear foot support. Once you
6have leveled the Bike, lock the levelers in place by tightening the wing nuts against the rear foot support.
SEAT ADJUSTMENT
Grasp the Seat Adjustment Knob, located at the base of the seatpost. Pull the Knob out, then raise or lower the seatpost to the desired height. Release the Knob and allow the seatpost to lock into position.
SEAT POSITIONING
The seat is at the proper position when your knee is slightly bent when the pedal is in the furthest position, with the ball of your foot centered on the pedal.
S L E D O M L L A
7
E 4 0 0 0 E 3 0 0 0
CONSOLE
Your easy-to-use VISION FITNESS Manual computer console provides the information you need to monitor your progress toward your personal fitness goals.
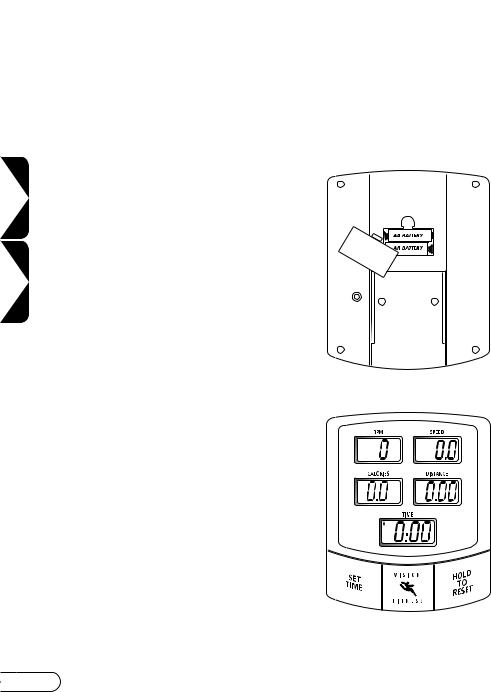
INSTALLING BATTERIES
If your Bike batteries have not already been installed by your retailer, please install them now. Your Manual console uses two size AA batteries. These batteries are located in a snap-open battery compartment in the back of the console.
TURNING SCREEN DISPLAY ON
To turn the screen display on, press any console button or turn the pedals one complete revolution. When the display first comes on, ‘0:00’ will be flashing in the TIME window.
8
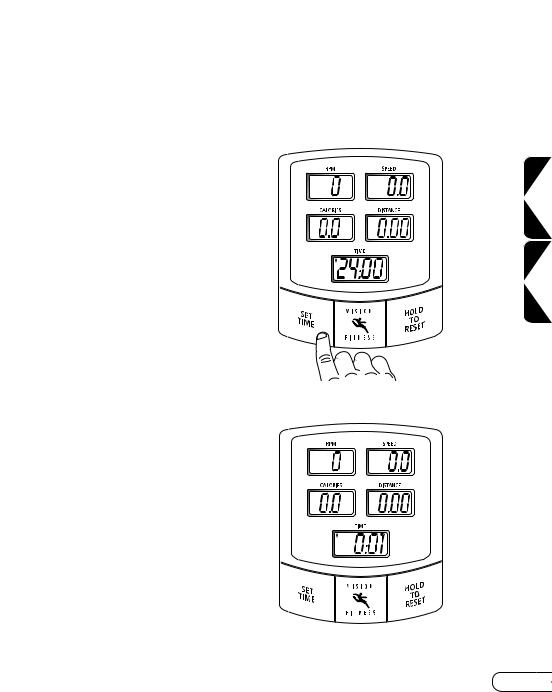
CHOOSING TIME AND STARTING
There are two ways to use the timer: Count-Down Mode or Count-Up Mode.
COUNT-DOWN MODE
Press the SET TIME button to enter your workout time. When the time you choose is showing in the TIME window, start pedaling. The timer will begin counting down to zero. When the workout time is completed, the console will beep for 5 seconds, then begin countingup if you continue pedaling. To reset, press and hold the HOLD TO RESET button.
COUNT-UP MODE
To use the timer in count up mode, simply start pedaling when ‘0:00’ is flashing on the screen.
TURNING SCREEN DISPLAY OFF
The screen display will go off automatically after 5 minutes of non-use.
0 0 0 4 E 0 0 0 3 E
9
E 4 0 0 0 E 3 0 0 0
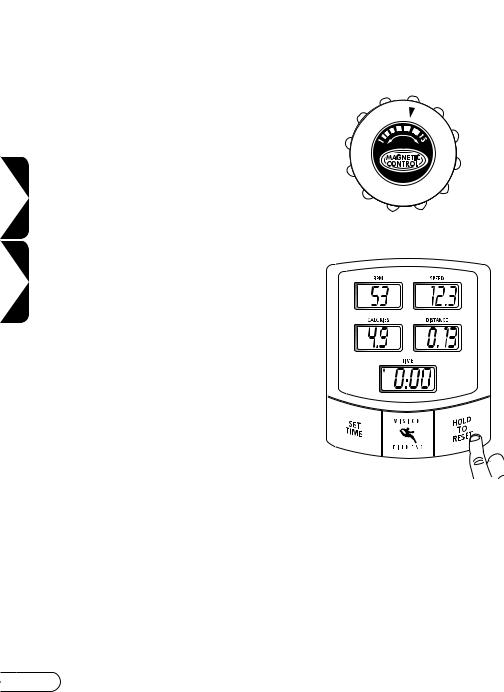
CHANGING RESISTANCE
There are two ways to increase your workload. You can pedal faster, or you can turn the tension knob which is located below the console. The tension knob will adjust to one of 15 levels of resistance.
PARTIAL RESET
To reset Time only, touch the HOLD TO RESET button. Time will return to ‘0:00’ and not delete the values in the other windows.
FULL RESET
To reset all the console values, press and hold the HOLD TO RESET button. Time will return to ‘0:00’ then all the other values will be deleted.
10

FEEDBACK DISPLAY
RPM
Shown as Revolutions-per-Minute. Improve cycling technique while reducing leg muscle fatigue by pedaling between 80 and 100 RPMs.
SPEED
Shown as Miles-per-Hour. View your current pedaling speed.
CALORIES
Shown as estimated total Calories burned during workout.
DISTANCE
Set personal goals for covering greater amounts of distance for each program. You can log mileage as a motivational tool.
TIME
Shown as Minutes:Seconds. View the time remaining if the CountDown mode is used, or view the elapsed time if the Count-Up mode is used.
0 0 0 4 E 0 0 0 3 E
BENEFITS OF THE E4000 DUAL-ACTION BIKE
By combining upper and lower body exercises in one machine, you get total body benefits from every workout. Because you are exercising all the major upper and lower body muscle groups you can achieve better results in less time.
The E4000 |
is also a great choice for rehabilitation patients. The dual- |
action design lets you use either upper-body or lower-body to produce |
|
most of the work, while helping to strengthen or increase range of motion |
|
to the other. |
11 |

E 3 1 0 0
CONSOLE
Your easy-to-use VISION FITNESS E3100 computer console provides the information you need to monitor your progress toward your personal fitness goals.
INSTALLING BATTERIES
If your batteries have not already been installed by your retailer, please install them now. Your E3100 console uses two size AA batteries. These batteries are located inside the mounting recess in the back of the console.
TURNING SCREEN DISPLAY ON
To turn the screen display on, press any console button or turn the pedals one complete revolution. When the display first comes on, ‘0:00’ will be flashing in the TIME window.
12
SETTING MPH & KPH
Your E3100 console should be set to Miles when you receive it. If it is not set to Miles or if you would like to change the feedback to Kilometers do the following steps.
•Take out the batteries.
•Reinsert the batteries – this will bring you to setup mode which will last for 30 seconds.
•You will hear a series of beeps and the model of the product will appear in the TIME window.
•The option “ML” for MILES or “KL” for KILOMETERS will also appear in the TIME window.
•Press the SELECT button to go to the appropriate distance setting.
•When you have the desired distance setting, press and hold the START button until you hear the beep.
0 0 1 3 E
13
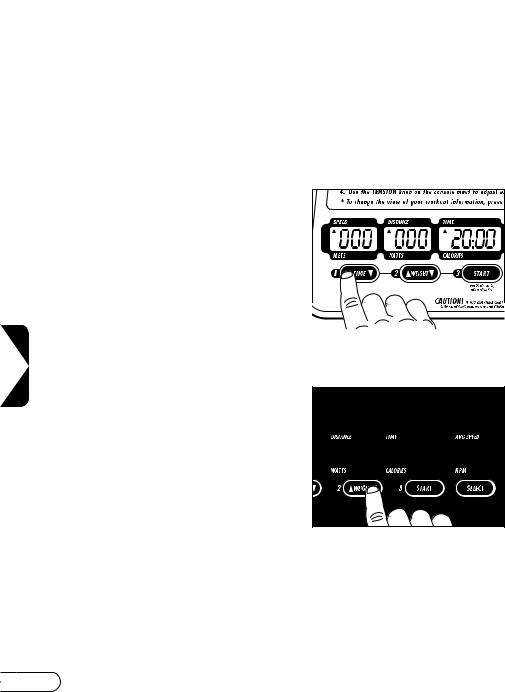
CHOOSING TIME AND STARTING
There are two ways to use the timer: Count-Down Mode and Count-Up Mode.
COUNT-DOWN MODE
Press the TIME ▲ or ▼ button to enter your workout time. When the Time you choose is showing in the TIME window, move to the WEIGHT button. To reset the Time, press and hold the START button for about three seconds.
E 3 1 0 0
COUNT-UP MODE
To use the timer in count-up mode, simply set WEIGHT, press START and begin; or press START to begin.
14
 Loading...