


O w n e r ’s G u i d e
R2200HRT, R2250HRT, E3200HRT, AND E3200
FITNESS BIKES
Congratulations on choosing a VISION FITNESS Bike. You’ve taken an important step in developing and sustaining an exercise program! Your Bike is a tremendously effective tool for achieving your personal fitness goals. Regular use of your Bike can improve the quality of your life in so many ways…
Here are just a few of the health benefits of aerobic exercise:
•Weight Loss
•A Healthier Heart
•Improved Muscle Tone
•Increased Daily Energy Levels
•Reduced Stress
•Help In Countering Anxiety and Depression
•An Improved Self Image
The key to reaping these benefits is to develop the exercise habit. Your new Bike will help you eliminate the obstacles that prevent you from getting in your exercise time. Snow and rain and darkness won't interfere with your workout when you have your Bike in the comfort of your home. This Owner’s Guide provides you with basic information on starting an exercise program. A more complete knowledge of your new Bike will assist you in realizing your goal of a healthy lifestyle.
Some kinds of service to your Bike should only be performed by your VISION FITNESS retailer. Please contact your authorized VISION FITNESS retailer should service be required. If a question or problem arises which cannot be handled by your VISION FITNESS retailer, please contact us:
VISION FITNESS 500 South CP Avenue P.O. Box 280
Lake Mills, WI 53551 Ph: 1.800.335.4348 Fax: 1.920.648.3373 www.visionfitness.com

A L L M O D E L S
. . . . . . . . . . 6
. . . . . . . . . . . 8
. . . . . . . 9
. . . . . . . . . . . 10
. . . . . . 12
. . . . . . . . . . 13
R 2 2 0 0 H R T
DISPLAY CONSOLE OVERVIEW . . . . 14 DISPLAY CONSOLE DESCRIPTIONS . . 15 PROGRAM OVERVIEWS . . . . . . . . . 18 USING THE PROGRAMS . . . . . . . . . 21 ENTERING TIME, WEIGHT, & LEVEL . 22 USING THE SPRINT 8 PROGRAM . . . 23 USING HEART RATE TRAINING . . . . . 24 USING THE HEART RATE STRAP . . . . 25 ALL HRT® PROGRAMS . . . . . . . . . . 26 USING CUSTOM PROGRAMS . . . . . . 28
Table of Contents
E 3 2 0 0
PROGRAM OVERVIEWS . . . . . . . . . 30 USING THE PROGRAMS . . . . . . . . . 32 ENTERING TIME, WEIGHT, LEVEL . . . 33 USING THE SPRINT 8 PROGRAM . . . 34 USING THE RACE PROGRAM . . . . . . 35 SET PACER SPEED . . . . . . . . . . . . . 36
G E N E R A L
ENGINEERING MODE . . . . . . . . . . . 37 PREVENTATIVE MAINTENANCE . . . . . 38 TROUBLESHOOTING:
BIKES . . . . . . . . . . . . . . . . . . . . . 39 HEART RATE MONITOR . . . . . . . . . . 41 HOME WARRANTY . . . . . . . . . . . . . 42 CORPORATE WARRANTY . . . . . . . . . 44 DEVELOPING FITNESS PROGRAM . . . 46 EXERCISE GUIDELINES . . . . . . . . . . 47 TARGET HEART RATE . . . . . . . . . . . . 48 RATE OF PERCEIVED EXERTION . . . . 49 BALANCED FITNESS . . . . . . . . . . . . 50 STRETCHING . . . . . . . . . . . . . . . . . 51 WEEKLY WORKOUT LOGS . . . . . . . . 54 MONTHLY WORKOUT LOGS . . . . . . 56
GENERAL E3200 T R H 0 0 2 3 E T R H 0 5 2 2 R T R H 0 0 2 2 R MODELS ALL
1
R 2 2 0 0 H R T
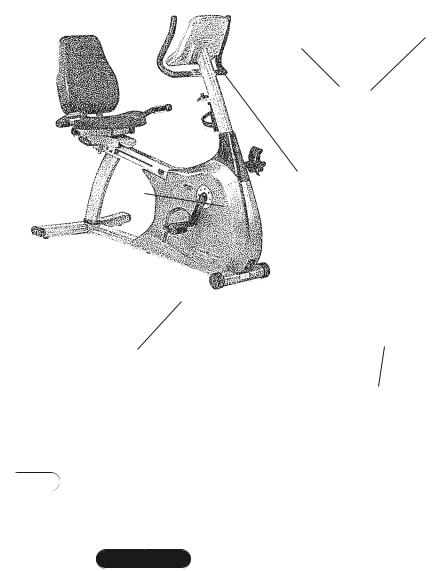
CONSOLE MAST
HANDLEBARS
CONSOLE
SEAT
HANDLEBARS
CONSOLE  MAST
MAST
SEAT
ADJUSTMENT
REAR FOOT
FRONT FOOT &
TRANSPORT WHEELS
2
R 2 2 0 0 H R T
S E M I - R E C U M B E N T F I T N E S S B I K E S
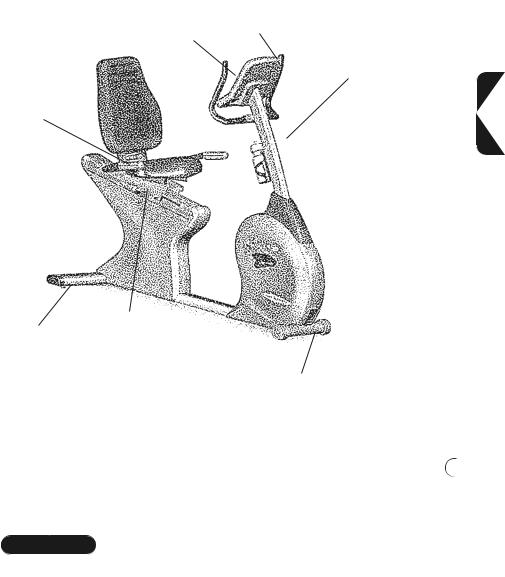
SEAT
HANDLEBARS
REAR FOOT
CONSOLE MAST
HANDLEBARS CONSOLE
CONSOLE
MAST
SEAT
ADJUSTMENT
FRONT FOOT &
TRANSPORT WHEELS
T R H 0 5 2 2 R
3
R 2 2 5 0 H R T
E M I - R E C U M B E N T F I T N E S S B I K E

SEAT
POST
SEAT
ADJUSTMENT
E3200 E 3 2 0 0 H R T
REAR FOOT
4
E 3 2 0 0
MULTI-POSITION
HANDLEBARS
CONSOLE
CONSOLE
MAST
FRONT FOOT &
TRANSPORT WHEELS
F I T N E S S B I K E S

MODELS ALL
5

ALL MODELS
IMPORTANT SAFETY INSTRUCTIONS SAVE THESE INSTRUCTIONS
When using an electrical product, basic precautions should always be followed, including the following:
Read all instructions before using this exercise product.
WARNING! To reduce the risk of burns, fire, electrical shock or injury to persons:
•Use this exercise product for its intended use as described in this Owner’s Guide. Only use attachments recommended by the manufacturer.
•Never drop or insert any object into any opening.
•Do not remove the Bike sidecovers. Service should be performed only by an authorized VISION FITNESS retailer.
•Never operate this Bike if it has a damaged cord or plug, if it is not working properly, or if it has been damaged or if it is immersed in water. Return the Bike to a retailer for examination and repair.
•Keep the cord away from heated surfaces.
•Do not use outdoors.
•To disconnect, turn the switch to the OFF position, then remove plug from outlet.
•Only use the power cord provided with your VISION FITNESS Bike.
•Never place the power cord under carpeting or place any object on top of the power cord that may pinch and damage it.
•Unplug your Bike before moving it.
CHILDREN
•Keep children off of your Bike at all times.
•When the Bike is in use, young children and pets should be kept at least 10 feet away.
6
OTHER SAFETY TIPS FOR YOUR VISION FITNESS BIKE
CAUTION! If you experience chest pains, nausea, dizziness or shortness of breath, stop exercising immediately and consult your physician before continuing.
•Do not wear loose clothing that might catch on any part of your Bike.
•Read this Owner’s Guide before operating your Bike.
•Drink plenty of fluids during your workout.
CLEANING
•Clean only with soap and a slightly damp cloth; never use solvents.
MODELS ALL
7
ALL MODELS
ASSEMBLY
It is recommended, when possible, that an authorized VISION FITNESS retailer assemble your Bike. If you have elected to assemble this product yourself, for your safety, please read and follow each of the steps in the enclosed assembly instructions. If you have any questions regarding any component or function of your Bike, contact your retailer.
MOVING
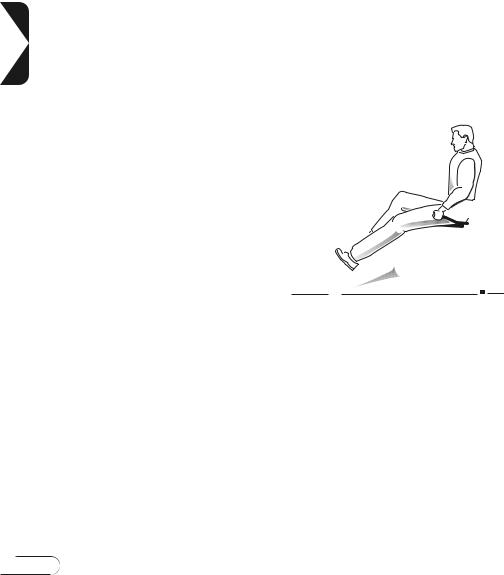
Your VISION FITNESS Bike has transport wheels included for ease of mobility. To move your semi-recumbent Bike, firmly grasp the rear of the seat rail or the rear of the frame assembly. Carefully lift and roll on the transport wheels. To move your upright Bike, firmly grasp the handlebars, carefully tip toward you, and roll on the transport wheels.
CAUTION: Our Bikes are well-built and heavy, weighing up to 140 pounds! Use care and additional help if necessary.
8
PLACEMENT IN YOUR HOME
Please follow the safety instructions to place your Bike in the location where it will best be used. It is important that you place your Bike in a comfortable and inviting room. Avoid putting your Bike in an unfinished basement or undesirable setting. Exercise adherence will be achieved only if you exercise in an attractive setting.
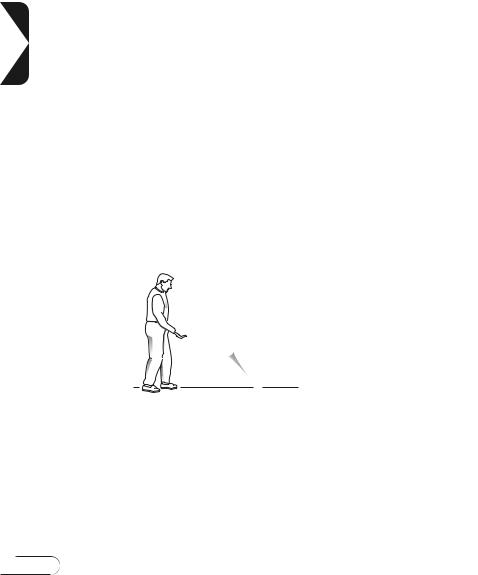
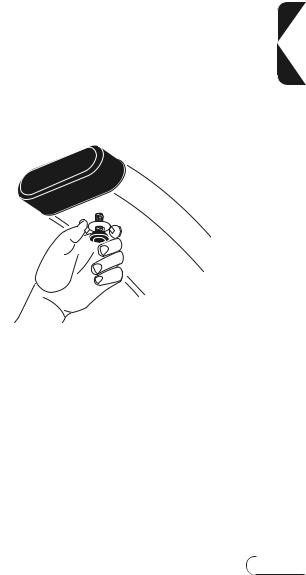
STABILIZING THEBIKE
After positioning your Bike in its intended location, check its stability by attempting to rock it side to side. Rocking or wobbling indicates that the Bike needs to be leveled. Determine which leveler is not resting completely on the floor. Loosen the wing nut at the base of the leveler to allow the leveler to rotate. Now rotate the leveler to the left or right until your Bike is stable. Lock the adjustment by tightening the wing nut against the rear foot support.
MODELS ALL
9
ALL MODELS
SEAT POSITIONING
To determine proper seat position, sit on the seat and position the ball of your foot on the center of the pedal. Your knee should bend slightly at the furthest pedal position. You should be able to pedal without locking your knees or shifting your weight from side to side.
UPRIGHT SEAT ADJUSTMENT
This Bike features a locking seat adjustment pin to easily and safely adjust the seat height. To adjust, loosen the adjustment knob by turning it two half turns counterclockwise. Pull out the knob to unlock the post, and adjust the post up or down to the desired setting. Release the knob to lock in place. Turn the knob clockwise until tightened. Please check to be sure seat post is locked in place
10 before each use.
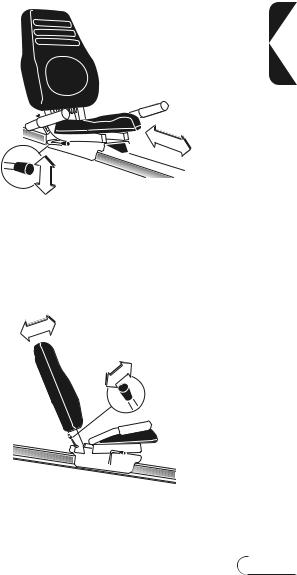
SEMI-RECUMBENT SEAT ADJUSTMENT
While seated on your Bike, lift the spring-loaded seat lever on the right side of the seat to make adjustments. Slide the seat forward or backward to desired location. Release the spring-loaded seat lever and gently attempt to rock forward and backward to assure it is locked in place.
TILTING SEAT BACK
The R2250HRT and R2200HRT come equipped with a tilting seat back. Tilt adjustments are made with a rotating lever on the user’s right side, slightly behind the handlebar.
To adjust the tilt angle of the seat, rotate the lever down (counter-clock wise) and lean back on the seat cushion until the desired position is achieved. When the position is set, rotate the lever upward (clock wise) until it is snug. The seat comes equipped with a spring return system to return the seat back to its original position when the friction lever is released and the user is not leaning against the backrest.
MODELS ALL
11
ALL MODELS
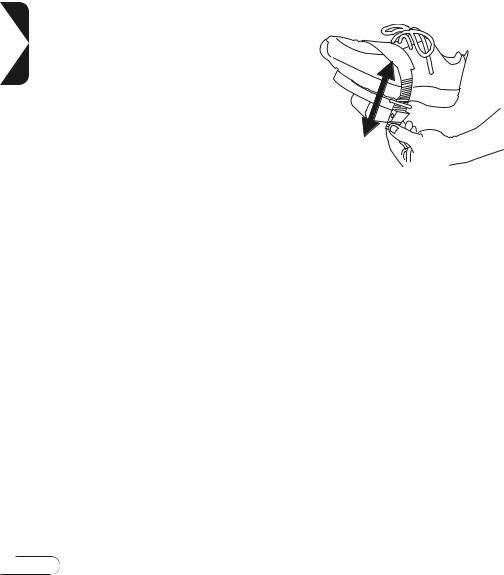
PEDAL STRAP ADJUSTMENT
The straps are designed to fit your individual foot size and should be adjusted tight enough to keep your feet from slipping. The pedals include spring-loaded clips for easy adjustment. To tighten the strap, pull down the open end of the strap. To loosen the strap, push down on the top of the clip and pull the strap up. Release the clip to lock in place.
POWER SUPPLY
Your Bike uses a wall mount external power supply. Use only the power supply provided with your Bike. If you misplace this power supply, please contact your authorized VISION FITNESS retailer for an original replacement. Use of the wrong power supply may cause damage to your Bike.
12
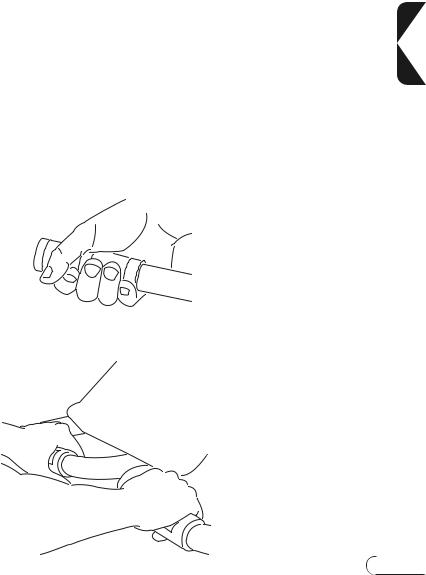
CONTACT HEART RATE
HAND PULSE HEART RATE SENSORS
The Contact Hand Pulse Sensors are included on each product to monitor your heart rate. To use, grasp the sensors with a comfortable grip during your workout. The console will display your heart rate. Although your signal will be displayed immediately, it may take the system a few seconds to zero in on your actual heart rate.
MODELS ALL
13
E 3 2 0 0 H R T R 2 2 5 0 H R T R 2 2 0 0 H R T
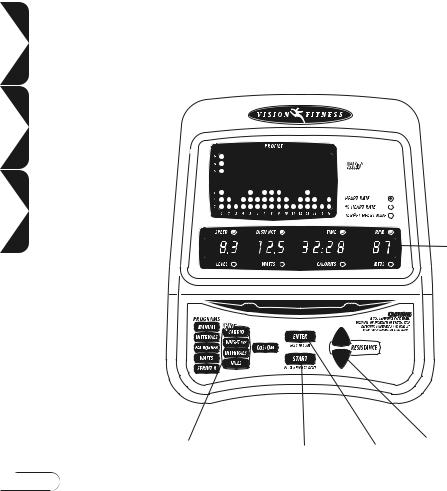
DISPLAY CONSOLE
DISPLAY CONSOLE OVERVIEW
The computerized display allows the user to select a workout that meets their desired fitness goals. It also allows the user to monitor the progress and feedback of each workout so they can track improvements in overall fitness over time.
E 


 G
G
F
D A B C
14

DISPLAY CONSOLE DESCRIPTIONS
A. START/HOLD TO RESET
Press the START key to begin a MANUAL workout immediately without having to set individual information. When the program begins, you have the ability to adjust resistance levels with the ARROW buttons. Feedback information will be calculated using default settings.
PAUSE: If you need to PAUSE your program during a workout, pressing the START button will PAUSE your program for two minutes. Pressing START will return you to your workout.
RESET: If you need to RESET the console during your workout, you can do so by holding down the START button for three seconds or until the display resets.
B. ENTER/HOLD TO SCAN
This button is used after entering each piece of information in setup such as age, weight, or level.
SCAN: When exercising in a program, pressing the ENTER button will allow you to SCAN the feedback display views. This is true for both the large message/feedback window and the heart rate feedback window. If you hold down the ENTER button for three seconds during your workout, the SCAN function will automatically alternate feedback display views.
C. ARROW BUTTONS
These buttons are used to change values in setup mode prior to your workout. During your workout, they are used to change workout levels. In HRT® programs, they are used to change your target heart rate.
D. PROGRAM BUTTONS
These buttons provide quick access to your favorite workouts. There is no need to scroll through the programs to find the one you want. Simply press the program button and begin user setup.
CHANGEONTHEFLY: You can change your program on the fly by simply 15 pressing another program button.
T R H 0 0 2 3 E T R H 0 5 2 2 R T R H 0 0 2 2 R

E 3 2 0 0 H R T R 2 2 5 0 H R T R 2 2 0 0 H R T
DISPLAY CONSOLE DESCRIPTIONS
E. PROFILE DISPLAY
This window provides a dot matrix profile of the workout segments you are about to complete, as well as the ones you have already completed, and the level of resistance for each segment.
F. MESSAGE/FEEDBACK WINDOW
This window provides step-by-step instructions in the setup mode, instructions, feedback or motivational messages during your workout; and congratulations and feedback information at the end of your workout.
FEEDBACK:
During your workout, this window displays exercise feedback about your workout, including:
TIME: the time elapsed or the time remaining in your workout. SPEED: the pedaling speed in miles or kilometers per hour. DISTANCE: the total distance traveled in miles or kilometers since the start of your workout.
RPM: the pedal rate or Revolutions Per Minute (RPM). WATTS: measurement of workload; one watt is equal to six kilogram-meters per minute.
CALORIES: an estimate of calories burned since the beginning of the workout.
LEVEL: the current resistance level of your workout.
METS: a measurement of oxygen consumption; one MET equals the approximate amount of oxygen consumed per minute by a person at rest.
G. HEART RATE/HRT FEEDBACK WINDOW
This window provides feedback on your current heart rate and the percent of your predicted maximum heart rate (% Heart Rate). It also
16includes your target heart rate when using one of the HRT® programs on the 200HRT products.
 Loading...