


STAINLESS STEEL GAS GRILL
MODEL NO.: 720-0150-LP ITEM NO: 168918
*Jenn-Air is a Trademark of the Maytag Corporation and is used under license to Lowe’s Companies, Incorporated.
FOR OUTDOOR USE ONLY
PLEASE CONTACT 1-800-554-5799 FOR ASSISTANCE DO NOT RETURN TO PLACE OF PURCHASE

TABLE OF CONTENTS
SECTION ONE |
|
SECTION FIVE |
|
Safety Instructions…………………………. |
1-3 |
|
|
Exploded View……………………….…. |
18 |
||
Placement of the Grill………………………. |
3 |
Parts List ………………………………… |
19 |
SECTION TWO
Side Shelf Assembly………………………
Side Shelf Handle & Grease Tray Handle
Assembly…………………………………..
Battery, Grid, Brake & Spice Tray
Assembly…………………………………..
Gas Holder & Propane Tank Assembly…
SECTION THREE
Gas Hook Up………………………………
Leak Testing……………………………….
Installer Final Check………………………
SECTION FOUR
Operating Instructions…………………… Lighting Instructions……………………… To Match Light the Grill………………….. Easy Lighting Illustrations……………….. Using the Side Burner ……………………
Care and Maintenance of Side Burner…. Care and Maintenance of Grill…….......... Troubleshooting…………………………...
SECTION SIX
4Grilling Hints …………………………….. 20 Grill Cooking Chart ……………………… 20-22
5Grill Recipe Suggestions ………………. 23-24
6SECTION SEVEN
7Limited Warranty ………………………… 25
8
9-10
10
11-12
12
13
14
15
15
16
17
To reduce the risk of fire, burn hazard or other injury, read this Care and Use Manual carefully and completely before using your grill.

SAFETY INSTRUCTIONS |
PRECAUTIONS |
 WARNING
Do not attempt to light the grill if gas odor is present. Contact customer service at 1-800- 554-5799.
When lighting, keep your face and body as far away from the burner as possible.
BEFORE LIGHTING
Inspect the gas supply hose prior to turning the gas “ON”. If there is evidence of cuts, wear, or abrasion, it must be replaced prior to use.
Only the pressure regulator and hose assembly supplied with the unit should be used. Never substitute regulators for those supplied with the grill. Contact customer service for proper replacement.
Screw the regulator (type QCC1) onto the tank. Leak check the hose and regulator connections with a soap and water solution before operating the grill (See “Leak Testing” instructions on page 9).
 LP GAS CYLINDER WARNING
1.Do not store or use gasoline or other flammable vapors and liquids in the vicinity of this or any other appliance.
2.An LP cylinder not connected for use should not be stored in the vicinity of this or any other appliance.
3.Do not store spare LP gas cylinders under or near this appliance.
4.Never fill the cylinder beyond 80 percent capacity.
5.LP gas cylinders must be fitted with an Overfill Protection Device (OPD).
6.If the information above is not followed exactly, a fire resulting in death or serious injury could occur.
USING THE SIDE BURNER
Inspect the gas supply hose prior to turning on the gas. If there is evidence of cuts, wear or abrasion, it must be replaced prior to use. Do not use the side burner if gas odor is present.
Keep a spray bottle of soapy water near the gas supply valve and check the connections before each use.
ROTISSERIE DRIVE MOTOR
To ensure continued protection against electric shock:
Connect to properly grounded outlets only.
Keep extension cord connections dry and off the ground.
Do not expose to rain.
Do not use indoors.
 WARNING
If you smell gas:
1.Shut off gas to the grill.
2.Open the top cover or lid.
3.Extinguish any open flames.
4.If the odor continues, immediately call your gas supplier or local fire department.
1
SAFETY INSTRUCTIONS 
 WARNING
Do not try lighting this appliance without first reading the “LIGHTING INSTRUCTIONS” section of this manual.
TESTED IN ACCORDANCE WITH ANSI Z21.58b
LATEST STANDARD and CGA 1.6b LATEST
STANDARD FOR OUTDOOR COOKING GAS
APPLIANCES.
Check your local building codes for the proper method of installation. In the absence of local codes, this unit should be installed in accordance with the National Fuel Gas Code ANSI Z223.1/NFPA 54, Storage and Handling of Liquefied Petroleum Gases, ANSI/NFPA 58 or CSA B149.1 Natural Gas and Propane Installation Code, and the National Electrical Code, ANSI/NFPA 70.

SAFETY INSTRUCTIONS
When using the grill, do not touch the grill rack, burner grate or immediate surroundings as these areas become extremely hot and could cause burns. Use only dry potholders. Moist or damp potholders on hot surfaces may cause steam burns. Do not use a towel or bulky cloth in place of potholders. Do not allow potholders to touch hot portions of the grill rack.
Grease is flammable. Let hot grease cool before attempting to handle it. Do not allow grease deposits to collect in the grease tray at the bottom of the grill’s firebox. Clean the grease tray often.
Do not use aluminum foil to line the grill racks or grill bottom. This can severely upset combustion air flow or trap excessive heat in the control area.
For proper lighting and performance of the burners, keep the burner ports clean. It is necessary to clean them periodically for optimum performance. The burners will only operate in one position and must be mounted correctly for safe operation.
Clean the grill with caution. To avoid steam burns, do not use a wet sponge or cloth to clean the grill while it is hot. Some cleaners produce noxious fumes or can ignite if applied to a hot surface.
 INSECT WARNING
Spiders and other insects can nest inside the burners of this and other grills, which could disrupt gas flow. This dangerous condition could cause a fire behind and beneath the valve panel, damaging the grill and making it unsafe for operation.
Inspect the grill at least twice a year.
Turn off all grill controls and make certain the grill is cool before using any type of aerosol cleaner on or around the grill. The chemical that produces the spraying action could, in the presence of heat, ignite or cause metal parts to corrode.
Do not use the grill to cook excessively fatty meats or other products which promote flare-ups.
Do not operate the grill under unprotected combustible constructions. Use only in well ventilated areas. Do not use in buildings, garages, sheds, breezeways or other such enclosed areas.
This unit is intended for outdoor use only.
Keep the areas surrounding the grill free from combustible materials, fluids, trash, and vapors such as gasoline or charcoal lighter fluid. Do not obstruct the flow of combustion and ventilation air. If the unit is stored indoors, make sure it is cool.
Do not use briquettes of any kind in the grill.
The 720-0150-LP grill is designed for optimum performance without the use of briquettes. Do not place briquettes on the flame tamers as this will block the vent to the grill burners. Adding briquettes can damage ignition components and knobs, thus voiding the warranty.
Keep electrical supply cords and the rotisserie motor cord away from heated areas of the grill.
Never use the grill in extremely windy conditions. If located in a consistently windy area (oceanfront, mountaintop, etc.), a windbreak will be required. Always adhere to the clearance specifications.
PLACEMENT OF THE GRILL
CLEARANCE Non-Combustible Construction
A minimum of 3 in. clearance from the back of the grill to non-combustible materials are required for the lid to open fully.
 WARNING
Do not install this unit into combustible enclosures. There should be a minimum clearance of 24 in. from all sides to combustible materials.
LOCATION
When determining a suitable location take into account concerns such as exposure to wind, proximity to traffic paths, and keeping gas supply lines as short as possible.
Place the grill in well-ventilated areas. Never place the grill in a building, garage, breezeway, shed or other such enclosed areas. During heavy use, the grill will produce a lot of smoke.
3
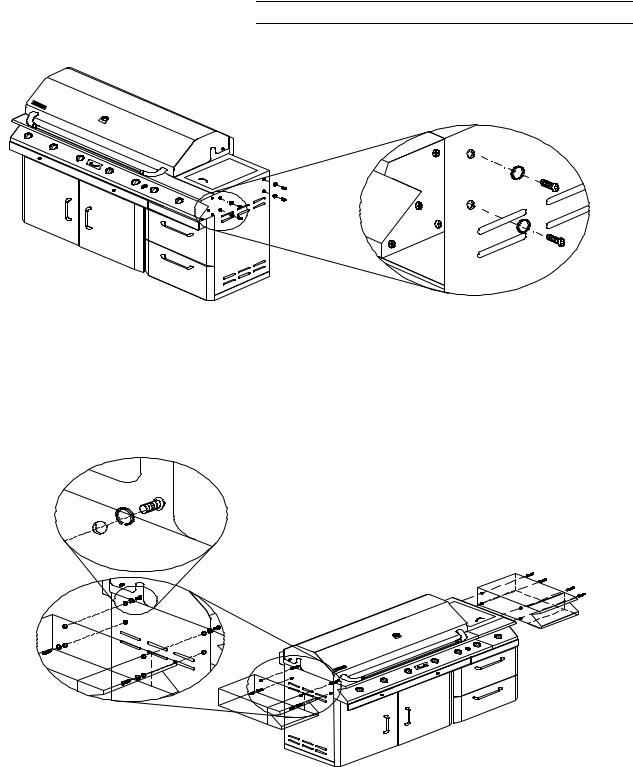
SIDE SHELF ASSEMBLY 

RIGHT ASSEMBLY
1.The screws to attach the side shelf are already screwed into the right side panel.
2.Remove the screws from the right side panel.
3.Align the holes in the side shelf with the screw holes in the right side panel.
4.Insert the screws and tighten.
LEFT ASSEMBLY
5.Repeat the steps above to install the left side shelf to the left side panel.
6.For the left side shelf, insert the top two screws from inside the grill and the bottom two from outside the grill.
4
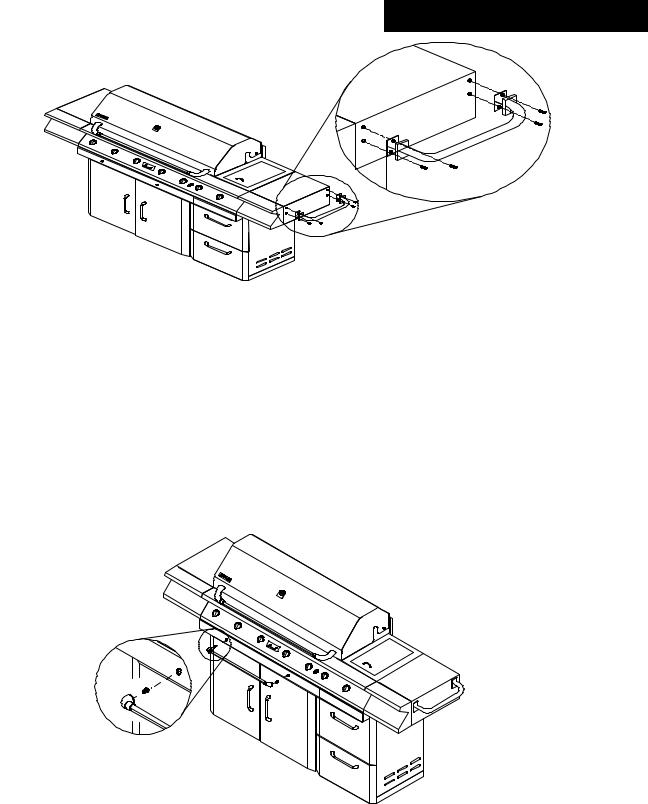
SIDE SHELF HANDLE ASSEMBLY
1.Remove the four handle screws from the side of the burner shelf.
2.Align the handle holes with the holes in the shelf.
3.Insert the screws and tighten.
GREASE TRAY HANDLE ASSEMBLY 
1.Remove the two screws from the grease tray handle.
2.Align the holes in the grease tray with the holes in the grease tray handle.
3.Insert the screws and tighten.
5

BATTERY ASSEMBLY 

1.Remove the ignition button housing.
2.Insert the battery into the housing with the positive side facing outward.
3.Replace the ignition button housing.
GRID, BRAKE & SPICE TRAY ASSEMBLY 
Remove the cooking grids from the firebox and insert them into the cooking griddle.
To lock the caster brake, lift the red handle upward.
Mount the spice tray into the holes on the left door of the grill.
6
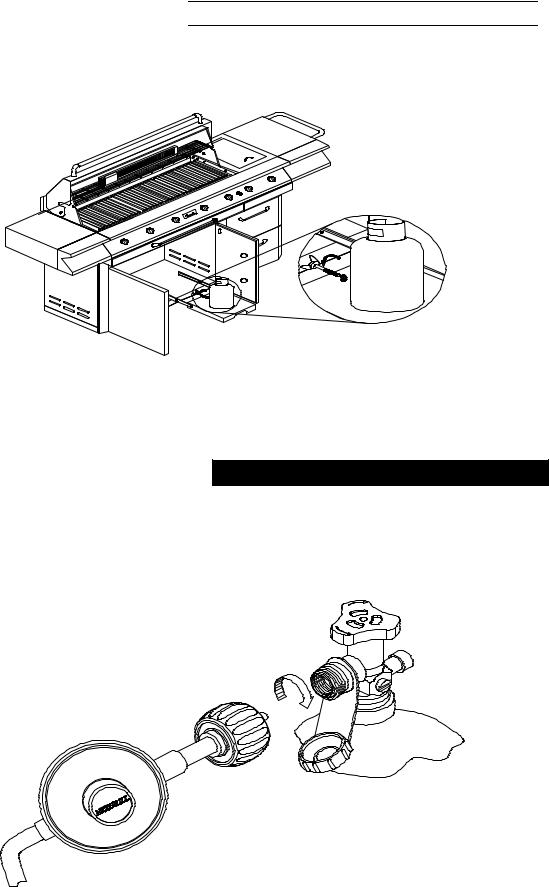
GAS HOLDER ASSEMBLY 

1. Secure the gas tank on the slide tray with the retention kit screws.
PROPANE TANK ASSEMBLY
1.Attach the regulator to the propane tank by turning the regulator handle clockwise.
2.Turn off the gas supply at the cylinder when the appliance is not in use.
ESOLC
g
NEPO
7
 Loading...