

Page 1
ZyWALL 70
Internet Security Gateway
Quick Start Guide
Version 3.64
3/2005
Table of Contents
ENGLISH 1
DEUTSCH 23
ESPAÑOL 47
FRANÇAIS 71
ITALIANO 95
中文 119
Page 2
ENGLISH
ENGLISH
Overview
The ZyWALL 70 is a load-balancing, dual WAN firewall with VPN, bandwidth management, content filtering
and many other features. You can use it as a transparent firewall and not reconfigure your network nor
configure the ZyWALL’s routing features. The ZyWALL increases network security by providing DMZ ports for
use with publicly accessible servers. This guide covers the initial connections and configuration needed to
start using the ZyWALL in your network.
See the User’s Guide for more information on all features.
You may need your Internet access information.
This guide is divided into the following sections.
1 Hardware Connections
2 Accessing the Web Configurator
3 Bridge Mode
4 Internet Access Setup
5 DNS
6 NAT
7 Firewall
8 VPN Rule Setup
9 myZyXEL.com Product Registration
10External Database Content Filtering
11Troubleshooting
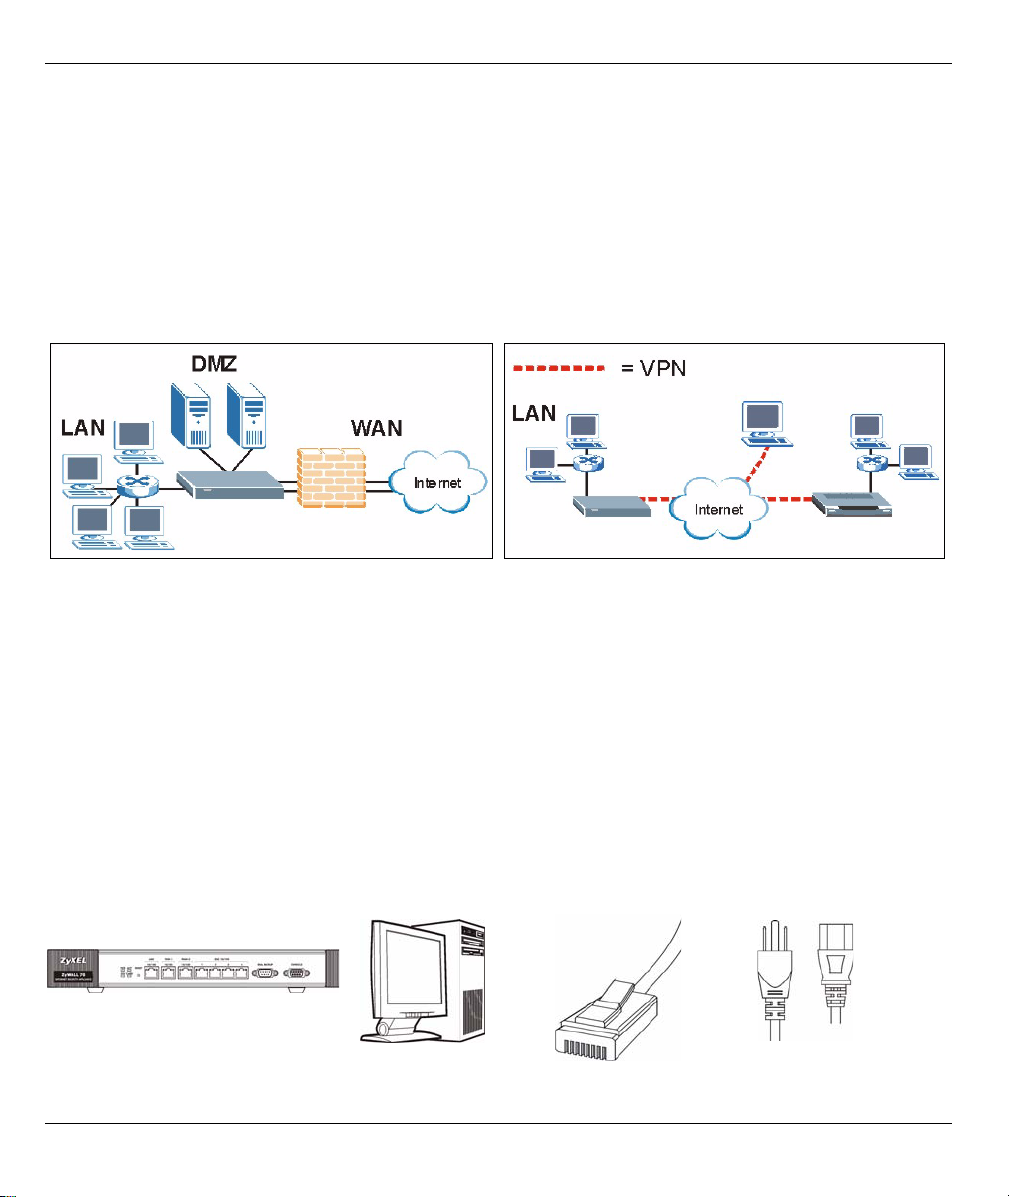
1 Hardware Connections
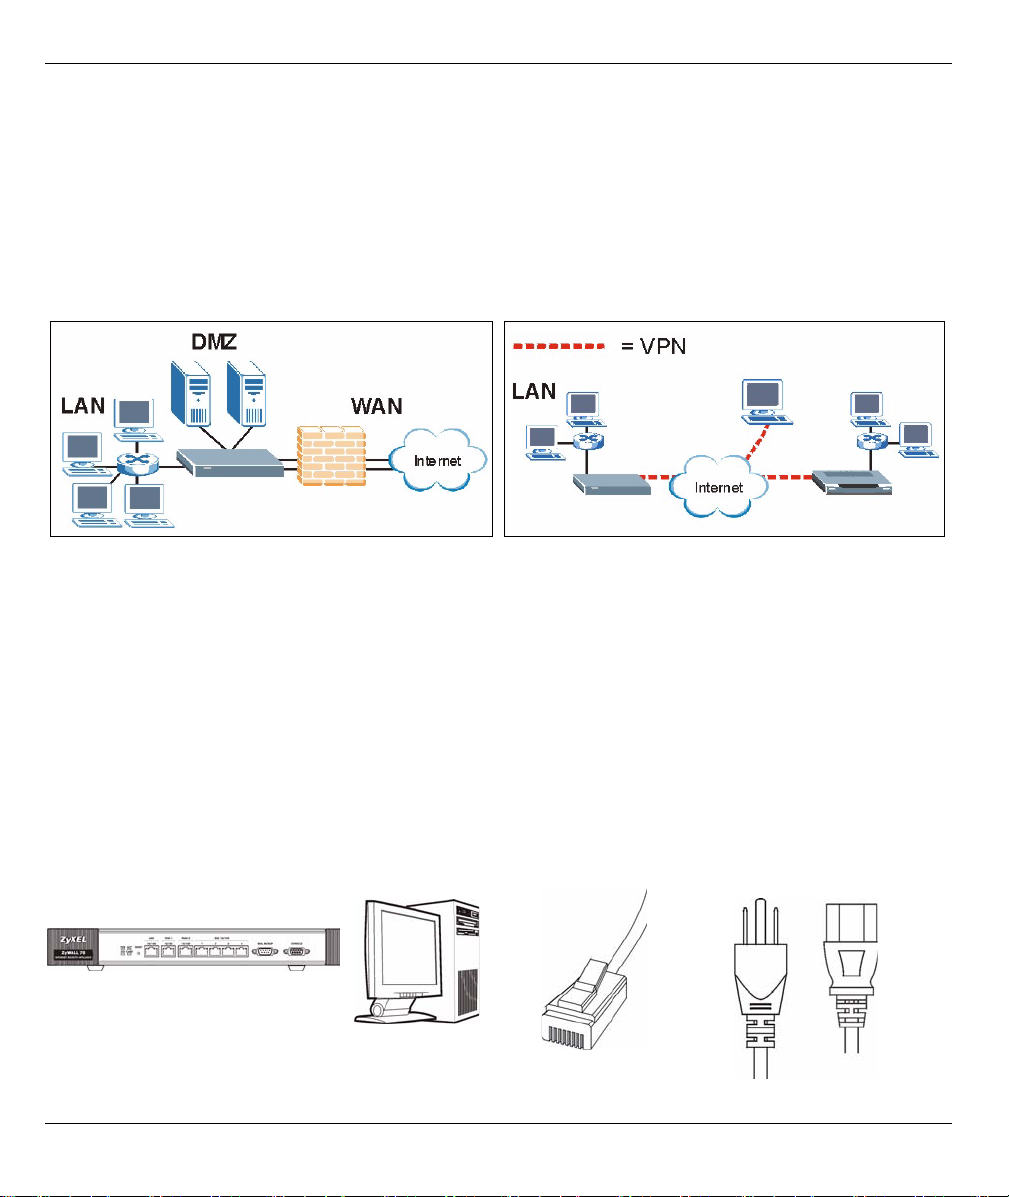
You need the following.
ZyWALL Computer Ethernet Cables
1
Power Cord
Page 3

ENGLISH
Do the following to make hardware connections for initial setup.
1 Use an Ethernet cable to connect the LAN port to a computer. You can also use Ethernet cables to
connect public servers (web, e-mail, FTP, etc.) to the DMZ ports.
2 Use another Ethernet cable(s) to connect the WAN 1 and/or WAN 2 port to an Ethernet jack with Internet
access.
3 Use the included power cord to connect the power socket (on the rear panel) to a power outlet
4 Push the power switch to the on position and look at the front panel. The PWR LED turns on. The SYS
LED blinks while performing system testing and then stays on if the testing is successful. The ACT, CARD,
LAN, DMZ, and WAN LEDs turn on and stay on if the corresponding connections are properly made.
2
Page 4
ENGLISH
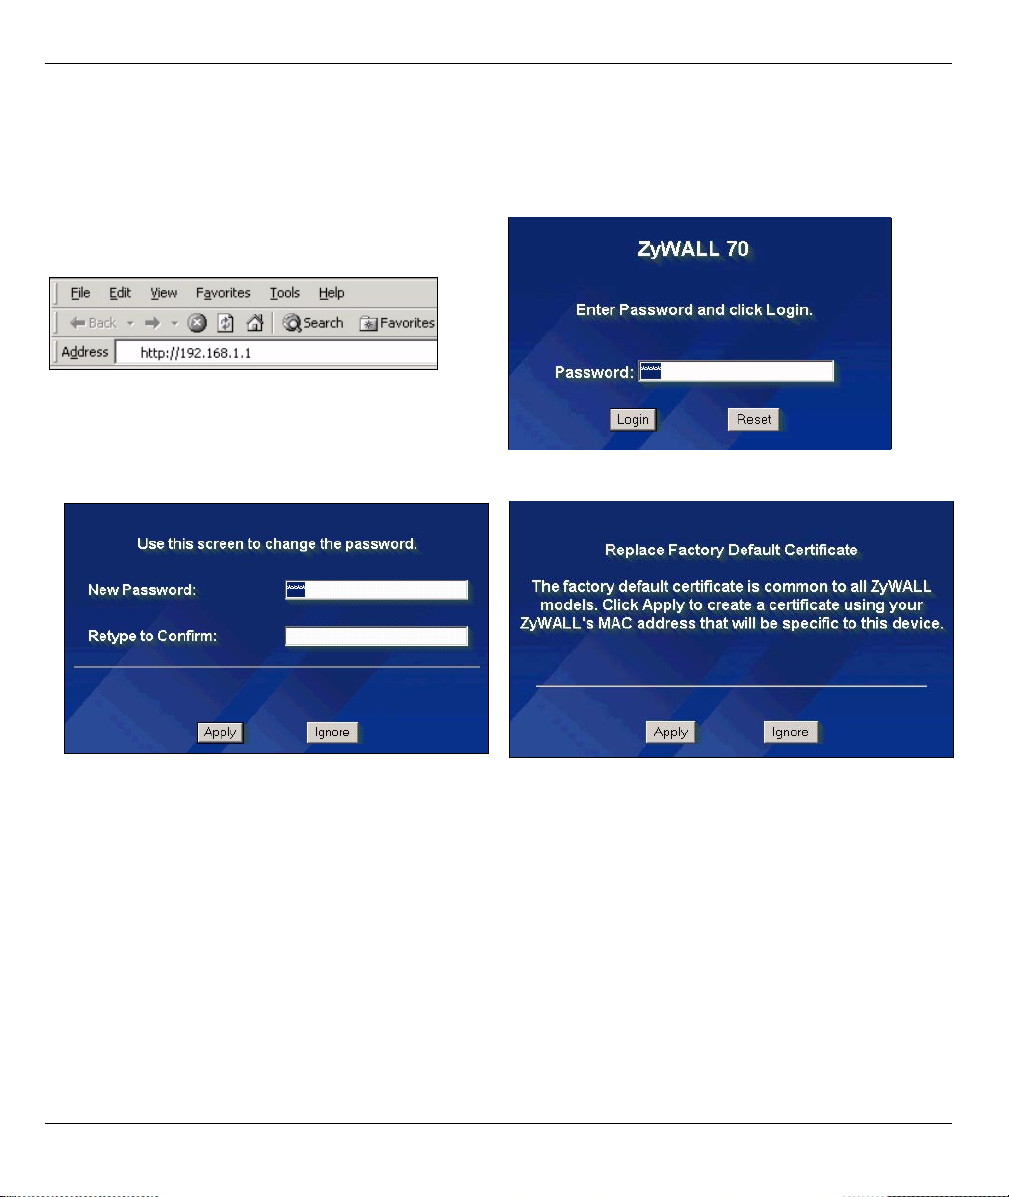
2 Accessing the Web Configurator
Use this section to configure the WAN 1 interface for Internet access.
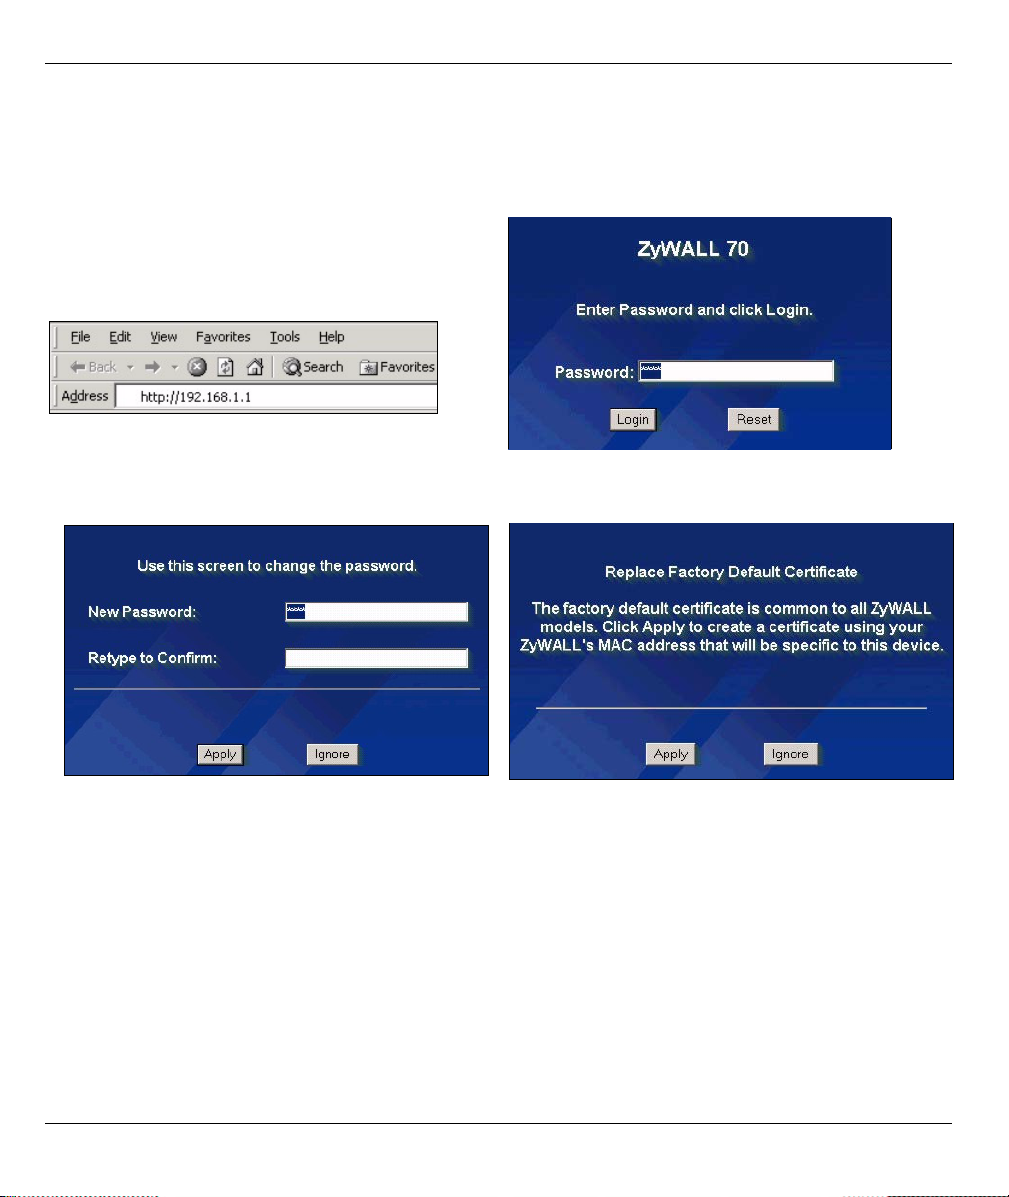
1 Launch your web browser. Enter 192.168.1.1 (the
ZyWALL’s default IP address) as the address.
If the login screen does not display, see Section
11.1 to set your computer’s IP address.
3 Change the login password by entering a new
password and clicking Apply.
2 Click Login (the default password 1234 is already
entered).
4 Click Apply to replace the ZyWALL’s default
digital certificate.
5 The HOME screen opens.
The ZyWALL is in router mode by default. Continue to the next step if you want to use routing features
such as NAT, DHCP and VPN.
Go to Section 3 if you prefer to use the ZyWALL as a transparent firewall.
3
Page 5
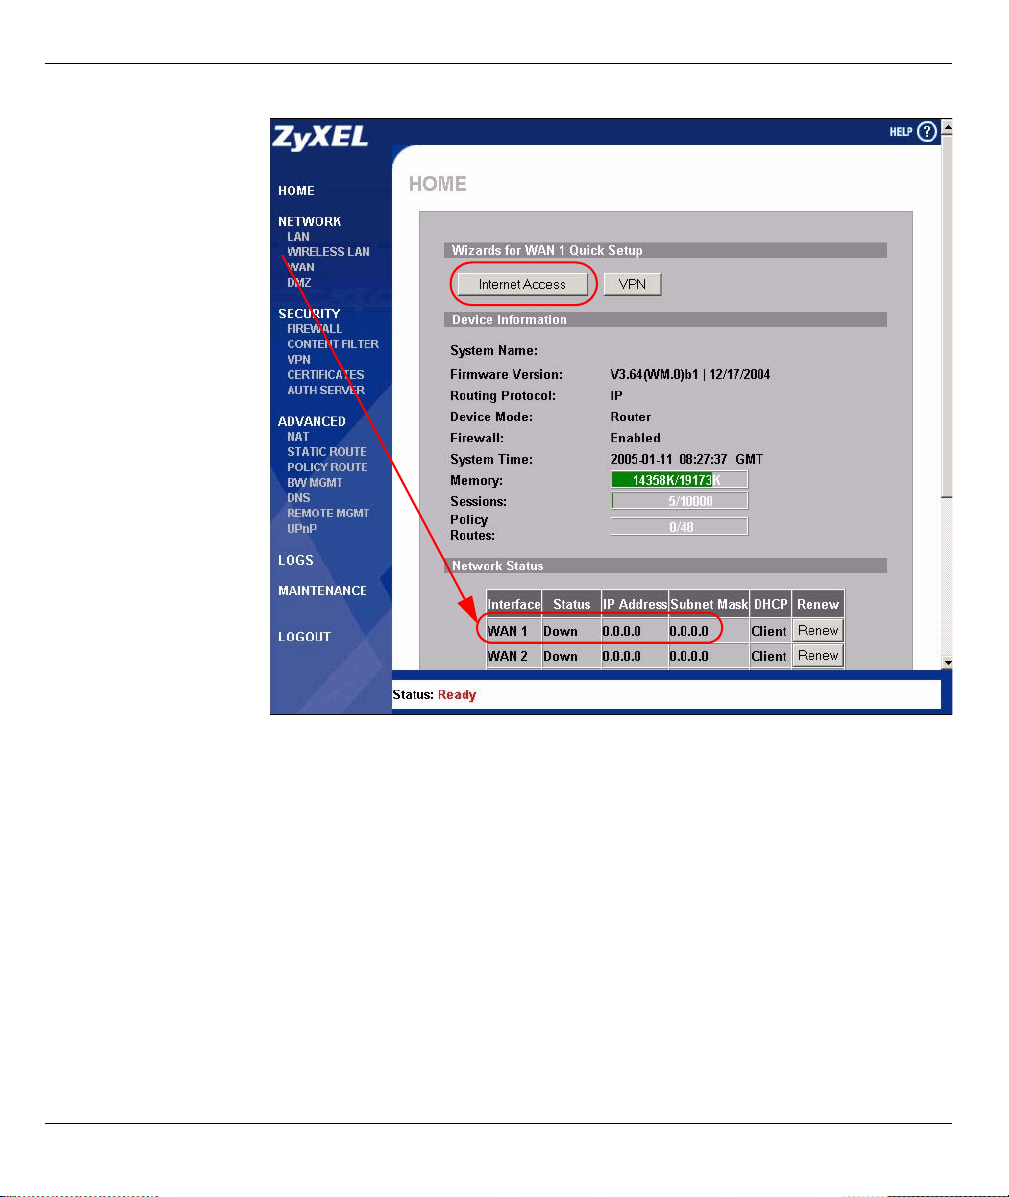
6 Check the Network
Status table. If the
WAN 1 status is not
Down and there is an
IP address, go to
Section 5.
If the WAN 1 status is
Down (or there is not
an IP address), click
Internet Access and
use Section 4 to
configure WAN 1.
Use the NETWORK
WAN screens if you
need to configure
WAN 2. You can also
configure load
balancing between the
WAN ports.
ENGLISH
3 Bridge Mode
When you set the ZyWALL to bridge mode, it functions as a transparent firewall. Do the following to set the
ZyWALL to bridge mode.
4
Page 6

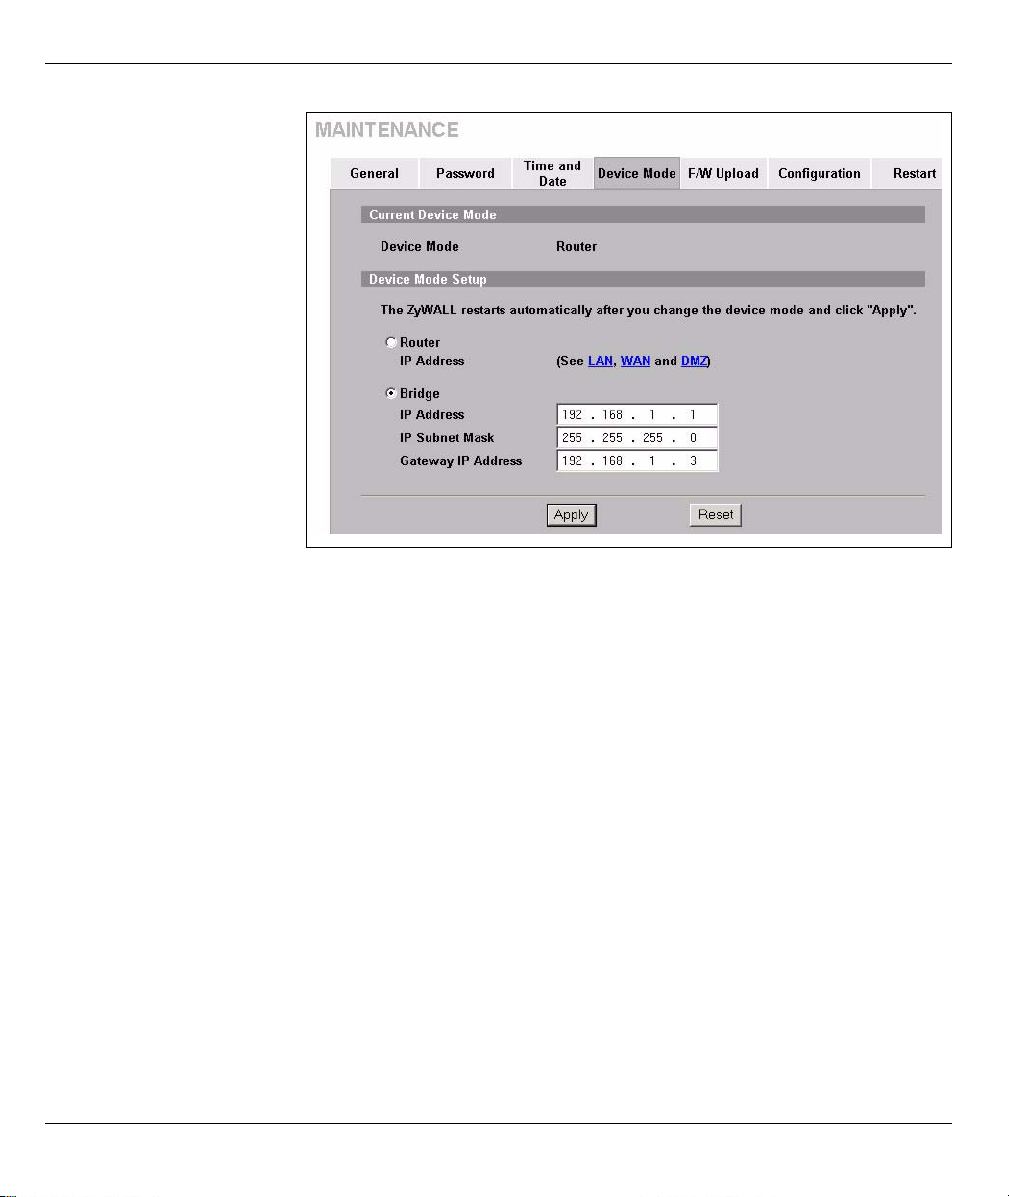
1 Click MAINTENANCE in
the navigation panel and
then Device Mode.
2 Select Bridge and
configure a (static) IP
address subnet mask and
gateway IP address for
the ZyWALL’s LAN, WAN,
DMZ and WLAN
interfaces.
3 Click Apply. The ZyWALL
restarts.
Skip to Section 5 if you have
servers that you need to be
accesible from the WAN.
4 Internet Access Setup
ENGLISH
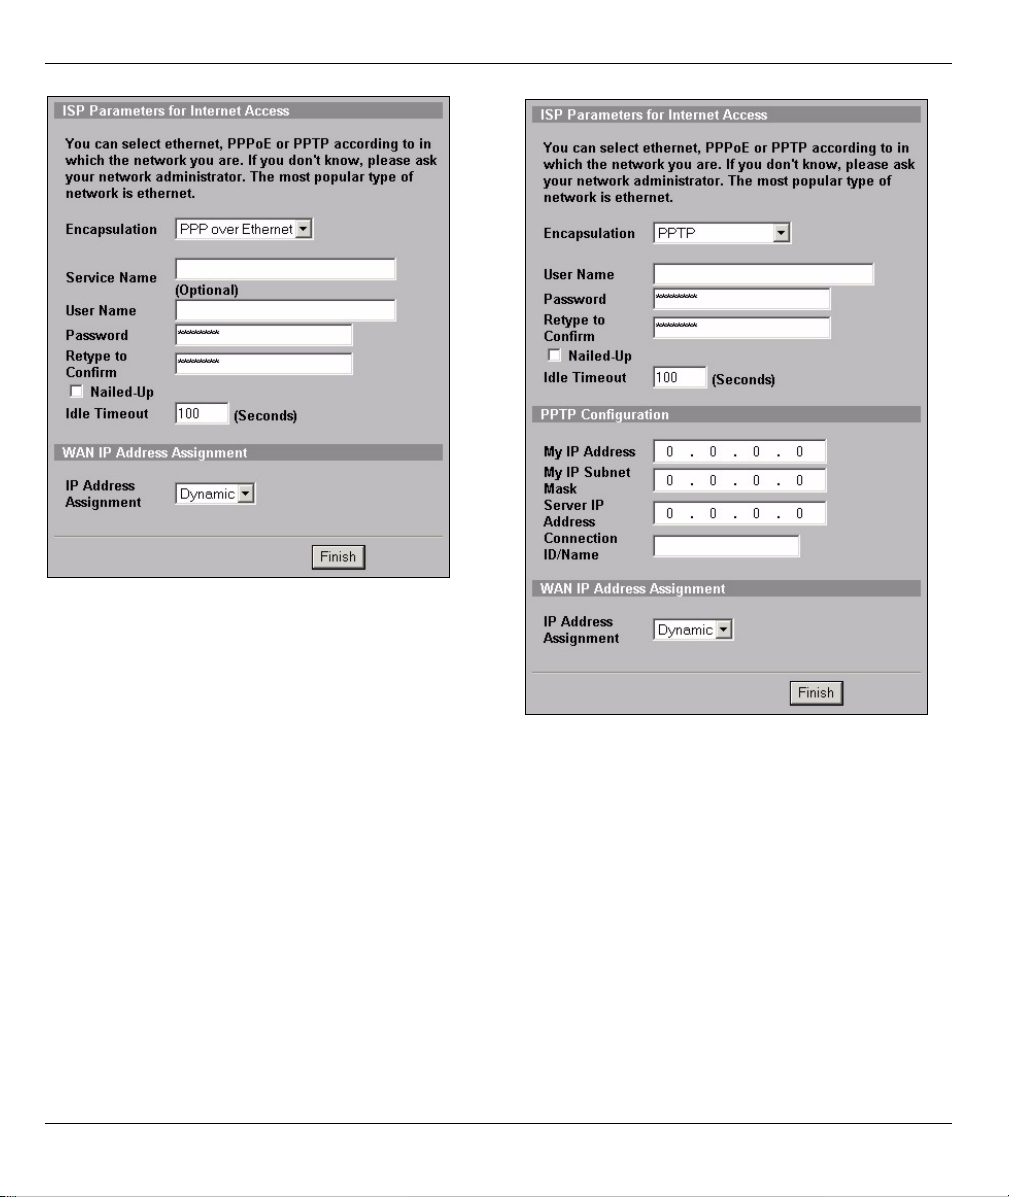
Enter the Internet access information exactly as given to you.
If you were given an IP address to use, select Static in the IP Address Assignment drop-down list box and
enter the information provided.
Note: The fields vary depending on what you select in the Encapsulation field. Fill them in with the
information provided by the ISP or network administrator.
Click Finish when you are done.
5
Page 7

• Ethernet Encapsulation
Configure a Roadrunner service in the
NETWORK WAN screens (use the WAN 1 tab).
ENGLISH
• PPP over Ethernet or PPTP Encapsulation
Select Nailed-Up when you want your connection up all the time (this could be expensive if your ISP bills you
for Internet usage time instead of a flat monthly fee).
To not have the connection up all the time, specify an idle time-out period (in seconds) in Idle Timeout.
6
Page 8
ENGLISH
5 DMZ
The DeMilitarized Zone (DMZ) allows public servers (web, e-mail, FTP, etc.) to be visible to the outside world
and still have firewall protection from DoS (Denial of Service) attacks.
Unlike the LAN, the ZyWALL does not assign TCP/IP configuration via DHCP to computers connected to the
DMZ ports. Configure the computers with static IP addresses (in the same subnet as the DMZ port's IP
address) and DNS server addresses. Use the ZyWALL's DMZ IP address as the default gateway.
Do the following to configure the DMZ if the ZyWALL is in routing mode.
Note: You do not need to configure DMZ with bridge mode, skip to Section 7.
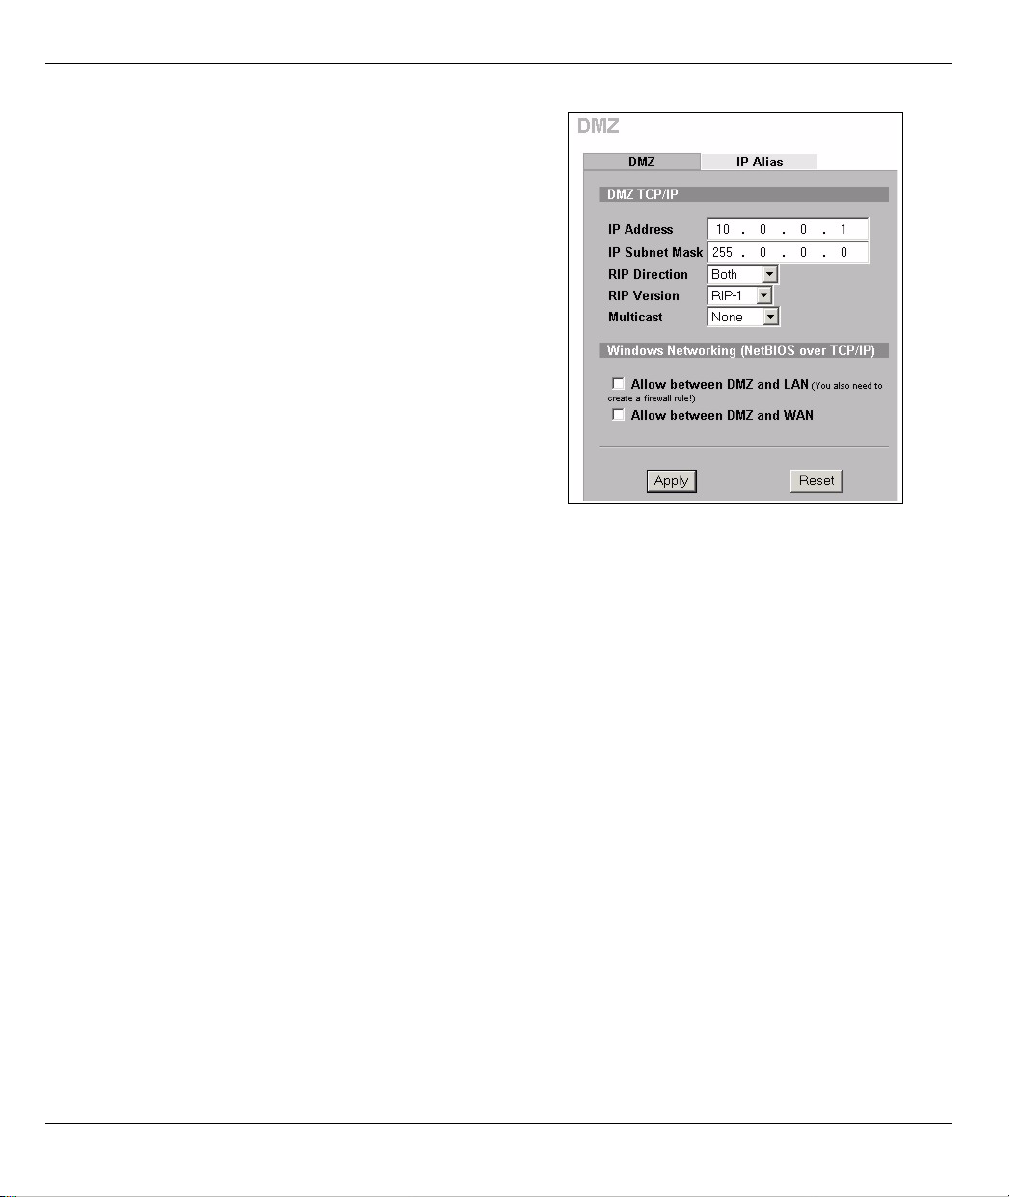
1 Click DMZ in the navigation panel.
7
Page 9
ENGLISH
2 Specify an IP address and subnet mask for the DMZ
interface.
If you use private IP addresses on the DMZ, use NAT to
make the servers publicly accessible (see Section 6).
A public IP address must be on a separate subnet from
the WAN port’s public IP address. If you do not configure
NAT for the public IP addresses on the DMZ, the ZyWALL
routes traffic to the public IP addresses on the DMZ
without performing NAT. This may be useful for hosting
servers for NAT unfriendly applications.
3 Click Apply.
6 NAT
NAT (Network Address Translation - NAT, RFC 1631) means the translation of an IP address in one network
to a different IP address in another. You can use the NAT Address Mapping screens to have the ZyWALL
translate multiple public IP addresses to multiple private IP addresses on your LAN (or DMZ).
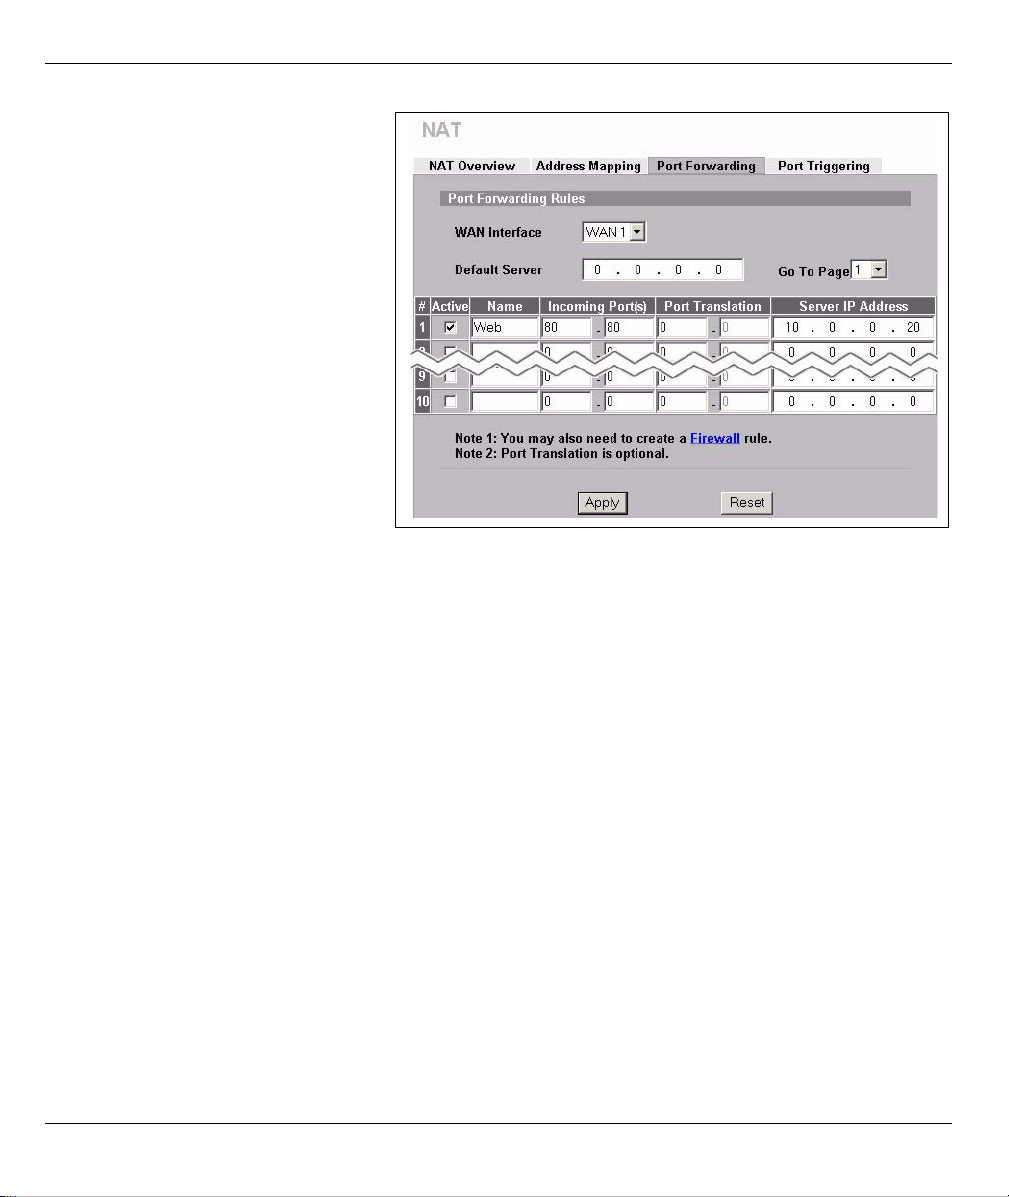
The following example allows access from the WAN to an HTTP (web) server on the DMZ. The server has a
private IP address of 10.0.0.20.
8
Page 10
ENGLISH
1 Click NAT in the navigation panel
and then Port Forwarding.
2 Select the Active check box.
3 Type a name for the rule.
4 Type the port number that the
service uses.
5 Type the HTTP server’s IP address.
6 Click Apply.
7 Firewall
You can use the ZyWALL without configuring the firewall.
The ZyWALL’s firewall is pre-configured to protect your LAN from attacks from the Internet. By default, no
traffic can enter your LAN unless a request was generated on the LAN first. The ZyWALL allows access to the
DMZ from the WAN or LAN, but blocks traffic from the DMZ to the LAN.
If you are using the ZyWALL in router mode, continue with the next section. For bridge mode, skip to Section
9.
9
Page 11
ENGLISH
8 VPN Rule Setup
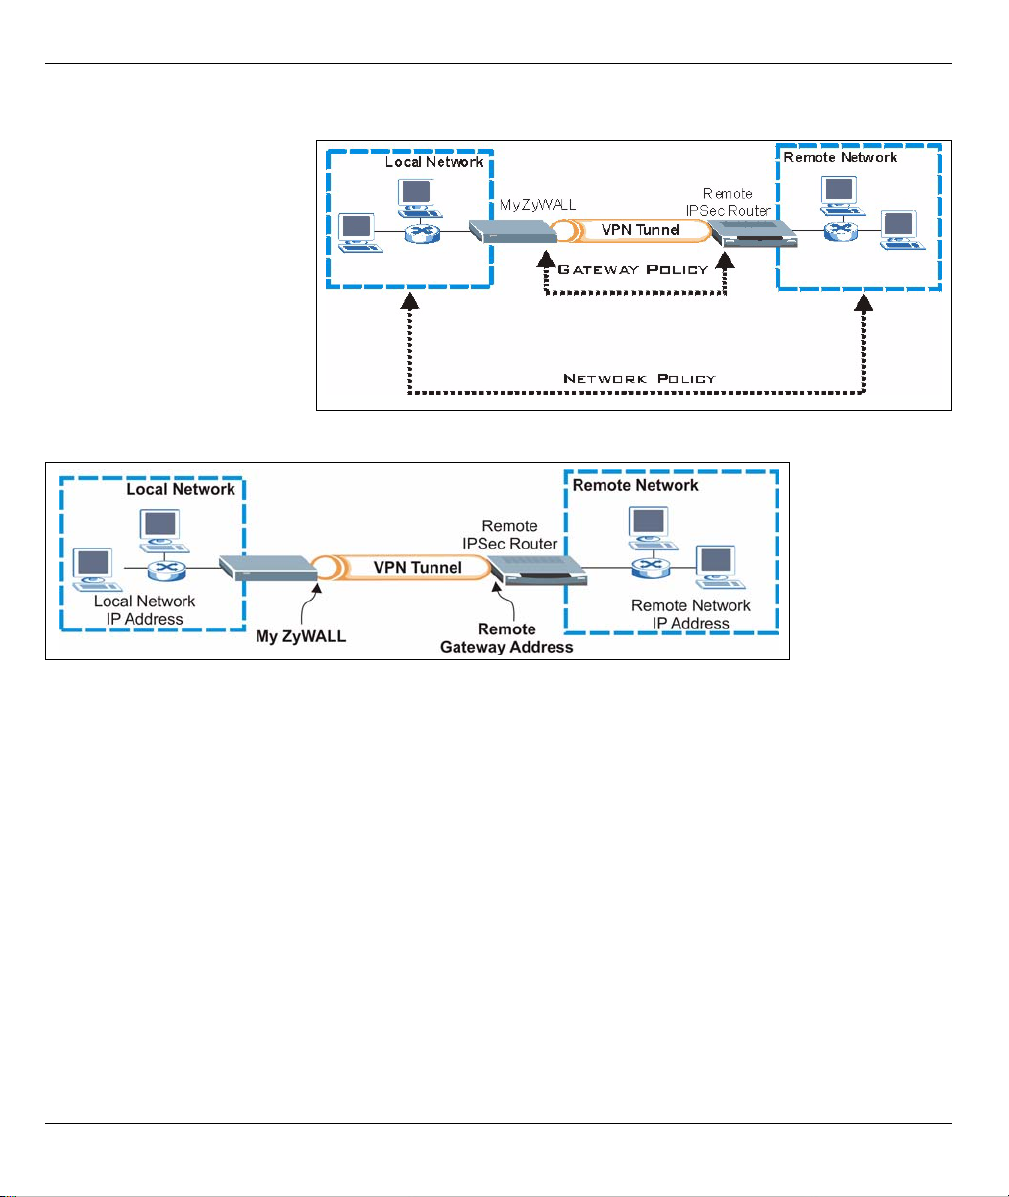
A VPN (Virtual Private
Network) tunnel gives you a
secure connection to another
computer or network.
A gateway policy identifies the
IPSec routers at either end of a
VPN tunnel.
A network policy specifies
which devices (behind the
IPSec routers) can use the
VPN tunnel.
This figure helps explain the main fields in the wizard screens.
1 Click VPN in the HOME screen (you may need to scroll up to see the link) to open the VPN wizard.
10
Page 12
ENGLISH
Note: Your settings are not saved when you click Back.
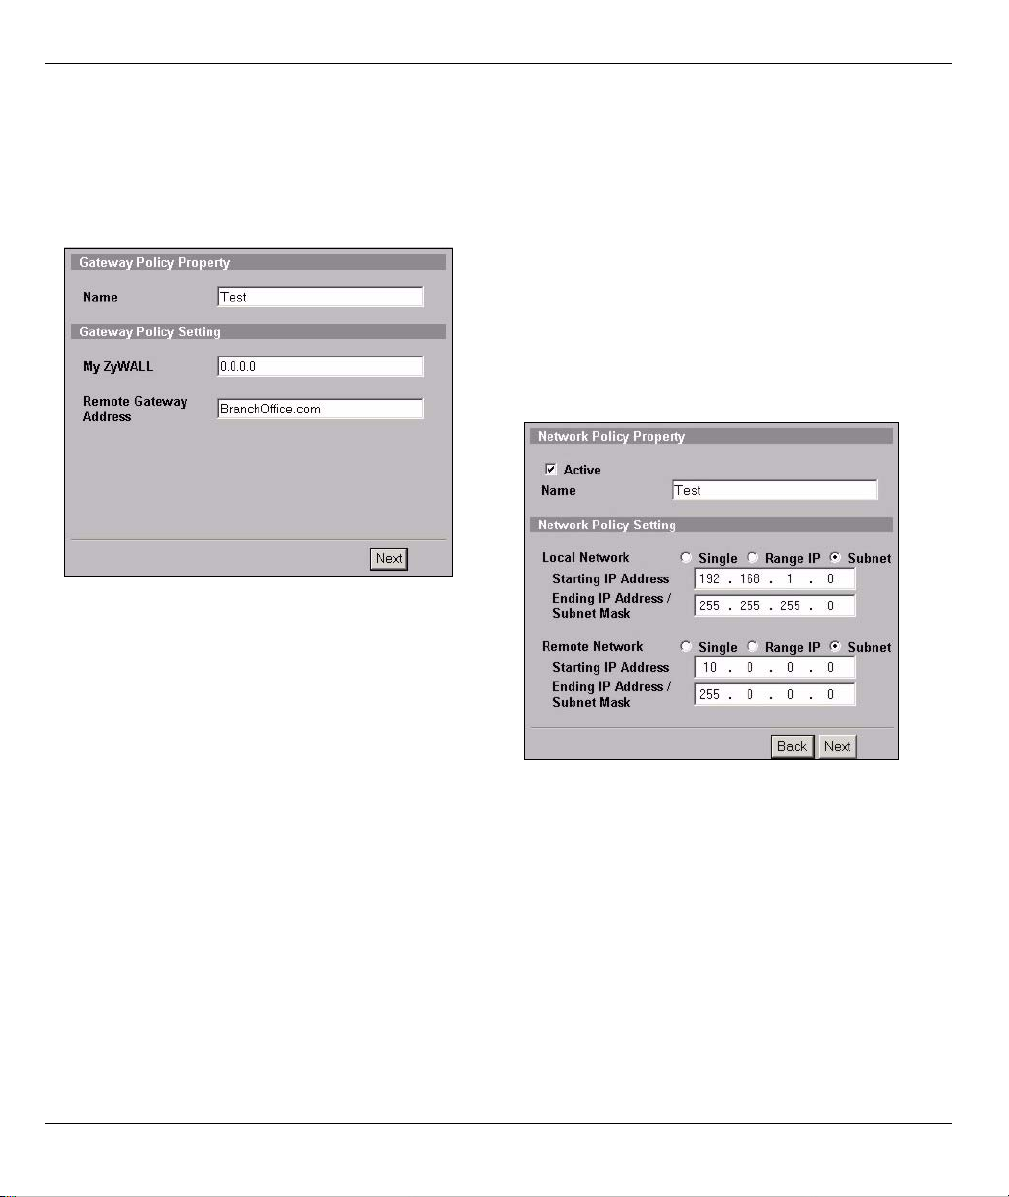
2 Use this screen to configure the gateway policy.
Name: Enter a name to identify the gateway policy.
Remote Gateway Address: Enter the IP address or
domain name of the remote IPSec router.
3 Use this screen to configure the network policy.
Leave the Active check box selected.
Name: Enter a name to identify the network policy.
Select Single and enter an IP address for a single IP
address.
Select Range IP and enter starting and ending IP
addresses for a specific range of IP addresses.
Select Subnet and enter an IP address and subnet
mask to specify IP addresses on a network by their
subnet mask.
11
Page 13
ENGLISH
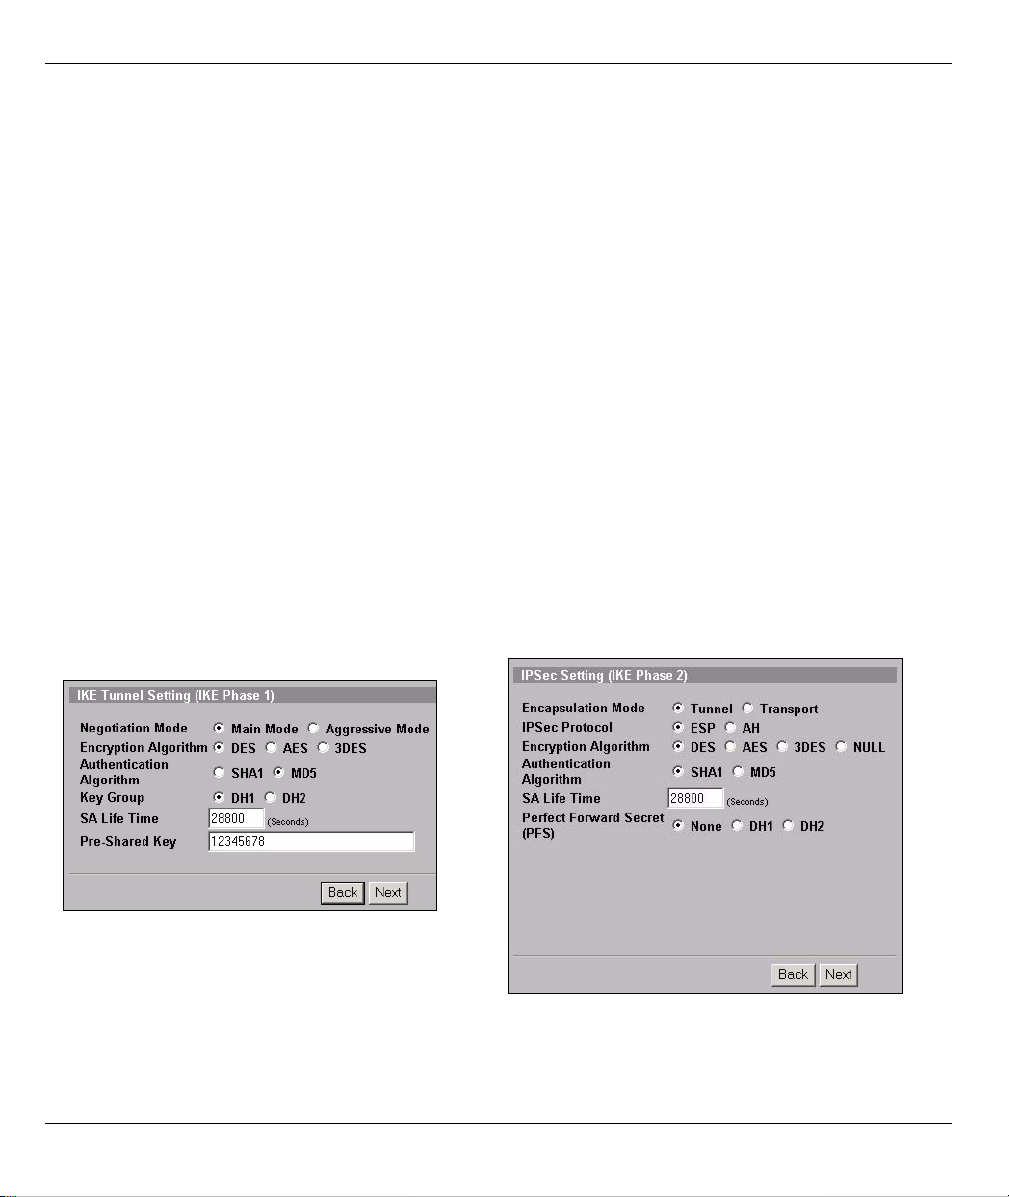
Note: Make sure that the remote IPSec router uses the same security settings that you configure in
the next two screens.
Negotiation Mode: Select Main Mode for identity protection. Select Aggressive Mode to allow more
incoming connections from dynamic IP addresses to use separate passwords.
Note: Multiple SAs (security associations) connecting through a secure gateway must have the same
negotiation mode.
Encryption Algorithm: Select 3DES or AES for stronger (and slower) encryption.
Authentication Algorithm: Select MD5 for minimal security or SHA-1 for higher security.
Key Group: Select DH2 for higher security.
SA Life Time: Set how often the ZyWALL renegotiates the IKE SA (minimum 180 seconds). A short SA life
time increases security, but renegotiation temporarily disconnects the VPN tunnel.
Pre-Shared Key: Use 8 to 31 case-sensitive ASCII characters or 16 to 62 hexadecimal ("0-9", "A-F")
characters. Precede a hexadecimal key with a "0x” (zero x), which is not counted as part of the 16 to 62
character range for the key.
Encapsulation Mode: Tunn el is compatible with NAT, Transport is not.
IPSec Protocol: ESP is compatible with NAT, AH is not.
Perfect Forward Secrecy (PFS): None allows faster IPSec setup, but DH1 and DH2 are more secure.
4 Use this screen to configure IKE (Internet Key
Exchange) tunnel settings.
5 Use this screen to configure IPSec settings.
12
Page 14
ENGLISH
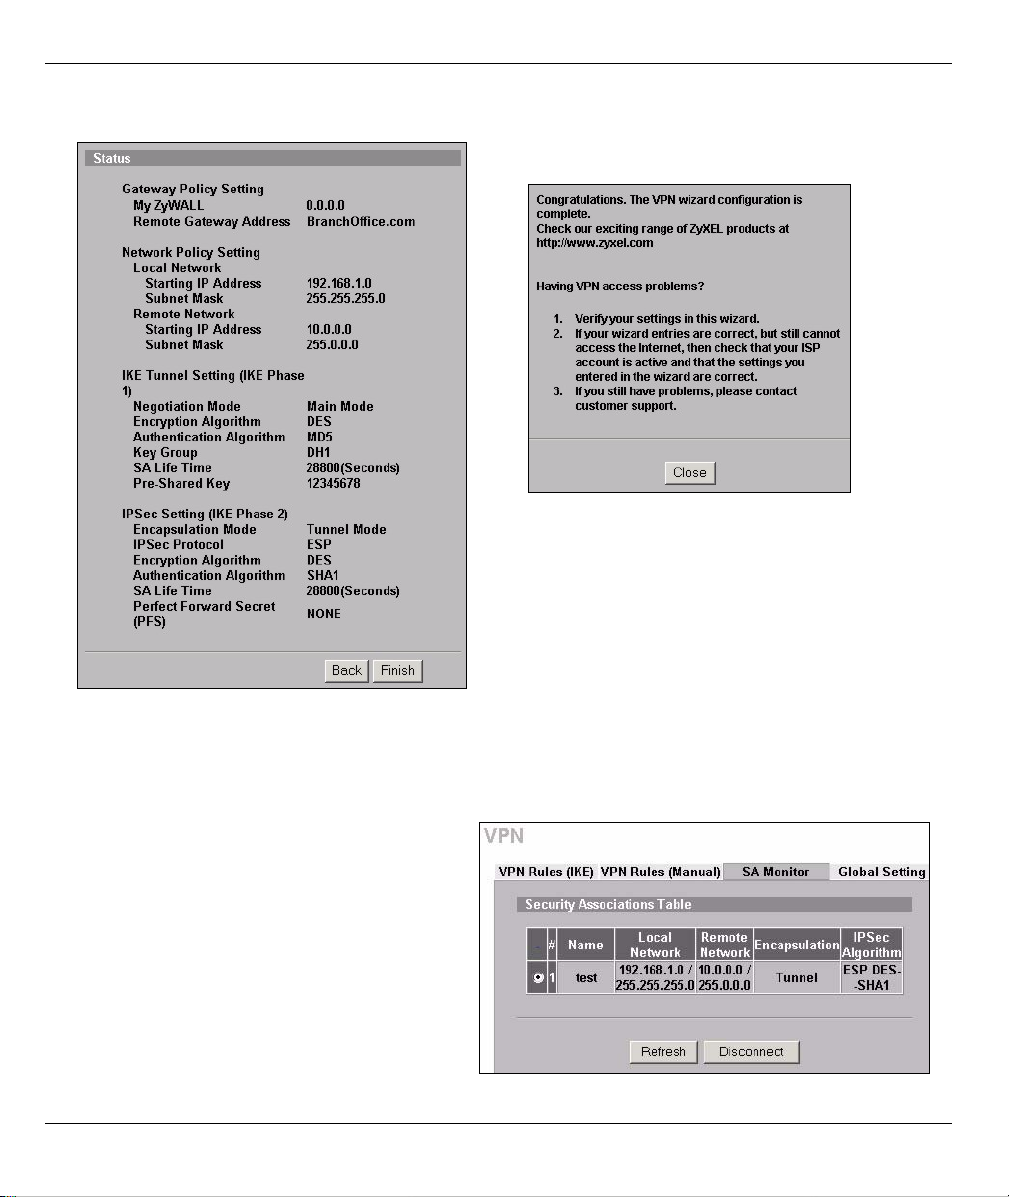
6 Check your VPN settings. Click Finish to save the
settings.
7 Click Close in the final screen to complete the
VPN wizard setup. Continue with the next section
to activate the VPN rule and establish a VPN
connection.
8.1 Using the VPN Connection
Use VPN tunnels to securely send and retrieve files, and allow remote access to corporate networks, web
servers and e-mail. Services work as if you were at the office instead of connected through the Internet.
For example, the “test” VPN rule allows
secure access to an web server on a remote
corporate LAN. Enter the server’s IP address
(10.0.0.23 in this example) as your browser’s
URL. The ZyWALL automatically builds the
VPN tunnel when you attempt to use it.
Click VPN in the navigation panel and then
the SA Monitor tab to display a list of
connected VPN tunnels (the “test” VPN
tunnel is up here).
13
Page 15
ENGLISH
9 myZyXEL.com Product Registration
myZyXEL.com is ZyXEL’s online services center where you can register your ZyXEL device.
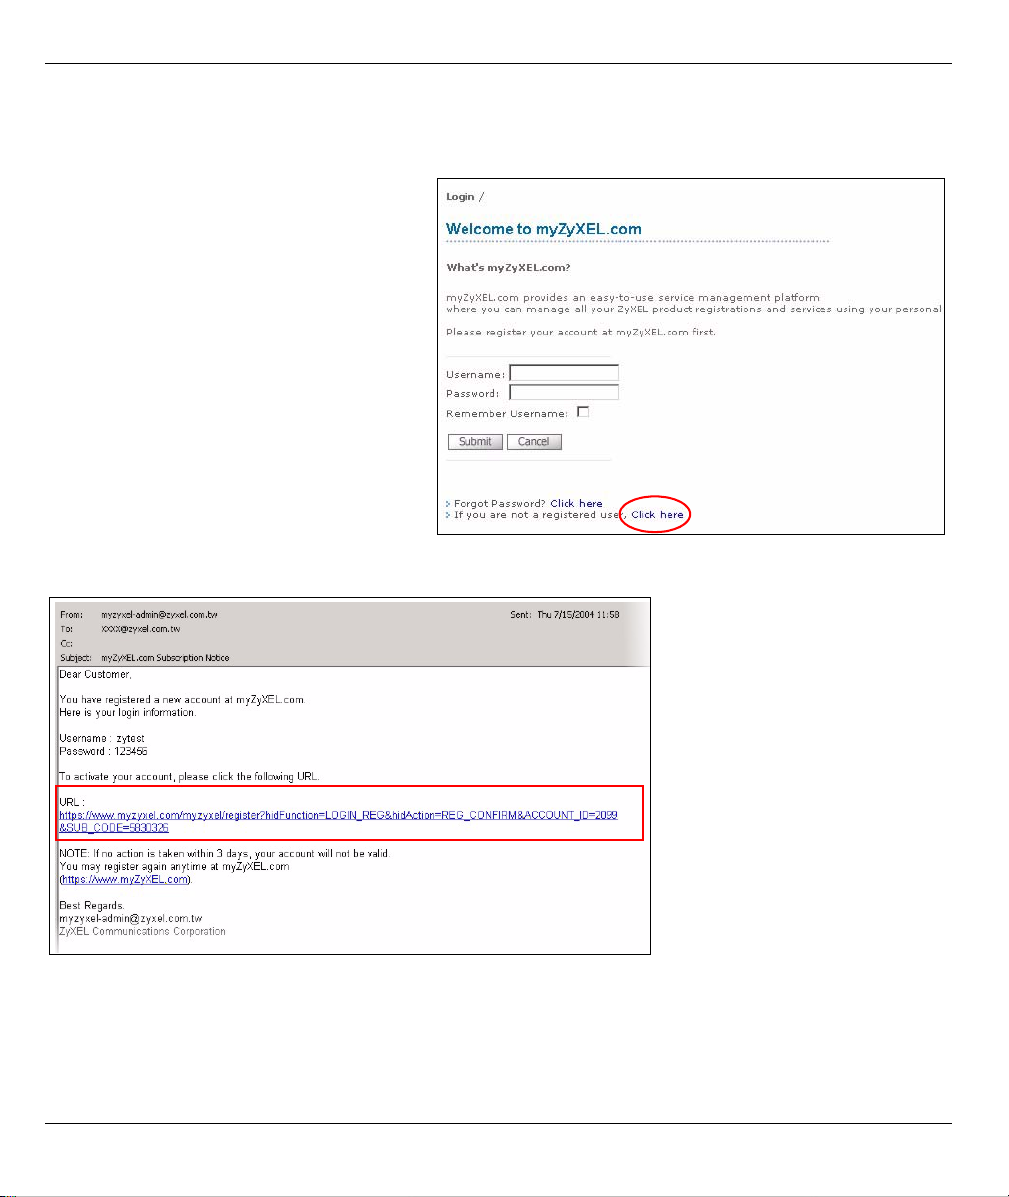
1 Go to myZyXEL.com using your web
browser.
2 Create a new account (if you don’t have
one already).
Note: You are automatically logged out of
your myZyXEL.com account after five
minutes of inactivity. Simply log back
into your myZyXEL.com account if
this happens to you.
3 After you create an account, you will receive a confirmation e-mail. Click the URL in the e-mail to activate
your account.
14
Page 16
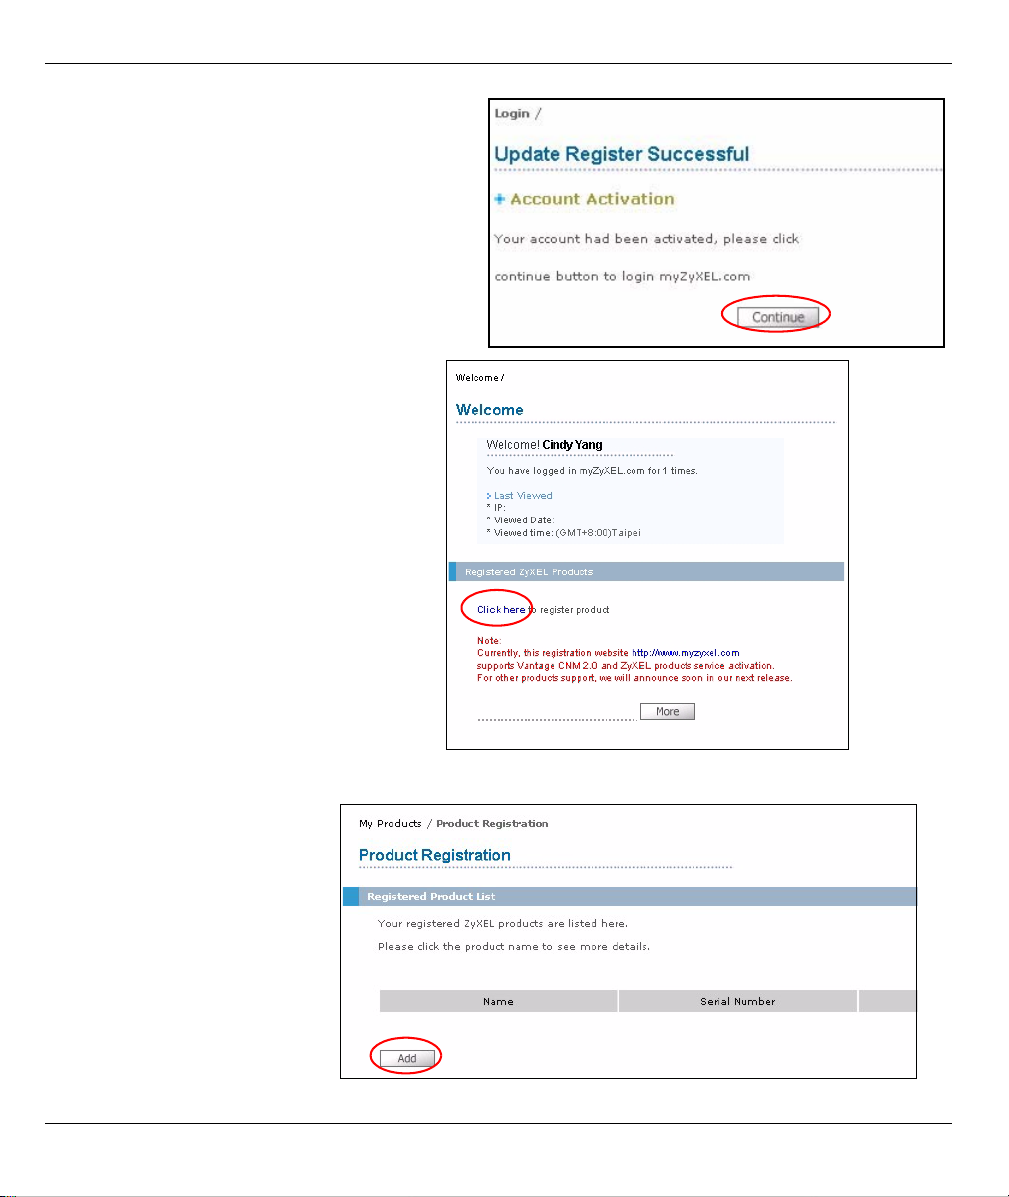
4 Click Continue to go to the myZyXEL.com
login screen.
5 Log in.
6 Click the link and register your ZyXEL
device.
ENGLISH
7 Click Add.
15
Page 17
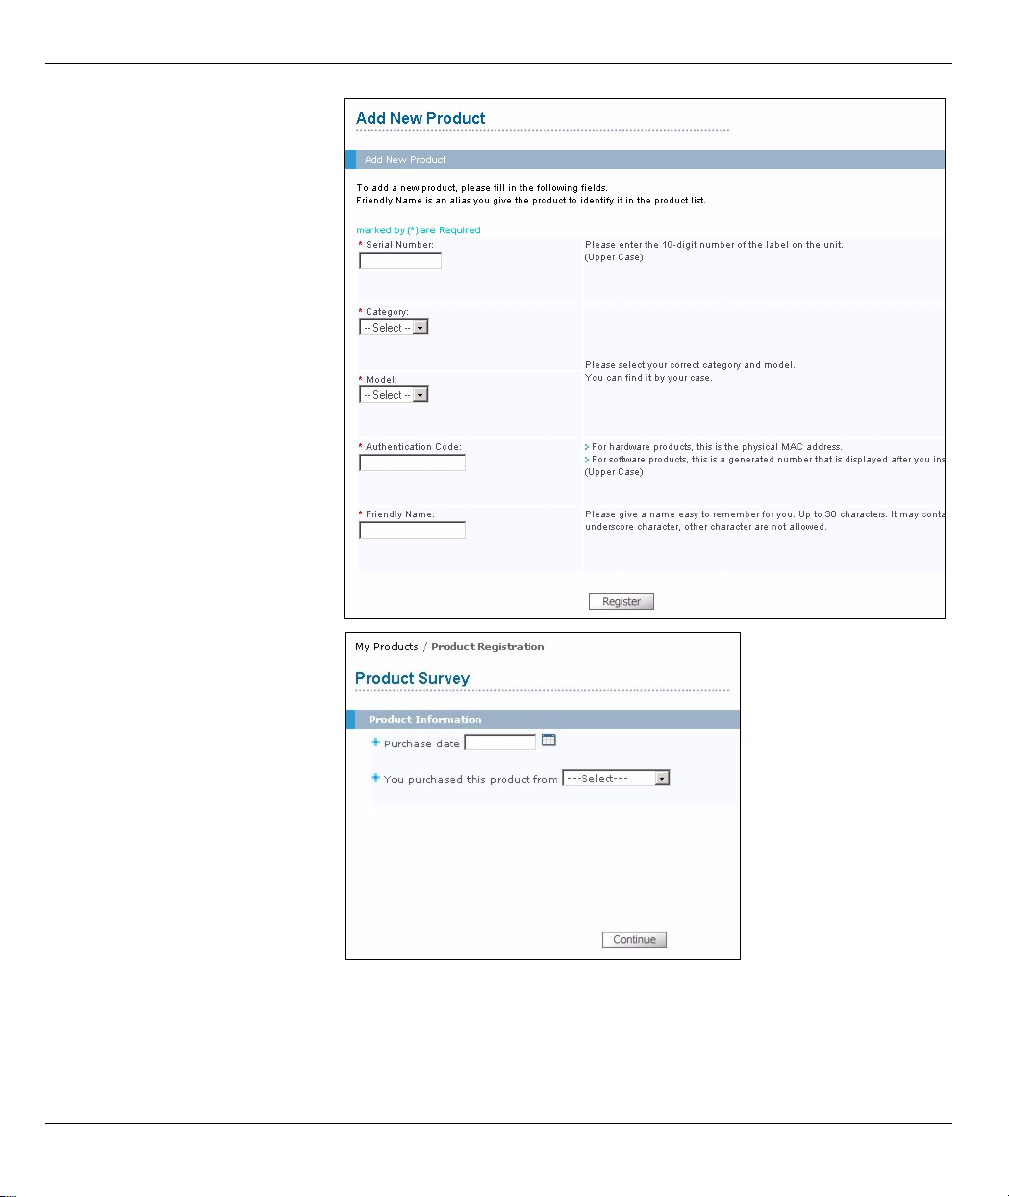
8 Enter the product serial
number in the Serial Number
field.
9 Your device category and
model number automatically
display in the Category and
Model fields respectively.
Otherwise, select the correct
ones from the drop-down list
boxes.
10Enter the device’s MAC
address in the Authentication
Code field (it may already be
displayed).
11Enter a descriptive name in
the Friendly Name field for
identification purposes.
12Click Register.
ENGLISH
13Specify the purchase
information and click
Continue.
14Click Continue again to
complete the process.
16
Page 18
ENGLISH
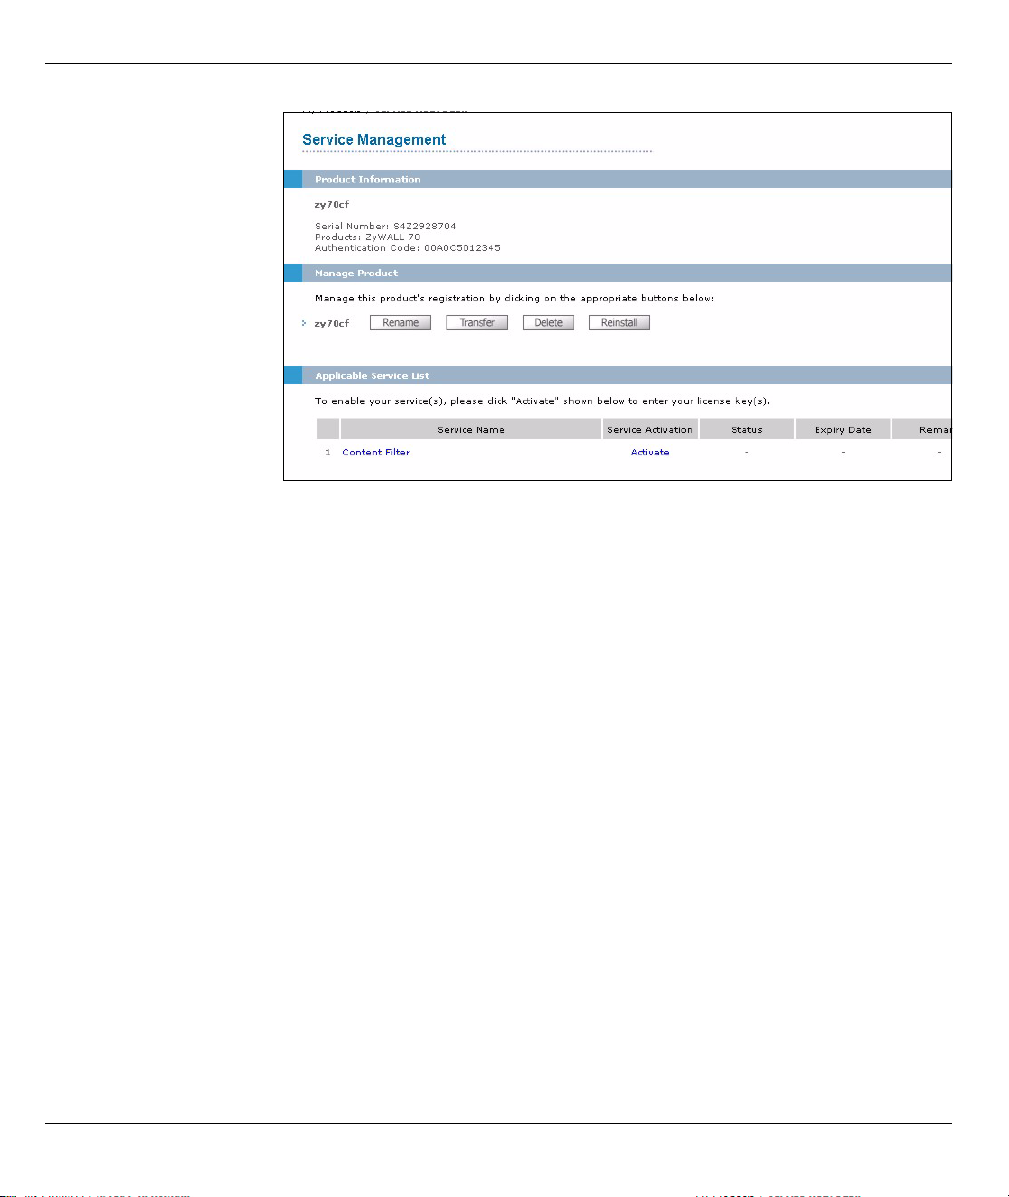
15After you have
registered your ZyXEL
device, you can view its
registration details in
the Service
Management screen.
The ZyXEL device is
now registered, but
content filtering is not
activated. To activate
content filtering, you
need to access
myZyXEL.com via your
device. Continue with
the next section.
10 External Database Content Filtering
When you register for and enable external database content filtering, your ZyWALL accesses an external
database that has millions of web sites categorized based on content. You can have the ZyWALL block and/or
log access to web sites based on these categories. Register your ZyWALL at myZyXEL.com (see Section 9)
and then do the following to register for external database content filtering.
17
Page 19
ENGLISH
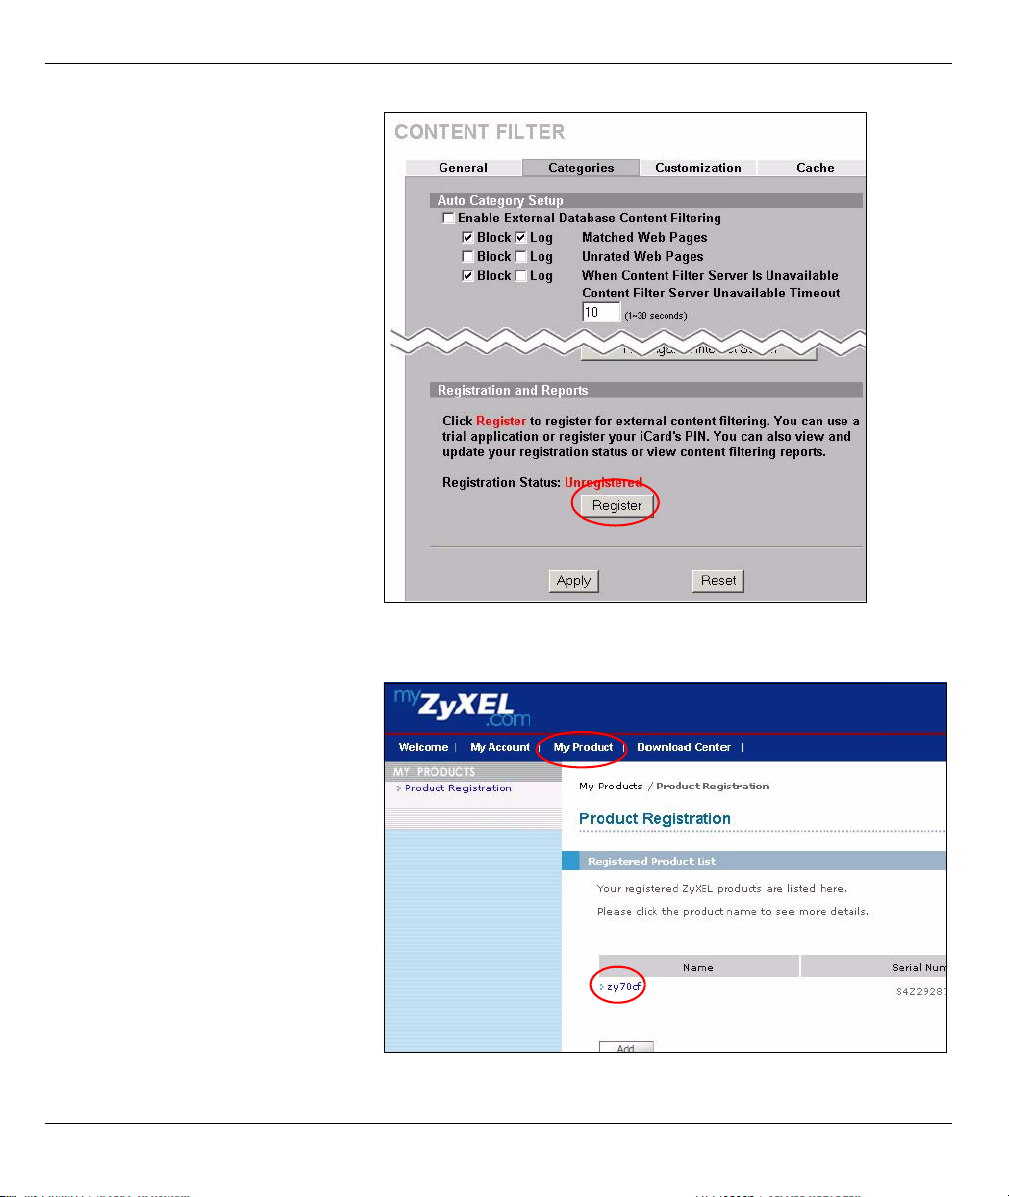
1 In your ZyXEL device’s web
configurator, click CONTENT
FILTER, Categories and then the
Register button.
Note: You must also use the
ZyWALL’s web configurator
CONTENT FILTER screens to
configure and enable content
filtering.
2 The myZyXEL.com login screen opens.
3 Enter the user name and password from your myZyXEL.com account.
4 Click My Product in the navigation
panel.
5 Click the product name link for your
device to view its registration details
in the Service Management
screen.
18
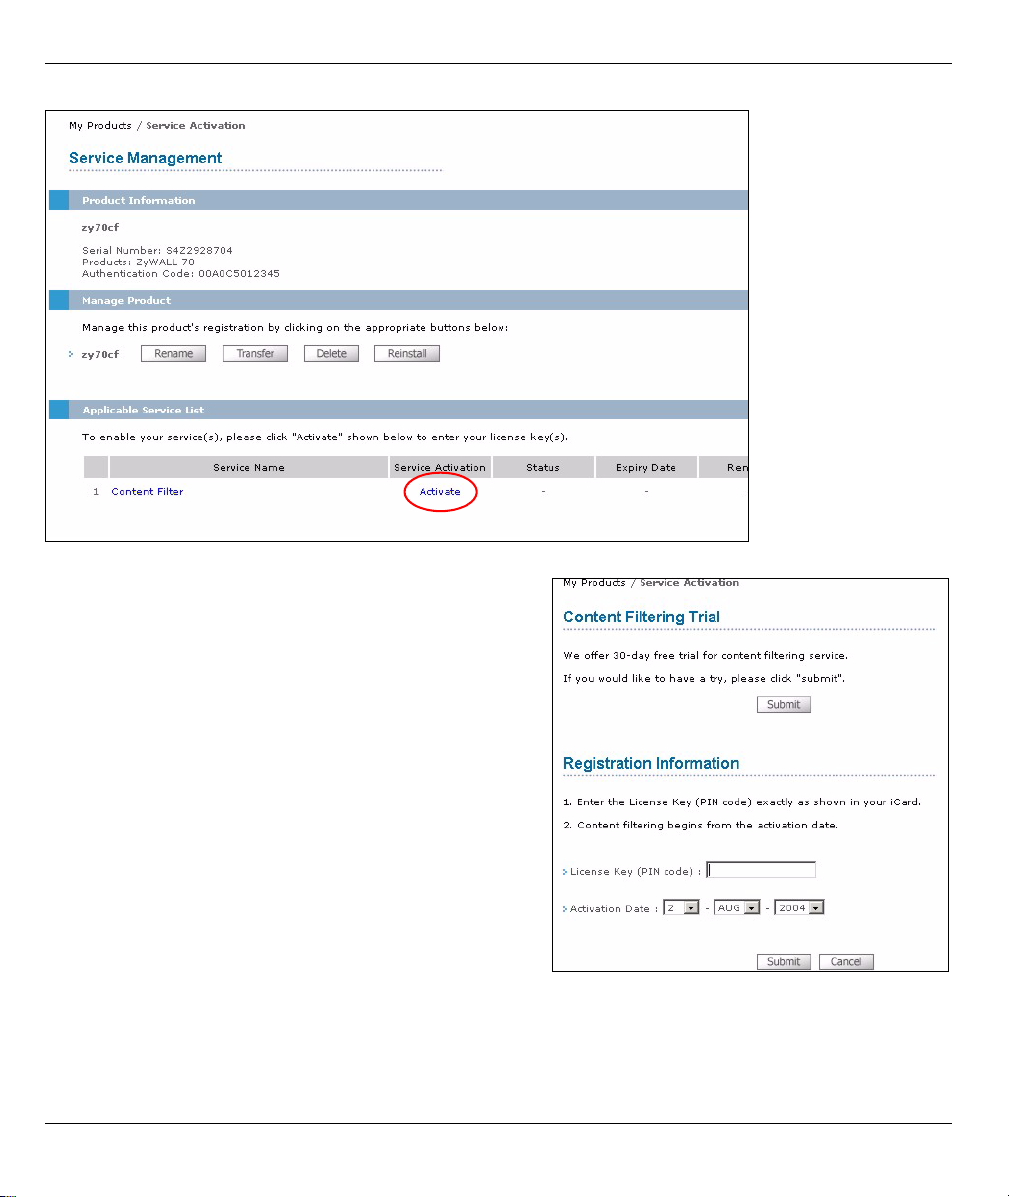
Page 20
ENGLISH
6 Click Activate for the content filter service to display the next screen.
7 If you want to use the trial, click Submit under
Content Filtering Trial. The trial period begins the
date you apply.
You cannot apply for a trial if you’ve already used a
trial or registered an iCard’s PIN number.
If you purchased an iCard, enter the PIN code exactly
as shown on your iCard in the License Key (PIN code)
field. Select the date when you want your content
filtering to start and click Submit under Registration
Information.
19
Page 21
ENGLISH
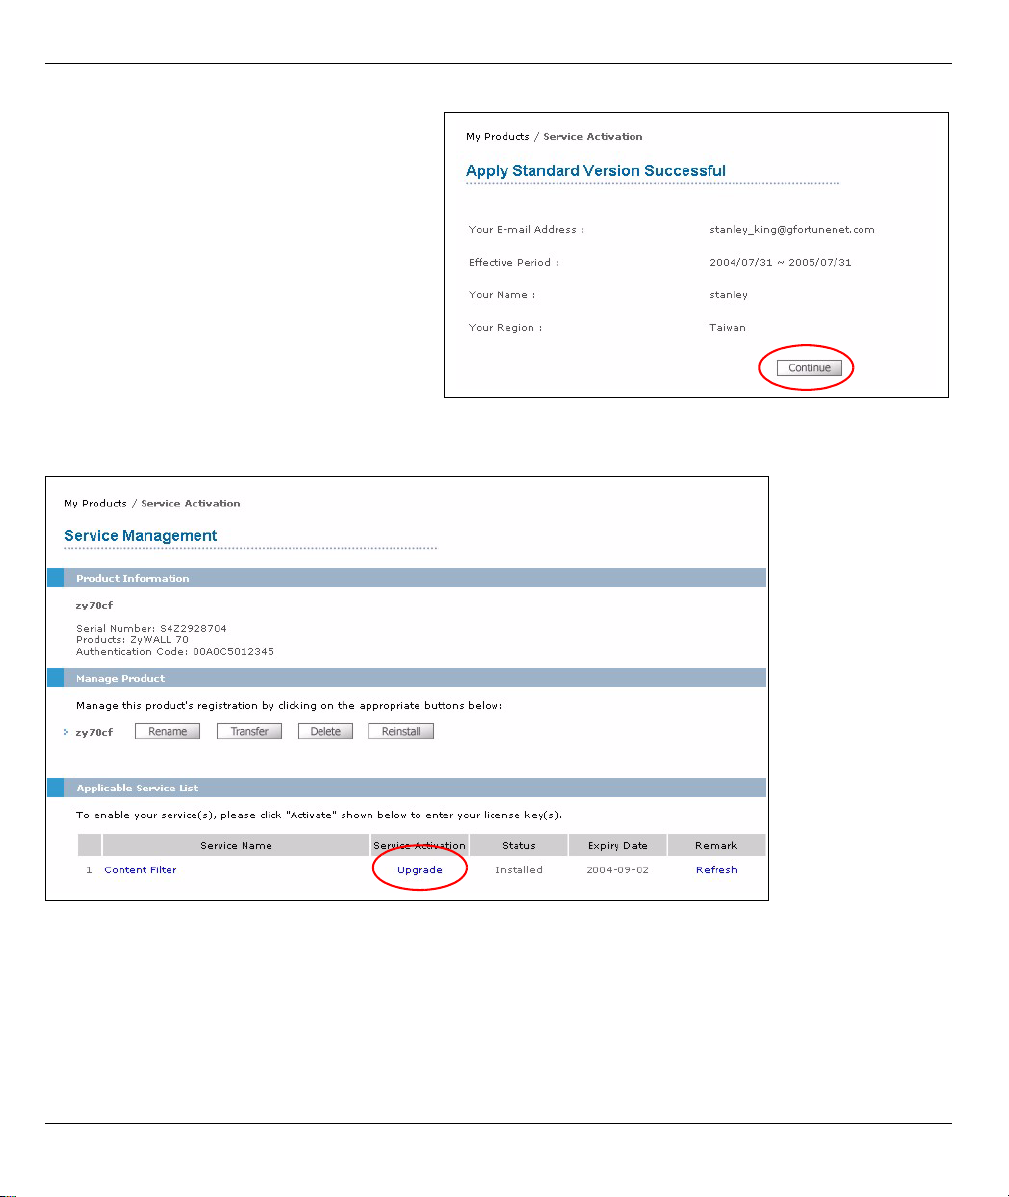
8 A screen displays showing you the
service is registered. Click
Continue to proceed to the Service
Management screen.
9 If you are currently using a trial, you can still register the PIN code from an iCard by clicking Upgrade in
the Service Activation field of the Service Management screen.
20
Page 22
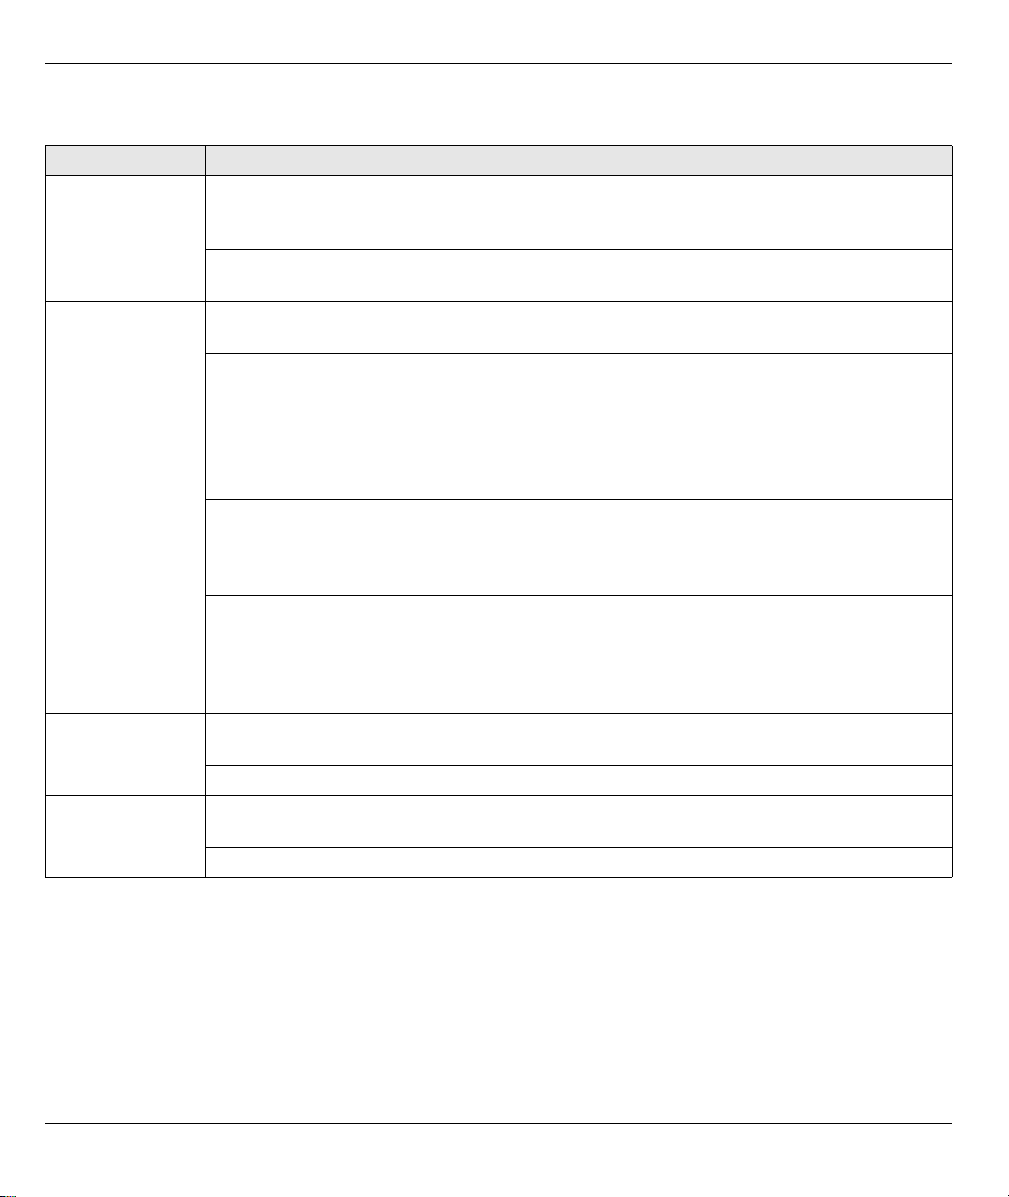
11 Troubleshooting
Problem Corrective Action
None of the LEDs
turn on.
Cannot access
the ZyWALL from
the LAN.
Cannot access
the Internet.
Cannot establish
a VPN connection
Make sure that you have the power cord connected to the ZyWALL and plugged in to an
appropriate power source. Make sure you have the ZyWALL turned on. Check all cable
connections.
If the LEDs still do not turn on, you may have a hardware problem. In this case, you should
contact your local vendor.
Check the cable connection between the ZyWALL and your computer or hub. Refer to
Section 1 for details.
Ping the ZyWALL from a LAN computer. Make sure your computer’s Ethernet card is
installed and functioning properly.
In the computer, click Start, (All) Programs, Accessories and then Command Prompt. In
the Command Prompt window, type "ping" followed by the ZyWALL’s LAN IP address
(192.168.1.1 is the default) and then press [ENTER]. The ZyWALL should reply. Otherwise,
refer to Section 11.1.
If you’ve forgotten the ZyWALL’s password, use the RESET button. Press the button in for
about 10 seconds (or until the PWR LED starts to blink), then release it. It returns the
ZyWALL to the factory defaults (password is 1234, LAN IP address 192.168.1.1 etc.; see
your User’s Guide for details).
If you’ve forgotten the ZyWALL’s LAN or WAN IP address, you can check the IP address in
the SMT via the console port. Connect your computer to the CONSOLE port using a console
cable. Your computer should have a terminal emulation communications program (such as
HyperTerminal) set to VT100 terminal emulation, no parity, 8 data bits, 1 stop bit, no flow
control and 9600 bps port speed.
Check the ZyWALL’s connection to the Ethernet jack with Internet access. Make sure the
Internet gateway device (such as a DSL modem) is working properly.
Click WAN in the navigation panel to verify your settings.
Make sure the ZyWALL and the remote IPSec router use the same VPN settings. Click VPN
in the navigation panel to configure advanced settings.
Access a web site to check that you have a successful Internet connection.
ENGLISH
11.1 Set Up Your Computer’s IP Address
This section shows you how to set up your computer to receive an IP address in Windows 2000, Windows NT
and Windows XP. This is ensures that your computer can communicate with your ZyWALL.
1 In Windows XP, click Start, Control Panel.
In Windows 2000/NT, click Start, Settings, Control Panel.
2 In Windows XP, click Network Connections.
21
Page 23

ENGLISH
In Windows 2000/NT, click Network and Dial-up Connections.
3 Right-click Local Area Connection and then click Properties.
4 Select Internet Protocol (TCP/IP) (under the General
tab in Windows XP) and click Properties.
5 The Internet Protocol TCP/IP Properties screen
opens (the General tab in Windows XP). Select the
Obtain an IP address automatically and Obtain DNS
server address automatically options.
6 Click OK to close the Internet Protocol (TCP/IP)
Properties window.
7 Click Close (OK in Windows 2000/NT) to close the
Local Area Connection Properties window.
8 Close the Network Connections screen.
11.2 Procedure to View a Product’s Certification(s)
1 Go to www.zyxel.com.
2 Select your product from the drop-down list box on the ZyXEL home page to go to that product's page.
3 Select the certification you wish to view from this page.
22
Page 24
DEUTSCH
DEUTSCH
Übersicht
Die ZyWALL 70 ist eine Load-balancing-, Dual-WAN-Firewall mit VPN, Bandbreitenmanagement, Content
Filtering und vielen anderen Funktionen. Sie können sie als transparente Firewall verwenden, ohne das
Netzwerk neu zu konfigurieren und die Routingfunktionen des Geräts zu konfigurieren. Die ZyWALL erhöht
die Netzwerksicherheit, indem sie DMZ-Ports für die Verwendung öffentlich zugänglicher Server bietet. In
dieser Anleitung finden Sie eine Beschreibung der Anschlüsse und der Konfiguration, die notwendig ist, damit
Sie die ZyWALL in Ihrem Netzwerk verwenden können.
Eine ausführliche Beschreibung aller Funktionen finden Sie im Benutzerhandbuch.
Bitte halten Sie die Daten für Ihren Internetzugang bereit.
Diese Anleitung ist in die folgenden Abschnitte aufgeteilt.
1 Anschließen der Hardware
2 Zugriff auf den Web-Konfigurator
3 Bridge Mode
4 Einrichten des Internetzugriffs
5 DNS
6 NAT
7 Firewall
8 Einstellen der VPN-Regeln
9 myZyXEL.com Produktregistrierung
10Externe Datenbank für den Content Filter
11Problembeseitigung
1 Anschließen der Hardware
Sie benötigen folgendes:
ZyWALL Computer Ethernetkabel
23
Netzkabel
Page 25

DEUTSCH
Wenn Sie das Gerät installieren, müssen Sie die Hardwaregeräte folgendermaßen anschließen.
1 Verbinden Sie den LAN-Port mit einem Ethernet-Kabel mit dem Computer. Mit Ethernet-Kabeln können
Sie auch öffentliche Server (Internet, E-Mail, FTP, usw.) an die DMZ-Ports anschließen.
2 Schließen Sie mit einem anderen Ethernet-Kabel den WAN 1- und/oder WAN 2-Port an die Ethernet-
Buchse mit Internetzugriff an.
3 Schliessen Sie den Netzanschluss des Geräts (an der Rückseite) mit dem mitgelieferten Netzkabel an
eine Netzsteckdose an.
4 Schalten Sie den Ein/Aus-Schalter in die Position On und sehen Sie sich das vordere Bedienfeld an. Die
PWR-LED beginnt zu leuchten. Während des Systemtests blinkt die SYS-LED. Wurde er Test erfolgreich
abgeschlossen, bleibt diese Anzeige an. Die LEDs ACT, CARD, LAN, DMZ und WAN beginnen zu
leuchten und bleiben an, wenn die entsprechenden Verbindungen richtig hergestellt wurden.
24
Page 26
DEUTSCH
2 Zugriff auf den Web-Konfigurator
In diesem Abschnitt wird beschrieben, wie die WAN 1-Schnittstelle für den Internetzugriff konfiguriert wird.
1 Starten Sie Ihren Internetbrowser. Geben Sie als
Adresse 192.168.1.1 (die IP-Standardadresse
des ZyWALL) ein.
Wenn das Loginfenster nicht angezeigt wird, lesen
Sie in Abschnitt 11.1 nach, wie Sie die IP-Adresse
Ihres Computers einstellen können.
3 Ändern Sie das Passwort, indem Sie ein neues
Passwort eingeben und auf Apply
(Übernehmen) klicken.
2 Klicken Sie auf Login (Einloggen) (das
Standardpasswort 1234 ist bereits vorgegeben).
4 Klicken Sie auf Apply (Übernehmen), um das
Standarddigitalzertifikat der ZyWALL zu
ersetzen.
5 Das Fenster HOME wird angezeigt.
Standardmäßig befindet sich die ZyWALL im Routermodus. Wenn Sie Routingfunktionen wie NAT, DHCP
oder VPN verwenden möchten, gehen Sie weiter zum nächsten Schritt.
Gehen Sie zu Abschnitt 3, wenn Sie die ZyWALL als eine transparente Firewall verwenden möchten.
25
Page 27

6 Prüfen Sie die
Netzwerkstatus
tabelle. Wenn der
Status von WAN 1
nicht Down ist und
eine IP-Adresse
angegeben ist, gehen
Sie zu Abschnitt 5.
Wenn der Status von
WAN 1 Down ist
(oder keine IPAdresse angegeben
ist), klicken Sie auf
Internet Access
(Internetzugriff) und
konfigurieren Sie mit
Abschnitt 4 WAN 1.
Verwenden Sie das
NETWORK WAN
Fenster, wenn Sie
WAN 2 konfigurieren
möchten. Sie können
auch ein Loadbalancing zwischen
den WAN-Ports
konfigurieren.
DEUTSCH
3 Bridge Modus
Wenn Sie bei der ZyWALL den Bridge Modus einstellen, funktioniert sie als transparente Firewall. Bei der
ZyWALL wird der Bridge Modus folgendermaßen eingestellt:
26
Page 28
1 Klicken Sie in der
Navigationsleiste auf
MAINTENANCE
(Wartung) und dann auf
Device Mode
(Gerätemodus).
2 Wählen Sie Bridge
(Brücke) und
konfigurieren Sie eine
statische) IP-AdressenSubnetmaske und eine
Gateway-IP-Adresse für
die LAN-, WAN-, DMZ-
und WLAN- Schnittstelle
der ZyWALL.
3 Klicken Sie auf Apply
(Übernehmen). Die
ZyWALL wird neu
gestartet.
Gehen Sie weiter zu Abschnitt
5, wenn Sie Server haben,
auf die Sie vom WAN aus
zugreifen müssen.
DEUTSCH
4 Einrichten des Internetzugriffs
Geben Sie die Daten für den Internetzugriff so ein, wie Sie sie erhalten haben.
Wenn Ihnen eine IP-Adresse gegeben wurde, wählen Sie im Listenfeld IP Address Assignment (IPAdressenzuweisung) die Option Static (Statisch) und geben Sie dort die Daten ein.
Hinweis: Je nachdem, was Sie im Feld Encapsulation (Verkapselung) wählen, sieht die
Eingabemaske anders aus. Geben Sie dort die Daten ein, die Sie von Ihrem
Internetdienstanbieter oder Netzwerkadministrator erhalten haben.
Wenn Sie die Eingabe beendet haben, klicken Sie auf Finish (fertigstellen).
27
Page 29

• Ethernet Encapsulation
Konfigurieren Sie einen Roadrunnerdienst in
den NETWORK WAN (Netzwerk-WAN)
Fenstern (auf der Registerkarte WAN 1).
DEUTSCH
• PPP over Ethernet or PPTP Encapsulation
Wählen Sie Nailed-Up, wenn die Verbindung dauerhaft aufrecht erhalten werden soll (das kann jedoch sehr
teuer sein, wenn Ihr Internetdienstanbieter Ihnen die Benutzungsdauer anstelle eines monatlichen
Pauschalbetrags in Rechnung stellt).
Wenn die Verbindung nicht dauerhaft stehen soll, müssen Sie bei Idle Timeout (Leerlaufausschaltzeit) eine
Leerlaufausschaltzeit (in Sekunden) festlegen.
28
Page 30

DEUTSCH
5 DMZ
Die DeMilitarisierte Zone (DMZ) ermöglicht es, dass öffentliche Server (Internet, E-Mail, FTP, usw.) nach
außen hin sichtbar sind aber dennoch über Firewallschutz vor DoS-Angriffen verfügen (Denial of Service).
Anders als beim LAN weist die ZyWALL den an den DMZ-Ports angeschlossenen Computern nicht über
DHCP die TCP/IP-Konfiguration zu. Die Computer werden mit statischen IP-Adressen (in demselben Subnetz
wie die IP-Adressen des DMZ-Ports) und DNS-Serveradressen konfiguriert. Verwenden Sie die DMZ-IPAdresse der ZyWALL als Standardgateway.
Wenn sich die ZyWALL im Routingmodus befindet, wird die DMZ folgendermaßen konfiguriert.
Hinweis: Im Bridge Modus muss die DMZ nicht konfiguriert werden. Gehen Sie weiter zu Abschnitt 7.
1 Klicken Sie in der Navigationsleiste auf DMZ.
29
Page 31

DEUTSCH
2 Geben Sie für die DMZ-Schnittstelle eine IP-Adresse und
eine Subnetmaske an.
Wenn Sie in der DMZ private IP-Adressen verwenden,
können Sie die Server mit NAT öffentlich zugänglich
machen (siehe Abschnitt 6).
Eine öffentliche IP-Adresse muss sich auf einem
anderen Subnetz als dem der öffentlichen IP-Adresse
eines WAN-Ports befinden. Wenn Sie das NAT nicht für
die öffentlichen IP-Adressen aus der DMZ konfigurieren,
leitet die ZyWALL den Datenverkehr ohne NAT zu den
öffentlichen IP-Adressen in der DMZ. Diese Funktion
kann für die Hostserver bei NAT-feindlichen
Anwendungen sehr nützlich sein.
3 Klicken Sie auf Apply (Übernehmen).
6 NAT
NAT (Network Address Translation - NAT, RFC 1631) ist die Übersetzung einer IP-Adresse eines Netzwerks
in eine andere IP-Adresse eines anderen Netzwerks. Wenn die ZyWALL mehrere öffentliche IP-Adressen in
mehrere private IP-Adressen Ihres LAN (oder Ihrer DMZ) übersetzen soll, verwenden Sie die Fenster NAT
Address Mapping (NAT-Adressmapping).
Das folgende Beispiel zeigt den Zugriff von einem WAN- auf einen HTTP-Server (Internet) in der DMZ. Der
Server hat die private IP-Adresse 10.0.0.20.
30
Page 32

DEUTSCH
1 Klicken Sie in der Navigationsleiste
auf NAT und dann auf Port
Forwarding (Portweiterleitung).
2 Wählen Sie das Kontrollfeld Active
(Aktiv).
3 Geben Sie eine Bezeichnung für die
Regel ein.
4 Geben Sie die Portnummer ein, die
der Dienst verwendet.
5 Geben Sie die IP-Adresse des
HTTP-Servers ein.
6 Klicken Sie auf Apply
(Übernehmen).
7 Firewall
Sie können die ZyWALL verwenden, ohne die Firewall zu konfigurieren.
Die Firewall die ZyWALL ist so vorkonfiguriert, dass sie Ihr LAN vor Angriffen aus dem Internet schützt. Bei
der Standardeinstellung können keine Daten in Ihr LAN eindringen, wenn nicht zuvor eine Anfrage aus dem
LAN gestellt wurde. Die ZyWALL lässt den Zugriff vom WAN oder LAN auf die DMZ zu, blockiert aber den
Datenverkehr aus der DMZ zum LAN.
Wenn Sie die ZyWALL im Routermodus verwenden, fahren Sie mit dem nächsten Abschnitt fort. Weiter mit
dem Bridge Modus geht es in Abschnitt 9.
31
Page 33

DEUTSCH
8 Einstellen der VPN-Regeln
Mit einem VPN-Tunnel (Virtual
Private Network) haben Sie
eine sichere Verbindung zu
anderen Computern oder
Netzwerken.
Eine Gateway-Policy
identifiziert an jedem Ende
eines VPN-Tunnels die IPSecRouter.
In einer Netzwerk-Policy ist
festgelegt, welche Geräte
(hinter den IPSec-Routern)
den VPN-Tunnel benutzen dürfen.
Diese Abbildung soll die Hauptfelder in den Assistentenfenstern erläutern.
1 Klicken Sie im Fenster HOME (Anfang) auf VPN (möglicherweise müssen Sie die Seite scrollen, um den
Link sichtbar zu machen), um den VPN-Assistenten zu öffnen.
32
Page 34

DEUTSCH
Hinweis: Wenn Sie auf Back (Zurück) klicken, werden Ihre Einstellungen nicht gespeichert.
2 In diesem Fenster können Sie die Gateway-Policy
konfigurieren.
Name : Geben Sie einen Namen ein, um die
Gateway-Policy zu bezeichnen.
Remote Gateway Address (RemoteGatewayadresse): Geben Sie die IP-Adresse oder
den Domainnamen des IPSec-Routers ein.
3 In diesem Fenster können Sie die Netzwerk-Policy
konfigurieren.
Lassen Sie die Markierung im Kontrollfeld Active
(Aktiv).
Name (Name): Geben Sie einen Namen ein, um die
Netzwerk-Policy zu bezeichnen.
Wählen Sie Single (Eine) und geben eine IPAdresse für eine einzelne IP-Adresse ein.
Wählen Sie Range IP (IP-Bereich) und geben Sie
die Anfangs- und End-IP eines bestimmten
Bereichs von IP-Adressen ein.
Wählen Sie Subnet (Subnetz) und geben Sie eine
IP-Adresse und eine Subnetmaske ein, um die IPAdressen eines bestimmten Netzwerk anhand ihrer
Subnetmaske festzulegen.
33
Page 35

DEUTSCH
Hinweis: Stellen Sie sicher, dass der Remote-IPSec-Router dieselben Sicherheitseinstellungen
verwendet, die Sie in den zwei folgenden Fenstern festlegen.
Negotiation Mode (Negotiation-Modus): Wählen Sie Main Mode (Hauptmodus) für den
Identitätsschutz. Wählen Sie Aggressive Mode (Agressiver Modus), wenn mehrere eingehende
Verbindungen von dynamischen IP-Adressen verschiedene Passwörter benutzen sollen.
Hinweis: Wenn mehrere SAs (Security Associations) durch ein Sicherheitsgateway verbunden sind,
müssen diese denselben Negotiation-Modus haben.
Encryption Algorithm (Verschlüsselungsalgorithmus): Wählen Sie 3DES oder AES für eine stärkere
(und langsamere) Verschlüsselung.
Authentication Algorithm (Authentifizierungsalgorithmus): Wählen Sie MD5 für eine minimale Sicherheit
oder SHA-1 für eine höhere Sicherheit.
Key Group (Schlüsselgruppe): Wählen Sie DH2 für eine höhere Sicherheit.
SA Life Time (SA-Dauer): Legen Sie fest, wie oft die ZyWALL die IKE SA wieder verhandelt (mindestens
180 Sekunden). Eine kurze SA-Dauer erhöht die Sicherheit, bei der Verhandlung wird aber vorübergehend
der VPN-Tunnel getrennt.
Pre-Shared Key (Vorgegebener Schlüssel): Geben Sie hier 8 bis 31 ASCII-Zeichen (Groß- und
Kleinschreibung beachten) oder 16 bis 62 Hexadezimalzeichen ("0-9", "A-F") ein. Setzen Sie einem
Hexadezimalschlüssel ein "0x” (Null x) voran, wird dieses nicht als Teil des 16 bis 32 Zeichen langen
Schlüssels betrachtet.
Encapsulation Mode (Verkapselungsmudus): Tunnel (Tunnel) ist kompatibel mit NAT, Transport
(Transport) nicht.
IPSec Protocol (IPSec-Protokoll): ESP ist kompatibel mit NAT, AH nicht.
Perfect Forward Secrecy (PFS): None (Keine) ermöglicht ein schnelleres Einrichten des IPSec, DH1
und DH2 bieten aber mehr Sicherheit.
34
Page 36

DEUTSCH
4 In diesem Fenster werden die IKE-
Tunneleinstellungen (Internet Key Exchange)
konfiguriert.
5 In diesem Fenster werden die IPSec-Einstellungen
konfiguriert.
35
Page 37

DEUTSCH
6 Prüfen Sie Ihre VPN-Einstellungen. Klicken Sie
auf Finish (Fertig stellen), um die Einstellungen
zu speichern.
7 Klicken Sie beim letzten Fenster auf Close
(Schließen), um die Installation mit dem VPNAssistenten zu beenden. Fahren Sie mit dem
nächsten Abschnitt fort, um die VPN-Regel zu
aktivieren und eine VPN-Verbindung
herzustellen.
8.1 Benutzen der VPN-Verbindung
Mit VPN-Tunneln können Sie Dateien sicher senden und empfangen sowie einen Remotezugriff auf
Firmennetzwerke, Internetserver und E-Mails zulassen. Die Dienste funktionieren so, als wären Sie an einem
Standort und nicht über das Internet miteinander verbunden.
36
Page 38

DEUTSCH
Zum Beispiel lässt die VPN-Regel “test” einen
sicheren Zugriff auf einen Internetserver in
einem Remote-Firmen-LAN zu. Geben Sie
die IP-Adresse des Servers (in diesem
Beispiell 10.0.0.23) als die URL Ihres
Browsers ein. Die ZyWALL baut automatisch
den VPN-Tunnel auf, wenn Sie ihn benutzen
möchten.
Klicken Sie in der Navigationsleiste auf VPN
und dort auf die Registerkarte SA Monitor.
Dort erscheint eine Liste der
angeschlossenen VPN-Tunnel (der VPNTunnel “test” ist hier oben).
9 myZyXEL.com Produktregistrierung
myZyXEL.com ist das Online-Servicecenter vonZyXEL, wo Sie Ihr ZyXEL-Produkt registrieren können.
1 Gehen Sie mit Ihrem Internetbrowser zu
myZyXEL.com.
2 Eröffnen Sie ein neues Konto (wenn Sie
noch keines besitzen).
Hinweis: Wenn Sie fünf Minuten lang keine
Eingaben machen, werden Sie
automatisch von Ihrem
myZyXEL.com-Konto abgemeldet.
Sie können sich dann wieder ganz
einfach bei Ihrem myZyXEL.comKonto anmelden.
37
Page 39

DEUTSCH
3 Wenn Sie ein Konto eröffnet haben, erhalten Sie eine E-Mail zur Bestätigung. Klicken Sie auf die in der
E-Mail angegebene URL, um das Konto zu aktivieren.
4 Klicken Sie auf Continue (Weiter), um das
myZyXEL.com-Anmeldefenster aufzurufen.
38
Page 40

5 Melden Sie sich an.
6 Klicken Sie auf den Link und registrieren
Sie Ihr ZyXEL-Produkt.
7 Klicken Sie auf Add
(Hinzufügen).
DEUTSCH
39
Page 41

8 Geben Sie in das Feld Serial
Number (Seriennummer) die
Seriennummer des Geräts
ein.
9 In den Feldern Category
(Kategorie) und Model
(Modell) erscheinen
automatisch die
Gerätekategorie und die
Modellnummen. Wenn nicht,
wählen Sie die richtigen
Angaben aus den
Listenfeldern aus.
10Geben Sie im Feld
Authentication Code
(Authentifizierungscode) die
MAC-Adresse des Geräts ein
(möglicherweise wird sie dort
schon angezeigt).
11Geben Sie im Feld Friendly
Name (freundicher Name) für
Identifikationszwecke eine
beschreibende Bezeichnung
ein.
12Klicken Sie auf Register
(Registrieren).
13Geben Sie die Kaufdaten ein
und klicken Sie auf Continue
(Fortfahren).
14Klicken Sie noch einmal auf
Continue (Fortfahren), um
den Vorgang abzuschließen.
DEUTSCH
40
Page 42

DEUTSCH
15Nachdem Sie Ihr
ZyXEL-Gerät
registriert haben,
können Sie sich die
Registrierungsdaten
im Fenster Service
Management
ansehen.
Das ZyXEL-Gerät ist
nun registriert, jedoch
ist der Content Filter
noch nicht aktiviert.
Um den Content Filter
zu aktivieren, müssen
Sie mit Ihrem Gerät
auf die Seite
myZyXEL.com
zugreifen. Lesen Sie
im nächsten Abschnitt
weiter.
10 Externe Datenbank für den Content Filter
Wenn Sie den Content Filter registrieren und die externe Datenbank für den Content Filter aktivieren, greift
die ZyWALL auf eine externe Datenbank zu, die Millionen von nach Inhalt sortierten Websites enthält. Auf der
Grundlage dieser Kategorien kann die ZyWALL den Zugriff blockieren und/oder den Zugriff auf diese
Websites zulassen. Registrieren Sie Ihre ZyWALL bei myZyXEL.com (siehe Abschnitt 9) und registrieren Sie
dann folgendermaßen die externe Datenbank für den Content Filter.
41
Page 43

DEUTSCH
1 Klicken Sie im Web-Konfigurator
des ZyXEL-Geräts auf CONTENT
FILTER (Inhaltsfilter), Categories
(Kategorien) und dann auf die
Tas te Register (Registrieren).
Hinweis: Um den Content Filter zu
konfigurieren, verwenden Sie
die Fenster CONTENT
FILTER (Inhaltsfilter) des
ZyWALL-Web-Konfigurators
.
2 Das myZyXEL.com-Loginfenster erscheint.
3 Geben Sie den Nutzernamen und das Passwort Ihres myZyXEL.com-Kontos ein.
4 Klicken Siein der Navigationsleiste
auf My Product (Mein Produkt).
5 Klicken Sie auf die Verknüpfung
Ihres Produktnamens, um die
Registrierungsdaten im Fenster
Service Management (ServiceManagement) aufzurufen.
42
Page 44

DEUTSCH
6 Klicken Sie auf Activate (Aktivieren), um den Content Filter Dienst auf der nächsten Seite aufzurufen.
7 Wenn Sie einen Testfilter verwenden möchten, klicken
Sie bei Content Filtering Trial (Content Filter
Testversion) auf Submit (Senden). Die Testdauer von
30 Tagen beginnt am Tag der Anmeldung.
Sie können keine Testversion anfordern, wenn Sie
vorher schon einmal eine Testversion angefordert
hatten oder eine PIN-Nummer einer iCard registriert
haben.
Wenn Sie eine iCard erworben haben, geben Sie in
das Feld License Key (PIN-Code) den PIN-Code
genau wie auf der iCard an . Geben Sie das Datum
ein, an dem der Inhaltsfilter beginnen soll und
klicken Sie bei Registration Information
(Registrierungsdaten) auf Submit (Senden).
43
Page 45

DEUTSCH
8 Eine Meldung teilt Ihnen mit, dass
der Dienst registriert wurde.
Klicken Sie auf Continue
(Fortfahren), um das Fenster
Service Management aufzurufen.
9 Auch wenn Sie gerade mit einer Testversion arbeiten, können Sie den PIN-Code einer iCard registrieren.
Klicken Sie dazu im Feld Service Activation (Dienstaktivierung) des Fensters Service Management auf
Upgrade (Aktualisieren).
44
Page 46

11 Problembeseitigung
Problem Lösungsmöglichkeit
Es leuchtet keine
der LEDAnzeigen.
Aus dem LAN
kann nicht auf die
ZyWALL
zugegriffen
werden.
Ein Zugriff auf
das Internet ist
nicht möglich.
Es kann keine
VPN-Verbindung
hergestellt
werden.
Stellen Sie sicher, dass das Netzkabel richtig an die ZyWALL und an eine Netzsteckdose
angeschlossen wurde. Stellen Sie sicher, dass die ZyWALL eingeschaltet wurde. Überprüfen
Sie alle Kabelverbindungen.
Wenn die LEDs auch dann nicht leuchten, besteht möglicherweise ein Hardwareproblem.
In diesem Fall sollten Sie sich an Ihren Händler wenden.
Überprüfen Sie die Kabelverbindung zwischen der ZyWALL und dem Computer oder
Hub. Eine ausführliche Beschreibung finden Sie in Abschnitt 1.
Versuchen Sie die ZyWALL mit einem Ping von einem LAN-Computer aus zu erreichen.
Stellen Sie sicher, dass die Ethernetkarte des Computers installiert ist und einwandfrei
funktioniert.
Klicken Sie im Computer auf Start, (Alle) Programme, Zubehör und dann auf
Eingabeaufforderung. Geben Sie im Fenster Eingabeaufforderung "ping" gefolgt von
der LAN-IP-Adresse der ZyWALL (192.168.1.1 ist die Standardadresse) ein und drücken
Sie dann auf [ENTER]. Nun sollte die ZyWALL reagieren. Falls nicht, lesen Sie nach
unter Abschnitt 11.1.
Wenn Sei das ZyWALL-Passwort vergessen haben, drücken Sie die RESET -Taste.
Drücken Sie etwa 10 Sekunden lang auf die Taste (oder so lange, bis die PWR-LED
blinkt). Lassen Sie die Taste dann wieder los. Auf diese Weise werden alle Einstellungen
der ZyWALL auf ihre Standardwerte zurückgesetzt (Passwort: 1234, LAN-IP-Adresse
192.168.1.1 usw.; Detailinformationen hierzu finden Sie im Benutzerhandbuch).
Wenn Sie die LAN- oder WAN-IP-Adresse der ZyWALL vergessen haben, können Sie
die IP-Adresse über den Konsolenport im SMT einsehen. Schließen Sie Ihren Computer
mit einem Konsolenkabel an den Anschluss CONSOLE an. Ihr Computer muss über ein
Terminalemulationsprogramm (z.B. HyperTerminal) verfügen, das folgendermassen
eingestellt ist: Anschlussemulation VT100, keine Parität, 8 Datenbits, 1 Stoppbit, keine
Flusskontrolle, Portgeschwindigkeit 9600 bps.
Prüfen Sie den Anschluss der ZyWALL an der Ethernet-Buchse mit Internetzugriff.
Stellen Sie sicher, dass das Gerät für den Internetzugriff (zum Beispiel ein DSL-Modem)
einwandfrei funktioniert.
Klicken Sie in der Navigationsleiste auf WAN und überprüfen Sie die Einstellungen.
Stellen Sie sicher, dass die ZyWALL und der Remote-IPSec -Router die gleichen VPN-
Einstellungen verwenden. Klicken Sie in der Navigationsleiste auf VPN , um die
erweiterten Einstellungen zu konfigurieren.
Rufen Sie eine Website auf, um zu überprüfen, ob die Internetverbindung hergestellt
werden kann.
DEUTSCH
45
Page 47

DEUTSCH
11.1 Einrichten der IP-Adresse des Computers
In diesem Abschnitt wird beschrieben, wie Sie Ihren Computer einrichten müssen, damit er bei Windows
2000, Windows NT und Windows XP eine IP-Adresse empfangen kann. Nur auf diese Weise kann Ihr
Computer mit der ZyWALL kommunizieren.
1 Klicken Sie bei Windows XP auf Start, Systemsteuerung.
Klicken Sie bei Windows 2000/NT auf Start, Einstellungen, Systemsteuerung.
2 Klicken Sie bei Windows XP auf Netzwerkverbindungen.
Klicken Sie bei Windows 2000/NT auf Netzwerk und DFÜ-Verbindungen.
3 Klicken Sie mit der rechten Maustaste auf LAN-Verbindung und dann auf Eigenschaften.
4 Wählen Sie Internetprotokoll (TCP/IP) (bei
Windows XP auf der Registerkarte Allgemein) und
klicken Sie auf Eigenschaften.
5 Das Fenster Eigenschaften von Internetprotokoll
(TCP/IP) erscheint (bei Windows XP auf der
Registerkarte Allgemein).Wählen Sie IP-Adresse
automatisch beziehen und DNS-Serveradresse
automatisch beziehen.
6 Klicken Sie auf OK, um das Fenster Eigenschaften
von Internetprotokolle (TCP/IP) zu schließen.
7 Klicken Sie auf Schließen (bei Windows 2000/NT auf
OK), um das Fenster Eigenschaften von LANVerbindung zu schließen.
8 Schließen Sie das Fenster Netzwerkverbindungen.
11.2 Schritte zum Ansehen der Produktzertifizierung(en)
1 Besuchen Sie www.zyxel.com.
2 Wählen Sie auf der ZyXEL-Homepage aus der Liste der Produkte Ihr Produkt aus.
Wählen Sie auf dieser die Zertifizierung aus, die Sie gerne angezeigt haben möchten.
46
Page 48

ESPAÑOL
ESPAÑOL
Vista previa
El ZyWALL 70 es un cortafuegos de WAN dual, con balanceo de carga, soporte de VPNs, gestión del ancho
de banda, filtrado de contenidos y muchas otras características. Puede usarlo como cortafuegos transparente
sin reconfigurar su red ni configurar las características de enrutamiento de ZyWALL. El ZyWALL aumenta la
seguridad de la red ofreciendo puertos DMZ para el uso con servidores públicos de acceso. Esta guía cubre
las conexiones iniciales y configuración necesaria para comenzar a usar el ZyWALL en su red.
Vea la Guía del usuario para más información sobre todas las características.
Puede que necesite su acceso a Internet para más información.
Esta guía está dividida en las siguientes secciones.
1 Conexiones del hardware
2 Acceso al configurador Web
3 Modo puente (bridge)
4 Configuración del acceso a Internet
5 DNS
6 NAT
7 Cortafuegos
8 Configuración de reglas VPN
9 Registro del producto en myZyXEL.com
10Filtrado de contenidos
11Solución de problemas
1 Conexiones del hardware
Necesita lo siguiente.
ZyWALL Ordenador Cables Ethernet
47
Cable de alimentación
Page 49

ESPAÑOL
Realice lo siguiente para crear conexiones de hardware para la configuración inicial.
1 Use un cable Ethernet para conectar el puerto LAN a un ordenador. También puede usar cables Ethernet
para conectar servidores públicos (web, correo electrónico, FTP, etc.) a los puertos DMZ.
2 Use otro(s) cable(s) Ethernet para conectar el puerto WAN 1 y/o WAN 2 a un dispositivo Ethernet con
acceso a Internet.
3 Use el cable de alimentación incluido para conectar el zócalo de alimentación (en el panel posterior) a una
toma de corriente
4 Pulse el interruptor de alimentación hasta la posición de encendido y mire al panel frontal. El LED PWR se
encenderá. El LED SYS parpadeará mientras realiza la prueba del sistema y luego se quedará fijo si la
prueba ha tenido éxito. Los LEDs ACT, CARD, LAN, DMZ y WAN se encenderán y permanecerán
encendidos si las conexiones correspondientes se han realizado correctamente.
48
Page 50

ESPAÑOL
2 Acceso al configurador Web
Use esta sección para configurar la interfaz WAN 1 para el acceso a Internet.
1 Abra su explorador de web. Introduzca
192.168.1.1 (la dirección IP predeterminada del
ZyWALL) como dirección.
Si no aparece la pantalla de acceso, vea Sección
11.1 para ajustar la dirección IP de su ordenador.
3 Cambie la contraseña de acceso introduciendo
una nueva contraseña y haciendo clic en Apply
(Aplicar).
2 Haga clic en Login (acceso) (la contraseña
predeterminada 1234 ya está introducida).
4 Haga clic en Apply (Aplicar) para reemplazar el
certificado digital predeterminado de ZyWALL.
5 Aparecerá la pantalla HOME (Inicio).
El ZyWALL está en modo router por defecto. Continúe en el siguiente paso si desea usar características
de enrutamiento como NAT, DHCP y VPN.
Vay a a Sección 3 si prefiere usar el ZyWALL como cortafuegos transparente.
49
Page 51

6 Compruebe la tabla
Network Status
(estado de la red). Si
el estado de WAN 1
no es Down (Caído) y
hay una dirección IP,
vaya a Sección 5.
Si el estado de la
WAN 1 es Down
(Caído) (o no hay una
dirección IP), haga clic
en Internet Access
(acceso a Internet) y
use Sección 4 para
configurar WAN 1.
Use las pantallas
WAN en NETWORK
(red) si necesita
configurar WAN 2.
También puede
configurar el balanceo
de carga entre los
puertos WAN.
ESPAÑOL
3 Modo puente (bridge)
Cuando configura el ZyWALL en modo puente, funciona como un cortafuegos transparente. Haga lo siguiente
para configurar el ZyWALL en este modo bridge.
50
Page 52

1 Haga clic en
MAINTENANCE
(Mantenimiento) en el
panel de navegación y
luego en Device Mode
(Modo de Dispositivo).
2 Seleccione Bridge
(Puente) y configure una
máscara de subred de
dirección IP (estática) y
una dirección IP de puerta
de enlace para las
interfaces LAN, WAN,
DMZ y WLAN del
ZyWALL.
3 Haga clic en Apply
(Aplicar). El ZyWALL se
reiniciará.
Vay a a Sección 5 si tiene
servidores que necesitan ser
accesibles desde la WAN.
ESPAÑOL
4 Configuración del acceso a Internet
Introduzca la información del acceso a Internet exactamente como se le ha dado.
Si se le ha dado una dirección IP para usarla, seleccione Static (Estática) en el cuadro desplegable IP
Address Assignment (Asignación de dirección IP) e introduzca la información facilitada.
Nota: Los campos varían dependiendo de lo que seleccione en el campo Encapsulation
(Encapsulación). Rellénelos con la información facilitada por el ISP o el administrador de
redes.
Haga clic en Finish (Finalizar) cuando haya terminado.
51
Page 53

• Encapsulación Ethernet
Configure un servicio Correcaminos en las
pantallas WAN de NETWORK (Red) (use la ficha
WAN 1).
ESPAÑOL
• Encapsulación PPP sobre Ethernet o PPTP
Seleccione Nailed-Up (Forzada) cuando desee que su conexión esté arriba todo el tiempo (esto puede
resultar caro si su ISP le cobra por el tiempo de uso de Internet en lugar de una cuota fija mensual).
Para no tener una conexión arriba todo el tiempo, especifique un período de tiempo en espera (en segundos)
en Idle Timeout (Temporizador de inactividad).
52
Page 54

ESPAÑOL
5 DMZ
La Zona DesMilitarizada (DeMilitarized Zone - DMZ) permite a los servidores públicos (web, correo
electrónico, FTP, etc.) estar visibles al mundo exterior teniendo aún protección de cortafuegos contra ataques
DoS (Denial of Service - Negación de Servicio).
A diferencia de LAN, el ZyWALL no asigna la configuración TCP/IP a través de DHCP a ordenadores
conectados a los puertos DMZ. Configure los ordenadores con direcciones IP estáticas (en la misma subred
que la dirección IP del puerto DMZ) y direcciones de servidor DNS. Use la dirección IP del ZyWALL como
puerta de enlace predeterminada.
Realice lo siguiente para configurar la DMZ si el ZyWALL está en modo de enrutamiento.
Nota: No necesita configurar la DMZ con modo puente, vaya a Sección 7.
1 Haga clic en DMZ en el panel de navegación.
53
Page 55

ESPAÑOL
2 Especifique una dirección IP y máscara de subred para la
interfaz DMZ.
Si usa direcciones IP privadas en la DMZ, use NAT para
hacer a los servidores accesibles públicamente (ver
Sección 6).
Una dirección IP pública debe estar en una subred
separada de las direcciones IP públicas de los puertos
WAN. Si no configura NAT para las direcciones IP
públicas en la DMZ, el ZyWALL enruta el tráfico a las
direcciones IP públicas de la DMZ sin realizar la NAT. Esto
puede resultar útil para albergar servidores para
aplicaciones hostiles NAT.
3 Haga clic en Apply (Aplicar).
6 NAT
NAT (Network Address Translation (Traducción de Direcciones de Redes) - NAT, RFC 1631) significa la
traducción de una dirección IP en una red a una dirección IP diferente en otra. Puede usar las pantallas de
NAT Address Mapping (mapeo de direcciones NAT) para que el ZyWALL traduzca múltiples direcciones IP
públicas a múltiples direcciones IP privadas en su LAN (o DMZ).
El siguiente ejemplo permite el acceso desde la WAN a un servidor HTTP (web) en la DMZ. El servidor tiene
una dirección IP privada de 10.0.0.20.
54
Page 56

ESPAÑOL
1 Haga clic en NAT en el panel de
navegación y luego en Port
Forwarding (Reenvío de puerto).
2 Seleccione la casilla de verificación
Active (Activa).
3 Escriba un nombre para la regla.
4 Escriba el número que el servicio
usa.
5 Escriba la dirección IP del servidor
HTTP.
6 Haga clic en Apply (Aplicar).
7 Cortafuegos
Puede usar el ZyWALL sin configurar el cortafuegos.
El cortafuegos del ZyWALL está preconfigurado para proteger su LAN de ataques desde Internet. Por
defecto, no puede entrar ningún tráfico en su LAN a menos que se haya generado una petición en la LAN
antes. El ZyWALL permite el acceso a la DMZ desde la WAN o LAN, pero bloquea el tráfico de la DMZ a la
LAN.
Si usa el ZyWALL en modo enrutador, continúe con la siguiente sección. Para el modo puente, vaya a
Sección 9.
55
Page 57

ESPAÑOL
8 Configuración de reglas VPN
Un túnel VPN (Virtual Private
Network - Red Privada Virtual)
le ofrece una conexión segura
a otro ordenador o red.
Una política de puerta de
enlace identifica a los
enrutadores IPSec en ambos
extremos del túnel VPN.
Una política de red especifica
qué dispositivos (detrás de los
enrutadores IPSec) pueden
usar el túnel VPN.
Esta figura ayuda a explicar los campos principales en las pantallas del asistente.
1 Haga clic en VPN en la pantalla HOME (Inicio) (puede que necesite desplazar arriba para ver el enlace)
para abrir el asistente para VPN.
56
Page 58

ESPAÑOL
Nota: Su configuración no se grabará cuando haga clic en Back (Atrás).
2 Use esta pantalla para configurar la política de la
puerta de enlace.
Name (Nombre): Introduzca un nombre para identificar
la política de la puerta de enlace.
Remote Gateway Address (Dirección de puerta de
enlace remota): Introduzca la dirección IP o nombre
del dominio del enrutador IPSec remoto.
3 Use esta pantalla para configurar la política de la
red.
Deje la casilla de verificación Active (Activa)
seleccionada.
Name (Nombre): Introduzca un nombre para
identificar la política de la red.
Seleccione Single (Una) e introduzca la dirección IP
para una única dirección IP.
Seleccione Range IP (Rango IP) e introduzca las
direcciones IP inicial y final para un rango específico
de direcciones IP.
Seleccione Subnet (Subred) e introduzca la dirección
IP y la máscara de subred para especificar las
direcciones IP en una red por su máscara de subred.
57
Page 59

ESPAÑOL
Nota: Compruebe que el enrutador IPSec usa la misma configuración de seguridad que la que
configurará en las siguientes dos pantallas.
Negotiation Mode (Modo de negociación): Seleccione Main Mode (Modo principal) para la protección de
la identidad. Seleccione Aggressive Mode (Modo agresivo) para permitir que más conexiones entrantes
desde direcciones IP dinámicas usen contraseñas separadas.
Nota: SAs (asociaciones de seguridad) múltiples conectadas a través de una puerta de enlace segura
deben tener el mismo modo de negociación.
Encryption Algorithm (Algoritmo de cifrado): Seleccione 3DES o AES para un cifrado más fuerte (y más
lento).
Authentication Algorithm (Algoritmo de autenticación): Seleccione MD5 para una seguridad mínima o
SHA-1 para una mayor seguridad.
Key Group (Grupo de claves): Seleccione DH2 para una mayor seguridad.
SA Life Time (Temporizador de SA): Ajuste la frecuencia con que ZyWALL negocia la IKE SA (mínimo 180
segundos). Una vida de SA corta aumenta la seguridad, pero la negociación desconecta temporalmente el túnel
VPN.
Pre-Shared Key (Clave pre-compartida): Use 8 a 31 caracteres ASCII sensibles a mayúsculas o 16 a 62
caracteres hexadecimales ("0-9", "A-F"). Precede una clave hexadecimal con un "0x” (cero x), que no cuenta
como parte del rango de caracteres 16 a 62 para la clave.
Encapsulation Mode (Modo de encapsulación): Tunnel (Túnel) es compatible con NAT, Transport
(Transporte) no lo es.
IPSec Protocol (Protocolo IPSec): ESP es compatible con NAT, AH no lo es.
Perfect Forward Secrecy (PFS): None (Ninguno) permite una configuración IPSec más rápida, pero DH1 y
DH2 son el modo seguro.
58
Page 60

ESPAÑOL
4 Use esta pantalla para establecer la configuración
de túnel IKE (Internet Key Exchange - Intercambio
de Claves de Internet).
5 Use esta pantalla para establecer la configuración
IPSec.
59
Page 61

ESPAÑOL
6 Compruebe su configuración VPN. Haga clic en
Finish (Finalizar) para guardar la configuración.
7 Haga clic en Close (Cerrar) en la pantalla final
para completar la configuración del asistente para
VPN. Continúe con la siguiente sección para
activar la regla VPN y establecer una conexión
VPN.
8.1 Usar la conexión VPN
Use túneles VPN para enviar y recibir archivos con seguridad y permitir el acceso remoto a redes
corporativas, servidores de web y correo electrónico. Los servicios funcionan igual que si estuviese en la
oficina en lugar de estar conectado a Internet.
60
Page 62

ESPAÑOL
Por ejemplo, la regla VPN “test” (prueba)
permite un acceso seguro a un servidor web
en una LAN corporativa remota. Introduzca la
dirección IP del servidor (10.0.0.23 en este
ejemplo) como URL en su explorador. El
ZyWALL construye automáticamente un túnel
VPN cuando intenta usarlo.
Haga clic en VPN en el panel de navegación
y luego en la ficha SA Monitor (monitor SA)
para mostrar una lista de los túneles VPN
conectados (el túnel VPN “test” (prueba) está
aquí).
9 Registro del producto myZyXEL.com
myZyXEL.com es el centro de servicios en línea de ZyXEL donde podrá registrar su dispositivo ZyXEL.
1 Vay a a myZyXEL.com usando su
explorador.
2 Cree una nueva cuenta (si todavía no tiene
una).
Nota: Saldrá automáticamente de la cuenta
myZyXEL.com tras cinco minutos de
inactividad. Simplemente vuelva a
entrar en su cuenta myZyXEL.com si
esto ocurre.
61
Page 63

ESPAÑOL
3 Tras crear una cuenta, recibirá un correo electrónico de confirmación. Haga clic en la URL del correo
electrónico para activar su cuenta.
4 Haga clic en Continue (Continuar) para ir
a la pantalla de acceso de myZyXEL.com.
62
Page 64

5 Acceda.
6 Haga clic en el enlace y registre su
dispositivo ZyXEL.
7 Haga clic en Add (Agregar).
ESPAÑOL
63
Page 65

8 Introduzca el número de serie
del producto en el campo
Serial Number (Número de
serie).
9 La categoría del dispositivo y
número de modelo aparecen
automáticamente en los
campos Category (Categoría)
y Model (Modelo)
respectivamente. En caso
contrario, seleccione los
correctos de los cuadros de
listas desplegables.
10Introduzca la dirección MAC
del dispositivo en el campo
Authentication Code (Código
de autenticación) (puede que
ya se vea).
11Introduzca un nombre de
descripción en el campo
Friendly Name (Nombre
amigable) para la
identificación.
12Haga clic en Registrar.
13Especifique la información de
compra y haga clic en
Continuar.
14Haga clic en Continuar de
nuevo para completar el
proceso.
ESPAÑOL
64
Page 66

ESPAÑOL
15Tras haber registrado
el dispositivo ZyXEL,
podrá ver los detalles
de su registro en la
pantalla Service
Management
(Administración del
servicio).
El dispositivo ZyXEL ya
está registrado, pero la
filtración de contenidos
no está activada. Para
activar la filtración de
contenidos, deberá
acceder a
myZyXEL.com a través
de su dispositivo.
Continúe con la
siguiente sección.
10 Filtrado de contenidos
Cuando registre y active la filtración de contenidos de la base de datos externa, su ZyWALL accederá a una
base de datos externa que tiene millones de sitios web clasificados según su contenido. Puede que el
ZyWALL bloquee y/o acceda a los sitios web basándose en estas categorías. Registre su ZyWALL en
myZyXEL.com (ver Sección 9) y luego realice lo siguiente para registrarse para la filtración de contenidos de
la base de datos externa.
65
Page 67

ESPAÑOL
1 En el configurador web del
dispositivo ZyXEL, haga clic en el
botón CONTENT FILTER (Filtro de
contenidos), Categories
(Categorías) y luego en Register
(Registrar).
Nota: Puede usar las pantallas
CONTENT FILTER (Filtro de
contenidos) del configurador
web del ZyWALL para
configurar y activar el filtrado
de contenidos.
2 Se abrirá la pantalla de acceso a myZyXEL.com.
3 Introduzca el nombre de usuario y contraseña de su cuenta myZyXEL.com.
4 Haga clic en My Product (Mi
producto) en el panel de
navegación.
5 Haga clic en el enlace del nombre
del producto de su dispositivo para
ver sus detalles de registro en la
pantalla Service Management
(Administración del servicio).
66
Page 68

ESPAÑOL
6 Haga clic en Activate (Activar) para que el servicio de filtro de contenidos aparezca en la siguiente
pantalla.
7 Si desea usar la versión de prueba, haga clic en
Submit (Enviar) en Content Filtering Trial (Prueba
de filtrado de contenidos). El período de prueba
comienza desde la fecha en que aplique.
No puede aplicar una prueba si ya ha usado un
número PIN de iCard de prueba o registrado.
Si ha comprado una iCard, introduzca el código PIN
exactamente como aparece en su iCard en el campo
License Key (Clave de licencia) (código PIN).
Seleccione la fecha cuando desea que la filtración de
sus contenidos comience y haga clic en Submit
(Enviar) en Registration Information (Información
del registro).
67
Page 69

ESPAÑOL
8 Aparecerá una pantalla mostrando
que el servicio se ha registrado.
Haga clic en Continue (Continuar)
para ir a la pantalla Service
Management (Administración del
servicio).
9 Si actualmente está usando una prueba, todavía puede registrar el código PIN de una iCard haciendo clic
en Upgrade (Actualizar) en el campo Service Activation (Activación del servicio) en la pantalla
Service Management (Administración del servicio).
68
Page 70

11 Solución de problemas
Problema Solución
Ninguno de los
LEDs se
enciende.
No se puede
acceder al
ZyWALL desde la
LAN.
No puedo acceder
a Internet.
No puedo
establecer una
conexión VPN
Asegúrese de haber conectado el cable de alimentación al ZyWALL y si lo ha enchufado en
una fuente de alimentación apropiada. Compruebe que el ZyWALL está encendido.
Compruebe todas las conexiones de los cables.
Si los LEDs todavía no se encienden, puede que tenga un problema de hardware. En este
caso, debería contactar con su vendedor local.
Compruebe la conexión de cables entre el ZyWALL y su ordenador o hub. Consulte Sección
1 para más detalles.
Realice un ping al ZyWALL desde un ordenador LAN. Compruebe que la tarjeta Ethernet de
su ordenador esté instalada y funcione correctamente.
En el ordenador, haga clic en Inicio, (Todos los) programas, Accesorios y luego en
Símbolo del sistema. En la ventana del Símbolo del sistema, escriba "ping" seguido por la
dirección IP LAN del ZyWALL (192.168.1.1 es la predeterminada) y pulse [ENTRAR]. El
ZyWALL debería responder. En caso contrario, consulte Sección 11.1.
Si ha olvidado la contraseña del ZyWALL, use el botón RESET . Mantenga pulsado el botón
durante unos 10 segundos (o hasta que el LED PWR comience a parpadear), a continuación
suéltelo. Esto devolverá al ZyWALL la configuración predeterminada de fábrica (la
contraseña es 1234, dirección IP LAN 192.168.1.1 etc.; vea la Guía del usuario para más
detalles).
Si ha olvidado la dirección IP LAN o WAN del ZyWALL puede comprobar la dirección IP en la
SMT a través del puerto consola SMT. Conecte su ordenador al puerto CONSOLE
(Consola) usando un cable de consola. Su ordenador debería tener un programa de
comunicaciones de emulación de terminales (como HyperTerminal) ajustado a la emulación
del terminal VT100, sin paridad, 8 bits de datos, 1 bit de parada, sin flujo de control y una
velocidad de puerto de 9600 bps.
Compruebe la conexión del ZyWALL a la clavija Ethernet con acceso a Internet. Compruebe
si el dispositivo de puerta de enlace de Internet (como un módem DSL) funciona
correctamente.
Haga clic en WAN en el panel de navegación para verificar su configuración.
Compruebe si el ZyWALL y el enrutador IPSec usan la misma configuración VPN. Haga clic
en VPN en el panel de navegación para establecer la configuración avanzada.
Acceda a un sitio web para comprobar si tiene una conexión a Internet correcta.
ESPAÑOL
11.1 Configurar la dirección IP de su ordenador
Esta sección le explica cómo configurar su ordenador para recibir una dirección IP en Windows 2000,
Windows NT y Windows XP. Esto asegura que su ordenador pueda conectarse con su ZyWALL.
69
Page 71

ESPAÑOL
1 En Windows XP, haga clic en Inicio, Panel de control.
En Windows 2000/NT, haga clic en Inicio, Configuración, Panel de control.
2 En Windows XP, haga clic en Conexiones de red.
En Windows 2000/NT, haga clic en Conexiones de red y marcación.
3 Haga clic con el botón derecho en Conexión de área local y haga clic en Propiedades.
4 Seleccione Protocolo Internet (TCP/IP) (en la ficha
General en Windows XP) y haga clic en Propiedades.
5 Se abrirá la pantalla Propiedades de Protocolo
Internet TCP/IP (la ficha General en Windows XP).
Seleccione las opciones Obtener una dirección IP
automáticamente y Obtener la dirección del
servidor DNS automáticamente.
6 Haga clic en Aceptar para cerrar la ventana
Propiedades de Protocolo Internet (TCP/IP).
7 Haga clic en Cerrar (Aceptar en Windows 2000/NT)
para cerrar la ventana Propiedades de conexión de
área local.
8 Cierre la pantalla Conexiones de red.
11.2 Procedimiento para ver la(s) certificación(es) del producto
1 Vaya a www.zyxel.com.
2 Seleccione su producto de la lista desplegable en la página inicial de ZyXEL para ir a la página de ese
producto.
3 Seleccione la certificación que desee visualizar en esta página.
70
Page 72

FRANÇAIS
FRANÇAIS
Présentation
Le ZyWALL 70 est un pare-feu double WAN à équilibrage de charge avec VPN, gestion de bande passante,
filtrage de contenu et de nombreuses autres fonctionnalités. Vous pouvez l'utiliser comme un pare-feu
transparent et ne pas reconfigurer votre réseau ni configurer les fonctionnalités de routage du ZyWALL. Le
ZyWALL améliore la sécurité du réseau en offrant des ports DMZ à utiliser avec les serveurs accessibles au
public. Ce guide couvre les connexions initiales et la configuration nécessaire pour commencer à utiliser le
ZyWALL dans votre réseau.
Voir le Guide de l'utilisateur pour plus d'informations sur toutes les fonctionnalités.
Vous aurez peut-être besoin de vos informations d'accès à Internet.
Ce guide est divisé en sections comme suit.
1 Connexions matérielles
2 Accéder au Configurateur Web
3 Mode Pont
4 Installation de l'accès à Internet
5 DNS
6 NAT
7 Pare-feu
8 Installation de la règle VPN
9 Enregistrement du produit sur myZyXEL.com
10Filtrage du contenu à partir d'une base données externe
11Dépannage
1 Connexions matérielles
Vous avez besoin des éléments suivants.
ZyWALL Ordinateur Câbles Ethernet
71
Cordon
d'alimentation
Page 73

FRANÇAIS
Procédez comme suit pour effectuer les connexions matérielles pour l'installation initiale.
1 Utilisez un câble Ethernet pour connecter le port LAN à un ordinateur. Vous pouvez aussi utiliser les
câbles Ethernet pour connecter les serveurs publics (web, e-mail, FTP, etc.) aux ports DMZ.
2 Utilisez un autre (ou d'autres) câble(s) Ethernet pour connecter le port WAN 1 et/ou WAN 2 à une prise
Ethernet avec accès à Internet.
3 Utilisez le cordon d'alimentation pour connecter la prise d'alimentation.
4 Mettez le commutateur d'alimentation sur la position allumé et regardez le panneau avant. La LED PWR
s'allume. La LED SYS clignote lors du test du système et reste ensuite allumée si le test a réussi. Les LED
ACT, CARD, LAN, DMZ, et WAN s'allument et restent allumées si les connexions correspondantes sont
effectuées correctement.
72
Page 74

FRANÇAIS
2 Accéder au Configurateur Web
Utilisez cette section pour configurer l'interface WAN 1 pour l'accès à Internet.
1 Lancez votre navigateur web. Entrez 192.168.1.1
(l'adresse IP par défaut du ZyWALL) comme
adresse.
Si l'écran de connexion n'apparaît pas, voyez la
Section 11.1 comment définir l'adresse IP de votre
ordinateur.
3 Changez le mot de passe d'ouverture de session
en entrant un nouveau mot de passe et cliquez sur
Apply (Appliquer).
2 Cliquez sur Login (Ouverture de session) (le
mot de passe par défaut 1234 est déjà entré).
4 Cliquez sur Apply (Appliquer) pour remplacer le
certificat numérique par défaut du ZyWALL.
5 L'écran HOME (ACCUEIL) s'ouvre.
Par défaut, le ZyWALL est en mode routeur. Suivez l'étape suivante si vous voulez utiliser les
fonctionnalités de routage telles que NAT, DHCP et VPN.
Allez à la Section 3 si vous préférez utiliser le ZyWALL comme un pare-feu transparent.
73
Page 75

6 Reportez-vous au
tableau d'Network
Status (Etat du
Réseau). Si l'état
WAN 1 n'est pas
Désactivé et qu'il y a
une adresse IP, allez
à la Section 5.
Si l'état WAN 1 est
Désactivé (ou s'il n'y
a pas d'adresse IP),
cliquez sur Accès
Internet et passez à la
Section 4 pour
configurer WAN 1.
Utilisez les écrans
NETWORK/ WAN si
vous devez configurer
WAN 2. Vous pouvez
également configurer
l'équilibrage de charge
entre les ports WAN.
FRANÇAIS
3 Mode Pont
Quand vous paramétrez le ZyWALL en mode pont, il fonctionne comme un pare-feu transparent. Procédez
comme suit pour paramétrer le ZyWALL en mode pont.
74
Page 76

FRANÇAIS
1 Cliquez sur
MAINTENANCE dans le
panneau de navigation et
ensuite sur le Mode
Périphérique.
2 Sélectionnez Pont et
configurez une
d'adresse IP (statique) de
masque de sous-réseau
et une adresse IP de
passerelle pour les
interfaces LAN, WAN,
DMZ et WLAN du
ZyWALL.
3 Cliquez sur Appliquer. Le
ZyWALL redémarre.
Passez à la Section 5 si vous
avez des serveurs qui doivent
être accessibles à partir du
WAN.
4 Installation de l'accès à Internet
Entrez les informations d'accès à Internet exactement telles qu'elles vous ont été fournies.
Si vous avez reçu une adresse IP à utiliser, sélectionnez Statique dans la boîte de la liste déroulante
d'Attribution d'adresse IP et saisissez les informations fournies.
Remarque: Les champs varient en fonction de ce que vous sélectionnez dans le champ
Encapsulation. Remplissez-les avec les informations fournies par l'ISP ou l'administrateur
réseau.
Cliquez sur Ter miner quand vous avez terminé.
75
Page 77

• Encapsulation Ethernet
Configurer un service Roadrunner dans les
écrans du NETWORK WAN (utilisez l'onglet
WAN 1).
FRANÇAIS
• PPP over Ethernet ou PPTP Encapsulation
Sélectionnez Nailed-Up quand vous voulez que votre connexion soit toujours active (cela peut être cher si
votre ISP vous facture pour votre temps d'utilisation à la place d'un abonnement mensuel).
Pour ne pas avoir la connexion constamment active, spécifiez un délai d'inactivité (en secondes) dans Délai
d'inactivité (Idle Timeout).
76
Page 78

FRANÇAIS
5 DMZ
La Zone Démilitarisée (DMZ) permet aux serveurs publics (web, e-mail, FTP, etc.) d'être visible au monde
extérieur et avoir cependant une protection pare-feu contre les attaques DoS (Denial of Service).
Contrairement au LAN, le ZyWALL n'attribue pas de configuration TCP/IP via DHCP aux ordinateurs
connectés aux ports DMZ. Configurez les ordinateurs avec des adresses IP statiques (dans le même sousréseau que les adresses IP des ports DMZ) et les adresses de serveur DNS. Utilisez l'adresse IP DMZ du
ZyWALL comme passerelle par défaut.
Procédez comme suit pour configurer le DMZ si le ZyWALL est en mode routage.
Remarque: Vous n'avez pas besoin de configurer DMZ avec le mode pont, sautez à la Section 7.
1 Cliquez DMZ dans le panneau de navigation.
77
Page 79

FRANÇAIS
2 Spécifiez une adresse IP et un masque de sous-réseau
pour l'interface DMZ.
Si vous utilisez des adresses IP privées sur le DMZ,
utilisez NAT pour rendre les serveurs accessibles au
public (voir la Section 6).
Une adresse IP publique doit se trouver sur un sous-
réseau séparé de l'adresse IP publique du port WAN. Si
vous ne configurez pas NAT pour les adresses IP
publiques sur le DMZ, le ZyWALL dirige le trafic vers les
adresses IP publiques sur le DMZ sans effectuer de NAT.
Cela peut être utile pour héberger des serveurs pour des
applications non conviviales avec NAT.
3 Cliquez sur Appliquer.
6 NAT
NAT (Network Address Translation - NAT, RFC 1631) permet la conversion d'un adresse IP dans un réseau
en une adresse IP différente dans un autre. Vous pouvez utiliser les écrans de Mappage d'Adresse NAT pour
que le ZyWALL convertisse plusieurs adresses IP publiques en plusieurs adresses IP privées sur votre LAN
(ou DMZ).
L'exemple suivant permet l'accès depuis le WAN à un serveur HTTP (web) sur le DMZ. Le serveur possède
une adresse IP privée de 10.0.0.20.
78
Page 80

FRANÇAIS
1 Cliquez sur NAT dans le panneau
de navigation et ensuite sur
Réacheminement de Port.
2 Sélectionnez la case à cocher
Active.
3 Tapez un nom pour la règle.
4 Tapez le numéro de port que le
service utilise.
5 Tapez l'adresse IP du serveur
HTTP.
6 Cliquez sur Appliquer.
7 Pare-feu
Vous pouvez utiliser le ZyWALL sans configurer le pare-feu.
Le pare-feu du ZyWALL est préconfiguré pour protéger votre LAN contre les attaques provenant d'Internet.
Par défaut, aucun trafic ne peut pénétrer dans votre LAN à moins qu'une requête ne soit tout d'abord générée
sur le LAN. Le ZyWALL permet l'accès au DMZ depuis le WAN ou LAN, mais bloque le trafic provenant du
DMZvers le LAN.
Si vous utilisez le ZyWALL en mode routeur, suivez la section suivante. Pour le mode pont, passez à la
Section 9.
79
Page 81

FRANÇAIS
8 Installation de la règle VPN
Un tunnel VPN (Virtual Private
Network) vous offre une
connexion sécurisée à un autre
ordinateur ou réseau.
Une stratégie de passerelle
identifie les routeurs IPSec aux
extrémités d'un tunnel VPN.
Une stratégie de réseau
spécifie les périphériques
(derrière les routeurs IPSec)
pouvant utiliser le tunnel VPN.
Cette figure aide à expliquer les champs principaux dans les écrans de l'assistant.
1 Cliquez sur VPN dans l'écran d'ACCUEIL (vous devrez peut-être faire défiler vers le haut pour voir les
liens) pour ouvrir l'assistant VPN.
80
Page 82

FRANÇAIS
Remarque: Vos paramètres ne sont pas enregistrés quand vous cliquez sur Retour.
2 Utilisez cet écran pour configurer la stratégie de
passerelle.
Nom : Entrez un nom pour identifier la stratégie de
passerelle.
Adresse de passerelle distante : Entrez l'adresse
IP ou le nom de domaine du routeur IPSec distant.
3 Utilisez cet écran pour configurer la stratégie de
réseau.
Laissez la case à cocher Active sélectionnée.
Nom : Entrez un nom pour identifier la stratégie de
réseau.
Sélectionnez Unique et entrez une adresse IP pour
une adresse IP unique.
Sélectionnez Plage d'IP et saisissez les adresses IP
de début et de fin pour une plage d'adresses IP
spécifique.
Sélectionnez Sous-réseau et saisissez une adresse
IP et un masque de sous-réseau pour spécifier les
adresses IP sur le réseau par leur masque de sousréseau.
81
Page 83

FRANÇAIS
Remarque: Vérifiez que le routeur IPSec distant utilise les mêmes paramètres de sécurité que ceux
que vous configurez dans les deux écrans suivants.
Mode de négociation : Sélectionnez Mode Principal pour la protection d'identité. Sélectionnez le Mode
Agressif pour permettre à plus de connexions entrantes à partir des adresses IP dynamiques d'utiliser
des mots de passe séparés.
Remarque: Plusieurs SAs (associations de sécurité) se connectant via une passerelle de sécurité
doivent avoir le même mode de négociation.
Algorithme de cryptage : Sélectionnez 3DES ou AES pour bénéficier d'un cryptage plus puissant (et
plus lent).
Algorithme d'authentification : Sélectionnez MD5 pour la sécurité minimale ou SHA-1 pour une sécurité
plus élevée.
Groupe de clés : Sélectionnez DH2 pour avoir une sécurité plus élevée.
Durée de vie SA : Définissez la fréquence à laquelle le ZyWALL renégocie l'IKE SA (minimum 180
secondes). Une durée de vie de SA courte augmente la sécurité, mais la renégociation déconnecte
temporairement le tunnel VPN.
Clé prépartagée : Utilisez 8 à 31 caractères ASCII sensibles à la casse ou 16 à 62 caractères
hexadécimaux ("0-9", "A-F"). Faites précéder une clé hexadécimale par un "0x” (zéro x), qui n'est pas
compté comme faisant partie de la plage de 16 à 62 caractères pour la clé.
Mode d'encapsulation : Tun nel est compatible avec NAT, Transport ne l'est pas.
Protocole IPSec : ESP est compatible avec NAT, AH ne l'est pas.
Confidentialité de transmission parfaite (PFS) : Aucune permet une configuration IPSec plus rapide,
mais DH1 et DH2 sont plus sécurisés.
82
Page 84

FRANÇAIS
4 Utilisez cet écran pour configurer les paramètres
IKE (Internet Key Exchange-Echange de clé
Internet).
5 Utilisez cet écran pour configurer les paramètres
IPSec.
83
Page 85

FRANÇAIS
6 Vérifiez vos paramètres VPN. Cliquer sur
Terminer pour enregistrer les paramètres.
7 Cliquez sur Fermer dans l'écran final pour
terminer l'installation de l'assistant de VPN.
Suivez la section suivante pour activer la règle
VPN et établir une connexion VPN.
8.1 lUtiliser la Connexion VPN
Utilisez les tunnels VPN pour envoyer et recevoir de manière sécurisée, et permettre l'accès à distance aux
réseaux d'entreprise, serveurs web et e-mail. Les services fonctionnent comme si vous étiez au bureau au
lieu d'être connecté à Internet.
84
Page 86

FRANÇAIS
Par exemple, la règle VPN “test” permet un
accès sécurisé à un serveur web sur un LAN
d'entreprise distant . Entrez l'adresse IP du
serveur (10.0.0.23 dans cet exemple) comme
votre URL de navigateur. Le ZyWALL
construit automatiquement le tunnel VPN
quand vous tentez de l'utiliser.
Cliquez sur VPN dans le panneau de
navigation et ensuite sur l'onglet du Moniteur
SA pour afficher une liste de tunnel VPN
connectés (le tunnel VPN “test” est là).
9 Enregistrement du produit sur myZyXEL.com
myZyXEL.com est le centre de services en ligne de ZyXEL où vous pouvez enregistrer votre matériel ZyXEL.
1 Allez à myZyXEL.com à l'aide de votre
navigateur web.
2 Créez un nouveau compte (si vous n'en
avez pas déjà un).
Remarque: Vous êtes automatiquement
déconnecté de votre compte
myZyXEL.com au bout de cinq
minutes d'inactivité. Réouvrez
simplement une session dans votre
compte myZyXEL.com si cela vous
arrive.
85
Page 87

FRANÇAIS
3 Après avoir créé un compte, vous recevrez un e-mail de confirmation. Cliquez sur l'URL dans l'e-mail
pour activer votre compte.
4 Cliquez sur Continuer pour aller à l'écran
de connexion de myZyXEL.com.
86
Page 88

5 Ouvrez une session.
6 Cliquez sur le lien et enregistrez votre
matériel ZyXEL.
7 Cliquez sur Ajouter.
FRANÇAIS
87
Page 89

8 Saisissez le numéro de série
du produit dans le champ du
numéro de série.
9 Votre numéro de catégorie et
de modèle de votre matériel
s'affiche automatiquement
dans les champs Catégorie
et Modèle respectivement.
Sinon, sélectionnez les bons
dans les boîtes de listes
déroulantes.
10Entrez l'adresse MAC du
matériel dans le champ Code
d'authentification (il est
peut-être déjà affiché).
11Entrez un nom de description
dans le champ Nom
convivial pour les besoins
d'identification.
12Cliquez sur Enregistrer.
FRANÇAIS
13Spécifiez les informations
d'achat et cliquez sur
Continuer.
14Cliquez à nouveau sur
Continuer pour terminer le
processus.
88
Page 90

FRANÇAIS
15Après avoir enregistré
vote matériel ZyXEL,
vous pouvez visualiser
ses informations
d'enregistrement dans
l'écran de gestion de
service.
Le matériel ZyXEL est
maintenant enregistré,
mais le filtrage de
contenu n'est pas
activé. Pour activer le
filtrage de contenu,
vous devez accéder à
myZyXEL.com via
votre matériel.
Continuer par la
section suivante.
10 Filtrage du contenu à partir d'une base données externe
Quand vous enregistrez et que vous activez un filtrage de contenu à partir d'une base données externe, votre
ZyWALL accède à une base de données externe ayant des millions de sites web classés par catégories
suivant leur contenu. Le ZyWALL peut bloquer et/ou accéder aux sites web en fonction de ces catégories.
Enregistrez votre ZyWALL à myZyXEL.com (voir la Section 9 et procédez comme suit pour inscrire à un
filtrage de contenu à partir d'une base données externe.
89
Page 91

FRANÇAIS
1 Dans le configurateur web de votre
matériel ZyXEL, cliquez sur FILTRE
DE CONTENU (CONTENT
FILTER), Catégories et ensuite sur
le bouton Enregistrer.
Remarque: Vous devez aussi
utiliser les écrans FILTRE
DE CONTENU (CONTENT
FILTER) du configurateur
web du ZyWALL pour
configurer et activer le
filtrage de contenu.
2 L'écran de connexion de myZyXEL.com s'ouvre.
3 Entrez le nom d'utilisateur et le mot de passe de votre compte myZyXEL.com.
4 Cliquez Mon Produit dans le
panneau de navigation.
5 Cliquez sur le lien du nom du
produit pour votre matériel pour
voir ses informations
d'enregistrement dans l'écran de
Gestion de Service.
90
Page 92

FRANÇAIS
6 Cliquez sur Activer pour le service de filtrage de contenu pour afficher l'écran suivant.
7 Si vous voulez utiliser l'évaluation, cliquez sur
Envoyer sous Evaluation du filtrage de contenu.
La période d'évaluation commence à la date à
laquelle vous vous inscrivez.
Vous ne pouvez pas vous inscrire à une évaluation si
vous avez déjà utilisé une évaluation ou enregistré
un numéro PIN d'iCard.
Si vous avez acheté une iCard, entrez le code PIN
exactement comme indiqué sur votre iCard dans le
champ Clé de Licence (code PIN). Sélectionnez la
date quand vous voulez que votre filtrage de contenu
commence et cliquez sur Envoyer sous
Informations d'enregistrement.
91
Page 93

FRANÇAIS
8 Un écran apparaît vous indiquant
que le service est enregistré.
Cliquez sur Continuer pour aller à
l'écran de Gestion de Service.
9 Si vous utilisez actuellement une version d'évaluation, vous pouvez quand même enregistrer le code PIN à
partir d'une iCard en cliquant sur Mise à niveau dans le champ Activation du Service de l'écran Gestion
du Service.
92
Page 94

11 Dépannage
problème ACTION CORRECTIVE
Aucune LED ne
s'allume.
Impossible
d'accéder au
ZyWALL à partir
du LAN.
Impossible
d'accéder à
Internet.
Impossible
d'établir une
connexion VPN
Vérifiez que votre cordon d'alimentation est connecté au ZyWALL et branché dans une prise
de courant appropriée. Vérifiez que le ZyWALL est allumé. Vérifiez toutes les connexions
câblées.
Si les LED ne s'allument toujours pas, cela signifie que vous avez peut-être un problème
matériel. Dans ce cas-là, vous devez contacter votre revendeur local.
Vérifiez la connexion câblée entre le ZyWALL et votre ordinateur ou hub. Reportez-vous à la
Section 1pour les détails.
Envoyez un signal Ping au ZyWALL à partir d'un ordinateur du LAN. Vérifiez que la carte
Ethernet de votre ordinateur est installée et fonctionne correctement.
Dans l'ordinateur, cliquez sur Démarrer, (Tous) Programmes, Accessoires et ensuite
sur Invite de Commande. Dans la fenêtre Invite de Commande, tapez "ping" suivi de
l'adresse IP LAN du ZyWALL (192.168.1.1 est l'adresse par défaut) et appuyez ensuite
sur [ENTER]. Le ZyWALL devrait répondre. Sinon, reportez-vous à la Section 11.1.
Si vous avez oublié le mot de passe du ZyWALL, utilisez le bouton RESET. Appuyez sur
le bouton pendant environ 10 secondes (jusqu'à ce que la LED PWR commence à
clignoter), puis relâchez-le. Cela rétablit le ZyWALL à ses paramètres par défaut d'usine
(le mot de passe est 1234, adresse IP LAN 192.168.1.1 etc.; voir votre Guide de
l'utilisateur pour les détails).
Si vous avez oublié l'adresse IP LAN ou WAN du ZyWALL, vous pouvez vérifier l'adresse
IP dans le SMT via le port de la console. Connectez votre ordinateur au port CONSOLE à
l'aide d'un câble de console. Votre ordinateur doit avoir un programme de communication
d'émulation de terminal (tel qu'HyperTerminal) paramétré sur l'émulation de terminal
VT100, pas de parité, 8 bits de données, 1 bit de stop, pas de contrôle de flux et une
vitesse de port de 9600 bps.
Vérifiez la connexion du ZyWALL à la prise Ethernet avec l'accès Internet. Vérifiez que le
périphérique de passerelle Internet (tel qu'un modem DSL) fonctionne correctement.
Cliquez sur WAN dans le panneau de navigation pour vérifier vos paramètres.
Vérifiez que le ZyWALL et le routeur IPSec distant utilise les mêmes paramètres VPN.
Cliquez sur VPN dans le panneau de navigation pour configurer les paramètres avancés.
Accédez à un site web pour vérifier que vous avez une connexion Internet qui fonctionne.
FRANÇAIS
11.1 Paramétrez l'adresse IP de votre ordinateur
Cette section vous indique comment paramétrer votre ordinateur pour recevoir une adresse IP dans Windows
2000, Windows NT et Windows XP. Cela permet à votre ordinateur de communiquer avec votre ZyWALL.
1 Dans Windows XP, cliquez sur Démarrer, Panneau de configuration.
93
Page 95

FRANÇAIS
Dans Windows 2000/NT, cliquez sur Démarrer, Paramètres, Panneau de configuration.
2 Dans Windows XP, cliquez sur Connexion réseau.
Dans Windows 2000/NT, cliquez sur Connexions réseau et accès à distance.
3 Cliquez avec le bouton droit de la souris sur Connexion de réseau local et cliquez sur Propriétés.
4 Sélectionnez Protocole Internet (TCP/IP) (dans
l'onglet Général dans Windows XP) et cliquez sur
Propriétés.
5 L'écran de Propriétés TCP/IP de protocole Internet
s'ouvre (onglet Général dans Windows XP).
Sélectionnez les options Obtenir automatiquement
une adresse IP et Obtenir automatiquement une
adresse de serveur DNS.
6 Cliquez sur OK pour fermer la fenêtre de Propriétés
(TCP/IP) de protocole Internet.
7 Cliquez sur Fermer (OK dans Windows 2000/NT) pour
fermer la fenêtre de Propriétés de connexion au
réseau local.
8 Fermez l'écran de Connexion réseau.
11.2 Procédure pour Afficher la (les) certification(s) d'un produit
1 Allez à www.zyxel.com.
2 Sélectionnez votre produit dans la boîte de la liste déroulante dans la page d'accueil de ZyXEL pour aller à
la page de ce produit.
3 Sélectionnez la certification que vous désirez consulter dans cette page.
94
Page 96

ITALIANO
ITALIANO
Cenni generali
ZyWALL 70 è un firewall con funzionalità di Load Balancing, a doppia WAN, dotato di funzioni di VPN,
gestione della larghezza di banda, filtraggio dei contenuti e molto altro. È possibile utilizzarlo come firewall
trasparente ed evitare di riconfigurare la propria rete e di configurare le funzionalità di routing dello ZyWALL.
ZyWALL aumenta la sicurezza della rete offrendo porte DMZ da utilizzare per server accessibili
pubblicamente. La presente guida illustra i collegamenti e la configurazione iniziale necessari per iniziare a
utilizzare lo ZyWALL nella propria rete.
Vedere la Guida dell'utente per maggiori informazioni su tutte le funzioni.
È possibile che occorre reperire le informazioni sul proprio accesso a Internet.
Questa guida è suddivisa nelle seguenti sezioni:
1 Collegamenti hardware
2 Accesso allo strumento di configurazione
Web
3 Modalità Bridge
4 Configurazione dell'accesso a Internet
5 DNS
6 NAT
7 Firewall
8 Configurazione delle regole di VPN
9 Registrazione del prodotto su myZyXEL.com
10Filtraggio dei contenuti mediante database esterno
11Risoluzione dei problemi
1 Collegamenti hardware
È necessario disporre dei seguenti componenti:
ZyWALL Computer Cavi Ethernet
95
Cavo di
alimentazione
Page 97

ITALIANO
Di seguito sono illustrati i collegamenti hardware per l'installazione iniziale.
1 Utilizzare un cavo Ethernet per collegare la porta LAN a un computer. È possibile utilizzare cavi Ethernet
anche per collegare server pubblici (Web, E-mail, FTP, ecc.) alle porte DMZ.
2 Utilizzare altri cavi Ethernet per collegare la porta WAN 1 e/o WAN 2 a un jack Ethernet con accesso a
Internet.
3 Utilizzare il cavo di alimentazione fornito a corredo per collegare la presa di alimentazione (situata dietro
all'apparecchio) a una presa elettrica.
4 Posizione l'interruttore di accensione sulla posizione ACCESO e analizzare il pannello frontale. Il LED
PWR si accende. Il LED SYS lampeggia mentre viene eseguito il test del sistema e quindi resta acceso in
caso di test riuscito. I LED ACT, CARD, LAN, DMZ e WAN si accendono e restano accesi se i
corrispondenti collegamenti sono stati eseguiti correttamente.
96
Page 98

ITALIANO
2 Accesso allo strumento di configurazione Web
Questa sezione spiega come configurare l'interfaccia WAN 1 per l'accesso a Internet.
1 Avviare il browser. Immettere 192.168.1.1
(l'indirizzo IP predefinito dello ZyWALL) nella
barra dell'indirizzo.
Se non viene visualizzata la schermata di
accesso, vedere Sezione 11.1 per impostare
l'indirizzo IP del proprio computer.
3 Cambiare la password di accesso immettendo una
nuova password e facendo clic su Apply
(applica).
2 Fare clic su Login (accedi)(la password
predefinita 1234 è già immessa).
4 Fare clic su Apply (applica) per sostituire il
certificato digitale predefinito dello ZyWALL.
5 Si apre la schermata HOME.
Per impostazione predefinita, lo ZyWALL è in modalità router. Continuare dal passo successivo se si
desidera utilizzare funzionalità di routing quali NAT, DHCP e VPN.
Passare a Sezione 3 se si preferisce utilizzare lo ZyWALL come firewall trasparente.
97
Page 99

6 Controllare la tabella
Network Status
(stato della rete). Se
lo stato della WAN 1 è
not Down (non
disattivata) ed è
presente un indirizzo
IP, passare a Sezione
5.
Se lo stato della WAN
1 è Down (disattivata)
(oppure se non è
presente un indirizzo
IP), fare clic su
Internet Access
(accesso a Internet)
e utilizzare Sezione 4
per configurare la
WAN 1.
Utilizzare le
schermate di
NETWORK WAN
(WAN della rete) se
occorre configurare lo
WAN 2. È anche
possibile configurare il
load balancing
(bilanciamento del
carico) tra le porte
WAN.
ITALIANO
3 Modalità Bridge
Quando si imposta lo ZyWALL in modalità Bridge, esso funziona come un firewall trasparente. La procedura
illustrata di seguito consente di impostare lo ZyWALL in modalità Bridge.
98
Page 100

ITALIANO
1 Fare clic su
MAINTENANCE
(manutenzione) nel
pannello di navigazione,
quindi su Device Mode
(modalità dispositivo).
2 Selezionare Bridge e
immettere un indirizzo IP
(statico), una subnet
mask e un indirizzo IP del
gateway per le interfacce
LAN, WAN, DMZ e
WLAN dello ZyWALL.
3 Fare clic su Apply
(applica). Lo ZyWALL si
riavvia.
Passare a Sezione 5 se si
dispone di server che occorre
rendere accessibili dalla
WAN.
4 Configurazione dell'accesso a Internet
Immettere le informazioni e i parametri Internet esattamente come sono stati forniti.
Se è stato fornito un indirizzo IP da utilizzare, selezionare Static (statico) nell'elenco di riepilogo IP Address
Assignment (assegnazione indirizzo IP) e immettere le informazioni fornite.
Nota: I campi variano a seconda di quanto viene selezionato nel campo Encapsulation
(incapsulamento). Compilare i campi con le informazioni fornite dall'ISP o dall'amministratore di
rete.
Fare clic su Finish (fine) una volta terminata la configurazione.
99
 Loading...