


ZyXEL Communications ZyWALL 2WG User Manual

ZyWALL 2WG
Security Appliance
Support Notes
Version 4.03
Sep. 2007

ZyWALL 2WG Support Notes
INDEX
Application Notes......................................................................................................9
Mobility Internet Access........................................................................................9
Utilize 3G and Wireless for the Internet Access......................................10
Seamless Incorporation into your network..........................................................18
Using Transparent (Bridge Mode) Firewall ............................................18
Internet Connection...................................................................................24
DHCP server/client/relay...........................................................................25
Using NAT/Multi-NAT ..............................................................................26
Optimize network performance & availability....................................................35
Using Bandwidth Management ................................................................35
Secure Connections across the Internet...............................................................43
Site-to-Site VPN (Intranet) Scenario........................................................43
Configure ZyWALLs with Static WAN IP Address.............................43
Configure ZyWALL with Dynamic WAN IP Address.........................44
Configure ZyWALL behind NAT Router ............................................46
Mapping multiple Network policy to same gateway policy................48
Using Certificate for Device Authentication........................................53
Using Self-signed Certificates .....................................................54
Online Enroll Certificates............................................................57
Offline Enroll Certificates............................................................66
Using Pre-Shared Key for Device Authentication...............................99
Using VPN routing between branches...............................................100
NAT over IPSec on ZyNOS...............................................................110
Never lost your VPN connection (IPSec High Availability)..............119
Access control and security VPN connection (Security policy
enforcement IPSec)............................................................................123
How to configure access control rule over VPN .......................123
How to configure Web filtering rule over VPN – Content Filter128
ZyWALL vs 3rd Party VPN Gateway....................................................130
SonicWALL with ZyWALL VPN Tunneling.............................130
NetScreen with ZyWALL VPN Tunneling................................139
Check Point with ZyWALL VPN Tunneling ............................151
FortiNet with ZyWALL VPN Tunneling ...................................185
Remote Access VPN Scenario .................................................................198
Using xAuth for User Authentication................................................198
ZyXEL VPN Client to ZyWALL Tunneling......................................200
Content Filter Application..................................................................................209
All contents copyright (c) 2006 ZyXEL Communications Corporation.
2

ZyWALL 2WG Support Notes
To filter non-work related and unproductive web surfing to mitigate
spyware and phishing threats.................................................................209
Centralized Management...................................................................................216
Using Vantage CNM for Management...................................................216
FAQ ...........................................................................................................................221
A. Product FAQ .................................................................................................221
A01. What is the ZyWALL Internet Access Sharing Router? .............221
A02. Will the ZyWALL work with my Internet connection?...............222
A03. What do I need to use the ZyWALL?............................................222
A04. What is PPPoE? ..............................................................................222
A05. Does the ZyWALL support PPPoE?..............................................222
A06. How do I know I am using PPPoE? ..............................................222
A07. Why does my Internet Service Provider use PPPoE?..................222
A08. How can I configure the ZyWALL? ..............................................223
A09. What can we do with ZyWALL? ...................................................223
A10. Does ZyWALL support dynamic IP addressing?.........................223
A11. What is the difference between the internal IP and the real IP
from my ISP?............................................................................................223
A12. How does e-mail work through the ZyWALL?............................223
A13. Is it possible to access a server running behind NAT from the
outside Internet? If possible, how?.........................................................223
A14. What DHCP capability does the ZyWALL support?...................224
A15. How do I used the reset button, more over what field of
parameter will be reset by reset button?
................................................224
A16. What network interface does the new ZyWALL series support?224
A17. How does the ZyWALL support TFTP?.......................................224
A18. Can the ZyWALL support TFTP over WAN?..............................224
A19. How can I upload data to outside Internet over the one-way
cable?.........................................................................................................224
A20. My ZyWALL can not get an IP address from the ISP to connect
to the Internet, what can I do?................................................................225
A21. What is BOOTP/DHCP?................................................................225
A22. What is DDNS?................................................................................225
A23. When do I need DDNS service?.....................................................226
A24. What DDNS servers does the ZyWALL support?........................226
A25. What is DDNS wildcard? ...............................................................226
A26. Does the ZyWALL support DDNS wildcard?...............................226
A27. Can the ZyWALL NAT handle IPSec packets sent by the VPN
All contents copyright (c) 2006 ZyXEL Communications Corporation.
3

ZyWALL 2WG Support Notes
gateway behind ZyWALL? .....................................................................226
A28. How do I setup my ZyWALL for routing IPSec packets over
NAT? .........................................................................................................227
A29. What is STP (Spanning Tree Protocol) /RSTP (Rapid STP)?.....227
A30. What is the flow ZyWALL handles inbound and outgoing
traffic?.......................................................................................................227
B. Firewall FAQ.................................................................................................227
B01. What is a network firewall?...........................................................228
B02. What makes ZyWALL secure?......................................................228
B03. What are the basic types of firewalls?...........................................228
B04. What kind of firewall is the ZyWALL?........................................229
B05. Why do you need a firewall when your router has packet
filtering and NAT built-in?.....................................................................229
B06. What is Denials of Service (DoS)attack?.......................................229
B07. What is Ping of Death attack?........................................................230
B08. What is Teardrop attack?...............................................................230
B09. What is SYN Flood attack?............................................................230
B10. What is LAND attack?....................................................................230
B11. What is Brute-force attack?...........................................................230
B12. What is IP Spoofing attack?...........................................................231
B13. What are the default ACL firewall rules in ZyWALL?..............231
B14. Why does traffic redirect/static/policy route be blocked by
ZyWALL?.................................................................................................231
B15. How can I protect against IP spoofing attacks?...........................233
C. Security Service licenses FAQ ......................................................................234
C01. What is iCard? ................................................................................234
C02. Where can I buy the iCard and how much does it cost?.............234
C03. How many kinds of iCard does ZyXEL provide?........................234
C04. Is each type of iCard device specific?............................................234
C05. What are the available security service licenses which require
additional purchase and license activation in ZyNOS v4.00?..............234
C06. What kind of iCard should I buy?.................................................235
C07. If I violate the mappings described above, for example, using a
silver iCard for ZyWALL 35 or ZyWALL 70, what will happen?
.......235
C08. Can I try the Content Filtering service for free? How long is the
free trial period of Content Filtering service?
.......................................235
D. Security Service Activation and UpdateFAQ................................................235
D01. Why do I have to register?.............................................................235
All contents copyright (c) 2006 ZyXEL Communications Corporation.
4

ZyWALL 2WG Support Notes
D02. In addition to registration, what can I do with myZyXEL.com?235
D03. Is there anything changed on myZyXEL.com because of the
launch of ZyNOS v4.00? Which ZyWALL models can be registered
via myZyXEL.com?.................................................................................236
D04. What’s the difference between new registration flow and
previous registration? What’s the advantage of new registration flow
over the previous registration flow?.......................................................236
D05. If I were new to myZyXEL.com, what are the required fields
when I register my ZyWALL device on myZyXEL.com?....................237
D06. When using the new registration flow of myZyXEL.com for
ZyNOS v4.0, do I have to create a new account if I were already a
registered user on myZyXEL.com?........................................................237
D07. What is mySecurityZone? ..............................................................237
D08. What is Update Server?..................................................................237
D09. Who maintains mySecurityZone & Update Server? ...................238
D10. What’s the URL for these service portals? ...................................238
E. Content Filter FAQ........................................................................................238
E01. What's the operation between ZyXEL appliance and BlueCoat
data center?..............................................................................................238
E02. How many entries can the cache of Web Site Auto Categorization
keep at most?............................................................................................238
E03. Can I specify the time out value of the query response from
BlueCoat data center? .............................................................................238
E04. Can I decide whether to forward or drop the HTTP response if
the query to BlueCoat data center is timed out?...................................239
E05. How to register for BlueCoat service?...........................................239
E06. Why can't I make registration successfully?................................239
E07. What services can I get with Trial Registration? .........................239
E08. What types of content filter does ZyWALL provide?..................239
E09. What are the primary features of ZyXEL Content Filtering?....239
E10. Who needs ZyXEL Content Filtering? Is ZyXEL Content
Filtering for small companies or for large corporations? ....................240
E11. Can I have different policies in effect for different times of the
day or week?
.............................................................................................240
E12. How many policies can I create?....................................................240
E13. Can I create my own categories?...................................................240
E14. Can I override (block or allow) certain URLs regardless of the
rating?.......................................................................................................240
All contents copyright (c) 2006 ZyXEL Communications Corporation.
5

ZyWALL 2WG Support Notes
E15. How many URL keywords does ZyWALL support?....................240
E16. How do I keep database of Content Filtering service updated?.241
E17. What is BlueCoat Filter list?..........................................................241
E18. How many ratings does the BlueCoat database contain?............241
E19. How often does BlueCoat update the database? ..........................241
E20. How do I locate sites to block?.......................................................241
E21. Do humans review the ratings?......................................................242
E22. How can I do if I find a WEB site is mis-categorized?.................242
E23. How many and what categories do you provide?.........................242
E24. How does the ZyXEL content filtering handle dynamically
generated sites?........................................................................................244
E25. Does BlueCoat have more than one data center? Is the BlueCoat
Web Filter geographically load balanced? ............................................244
E26. Who can generate and view reports on BlueCoat WEB site?.....244
E27. How can I get Content Filtering report?.......................................244
E28. Can I change the password for BlueCoat service?.......................244
E29. Which User Name & Password should I input for Content
Filtering report?.......................................................................................245
E30. My device can't get connected to Http://myZyXEL.com, so I
can't get into Registration page. What should I check?.......................245
F. IPSec FAQ......................................................................................................245
F01. How to count my VPN tunnels on ZyWALL?...............................245
F02. What is VPN?...................................................................................246
F03. Why do I need VPN?.......................................................................246
F04. What are most common VPN protocols? ......................................247
F05. What is PPTP?.................................................................................247
F06. What is L2TP?.................................................................................247
F07. What is IPSec?.................................................................................247
F08. What is SA?......................................................................................248
F09. What is Pre-Shared Key?................................................................248
F10. What is Phase 1 ID for?..................................................................248
F11. What are Local ID and Peer ID?....................................................249
F12. Is my ZyWALL ready for IPSec VPN?..........................................249
F13. How do I configure ZyWALL VPN?..............................................249
F14. What VPN protocols are supported by ZyWALL? ......................250
F15. What types of encryption does ZyWALL VPN support?.............250
F16. What types of authentication does ZyWALL VPN support?......250
F17. I am planning my ZyWALL-to-ZyWALL VPN configuration.
All contents copyright (c) 2006 ZyXEL Communications Corporation.
6

ZyWALL 2WG Support Notes
What do I need to know?.........................................................................250
F18. Does ZyWALL support dynamic secure gateway IP?..................251
F19. What VPN gateway that has been tested with ZyWALL
successfully?..............................................................................................251
F20. What VPN software that has been tested with ZyWALL
successfully?..............................................................................................251
F21. Will ZyXEL support Secure Remote Management?....................252
F22. Does ZyWALL VPN support NetBIOS broadcast?......................252
F23. Is the host behind NAT allowed to use IPSec?..............................252
F24. How do I configure ZyWALL with NAT for internal servers? ...252
F25. I am planning my ZyWALL behind a NAT router. What do I
need to know?...........................................................................................252
F26. Where can I configure Phase 1 ID in ZyWALL?..........................253
F27. How can I keep a tunnel alive?.......................................................253
F28. Single, Range, Subnet, which types of IP address does ZyWALL
support in VPN/IPSec?............................................................................254
F29. Does ZyWALL support IPSec pass-through?...............................254
F30. Can ZyWALL behave as a NAT router supporting IPSec pass
through and an IPSec gateway simultaneously?...................................254
G. PKI FAQ ........................................................................................................254
G01. Basic Cryptography concept..........................................................254
G02. What is PKI?...................................................................................255
G03. What are the security services PKI provides?..............................255
G04. What are the main elements of a PKI?.........................................255
G05. What is a Certification Authority?................................................256
G06. What is a digital certificate?..........................................................256
G07. What are public and private keys, and what is their
relationship?.............................................................................................256
G08. What are Certificate Policies (CPs)?.............................................256
G09. How does a PKI ensure data confidentiality?..............................257
G10. What is a digital signature?...........................................................257
G11. How does a digital signature work? ..............................................257
G12. Does ZyXEL provide CA service?.................................................259
G13. What if customers don't have access to CA service, but would
like to use PKI function?.........................................................................259
G14. How can I have Self-signed certificate for ZyXEL appliance?...259
G15. Can I create self-signed certificates in addition to the default
one?............................................................................................................259
All contents copyright (c) 2006 ZyXEL Communications Corporation.
7

ZyWALL 2WG Support Notes
G16. Will Self-signed certificate be erased if I reset to default
configuration file?....................................................................................259
G17. Will certificates stored in ZyXEL appliance be erased if I reset to
default configuration file?.......................................................................259
G18. What can I do prior to reset appliance's configuration?.............259
G19. If I export My Certificates from ZyXEL appliance, save them
locally, and then import them back after resetting the configuration
file, can I reuse the imported My Certificates ?....................................260
H. Wireless FAQ................................................................................................260
H01. What are the capability of wireless feature of ZyWALL? ..........260
H02. What is the coverage range of Wireless in ZyWALL? ................260
H03. What is a Wireless LAN? ...............................................................260
H04. What are the advantages of Wireless LANs?...............................260
H05. What is IEEE 802.11.......................................................................261
H06. What is 802.11b? .............................................................................261
H07. What is 802.11g? .............................................................................261
H08. What is 802.11a? .............................................................................262
H09. What is Wi-Fi? ................................................................................262
H10. What types of devices use the 2.4 GHz Band? .............................262
H11. Can wireless signals pass through walls?......................................262
H12. What are the potential factors that may causes interference
among WLAN products?.........................................................................262
H13. What is SSID (Sever Set ID)? ........................................................263
H14. What is WEP? .................................................................................263
H15. What is a WEP key? .......................................................................263
H16. By turning off the broadcast of SSID, can someone still sniff the
SSID?
.........................................................................................................263
H17. What is 802.1x?...............................................................................264
H18. Can I use WiFi access when I plug a 3G wireless card in the
PCMCIA slot ? .........................................................................................264
All contents copyright (c) 2006 ZyXEL Communications Corporation.
8
ZyWALL 2WG Support Notes
Application Notes
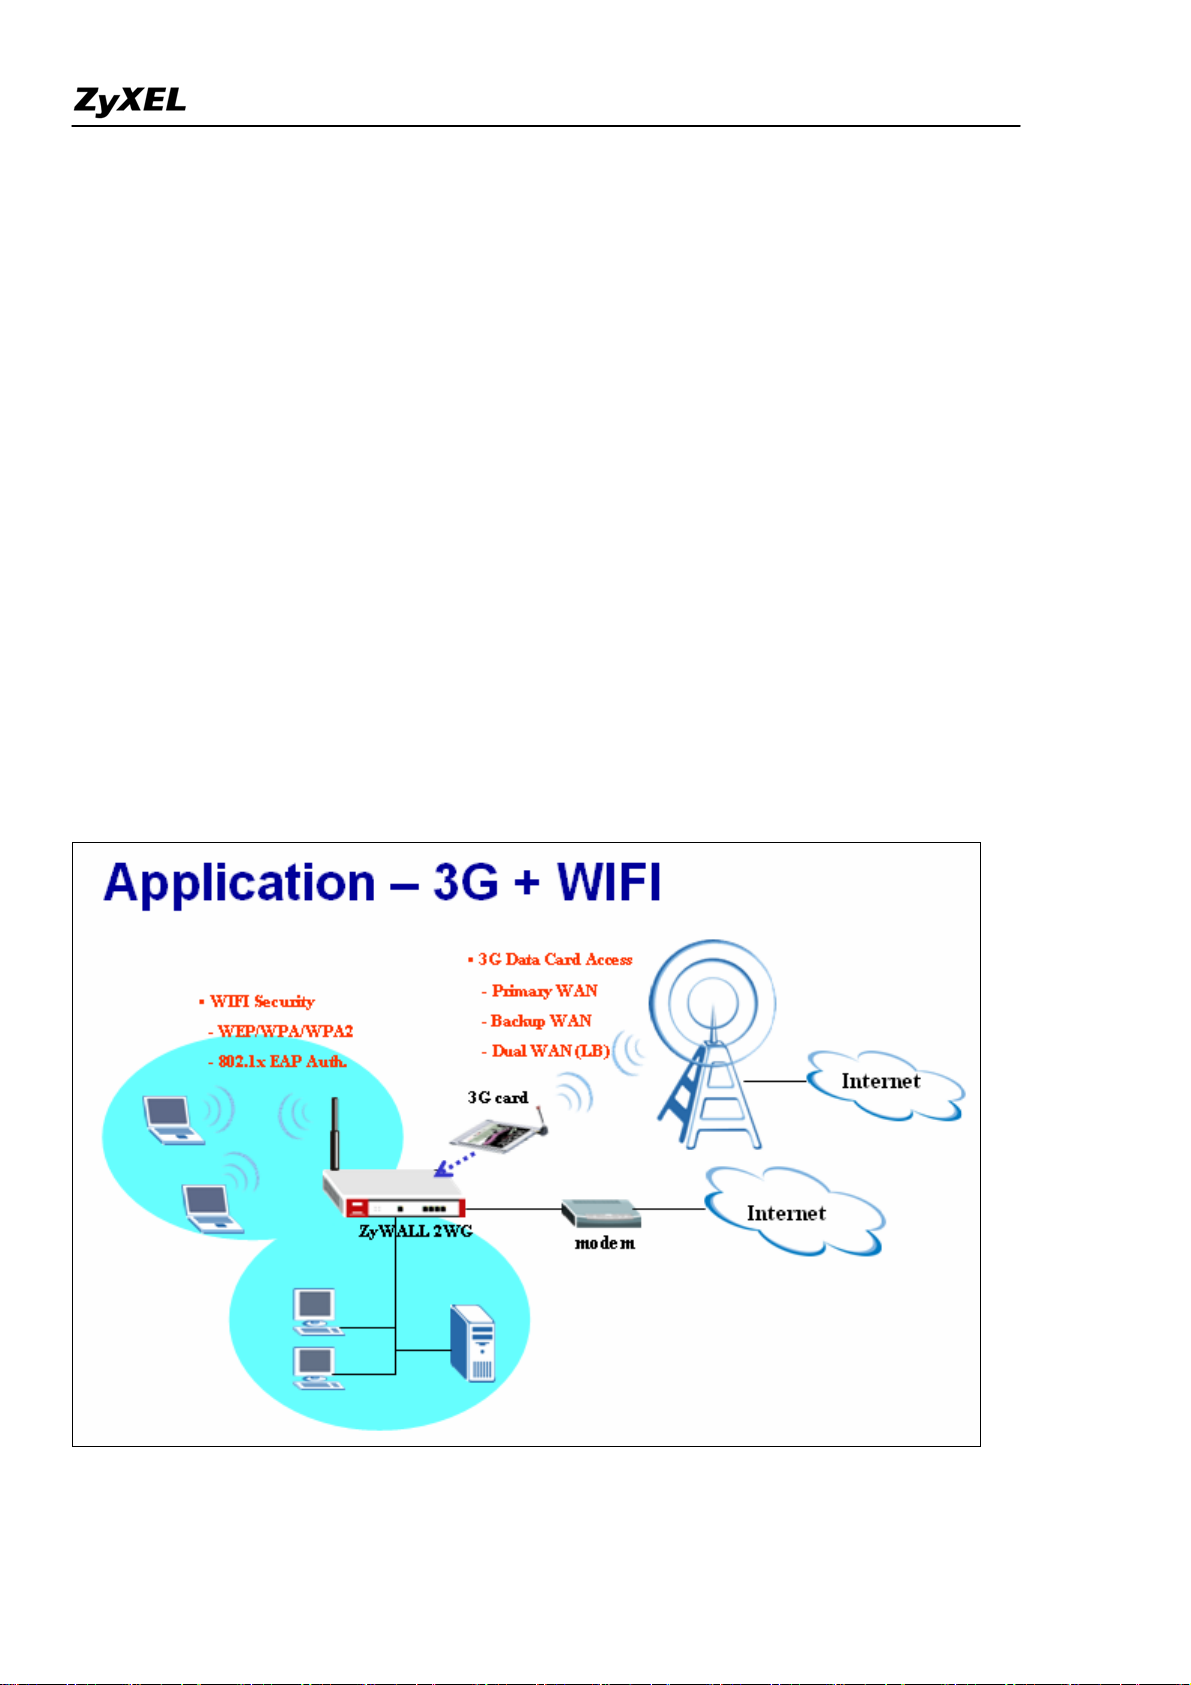
Mobility Internet Access
You may have the experienced a need of Internet access in a location where wired connection is difficult
to deploy, e.g. in countryside or mountain. Or you are just in a public environment without Internet access,
like in a park, on a bus, in a train or metropolitan subway, etc… Or you may temporarily need Internet
access when you are in your exhibition booth and need Internet access for some demonstration. ZyWALL
2WG is especially designed for the mobility Internet access; it is light to carry everywhere and can utilize
a 3G card for dial up to get the Internet access. Besides, you could utilize the embedded wireless card to
provide wireless access for your LAN users.
Not only the mobility, you could also use ZyWALL 2WG as your WAN backup in the small office or
SOHO. You could further choose a certain load balancing mechanism to perform dual WAN access.
In summery, you could utilize the 3G wireless access for your primary WAN, or backup WAN, or work
with your primary WAN(Ethernet or PPP) together as a dual WAN application.
9
All contents copyright (c) 2006 ZyXEL Communications Corporation.
ZyWALL 2WG Support Notes
Utilize 3G and Wireless for the Internet Access
Following we will show you how to configure it step-by-step.
Utilize 3G card to get Internet access
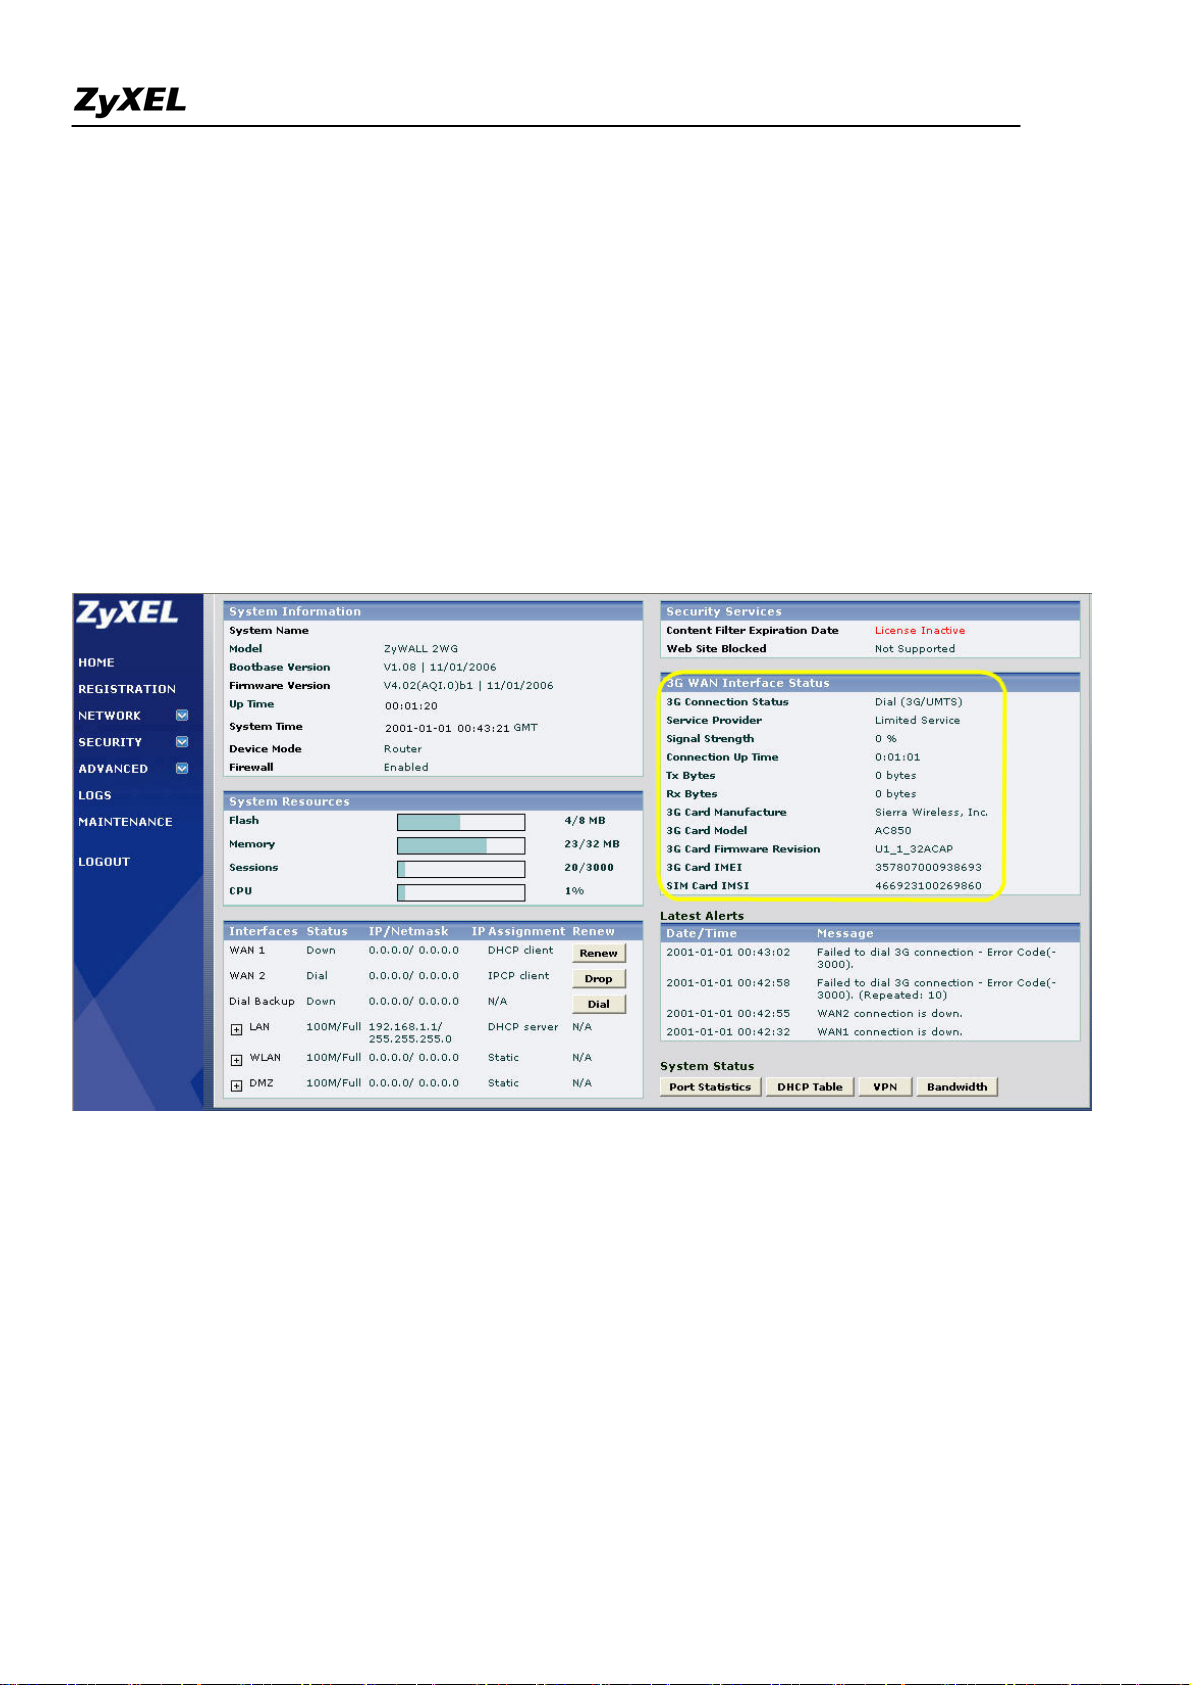
1). Plug the 3G card to ZyWALL 2WG's card slot before powering on the ZyWALL 2WG device.
2). Login the GUI. After the system boots up, you can see the 3G card information on the home page. Make
sure there is no "Error" message in "3G Card IMEI" and "SIM Card IMSI" fields. Otherwise, you need to
re-install the 3G card and the SIM card and make sure they are properly installed. Please refer to the quick start
guide if you need to troubleshoot because of an error message.
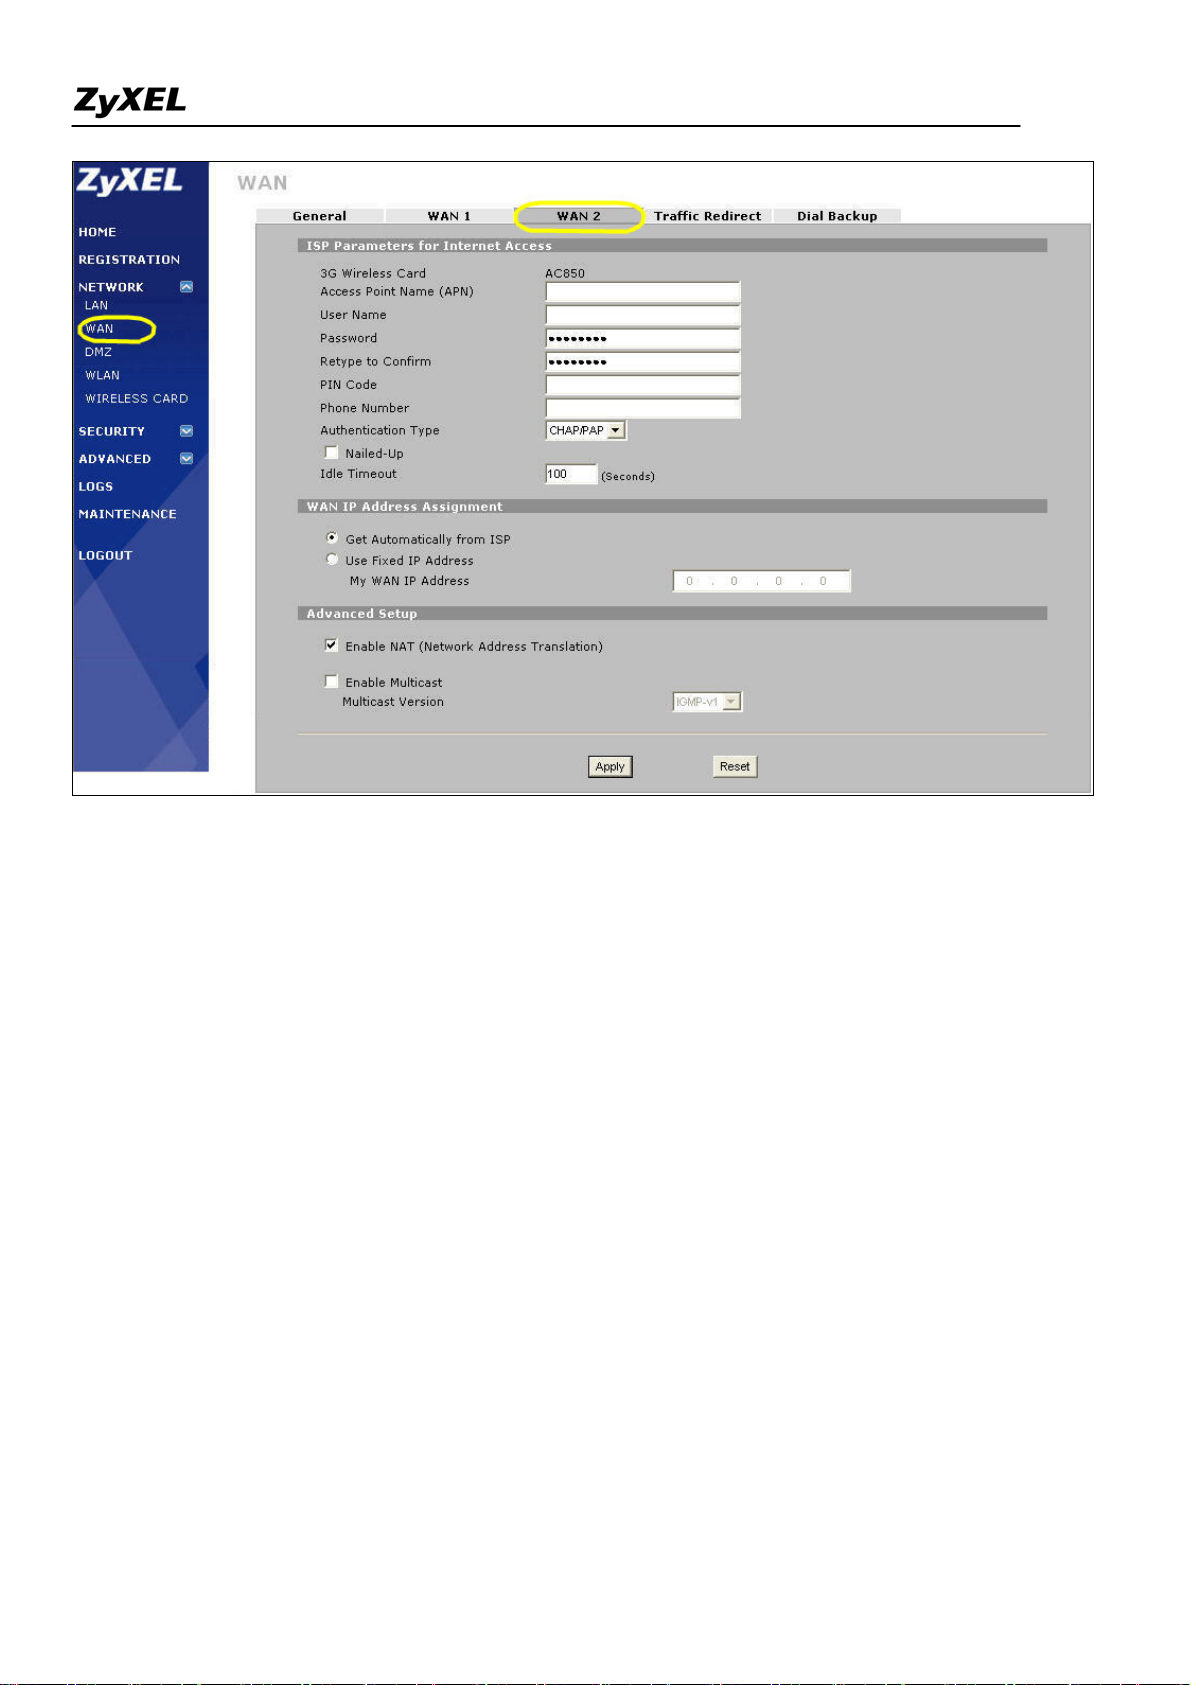
3) Switch to GUI menu Network > WAN2 tab. Configure the APN, username, password, PIN code, phone
number, the authentication type and other settings you have got from your service provider. Click the Apply
button.
All contents copyright (c) 2006 ZyXEL Communications Corporation.
10
ZyWALL 2WG Support Notes
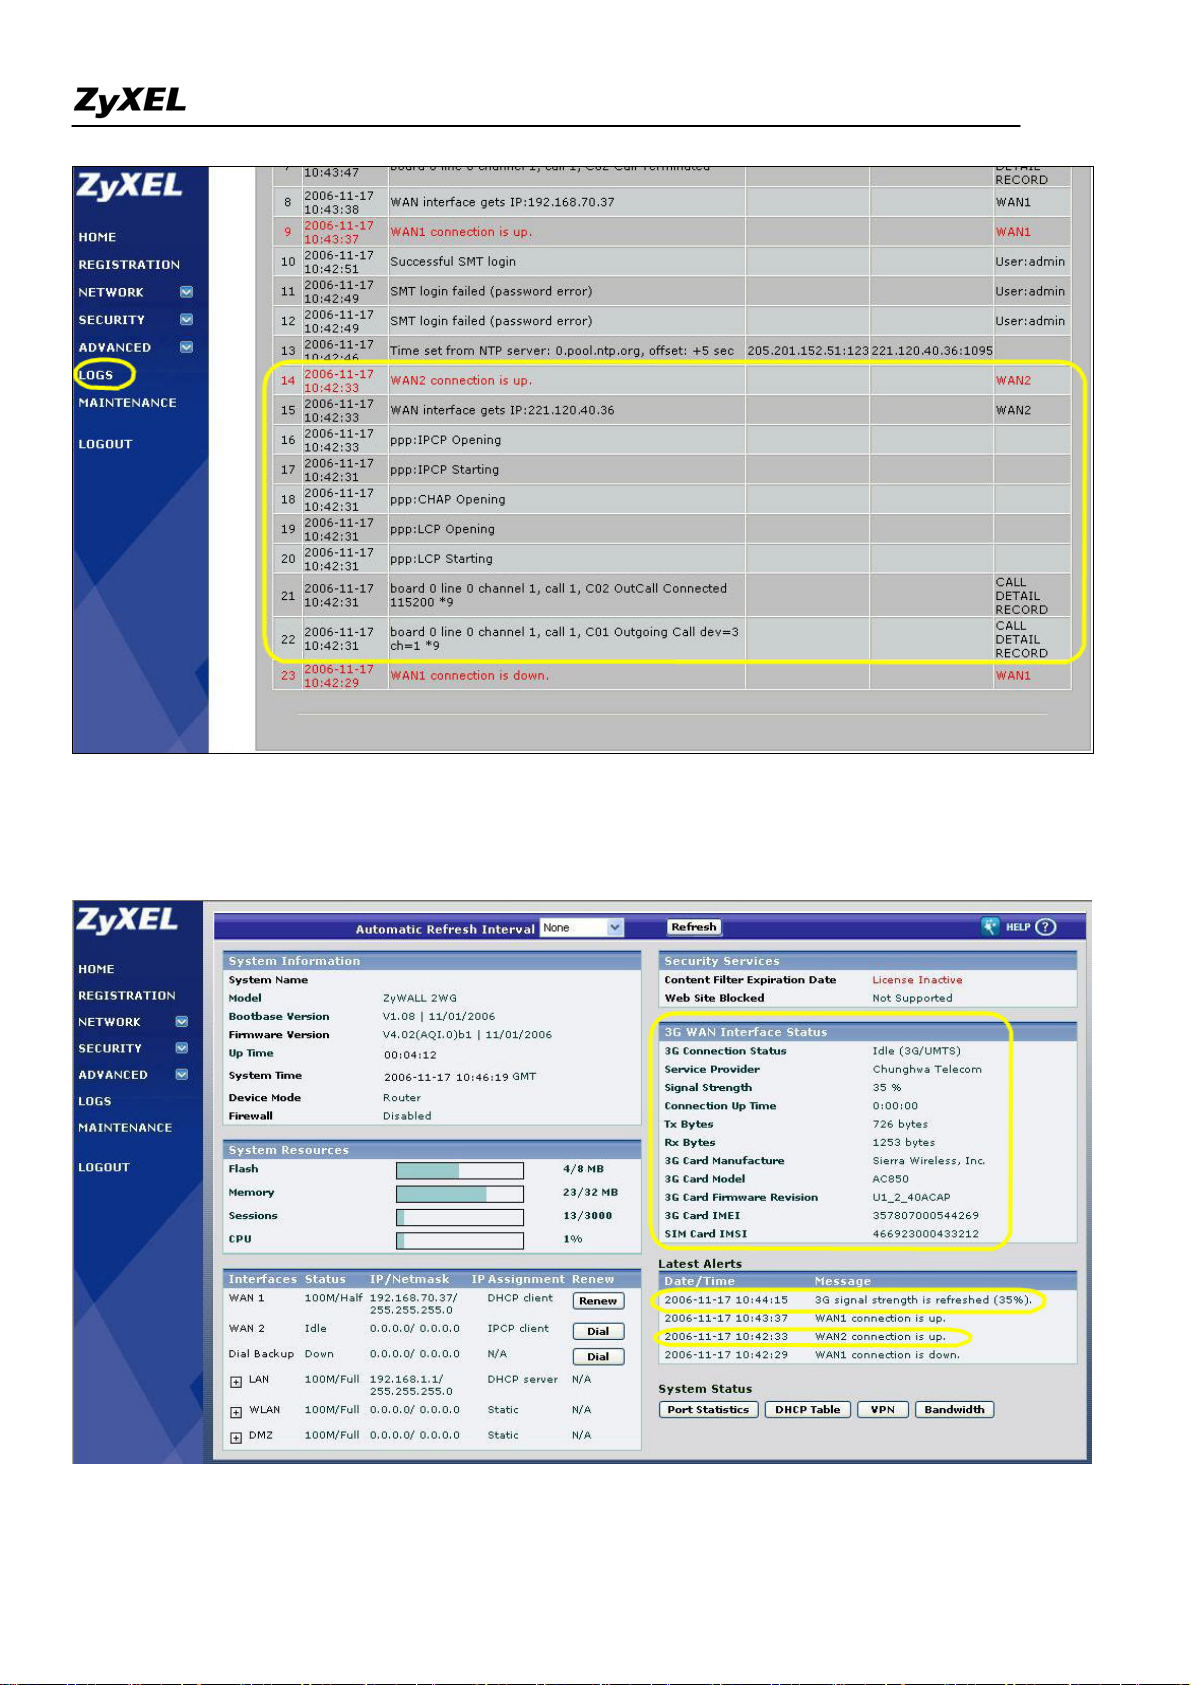
3). Then the 3G wireless card will be dialed up automatically when WAN1 is not available. If you check the
"Nailed-up" option as shown in the figure above, the system will automatically dial up the 3G Internet access
even if WAN1 is available. Then you will see the process in logs as following.
All contents copyright (c) 2006 ZyXEL Communications Corporation.
11
ZyWALL 2WG Support Notes
4) If dialed up successfully, you can see the GUI home page as shown below. You will get the "WAN2
connection is up" and "3G card's signal strength" messages in the latest alerts.
All contents copyright (c) 2006 ZyXEL Communications Corporation.
12
ZyWALL 2WG Support Notes
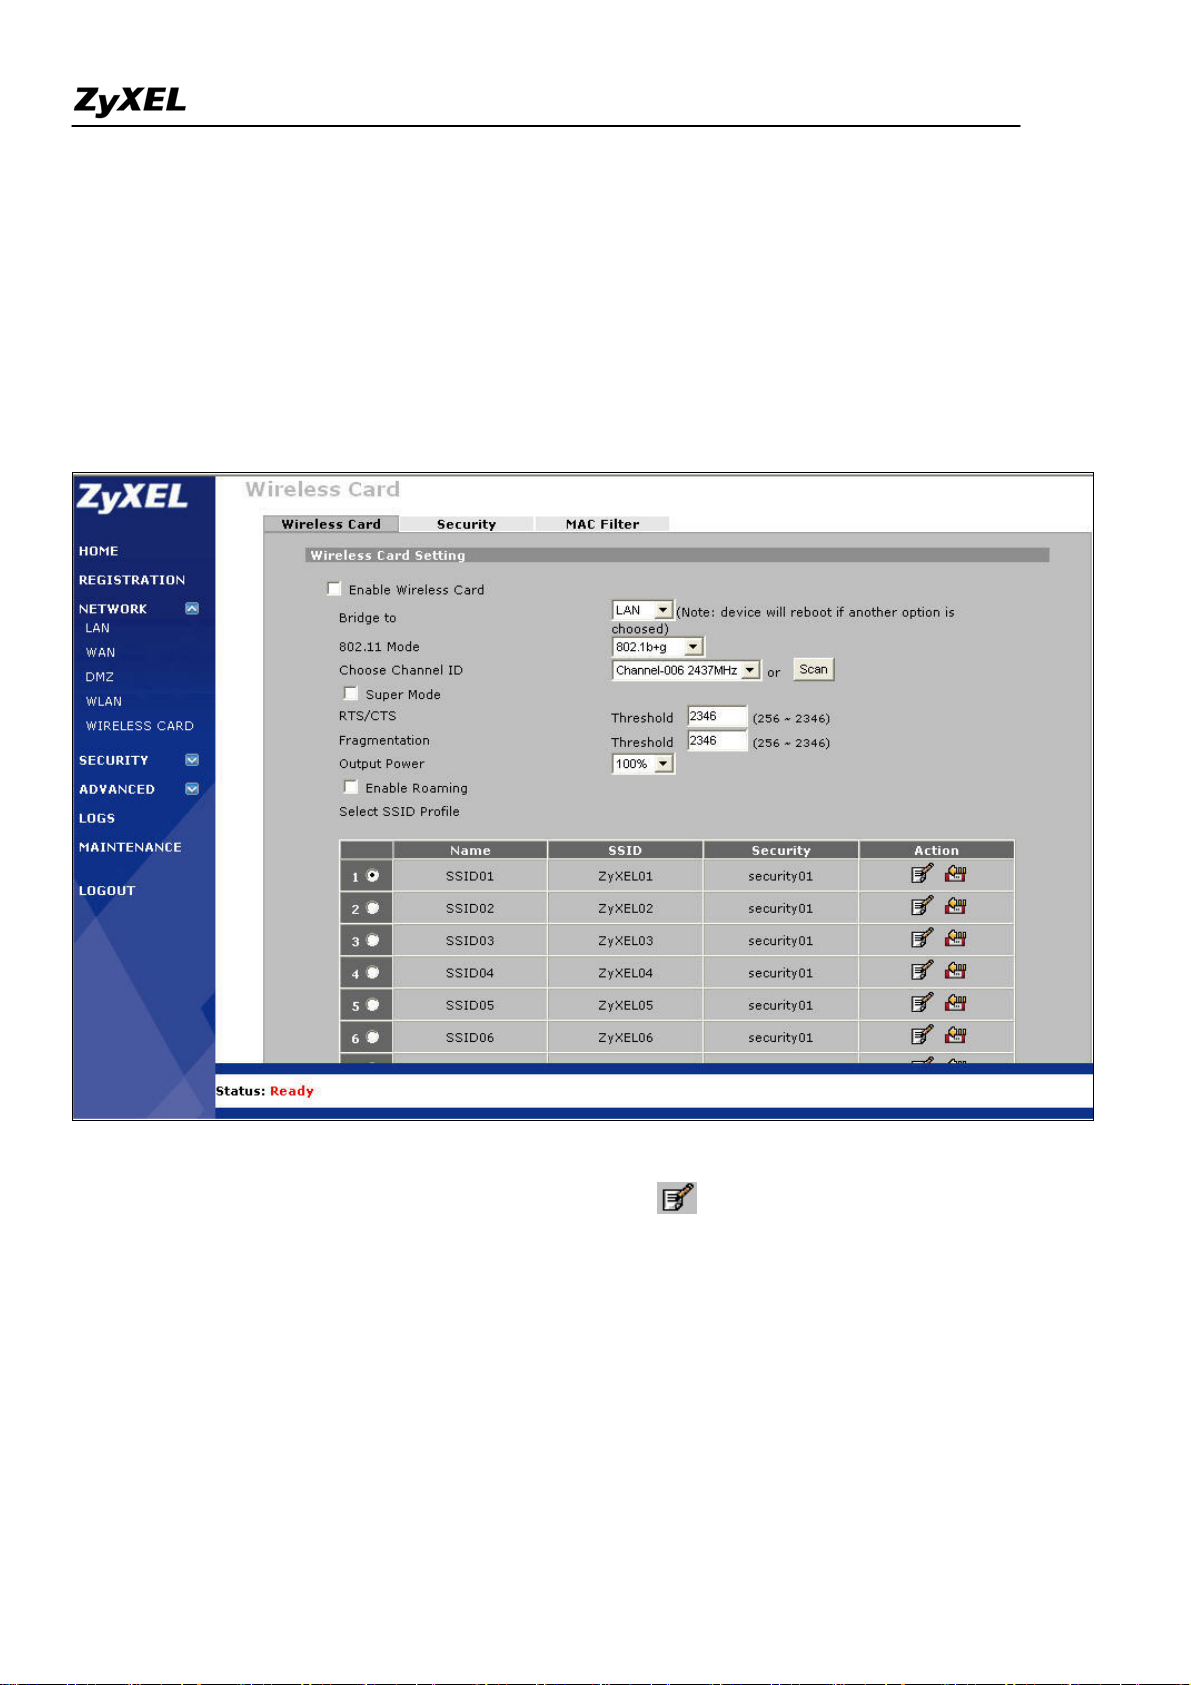
Utilize the embedded wireless card to provide LAN users access
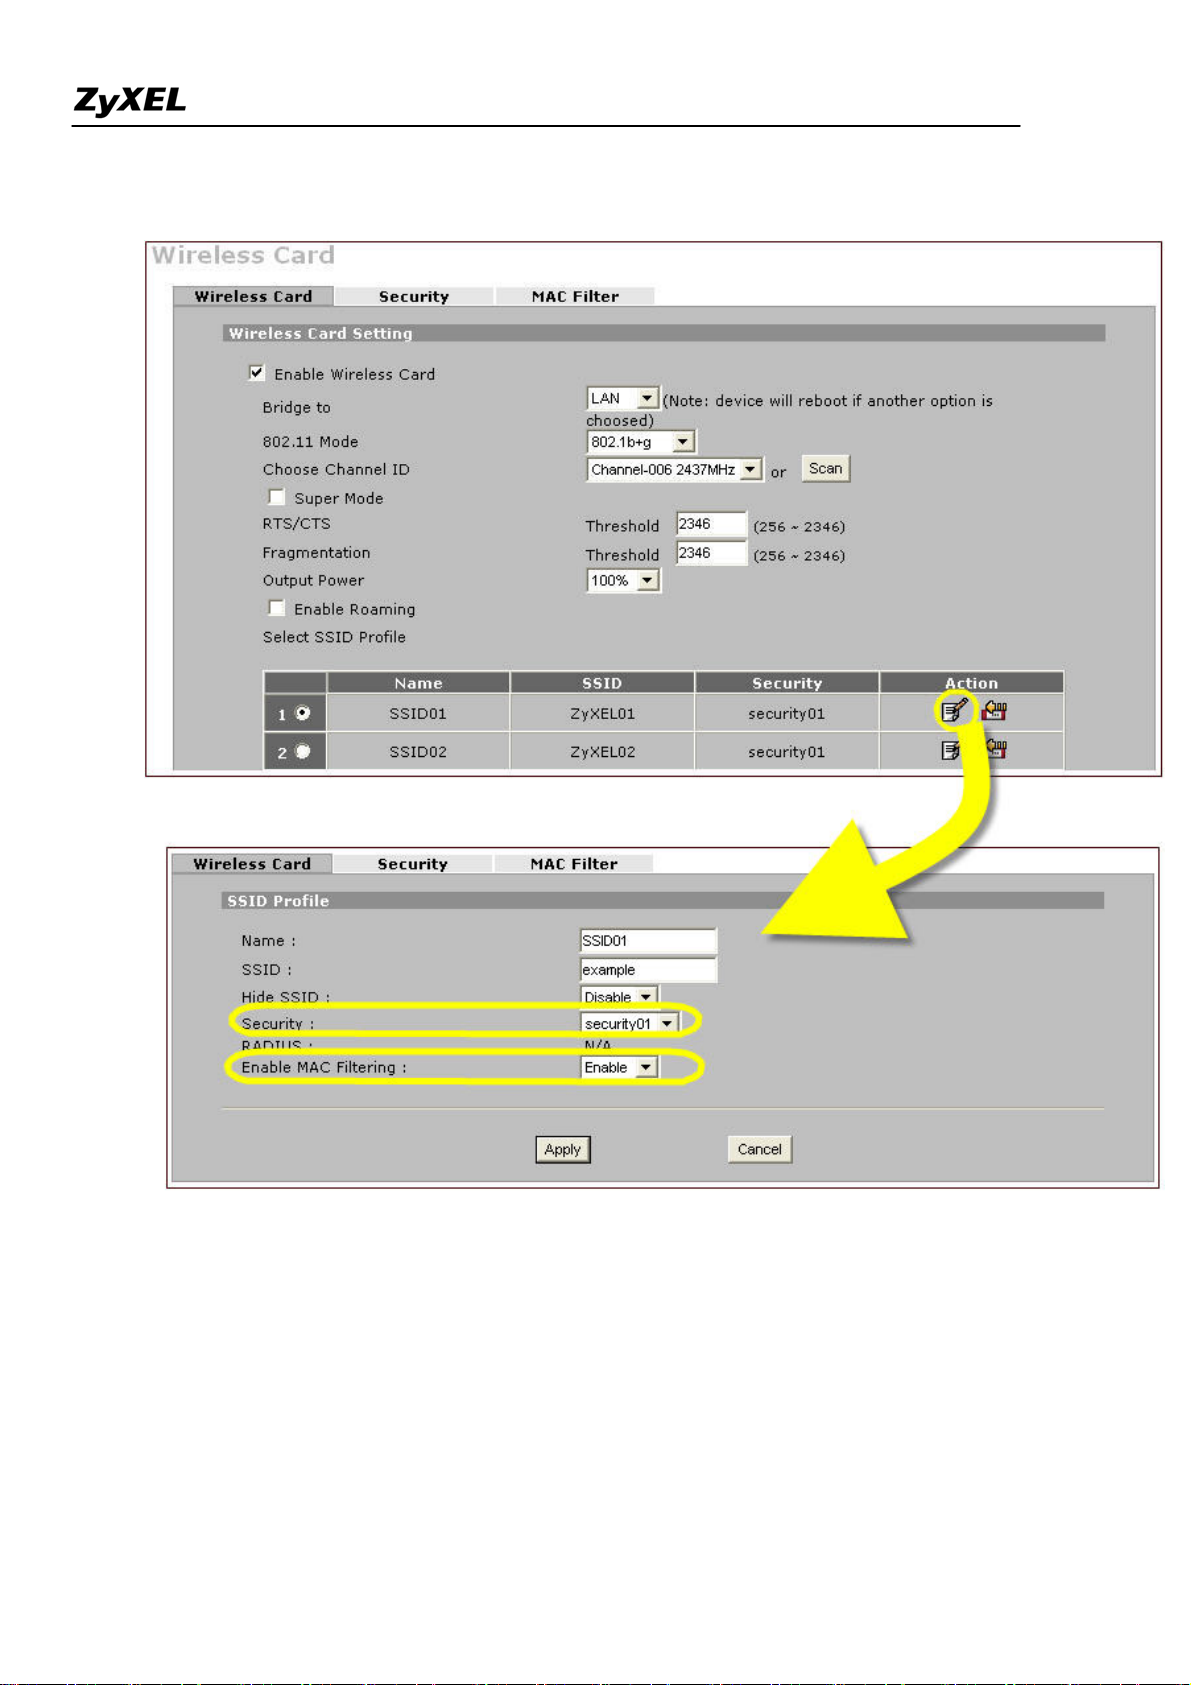
1). Go to GUI menu Network > WIRELESS CARD, enable it and configure the other parameters like 802.11
mode (four modes available: 802.11b only, 802.11g only, 802.11b+g, 802.11a only), channel ID, super mode,
RTS/CTS, fragmentation, output power(four options: 100%, 50%, 25%, 12.5%) and roaming.
ZyWALL 2WG allows you to configure up to 8 SSID profiles. Choose the SSID profile you want to use and
click Apply button.
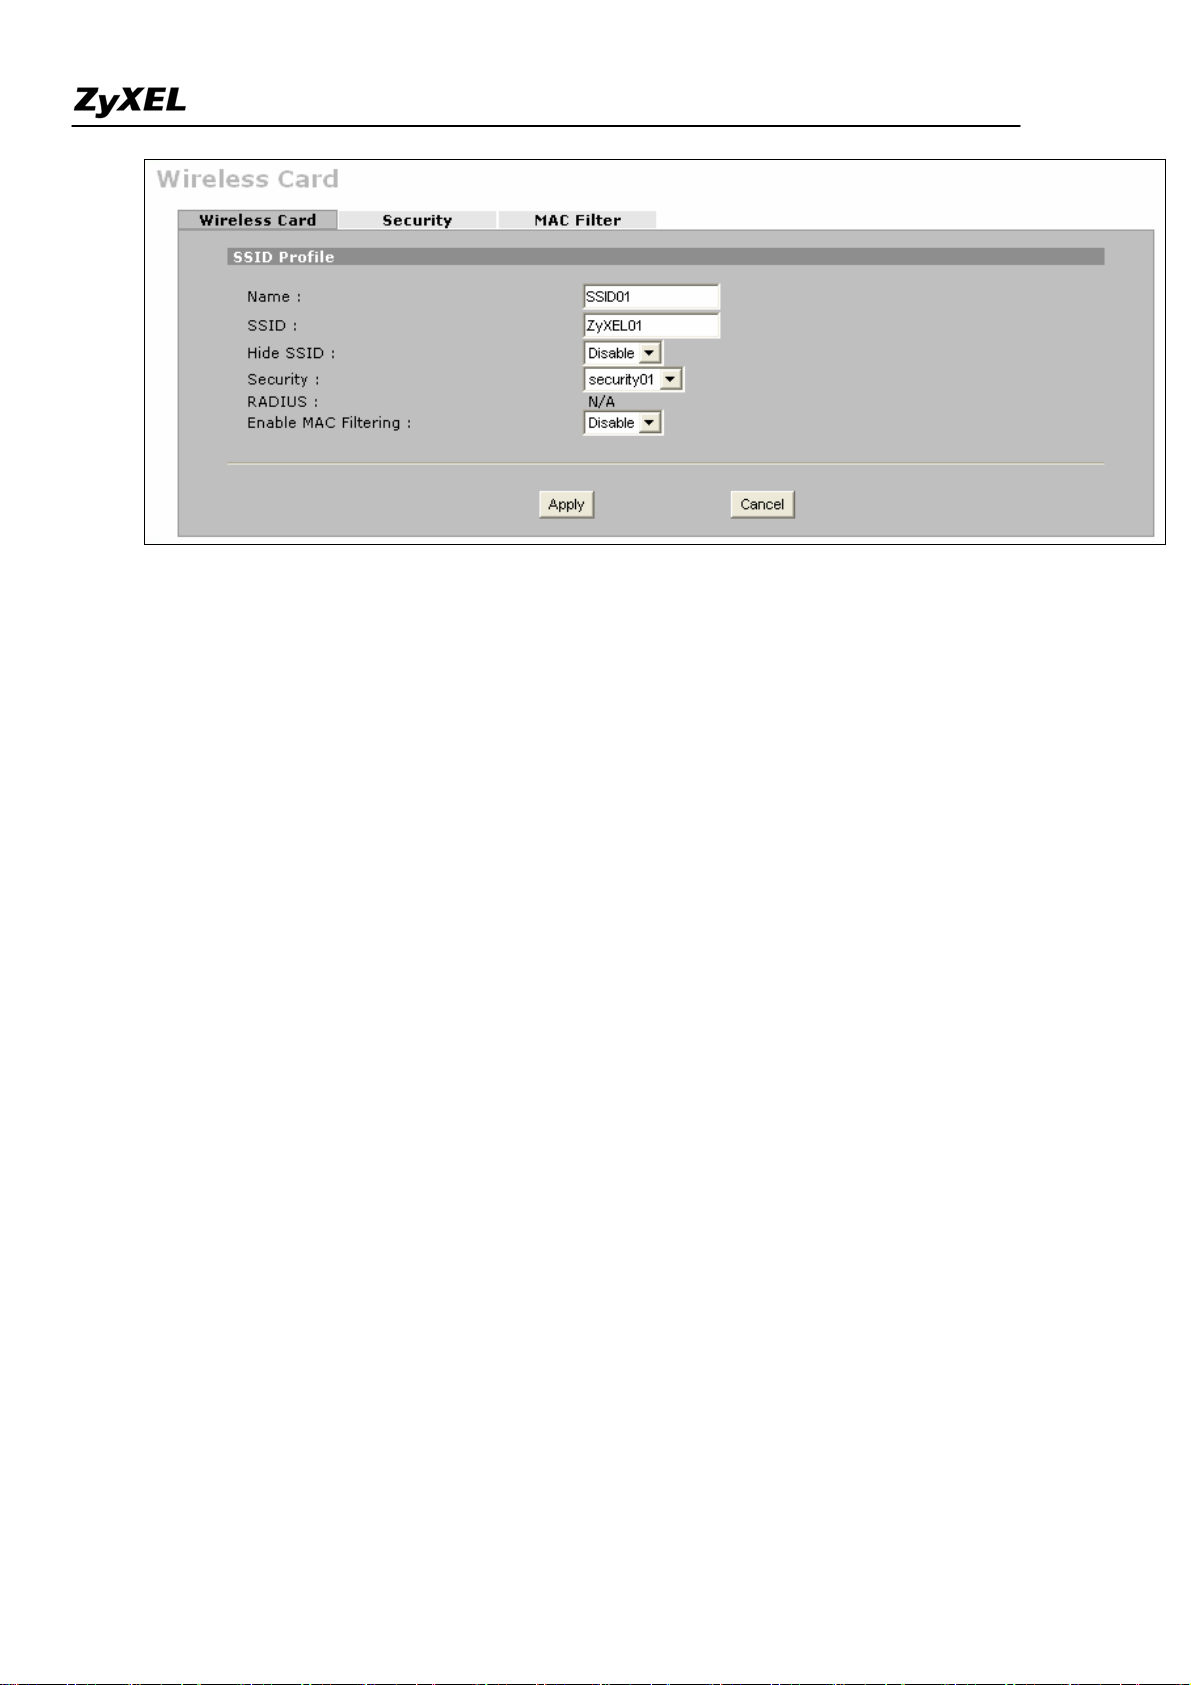
Note: You can modify the SSID profile by clicking the modify ( ) icon in the figure above: here you can
configure the SSID information and choose the security and the MAC filtering.
All contents copyright (c) 2006 ZyXEL Communications Corporation.
13
ZyWALL 2WG Support Notes
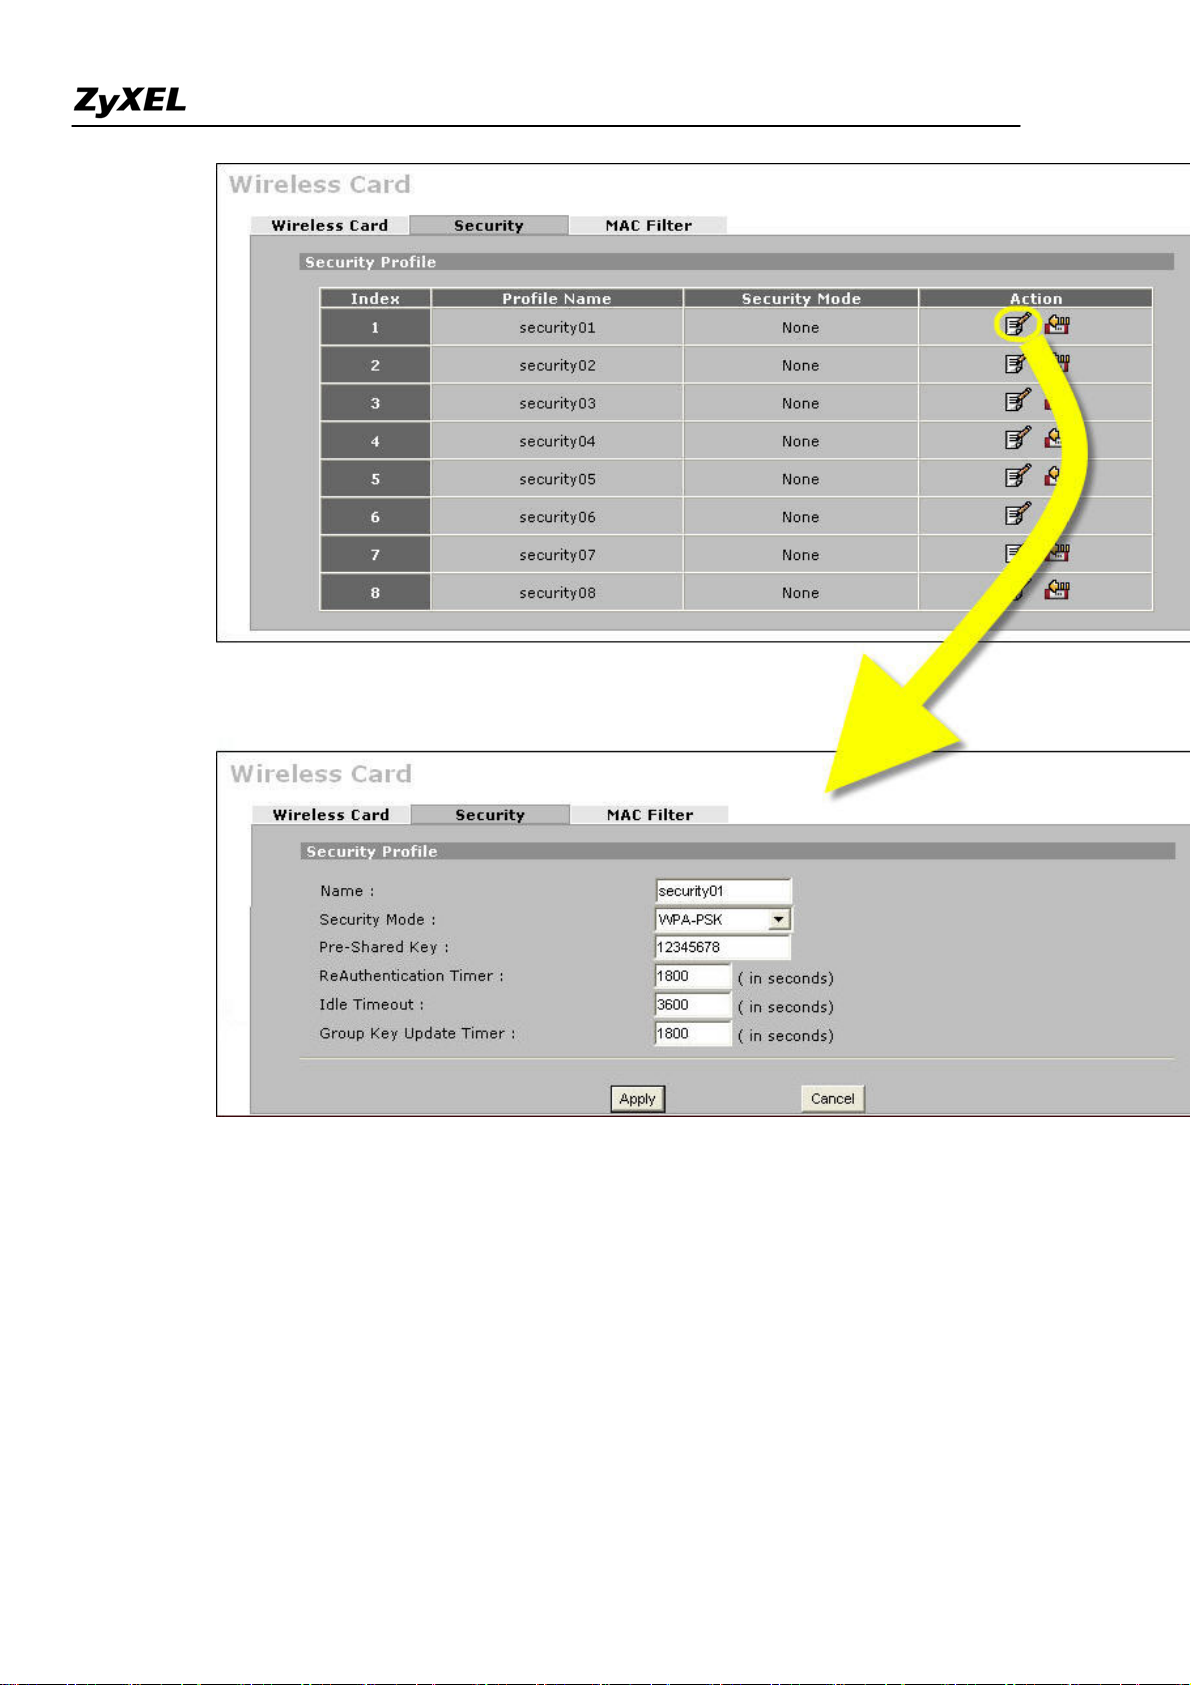
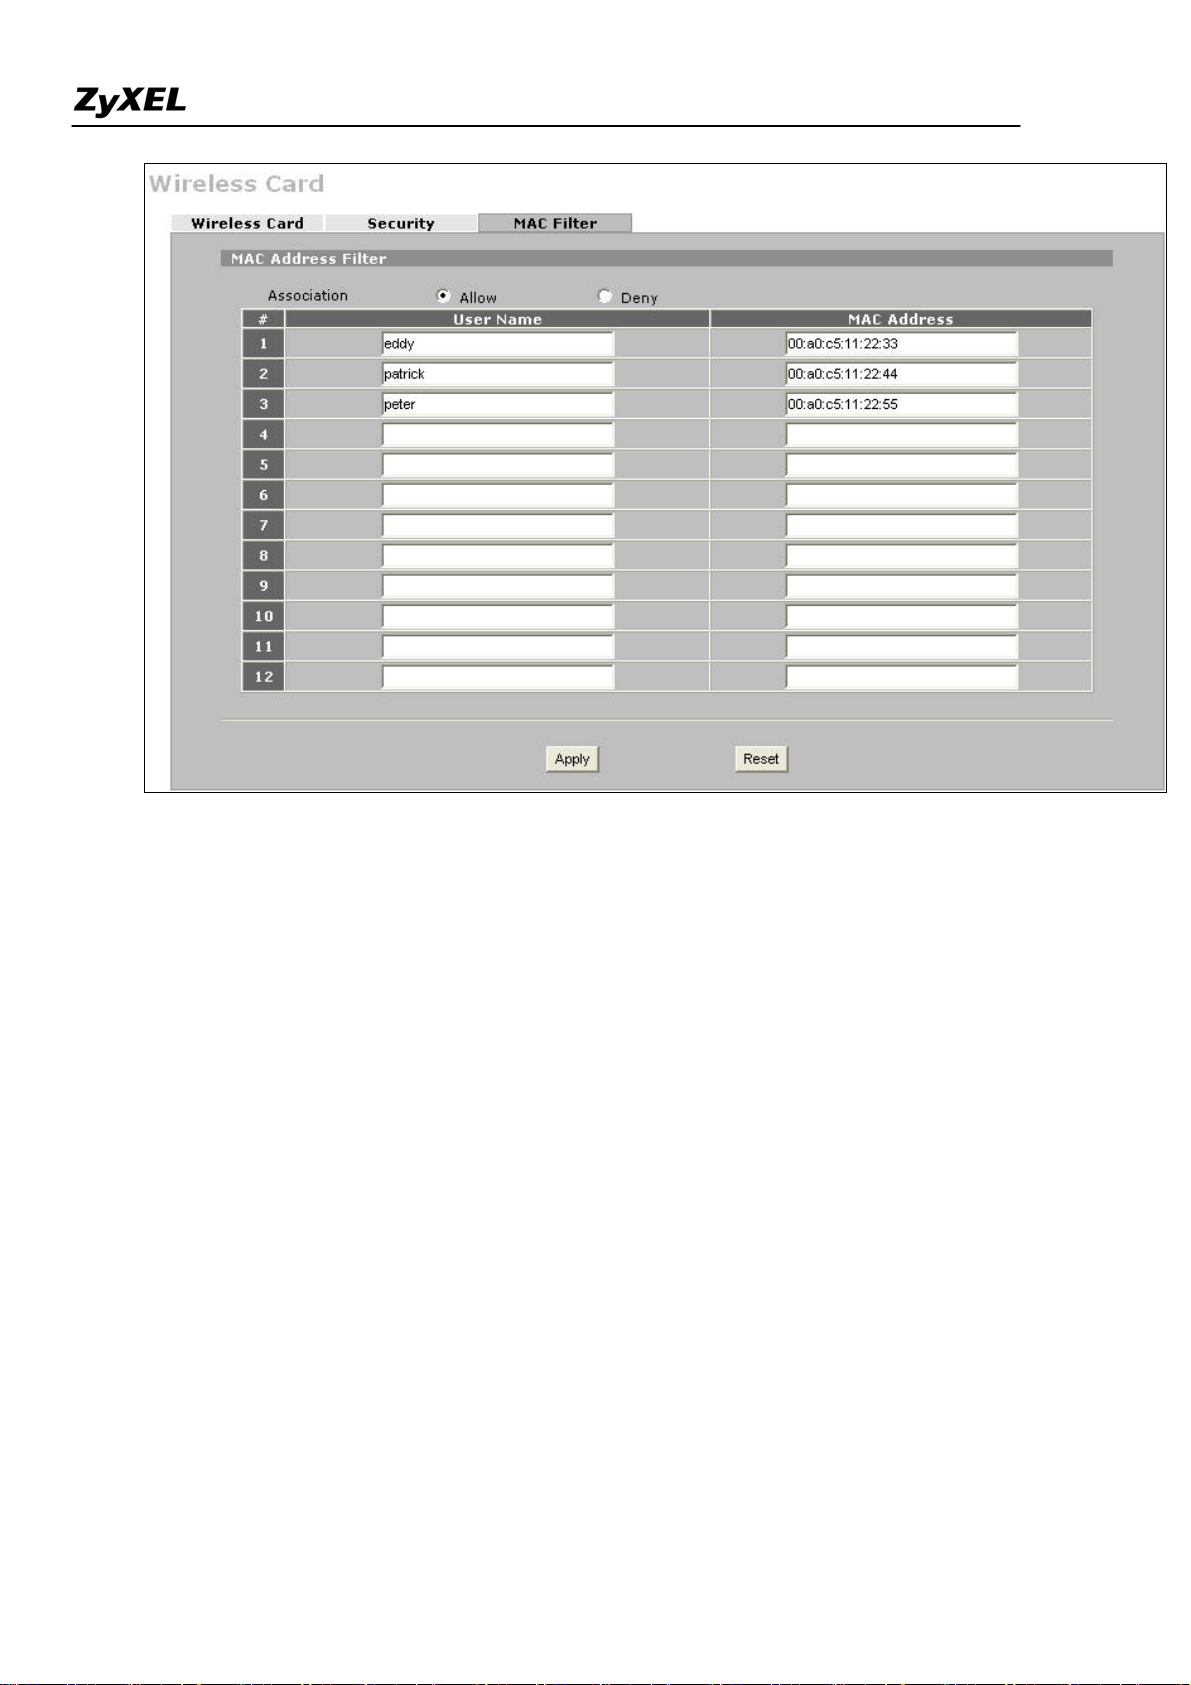
To configure the security and the MAC filter, go to Wireless Card > Security or Wireless Card > MAC Filter to
further configure it.
For example, we would like to provide the wireless access clients with preset MAC address filtering list.
Furthermore, these clients will also have to pass the security control described below.
a. Wireless security level to "WPA-PSK"with key "12345678".
b. Only allow the PC's with MAC of "00:A0:C5:11:22:33", "00:A0:C5:11:22:44", and
"00:A0:C5:11:22:55" are allowed to associate the wireless network.
All contents copyright (c) 2006 ZyXEL Communications Corporation.
14
ZyWALL 2WG Support Notes
All contents copyright (c) 2006 ZyXEL Communications Corporation.
15
ZyWALL 2WG Support Notes
All contents copyright (c) 2006 ZyXEL Communications Corporation.
16
ZyWALL 2WG Support Notes
After you have configured the Security and MAC filter profiles, you can choose them in the main page
of wireless card setting as shown
All contents copyright (c) 2006 ZyXEL Communications Corporation.
17
ZyWALL 2WG Support Notes
Seamless Incorporation into your network
Using Transparent (Bridge Mode) Firewall
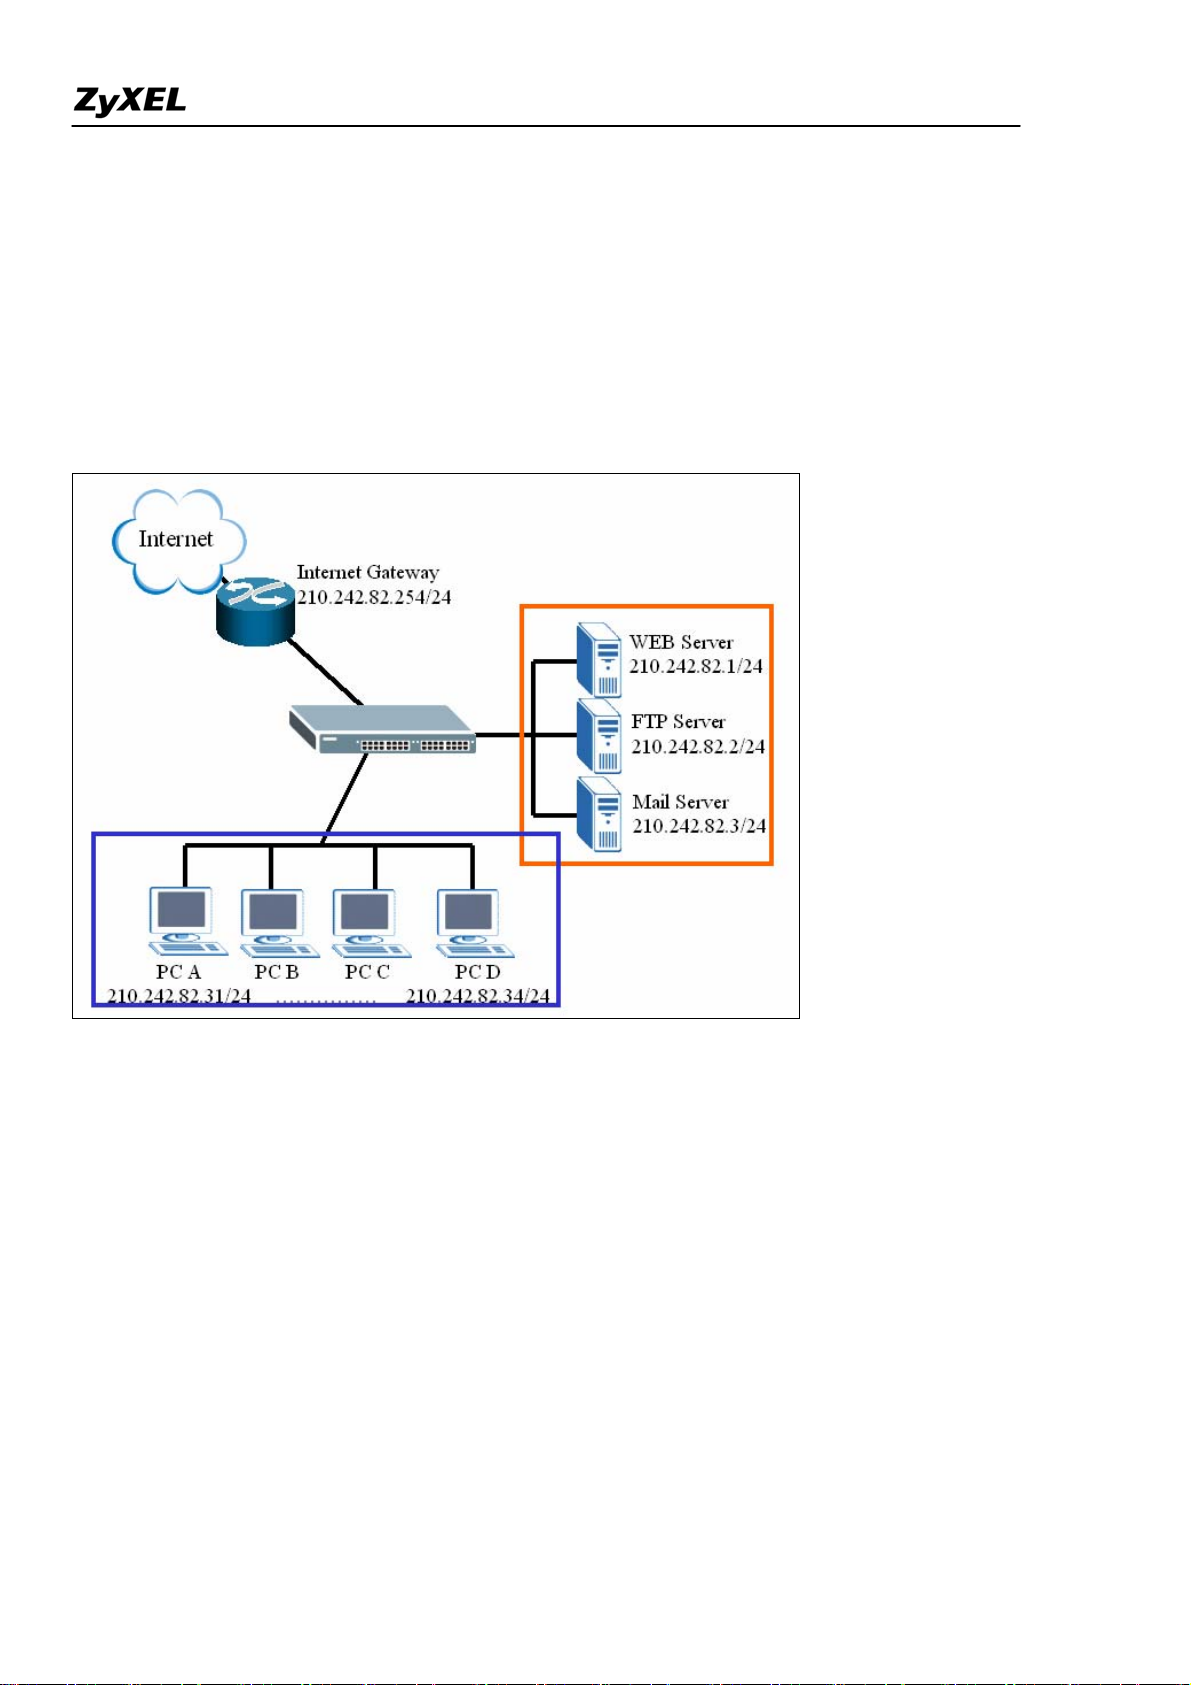
If user wants to insert a firewall into current network, IP setting of hosts and servers may need to change.
Following example illustrates an example of current deployment: servers and other hosts sit in the same IP
segment.
If a router mode firewall is inserted into existing network, user may need to reassign the IP of all servers
and hosts and related setting of applications. However, it may be a huge task to admi nistrators.
All contents copyright (c) 2006 ZyXEL Communications Corporation.
18
ZyWALL 2WG Support Notes
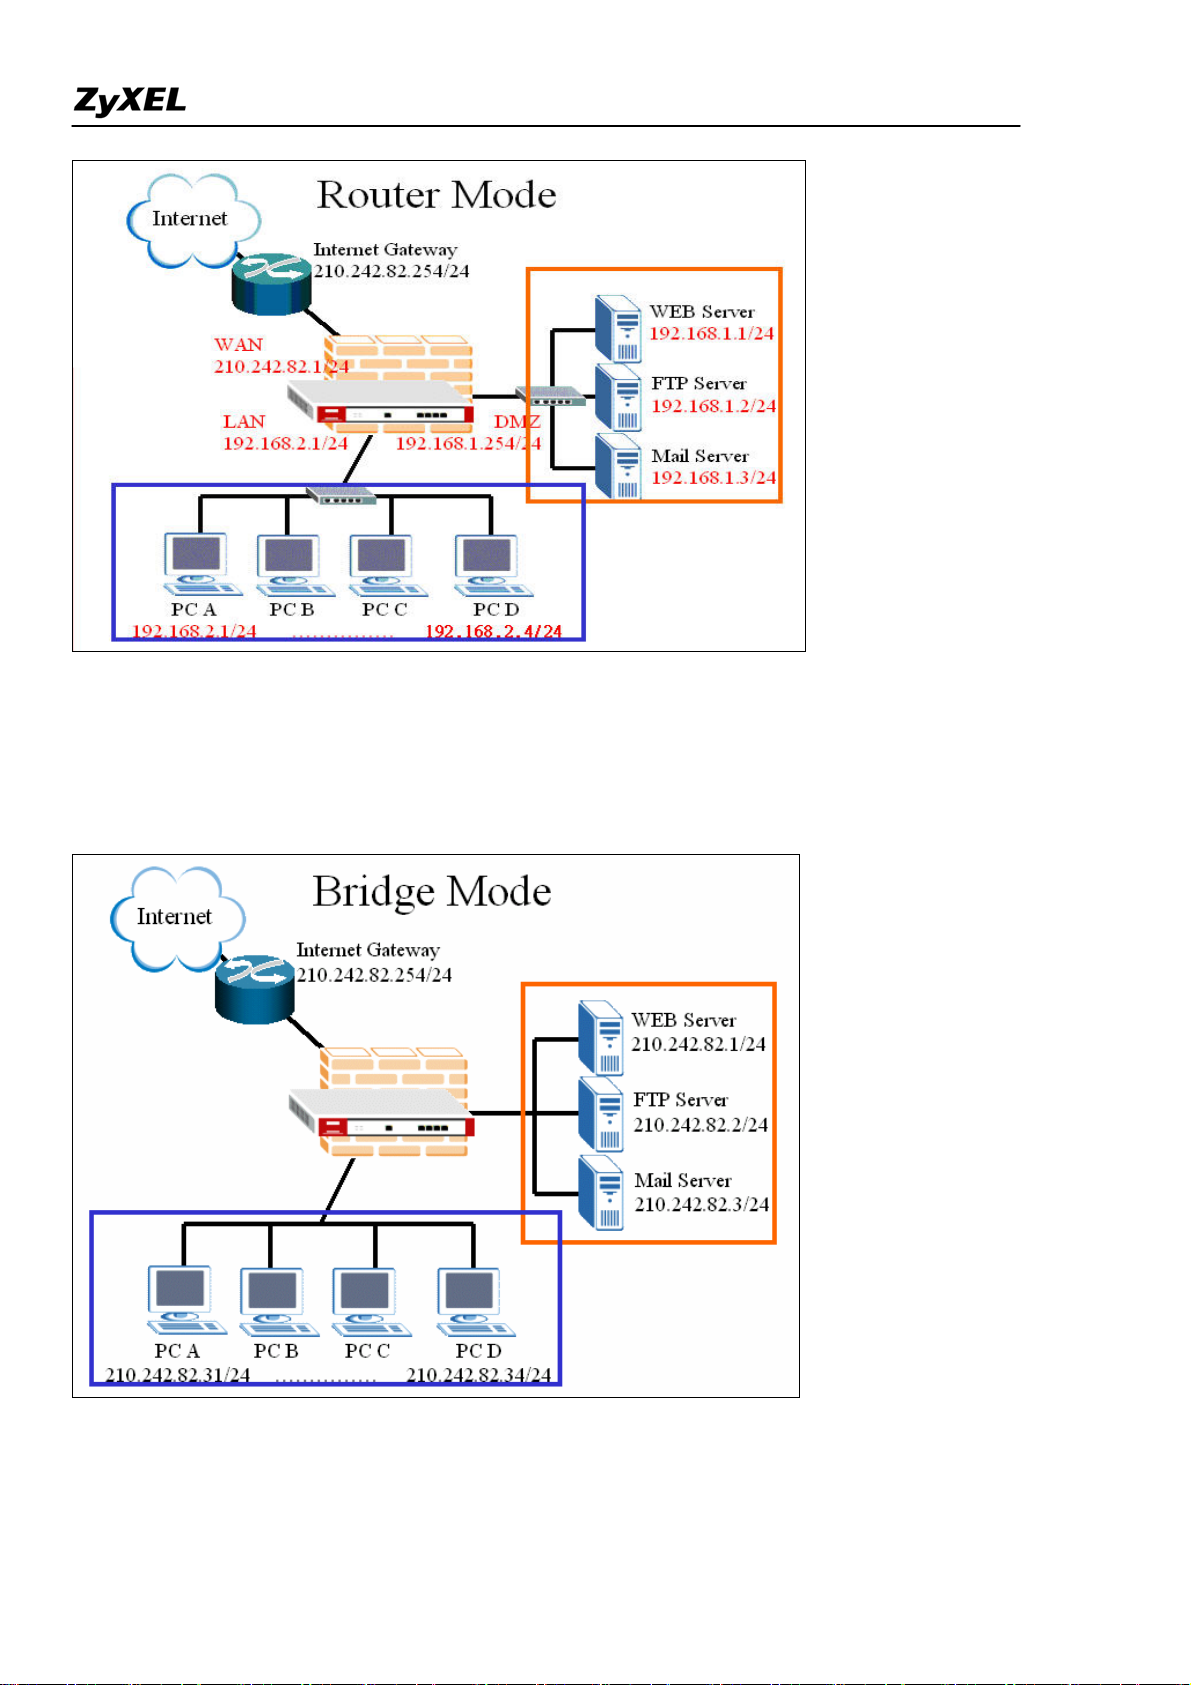
Deploying a transparent mode firewall doesn’t require any changes of settings on the original network
topology. It works as bridge/switch; therefore, all the hosts can communicate with each other as without
firewall in between. At the same time, the transparent firewall can check the packets passing through it
and block attacks and limit unauthorized access through access control right.
In the following section, we will explain how to configure ZyWALL as bridge firewall. Therefore, all
hosts and servers can keep using the same IP as that of current network.
All contents copyright (c) 2006 ZyXEL Communications Corporation.
19
ZyWALL 2WG Support Notes
User can configure ZyWALL to act as a router mode firewall or bridge (transparent) firewall. The default
is router mode firewall.
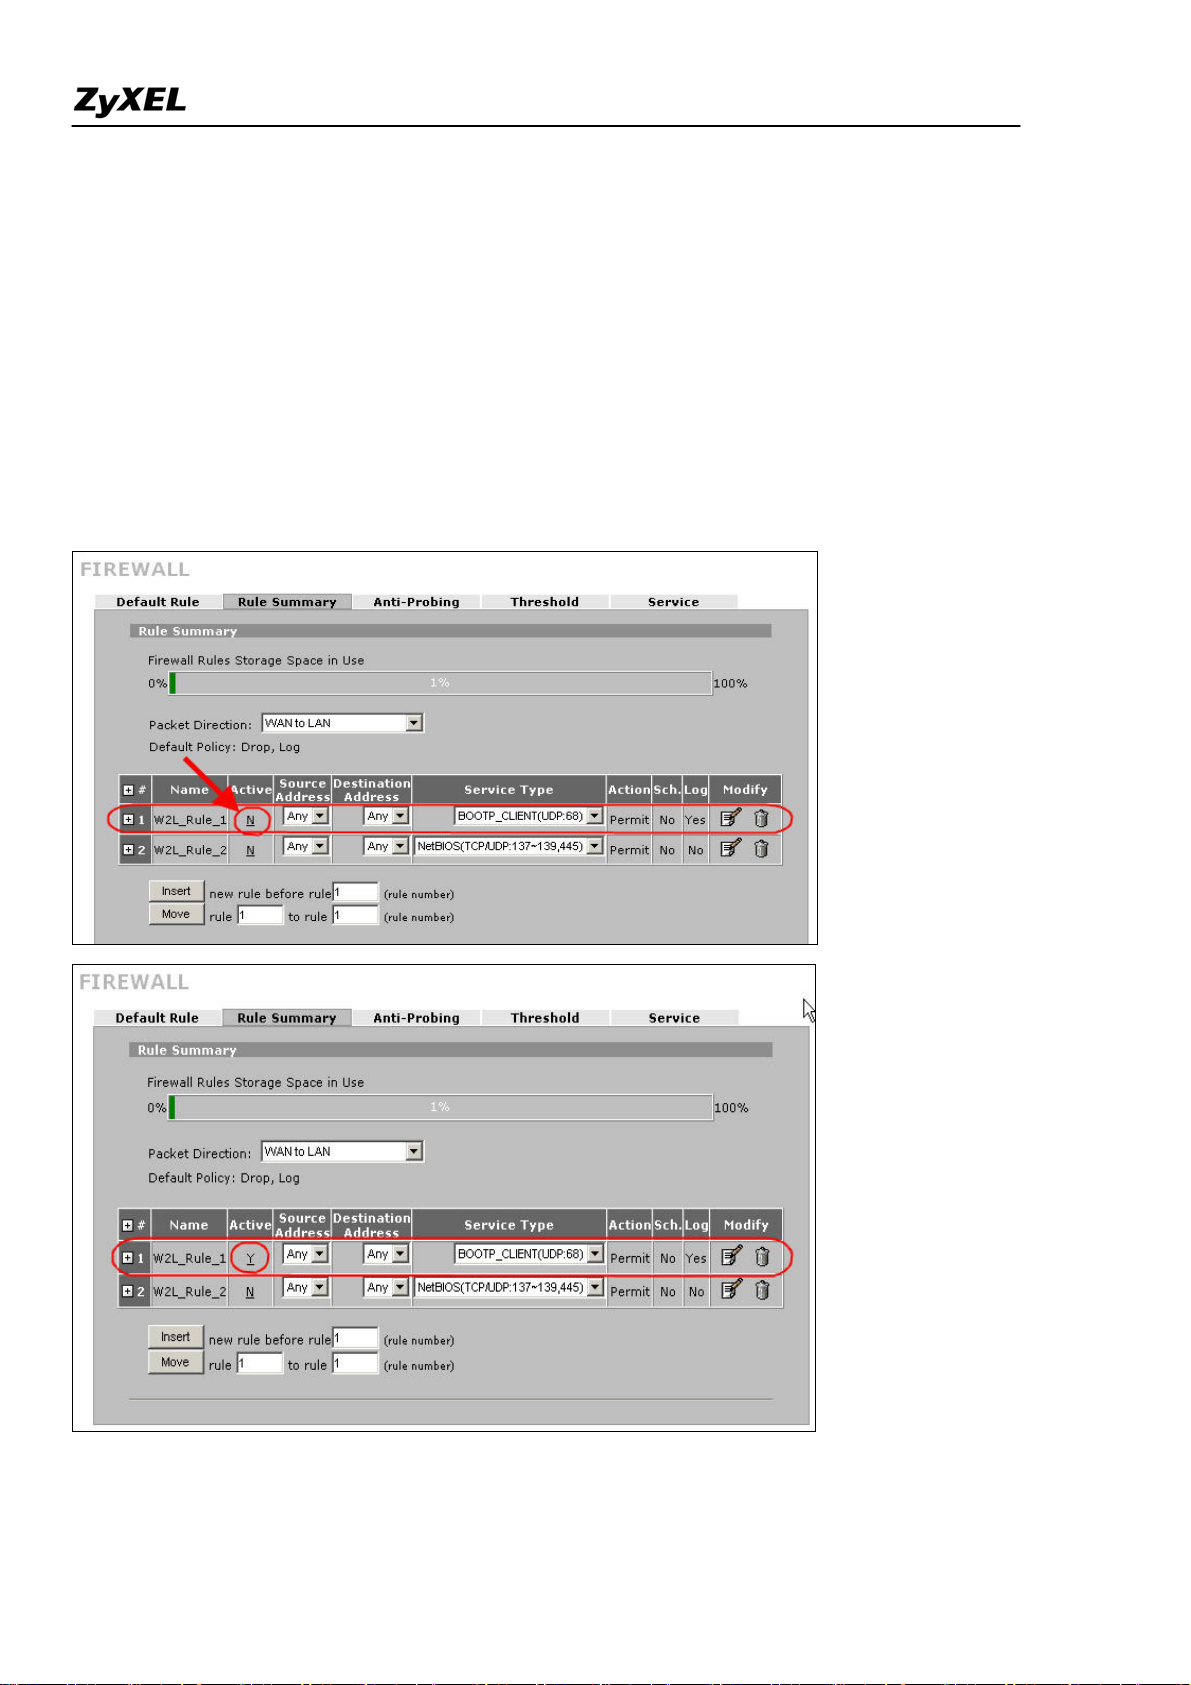
Step1. Before changing ZyWALL to bridge mode, if admin wants to make the ZyWALL’s LAN PC be
able to get DHCP IP address assignment from the DHCP server or the gateway upper than the ZyWALL,
there is one firewall rule needs to be activated.
Go to Firewall >> Rule Summary; choose ‘WAN to LAN’ from ‘Packet Direction’. You will see a rule
to permit the service type, ‘BOOTP_CLIENT(UDP:68)’, to pass firewall. It’s INACTIVE by default.
Admin can activate the rule by clicking the ‘N’ as following picture. Then the rule will be activated right
away.
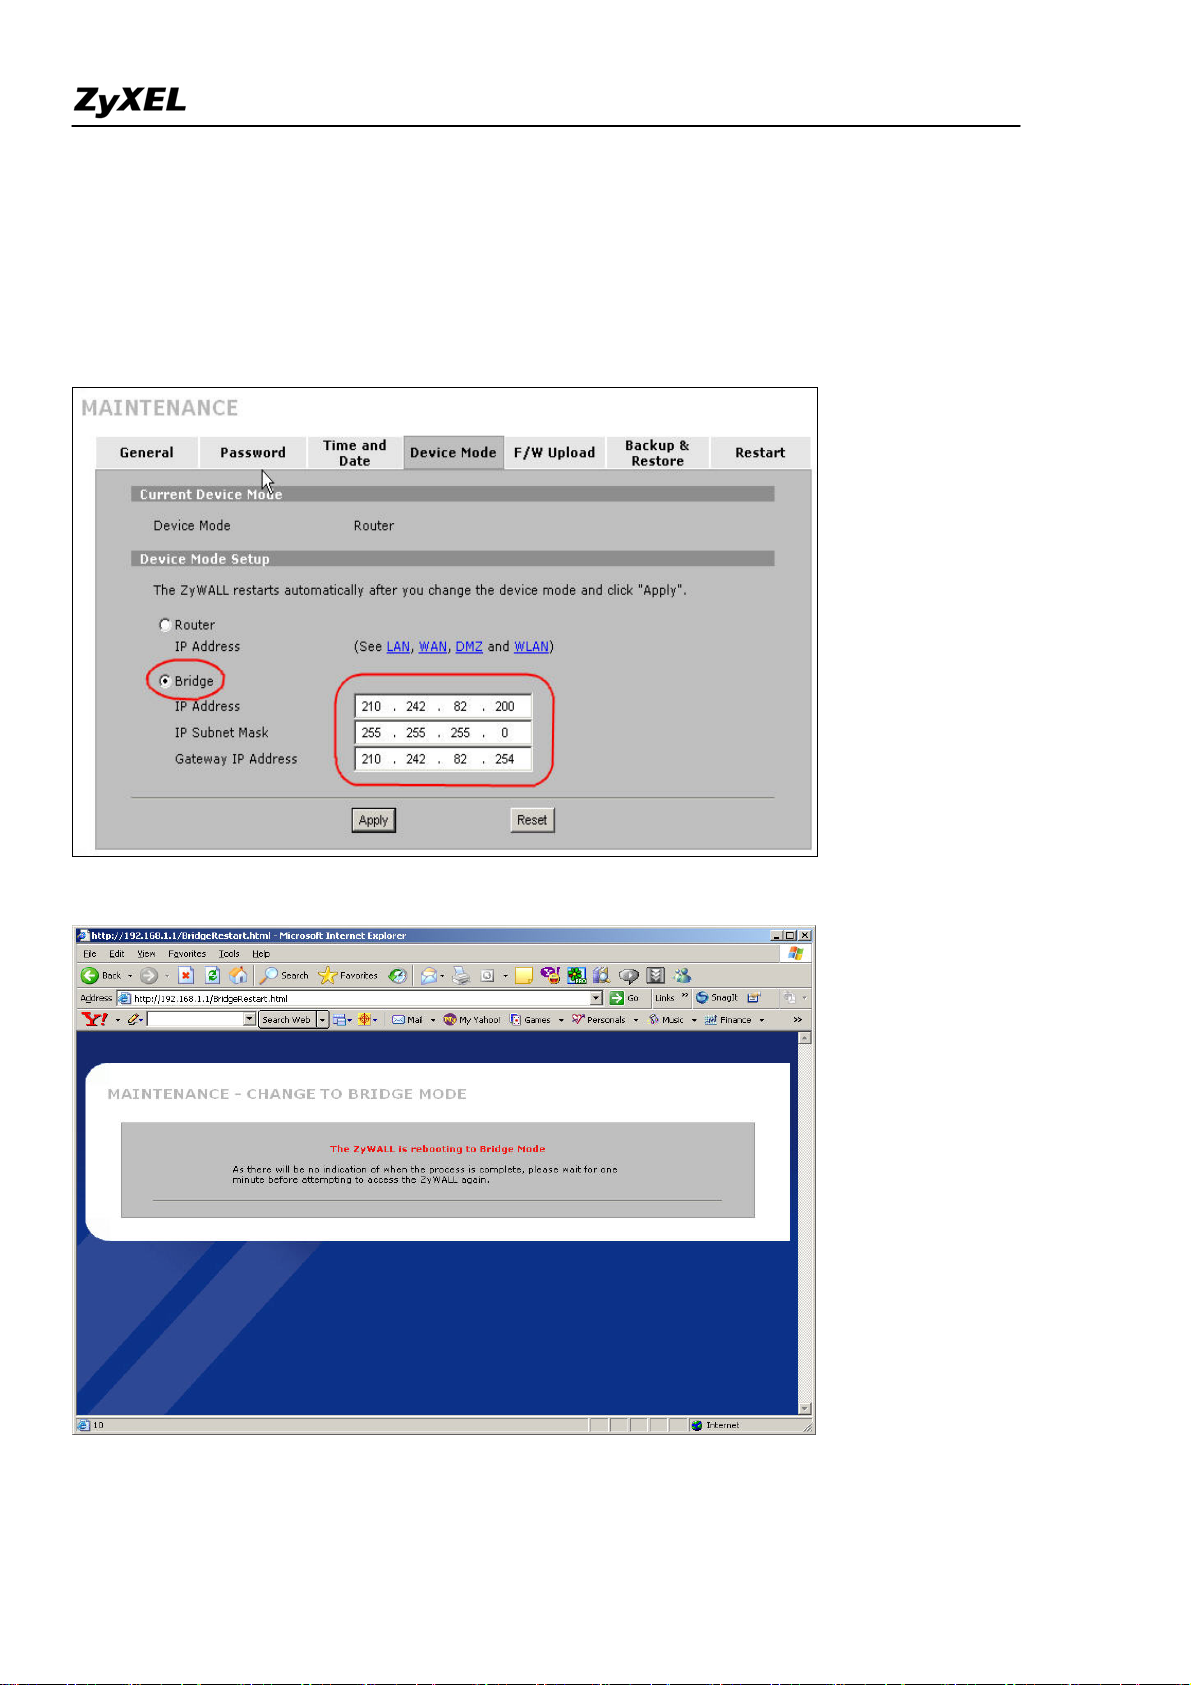
Step2. To change the device mode, go to MAINTENANCE >> Device Mode. Select ‘Bridge’ and
All contents copyright (c) 2006 ZyXEL Communications Corporation.
20
ZyWALL 2WG Support Notes
assign a management IP for ZyWALL. The Gateway IP Address is used as next-hop of default route.
ZyWALL will restart after applying the change.
(Note: Here we suggest admin to dedicate an IP address to ZyWALL itself at the same subnet as
original one (like 210.242.82.X/24 in this example). In this way, admin doesn’t need to change his
PC’s IP address when he wants to access Internet and ZyWALL’s web GUI at the same time.)
21
All contents copyright (c) 2006 ZyXEL Communications Corporation.
ZyWALL 2WG Support Notes
Step3. After rebooting, login ZyWALL’s GUI by accessing ZyWALL’s management IP address.
(Accessing ZyWALL by the PC with a static IP address configured in the same subnet or with an IP from
DHCP server (refer to step1 for the pre-configured firewall rule).
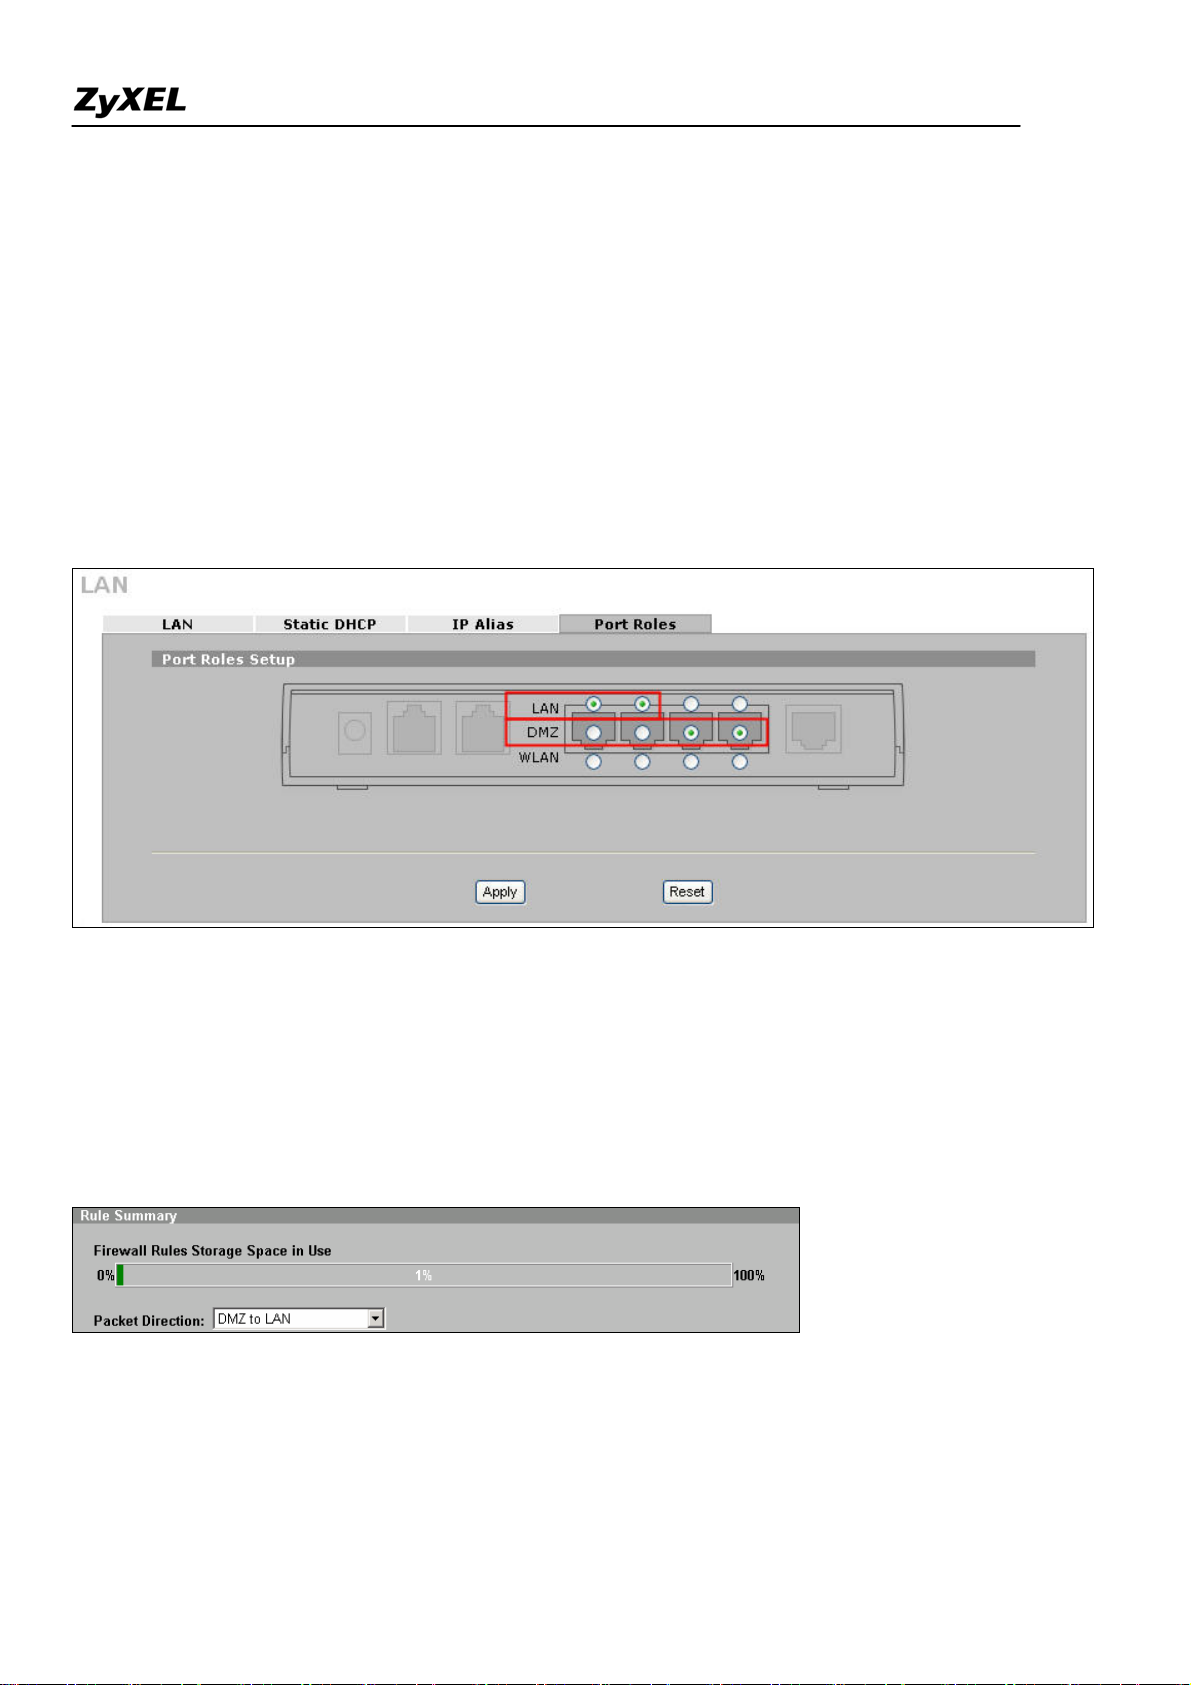
Step4. In this example, since we want to apply a DMZ zone for servers. So for ZyWALL 2 Plus which
the ports of LAN & DMZ can be configured, user can decide the roles of each port.
Go to Network >> LAN (or DMZ or WLAN) >> Port Roles. By default, 4 ports are assigned to LAN.
In this example, we use port 1 & 2 assigned to LAN and Port 3 & 4 assigned to DMZ as following
picture.
Step5. Furthermore, to configure firewall rule to control the access of your network, go to SECURITY
>> FIREWALL as you do in router mode firewall. For example, user wants to block the access from a
FTP server (210.242.82.2) in DMZ zone to LAN hosts (210.242.82.31~34) (Note that they all sits in the
same IP segment 210.242.82.0/24). Edit the firewall rule via Firewall >> Rule Summary and with
packet direction: DMZ to LAN.
And enter 210.242.82.2 as the source address and 210.242.82.31~34 as destination address. And then
select the service and set the action for ‘Matched Packet’ to
‘BLOCK’.
All contents copyright (c) 2006 ZyXEL Communications Corporation.
22

ZyWALL 2WG Support Notes
23
All contents copyright (c) 2006 ZyXEL Communications Corporation.
ZyWALL 2WG Support Notes
Internet Connection
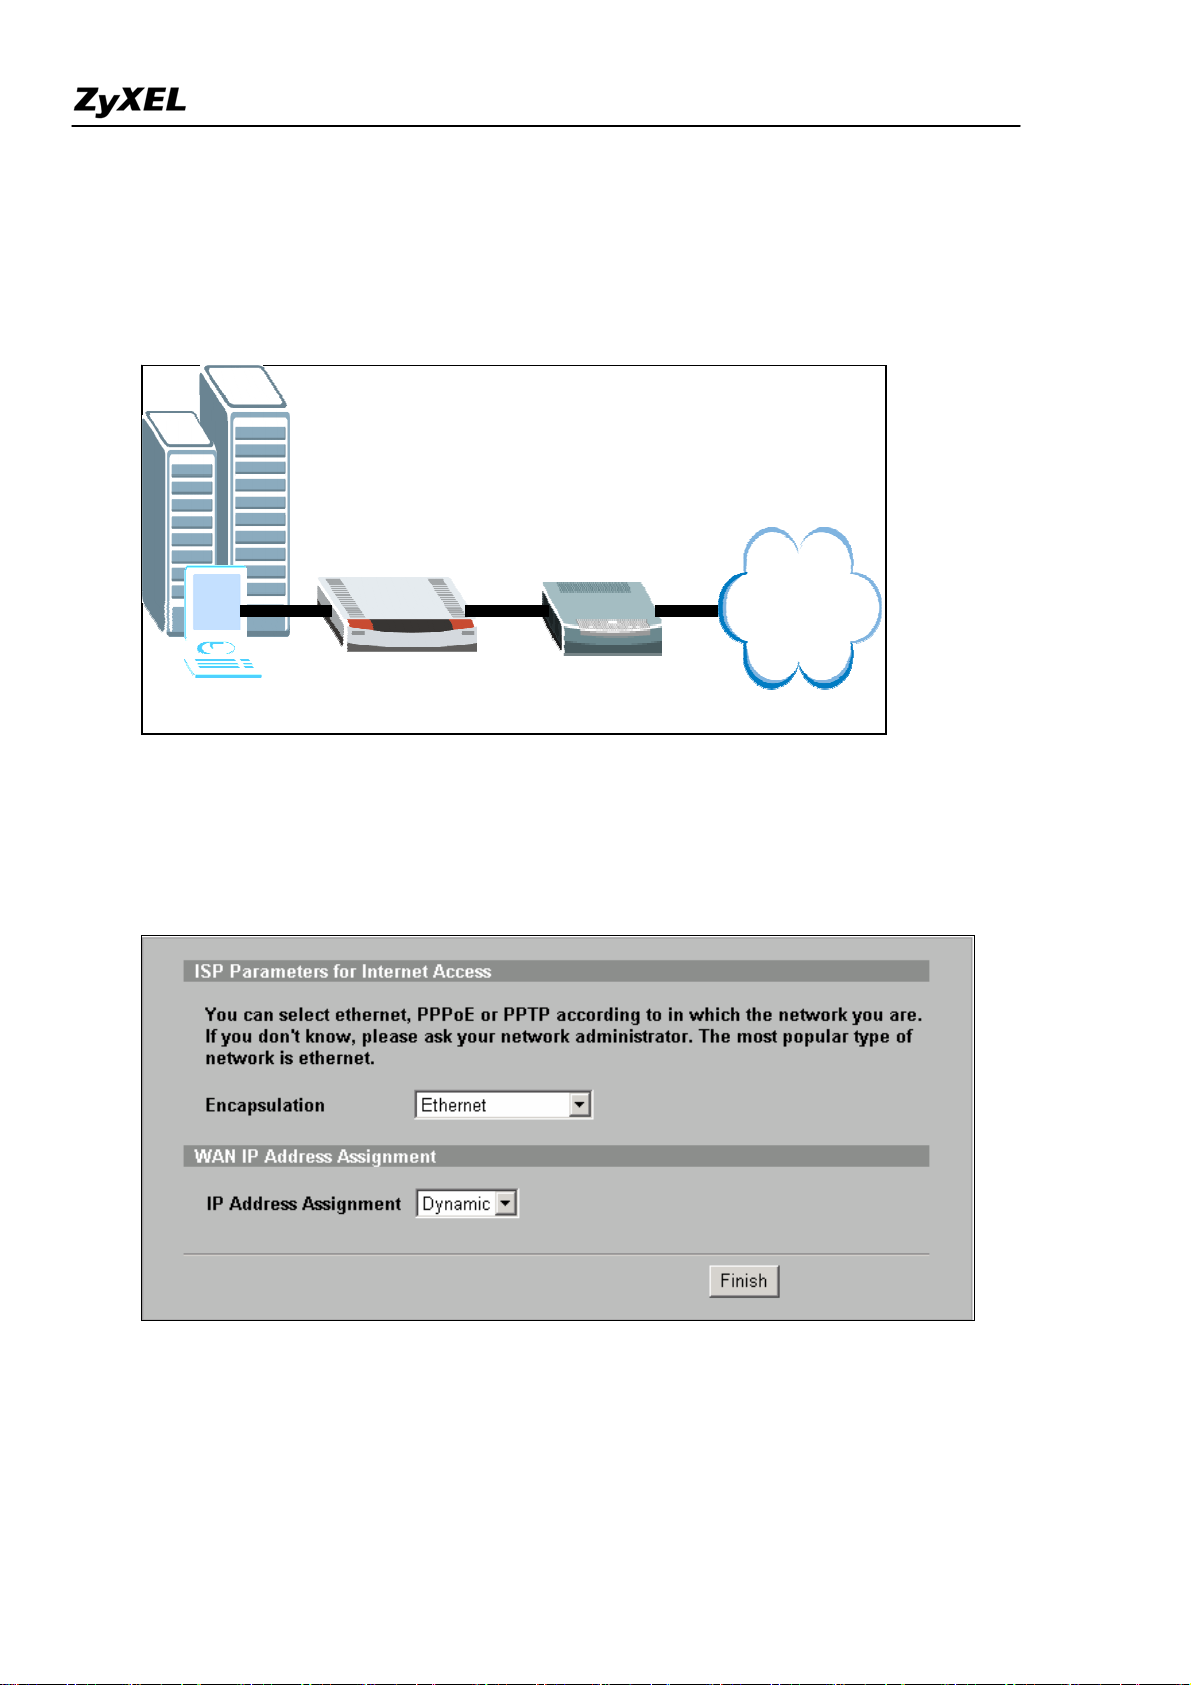
A typical Internet access application of the ZyWALL is shown below. This section guides you how to
configure ZyWALL to gain the Internet access.
ZyWALL
Internet
LAN
WAN
Step1. First of all, Select Home menu and click Internet Access Wizard to configure your WAN
connection. Click “Internet Access” under Home >> Wizards for Internet Access Quick Setup
A pop-up window as below will indicate you to enter ISP Parameters for Internet Access .
There are three kinds of encapsulation which are supported by ZyWALL: Ethernet, PPPoE & PPTP.
Select the correct encapsulation type from the drop-down menu. The wizards will requests related
information needed. These fields vary depending on what you select in the Encapsulation field. Fill them
in with the information exactly as given by the ISP or network administrator.
All contents copyright (c) 2006 ZyXEL Communications Corporation.
24
ZyWALL 2WG Support Notes
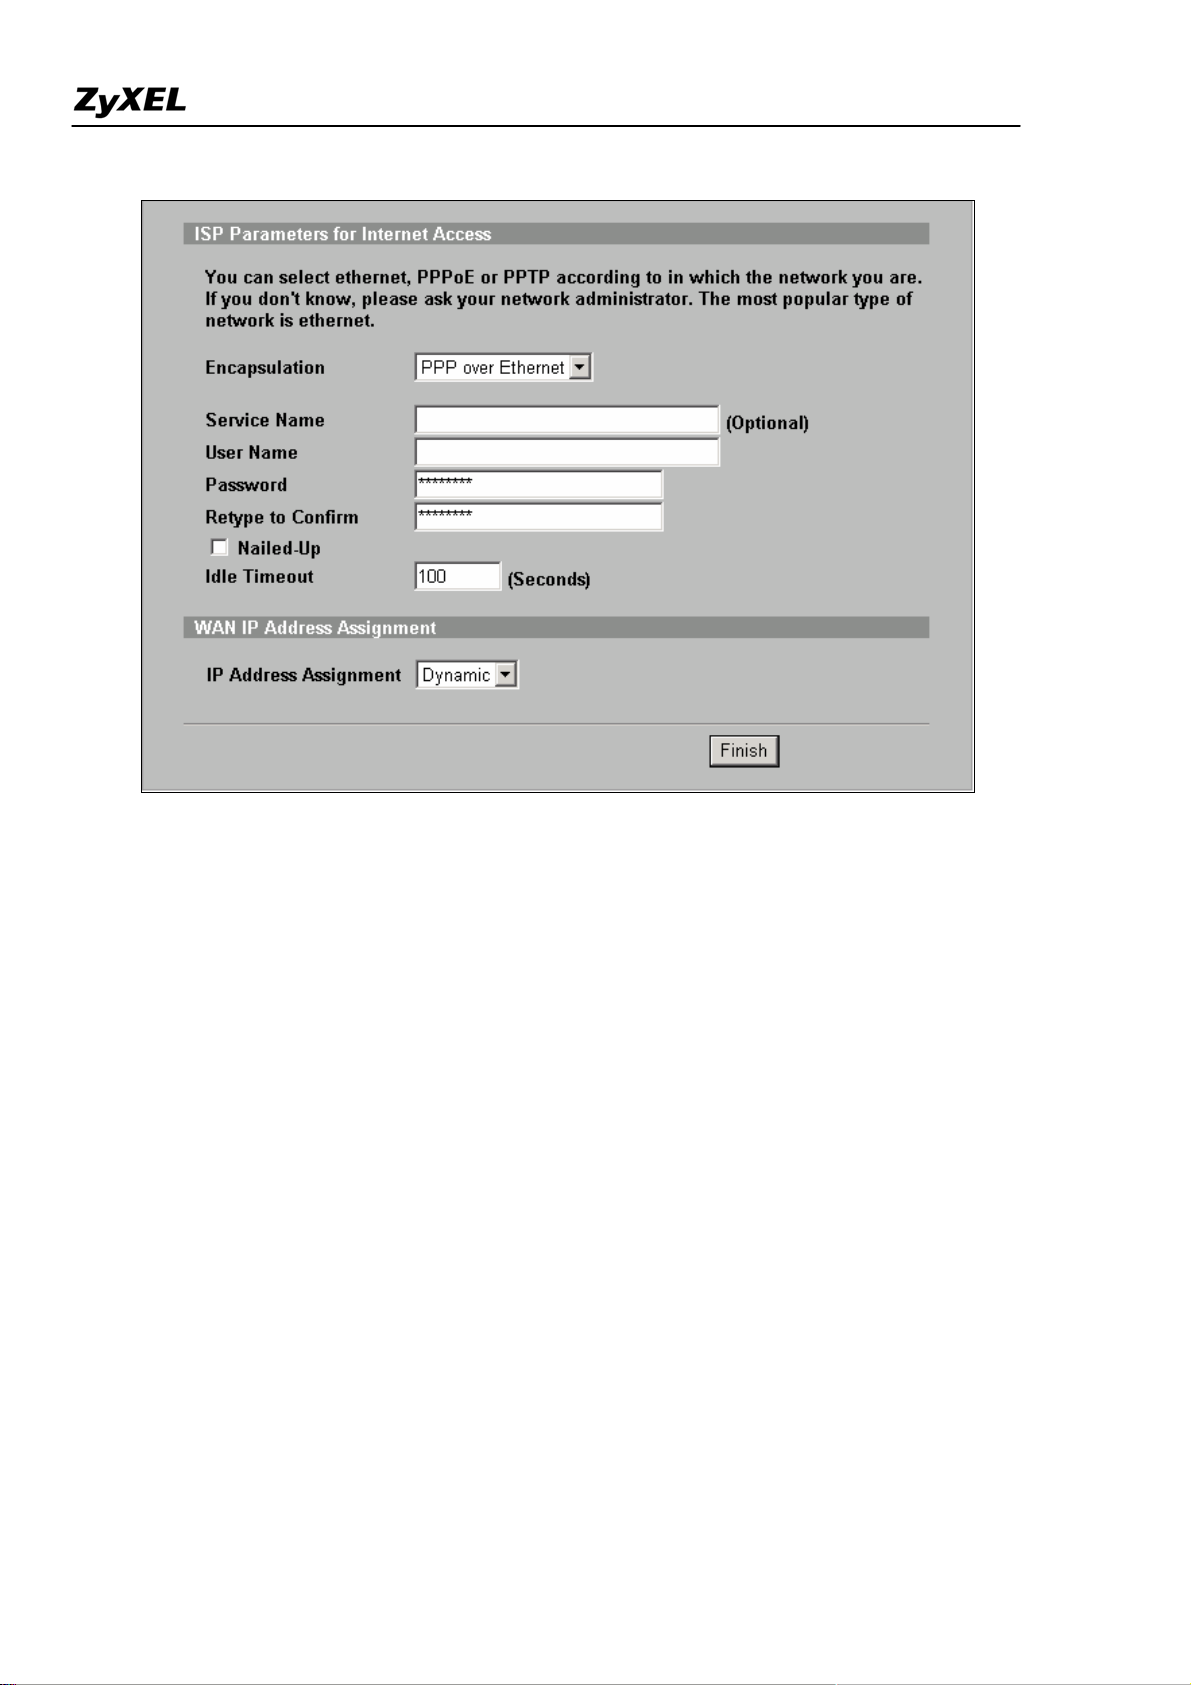
Following picture is an example while PPPoE is selected.
Once the required information is correctly configured, click on the “Finish” button to apply the setting
and then you have finished configuring Internet Access on WAN link.
DHCP server/client/relay
ZyWALL supports
(1) DHCP client on the WAN port
User can choose either a static IP or a dynamic IP address for WAN port. When choosing dynamic IP,
ZyWALL will get a DHCP IP address from ISP or upper layer DHCP server.
(2) DHCP server/relay/none on the LAN ports
ZyWALL supports DHCP server for LAN ports, but also
1. When choosing DHCP setting as ‘None’, the LAN will NOT assign IP address to the
associated hosts. Client PCs need to configure IP address manually.
All contents copyright (c) 2006 ZyXEL Communications Corporation.
25

ZyWALL 2WG Support Notes
2. When choosing DHCP setting as a ‘Server’, the LAN will automatically assign IP, subnet,
gateway and DNS to the associated clients.
3. When choosing DHCP setting as a ‘Relay’, the LAN will forward the DHCP request to
another DHCP server.
Using NAT/Multi-NAT
• What is Multi-NAT?
• How NAT works
• NAT Mapping Types
• SUA versus Multi-NAT
• Example
Step 1. Applying NAT on WAN Interface
Step 2. Configuring NAT Address Mapping
Step 3. Using Multiple Global IP addresses for clients and servers (One-to-One, Many-to-One,
Server Set mapping types)
• Application -- Non NAT-Friendly Support
• What is Multi-NAT?
NAT (Network Address Translation-NAT RFC 1631) is the translation of an Internet Protocol address used
within one network to a different IP address known within another network. One network is designated the
inside
network and the other is the
outside
. Typically, a company maps its local inside network addresses to one
or more global outside IP addresses and "unmaps" the global IP addresses on incoming packets back into local
IP addresses. The IP addresses for the NAT can be either fixed or dynamically assigned by the ISP. In addition,
you can designate servers, e.g., a web server and a telnet server, on your local network and make them
accessible to the outside world. If you do not define any servers, NAT offers the additional benefit of firewall
protection. In such case, all incoming connections to your network will be filtered out by the ZyWALL, thus
preventing intruders from probing your network.
The SUA feature that the ZyWALL supports previously operates by mapping the private IP addresses to a
global IP address. It is only one subset of the NAT. The ZyWALL supports the most of the features of the NAT
based on RFC 1631, and we call this feature as 'Multi-NAT'. For more information on IP address translation,
please refer to RFC 1631,
The IP Network Address Translator (NAT)
.
26
All contents copyright (c) 2006 ZyXEL Communications Corporation.
ZyWALL 2WG Support Notes
• How NAT works
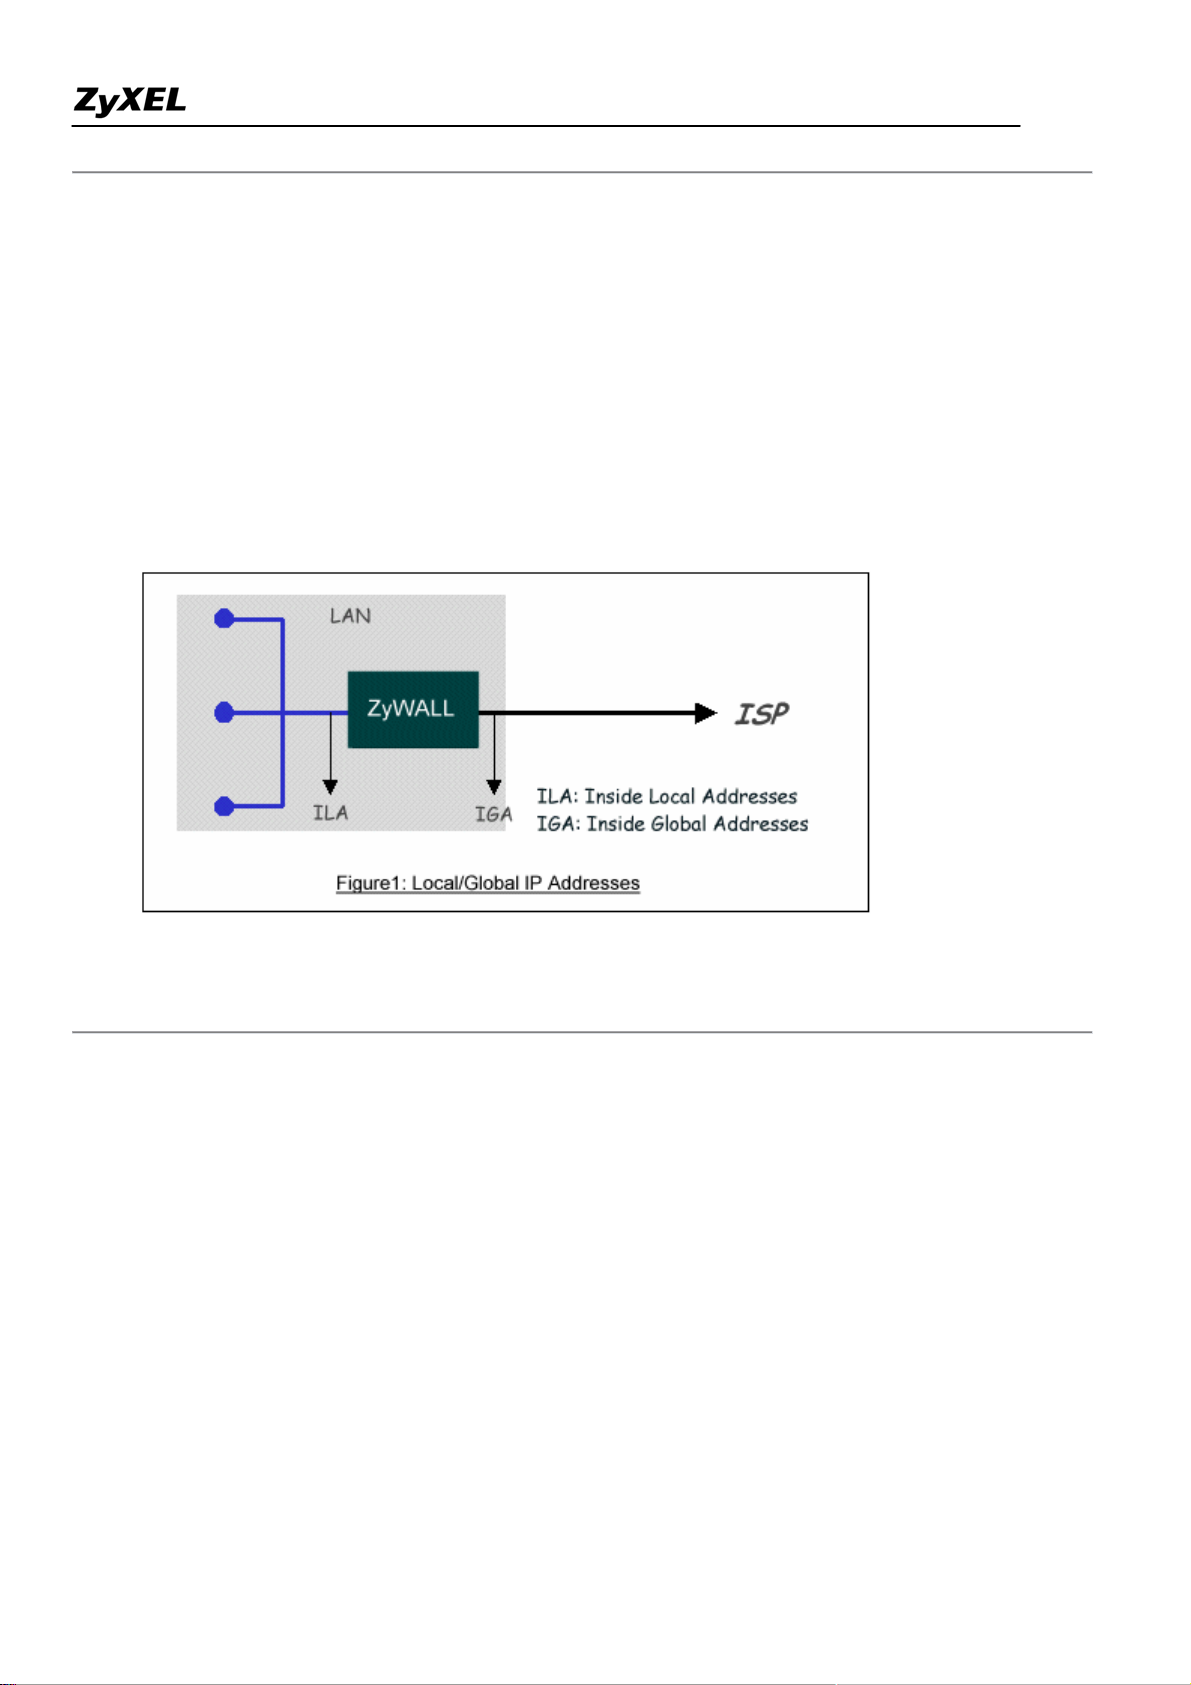
If we define the local IP addresses as the Internal Local Addresses (ILA) and the global IP addresses as the
Inside Global Address (IGA), see the following figure. The term 'inside' refers to the set of networks that are
subject to translation. NAT operates by mapping the ILA to the IGA required for communication with hosts on
other networks. It replaces the original IP source address (and TCP or UDP source port numbers) and then
forwards each packet to the Internet ISP, thus making them appear as if they had come from the NAT system
itself (e.g., the ZyWALL router). The ZyWALL keeps track of the original addresses and port numbers so
incoming reply packets can have their original values restored.
• NAT Mapping Types
NAT supports five types of IP/port mapping. They are:
1. One to One
In One-to-One mode, the ZyWALL maps one ILA to one IGA.
2. Many to One
In Many-to-One mode, the ZyWALL maps multiple ILA to one IGA. This is equivalent to SUA (i.e., PAT,
port address translation), ZyXEL's Single User Account feature that previous ZyNOS routers supported
(the SUA only option in today's routers).
3. Many to Many Overload
In Many-to-Many Overload mode, the ZyWALL maps the multiple ILA to shared IGA.
4. Many One to One
In Many One to One, the ZyWALL maps each ILA to unique IGA.
All contents copyright (c) 2006 ZyXEL Communications Corporation.
27

ZyWALL 2WG Support Notes
5. Server
In Server mode, the ZyWALL maps multiple inside servers to one global IP address. This allows us to
specify multiple servers of different types behind the NAT for outside access. Note, if you want to map
each server to one unique IGA please use the One-to-One mode.
The following table summarizes these types.
NA T Type IP Mapping
One-to-One ILA1<--->IGA1
Many-to-One
(SUA/PAT)
Many-to-Many
Overload
Many One-to-One
Server
ILA1<--->IGA1
ILA2<--->IGA1
...
ILA1<--->IGA1
ILA2<--->IGA2
ILA3<--->IGA1
ILA4<--->IGA2
...
ILA1<--->IGA1
ILA2<--->IGA2
ILA3<--->IGA3
ILA4<--->IGA4
...
Server 1 IP<--->IGA1
Server 2 IP<--->IGA1
• SUA Versus Multi-NAT
SUA (Single User Account), if you get only one public IP address from your ISP, then you should use SUA.
With SUA, PCs on ZyWALL's LAN side can access Internet without further configuration. If you have internal
servers to be accessed by remote users on Internet, you need to go to ADVANCED -> SUA/NAT -> SUA
Server to setup which service, or port numbers, you would like to forward to which Internal server.
Multi-NAT, if you get multiple public IP addresses from your ISP, then you may use Multi-NAT. With
Multi-NAT, you can choose different types of NAT mapping methods to utilize the public IP addresses. You
should define each NAT mapping rules clearly in ADVANCED -> SUA/NAT -> Address Mapping, so that
internal PCs can access Internet and internal servers can be accessed by remote uses on Internet.
28
All contents copyright (c) 2006 ZyXEL Communications Corporation.
ZyWALL 2WG Support Notes
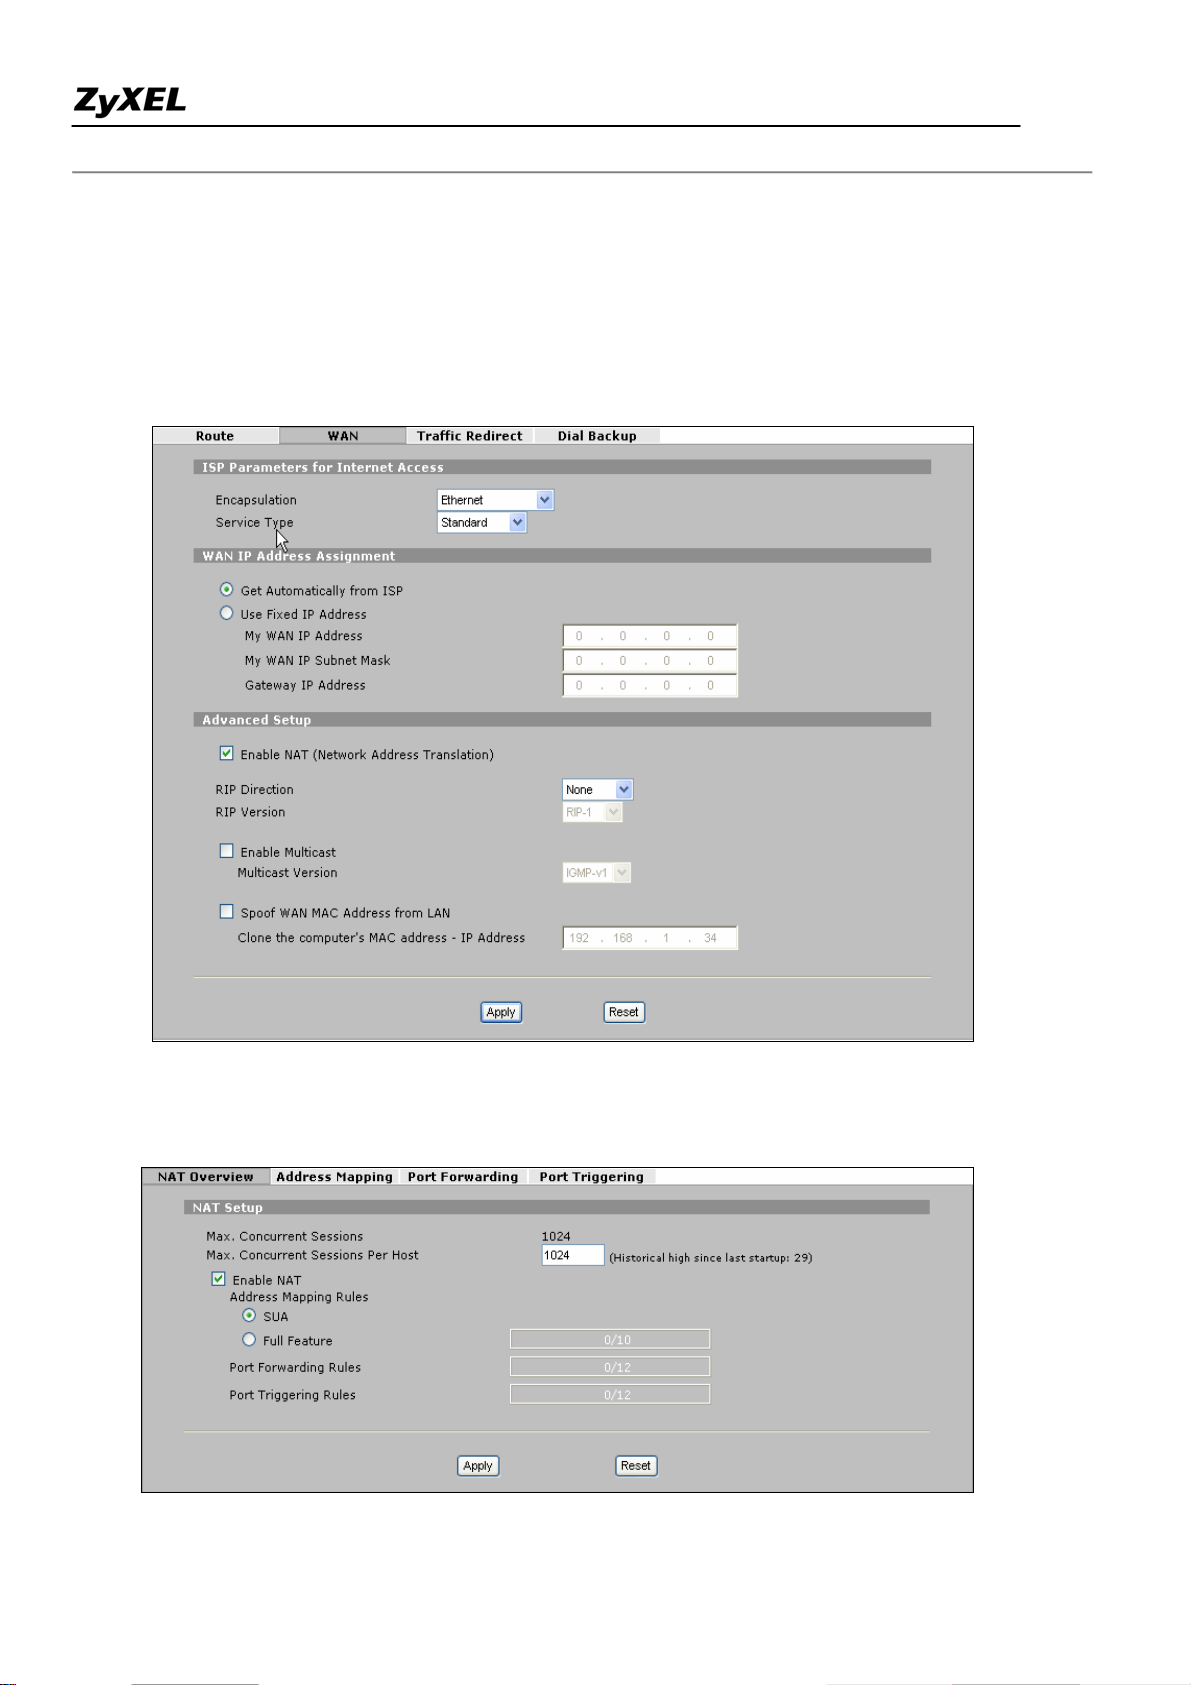
Step 1. Applying NAT in WAN Interface
You can choose the NAT mapping types to either SUA Only or Full Feature in WAN setup.
NETWORK -> WAN
or ADVANCED -> NAT -> NAT Overview
All contents copyright (c) 2006 ZyXEL Communications Corporation.
29
ZyWALL 2WG Support Notes
Key Settings
Field Options Description
Full Feature
Set to 'Full Feature' if there are multiple IP addresses
given by ISP and can assigned to your clients.
Set to 'Routring' if you clients use Internet IP
Network Address Translation
Routing
addresses and thus do not need NAT function.
Set this field to 'SUA Only' if you want all clients
SUA Only
share one IP to Internet.
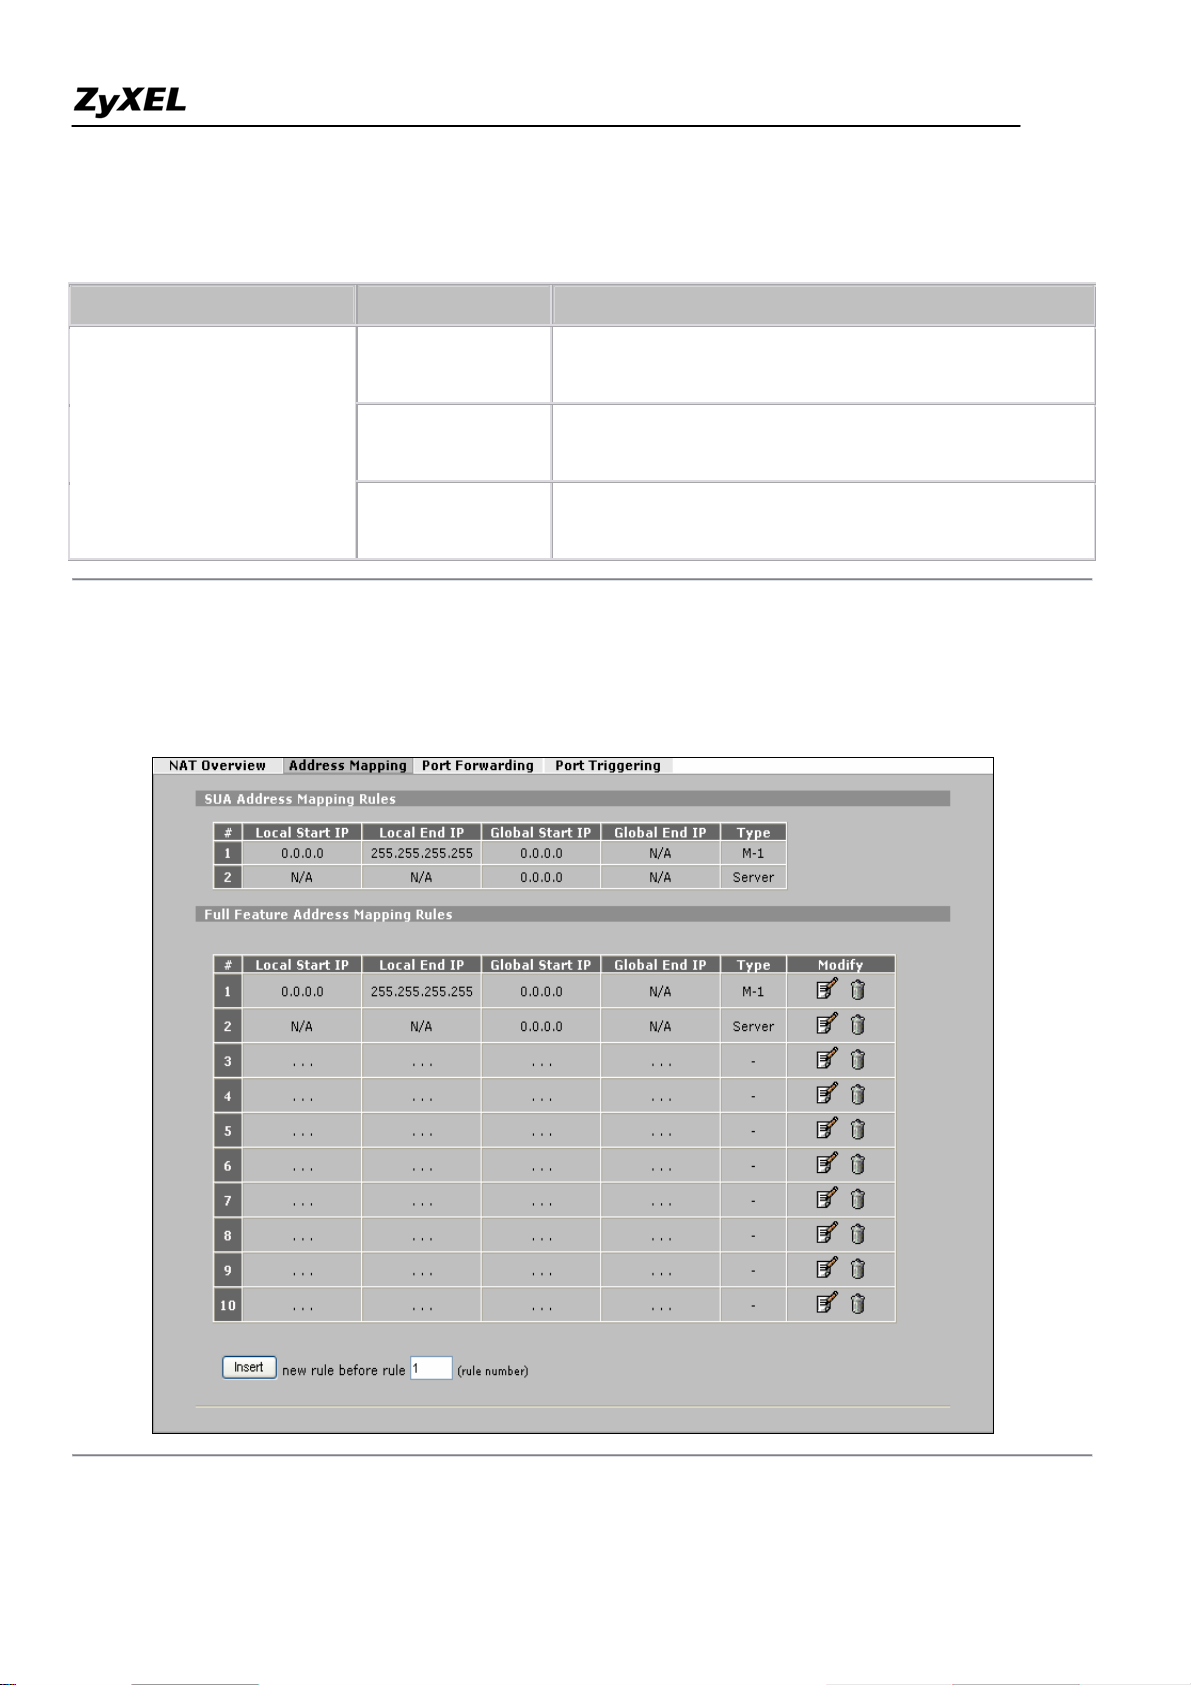
Step 2. Configuring NAT Address Mapping
To configure NAT, go to ADVANCED -> NAT -> Address Mapping
All contents copyright (c) 2006 ZyXEL Communications Corporation.
30
 Loading...