

Page 1

NSA-2400
Network Storage Appliance
Quick Start Guide
Version 1.00
6/2006
Edition 1
Page 2
NSA-2400 Quick Start Guide
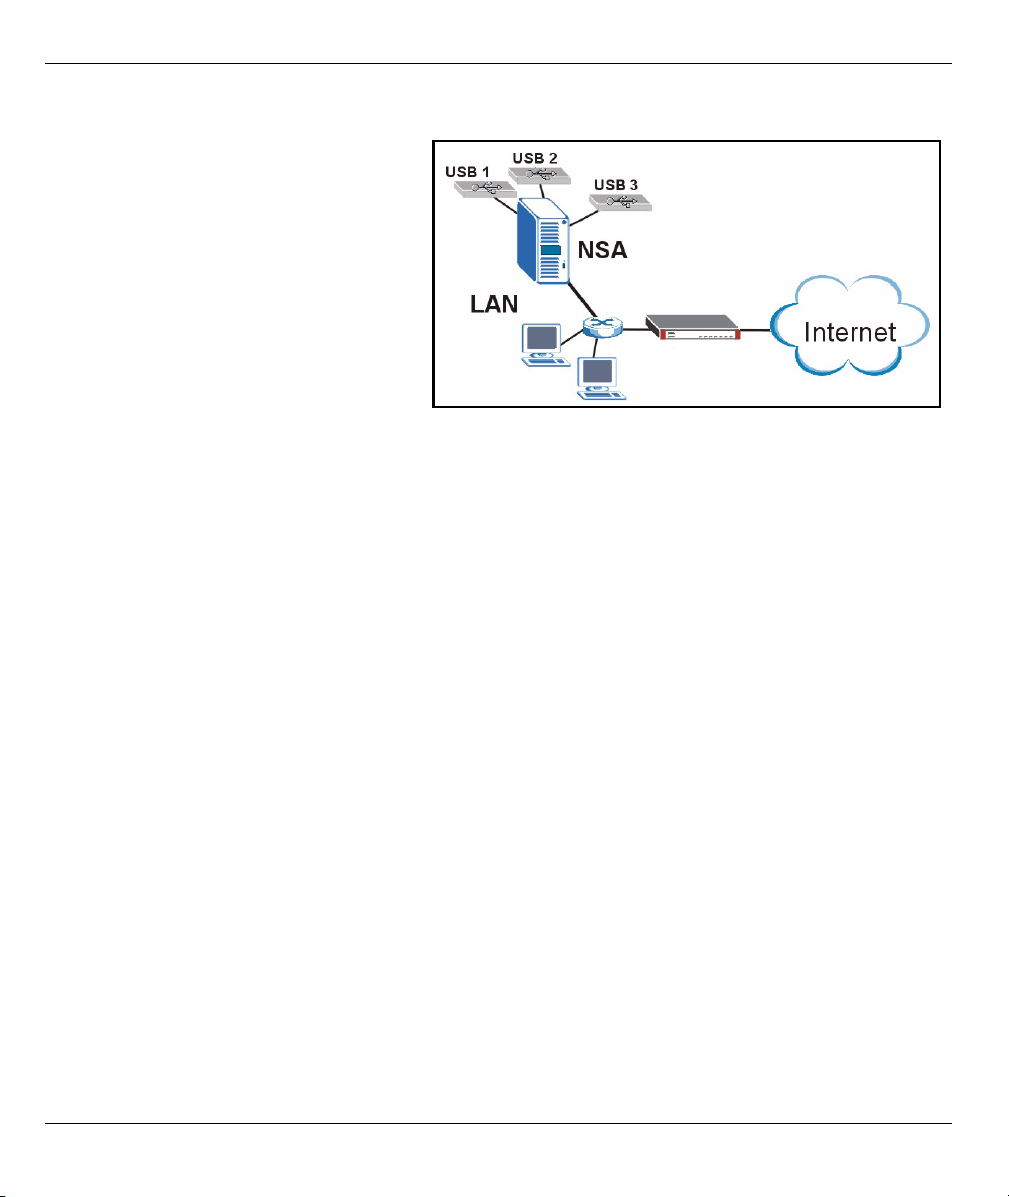
Overview
The NSA-2400 (the NSA) is a network storage
device for file sharing, data backup and data
protection in small (home) offices and/or
medium-sized offices.
This guide shows you how to:
1 Install hard drives
2 Make NSA Connections
3 Access the NSA using NDU (NSA
Discovery Utility) or your web browser
4 Set up the NSA using the wizard
5 Map the NSA to a network drive from any
computer
Note: See the User’s Guide for more details and specifications on the NSA.
Requirements
You need the following before you start:
•NSA
• Included CD containing the NDU (NSA Discovery Utility) and Genie Backup Manager
• Power cord and power supply (external)
• 8-wire Ethernet cable for Gigabit Ethernet
• Up to four SATA-1 (Serial Advanced Technology Attachment) compatible hard disk(s) with 15-pin SATA power
connectors
• Screwdriver to install the hard disks in the disk trays
• USB cable (optional: you only need this if you want to expand storage capacity by connecting compatible USB
drives (version 2))
• Computer with Network Interface Card (NIC) and TCP/IP installed
• Network access device such as a switch or hub.
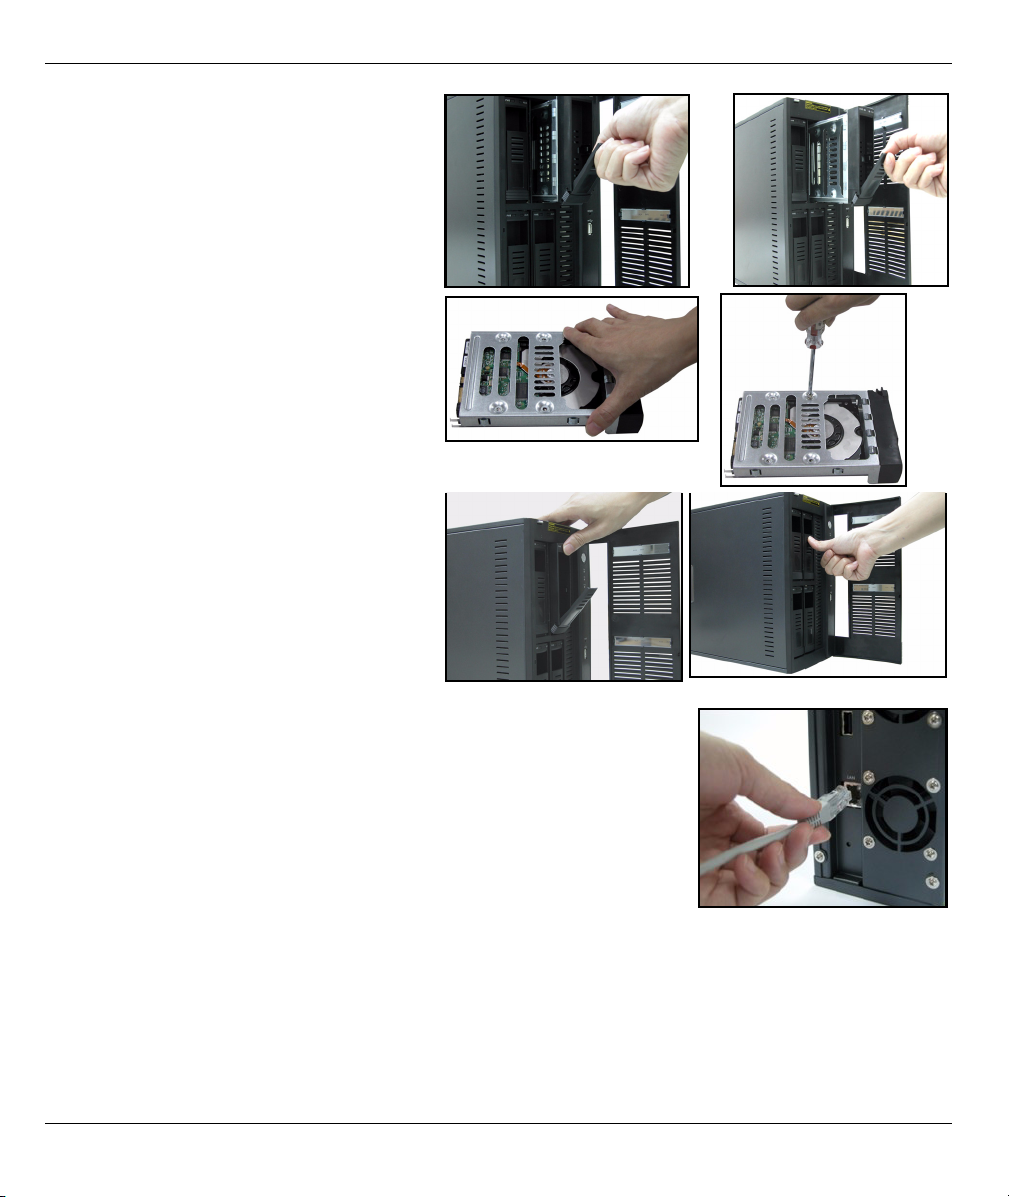
1 Install Hard Drives
Note: Hard drives are NOT hot swappable. The NSA must be turned off before you remove or install
hard drive(s).
1 Pull the tab on the left of the front door of the NSA to open it.
2
Page 3
NSA-2400 Quick Start Guide
2 Pull out the latch and grip the sides of the
tray to remove disk tray 1. Be careful not
to break the latch. Disk bay 1 is labelled on
your NSA (the top-left bay).
3 Place the disk tray on a flat surface with
the panel facing up. Place a hard disk with
the screw holes facing up on the same
surface and slide it into the disk tray.
Secure it with the screws as shown.
4 Push the top of the tray back into NSA disk
bay 1 until it snaps into place and push the
latch up as shown.
5 Repeat steps 1 to 3 for other hard drives
that you may have.
2 Make the NSA Connections
1 Connect the Ethernet port on the rear of the NSA to a hub, switch, or
router on your network using an Ethernet cable. Use an 8-wire Ethernet
cable for Gigabit connections.
3
Page 4
NSA-2400 Quick Start Guide
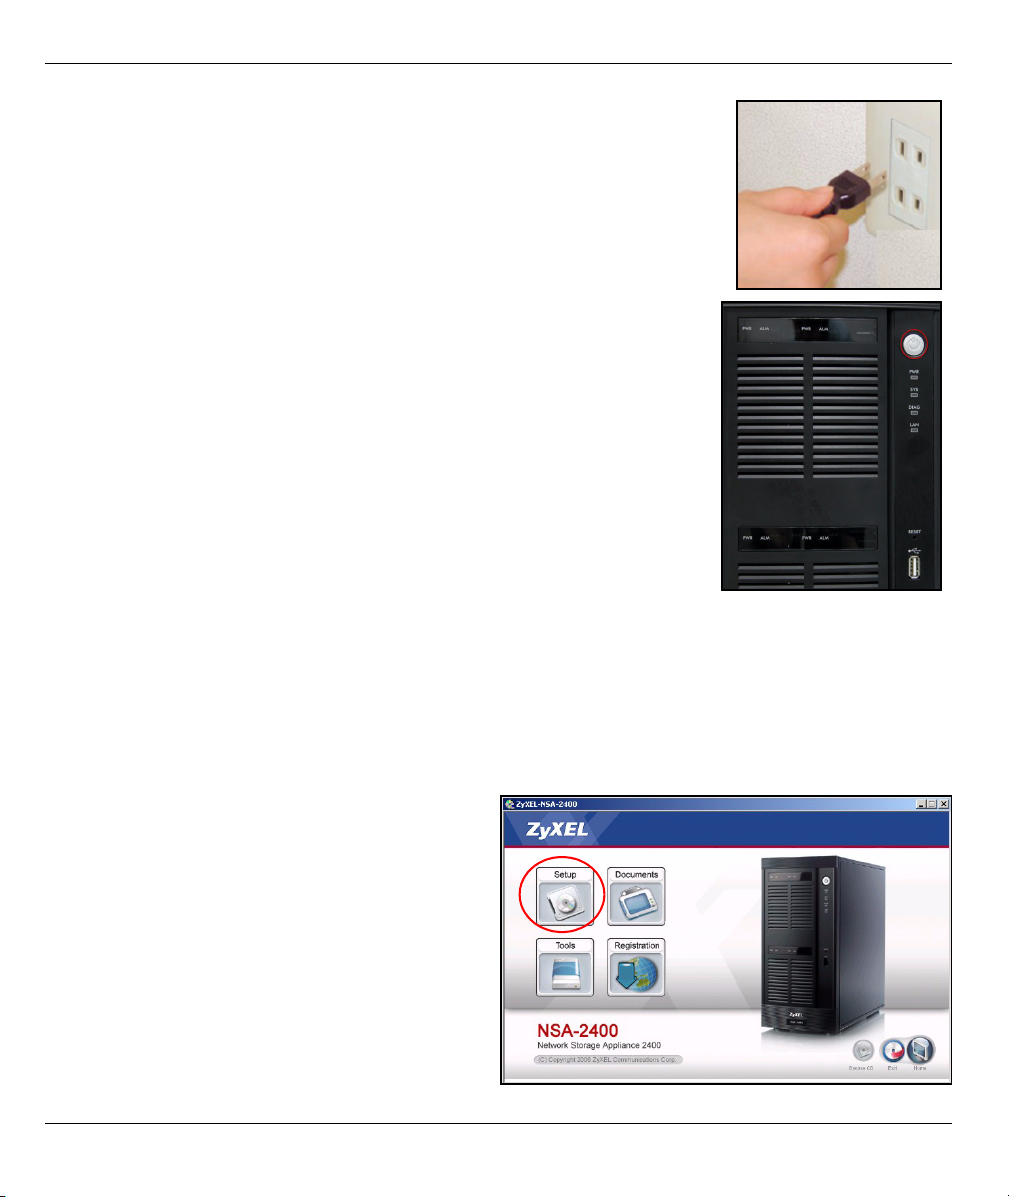
2 Connect one end of the power cord to the power socket on the rear of the
NSA and the other end to the external power supply. Connect the external
power supply to a power outlet.
3 Turn on the power by pressing in the power button on the front of the NSA.
Look at the front panel lights. The PWR light turns steady green. The SYS
light turns steady green after the NSA has booted successfully (it takes
about 50 seconds). The LAN light turns on if the NSA Ethernet port is
properly connected to your network. It blinks while transmitting or receiving
traffic.
Note: To turn off the NSA, press the power button in once only. The SYS
light blinks red indicating the NSA is shutting down.
3 Access the NSA
You can access the NSA in one of two ways: using the NDU (NSA Discovery
Utility) or directly entering the NSA IP address into your web browser.
3.1 Use the NDU to Discover the NSA IP Address
Use the NDU (NSA Discovery Utility) on a Windows computer if your network has a DHCP server that will
assign the NSA an IP address and/or if you have many NSAs in your network.
Note: The Genie Backup program uses the same network port as the NDU to discover the NSA. To
avoid a port conflict, do not run the Genie Backup at the same time as the NDU.
1 Insert the included CD into your CD-ROM drive.
The next screen should automatically display
(autorun). Click the Setup icon.
4
Page 5
NSA-2400 Quick Start Guide
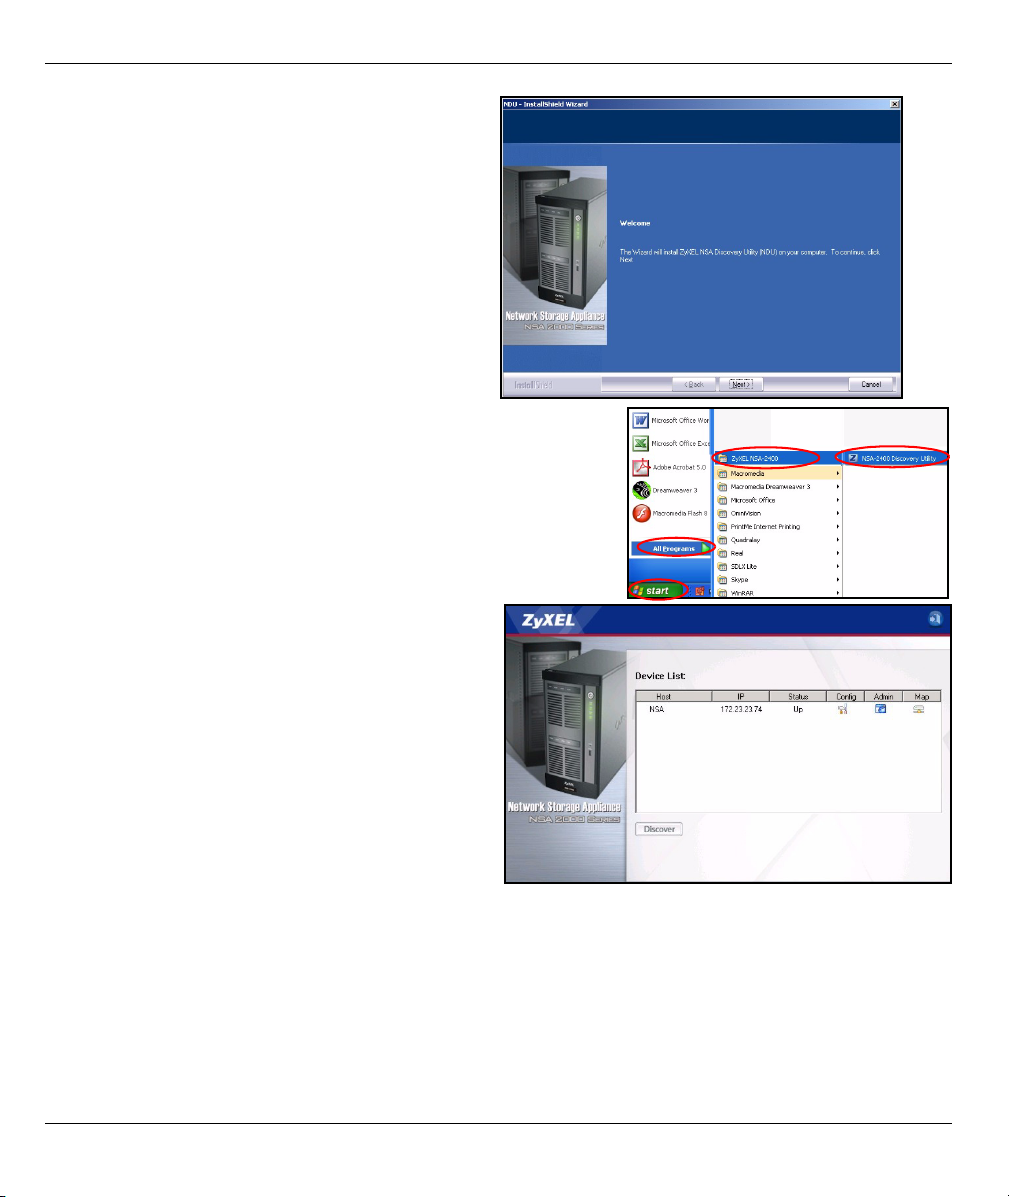
2 The NDU installation wizard begins. Follow the
installer instructions. Click Finish to complete the
installation.
3 In Windows XP, click start, All Programs, ZyXEL
NSA-2400, ZyXEL NSA-2400 Discovery Utility to run the NDU.
For other Windows operating systems, procedures should be
similar. If your computer has more than one network card, then
you will first be prompted to select a network interface card.
4 The NDU main screen appears listing all
hostnames, IP addresses and status of all NSAs
in your network. Click the icon under Admin to
see the main web configurator screen as shown
in Section 4 on page 6. (If you want to change the
NSA IP address, click the icon under Config. If
you want to map the NSA to a Windows network
drive, click the icon under Map (see Section 5 on
page 14). To refresh the screen, click Discover.)
3.2 Direct Access Via Web Browser
If the NSA cannot get an IP address from a DHCP
server, then the default IP address of the NSA
reverts to 192.168.1.3. Before directly entering the NSA IP address into your web browser, you must make
sure that your computer and the NSA are in the same subnet. This section shows you how to set your
Windows NT/2000/XP computer to have an IP address in the same subnet as the NSA. Refer to your User’s
Guide for detailed IP address configuration for other operating systems.
1 In Windows XP, click start, Control Panel. In Windows 2000/NT, click Start, Settings, Control Panel.
2 In Windows XP, click Network Connections. In Windows 2000/NT, click Network and Dial-up
Connections.
5
Page 6

NSA-2400 Quick Start Guide
3 Right-click Local Area Connection and then click Properties.
4 Select Internet Protocol (TCP/IP) (under the General
tab in Win XP) and click Properties.
5 The Internet Protocol TCP/IP Properties screen opens
(the General tab in Windows XP).
6 Select the Use the following IP address and enter an IP
address from 192.168.1.1 to 192.168.1.254 excluding
192.168.1.3 (the NSA) and any other IP addresses in this
range already being used by a device on your network.
7 Click OK to close the Internet Protocol (TCP/IP)
Properties window.
8 Close the Local Area Connection Properties window
and then the Network Connections screen.
9 Launch your web browser and enter “192.168.1.3” as the
web site address.
4 NSA Wizard Setup
1 Access the NSA using the NDU or web configurator directly.
2 When you first access the NSA web configurator, you may see
this screen telling you that this is a secure connection using
HTTPS. Click OK to continue.
6
Page 7

NSA-2400 Quick Start Guide
3 The web browser client uses certificates to
authenticate the NSA. The default NSA certificate
will most likely show a name and certification
authority mis-match; however encryption is still
performed. Click Yes to proceed.
4 When you access the NSA web configurator, the
login screen appears. The default user name and
password are ‘admin’ and ‘1234’ respectively. Click
Login.
5 It is recommended that you change the default
password. You can also enter an e-mail address to
which NSA alerts can be sent here (you must enter
e-mail server information in the wizard or Log Alert
screen). Click Apply to save your changes and go
to the next screen or ignore this screen and click
Skip to go to the next screen.
7
Page 8

NSA-2400 Quick Start Guide
6 The first time you access the NSA web
configurator, you are prompted to run the setup
wizard. Click Run Setup Wizard.
4.1 Setup Wizard
Each time you click Next in the wizard, your settings
are saved to the NSA. Click Back to return to a
previous screen in the wizard.
1 Click Next to begin the
wizard.
2 If you want to change the
network settings of the NSA, click
Modify Network Settings. You can
also do this using the NDU
(recommended). If you change the IP
address, then you will have to use the
new IP address to access the web
configurator again. Click Next to
continue.
8
Page 9

4.1.1 Disk Setup Wizard
3 This screen is the Disk Setup
Wizard (this screen can be
accessed separately from the main
NSA screen). Skip this wizard to
have the NSA use the current or
default volume configuration.
• Choose RAID 1 if you
have two or four disks in
the NSA; half the disk
space is used for data
backup. If you have four
disks, you could choose
RAID 5 where data parity
and striping allow you to
recover data even if one
disk fails. Choose SIN-
GLE if you have just one
disk or have multiple disks
but don’t need disk
backup. Click Next to
continue (without saving
anything yet).
NSA-2400 Quick Start Guide
9
Page 10

NSA-2400 Quick Start Guide
• Disk data is lost if you
reconfigure a volume.
Select the I Under-
stand... checkbox and
then click Apply to save
the Disk Setup Wizard
settings. You now return
to the main installation
wizard.
4.1.2 Return to Main Wizard
4 The next screen allows
you to enable FTP on
the NSA. You can use
FTP and/or Windows
explorer (CIFS) to
transfer files to or from
the NSA. Select Enable
Anonymous FTP
Access to allow any
user to log into the NSA
using an ‘FTP’ user
name or ‘anonmyous’
without giving a
password. If you clear
Enable Anonymous
FTP Access then you
must create a user
account and associated
password. Use that username and password to log into the NSA via FTP.
10
Page 11

5 You must configure e-
mail address(es), an
e-mail server and how
often the NSA should
send alerts in this
screen. An alert is an
event, such as hard
disk failure, that may
require your
immediate attention.
6 Select a time server
and a time zone in this
screen. The NSA
updates its date and
time from the time
server. This time is
used in NSA log and
alert time stamps. The
NSA time and date
must be the same as
the time and date on
the external domain
controller if the NSA is
using one to import
users and groups.
NSA-2400 Quick Start Guide
11
Page 12

7 Add users that may
access the NSA in this
screen. The NSA can
import users from an
external domain
controller or you can
add users on the NSA. If
you have an external
domain controller, select
Join a Domain Server.
To create users on the
NSA, select Create My
Own Local Users.
• Local Users: Click add
to configure each new
local user and then click
Next to mass create
them all on the NSA.
Enter a user name from
one to 32 alpha-numeric
characters; the first character must be alphabetical. See your User Guide
for user name details. If
you return to this screen
later, you will not see the
users you added to the
NSA in the screen but the
users have been added
to the NSA.
NSA-2400 Quick Start Guide
12
Page 13

• Domain: Choose NT4
Domain if your server
uses a Windows NT operating system. Choose
Active Directory
Domain if it uses a Win-
dows 2000 or later operating system. Type the IP
address of the Windows
server domain controller,
the Windows domain
administrator (Adminis-
trator is the default) and
an associated password.
You can use a domain
name if the server uses
an operating system earlier than Windows 2000,
8 Click Finish for the NSA
to complete the
configuration. Restart
the NSA if prompted.
NSA-2400 Quick Start Guide
13
Page 14

NSA-2400 Quick Start Guide
• If you deleted the default volume and didn’t create
another volume, or you don’t have an internal hard
disk installed, you will see the following Maintenance
Mode screen. In Maintenance Mode, you MUST create an internal volume.
Note: You must install at least one hard disk and
create an internal volume before you can use
external USB hard drive(s) with the NSA.
9 The next time you
log into the NSA,
you go directly to
the Status
Overview screen.
You may access
the wizard again
by clicking on the
icon in the topright of the screen
as shown. Access
any of the menus
in the navigation
panel on the left
for more advanced
configuration.
Note: See your
User’s Guide
for more
information on these advanced screens.
5 Map the NSA to Your Computer Network Drive
Mapping a share (a folder where you store data)
on the NSA to a Windows network drive makes it
easy for Windows users to transfer files to and
from the NSA (using CIFS). Click the MAP icon in
the NDU (see Section 3.1 on page 4) to display the
NSA public folder in Windows Explorer.
14
Page 15

NSA-2400 Quick Start Guide
Click Tools, Map Network Drive. Select the network
drive that you want to map NSA to from the Drive list
box and browse to the share on the NSA (Public is the
only one available if you have not created shares on
the NSA yet). You can then simply drag files from/to
your local computer’s drives to or from this network
folder.
Alternatively (from
another computer
that does not have
NDU installed for
example), open
Windows Explorer
and type two back slashes followed by the NSA system name or IP address.
15
Page 16

NSA-2400 Quick Start Guide
6 Troubleshooting
PROBLEM CORRECTIVE ACTION
None of the LEDs turn on when
you connect the power.
Cannot access the NSA from
my computer.
Make sure that the NSA is turned on.
Check that there are no loose cable connections, that there are no faulty cables
and that Ethernet cable connections do not exceed 100m.
Make sure that you have the power cord connected to an active power source.
If the LEDs still do not turn on, you may have a hardware problem. In this case,
you should contact your local vendor.
Check the Ethernet cable connection from your network to the NSA.
If the NSA’s IP address has changed, then enter the new one as the website
address.
Make sure your computer’s IP address is in the same subnet as the NSA’s IP
address (see section Section 3.2 on page 5).
Ping the NSA from your computer. Make sure your computer’s Ethernet adapter
is installed and functioning properly. In a (Windows) computer, click Start, (All)
Programs, Accessories and then Command Prompt. In the Command
Prompt window, type “ping” followed by the NSA’s IP address (192.168.1.3 is
the default) and then press [ENTER].
Use Internet Explorer 6.0 (and later) or Firefox 1.07 (and later) with JavaScript
enabled.
Make sure you enter the user name and password correctly (these fields are
case sensitive).
Viewing Your Product’s Certifications
1 Go to www.zyxel.com.
2 Select your product from the drop-down list box on the ZyXEL home page to go to that product's page.
3 Select the certification you wish to view from this page.
16
 Loading...