

NSA210
1-Bay Digital Media Server
Firmware v3.20
Edition 2, 7/2009
DEFAULT LOGIN DETAILS
Web Address: nsa210
Username: admin
Password: 1234
CONTENTS
ENGLISH 3
DEUTSCH 17
ESPAÑOL 31
FRANÇAIS 45
ITALIANO 59
NEDERLANDS 75
SVENSKA 89
繁體中文
ČESKY 117
POLSKI 131
SLOVENSKY 145
LEGAL 159
www.zyxel.com
103
Copyright 2009
ZyXEL Communications Corporation
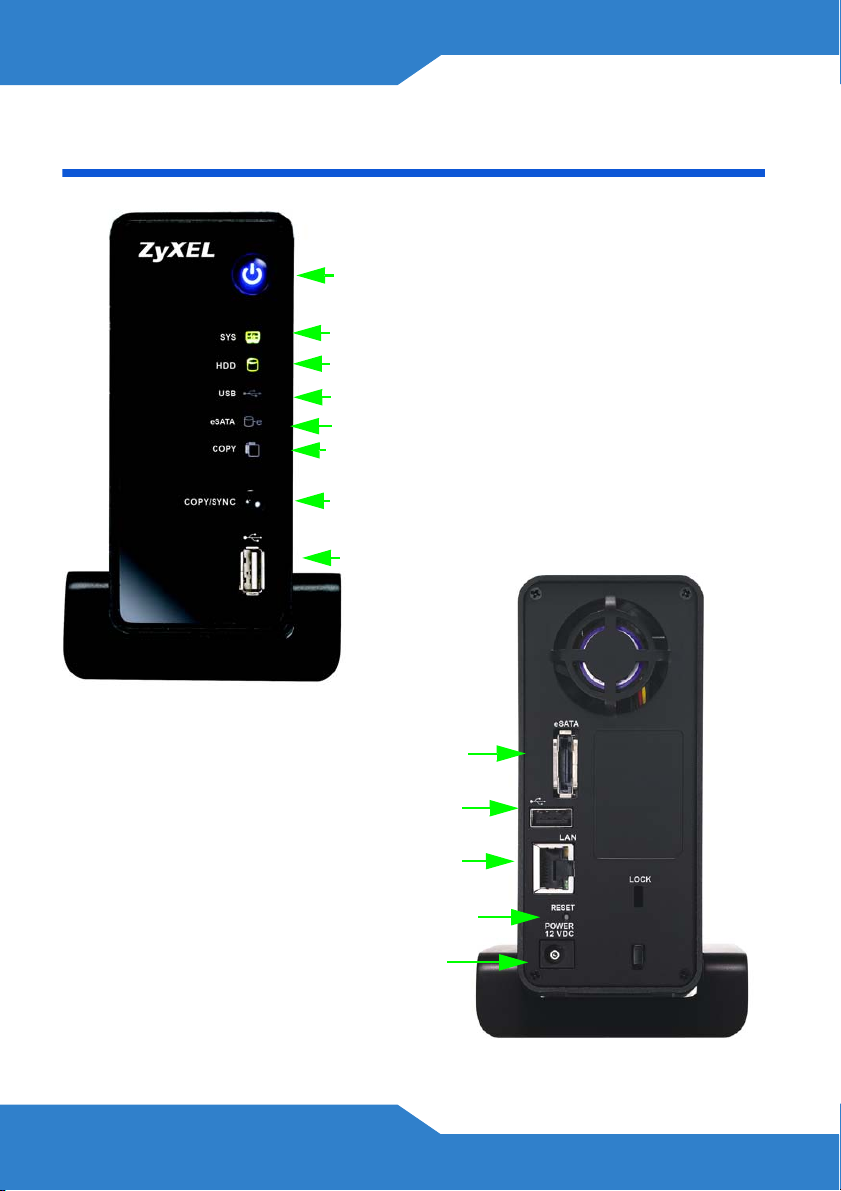
Device Panels
On / Off
SYS LED
HDD LED
USB LED
eSATA LED
COPY LED
COPY/SYNC button
USB Port
eSATA Port
USB Port
LAN Port
RESET
Power
2
ENGLISH
ENGLISH
Introduction
The NSA210 lets you share files and back up data on your home
network. You can also play video, music, and show photo files stored on
the NSA210 using a media client such as the DMA-2500.
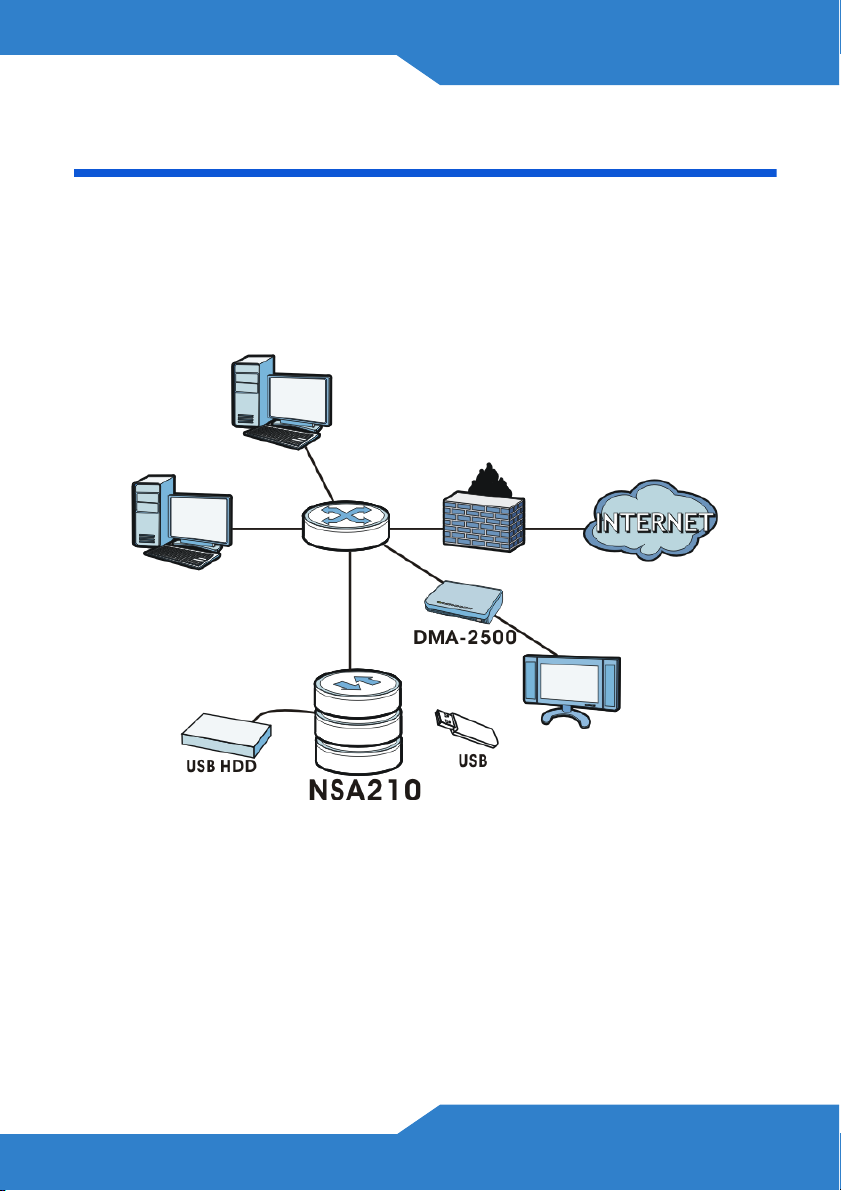
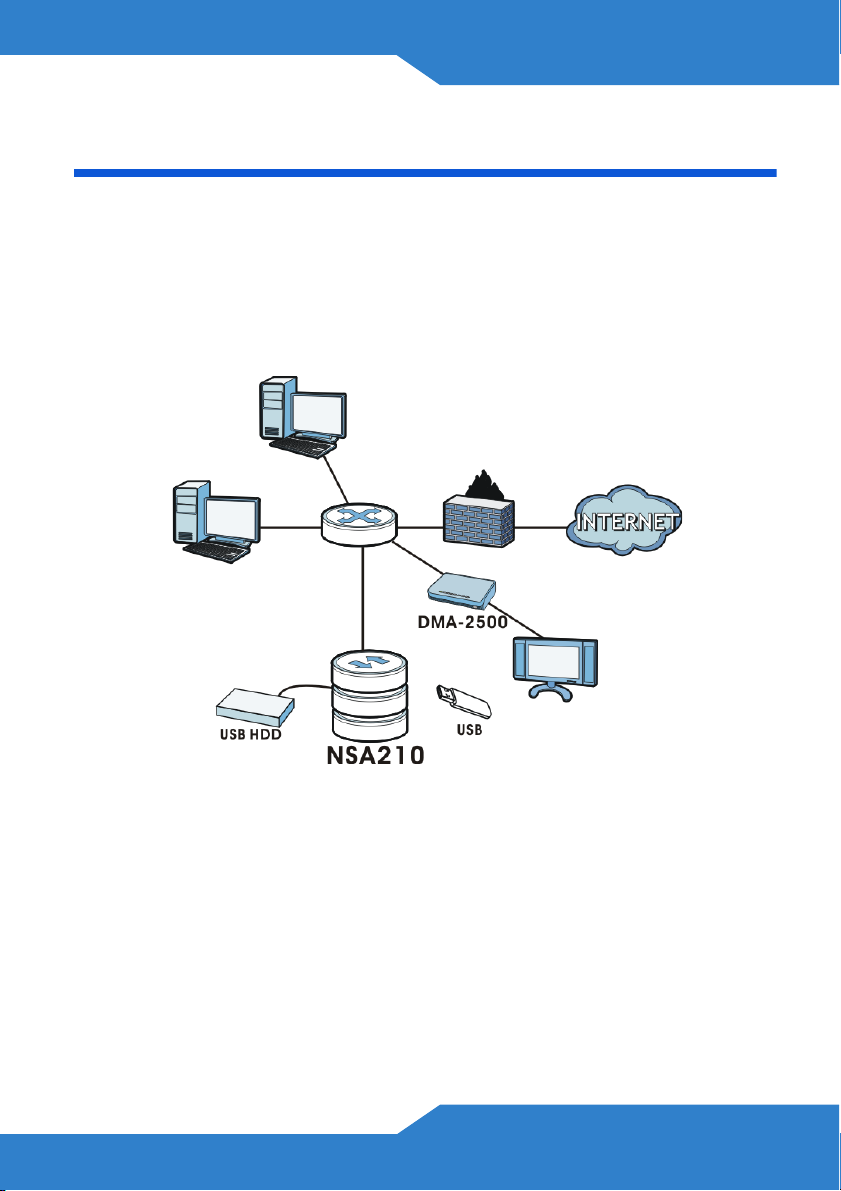
How It Works
Above is the NSA210 in a home network. Users back up and share data
on the NSA210. The DMA-2500 plays the NSA210’s media files on the
TV. A USB hard drive provides extra storage space and files are copied
directly from the USB memory stick to the NSA210.
Place the NSA210 behind a firewall and/or IDP (Intrusion Detection and
Prevention) device to protect it from attacks from the Internet.
See the User’s Guide on the included CD for details on configuring all of
the NSA210’s features.
3

This Quick Start Guide shows you how to:
• Install Hard Drive
• Connect the NSA210
• Access the NSA210
• Log into the NSA210
Before You Begin
You need the following before you start:
• NSA210
• Included CD containing the NAS Starter Utility and User’s Guide
• Power adapter
• Included Ethernet cable
• One SATA I or SATA II (3.0 Gbit/s) (Serial Advanced Technology
Attachment) compatible hard disk(s) with 15-pin SATA power
connectors
• eSATA hard disk and cable (optional)
• USB cable (optional: you only need this if you want to expand
storage capacity by connecting USB drives). Make sure that the
USB device use it’s own external power adapter if it has one.
• Computer with an Ethernet port
• Network device such as a switch, router, or hub (optional)
4
ENGLISH
Install Hard Drive
Once you intall a hard drive on the NSA210 and create a volume, all
existing data on the disk will be erased.
The NSA210 must be turned off before you remove or install
hard drive.
Creating a volume formats the hard drive. All data will be lost.
Back up any files on the disk to another location before you
install the disk in the NSA210.
1. Make sure the power and Ethernet cords are disconnected from the
NSA210.
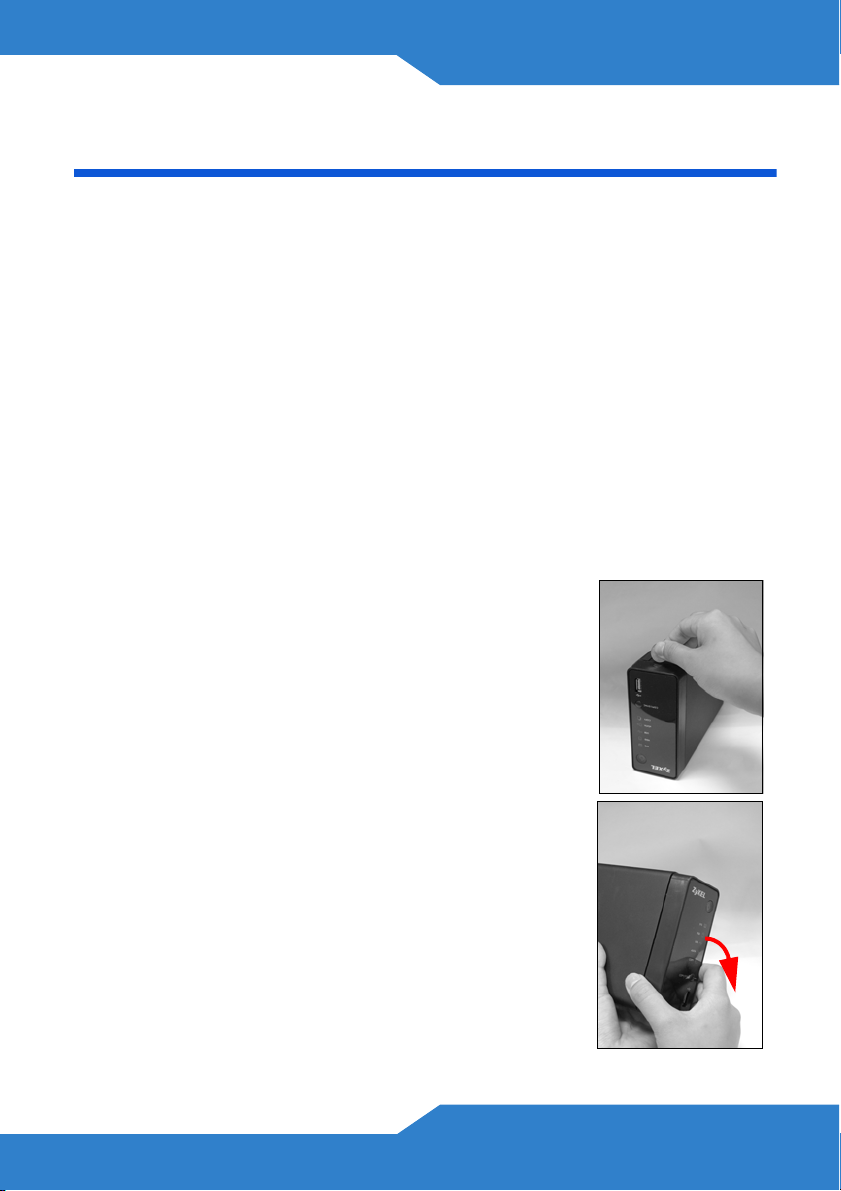
2. Place the NSA210 on a flat surface with the
bottom panel facing up. This exposes the bottom
panel where the thumbscrew is located. Loosen
the thumbscrew using a flat head screwdriver or
a coin.
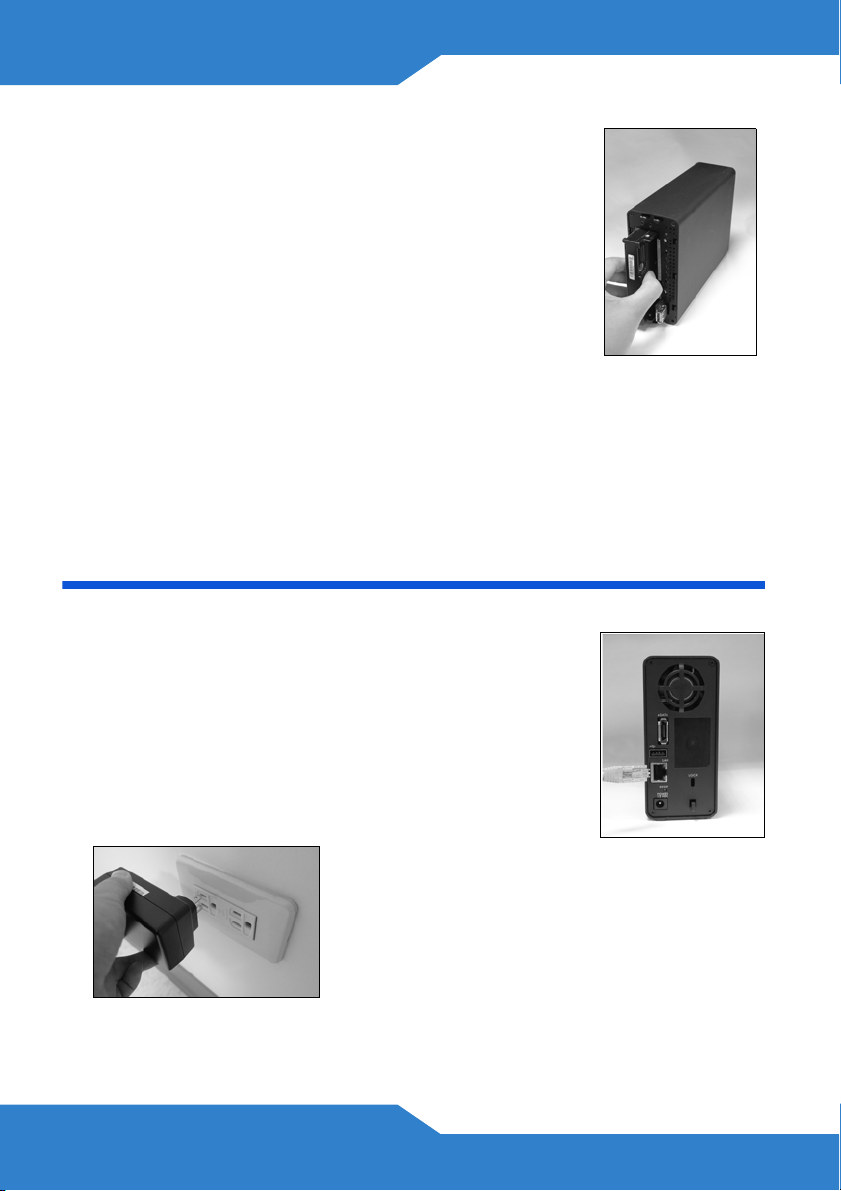
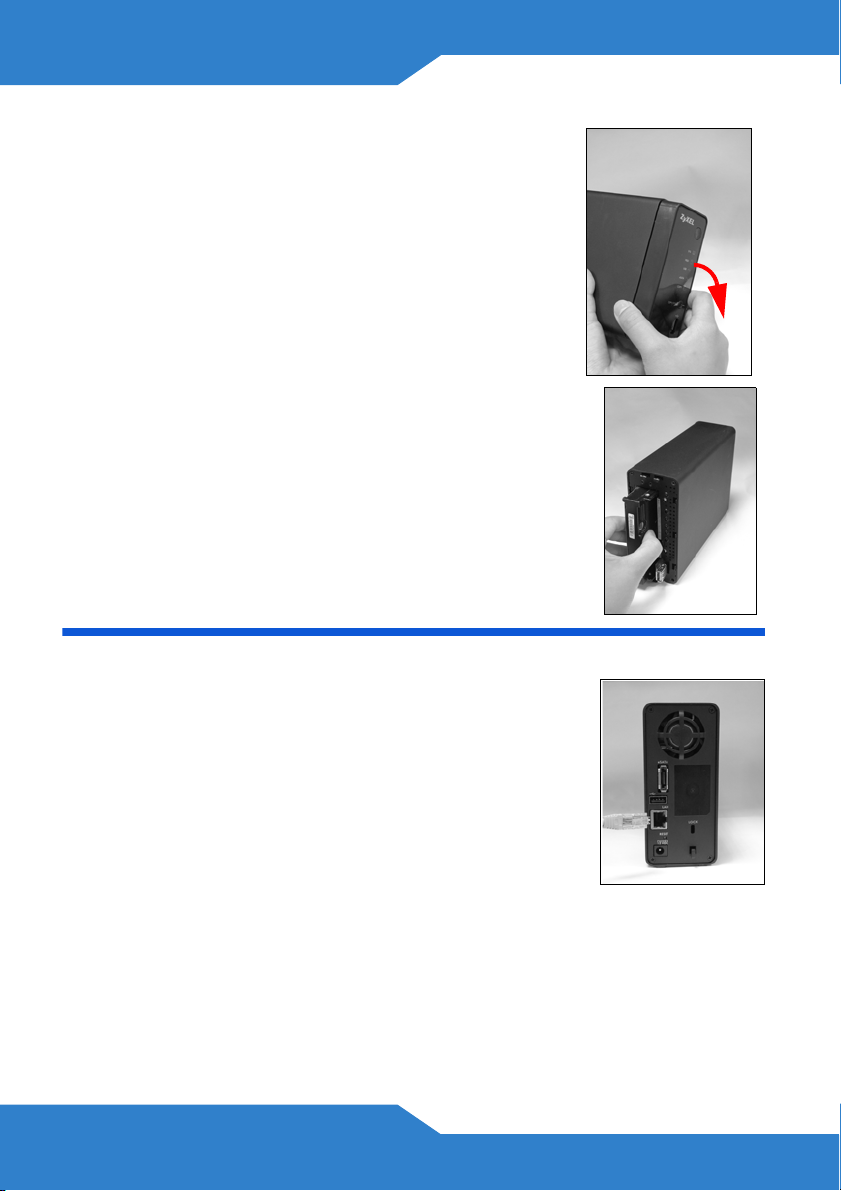
3. Bring the NSA210 to an upright position and take
off the front lid to open the hard disk tray as
shown in the following:
5
4. Slide in the hard disk into the tray until the hard disk
is fitted snugly inside the NSA210.
5. Attach the front panel to cover the hard disk tray.
Place the NSA210 on a flat surface with the bottom
panel facing up and tighten the screw.
If you want to use two hard drives and configure them as RAID volumes,
you should have: 1) a SATA hard disk installed inside the NSA210; and
2) an eSATA hard disk with its cable. It is also recommended to use the
same disk size and model for best performance. Refer to the User’s
Guide for the steps to create volumes on your NSA210.
Connect the NSA210
1. Use the included Ethernet cable to connect the
LAN port on the rear of the NSA210 to a computer,
switch, or router on your network.
2. Connect one end of the power cord to the POWER
socket on the rear of the NSA210 and the other
end to the external power supply. Connect the
external power supply to a power outlet.
Use ONLY the included power adapter.
6
ENGLISH
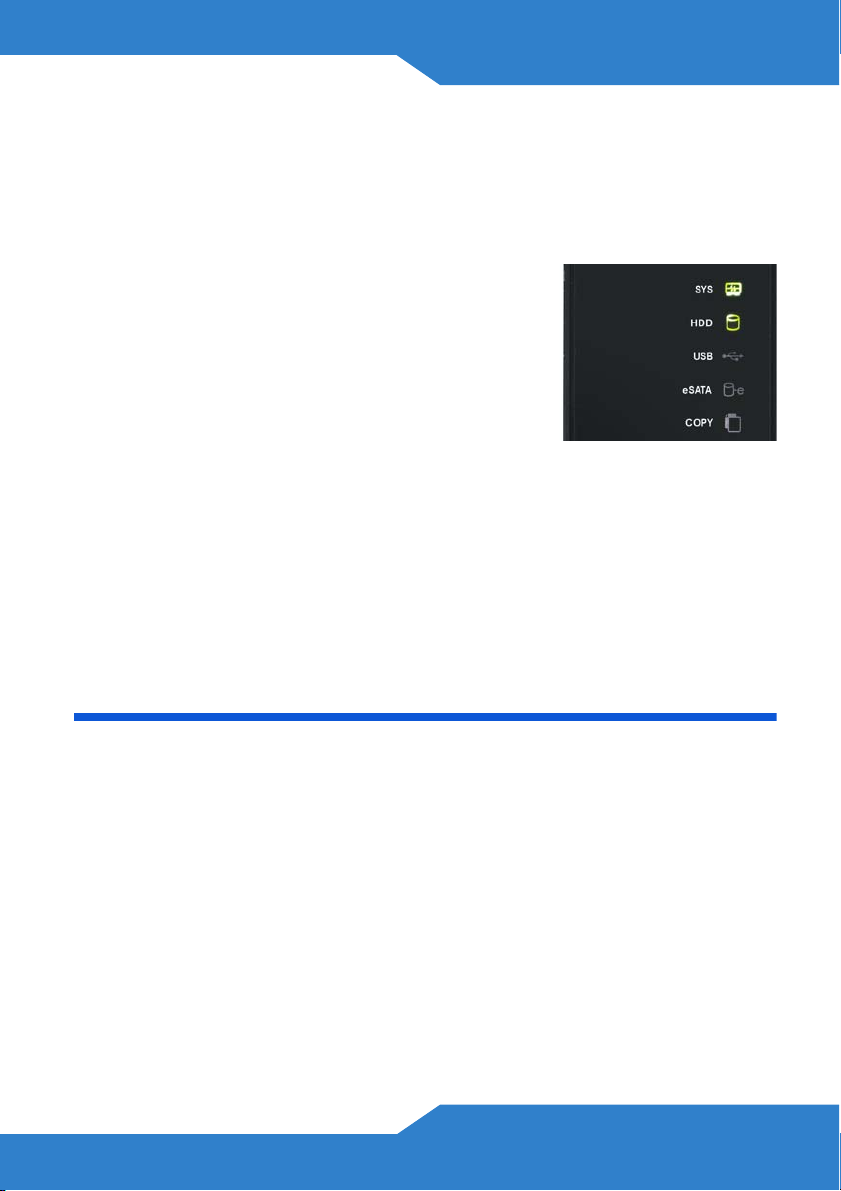
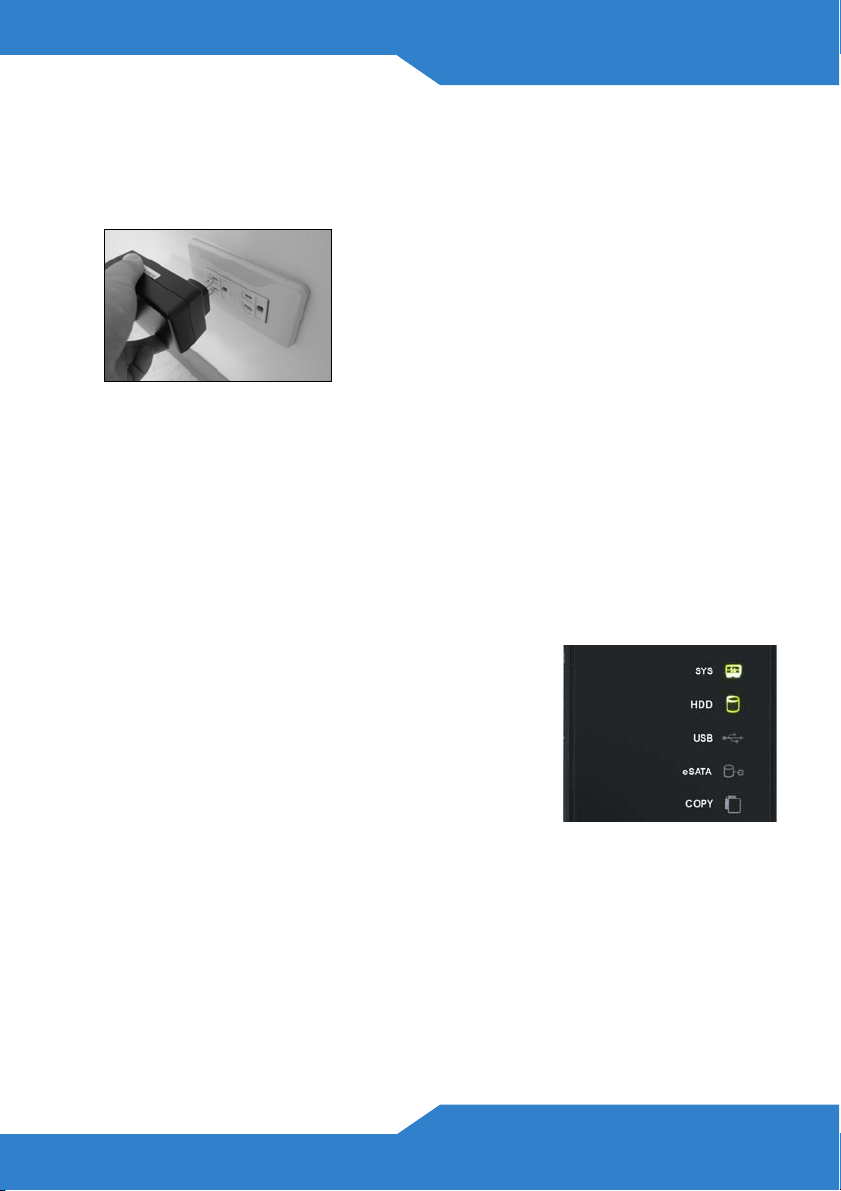
3. Press the power button on the front of the NSA210 to turn it on. Look
at the front panel lights.
If no lights turn on, make sure the power cord is not loose
and that the power source is turned on.
• The power button light turns steady blue.
• The SYS light turns steady green after a
successful startup (it takes about 50
seconds).
• The HDD lights come on if the NSA210
detects hard drives in the disk bays.
• The rear panel LAN port has a light that turns on if the Ethernet port
is properly connected to your network. It blinks while sending or
receiving traffic.
To turn off the NSA210, press the power button in and hold it until you
hear a beep. Then release the button.
Access the NSA210
Use the NAS Starter Utility to access the NSA210. Follow these steps:
1. Insert the included CD into your CD-ROM drive. Click Setup in the
screen that displays. Then click the NAS Starter Utility link.
If this screen does not display, use Windows Explorer (My
Computer) to go to the CD-ROM. Double-click setup.exe.
7
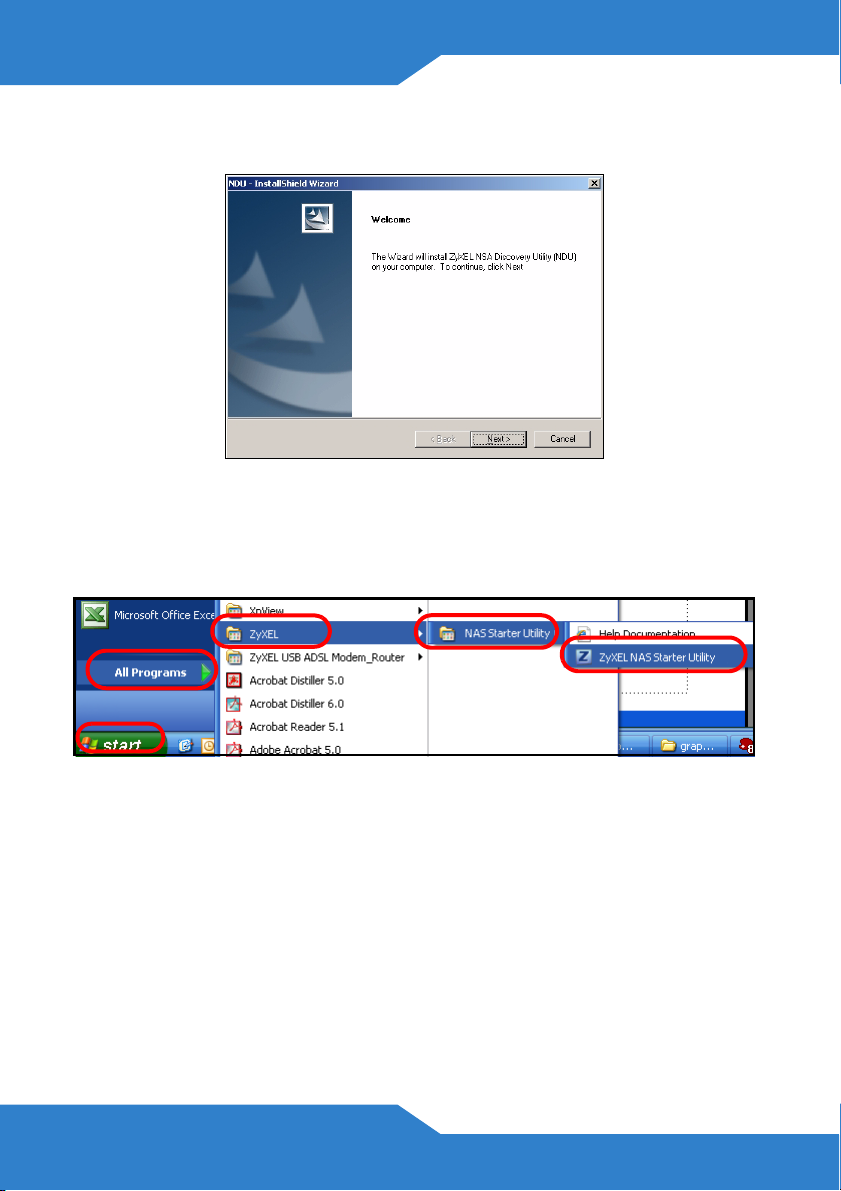
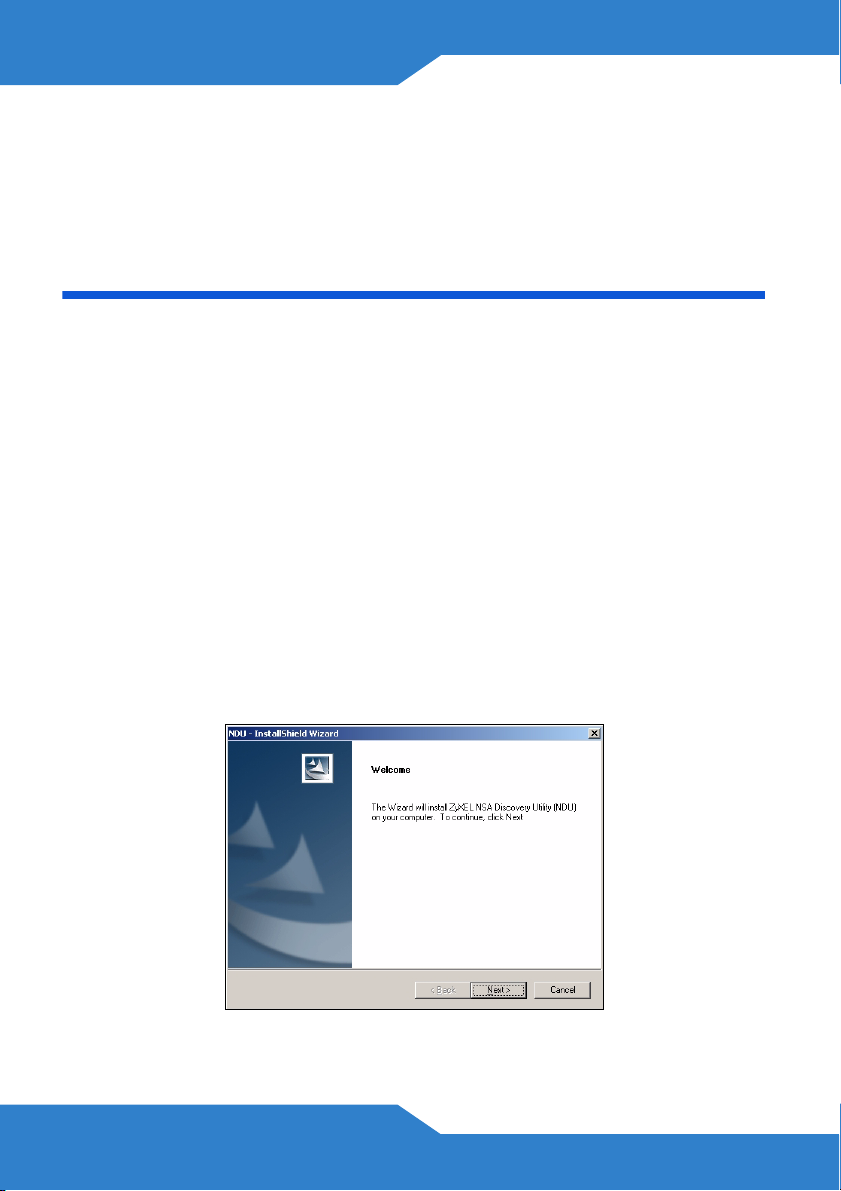
2. The installation wizard begins. Follow the installer instructions. Click
Finish to complete the installation.
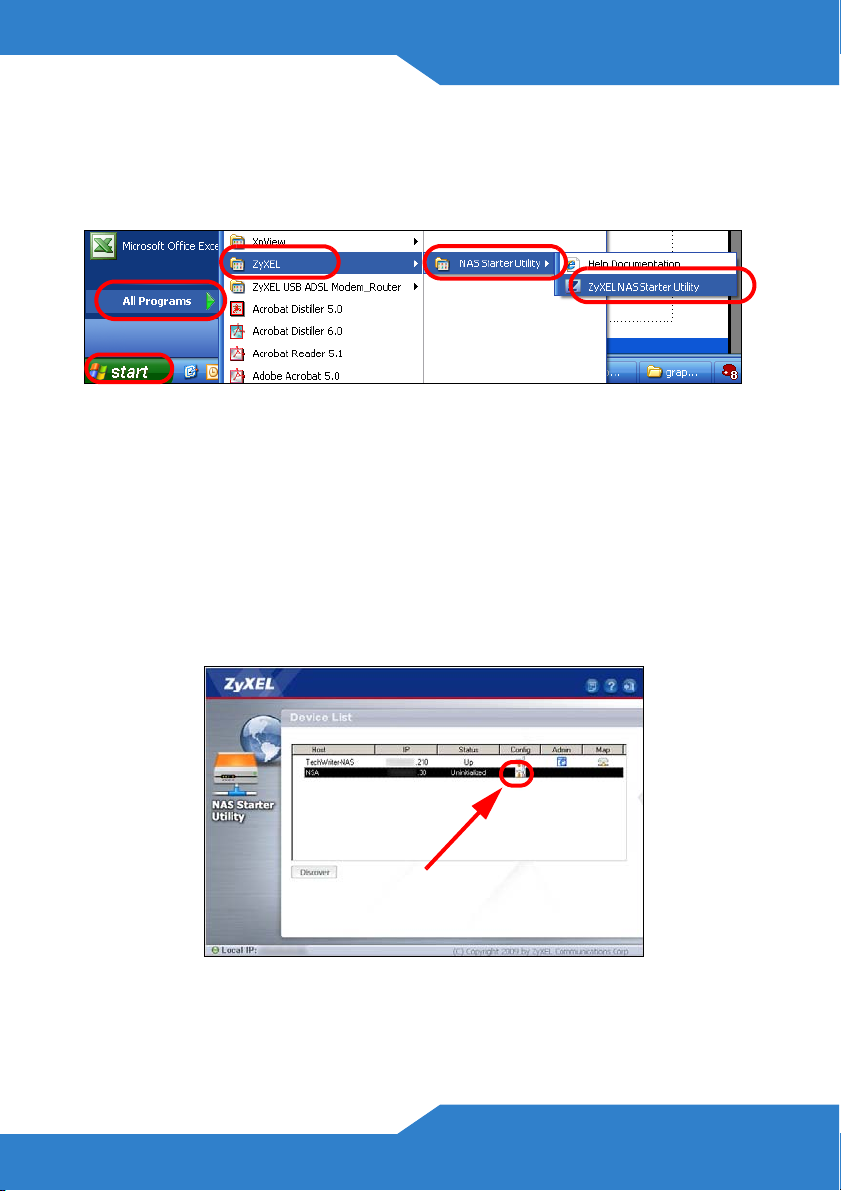
3. In Windows, click Start > All Programs > ZyXEL > NAS Starter
Utility > ZyXEL NAS Starter Utility to run the NAS Starter Utility. If
your computer has more than one network card, then you will be
prompted to select one.
NSA210 Initialization
Make sure you have installed the hard drive before following these steps.
8
ENGLISH
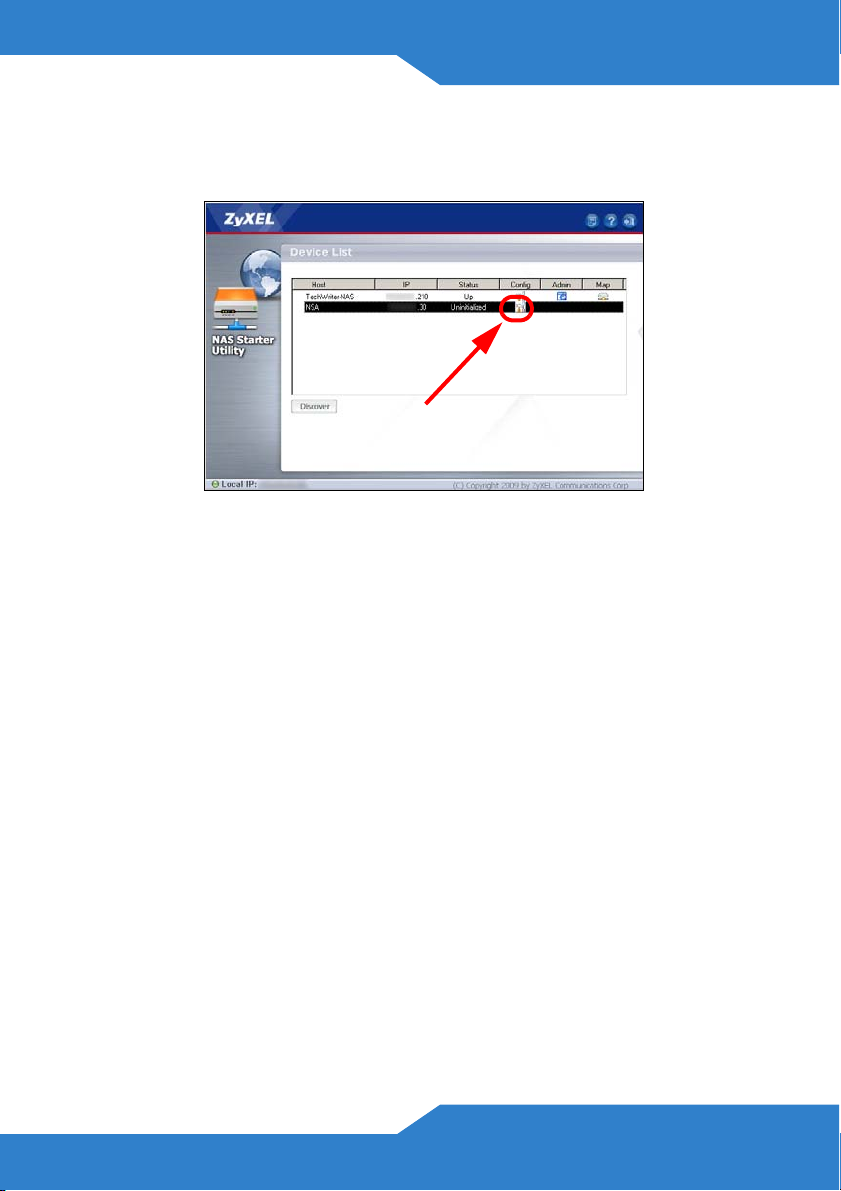
1. In the following screen, check the Status of your NSA210. If it shows
Up, you can start using your NSA210. If it shows Uninitialized, click
the Config icon to start initialization.
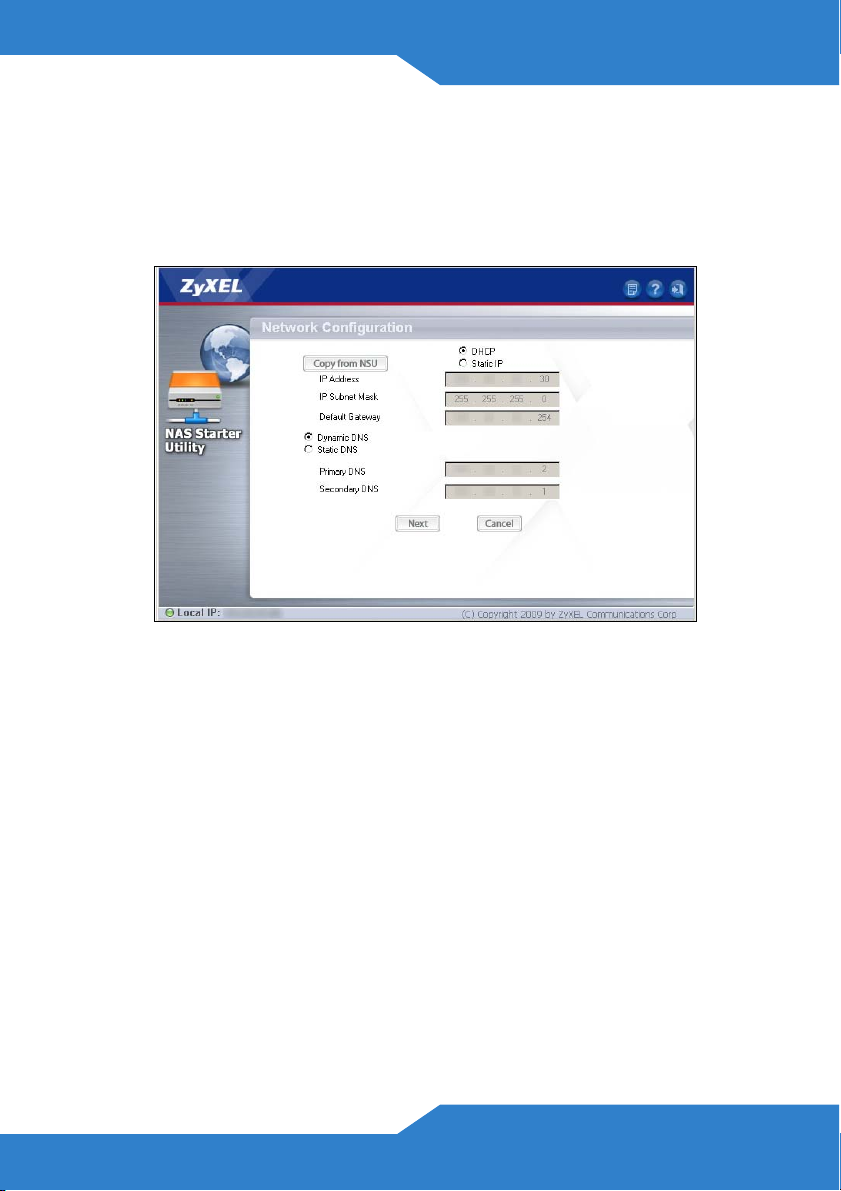
2. Input your settings in the Network Configuration screen.
• Select DHCP if you have a network device (such as a router or
cable modem) that assigns IP addresses to clients. This
automatically selects Dynamic DNS.
• Select Static IP if the clients in your network have specific address
assignments. This automatically selects Static DNS. Enter the
details in corresponding fields (IP Address, IP Subnet Mask,
Gateway Address, Primary DNS and Secondary DNS.) You can
also click Copy from NSU to have the NAS Starter Utility detect
and fill in these values.
9
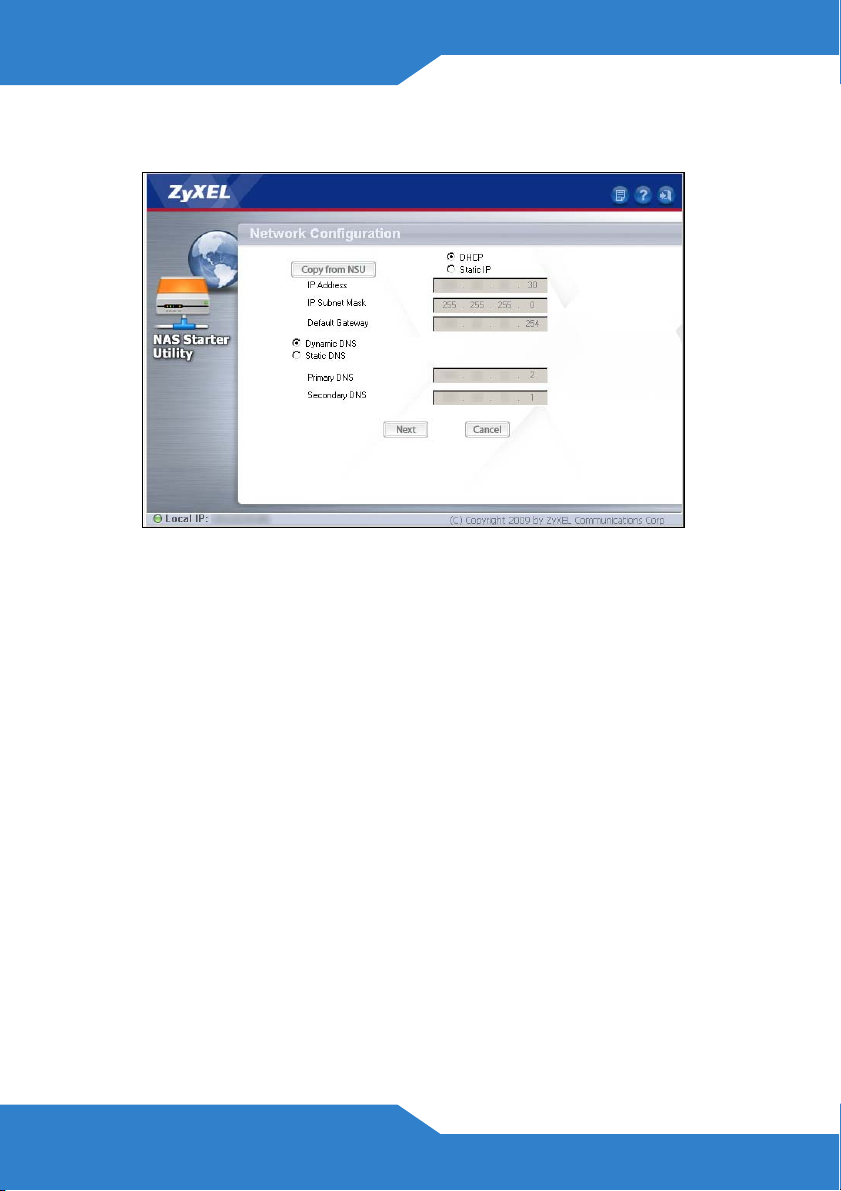
Use the default values if your network administrator did not provide this
information. Click Next.
10
ENGLISH
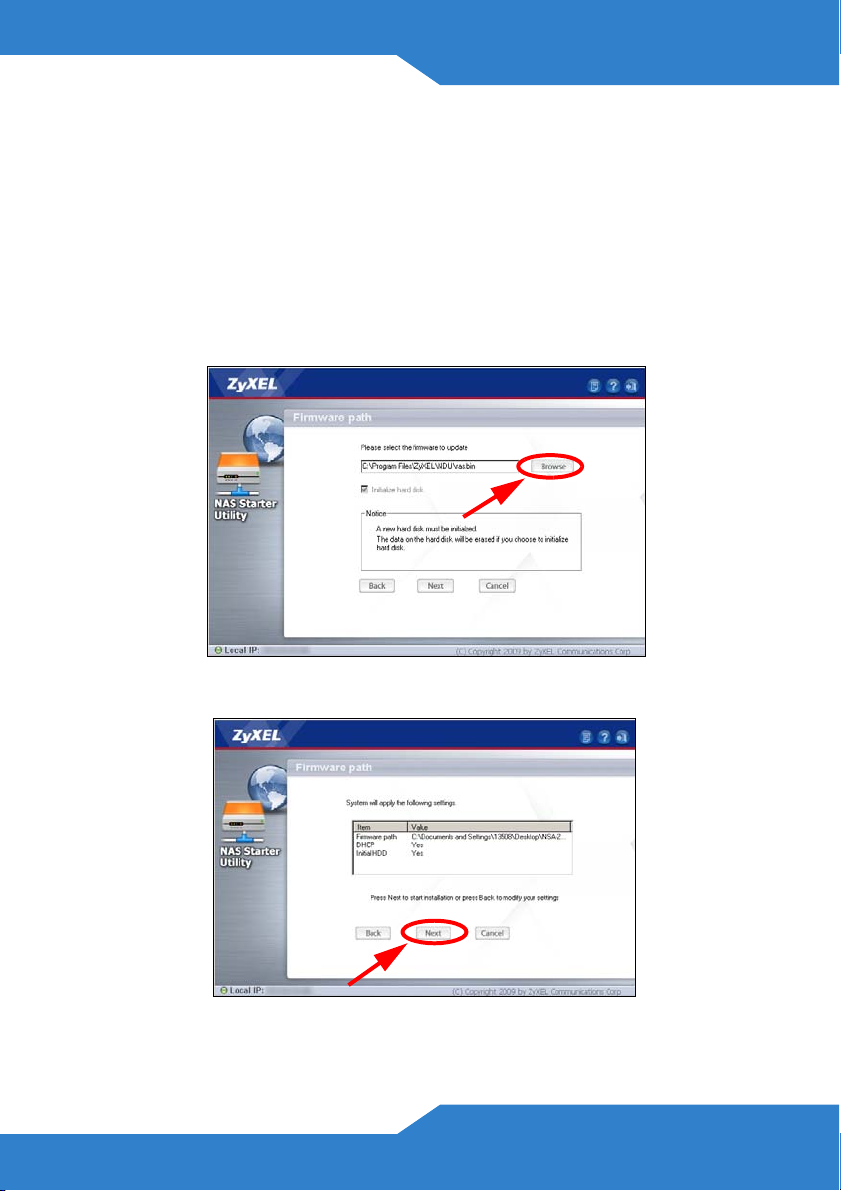
3. Initialize the hard disk and install the firmware. Click Browse and
point to the location of the file provided by your administrator or that
came with the CD-ROM drive.
The Initialize Hard Disk option is selected by default. This reformats
and deletes all data in the hard disk.
All data in the hard disk are lost and cannot be recovered.
Click Next to upload the firmware.
4. Confirm your settings in the following screen and click Next.
11

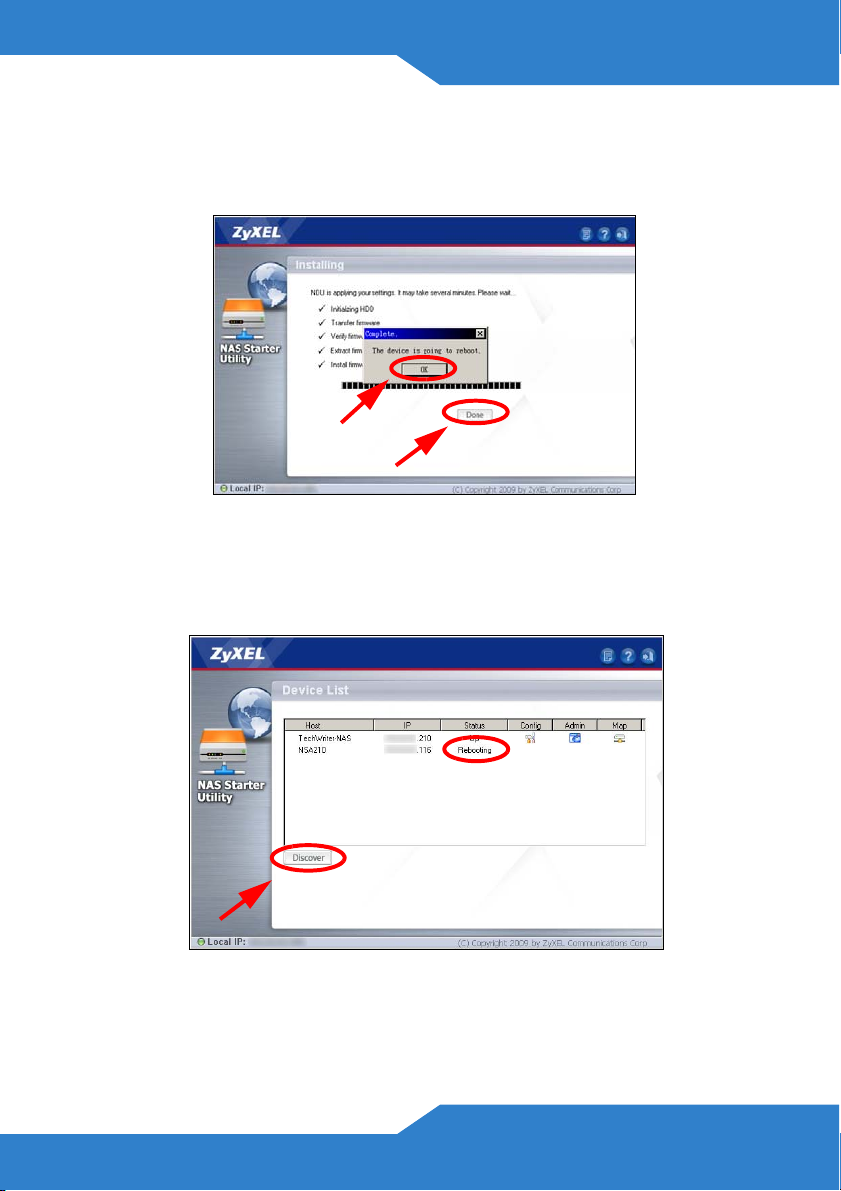
5. The hard disk initialization and firmware installation starts. If the
process is successful, the NSA210 reboots. Click Done.
1
2
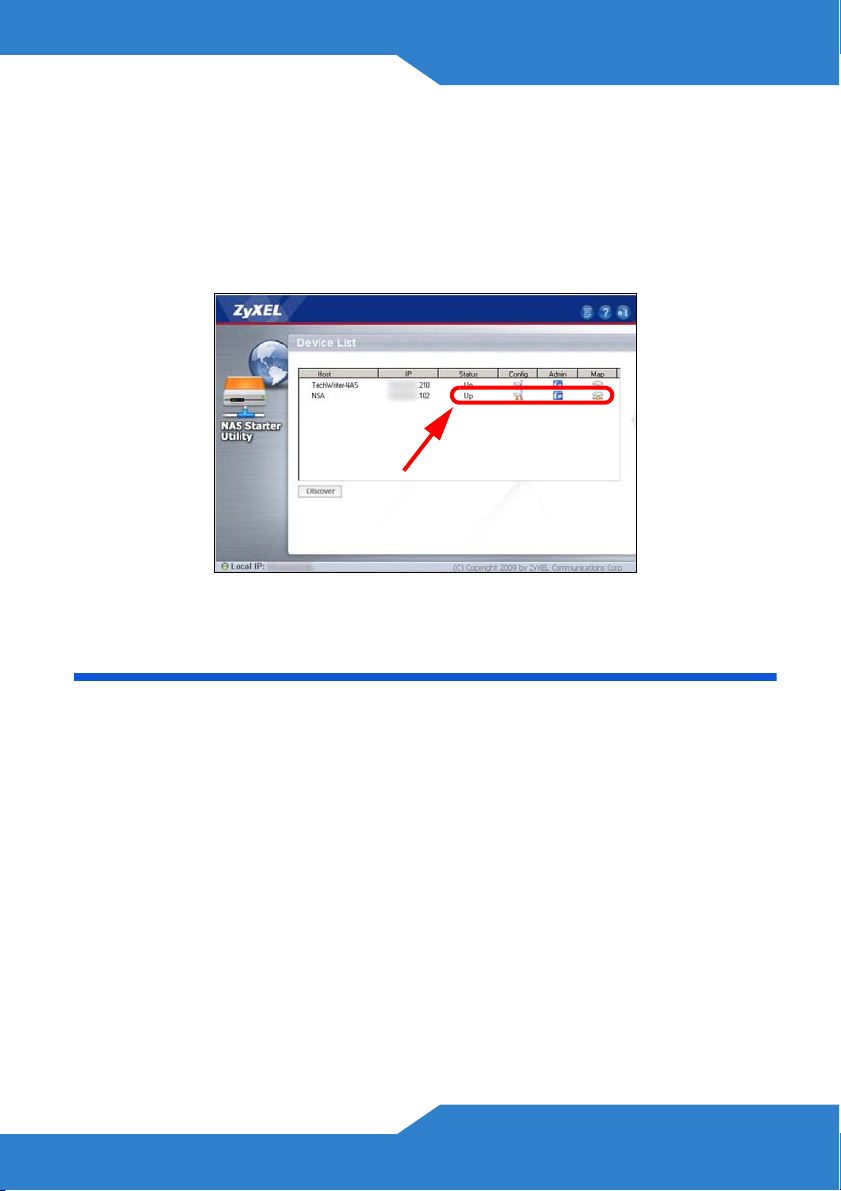
6. The Device List screen shows your NSA210 Status is Rebooting.
Click Discover to refresh the screen until the NSA Status shows Up.
7. You can now use your NSA210 and do the following:
• Click the Admin icon to see the web configurator login screen (see
page 13).
12
ENGLISH
• If you need to change the NSA210 IP address, click the icon under
Config.
• To map the NSA210 to a Windows network drive, click the icon
under Map.
• To refresh the screen, click Discover.
Log into the NSA210
This section shows you how to log into the NSA210 and change the
administrator’s password.
If you cannot get to the login screen, see the troubleshooting
section at the end of this guide.
13
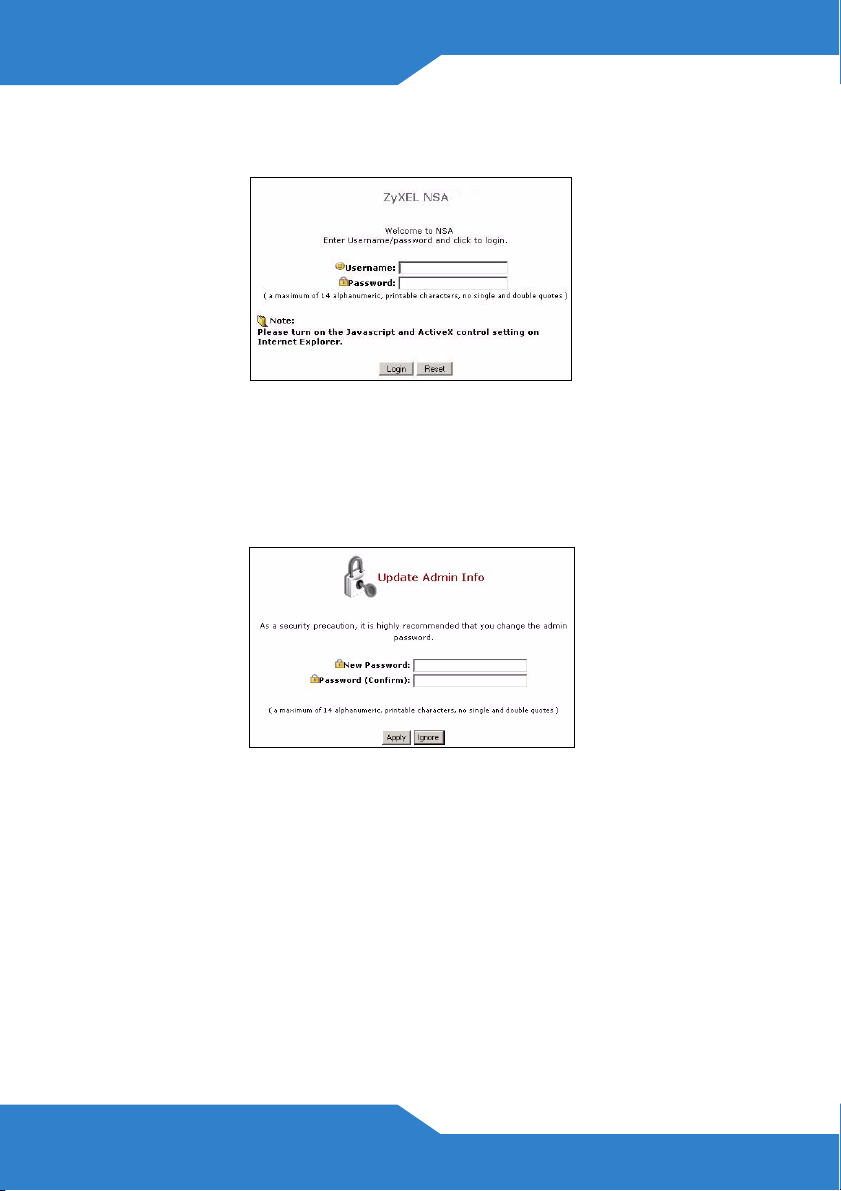
1. Enter the default username ‘admin’ and password ‘1234’ and click
Login.
The username and password are case sensitive. You may
need to make sure you don’t have the caps lock on.
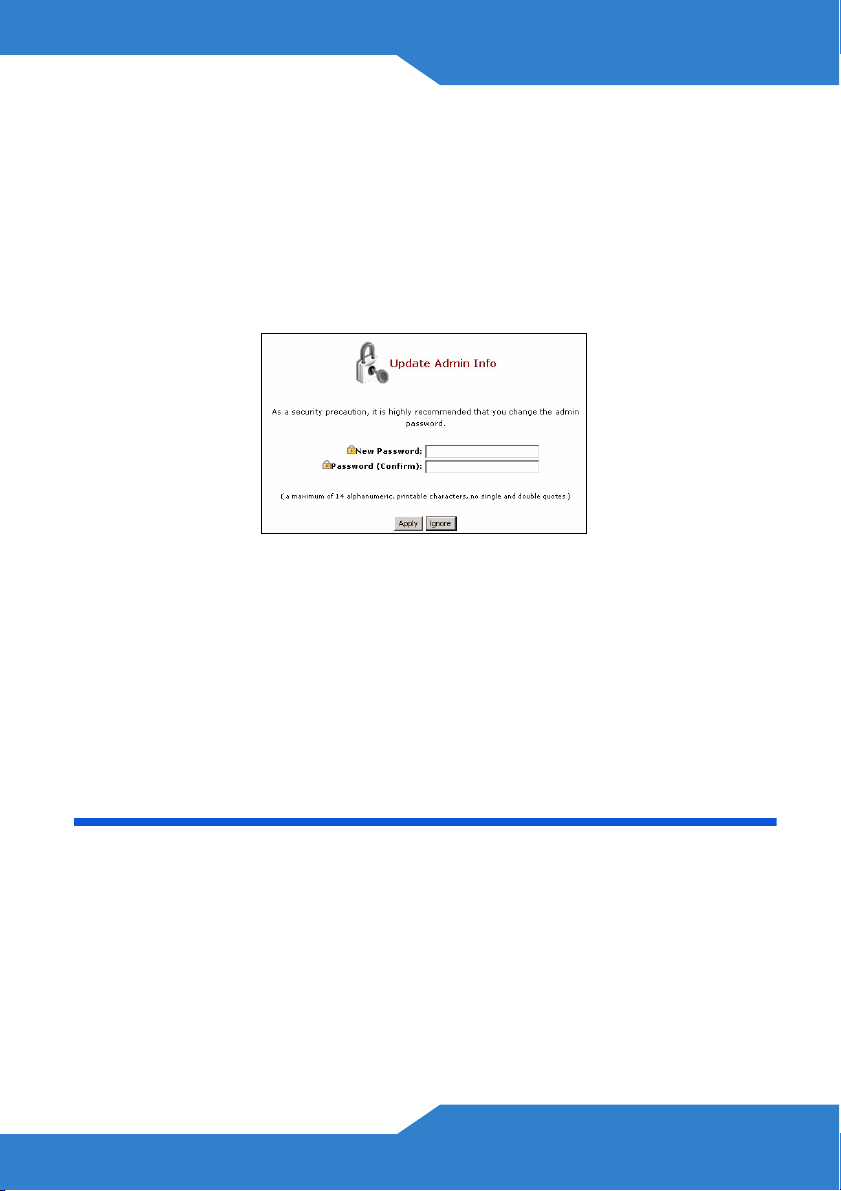
2. It is recommended that you change to a new password (and write it
down). Click Apply to save your changes and go to the next screen.
3. The My NSA screen displays.
Use the Memeo Autobackup software included on the CD to
automatically back up selected files from your computer to the NSA210
whenever you modify the files. Refer to your User's Guide for details on
this.
14

ENGLISH
Troubleshooting
Try the following if you cannot get to the NSA210 login screen.
• Make sure the NSA210 is turned on.
• Check the NSA210’s cable connections. Make sure the NSA210’s
LAN LED (located on the LAN port) is on or flashing.
• Make sure you have initialized your NSA210 using the NAS Starter
Utility.
• If you were trying to login directly by typing the server name (default
nsa210) into your web browsers address field, make sure you have
installed the NAS Starter Utility and that you have typed the server
name correctly. If it still doesn’t work, try running the NAS Starter
Utility steps again.
• Make sure your computer’s IP address is in the same subnet as the
NSA210’s IP address. You can use the NAS Starter Utility to find
the NSA210’s IP address. See the User’s Guide appendix on
setting up your computer’s IP address for how to change your
computer’s IP address. Skip this if you know that there are routers
between your computer and the NSA210 (like if you are connecting
through the Internet).
• Ping the NSA210 from your computer. Make sure your computer’s
Ethernet adapter is installed and functioning properly. In a
(Windows) computer, click Start, (All) Programs, Accessories
and then Command Prompt. In the Command Prompt window,
type “ping” followed by the NSA210’s IP address and press
[ENTER]. Use the NAS Starter Utility to find the NSA210’s IP
address if you don’t know it.
• Use Internet Explorer 6.0, Mozilla Firefox 1.07, Netscape Navigator
7.0, or later versions of these with JavaScript enabled.
15

16
DEUTSCH
DEUTSCH
Einführung
Mit dem NSA können Sie in Ihrem Heimnetzwerk von verschiedenen
Geräten aus gemeinsam auf Dateien zugreifen und Daten sichern. Sie
können mit einem Medien-Client wie dem DMA-2500 auch Video-,
Musik- und Fotodateien abspielen, die auf dem NSA gespeichert sind.
So funktioniert es
Die obige Abbildung zeigt den NSA in einem Heimnetzwerk. Benutzer
sichern Daten auf dem NSA und haben gemeinsamen Zugriff darauf.
Der DMA-2500 spielt die Mediendateien des NSA auf dem Fernsehgerät
ab. Eine USB-Festplatte bietet zusätzlichen Speicherplatz, und Dateien
werden direkt von jedem PC im Netzwerk oder auch vom USB auf das
NSA geladen.
Schließen Sie das NAS möglichst hinter ihrem Router mit Firewall an.
Eine Beschreibung zum Konfigurieren aller Funktionen des NSA finden
Sie im Benutzerhandbuch, das auf der CD enthalten ist.
17

Erste Schritte
• Installieren der Festplatten, 19
• Anschließen des NSA, 20
• Zugreifen auf das NSA, 22
• NSA Anmelden, 28
Vor der Installation
Bevor Sie anfangen, benötigen Sie Folgendes:
• Den NSA
• Die mitgelieferte CD (mit dem NSA Starter Utility-Programm, dem
Memeo Autobackup-Programm, und dem Benutzerhandbuch)
• Netzadapter
• Das mitgelieferte Ethernet-Kabel
• Eine Festplatten mit 15-poligen SATA-Anschlussen, die mit SATA I
oder SATA II (3.0 Gbit/s) (Serial Advanced Technology
Attachment) kompatibel sind.
• eSATA-Festplatte und Kabel (optional)
• Kreuzschlitzschraubendreher zum Festschrauben der Festplatten
in den Einschub.
• USB-Kabel (optional: Dieses benötigen Sie nur, wenn Sie durch
Anschließen von USB-Laufwerken (Ver. 2) die Speicherkapazität
erweitern möchten). Es wird empfohlen, aktive USB Speichergeräte
mit eigenem Netzadapter zu verwenden.
18

DEUTSCH
• Computer mit Netzwerkkarte (NIC) und installiertem TCP/IP
Protokoll
• Netzwerkgerät wie Switch, Router oder Hub
Installieren der Festplatten
Sobald Sie eine Festplatte auf dem NSA installieren und ein Volume
erstellen, werden alle auf der Disk vorhandenen Daten gelöscht.
Schalten Sie das NSA aus, bevor Sie die Festplatte(n)
einsetzen oder entfernen.
Beim Erstellen eines Volumes werden die Festplatten
formatiert. Alle Daten gehen verloren. Bevor Sie die Festplatte
im dem NSA installieren, sollten Sie alle anderen Dateien
unbedingt an einem vorhandenen Speicherort sichern.
1. Stellen Sie sicher, dass das Netz- und das Ethernetkabel vom NSA
abgetrennt sind.
2. Legen Sie den NSA mit der Unterseite nach oben
auf eine flache Unterlage. An dieser Unterseite
befindet sich eine Rändelschraube. Lösen Sie
diese Schraube mit einem
Schlitzschraubendreher oder einer Münze.
19
3. Stellen Sie den NSA aufrecht hin, und nehmen
sie die vordere Abdeckung ab, um die
Festplattenlade zu öffnen (siehe Abbildung).
4. Schieben Sie die Festplatte in die Lade, bis sie
ganz im NSA sitzt.
5. Befestigen Sie die vordere Abdeckung wieder,
um die Festplatte zu verdecken. Legen Sie den NSA
wieder mit der Unterseite nach oben auf eine flache
Unterlage, und ziehen Sie die Schraube fest.
Anschließen des NSA
1. Schließen Sie das mitgelieferte Ethernet-Kabel an
den LAN-Port an der Rückseite des NSA und an
einen Computer, Switch oder Router des
Netzwerks an
.
20
DEUTSCH
2. Schließen Sie ein Ende des Netzkabels an den POWER-Anschluss
an der Rückseite des NSA und das andere Ende an das externe
Netzteil an. Schließen Sie das externe Netzteil an eine
Netzsteckdose an.
Verwenden Sie NUR das mitgelieferte Netzteil.
3. Drücken Sie auf die Ein/Aus-Taste an der Vorderseite des NSA, um
das Gerät einzuschalten. Die LED-Anzeigen befinden sich an der
Gerätevorderseite.
Wenn keine Anzeige leuchtet, prüfen Sie noch einmal die
Kabelanschlüsse und die Stromquelle.
• Die Betriebsanzeige-LED leuchtet blau.
• Die SYS-LED leuchtet nach einem
erfolgreichen Hochfahren des Geräts grün
(dies dauert etwa 50 Sekunden).
• Die HDD-LED leuchtet, wenn das NSA in
den Laufwerkschächten Festplatten
erkennt.
• Der LAN-Anschluss an der Rückseite hat eine LED-Anzeige, diese
leuchtet, wenn der Ethernet-Anschluss richtig mit dem Netzwerk
verbunden ist. Sie blinkt, wenn Daten gesendet oder empfangen
werden.
21
Um das NSA auszuschalten, drücken Sie so lange auf die Ein/AusTaste, bis ein Signalton zu hören ist. Lassen Sie dann die Taste los. Der
Gerät wird dann sicher herunter gefahren.
Zugreifen auf das NSA
Verwenden Sie das NAS Starter-Utility, um auf den NSA zuzugreifen.
Führen Sie diese Schritte aus:
1. Legen Sie die mitgelieferte CD in das CD-ROM-Laufwerk ein. Klicken
Sie im nächsten Fenster auf Setup (Installieren). Klicken Sie dann
auf die Verknüpfung NAS Starter Utility.
Wenn dieses Fenster nicht gezeigt wird, rufen Sie mit
Windows Explorer (Arbeitsplatz) die CD-ROM
(normalerweise Laufwerk D) auf. Klicken Sie doppelt auf
setup.exe um die Installation manuell zu starten.
2. Auf dem Bildschirm wird der Installationsassistent angezeigt. Führen
Sie die Anweisungen auf dem Bildschirm aus. Klicken Sie auf Finish
(Fertig stellen), um die Installation abzuschließen.
22
DEUTSCH
3. Um das Discovery Utility zu starten, klicken Sie bei Windows auf
Start > Alle Programme > ZyXEL > NSA Starter Utility > ZyXEL
NSA Starter Utility. Wenn der Computer über mehr als eine
Netzwerkkarte verfügt, werden Sie aufgefordert, eine auszuwählen.
NSA Initialisierung
Stellen Sie sicher, dass die Festplatte installiert ist, bevor Sie diese
Schritte ausführen.
1. Prüfen Sie im folgenden Fenster den Status des NSA. Wenn Up
(Verbindung) angezeigt wird, können Sie den NSA verwenden. Wenn
Uninitialized (Nicht initialisiert) angezeigt wird, klicken Sie auf das
Konfigurationssymbol, um die Initialisierung zu starten.
2. Gegen Sie Ihre Einstellungen im Fenster Network Configuration
(Netzwerkkonfiguration) ein.
23

• Wählen Sie DHCP, wenn Sie ein Netzwerkgerät haben (z. B. ein
Router oder Kabelmodem), das den Clients IP-Adressen zuweist.
Automatisch wird Dynamic DNS (Dynamische DNS) gewählt.
• Wählen Sie Static IP (Statische IP), wenn die Clients im Netzwerk
spezifische Adresszuweisungen haben. Automatisch wird Static
DNS (Statische DNS) gewählt. Geben Sie die Daten in die
entsprechenden Felder ein (IP Address (IP-Adresse), IP Subnet
Mask (IP-Subnetzmaske), Gateway Address (Gateway-Adresse),
Primary DNS (Primäre DNS) und Secondary DNS (Sekundäre
DNS)). Sie können auch auf Copy from NSU (Von NSU kopieren),
24
DEUTSCH
damit das NAS Starter-Utlity diese Werte selbst ermittelt und
einsetzt.
Verwenden Sie die Standardwerte, wenn Sie vom
Netzwerkadministrator keine Daten erhalten haben. Klicken Sie auf
Next (Weiter).
3. Initialisieren Sie die Festplatte, und installieren Sie die Firmware falls
notwendig. Klicken Sie auf Browse (Durchsuchen), und geben Sie
den Speicherort der Datei an, die Ihnen Ihr Administrator gegeben
hat oder die sich auf der mitgelieferten CD-ROM befindet.
Standardmäßig ist die Option Initialize Hard Disk (Festplatte
initialisieren) markiert. Dabei werden alle Daten auf der Festplatte
gelöscht und die Festplatte wird neu formatiert.
Alle Daten auf der Festplatte gehen dabei verloren und
können nicht wiederhergestellt werden!
25

Klicken Sie auf Next (Weiter), um die Firmware zu installieren.
4. Bestätigen Sie die Einstellungen im folgenden Fenster, und klicken
Sie auf Next (Weiter).
26
DEUTSCH
5. Die Initialisierung der Festplatte und die Installation der Firmware wird
gestartet. Wenn der Vorgang erfolgreich abgeschlossen wurde, wird
der NSA neu gestartet. Klicken Sie auf Done (Beenden).
1
2
6. Im Fenster Device List (Geräteliste) ist der Status des NSA
Rebooting (Neustart). Klicken Sie auf Discover (Erkennen), um das
Fenster zu aktualisieren bis als NSA-Status Up (Verbindung)
angezeigt wird.
7. Sie können jetzt den NSA verwenden und folgendes tun:
27

• Klicken Sie auf das Symbol Admin (Administrator), um das
Anmeldefenster des Web-Konfigurators aufzurufen (siehe Seite
28).
• Wenn Sie die NSA IP-Adresse ändern müssen, klicken Sie auf das
Symbol unter Config (Konfigurieren).
• Um den NSA auf ein Windows-Netzwerklaufwerk zu mappen,
klicken Sie auf das Symbol unter Map (Mappen).
• Um die Bildschirmanzeige zu aktualisieren, klicken Sie auf
Discover (Erkennen).
NSA Anmelden
In diesem Abschnitt wird beschrieben, wie Sie sich beim NSA anmelden
und das Administratorkennwort ändern.
Wenn das Anmeldefenster nicht angezeigt wird, lesen Sie im
Abschnitt Problembeseitigung am Ende dieser Anleitung
nach.
1. Geben Sie den Standardbenutzernamen admin und das Kennwort
1234 ein, und klicken Sie auf Login (Anmelden).
28
DEUTSCH
Achten Sie bei der Eingabe des Benutzernamens und des
Kennworts auf Groß- und Kleinschreibung. Die Feststelltaste
darf nicht aktiviert sein.
2. Es wird empfohlen, aus Sicherheitsgründen das Kennwort umgehend
zu ändern (notieren Sie es sich). Klicken Sie auf Apply
(Übernehmen), um die Änderungen zu speichern und zum nächsten
Fenster zu wechseln.
3. Das Fenster My NSA (Mein NSA) wird angezeigt.
Die auf der CD enthaltene Memeo Autobackup-Software kann dazu
verwendet werden, automatisch diese ausgewählten Dateien vom
Computer auf dem NSA zu sichern, sobald sie geändert werden.
Ausführliche Informationen dazu finden Sie im Benutzerhandbuch.
Problembeseitigung
Wenn Sie nicht das Anmeldefenster des NSA aufrufen können,
versuchen Sie Folgendes.
• Stellen Sie sicher, dass der NSA eingeschaltet ist.
• Prüfen Sie die Kabelverbindungen des NSA. Stellen Sie sicher,
dass die LAN-LED des NSA (am LAN-Port) leuchtet oder blinkt.
29

• Stellen Sie sicher, dass der NSA mit dem NAS Starter-Utility
initialisiert wurde.
• Achten Sie beim Anmelden durch direktes Eingeben des
Servernamens (Standard nsa210) in das Adressfeld darauf, dass
der Servername richtig geschrieben und das NAS Starter-Utility
installiert ist. Wenn das nicht funktioniert, starten Sie erneut das
NAS Starter-Utility.
• Stellen Sie sicher, dass sich die IP-Adresse des Computers im
selben Subnetz wie die des NSA befindet. Sie können die IPAdresse des NSA mit dem Discovery Utility ermitteln. Eine
Anleitung zum Einrichten oder Ändern der IP-Adresse des
Computers finden Sie im Anhang des Benutzerhandbuchs.
Überspringen Sie diesen Schritt, wenn sich zwischen dem
Computer und dem NSA keine Router befinden (wenn Sie z. B.
über das Internet verbunden sind).
• Versuchen Sie den NSA mit dem Ping Befehl vom Computer aus
zu erreichen. Stellen Sie sicher, dass der Ethernet-Adapter des
Computers angeschlossen ist und richtig funktioniert. Klicken Sie
bei einem Windows-Computer auf Start, (Alle) Programme,
Zubehör und dann auf Eingabeaufforderung. Geben Sie im
Fenster der Eingabeaufforderung "Ping" und dann die IP-Adresse
des NSA ein, und drücken Sie auf die Eingabetaste. Finden Sie die
IP-Adresse des NSA mit dem Discovery Utility-Programm heraus.
• Verwenden Sie Internet Explorer 6.0, Mozilla Firefox 1.07,
Netscape Navigator 7.0 oder spätere Versionen davon mit
aktivierter Java-Script-Unterstützung.
30

ESPAÑOL
ESPAÑOL
Introducción
El NSA le permite compartir archivos y copiar datos en su red
doméstica. También puede reproducir vídeo, música y mostrar archivos
de fotos guardados en el NSA utilizando un cliente de medios como el
DMA-2500.
Cómo funciona
Arriba el NSA está en una red doméstica. Los usuarios realizan copias
de seguridad y comparten los datos en el NSA. El DMA-2500 reproduce
los archivos de medios del NSA en el televisor. Una unidad de disco
duro USB ofrece espacio de almacenamiento extra y los archivos son
copiados directamente de la unidad USB al NSA.
Proteja el NSA con un cortafuegos y/o un dispositivo IDP (Intrusion
Detection and Prevention) para protegerlo de los ataques de Internet.
Consulte la Guía del usuario en el CD incluido para más detalles sobre
la configuración de todas las características del NSA.
31

Esta Guía de instalación rápida le muestra cómo:
• Instalar discos duros, 33
• Conectar el NSA, 34
• Acceso al NSA, 35
• Inicio de sesión al NSA, 41
Antes de comenzar
Necesita lo siguiente antes de comenzar:
• NSA
• El CD incluido que contiene la utilidad NSA Starter, el programa
Memeo Autobackup y la Guía del usuario
• Adaptador de corriente
• Cable Ethernet incluido
• Un disco duro compatible SATA I o SATA II (3.0 Gbit/s) (Serial
Advanced Technology Attachment) con conectores de
alimentación SATA de 15 contactos
• Disco duro eSATA y cable (opcional)
• Destornillador de estrella para instalar los discos duros en las
bandejas para discos
• Cable USB (opcional: sólo lo necesita si desea ampliar la
capacidad de almacenamiento conectando unidades USB (versión
2 compatibles). Se recomienda que el dispositivo USB utilice su
propio adaptador externo si tiene uno.
• Ordenador con Network Interface Card (NIC) y TCP/IP instalados
• Dispositivo de red como un switch, router o hub
32

ESPAÑOL
Instalar discos duros
Una vez instalado el disco duro en el NSA y creado un volumen, se
borrarán todos los datos existentes en el disco.
El NSA debe apagarse antes de quitar o instalar la(s)
unidad(es) de disco duro.
Al crear un volumen se formate la unidad de disco. Se
perderán todos los datos. Realice copias de seguridad de los
archivos en el disco en otra ubicación antes de instalar el
disco en el NSA.
1. Compruebe que los cables Ethernet estén desconectados del NSA.
2. Coloque el NSA en una superficie plana con el
panel inferior mirando hacia arriba. Esto deja
expuesto el panel inferior donde está situado el
tornillo. Afloje el tornillo con un destornillador de
cabeza plana o con una moneda.
3. Coloque el NSA hacia arriba y quite la tapa
frontal para abrir el disco duro.
4. Coloque el disco duro en la bandeja hasta que
quede ajustado dentro del NSA.
33

5. Coloque el panel frontalpara cubrir la bandeja del
disco duro. Coloque el NSA en una superficie plana
con el panel inferior mirando arriba y apriete el
tornillo.
Si desea usar dos discos duros y configurarlos como
volúmenes RAID, debería tener: 1) un disco duro SATA
instalado en el NSA; y 2) un disco duro eSATA con su
cable. También se recomienda que utilice el mismo
tamaño de disco y modelo para obtener el mejor
rendimiento. Consulte la Guía del usuario para ver los pasos para crear
volúmenes en su NSA.
Conectar el NSA
1. Utilice el cable Ethernet incluido para conectar el
puerto LAN de la parte posterior del NSA a un
ordenador, switch o router en su red.
2. Conecte un extremo del cable de alimentación en
el zócalo POWER de la parte posterior del NSA y
el otro extremo en la fuente de alimentación
externa. Conecte la fuente de alimentación externa
en una toma de corriente.
Utilice SOLAMENTE la fuente de alimentación incluida.
34

ESPAÑOL
3. Pulse el botón de alimentación de la parte frontal del NSA para
encenderlo. Fíjese en las luces del panel frontal.
Si no se encienden luces, compruebe que el cable de
alimentación no esté suelto y que la fuente de alimentación
esté encendida.
• La luz del botón de alimentación
permanece encendida en azul.
• La luz SYS permanece encendida en
verde tras un arranque con éxito (tarda
unos 50 segundos).
• La luz HDD se enciende si el NSA detecta
discos duros en las bahías para discos.
• El puerto LAN del panel posterior tiene una luz que se enciende si
el puerto Ethernet está correctamente conectado en su red.
Parpadea mientras envía o recibe tráfico.
Apague el NSA, presione el botón de encendido y manténgalo hasta que
escuche un sonido. Luego suelte el botón.
Acceso al NSA
Utilice NAS Starter Utility para acceder al NSA. Siga estos pasos:
1. Inserte el CD incluido en la unidad de CD-ROM. Haga clic en Setup
(Instalar) en la pantalla que aparece. Luego haga clic en el enlace
NAS Starter Utility.
Si esta pantalla no aparece, utilice Windows Explorer (Mi
PC) para ir al CD-ROM (normalmente la unidad D). Haga
doble clic en setup.exe.
35

2. Comenzará el asistente para la instalación. Siga las instrucciones del
instalador. Haga clic en Finish (Finalizar) para completar la
instalación.
3. En Windows, haga clic en Inicio > Todos los programas > ZyXEL >
NAS Starter Utility > ZyXEL NAS Starter Utility para ejecutar la
utilidad discovery. Si su ordenador tiene más de una tarjeta de red,
se le pedirá que seleccione una.
Inicialización del NSA
Asegúrese de haber instalado la unidad de disco duro antes de seguir
estos pasos.
36

ESPAÑOL
1. En la pantalla siguiente, compruebe el Status (Estado) de su NSA. Si
aparece Up, puede comenzar a usar su NSA. Si aparece
Uninitialized, haga clic en el icono Config para comenzar la
inicialización.
2. Escriba su configuración en la pantalla Network Configuration
(Configuración de red).
• Seleccione DHCP si tiene un dispositivo de red (como un router o
cable módem) que asigne direcciones IP a los clientes. Esto
selecciona automáticamente Dynamic DNS (DNS dinámico).
• Seleccione Static IP (IP estática) si los clientes de su red tienen
asignaciones de dirección específicas. Esto selecciona
automáticamente Static DNS (DNS estático). Escriba los detalles
en los campos correspondientes (IP Address (Dirección IP), IP
Subnet Mask (Máscara de subred IP), Gateway Address
(Dirección de puerta de enlace), Primary DNS (DNS primario)
Secondary DNS (DNS secundario)). También puede hacer clic en
37

Copy from NSU (Copiar desde NSU) para que la NAS Starter
Utlity detecte y rellene estos valores.
Utilice los valores predeterminados si su administrador de red no le
ha facilitado esta información. Haga clic en Next (Siguiente).
38

ESPAÑOL
3. Inicialice el disco duro e instale el firmware. Haga clic en Browse
(Examinar) y apunte a la ubicación del archivo facilitado por su
administrador o que venía con la unidad de CD-ROM.
La opción Initialize Hard Disk (Inicializar disco duro) está
seleccionada por defecto. Esto vuelve a formatear y elimina todos los
datos del disco duro.
Todos los datos del disco duro se pierden y no pueden
recuperarse.
Haga clic en Next (Siguiente) para cargar el firmware.
4. Confirme su configuración en la pantalla siguiente y haga clic en Next
39

(Siguiente).
5. La inicialización del disco duro y la instalación del firmware
comenzarán. Si el proceso tiene éxito, el NSA se reiniciará. Haga clic
en Done (Listo).
40
1
2

ESPAÑOL
6. La pantalla Lista de dispositivos le mostrará su NSA Status (Estado)
como Rebooting (Reiniciando). Haga clic en Discover (Descubrir)
para actualizar la pantalla hasta que el Status (Estado) del NSA
aparezca como Up.
7. Ahora puede usar su NSA y hacer lo siguiente:
• Haga clic en el icono Admin para ver la pantalla de inicio de sesión
del configurador web (ver página 41).
• Si necesita cambiar la dirección NSA IP, haga clic en el icono en
Config.
• Para mapear el NSA en una unidad de red de Windows, haga clic
en el icono en Map.
• Para actualizar la pantalla, haga clic en Discover (descubrir).
Inicio de sesión al NSA
Esta sección le muestra cómo acceder al NSA y cambiar la contraseña
de administrador.
41

Si no puede ir a la página de inicio de sesión, consulte la
sección solución de problemas al final de esta guía.
1. Escriba el nombre de usuario (admin) y la contraseña (1234)
predeterminados y haga clic en Login (Iniciar sesión).
El nombre de usuario y contraseña distinguen mayúsculas.
Asegúrese de no tener el bloqueo de mayúsculas si no lo
necesita.
2. Se recomienda que cambie a una nueva contraseña (y la escriba).
Haga clic en Apply (Aplicar) para guardar los cambios y vaya a la
pantalla siguiente.
3. Aparecerá la pantalla My NSA.
Utilice el software Memeo Autobackup incluido en el CD para copiar
automáticamente los archivos seleccionados de su ordenador al NSA
siempre que modifique los archivos. Consulte la Guía del usuario para
más detalles sobre esto.
42

ESPAÑOL
Solución de problemas
Intente lo siguiente si no consigue acceder a la pantalla de inicio de
sesión del NSA.
• Asegúrese de que el NSA esté encendido.
• Compruebe las conexiones de cables del NSA. Compruebe que el
LED del NSA LAN (situado en el puerto LAN) esté encendido o
parpadeando.
• Asegúrese de haber inicializado su NSA usando la NAS Starter
Utility.
• Si ha intentado iniciar sesión directamente escribiendo el nombre
del servidor (predeterminado nsa210) en el campo de dirección de
su explorador, asegúrese de haber instalado la NAS Starter Utility y
de haber escrito el nombre del servidor correctamente. Si continúa
sin funcionar, inténtelo ejecutando los pasos de la NAS Starter
Utility de nuevo.
• Compruebe que la dirección IP del ordenador esté en la misma
subred que la dirección IP del NSA). Puede utilizar la utilidad
discovery para buscar la dirección IP del NSA. Consulte el
apéndice de la Guía del usuario sobre la configuración de la
dirección IP de su ordenador para cómo cambiar la dirección IP de
su ordenador. Sáltese esto si sabe que hay routers entre su
ordenador y el NSA (como si se conecta a través de Internet).
• Realice un ping al NSA desde su ordenador. Compruebe que el
adaptador Ethernet de su ordenador esté instalado y funcione
correctamente. En un ordenador (Windows), haga clic en Inicio,
(Todos los) programas, Accesorios y luego en Símbolo del
sistema. En la ventana Símbolo del sistema, escriba "Ping"
seguido por la dirección IP del NSA y pulse [ENTRAR]. Use la
utilidad discovery para buscar la dirección IP del NSA si no la sabe.
43

• Utilice Internet Explorer 6.0, Mozilla Firefox 1.07, Netscape
Navigator 7.0 o versiones posteriores a éstas con JavaScript
habilitado.
44

FRANÇAIS
FRANÇAIS
Introduction
Le NSA210 vous permet de partager des fichiers et de sauvegarder des
données sur votre réseau domestique. Vous pouvez aussi lire des
fichiers vidéo, de musique et afficher des photos stockés sur le NSA210
en utilisant un client média comme le DMA-2500.
Comment cela fonctionne-t-il
Ci-dessus se trouve le NSA210 dans un réseau domestique. Les
utilisateurs sauvegardent et partagent les données sur le NSA210. Le
DMA-2500 lit les fichiers média du NSA210 sur le téléviseur. Un disque
dur USB offre un espace de stockage supplémentaire et les fichiers sont
directement copiés depuis la clé USB sur le NSA210.
Placez le NSA210 derrière un pare feu et/ou un dispositif IDP (Intrusion
Detection and Prevention (Détection d’intrusion et prévention)) pour le
protéger des attaques provenant d’Internet.
Consulter le guide de l’utilisateur sur le CD inclus pour les instructions
concernant la configuration de toutes les fonctionnalités du NSA210.
45

Ce guide de mise en route rapide vous indique comment:
• Installer les disques durs, 47
• Connecter le NSA210, 48
• Accéder au NSA210, 50
• NSA210 Ouvrir une session, 56
Avant de commencer
Vous avez besoin des éléments suivants avant de commencer :
• NSA210
• CD inclus contenant l’utilitaire de Starter du NSA, le programme
Memeo Autobackup, et le guide de l’utilisateur
• Adaptateur d’alimentation
• Câble Ethernet fourni
• Un disque dur compatibles SATA I ou SATA II (3.0 Gbit/s) (Serial
Advanced Technology Attachment) avec connecteurs
d'alimentation SATA 15 broches
• Disque dur eSATA et câble (en option)
• Câble USB (en option : ceci est nécessaire seulement si vous
voulez augmenter la capacité de stockage en connectant des
lecteurs USB compatibles (version 2)). Il est recommandé d’utiliser
l’adaptateur d’alimentation externe propre au périphérique USB s’il
en est équipé.
• Ordinateur avec carte d'interface réseau (NIC) et TCP/IP installé
• Périphérique réseau tel que commutateur, routeur ou hub.
46

FRANÇAIS
Installer les disques durs
Une fois que vous avez installé un disque dur sur le NSA210 et créé un
volume, toutes les données existantes sur le disque seront effacées.
Le NSA210 doit être éteint avant de retirer ou d'installer le(s)
disque(s) dur(s).
Le fait de créer un volume formate les disques durs. Toutes
les données seront perdues. Sauvegardez tous les fichiers du
disque sur un autre emplacement avant d’installer le disque
dans le NSA210.
1. Assurez-vous que les cordons d’alimentation et Ethernet sont
déconnectés du NSA210.
2. Placez le NSA210 sur une surface plane avec le
panneau inférieur dirigé vers le haut. Cela
expose le panneau inférieur à l'endroit où se
trouve la vis à serrage à main. Desserrez la vis à
serrage à main à l'aide d'un tournevis plat ou
d'une pièce de monnaie.
47

3. Mettez le NSA210 en position verticale et retirez
le couvercle avant pour ouvrir le tiroir du disque
dur comme indiqué plus bas.
4. Insérez le disque dur dans le tiroir en le faisant
glisser jusqu'à ce que le disque dur soit
parfaitement installé dans le NSA210.
5. Fixez le panneau avant pour couvrir le tiroir du
disque dur. Placez le NSA210 sur une surface plane
avec le panneau inférieur dirigé vers le haut et
serrez la vis.
If you want to use two hard drives and configure them
as RAID volumes, you should have: 1) a SATA hard
disk installed inside the NSA210; and 2) an eSATA hard
disk with its cable. It is also recommended to use the
same disk size and model for best performance. Refer
to the User’s Guide for the steps to create volumes on your NSA210.
Connecter le NSA210
1. Utilisez le câble Ethernet fourni pour connecter le
port LAN situé au dos du NSA210 à un ordinateur,
commutateur ou routeur sur votre réseau.
48

FRANÇAIS
2. Connectez une extrémité du cordon d'alimentation à la prise POWER
(Alimentation) située au dos duNSA210 et l'autre extrémité à
l'alimentation externe. Connectez l'alimentation externe à une prise
de courant.
Utilisez UNIQUEMENT l’alimentation incluse.
3. Appuyez sur le bouton d’alimentation situé sur la façade du NSA210
pour l’allumer. Observez les voyants en façade.
Si aucun voyant ne s’allume, vérifiez que le cordon
d’alimentation est correctement branché et que la source
d’alimentation est allumée.
• Le témoin du bouton d’alimentation
s’allume en bleu.
• Le voyant SYS s'allume en vert après le
démarrage (cela prend environ 50
secondes).
• Les voyants de HDD s’allument si le
NSA210 détecte les disques durs dans les
baies de disques.
• Le voyant du port LAN du panneau arrière s’allume si le port
Ethernet du est correctement connecté à votre réseau. Il clignote
lors de l’émission ou la réception de données.
49

Pour éteindre le NSA210, appuyez sur le bouton d'alimentation et
maintenez-le enfoncé jusqu'à entendre un bip. Relâchez ensuite le
bouton.
Accéder au NSA210
Utilisez l'utilitaire NAS Starter pour accéder au NSA210. Suivez ces
étapes :
1. Insérez le CD inclus dans votre lecteur de CD-ROM. Cliquez sur
Setup (Installer) dans l’écran qui s’affiche. Puis cliquez sur le lien
NAS Starter Utility.
Si cet écran n’apparaît pas, utilisez Windows Explorer (My
Computer) (Poste de travail) pour accéder au CD-ROM
(généralement lecteur D). Double cliquez sur setup.exe.
2. L'assistant d'installation démarre. Suivez les instructions de
l'installateur. Cliquez sur Finish (Terminer) pour terminer
l'installation.
50

FRANÇAIS
3. Dans Windows, cliquez sur Start (Démarrer) > All Programs (Tous
les programmes) > ZyXEL > NSA Starter Utility > ZyXEL NAS
Starter Utility pour exécuter l’utilitaire de découverte. Si votre
ordinateur est équipé de plusieurs cartes réseau, vous serez alors
invité à en choisir une.
NSA210 Initialisation
Vérifiez que vous avez installé le disque dur avant d'effectuer ces
étapes.
1. Dans l'écran suivant, consultez l'Etat de votre NSA210. S'il affiche Up
( Haut), vous pouvez commencer à utiliser votre NSA210. S'il affiche
Uninitialized (Non initialisé), cliquez sur l'icône Config pour démarrer
l'initialisation.
51

2. Entrez vos paramètres dans l'écran Network Configuration
(Configuration du réseau).
• Sélectionnez DHCP si vous avez un périphérique réseau (tel qu'un
routeur ou un modem câblé) attribuant des adresses IP aux clients.
Cela sélectionne automatiquement Dynamic DNS (DNS
dynamique).
• Sélectionnez Static IP (IP statique) si les clients dans votre réseau
ont des attributions d'adresses spécifiques. Cela sélectionne
automatiquement Static DNS (DNS statique). Entrez les détails
dans les champs correspondants (IP Address (Adresse IP), IP
Subnet Mask (Masque de sous-réseau d'IP), Gateway Address
(Adresse de passerelle), Primary DNS (DNS principale) et
Secondary DNS (DNS secondaire).) Vous pouvez aussi cliquer sur
Copy from NSU (Copier depuis NSU) pour que l'utilitaire NAS
Starter détecte et remplisse ces valeurs.
Utilisez les valeurs par défaut si votre administrateur de réseau ne
vous a pas fourni ces informations. Cliquez sur Next (Suivant).
52

FRANÇAIS
3. Initialisez le disque dur et installez le microprogramme. Cliquez sur
Browse (Parcourir) et pointez sur l'emplacement du fichier fourni par
votre administrateur ou qui accompagne le lecteur CD-ROM.
L'option Initialize Hard Disk (Initialiser le disque dur) est
sélectionnée par défaut. Cela reformate et supprime toutes les
données dans le disque dur.
Toutes les données dans le disque dur sont perdues et ne
peuvent être récupérées.
Cliquez sur Next (Suivant) pour télécharger le microprogramme.
4. Confirmez vos paramètres dans l'écran suivant et cliquez sur Next
53

(Suivant).
5. L'initialisation du disque dur et l'installation du microprogramme
démarrent. Si l'opération réussit, le NSA210 redémarre. Cliquez sur
Done (Terminé).
54
1
2

FRANÇAIS
6. L'écran Liste des périphériques indique que votre Etat NSA210 est
Rebooting (Redémarrage). Cliquez sur Discover (Découvrir) pour
actualiser l'écran jusqu'à ce que l'Etat du NSA indique Up (Haut).
7. Vous pouvez maintenant utiliser votre NSA210 et procéder comme
suit:
• Cliquez sur l’icône Admin pour voir l’écran d’ouverture de session
du configurateur web (voir page 56).
• (Si vous devez changer l'adresse NSA210IP du , cliquez sous
l'icône sous Config.
• Pour mapper leNSA210 à un lecteur réseau Windows, cliquez sur
l’icône sous Map.
55

• Pour actualiser l'écran, cliquez sur Discover (Découvrir).
NSA210 Ouvrir une session
Cette section vous indique comment ouvrir une session dans le NSA210
et changer le mot de passe d’administrateur.
Si vous n’arrivez pas à accéder à l’écran d’ouverture de
session, consultez la section de dépannage à la fin de ce
guide.
1. Entrez le nom d’utilisateur ‘admin’ et le mot de passe ‘1234’ par
défaut et cliquez sur Login (Ouvrir une session).
56

FRANÇAIS
Le nom de l'utilisateur et le mot de passe tiennent compte de
la casse. Vérifiez que le verrouillage de majuscule n’est pas
activé.
2. Il est conseillé de choisir un nouveau mot de passe (et de le noter).
Cliquez sur Apply (Appliquer) pour sauvegarder vos modifications et
passer à l'écran suivant.
3. L’écran My NSA s’affiche.
Utilisez le logiciel Memeo Autobackup inclus sur le CD pour sauvegarder
automatiquement les fichiers sélectionnés depuis votre ordinateur sur le
NSA210 chaque fois que vous modifiez les fichiers. Reportez-vous à
votre guide de l'utilisateur pour les détails concernant ce sujet.
Dépannage
Procédez de la manière suivante si vous n’arrivez pas à obtenir
l’écranNSA210 d’ouverture de session.
• Assurez-vous que le NSA210 est allumé.
• Vérifiez les connexions des câbles du NSA210. Vérifiez que la LED
LAN du NSA210 (située sur le port LAN) est allumée ou clignote.
57

• Vérifiez que vous avez initialisé votre NSA210 à l'aide de l'utilitaire
NAS Starter.
• Si vous essayez d'ouvrir une session en tapant directement le nom
du serveur (par défaut nsa210) dans le champ d'adresse de votre
navigateur, vérifiez que vous avez installé l'utilitaire NAS Starter et
que vous avez correctement tapé le nom du serveur. Si cela ne
fonctionne toujours pas, essayez à nouveau d'exécuter les étapes
de l'utilitaire NAS Starter.
• Vérifiez que l'adresse IP de votre ordinateur se trouve dans le
même sous-réseau que l'adresse IP du NSA210. Vous pouvez
utiliser l’utilitaire de découverte pour trouver l’adresse IP du
NSA210. Consultez l’appendice du guide de l’utilisateur pour la
manière de paramétrer l’adresse IP de votre ordinateur afin de
pouvoir la modifier. Sautez cette partie si vous savez que des
routeurs sont placés entre votre ordinateur et le NSA210 (comme si
vous vous connectiez par Internet).
• Envoyez une requête ping au NSA210 depuis votre ordinateur.
Vérifiez que l'adaptateur Ethernet de votre ordinateur est installé et
fonctionne correctement. Sur un ordinateur (Windows), cliquez sur
Start (Démarrer), (All) Programmes ((Tous) Programmes),
Accessories (Accessoires) et ensuite sur Command Prompt
(Invite de commandes). Dans la fenêtre Command Prompt (Invite
de commands), tapez “Ping” suivi de l’adresse IP du NSA210 et
appuyez sur [ENTER] (ENTRÉE). Utilisez l’utilitaire de découverte
pour trouver l’adresse IP duNSA210 si vous ne la connaissez pas.
• Utilisez Internet Explorer 6.0, Mozilla Firefox 1.07, Netscape
Navigator 7.0, ou des versions ultérieures à celles-ci avec
JavaScript activé.
58

ITALIANO
ITALIANO
Introduzione
L'NSA consente di condividere file e di eseguire il backup di dati nella
propria rete. È anche possibile riprodurre video, musica e visualizzare
file fotografici memorizzati sull'NSA utilizzando un client multimediale
come il DMA-2500.
Come funziona
L'illustrazione si riferisce all'NSA in una rete domestica. Gli utenti fanno
backup e condividono dati sull'NSA. Il DMA-2500 riproduce sulla TV i file
multimediali dell'NSA. Un'unità di archiviazione USB fornisce spazio di
archiviazione aggiuntivo e i file vengono copiati direttamente dalla penna
di memoria USB verso l'NSA.
Posizionare l'NSA dietro un firewall e/o un dispositivo IDP (Intrusion
Detection and Prevention) per proteggerlo da eventuali attacchi
provenienti da Internet.
Fare riferimento alla Guida utente memorizzata sul CD fornito a corredo
per i dettagli sulla configurazione di tutte le funzioni dell'NSA.
59

La Guida introduttiva rapida illustra come:
• Installazione delle unità a disco rigido, 61
• Collegare l'NSA, 62
• Accesso all'NSA, 64
• Accesso all'NSA, 71
Prima di iniziare
Prima di iniziare è necessario disporre di:
• NSA
• Il CD fornito a corredo contenente l'utilità di analisi NSA, il
programma Memeo Autobackup e la Guida utente
• Adaptador de corriente
• Cavo Ethernet fornito a corredo
• Uno dischi rigidi compatibili SATA I o SATA II (3.0 Gbit/s) (Serial
Advanced Technology Attachment) con connettori di alimentazione
SATA a 15 piedini
• Disco duro eSATA y cable (opcional)
• Un cacciavite a croce per installare i dischi rigidi negli appositi
vassoi
• Un cavo USB (opzionale: questo serve solo se si desidera
espandere la capacità di memorizzazione collegamento unità USB
(versione 2) compatibili). È consigliabile che l'unità USB impieghi il
proprio alimentatore esterno, se ne è dotato.
• Computer con scheda di rete e protocollo TCP/IP installato
• Unità di rete come uno switch, un router o un hub
60

ITALIANO
Installazione delle unità a disco
rigido
Quando si installa un disco rigido sull'NSA e si crea un volume, tutti i dati
esistenti sul disco vengono cancellati.
L'NSA deve essere spento prima di poter rimuovere o
installare i dischi rigidi.
La creazione di un volume formatta il disco rigido. Tutti i dati
vengono persi. Effettuare il backup di tutti i file presenti sul
disco verso un'altra posizione prima di installare il disco
nell'NSA.
1. Verificare che alimentazione e cavi Ethernet siano scollegati
dall'NSA.
2. Coloque el NSA en una superficie plana con el
panel inferior mirando hacia arriba. Esto deja
expuesto el panel inferior donde está situado el
tornillo. Afloje el tornillo con un destornillador de
cabeza plana o con una moneda.
61

3. Coloque el NSA hacia arriba y quite la tapa
frontal para abrir el disco duro.
4. Coloque el disco duro en la bandeja hasta que
quede ajustado dentro del NSA.
5. Coloque el panel frontalpara cubrir la bandeja del
disco duro. Coloque el NSA en una superficie plana
con el panel inferior mirando arriba y apriete el
tornillo.
Si desea usar dos discos duros y configurarlos como
volúmenes RAID, debería tener: 1) un disco duro SATA
instalado en el NSA; y 2) un disco duro eSATA con su
cable. También se recomienda que utilice el mismo
tamaño de disco y modelo para obtener el mejor
rendimiento. Consulte la Guía del usuario para ver los pasos para crear
volúmenes en su NSA.
Collegare l'NSA
1. Utilice el cable Ethernet incluido para conectar el
puerto LAN de la parte posterior del NSA a un
ordenador, switch o router en su red.
62

ITALIANO
2. Conecte un extremo del cable de alimentación en el zócalo POWER
de la parte posterior del NSA y el otro extremo en la fuente de
alimentación externa. Conecte la fuente de alimentación externa en
una toma de corriente.
Utilizzare SOLO l'alimentatore fornito a corredo.
3. Premere il pulsante di accensione che si trova davanti all'NSA per
accendere l'unità. Osservare le luci del pannello anteriore.
Se nessuna spia è accesa, verificare che il cavo di
alimentazione non sia lento e che sia presente corrente.
• La luce del pulsante di accensione si
accende di colore blu fisso.
• Dopo un avvio riuscito, la luce SYS si
accende di colore verde fisso (ci vogliono
circa 50 secondi).
• Le luci HDD si accendono se l'NSA rileva
la presenza di dischi rigidi nei bay.
• La porta LAN del pannello posteriore ha una luce che si accende
se la porta Ethernet è correttamente collegata alla rete. Questa
lampeggia quando è in invio o ricezione del traffico dati.
Per spegnere NSA, tenere premuto il pulsante di accensione/
spegnimento fino a sentire un segnale acustico. A questo punto
rilasciare il pulsante.
63

Accesso all'NSA
Utilice NAS Starter Utility para acceder al NSA. Siga estos pasos:
1. Inserire il CD fornito a corredo nell'unità CD-ROM. Fare clic su Setup
(installa) nella schermata visualizzata. Scegliere il collegamento
NAS Starter Utility.
Se la schermata non viene visualizzata, aprire il CD
(generalmente l'unità D) da Esplora risorse di Windows
(Risorse del computer). Fare doppio clic su setup.exe.
2. Viene avviata l'installazione guidata. Seguire le istruzioni del
programma di installazione. Fare clic su Finish (fine) per completare
l'installazione.
64

ITALIANO
3. In Windows, scegliere Start > Tutti i programmi > ZyXEL > NAS
Starter Utility > ZyXEL NAS Starter Utility per avviare l'utilità di
analisi. Se nel computer c'è più di una scheda di rete, viene richiesto
di selezionarne una.
NSA Inicialización
Asegúrese de haber instalado la unidad de disco duro antes de seguir
estos pasos.
1. En la pantalla siguiente, compruebe el Status (Estado) de su NSA. Si
aparece Up, puede comenzar a usar su NSA. Si aparece
Uninitialized, haga clic en el icono Config para comenzar la
inicialización.
2. Escriba su configuración en la pantalla Network Configuration
(Configuración de red).
65

• Seleccione DHCP si tiene un dispositivo de red (como un router o
cable módem) que asigne direcciones IP a los clientes. Esto
selecciona automáticamente Dynamic DNS (DNS dinámico).
• Seleccione Static IP (IP estática) si los clientes de su red tienen
asignaciones de dirección específicas. Esto selecciona
automáticamente Static DNS (DNS estático). Escriba los detalles
en los campos correspondientes (IP Address (Dirección IP), IP
Subnet Mask (Máscara de subred IP), Gateway Address
(Dirección de puerta de enlace), Primary DNS (DNS primario)
Secondary DNS (DNS secundario)). También puede hacer clic en
Copy from NSU (Copiar desde NSU) para que la NAS Starter
Utlity detecte y rellene estos valores.
3. Utilice los valores predeterminados si su administrador de red no le
ha facilitado esta información. Haga clic en Next (Siguiente).
66

ITALIANO
4. Inicialice el disco duro e instale el firmware. Haga clic en Browse
(Examinar) y apunte a la ubicación del archivo facilitado por su
administrador o que venía con la unidad de CD-ROM.
La opción Initialize Hard Disk (Inicializar disco duro) está
seleccionada por defecto. Esto vuelve a formatear y elimina todos los
datos del disco duro.
Todos los datos del disco duro se pierden y no pueden
recuperarse.
Haga clic en Next (Siguiente) para cargar el firmware.
5. Confirme su configuración en la pantalla siguiente y haga clic en Next
67

(Siguiente).
6. La inicialización del disco duro y la instalación del firmware
comenzarán. Si el proceso tiene éxito, el NSA reiniciará. Haga clic en
Done (Listo).
68
1
2

ITALIANO
7. La pantalla Lista de dispositivos le mostrará su NSA Status (Estado)
como Rebooting (Reiniciando). Haga clic en Discover (Descubrir)
para actualizar la pantalla hasta que el Status (Estado) del NSA
aparezca como Up.
8. Ahora puede usar su NSA y hacer lo siguiente:
• Fare clic sull'icona Admin per visualizzare la schermata di accesso
dello strumento di configurazione Web (vedere pagina 71).
• Se occorre cambiare l'indirizzo IP dell'NSA, scegliere l'icona sotto
Config.
• Per mappare l'NSA a un'unità di rete Windows, fare clic sull'icona
sotto Map.
• Per aggiornare la schermata, fare clic su Discover (analisi).
NSA - Login
In questa sezione viene illustrato come accedere all'NSA e come
cambiare la password di amministratore.
69

Se non si riesce a visualizzare la schermata di login, vedere
la sezione sulla risoluzione dei problemi che si trova alla fine
di questa guida.
1. Inserire il nome utente "admin" e la password "1234" predefiniti e
scegliere Login (accedi).
Per nome utente e password viene fatta distinzione tra
maiuscole e minuscole. Può essere necessario verificare di
non avere il Blocco maiuscole attivato.
2. Si consiglia di utilizzare una nuova password (e di annotarla).
Scegliere Apply (applica) per salvare le modifiche e passare alla
sezione successiva.
3. Viene visualizzata la schermata My NSA.
70

ITALIANO
Utilizzare il software Memeo Autobackup incluso nel CD per eseguire
automaticamente il backup dei file selezionati dal computer all'NSA ogni
volta che si modificano i file. Consulte la Guía del usuario para más
detalles sobre esto.
Risoluzione dei problemi
Se non si riesce a visualizzare la schermata di login dell'NSA, provare
con le istruzioni seguenti.
• Verificare che l'unità NSA sia accesa.
• Controllare i collegamenti dei cavi dell'NSA. Verificare che il LED
LAN dell'NSA (che si trova sulla porta LAN) sia acceso o
lampeggiante..
• Asegúrese de haber inicializado su NSA usando la NAS Starter
Utility.
• Si ha intentado iniciar sesión directamente escribiendo el nombre
del servidor (predeterminado nsa210) en el campo de dirección de
su explorador, asegúrese de haber instalado la NAS Starter Utility y
de haber escrito el nombre del servidor correctamente. Si continúa
sin funcionar, inténtelo ejecutando los pasos de la NAS Starter
Utility de nuevo.
• Verificare che l'indirizzo IP del computer appartenga la stessa
subnet dell'indirizzo IP dell'NSA. È possibile utilizzare l'utilità di
analisi per trovare l'indirizzo IP dell'NSA. Vedere l'appendice della
Guida utente relativa alla configurazione dell'indirizzo IP del
computer per le istruzioni su come cambiare l'indirizzo IP del
computer. Saltare questa sezione se si è a conoscenza della
presenza di router tra il computer e l'NSA (come ad esempio se ci si
connette a Internet tramite router).
71

• Pingare l'NSA dal computer. Assicurarsi che la scheda Ethernet del
computer sia installata e correttamente funzionante. In un computer
(Windows), fare clic su Start, (Tutti i) Programmi, Accessori e
quindi Prompt dei comandi. Nella finestra del Prompt dei
comandi, digitare "ping" seguito dall'indirizzo IP dall'NSA e
premere [INVIO]. Utilizzare l'utilità di analisi per trovare l'indirizzo IP
dell'NSA se non lo si conosce.
• Utilizzare Internet Explorer 6.0, Mozilla Firefox 1.07, Netscape
Navigator 7.0 o versioni successive con JavaScript attivato.
72

ITALIANO
Ai sensi dell'art. 13 del Decreto Legislativo 25 luglio 2005,
n.151"Attuazione delle Direttive 2002/95/CE, 2002/96/CE e 2003/108/
CE, relative alla riduzione dell'uso di sostanze pericolose nelle
apparecchiature elettriche ed elettroniche, nonché allo smaltimento dei
rifiuti"
Il simbolo del cassonetto barrato riportato sull'apparecchiatura o sulla
sua confezione indica che il prodotto alla fine della propria vita utile deve
essere raccolto separatamente dagli altri rifiuti.
La raccolta differenziata della presente apparecchiatura giunta a fine vita
è organizzata e gestita dal produttore. L'utente che vorrà disfarsi della
presente apparecchiatura dovrà quindi contattare il produttore e seguire
il sistema che questo ha adottato per consentire la raccolta separata
dell'apparecchiatura giunta a fine vita.
L'adeguata raccolta differenziata per l'avvio successivo
dell'apparecchiatura dismessa al riciclaggio, al trattamento e allo
smaltimento ambientalmente compatibile contribuisce ad evitare
possibili effetti negativi sull'ambiente e sulla salute e favorisce il
reimpiego e/o riciclo dei materiali di cui è composta l'apparecchiatura.
Lo smaltimento abusivo del prodotto da parte del detentore comporta
l'applicazione delle sanzioni amministrative previste dalla normativa
vigente."
73

74

NEDERLANDS
NEDERLANDS
Inleiding
De NSA maakt het mogelijk dat u bestanden deelt en van belangrijke
bestanden een backup kan worden gemaakt binnen uw thuisnetwerk. U
kunt ook video's en muziek afspelen en op de NSA opgeslagen
fotobestanden tonen met gebruik van een media client zoals de DMA-
2500.
Hoe het werkt
Aan de bovenstaande afbeelding bevindt zich de NSA in uw
thuisnetwerk. Gebruikers maken een backup en delen gegevens op de
NSA. De DMA-2500 speelt de mediabestanden van de NSA op de TV.
Een USB harde schijf verschaft extra opslagruimte en bestanden worden
direct vanuit de USB geheugenstick gekopieerd naar de NSA.
Plaats de NSA achter een firewall en/of IDP (Intrusion Detection en
Prevention) apparaat om het tegen aanvallen vanuit internet te
beschermen.
Zie de Gebruikershandleiding op de bijgeleverde CD voor details van
configuratie van alle functies van de NSA.
75

Met deze Snelstartgids kunt u:
• Installeer Harde Schijven, 77
• Sluit de NSA aan, 78
• Toegang tot de NSA, 80
• NSA Login, 87
Voor u Begint
Voor u begint heeft u het volgende nodig
• NSA
• Bijgevoegde CD die de NSA Discovery Utility, Memeo Autobackup
program en Gebruikershandleiding bevat
• Voedingsadapter
• Bijgevoegde ethernetkabel
• Eén SATA I of SATA II (3,0 Gbit/s) (Serial Advanced Technology
Attachment) compatibele harde schijven met 15-pin SATA
stroomaanslutingen.
• eSATA harddisk en kabel (optioneel)
• Kruiskop schroevendraaier om de hard disks en de disk sledes te
monteren.
• USB-kabel (optioneel: u hebt deze alleen nodig als u de
opslagcapaciteit uit wilt breiden door compatibile USB (versie 2)
drivers aan te sluiten). Het wordt aanbevolen om, indien aanwezig,
de eigen externe stroomaansluiting van het USB apparaat te
gebruiken.
76

NEDERLANDS
• Computer met Netwerk Interface Card (NIC) en TCP/IP
geïnstalleerd.
• Netwerkapparatuur zoals een switch, router of hub
Installeer Harde Schijven
Wanneer u een harde schijf op de NSA installeert en een volume creert,
worden alle gegevens op de schijf gewist.
De NSA moet uitgezet zijn voordat u harde schijven verwijdert
of installeert.
Het creëren van een volume formatteert de harde schijven.
Alle gegevens zullen verloren gaan. Maak een reserve kopie
op een andere locatie van de bestanden van de schijf
alvorens de schijf in de NSA te installeren.
1. Zorg ervoor dat de stroom- en ethernetkabels van de NSA
losgemaakt zijn.
2. Plaats de NSA op een vlak oppervlak met de
onderkant naar boven. Hierdoor worden het
paneel en het schroefkapje aan de onderzijde
zichtbaar. Draai het schroefkapje los met een
platte schroevendraaier of een muntje.
77

3. Zet de NSA rechtop en neem het voorpaneel af
zodat de houder van de harddisk zichtbaar wordt
zoals op de volgende afbeelding:
4. Schuif de harddisk in de houder tot deze goed
passend in de NSA zit.
5. Sluit het voorpaneel zodat de houder weer
afgesloten is. Plaats de NSA weer op een vlak
oppervlak met de onderkant naar boven en draai het
schroefkapje weer vast.
Als u twee harde schijfstations wilt gebruiken en deze
als RAID volumes wil configureren, dan moet u: 1) een
SATA harddisk installeren in de NSA; en 2) een eSATA
harddisk met een kabel bevestigen. Wij raden u ook
aan om dezelfde diskgrootte en model te gebruiken
voor de beste prestaties. Zie de Gebruikershandleiding voor de stappen
om volumes aan te maken op uw NSA.
Sluit de NSA aan
1. Gebruik de meegeleverde Ethernet kabel om de
LAN poort te verbinden aan de achterzijde van de
NSA naar de computer, switch, of router op uw
netwerk.
78

NEDERLANDS
2. Verbind een kant van de voedingskabel aan de POWER uitgang aan
de achterzijde van de NSA en de andere aan de externe
stroomtoevoer. Verbind de externe stroomtoevoer aan een
stopcontact.
Gebruik ALLEEN de inbegrepen stroomaansluiting.
3. Druk op de aan/uit knop op de voorkant van de NSA om hem aan te
zetten. Kijk naar de lampjes op het voorpaneel.
Als er geen lampjes aan gaan, controleer dan of de
stroomkabel niet los zit en of de stroombron gevoed wordt.
• Het lampje van de aan/uit knop kleurt
blauw.
• Het SYS lampje kleurt groen nadat het
apparaat met succes is aangezet (dit
duurt ongeveer 50 seconden).
• De HDD lampjes gaan aan als de NSA
harde schijven in de schijfcompartimenten
waarneemt.
• De LAN poort van het achterpaneel heeft een lampje dat aangaat
wanneer de internetpoort correct op uw netwerk is aangesloten.
Het knippert wanneer dataverkeer wordt verzonden of ontvangen.
Om de NSA uit te zetten, drukt u op de aan/uit knop en houdt deze
ingedrukt totdat u een piep hoort. Laat de knop dan los.
79

Toegang tot de NSA
Gebruik de NAS Starter Utility om toegang te krijgen tot de NSA. Volg
deze stappen:
1. Doe de bijgevoegde CD in de CD-Rom drive. Klik Installeer op het
scherm dat verschijnt. Klik vervolgens op de NAS Starter Utility link.
Als dit scherm niet verschijnt, gebruik dan Windows Explorer
(Mijn Computer) om naar de CD-ROM te gaan (gewoonlijk
D-schijf). Dubbelklikken op setup.exe.
2. De installatiewizard wordt gestart. Volg de instructies van het
intallatieprogramma. Klik op Beëindigen om de installatie te
voltooien.
80

NEDERLANDS
3. Klik in Windows op Start > Alle Programa's > ZyXEL > NAS Starter
Utility > ZyXEL NAS Starter Utility om het programma te starten.
Indien uw computer meer dan één netwerkkaart heeft, wordt u
gevraagd om er één te selecteren.
NSA Initialiseren
Zorg dat het harde schijfstation is geïnstalleerd voor de stappen worden
uitgevoerd.
1. In het volgende scherm, controleert u de Status van uw NSA. Als Up
(gereed) zichtbaar is, dan kunt u de NSA gaan gebruiken. Als er
geen Uninitialized (initialisatie) heeft plaatsgevonden, klik dan op het
Config pictogram om de initialisatie op te starten.
2. Voer uw instellingen in op het Network Configuration (Netwerk
Configuratie) scherm.
81

• Selecteer DHCP indien u een netwerkapparaat heeft (zoals een
router of een kabelmodem) waarmee IP adressen worden
toegewezen aan cliënten. Hiermee wordt automatisch gekozen
voor Dynamic DNS (Dynamische DNS).
• Selecteer Static IP (Statische IP) indien de cliënten in uw netwerk
specifieke adressen toegewezen krijgen. Hiermee wordt
automatisch gekozen voor Static DNS (Statische DNS). Voer de
gegevens in voor de betreffende velden (IP Address (IP Adres), IP
Subnet Mask, Gateway Address (Gateway Adres), Primary DNS
(Primaire DNS) en Secondary DNS (Secondaire DNS).) U kunt
ook klikken op Copy from NSU (Kopiëren van NSU) waarmee de
NAS Starter Utlity deze warden opzoekt en invult.
Gebruik de standaardwaarden als uw netwerkbeheerder uw deze
informatie niet heeft gegeven. Klik op Next
(Volgende).
82

NEDERLANDS
3. Initialiseer de harddisk en installeer de firmware. Klik op Browse
(Bladeren) en zoek de locatie van het bestand dat door uw beheerder
is gegeven of dat bij het CD-ROM station werd geleverd
Per standaard wordt de Initialize Hard Disk (Initialiseren van
Harddisk) optie gekozen. Hierdoor wordt de harddisk
geherformateerd en alle gegevens worden gewist.
Alle gegevens op de harddisk zijn verdwenen en kunnen niet
meer worden teruggezet.
Klik op Next (Volgende) om de firmware te uploaden.
4. Bevestig de instellingen in het volgende scherm en klik op Next
83

(Volgende).
5. De harddisk initialiseert en de installatie van de firmware begint. Als
het proces succesvol is dan zal de NSA rebooten. Klik op Done
(Gereed).
84
1
2

NEDERLANDS
6. Het apparatenlijst venster toont nu dat de NSA Status op Rebooting
staat. Klik op Discover (Ontdekken) om het scherm te verversen
totdat de NSA Status aantoont dat het Done (Gereed) is.
7. U kunt nu de NSA gaan gebruiken en het volgende doen:
• Klik op het Admin- icoon om het webconfigurartie login scherm te
tonen ( zie pagina87).
• Indien u het NSA IP address moet veranderen, klik dan op het
icoon onder Config.
• Om te koppelen NSA aan een Windows netwerkschijf, op het icoon
klikken onder Koppelen.
85

• Om het scherm te vernieuwen, klikken op Zoeken.
NSA Login
Dit deel laat u zien hoe u inlogt op de NSA en het wachtwoord van de
beheerder kunt veranderen.
Als u niet in het login scherm kunt komen, wordt verwezen
naar de het deel "troubleshooting" achterin deze
handleiding.
1. Voer de default gebruikersnaam ‘admin’ en wachtwoord ‘1234’ in en
klik op Login.
86

NEDERLANDS
De gebruikersnaam en het paswoord zijn
hoofdlettergevoelig. Controleer of u niet de
hoofdlettertoetsen aan heeft staan.
2. Het wordt aanbevolen om een nieuw wachtwoord aan te maken (en
dit op te schrijven). Klik op Toepassen om de veranderingen op te
slaan en naar het volgende scherm te gaan.
3. Het My NSA scherm verschijnt.
Gebruik de Memeo Autobackup software op de CD om geselecteerde
bestanden automatisch een backup te maken vanaf uw computer op de
NSA elke keer als u de bestanden wijzigt. Zie de gebruikershandleiding
voor details.
Troubleshooting
Probeer het volgende als u het NSA login scherm niet inkomt.
• Zorg dat de NSA aan staat.
• Controleer de kabelaanluitingen van de NSA. Controleer of deNSA
LAN LED van de (die zich van in de LAN poort bevindt) aan is of
knippert.
• Zorg dat u de NSA heeft geinitialiseert met de NAS Starter Utility.
87

• Indien u direct probeert in te loggen door de servernaam in te typen
(standaard nsa210) in de webbrowser, zorg dan dat u de NAS
Starter Utility heeft geïnstalleerd en dat uw de servernaam correct
heeft ingetypt. Als er dan nog geen verbinding is, probeer dan de
NAS Starter Utility stappen nogmaals.
• Zorg ervoor dat het IP-adres van uw computer zich in het zelfde
subnet als het IP-adres van NSA bevindt. U kunt de zoekhulp
gebruiken om het IP-adres van NSA te vinden. Zie de appendix van
de Gebruikshandleiding voor het instellen van het IP-adres van uw
computer in het geval u dit wilt veranderen. Sla dit over als u weet
dat zich routers bevinden tussen uw computer en de NSA (zoals
wanneer u via het Internet verbinding maakt).
• Ping de NSA van uw computer. Zorg ervoor dat dat Ethernet
adapter van uw computer geïnstalleerd is en goed werkt. Klik op
een (Windows) computer, Start, (Alle) Programma's,
Accessoires en vervolgens Opdrachtregel. Typ in het
Opdrachtregel venster “ping” gevolgd door het IP-adres van de
NSA en druk op [ENTER]. Gebruik de zoekhulp om het IP-adres
van de NSA te vinden als u dit niet weet.
• Gebruik Internet Explorer 6.0, Mozilla Firefox 1.07, Netscape
Navigator 7.0 of latere versies hiervan met JavaScript aan.
88

SVENSKA
SVENSKA
Introduktion
NSA låter dig dela filer och säkerhetskopiera data på ditt nätverk i
hemmet. Du kan även spela upp video, musik och visa fotofiler lagrade i
NSA med en medieklient som t.ex. DMA-2500.
Så här fungerar det
Ovanför visas NSA i ett hemmanätverk. Användare säkerhetskopierar
och delar data på NSA. DMA-2500 spelar upp NSA:s mediefiler på TV:n.
En USB-hårddiskenhet ger extra lagringsutrymme och filer kopieras
direkt från USB-minnet till NSA.
Placera NSA bakom en brandvägg och/eller IDP-enhet (Intrusion
Detection and Prevention) för att skydda den mot attacker från Internet.
Se bruksanvisningen på den medföljande CD-skivan för information om
alla funktioner hos NSA.
89

Denna snabbstartguide visar hur du:
• Installera hårddiskenheter, 91
• Anslut NSA, 92
• Åtkomst till NSA, 93
• NSA Inloggning, 99
Innan du börjar
Du behöver följande innan du kan komma igång:
• NSA
• Den medföljande CD-skivan innehåller NSA-upptäcktsverktyg,
Memeo Autobackup-program och bruksanvisning
• Nätadapter
• Medföljande Ethernet-kabel
• En SATA I eller SATA II kompatibel hårddisk med 15-stifts SATAströmanslutning
• eSATA-hårddisk och sladd (tillval)
• Stjärnskruvmejsel för att montera hårddisken i diskfacket
• USB-kabel (tillval: Du behöver bara denna ifall du vill utöka
lagringskapaciteten genom att ansluta kompatibla USB-enheter
(USB 2.0)). Det rekommenderas att USB-enheten använder en
egen extern strömadapter, om sådan finns.
• Dator med nätverkskort och TCP/IP installerat
• Nätverksenhet som exempelvis en switch, router eller hubb.
90

SVENSKA
Installera hårddiskenheter
När du installerar en hårddiskenhet på NSA och skapar en volym,
raderas all befintliga data på disken.
NSA måste stängas av innan du tar bort eller installerar en
hårddisk.
När du skapar en volym formateras hårddisken. All data
förloras. Säkerhetskopiera eventuella filer på hårddisken till
en annan plats innan du installerar disken i NSA.
1. Kontrollera att ström- och Ethernet-kablar är bortkopplade från NSA.
2. Placera NSA på ett plant underlag med den
undre panelen uppåtvänd. Detta frilägger den
undre panelen där vingskruven sitter. Lossa
vingskruven med en skruvmejsel med platt
huvud eller ett mynt.
3. Flytta NSA till ett upprätt läge och avlägsna den
främre luckan för att öppna hårddisken enligt
följande anvisningar:
4. För in hårddisken i brickan tills den sitter
ordentligt i NSA.
91

5. Fäst den främre panelen över hårddiskbrickan.
Placera NSA på ett plant underlag med den undre
panelen uppåtvänd och dra åt skruven.
Om du vill använda två hårddiskar och konfigurera dem
som RAID-volymer, måste du ha: 1) en SATA-hårddisk
installerad i NSA; och 2) en eSATA-hårddisk med dess
kabel. Det rekommenderas även att använda samma
diskstorlek och -modell för att få bästa prestanda. Se
bruksanvisningen för stegen för att skapa volymer på
din NSA.
Anslut NSA
1. Använd bifogad Ehternet-kabel för att ansluta LAN
-porten på baksidan av NSA till en dator, switch,
eller router på ditt nätverk.
2. Anslut nätkabelns ena ände till uttaget POWER på
baksidan av NSA och den andra änden till den
externa strömförsörjningen. Anslut den externa
strömförsörjningen till ett nätuttag.
Använd ENBART den medföljande strömkällan.
3. Tryck på strömknappen framtill på NSA för att sätta igång den. Titta
på frontpanelens lampor.
92

SVENSKA
Om ingen lampa tänds, kontrollera att strömkabeln är
ordentligt ansluten och att strömadaptern är påslagen.
• Strömlampknappen lyser blå.
• Lampan SYS lyser grön efter lyckad start
(det tar ungefär 50 sekunder).
• Lamporna HDD tänds om NSA detekterar
hårddiskenheter i diskfacken.
• Bakpanelens LAN-port har en lampa som
tänds om Ethernet-porten är rätt ansluten till ditt nätverk. Den
blinkar medan trafik skickas eller tas emot.
Du stanger av NSA genom att trycka in och halla kvar stromknappen tills
du hor en signal. Sedan slapper du knappen.
Åtkomst till NSA
Använd NAS Starter Utility för att öppna NSA. Följ dessa steg:
1. Sätt in den medföljande CD-skivan i din CD-ROM-enhet. Klicka på
Setup (inställning) på skärmen som visas. Klicka därefter på länken
NAS Starter Utility.
Om denna skärmbild inte visas, använd Windows Explorer
(utforskaren-den här datorn) för att gå till CD-ROM
(vanligtvis enhet D). Dubbelklicka på setup.exe.
93

2. Installationsguiden startar. Följ installationsprogrammets
instruktioner. Klicka på Finish (slutför) för att slutföra installationen.
3. I Windows, klicka på Start > All Programs > ZyXEL > NAS Starter
Utility > ZyXEL NAS Starter Utility för att köra upptäcktsverktyget.
Om din dator har fler än ett nätverkskort, uppmanas du att välja ett av
dem.
NSA Initiering
Kontrollera att du har installerat hårddisken innan du utför följande steg.
94

SVENSKA
1. I följande fönster, kontrollera Status (Statusen) för NSA. Om den
visar Up (Upp), kan du börja använda NSA. Om den visar
Uninitialized (Ej initierad), klicka på ikonen Konfigurera för att starta
initieringen.
2. Ange dina inställningar i fönstret Network Configuration
(Nätverkskonfiguration).
• Välj DHCP om du har en nätverksenhet (som en router eller ett
kabelmodem) som tilldelar IP-adresser till klienter. Denna väljer
automatiskt Dynamic DNS (Dynamisk DNS).
• Välj Static IP (Statisk IP) om klienten i nätverket har specifik
adresstilldelning. Denna väljer automatiskt Static DNS (Statisk
DNS). Ange informationen i motsvarande fält (IP Address, IP
Subnet Mask (IP nätverksdelens mask), Gateway Address,
Primary DNS (Primär DNS) and Secondary DNS (Sekundär
95

DNS)). Du kan även klicka på Copy from NSU (Kopiera från NSU)
för att låta NAS Starter Utlity hitta och fylla i dessa värden.
Använd normalvärdena om nätverksadministratören inte tillhandahöll
denna information. Klicka på Next
(Nästa).
96

SVENSKA
3. Initiera hårddisken och installera mjukvarant. Klicka på Browse
(Bläddra) och öppna platsen för filen som tillhandahölls av
administratören eller som kom med drivrutinen på CD-ROM-skivan.
Alternativet Initialize Hard Disk (Initiera hårddisk) väljs som
standard. Detta formaterar om och raderar all data på hårddisken.
All data på hårddisken förloras och kan inte återskapas.
Klicka på Next (Nästa) för att ladda upp det fasta programmet.
4. Bekräfta dina inställningar i följande fönster och klicka på Next
(Nästa).
97

5. Hårddiskinitieringen samt installationen av mjukvaran startar. Om
processen är problemfri, startas NSA om. Klicka på Done (Klar).
1
2
6. Fönstret Enhetslistavisar att NSA Status (Statusen) håller att
Rebooting (Startas om). Klicka på Discover (Upptäck) för att
uppdatera fönstret tills NSA Status (Statusen) visar Up (Upp).
7. Du kan nu använda NSA och göra följande:
• Klicka på ikonen Admin för att visa webbkonfiguratorns
inloggningsskärm (se sida 99).
98

SVENSKA
• Om du vill ändra NSAs IP-adress, klicka på ikonen under Config.
• För att mappa NSA till en Windows-nätverksenhet, klicka på ikonen
under Map.
• Du uppdaterar skärmen genom att klicka på Discover (upptäck).
NSA Inloggning
Detta avsnitt beskriver hur du loggar in i NSA och ändrar
administratörslösenordet.
Om du inte kan komma till inloggningsskärmen, se
felsökningsavsnittet i slutet av denna guide.
99

1. Ange standardanvändarnamn ‘admin’ och lösenord ‘1234’ och klicka
på Login (logga in).
Användarnamn och lösenord är skiftlägeskänsliga.
Kontrollera att du inte har låst tangentbordet i läget för
versaler (tangenten Caps Lock).
2. Du rekommenderas att byta till ett nytt lösenord (och att skriva ner
det). Klicka på Apply (verkställ) för att spara dina ändringar och gå till
nästa skärm.
3. Skärmen My NSA (min NSA) visas.
Använd programvaran Memeo Autobackup som medföljer på CD-skivan
för att automatiskt säkerhetskopiera valda filer från datorn till NSA
närhelst du modifierar filerna. Se bruksanvisningen för ytterligare detaljer
om detta.
100
 Loading...