

Page 1

NSA-220
Network Storage Appliance
User’s Guide
Version 2.10
11/2007
Edition 1
DEFAULT LOGIN
Web Address nsa220
Password 1234
www.zyxel.com
Page 2

Page 3

About This User's Guide
About This User's Guide
Intended Audience
This manual is intended for people who want to configure the NSA using the web
configurator. A basic knowledge of TCP/IP networking concepts and topology will be helpful.
Related Documentation
• Quick Start Guide
The Quick Start Guide is designed to help you get up and running right away. It contains
information on setting up your network and configuring for Internet access.
• Web Configurator Online Help
Embedded web help for descriptions of individual screens and supplementary
information.
• Supporting Disk
Refer to the included CD for support documents.
• ZyXEL Web Site
Please refer to www.zyxel.com
certifications.
for additional support documentation and product
User Guide Feedback
Help us help you. Send all User Guide-related comments, questions or suggestions for
improvement to the following address, or use e-mail instead. Thank you!
The Technical Writing Team,
ZyXEL Communications Corp.,
6 Innovation Road II,
Science-Based Industrial Park,
Hsinchu, 300, Taiwan.
E-mail: techwriters@zyxel.com.tw
NSA-220 User’s Guide
3
Page 4
Document Conventions
Document Conventions
Warnings and Notes
These are how warnings and notes are shown in this User’s Guide.
1 Warnings tell you about things that could harm you or your device.
" Notes tell you other important information (for example, other things you may
need to configure or helpful tips) or recommendations.
Syntax Conventions
• The NSA may be referred to as the “NSA”, the “device” or the “system” in this User’s
Guide.
• Product labels, screen names, field labels and field choices are all in bold font.
• A key stroke is denoted by square brackets and uppercase text, for example, [ENTER]
means the “enter” or “return” key on your keyboard.
• “Enter” means for you to type one or more characters and then press the [ENTER] key.
“Select” or “choose” means for you to use one of the predefined choices.
• A right angle bracket ( > ) within a screen name denotes a mouse click. For example,
Maintenance > Log > Log Setting means you first click Maintenance in the navigation
panel, then the Log sub menu and finally the Log Setting tab to get to that screen.
• Units of measurement may denote the “metric” value or the “scientific” value. For
example, “k” for kilo may denote “1000” or “1024”, “M” for mega may denote “1000000”
or “1048576” and so on.
• “e.g.,” is a shorthand for “for instance”, and “i.e.,” means “that is” or “in other words”.
4
NSA-220 User’s Guide
Page 5
Document Conventions
Icons Used in Figures
Figures in this User’s Guide may use the following generic icons. The NSA icon is not an
exact representation of your device.
NSA Computer Notebook computer
Server Television Firewall
Router Switch Internet
NSA-220 User’s Guide
5
Page 6

Safety Warnings
Safety Warnings
1 For your safety, be sure to read and follow all warning notices and instructions.
• Do NOT use this product near water, for example, in a wet basement or near a swimming
pool.
• Do NOT expose your device to dampness, dust or corrosive liquids.
• Do NOT store things on the device.
• Do NOT install, use, or service this device during a thunderstorm. There is a remote risk
of electric shock from lightning.
• Connect ONLY suitable accessories to the device.
• Do NOT open the device or unit. Opening or removing covers can expose you to
dangerous high voltage points or other risks. ONLY qualified service personnel should
service or disassemble this device. Please contact your vendor for further information.
• ONLY qualified service personnel should service or disassemble this device.
• Make sure to connect the cables to the correct ports.
• Place connecting cables carefully so that no one will step on them or stumble over them.
• Always disconnect all cables from this device before servicing or disassembling.
• Use ONLY an appropriate power adaptor or cord for your device.
• Connect the power adaptor or cord to the right supply voltage (for example, 110V AC in
North America or 230V AC in Europe).
• Do NOT allow anything to rest on the power adaptor or cord and do NOT place the
product where anyone can walk on the power adaptor or cord.
• Do NOT use the device if the power adaptor or cord is damaged as it might cause
electrocution.
• If the power adaptor or cord is damaged, remove it from the power outlet.
• Do NOT attempt to repair the power adaptor or cord. Contact your local vendor to order a
new one.
• Do not use the device outside, and make sure all the connections are indoors. There is a
remote risk of electric shock from lightning.
• CAUTION: RISK OF EXPLOSION IF BATTERY (on the motherboard) IS REPLACED
BY AN INCORRECT TYPE. DISPOSE OF USED BATTERIES ACCORDING TO
THE INSTRUCTIONS. Dispose them at the applicable collection point for the recycling
of electrical and electronic equipment. For detailed information about recycling of this
product, please contact your local city offi ce, your household waste disposal service or the
store where you purchased the product.
• Do NOT obstruct the device ventilation slots, as insufficient airflow may harm your
device.
6
This product is recyclable. Dispose of it properly.
NSA-220 User’s Guide
Page 7
Safety Warnings
NSA-220 User’s Guide
7
Page 8

Safety Warnings
8
NSA-220 User’s Guide
Page 9

Contents Overview
Contents Overview
Introduction ............................................................................................................................23
Getting to Know Your NSA ........................................................................................................ 25
Web Configurator Basics .................................... ... .......................................................... ... ....... 29
Tutorials .....................................................................................................................................45
Status Screen ............................................................................................................................ 63
System Setting and Applications .........................................................................................67
System Setting Screens ..................... .......................................................... ... ... .... ... ... ... ... ....... 69
Storage Screens .......................................................................................................................73
Network Screen ......................................................................................................................... 85
Application Screens ...................................................................................................................89
User Accounts and Shares .................................................................................................113
Users ........................................................................................................................................115
Shares ......................................................................................................................................119
Maintenance, Protecting Data, and Media Client ..............................................................125
Maintenance Screens .............................................................................................................127
Protecting Your Data ................................................................................................................135
Media Client Software .................................................. ........................................................... 137
Memeo Autobackup Software ...................................... ... ... ... .... ... ... ... ..................................... 139
Troubleshooting and Specifications ..................................................................................141
Troubleshooting ......................................................................................................................143
Product Specifications ............................................................................................................. 155
Appendices and Index .........................................................................................................163
NSA-220 User’s Guide
9
Page 10

Contents Overview
10
NSA-220 User’s Guide
Page 11

Table of Contents
Table of Contents
About This User's Guide..........................................................................................................3
Document Conventions............................................................................................................4
Safety Warnings ........................................................................................................................6
Contents Overview ...................................................................................................................9
Table of Contents....................................................................................................................11
List of Figures.........................................................................................................................17
List of Tables...........................................................................................................................21
Part I: Introduction................................................................................. 23
Chapter 1
Getting to Know Your NSA.....................................................................................................25
1.1 NSA Overview ................. ... ... .... ... .......................................................... ... ... .......................25
1.1.1 LEDs ......................................................... .... ............................................................. 26
1.1.2 COPY Button ....................... ... ... ... .... .......................................................... ... ... ... .... ...28
Chapter 2
Web Configurator Basics.......................................................................................................29
2.1 Web Configurator Overview .................................................................................................29
2.2 Accessing the NSA Web Configurator ............. ... .... ... ... ... .... ... ... ... ....................................... 29
2.2.1 Access the NSA Via NDU ............................. ... ... ... .... ... ... ... ....................................... 29
2.2.2 Web Browser Access ................ ... ........................................................... ... ... ... ... .... ... 30
2.3 Login .......................................... ... ... .......................................................... ... .......................30
2.4 User-level Screens Overview ................... ... ... ... .......................................................... .... ... 31
2.5 My NSA Screen ...................................................................................................................33
2.5.1 My NSA Share Browsing Screen ........................................ ... .... ... ... .......................... 34
2.5.2 My NSA Share Browsing Move to or Copy to Screen ................................................35
2.5.3 My NSA Management Overview Screen ................ .... ... ... ... ....................................... 36
2.5.4 My NSA Change Share Properties Screen ........................ ....................................... 36
2.5.5 Share and Folder Names .................... ... ... .... ... ... ... .... ... ... .......................................... 38
2.5.6 Share Paths ........ ... ... ... .... .......................................................... ... ... ... .... ... ... ... ..........39
2.5.7 Password Screen ...................................................................................................... 39
2.6 Administration Screens ................................................................... .... ... ... ... .... ... ... ... ... .......40
NSA-220 User’s Guide
11
Page 12

Table of Contents
2.6.1 Global Administration Icons ....................................................................................... 41
2.6.2 Navigation Panel ....................... ... .... ..........................................................................42
2.6.3 Main Window .......................... ... .......................................................... .... ... ... ... ... .......43
2.6.4 Status Messages .......... .... ... .......................................................... ... .......................... 43
2.6.5 Common Screen Icons ..................... ... ... ... .......................................................... .... ... 43
Chapter 3
Tutorials...................................................................................................................................45
3.1 File Sharing Tutorials ............. .... ... ... ... ... .... ... ... .......................................................... ..........45
3.1.1 Creating a User Account ............................................................................................ 45
3.1.2 Creating a Share ........................................................................................................ 47
3.1.3 Accessing a Share From Windows Explorer .......................... .................................... 49
3.1.4 Accessing a Share Using FTP ...................................................................................50
3.1.5 Accessing a Share Through the Web Configurator .................................... ................ 51
3.2 Download Service Tutorial ............ ... ... ... .... ... ... ... .... ... ... ... .... ................................................ 52
3.3 Broadcatching Tutorial ........ ... .... ... ... ... ... .... .......................................................... ... ... ... ....... 56
3.4 Printer Server Tutorial ............................................. ... .......................................................... 59
Chapter 4
Status Screen..........................................................................................................................63
4.1 Status Screen ..... ... ... .... ... ... ... .... ... .......................................................... ... ... .... ... ................63
4.1.1 Session Example (Windows) ................................. .... ... ... ... ....................................... 65
Part II: System Setting and Applications............................................. 67
Chapter 5
System Setting Screens.........................................................................................................69
5.1 System Setting Screens ..................................................................................................... 69
5.1.1 Windows/CIFS ................................................. ... ... .... ................................................ 69
5.2 Server Name ............................................. ... ... ... ................................................................. 69
5.3 Date/Time ............. ... .... ... ... ... .... ... ... .......................................................... ... .... ... ... ............. 70
5.3.1 Time Lag ...................................... .... ... ... ... .... ............................................................. 70
5.3.2 Date/Time Screen ..................................... .... .......................................................... ... 70
Chapter 6
Storage Screens.....................................................................................................................73
12
6.1 Storage Introduction ........................................................................................................... 73
6.2 Storage Overview Screen ....................................................................................................73
6.3 Creating an Internal Volume ................................................................................................74
6.4 Editing a Volume ..................................................................................................................76
6.5 Volumes and RAID ..............................................................................................................76
NSA-220 User’s Guide
Page 13

Table of Contents
6.5.1 Choosing A Storage Method For a Volume ......................... ....................................... 77
6.5.2 Volume Status ..... ... ... ... .... .......................................................... ... .............................77
6.6 Disk Replacement Restrictions ............................................................................................ 78
6.6.1 Resychronizing or Recovering a RAID 1 Volume .......................................... ... ... .... ... 79
6.6.2 Disk Replacement and Volume Labels ...................................................................... 79
6.7 Creating an External Volume .............................................................................................. 79
6.8 External Disks ............... ... .......................................................... ... ... .... ... ... ... .... ... ... .............80
6.9 RAID ................................................................ ... .... ............................................................. 81
6.9.1 JBOD ................... ... ... ... .... ... ... .......................................................... ... .... ...................82
6.9.2 RAID 0 ....................... ... .... ... ... ... ... ........................................................... ... ... .............82
6.9.3 RAID 1 ....................... ... .... ... ... ... ... ........................................................... ... ... .............83
6.9.4 RAID and Data Protection .......................................................................................... 83
Chapter 7
Network Screen.......................................................................................................................85
7.1 Network Settings .......................................... ... ... .... ... .......................................................... 85
7.1.1 IP Address ........................... ... ... .......................................................... .... ... ... ... ..........85
7.1.2 DNS Server Address .............................................. .... ... ............................................. 85
7.1.3 Jumbo Frames .................................... ... ... .... ... ... ... .... ... ............................................. 85
7.2 Network Config Screen ....... ... .......................................................... .... ... ... ... .... ... ... ... ... ....... 86
Chapter 8
Application Screens ...............................................................................................................89
8.1 Application Screens ...................................... ... ... .... ... ... ... .... ................................................ 89
8.2 FTP Access for NSA Files ...................................................................................................89
8.3 Sharing Media Files on Your Network ................................................................................ 90
8.3.1 iTunes Server ................................................ ... ... ... .... ... ... ... ... .................................... 91
8.3.2 Songs and Videos from the iTunes Store ................................................................... 92
8.4 Media Server Screen ....................................... ... .... ............................................................. 92
8.5 Download Service ............... ... .... .......................................................... ... ... ... .... ... ... ... ... ....... 93
8.5.1 BitTorrent .......................... ... ... ... ... .... .......................................................... ... ... ... ....... 94
8.5.2 Protecting Your Network and NSA When Using BitTorrent ........................................ 94
8.6 Download Service Screen ......................... ... ... ... .... ... ... ... .... ... ............................................. 96
8.7 Adding a Download Task ....................................................................................................99
8.8 Configuring Your General Download Preferences ............................................................100
8.9 Web Publishing ................................................................................................................. 101
8.9.1 Accessing Web-published Shares from the Internet ........ ... ... .... ... ... ... .... ... ... ...........101
8.9.2 Web Publishing Port Number ................................................................................... 102
8.10 Web Publishing Screen ...................................................................................................102
8.11 Web Publishing Example ............................... ... .... ... ........................................................ 104
8.12 Broadcatching .................................................................................................................. 105
8.12.1 Channel Guides ..................................................................................................... 106
8.13 Broadcatching Screen .....................................................................................................106
NSA-220 User’s Guide
13
Page 14

Table of Contents
8.14 Adding or Editing a Broadcatching Channel .................................................................... 108
8.15 Printer Sharing ................................................................................................................. 109
8.16 Print Server Screen ..........................................................................................................110
8.17 Print Server Rename ........................................................................................................110
Part III: User Accounts and Shares.....................................................113
Chapter 9
Users......................................................................................................................................115
9.1 User Accounts Introduction ......................................... ... .... ... ... ... ......................................115
9.2 Users Overview Screen ......................................................................................................115
9.2.1 User Icons ................. .......................................................... ... .... ...............................116
9.3 Adding or Editing an Account ................................... ......................................................... 116
9.3.1 Usernames ................................................ .... ... ... ... .... ...............................................117
9.4 Delete Account Screen .................................... ... .... ... .........................................................118
Chapter 10
Shares....................................................................................................................................119
10.1 Shares Introduction ..........................................................................................................119
10.1.1 Share Icons .............................................................................................................119
10.1.2 Shares Screen ........................................................................................................119
10.2 Adding or Editing Share ..................................................................................................120
10.2.1 Public and ANONYMOUS Share Access Rights ................................................... 122
10.3 Share Path Browse Screen .............................................................................................122
Part IV: Maintenance, Protecting Data, and Media Client................. 125
Chapter 11
Maintenance Screens..........................................................................................................127
11.1 Maintenance Overview .................................................................................................... 127
11.2 Log .................................................................................................................................. 127
11.3 Log Classes .....................................................................................................................128
11.4 Log Severity Levels ..........................................................................................................128
11.5 Log Messages ..................................................................................................................129
11.6 Configuration ...................................................................................................................131
11.7 Firmware Upgrade ..........................................................................................................131
11.8 Shutdown ........................................................................................................................ 132
Chapter 12
Protecting Your Data.............................................................................................................135
14
NSA-220 User’s Guide
Page 15

Table of Contents
12.1 Protection Methods ........................ ....................... ...................... ....................... .............. 135
12.1.1 Configuration File Backup and Restoration ............................................................ 135
12.1.2 Memeo Autobackup ............................................................................................... 136
Chapter 13
Media Client Software...........................................................................................................137
13.1 Media Client Introduction .................................................................................................137
13.2 Using the Media Client Software .....................................................................................137
Chapter 14
Memeo Autobackup Software..............................................................................................139
14.1 Memeo Autobackup Introduction ....................................... .............................................. 139
14.2 Using the Memeo Autobackup Software ......................................................................... 139
Part V: Troubleshooting and Specifications...................................... 141
Chapter 15
Troubleshooting...................................................................................................................143
15.1 Troubleshooting Overview ...............................................................................................143
15.2 Power, Hardware, Connections, and LEDs ..................................................................... 143
15.3 NSA Login and Access ....................................................................................................145
15.3.1 Reset the NSA ........... ............................................................................................ 146
15.3.2 Enabling Scripting of Safe ActiveX Controls .......................................................... 147
15.4 I Cannot Access The NSA ...............................................................................................148
15.5 External USB Drives ........................................................................................................149
15.6 Some Features’ Screens Do Not Display ........................................................................ 150
15.7 Media Server Functions ........................... ................... ....................... ...................... ........ 150
15.8 Download Service and Broadcatching Functions ............................................................152
15.9 Web Publishing ................................................................................................................ 152
Chapter 16
Product Specifications.........................................................................................................155
16.1 Physical Features ............................................................................................................ 155
16.2 Firmware Features ..........................................................................................................155
16.3 Specification Tables ......................................................................................................... 156
16.4 Supported Media Server Content Formats ...................................................................... 160
16.5 Supported iTunes Server Content Formats ..................................................................... 160
16.6 Power Consumption ........................................................................................................ 160
16.7 Compatible Hard Disks ....................................................................................................161
NSA-220 User’s Guide
15
Page 16

Table of Contents
Part VI: Appendices and Index ........................................................... 163
Appendix A Setting up Your Computer’s IP Address............................................................165
Appendix B Pop-up Windows, JavaScripts and Java Permissions......................................179
Appendix C Common Services ............................................................................................187
Appendix D Open Source Licences .....................................................................................191
Appendix E Legal Information ..............................................................................................221
Appendix F Customer Support.............................................................................................223
Index.......................................................................................................................................229
16
NSA-220 User’s Guide
Page 17

List of Figures
List of Figures
Figure 1 Example of the NSA in a Home Network ................................................................................. 25
Figure 2 NSA Front Panel .....................................................................................................................26
Figure 3 NSA Rear Panel ...................................................................................................................... 27
Figure 4 NDU Main Screen ....................................................................................................................30
Figure 5 NSA URL .................................................................................................................................. 30
Figure 6 NSA Login Screen ....................................................................................................................31
Figure 7 Change Password Screen ........................................................................................................ 31
Figure 8 My NSA ................................................................................................................................... 32
Figure 9 My NSA ................................................................................................................................... 33
Figure 10 My NSA Share Browsing .......................................................................................................34
Figure 11 My NSA Share Browsing > Move to (or Copy to) .................................................................. 35
Figure 12 My NSA Management Overview ...........................................................................................36
Figure 13 My NSA Change Share Properties ........................................................................................ 37
Figure 14 Password ............................................................................................................................... 40
Figure 15 Status ................................................................................................................................... 41
Figure 16 Navigation Panel Links ...........................................................................................................42
Figure 17 My NSA ................................................................................................................................. 45
Figure 18 Users ..................................................................................................................................... 46
Figure 19 Users > Create Example ......................................................................................................46
Figure 20 Users (Account Created) ......................................................................................................46
Figure 21 Shares .................................................................................................................................... 47
Figure 22 Shares > Create Example ..... ... .... ... ... ... ... .... ... ... ... .... ... ... ... .... ... ... ... ... .... ... ... ... .... ...................47
Figure 23 Shares > Create > Browse > Create Folder Example ............................................................48
Figure 24 Shares > Create > Browse > New Folder Example ................................................................ 48
Figure 25 Shares > Create Example ..... ... .... ... ... ... ... .... ... ... ... .... ... ... ... .... ... ... ... ... .... ... ... ... .... ...................49
Figure 26 NSA Top Level .......................................................................................................................49
Figure 27 Map Network Drive .................................................................................................................49
Figure 28 Enter Network Password ....................... ................................................. ................................ 50
Figure 29 Example Share Mapped (Folders View) .................................................................................50
Figure 30 FTP Example: Typing the FTP Target ....................................................................................51
Figure 31 FTP Example: Enter the Password .............................. ... ... .... ................................................ 51
Figure 32 FTP Example: Logged In ........................................................................................................ 51
Figure 33 My NSA User Login ...............................................................................................................52
Figure 34 My NSA User Login ...............................................................................................................52
Figure 35 Download Link Example ........................................................................................................ 53
Figure 36 Copy Shortcut ........................................................................................................................ 54
Figure 37 Download Service Tutorial: My NSA .....................................................................................54
Figure 38 Download Service Tutorial: Download Service ...................................................................... 54
NSA-220 User’s Guide
17
Page 18

List of Figures
Figure 39 Download Service Tutorial: Paste Link ..................................... ...................................... .......55
Figure 40 Download Service Tutorial: Apply Pasted Link ...................................................................... 55
Figure 41 Download Service Tutorial: Download Task Added ...............................................................55
Figure 42 Broadcatching Link Example ................................................................................................. 56
Figure 43 Copy Link Location ...................... ............................................. ............................................. 57
Figure 44 Broadcatching Tutorial: My NSA ...........................................................................................57
Figure 45 Broadcatching Tutorial: Broadcatching .................................................................................. 58
Figure 46 Broadcatching Tutorial: Paste Link ......................................................................................... 58
Figure 47 Broadcatching Tutorial: Apply Pasted Link ....................... .... ... ... ... ... .... ................................ 58
Figure 48 Printer Sharing ........... .... ... ... ... .... ... ... ... ... .... ..........................................................................59
Figure 49 Printer Connected to NSA: Windows Explorer ...................................................................... 59
Figure 50 Printer Connected to NSA: Windows Explorer Warning ................................................. .... ... 59
Figure 51 Printer Driver Needed ............................................................................................................ 60
Figure 52 Applications > Print Server .................................................................................................... 60
Figure 53 Printer Screen in Windows Explorer ......................... ... ... ... .... ... ... ... ... .... ... ... ... .......................60
Figure 54 Status ..................................................................................................................................... 63
Figure 55 Session Example (Windows) ............................................................................... ... ... ... .......... 65
Figure 56 System Setting > Server Name ..............................................................................................70
Figure 57 System Setting > Date/Time ...................................................................................................71
Figure 58 System > Storage ..................................................................................................................73
Figure 59 Delete a Volume Warning Screen ......... ... .... ... ... .......................................................... ... ....... 74
Figure 60 System > Storage > Create an Internal Volume ....................................................................75
Figure 61 System > Storage > Edit .......................................... ............................................................. 76
Figure 62 System > Storage > Create an External Volume ................................................................... 80
Figure 63 Jumbo Frames .......................................................................................................................86
Figure 64 System Setting > Network > TCP/IP ..................................................................................... 87
Figure 65 Applications > FTP ............ ... ... .... ... ... ... ... .... ... .......................................................................90
Figure 66 NSA link in iTunes .................................................................................... ... .......................... 91
Figure 67 Applications > Media Server .................................................. ... ... ... ... .... ... ... ... .... ... ... .............92
Figure 68 Firewall ................................................................................................................................... 95
Figure 69 Firewall Blocking Incoming BitTorrent Requests .................................................................... 95
Figure 70 Firewall Configured to Allow Incoming BitTorrent Requests ................... ... ... .......................... 96
Figure 71 Applications > Download Service ............................................. ... ... ... .... ... ... ... .... ... ... ... ... . ......97
Figure 72 Applications > Download Service > Add ...............................................................................99
Figure 73 Applications > Download Service > Preferences ................................................................ 100
Figure 74 Web Publishing Port Number Example ................................................................................ 102
Figure 75 Applications > Web Publishing ............................................................................................. 103
Figure 76 Applications > Web Publishing (Example) .............................................. ................ .............. 104
Figure 77 Browsing to an NSA Share Example ....................................................................................105
Figure 78 Feed Icon ........... ... ... ... .... ... ... ............................................................. .... ... ...........................106
Figure 79 Applications > Broadcatching .............................................................................................. 107
Figure 80 Applications > Broadcatching > Add ................................................................................... 108
Figure 81 Printer Sharing ........... .... ... ... ... .... ... ... ... ... .... ........................................................................109
18
NSA-220 User’s Guide
Page 19

List of Figures
Figure 82 Applications > Print Server ...................................................................................................1 1 0
Figure 83 Applications > Print Server > Rename .................................................................................110
Figure 84 Users .....................................................................................................................................115
Figure 85 Users > Add or Edit an Account ...........................................................................................116
Figure 86 Users > Delete Account ..................... ... ... .... ... ... ... .... ............................................................118
Figure 87 Shares ........................ .... ... ... ... .......................................................... .... ... ... ... .....................120
Figure 88 Shares > Add Share ........................................................................................................... 121
Figure 89 Share Path Browse .............................................................................................................122
Figure 90 Maintenance > Log ................ ... .... ... ... ... ... .............................................................. ..............127
Figure 91 Maintenance > Configuration ..............................................................................................131
Figure 92 Maintenance > FW Upgrade ............................................................................................... 132
Figure 93 Maintenance > Shutdown ............................................................... ..................................... 132
Figure 94 Maintenance > Shutdown > Confirm Restart ........................................................................ 133
Figure 95 Maintenance > Shutdown > Confirm Shutdown ................................................................... 133
Figure 96 Internet Options: Security .....................................................................................................147
Figure 97 Security Settings - Script Safe ActiveX Controls .................................................................. 148
Figure 98 iTunes Eject Button ............................................................................................................. 151
Figure 99 iTunes Reconnected ............................................................................................................ 151
Figure 100 WIndows 95/98/Me: Network: Configuration ...................................................................... 166
Figure 101 Windows 95/98/Me: TCP/IP Properties: IP Address .......................................................... 167
Figure 102 Windows 95/98/Me: TCP/IP Properties: DNS Configuration .............................................. 168
Figure 103 Windows XP: Start Menu .................................................................................................... 169
Figure 104 Windows XP: Control Panel ...............................................................................................169
Figure 105 Windows XP: Control Panel: Network Connections: Properties . ... ... .... ... ... ... .... ... ... ... ... .... . 170
Figure 106 Windows XP: Local Area Connection Properties ............................................................... 170
Figure 107 Windows XP: Internet Protocol (TCP/IP) Properties ............... ... ... ... .... ... ........................... 171
Figure 108 Windows XP: Advanced TCP/IP Properties ....................................................................... 172
Figure 109 Windows XP: Internet Protocol (TCP/IP) Properties ............... ... ... ... .... ... ........................... 173
Figure 110 Macintosh OS X: Apple Menu ............................................................................................174
Figure 111 Macintosh OS X: Network ................................................................................................... 174
Figure 112 Red Hat 9.0: KDE: Network Configuration: Devices ..........................................................175
Figure 113 Red Hat 9.0: KDE: Ethernet Device: General ....................................................................176
Figure 114 Red Hat 9.0: KDE: Network Configuration: DNS ............................................................... 176
Figure 115 Red Hat 9.0: KDE: Network Configuration: Activate ............................................ .............. 1 77
Figure 116 Red Hat 9.0: Dynamic IP Address Setting in ifconfig-eth0 .. ... ........................................... 177
Figure 117 Red Hat 9.0: Static IP Address Setting in ifconfig-eth0 ....................................................177
Figure 118 Red Hat 9.0: DNS Settings in resolv.conf ........................................................................178
Figure 119 Red Hat 9.0: Restart Ethernet Card ................................................................................... 178
Figure 120 Red Hat 9.0: Checking TCP/IP Properties ........................................................................178
Figure 121 Pop-up Blocker ...................................................................................................................179
Figure 122 Internet Options: Privacy .................................................................................................... 180
Figure 123 Internet Options: Privacy .................................................................................................... 181
Figure 124 Pop-up Blocker Settings .....................................................................................................181
NSA-220 User’s Guide
19
Page 20

List of Figures
Figure 125 Internet Options: Security ................................................................................................... 182
Figure 126 Security Settings - Java Scripting ....................................................................................... 183
Figure 127 Security Settings - Java ...................................................................................................... 183
Figure 128 Java (Sun) .......................................................................................................................... 184
Figure 129 Mozilla Firefox: Tools > Options .............................. ... ... ... .... ... ........................................... 185
Figure 130 Mozilla Firefox Content Security .........................................................................................185
20
NSA-220 User’s Guide
Page 21

List of Tables
List of Tables
Table 1 LEDs .........................................................................................................................................27
Table 2 User-level Global Labels and Icons .......................................................................................... 32
Table 3 My NSA ..................................................................................................................................... 34
Table 4 My NSA Share Browsing .......................................................................................................... 35
Table 5 My NSA Share Browsing > Move to (or Copy to) ............................................... .... ... ... ... ... .... ... 35
Table 6 My NSA Management Overview ...............................................................................................36
Table 7 My NSA Change Share Properties ........................................................................................... 37
Table 8 Password ..................................................................................................................................40
Table 9 Global Labels and Icons ...........................................................................................................41
Table 10 Screens Summary .................................................................................................................. 42
Table 11 Common Configuration Screen Icons .....................................................................................43
Table 12 Status ...................................................................................................................................... 64
Table 13 System Setting > Server Name ............................................................................................... 70
Table 14 System Setting > Date/Time ...................................................................................................71
Table 15 System > Storage ................................................................................................................... 74
Table 16 System > Storage > Create an Internal Volume ...................................................................... 75
Table 17 System > Storage > Edit .........................................................................................................76
Table 18 RAID Quick Comparison ......................................................................................................... 77
Table 19 System > Storage > Create an External Volume .................................................................... 80
Table 20 JBOD ...................................................................................................................................... 82
Table 21 RAID 0 .................................................................................................................................... 82
Table 22 RAID 1 .................................................................................................................................... 83
Table 23 System Setting > Network > TCP/IP ....................................................................................... 87
Table 24 Applications > FTP ................................................. .... ... ... ... .... ... ... ... ... .... ... ... ... .... ...................90
Table 25 Applications > Media Server .................................. .... ... ... ... .... ... ... ... ... .... ... ... ... .... ... ... .............92
Table 26 Applications > Download Service ........................ ... .... ... ... ... .... ... ... ... ... .... ... ... ... .... ... ... ... ... .......97
Table 27 Applications > Download Service > Add ................................................................................. 99
Table 28 Applications > Download Service > Preferences .................................................................. 100
Table 29 Applications > Web Publishing ................................................................................ ... ... ........103
Table 30 Applications > Broadcatching ................................................................................................ 107
Table 31 Applications > Broadcatching > Add ..................................................................................... 109
Table 32 Applications > Print Server ........................ .... ... ... ... ................................................................110
Table 33 Applications > Print Server > Rename ...................................................................................110
Table 34 Users ......................................................................................................................................1 16
Table 35 User Icons ................................. .... ... ............................................................. ... ......................116
Table 36 Users > Add or Edit an Account .................................................... ... ... .... ...............................117
Table 37 Users > Delete Account .........................................................................................................118
Table 38 Share Icons ............................ ... .... ... ... ... ... .... ... ... ...................................................................119
NSA-220 User’s Guide
21
Page 22

List of Tables
Table 39 Shares ...................................................................................................................................120
Table 40 Shares > Add Share (or Change Share Properties) ............................................................. 121
Table 41 Shares > Share Path Browse ................................................................................................ 123
Table 42 Maintenance > Log ... ... .... ... ... ... .... ... ... ... ... .... ... ... ... ............................................................... 128
Table 43 Log Classes .......................................................................................................................... 128
Table 44 Log Severity Levels ...............................................................................................................128
Table 45 Log Messages .......................................................................................................................129
Table 46 Maintenance > Configuration ................................................................................................ 131
Table 47 Maintenance > FW Upgrade ..................... .... ... ... ... .... ... ... ... .... ... ... ... ... .... ... ... ... .... ... ... ... ........ 132
Table 48 Maintenance > Shutdown .....................................................................................................132
Table 49 Overview of Protection Methods ........................................................................................... 135
Table 50 Ports Blocked By Default in Firefox ......................................................................................153
Table 51 Physical Features ................................................................................................................. 155
Table 52 Firmware Features ................................................................................................................ 155
Table 53 NSA Hardware Specifications ............................................................................................... 156
Table 54 NSA Firmware Specifications ................................................................................................157
Table 55 Supported Standards and Recommendations ...................................................................... 158
Table 56 Supported Media Server Content Formats ...........................................................................160
Table 57 Power Consumption in Watts (W) .........................................................................................161
Table 58 .............................................................................................................................................. 161
Table 59 Commonly Used Services ..................................................................................................... 187
22
NSA-220 User’s Guide
Page 23
PART I
Introduction
Getting to Know Your NSA (25)
Web Configurator Basics (29)
Tutorials (45)
Status Screen (63)
23
Page 24

24
Page 25
CHAPTER 1
Getting to Know Your NSA
This chapter covers the main features and applications of the NSA.
1.1 NSA Overview
Use the NSA (Network Storage Appliance) to do the following.
• Share files between computers on your network.
• Back up files from your computers to the NSA.
• Use the COPY button to copy files directly to the NSA from USB devices like card
readers, MP3 players, memory sticks, and digital cameras without using a computer.
• Have the NSA handle large file downloads.
• Automatically download files from website feeds for convenient viewing.
• Play the NSA’s video, music and photo files on your computers using the included media
client software.
• Play the NSA’s video, music and photo files on hardware-based media clients like the
DMA-1000.
• Use the NSA’s web site to share files with remote users.
• Use iTunes on your computer to play video and music files stored on the NSA.
• Share printers.
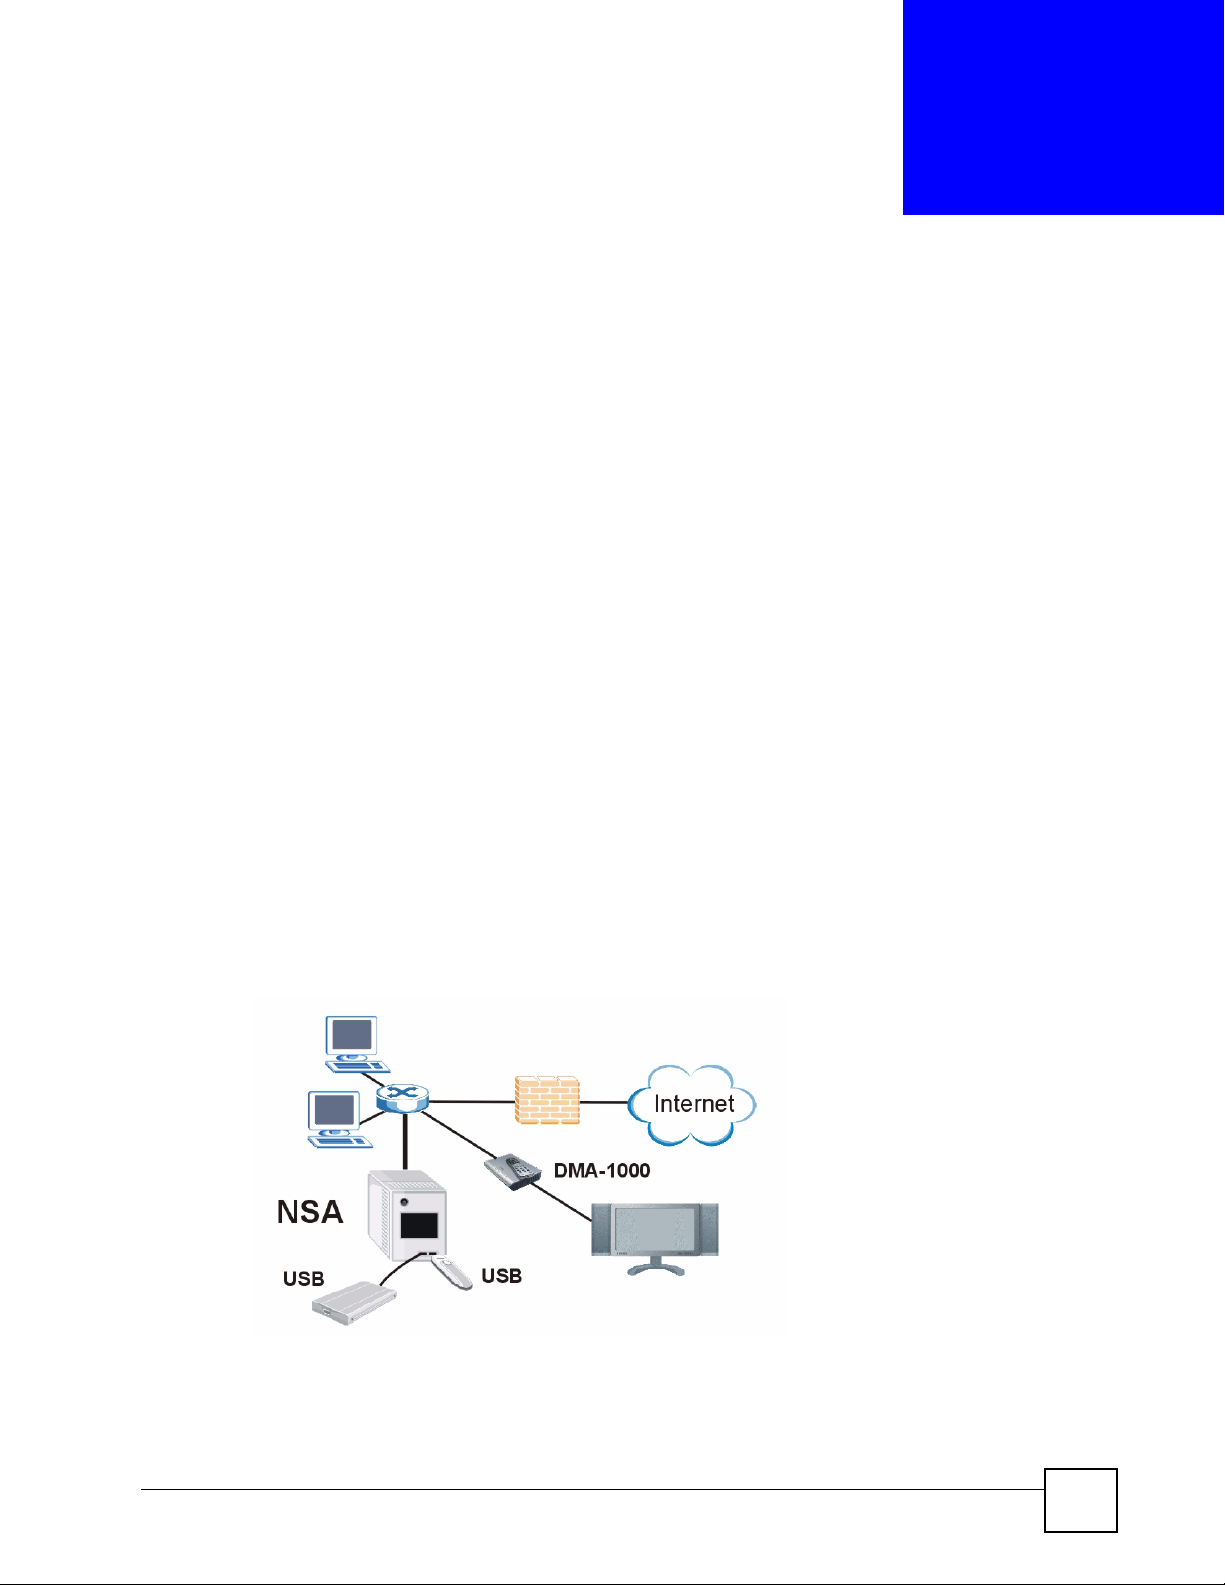
Figure 1 Example of the NSA in a Home Network
Above is the NSA in a home network. Users back up and share data on the NSA. The DMA1000 plays the NSA’s media files on the TV. A USB hard drive provides extra storage space
and files are copied directly from the USB memory stick to the NSA.
NSA-220 User’s Guide
25
Page 26
Chapter 1 Getting to Know Your NSA
Place the NSA behind a firewall and/or IDP (Intrusion Detection and Prevention) device to
protect it from attacks from the Internet.
" See Chapter 16 on page 155 for a more detailed list of NSA features and lists
of compatible hard drives and USB devices.
Refer to the Quick Start Guide for hardware connections and how to install and remove hard
drives from the disk trays.
" Turn off and disconnect the NSA before you install or remove internal hard
drives.
1.1.1 LEDs
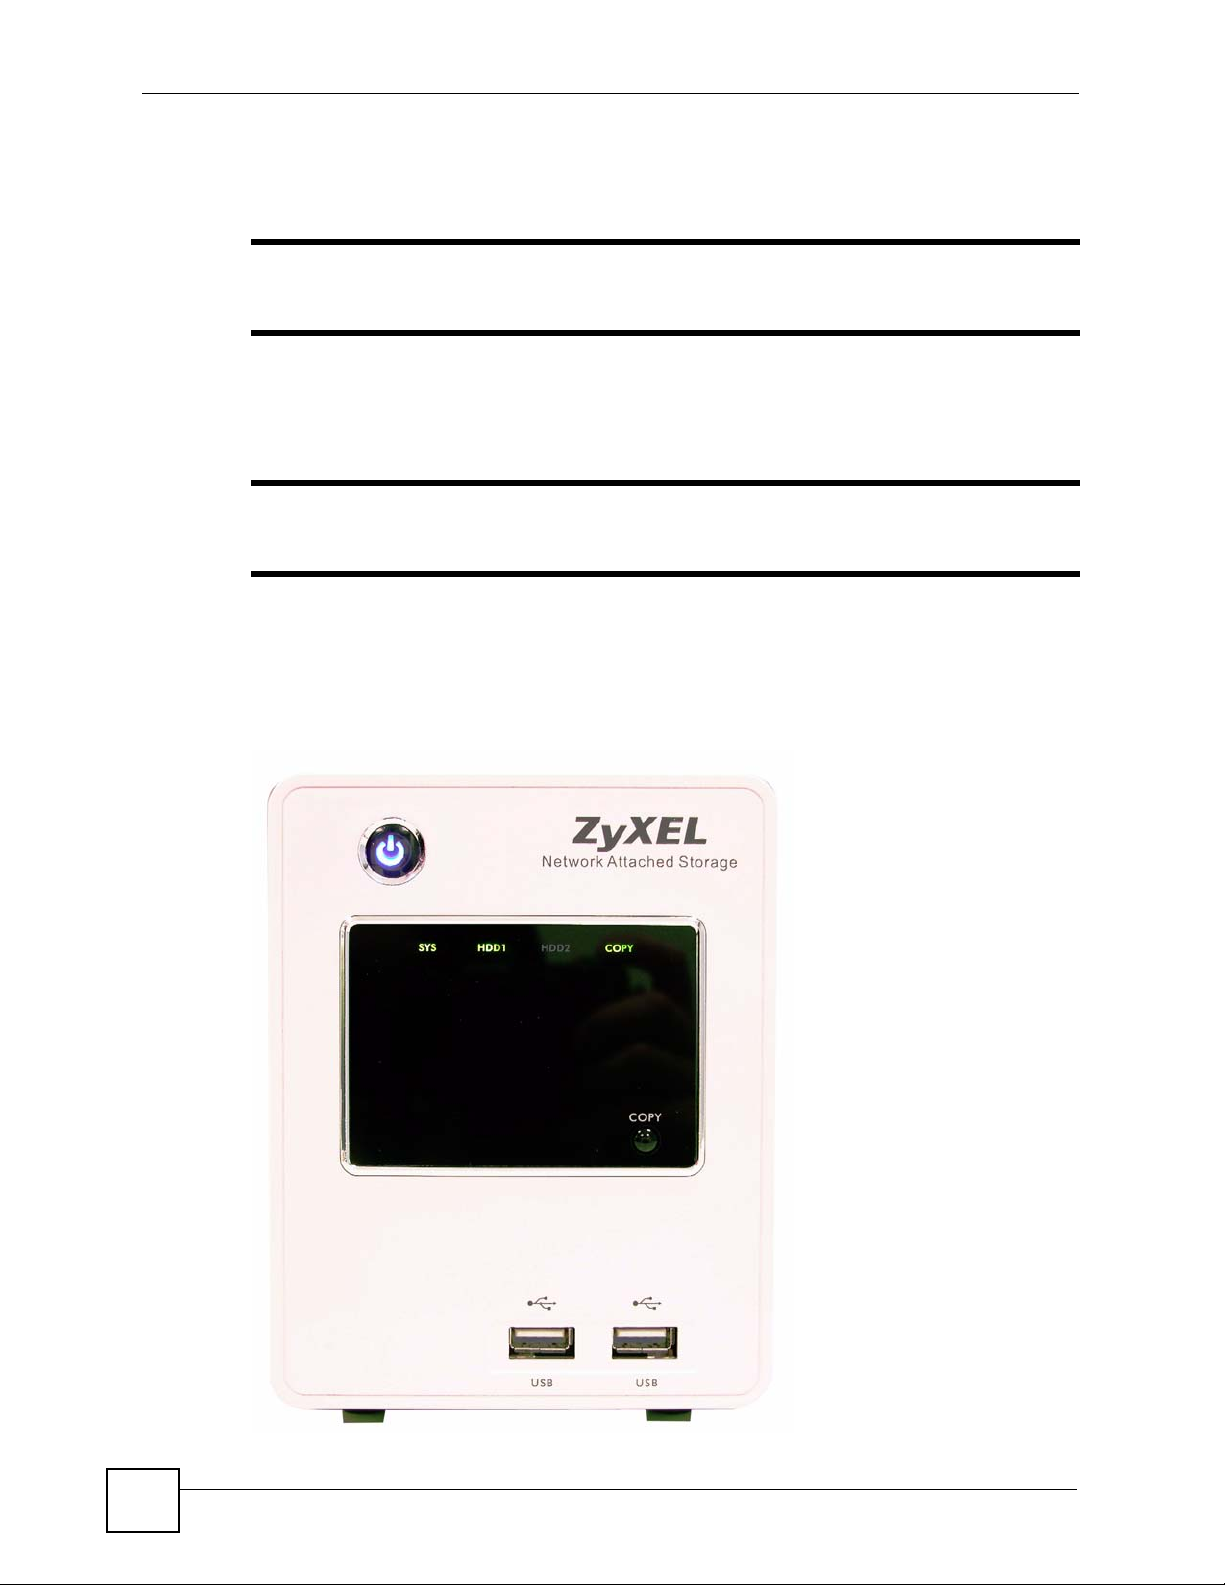
The NSA LEDs (lights) tell you important information.
Figure 2 NSA Front Panel
26
NSA-220 User’s Guide
Page 27
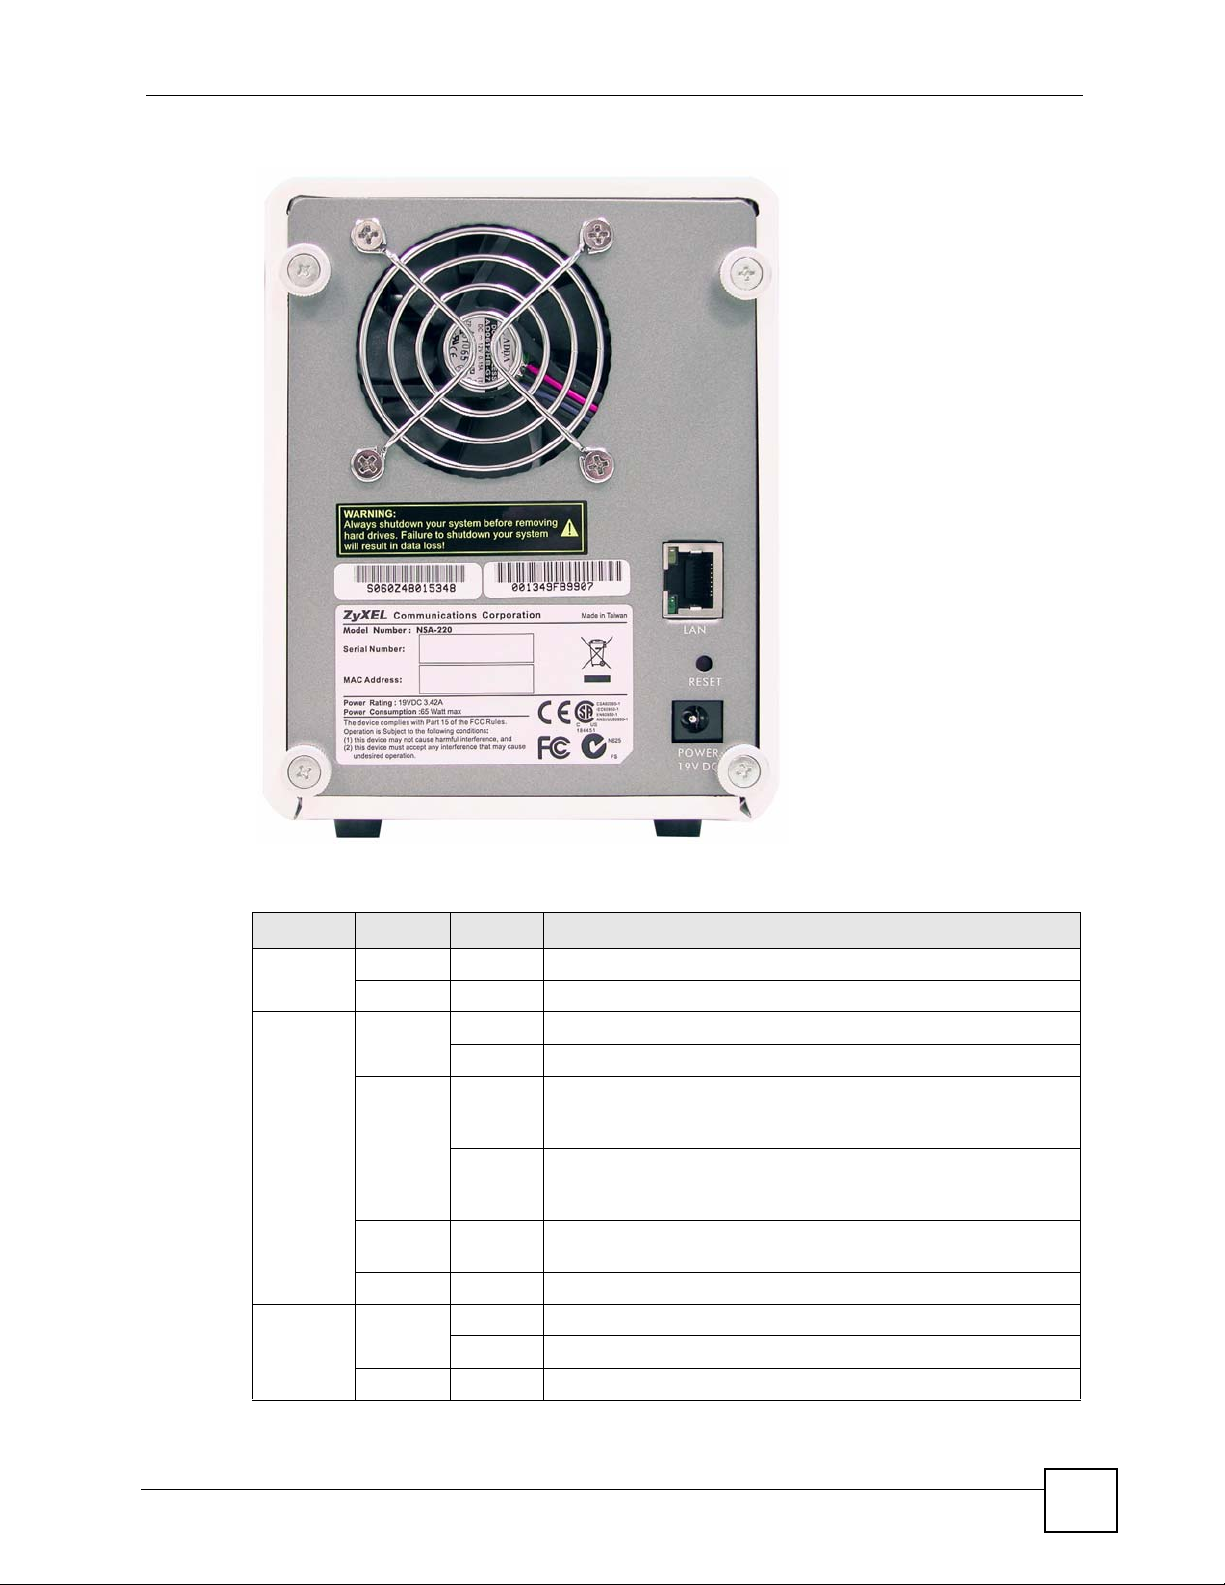
Figure 3 NSA Rear Panel
Chapter 1 Getting to Know Your NSA
This table describes the NSA’s LEDs.
Table 1 LEDs
LED COLOR STATUS DESCRIPTION
POWER Blue On The NSA is turned on and receiving power.
Off The NSA is turned off.
HDD1/
HDD2
SYS Green On The NSA has fully started and is operating normally.
Green On The hard disk drive is connected properly to the NSA.
Blinking The NSA is saving data to the hard disk drive.
A
Orange
Red On The hard disk drive has failed and the NSA can no longer detect
Red On The NSA has failed.
On The NSA detected an error on the hard disk drive (like a bad
sector for example). The NSA automatically tries to recover a bad
sector, but the LED stays orange until the NSA restarts.
Blinking The hard disk drive connection came loose or the NSA detected
an error on the hard disk drive (like a bad sector for example) and
is saving data to the hard disk drive.
it.
Off The NSA cannot detect a hard disk in the disk bay.
Blinking The NSA is starting up.
NSA-220 User’s Guide
27
Page 28
Chapter 1 Getting to Know Your NSA
Table 1 LEDs (continued)
LED COLOR STATUS DESCRIPTION
LAN Green On The NSA has a successful 10/100 Mbps Ethernet connection.
Yellow On The NSA has a successful 1000 Mbps Ethernet connection.
COPY Green On A USB device is connected to the NSA.
Red On Copying files from the USB device failed.
A. The HDD1 and HDD2 LEDs are dual-color (green and red). The green LED is normally on when you have a hard
disk installed. If the NSA detects an error on the disk, the disk’s connection comes loose, or the disk fails, the red
LED also comes on. Since the green LED still stays on, the color appears to be orange. If the NSA is no longer
able to detect a hard disk in the disk bay, the green LED turns off and the LED appears as red.
Blinking The 100M LAN is sending or receiving packets.
Off The NSA does not have a 10/100 Mbps Ethernet connection.
Blinking The 1000 M LAN is sending or receiving packets.
Off The NSA does not have a 1000 Mbps Ethernet connection.
Blinking The NSA is copying files from the USB device.
Off No USB device is connected.
1.1.2 COPY Button
Use the COPY button on the front panel to copy files from a connected USB device to the
NSA. The files are stored in a folder created within the public share. The name of the folder
created for the copied files consists of the date and time of the copy in
year_month_day_hour_minute_second format. Up to a total of 10 GB for files can be copied.
If the USB device has more than 10 GB of files, the NSA emits a long beep and does not copy
any of the files.
28
NSA-220 User’s Guide
Page 29

CHAPTER 2
Web Configurator Basics
This chapter describes how to access the NSA web configurator and provides an overview of
its screens.
2.1 Web Configurator Overview
The web configurator is an HTML-based management interface that allows easy NSA setup
and management using an Internet browser. Use Internet Explorer 6.0, Mozilla Firefox 1.07,
Netscape Navigator 7.0 or later versions of these browsers. The recommended screen
resolution is 1024 by 768 pixels or higher.
In order to use the web configurator you need to allow:
• Web browser pop-up windows from your device. We b po p-up blockin g i s enab led by
default in Windows XP SP (Service Pack) 2.
• JavaScript (enabled by default).
2.2 Accessing the NSA Web Configurator
Make sure your NSA is properly connected and that your computer is in the same subnet as the
NSA (refer to the Quick Start Guide or the appendices).
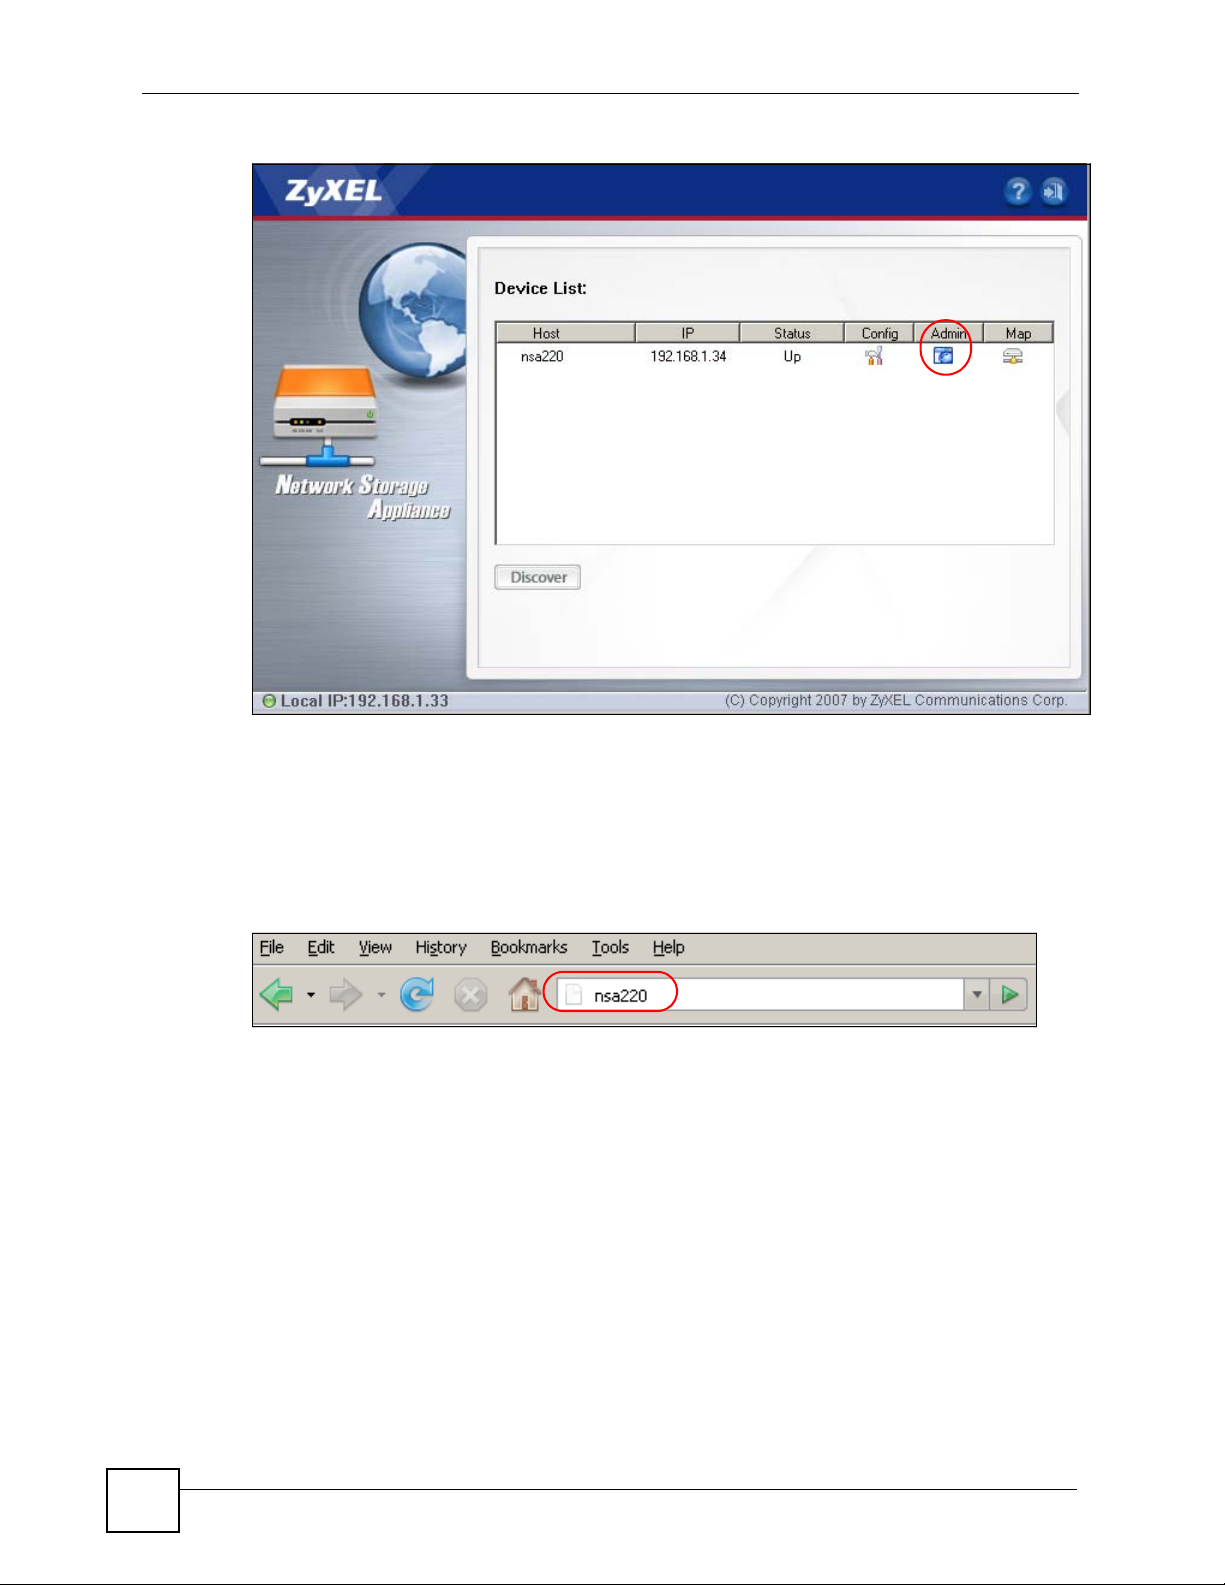
2.2.1 Access the NSA Via NDU
If you don’t know the IP address of the NSA, then use the NDU to find it. Refer to the Quick
Start Guide for how to install and run the NDU.
NSA-220 User’s Guide
29
Page 30
Chapter 2 Web Configurator Basics
Figure 4 NDU Main Screen
From the NDU main page click an icon under Admin to see the web configurator screen login
screen.
2.2.2 Web Browser Access
Open your browser and type in the server name of the NSA (“nsa220” is the default).
Figure 5 NSA URL
2.3 Login
The default username and password are ‘admin’ and ‘1234’ respectively . Enter your username
and password, then click Login. See Chapter 9 on page 115 for how to create other user
accounts.
30
NSA-220 User’s Guide
Page 31

Figure 6 NSA Login Screen
Chapter 2 Web Configurator Basics
You should see a screen asking you to change your password (highly recommended) as shown
next. Type a new password (and retype it to confirm) and click Apply or click Ignore.
Figure 7 Change Password Screen
2.4 User-level Screens Overview
All users (including the administrator) first see the user-level access My NSA screen after
login.
NSA-220 User’s Guide
31
Page 32

Chapter 2 Web Configurator Basics
Figure 8 My NSA
" The web configurator management session automatically times out if it is left
idle for 15 minutes. Simply log back into the NSA if this happens to you.
The icons and language label at the top-right of the screen ( ) are visible from most screens.
Use the tabs at the top of the screen to navigate between the user-level screens and menus. The
following table describes the ‘global’ icons and tabs in the user-level screens.
Table 2 User-level Global Labels and Icons
LABEL/ICON DESCRIPTION
Language Select the web configurator language from the drop-down list box.
Help Click the Help icon to open a web help page specific to the screen you are
Logout Click the Logout icon at any time to exit the web configurator.
My NSA Click this tab to go to screens where you can manage your shares and access the
Password Click this tab to go to a screen where you can change your password.
Administration This tab displays when you log in as the administrator. Click the tab to go to
Download
Service
currently configuring.
files on public shares. The administrator must go into the administration screens to
manage other user’s shares.
screens where you can manage advanced configurations.
This tab displays when you log in as the administrator. Click the tab to go to
screens where you can have the NSA handle file downloads. See Section 8.5 on
page 93 for more information.
1
32
NSA-220 User’s Guide
Page 33

2.5 My NSA Screen
Use the My NSA screens to manage your shares and access the files in folders to which you
have access.
A share is a set of user access permissions for a specific folder on a volume (gives someone
access to a folder). It is equivalent to the Windows concept of a shared folder, but the access
rights are independent of the folder (you configure the share and the folder separately). You
can map a share to a network drive for easy and familiar file transfer for Windows users.
The main My NSA screen displays the shares to which you have access.
Figure 9 My NSA
Chapter 2 Web Configurator Basics
NSA-220 User’s Guide
33
Page 34

Chapter 2 Web Configurator Basics
The following table describes the labels in this screen.
Table 3 My NSA
LABEL DESCRIPTION
My Own Shares These are the shares that you own (and manage). The share icons are folder
Manage It Click this button to see and configure the management details for a share.
Other Shares These are other shares on the internal hard drives or external (USB) devices that
shaped. Click a share icon to access the share’s contents.
A plain share icon displays for a share on a volume on the internal hard
drives.
A USB symbol displays on the icon for a share on an external (USB)
device. An external share’s icon turns gray if the share is not currently
available (because the USB device was removed for example).
The administrator owns and manages the public shares.
you can access (but not manage).
2.5.1 My NSA Share Browsing Screen
Click My NSA and then click a share to open the following screen. Use the My NSA share
browsing screens to see and access share contents.
• Click a folder’s name to go into the folder.
• Click a file’s name to be able to save the file to your computer.
• Click the play icon to play the file. At the time of writing this is supported for MP3 files.
• Click to the right of a file or folder name to select it.
• Use the [SHIFT] key to select a range of entries. Hold down the [CTRL] key to select
multiple individual entries.
Figure 10 My NSA Share Browsing
34
NSA-220 User’s Guide
Page 35

Chapter 2 Web Configurator Basics
The following table describes the labels in this screen.
Table 4 My NSA Share Browsing
LABEL DESCRIPTION
Current location This is the name of the share and folder path that you are in.
Move to Select a folder or file and click this button to move it to another location
within this share or another share that you can access.
Copy to Select a folder or file and click this button to move create a copy of it in
another location within this share or another share that you can access.
Type The icon in this column identifies the entry as a folder or a file.
The folder with an arrow pointing up is for the link that takes you to the
next higher layer in the share’s folder tree.
Name This column identifies the names of folders and files in the share.
Click Up One Level to go to the next higher layer in the share’s folder
tree.
Click a file’s file name to open the file or save it to your computer.
Click a folder’s name to display the folder’s contents.
Size This column displays a file’s size in bytes.
Modified Date This column displays the last time the file or folder was changed (in year-
Close Click this button to return to the My NSA screen.
month-day hour:minute:second format).
2.5.2 My NSA Share Browsing Move to or Copy to Screen
Select a folder or file in the My NSA share browsing screens and click the Move to button or
the Copy to button to display a screen like the following. Use this screen to select the target
path for moving or copying the folder or file.
Figure 11 My NSA Share Browsing > Move to (or Copy to)
The following table describes the labels in this screen.
Table 5 My NSA Share Browsing > Move to (or Copy to)
LABEL DESCRIPTION
Shares Select the target share.
Path Select a folder on the NSA. You can also browse (see Section 10.3 on page 122) to find
or create a folder on the NSA or type the location of the folder using forward slashes as
branch separators.
Yes Click this button to move or copy the file.
Close Click this button to return to the My NSA share browsing screen.
NSA-220 User’s Guide
35
Page 36

Chapter 2 Web Configurator Basics
2.5.3 My NSA Management Overview Screen
Use the My NSA management overview screens to see and configure share management
details.
Click My NSA and then the Manage It button of one of your shares to open the following
screen. This screen displays a share’s management details.
Figure 12 My NSA Management Overview
The following table describes the labels in the this screen.
Table 6 My NSA Management Overview
LABEL DESCRIPTION
Share Owner The share belongs to (and is managed by) this user account. The share
owner controls access rights to the share.
Location The share is for a folder on this volume.
Path This is the share’s file path.
Share Browsing Click this link to see and access the share’s contents.
Change Share Properties Click this link to configure th e share’s management details.
2.5.4 My NSA Change Share Properties Screen
Use the My NSA Change Share Properties screen to configure share management details.
Click My NSA and a share’ s Manage It button. Then cli ck Change Share Pr operties to open
the following screen. This screen displays a share’s management details.
36
NSA-220 User’s Guide
Page 37

Chapter 2 Web Configurator Basics
Figure 13 My NSA Change Share Properties
The following table describes the labels in the this screen.
Table 7 My NSA Change Share Properties
LABEL DESCRIPTION
Share Name Configure a name to identify this share. Type a share name from 1 to 255 single-
byte (no Chinese characters allowed for example) ASCII characters. The name
cannot be the same as another existing local share. See Section 2.5.5 on page
38 for more information on share names.
Volume You should have already created volumes (a single accessible storage area with
Path This is the share’s file path.
Make this share
owned by
Publish this share
to Media Server
Publish this share
to Web
Share Access Select who can access the files in the share and how much access they are to be
Username This appears when you set the Share Access to Advanced. This column lists
Full This appears when you set the Share Access to Advanced. Select this column’s
a single file system) on the NSA.
Select the volume that you want to use with this share.
Select the administrator or user account that is to own (manage) this share. The
share owner controls access rights to the share.
Select this option to make the share’s files available to media clients.
Select this option to let people use a web browser to access this share’s files
without logging into the My NSA screens.
given. If you publish the share to the media server or the web, all users will have
at least read-only access to the share, regardless of what you configure here.
Select Keep it private to owner to allow only the share owner to read files in the
share, delete files in the share and save files to the share.
Select Make it public to allow anyone (with or without a user account on the
NSA) to read files in the share, delete files in the share and save files to the
share.
Select Advanced to select which individual users can read the share’s files,
which users can delete the share’s files, and which users are blocked from doing
either.
the names of the NSA’s user accounts. Click Username in the heading column to
reverse the sort order.
radio button in a user account’s row to give the user full access to the share. This
allows the user to read files in the share, delete files in the share and save files to
the share.
Select the check box at the top of the column to give all of the users full access to
the share.
NSA-220 User’s Guide
37
Page 38

Chapter 2 Web Configurator Basics
Table 7 My NSA Change Share Properties (continued)
LABEL DESCRIPTION
Read Only This appears when you set the Share Access to Advanced. Select this column’s
radio button in a user account’s row to give the user read-only access to the
share. This allows the user to view or copy files in the share, but not delete files in
the share or save files to the share.
Select the check box at the top of the column to give all of the users read-only
access to the share.
Deny This appears when you set the Share Access to Advanced. Select this column’s
radio button in a user account’s row to stop the user from accessing the share.
This means the user cannot read files in the share, delete files in the share, or
save files to the share.
Select the check box at the top of the column to stop all of the users from
accessing the share.
Note: Selecting the check box at the top of the column blocks
Apply Click this button to save your changes back to the NSA.
Cancel Click this button to leave this screen without saving your changes.
everyone (including the administrator) from accessing the
share.
2.5.5 Share and Folder Names
The name can only contain the following characters:
• Alphanumeric (A-z 0-9) and Unicode.
The NSA allows FTP access to shares, folders or files with names encoded in the UTF-8
(8-bit UCS/Unicode Transformation Format) format. So your FTP client must support
UTF-8 in order to access shares, folders or files on the NSA with Unicode names.
• Spaces
• _ [underscores]
•. [periods]
• - [dashes]
Other limitations include:
• All leading and trailing spaces are removed automatically.
• Multiple spaces within names are converted to a single space.
• Share names must be unique (they cannot be the same as other share names).
• The NSA creates automatic volume names for external (USB) disk volumes. These are a
type of share, so the share name you configure cannot conflict with the external (USB)
disk volume names. “ExtVol1” or “ExtVol2” are examples of external (USB) disk volume
names.
• Folder names must be unique (they cannot be the same as other folder na mes).
• The minimum character length of a name is one character, that is a name cannot be blank.
• The maximum character length of share name is 255 characters.
• Unicode is supported for share names, although your FTP client must support UTF-8. Full
support should be available in all Windows versions after Windows 2000.
38
NSA-220 User’s Guide
Page 39

2.5.6 Share Paths
A share path is the full path to a folder on a volume that will be shared, for example, /mynsa/
topsecret/ugs/. This is independent from a “share name” which is the name shown for this
share when accessing the share via CIFS or FTP. The path should start with a '/' (forward
slash) followed by a parent folder, child folders leading to the folder that is to be shared.
The share path can include all characters including unicode characters (that is, you can use
Chinese folder names for example) except for the following characters:
• \ [backslash] this will be converted to forward slash and interpreted as a path delimiter
• / [forward slash] this is always interpreted as a path delimiter, so a folder cannot include it
in its folder name
•: [colon]
•* [asterisk]
• ? [question mark]
• “[double quote]
• < [less than]
• > [greater than]
•| [pipe]
Chapter 2 Web Configurator Basics
Please also note the following as regards share paths:
• If the share path is missing the root path slash (the first forward slash), the system will
automatically add the initial slash.
• If the share path is missing the end trailing slash, the system will automatically add the
trailing slash.
• If the share path has '\' (backslashes) instead of '/' (forward slashes) they will all be
automatically converted to forward slashes.
• Share paths are case sensitive.
• The maximum share path length is 600 characters (the entire path string including slashes)
• The share path cannot be blank
• You cannot have an empty folder name, that is, two consecutive slashes (for example, '/
My//Corner/')
• Each individual folder in the path (that is, the content between the slashes) cannot exceed
255 characters
2.5.7 Password Screen
Click Password to open the following screen. Use this screen to change an account’s
password. Enter a new password and confirm it by re-entering it.
NSA-220 User’s Guide
39
Page 40

Chapter 2 Web Configurator Basics
Figure 14 Password
The following table describes the labels in this screen.
Table 8 Password
LABEL DESCRIPTION
Account Name Type the user name of the account for which you want to change the
Old Password Type the user’s curren t password.
New Password Create a new password for the user. You can type from one to 14 single-
Retype to confirm You must type the exact same password that you just typed in the above
Apply Click this button to save your changes back to the NSA.
Cancel Click this button to begin configuring this screen afresh.
password.
byte (no Chinese characters allowed for example) ASCII characters.
field.
2.6 Administration Screens
The Administration tab displays when you log in as the administrator. Click Administration
in the My NSA screens to open the advanced administration screens.
The Status screen is the first advanced administration screen that displays.
40
NSA-220 User’s Guide
Page 41

Figure 15 Status
2
Chapter 2 Web Configurator Basics
1
3
4
2.6.1 Global Administration Icons
The icons and language label at the top-right of the screen ( ) are visible from most of the
administration screens. The following table describes the ‘global’ icons and labels.
Table 9 Global Labels and Icons
LABEL/ICON DESCRIPTION
Language Select the web configurator language from the drop-down list box.
Click this Help icon to open a web help page specific to the screen you are
currently configuring.
Click this About icon to view the model name, firmware version and copyright.
Click this Home icon to return to the user-level screens.
Click this Logout icon at any time to exit the web configurator. This is the same as
clicking the Logout link at the bottom of the Navigation panel.
1
NSA-220 User’s Guide
41
Page 42

Chapter 2 Web Configurator Basics
2
2.6.2 Navigation Panel
The navigation panel on the left of the screen ( ) contains screen links. Click a link to
display sub-links. There are no sub-links for the Status screen. Certain screens also contain
hyper links that allow you to jump to another screen.
Click the Status icon to open the Status screens.
Figure 16 Navigation Panel Links
The following table describes the navigation panel screens.
Table 10 Screens Summary
LINK SCREEN FUNCTION
Status This screen shows system information, the status of the volumes,
System Setting Server Name Specify the NSA’s server name and workgroup name.
Date & Time Chose a time zone and/or allow the NSA to synchronize with a
Storage View volume and disk information and create and edit volumes. A
Network TCP/IP Assign the NSA a dynamic or static IP address and DNS
and the users who are currently using the NSA.
time server.
volume is a storage area that can span one or more internal disks
or a single external (USB) disk.
information.
42
NSA-220 User’s Guide
Page 43

Chapter 2 Web Configurator Basics
Table 10 Screens Summary (continued)
LINK SCREEN FUNCTION
Applications FTP Enable FTP file transfer to/from the NSA, set the number of FTP
connections allowed, an FTP idle timeout, and the character set.
Media Server Enable or disable the sharing of media files and select which
shares to share.
Download
Service
Web
Publishing
Broadcatching Subscribe the NSA to feeds to download frequently updated digital
Print Server View and manage the NSA’s list of printers and print jobs.
Users View, create and edit administrator and user accounts to let
Shares View, create and edit shares. Shares are shared folders to which
Maintenance Log View the NSA’s logs.
Configuration Back up and/or restore the NSA configuration file.
FW Upgrade Upload new firmware to your NSA.
Shutdown Restart the NSA or shut it down.
Logout Click Logout to exit the web configurator . This is recommended to
Have the NSA handle large file downloads.
Let people use a web browser to access files in shares without
logging into the My NSA screens.
content like TV programs, radio talk shows, Podcasts (audio files),
YouTube videos, or even BitTorrents.
people use the NSA.
you can allow specific users read/write access rights.
prevent unauthorized administrator access to the NSA.
2.6.3 Main Window
The main window () shows the screen you select in the navigation panel. It is discussed in
the rest of this document.
The Status screen is the first administration screen to dis play. See Chapter 4 on page 63 for
more information about the Status screen.
3
2.6.4 Status Messages
The message text box at the bottom of the screen () displays status messages as you
configure the NSA.
2.6.5 Common Screen Icons
The following table explains some icons that appear in several configuration screens.
Table 11 Common Configuration Screen Icons
ICON DESCRIPTION
Click the Edit icon to go to a screen where you can change the configuration settings
of an entry.
Click the Delete icon to delete an entry from the list.
4
NSA-220 User’s Guide
43
Page 44

Chapter 2 Web Configurator Basics
Table 11 Common Configuration Screen Icons (continued)
ICON DESCRIPTION
Click the Edit icon to jump to related item’s configuration screen.
This is a user icon. See the chapter on user accounts for detailed information on
variants of this icon.
This is a share icon. See the chapter on shares for detailed information on variants of
this icon.
This icon represents a Healthy volume.
This icon represents a Degraded RAID 1 volume. Replace the faulty disk. If the
replacement disk does not contain a volume, the NSA automatically restores the
volume. If the replacement disk already contains a volume, you need to delete the
volume and then click the Repair icon to fix the degraded RAID volume.
This icon represents a Down volume. Click the Initialize icon to create a volume.
Click the Scan Disk icon to scan a hard disk for file system errors.
Click the Eject icon before you remove an external hard drive so that you do not lose
data that is being transferred to or from that hard drive.
Click the Locate icon to cause the LED on the external storage device to blink.
If you replace a faulty disk with a disk that contains a volume, you need to delete the
volume and then click the Repair icon to fix the degraded RAID volume.
44
NSA-220 User’s Guide
Page 45

CHAPTER 3
Tutorials
This chapter provides tutorials that show how to use the NSA.
3.1 File Sharing Tutorials
The following sections cover using the NSA for file sharing. This chapter assumes you have
already followed the Quick Start Guide instructions to perform initial setup and configuration
(so you have a working volume). See the Quick Start Guide for how to play media files using
the included DLNA-compliant media client software. See the rest of this User’s Guide for
details on configuring the NSA’s various screens.
3.1.1 Creating a User Account
Bob wants to create accounts for his sons Jimmy and Kevin. This is how he would do it.
1 Log into the NSA web configurator (see Section 2.3 on page 30) and click
Administration to go to the configuration screens.
Figure 17 My NSA
2 Click Users to open the Users screen. Then click Add Account.
NSA-220 User’s Guide
45
Page 46

Chapter 3 Tutorials
Figure 18 Users
3 Configure the screen as follows and write down the username and password to give to
Jimmy. If the username and password are the same as Jimmy’s Windows login, Jimmy
will not need to enter a username and password when he logs into his share from his
computer. Set the Account Type to User so Jimmy doesn’t get to configure the whole
NSA. Click Apply to create the account.
Figure 19 Users > Create Example
4 The account now displays in the Users screen.
Figure 20 Users (Account Created)
Now that Bob has created Jimmy’s account, he can go through the steps again to create
another account for Kevin. After both accounts are created, he can go to Section 3.1.2 on page
47 to create shares for Jimmy and Kevin.
46
NSA-220 User’s Guide
Page 47

3.1.2 Creating a Share
Suppose Bob has already created separate accounts for his sons Jimmy and Ke vin. Now Bob
wants to create a share for each son. He also wants to make sure that each son can only access
his own share (to keep them from deleting each other’s files). This is how he would do it.
1 In the NSA’s administration web configurator screens, click Shares > Add Share.
Figure 21 Shares
Chapter 3 Tutorials
2 Specify a name for the share and select which volume it should be on. Then click
Browse.
Figure 22 Shares > Create Example
3 Type a name for a new folder and click Create Folder.
NSA-220 User’s Guide
47
Page 48

Chapter 3 Tutorials
Figure 23 Shares > Create > Browse > Create Folder Example
4 Select the new folder and click Apply.
Figure 24 Shares > Create > Browse > New Folder Example
5 Configure the screen as follows and click Apply. (Make sure you also set the
anonymous-ftp access to Deny).
48
NSA-220 User’s Guide
Page 49

Figure 25 Shares > Create Example
Now that Bob has created Jimmy’s share, he can go through the steps again to create another
share for Kevin. Then he can see the rest of the tutorials for how to use the shares.
3.1.3 Accessing a Share From Windows Explorer
If you map a NSA share (where data is stored) to a Windows network drive, you can use
Windows Explorer to transfer files to and from the NSA as if it was another folder on your
computer. Here he maps Jimmy’s share to Jimmy’s computer.
Chapter 3 Tutorials
1 Start Windows Explorer and go to the NSA’ s server name (“nsa220” is the default) or IP
address.
2 click Tools > Map Network Drive.
Figure 26 NSA Top Level
3 Select the network drive that you want to map the NSA to from the Drive list box. This
example uses I. Then browse to and select the share on the NSA. Click Finish.
Figure 27 Map Network Drive
NSA-220 User’s Guide
49
Page 50

Chapter 3 Tutorials
4 Enter the username and password for Jimmy’s account and click OK. You do not need
Figure 28 Enter Network Password
5 After the mapping is done, you can then simply copy and paste or drag and drop files
Figure 29 Example Share Mapped (Folders View)
to do this if the username and password are the same as Jimmy’s Windows login.
from/to your local computer’s drives to or from this network folder. Just like the NSA’s
share was another folder on your computer.
Now that Bob has mapped Jimmy’s share to Jimmy’s computer, he can go through the steps
again to map Kevin’s share to Kevin’s computer.
3.1.4 Accessing a Share Using FTP
You can also use FTP to access the NSA. Suppose Jimmy is temporarily using a different
computer and wants to access his share without mapping it to the computer. This is how he
would do it.
1 Open the FTP client (Windows Explorer is used here) and type “ftp://username@server”
where “username” is the account’s username and “server” is the NSA’s IP address or
server name.
50
NSA-220 User’s Guide
Page 51

Figure 30 FTP Example: Typing the FTP Target
2 Enter your password and click Login.
Figure 31 FTP Example: Enter the Password
Chapter 3 Tutorials
3 Now you can access files and copy files from/to your local computer’s drives to or from
this network folder.
Figure 32 FTP Example: Logged In
1
3.1.5 Accessing a Share Through the Web Configurator
You can browse and access files through the web configurator.
1 Log into the NSA web configurator (see Section 2.3 on page 30) using your username
and password.
1. Even though the admin share displays, user accounts cannot access it unless you change it’s share access
settings.
NSA-220 User’s Guide
51
Page 52

Chapter 3 Tutorials
Figure 33 My NSA User Login
2 Click a share to see the top level of the share’s contents. Here is the Jimmy share.
Figure 34 My NSA User Login
3 Click a folder’s file name to browse the folder. You can open files or copy them to your
computer. However at the time of writing you cannot use the web configurator to upload
files to the NSA (use CIFS or FTP to upload files, see Section 3.1.3 on page 49 and
Section 3.1.4 on page 50).
4 Click the logout icon when your are done (see Table 2 on page 32).
3.2 Download Service Tutorial
This tutorial covers using the NSA to download a file from the Internet. Use this same
procedure for BitTorrent downloads as well as regular HTTP (web) and FTP downloads. See
Section 8.5 on page 93 for more on the download service.
52
NSA-220 User’s Guide
Page 53

Chapter 3 Tutorials
1 Open your Internet browser (this example uses Internet Explorer).
2 Find a download link for the file you want. In this example, www.zyxel.com has a
Download Now link for downloading a datasheet for ZyXEL’s P-2301RL-P1C (a
device for making phone calls over the Internet).
Figure 35 Download Link Example
" Make sure the link opens either the file you want or a pop-up window about
how to handle the file.
It is also OK for the link to open a .torrent file. If you are redirected to a screen
that says the download should start in a few seconds, there may be a link to
click if the download does not start automatically. See if that link opens the file
or the pop-up window.
3 Right-click the download link and select Copy Shortcut in Internet Explorer (or Copy
Link Location in Firefox).
NSA-220 User’s Guide
53
Page 54

Chapter 3 Tutorials
Figure 36 Copy Shortcut
4 Log into the NSA web configurator (see Section 2.3 on page 30) using the administrator
Figure 37 Download Service Tutorial: My NSA
account and click Download Service.
5 Click Add.
Figure 38 Download Service Tutorial: Download Service
6 Right-click the URL field and select Paste.
54
NSA-220 User’s Guide
Page 55

Figure 39 Download Service Tutorial: Paste Link
7 The URL displays in the URL field. Click Apply.
Figure 40 Download Service Tutorial: Apply Pasted Link
Chapter 3 Tutorials
8 After a few moments, the download task appears in the Download Service screen’s
Active tab.
Figure 41 Download Service Tutorial: Download Task Added
The download appears in the Completed tab when it is done. By default the NSA stores all
downloads in the admin share’s download fold er. See Section 3.1.3 on page 49, Section 3.1.4
on page 50, or Section 3.1.5 on page 51 for how to access a share.
NSA-220 User’s Guide
55
Page 56

Chapter 3 Tutorials
3.3 Broadcatching Tutorial
Use broadcatching to have the NSA download frequently updated digital content like TV
programs, radio talk shows, Podcasts (audio files), and blogs. This example shows how to
subscribe the NSA to the CNET TV Internet television channel. See Section 8.12 on page 105
for more on the broadcatching service.
1 Open your Internet browser (this example uses Firefox).
1 Find the link for the RSS feed containing the channel you want to add. In this example,
http://reviews.cnet.com/4520-11455_7-6333605-1.html has an RSS link for subscribing
to the CNET Live podcast. However this is not the link for the actual RSS feed. Click the
link to go to another screen that has RSS feed links.
Figure 42 Broadcatching Link Example
" Make sure the link goes to the actual RSS feed instead of to another list of
links or information about the channel.
One way to test this is by clicking the link. Clicking an actual RSS feed link opens a
screen of XML code (in browsers without an RSS feed aggregator) or a window where
you can add the RSS feed (in browsers with an RSS feed aggregator).
2 Right-click the download link and select Copy Link Location in Internet Explorer (or
Copy Shortcut in Internet Explorer).
56
NSA-220 User’s Guide
Page 57

Figure 43 Copy Link Location
Chapter 3 Tutorials
3 Log into the NSA web configurator (see Section 2.3 on page 30) using the administrator
account and click Administration > Applications > Broadcatching.
Figure 44 Broadcatching Tutorial: My NSA
4 Click Add Channel.
NSA-220 User’s Guide
57
Page 58

Chapter 3 Tutorials
Figure 45 Broadcatching Tutorial: Broadcatching
5 Right-click the URL field and select Paste.
Figure 46 Broadcatching Tutorial: Paste Link
6 The URL displays in the URL field.
7 Select a policy for what items to download. This example uses Manual so you will be
able to select individual items to download later.
8 Select a policy for what items to delete. This example keeps the most recent 10 items.
9 Click Apply.
Figure 47 Broadcatching Tutorial: Apply Pasted Link
10After a few moments, the channel appears in the Broadcatching screen where you can
select items you want to download. The NSA saves the items you download in a folder
named after the channel. By default, the channel folders are created in the admin share’s
download folder. The NSA’s media server feature makes it easy for users on your
network to play the broadcatching files you download. See Section 8.3 on page 90 for
more on the media server.
58
NSA-220 User’s Guide
Page 59

3.4 Printer Server Tutorial
Do the following to have the NSA let computers on your network share a printer. See
www.zyxel.com for a list of compatible printers.
1 Make sure the NSA is on and the SYS light is on steady (not blinking).
2 Use a USB cable to connect the printer’s USB port to one of the NSA’s USB ports.
Make sure the printer is also connected to an appropriate power source.
Figure 48 Printer Sharing
Chapter 3 Tutorials
3 Turn on the printer.
4 The NSA detects the printer after a few moments.
5 On your computer, open your CIFS file sharing program (Windows Explorer for
example) and browse to the NSA. Double-click the printer’s icon.
Figure 49 Printer Connected to NSA: Windows Explorer
6 If you get a warning screen, click the option that lets you continue (Yes in this example).
Figure 50 Printer Connected to NSA: Windows Explorer Warning
7 If your computer does not already have the printer’s driver installed, you will need to
install it. In this example, click OK.
NSA-220 User’s Guide
59
Page 60

Chapter 3 Tutorials
Figure 51 Printer Driver Needed
8 Use the wizard screens to install the printer driver on the co mputer. Y ou may need to get
the file from the printer’s CD or the printer manufacturer’ s website (the driver is not
installed on the NSA).
" You must install the printer driver on each computer that will use the printer.
Figure 52 Applications > Print Server
60
After the driver installation finishes, the computer is ready to use the printer . Select the printer
in an application to use it to print. Browse to the NSA using a CIFS program (like Windows
Explorer) and double-click the printer’s icon to open the printer’s queue of print jobs.
Figure 53 Printer Screen in Windows Explorer
NSA-220 User’s Guide
Page 61

Chapter 3 Tutorials
" Repeat steps 5 to 8 on your other computers so they can also use the printer.
NSA-220 User’s Guide
61
Page 62

Chapter 3 Tutorials
62
NSA-220 User’s Guide
Page 63

CHAPTER 4
Status Screen
This chapter introduces the NSA Status screen.
4.1 Status Screen
The Status screen is the first main web configurator screen you see after you enter the
administrator screens. To view the status screens, click Status on the top-left of the navigation
panel.
Figure 54 Status
NSA-220 User’s Guide
63
Page 64

Chapter 4 Status Screen
The following table describes the labels in this screen.
Table 12 Status
LABEL DESCRIPTION
Status Click Status to refresh the status screen statistics.
System Information
Server Name This displays the name which helps you find the NSA on the network.
Model Name This displays which model this NSA device is.
Firmware Version This is the NSA firmware version. Click the update link to go to the
MAC Address This displays the NSA’s unique physical hardware address (MAC). You
Media Server Status This shows whether the media server function is enabled or disabled. It
FTP Server Status This shows whether the FTP server function is enabled or disabled. It
Web Publishing Status This shows whether the Web server function is enabled or disabled. It
Volume Status A volume is a storage area on a single disk or spread across a number of
Internal Volume This displays the volumes created on the hard drives installed in the NSA.
Create an Internal Volume This displays if there are no volumes created on the hard drive(s) installed
External Volume This displays the volumes created on USB hard drives connected to the
Status This icon indicates whether the volume is healthy, degraded, or down.
Name This field shows the name for the volume. Read only displays for an
Configuration This field (also known as Type) shows what type of data storage system
File System This field shows what file system an external (USB) volume is using.
Disk(s) For internal drives, this shows which hard drive bays are included in the
Disk Usage This field shows total disk size, the percentage of the disk being used and
Active Sessions This shows how many users are currently connected to the NSA.
Type This shows whether it’s a Windows/CIFS, web (web configurator), or FTP
Share Name This displays the shared folder name on the NSA that the user is
Click the edit icon to go to the screen where you can configure this.
Maintenance > Firmware Upgrade screen from which you can upload
new firmware. Click the edit icon to go to the screen where you can
upload new firmware.
need the MAC address to register the product at myZyXEL.com.
Customer support may also request it for troubleshooting purposes.
must be enabled for media clients to play content files stored on the NSA.
Click the edit icon to go to the screen where you can configure this.
must be enabled to use FTP file transfer to/from the NSA. Click the edit
icon to go to the screen where you can configure this.
must be enabled to use HTTP to access shares on the NSA. Click the edit
icon to go to the screen where you can configure this.
disks within a single file system.
in the NSA. Click this button to create a volume. See Section 6.4 on page
76.
NSA. USB disks are numbered in the order that you insert USB devices.
external volume that uses Windows NTFS. This means the NSA can read
the volume but can’t save files on it.
(a RAID type or JBOD) an internal volume is using.
volume. For external drives, this field shows USB1 for the first external
hard drive you connect to the NSA (regardless of which USB port) and
USB2 for the second.
the percentage that is available.
connection to the NSA.
connected to for CIFS sessions and is blank for FTP sessions.
64
NSA-220 User’s Guide
Page 65

Table 12 Status (continued)
LABEL DESCRIPTION
Username This displays the name of the user connected to the NSA if one is defined.
ANONYMOUS CIFS or ANONYMOUS FTP display if a username is not
defined for the user’s connection.
Connected At This displays the date and time the user last connected to the NSA in
year, month, day, hour, minute, second format.
IP Address This displays the IP address of the computer connected to the NSA.
4.1.1 Session Example (Windows)
Open windows explorer and type two back slashes followed by the NSA name or IP address.
Initially you can only read and write to the Public, Video, Music, and Photo folders until you
create other shares on the NSA. This session is then displayed as shown in Figure 54 on page
63.
Figure 55 Session Example (Windows)
Chapter 4 Status Screen
NSA-220 User’s Guide
65
Page 66

Chapter 4 Status Screen
66
NSA-220 User’s Guide
Page 67

PART II
System Setting and
Applications
System Setting Screens (69)
Storage Screens (73)
Network Screen (85)
Application Screens (89)
67
Page 68

68
Page 69

CHAPTER 5
System Setting Screens
This chapter discusses the system setting screens.
5.1 System Setting Screens
This section gives an overview of the various features included in the system setting screens.
Use the system setting screens to:
• Specify the NSA’s Windows/CIFS server name and workgroup name.
• Chose a time zone and/or allow the NSA to synchronize with a time server.
• Create and edit volumes (see Chapter 6 on page 73 for details).
5.1.1 Windows/CIFS
Common Internet File System (CIFS) is a standard protocol supported by most operating
systems in order to share files across the network.
• CIFS is included by default in Windows and Mac OSX operating systems.
• You can use Samba with Linux to use CIFS.
• CIFS transfers use security.
5.2 Server Name
Click System Setting > Server Name to open the following screen. Use this screen to configure
your CIFS settings. In this screen you can set your server name and specify if your NSA is a
part of a workgroup or domain.
" CIFS cannot be disabled on the NSA.
NSA-220 User’s Guide
69
Page 70

Chapter 5 System Setting Screens
Figure 56 System Setting > Server Name
The following table describes the labels in these screens.
Table 13 System Setting > Server Name
LABEL DESCRIPTION
Server Name Enter a name to identify your NSA on the network in this field.
Description Add text here to describe the NSA if the Server Name field was not
Workgroup Name A workgroup is a group of computers on a network that can share
Apply Click here to save your changes back to the NSA.
Y ou can enter up to 15 alphanumeric characters with minus signs allowed
but not as the last character. The name must begin with an alphabetic
character (a-z) and is NOT case sensitive.
enough. Use up to 61 characters. You can use all characters except the
following: . /\:|[]<>+;,?=*"~
files.These user accounts are maintained on the NSA.
Type your workgroup name in this field.
Y ou can enter up to 15 alphanumeric characters with minus signs allowed
but not as the last character. The name must begin with an alphabetic
character (a-z) and is NOT case sensitive.
5.3 Date/Time
Use this screen to select a time zone and a time server from which your NSA can get the time
and date. This time is then used in NSA logs and alerts.
5.3.1 Time Lag
Time lag occurs when the time on the NSA falls behind the time on the time server. This may
happen if:
• the time server is no longer reachable
• if the NSA is shut down often (the NSA internal battery keeps time when the NSA is shut
down and this may cause possible variance)
• power surges occur.
The NSA gives no warning if time lag occurs. You should resynchronize the time after a
power surge or after you have shut down the NSA several times.
5.3.2 Date/Time Screen
Click the System Setting link in the navigation panel and then click the Date/Time link to
access the System Setting > Date/Time screen.
70
NSA-220 User’s Guide
Page 71

Figure 57 System Setting > Date/Time
Chapter 5 System Setting Screens
The following table describes the labels in this screen.
Table 14 System Setting > Date/Time
LABEL DESCRIPTION
Current System Date
Time Setting
Current Time This field displays th e time of your NSA.
Current Date This field displays the date of your NSA.
Current Time Zone This fi eld displays the time zone of your location. This will set the time
difference between your time zone and Greenwich Mean Time (GMT).
Date Time Setup
Manual Select this radio button to enter the time and date manually.
When you enter the time settings manually, the NSA uses the new setting
once you click Apply.
Note: If you enter time settings manually, they revert to their
defaults when power is lost.
New Time (hh:mm:ss) This field displays the last updated time from the time server or the last
New Date (yyyy-mmdd)
Get from Time Server Select this check box to have the NSA get the time and date from the time
Synchronize Now Click this button for the NSA to retrieve the correct time from the
time configured manually.
When you set Time and Date Setup to Manual, enter the new time in this
field and then click Apply.
This field displays the last updated date from the time server or the last
date configured manually.
When you set Time and Date Setup to Manual, enter the new date in this
field and then click Apply.
server you select in the Time Server Address field.
configured time server right away.
NSA-220 User’s Guide
71
Page 72

Chapter 5 System Setting Screens
Table 14 System Setting > Date/Time (continued)
LABEL DESCRIPTION
Time Server Address Select a time server from the drop-down list box or select Specify my
Synchronize Now Click this button for the NSA to retrieve the correct time from the
Time Server Address Select a time server from the drop-down list box or select Specify my
Time Zone
Time Zone Choose the time zone of your location. This will set the time difference
Enable Daylight
Saving
Start Date Configure the day and time when Daylight Saving Time starts if you
End Date Configure the day and time when Daylight Saving Time ends if you
Offset Specify by how many hours to change the time for Daylight Saving Time.
Apply Click Apply to save your changes back to the NSA. If you configured a
Reset Click Reset to begin configuring this screen afresh.
own time server and enter the time server you wish to use in the field
below. Check with your ISP/network administrator if you are unsure of this
information.
configured time server right away.
own time server and enter the time server you wish to use in the field
below. Check with your ISP/network administrator if you are unsure of this
information.
between your time zone and Greenwich Mean Time (GMT).
Daylight saving is a period from late spring to early fall when many
countries set their clocks ahead of normal local time by one hour to give
more daytime light in the evening.
Select this option if you use Daylight Saving Time.
selected Enable Daylight Saving. The hour field uses the 24 hour
format. Here are a couple of examples:
Daylight Saving Time starts in most parts of the United States on the
second Sunday of March. Each time zone in the United States starts
using Daylight Saving Time at 2 A.M. local time. So in the United States
you would use March, Second, Sunday, at 2:00.
Daylight Saving Time starts in the European Union on the last Sunday of
March. All of the time zones in the European Union start using Daylight
Saving Time at the same moment (1 A.M. GMT or UTC). So in the
European Union you would select March, Last, Sunday. The time you
specify depends on your time zone. In Germany for instance, you would
type 2 because Germany's time zone is one hour ahead of GMT or UTC
(GMT+1).
selected Enable Daylight Saving. The o'clock field uses the 24 hour
format. Here are a couple of examples:
Daylight Saving Time ends in the United States on the first Sunday of
November. Each time zone in the United States stops using Daylight
Saving Time at 2 A .M. local time . So in the Uni ted S t ates you would se lect
November, First, Sunday, at 2:00.
Daylight Saving Time ends in the European Union on the last Sunday of
October. All of the time zones in the European Union stop using Daylight
Saving Time at the same moment (1 A.M. GMT or UTC). So in the
European Union you would select October, Last, Sunday. The time you
specify depends on your time zone. In Germany for instance, you would
type 2 because Germany's time zone is one hour ahead of GMT or UTC
(GMT+1).
new time and date, Time Zone and Daylight Saving at the same time, all
of the settings take affect.
72
NSA-220 User’s Guide
Page 73

CHAPTER 6
Storage Screens
This chapter covers storage systems, volumes and disks on the NSA.
6.1 Storage Introduction
Use the System > Storage screens to manage volumes and disks (both internal and external).
" Several NSA features require a valid internal volume.
• Volumes are storage areas on disks. See Section 6.5 on page 76 for details.
• For details on replacing internal disks, see Section 6.6 on page 78.
• For details about external disks, see Section 6.8 on page 80.
6.2 Storage Overview Screen
Click System > Storage in the navigation panel to display the following screen.
Figure 58 System > Storage
NSA-220 User’s Guide
73
Page 74

Chapter 6 Storage Screens
The following table describes the labels in this screen.
Table 15 System > Storage
LABEL DESCRIPTION
Internal/External Volume These tables display information on all internal volumes (created on NSA
Create an Internal Volume Click this to format internal hard drives and create a new volume. All data
Create an External
Volume
Status This field shows whether the volume is Healthy, Resync, Recovering,
Volume The NSA creates the volume name automatically. You can edit it.
Disk Configuration This field shows which disks and data storage system the volume is
File System This field displays the file system that an external (USB) volume is using.
Disk(s) Click or roll your mouse over a link in this column to display the following
Capacity This field shows total disk size, the percentage of the volume being used
Actions This field displays icons allowing you to edit, scan, repair or delete a
internal disk drives) and external volumes (created on external disk drives
attached to the NSA USB ports). See the volume screen for field details.
on the disk(s) will be lost.
Click this to format an external hard drive and create a new volume. All
data on the disk will be lost.
Degraded, or Down.
using.
details about the hard drive located in the corresponding hard drive bay.
Type: Whether it is an internal or external (USB) hard drive.
Model Name: This is the hard disk number that identifies the disk.
File System: The file system that an external volume is using
Capacity: The total storage space on the disk.
and the percentage that is available.
volume. You can also locate or eject an external volume.
Note: If you delete a volume, all data in the volume disk(s) is
erased.
You see a warning screen before you delete a volume.
Figure 59 Delete a Volume Warning Screen
6.3 Creating an Internal Volume
Click the Create an Internal Volume button in the Storage screen as shown in Figure 58 on
page 73 to open the following screen. Use this screen to create a new NSA internal disk drive
volume.
74
NSA-220 User’s Guide
Page 75

Chapter 6 Storage Screens
" Creating a volume formats the hard drive. All data on the disk will be lost.
Figure 60 System > Storage > Create an Internal Volume
The following table describes the labels in this screen.
Table 16 System > Storage > Create an Internal Volume
LABEL DESCRIPTION
Volume Name Type a volume name from 1 to 31 characters. The name cannot be the same as
another existing external volume.
Acceptable characters are all alphanumeric characters and " " [spaces], "_"
[underscores], and "." [periods].
The first character must be alphanumeric (A-Z 0-9).
The last character cannot be a space " ".
For an external volume, type a volume name from 1 to 32 single-byte (no Chinese
characters allowed for example) ASCII characters. The name cannot be the same
as another existing external volume.
JBOD Use JBOD if you want maximum storage capacity and/or you have other means of
protecting your data. JBOD is the only option if you only have one disk installed.
With two disks, you can choose to create a JBOD volume on one of the disks or
both.
RAID 0 Use RAID 0 if you want maximum speed for your disks, and/or you have other
means of protecting your data. This is only available when you have two hard disks
installed.
RAID 1 Use RAID 1 if you want to mirror all data on one disk to the other disk. This is only
available when you have two hard disks installed.
Volume will be
created on
Apply Click this button to save your changes back to the NSA and create the volume.
Cancel Click this button to exit this screen without saving your changes or creating a
This field lists all hard disks installed inside the NSA. Select which disks should
make up this volume. A disk can only belong to one volume. You do not need to
select anything if only one hard disk is installed.
volume.
NSA-220 User’s Guide
75
Page 76

Chapter 6 Storage Screens
6.4 Editing a Volume
Click an internal volume’s Edit icon in the System > Storage screen as shown in Figure 58 on
page 73 to open the following screen. Use this screen to change the volume’s name.
Figure 61 System > Storage > Edit
The following table describes the labels in this screen.
Table 17 System > Storage > Edit
LABEL DESCRIPTION
Volume Name For an internal volume, type a volume name from 1 to 31 characters. The
Apply Click this button to save your changes back to the NSA and rename the
Cancel Click this button to close this screen without saving your changes.
name cannot be the same as another existing external volume.
Acceptable characters are all alphanumeric characters and " " [spaces],
"_" [underscores], and "." [periods].
The first character must be alphanumeric (A-Z 0-9).
The last character cannot be a space " ".
For an external volume, type a volume name from 1 to 32 single-byte (no
Chinese characters allowed for example) ASCII characters. The name
cannot be the same as another existing external volume.
volume.
6.5 Volumes and RAID
A volume is a storage area on a disk or disks. You can create volumes on the internal disks and
external disks attached to the USB port(s). You can spread a volume across internal disks but
not between internal and external disks.
RAID (Redundant Array of Independent Disks) or JBOD is the storage method that the NSA
uses. The storage method you use depends on how many disks you have and how many
volumes you want to create. It’s important that you consider this carefully as all data is deleted
when you re-create a volume.
" Back up your data before deleting or re-creating a volume!
For example if you originally have one disk configured at JBOD, and you then install another
disk and want to configure the two disks to use RAID 1, you shou ld first back up al l your data
on the two disks (see the Memeo Autobackup utility on the included CD) and then restore your
data later after you create the new volume type.
Below is a table that summarizes some attributes of the various RAID levels as supported on
the NSA. For capacity and storage efficiency, “S” is the size of the smallest drive in the array,
and “N” is the number of drives in the array.
76
NSA-220 User’s Guide
Page 77

Storage efficiency assumes all drives are of identical size.
Performance rankings are approximations.
Table 18 RAID Quick Comparison
RAID Level 0 1
Number of Disks 2 2
Capacity S*N S*N/2
Storage Efficiency 100% 50%
Fault Tolerance None YYYY
Availability Y YYYY
Read Performance YYYY YYY
Write Performance YYYY YYY
6.5.1 Choosing A Storage Method For a Volume
The following is a guide to help you choose a storage method for the various number of disks
supported on the NSA. See Section 6.9 on page 81 for theoretical background on JBOD and
the RAID levels used on the NSA. Typical applica tions for each method are also shown there.
Chapter 6 Storage Screens
6.5.1.1 One Disk
If you only have one disk, you must use JBOD. All disk space is used for your data - none is
used for backup. If the disk fails, then you lose all the data on that volume (disk). You can add
another disk to your one-disk JBOD volume later without having to re-create shares, access
rights, and so on. Alternatively, you could create a different JBOD volume if you install a
second disk. (and create new shares, access rights and so on).
6.5.1.2 Two Disks:
You may choose JBOD, RAID 0 or RAID 1. With two disks you could create:
• up to two JBOD volumes
• one RAID 0 or RAID 1 volume
• Choose JBOD for flexibility and maximum usage of disk space for data.
• Choose RAID 0 if performance matters more than data security. RAID 0 has the
fastest read and write performance but if one disk fails you lose all your data on the
volume. It has fast performance as it can read and write to two disks simultaneously.
Performance may matter more than data security to gamers for example. This method
may also be acceptable for data that is already backed up somewhere else.
• Choose RAID 1 if data security is more important than performance. Since RAID 1
mirrors data onto a second disk, you can recover all data even if one disk fails, but the
performance is slower than RAID 0.
6.5.2 Volume Status
You (the administrator) can see the status of a volume in the Status or System > Storage
screens.
The NSA has the following classifications for the status of a volume:
• Healthy if all disks in the volume are OK and the file system is functioning properly.
NSA-220 User’s Guide
77
Page 78

Chapter 6 Storage Screens
• OK means the USB connected device is functioning properly.
• Resync when you create a RAID volume.
• Recovering appears when repairing a RAID 1 volume. (A RAID1 volume was once
degraded, but you have installed a new disk and the NSA is restoring the RAID1 volume
to a healthy state.)
• Degraded when a volume is currently down, but can be fixed. Data access may be slower
from a degraded volume, so it’s recommended that you replace the faulty disk and repair
the volume as soon as you can.
• Inactive when a disk is missing from a RAID 0 volume or a two-disk JBOD volume. The
volume is unusable. If you removed one of the disks you should be able to re-install it and
use the volume again (as long as you did not change anything on the disk). If a disk has
failed, you need to replace it and re-create the whole volume. All data will be lost. See
page 144 for how to install or replace a hard drive.
• Down when a volume is down and can not be fixed.
A down RAID volume cannot be used until you repair or replace the faulty disk(s) in the
volume. Degraded means one of the disks in the RAID volume is not available but the volume
can still be used. For a degraded volume, you should replace the faulty disk as soon as possible
to obtain previous performance. See your Quick Start Guide for more information on replacing
a disk.
If it’s down, then the only indication is that you can no longer transfer files to/from the shares
in the down volume. If it’s degraded, then file transfer to/from the shares in the degraded
volume will be slower.
" There is no explicit message from CIFS that tells users their volume is
degraded or down.
6.6 Disk Replacement Restrictions
See the Quick Start Guide for information on replacing disks in the NSA. When replacing a
disk in a degraded or down RAID volume, the new disk must be at least the same size or
bigger than the other disks that are already in the RAID volume, so as all data in the volume
can be restored.
For example, if you have RAID with 250 GB disks, you must put in a 250 GB or bigger disk as
a replacement in order to restore all original data in that volume. If you put a bigger disk, the
extra space on the disk will not be used.
" The NSA repairs a RAID volume automatically when you replace a faulty disk
with a disk that does not contain a volume.
78
NSA-220 User’s Guide
Page 79

Chapter 6 Storage Screens
6.6.1 Resychronizing or Recovering a RAID 1 Volume
Resychronizing or recovering a RAID 1 volume that was down is done block-by-block, so the
time it takes depends more on the size of your hard drive(s) than the amount of data you have
on them.
" Do not restart the NSA while the NSA is resychronizing or recovering a volume
as this will cause the synchronization to begin again after the NSA fully
reboots.
" You can access data on a RAID volume while it is resychronizing or
recovering, but it is not recommended.
6.6.2 Disk Replacement and Volume Labels
When you create a volume, the NSA writes the volume label to the disk.
" Deleting a volume removes volume label information on its disk(s). It is
recommended that you first delete a volume before removing its disk(s).
If you do not want to keep the data on a disk that you will remove, it is recommended that you
delete the volume before you remove the disk. If you remove a disk(s) without deleting its
volume and you later put the disk(s) back in a different volume, you may have more than one
volume with the same name. For example, suppose you have two disks, Disk A and Disk B
and you create two JBOD volumes, volume1 (with Disk A) and volume2 (Disk B). Later you
remove Disk A and replace it with another disk, Disk C and you re-create volume1. (You did
not delete volume1 when you removed Disk A.) Later you replace Disk B with Disk A. Disk A
still retains the volume1 label, so at this point both Disk A and Disk C have the volume1 label.
Although you can still use the volumes, you may find the naming confusing.
6.7 Creating an External Volume
Click the Create a New External Volume button in the Volume screen as shown in Figure 58
on page 73 to open the following screen. Use this screen to create a new NSA external disk
drive volume.
NSA-220 User’s Guide
79
Page 80

Chapter 6 Storage Screens
" Creating a volume formats the drive. All data on the disk will be lost.
Figure 62 System > Storage > Create an External Volume
The following table describes the labels in this screen.
Table 19 System > Storage > Create an External Volume
LABEL DESCRIPTION
Volume Name Type a volume name from 1 to 31 characters. The name cannot be the same as
another existing external volume.
Acceptable characters are all alphanumeric characters and " " [spaces], "_"
[underscores], and "." [periods].
The first character must be alphanumeric (A-Z 0-9).
The last character cannot be a space " ".
Available Disk(s) Select the external (USB) device upon which you want to create the volume.
File System Select the file system you want the new volume to use.
Windows file systems
FAT32: Newer, and more efficient than FAT16. Supports a volume size of up to
2 TB (Tera Bytes) and indi vidual file sizes of up to 4 GB.
FAT16: Compatible with older Windows operating systems. Supports volume
and file sizes of up to 2 GB.
Linux file systems
EXT2: Older file system.
EXT3: The same as EXT2, but adds a journaled file system and is more robust.
ReiserFS: Offers better performance for small files.
Apply Click this button to save your changes back to the NSA and create the volume.
Cancel Click this button to exit this screen without saving changes.
6.8 External Disks
You may connect USB storage devices that support the following file systems to the NSA.
• Windows File Systems: NTFS, FAT32 and FAT16.
• Linux File Systems: ReiserFS, EXT2, and EXT3.
80
NSA-220 User’s Guide
Page 81

6.9 RAID
This section contains theoretical background on JBOD and the RAID levels used on the NSA.
Skip to the next section if you already understand RAID and know what storage system you
want to use on the NSA.
Redundant Array of Independent Disks (RAID) is a method of storing data on multiple disks
to provide a combination of greater capacity, reliability, and/or speed. JBOD (Just a Bunch Of
Disks) is not a RAID storage method but it is included in this discussion.
These are some terms that you need to know in order to understand storage systems.
•Mirroring
• Duplexing
• Striping
• Parity
Chapter 6 Storage Screens
In a RAID system using mirroring, all data in the system is written simultaneously to two
hard disks instead of one. This provides 100% data redundancy as if one disk fails the
other has the duplicated data. Mirroring setups always require an even number of drives.
Like in mirroring, all data is duplicated onto two distinct physical hard drives but in
addition it also duplicates the hardware that controls the two hard drives (one of the drives
would be connected to one adapter and the other to a second adapter).
Striping is the breaking up of data and storing dif ferent data p ieces on each of the drives in
an array. This allows faster reading and writing as it can be done simultaneously across
disks. Striping can be done at the byte level, or in blocks. Byte-level striping means that
the first byte of the file is sent to the first drive, then the second to the second drive, and so
on. Block-level striping means that each file is split into blocks of a certain size and those
are distributed to the various drives. The size of the blocks used is also called the stripe
size (or block size).
In mirroring 50% of the drives in the array are reserved for duplicate data. Parity is
another way to allow data recovery in the event of disk failure using calculations rather
than duplicating the data. If you have ‘n’ pieces of data, parity computes an extra piece of
data. The’n+1’ pieces of data are stored on ‘n+1’drives. If you lose any one of the ‘n+1’
pieces of data, you can recreate it from the ‘n’ that remain, regardless of which piece is
lost. Parity protection is used with striping, and the “n” pieces of data are typically the
blocks or bytes distributed across the drives in the array. The parity information can either
be stored on a separate, dedicated drive, or be mixed with the data across all the drives in
the array.
" In the following figures, A1, A2, A3 and so on are blocks of data from the A file.
Similarly, B1, B2, B3 and C1, C2, C3 ar blocks of data from the B and C files.
NSA-220 User’s Guide
81
Page 82

Chapter 6 Storage Screens
6.9.1 JBOD
JBOD allows you to combine multiple physical disk drives into a single virtual one, so they
appear as a single large disk. JBOD can be used to turn multiple different-sized drives into one
big drive. For example, JBOD could convert 80 GB and 100 GB drives into one large logical
drive of 180 GB. If you have two JBOD volumes (with one disk in each), a failure of one disk
(volume) should not affect the other volume (disk). JBOD read performance is not as good as
RAID as only one disk can be read at a time and they must be read sequentially.
figure shows disks in a single JBOD volume. Data is not written across disks but written
sequentially to each disk until it’s full.
Table 20 JBOD
A1 B1
A2 B2
A3 B3
A4 B4
DISK 1 DISK 2
The following
6.9.2 RAID 0
RAID 0 spreads data evenly across two or more disks (data striping) with no mirroring nor
parity for data redundancy , so if one disk fails the entire volume will be lost. The major benefit
of RAID 0 is performance. The following figure shows two disks in a single RAID 0 volume.
Data can be written and read across disks simultaneously for faster performance.
Table 21 RAID 0
A1 A2
A3 A4
A5 A6
A7 A8
DISK 1 DISK 2
RAID 0 capacity is the size of the smallest disk multiplied by the number of disks you have
configured at RAID 0 on the NSA. For example, if you have two disks of sizes 100 GB and
200 GB respectively in a RAID 0 volume, then the maximum capacity is 200 GB (2 * 100 GB,
the smallest disk size) and the remaining space (100 GB) is unused.
Typical applications for RAID 0 are non-critical data (or data that changes infrequently and is
backed up regularly) requiring high write speed such as audio, video, graphics, games and so
on.
82
NSA-220 User’s Guide
Page 83

6.9.3 RAID 1
RAID 1 creates an exact copy (or mirror) of a set of data on another disk. This is useful when
data backup is more important than data capacity. The following figure shows two disks in a
single RAID 1 volume with mirrored data. Data is duplicated across two disks, so if one disk
fails, there is still a copy of the data.
Table 22 RAID 1
A1 A1
A2 A2
A3 A3
A4 A4
DISK 1 DISK 2
As RAID 1 uses mirroring and duplexing, a RAID 1 volume needs an even number of disks
(two or four for the NSA).
Chapter 6 Storage Screens
RAID 1 capacity is limited to the size of the smallest disk in the RAID array. For example, if
you have two disks of sizes 150 GB and 200 GB respectively in one RAID 1 volume, then the
maximum capacity is 150 GB and the remaining space (50 GB) is unused.
Typical applications for RAID 1 are those requiring high fault tolerance without need of large
amounts of storage capacity or top performance, for example, accounting and financial data,
small database systems, and enterprise servers.
6.9.4 RAID and Data Protection
If a hard disk fails and you’re using a RAID 1 volume, then your data will still be available
(but at degraded speeds until you replace the hard disk that failed and resynchronize the
volume). However, RAID cannot protect against file corruption, virus attacks, files incorrectly
deleted or modified, or the NSA malfunctioning. Here are some suggestions for helping to
protect your data.
• Place the NSA behind a hardware-based firewall. It should have stateful packet inspection,
IDP (Intrusion Detection and Prevention), and anti-virus (like ZyXEL’s ZyWALL UTM
products for example).
• Use anti-virus software on your computer to scan files from others before saving the files
on the NSA.
• Keep another copy of important files (preferably in another location).
NSA-220 User’s Guide
83
Page 84

Chapter 6 Storage Screens
84
NSA-220 User’s Guide
Page 85

CHAPTER 7
Network Screen
This chapter discusses the network configuration screen.
7.1 Network Settings
Use the network configuration screen to assign the NSA a dynamic or static IP address and
DNS information.
7.1.1 IP Address
The NSA needs an IP address to communicate with the media servers on your network. The
NSA can get an IP address automatically if you have a device on your network that gives them
out. Or you can assign the NSA a static (fixed) IP address.
7.1.2 DNS Server Address
A DNS (Domain Name System) server maps domain names (like www.zyxel.com) to their
corresponding IP addresses (204.217.0.2 in the case of www.zyxel.com). This lets you use
domain names to access web sites without having to know their IP addresses. The NSA can
receive the IP address of a DNS server automatically (along with the NSA’s own IP address).
You can also manually enter a DNS server IP address in the NSA.
7.1.3 Jumbo Frames
Jumbo frames are Ethernet frames larger than 1500 bytes. They enable data transfer with less
overhead. The bigger the frame, the better the network performance.
T o use jumbo frames, your LAN must support 1 Gbps transmissions (Gigabit Ethernet). All of
your network devices (computer Ethernet cards and switches, hubs, or routers) must also
support the same size of jumbo frames that you specify in the NSA.
" If you enable jumbo frames on the NSA in a network that does not support
them, you will lose access to the NSA. If this occurs, you will have to restore
the factory default configuration. Push the RESET button on the NSA’s rear
panel and release it after you hear a beep.
NSA-220 User’s Guide
85
Page 86

Chapter 7 Network Screen
In the following example, the NSA has jumbo frames enabled and set to 8KB frames. This
means the computer, notebook computer, and sw itch must also have jumbo frames enabled
and be capable of supporting 8KB frames.
Figure 63 Jumbo Frames
1 Gbps Ethernet
8KB
8KB
8KB
8KB
7.2 Network Config Screen
Click System Setting > Network > TCP/IP in the navigation panel to open the following
screen.
Use this screen to have the NSA use a dynamic or static IP address, subnet mask, default
gateway and DNS servers.
" If you change the NSA’s IP address, you need to log in again after you apply
changes.
86
NSA-220 User’s Guide
Page 87

Figure 64 System Setting > Network > TCP/IP
Chapter 7 Network Screen
The following table describes the labels in this screen.
Table 23 System Setting > Network > TCP/IP
LABEL DESCRIPTION
IP Address
Dynamic Select this option to have the NSA get IP address information automatically.
If no IP address information is assigned, the NSA uses Auto-IP to assign itself an
IP address and subnet mask. For example, you could connect the NSA directly to
your computer. If the computer is also set to get an IP address automatically, the
computer and the NSA will choose addresses for themselves and be able to
communicate.
Static Select this option for the NSA to use fixed TCP/IP information. Y ou must fill in the
following fields.
IP Address Type an IP address in this field.
IP Subnet
Mask
Default
Gateway
DNS DNS (Domain Name System) is for mapping a domain name to its corresponding
Dynamic Select the option to have the NSA get a DNS server address automatically.
Static Select this option to choose a static DNS server address. Type the DNS server IP
Primary DNS
Server
Type an IP subnet mask in this field.
Type a default gateway address in this field.
IP address and vice versa. If you have the IP address(es) of the DNS server(s),
enter them.
address(es) into the fields below.
Type a primary DNS server IP address.
NSA-220 User’s Guide
87
Page 88

Chapter 7 Network Screen
Table 23 System Setting > Network > TCP/IP
LABEL DESCRIPTION
Secondary
DNS Server
Jumbo Frames Jumbo frames improve network performance. You must have a 1 Gbps (Gigabit
Network
Diagnostic Tool
Apply Click Apply to save your TCP/IP configurations. After you click Apply, the NSA
Reset Click Reset to begin configuring this screen afresh.
Type a secondary DNS server IP address.
Ethernet) network that supports jumbo frames. Select the largest size of frame
that all of your network devices (including computer Ethernet cards and switches,
hubs, or routers) support.
Note: If you enable jumbo frames on the NSA in a network that
does not support them, you will lose access to the NSA. If
this occurs, you will have to restore the factory default
configuration. Push the RESET button on the NSA’s rear
panel and release it after you hear a beep.
Use this section to test the network connection to a particular IP address or
domain name. Select an address or type it into the field. Then click Ping to have
the NSA send a packet to test the network connection. If the NSA is able to “ping”
the host, the network connection is OK.
restarts. Wait until you see the Login screen or until the NSA fully boots and then
use the NDU to rediscover it.
88
NSA-220 User’s Guide
Page 89

CHAPTER 8
Application Screens
This chapter discusses the application screens.
8.1 Application Screens
Use the application screens to:
• Configure settings for FTP file transfers to/from the NSA. See Section 8.2 on page 89.
• Share files with media clients. See Section 8.3 on page 90.
• Download files from the Internet. See Section 8.5 on page 93.
• Download frequently updated digital content like TV programs, radio talk shows,
Podcasts (audio files), and blogs. See Section 8.12 on page 105.
• Share a printer. See Section 8.15 on page 109.
8.2 FTP Access for NSA Files
Use FTP to upload files to the NSA and download files from the NSA. Click Applications >
FTP to open the following screen. Use this screen to:
• Enable or disable FTP.
• Set a connection limit.
• Set an idle timeout.
• Enable or disable anonymous FTP access.
• Specify a character set to use.
File Transfer Protocol (FTP) is a file transfer service that operates on the Internet. A system
running the FTP server accepts commands from a system running an FTP client. FTP is not a
secure protocol. Your file transfers could be subject to snooping.
NSA-220 User’s Guide
89
Page 90

Chapter 8 Application Screens
Figure 65 Applications > FTP
The following table describes the labels in this screen.
Table 24 Applications > FTP
LABEL DESCRIPTION
FTP
Enable FTP You can use FTP to send files to the NSA or get files from the NSA. Select
Connection Limit Enter the maximum number of concurrent FTP connections allowed on the
Idle Timeout Enter the length of time that an FTP connection can be idle before timing
Enable Anonymous FTP
Access
Character Set The NSA uses UTF-8 (8-bit UCS/Unicode Transformation Format) format
Apply Click Apply to save your changes back to the NSA.
Reset Click Reset to begin configuring this screen afresh.
the Enable FTP check box to allow users to connect to the NSA via FTP;
otherwise clear the check box.
NSA in this field.
out.
Select Enable Anonymous FTP Access to allow any user to log into the
NSA using ‘FTP’ or ‘anonymous’ as a username and no password. Any
other name is considered a username, so must be valid and have a
corresponding correct password.
for FTP by default. If the NSA’s folders, or file names do not display
correctly in your FTP client, select the appropriate language encoding
here.
This setting applies to all FTP client connections to the NSA. It does not
affect your Windows/CIFS connections (it will not correct the character
display in Windows Explorer).
8.3 Sharing Media Files on Your Network
The media server feature lets anyone on your network play video, music, and photos from the
NSA (without having to copy them to another computer). The NSA can function as a DLNAcompliant media server and/or an iTunes server. The NSA streams files to DLNA-compliant
media clients or computers using iTunes. The Digital Living Network Alliance (DLNA) is a
group of personal computer and electronics companies that works to make products
compatible in a home network.
• Publish shares to let others play the contained media files.
90
NSA-220 User’s Guide
Page 91

Chapter 8 Application Screens
• The media server is a convenient way to share files you download using the broadcatching
service (see Chapter 8 on page 105).
• Media client software is included on the CD.
• Hardware-based media clients like the DMA-1000 can also play the files. See Appendix
on page 160 for the supported multimedia file formats.
" Anyone on your network can play the media files in the published shares. No
user name and password or other form of security is used. The media server is
enabled by default with the video, photo, and music shares published.
8.3.1 iTunes Server
The NSA iTunes server feature lets you use Apple’s iTunes software on a computer to play
music and video files stored on the NSA. You can download iTunes from www.apple.com.
• The iTunes server feature lets computers on your network use iTunes to play media files in
the NSA’ s published shares.
• See Section 16.4 on page 160 for the multimedia file formats iTunes supports.
• A link for the NSA in iTunes under SHARED. Click it to display the NSA’s published
media files as shown next.
Figure 66 NSA link in iTunes
NSA-220 User’s Guide
91
Page 92

Chapter 8 Application Screens
8.3.2 Songs and Videos from the iTunes Store
After using iTunes on your computer to download songs and videos from Apple’s iTunes
Store, you can copy them to the NSA. Many of these songs and videos have DRM (Digital
Rights Management). At the time of writing, you can use your Apple account ID and password
to authorize up to a total of five computers to play the files. To authorize a computer, open
iTunes and click Store > Authorize Computer.
8.4 Media Server Screen
Click Applications > Media Server to open the following screen. Use this screen to turn the
media server and/or iTunes server on or off and select shares to publish (share with media
clients like iTunes or the DLNA-compliant media client included on the NSA CD).
Figure 67 Applications > Media Server
92
The following table describes the labels in this screen.
Table 25 Applications > Media Server
LABEL DESCRIPTION
Media Server Name This is the name of the NSA media server on the network. It is the same
as the NSA’s server name. This name lets media clients distinguish
between multiple media servers on your network.
Disable / Enable Media
Server
Turn on the media server to let (DLNA-compliant) media clients on your
network play media files located in the published shares.
NSA-220 User’s Guide
Page 93

Chapter 8 Application Screens
Table 25 Applications > Media Server
LABEL DESCRIPTION
Disable / Enable
transcoding
Unpublished Shares This list box displays the shares that the NSA does not share with the
Publish Selected Share(s) Select shares in the Unpublished Shares box and click this button to
Published Shares This list box displays the shares that the NSA shares with the media
Unpublish Selected
Share(s)
Enable iTunes Server Select this option to let anyone on your network use iTunes to play music
Apply Click Apply to save your changes back to the NSA.
Reset Click Reset to begin configuring this screen afresh.
Disable transcoding to improve the performance of the NSA.
However, disabling may cause certain media clients to fail when
displaying non-JPEG photos. In the case of the media client included on
the CD with the NSA, TIFF and GIF images will not be properly displayed.
Enabling transcoding allows these files to be shown properly, but slows
down the NSA’s performance.
media clients.
share the shares with media clients. Use the [SHIFT] key to select a range
of entries. Hold down the [CTRL] key to select multiple individual entries.
clients.
Select shares in the Published Shares box and click this button to not
share the shares with media clients. Use the [SHIFT] key to select a range
of entries. Hold down the [CTRL] key to select multiple individual entries.
and video files in the published shares.
8.5 Download Service
The NSA’s download service downloads files from the Internet directly to the NSA. You do
not have to download to your computer and then copy to the NSA. This can free up your
computer’s system resources. The download service also handles your broadcatching
downloads. See Section 8.12 on page 105 for information on broadcatching.
The NSA can download using these protocols.
• HTTP: The standard protocol for web pages.
• FTP: A standard Internet file transfer service.
• BitTorrent: A popular distributed peer-to-peer files sharing protocol.
" Do not use the NSA for illegal purposes. Illegal downloading or sharing of files
can result in severe civil and criminal penalties. You are subject to the
restrictions of copyright laws and any other applicable laws and will bear the
consequences of any infringements thereof. ZyXEL bears NO responsibility or
liability for your use of the download service feature.
NSA-220 User’s Guide
93
Page 94

Chapter 8 Application Screens
8.5.1 BitTorrent
The NSA includes a BitTorrent client for fast downloading and sharing of large files (such as
educational public domain videos). With BitTorrent, you share while you’re downloading the
file. BitT orrent breaks up the file and distributes it in hundreds of chunks. You start sharing the
file as soon as you have downloaded a single chunk.
8.5.1.1 Torrent Files
Before using BitTorrent to download a file, you must first obtain a “torrent” file. The torrent
file uses a .torrent extension. The torrent file has information about the file to be downloaded
(and shared) and the computer(s) that coordinates the distribution of the file (called the
tracker). Your BitTorrent client uses the torrent file to connect to the tracker to find out where
to get the pieces of the file you want to download.
When you add a BitT orrent down load task in the NSA’ s web configurator screens, you can just
copy and paste the URL of the torrent file. The NSA automatically downloads the torrent file
and saves it in a torrent folder located in the same folder where the NSA stores downloaded
files (the admin share’s download folder by default).
If you already have the torrent file saved on your computer, you can just specify its location
when adding a download task through the web configurator. Another method is to use FTP or
a CIFS program (Windows Explorer for example) to copy the torrent file into the torrent
folder. The torrent folder is located in the same folder where the NSA stores downloaded files
(the admin share’s download folder by default). The NSA automatically downloads and uses
the torrent file.
After your BitT orrent download and sharing are finished, you can go to the torrent folder and
delete the .torrent file if you need to free up hard disk space.
8.5.2 Protecting Your Network and NSA When Using BitTorrent
When you download using BitTorrent, you reveal your IP address. This increases the risk of
hacking attacks, which can be protected against by a good firewall.
8.5.2.1 Use a Hardware-based Firewall
Place a hardware-based firewall between your network and the Internet (a software-based
firewall on your computer would just protect the computer itself, not the NSA since your
computer is not between your NSA and the Internet). Ideally your firewall should have all of
the following.
94
NSA-220 User’s Guide
Page 95

Chapter 8 Application Screens
Figure 68 Firewall
Hacking
Malicious
Packets
Viruses
• Stateful packet inspection to control access between the Internet and your network and
protect your NSA (and computers) from hacking attacks.
• IDP (Intrusion Detection and Prevention) to detect malicious packets within normal
network traffic and take immediate action against them.
• Anti-virus to check files you download for computer viruses.
8.5.2.2 BitTorrent and Your Firewall
The anti-virus feature on a firewall probably cannot check BitTorrent downloads for viruses,
so use anti-virus software on your computer to scan the NSA for viruses.
When you download using BitTorrent, many other BitTorrent users are also trying to
download the file from you. The firewall slows this down because by default, it only allows
traffic from the Internet in response to a request that originated on the LAN (it lets you get
files from the Internet and blocks those on the Internet from getting files from you).
Figure 69 Firewall Blocking Incoming BitTorrent Requests
Incoming BitTorrent Requests Blocked
Outgoing BitTorrent Request Allowed
Corresponding BitTorrent Reply Allowed
To speed up BitTorrent file transfers, configure your firewall’s port forwarding to send
incoming TCP port 6881 and UDP port 6880 connections to the NSA. You probably need to
use your firewall’s HTML (web-based) configuration interface to set this up (see the firewall’ s
manual for details). You may also have to configure a corresponding firewall rule.
NSA-220 User’s Guide
95
Page 96

Chapter 8 Application Screens
Figure 70 Firewall Configured to Allow Incoming BitTorrent Requests
8.6 Download Service Screen
Click Applications > Download Service to open the following screen. Use this screen to
manage the NSA’s file downloads.
Incoming BitTorrent Requests Allowed
Other Incoming Traffic Blocked
" By default, the NSA saves downloads in the admin share’s download folder.
96
NSA-220 User’s Guide
Page 97

Figure 71 Applications > Download Service
Chapter 8 Application Screens
The following table describes the labels in this screen.
Table 26 Applications > Download Service
LABEL DESCRIPTION
Enable Download
Service
Add After you find a file to download, copy the file’s URL. Then log into the NSA web
Delete To delete download tasks (or manually clear out completed download tasks),
Pause Select a downloading item and click Pause to temporarily stop the download.
Resume Select a paused item and click Resume to continue the download.
Use this option (and the Apply button) to turn the download service off or on. If you
turn off the service, all downloads are paused. The files that were downloading are
treated as queued. Turning the download service back on resumes your
downloads (or restarts them if they are not able to be resumed).
configurator and go to the Applications > Download Server screen and click the
Add button. A screen opens where you create a new download task. You can
paste the file’s URL or use a BitTorrent file.
select a download task and click Delete to remove it from the list. A pop-up screen
asks you to confirm. Click Apply to delete or Cancel to quit. When you delete a
download task, you are given the option to delete the associated files. Selecting
this option deletes a downloaded file and in the case of a BitTorrent download task,
also deletes the related .torrent file.
Use your keyboard’s [SHIFT] key to select a range of download tasks. Use the
[CTRL] key and click individual download tasks to select multiple individual
download tasks.
Paused downloads appear in the Download Service screen’s Inactive tab.
Use your keyboard’s [SHIFT] key to select a range of download tasks. Use the
[CTRL] key and click individual download tasks to select multiple individual
download tasks.
NSA-220 User’s Guide
97
Page 98

Chapter 8 Application Screens
Table 26 Applications > Download Service
LABEL DESCRIPTION
Refresh Click this button to update the information displayed on the screen.
Preferences Click this button to open a screen where you can set the default location for saving
Active Click this tab to see the list of files the NSA is currently downloading or sharing
Inactive Click this tab to see the list of files that are queued (waiting in line) for the NSA to
Completed Click this tab to see the list of files that the NSA has finished downloading.
Error Click this tab to see the list of files that the NSA was not able to download. The
Status The icon shows the download’s status.
Name This identifies the download file. A “...” indicates an abbreviated name. Hold your
Complete (%) This is the percentage of the file that the NSA has downloaded.
Location This appears in the Completed tab. It displays the path for where the file is saved.
Seeds Seeds apply to BitTorrent downloads. This is the number of computers that are
Peers Peers apply to BitTorrent downloads. This is the number of other computers that
Download Speed This is how fast the NSA is getting the file.
Upload Speed This is how fast the NSA is sending the file to other BitTorrent users.
downloads and configure your BitTorrent settings.
The table lists your downloads. Click a column’s heading to sort the entries by that
criteria.
with other BitTorrent users. The NSA handles a maximum of 10 active tasks at a
time (or fewer depending on how much of the NSA’s system memory is available).
If you add more, they appear in the Inactive tab.
Bit Torrent downloads may appear in the Inactive tab for a while before showing in
the Downloading tab. The NSA automatically moves completed tasks to the
Completed tab.
download or the downloads that have been manually paused.
NSA automatically retries unsuccessful download attempts. The download
displays in the error tab when the re-attempts are also unsuccessful and the NSA
stops trying to download the file. To try the download again, use the Add button to
create a new download task.
Completed: The NSA has downloaded the whole file.
Seeding: The download is finished and the NSA is allowing other BitTorrent users
to download it.
Downloading: The NSA is getting the file.
Queued: The download is waiting in line for the NSA to download it.
Pause: The download has been manually stopped. Select it and click Resume to
continue it.
Error: The NSA was not able to complete the download. Select it and click
Resume to reattempt the download.
cursor over the name to display the full name.
sharing the complete file that you are downloading.
are also downloading (and sharing) the file you are downloading.
It is normal for a BitT orrent download to start out with a slow download speed since
it has to set up numerous connections. The speed should increase as the
download progresses and decrease near the end of the download.
98
NSA-220 User’s Guide
Page 99

Table 26 Applications > Download Service
LABEL DESCRIPTION
Time Left This is how much longer (in hours, minutes, and seconds) it should take to finish
the download at the current download speed.
Priority This is the download’s priority on the NSA. You can set a currently downloading or
queued download to high or automatic priority. You can set a download to high
priority to have the NSA try to download it before the other files. However the
actual download speed depends more on factors like the speed of you Internet
connection, the speed of the download source’s Internet connection, how many
others are trying to download at the same time, the peers and seeds available and
general network conditions.
8.7 Adding a Download Task
Click Applications > Download Service > Add to open the following screen. Use this screen
to specify a file for the NSA to download. Section 3.2 on page 52 provides a tutorial on adding
a download task.
Figure 72 Applications > Download Service > Add
Chapter 8 Application Screens
The following table describes the labels in this screen.
Table 27 Applications > Download Service > Add
LABEL DESCRIPTION
URL Paste the URL of the file you want to download into this field. The URL can be for an
Torrent File A “torrent” file has information the NSA uses to do a BitTorrent download. A torrent file
NSA-220 User’s Guide
HTTP, FTP, or BitTorrent download.
For a BitTorrent download, you can copy and paste the URL of the .torrent file. The
NSA will automatically download the .torrent file and use it. You do not have to
manually download the .torrent file or save it to your computer.
Note: Make sure the link opens either the file you want or a pop-up
window about how to handle the file.
It is also OK for the link to open a .torrent file. If you are redirected to a screen that says
the download should start in a few seconds, there may be a link to click if the download
does not start automatically. See if that link opens the file or the pop-up window.
uses a .torrent extension. If you already have a torrent file saved on your computer,
select the Torrent File option and specify its path or click Browse and look for its
location.
99
Page 100

Chapter 8 Application Screens
Table 27 Applications > Download Service > Add
LABEL DESCRIPTION
Default
Destination
Volume This is the volume where the NSA saves downloaded files.
Path This is the location of the share where the NSA will save the downloaded files. Click
Apply Click Apply to save your changes back to the NSA.
Cancel Click Cancel to close this screen without saving your changes.
This shows where the NSA stores files after downloading them.
Edit to go to a screen where you can set the default location for saving downloads and
configure your BitTorrent settings.
8.8 Configuring Your General Download Preferences
Click Applications > Download Service > Prefer ences to open the following screen. Use this
screen to set the default location for saving downloads and configure your BitTorrent settings.
Figure 73 Applications > Download Service > Preferences
The following table describes the labels in this screen.
Table 28 Applications > Download Service > Preferences
LABEL DESCRIPTION
Default Destination Use these fields to select where on the NSA to store the files the NSA
Volume If you have more than one volume, select the one that contains the share
Path Type the location of the share to save downloaded files in or click Browse
BitTorrent These settings control the NSA’s BitTorrent downloads.
Max. download rate You may need to limit the bandwidth the NSA uses for BitTorrent downloads
Max. upload rate You may need to limit the bandwidth the NSA uses to share files through
downloads.
where you want to save downloaded files.
and navigate to the file’s location.
if your network’s other Internet applications are not getting enough
downstream bandwidth. 0 has the NSA impose no restriction.
BitT orrent if your network’s other Internet applications are not getting enough
upstream bandwidth. 0 has the NSA impose no restriction.
If you do not allow any uploads, (for example, you set a limit of 1 KB/s) you
will not have a good standing in the BitTorren t communi ty.
100
NSA-220 User’s Guide
 Loading...