

IPC-2605N
The First Consumer-Friendly Network Camera
Edition 0.1, 6/2012
www.zyxel.com
Copyright © 2012
ZyXEL Communications Cor poration


1 Contents
2 Getting to know your IPC-2605N ............................................................................... 6
2.1 Package Contents ............................................................................................ 6
2.2 Features ........................................................................................................... 7
2.3 Camera Layout ................................................................................................ 8
2.4 LED Status Indicator....................................................................................... 9
3 Installation................................................................................................................. 10
3.1 Connecting Your IPC-2605N ....................................................................... 10
3.2 Wireless......................................................................................................... 11
3.3 Wall and Ceiling Mounting .......................................................................... 12
4 Initial Setup ............................................................................................................... 13
5 Accessing your camera ............................................................................................. 14
5.1 CloudEnabled™ Viewing ............................................................................. 15
5.2 Direct Viewing of your Camera (For Advanced Users) ............................... 17
6 Configuration ............................................................................................................ 23
6.1 Video Settings ............................................................................................... 23
6.2 Camera Settings ............................................................................................ 24
6.3 Audio Settings ............................................................................................... 26
6.4 User Settings ................................................................................................. 26
6.5 Network Settings ........................................................................................... 27
6.6 PTZ Control .................................................................................................. 33
6.7 Event Setup ................................................................................................... 36
6.8 Recording Setup ............................................................................................ 42
6.9 Recording History ......................................................................................... 43
6.10 Date ............................................................................................................... 43
7 Event Viewer ............................................................................................................ 44
8 Maintenance .............................................................................................................. 45
8.1 Information ................................................................................................... 45
8.2 Log ................................................................................................................ 45
8.3 Maintenance .................................................................................................. 45
9 Troubleshooting ........................................................................................................ 48
9.1 Reconfiguring Your Device .......................................................................... 48
9.2 Cabling Check ............................................................................................... 48
9.3 Resetting to Factory Defaults........................................................................ 49
9.4 Trouble with Active X .................................................................................. 50
9.5 Trouble with Remote Viewing on Browser .................................................. 52
9.6 Symptoms, Causes, and Solutions ................................................................ 54
10 Technical Specifications ....................................................................................... 59
11 Open-Sourced Components .................................................................................. 61

Important Notices
Regulatory Notice
This device complies with Part 15 of the FCC Rules. Operation is subject to the following two conditions:
(1) This device may not cause harmful interference, and (2) This device must accept any interference
received, including interference that may cause undesired operation.
FCC Interference Statement
This equipment has been tested and found to comply with the limits for a Class B digital device, pursuant
to Part 15 of the FCC Rules. These limits are designed to provide reasonable protection against harmful
interference in a residential installation.
This equipment generates, uses, and can radiate radio frequency energy and, if not installed and used in
accordance with the instructions, may cause harmful interference to radi o communications. However, there
is no guarantee that interference will not occur in a particular installation. If this equipment does cause
harmful interference to radio or televisi o n recept i on , whi ch can be determined by turning the equipment off
and on, the user is encouraged to try to correct the interference by one of the following measures:
Reorient or relocate the receiving antenna
Increase the separation between the equipment and the receiver
Connect the equipment to an outlet on a different circuit than the receiver is connected.
Consult the dealer or an experienced TV/radio technician for help.
To assure continued compliance, any changes or modifications not expressly approved by the party
responsible for compliance could void the user’s authority to operate this equipment.
Operation Safety
Before using this camera, please read and follow the steps below to protect your IP camera.
Please place the IP camera on a level surface and keep it out of direct sunlight
Keep the IP camera indoors and away from water, dust, humidity, and magnetic products
Do not rotate your IP camera by hand. It may cause damage to the camera.
Do not drop the IP camera, this may damage the mechanical parts of the camera.
Do not disassemble or remodel the product, it can cause damage or fire.
Do not shake, move, or disturb the camera when it is in operation, as such actions may result in
the malfunction of the device.
Power the camera off if it produces smoke or unusual odor.
Do not place the IP camera around heat sources such as a Television or microwave oven.
About This Manual
This manual is indented only for users of the Zy XEL IPC - 2 60 5 N net w or k camera.
Conventions in this Manual
While using this manual, pay attention to symbols and notations used to draw attention to special
situations, such as:
Caution!
Information provided with this symbol is critical to prevent damage to
the product or injury to the user.
Important!
This symbol indicates instructions that a user must follow in order to
complete a task.
Note:
This symbol indicates additional information or tips to help the user
operate the product.
2 Getting to know your IPC-2605N
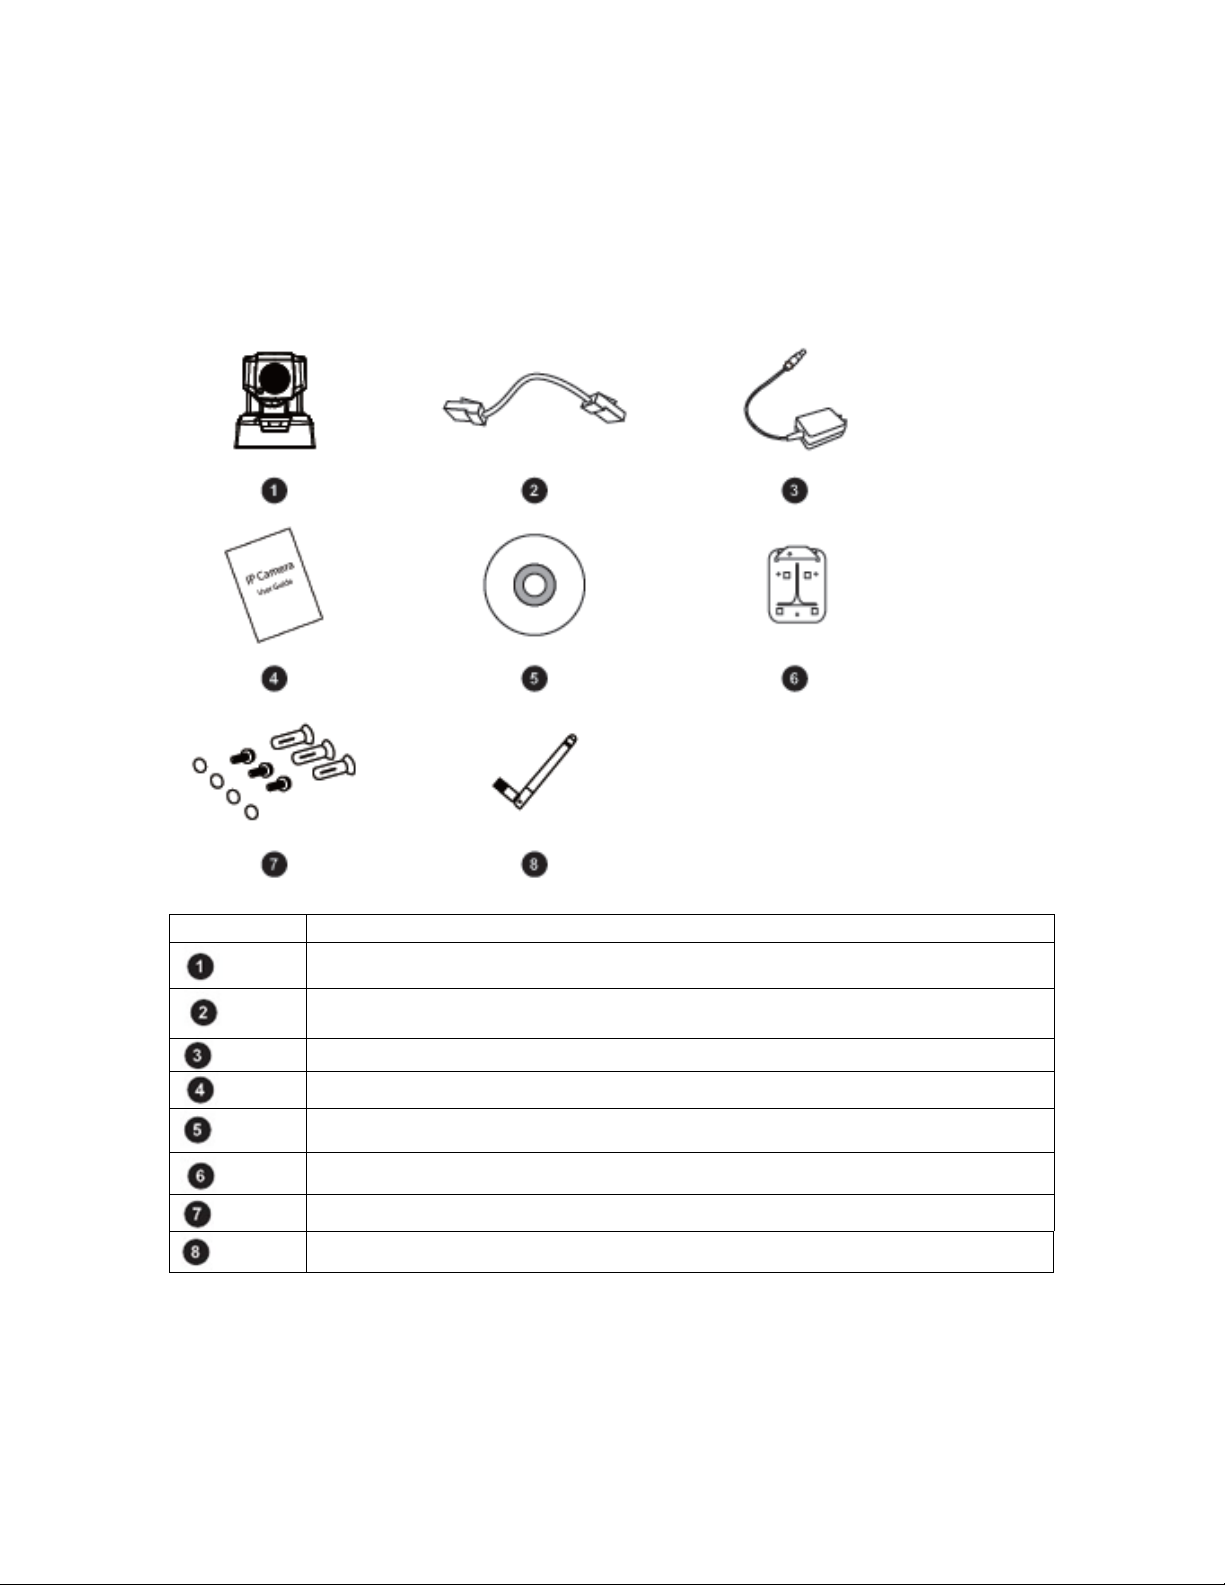
2.1 Package Contents
Before setup, ensure your package contains all contents. If anything is missing, contact
your distributor.
Number Contents
IPC-2605N Network Camera
Ethernet Cable
Power Adapter
Quick Installation Guide
Install Disk
Wall/Ceiling Mount Plate
Camera Pad x4, Screw Mount x3, Screw x3
Detachable Wireless Antenna

2.2 Features
ZyXEL’s IPC-2605N sports an advanced 340-degree pan and 100-degree tilt mechanical
design, ideal for deployment in warehouses, offices, restaurant, lobby area, or anywhere
it’s important to have a wide field of view.
Pan/Tilt with 10x digital zoom
Day/Night functionality
Network bandwidth detection
SMS & E-Mail Notification
Built-in microphone
Two-way audio communication
Plug n Play installation
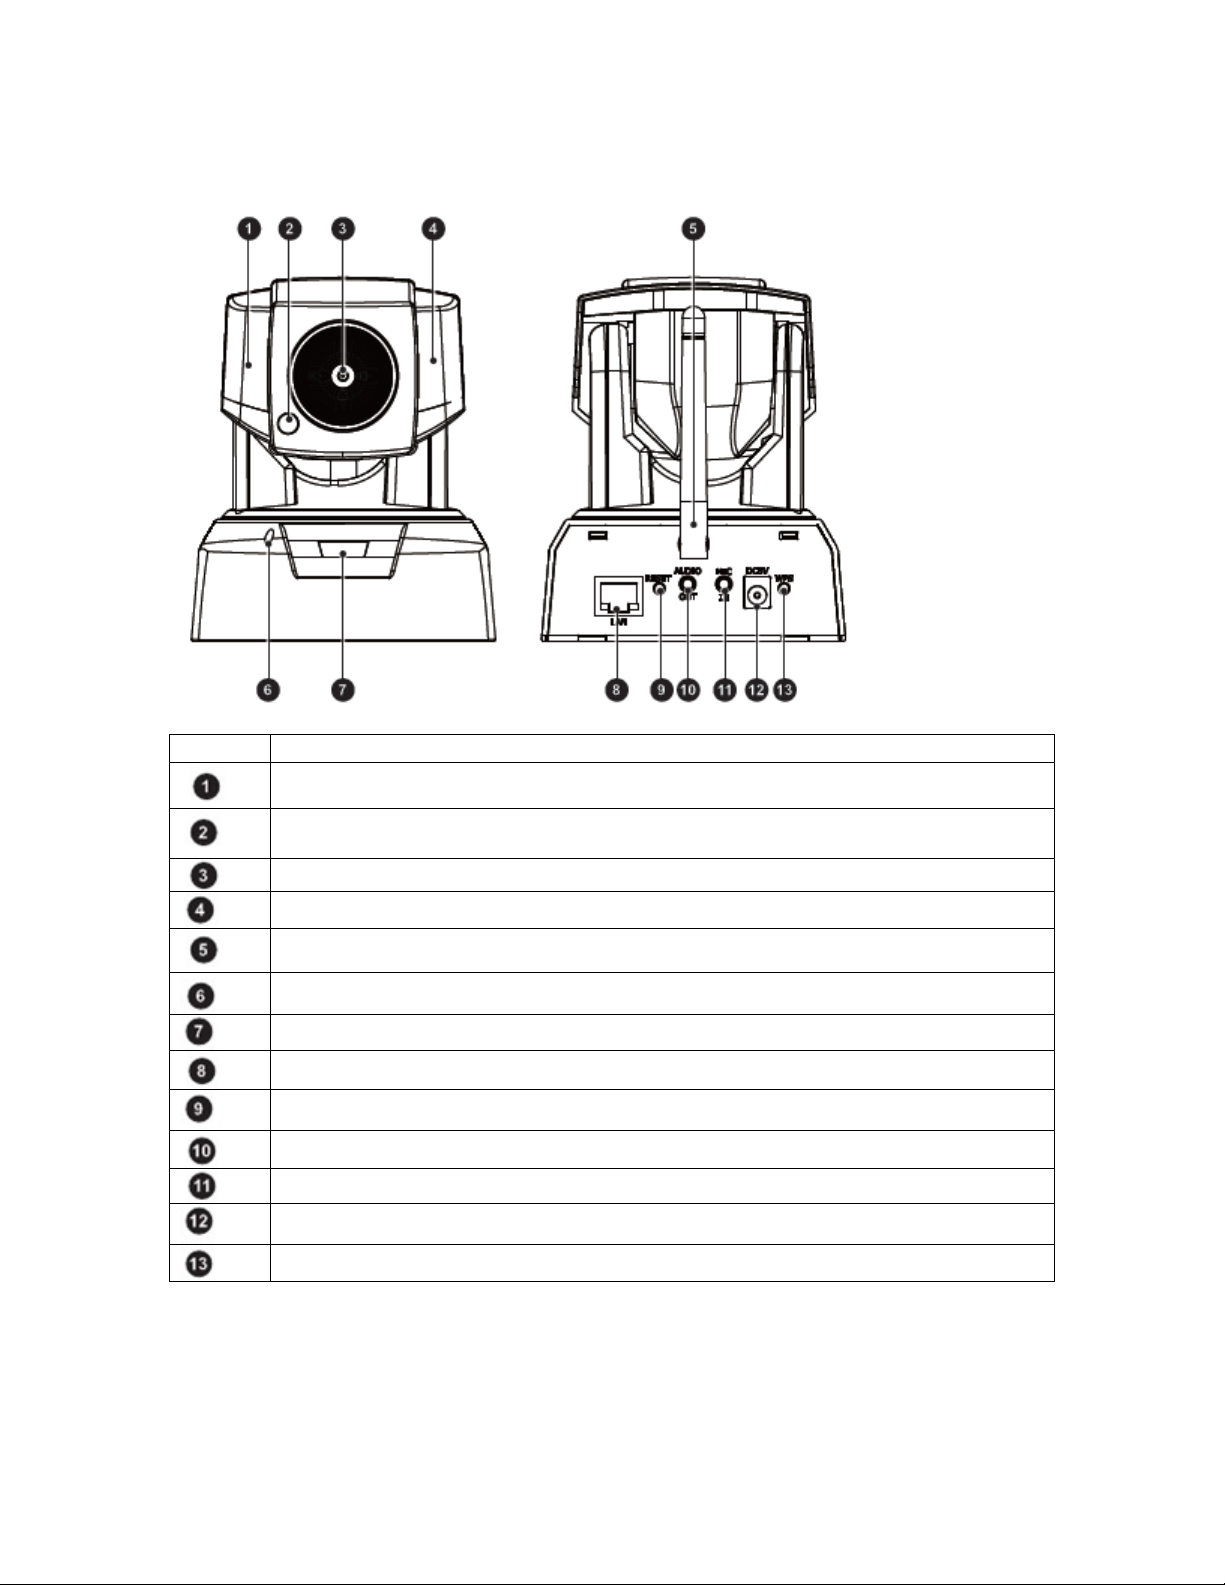
2.3 Camera Layout
Number Contents
IR LEDs x6 (12 in total)
Light Sensor
Lens 2.0 mm, F2.8, fixed iris
IR LEDs x6 (12 in total)
Detachable Wireless Antenna
Microphone
LED Status Indicator
Ethernet Port
Reset Button
Audio Output
Microphone In
Power Connector
WPS Button
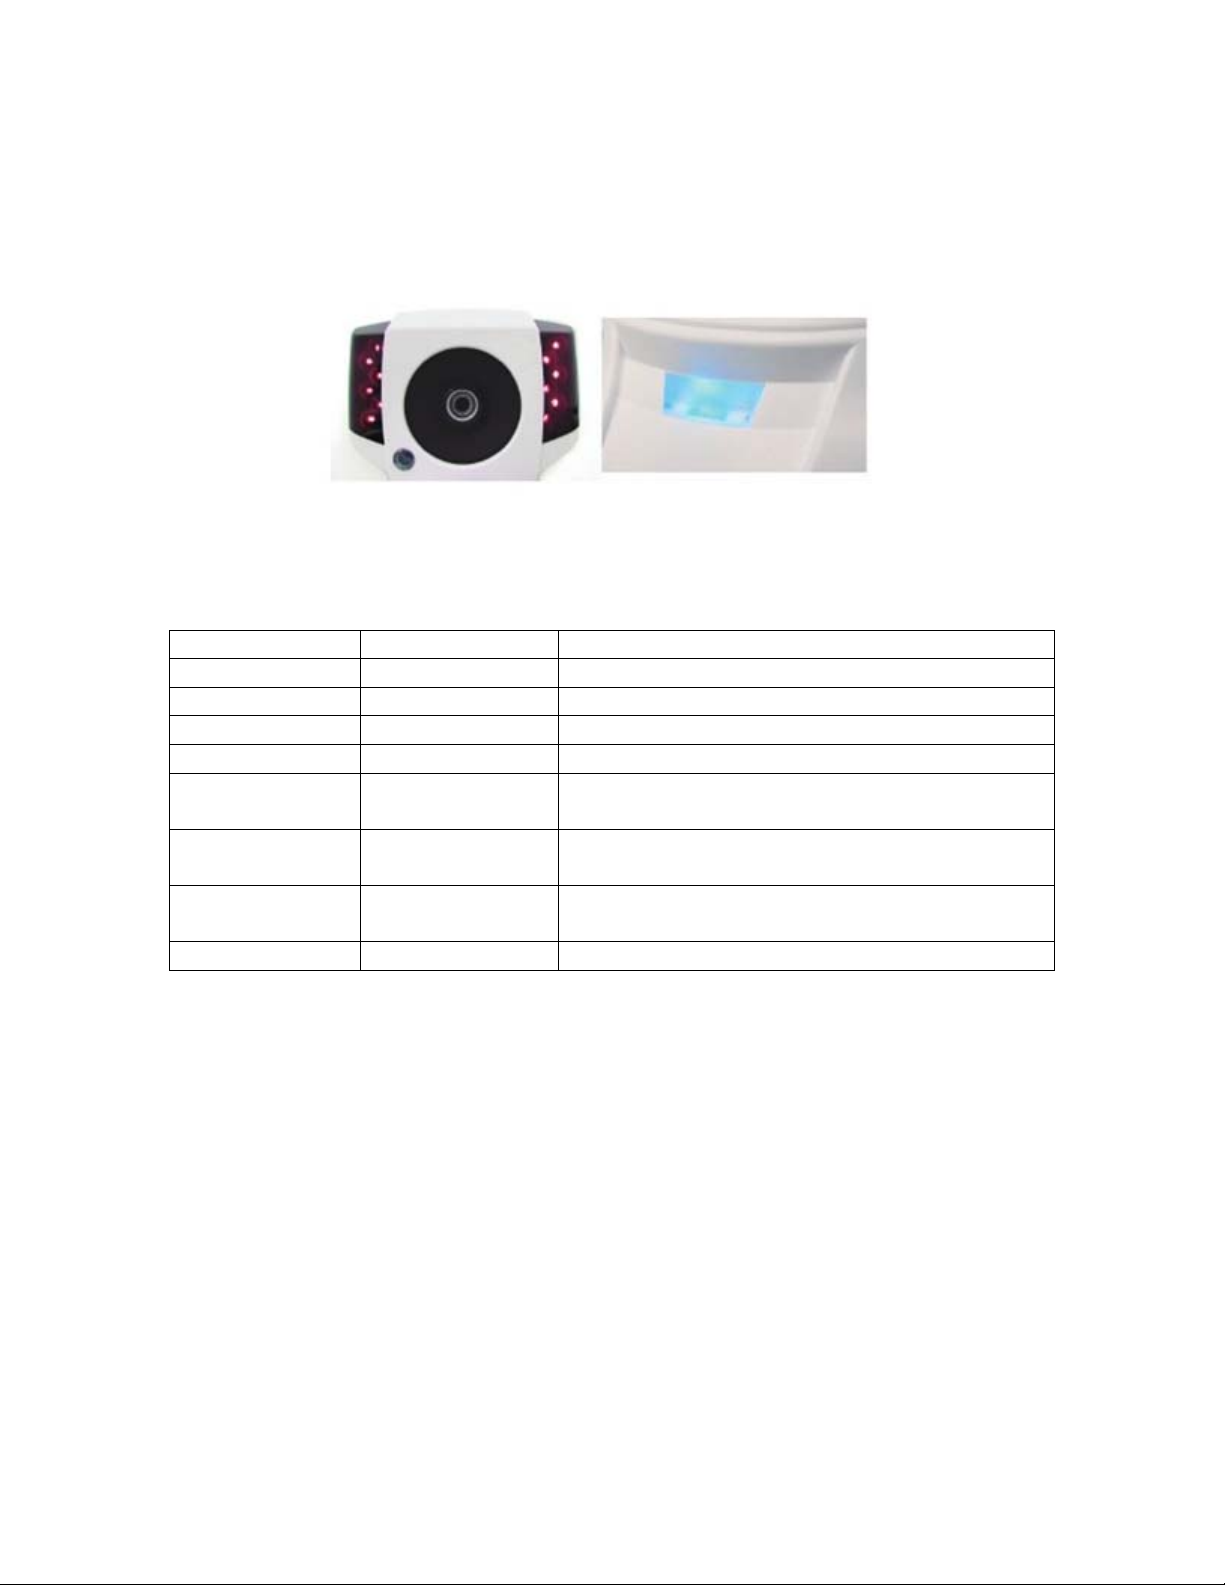
2.4 LED Status Indicator
The LED status indicator consists of a blue status indicator and red IR LEDs. The LEDs
appear as follows:
Red IR LEDs (Left), Blue Status LED (Right)
When the IP camera is turned on, the LEDs will light in the following patterns:
Red LEDs Blue LED Indication
On On System booting
Off On Successfully established network connection
On Off Performing hardware test
Off Off Powered off
Blinking (Every
0.5 seconds)
Off Blinking (Every
Off Blinking (Every
Blinking Blinking Attempting to establish a network connection
Off Failed to connect to network/Failed to establish
WPS connection
Attempting to establish a WPS connection
0.5 seconds)
Successfully established a WPS connection
0.2 seconds)
3 Installation
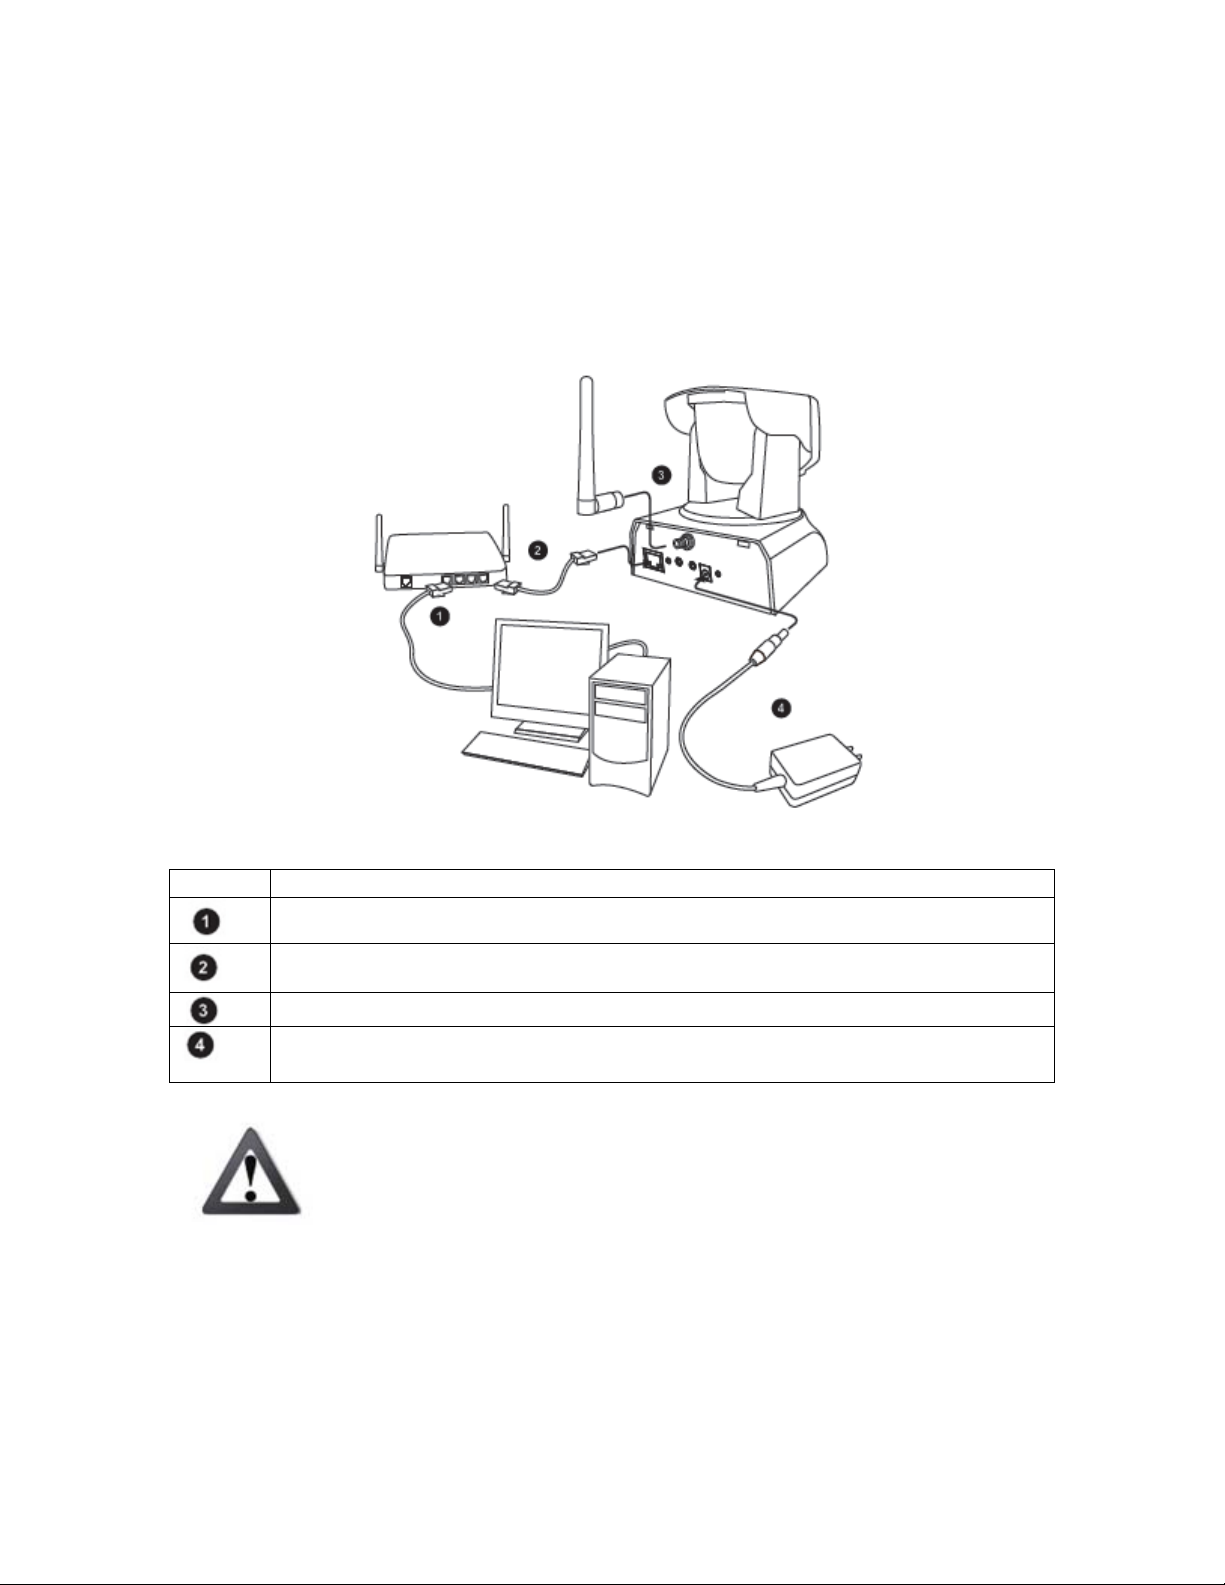
3.1 Connecting Your IPC-2605N
The picture below illustrates the basic connection of your IPC-2605N camera:
The following table describes the numbered items:
Number Contents
Ethernet cable from PC to hub/router.
Ethernet cable from router to camera.
Wireless antenna. Attach to connector on the back of the camera.
Power: Attach the power adapter to the camera’s power port, and connect the
plug to a power outlet.
Important!
Do not rotate your camera by hand. Doing so can damage the camera
After unplugging the camera’s power cable, wait at least 4 seconds before
restoring power to the camera.

3.2 Wireless
While using the ZyXEL Wireless antenna, you’ll be able to connect your camera to your
network via WiFi. Keep in mind that you can only have one active connection at any
given time – either through LAN or a wireless network.
Note: If the wireless connection drops or seems slow, try moving your IP camera closer
to the wireless access point for an improved signal.
Important!
Obstacles between your camera and wireless access point, particularly if made of
materials like wood, cement, or metal, will weaken the strength of your wireless
signal.
Other 2.4 GHz devices such as microwaves and wireless phones may degrade
performance. Attempt to keep your camera away from such devices.
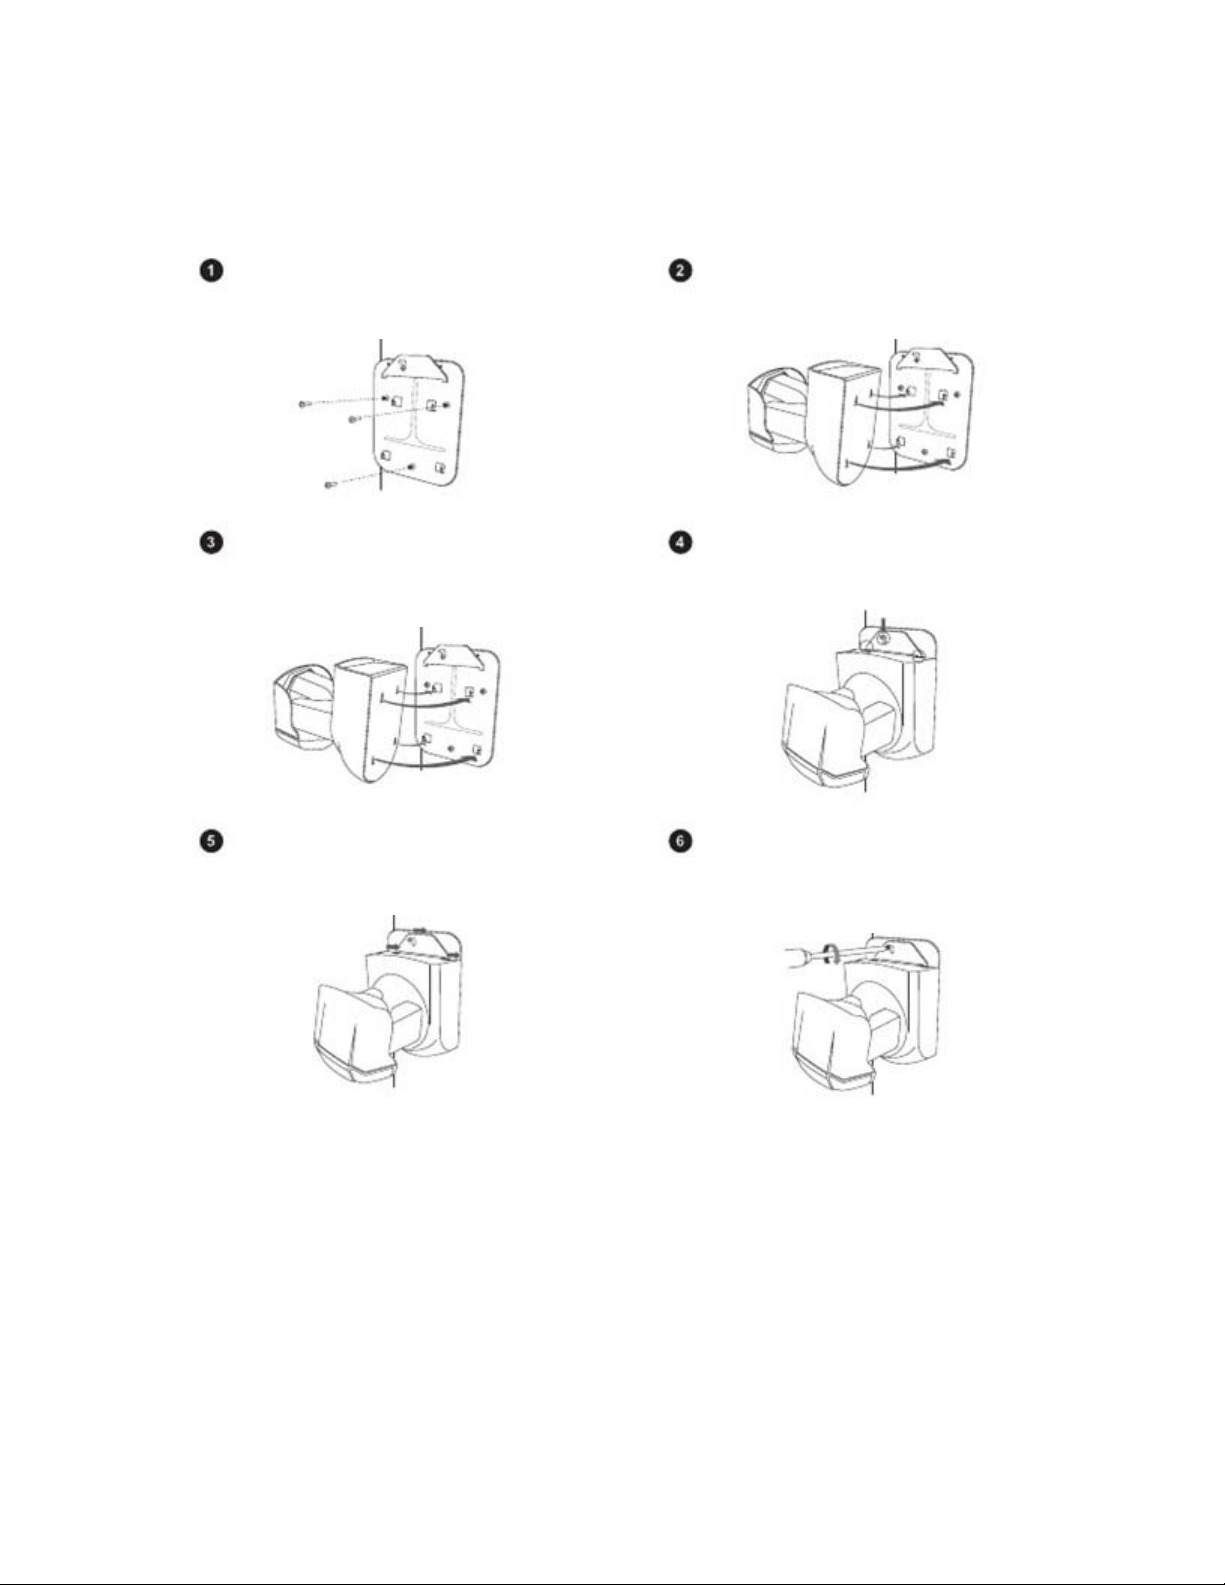
3.3 Wall and Ceiling Mounting
Screw the mounting plate into
the mounting surface
Loosen the top screw on the
trapezoid-shaped fastening
bracket.
Return fastening bracket to its original
position.
Secure the IP camera to the
mounting plate
Insert the tips of the fastening
bracket into the IP camera as
shown.
Use a screwdriver to tighten the fastening
bracket firmly back in place.

4 Initial Setup
Before running the setup utility, make sure you have the IP Camera properly connected.
To begin setup, insert the installation CD supplied with the camera into the CD-ROM
drive of the viewing PC, and the eaZy Wizard utility will start and guide you during the
installation process of the hardware and software for your IP camera.

5 Accessing your camera
Your camera’s video feeds can be accessed in a number of ways, as follows.
1) Your camera is CloudEnabled™ and can be viewed from any PC running a
modern web browser with the Flash plug-in installed. When you first setup your
camera using the included CD, it will register your camera with iSecurity+.
Simply point your web browser to http://zyxel.isecurityplus.com and login with
the username and password you created during setup. You can also download the
iSecurity+ app from iTunes or the Android Market to view your camera from a
smartphone or tablet. This is by far the easiest way to view & control your
camera.
2) View the live video stream on the web browser of any computer. This feature is
compatible with all Desktops, Laptops, or Tablets modern browser. This is the
easiest way to view the video of the IP camera and requires little learning time.
This may require advanced configuration of your home router in order to view the
camera remotely.
(Note: Non-IE web browsers, such as FireFox and Safari, are supported after a
VLC plug-in installation.)
3) View the live video stream on the mobile web browser of your iPhone/iPod,
Android phone, BlackBerry, PDA, or any other mobile phones with a built-in web
browser. Through live Motion-JPEG video streaming, you can view your ZyXEL
IP camera while on the go. This may require advanced configuration of your
home router in order to view the camera remotely.
(Note: This functionality requires that a secondary video stream be enabled.
Motion-JPEG mode only offers live viewing function.)
5.1 CloudEnabled™ Viewing
5.1.1 Accessing via iSecurity+ Smartphone App
iSecurity+ is an iOS/Android App designed to allow you to quickly and easily access,
control, and view your camera’s video feeds from anywhere.
The iSecurity+ can be located on the App Store and Android Market from your device by
searching “iSecurity+,” or directly from your computer at the Android Market
(http://market.android.com) for Android devices, or the App Store through iTunes
(http://www.apple.com/itunes).
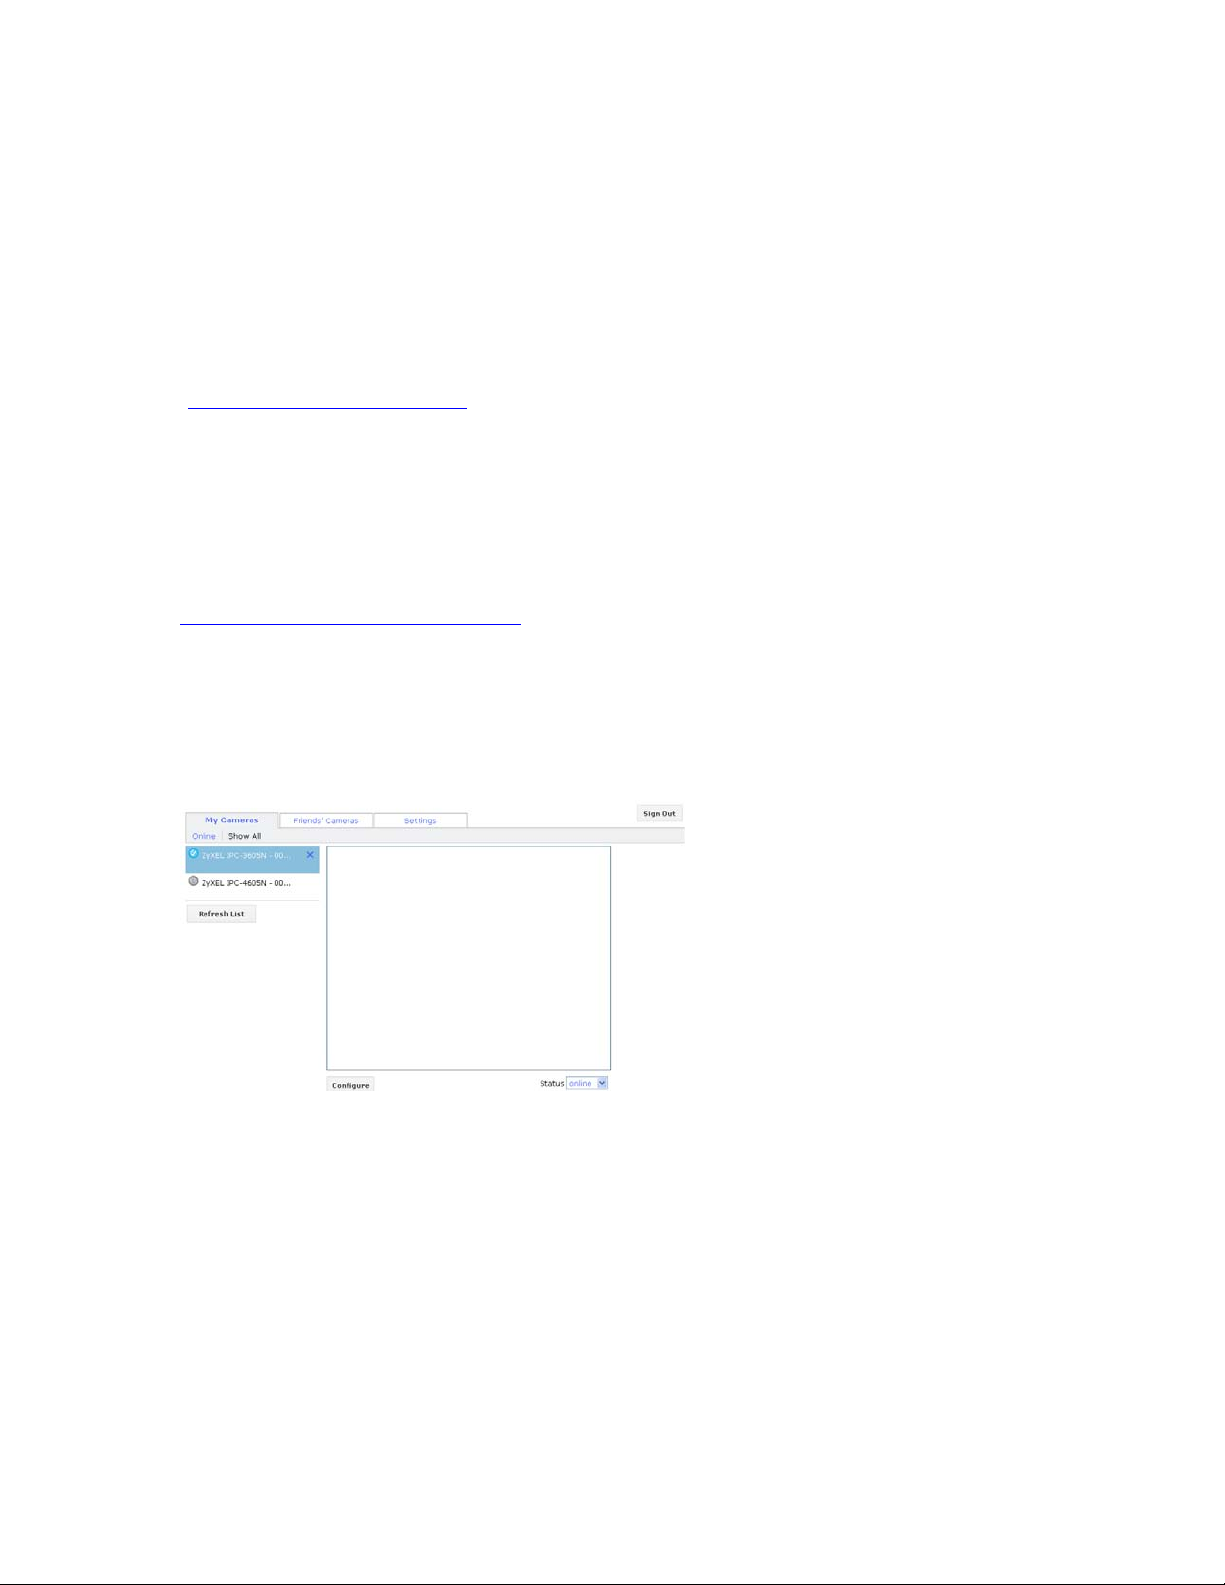
5.1.2 Accessing via iSecurity+ Web App
Once a second stream has been successfully enabled on your ZyXEL camera, you can use
the iSecurity+ web app to view your video feeds. To access the app, simply navigate to
http://zyxel.isecurityplus.com/login in your web browser.
From the login screen, simply enter the username and password you configured during
the camera’s initial setup (For more information, see the eaZy Setup Wizard).
The following screen will appear:
To configure your camera’s settings, click the Configure button beneath the video
display.
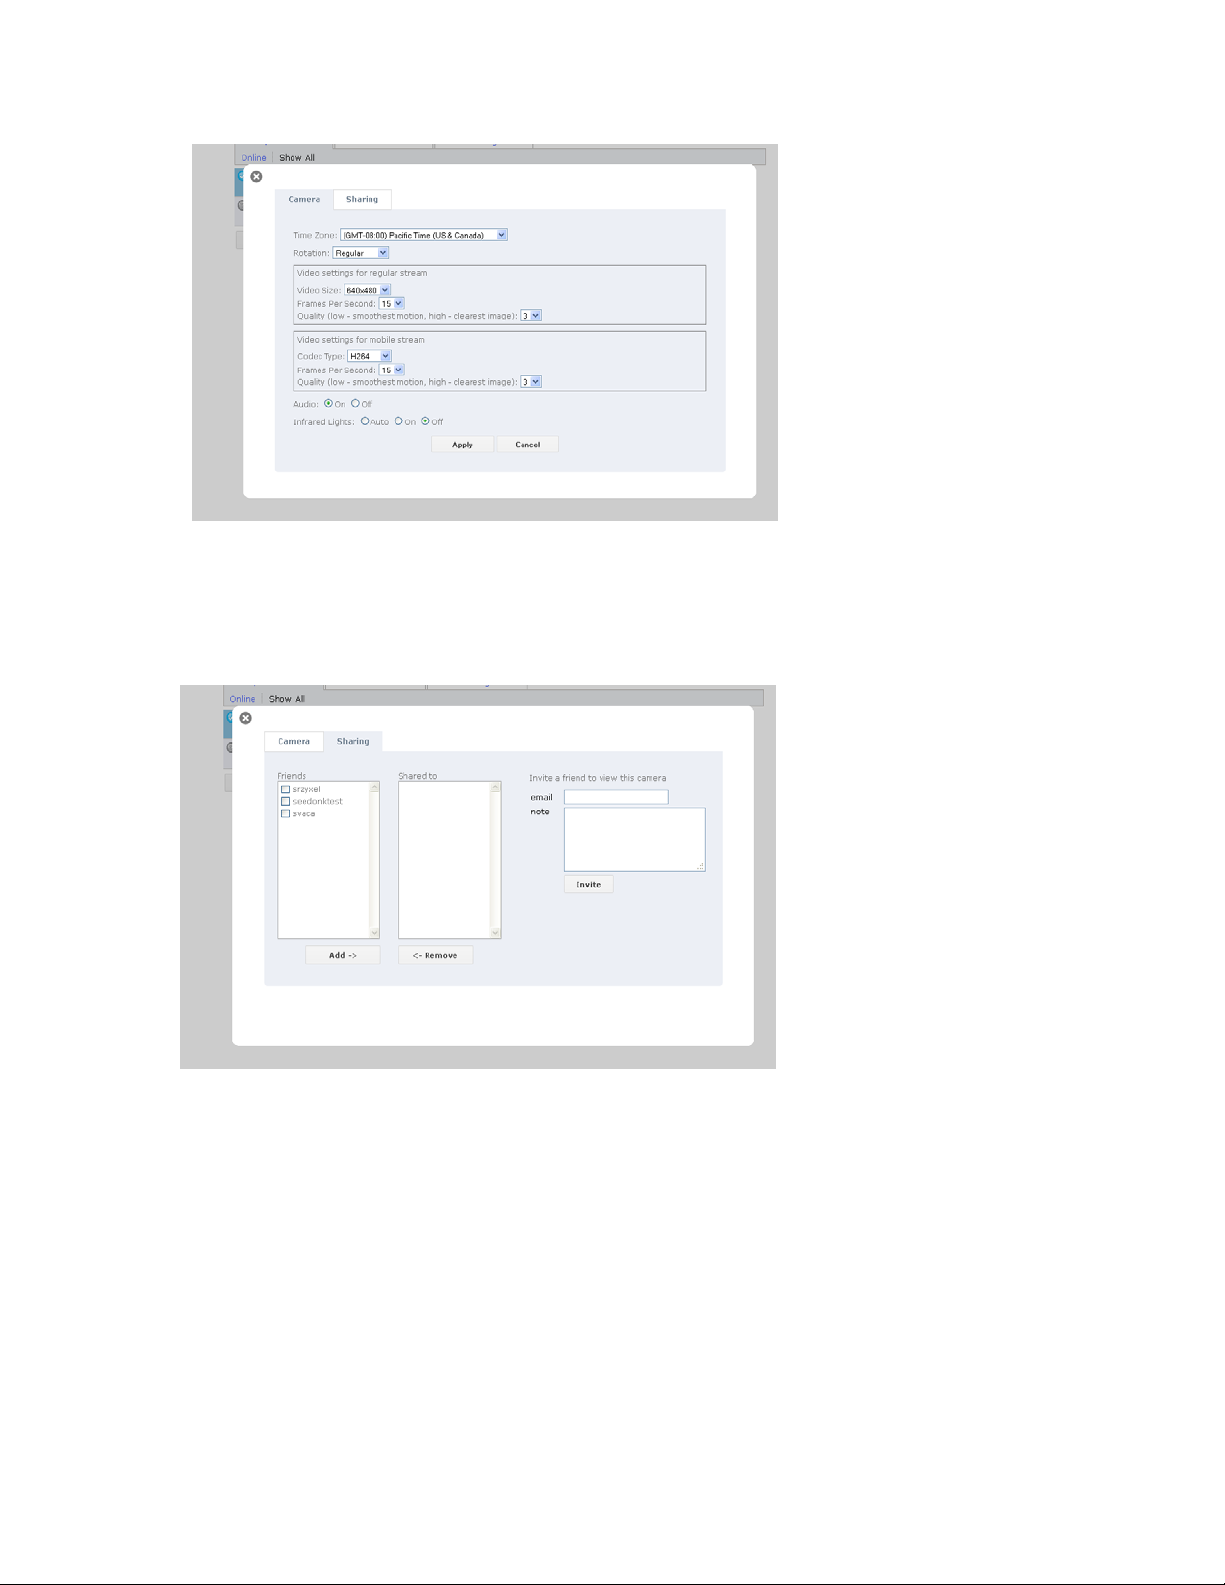
This page allows you to easily adjust your camera’s time zone, display and audio settings,
and infrared lighting.
Sharing options can be accessed from the Sharing tab at the top of the screen.
5.2 Direct Viewing of your Camera (For Advanced Users)
5.2.1 Accessing via PC web browser
Users can access their video feeds and camera management tools easily through any web
browser. Simply follow these steps.
1) Open any web browser (Internet Explorer, Safari, Firefox, Chrome, etc.)
2) Type in your camera’s IP address (eg. 192.168.1.11. This number can be easily
found by using the eaZy set up Wizard utility)
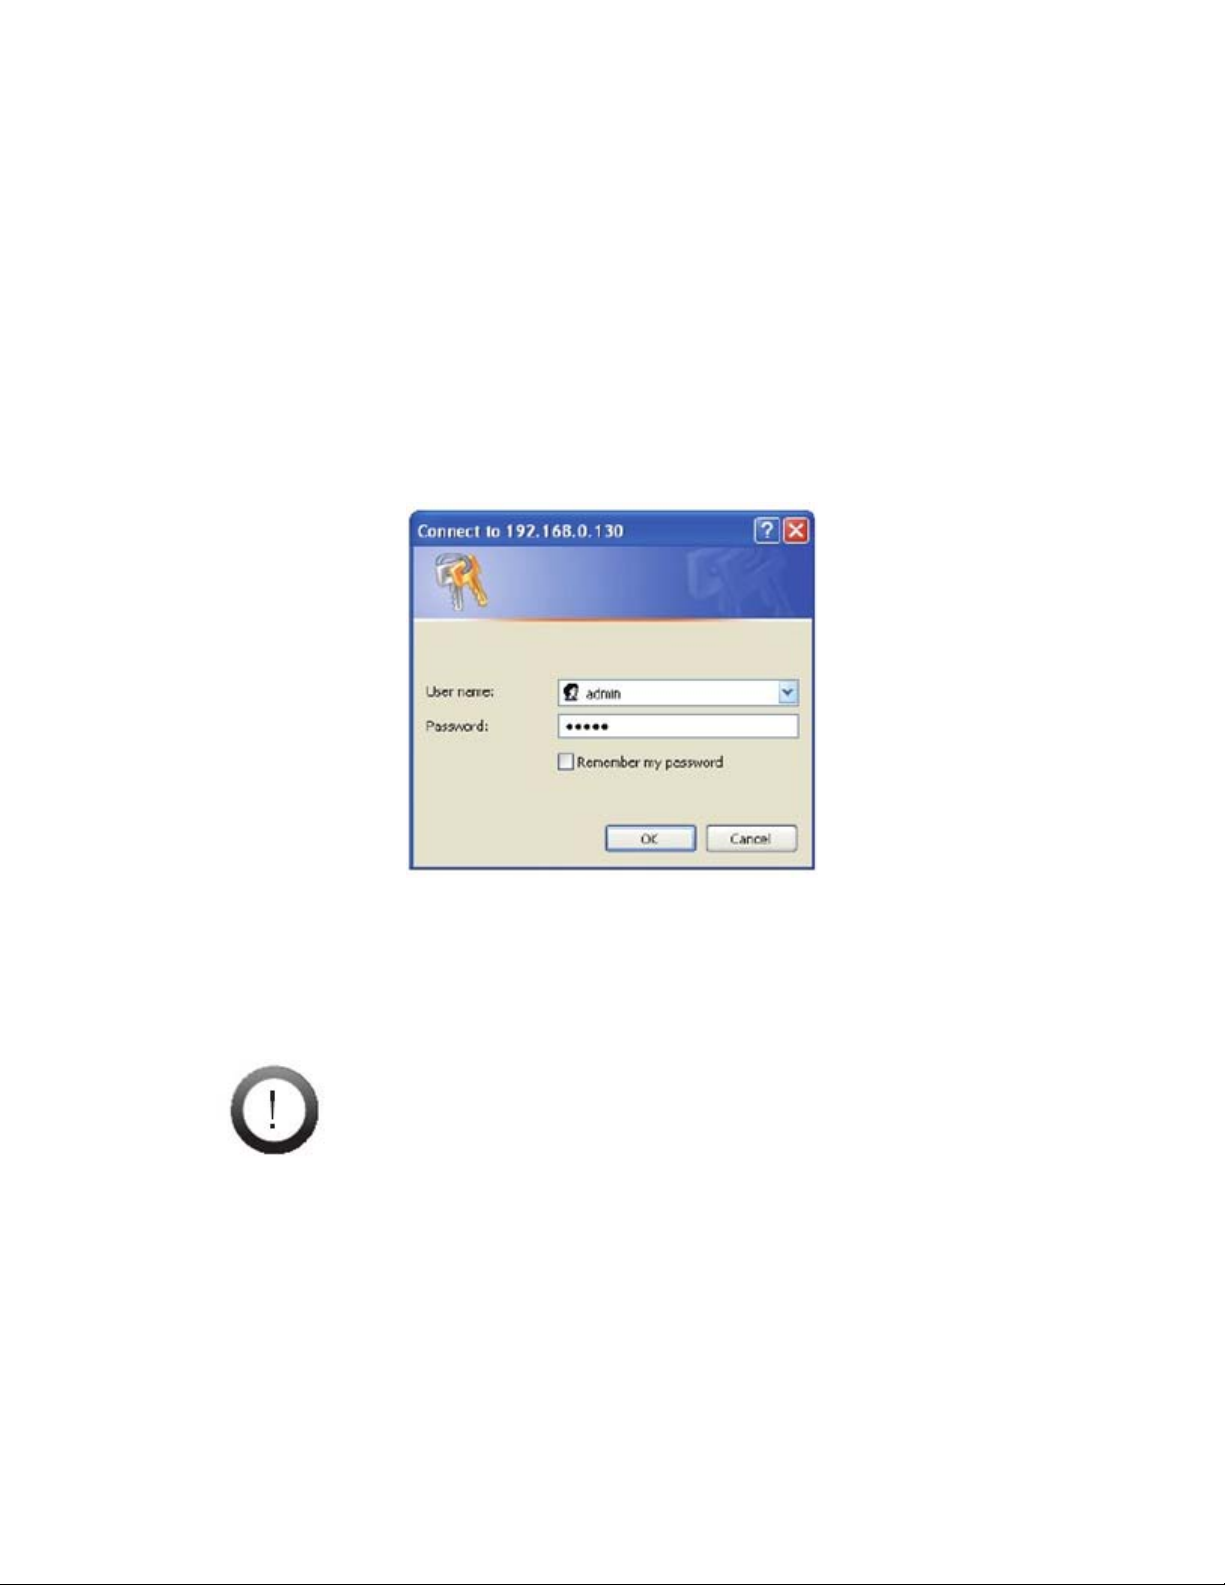
3) A dialogue box will appear requesting a user name and password. (Default
username and password are both ‘admin’)
4) After entering a valid username and password, your browser will prompt
installation of camera software from ZyXEL Communications Corporation. Click
on the warning message, and choose to Install ActiveX
5) A confirmation dialogue box will appear. Select [Install] twice to install both
USActiveX.cab and IPCamClientActiveX.cab.
Note: ZyXEL ActiveX only supports 32-Bit browsers. If you’re running
a 64-bit Operating System, you’ll still have to run the 32-Bit version of
your browser in order to access your camera.
6) If a security alert appears, select “Unblock.”
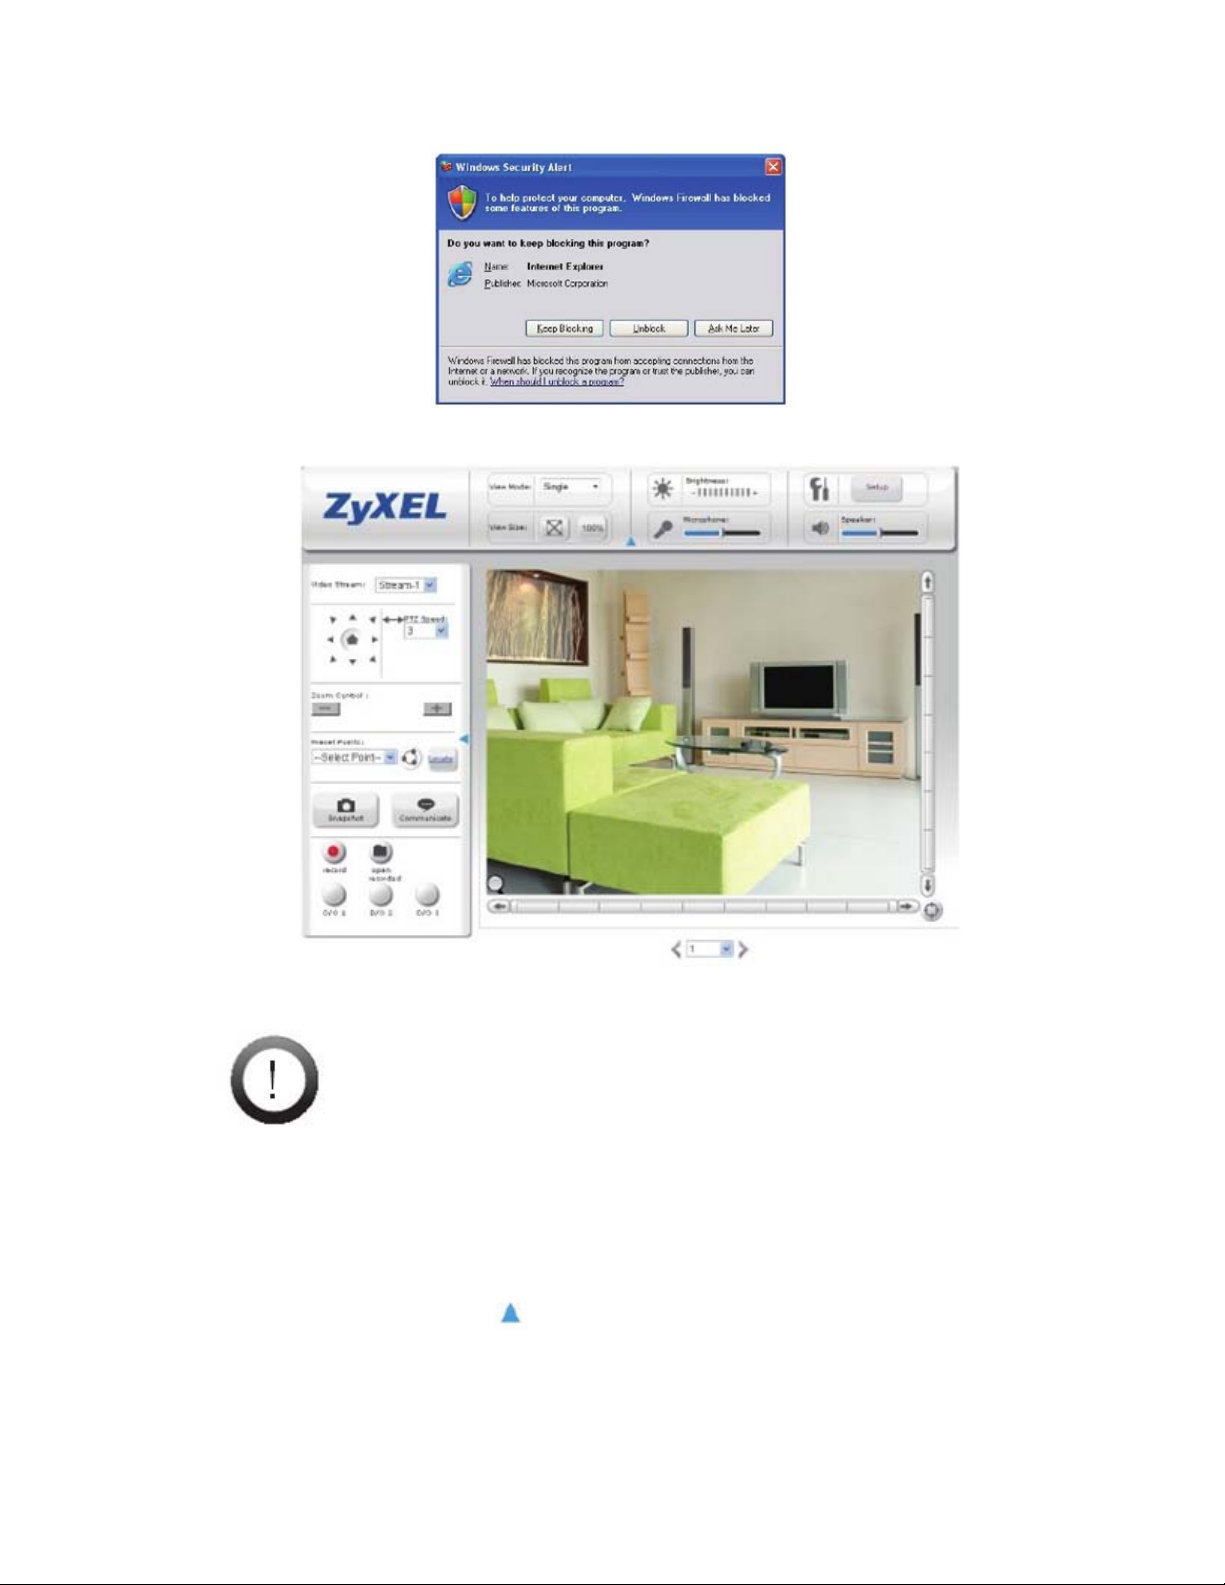
7) You’re now ready to view and manage your camera from your web browser.
Note: If your IP camera falls behind a firewall, you will need to enable
ports 80 and 554 in your firewall and link them to the internal IP address
of the camera. Should you have more than one, increase the values
above by 1 (For example, the second camera would have ports 81 and
555.)
5.2.1.1 Page Layout
On the first page, you can see the basic control panel on the top and left, and live video
on the right hand side. Click the
icon to collapse control panels.
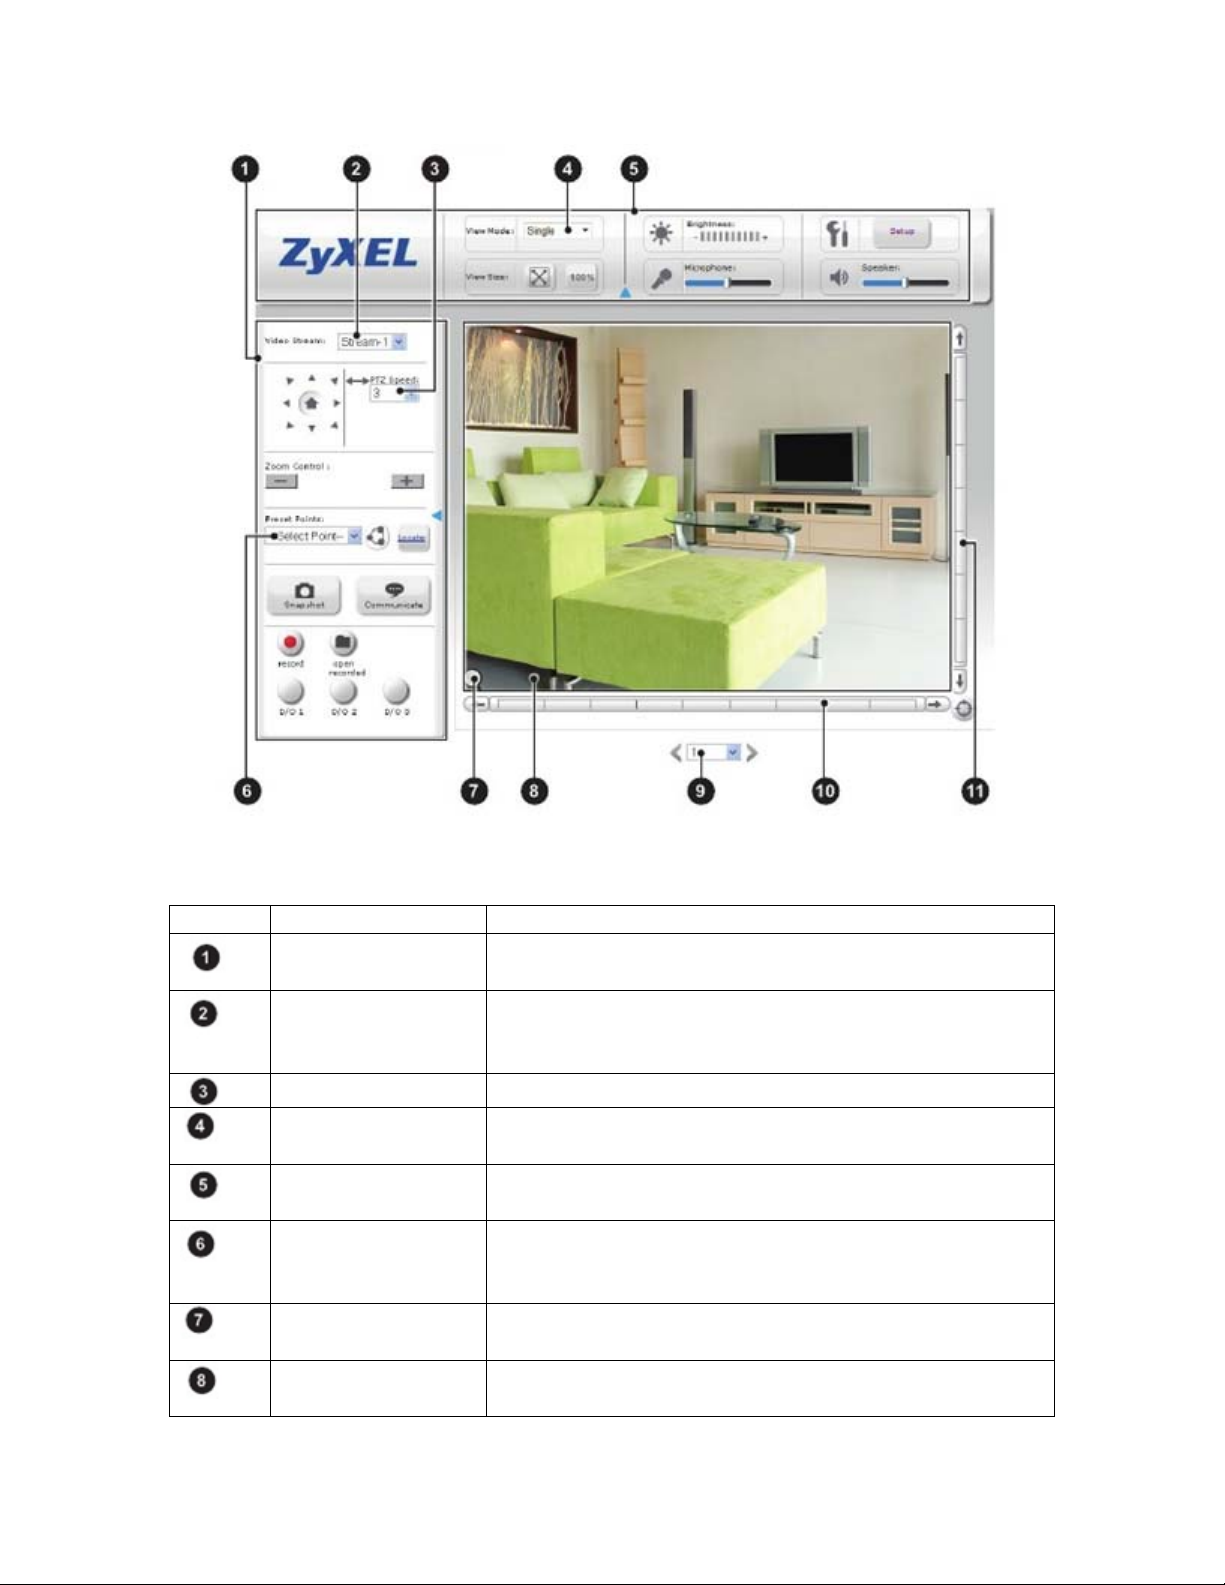
The following table describes the labels found on this screen.
Number Label Description
Left control panel provides control over video recording, voice
Video stream Allows you to change between stream-1 and stream-2.
PTZ speed set the pan and tilt speed on a scale of 1 to 10
Video mode
selection
Top control panel Allows you to adjust Brightness, Speaker volume, and
Preset Point Changing the preset point allows you move the camera
Magnifier Click on the magnifier icon to bring up digital zoom
Live video pane Live video stream. Click any spot on the video window
communication, I/O, Pan/Tilt, and snapshot
(Stream 2 can be enabled and configured in [Settings] >
[Video]
Allows you to change the video display between single,
multi, and auto scan.
microphone volume.
to a pre-defined point. (Preset points can be configured
in [setup] > [PTZ control])
control.
to pan/tilt. You can switch to full-screen mode by right-
clicking on the video pane and selecting “Fullscreen”
Channel Select a channel from the drop-down list, or click on the
X-Axis Adjust the camera’s position on the X-Axis
Y-Axis Adjust the camera’s position on the Y-Axis
arrow icon to switch to the next/previous channel.
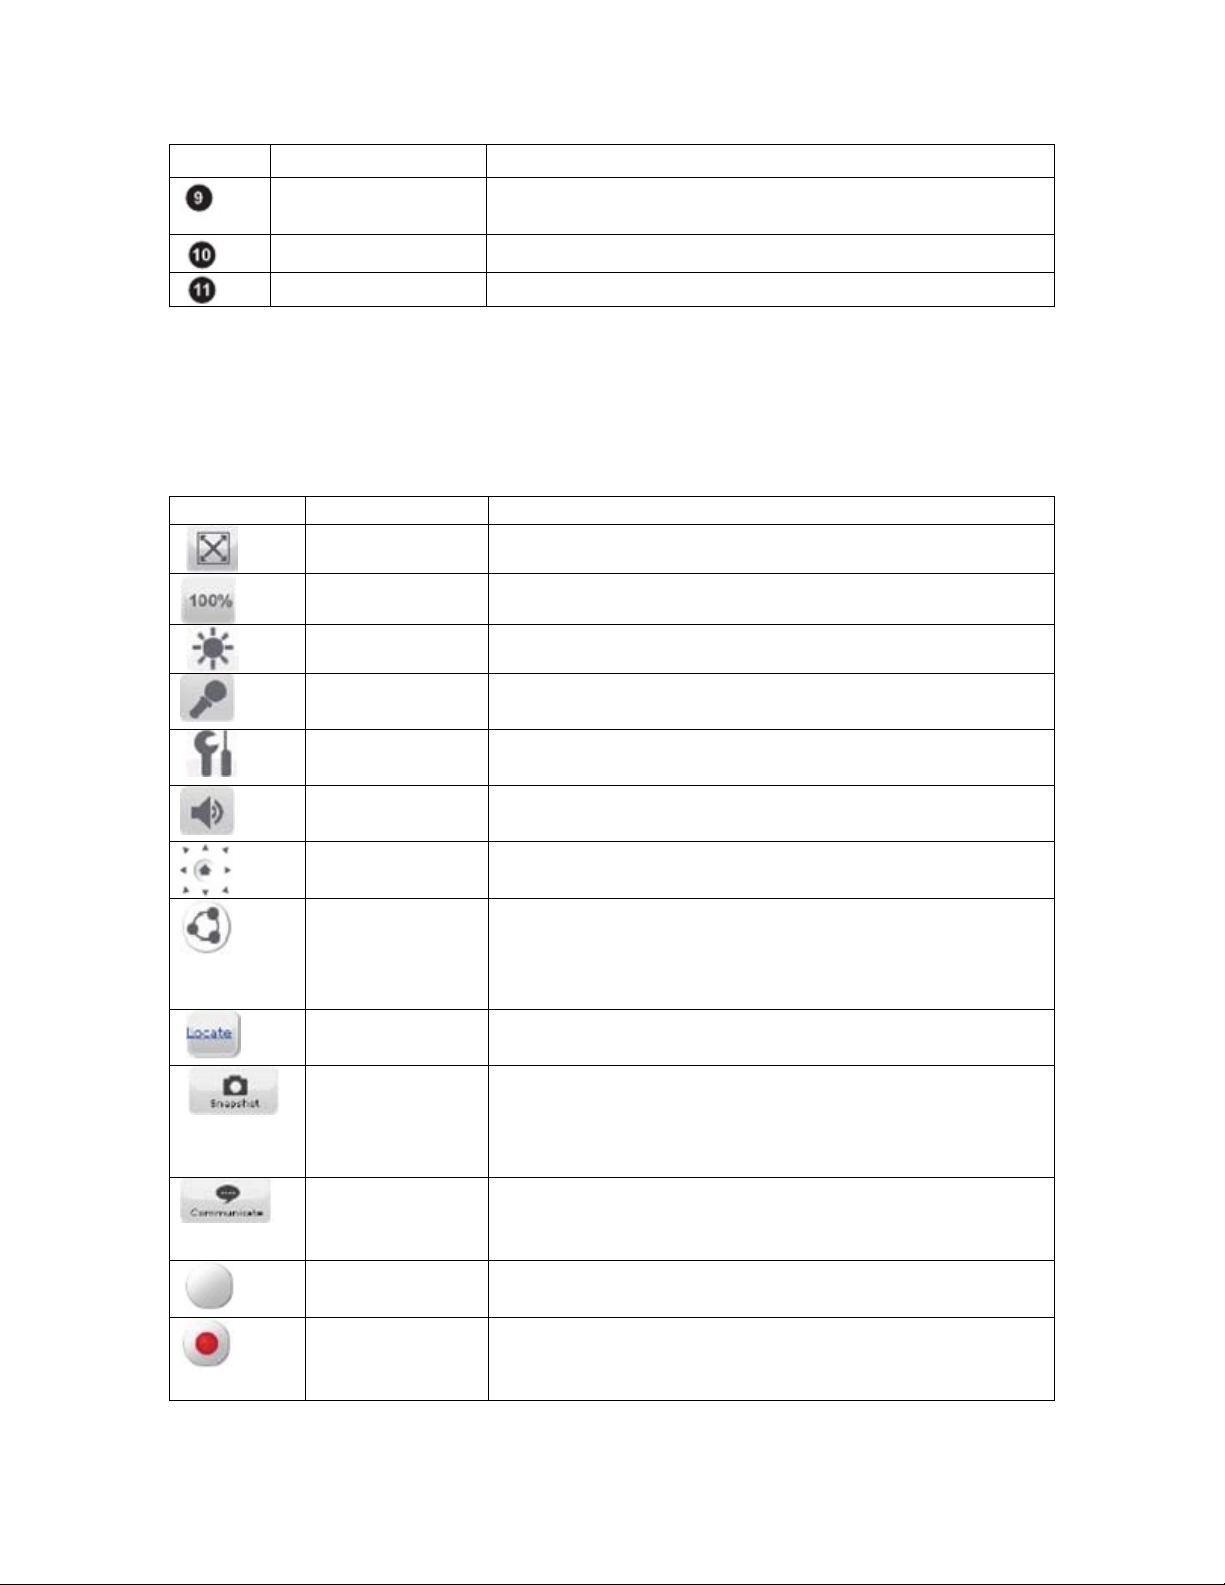
5.2.1.2 Icons
The following table describes the icons found on this screen.
Icon Label Description
Fit browser Resizes the live video pane to fit your browser window
Actual size Resizes the live video pane to the original size
Brightness Adjusts the camera’s brightness.
Microphone
Volume
Setup Click the [Setup] button to access the settings for you
Speaker Volume Adjust speaker volume. Click this icon to mute the
Control Direction control buttons to rotate the camera, and a
Patrol Mode Use patrol mode to make the camera rotate through
Locate Shows your camera’s position on the X-Axis and Y-
Snapshot Click the snapshot button to take a snapshot from live
Communicate Allows you to speak into your PC microphone and
Digital Out Triggers the alarm and siren connected to the Digital
Record Record live video by pressing the [Record] button. (If
Adjust microphone volume. Click the icon to mute the
built-in microphone
camera.
built-in speaker
home button for returning to the preset position.
different predefined camera positions. Predefined
positions can be defined in [Setup] > [PTZ control] >
[Patrol mode]
Axis
view. A preview window will pop up. Right-click and
choose ‘Save Image As…’ to save the snapshot to your
PC.
broadcast through the camera’s speaker. See the Voice
Communication section for details.
Out port of your camera
your computer cannot play .mkv files, download and
install VLC media player from the internet.)
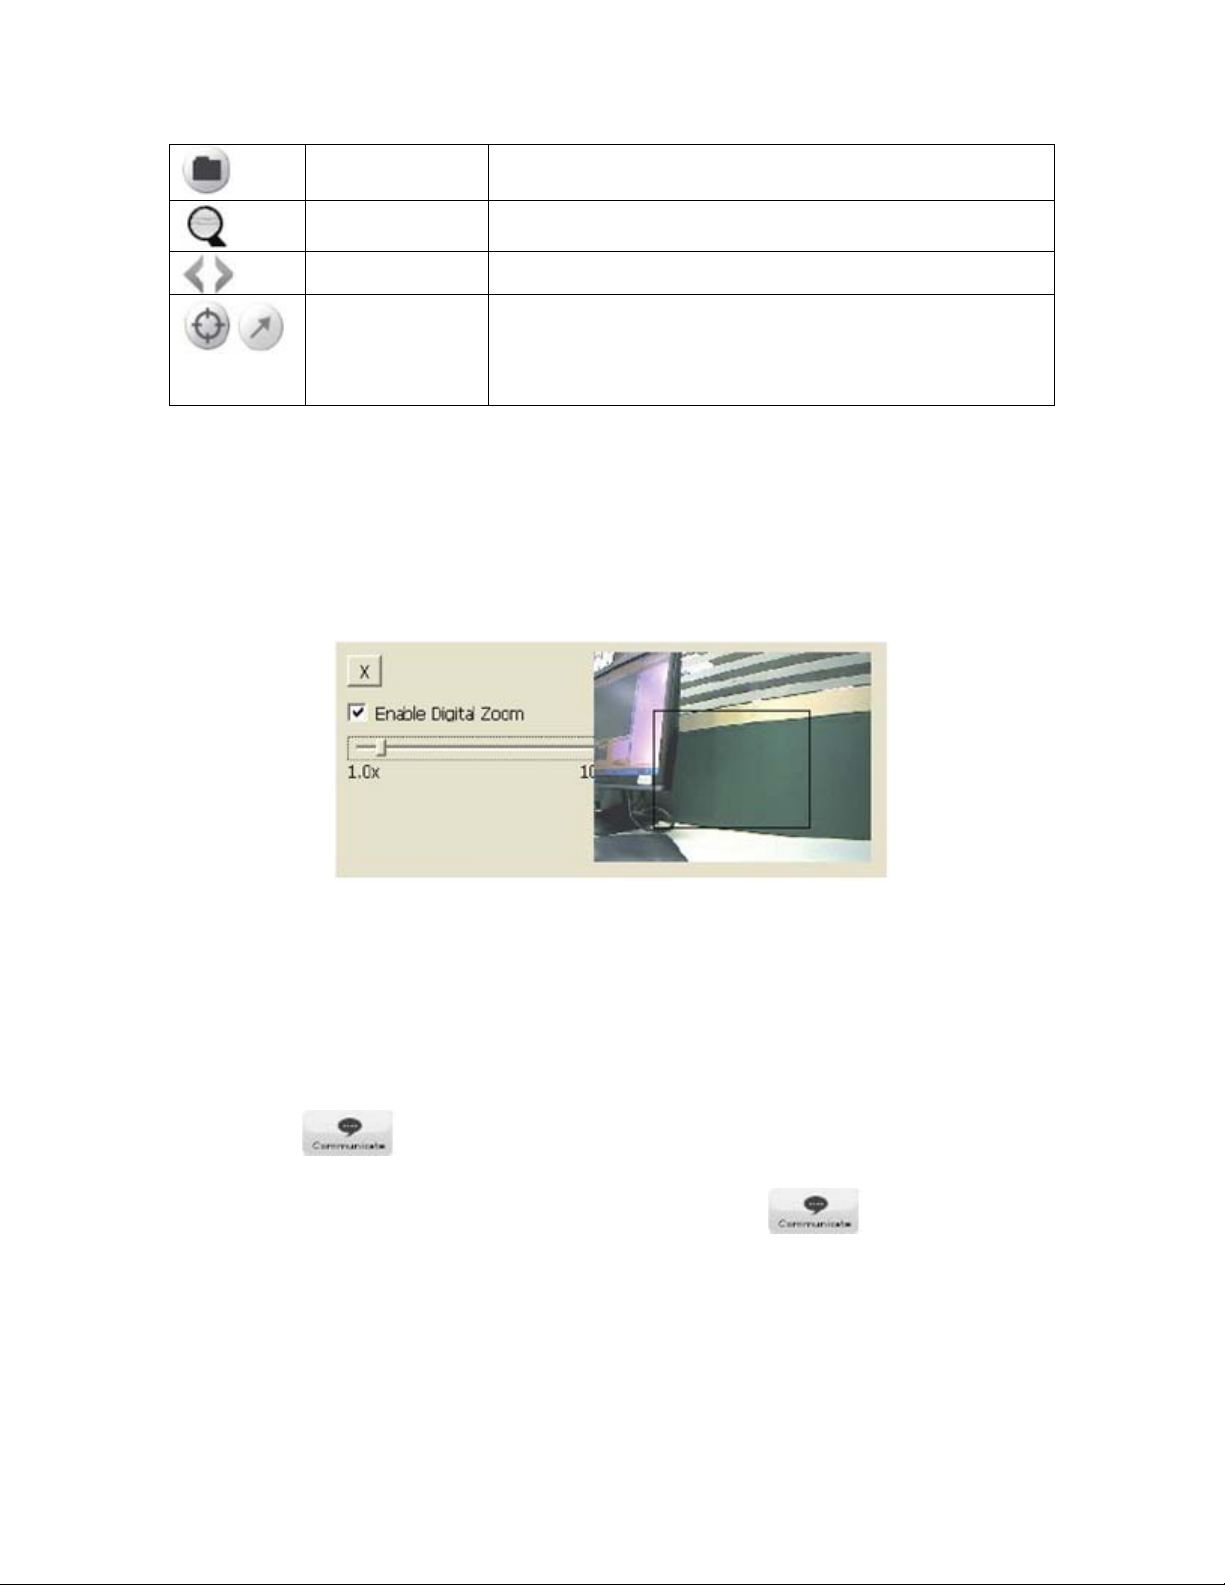
Open Open a file browser to search and playback video files
Digital Zoom Digital zoom button. Available zoom: 1~10x
Switch Channel Click the Left/Right arrow to switch channel
Crosshair/Arrow The crosshair allows you to move your cursor over a
captured by the camera
point on the live view and make that point the new
center of view. The arrow moves the camera in the
direction of the mouse click.
5.2.1.3 Enable Digital Zoom
To enable the digital zoom feature:
1) Click on the magnifier icon located on the lower-left corner of the real-time video
display. The digital zoom control window will appear.
2) Check [Enable Digital Zoom], and set the desired zoom by dragging the slider
bar. Then set the area to be enlarged by dragging the black square shown above.
Click on the [X] button or press the [Esc] key to save the changes and/or close the
previous window.
5.2.1.4 Voice Communication
Pressing the button allows you to speak into your PC microphone and
broadcast through the camera’s speaker or audio line out. To talk through the external
speaker connected to the IP camera, place your cursor on the button, rightclick, and select [Settings] to choose input device and input source.
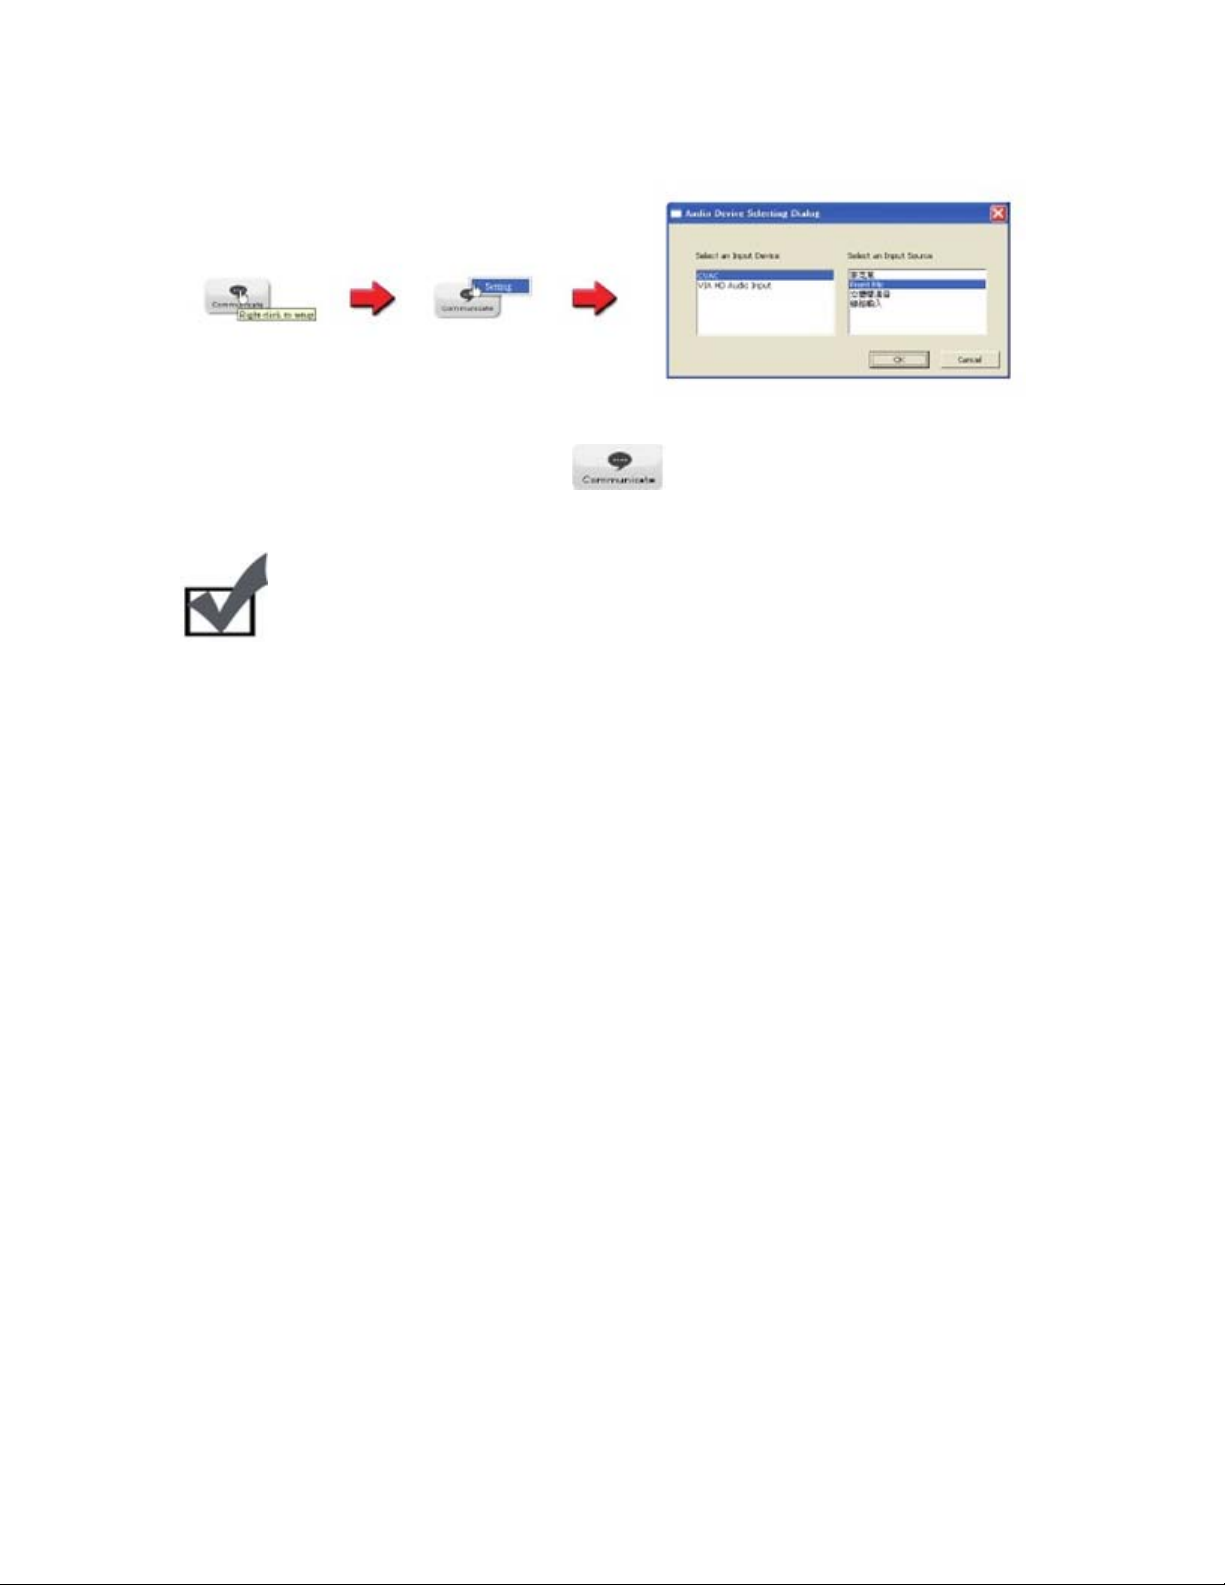
With the device configured, clicking the will allow you to speak through your
microphone and be heard from the camera for 90 seconds.
Note:
When using the voice communication feature, you may experience various
degrees of delay between transmission from the computer and playback on the
camera, depending on the condition of your network environment.
d
6 Configuration
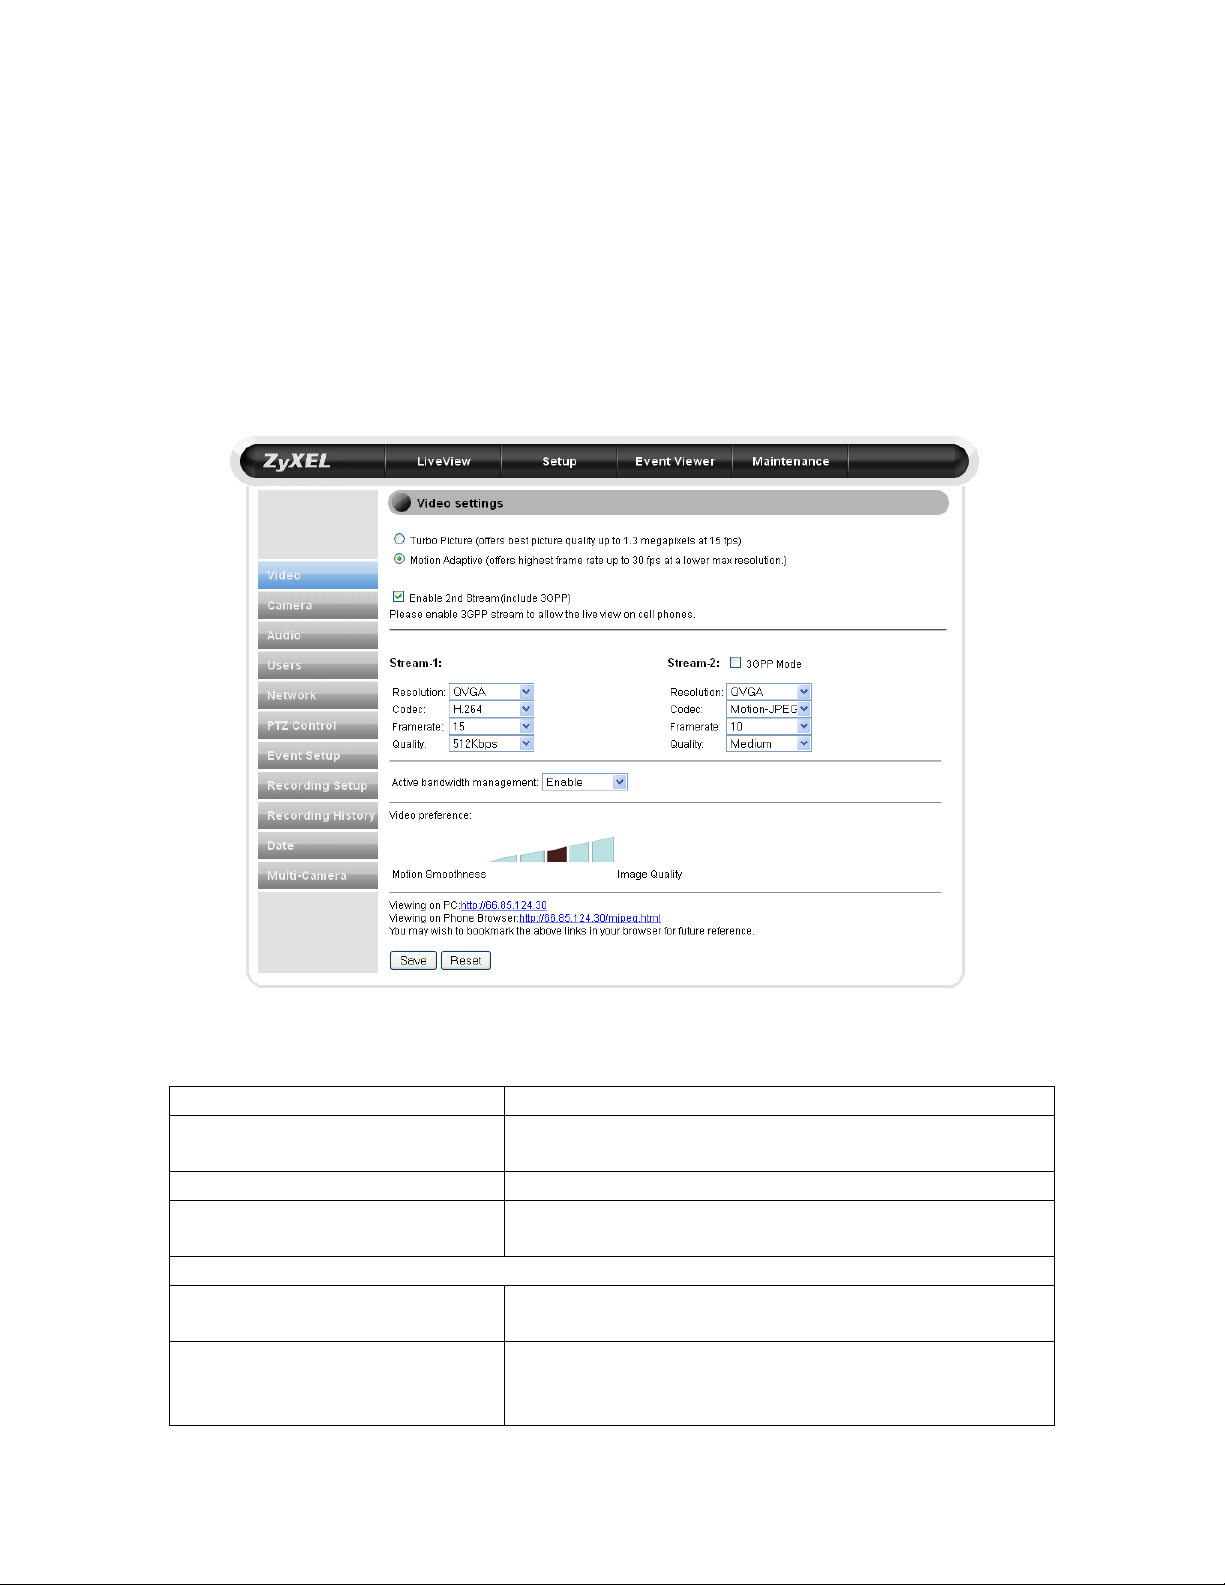
6.1 Video Settings
The Video Settings screen consists of all the basic settings options. To access the main
setup page, click the setup button at the top right in the live view screen. You can
configure detailed settings of your IP camera here.
The following table describes the labels found on this screen.
Label Description
Turbo Picture This mode provides best video quality, but frame rate
is limited to 15.
Motion Adaptive This mode provides 30FPS at a lower resolution
Enable 2
Stream-1/Stream-2
Resolution Resolution settings. Options are QQVGA, QVGA,
Codec The codec used to encode video. MPEG-4 can be
n
Stream This enables the second stream for viewing from
mobile devices.
VGA, and 1080x720 (720p)
viewed from external devices, while H.264 uses less
bandwidth.
Framerate Framerate. 5~30 FPS. Higher framerate is more
bandwidth-intensive.
Quality Video quality settings. 64kpbs~3Mbps.
Active Bandwidth Management Allows the IPC-2605N to intelligently change video
bitrate depending on network congestion. This avoids
video deterioration and frame dropping.
Video Preference Allows you to choose between a preference toward
higher quality image or a higher framerate. Click on
the bar to set.
Viewing on PC The IP to view your camera from a PC outside the
network.
Viewing on Phone Browser The address to view your camera from a mobile
device.
Save Saves current settings
Reset Reset to defaults.
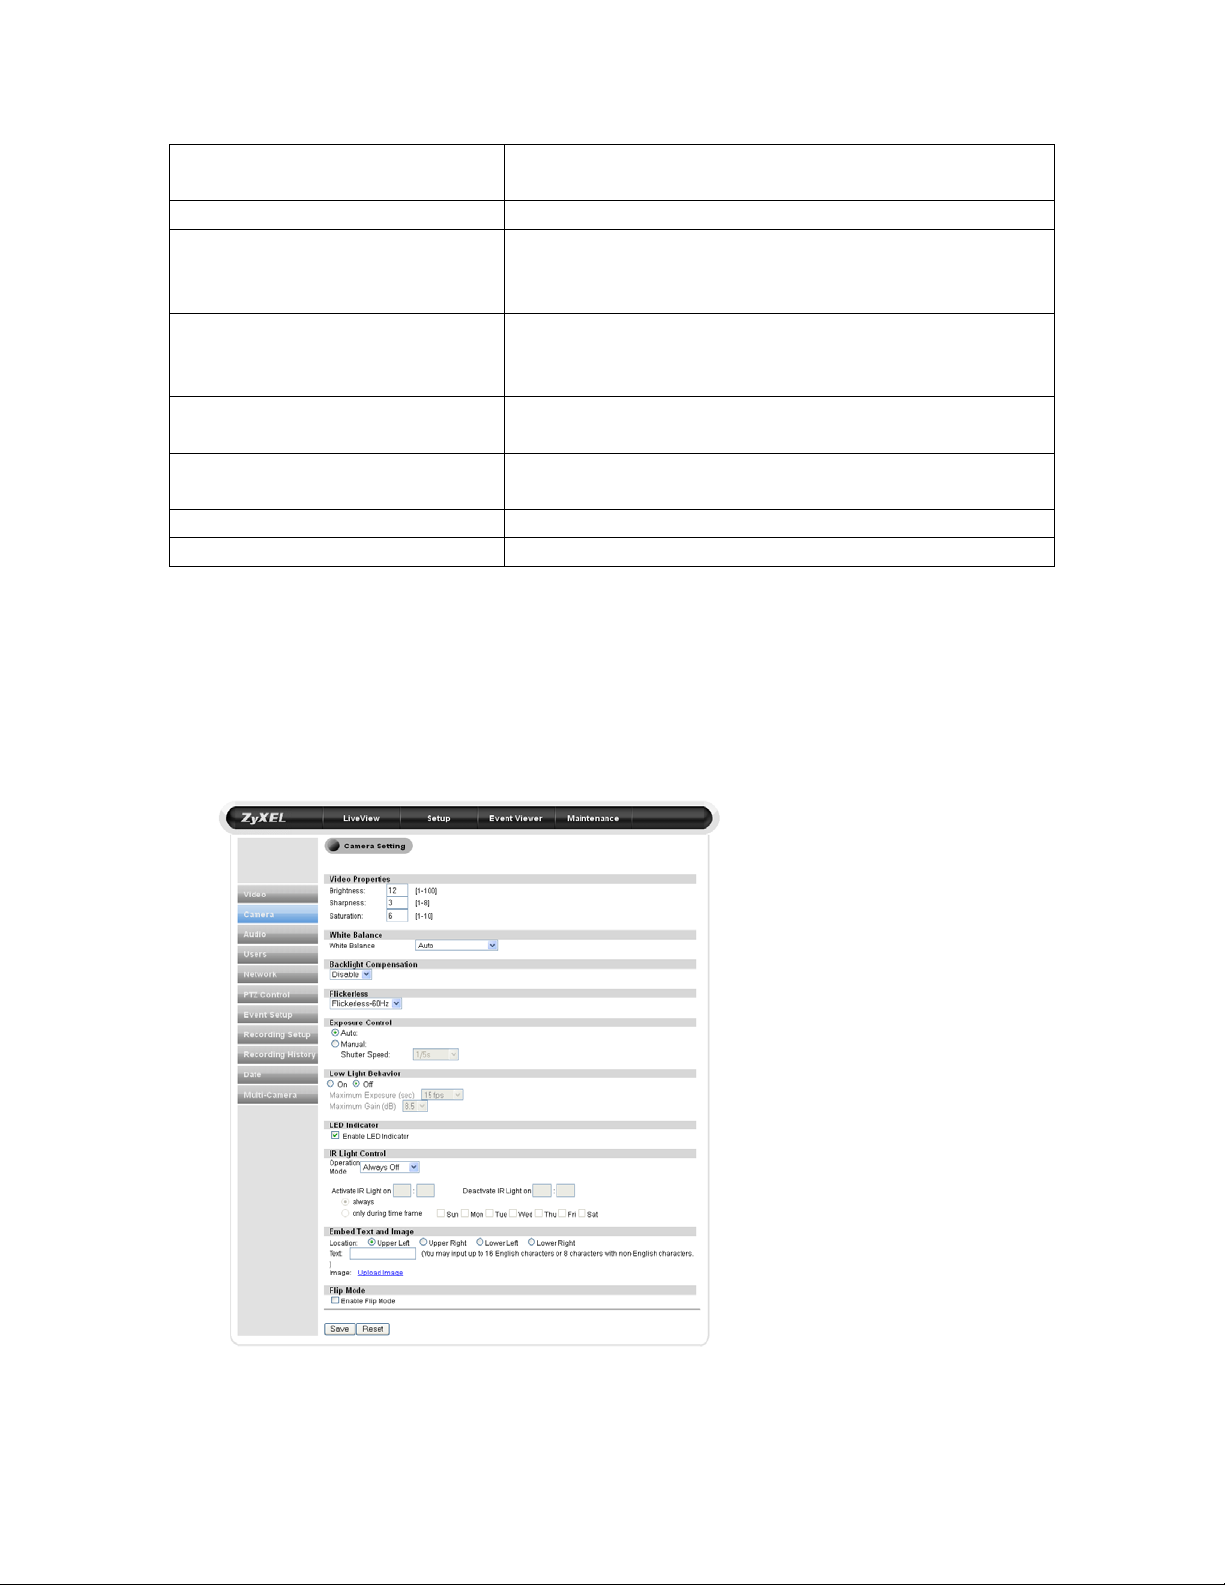
6.2 Camera Settings
To access the Camera Settings screen, click on ‘Camera’ on the navigation bar in the
settings menu. From this page, you can control image and color related settings, as well
as the IR lights of your camera.

The following table describes the labels found on this screen.
Label Description
Video Properties
Brightness Set image brightness (1~100)
Sharpness Set image sharpness (1~8)
Saturation Set image saturation (1~10)
White Balance Set image’s white balance to compensate for different lighting
conditions.
Flickerless Sets Flickerless mode. 50(default) or 60 Hz
Exposure Control
Auto Allow the camera to automatically control shutter speed.
Manual Manually configure shutter speed (1/5s~1/1600s)
Low Light Behavior
On/Off Controls your camera’s automatic behavior in low-light.
Maximum Exposure Control shutter speed in low light. (Disable~30FPS)
Maximum Gain Controls image gain in low light. (1~8.5dB)
LED Indicator Turns the blue LED on the front of your camera On/Off
IR Light Control
Operation Mode Allows you to set when your camera’s IR lights will turn on.
Options include Always Off, Always On, Auto, or By
Schedule.
Activate/Deactive IR
light on…
Embed Text and Image
Location Embed text in the upper left, upper right, lower left, or lower
Text Enter the text you wish to display.
Enable Flip Mode Flips the image 180 degrees vertically. Enable this feature
Allows you to set days and times when the camera’s IR lights
will be active.
right of the video feed.
when the camera is mounted upside-down.
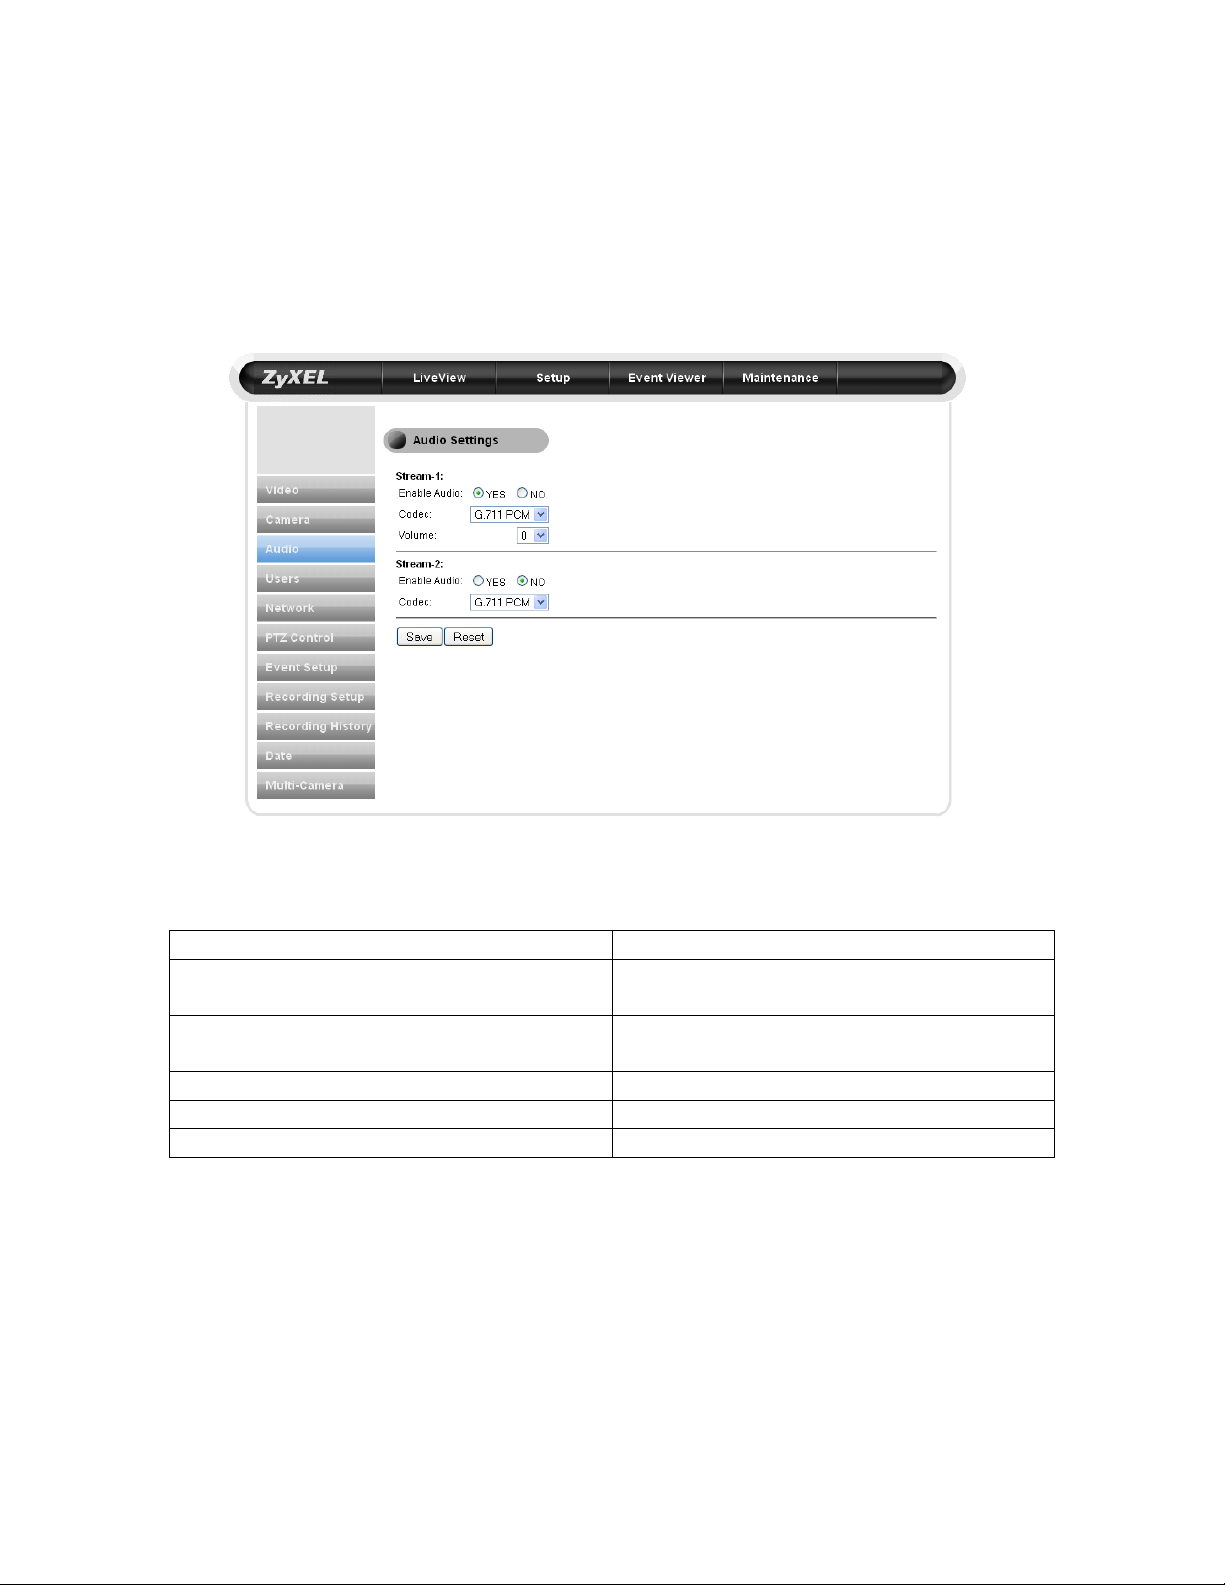
6.3 Audio Settings
The Audio Settings screen allows you to enable or disable audio, as well as adjust
volume.
To access the Audio Settings screen, go to settings, then select Audio from the sidebar.
The following screen will appear.
The following table describes the labels found within this screen.
Label Description
Enable Audio Select Yes or No to enable or disable
audio.
Codec Select the codec which will be used to
encode audio.
Volume Select volume level (1~10)
Save Save settings
Reset Reset to default settings
6.4 User Settings
The User Settings pane allows you to add, modify, or remove viewers/administrators.
Viewers are only able to view live audio, and can’t change any camera settings.
Administrators may control the camera and make changes to settings.
To access the user settings pane, navigate to Settings, then select Users from the sidebar.
The following screen will appear.
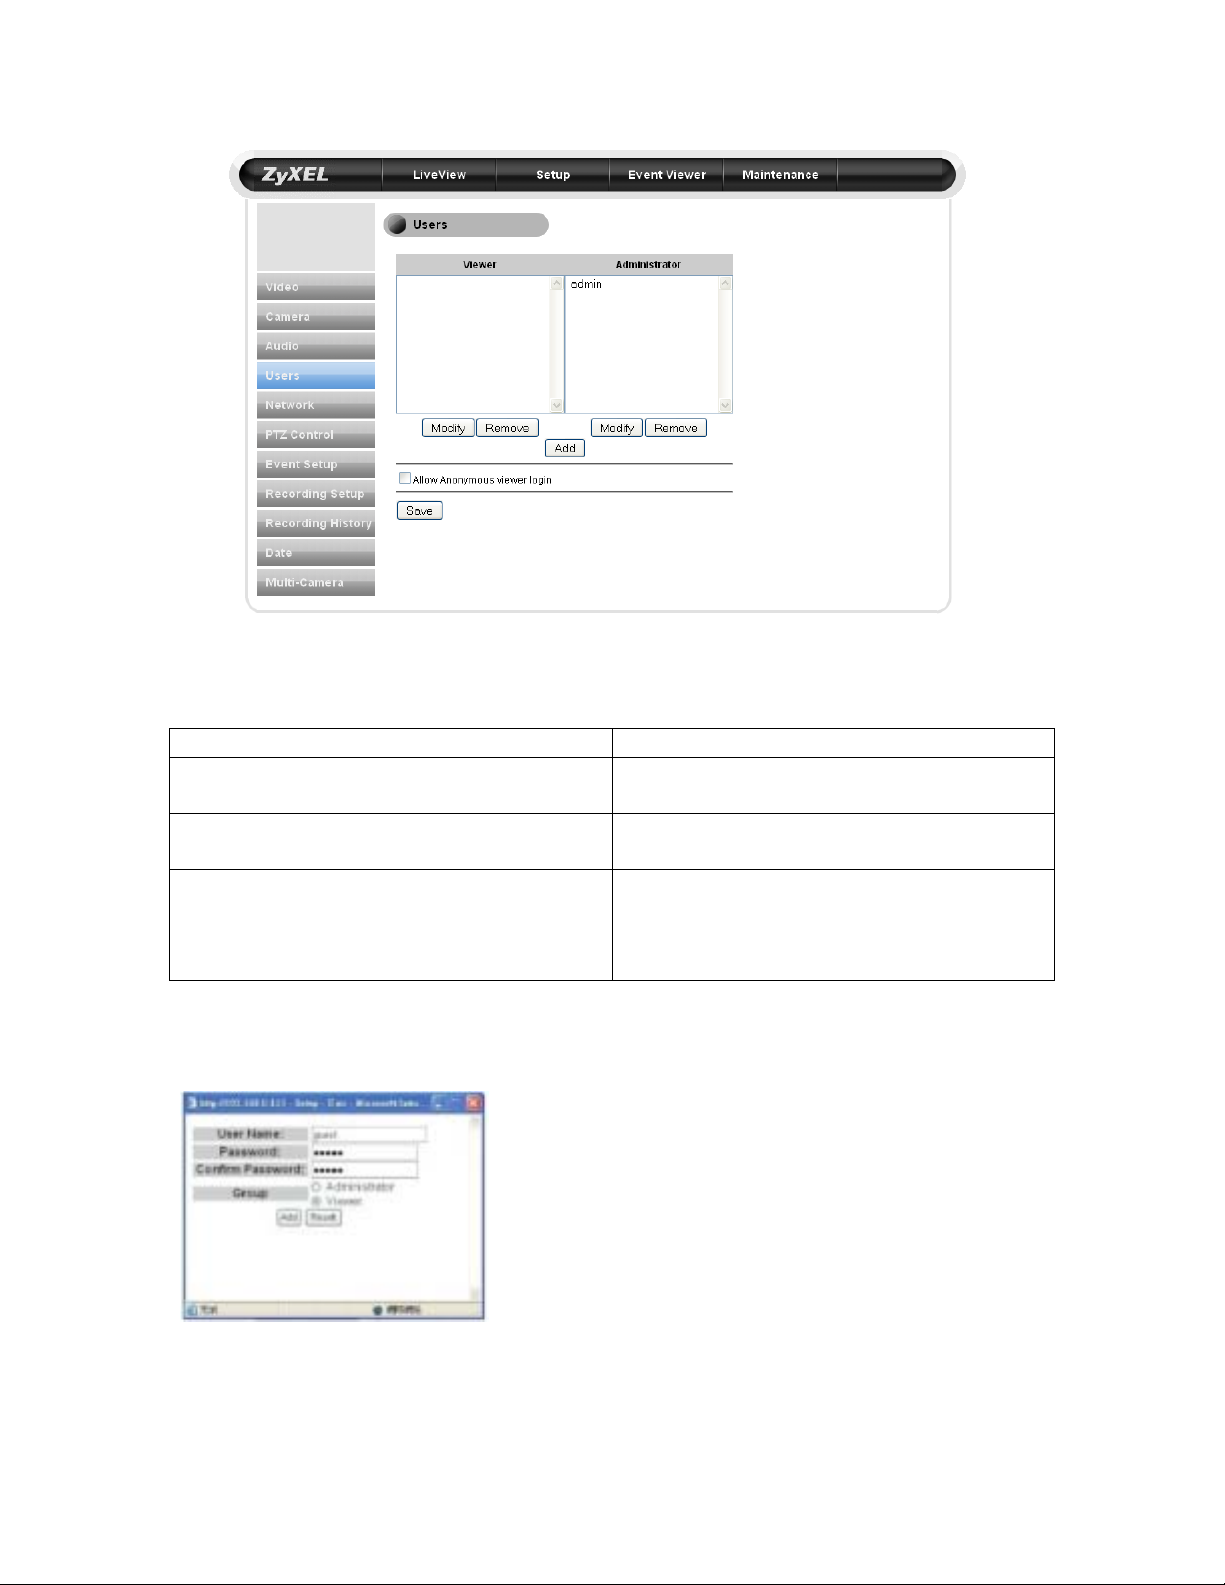
The following table describes the labels found within this screen.
Label Description
Modify/Remove Click here to Modify or Remove an
existing viewer
Add Click here to add a new viewer or
administrator
Allow anonymous viewer login Click here to allow anonymous viewers
without requiring name and password.
These viewers are restricted to viewing live
video only.
When you add a new user, the following screen will appear to allow you to provide user
name, password, and group type.
6.5 Network Settings
 Loading...