

ZyXEL Prestige 660W, Prestige 660HW Compact Manual

Prestige 660W/HW Series
ADSL 2/2+ Gateway with 802.11g Wireless
Compact Guide
Version 3.40
March 2004

Prestige 660W/HW
Table of Contents
1 Introducing the Prestige..............................................................................................3
2 Hardware .....................................................................................................................4
2.1 Rear Panel Connections.........................................................................................4
2.2 The Front Panel LEDs ...........................................................................................5
3 Setting Up Your Computer’s IP Address ..................................................................8
3.1 Windows 95/98/Me.................................................................................................9
3.2 Windows 2000/NT/XP ..........................................................................................11
3.3 Checking/Updating Your Computer’s IP Address................................................ 13
3.4 Testing the Connection to the Prestige.................................................................13
4 Configuring Your Prestige........................................................................................14
4.1 Accessing Your Prestige Via Web Configurator ..................................................14
4.2 Common Screen Command Buttons.....................................................................15
4.3 Internet Access Using the Wizard ........................................................................16
4.4 Test Your Internet Connection ............................................................................. 21
5 Advanced Configuration...........................................................................................21
5.1 Wireless LAN Setup..............................................................................................21
5.2 Wireless LAN Security Setup................................................................................24
5.3 802.1x and WPA Overview...................................................................................25
5.4 Network Address Translation Overview...............................................................25
5.5 Configuring SUA Server ......................................................................................26
5.6 Firewall Overview................................................................................................28
5.7 Enabling the Firewall ..........................................................................................29
5.8 Procedure for Configuring Firewall Rules ..........................................................29
5.9 Configuring Source and Destination Addresses...................................................33
6 Troubleshooting.........................................................................................................35
2

Prestige 660W/HW
1 Introducing the Prestige
The Prestige 660W/HW ADSL 2/2+ Gateway with 802.11g Wireless is the ideal all-inone device for small networks connecting to the Internet via ADSL. Key features of the
Prestige include NAT, 802.1x wireless LAN security, WPA (Wi-Fi Protected Access)
and Firewall. See your User’s Guide for more details on all Prestige features.
You should have an Internet account already set up and have been given most of the
following information.
INTERNET ACCOUNT INFORMATION
Your device’s WAN IP Address (if given): __________________
DNS Server IP Address (if given): Primary __________________,
Secondary _________________
Virtual Path Identifier (VPI): ____________
Virtual Channel Identifier (VCI): ____________
Multiplexing (VC-based or LLC-based):
Encapsulation: (choose one below)
RFC 1483
ENET ENCAP
PPPoA
PPPoE
Ethernet Encapsulation Gateway IP Address:
__________________
User Name: ____________ Password: ____________
Service Name: ____________
User Name: ____________ Password: ____________
VC LLC
Certifications
1. Go to www.zyxel.com
2. Select your product from the drop-down list box on the ZyXEL home page to go to
that product's page.
3. Select the certification you wish to view from this page.
3
Prestige 660W/HW
2 Hardware
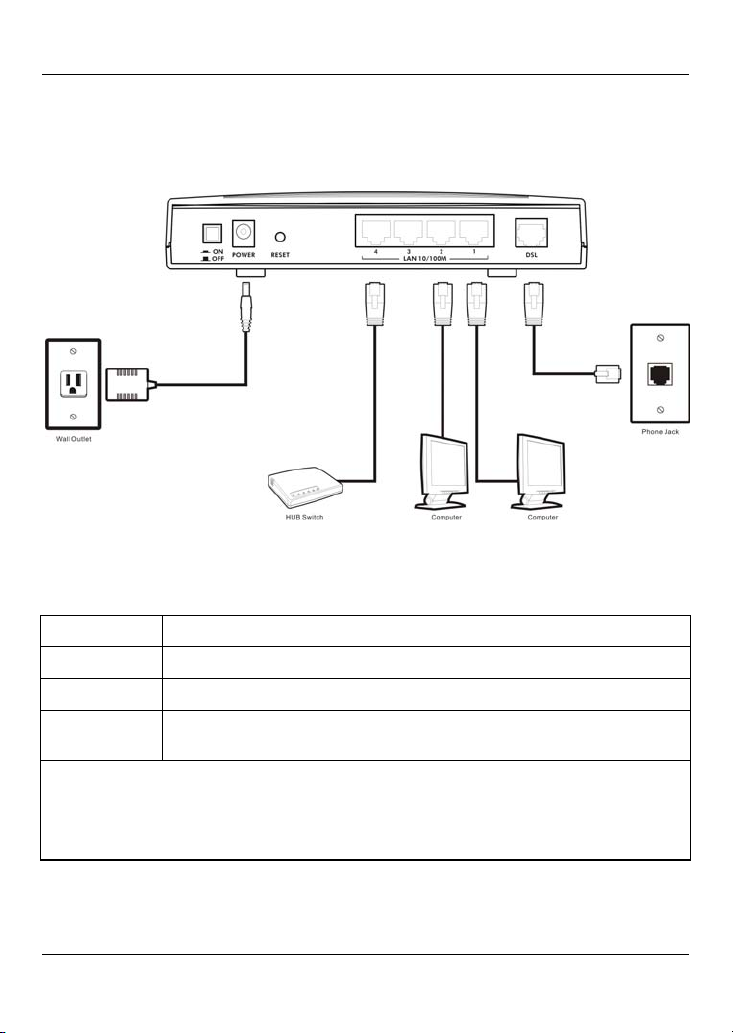
2.1 Rear Panel Connections
Figure 1 P660HW Hardware Connections
Table 1 Prestige Rear Panel Description
LABEL DESCRIPTION
1. DSL Connect to a telephone jack using the included phone wire.
2. LAN 1..4 Connect to a computer/external hub using an Ethernet cable.
3. POWER Connect to a power source using the power adaptor for your region
(see your User’s Guide).
After you’ve made the connections, connect the power adaptor to a power supply and
push in the power button to turn on the Prestige.
The PWR/SYS LED blinks while performing system testing and then turns steady on if
the testing is successful. A LAN LED turns on if a LAN port is properly connected.
4
Prestige 660W/HW
Table 1 Prestige Rear Panel Description
LABEL DESCRIPTION
RESET You only need to use this button if you’ve forgotten the Prestige’s
password. It returns the Prestige to the factory defaults (password is
1234, LAN IP address 192.168.1.1 etc.; see your User’s Guide for
details).
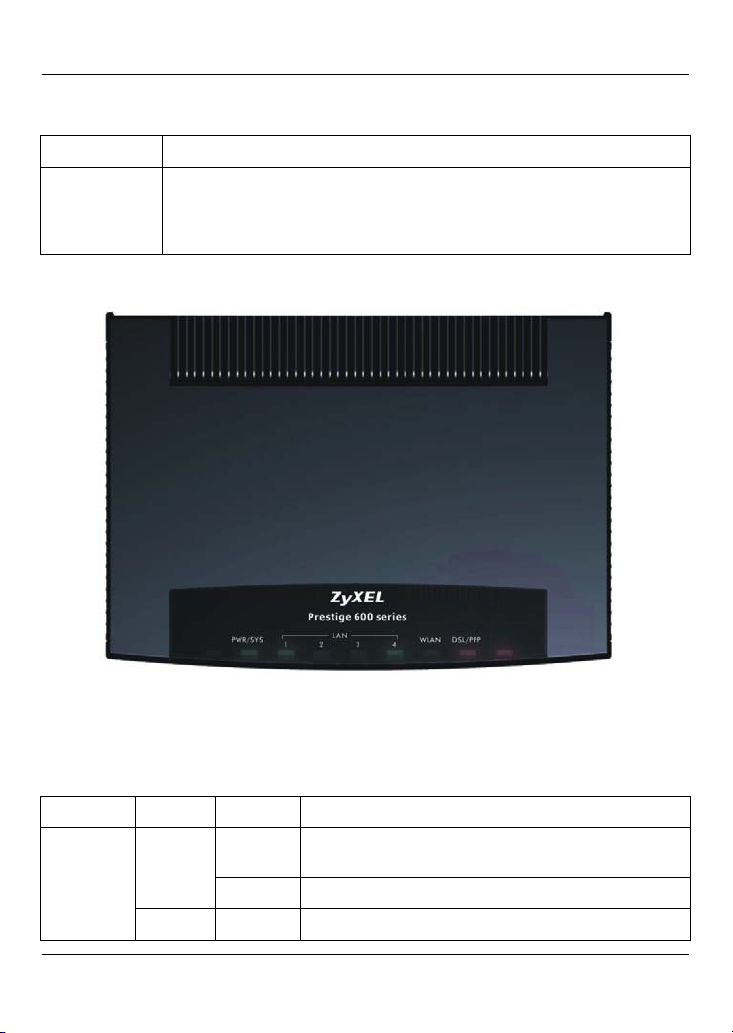
2.2 The Front Panel LEDs
Figure 2 P660HW Front Panel
Refer to the following table for more detailed LED descriptions.
Table 2 P660HW Front Panel LED Description
LED COLOR STATUS DESCRIPTION
PWR/SYS
Green
Red On Power to the Prestige is too low.
On The Prestige is receiving power and functioning
properly.
Blinking The Prestige is rebooting.
5

Prestige 660W/HW
Table 2 P660HW Front Panel LED Description
LED COLOR STATUS DESCRIPTION
Off The system is not ready or has malfunctioned.
LAN 1-4
WLAN Green
DSL/PPP
Green
Amber
Off The LAN is not connected.
Green
Off The DSL link is down.
On The Prestige has a successful 10Mb Ethernet
Blinking The Prestige is sending/receiving data.
On The Prestige has a successful 100Mb Ethernet
Blinking The Prestige is sending/receiving data.
On The Prestige is ready, but is not sending/receiving
Blinking The Prestige is sending/receiving data through the
Off The wireless LAN is not ready or has failed.
Fast
Blinking
Slow
Blinking
On The system is ready, but is not sending/receiving
On The connection to the PPPoE server is up. Amber
Blinking The Prestige is sending/receiving PPP data.
connection.
connection.
data through the wireless LAN.
wireless LAN.
The Prestige is sending/receiving non-PPP data.
The Prestige is initializing the DSL line.
non-PPP data.
6
Prestige 660W/HW
Figure 3 P660W Front Panel
Refer to the following table for more detailed LED descriptions.
Table 3 P660W Front Panel LED Description
LED COLOR STATUS DESCRIPTION
Green On The Prestige is receiving power. PWR
Off The Prestige is not receiving power.
SYS
Red On Power to the Prestige is too low.
Off The system is not ready or has malfunctioned.
DSL
Off The DSL link is down.
On The Prestige is functioning properly. Green
Blinking The Prestige is rebooting.
On The Prestige is linked successfully to a DSLAM. Green
Blinking The Prestige is initializing the DSL line.
7

Prestige 660W/HW
Table 3 P660W Front Panel LED Description
LED COLOR STATUS DESCRIPTION
PPP/ACT
WLAN Green
10M/100M
Green Blinking The Prestige is sending/receiving non-PPP data.
Amber
Off The system is ready, but is not sending/receiving
Green
Amber
Off The LAN is not connected.
On The Prestige has a PPP (PPPoA or PPPoE)
connection.
Blinking The Prestige is sending/receiving PPPoA or
PPPoE traffic.
data.
On The Prestige is ready, but is not sending/receiving
data through the wireless LAN.
Blinking The Prestige is sending/receiving data through the
wireless LAN.
Off The wireless LAN is not ready or has failed.
On The Prestige has a successful 10Mb Ethernet
connection.
Blinking The Prestige is sending/receiving data.
On The Prestige has a successful 100Mb Ethernet
connection.
Blinking The Prestige is sending/receiving data.
3 Setting Up Your Computer’s IP
Address
Skip this section if your computer is already set up to accept a
dynamic IP address. This is the default for most new computers.
The Prestige is already set up to assign your computer an IP address. Use this section to
set up your computer to receive an IP address or assign it a static IP address in the
192.168.1.2 to 192.168.1.254 range with a subnet mask of 255.255.255.0. This is
necessary to ensure that your computer can communicate with your Prestige.
8
Prestige 660W/HW
Your computer must have an Ethernet card and TCP/IP installed. TCP/IP should already
be installed on computers using Windows NT/2000/XP, Macintosh OS 7 and later
operating systems.
3.1 Windows 95/98/Me
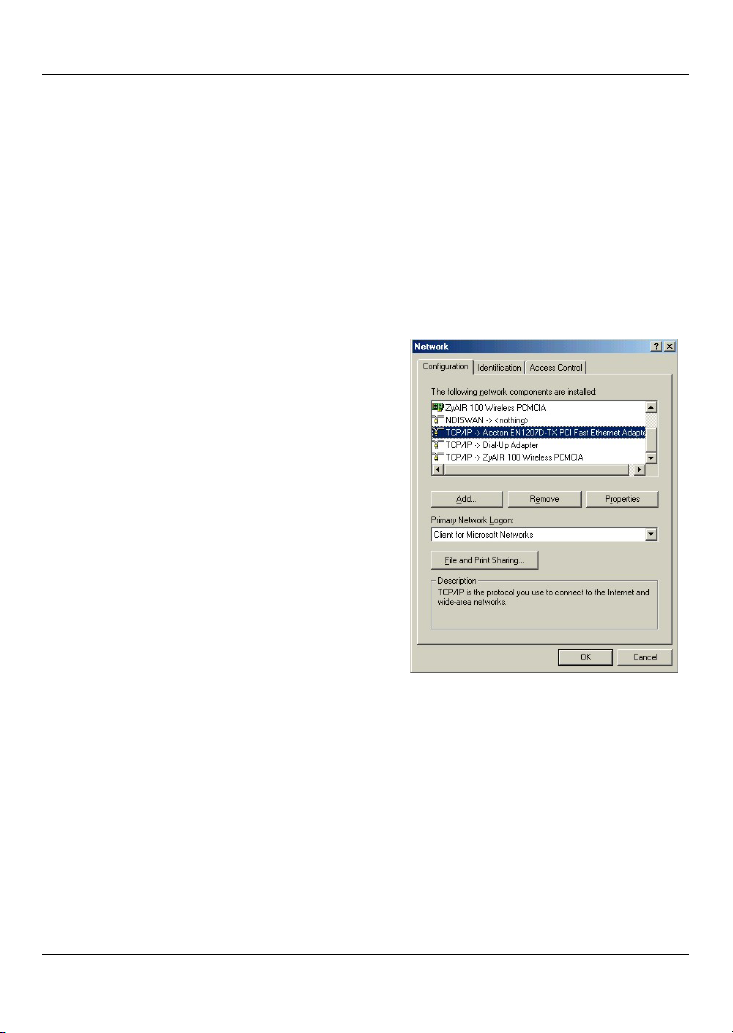
Click Start, Settings, Control Panel and double-click the Network icon to
1.
open the Network window.
The Network window Configuration tab displays a list of installed
2.
components. You need a network adapter, the TCP/IP protocol and Client
for Microsoft Networks.
In the Network window
3.
Configuration tab, select your
network adapter's TCP/IP entry and
click Properties.
9

Prestige 660W/HW
4. Click the IP Address tab.
-If your IP address is dynamic, select
Obtain an IP address automatically.
-If you have a static IP address, select
Specify an IP address and type your
information into the IP Address and
Subnet Mask fields.
5. Click the DNS Configuration tab.
-If you do not know your DNS
information, select Disable DNS.
-If you know your DNS information, select
Enable DNS and type the information in
the fields below (you may not need to fill
them all in).
10
Prestige 660W/HW
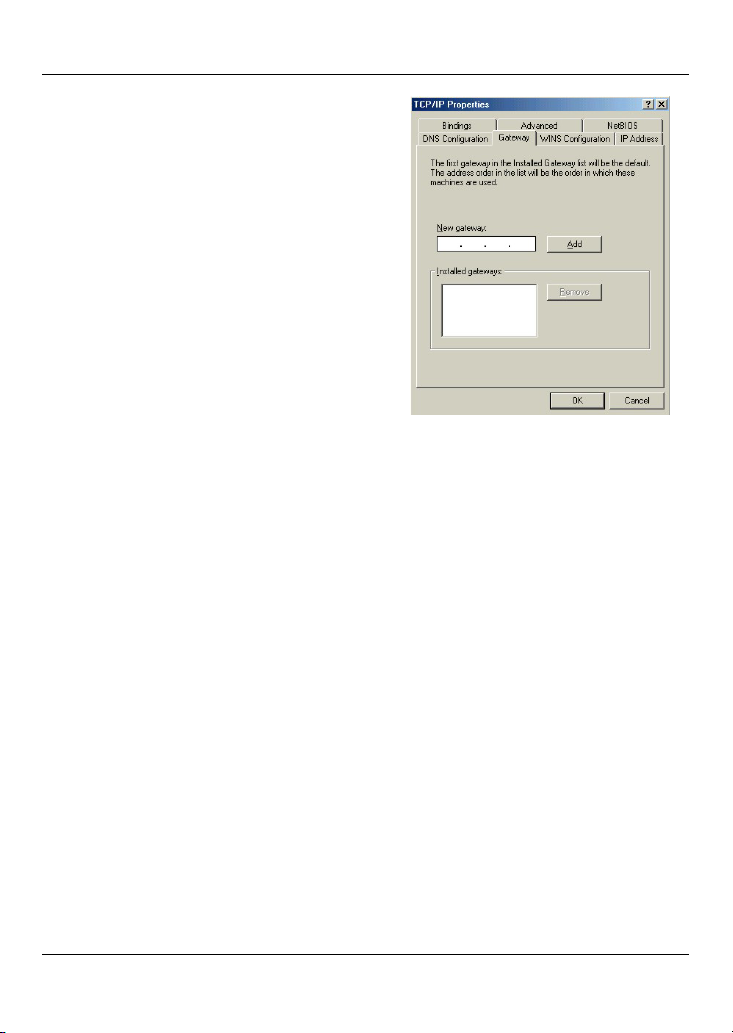
6.
Click the Gateway tab.
-If you do not know your gateway’s IP
address, remove previously installed
gateways.
-If you have a gateway IP address, type it
in the New gateway field and click Add.
7. Click OK to save and close the TCP/IP Properties window.
8. Click OK to close the Network window. Insert the Windows CD if prompted.
9. Turn on your Prestige and restart your computer when prompted.
Verifying Your Computer’s IP Address
1. Click Start and then Run.
2. In the Run window, type "winipcfg" and then click OK to open the IP
Configuration window.
3. Select your network adapter. You should see your computer's IP address, subnet
mask and default gateway.
3.2 Windows 2000/NT/XP
1. In Windows XP, click start, Control Panel. In Windows 2000/NT, click Start,
Settings, Control Panel.
2. In Windows XP, click Network Connections.
In Windows 2000/NT, click Network and Dial-up Connections.
3. Right-click Local Area Connection and then click Properties.
4. Select Internet Protocol (TCP/IP) (under the General tab in Win XP) and click
Properties.
11
 Loading...